1
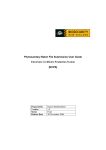
ZXTM Virtual Appliance
Getting Started Guide
VMware Server 1.0, VMware ESX Server 3.0
Software Version 5.0
Zeus Technology Limited
The Jeffreys Building
Cowley Road
Cambridge CB4 0WS
United Kingdom
Zeus Technology
5201 Great America Parkway Suite 320
Santa Clara
CA 95054
United States
UK:
US:
+44 (0)1223 525000
+1-408-850-7204
Email:
Web:
[email protected]
http://www.zeus.com/
Copyright Notice
© Zeus Technology Limited 2008. Copyright in this documentation belongs to Zeus Technology
Limited. All rights are reserved. This documentation may not be reproduced in whole or in part in any
manner or form (including photocopying or storing it in any medium by electronic means and whether
or not transiently or incidentally to some other use of this documentation) other than in accordance
with any applicable license agreement or with the prior written consent of Zeus Technology Limited.
Any copies of this documentation must incorporate this notice.
Zeus Technology, the Zeus logo, Zeus Extensible Traffic Manager, ZXTM, TrafficScript, TrafficCluster
and RuleBuilder are trademarks of Zeus Technology Limited. Other trademarks used may be owned
by third parties.
2
© Zeus Technology Limited 1995-2008
Table of Contents
1
Overview ................................................................................................... 5
1.1
Introducing the ZXTM product family .................................................. 5
1.2
ZXTM Product Versions ..................................................................... 6
1.3
2
3
1.2.1
ZXTM Software ..................................................................... 7
1.2.2
ZXTM Appliance .................................................................... 7
Introducing This Manual.................................................................... 7
Getting Started .......................................................................................... 8
2.1
Prerequisites ................................................................................... 8
2.2
Network Configurations .................................................................... 9
2.2.1
Scenario1: Simple network..................................................... 9
2.2.2
Scenario 2: Public/Private networks........................................10
2.2.3
Scenario 3: Multiple ZXTM Virtual Appliances ...........................11
Installation and Configuration................................................................. 12
3.1
Initial Configuration ........................................................................12
3.1.1
Importing the Virtual Appliance (ESX Server) ...........................12
3.1.2
Installing the Virtual Appliance (VMware Server) ......................12
3.1.3
Initial IP Address .................................................................12
3.1.4
Connection to the Admin Server.............................................14
3.1.5
Network Configuration ..........................................................15
3.1.6
DNS Settings ......................................................................16
3.1.7
Date and Time Settings ........................................................16
3.1.8
Admin Password ..................................................................18
3.1.9
License Key.........................................................................18
3.1.10 Summary ...........................................................................19
3.1.11 Finish.................................................................................20
4
5
3.2
Cluster Creation .............................................................................21
3.3
Upgrading ZXTM .............................................................................22
3.4
Downgrading ZXTM .........................................................................23
Useful System Information...................................................................... 24
4.1
SSH ..............................................................................................24
4.2
ZXTM Installation Directory ($ZEUSHOME) .........................................24
4.3
Factory defaults..............................................................................24
4.4
The admin password .......................................................................24
4.5
Expanding the log file partition .........................................................25
4.5.1
VMware Server ....................................................................25
4.5.2
ESX Server .........................................................................25
4.5.3
The Virtual Appliance log partition ..........................................25
Basic Configuration ................................................................................. 26
5.1
ZXTM Concepts ..............................................................................26
5.1.1
5.2
6
Virtual Servers, Pools and Rules .............................................26
Managing your First Service .............................................................27
Features of ZXTM..................................................................................... 29
6.1
Virtual Servers ...............................................................................29
6.2
Pools ............................................................................................29
6.3
Catalogs ........................................................................................30
© Zeus Technology Limited 1995-2008
3
7
6.4
TrafficScript and the RuleBuilder ...................................................... 31
6.5
SSL.............................................................................................. 32
6.6
Fault Tolerance .............................................................................. 32
6.6.1
Front-End Fault Tolerance: Traffic IP Groups ........................... 32
6.6.2
Back-End Fault Tolerance ..................................................... 33
6.7
IP Transparency ............................................................................. 33
6.8
Draining Connections...................................................................... 33
6.9
Monitoring .................................................................................... 34
6.9.1
Performance Monitoring ....................................................... 34
6.9.2
Health Monitoring................................................................ 34
6.10
Load Balancing .............................................................................. 35
6.11
Session Persistence ........................................................................ 35
6.12
Service Protection .......................................................................... 36
6.13
Content Caching ............................................................................ 36
6.14
Content Compression...................................................................... 36
6.15
Request Rate Shaping..................................................................... 37
6.16
Bandwidth Management .................................................................. 37
6.17
Service Level Monitoring ................................................................. 38
6.18
ZXTM Control API........................................................................... 38
6.19
Advanced Settings ......................................................................... 38
Troubleshooting the operation of your ZXTM Virtual Appliance ...............40
7.1
ZXTM Diagnosis and Event Logging................................................... 40
7.1.1
7.2
Checking Basic Operation ................................................................ 40
7.2.1
7.3
8
9
4
Writing Logs ....................................................................... 40
Checking Automatic Fail-Over ............................................... 41
Common Errors ............................................................................. 42
7.3.1
Connection Refused ............................................................. 42
7.3.2
Inappropriate Traffic IP Addresses configured .......................... 42
7.3.3
ZXTM Drops Connection Before Protocol Begins ....................... 42
7.3.4
Web Server Returns Error 400 .............................................. 43
7.3.5
Wrong Port Number Configured ............................................. 43
Further Resources ...................................................................................44
8.1
ZXTM Manuals ............................................................................... 44
8.2
Online Help ................................................................................... 44
8.3
Information online.......................................................................... 44
Open source software license ..................................................................45
© Zeus Technology Limited 1995-2008
1 Overview
1.1 Introducing the ZXTM product family
Zeus Extensible Traffic Manager is a high-availability, application-centric traffic management
and load balancing product. It provides control, intelligence, security and resilience for all your
application traffic. ZXTM is intended for organizations hosting valuable business-critical
services, such as TCP and UDP-based services like HTTP (web) and media delivery, and
XML™-based services such as Web Services.
ZXTM's unique process architecture ensures it can handle large volumes of network traffic
efficiently. Its TrafficClusterTM scalability allows you to add more front-end traffic managers or
back-end servers to your cluster as the need arises. The cluster size is unlimited, and the
performance of ZXTM grows in line with the performance of the hardware.
Zeus Extensible Traffic Manager is a highly capable solution which can also be adapted and
extended as new requirements arise. Using the TrafficScript language you can write
sophisticated, tailored traffic management rules to inspect, transform, manage and route
requests and responses. TrafficScript rules can manage connections in any TCP or UDP-based
protocol.
ZXTM is secure out-of-the-box, and is hardened against intrusion and denial-of-service (DoS)
attacks. It incorporates the fastest and strongest SSL encryption technologies, and can
efficiently decrypt and encrypt large numbers of SSL connections. TrafficScript rules, security
policies and other content-based calculations can be applied to the encrypted request while
retaining full end-to-end security.
For critical, high-availability solutions, ZXTM offers TrafficClusterTM redundancy. This allows
you to have unlimited numbers of active and standby front-end servers. If one of your active
machines fails, ZXTM automatically brings a standby server into action; in the case of
subsequent failure, more standby servers are available to take up the load. This ensures that
there is no single point of failure in the system.
ZXTM incorporates a centralized web-based administration console that monitors and
manages each traffic management unit in your service infrastructure.
Officially supported browsers that work with the web-based administration console are:
Firefox (2.0), Internet Explorer (6+), Safari (2+).
© Zeus Technology Limited 1995-2008
5
Fig. 1.
A typical ZXTM configuration
1.2 ZXTM Product Versions
Zeus Extensible Traffic Manager is available in a variety of software, appliance and virtual
appliance configurations. All configurations share the same core ZXTM software, but different
versions may provide different levels of functionality depending on the enabling license key or
appliance/virtual appliance platform.
This manual may describe features and capabilities that are not present in the version of the
product you are using:
•
TrafficScript is not enabled in the entry-level ZXTM Load Balancer (ZXTM LB) Virtual
Appliance. Simple traffic management rules can be created using the RuleBuilder.
•
The ZXTM Control API is not available in the entry-level ZXTM LB Virtual Appliance.
•
The ZXTM LB Virtual Appliance can only be clustered in Active-Active or Active-Passive
mode. Larger TrafficClusters are not possible.
•
Content Caching, Service Level Monitoring, Bandwidth Management and Request Rate
Shaping are optional product capabilities and may not be enabled in your particular
configuration.
•
IP Transparency and Bandwidth Management are supported on all ZXTM Virtual
Appliances.
6
© Zeus Technology Limited 1995-2008
Your product version specifications will describe which capabilities are enabled in your virtual
appliance.
1.2.1 ZXTM Software
If you are installing ZXTM software on your own server hardware, you should refer to the
ZXTM Software Getting Started Guide rather than this document.
1.2.2 ZXTM Appliance
If you are deploying a ZXTM Appliance (physical), you should refer to the ZXTM Appliance
Getting Started Guide rather than this document.
1.3 Introducing This Manual
This manual introduces the basic concepts to help you understand and use ZXTM effectively.
It highlights key features and provides a guided introduction to the product and its
capabilities, by describing how to configure support for a basic traffic-managed website.
This manual describes the functionality of, and uses screen shots from, Zeus Extensible Traffic
Manager Virtual Appliance 5.0.
© Zeus Technology Limited 1995-2008
7
2 Getting Started
2.1 Prerequisites
Before you begin installation, you should gather the following information:
•
Host names for each of the ZXTM Virtual Appliances that you are installing.
•
IP addresses for each of the interfaces that you intend to use on each Virtual
Appliance.
•
Subnet masks. The subnet masks for each of the IP addresses you will be using.
•
Domain name. The domain name to which your virtual appliances belong.
•
Gateway IP address. The IP address of the default gateway.
•
Name server IP address. The IP address of the name server that the virtual
appliance(s) will use to resolve your internal network addresses.
•
DNS search paths. If you are using DNS, then this is the ‘local part’ of machine host
names. This is commonly the same as the domain name.
•
Admin password. A password for the ZXTM Administration Server.
•
Virtual Machine Import Utility. If you are installing the ZXTM Virtual Appliance to
an ESX server, you will need to convert the Virtual Appliance image into the ESX
server format. This utility is free, runs under Windows, and can be acquired from the
VMware website at http://www.vmware.com/products/vmimporter/.
Please note that IPv6 is only supported if you use ZXTM Virtual Appliance on ESX server 3.5 or
higher.
In addition to the above you will need to obtain your ZXTM License Key using the details
already supplied to you by email.
If, for any reason, you do not have a license key for each virtual appliance, please contact
your supplier quoting your company name and your contact details (name, email and
telephone).
8
© Zeus Technology Limited 1995-2008
2.2 Network Configurations
There are several ways in which ZXTM Virtual Appliances can be deployed in your network.
Here, three different scenarios are shown, starting from a basic network layout and then
showing how a ZXTM Virtual Appliance can be configured as a secure gateway between your
public network and private internal servers, and finally showing the use of multiple ZXTM
Virtual Appliances for high availability.
2.2.1 Scenario1: Simple network
This example network setup demonstrates how a single ZXTM Virtual Appliance can be placed
into an existing network to handle traffic for a web site. In this single-network setup, the
ZXTM traffic IPs and the back-end nodes (the web servers) are all running on a publicly
addressable network (represented with ‘xx.xx.xx’ in the diagram, with a netmask of
255.255.255.0).
In the example below, the ZXTM Virtual Appliance has been configured so that it is using a
single network port, IP xx.xx.xx.3, for receiving work traffic. Before ZXTM was in place, clients
connecting to the website www.example.com would be sent, via the gateway, to one of the
web servers (e.g. xx.xx.xx.20). Once ZXTM is installed, the DNS can be changed so that
www.example.com now gets directed to xx.xx.xx.50 and ZXTM receives the web page
requests.
Fig. 2.
Configuration using a single port to receive all the network traffic
© Zeus Technology Limited 1995-2008
9
2.2.2 Scenario 2: Public/Private networks
This configuration splits the layout into public and private networks. This offers greater
security, because the private network hides the internal back-end services from the outside
world. Access is only permitted through ZXTM. Using more virtual appliance network
interfaces also gives higher performance as there is greater bandwidth capacity.
The example shows the gateway and ZXTM’s front-end (eth1) interface being configured with
publicly routable IP addresses (the xx.xx.xx network, netmask 255.255.255.0). The back-end
interface (eth2) is configured to be on the internal network (10.100, netmask 255.255.0.0).
Fig. 3.
10
Configuration using ZXTM to separate a public from a private network
© Zeus Technology Limited 1995-2008
2.2.3 Scenario 3: Multiple ZXTM Virtual Appliances
This is identical to the previous scenario, except that this time there is a cluster of two ZXTMs.
When using a cluster in fault-tolerant mode, ZXTM makes use of ‘traffic IP addresses’. These
are additional IP addresses that are distributed across the front-end network interfaces. They
can move from virtual appliance to virtual appliance, ensuring that services continue to run
even if one or more ZXTMs have failed. Traffic IP addresses are managed through the webbased GUI of ZXTM, and are set up after the initial low-level networking is complete. Please
see the full user guide for more information.
Fig. 4.
Using multiple ZXTM appliances to separate networks and provide fault tolerance
© Zeus Technology Limited 1995-2008
11
3 Installation and Configuration
3.1 Initial Configuration
Before you begin, you should ensure that you have all the information discussed in section 2.1
(Prerequisites) above.
3.1.1 Importing the Virtual Appliance (ESX Server)
1.
Unpack the Virtual Appliance package to your Windows Workstation.
2.
Install the VMware Virtual Machine converter (available via the following link):
http://www.vmware.com/products/converter/
3.
Run the converter and convert the Virtual Appliance directly to your ESX server.
4.
Once the procedure is complete, you may start the virtual machine.
Note: When you first start the virtual appliance, you may see a message indicating that the
disk adapter type used in the virtual machine differs from that used in the ESX server. If you
see this message, please select Yes and click OK to continue.
Fig. 5.
Warning message regarding the disk adapter type
3.1.2 Installing the Virtual Appliance (VMware Server)
1.
Unpack the Virtual Appliance package to your VMware Server.
2.
Navigate to the newly created folder.
3.
Double click on the "ZXTM Virtual Appliance.vmx" file.
4.
The VMware Server console should open automatically, and the ZXTM Virtual
Appliance should now be registered in the inventory.
3.1.3 Initial IP Address
When you first start the virtual appliance, it will boot up and attempt to obtain an IPv4
address via DHCP. If it receives no response to its DCHP requests it will configure itself with
12
© Zeus Technology Limited 1995-2008
the static IP 192.168.1.101 (on the 192.168.1.0/24 network). In either case the IP address
chosen will be displayed on the console.
Note: if the ZXTM Virtual Appliance could not obtain an address via DHCP, and the default
192.168.1.101 address is not appropriate for your network, you can alter the IP address by:
1.
Engaging the ZXTM Virtual Appliance’s console interface.
2.
Pressing Alt+F2 to switch to tty2.
3.
Logging in as admin with the default password of admin.
4.
Running the zxtm-set-initial-address command.
This will prompt you for an IP address
ss and netmask. Once the command terminates, enter
the logout command, and switch back to tty1 by pressing Alt+F1. You should notice that
the IP address in the URL for the admin server has changed.
© Zeus Technology Limited 1995-2008
13
3.1.4 Connection to the Admin Server
Set the IP address of the desktop/laptop you will be using to configure the virtual appliance
such that it can communicate with the virtual appliance, and point a web browser at the URL
you recorded in the previous step. This will be “https://<virtual_appliance_IP>:9090/”
where <virtual_appliance_IP> is either 192.168.1.101, or the IP obtained via DHCP, or
that set by running the zxtm-set-initial-address command.
You will see the first page of the initial configuration wizard:
Fig. 6.
Launching the configuration wizard
Note: Before you are shown this page, your browser may report problems with the SSL
certificate (either that it cannot trust it, or that the hostname in the certificate doesn’t match
the hostname in the URL).
These can safely be ignored – the certificate is a self-signed
certificate, and the hostname in the certificate may not match the URL you have used to
access it, particularly if you have used the virtual appliance’s IP address in the URL.
Read the End User License Agreement, and click Next to continue if you agree to its terms.
14
© Zeus Technology Limited 1995-2008
3.1.5 Network Configuration
The first page of the initial configuration wizard asks you for the network configuration for the
virtual appliance. At this stage you are required to enter a hostname for the virtual appliance,
and the IP address of the virtual appliance, and you may also configure the other network
interfaces and default gateway address. An explanation of each of the fields is given below:
Fig. 7.
Configuring the IP addresses and hostname for the network
Hostname: The hostname of the virtual machine, which may be given in either the simple or
fully qualified forms (e.g. “zxtm1.example.com” or simply “zxtm1”). If you will be running a
cluster of ZXTM virtual appliances and are using DNS servers for name resolution, you must
make sure that the name you choose is resolvable from your name servers.
IP address: An IP address in dotted quad notation (e.g. 192.168.1.101). During IP the initial
configuration, only IPv4 addresses can be assigned. IPv6 can be configured later in the
Networking page.
Netmask: The netmask for the associated IP address (e.g. 255.255.255.0)
Gateway: The IP address of the default gateway. This IP address is also used for network
connectivity tests by ZXTM. Your gateway machine should respond to ping requests by ZXTM.
If it does not, then ZXTM will need to be configured with an additional machine to ping
instead. If you need to configure a different address to ping, this can be set up through the
web-based ZXTM interface later.
For optimum performance, we recommend that you use virtual switches which are assigned to
separate physical devices for front and back end traffic (that is: for traffic to ZXTM from
remote clients and for traffic between ZXTM and the servers that it is load balancing).
© Zeus Technology Limited 1995-2008
15
You may find Chapter 2 “Network Layouts” of the ZXTM User Manual helpful in planning your
network. The website http://knowledgehub.zeus.com/docs/ contains this document plus many
other helpful articles about configuring ZXTM.
3.1.6 DNS Settings
On the third page, you can optionally configure the IP addresses of name servers to use for
DNS resolution, and the DNS search domain. Providing one or more name servers will allow
you to use your servers’ hostnames instead of IP addresses when configuring pools, and is the
recommended method of operation.
Your ZXTM Virtual Appliance will work correctly without access to external name servers, but
you will then have to use IP addresses instead of hostnames when setting up pools of servers,
or manually enter the hostname to IP mappings, which can be done from the main ZXTM
administration interface (in the DNS section of the Networking page in the System part of
the Admin Server) once you’ve completed the initial installation wizard.
Fig. 8.
Configuring the Domain Name Servers' names
3.1.7 Date and Time Settings
Use this page to set your time zone and the date and time. Setting this correctly will ensure
that any logs generated by ZXTM have the correct timestamps. It is recommended that you
configure your virtual appliances to use NTP to synchronize their clocks. You can do this from
the Time page in the System part of the Admin Server, once you have completed the initial
configuration wizard.
16
© Zeus Technology Limited 1995-2008
Fig. 9.
Configuring the date and time settings
© Zeus Technology Limited 1995-2008
17
3.1.8 Admin Password
You will be asked to set the password for the admin user. This is the password you will use
when logging in to the virtual appliance via the GUI, and if you ever need to log in to the
virtual appliance via SSH (with the username ‘admin’).
Fig. 10.
Giving a password for the Admin
3.1.9 License Key
ZXTM Virtual Appliances are enabled by license key. You should have been sent the key for
each of your virtual appliances by email. If for some reason these have not arrived, please
contact your account manager.
You can choose either to upload the license key now, or to upload it later, once you’ve
completed the initial configuration wizard.
Fig. 11.
18
Uploading the license key
© Zeus Technology Limited 1995-2008
3.1.10 Summary
You will be shown a summary of the settings you have configured. You should review these,
paying particular attention to the network settings, since your virtual appliance may become
unreachable if you have made an error.
If you wish to make any changes, use the Back
button to skip back through the wizard to the appropriate page.
Once you are satisfied with your settings, click the Finish button.
Fig. 12.
Summary screen for the configuration process
You will then be shown a page with a link to the new URL of the admin server. You should
wait a short while (typically 10 – 30 seconds) before clicking on this link, whilst the virtual
appliance reconfigures its network interfaces.
You may also need to reconfigure your
computer’s network settings so that it can send packets to the IP address of the virtual
appliance.
© Zeus Technology Limited 1995-2008
19
3.1.11 Finish
Fig. 13.
Confirming the configuration is finished
When you click on the link, you should be shown the login page of the ZXTM Admin Server.
You can log into this using the username “admin” and the password you chose above.
Fig. 14.
20
First login to ZXTM
© Zeus Technology Limited 1995-2008
3.2 Cluster Creation
If you are deploying two or more ZXTM Virtual Appliances in a cluster, you should first
perform the initial configuration for each virtual appliance as described above. Then, before
making any other changes, you should join the virtual appliances together to form a cluster,
by following the procedure below:
Log into the admin server on one of the virtual appliances and select the Join a cluster
wizard from the drop down box next to the Help icon.
Click the Next button to begin. The virtual appliance will scan the network for other ZXTM
virtual appliances, and produce a list of clusters. Select one of the other virtual appliances
that you wish to cluster ZXTM with, or an existing cluster of two or more virtual appliances,
and click Next.
You will be prompted for the admin password of the virtual appliance or
cluster you have just selected. Enter it, and follow the prompts to join the cluster.
The virtual appliance will restart, and you will see a new home page showing both virtual
appliances in the Traffic Manager list, similar to this:
Fig. 15.
ZXTM's main screen
If you wish to add further virtual appliances to the new cluster you’ve created, log into each of
the additional virtual appliances’ admin GUIs, and use the join cluster wizard to join the
cluster as above.
Note that the act of joining a cluster sets the admin password of the virtual appliance that you
are joining to the cluster to be the same as that of the cluster (i.e. all virtual appliances in a
cluster share the user/password database).
© Zeus Technology Limited 1995-2008
21
If you wish to join a virtual machine to an existing cluster, but it doesn’t appear in the list of
existing clusters, check your network configuration and cabling, and that no firewalls exist
between the virtual appliance and the cluster that might block IP broadcast packets.
3.3
Upgrading ZXTM
Upgrades between minor versions
Upgrading between minor versions (e.g. 4.1 to 4.1r1) is very quick and simple:
•
Download the upgrade package from your customer page - http://customer.zeus.com/
•
Log into the Administration interface, and go to the System -> Upgrade page.
•
Upload the upgrade package, and follow the instructions.
Upgrading a cluster of ZXTMs
The procedure for upgrading one ZXTM is the same as upgrading several. However, there are
a few extra considerations:
•
Upgrade each ZXTM in turn. All ZXTMs in the cluster will continue to run their
configured services.
•
Once you have upgraded one ZXTM in the cluster, do not make any configuration
changes until you have upgraded the whole cluster.
Before upgrading ZXTM, you may wish to back up your configuration as a precaution. You can
do this by clicking the System button on the Admin Server interface, and then the Backup
tab. This allows you to store a snapshot of your current configuration which you can restore
later if necessary.
Upgrading major versions
•
Download the install package from the customer page, this will be called something
like zxtm_appliance-4.2b1-amd64.zpkg
•
Copy it onto the appliance, using scp from Linux, or an sftp client, such as PSFTP
(http://www.chiark.greenend.org.uk/~sgtatham/putty/) or WinSCP
(http://winscp.net/eng/index.php)
•
SSH onto the appliance (e.g using 'putty' from the above url)
•
Run 'upgrade-appliance <filename>'
•
Follow the instructions
•
Configuration is copied to the upgraded version of the appliance, but to start running
the new version a reboot is needed. Subsequent configuration changes in the original
version are not migrated to the new version.
•
22
Reboot when convenient from the UI or command line ('reboot')
© Zeus Technology Limited 1995-2008
3.4
Downgrading ZXTM
Downgrading minor versions
Should you find it necessary to cancel an upgrade, it is possible to ‘roll-back’ ZXTM to the
previous installed version. To do so, ssh onto the appliance using ‘putty’, become root and run
ZEUSHOME/zxtm/bin/rollback:
Rollback – Copyright (C) Zeus Technology 2008
This program allows you to roll back to a previously installed version of
ZXTM. Please note that the older ZXTM will not gain any of the
configuration changes made since upgrading.
Do you want to continue? Y/N [N]:
If you choose to continue, the program will list all the available versions of ZXTM:
Which version of ZXTM would you like to use?
1) 3.0
2) 3.1
3) 3.1r1
4) 4.0
5) 4.1
6) 4.2
7) 5.0 (current)
Select a version [7]
Select the version of ZXTM that you would like to switch to, and press return. The current
version of ZXTM will be stopped and the selected version will be started.
If you wish to cancel the rollback, run the program again and pick the new version of ZXTM to
switch to. There is no need to re-install the new version of ZXTM.
Downgrading major versions
Only one previous major version is preserved, and you can downgrade using the 'boot menu':
•
Reboot the appliance from the console (recovery console on windows) (Alt+F2 + Login
+ 'reboot')
•
When the appliance reboots, press Escape when you see:
GRUB loading, please wait...
Press 'ESC' to enther the menu...
•
Then select the appropriate version.
•
The selected version will be remembered across reboots so to upgrade either reinstall, or go to the grub menu again and select the new version
© Zeus Technology Limited 1995-2008
23
4 Useful System Information
4.1 SSH
You will normally administer the Virtual Appliance through the web-based GUI. However, you
can also access the Virtual Appliance through the command line interface to access files stored
on the system. To do this, you can log into the virtual appliance, using an SSH client, as the
admin user, or any other user in the admin group.
4.2 ZXTM Installation Directory ($ZEUSHOME)
The ZXTM installation directory (referred to throughout the ZXTM documentation as
$ZEUSHOME) is: /opt/zeus
4.3 Factory defaults
If you would like to completely reset the virtual appliance back to its un-configured state, then
you can type the following command. Please be aware that this will delete your entire existing
configuration, including the network configuration.
reset_to_factory_defaults
Once the virtual appliance has been reset you should follow the instructions in Section 3.1.3
to reconfigure it.
4.4 The admin password
If you forget the admin password, you can reset it using the following procedure:
1.
Select the ZXTM Virtual Appliance from the inventory panel.
2.
Select the “Console” tab from the information panel.
3.
Click the reset button in the toolbar.
4.
Engage the console by clicking in the console window.
5.
Press ESCAPE when you see the following prompt:
GRUB loading, please wait
Press ESC to enter menu...
6.
Select Recovery mode from the boot menu and hit RETURN.
7.
At the prompt, type reset_password and hit RETURN.
8.
Follow the instructions to change the password (you will be asked to enter a new
admin password twice).
24
© Zeus Technology Limited 1995-2008
9.
Type reboot and hit RETURN.
The virtual appliance will reboot and you will be able
to log in to the GUI using the new admin password.
Note: If your virtual appliance is a member of a cluster, you should then visit the Diagnose
section of the Admin Server, which will report a configuration conflict.
Use the Diagnose
page to push the new admin password to the other virtual appliances in the cluster.
4.5 Expanding the log file partition
If you find that you need more space for your log files, you can expand the virtual disk, and
then resize the file system from the virtual appliance’s command line.
Note: Before you start, please ensure that you have:
1.
Performed a backup of your ZXTM configuration and log files.
2.
Stopped the virtual appliance.
4.5.1 VMware Server
1.
On the command line of the VMware Server, change to the directory containing the
virtual disk file (.vmdk) for your Virtual Appliance.
2.
Use the vmware-vdiskmanager command to expand the disk.
vmware-vdiskmanager -x 6Gb < Virtual Appliance Name >.vmdk
4.5.2 ESX Server
1.
On the command line of the ESX Server, change to the directory containing the
virtual disk file (.vmdk) for your Virtual Appliance.
2.
Use the vmkfstools command to expand the disk:
vmkfstools -X 6g <Virtual Appliance Name>.vmdk
4.5.3 The Virtual Appliance log partition
1.
Start the Virtual Appliance.
2.
Engage the virtual appliance’s console interface, or connect using SSH.
3.
Use the zxtm-expand-logs-partition command to resize the /logs partition:
zxtm-expand-logs-partition
© Zeus Technology Limited 1995-2008
25
5 Basic Configuration
5.1 ZXTM Concepts
ZXTM receives traffic from the Internet, makes decisions based on its source, destination and
content, and chooses a group of back-end servers to assign it to. Traffic is balanced across
this group according to the network resources.
In a ZXTM system, you configure a Virtual Server object to manage connections from remote
clients, and a Pool object to manage connections to your local servers.
Once you have installed and configured your ZXTM Virtual Appliance on the network, you can
access the web-based user interface and set up a pool and a virtual server.
5.1.1 Virtual Servers, Pools and Rules
Fig. 16.
Using rules to distribute the traffic across several pools
A pool is a collection of nodes. Each node corresponds to a back-end server and port, such as
server1.mysite.com:80. You can set up several pools, which may have nodes in common.
26
© Zeus Technology Limited 1995-2008
A virtual server on a ZXTM machine processes incoming network traffic, and will typically
handle all the traffic for a certain protocol (HTTP, FTP etc) 1 . It can choose from a number of
pools to send traffic to, according to a list of rules. The traffic will then be balanced across the
nodes in the selected pool.
A rule can do several things. It can read the headers on a packet, or the whole packet; from
this it decides whether to select a pool to send the packet to, close the connection, or pass the
packet on to the next rule in the list.
Note that each virtual server must have a default pool: if none of the rules makes a positive
routing decision, the traffic is passed to this pool.
5.2 Managing your First Service
Browse to the address of the Admin Server home page (see above) and log in with the
username ‘admin’ and your password.
The Admin Server home page shows that you have not yet created any pools or virtual
servers. Click the “Wizards:” drop-down box and choose Manage a New Service to step
through the wizard.
1.
Specify a name which you will use to identify the virtual server within the configuration
interface. Choose a protocol and port for the virtual server (e.g. HTTP, port 80).
Fig. 17.
1
Creating a virtual server with a given protocol and port number associated to it
This is different from a virtual server in a web server, which serves one website.
© Zeus Technology Limited 1995-2008
27
2.
Create a list of back-end nodes, which will form the default pool for the virtual server (see
section 5.1.1 for an explanation of pools and virtual servers). The nodes are identified by
hostname and port, and you can modify them later from the Pools > Edit page, described in
section 6.2. You should ensure that you can serve content directly from the hostname/port
combinations you specify.
Fig. 18.
Creating a virtual server with a given protocol and port number associated to it
3.
Finally, review the settings you have chosen before clicking Finish.
4.
You can now test your ZXTM setup by browsing to it, using the port you set up for your new
service:
http://zxtm_machine_name:port/
or
http://zxtm_ip_address:port/
To verify that ZXTM has managed the traffic, click the ‘Activity’ button on the Admin
Server and select the ‘Connections’ tab. This will give you a list of connections that
ZXTM has recently managed.
28
© Zeus Technology Limited 1995-2008
6 Features of ZXTM
This chapter provides an overview of the main features of ZXTM. Most of these features can
be configured in one of three locations on the UI: the Virtual Servers > Edit pages, the
Pools > Edit pages, or the Catalogs. Each of these is described below.
6.1 Virtual Servers
A virtual server receives traffic from the Internet and assigns it to a pool of back-end servers.
The choice of pool is influenced by any rules the virtual server is using.
Setting up a basic pool and virtual server is described in section 5.2. In the Configuration
section of the Admin Server interface you can modify the settings for an existing virtual
server, or set up a new one.
Click the Services button in the top menu bar of any page, and go to the Virtual Servers
tab. The page lists the virtual servers you have set up.
You can create a new virtual server here by entering its name, protocol, port and default pool.
Requests are assigned to the default pool unless a rule dictates a different pool or action.
To edit the settings for an existing virtual server, click on its name on the Virtual Servers
page. This takes you to the Virtual Servers > Edit page for that virtual server. From here
you can access a wide range of settings, and apply rules and SSL decryption.
6.2 Pools
A pool is a logical group of back-end nodes, across which ZXTM distributes traffic.
Pools can also be configured and created from the Configuration section of the Admin Server
interface. Click the Services button in the top menu bar, and then click the Pools tab. A list
of the pools you have set up is shown. (Initial setup is described in section 5.2.)
To create a new pool, enter its name and a list of nodes. Each node should be in the form
server1.mysite.com:80, where 80 is the port server1 is listening on. The list of nodes
should be separated by spaces:
s1.mysite.com:80 s2.mysite.com:8080 s3.mysite.com:80
You can edit a pool by clicking on its name on the Pools page. This takes you to the Pools >
Edit page for that pool, where you can access settings including load balancing algorithms
and session persistence methods.
© Zeus Technology Limited 1995-2008
29
6.3 Catalogs
The catalogs are central repositories of objects you can use for managing traffic:
•
The Rules catalog contains the TrafficScript or RuleBuilder rules you have created;
•
The Java extensions catalog contains a list with available Java programs that can be
included within a TrafficScript rule.
•
The Monitors catalog stores the various monitors you can use to check a pool’s
health;
•
The various SSL catalogs contain SSL resources: server and client certificates,
certificate authorities and certificate revocation lists;
•
The Service Protection catalog holds your preset classes of service protection
settings, used to filter unwanted traffic;
•
The
Session
Persistence
catalog
contains
classes
which
manage
session
persistence information for client connections;
•
The Bandwidth Management catalog contains bandwidth allocations which you can
use to manage bandwidth usage;
•
The Service Level Monitoring catalog contains classes that monitor node response
time and conformance to agreed levels of service.
•
The Request Rate Shaping catalog contains classes that can be used to queue and
rate-shape requests to impose maximum request rates.
•
The Extra files catalog allows access to data files readable from TrafficScript rules,
and error files as well.
You can edit each of these from the Catalogs page and later apply them to a virtual server or
a pool. If you edit an item in the catalog, the changes will be propagated to every service
which uses it, making it easy to keep your configuration up to date.
30
© Zeus Technology Limited 1995-2008
6.4 TrafficScript and the RuleBuilder
ZXTM includes a sophisticated system of traffic management rules. These are created using a
scripting language called TrafficScript. Traffic management rules can:
•
Enable ZXTM to make intelligent routing decisions
•
Modify incoming requests and outgoing responses
•
Enable different Traffic Management logic (enabling different ZXTM features) to
process each request individually
TrafficScript functions like a typical scripting language (Perl, Basic, etc), and some
programming experience is necessary to take full advantage of its capabilities.
ZXTM also includes a UI-based tool (the ‘RuleBuilder’) to simplify the creation of TrafficScript
rules. Simple TrafficScript rules, such as routing requests based on the type of the resource
requested, can be constructed with the RuleBuilder, without requiring any programming
experience.
TrafficScript rules and XML processing are not available on all versions of the ZXTM software.
They can be obtained as an upgrade option if required.
ZXTM is able to examine all aspects of the incoming and outgoing data, from the source and
destination to the type of data and actual content of the traffic. This makes it possible to
extend the product using rules customized to your own business requirements.
A powerful feature of the TrafficScript language is that it incorporates XML support for XPath,
XSLT and schema validation. XML is used by SOAP-based protocols such as web services, and
enables complex data to be exchanged and understood automatically between client
applications and servers.
You can create new rules in the Catalogs section, either by writing them explicitly in
TrafficScript or by using the RuleBuilder. You can then apply rules to a virtual server from the
Virtual Servers > Edit page.
The TrafficScript language is documented in a separate reference manual provided with your
distribution.
© Zeus Technology Limited 1995-2008
31
6.5 SSL
SSL (Secure Sockets Layer) is a protocol used to send traffic securely over the Internet.
Traffic is encrypted using a key agreed between the server and client machines.
You can set a virtual server to decrypt SSL-encrypted traffic as it comes into ZXTM. This can
be useful for two reasons:
•
After decryption, a rule can analyze the contents of a packet and make an intelligent
decision about its destination.
•
It may be an advantage to move the processing overhead of decryption away from
your back-end servers.
SSL connections can be used to restrict access to your services. If you only want to allow
selected people to access a service, such as a company intranet, you can require that clients
hold a certificate identifying themselves. After authentication, data transfer is encrypted,
protecting confidential information from potential eavesdroppers.
If you decrypt traffic in order to apply rules, you may wish to re-encrypt it before sending it
on to the back-ends. Re-encryption is handled by the pools.
Within the catalogs, you can set up both server and client SSL certificates, as well as
certificate authority and certificate revocation list files. You can apply SSL decryption to a
virtual server via the Virtual Servers > Edit page, and SSL re-encryption via the Pools >
Edit page for the appropriate pool.
6.6 Fault Tolerance
ZXTM can be set up so that there is no single point of failure in your system. This means that
if any one machine should fail, your services will be unaffected.
With a clustered install of at least two traffic managers and at least two back-end servers, any
machine’s failure can be detected by ZXTM. Requests are diverted to the healthy machines in
the cluster until the failed machine recovers.
6.6.1 Front-End Fault Tolerance:Traffic IP Groups
ZXTM machines can be deployed in a fault-tolerant cluster of any size. You can set up a
traffic IP group which contains the IP addresses you use to host your services, and spans
your ZXTM machines. The traffic managers negotiate to share out and raise these IP
addresses, and constantly monitor each other.
Some versions of the ZXTM software only support a limited cluster size – just a pair of ZXTMs
for example. Larger cluster sizes can be supported by upgrading the software features.
If any machine should fail, the other machines in the cluster detect this and one of them
raises the IP address that was lost. They continue to monitor the failed machine so that when
it recovers, it is automatically brought back into use.
32
© Zeus Technology Limited 1995-2008
You can set up traffic IP groups by clicking the Services button. Go to the Traffic Managers
tab and click the Configure Traffic IP Groups link.
6.6.2 Back-End Fault Tolerance
Organizing your back-end servers into pools gives automatic back-end fault tolerance. If any
machine in a pool should fail, ZXTM’s monitors detect this and stop sending requests to that
node. Traffic is distributed among the other nodes so that your service continues without
interruption. When the failed node recovers, it is brought back into service slowly until ZXTM
is satisfied that it can be relied upon.
You can associate a pool with a failure pool. In the event that every node in your pool should
fail, traffic will be diverted to this failure pool.
In addition, ZXTM offers the option of priority lists. Within a pool, you can arrange your
nodes in order of priority and state the minimum number of nodes which must always be
available. You can arrange priority groups so that at least this many nodes are always active,
but specified servers are kept in reserve in case the active nodes should fail.
Failure pools and priority lists are configured via the Pools > Edit page. Monitors are
described in section 6.9.
6.7 IP Transparency
ZXTM functions as an application proxy. This means that ZXTM does not forward individual
network packets from a remote client to a back-end server node.
Instead, ZXTM manages the request from the client, reading it from the network and
processing it internally. Typically, ZXTM then connects to one of the server nodes (which may
reside on a local or remote network) and writes the request to that server. ZXTM receives the
server’s response and forwards the response back to the client.
With this architecture, the back-end server views the client’s request as originating from the
ZXTM machine, not from the remote client. This can be a disadvantage if the back-end server
performs access control based on the client’s IP address, or if the server wishes to log the
remote IP address.
This can often be worked around by performing the access control or
logging functions on the ZXTM itself, or by making use of the X-Cluster-Client-Ip header that
ZXTM inserts into every HTTP connection to identify the client’s IP address.
In situations where these workarounds are not appropriate, ZXTM can arrange that the
server-side connection appears to originate from the client’s remote IP address.
This
capability is known as IP transparency.
6.8 Draining Connections
You may occasionally wish to remove one of your back-end servers from the system. This
could be permanent, or a temporary measure to allow for maintenance or upgrade.
If you simply disconnect or power down the server, ZXTM will detect this and stop sending it
new requests. However, any existing connections will be lost.
© Zeus Technology Limited 1995-2008
33
Instead, you can choose to drain the node, either via the Pools > Edit pages or using the
Drain a Node wizard. This stops ZXTM from sending it new connections, other than those in
sessions already established with the node. When all existing connections and sessions have
expired, you can safely remove the node.
6.9 Monitoring
6.9.1 Performance Monitoring
The Activity section of the Admin Server interface contains several real-time and historical
traffic monitoring tools. These allow you to keep track of the current and past activity on your
system.
Graphs show the current and historical traffic flow on the system. You can choose from a
range of statistics to display, including bandwidth and number of connections, and split the
data by virtual server or by pool. Historical data can be shown for up to the past 30 days.
You can also view details about the connections your system is handling. These details include
the addresses of the machines involved; the current state of the connection; and the number
of bytes received and sent.
If you want to remove a node from a pool, perhaps for maintenance or upgrade, you can set it
to drain its connections (see section 6.8). Within the Activity pages you can monitor a
draining node, and see when its current active connections have expired and it can safely be
removed.
6.9.2 Health Monitoring
If ZXTM sends a request to a node and receives no response, it assumes that node has failed.
It stops sending it requests and balances traffic across the remainder of the pool.
By performing periodic tests on each node the traffic manager can detect failures
immediately, before any external requests are affected. It performs these tests using a
monitor attached to the pool.
The monitors are held in the Monitors Catalog and can be applied to any pool. Each performs
a specific test. These range from simple tests, such as pinging each node, to more
sophisticated tests which check that the appropriate port is open and the node is able to serve
specified data, such as your home page.
Monitors fall into two categories: per-node and pool-wide. A per-node monitor tests the
health of each node in the pool. A pool-wide monitor performs tests on one machine which
influences the health of the entire pool. For example, a mail server pool might keep its data
on an NFS server, which each back-end server accesses. A pool-wide monitor could test this
server. If it fails, none of the back-ends can retrieve the data so the whole pool is deemed to
have failed.
You can extend ZXTM by writing custom monitors. These can be written in any
programming language and, after performing your tests, can report back to ZXTM whether a
node or pool is healthy.
34
© Zeus Technology Limited 1995-2008
6.10 Load Balancing
When requests are assigned to a pool, that pool distributes them across its nodes. You can
choose one of a variety of load-balancing algorithms to achieve this, via the Pools > Edit
page.
The algorithms available range from the simple, such as Round Robin (which directs requests
to each node in turn), to the highly sophisticated. The Perceptive algorithm monitors the load
and response times of each node, and predicts the best distribution of traffic. This optimizes
response times and ensures that no single server is overloaded. In most cases with heavy
traffic loads, this algorithm will give the best performance.
The more sophisticated algorithms (Perceptive, Least Connections and Fastest Response
Time) take account of web server caching. The back-ends cache the pages they have most
recently served. If another request comes in for the same page, ZXTM allows for the added
efficiency in sending this request to a back-end which recently handled it.
6.11 Session Persistence
Session persistence is used to send all requests from the same client session to the same
back-end server. It is configured via Session Persistence classes in the catalog, and assigned
to a connection via the Session Persistence section in the Pools > Edit pages.
A pool serving static web content usually has no requirement for session persistence; each
page or image for a particular client can be served from a different machine with no ill effects.
Another pool, serving an online shopping site, may use session persistence to ensure that a
user's requests are always directed to the server holding details of their shopping basket.
ZXTM offers several methods to identify requests which belong to the same session. A variety
of different cookies can be used; persistence can be based on a rule; or the client’s IP address
can be used to identify sessions. If traffic is SSL-encrypted, the SSL session ID can be used.
Connections from different virtual servers can use the same session persistence class. This
allows you to share session persistence data between virtual servers – for example, between
HTTP and HTTPS versions of the same website. Session persistence data is shared between
ZXTM machines in a cluster, so if one machine fails, the session persistence maps are not lost.
You can choose what to do if a persistent session is lost. This might be due to invalid session
data, or because the node handling it has failed. In this case you can choose to have the
session redirected to a new node, or redirect the user to a specified URL such as an error
page.
© Zeus Technology Limited 1995-2008
35
6.12 Service Protection
A service protection class is a group of settings you specify to protect your service against
malicious attacks, such as Denial of Service (DoS) and Distributed Denial of Service (DDoS).
You can create a service protection class in the Service Protection Catalog, and configure
settings such as the following:
•
Lists of banned and trusted IP addresses. Connections from these IPs are never
allowed and always allowed, respectively.
•
Limits on the number of connections from one machine or a group of machines.
•
A limit on the connection rate from any one IP address.
•
Restrictions on HTTP requests, such as whether they should be strictly RFC2396
compliant.
You can apply a service protection class to a virtual server using the appropriate Virtual
Servers > Edit page.
6.13 Content Caching
Content Caching is performed by an HTTP virtual server. The virtual server stores common
responses in a web cache, and replies to common requests by serving the response directly
from the web cache.
This has the effect of reducing the number of connections that ZXTM forwards to your backend server nodes, this reducing the load on these servers.
Content caching is handled by HTTP virtual servers, and can be accessed via the Virtual
Servers > Edit page.
Content Caching is an optional ZXTM capability. Some versions of ZXTM may not provide this
feature; it can be obtained as an upgrade option if required.
6.14 Content Compression
ZXTM can compress web content before sending it to the remote client. This can reduce your
bandwidth usage, and speed up the delivery of large web pages to clients with slow
connections.
Some web servers are also able to compress content, so it may be more efficient to spread
this work across your web servers instead of using ZXTM. Enabling compression on both
should not cause any problems.
If you offer large files for download from your site, it may be sensible to pre-compress them
rather than have a server do this each time they are requested. ZXTM can be configured to
only compress certain file types; by default, it only compresses HTML and plain text
documents.
36
© Zeus Technology Limited 1995-2008
Content compression is handled by a virtual server and can be accessed via the Virtual
Servers > Edit page.
6.15 Request Rate Shaping
Individual users may dominate the use of a service, to the detriment of other users of the
service.
A back-end application infrastructure may have limited scalability, being easily
overwhelmed when too many requests are given to it. You may wish to restrict the rate at
which certain activities can occur, such as sending an email, or logging in to a service, as part
of a wider security policy.
Request Rate Shaping allows you to specify limits on a wide range of events, with very fine
grained control over how events are identified. You can impose per-second and per-minute
rates on these events.
Request Rate Limits are most commonly used in TrafficScript request rules, to shape the rate
at which requests are processed. They may be used in response rules if desired, and they can
be used to restrict other events, but this is not a common requirement.
Request Rate Shaping is not available on all versions of ZXTM.
6.16 Bandwidth Management
Bandwidth management allows ZXTM to limit the bandwidth used by a Virtual Server, or by
various types of request. For example, you may wish to restrict the bandwidth used by the
‘downloads’ part of a web site to a small proportion of your total available bandwidth.
Bandwidth management may not be supported on all ZXTM supported operating systems.
Additionally, some versions of ZXTM may not provide this feature; it can be obtained as an
upgrade option if required.
ZXTM's bandwidth management features are provided via classes in the Catalog.
add more than one Bandwidth Management Class, each with its own limits.
You may
The choice of
Bandwidth Management Class can be made through a TrafficScript rule, providing greater
flexibility for situations where it is helpful to distinguish between requests to the same Virtual
Server. For example, ZXTM's Bandwidth Management System can be used to apply different
limits for CGI requests than for image requests.
You can use bandwidth management to control bandwidth usage when forwarding responses
to the remote clients, and when forwarding requests to local or remote servers.
If you have a cluster of more than one Traffic Manager, the Bandwidth Management System
takes this into account. You do not need to make adjustments when new servers are being
added, as this is done automatically.
It is configured via Bandwidth classes in the catalog, and assigned to a connection via the
Assigned Classes section in the Virtual Server > Edit pages.
© Zeus Technology Limited 1995-2008
37
6.17 Service Level Monitoring
Using Service Level Monitoring, ZXTM can measure and react to changes in response times for
your Nodes, by comparing response times to a conformance value. You can chart response
times and other related information, and configure ZXTM to issue alerts or log when response
times fall below the conformance value. ZXTM also has the ability to dynamically adjust the
resources available based on response times, using TrafficScript rules.
The Service Level monitoring functionality is not available on all versions of ZXTM.
If
required, it can be obtained as an upgrade option.
It is configured via Service Level Monitoring classes in the catalog, and assigned to a
connection via the Assigned Classes section in the Virtual Server > Edit pages.
6.18 ZXTM Control API
ZXTM’s Control API is a standard-conformant SOAP-based API that can be used to remotely
administer and configure a ZXTM cluster. The Control API provides an alternative to the webbased Admin Server and is suitable if you wish to configure ZXTM from another application.
For example, when an Intrusion Detection System detected a remote attack attempt, it could
use the ZXTM Control API to configure the ZXTM cluster to drop all connections from the
suspect IP address.
A provisioning system could detect server overloading by monitoring the response times of
the server nodes using ZXTM’s Service Level Monitoring capability and the SNMP interface.
Once it had provisioned additional servers, it could then inform ZXTM by reconfiguring the
server pools using the ZXTM Control API.
The ZXTM Control API can be used by any programming language and application
environment that supports SOAP services.
Perl, Python, Java and C# are commonly used.
The ZXTM Control API is documented in a separate reference manual provided with your
distribution.
The ZXTM Control API is not available on all versions of ZXTM.
6.19 Advanced Settings
A number of advanced settings are available to allow you to tune every aspect of ZXTM.
Both the virtual servers and pools have settings for connection management. These control
the connections between the remote client and ZXTM, and between ZXTM and the back-end
nodes, respectively. They cover settings such as timeouts, memory buffer size, and protocolspecific settings including HTTP keepalive parameters and FTP port ranges.
There is also an extensive set of global settings. You can access these by clicking the
System button and then the Global Settings tab. They cover many aspects of ZXTM,
including system settings, event logging, and SSL caching.
38
© Zeus Technology Limited 1995-2008
Care should be taken when modifying these settings. The default values have been chosen to
give good performance on a wide range of systems, and to preserve the stability and security
of the software. Configuring these settings incorrectly could compromise the stability and
security of your system, and may impact performance.
© Zeus Technology Limited 1995-2008
39
7 Troubleshooting the operation of your ZXTM Virtual
Appliance
7.1 ZXTM Diagnosis and Event Logging
If you encounter any problems with ZXTM, you can click the Diagnose button on any page of
the Admin Server interface to view the current system status. The Diagnose page is divided
into sections which will help you understand and resolve any issues you may have.
The Cluster Diagnosis section reports any problems ZXTM finds with your setup, such as
unavailable machines or bad configuration. The Event Log shows the contents of the error
logs on each traffic manager machine. You can view logs created in a recent period of your
choice.
The Technical Support section provides useful links to manuals, and an option to download
technical support data for the Zeus support team if necessary.
7.1.1 Writing Logs
You can use a TrafficScript rule to log information about the packets coming into your virtual
server.
TrafficScript functions can retrieve information about every part of a request. Functions such
as http.getHeader() and http.cookie() give information about HTTP requests; functions
such as ssl.getSessionID() provide details about SSL traffic. For other protocols, you can
use the connection.getData() function to return a specified number of bytes of a request.
You can use the log.info() function to write details of the incoming requests to ZXTM’s log
files, to pinpoint any problems that are occurring with incoming traffic.
See the TrafficScript manual for details of these functions. You should take care when logging
such information: if you do this for every incoming request, the log file will grow very rapidly.
7.2 Checking Basic Operation
Ensure that each of your back-end machines is operating correctly. You should check that you
can use the services they are hosting directly, and that you can access these services through
the front-end traffic manager. The mechanism for doing this will entirely depend upon the
protocols you are using and your network configuration.
First check any log files that are created by your back-end services to ensure that accesses
are recorded as you expect and no unexpected errors are logged. Then try to access your
back-end services directly and through ZXTM.
For example, for SMTP, set up an email client to send mail to each of your back-ends and
send a test email; repeat for each front-end.
40
© Zeus Technology Limited 1995-2008
For HTTP, use a web browser or other client software to connect directly to your web server,
and to connect through the traffic manager. You may need to reconfigure your website or
ensure that the correct host header is delivered to the back-end web server.
The program httpclient, included with the ZXTM distribution, can be used to issue HTTP
requests to particular machines. You can find it at ZEUSHOME/admin/bin/httpclient.
Use the following syntax:
$ httpclient --hostheader=<website_name> http://<trafficIP>/
For some protocols, you can perform initial tests using a telnet client to perform a basic test
on the service:
$ telnet www.mysite.com 80
Trying 62.254.209.66...
Connected to 62.254.209.66.
GET / HTTP/1.1<RETURN>
Host: www.mysite.com<RETURN>
<RETURN>
7.2.1 Checking Automatic Fail-Over
Automatic Back-End Fail-Over
To check ZXTM’s automatic fail-over of back-ends you will need at least two back-end servers
configured, or there will be no machines for ZXTM to fall back on. You can test fail-over by
pulling out the network cable on one of the back-end machines; or by pressing the pause
button in the VMware admin console (if your backend is also a Virtual Machine); or you can
manually stop the service running on the back-end. Verify that nothing is then listening on
that port on the back-end.
If you only have one back-end server you could run two instances of the required service on
different ports on the same server machine, and then manually stop one instance of the
service.
Try to use your selected service through ZXTM. For SMTP send an email through the server
farm, or for HTTP make a web page request. If at least one back-end server is available to
fulfill your request, it should succeed.
Check the ZXTM event log, linked from the Diagnose pages, for notification that a back-end
machine has failed.
Automatic Front-End Fail-Over
If you have two or more traffic managers, you can check that automatic front-end fail-over is
working properly. Set up a traffic IP group spanning your traffic managers, and a service
using this traffic IP group, such as a virtual server managing web content on port 80. Check
that you can request web pages from this service successfully on each of the traffic IP
addresses in the group. You can do this by entering the IP address rather than the DNS name
in your browser (so long as the web server is configured to respond to requests where the
“Host:” header contains the IP address).
© Zeus Technology Limited 1995-2008
41
Now click the Services button on the ZXTM Admin Server pages. Click the Traffic IP Groups
tab, and click Unfold All to view details of your traffic IP groups. This shows you which
machine has raised which IP address; note that if you have more machines than traffic IPs in
the group, some machines will be on standby and not actively handling traffic.
Now select a Virtual Machine that has raised a Traffic IP Address, and press the pause button
in the VMware admin interface. The IP address will be raised by another ZXTM in the group;
try browsing to the traffic IP address again and check that you can still receive content. You
may need to <SHIFT>-refresh the page in your browser to ensure that it is not using cached
content.
7.3 Common Errors
The following mistakes and error messages may be encountered when installing and
configuring ZXTM:
7.3.1 Connection Refused
The most common configuration error for front-ends is a bad DNS setup mapping the external
name to the external IP addresses for your front-end machines. If you receive a “Connection
Refused” message when connecting to your server through the front-end DNS name, it is
likely that your DNS is not configured correctly.
To check your DNS configuration, you can use the host or nslookup commands:
$ host www.w3.org
www.w3.org has address 18.29.1.35
www.w3.org has address 18.7.14.127
www.w3.org has address 18.29.1.34
Verify that your ZXTM machines are listening on these IP addresses.
You can configure a virtual server to listen for traffic on these IP addresses explicitly. Then the
Diagnose pages will report an error if these IP addresses are not available to the ZXTM
cluster.
7.3.2 Inappropriate Traffic IP Addresses configured
If you configure a traffic IP group for front-end fault tolerance, ZXTM will make a number of
checks to ensure that the traffic IPs you select are sensible. However, you should also doublecheck that they are appropriate for your current network configuration. Common errors
include selecting traffic IPs that are used elsewhere (including as permanent IPs on the traffic
manager machines), IPs that do not lie in the subnets used by the traffic managers, or IPs
that are not routable from elsewhere.
7.3.3 ZXTM Drops Connection Before Protocol Begins
If ZXTM cannot contact any back-ends for work for a particular port, it will have no choice
other than to drop the connection with the client. If you connect to the correct port on the
ZXTM machine (using telnet for instance), and get a successful connection (i.e. no
42
© Zeus Technology Limited 1995-2008
“Connection Refused” message), but the connection drops almost immediately, ZXTM is trying
to talk to a back-end but cannot find any.
Check the event log on the Diagnose pages for messages about the status of the back-end
servers.
7.3.4 Web Server Returns Error 400
If on testing your traffic-managed website you only get errors of type Error 400 Bad Request,
this may be because the website you are trying to access has not been configured to accept
any other host headers (or aliases). In order to resolve this problem you can add a rule to set
the right host header:
http.setHeader( "Host", "www.mysite.com" );
7.3.5 Wrong Port Number Configured
Another common problem is the wrong port number being balanced. If, for instance, your
website is running on a port other than 80, you will need to balance that port number with the
HTTP protocol rather than the default. If you are running an SSL-encrypted site, you should
select the HTTPS protocol rather than HTTP, or SSL-decrypt your traffic. The default port for
HTTPS is 443.
Note that it is possible to balance many distinct ports with one ZXTM installation, provided an
appropriate protocol is selected in each case.
© Zeus Technology Limited 1995-2008
43
8 Further Resources
8.1 ZXTM Manuals
This guide is intended to get you up and running, and to introduce some of the functionality
available in ZXTM.
Included with the product is a comprehensive User Guide that covers the features in depth.
There are also full manuals for the TrafficScript rules language and the ZXTM Control API.
You can access these manuals via the Help pages (described below), or download the most
recent versions from the ZXTM KnowledgeHub at http://knowledgehub.zeus.com/.
8.2 Online Help
By clicking the Help button on any page of the Admin Server interface, you can see detailed
help information for that page. You can also view contents and index pages to navigate
around the online help.
You can access the User Guide and TrafficScript reference manual by clicking the Manuals
button on any of the Help pages.
The Rules > Edit page also has a link to TrafficScript Help, a quick reference guide to the
functions.
8.3 Information online
Product specifications can be found at:
http://www.zeus.com/products/
Visit ZXTM KnowledgeHub for further documentation, examples, white papers and other
resources:
http://knowledgehub.zeus.com/
44
© Zeus Technology Limited 1995-2008
9 Open source software license
This product includes software originating from third parties that are subject to:
1.
the GNU Library/Lesser General Public License (LGPL),
2.
the GNU General Public License (GPL),
Zeus Technology offers to provide a complete copy of the source code for the software under
the LGPL and GPL on a CD-ROM, for a charge covering the cost of performing such
distribution, such as the cost of media, shipping, and handling, upon written request to Zeus
Technology at:
Source Code Requests ZXTM-VA (GPL)
Zeus Technology
The Jeffreys Building
Cowley Road
Cambridge
CB4 0WS
United Kingdom
This offer is valid for a period of three (3) years from the date of the distribution of this
product by Zeus Technology. Please refer to the exact terms of the LGPL and the GPL
regarding your rights under these licenses.
© Zeus Technology Limited 1995-2008
45
Index
Admin password, 18
Multiple ZXTM Virtual Appliances, 11
Backing up, 22
Public and private networks, 10
Simple network, 9
Cluster creation, 21
Network configurations, 9
Common errors, 42
Connection management settings, 38
Connection to the Admin Server, 14
Date and Time settings, 16
Service Level Monitoring, 38
SSH, 24
SSL
Overview, 32
DNS settings, 16
TrafficScript availability, 31
Downgrading ZXTM, 23
Upgrading
Expanding the log file partition, 25
ZXTM, 22
Factory defaults, 24
Upgrading ZXTM, 22
Fail-over of backends, 41
Use of the wizard to create as service, 27
Forgotten admin password, 24
Virtual Appliance log partition, 25
Global settings, 38
Virtual Servers
Importing the Virtual Appliance, 12
Overview, 29
Initial configuration, 12
ZEUSHOME directory, 24
Initial IP address, 12
ZXTM
Installation prerrequisites, 8
Installation Summary, 19
IP transparency, 33
License key, 18
Available catalogs, 30
Installation directory, 24
Network configurations, 9
Overview, 5
Product versions, 6
Network configuration
46
© Zeus Technology Limited 1995-2008
© Zeus Technology Limited 1995-2008
47