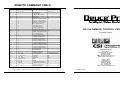
1
USER’S MANUAL Model 2210A WORLD HEADQUARTERS 55 Cabot Court Hauppauge, NY 11788 USA TEL: (631) 273-0404 FAX:(631) 273-1638 WWW: http://www.commspecial.com EMAIL: [email protected] Communications Specialties Pte Ltd 100 Beach Road #22-09 Shaw Tower Singapore 189702 TEL: +65 6391 8790 FAX: +65 6396 0138 EMAIL: [email protected] P/N 121476 Rev. E Copyright 2001 Deuce Pro User’s Manual Deuce Pro User’s Manual REAR CONNECTOR PIN-OUTS POWER: AC Line HD-15 CONNECTOR For VGA 1 ............................. Red 2 ............................. Green 3 ............................. Blue 4 ............................. n/c 5 ............................. Ground 6 ............................. Red Ground 7 ............................. Green Ground 8 ............................. Blue Ground 9 ............................. n/c 10 ........................... Ground 11 ........................... n/c 12 ........................... n/c 13 ........................... H-Sync Out 14 ........................... V-Sync Out 15 ........................... n/c CONTENTS Introduction ............................................................................................ 3 Installation ............................................................................................... Connecting the Power ...................................................................... Connecting the Inputs and Outputs.................................................. Selecting the Input Source ............................................................... Selecting the Input Aspect Ratio ...................................................... Selecting the Output Format ............................................................ Selecting the Output Rate ................................................................ 4 4 4 4 4 5 5 Operation................................................................................................. Video Processing.............................................................................. V-Crop ............................................................................................. Key Panel Lock/Unlock ................................................................... Global Reset..................................................................................... Custom Output Formats ................................................................... Custom Output Formats Reset ......................................................... RS-232 Remote Control ................................................................... 6 6 7 7 7 7 7 7 Internal Dip Switch Settings ................................................................... 8 Accessing the Switch ........................................................................ 8 Setting the Dip Switch ...................................................................... 8 MINI-DIN-4 CONNECTORS 4 ............................. Ground For S-Video(1) and S-Video(2) 3 ............................. Ground 2 ............................. Luminance 1 ............................. Chrominance Output Timing Specifications ................................................................. 9 Troubleshooting .................................................................................... 10 Accessories ........................................................................................... 11 Rear Connector Pin-Outs...................................................................... 12 BNC CONNECTORS For Video(1), Video(2), Y/G, U/B, CSYNC, R, G, B, CS and HV 1 ............................. Signal (Center) 2 ............................. Ground (Shell) Statement of Warranty.......................................................................... 13 DB-9 CONNECTOR For RS-232 Remote 1 ........ DCD 2 ........ RXD 3 ........ TXD RCA CONNECTOR For Audio(1), Audio(2), Audio (Component), Audio (VGA), Audio Out R .......................... RIGHT CHANNEL (Red) L .......................... LEFT CHANNEL (White) 1 - Deuce Pro Intelligent Video Scaler 1 - AC power line cord 1 - 12 foot composite video input cable 1 - 12 foot S-video input cable 1 - 6 foot RS-232 Control cable 1 - Rackmount kit 1 - User’s Manual 1 - Product Registration Card Page 12 4 ......... DTR 5 ......... GROUND 6 ......... DSR 7 ........ RTS 8 ........ CTS 9 ........ NO CONNECTION INCLUDED WITH THIS PRODUCT YOU SHOULD HAVE: • See page 11 for a list of available accessories AVAILABLE OPTIONAL ACCESSORIES Deuce Pro User’s Manual Deuce is a registered trademark of Communications Specialties, Inc. Macintosh and Mac are registered trademarks of Apple Computer, Inc. Deuce Pro User’s Manual Page 1 ACCESSORIES FCC STATEMENT: WARNING: This equipment generates, uses and can radiate radio frequency energy and, if not installed and used in accordance with the instruction manual, may cause interference to radio communications. It has been tested and found to comply with the limits for a Class B computing device pursuant to Subpart B of Part 15 of FCC Rules, which are designed to provide reasonable protection against such interference when operated in a commercial environment. Operation of this equipment in a residential area is likely to cause interference, in which case the user, at his/her own expense, will be required to take whatever measures may be required to correct the interference. UL INFORMATION: This product carries the UL and CUL marks for ITE equipment, File E173243; Project 99ME42861, ASK/C. CE INFORMATION: Standards to which conformity is declared: Emission requirements: EN 55022: 1998 Class B Immunity requirements: EN 50082-1: 1992 IEC 801-2:1984 IEC 801-3:1984 IEC 801-4:1988 WARNING: TO REDUCE THE RISK OF FIRE OR ELECTRONIC SHOCK, DO NOT EXPOSE THIS APPLIANCE TO RAIN OR MOISTURE. CAUTION: TO REDUCE THE RISK OF CAUTION RISK OF ELECTRIC SHOCK DO NOT OPEN This symbol warns the user of uninsulated voltage within the unit that can cause dangerous electronic shocks. Page 2 ELECTRONIC SHOCK, DO NOT REMOVE COVER. NO USER SERVICEABLE PARTS INSIDE. REFER SERVICING TO QUALIFIED SERVICE PERSONNEL. This symbol alerts the user that there are important operating and maintenance instructions in the literature accompanying this unit. Deuce Pro User’s Manual T he following accessories are available for Deuce Pro. They may be ordered from your dealer or from Communications Specialties, Inc. If you need an accessory that isn’t listed below or have a specific application for which you need assistance, please give us a call. ITEM # DESCRIPTION 1152 RGBS cable for 4 BNC connection. This is a 12-foot cable that connects the RGB output or component input of Deuce Pro to video equipment that uses BNC connectors 1119-066 ft. VGA 15-pin M/M or M/F output extension cable 1119-1010 ft. VGA 15-pin M/M or M/F output extension cable 1119-025 25 ft. VGA 15-pin M/M or M/F output extension cable 1119-050 50 ft. VGA 15-pin M/M or M/F output extension cable 1119-100 100 ft. VGA 15-pin M/M or M/F output extension cable 1143-012 12 ft. 5-BNC cable for RGBH&V 1143-025 25 ft. 5-BNC cable for RGBH&V 1143-050 50 ft. 5-BNC cable for RGBH&V 1143-100 100 ft. 5-BNC cable for RGBH&V 1206 6 ft. HD-15M to 5-BNC cable 1207 6 ft. HD-15F to 5-BNC cable Custom cable lengths are available. Call for information. Deuce Pro User’s Manual Page 11 TROUBLESHOOTING IF THIS IS YOUR PROBLEM THEN CHECK THE FOLLOWING: Nothing works • Are any of the LEDs lit? If not, check to see if the AC cord is plugged into the unit and into the wall outlet. Also, make sure that the unit is turned on, using the power switch on the back panel. • Is the video source connected to the unit? If it is, are you sure that the video source is actually putting out a video signal, as viewed on a video monitor? No video on outputs (Just a blue screen) There is video on the output display, but it appears out of sync Page 10 • Is the video source (VCR or other) in the proper mode to output video? • Have you selected the proper input source on the Input Source section of the front panel? • Is the video source “on?” • If you are using the 5 BNC connectors on the unit, try reversing the H and V sync connectors. • Are you sure that the display is capable of supporting the resolution you selected on the front panel of the unit? Try a lower resolution. Deuce Pro User’s Manual INTRODUCTION Communications Specialties, Inc. 55 Cabot Court Hauppauge, NY 11788 USA TEL: (631) 273-0404 FAX: (631) 273-1638 WWW: http://www.commspecial.com EMAIL: [email protected] Communications Specialties Pte Ltd 100 Beach Road #22-09 Shaw Tower Singapore 189702 TEL: +65 6391 8790 FAX: +65 6396 0138 WWW: http://www.commspecial.com EMAIL: [email protected] T hank you for purchasing Deuce Pro, the Intelligent Video Scaler. With Deuce Pro, you now have the ability to enjoy high-resolution, film-like images from any standard video source, including broadcast or cable TV, video tape, DVD and laser disc. Deuce Pro converts any composite, S-video or component signal into one of ten computer resolutions. These resolutions match the native resolution or “sweet spot” of almost any LCD, DLP or plasma projector or display, allowing the display device to perform to its maximum potential. In addition, Deuce Pro uses advanced motion compensation to eliminate the artifacts typically visible when interlaced video is de-interlaced. The result is a picture of stunning quality, filled with rich detail and color. Like all the products from Communications Specialties, Deuce Pro comes with our continuing commitment to provide support. In order to assist us in this process, please be sure to mail in your product registration card. This will make it easier for us to notify you with any new product announcements or other information concerning our product line. Should you need to contact us for support, our office is open Monday through Friday, from 8:30 AM to 5:00 PM Eastern Time. We also offer a comprehensive web site for your added convenience. Thank you for choosing Deuce Pro. As always, we welcome your comments and suggestions. Deuce Pro User’s Manual Page 3 OUTPUT TIMING SPECIFICATIONS INSTALLATION CONNECTING THE POWER: CONNECTING THE INPUTS AND OUTPUTS: Plug the provided AC power cord into the AC input on Deuce Pro’s rear panel and into an AC power outlet. Deuce Pro features an auto-sensing internal power supply which makes the unit compatible with worldwide electrical standards. T he timing specifications for the ten output resolutions, including the factory default settings for Custom 1 and Custom 2, follow VESA, Macintosh or SMPTE specifications where applicable. Video Source (Input): Connect one or more video sources to the composite, S-video and/or component inputs on the rear panel. Audio associated with each input may be connected to the corresponding audio jacks. Resolution Refresh H(kHz) V(Hz) Both the Video 1 and Video 2 inputs allow for you to provide an S-video and/or a composite video source. If desired, you may hook up both types of sources to the two connectors identified for each input. However, if both types of signals are connected, Deuce Pro will automatically sense the S-video signal as the default source for that input. 640 x 480 640 x 480 60 75 31.48 37.51 59.96 75.03 852 x 480 852 x 480 60 75 31.73 38.07 59.98 71.97 800 x 600 800 x 600 60 75 37.89 46.89 60.33 75.02 832 x 624 832 x 624 60 75 39.29 49.19 60.07 75.10 1024 x 768 1024 x 768 60 75 48.38 60.04 60.19 75.05 1280 x 1024 1280 x 1024 60 75 64 79.98 60.04 75.02 1280 x 768 1280 x 768 60 75 45.1 60.1 56.25 75 1365 x 1024 1365 x 1024 60 75 64 79.98 60.04 75.02 60 31.47 60 60 45 60 Computer Input Support: An HD-15 connector, labeled VGA, provides the option to input any type of computer signal which may then be selected as one of the switchable outputs. Deuce Pro does not perform any scaling or processing of this input. (To select this input as Deuce Pro’s output, simply press the Input Source button marked VGA on the front panel of the unit.) Audio Support (input): Each video input and the computer input have a set of stereo jacks associated with them. When an input source is selected, the respective audio is automatically switched to the Audio Out jacks. This is a passive, unterminated switch. Display Device (Output): Connect a computer monitor, projector, display or routing switcher to either the BNC connectors or the VGA connector on the rear panel. Both outputs may be connected at the same time. Custom 1: 720 x 483 Custom 2: SELECTING THE INPUT SOURCE: 1280 x 720 In the Input Source section of the front panel, push the button for the desired input video source. If you select “VGA,” Deuce Pro will not perform any scaling or processing of the image. SELECTING THE INPUT ASPECT RATIO: In the Input Aspect section of the front panel, push the Select button repeatedly to scroll through and select the correct input aspect ratio. 4:3: This is the aspect ratio of a standard or “normal” video monitor. Letterbox: Deuce Pro supports three letterbox or widescreen formats; 16:9, 1.85:1 and 2.35:1. If using a widescreen source, such as a DVD, check its box to see which of the widescreen aspect ratios it uses. Page 4 Deuce Pro User’s Manual Deuce Pro User’s Manual Page 9 INTERNAL DIP SWITCH SETTINGS I nside Deuce Pro there is a 2-position DIP switch, used to set the output sync format. This switch is intended for installation and setup purposes only. Under normal operation, there is no need to access it. SELECTING THE OUTPUT FORMAT: However, should you need to access it, you should do so as follows: ACCESSING THE DIP SWITCH: IMPORTANT NOTE: If you are using a discrete, or fixed, resolution display device (not a CRT), you will benefit from the best quality image by selecting the resolution that matches your display’s native resolution. This is not necessarily the highest resolution that the device will support. An extensive listing of the native resolutions of various projects and display devices can be found beginning on page 15 of this manual. As new projector and display models are introduced to the marketplace, an updated version of this list will be available at our web site: www.commspecial.com. 1. Remove the power and all input and output connections to the unit. 2. Remove the eight screws on the top cover. 3. Remove the top cover and locate the dip switch S1 located in the middle of the circuit board towards the rear panel. SETTING THE DIP SWITCH: Page 8 The following chart indicates the settings for the S1 dip switch: Position Function Position S1-1 Block Sync On = Block Off = Serrated (default setting) S1-2 Sync-On-Green On = Sync inserted on green output Off = No sync-on-green (default setting) Deuce Pro User’s Manual In the Output Format area of the front panel, press the Select button repeatedly to scroll through and select the desired output resolution. The last two formats are identified as Custom 1 and Custom 2. These are user-defined outputs. Refer to the explanation of the Custom Output Formats feature, on page 7 of this manual, for more information. SELECTING THE OUTPUT RATE: In the Output Rate section of the front panel, press the Select button repeatedly to scroll through and select the desired output refresh rate. The Input Lock option in this section automatically matches the Deuce Pro’s output vertical refresh rate to the refresh rate (per field) of your incoming video source. Deuce Pro User’s Manual Page 5 OPERATION D euce Pro is designed to operate properly with any projector or display while requiring minimal set-up and adjustments. However, you may want to take advantage of Deuce Pro’s many additional features, including its video processing controls, as they are designed to provide enhanced picture quality and added convenience. On current models of Deuce Pro (Models 2210A), video processing functions may be used with all input source types. V-CROP: This feature will only work when the 4:3 Input Aspect ratio is selected. KEY PANEL LOCK/UNLOCK: VIDEO PROCESSING: In the Process section of the front panel, press the Select button repeatedly to scroll through the various video processing functions. As you select each function, the LED bar graph will indicate that function’s current, relative position or level. Following is a description of how to use the + and - keys in conjunction with the selected function in order to manipulate or process the image. There may be situations in which you want to prevent other users from changing the settings on Deuce Pro. In order to lock the front panel of the unit, simply press the Crop and Process Select buttons simultaneously for three seconds. All the LEDs will turn off, indicating that the key panel is now locked. In order to unlock the panel, repeat the process. After holding down the Crop and Process Select buttons for three seconds, the LEDs will illuminate, indicating the key panel is again operational. NOTE: Pressing the + and - buttons simultaneously will return the selected function to its default or “detent” position. H Position: The + button will shift the output image to the right; the - button will shift it to the left. This button allows you to eliminate the appearance of “headswitch,” the banding that sometimes appears at the bottom of an image being produced by a VCR. Pressing this button will cause a slight vertical expansion of the output image, therefore forcing the headswitch off the bottom of the screen or display and making it no longer visible. GLOBAL RESET: Press the Input Aspect Select button for three seconds to reset the unit and return all controls to their factory default settings. CUSTOM OUTPUT FORMATS: Deuce Pro provides for two user-defined output formats which can be downloaded through the RS-232 remote control connector. Communications Specialties provides free software to facilitate this operation. Contact us or your dealer for more information Chroma Noise: Controls the amount of noise present in the color portion of the input video signal. CUSTOM OUTPUT FORMAT RESET: Press the Output Format Select button for three seconds to return the two custom output formats to their factory default resolutions (1280 x 720 and 1920 x 1080). Brightness: Increases or decreases the overall brightness, or “black level,” of the video source. RS-232 REMOTE CONTROL: All front panel functions can be controlled through the RS-232 remote control connector. Please contact Communications Specialties or your dealer for software and protocol details. V Position: The + button will shift the output image up; the - button will shift it down. Detail: Increases or decreases the detail and sharpness of the image. Luma Noise: Controls the amount of noise that may be present at the input source. This is particularly useful if you are using a noisy video tape as your source. Contrast: Increases or decreases the overall contrast, or “gain,” of the video source. Saturation: Increases or decreases the color saturation or intensity of the color. Hue: Adjusts the hue or tint of the color. (This control is not active when using PAL video inputs.) Page 6 Deuce Pro User’s Manual Deuce Pro User’s Manual Page 7 OPERATION D euce Pro is designed to operate properly with any projector or display while requiring minimal set-up and adjustments. However, you may want to take advantage of Deuce Pro’s many additional features, including its video processing controls, as they are designed to provide enhanced picture quality and added convenience. On current models of Deuce Pro (Models 2210A), video processing functions may be used with all input source types. V-CROP: This feature will only work when the 4:3 Input Aspect ratio is selected. KEY PANEL LOCK/UNLOCK: VIDEO PROCESSING: In the Process section of the front panel, press the Select button repeatedly to scroll through the various video processing functions. As you select each function, the LED bar graph will indicate that function’s current, relative position or level. Following is a description of how to use the + and - keys in conjunction with the selected function in order to manipulate or process the image. There may be situations in which you want to prevent other users from changing the settings on Deuce Pro. In order to lock the front panel of the unit, simply press the Crop and Process Select buttons simultaneously for three seconds. All the LEDs will turn off, indicating that the key panel is now locked. In order to unlock the panel, repeat the process. After holding down the Crop and Process Select buttons for three seconds, the LEDs will illuminate, indicating the key panel is again operational. NOTE: Pressing the + and - buttons simultaneously will return the selected function to its default or “detent” position. H Position: The + button will shift the output image to the right; the - button will shift it to the left. This button allows you to eliminate the appearance of “headswitch,” the banding that sometimes appears at the bottom of an image being produced by a VCR. Pressing this button will cause a slight vertical expansion of the output image, therefore forcing the headswitch off the bottom of the screen or display and making it no longer visible. GLOBAL RESET: Press the Input Aspect Select button for three seconds to reset the unit and return all controls to their factory default settings. CUSTOM OUTPUT FORMATS: Deuce Pro provides for two user-defined output formats which can be downloaded through the RS-232 remote control connector. Communications Specialties provides free software to facilitate this operation. Contact us or your dealer for more information Chroma Noise: Controls the amount of noise present in the color portion of the input video signal. CUSTOM OUTPUT FORMAT RESET: Press the Output Format Select button for three seconds to return the two custom output formats to their factory default resolutions (1280 x 720 and 1920 x 1080). Brightness: Increases or decreases the overall brightness, or “black level,” of the video source. RS-232 REMOTE CONTROL: All front panel functions can be controlled through the RS-232 remote control connector. Please contact Communications Specialties or your dealer for software and protocol details. V Position: The + button will shift the output image up; the - button will shift it down. Detail: Increases or decreases the detail and sharpness of the image. Luma Noise: Controls the amount of noise that may be present at the input source. This is particularly useful if you are using a noisy video tape as your source. Contrast: Increases or decreases the overall contrast, or “gain,” of the video source. Saturation: Increases or decreases the color saturation or intensity of the color. Hue: Adjusts the hue or tint of the color. (This control is not active when using PAL video inputs.) Page 6 Deuce Pro User’s Manual Deuce Pro User’s Manual Page 7 INTERNAL DIP SWITCH SETTINGS I nside Deuce Pro there is a 2-position DIP switch, used to set the output sync format. This switch is intended for installation and setup purposes only. Under normal operation, there is no need to access it. SELECTING THE OUTPUT FORMAT: However, should you need to access it, you should do so as follows: ACCESSING THE DIP SWITCH: IMPORTANT NOTE: If you are using a discrete, or fixed, resolution display device (not a CRT), you will benefit from the best quality image by selecting the resolution that matches your display’s native resolution. This is not necessarily the highest resolution that the device will support. An extensive listing of the native resolutions of various projects and display devices can be found beginning on page 15 of this manual. As new projector and display models are introduced to the marketplace, an updated version of this list will be available at our web site: www.commspecial.com. 1. Remove the power and all input and output connections to the unit. 2. Remove the eight screws on the top cover. 3. Remove the top cover and locate the dip switch S1 located in the middle of the circuit board towards the rear panel. SETTING THE DIP SWITCH: Page 8 The following chart indicates the settings for the S1 dip switch: Position Function Position S1-1 Block Sync On = Block Off = Serrated (default setting) S1-2 Sync-On-Green On = Sync inserted on green output Off = No sync-on-green (default setting) Deuce Pro User’s Manual In the Output Format area of the front panel, press the Select button repeatedly to scroll through and select the desired output resolution. The last two formats are identified as Custom 1 and Custom 2. These are user-defined outputs. Refer to the explanation of the Custom Output Formats feature, on page 7 of this manual, for more information. SELECTING THE OUTPUT RATE: In the Output Rate section of the front panel, press the Select button repeatedly to scroll through and select the desired output refresh rate. The Input Lock option in this section automatically matches the Deuce Pro’s output vertical refresh rate to the refresh rate (per field) of your incoming video source. Deuce Pro User’s Manual Page 5 OUTPUT TIMING SPECIFICATIONS INSTALLATION CONNECTING THE POWER: CONNECTING THE INPUTS AND OUTPUTS: Plug the provided AC power cord into the AC input on Deuce Pro’s rear panel and into an AC power outlet. Deuce Pro features an auto-sensing internal power supply which makes the unit compatible with worldwide electrical standards. T he timing specifications for the ten output resolutions, including the factory default settings for Custom 1 and Custom 2, follow VESA, Macintosh or SMPTE specifications where applicable. Video Source (Input): Connect one or more video sources to the composite, S-video and/or component inputs on the rear panel. Audio associated with each input may be connected to the corresponding audio jacks. Resolution Refresh H(kHz) V(Hz) Both the Video 1 and Video 2 inputs allow for you to provide an S-video and/or a composite video source. If desired, you may hook up both types of sources to the two connectors identified for each input. However, if both types of signals are connected, Deuce Pro will automatically sense the S-video signal as the default source for that input. 640 x 480 640 x 480 60 75 31.48 37.51 59.96 75.03 852 x 480 852 x 480 60 75 31.73 38.07 59.98 71.97 800 x 600 800 x 600 60 75 37.89 46.89 60.33 75.02 832 x 624 832 x 624 60 75 39.29 49.19 60.07 75.10 1024 x 768 1024 x 768 60 75 48.38 60.04 60.19 75.05 1280 x 1024 1280 x 1024 60 75 64 79.98 60.04 75.02 1280 x 768 1280 x 768 60 75 45.1 60.1 56.25 75 1365 x 1024 1365 x 1024 60 75 64 79.98 60.04 75.02 60 31.47 60 60 45 60 Computer Input Support: An HD-15 connector, labeled VGA, provides the option to input any type of computer signal which may then be selected as one of the switchable outputs. Deuce Pro does not perform any scaling or processing of this input. (To select this input as Deuce Pro’s output, simply press the Input Source button marked VGA on the front panel of the unit.) Audio Support (input): Each video input and the computer input have a set of stereo jacks associated with them. When an input source is selected, the respective audio is automatically switched to the Audio Out jacks. This is a passive, unterminated switch. Display Device (Output): Connect a computer monitor, projector, display or routing switcher to either the BNC connectors or the VGA connector on the rear panel. Both outputs may be connected at the same time. Custom 1: 720 x 483 Custom 2: SELECTING THE INPUT SOURCE: 1280 x 720 In the Input Source section of the front panel, push the button for the desired input video source. If you select “VGA,” Deuce Pro will not perform any scaling or processing of the image. SELECTING THE INPUT ASPECT RATIO: In the Input Aspect section of the front panel, push the Select button repeatedly to scroll through and select the correct input aspect ratio. 4:3: This is the aspect ratio of a standard or “normal” video monitor. Letterbox: Deuce Pro supports three letterbox or widescreen formats; 16:9, 1.85:1 and 2.35:1. If using a widescreen source, such as a DVD, check its box to see which of the widescreen aspect ratios it uses. Page 4 Deuce Pro User’s Manual Deuce Pro User’s Manual Page 9 TROUBLESHOOTING IF THIS IS YOUR PROBLEM THEN CHECK THE FOLLOWING: Nothing works • Are any of the LEDs lit? If not, check to see if the AC cord is plugged into the unit and into the wall outlet. Also, make sure that the unit is turned on, using the power switch on the back panel. • Is the video source connected to the unit? If it is, are you sure that the video source is actually putting out a video signal, as viewed on a video monitor? No video on outputs (Just a blue screen) There is video on the output display, but it appears out of sync Page 10 • Is the video source (VCR or other) in the proper mode to output video? • Have you selected the proper input source on the Input Source section of the front panel? • Is the video source “on?” • If you are using the 5 BNC connectors on the unit, try reversing the H and V sync connectors. • Are you sure that the display is capable of supporting the resolution you selected on the front panel of the unit? Try a lower resolution. Deuce Pro User’s Manual INTRODUCTION Communications Specialties, Inc. 55 Cabot Court Hauppauge, NY 11788 USA TEL: (631) 273-0404 FAX: (631) 273-1638 WWW: http://www.commspecial.com EMAIL: [email protected] Communications Specialties Pte Ltd 100 Beach Road #22-09 Shaw Tower Singapore 189702 TEL: +65 6391 8790 FAX: +65 6396 0138 WWW: http://www.commspecial.com EMAIL: [email protected] T hank you for purchasing Deuce Pro, the Intelligent Video Scaler. With Deuce Pro, you now have the ability to enjoy high-resolution, film-like images from any standard video source, including broadcast or cable TV, video tape, DVD and laser disc. Deuce Pro converts any composite, S-video or component signal into one of ten computer resolutions. These resolutions match the native resolution or “sweet spot” of almost any LCD, DLP or plasma projector or display, allowing the display device to perform to its maximum potential. In addition, Deuce Pro uses advanced motion compensation to eliminate the artifacts typically visible when interlaced video is de-interlaced. The result is a picture of stunning quality, filled with rich detail and color. Like all the products from Communications Specialties, Deuce Pro comes with our continuing commitment to provide support. In order to assist us in this process, please be sure to mail in your product registration card. This will make it easier for us to notify you with any new product announcements or other information concerning our product line. Should you need to contact us for support, our office is open Monday through Friday, from 8:30 AM to 5:00 PM Eastern Time. We also offer a comprehensive web site for your added convenience. Thank you for choosing Deuce Pro. As always, we welcome your comments and suggestions. Deuce Pro User’s Manual Page 3 ACCESSORIES FCC STATEMENT: WARNING: This equipment generates, uses and can radiate radio frequency energy and, if not installed and used in accordance with the instruction manual, may cause interference to radio communications. It has been tested and found to comply with the limits for a Class B computing device pursuant to Subpart B of Part 15 of FCC Rules, which are designed to provide reasonable protection against such interference when operated in a commercial environment. Operation of this equipment in a residential area is likely to cause interference, in which case the user, at his/her own expense, will be required to take whatever measures may be required to correct the interference. UL INFORMATION: This product carries the UL and CUL marks for ITE equipment, File E173243; Project 99ME42861, ASK/C. CE INFORMATION: Standards to which conformity is declared: Emission requirements: EN 55022: 1998 Class B Immunity requirements: EN 50082-1: 1992 IEC 801-2:1984 IEC 801-3:1984 IEC 801-4:1988 WARNING: TO REDUCE THE RISK OF FIRE OR ELECTRONIC SHOCK, DO NOT EXPOSE THIS APPLIANCE TO RAIN OR MOISTURE. CAUTION: TO REDUCE THE RISK OF CAUTION RISK OF ELECTRIC SHOCK DO NOT OPEN This symbol warns the user of uninsulated voltage within the unit that can cause dangerous electronic shocks. Page 2 ELECTRONIC SHOCK, DO NOT REMOVE COVER. NO USER SERVICEABLE PARTS INSIDE. REFER SERVICING TO QUALIFIED SERVICE PERSONNEL. This symbol alerts the user that there are important operating and maintenance instructions in the literature accompanying this unit. Deuce Pro User’s Manual T he following accessories are available for Deuce Pro. They may be ordered from your dealer or from Communications Specialties, Inc. If you need an accessory that isn’t listed below or have a specific application for which you need assistance, please give us a call. ITEM # DESCRIPTION 1152 RGBS cable for 4 BNC connection. This is a 12-foot cable that connects the RGB output or component input of Deuce Pro to video equipment that uses BNC connectors 1119-066 ft. VGA 15-pin M/M or M/F output extension cable 1119-1010 ft. VGA 15-pin M/M or M/F output extension cable 1119-025 25 ft. VGA 15-pin M/M or M/F output extension cable 1119-050 50 ft. VGA 15-pin M/M or M/F output extension cable 1119-100 100 ft. VGA 15-pin M/M or M/F output extension cable 1143-012 12 ft. 5-BNC cable for RGBH&V 1143-025 25 ft. 5-BNC cable for RGBH&V 1143-050 50 ft. 5-BNC cable for RGBH&V 1143-100 100 ft. 5-BNC cable for RGBH&V 1206 6 ft. HD-15M to 5-BNC cable 1207 6 ft. HD-15F to 5-BNC cable Custom cable lengths are available. Call for information. Deuce Pro User’s Manual Page 11 REAR CONNECTOR PIN-OUTS POWER: AC Line HD-15 CONNECTOR For VGA 1 ............................. Red 2 ............................. Green 3 ............................. Blue 4 ............................. n/c 5 ............................. Ground 6 ............................. Red Ground 7 ............................. Green Ground 8 ............................. Blue Ground 9 ............................. n/c 10 ........................... Ground 11 ........................... n/c 12 ........................... n/c 13 ........................... H-Sync Out 14 ........................... V-Sync Out 15 ........................... n/c CONTENTS Introduction ............................................................................................ 3 Installation ............................................................................................... Connecting the Power ...................................................................... Connecting the Inputs and Outputs.................................................. Selecting the Input Source ............................................................... Selecting the Input Aspect Ratio ...................................................... Selecting the Output Format ............................................................ Selecting the Output Rate ................................................................ 4 4 4 4 4 5 5 Operation................................................................................................. Video Processing.............................................................................. V-Crop ............................................................................................. Key Panel Lock/Unlock ................................................................... Global Reset..................................................................................... Custom Output Formats ................................................................... Custom Output Formats Reset ......................................................... RS-232 Remote Control ................................................................... 6 6 7 7 7 7 7 7 Internal Dip Switch Settings ................................................................... 8 Accessing the Switch ........................................................................ 8 Setting the Dip Switch ...................................................................... 8 MINI-DIN-4 CONNECTORS 4 ............................. Ground For S-Video(1) and S-Video(2) 3 ............................. Ground 2 ............................. Luminance 1 ............................. Chrominance Output Timing Specifications ................................................................. 9 Troubleshooting .................................................................................... 10 Accessories ........................................................................................... 11 Rear Connector Pin-Outs...................................................................... 12 BNC CONNECTORS For Video(1), Video(2), Y/G, U/B, CSYNC, R, G, B, CS and HV 1 ............................. Signal (Center) 2 ............................. Ground (Shell) Statement of Warranty.......................................................................... 13 DB-9 CONNECTOR For RS-232 Remote 1 ........ DCD 2 ........ RXD 3 ........ TXD RCA CONNECTOR For Audio(1), Audio(2), Audio (Component), Audio (VGA), Audio Out R .......................... RIGHT CHANNEL (Red) L .......................... LEFT CHANNEL (White) 1 - Deuce Pro Intelligent Video Scaler 1 - AC power line cord 1 - 12 foot composite video input cable 1 - 12 foot S-video input cable 1 - 6 foot RS-232 Control cable 1 - Rackmount kit 1 - User’s Manual 1 - Product Registration Card Page 12 4 ......... DTR 5 ......... GROUND 6 ......... DSR 7 ........ RTS 8 ........ CTS 9 ........ NO CONNECTION INCLUDED WITH THIS PRODUCT YOU SHOULD HAVE: • See page 11 for a list of available accessories AVAILABLE OPTIONAL ACCESSORIES Deuce Pro User’s Manual Deuce is a registered trademark of Communications Specialties, Inc. Macintosh and Mac are registered trademarks of Apple Computer, Inc. Deuce Pro User’s Manual Page 1 WARRANTY C ommunications Specialties, Inc. (CSI) warrants that for a period of three years after purchase by the Buyer, Deuce Pro will will be free from defects in material and workmanship under normal use and service. A Return Material Authorization (RMA) number must be obtained from CSI before any equipment is returned by the Buyer. All material must be shipped to CSI at the expense and risk of the Buyer. CSI’s obligation under this warranty will be limited, at its option, to either the repair or replacement of defective units, including free materials and labor. In no event shall CSI be responsible for any incidental or consequential damages or loss of profits or goodwill. CSI shall not be obligated to replace or repair equipment that has been damaged by fire, war, acts of God, or similar causes, or equipment that has been serviced by unauthorized personnel, altered, improperly installed, or abused. RMA numbers and repairs can be obtained from: Communications Specialties, Inc. 55 Cabot Court Hauppauge, NY 11788 USA TEL: (631) 273-0404 FAX: (631) 273-1638 or, in the Asia Pacific Region: Communications Specialties Pte Ltd Singapore TEL: +65 6391 8790 FAX: +65 6396 0138 (See page 3 of this manual for complete address) RMA numbers can also be obtained from our web site: http://www.commspecial.com Please have your serial number (located underneath your unit) available when contacting us. Deuce Pro User’s Manual Deuce Pro User’s Manual Page 13 REMOTE COMMAND TABLE Command sr rc rp lo ul is if of or hp vp br co sa hu de ln cn vc vn Parameter Deuce Pro 0 1 2 3 4 5 6 7 8 0 1 2 3 0 1 2 3 4 5 6 7 8 9 0 1 2 #[1..512] # [1..256] # [-128..127] # [0..63] # [1..4095] # [-512..512] # [0..4] # [0..4] # [0..4] 0/1 Description System Reset Custom Reset Custom H&V Reset lock panel unlock panel Composite 1 Input Source S-Video 1 Input Source Composite 2 Input Source S-Video 2 Input Source YUV Input Source RGB Input Source VGA Input Source Video 1 Input Source Video 2 Input Source Normal (4:3) Input Format Letter (16:9) Input Format 1.85:1 Input Format 2.35:1 Input Format 640x480 Output Format 852x480 Output Format 800x600 Output Format 832x624 Output Format 1024x768 Output Format 1280x768 Output Format 1280x1024 Output Format 1365x1024 Output Format Custom 1 Output Format Custom 2 Output Format 60 Output Rate 75 Output Rate Locked Output rate horizontal position vertical position brightness contrast saturation hue Detail Luma Noise Reduction Chroma Noise Reduction Video Crop OFF/ON Version Number N/A = not applicable # = a number within the range specified within the brackets Page 4 Deuce® RS-232 Protocol Defaults Deuce Pro d d RS-232 REMOTE CONTROL PROTOCOL d (For 2210A version) d d WORLD HEADQUARTERS 55 Cabot Court Hauppauge, NY 11788 USA TEL:(631) 273-0404 FAX:(631) 273-1638 WWW: http://www.commspecial.com EMAIL: [email protected] resolution dependent resolution dependent 32 44 2070 0 0 0 0 0 Singapore Office 100 Beach Road #22-09 Shaw Tower Singapore 189702 TEL: +65 6391 8790 FAX: +65 6396 0138 EMAIL: [email protected] Copyright 2002 P/N 121819 Rev.B Deuce® RS-232 Protocol Page 1 DOCUMENT CONVENTIONS Conventions are explained as follows: This bold Represents Commands. To carry out a command, type the command and then press the ENTER key. italic Placeholders that represent the parameter information you must provide. For example, if you are asked to type optional parameter, you would type the actual name of a parameter instead of the word shown in italic. Italic type also indicates a return value. <cr> Carriage return or the enter key. COMMANDS FOR REMOTE OPERATION Communication Parameters: Use 9600 baud, 8N1, generic TTY, no flow control. Command Formats: All commands are case insensitive. Illegal commands or commands with illegal parameters have no effect. Returns Unknown Cmd. Read Format: two_letter_command_name: <cr>. Example: if: Return value = two_letter_command_name: = register_value. Example: if: = 1 Return Message Format: System Reset (sr:) commands returns CSI product-name version number. Lock and Unlock (lo:, ul:) returns parameters last settings. Custom Reset and Custom H&V Reset (rc:, rp:) returns no parameters. HOW TO INSTALL A CABLE On the Deuce Pro, connect an RS-232 serial cable to the RS-232 remote connector located on the upper left rear panel. This cable should be wired with all nine pins connected on a one-for-one basis (i.e. pin 1 wired to pin 1). Write Format: two_letter_command_name:, optional_parameter <cr>. Example: is:, 1 Lock and Unlock Command Format: two_letter_command_name <cr>. Example: ul Page 2 Deuce® RS-232 Protocol Deuce® RS-232 Protocol Page 3 DOCUMENT CONVENTIONS Conventions are explained as follows: This bold Represents Commands. To carry out a command, type the command and then press the ENTER key. italic Placeholders that represent the parameter information you must provide. For example, if you are asked to type optional parameter, you would type the actual name of a parameter instead of the word shown in italic. Italic type also indicates a return value. <cr> Carriage return or the enter key. COMMANDS FOR REMOTE OPERATION Communication Parameters: Use 9600 baud, 8N1, generic TTY, no flow control. Command Formats: All commands are case insensitive. Illegal commands or commands with illegal parameters have no effect. Returns Unknown Cmd. Read Format: two_letter_command_name: <cr>. Example: if: Return value = two_letter_command_name: = register_value. Example: if: = 1 Return Message Format: System Reset (sr:) commands returns CSI product-name version number. Lock and Unlock (lo:, ul:) returns parameters last settings. Custom Reset and Custom H&V Reset (rc:, rp:) returns no parameters. HOW TO INSTALL A CABLE On the Deuce Pro, connect an RS-232 serial cable to the RS-232 remote connector located on the upper left rear panel. This cable should be wired with all nine pins connected on a one-for-one basis (i.e. pin 1 wired to pin 1). Write Format: two_letter_command_name:, optional_parameter <cr>. Example: is:, 1 Lock and Unlock Command Format: two_letter_command_name <cr>. Example: ul Page 2 Deuce® RS-232 Protocol Deuce® RS-232 Protocol Page 3 REMOTE COMMAND TABLE Command sr rc rp lo ul is if of or hp vp br co sa hu de ln cn vc vn Parameter Deuce Pro 0 1 2 3 4 5 6 7 8 0 1 2 3 0 1 2 3 4 5 6 7 8 9 0 1 2 #[1..512] # [1..256] # [-128..127] # [0..63] # [1..4095] # [-512..512] # [0..4] # [0..4] # [0..4] 0/1 Description System Reset Custom Reset Custom H&V Reset lock panel unlock panel Composite 1 Input Source S-Video 1 Input Source Composite 2 Input Source S-Video 2 Input Source YUV Input Source RGB Input Source VGA Input Source Video 1 Input Source Video 2 Input Source Normal (4:3) Input Format Letter (16:9) Input Format 1.85:1 Input Format 2.35:1 Input Format 640x480 Output Format 852x480 Output Format 800x600 Output Format 832x624 Output Format 1024x768 Output Format 1280x768 Output Format 1280x1024 Output Format 1365x1024 Output Format Custom 1 Output Format Custom 2 Output Format 60 Output Rate 75 Output Rate Locked Output rate horizontal position vertical position brightness contrast saturation hue Detail Luma Noise Reduction Chroma Noise Reduction Video Crop OFF/ON Version Number N/A = not applicable # = a number within the range specified within the brackets Page 4 Deuce® RS-232 Protocol Defaults Deuce Pro d d RS-232 REMOTE CONTROL PROTOCOL d (For 2210A version) d d WORLD HEADQUARTERS 55 Cabot Court Hauppauge, NY 11788 USA TEL:(631) 273-0404 FAX:(631) 273-1638 WWW: http://www.commspecial.com EMAIL: [email protected] resolution dependent resolution dependent 32 44 2070 0 0 0 0 0 Singapore Office 100 Beach Road #22-09 Shaw Tower Singapore 189702 TEL: +65 6391 8790 FAX: +65 6396 0138 EMAIL: [email protected] Copyright 2002 P/N 121819 Rev.B Deuce® RS-232 Protocol Page 1