1
Performing Basic Maintenance and Troubleshooting
2.3
2-3
Replacing the Deuterium Lamp (TRIAD only)
The TRIAD is equipped with a deuterium lamp, which is used in measurements made
at wavelengths between 230 and 359 nm. The lamp needs to be replaced when
Concert - TRIAD Series Software warns that lamp energy is too low to perform
measurements.
Replacing the deuterium lamp requires a 2 mm Allen wrench and a 2.5 x 0.6mm
flathead screwdriver. The Allen wrench is provided with the instrument; the
screwdriver with the replacement deuterium lamp.
To replace the deuterium lamp:
WARNING: Turn off power and disconnect the instrument from the
power source before performing maintenance on the instrument. There
is a risk of electric shock when the power is on.
WARNING: Never view the deuterium lamp directly without approved
eyewear. Protect skin from exposure to the light emitted by the lamp.
The lamp emits UV radiation.
WARNING: Turn off the instrument and allow a minimum of 30 minutes
for the deuterium lamp to cool before servicing. During operation, the
lamp reaches a temperature of approximately 250°C (482°F).
1. Turn off power and disconnect the power cable from the instrument.
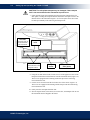
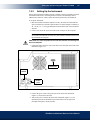
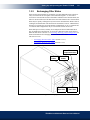
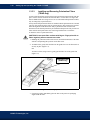
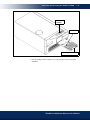
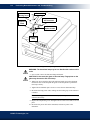
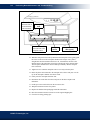
2. On the top of the instrument case, use the supplied 2 mm Allen wrench to remove
the two Allen screws that secure the lamp housing cover (Figure 2-1). The lamp
and power connector are now accessible.
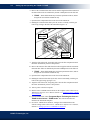
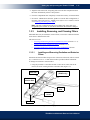
3. On the lamp power cable connector, press down on the locking clip to unlatch the
connector. With the clip unlatched, disconnect the lamp power cable from the
instrument.
4. Loosen, but do not attempt to completely remove, the two flathead captive
screws that secure the deuterium lamp. Captive screws are designed to remain
connected to the lamp base.
TRIAD Series Multimode Detector User’s Manual