1
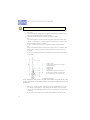
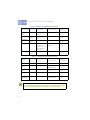
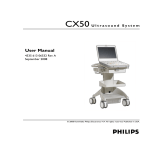
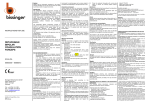
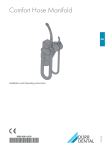
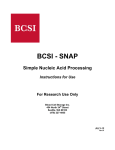
1Disinfection and cleaning DISINFECTION AND CLEANING 9 Document version: 2v1.01 DISINFECTION AND CLEANING 1 PREPARING PROBES1 CAUTION: Risk of allergic reaction. Some probe faces and probe sheaths contain natural rubber latex and talc, which can cause allergic reactions on some individuals. In rare cases some gels and disinfectants can cause an allergic reaction. Read the supplied information concerning ingredients before using. It is recommended to test the skin reaction before proceeding. In case of incompatibility with one or more of the mentioned substances immediately contact a physician. CAUTION: Risk of damages to the probes. Probes contain very sensitive electrical components. Take special care when handling them. Avoid applying vibrations or mechanical pressure to the probes. Do not allow sharp objects, such as scalpels or knives, to touch probes or cables. Inspect the probe cable, housing, connector and face before each use. Remove any dust or foreign objects from the connectors with a soft brush. Check for cracks or other damage that jeopardizes the integrity of the probe. If the probe or its cable is damaged, discontinue using it and contact eZono AG. NOTE: Only use probes supported by eZono AG. Non-supported components may damage the device. WARNING: Attempting to disinfect a probe using a method other than the one included here can damage the probe. Non-compliance will void any warranty claims. The level of disinfection required for a probe is dictated by the type of tissue it will contact during use. To avoid infection follow these instructions: • Clean the probe after each use. Cleaning is an essential step prior to effective disinfection. • Ensure that the disinfectant type is appropriate for the probe. • Ensure the solution strength and duration of contact are appropriate for the intended clinical use of the probe. • Be sure to follow the manufacturer’s instructions when using disinfectants and to observe the expiration dates of the disinfectants. 1.When using eZono probes that support the eZGuide Needle Guidance System also refer to the eZGuide Needle Guidance System user manual for more specific preparation instructions. 10 TABLE 1-1: OVERVIEW OF USE CASES AND DISINFECTION LEVELS 2 USE CASE DESCRIPTION DISINFECTION LEVEL USE OF PROBE SHEATH NONCRITICAL APPLICATION Device contacts only intact skin Cleaning and low-level disinfection Not required SEMICRITICAL USE Device may contact mucous membranes such as endocavity applications Cleaning and high-level disinfection Recommended CRITICAL USE Device contacts blood, compromised tissue, or is used in a sterile field Cleaning and at least high-level disinfection Required CLEANING AND DISINFECTING PROBES WARNING: Danger of electrical shocks! Before starting cleaning and disinfection, disconnect the probe from the system. Never place the device on the floor when cleaning and disinfecting the probe. The cable connection to the device must always be higher than the lowest point of the cable, to prevent fluid from flowing down the cable to the device. WARNING: To avoid injury, always use protective eyewear and gloves when cleaning and disinfecting a probe. To disinfect a probe you can choose between an immersion method or a wipe method using the corresponding disinfection agent recommended by eZono AG ( table 1-2). NOTE: Probes can be disinfected using the wipe method only if the manufacturer’s instructions of the compatible disinfectant you are using indicates it can be used with a wipe method. 1. Disconnect the probe from the system 2. Remove any probe sheath 3. Damp lightly a soft cloth in a mild soap or detergent cleaning solution to remove any particulate matter or body fluids from the probe or cable 11 DISINFECTION AND CLEANING NOTE: Apply the solution to the cloth rather than the surface. 4. Rinse with water or wipe with water-dampened cloth, then wipe with a dry cloth 5. Mix the disinfection agent following the manufacturer’s instructions for solution strengths and contact duration 6. Wipe the probe’s surfaces with the disinfection agent OR Immerse the probe into the disinfection agent (not beyond the cable sleeve, illustration 1-1) following the manufacturer’s instructions for the duration of the immersion 7. Air dry or towel dry with a clean, disinfected cloth (wipe method) OR Rinse in disinfected water to the point of the previous immersion and then air dry or towel dry with a clean, disinfected cloth (immersion method) 8. Examine the probe and cable for damage such as cracks, splitting, or fluid leaks 1 2 3 4 5 6 A B PROBE CABLE PROBE BEND RELIEF/CABLE SLEEVE PROBE HANDLE PROBE NOSE PROBE HEAD PROBE FACE ZERO INSERTION FORCE CONNECTOR INGRESS OF LIQUIDS CLASSIFICATION IPX7: IMMERSIBLE FOR <30 MINUTES ILLUSTR. 1-1) PROBE COMPONENTS If any damage at the probe is evident, discontinue using the probe, and contact eZono AG. To avoid damages to the probe consider the following guidelines: • Using non-recommended cleaning solutions and disinfectants, incorrect solution strengths, or immersing a probe deeper or for a longer contact time can damage or discolour the probe and will void the probe warranty. • If you use an isopropyl alcohol solution for disinfection, ensure the 12 solution is only 70% alcohol or less. Solutions of more than 70% alcohol can cause product damage. TABLE 1-2: OVERVIEW OF COMPATIBLE DISINFECTANTS DISINFECTAN T / SOLUTION TYPE INGREDIENT MANUFACTURER PROBE CHEMICAL COMPATIBILIT Y CIDEX OPA Solution Orthophthalaldehyde Johnson & Johnson L3-12(NGS) CL1-6 CIDEX PLUS Solution Glutaraldehyde Johnson & Johnson L3-12(NGS) CL1-6 GIGASEPT FF Solution Ethanol Succindialdehyde Schülke&Mayr UK Ltd. L3-12(NGS) CL1-6 VIRKON Solution Potassium Dupont (Antec) L3-12(NGS) CL1-6 WAVICIDE-01 Solution Glutaraldehyde Medical Chemical Corporation L3-12(NGS) CL1-6 AIDAL PLUS Solution Glutaraldehyde Whiteley Corp. L3-12(NGS) CL1-6 CETYLCIDE-G Solution Glutaraldehyde Cetylite Industries L3-12(NGS) CL1-6 TABLE 1-3: OVERVIEW OF COMPATIBLE PRE-CLEANERS BRAND NAME TYPE INGREDIENT MANUFACTURER PROBE CHEMICAL COMPATIBILIT Y ENZOL Solution Subtilisin (proteolytic enzymes) Johnson and Johnson L3-12(NGS) CL1-6 TRANSEPTIC Spray Isopropyl alcohol Parker Laboratories L3-12(NGS) CL1-6 S5N (THERACIDE PLUS) Solution Isopropyl alcohol Burnishine Products L3-12(NGS) CL1-6 T-SPRAY I I Spray Alkyl dimethyl benzyl ammonium chloride Pharmaceutical Innovations, Inc. L3-12(NGS) CL1-6 13 DISINFECTION AND CLEANING TABLE 1-3: OVERVIEW OF COMPATIBLE PRE-CLEANERS PROBE CHEMICAL COMPATIBILIT Y BRAND NAME TYPE INGREDIENT MANUFACTURER SANI-CLOTH PLUS Wipe Isopropyl Alcohol Nice Pak L3-12(NGS) CL1-6 SEPTIHOL Solution Isopropyl Alcohol STERIS L3-12(NGS) CL1-6 ENDOZIME Solution 2-Propanol Ruhof L3-12(NGS) CL1-6 CLEANISEPT Wipe Quaternary Ammonium (benzyl-C12-16alkyldimethyl, chlorides Dr. Schumacher GmbH L3-12(NGS) CL1-6 SPORICIDIN Solution Phenol Sporicidin L3-12(NGS) CL1-6 TABLE 1-4: OVERVIEW OF COMPATIBLE COUPLANTS BRAND NAME TYPE INGREDIENT MANUFACTURER PROBE CHEMICAL COMPATIBILIT Y RAPHASONIC Gel Propylene Glycol Rapha PHARM L3-12(NGS) AQUASONIC 100 Gel Propylene Glycol Parker Laboratories L3-12(NGS) CL1-6 SOFLEAN GEL Gel Propylene Glycol TAEMEN Medical L3-12(NGS) CL1-6 CARE SONIC Gel Propylene Glycol Care Mate L3-12(NGS) CL1-6 ULTRASOUND GEL Gel Carbomer Ultragel Hungary 2000 Ltd. L3-12(NGS) CL1-6 DO NOT: Do not allow any disinfectant to contact metal surfaces. Use a soft cloth lightly dampened in a mild soap or compatible cleaning solution to remove any disinfectant that remains on metal surfaces. 14 WARNINGS: • Refer to local regulations for environmental protection (e.g EPA registration or CE approval etc.) regarding the use of the cleaning and disinfection agents listed in table 1-2 and table 1-3. • Not all of the above chemicals may have clearance for your market. Please verify with local authorities on approved disinfectants in your country or region. 3 USING ACOUSTIC COUPLING GELS AND PROBE SHEATHS To provide suitable acoustic coupling the used acoustic coupling gels must be compatible with the probe’s material. eZono AG has positively tested the compatibility of a gel from Aquasonics® and provides a sample with the system. For general use, apply a liberal amount of gel between the probe and the body. NOTE: Follow the cleaning recommendations given in table 1-2 before using probe sheaths. Only use medically approved sterile probe sheaths. WARNING: To reduce the risk of contamination, install the probe sheath only when you are ready to perform the procedure. Only use probe sheaths appropriate for the sterility requirements of the procedure. Follow these steps to apply the probe sheath: 1. 2. 3. 4. 5. Place some gel inside the sheath Insert the probe into the sheath Pull the sheath over the probe until the sheath is fully extended Secure the sheath using the bands supplied with the sheath Check for and eliminate bubbles between the probe face and the sheath, since they may affect the ultrasound image 6. Inspect the sheath to ensure that there are no holes or tears, before scanning 4 CLEANING EZONO 4000 The surface of eZono 4000, the probes and the accessories can be cleaned by using a recommended cleaning solution ( table 1-3 for cleaning the probes). For the touchscreen it is recommended to use a 15 DISINFECTION AND CLEANING mild detergent or iso-propyl alcohol. The system casing should be cleaned with a mild detergent or ethanol. WARNING: Danger of electrical shocks! Before cleaning the system, always disconnect the AC power adapter from the system. CAUTION: Use only recommended cleaners. Make sure that the solution does not get inside the system or into the battery compartment. Direct contact of electronics and battery with water or solution must be strictly avoided. DO NOT • Do not allow cleaning solution to leak inside the system. Doing so may cause damage to internal system electronics and void the warranty cover. • Do not spray or pour cleaning solution directly onto the system surface. • Do not use chemical solvents, acidic or alkali solutions, or abrasive cleaners, since these will damage the surface. • Do not use a water jet or any other high pressure cleaner. • Do not scratch the LCD screen. • Do not immerse the system or probe cable under water or other liquids. CLEANING THE CASING AND THE LCD SCREEN Moisten a clean, non-abrasive, cotton cloth with a cleaning solution, and wipe the casing and screen clean. Apply the cleaner to the cloth rather than the surface of the screen. CLEANING PROBES Probes must be cleaned after every use! Cleaning is a necessary step before disinfection, thus cleaning and disinfecting activities for probes are described in chapter 2. CLEANING PRINTER AND ISOLATION TRANSFORMER To clean the printer or the isolation transformer please refer to the respective user manuals for detailed cleaning instructions. CLEANING THE AIR VENTS It is recommended to verify that the air vents are free from dust, dirt or 16 other obstacles. Clean them with a soft brush if necessary. CLEANING OTHER PERIPHERALS Moisten a clean, non-abrasive, cotton cloth with a mild detergent and carefully wipe clean peripheral surfaces. WARNING: After each cleaning or disinfection cycle, and before subsequent use, it is advised to visually inspect the housing of all supported equipment (e.g. probe housing) and cables for signs of wear or tear or other damages. 17