1
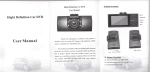
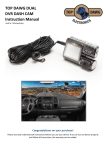
U-DRIVE
DUAL
Your personal Driving Blackbox
and Rear view Camera
MT4056
User Manual
EN Overview
Rear camera
socket
USB/charger
socket
Front camera
microSD socket
Front camera lens
Microphone
SOS button
IR LED
Speaker
Rear camera
Connection to
reverse light
Red(+), Black (-)
Rear
camera plug
Rear camera lens
2
Reset
button
Up
button
OK
button
Down
button
Mode
button
Menu
button
Power
button
Reverse
light
Front camera
Rear
camera
Before first use
Put microSD card into slot according to icon marks on the
casing, plug USB cable to PC computer or USB charger for
few hours to fully charge the device.
Note: Device supports microSD card class6 or higher.
Slower cards like class4 or lower are not supported.
Power on/Power off
Note! Rear camera is powered from front camera.
Reverse light connection is used to detect whenever reverse gear is switched on – image will be
displayed on the LCD in Full Screen mode. When
reverse gear is out the LCD image will be resumed.
Switching front/rear camera view
Use UP button to switch current view: full front view/full
front view with PIP rear view/front and rear side by side
view/full rear view.
Press and hold OK button for 1 sec to disable/enable OSD
menu.
Using menu
Press and hold POWER for 2 sec to power on the device,
press and hold again for 2 sec to power off.
When charger is plugged in device will power on and start
to record automatically, when charger is plugged out recording will be stopped and device will power off.
When device is not recording press MENU button once
to open context menu, press MENU again to open more
options. Context menu is related to actual working mode:
DVR/digital camera/file browser.
To enter option press OK, to exit option press MENU, to
navigate use UP/DOWN buttons.
Note! Movies are always recorded simultaneously
from both cameras, please find DCIMA folder for front
camera and DCIMB folder for rear camera.
■MP – select size of recorded movie in front camera
[1080p/720p/VGA]
Options in DVR mode:
3
EN
EN
■Record time – select sequence duration in the loop recording mode [1min/3min/5min/off ].
Note!When OFF option is selected then loop option is
off. Device will record movies up 4GB till microSD card
is full and then stop recording.
General settings:
■AWB – select white balance [auto/sunlight/fluorescence/cloudy/tungsten].
■Exposure – select exposure compensation [from -3EV
to 3V].
■Color – select color effect for front camera capture [normal/mono/negative/ancient/light blue].
■Auto Detect - start to record when movement is detected in the camera sight [on/off ].
■Time Stamp – data stamp on recorded movies [on/off ].
■Audio – record movies with sound [on/off ].
■Language [select menu language].
■Frequency – select according to power grid parameters
when recording with indoor lighting [50Hz/60Hz].
■Parking Guard – when option is enabled and device is
powered off it can automatically power on and record
movie when shock is detected [off/on].
■Keytone – button beep [on/off ].
■G_sensor – select G-sensor sensitivity, when shock is
detected actual file will be secured [high/medium/low/
off ].
4
■Backlight time – select time to power off LCD for power
saving [10sec/1min/3min/off ].
■TV System – function disabled.
■IR light – select when IR LED support light is activated
[off/on/auto].
■Delay Power Off – select idle time to power off for power saving [10sec/30sec/1min/3min/off ].
■Version Info – show firmware version.
■Date set – set actual date and time, use UP/DOWN button to set value, use MODE button to switch next value.
■Format – perform microSD card format. Caution! All
data will be lost.
■Default set – restore default settings.
Using the device
Plug in the charger, device will power on and start to record automatically. When device is powered on manually
press OK button to start/stop recording.
When device is in standby mode you can press shortly
POWER to switch IR LED mode manually [off/on/auto].
When device is recording you can press SOS button or
MENU button to secure actual file (from both cameras).
When device is recording you can press DOWN button to
manually set record with audio [on/off ].
When device is recording or in standby mode press shortly UP button to switch camera viewing modes.
Switching modes
EN
When device is in standby, press MODE button to switch
current mode: DVR/digital camera/file browser.
Rear camera view
When you engage reverse gear it will turn on reverse light
and rear camera view will appear in full screen mode with
parking assistance grid. You can adjust assistance grid position by pressing DOWN button.
Browsing recorded files using the PC
computer
In order to view recorded files put microSD card into card
reader of your PC computer, go to DCIMA (front camera)
and DCIMB (rear camera) folder, use media browser to
play selected file.
You can also plug device to PC computer via USB cable –
when menu pop-up on the LCD please select “USB Disk”system will detect and install new mass storage.
Due to continuous development specification and appearance of product are subject to change without prior notice.
For technical support please visit www.media-tech.eu.
Device is equipped with built-in battery, please remember to charge it once a week.
5
EN
6