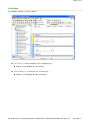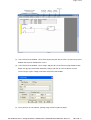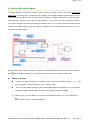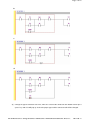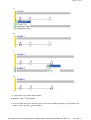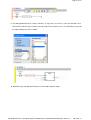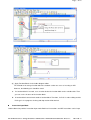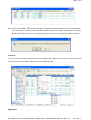
1
ISP Soft
Manual
Table of Content
Chapter 1
Chapter 2
Chapter 3
Chapter 4
Chapter 5
Chapter 6
Chapter 7
Chapter 8
Chapter 9
Introduction
Introduction to Menu Bar
Creating Program Printing
Ladder Diagram Editing
PLC
Tools
Simulator
Help
Appandix
This is a withdraw from ISP Soft Helpfile
Page 1 of 1
1.1 Introduction and System Requirements
ISPSoft is a program editor of Delta DVP series PLC for WINDOWS. In addition to general PLC programming
and WINDOWS editing functions (e.g. cut, paste, copy, multi-window display, etc.), ISPSoft also provides
various comment editing as well as other special functions (e.g. register editing and settings, file accessing
and saving, contacts monitoring and setting, etc.).
System Requirements
Operation System
Windows 2000/NT/ME/XP/VISTA
CPU
Pentium 1.5G and above
Memory
256MB or above (512MB and above is recommended)
Hard Disk
Capacity: 50MB or above
CD-ROM drive(for installing ISPSoft)
Monitor
Resolution: 640×084, 16 colors or above, It is recommended to set
display setting of Windows to 800×600.
Mouse
General mouse or the device compatible with Windows
Printer
Printer with driver for Windows
RS-232
At least one of COM1~COM8 connected to PLC
Compatibility
All Delta DVP series PLC
ISPSoft supports the following PLCs:
Supported Models
Firmware version
1
DVP-SS/ES/EX
V6.2 and above
2
DVP-SA/SX
V1.6 and above
3
DVP-SC
V1.4 and above
4
DVP-EH/EH2/EH2L/SV
All
5
DVP-ES2/EX2
All
mk:@MSITStore:C:\Program\Delta%20Industrial%20Automation\ISPSoft1.01\User...
2011-06-17
Page 1 of 3
1.2 System Installations and Setup
Start-up your computer to Windows 2000/NT/ME/XP system.
Insert ISPSoft CD into the CD-ROM drive or download installation program from
http://www.delta.com.tw/product/em/plc/plc_main.asp
(If the installation program is downloaded from the website, it needs to be saved in the designated directory
after uncompressing, and then the installation can be started.)
Click “START”, and then click on “RUN”
Designate the location where ISPSoft is to be installed
mk:@MSITStore:C:\Program\Delta%20Industrial%20Automation\ISPSoft1.01\User...
2011-06-17
Page 2 of 3
Enter the user name and the organization then click “Next>” .
Click "Next" to comtinue or click "Change“ to install to a different folder.
mk:@MSITStore:C:\Program\Delta%20Industrial%20Automation\ISPSoft1.01\User...
2011-06-17
Page 3 of 3
mk:@MSITStore:C:\Program\Delta%20Industrial%20Automation\ISPSoft1.01\User...
2011-06-17
Page 1 of 3
1.3 Program Execution
When installation is completed, ISPSoft will be installed in the default directory "C:\Program Files\ DELTA
Industrial Automation\ISPSoftx.xx". Double-click ISPSoft icon to execute the program. (See the figure below)
The PLC editor window will pop up as shown below. There are only File (F), PLC(P), Tools(T) and Help(H) in
the toolbar when executing ISPSoft for the first time.
When entering ISPSoft at the second time, the last file you edited will be opened. The following diagram is the
introduction to functions of ISPSoft.
mk:@MSITStore:C:\Program\Delta%20Industrial%20Automation\ISPSoft1.01\User...
2011-06-17
Page 2 of 3
Title bar: Displaying file name and directory that is editing.
Menu bar: There are eight items in menu bar: File(F), Edit(E), View(V), Compile(C), PLC(P), Tools(T),
Window(W), and Help(H).
Toolbar: Selecting editing tools by clicking icons directly. There are four types:
1.
Standard toolbar:
2.
PLC toolbar:
3.
Common editor bar: (display in ladder diagram mode)
4.
Program bar: (display in SFC diagram mode)
Working area: The area for designing and programming. Users can choose Instruction editing, Ladder edition
mk:@MSITStore:C:\Program\Delta%20Industrial%20Automation\ISPSoft1.01\User...
2011-06-17
Page 3 of 3
or SFC editing as their custom setting
Status bar: Displaying messages, including replace/insert mode, coordinate, PLC scan time, program size
after compiling, communication indicating LED (blinking during communication), PLC status
(RUN/STOP/HALT/ ERROR), PLC COM port number (baud rate), and PLC models.
mk:@MSITStore:C:\Program\Delta%20Industrial%20Automation\ISPSoft1.01\User...
2011-06-17
Page 1 of 3
1.4 Initial Setup
After executing ISPSoft, users can open a new file for PLC program design. PLC Type, file name and file path
can be setup in Create a New Project window.
Click the box “Properties…” in the left corner then a dialog will pop up.
Users can enter program title, company, designer name and project comment in this dialog.
mk:@MSITStore:C:\Program\Delta%20Industrial%20Automation\ISPSoft1.01\User...
2011-06-17
Page 2 of 3
When the above settings are finished, the workspace will pop up. Right click the “Programs” in the Project
workspace and select “New POU…” to create a POU.
Enter the name of POU and select a task for this POU. Click “OK” and the POU will be created with a ladder
diagram programming window.
mk:@MSITStore:C:\Program\Delta%20Industrial%20Automation\ISPSoft1.01\User...
2011-06-17
Page 3 of 3
Rules for naming a POU
Special characters such as “~, !, @, #, $, %, ^, &, *, (, )” are not allowed.
POU names in the same project cannot be repeated.
Case-insensitive
If Function Block is named by the following format: P0_FB, P1_FB…etc, ISPSoft will assign P0 for POU
named P0_FB and P1 for POU named P1_FB in memory allocation.
Max length is 16 characters
mk:@MSITStore:C:\Program\Delta%20Industrial%20Automation\ISPSoft1.01\User...
2011-06-17
Page 1 of 2
2.1 About the Menu Bar
When ISPSoft is activated, the first pop up window is as below. Four selections including File, PLC, Tools and
Help will be shown on the menu bar.
After clicking “File” “New”, the window below will be shown. More items including Edit, View, Compile, and
Window will be listed on the menu bar. We will introduce them later one by one.
mk:@MSITStore:C:\Program\Delta%20Industrial%20Automation\ISPSoft1.01\User...
2011-06-17
Page 2 of 2
mk:@MSITStore:C:\Program\Delta%20Industrial%20Automation\ISPSoft1.01\User...
2011-06-17
Page 1 of 2
2.2 File
The pull-down menu of File provides functions as follows:
New (N) Create a new file.
Method 1: Click “File” “New(N)”.
Method 2: Click the icon
on toolbar.
Method 3: Use keyboard shortcuts by pressing keys (Ctrl) + (N).
Open (O) Open an old file.
Method 1: Click “File” “Open(O)”.
Method 2: Click the icon
on toolbar.
Method 3: Use keyboard shortcuts by pressing keys (Ctrl) + (O).
Save (S) Save current file.
Method 1: Click “File” “Save(S)”.
Method 2: Click the icon
on toolbar.
Method 3: Use keyboard shortcuts by pressing keys (Ctrl) + (S).
Save as (A) Save current file to another file name.
Method 1: Click “File” “Save as(A)”.
Method 2: Use keyboard shortcuts by pressing keys (Ctrl) + (Alt) + (S).
Close project (C) Close current file.
Method: Click “File” “Close Project”.
Print (P) Print current file (only print current window, i.e. one of ladder diagram/SFC/Instruction
List).
mk:@MSITStore:C:\Program\Delta%20Industrial%20Automation\ISPSoft1.01\User...
2011-06-17
Page 2 of 2
Method 1: Click “File” “Print(P)”.
Method 2: Click the icon
from the toolbar.
Method 3: Use keyboard shortcuts by pressing keys (Ctrl) + (P).
Exit (X) End ISPSoft.
Method 1: Click “File” “Exit(X)”.
Method 2: Use keyboard shortcuts by pressing keys (Alt) + (X).
File Explanation:
Extension Name
Explanation
1
*.ISP
Execution file with program code; the file generated after the
ladder diagram program has gone through a successful
compiler
2
*.TXT
The file is used to save variables when exporting.
3
*.MPU
The file is use to save programs when exporting.
4
*.FBU
The file is use to save function blocks when exporting.
4
*.DVL
The file is used to record register T,C and D.
5
*.DVB
The file is used to record device state (M and S)
6
*.WFT
The file is used to record file register.
7
*.PFS
The file is used to record user preference of ISPSoft.
mk:@MSITStore:C:\Program\Delta%20Industrial%20Automation\ISPSoft1.01\User...
2011-06-17
Page 1 of 3
2.3 Edit
The “Edit” function is shown as follows:
Undo (U) Undo the previous actions (20 steps max.)
Method 1: Click “Edit” “Undo(U)”
Method 2: Click the icon
on the toolbar
Method 3: Use keyboard shortcuts by pressing keys (Ctrl) + (Z)
Method 4: Right-click to get pop-up menu and select “Undo.”
Redo (R) Redo previous actions.
Method 1: Click “Edit” “Redo(R)”
Method 2: Click the icon
on the toolbar
Method 3: Use keyboard shortcuts by pressing keys (Ctrl) + (Alt) + (Z)
Method 4: Right-click to get pop-up menu and select “Redo.”
Cut (T) Cut down the selected objects.
Method 1: Click “Edit” “Cut(T)”
Method 2: Click the icon
on the toolbar
Method 3: Use keyboard shortcuts by pressing keys (Ctrl) + (X)
Method 4: Right-click to get pop-up menu and select “Cut.”
mk:@MSITStore:C:\Program\Delta%20Industrial%20Automation\ISPSoft1.01\User...
2011-06-17
Page 2 of 3
Copy (C) Copy the selected objects.
Method 1: Click “Edit” “Copy(C)”
Method 2: Click the icon
on the toolbar
Method 3: Use keyboard shortcuts by pressing keys (Ctrl) + (C)
Method 4: Right-click to get pop-up menu and select “Copy.”
Paste (P) Paste objects to focused position from clipboard
Method 1: Click “Edit” “Paste(P)”
Method 2: Click the icon
on the toolbar
Method 3: Use keyboard shortcuts by pressing keys (Ctrl) + (V)
Method 4: Right-click to get pop-up menu and select “Paste.”
Paste right Paste the data to the right block of the designated position (only in ladder editor)
Method 1: Click “Edit” “Paste Right”
Method 2: Right-click to get pop-up menu and select “Paste Right.”
OR paste Paste the data to the bottom block of the designated position (only in ladder editor)
Method 1: Click “Edit” “OR Right”
Method 2: Right-click to get pop-up menu and select “OR Right.”
Delete Delete the selected objects
Method 1: Click “Edit” “Delete”
Method 2: Click the icon
on the toolbar
Method 3: Use keyboard shortcuts by pressing key (Delete)
Method 4: Right-click to get pop-up menu and select “delete.”
Select All (A) Select and mark the entire document
Method 1: Click “Edit” “Select All”
Add Network (After) Add a network after the focused network
Method 1: Click “Edit” “Add Network (After)”
Method 2: Click the icon
on the toolbar
Method 3: Use keyboard shortcuts by pressing keys (F12)
Insert Network (Before) Insert a network before the focused network
Method 1: Click “Edit” “Insert Row”
Method 2: Click the icon
on the toolbar
Method 3: Use keyboard shortcuts by pressing keys (F11)
Find Search for th designated device name, instruction or comment
Method 1: Click “Edit” “Find”
Method 2: Click the icon
on the toolbar
Method 3: Use keyboard shortcuts by pressing keys (Ctrl) + (F)
mk:@MSITStore:C:\Program\Delta%20Industrial%20Automation\ISPSoft1.01\User...
2011-06-17
Page 3 of 3
Method 1: Click “Edit” “Replace”
Method 2: Click the icon
on the toolbar
Method 3: Use keyboard shortcuts by pressing keys (Ctrl) + (H)
Goto Change the focused network to another one by network ID or network label
Method 1: Click “Edit” “Goto”.
Method 2: Click the icon
on the toolbar
Method 3: Use keyboard shortcuts by pressing keys (Ctrl) + (J)
Toggle Bookmark Toggle a bookmark on the selected network.
Method 1: Click “Edit” “Bookmarks” “Toggle Bookmark”
Method 2: Click the icon
on the toolbar
Method 3: Use keyboard shortcuts by pressing keys (Ctrl) + (Shift) + (B)
Next Bookmark Change the focused network to another one by next bookmark
Method 1: Click “Edit” “Bookmarks “Next Bookmark”
Method 2: Click the icon
on the toolbar
Method 3: Use keyboard shortcuts by pressing keys (Ctrl) + (Shift) + (N)
Previous Bookmark Change the focused network to another one by previous bookmark
Method 1: Click “Edit” “Bookmarks “Previous Bookmark”
Method 2: Click the icon
Method 3: Use keyboard shortcuts by pressing keys (Ctrl) + (Shift) + (P)
on the toolbar
Remove Bookmark Remove all bookmarks
Method 1: Click “Edit” “Bookmarks “Remove All Bookmark”
Deactive/Active Network Disable the selected network. The De-active network will not be
compiled when executing compiling.
Method 1: Click “Edit” “Deactive/Active Network”
Method 2: Click the icon
Method 3: Use keyboard shortcuts by pressing keys (Ctrl) + (Shift) + (A)
Method 4: Right-click in the ladder editor to get pop-up menu and select “Deactive/Active
on the toolbar
Network.”
mk:@MSITStore:C:\Program\Delta%20Industrial%20Automation\ISPSoft1.01\User...
2011-06-17
Page 1 of 3
2.4 View
The “View” function is shown as follows:
Toolbars (T) tools of standard, PLC, editor is included.
Standard: Display or hide standard tools.
PLC: Display or hide PLC tools
Editor: Display or hide Editor tools
Workspace Display or hide project work area. You can click related windows and detect or set
communication.
Method 1: Click “View” “Workspace”
Method 2: Click the icon
on the toolbar
Output Window Display or hide compiling message area. After compiling, you can double click
the item in the output window to change focused node to the error area in the editor.
Method 1: Click “View” “Output Window”
Method 2: Click the icon
on the toolbar
mk:@MSITStore:C:\Program\Delta%20Industrial%20Automation\ISPSoft1.01\User...
2011-06-17
Page 2 of 3
Zoom In You can zoom in the window.
Method 1: Click “View” ”Zoom” “Zoom In”
Method 2: Click the icon
Method 3: Use keyboard shortcuts by pressing keys (Alt) + (Shift) + (I)
on the toolbar
Zoom Out You can zoom out the window.
Method 1: Click “View” ”Zoom” “Zoom Out”
Method 2: Click the icon
on the toolbar
Method 3: Use keyboard shortcuts by pressing keys (Alt) + (Shift) + (O)
View Ratio Adjust the displaying ratio of the text and graphics in the ladder diagram, available in
25%, 50 %, 75 %, 100 %, 125 %, 150 % and 200 %
Method 1: Click “View” ”Zoom” “View Ratio”
Method 2: Scroll down the ratio list on the icon bar and select the ratio you like.
Monitor Radix Switch the numeral system adopted by the value in each register in ladder diagram
mode, available in signed decimal, unsigned decimal, hexadecimal and floating poin.
Method : Select “Monitoring Radix” in the view menu
Edit Device Comments (D) Display all device comments (you can edit all device comments in this
window)
Method 1: Click “View” “Edit Device Comments”
Method 2: Double click Edit Device Comments in project tree diagram. (You can get a project
tree diagram after clicking view workspace.)
Used Devices Report (U) Display all device usage status
mk:@MSITStore:C:\Program\Delta%20Industrial%20Automation\ISPSoft1.01\User...
2011-06-17
Page 3 of 3
Method 1: Click “View” “Used Device Report”
Method 2: Double click “Used Device Report” in the project tree window. (You can get a project
tree diagram after clicking view workspace.)
Network Comments (M) Display or hide network comments.
Method 1: Click “View” “Network Comments”
Method 2: Click the icon
Method 3: Use keyboard shortcuts by pressing keys (Ctrl) + (Shift) + (C)
on the toolbar
Device Comments Display or hide network comments.
Method : Click Click the icon
on the toolbar
Project Properties Display the project information. (You can modify project information in this
window)
Method 1: Click “View” “Project Properties”
Method 2: Right-click at the “Project” node in the project tree to get pop-up menu and select
“Properties”
mk:@MSITStore:C:\Program\Delta%20Industrial%20Automation\ISPSoft1.01\User...
2011-06-17
Page 1 of 1
2.5 Compile
If the declared variables have not been allocated with associated devices when Compile executes, compiler
will allocate devices for variables according to the range set in Variable Allocation table. When there is no
sufficient devices for allocation, error message indicating device insufficiency will list in the compile message
window. Therefore, when editing programs it is suggested to use devices out of the set range in Variable
Table for ensuring sufficient device range for allocation.
The “Compile” function is shown as follows:
Check To check the grammar of codes at current POU.
Method 1: Click “Compile” “Check”
Method 2: Click the icon
on the toolbar
Compile Check all POUs and allocation memory for each function block instance and
variables. Then adjust execution time of each POU by its tasks to control the running sequence
(Only when POUs are “Program” type)
Method 1: Click “Compile” “Compile”
Method 2: Click the icon
on the toolbar
mk:@MSITStore:C:\Program\Delta%20Industrial%20Automation\ISPSoft1.01\User...
2011-06-17
Page 1 of 3
2.6 PLC
The “PLC” function is shown as follows:
Run to execute PLC.
Method 1: Click “PLC” “Run”
Method 2: Click the icon
on the toolbar
Method 3: Use keyboard shortcuts by pressing keys (Ctrl) + (F8)
Stop to stop executing PLC.
Method 1: Click “PLC” “Stop”
Method 2: Click the icon
on the toolbar
Method 3: Use keyboard shortcuts by pressing keys (Ctrl) + (F7)
Online Mode Switch to monitor mode. (Only when the programs are consistent with each other
between ISPSoft and PLC, the On-line mode can be continued)
Method 1: Click “PLC” “Online mode”
Method 2: Click the icon
on the toolbar
Devices Monitoring Monitor devices to get the information of device state and value.
Method 1: Click “PLC” “Devices Monitoring”
mk:@MSITStore:C:\Program\Delta%20Industrial%20Automation\ISPSoft1.01\User...
2011-06-17
Page 2 of 3
Method 2: Click the icon
on the toolbar
Upload Upload the program, comment, and devices retentive range from PLC to ISPSoft.
Method 1: Click “PLC” “Transfer” “Upload”
Method 2: Click the icon
on the toolbar
Download Download the program, comment, and devices retentive range, RTC, parameter and
password opened in the ISPSoft project into PLC.
Method 1: Click “PLC” “Transfer” “Download”
Method 2: Click the icon
on the toolbar
Online Edit Mode Switch to online editing mode. (Only when ISPSoft is in the On-line mode, the
button can be enabled)
Method : Click the icon
on the toolbar
Send Change Send the change of the program to PLC in online editing mode. (Only when
ISPSoft is in the On-line edit mode, the button can be enabled)
Method : Click the icon
Set MPU On/Off Enable X device to be set On.
Method : Click the icon
on the toolbar
on the toolbar
Edit Register Memory (T,C,D) Proceed with functions such as read, write, print, file readout, and
save the file within internal registers (T, C and D) of the PLC.
Method : Click “PLC” “Edit Register Memory (T, C, D)”
Edit Bit Memory (M,S) Proceed with functions such as read and save the file within internal
registers (M and S) of the PLC.
Method : Click “PLC” “Edit Bit Memory (M, S)”
Edit File Register Memory Proceed with functions such as read, write, file readout, and save the
file within file registers of the PLC.
Method : Click “PLC” “Edit File Register Memory”
Format PLC Memory… Clear PLC memory or set PLC to factory settings (the PLC is
communicating with ISPSoft).
Method : Click “PLC” “Format PLC Memory”
Password Setting Set or remove PLC password.
mk:@MSITStore:C:\Program\Delta%20Industrial%20Automation\ISPSoft1.01\User...
2011-06-17
Page 3 of 3
Method 1: Click “PLC” “Password Setting”
Method 2: Use keyboard shortcuts by pressing keys (Ctrl) + (F5)
PLC ID Setting (I) Set or remove PLC ID.
Method : Click “PLC” “PLC ID Setting”
PLC Information Display current PLC information, including PLC state, capacity, PLC version,
host, slave address, syntax check, error address and lock state.
Method 1: Click “PLC” “PLC Information”
Method 2: Use keyboard shortcuts by pressing keys (Ctrl) + (Alt) + (I)
Password Setting Set or remove PLC password.
Method 1: Click “PLC” “Password Setting”
Method 2: Use keyboard shortcuts by pressing keys (Ctrl) + (F5)
Communication Auto-Detect Detect and display current PLC model, communication baud rate
and communication protocol according to the COM Port setting in “Tools (T)” > “Communication
Setting” when PLC connects to PC correctly.
Method : Click “PLC” “Communication Auto-Detect”
PLC Station Address Set the PLC station address.
Method : Click the icon
on the toolbar
Auto Search Ethernet Module Search Ethernet modules. No need to assign an IP address. (Only
when the communication type is “Ethernet” the function can be executed)
Method : Click the icon
on the toolbar
Static IP Search Ethernet Module Search Ethernet modules by a static IP address. (Only when
the communication type is “Ethernet” the function can be executed)
Method : Click the icon
on the toolbar
Configure Ethernet Module by RS232 Configure Ethernet Module by RS-232.
Method : Click the icon
on the toolbar
mk:@MSITStore:C:\Program\Delta%20Industrial%20Automation\ISPSoft1.01\User...
2011-06-17
Page 1 of 6
2.7 Tools
The “Tools” function is shown as follows:
Communication Setting… ISPSoft will detect applicable PC COM port and allow users to choose
one of applicable COM port to connect to PLC.
Method : Click “Tools” “Communication Setting…”
Change PLC Type… Change the PLC type to other DVP Models.
Method : Click “Tools” “Change PLC Type…”
mk:@MSITStore:C:\Program\Delta%20Industrial%20Automation\ISPSoft1.01\User...
2011-06-17
Page 2 of 6
Subroutine Password Setting Set or remove Subroutine password.
Method : Click “Tools” “Subroutine Password Setting”
Program ID Setting Set or remove Program ID.
Method : Click “Tools” “Program ID Setting”
Set RTC… Set RTC settings of DVP-SA/SX/SC/EH/EH2/EH2L/SV/EX2/ES2 series to be the
same as computer RTC or defined by user.
Method : Click “Tools” “Set RTC…”
PLC Flash Copy program or D device value from PLC to flash, or from flash to PLC.
Method : Click “Tools” “PLC Flash”
mk:@MSITStore:C:\Program\Delta%20Industrial%20Automation\ISPSoft1.01\User...
2011-06-17
Page 3 of 6
Set TC-01 Password Key Set TC-01 password key.
Method : Click “Tools” “Set TC-01 Password Key”
Clear TC-01 Password Key Remove TC-01 password key.
Method : Click “Compiler” > “Ladder => Instruction”
Clear MRU List Clear the MRU list in the File menu.
Method : Click “Tools” “Clear MRU List”
Import Variables Import variables to variable table of the opened project.
Method : Click “Tools” “Import/Export” “Import Variables”
mk:@MSITStore:C:\Program\Delta%20Industrial%20Automation\ISPSoft1.01\User...
2011-06-17
Page 4 of 6
Export Variables Export global variable table of the opened project to a file.
Method : Click “Tools” “Import/Export” “Export Variables”
Import Programs Import programs to the opened project.
Method 1: Click “Tools” “Import/Export” “Import Programs”
Method 2: Right-click at the “Programs” node in the project tree to get pop-up menu and select
“Import Programs”.
Export Programs Export programs of the opened project to a file.
Method 1: Click “Tools” “Import/Export” “Import Programs”
Method 2: Right-click at the “Programs” node in the project tree to get pop-up menu and select
“Import Programs”.
Import Function Blocks Import function blocks to the opened project.
Method 1: Click “Tools” “Import/Export” “Import Function Blocks”
Method 2: Right-click at the “Function Blocks” node in the project tree to get pop-up menu and
select “Import Function Blocks”.
mk:@MSITStore:C:\Program\Delta%20Industrial%20Automation\ISPSoft1.01\User...
2011-06-17
Page 5 of 6
Export Function Blocks Export function blocks of the opened project to a file.
Method 1: Click “Tools” “Import/Export” “Export Function Blocks”
Method 2: Right-click at the “Function Blocks” node in the project tree to get pop-up menu and
select “Export Function Block”.
Import Preference Import user preferences to the ISPSoft.
Method : Click “Tools” “Import/Export” “Import Preference”
Export Preference Export the current user preferences to a file.
Method : Click “Tools” “Import/Export” “Export Preference”
Language Change the language of ISPSoft.
Method : Scroll down the language list on the icon bar and select the language you like
mk:@MSITStore:C:\Program\Delta%20Industrial%20Automation\ISPSoft1.01\User...
2011-06-17
Page 6 of 6
Option Set ISPSoft user editing environment
Method : Click “Tools” “Option…”
mk:@MSITStore:C:\Program\Delta%20Industrial%20Automation\ISPSoft1.01\User...
2011-06-17
Page 1 of 2
2.8 Window
The “Window” function is shown as follows:
Cascade (C) Arrange windows in an overlapping way.
Method : Click “Window” “Cascade(C)”
Title Vertically (V) Arrange files in a vertical way.
Method : Click “Window” “Title Vertically(V)”
mk:@MSITStore:C:\Program\Delta%20Industrial%20Automation\ISPSoft1.01\User...
2011-06-17
Page 2 of 2
Title Horizontally (H) Arrange the file in a horizontal way.
Method : Click “Window” “Title Horizontally(H)”
The current files list Switch the displaying window between Ladder Diagram, Global Variable
Table, Device Comment, Used Device Report, Register State, Device State Edition, File Register
and Device Monitor.
mk:@MSITStore:C:\Program\Delta%20Industrial%20Automation\ISPSoft1.01\User...
2011-06-17
Page 1 of 1
2.9 Help
The “Help” function is shown as follows:
About ISPSoft (A) Display ISPSoft information, including DELTA website and ISPSoft program
version.
Method : Click “Help” “About…”
Help (H) User Manual for ISPSoft
Method : Click the icon
on the toolbar
mk:@MSITStore:C:\Program\Delta%20Industrial%20Automation\ISPSoft1.01\User...
2011-06-17
Page 1 of 2
3.1 Create a new file
ISPSoft allows users to create a new file by clicking the icon on toolbar or clicking “File” “New (N)”. The
methods of creating a new file are listed as follows:
Method 1: ClClick “File” “
New(N)”
a.
Click “File” “New(N)” to create a blank document.
b.
Then, the dialog box of “Create a New Project” will pop up. You can set PLC type, file name and file
path. For further settings, click “Properties” to open another dialog
c.
The program title is used to remind users the purpose of the program. For example, if all control
functions edited in this program are concerned with Inverters, it is thus named as “TEST”.
The following figure is the window when a new file is created:
mk:@MSITStore:C:\Program\Delta%20Industrial%20Automation\ISPSoft1.01\User...
2011-06-17
Page 2 of 2
Method 2: Click the icon
on toolbar to create a new blank file.
Method 3: Use keyboard shortcuts by pressing keys (Ctrl) + (N) to create a new blank file.
mk:@MSITStore:C:\Program\Delta%20Industrial%20Automation\ISPSoft1.01\User...
2011-06-17
Page 1 of 2
3.2 Open an existed file
ISPSoft utilizes the project-by-project conducts. Users can only open one document at a time. If users want to
edit two PLC programs at the same time, execute the ISPSoft editor twice then functions such as editing,
copying, cutting and pasting in two PLC programs can be conducted simultaneously.
ISPSoft lets users open an old file by clicking the icon on toolbar or clicking “File” “Open (O)”. The methods
of opening an old file are listed as follows:
Method 1: Click “File” ”
Open(O)”
a. Click “File” “Open (O)” to open an old document.
b.
The “Open(O)” Dialog Box:
mk:@MSITStore:C:\Program\Delta%20Industrial%20Automation\ISPSoft1.01\User...
2011-06-17
Page 2 of 2
Look in Locate the folder where the required “*.isp” file is stored.
File name Type or select the filename you want in the File name box. In this box, you can see all files
with same extension as “*.isp”.
Files of type Select the file format you want in the Files of type box; for example, type *.isp to find
ISPSoft files or *.DVP to find WPLSoft files.
Method 2: Click the icon
on toolbar to open an old document.
Method 3: Use keyboard shortcuts by pressing keys (Ctrl) + (O) to open an old document.
mk:@MSITStore:C:\Program\Delta%20Industrial%20Automation\ISPSoft1.01\User...
2011-06-17
Page 1 of 1
3.3 Save a file
ISPSoft allows users to save editing file by clicking the icon on toolbar or clicking “File” “Save(S)”. The
editing file can be saved by its original filename in the current folder. The methods of saving a file are listed as
follows:
Method 1: Click “File” > “
Save(S)”
Method 2: To quickly save a document, click the icon
on toolbar.
Method 3: To quickly save a document, use keyboard shortcuts by pressing keys (Ctrl) + (S).
mk:@MSITStore:C:\Program\Delta%20Industrial%20Automation\ISPSoft1.01\User...
2011-06-17
Page 1 of 1
3.4 Save as
ISPSoft allows users to save a copy of a document by clicking “Save As (A)” on the File menu. The editing
program can be saved as a different name. If this is the first time you save the document, ISPSoft will save
the document with its default filename. If you want to change the filename of the document or save the
document in different folder, click “Save As (A).” The methods of saving a copy of a document are listed as
follows:
Method 1: Click “File” “Save As(A)”
Enter the new file name in the “File name” column and click on “Save” to save the file.
Method 2: To quickly save a copy of a document, use keyboard shortcuts by pressing keys (Ctrl) +
(Alt) + (S).
mk:@MSITStore:C:\Program\Delta%20Industrial%20Automation\ISPSoft1.01\User...
2011-06-17
Page 1 of 1
3.5 Close Project
If you would like to close the project, use “Close Project” in the File menu to close it. See below for the method
to close a file.
Method: Select “Close Project” in the File menu.
Two scenarios when closing a file:
Scenario 1:
If the file has been edited, but you have not yet saved it before, you will be asked whether you would like to
save it first. Click on “Yes” to save the file, or “No” to give up the file you have edited
Scenario 2:
If this is a completely new file and has not been given a file name before, you will also see the dialog box
above asking you whether you would like to save it. Click on “Yes” to save to file following the steps of “save
as” as explained in 3.4. Click on “No” to give up the file you have edited.
mk:@MSITStore:C:\Program\Delta%20Industrial%20Automation\ISPSoft1.01\User...
2011-06-17
Page 1 of 6
3.6 Print
When you complete designing the program and would like to make it handy for data checking, you can click
on icon
or select “Print” in the File menu to print out the program. ISPSoft allows users to print: ladder
diagrams, function block diagrams, SFC diagrams, instructions list, editing register devices and device
comments.
See below for the methods to print.
Printing Ladder Diagrams
Method 1: Select “Print” in the File menu.
(1) Select “Print” in the File menu.
(2) You will then see a “Print Preview” window as shown below.
mk:@MSITStore:C:\Program\Delta%20Industrial%20Automation\ISPSoft1.01\User...
2011-06-17
Page 2 of 6
(3) In the Print Preview window, select “Print” to print out your data or “Close” to close the preview
window and return to ISPSoft main screen.
(4) In the Print Preview window, select “Setup” and you will see the Printer Setup window shown
below. Set up paper, orientation, boundary settings and click on “OK” to confirm, or click
“Cancel” to give up the settings and return to Print Preview window.
(5) Next, you have to select printer, printing range and the number of copies.
mk:@MSITStore:C:\Program\Delta%20Industrial%20Automation\ISPSoft1.01\User...
2011-06-17
Page 3 of 6
Method 2: Click
on the icon bar and follow the setup steps described in method 1.
mk:@MSITStore:C:\Program\Delta%20Industrial%20Automation\ISPSoft1.01\User...
2011-06-17
Page 4 of 6
Printing Editing Registers (T, C, D) and Bit Memory (M, S)
When the registers or devices editing windows is activate, click the icon
on toolbar or choose “Print”
command from the “File” menu. The printing dialog box will pop up and then users can select printing options
to print the editing registers or devices. Users can choose to print all or partial document in the selection box
and decide the printing range that users specify (Start and End). Also, users can determine if the title, page
numbers and cover are printed out or not. Clicking “Preview” button can check how the document is going to
look before printing it. Clicking “Printer setup” button can setup the printer and the layout of the whole
document.
Printing Device Comments
When the device comments editing window is activate, click the icon
on toolbar or choose “Print”
command from the “File” menu. The printing dialog box will pop up and then users can select printing options
to print the device comments. Users can choose to print all or partial document in the selection box and
decide the printing range that users specify (Start and End). Also, users can determine if the title, page
numbers and cover are printed out or not. Clicking “Preview” button can check how the document is going to
look before printing it. Clicking “Printer setup” button can setup the printer and the layout of the whole
document.
mk:@MSITStore:C:\Program\Delta%20Industrial%20Automation\ISPSoft1.01\User...
2011-06-17
Page 5 of 6
Printing Editing File Registers Memory
When the File Registers Memory editing windows is activate, click the icon
on toolbar or choose “Print”
command from the “File” menu. The printing dialog box will pop up and then users can select printing options
to print the editing registers or devices. Users can choose to print all or partial document in the selection box
and decide the printing range that users specify (Start and End). Also, users can determine if the title, page
numbers and cover are printed out or not. Clicking “Preview” button can check how the document is going to
look before printing it. Clicking “Printer setup” button can setup the printer and the layout of the whole
document.
mk:@MSITStore:C:\Program\Delta%20Industrial%20Automation\ISPSoft1.01\User...
2011-06-17
Page 6 of 6
mk:@MSITStore:C:\Program\Delta%20Industrial%20Automation\ISPSoft1.01\User...
2011-06-17
Page 1 of 1
4.1 Editing Environment
Start up ISPSoft, and click ”New” to create a new screen or click “Open” to open an old file. Then, users can
enter into the editing environment of ladder diagram mode and use ladder diagrams to create PLC programs
shown as the figure below.
mk:@MSITStore:C:\Program\Delta%20Industrial%20Automation\ISPSoft1.01\User...
2011-06-17
Page 1 of 9
4.2 Basic Operation
Create POUs in the project
When the project is created, the first step is to create a POU. Then user can program their code on the POU.
See below for the method to create a POU.
Method:
(1) Right-click at the “Programs” node in the project tree to get pop-up menu and select “New POU…”
(2) ISPSoft will show “Create Program” window. (see figure below)
mk:@MSITStore:C:\Program\Delta%20Industrial%20Automation\ISPSoft1.01\User...
2011-06-17
Page 2 of 9
POU Name: a project can not allow that two POU shares the same name. The rules for naming a POU
are as below.
Rules for naming a POU
Special characters such as “~, !, @, #, $, %, ^, &, *, (, )” are not allowed.
POU names in the same project cannot be repeated.
Case-insensitive
If Function Block is named by the following format: P0_FB, P1_FB…etc, ISPSoft will assign
P0 for POU named P0_FB and P1 for POU named P1_FB in memory allocation.
Max length is 16 characters
Task: Task is a property of a POU. It controls whether the POU is executable or not, and it also controls
POU which is executed by timers or interrupt signals.
mk:@MSITStore:C:\Program\Delta%20Industrial%20Automation\ISPSoft1.01\User...
2011-06-17
Page 3 of 9
Default setting of Task for new POU is Cyclic.
Cyclic: The POU will be executed by cyclic control.
External Interrupt (X0), External Interrupt (X1), ... : The POU will be executed by interrupt
signal
Protection: If the user sets the password of the POU. The POU will not be opened until the password is
unlocked.
Language: There are 4 kinds of programming language in ISPSoft. For DVPSS/ES/EX/SA/SC/SX/EH/EH2/EH2L/SV/EX2/ES2 series MPU, only ladder diagram can be selected.
(3) Click “OK” , then the ladder diagram editor will show up.
Task Setting
POU of program type has to be assigned with a Task, otherwise the POU will not be executed.
Note: POU of Function Block type can not be assigned with a task.
Method: Right click at Task under Project workspace and select the item ”Set POU Priority” to open a
new Task Manager window.
mk:@MSITStore:C:\Program\Delta%20Industrial%20Automation\ISPSoft1.01\User...
2011-06-17
Page 4 of 9
Task List: List the task items provided by the current model of PLC
Task Attributes: Display the information of the selected Task
Unassigned POUs: List the unassigned POUs (Program type)
Assigned POUs: List the assigned POUs for selected Task
mk:@MSITStore:C:\Program\Delta%20Industrial%20Automation\ISPSoft1.01\User...
2011-06-17
Page 5 of 9
Click the items under Task List and set up the content of each Task.
For example: Click External Interrupt (X0) and Interrupt Label, parameter for External and notes of the Task
will be displayed in Task Attributes.
Select a POU under Unassigned POUs then click he button “>”, the selected POU will be assigned to current
Task. On the contrary, select a POU from the Assigned POUs then click “<”, the selected POU will be
removed from the current Task.
When Task Manager is set up, the POUs managed by each task can be viewed under the index of Project
workspace.
Users can quickly adjust the execution order of POU by drag-and-drop the POU under associated Task.
mk:@MSITStore:C:\Program\Delta%20Industrial%20Automation\ISPSoft1.01\User...
2011-06-17
Page 6 of 9
Edit Global Variable Table
When a project is created, the project will have a global variable table. Users can edit variables on this table
then those variables can be used in every POU created in this project. See below for the method to open the
global variables table.
Method: Double click “Global Variables” in the project tree window. (You can get a project tree
window after clicking view workspace.)
mk:@MSITStore:C:\Program\Delta%20Industrial%20Automation\ISPSoft1.01\User...
2011-06-17
Page 7 of 9
Add Variable: Add Variable window can be opened by either click the blank space of variable table then input
characters on keyboard, or double click on the blank space directly. Fill in the data of variable then click OK to
complete Add Variable process.
Modify Variable: Click the variable to be modified on the variable table. Press Enter or double-click the
selected variable and Modify Variable window will pop up. Modify the variable data then click OK to complete
Modify Variable process.
Move Variable: Select the variable to be moved from the variable table. Keep pressing the key Alt and move
the variable by Up/Down keys on keyboard.
Select Multiple Variables: Select a variable in variable table first, then press Shift or Ctrl on keyboard to
mk:@MSITStore:C:\Program\Delta%20Industrial%20Automation\ISPSoft1.01\User...
2011-06-17
Page 8 of 9
select multiple variable
Set Retentive Memory Range
When a project is created, the project will have a retentive memory area for user to set the retentive memory
range. Users can edit retentive memory range, set retentive memory range to PLC or read retentive memory
range from PLC. See below for the method to open the retentive memory window.
Method: Double click “Retentive Memory” in the project tree window. (You can get a project tree
window after clicking view workspace.)
Range: The range of data retaining area. Set value “-1” indicates the whole range is non-retentive area.
Clear: Set the whole range as non-retentive area.
Set in PLC: Write the retentive range into PLC.
Read from PLC: Read out the set range of retentive area in PLC.
Default: Set the retentive range as default setting.
mk:@MSITStore:C:\Program\Delta%20Industrial%20Automation\ISPSoft1.01\User...
2011-06-17
Page 9 of 9
Variable Allocation
When a project is created, the project will have a variables allocation window for user to set the range of D, M,
T and C device. Users can edit those device ranges and the setting range of device will be allocated by
system for variables declaration in compiling. See below for the method to open the variable allocation
window.
Method: Double click “Variable Allocation” in the project tree window. (You can get a project tree
window after clicking view workspace.)
mk:@MSITStore:C:\Program\Delta%20Industrial%20Automation\ISPSoft1.01\User...
2011-06-17
Page 1 of 4
4.3 Editing Example
Example: Create a ladder diagram as below
Note:
1. When editing ladder diagram, make sure the icon
2. Every time before you enter device comments, click
which displays device comments is toggled on.
on the toolbar to display the Select cursor and use
the Select cursor for editing device names or comments.
Create a new file
Create a POU
mk:@MSITStore:C:\Program\Delta%20Industrial%20Automation\ISPSoft1.01\User...
2011-06-17
Page 2 of 4
Click
(NO/Normally Open contact) icon on the toolbar and move the cursor to the dotted rectangle
area. You will see the NO contact icon you just selected. Click on it to create a
component.
The NO contact is circled by a dotted square indicating that you are currently editing this component.
Click
and input device names and comments as following steps:
A.
Move the cursor to the component. Press “Enter” or “Tab” on it.
B.
Enter the device name by keyboard. (e.g. M10)
C.
Click on the upper position on the device name.
D.
Enter the device comment by keyboard. (e.g. motor_switch)
mk:@MSITStore:C:\Program\Delta%20Industrial%20Automation\ISPSoft1.01\User...
2011-06-17
Page 3 of 4
Click
(output coil) icon on the toolbar and move the cursor to the dotted rectangle area. You will see
the output coil icon you just selected. Click on it to create a
component. Enter the device name (e.g.
Y0) and device comment (e.g. motor_on) with same steps as editing on contacts.
When editing is completed, compile the program. Download to PLC then run the program.
If errors occur in the program, you will see error messages in the output window after compiling. Double
click the error item and the position where the errors occur will be displayed.
mk:@MSITStore:C:\Program\Delta%20Industrial%20Automation\ISPSoft1.01\User...
2011-06-17
Page 4 of 4
mk:@MSITStore:C:\Program\Delta%20Industrial%20Automation\ISPSoft1.01\User...
2011-06-17
Page 1 of 27
4.4 How to Edit Ladder Diagram
The ladder diagram is composed of network sections, and every network section is consisted of input/output
editing area. In editing process, ISPSoft generates logically correct ladder diagrams automatically, so users
need do not need to add extra lines for connecting the diagram. In addition, ISPSoft offers various diagram
editing functions, allowing users to edit the ladder diagram in a more convenient way. ISPSoft also reminds
users of the changed status during the editing of network section, so users will be able to know the changed
network in the ladder diagram before the program is compiled. See the below diagram for the structure and
functions in a ladder diagram.
Every network section contains two types of comments: Network Comment and Device Comment. Click the
icon
on the toolbar and make the cursor appear before you enter the comment editing area.
Editing Techniques
To move the dotted rectangle in the network section, click on the component or press →↑↓← keys
on the keyboard. To edit components, press “Enter” or “Tab.”
There are many editing techniques when editing ladder diagram by ISPSoft. Users can apply the
techniques introduced below with
(1) Click the icon
(input) and
(output) buttons on toolbar.
on the tool bar, move the cursor to dotted rectangle. The cursor will become
and click to create a contact component.
mk:@MSITStore:C:\Program\Delta%20Industrial%20Automation\ISPSoft1.01\User...
2011-06-17
Page 2 of 27
(2) Move the cursor down a little bit on the line and you will see
. If the cursor is now on the node,
click the mouse to connect all the input components in parallel.
a. An example of inserting a parallel contact.
mk:@MSITStore:C:\Program\Delta%20Industrial%20Automation\ISPSoft1.01\User...
2011-06-17
Page 3 of 27
b. An example of inserting a coil.
(3) In the editing of ladder diagrams in ISPSoft, input components circled by a single dotted rectangle
are regarded as one component. The dotted rectangle area can be modified by changing the cursor
status in a network section. Click
to switch to “Select” status. By pressing “Shift” and clicking on
the components required, you can circle the area you like. Release “Shift” key, and you will be able
to connect input components to the dotted area in parallel and conduct delete, copy, cut and paste
functions. The example below demonstrates how to connect an input component to three serial
connected input components in parallel. First, click
to switch to “Select” status. Then Click on
X0, press “Shift” and click on M200 directly to select all components to be connected. Release
“Shift” key and click on the input component on the toolbar which is required to be connected in
parallel, e.g.
. Finally, move the cursor to the position under the dotted area, and the symbol
will appear. Click the mouse and a new component will be generated to connect the selected
area in parallel.
a.
mk:@MSITStore:C:\Program\Delta%20Industrial%20Automation\ISPSoft1.01\User...
2011-06-17
Page 4 of 27
b.
c.
d.
(4) Change the type of contact or coil. First, move the cursor to the contact or coil. Double click or press
“space” key and a list will pop up. Select the proper type and the contact or coil will be changed.
mk:@MSITStore:C:\Program\Delta%20Industrial%20Automation\ISPSoft1.01\User...
2011-06-17
Page 5 of 27
a.
b.
c.
d.
(5) Apply APIs in the ladder diagram editor.
Method 1: Click
on the toolbar.
a. Select a network where you want to insert the API. Locate the dotted rectangle at any position in the
network section, and click
on the toolbar.
mk:@MSITStore:C:\Program\Delta%20Industrial%20Automation\ISPSoft1.01\User...
2011-06-17
Page 6 of 27
b. The dialog below will pop up. Choose “Libraries” in Type Class and “<ALL>” in the Classification. Then
all of the APIs will be listed as below. Select the proper API and click “Insert.” The API will be created on
the output editing area of the network.
Method 2: Drag and drop from workspace to the ladder diagram editor.
mk:@MSITStore:C:\Program\Delta%20Industrial%20Automation\ISPSoft1.01\User...
2011-06-17
Page 7 of 27
(6) Apply Function Blocks in the ladder diagram editor.
The methods of inserting a function block to a network section are same as inserting an API.
However, the following rule should be noted:
a.
If a function block is inserted, users need to declare the function block on the variable table. Then
you can use the instance of the function block.
b.
A function block cannot invoke another function block. Therefore, if a POU is under editing and the
POU type isn’t a program, the drag and drop action will be denied.
Instruction Input Mode
Ladder editor also provides instruction input mode. Both basic instructions and API instructions can be input
mk:@MSITStore:C:\Program\Delta%20Industrial%20Automation\ISPSoft1.01\User...
2011-06-17
Page 8 of 27
by instruction input mode in the editing window. However, the application of function blocks is not supported.
The editing of instruction input mode can be further operated in Insert Mode and Replace Mode.
(1) Basic instruction
Insert Mode:
Select device X0 and key in the instruction “ldp x1” then click OK.
Device X1 will be inserted on the left side of X0. If users key in “AND X1” at the previous step, device X1
will be inserted on the right side of X0.
Click X0 and key in “ANI X2”. The device X2 will be inserted on the right of X0.
mk:@MSITStore:C:\Program\Delta%20Industrial%20Automation\ISPSoft1.01\User...
2011-06-17
Page 9 of 27
Replace Mode:
Select device X0, key in “LD X1” and click OK.
In this case, device X0 will be replaced by device X1
Furthermore, key in “AND X2” and click OK, Device X1 will be replaced by device X2.
mk:@MSITStore:C:\Program\Delta%20Industrial%20Automation\ISPSoft1.01\User...
2011-06-17
Page 10 of 27
(2) API Instruction:
When editing API instruction, simply key in the instruction name and input the parameters. Click OK then
the API instruction will be successfully created.
Another editing method is to key in instruction name and click OK. In this way, parameters will be
replaced by ???. Users can input the parameters later.
Basic Tools for Editing a Network Section
(1) Undo: Recover the previous step (Max. 20 steps).
Method 1: Select “Undo” in the Edit menu to recover the previous step. You can recover maximum
20 previous steps
mk:@MSITStore:C:\Program\Delta%20Industrial%20Automation\ISPSoft1.01\User...
2011-06-17
Page 11 of 27
Method 2: Click
on the toolbar.
Method 3: Use quick launch keys, Ctrl + Z.
Method 4: Right click and select “Undo”.
Example:
a. Click on X1 first.
b. Press “Shift” and click on M200 to select 4 components. Cut off the selected area by clicking
on the toolbar.
c. Select “Undo” function by clicking
on the tool bar.
d. The ladder diagram returns to the previous step.
mk:@MSITStore:C:\Program\Delta%20Industrial%20Automation\ISPSoft1.01\User...
2011-06-17
Page 12 of 27
(2) Redo: Redo the step before the undo
Method 1: Select “Redo” in the Edit menu to return to the step before undo is executed.
Method 2: Click
on the toolbar.
Method 3: Use quick launch keys, Ctrl + Y.
Method 4: Right click and select “Redo”.
(3) Delete a component
Method 1: Select “Delete” in the Edit menu to delete a component selected by the dotted rectangle
Method 2: Click
on the toolbar.
Method 3: Press “Delete” on the keyboard.
Method 4: Click on the component to be deleted or use ← →↑↓ keys to locate the dotted rectangle
on the component. Right click to select “Delete”
(4) Delete an area
Method 1: Select “Delete” in the Edit menu.
mk:@MSITStore:C:\Program\Delta%20Industrial%20Automation\ISPSoft1.01\User...
2011-06-17
Page 13 of 27
Method 2: Click
on the toolbar.
Method 3: Right click to select “Delete.”
Method 4: Press “Delete” on the keyboard.
(5) Copy an area
Method 1: Select “Copy” in the Edit menu.
Method 2: Click
on the toolbar.
Method 3: Use quick launch keys, Ctrl + C.
Method 4: Right click and select “Copy".
mk:@MSITStore:C:\Program\Delta%20Industrial%20Automation\ISPSoft1.01\User...
2011-06-17
Page 14 of 27
(6) Cut an area
Method 1: Select “Cut” in the Edit menu.
Method 2: Click
on the toolbar.
Method 3: Use quick launch keys, Ctrl + X.
Method 4: Right click and select “Cut”.
(7) Paste an area (to the left of a selected area)
Method 1: Select “Paste” in the Edit menu.
Method 2: Click
on the toolbar.
Method 3: Use quick launch keys, Ctrl + V.
Method 4: Right click and select “Paste”.
Example:
a.
Copy the area to be pasted
mk:@MSITStore:C:\Program\Delta%20Industrial%20Automation\ISPSoft1.01\User...
2011-06-17
Page 15 of 27
b.
Locate the position for pasting
c.
Execute Paste to paste the area onto the left of the selected area.
(8) Paste an area (to the right of a selected area)
Method 1: Select “Paste Right” in the Edit menu.
Method 2: Use quick launch keys, Ctrl + R.
Method 3: Right click and select “Paste Right”
Example:
a.
Copy the area to be pasted.
mk:@MSITStore:C:\Program\Delta%20Industrial%20Automation\ISPSoft1.01\User...
2011-06-17
Page 16 of 27
b.
Locate the position for pasting
c.
Execute Paste Right to paste the area onto the right of the selected area.
(9) Paste an area (under a selected area)
Method 1: Select “OR Paste” in the Edit menu.
Method 2: Use quick launch keys, Ctrl + D
Method 3: Right click and select “OR Paste”.
Example:
a.
Copy the area to be pasted.
b.
Set up the position for the pasting
mk:@MSITStore:C:\Program\Delta%20Industrial%20Automation\ISPSoft1.01\User...
2011-06-17
Page 17 of 27
c.
Execute OR Paste to paste the area under the selected area.
(10) Select all (Select all network)
Method 1: Select “Select All” in the Edit menu.
Method 2: Use quick launch keys, Ctrl + A.
Method 3: Right click and select “Select All”.
Example: (Yellow bars refer to selected networks)
mk:@MSITStore:C:\Program\Delta%20Industrial%20Automation\ISPSoft1.01\User...
2011-06-17
Page 18 of 27
(11) Select multiple network sections.
Continuous network sections: Click on the network sections to be edited with “Shift” key. (Yellow
bars refer to selected networks.)
mk:@MSITStore:C:\Program\Delta%20Industrial%20Automation\ISPSoft1.01\User...
2011-06-17
Page 19 of 27
Intermittent network sections: Click on the network sections to be edited with “Ctrl” key. (Yellow
bars refer to selected networks.)
(12) Add Network (After)
Method 1: Select “Add Network (After)” in the Edit menu to add a new network under the focused
network section.
Method 2: Click
on the toolbar.
Example:
Before executing Add Network (After)
mk:@MSITStore:C:\Program\Delta%20Industrial%20Automation\ISPSoft1.01\User...
2011-06-17
Page 20 of 27
Execute Add Network (After)
(13) Insert Network (Before)
Method 1: Select “Insert Network (Before)” in the Edit menu to add a new network above the
focused network section.
Method 2: Click on the toolbar.
Example:
Before executing Insert Network (Before)
mk:@MSITStore:C:\Program\Delta%20Industrial%20Automation\ISPSoft1.01\User...
2011-06-17
Page 21 of 27
Execute Insert Network (Before)
(14) Find
Use Find function to search for an instruction or device in the program. If the instruction or device exists,
the program will locate its position. By clicking “More…” at the corner of the window, users can specify
more conditions for advanced searching.
mk:@MSITStore:C:\Program\Delta%20Industrial%20Automation\ISPSoft1.01\User...
2011-06-17
Page 22 of 27
Searching conditions:
*
Current Network: The searching starts from the current network section you are editing.
*
Entire Scope: The searching starts from the beginning of the window you are currently editing.
*
Match Case: The instruction or device name for searching matches exactly the entered capital or
small letters.
*
Whole Words: The instruction or device name for searching matches the whole entered string of
letters.
*
Forward: The searching is conducted from top to down.
*
Backward: The searching is conducted from down to top.
*
Program: The searching is only conducted in program areas.
*
Network Comment: The searching is including device and network comment areas.
After the conditions are set, click “Find Next” to start the searching. The items found will be highlighted.
Click “Find Next” again and the searching will proceed to the next found item. Repeat the action until
“Find is complete!” message appears to indicate searching completed.
mk:@MSITStore:C:\Program\Delta%20Industrial%20Automation\ISPSoft1.01\User...
2011-06-17
Page 23 of 27
* The searching does not include local variable table. If users want to search variables, click the variable
table then trigger the find function.
How to open Find window:
Method 1: Select “Find” in the Edit menu.
Method 2: Click the icon
on the toolbar.
Method 3: Use keyboard shortcuts by pressing keys (Ctrl) + (F).
How to conduct Find Next in Find window:
Find Next function is conducted according to the specified search object in Find What column and
searches downwards for the next item in the ladder diagram. Therefore, always set the Direction
condition as “Forward” when executing Find Next.
Method 1: Click “Find Next” in the Find window.
mk:@MSITStore:C:\Program\Delta%20Industrial%20Automation\ISPSoft1.01\User...
2011-06-17
Page 24 of 27
Method 2: Press "F3" on the keyboard.
(15) Replace
The function Replace has to be used together with Find. Select either Replace for replacing single item
or Replace All for replacing all items found with the specified object. Please check whether the
replacement causes instruction error, illegal device or incorrect instruction combination in the ladder
diagram. See below for the details of the Replace window.
How to open Replace window:
Method 1: Select “Replace” in the Edit menu.
Method 2: Click the icon
on the toolbar.
Method 3: Use keyboard shortcuts by pressing keys (Ctrl) + (H).
(16) Goto
Use Goto function to search for a network section by network number or network label in the program. If
the network section exists, the program will locate its position.
mk:@MSITStore:C:\Program\Delta%20Industrial%20Automation\ISPSoft1.01\User...
2011-06-17
Page 25 of 27
There are two conditions for searching:
Network Number: Search the program according to the network number specified in Index column
Network Label: Search the program according to the network label specified in Index column
Bookmark: Search the program according to the network bookmark specified in Index column
How to open Goto window:
Method 1: Select “Goto” in the Edit menu.
Method 2: Click the icon
on the toolbar.
Method 3: Use keyboard shortcuts by pressing keys (Ctrl) + (J).
Editing Comments and Labels of a Network Section
Network section comments:
The network section comment area is at the top left corner of the ladder diagram editing area. Click
on the toolbar to switch to Select mode then click on gray area to start editing. When editing is
completed, move out the cursor from the gray area and click to save the comments. (See the
demonstration below).
1. Enter the comment area.
mk:@MSITStore:C:\Program\Delta%20Industrial%20Automation\ISPSoft1.01\User...
2011-06-17
Page 26 of 27
2. Edit comments in the editing area
3. Move out the cursor from the comment area.
4. The comment editing is completed.
Network section label:
The network section label area is on the right of the network section number. Click
on the toolbar to
switch to Select mode then click on the label editing area to start editing. When editing is completed,
move out the cursor from the label editing area and click to save the labels. (See the demonstration
below).
* The same “p label” cannot be used two times. If you place same label in different network sections, an
mk:@MSITStore:C:\Program\Delta%20Industrial%20Automation\ISPSoft1.01\User...
2011-06-17
Page 27 of 27
error message will pop up.
1.
Click to enter the label area.
2.
Edit label in this area
3.
Move out the cursor form the label editing area and click to complete editing.
mk:@MSITStore:C:\Program\Delta%20Industrial%20Automation\ISPSoft1.01\User...
2011-06-17
Page 1 of 8
4.5 Variable Table
Introduction to the Local Variable Table
POUs have two types: Program and Function Block. The difference of two the types is listed as below
Program type:
:
Only VAR is available for Class and is for internal use in current program.
The “Address” blank must be filled in.
Function Block type:
:
Three kinds of Class including VAR, VAR_INPUT and VAR_OUTPUT
The “Address” can be left blank
If the class of variables is set to VAR_INPUT or VAR_OUTPUT. The variables will become the
interface of the function block. See as below.
Add or Modify a Variable in the Variable Table
mk:@MSITStore:C:\Program\Delta%20Industrial%20Automation\ISPSoft1.01\User...
2011-06-17
Page 2 of 8
Add a variable in the variable table
1.
Click Local Variables table and key in one character directly. “Input/Modify Variable” window will
pop up. Fill in the blanks to define the properties of the variable.
Explanation on properties:
Identifier: A code for an associated device of PLC
Address: The associated device of PLC which indicated the location where Identifier will be linked to.
Type: Data type of the Identifier. You can fill in the blank by keyboard directly or click the icon
to
define the data type. A Type selection dialog will pop up as below. Choose the data type form the
list.
Initial: The initial value of the identifier. The value can be written to PLC when downloading.
Comment: Information or explanation about the identifier.
2.
Click “OK” and the variable will be added to the Local Variables table.
Modify a variable in the variable table
Double click on the variable to be modified under the Class column, then “Input/Modify Variable” window will
pop up. Modify the properties in the window and click “OK” to finish
mk:@MSITStore:C:\Program\Delta%20Industrial%20Automation\ISPSoft1.01\User...
2011-06-17
Page 3 of 8
Note 1: Function Block type POUs are not allowed to declare Function Block type variables.
Note 2: If the variable of Function Block type POU is VAR_INPUT or VAR_OUTPUT, users can not assign
Address, i.e. Address will be allocated by system.
Rules for Naming a Variable Identifier
Special characters such as “~, !, @, #, $, %, ^, &, *, (, )” are not allowed.
Case-insensitive
Max length is 16 characters
Variable Editing Techniques
Copy the identifier to the contact or coil in ladder diagram
1.
Select a contact or coil on the network section
2.
Right click on the variable to be copied from the variable table and select the “Identifier to editor.”
mk:@MSITStore:C:\Program\Delta%20Industrial%20Automation\ISPSoft1.01\User...
2011-06-17
Page 4 of 8
3.
The contact will be defined by the identifier
Identifier to Address
1.
Right click on the variable table and select the “Identifier to Address.”
mk:@MSITStore:C:\Program\Delta%20Industrial%20Automation\ISPSoft1.01\User...
2011-06-17
Page 5 of 8
2.
The variables in ladder diagram will be changed to device names.
Address to Identifier
1.
Right click on the variable table and select the “Address to Identifier.”
mk:@MSITStore:C:\Program\Delta%20Industrial%20Automation\ISPSoft1.01\User...
2011-06-17
Page 6 of 8
2.
Device names in ladder diagram will be changed to variables.
Shift the variable’s position
1. Select an identifier to be shifted
2.
Press “Alt + ↓” or “Alt” + ↑” and the identifier will be moved up or down.
mk:@MSITStore:C:\Program\Delta%20Industrial%20Automation\ISPSoft1.01\User...
2011-06-17
Page 7 of 8
Undo/Redo action can be applied when editing variables. (Max.20 steps)
mk:@MSITStore:C:\Program\Delta%20Industrial%20Automation\ISPSoft1.01\User...
2011-06-17
Page 8 of 8
mk:@MSITStore:C:\Program\Delta%20Industrial%20Automation\ISPSoft1.01\User...
2011-06-17
Page 1 of 2
5.1 Communication
Communication setting
(1) Before conducting transmission between ISPSoft and PLC, make sure the connection settings between
PC and PLC have been completed.
(2) Click “Tools” “Communication Setting” to setup COM port and protocol (as shown below).
Communication Setting Items:
Communication Type: RS232、Ethernet
COM Port: RS-232 current support of PC
Data Length:7、8
Parity: None、Odd、Even
mk:@MSITStore:C:\Program\Delta%20Industrial%20Automation\ISPSoft1.01\User...
2011-06-17
Page 2 of 2
Stop Bits: 1、2
Baud Rate: 9600、19200、38400、57600、115200。
Station Address: Setting range between 0 to 255. ISPSoft default setting as 0 (assign PC connect to
the PLC which communication address is 1 (D1121). Station address can also be set by clicking icon
on toolbar.
Communication Format: ASCII、RTU
Default Setting:
1.
ASCII: 9600、7、Even、1
2.
RTU: 9600、8、None、1
Assign IP Address: Use in Ethernet connection
Baudrate Setting Decided by: PLC、ISP. Set up communication baudrate between ISPSoft and PLC
by user defined
Responding Time:
1.
Time of Auto-retry: 0~50
2.
Time Interval of Auto-rely(sec): 3~20
mk:@MSITStore:C:\Program\Delta%20Industrial%20Automation\ISPSoft1.01\User...
2011-06-17
Page 1 of 2
5.2 Data Transmission
Read PLC
After communication setting is completed, users can start to read information from PLC.
(1) Click “PLC” “Transfer” “Upload” or click icon
on toolbar.
(2) To read data from PLC, select “PC <= PLC (Upload)”
If Program is checked in transfer selections, the ladder diagram in PLC will also be uploaded if there is ladder
diagram stored in PLC.
(3) If password is required for accessing the PLC, a password setting window will pop up. Entering the
correct password allows users reading data from PLC once. However, an error message will pop up if
mk:@MSITStore:C:\Program\Delta%20Industrial%20Automation\ISPSoft1.01\User...
2011-06-17
Page 2 of 2
wrong password is entered.
Write PLC
Program: If checked, project program will be downloaded as well.
Comment: When Program is checked, users can specify the comments to be downloaded
PLC Password: If checked, PLC password will be downloaded as well.
Retentive Range: If checked, retentive range will be downloaded as well. ES2/EX2 models are not
supported.
Initial Value: If checked, initial setting in variable table will be downloaded as well.
RTC: If checked, the RTC data will be downloaded as well.
(1) Transmit a new program to PLC by clicking “PLC” “Transfer” ”Download” or click icon
on
toolbar.
(2) To write data into PLC, select “PC => PLC (Download)”
(3) If password is required for accessing the PLC, a password setting window will pop up. Entering the
correct password allows users writing data into PLC once. However, an error message will pop up if
wrong password is entered.
mk:@MSITStore:C:\Program\Delta%20Industrial%20Automation\ISPSoft1.01\User...
2011-06-17
Page 1 of 2
5.3 Password Setting
The function is to set up or remove the PLC read/write password..
(1) Enter password setting by clicking “PLC” “password setting” (as shown below). Enter the user
password to create a new password and click OK to proceed. Then, the dialog will show “Locked” on the
bottom.
mk:@MSITStore:C:\Program\Delta%20Industrial%20Automation\ISPSoft1.01\User...
2011-06-17
Page 2 of 2
(2) If users forget password for SA/SX/SC models, please remove the battery for about 10 minutes, the PLC
program and password will then be cleared. Besides, clicking “Communication” > “Format PLC Memory
(M)” to clear PLC internal memory will remove the password as well.
mk:@MSITStore:C:\Program\Delta%20Industrial%20Automation\ISPSoft1.01\User...
2011-06-17
Page 1 of 2
5.4 Run/Stop PLC
Run PLC
Click “PLC” “Run” (as shown below), or use keyboard shortcuts by pressing keys (Ctrl) + (F8), or click on
the icon
to get the dialog box. Click “Yes” to set the PLC in RUN condition.
Stop PLC
Click “PLC” “Stop” (as shown below), or use keyboard shortcuts by pressing keys (Ctrl) + (F7), or click on
the icon
to get the dialog box. Click “Yes” to set the PLC in STOP condition.
mk:@MSITStore:C:\Program\Delta%20Industrial%20Automation\ISPSoft1.01\User...
2011-06-17
Page 2 of 2
mk:@MSITStore:C:\Program\Delta%20Industrial%20Automation\ISPSoft1.01\User...
2011-06-17
Page 1 of 2
5.5 On-Line Mode
The function is used to switch the ladder diagram mode to the ladder diagram monitor mode. In the monitor
mode, all editing actions are not allowed. All the execution conditions of the program could be observed from
the window. Therefore, the monitor mode helps a lot in debugging and confirming operation results.
In the on-line mode, the component marked in green indicates that the device or the output coil is ON. On the
other hand, if the contact or output coil is not marked in green, the device will not conduct any action.
Step 1: Click “Online Mode”
icon on the tool bar. The program comparison between PLC and ISPSoft will
start. If the result is consistent, the window opened will start monitoring.
If the program in ISPSoft has not been compiled, the message below will appear to require a confirmation for
compiling from users.
If the program in ISPSoft is not consistent with PLC, the message below will appear to ask users to download
programs into PLC.
mk:@MSITStore:C:\Program\Delta%20Industrial%20Automation\ISPSoft1.01\User...
2011-06-17
Page 2 of 2
Users can select number system (Monitor Radix) of Unsigned/Signed Decimal, Hexadecimal or Float Point in
the View menu.
mk:@MSITStore:C:\Program\Delta%20Industrial%20Automation\ISPSoft1.01\User...
2011-06-17
Page 1 of 4
5.6 Device Monitoring
Device monitor can monitor single device status or numerous device statuses simultaneously. If users want to
view the status of several device statuses under the PC window, take the following steps for operation:
Step 1: Select "PLC” “Devices Monitoring" or click the icon
on the menu bar. The “Data Monitor” table
will pop up.
Step 2: Double click on the “Data Monitor” table or key in the name of the device to be monitored directly. The
Device Monitor Input dialog box will then pop up as below..
Step 3: Specify the device to be monitored. For example, users can monitor D1000 to D1004 by entering
D1000 in Device Name and 5 in Device Count as the figure below.
mk:@MSITStore:C:\Program\Delta%20Industrial%20Automation\ISPSoft1.01\User...
2011-06-17
Page 2 of 4
Users can also specify the devices by right click and select “Select Variables”. A “Variables Select” window
will be displayed as below. All of the variables in the project will be listed. Click the items in Object Source
then the associated variables will be listed on the right side. Select the proper variables and click Apply to add
them to Data Monitor table.
mk:@MSITStore:C:\Program\Delta%20Industrial%20Automation\ISPSoft1.01\User...
2011-06-17
Page 3 of 4
Step 4: Click “Online Mode”
icon on the tool bar. The program comparison between PLC and ISPSoft will
start. If the result is consistent, device monitoring will be started successfully. If the program in ISPSoft is
not consistent with PLC, the message below will appear to ask users to download programs into PLC.
*Footnote:
Users can select the field for displaying on the Data Monitor table. Right click at the table and move the cursor
to “Field.” Items checked will be displayed in the Data Monitor table.
Explanation:
mk:@MSITStore:C:\Program\Delta%20Industrial%20Automation\ISPSoft1.01\User...
2011-06-17
Page 4 of 4
Object: This field is valid when the device is selected from POU. The displayed POU name indicated the
source of the device. If the device is from Global Variable Table, the field will be left blank.
Identifiers: This field is valid when the device is selected from POU.
Device Name: Names of devices, such as X0, D1000, T2.
Status: Status of the devices (X, Y, M, S, T and C). Green indicates ON; Blank indicated OFF.
Data Type: Data type of the variable.
Value (16bits): The current value (16bits) of devices (T, C, D) at monitoring; e.g. the current value (16bits) of
T1 will be displayed as K7 or H7.
Value (32bits): The current value (32bits) of devices (T, C, D) at monitoring; e.g. the current value (32bits) of
T0 will be displayed as K458752 or H70000, which is combined by the low word T0 (H0000) and the high
word T1 (H0007).
Float: PLC uses 32-bit floating-point number that combined by two continuous registers with IEEE754
standard. There will be a character “F” in front of the number to mark it, e.g. the number for D0 floating-point
number will be displayed as F1.72920230497682e-42
Comment: The comment of the device
Radix: Number system (Monitor Radix) for displaying values. Four options are available including Signed
Decimal, Unsigned Decimal, Hexadecimal and Binary. Click
and select from the list.
mk:@MSITStore:C:\Program\Delta%20Industrial%20Automation\ISPSoft1.01\User...
2011-06-17
Page 1 of 3
5.7 Set On/Off
This instruction could force the status of certain devices to be ON or OFF. Before proceeding with the forced
ON/OFF operation, make sure that it will not be harmful to the equipment. When the external wirings have all
been completed, you could test whether there is an error through the forced ON/OFF function.
Application example:
Method:
(1) After compiling the above ladder diagram program and downloading it to the PLC, click the icon
to enter the Online Mode as shown below.
mk:@MSITStore:C:\Program\Delta%20Industrial%20Automation\ISPSoft1.01\User...
2011-06-17
Page 2 of 3
(2) In Online mode, certain functions listed on the menu bar are not to be used, and ISPSoft will have
these not-to-be-used icons displayed in relief.
(3) Move the cursor to the forced ON/OFF devices (M1), right-click to get pop-up menu and select the
forced ON function. (This function could also be used for device monitoring)
Online Mode:
Device monitoring:
mk:@MSITStore:C:\Program\Delta%20Industrial%20Automation\ISPSoft1.01\User...
2011-06-17
Page 3 of 3
mk:@MSITStore:C:\Program\Delta%20Industrial%20Automation\ISPSoft1.01\User...
2011-06-17
Page 1 of 4
5.8 Change Present Value
This function is only valid in the ladder diagram and the device monitor modes. Users can modify the current
value (16/32 bit) of devices (D, T, C, E, F) in this window.
(1) Right click on the device and select “Change Present Value” (For online Mode and Device Monitoring
only)
mk:@MSITStore:C:\Program\Delta%20Industrial%20Automation\ISPSoft1.01\User...
2011-06-17
Page 2 of 4
(2) Users should check suitable format for the device. If device C235 is 32-bit device, click 32 bits. If device
D0 is 16 bits, click 16 bits. When D0 is specified as 32 bit device, D1 will be used as well for representing
a 32 bits register. i.e. D1 is upper 16 bits (high word) and D0 is lower 16 bits (low word).
(3) For decimal values, input the values directly, e.g. 12345678. For hexadecimal values, add “16#” before
the value, e.g. 16#64A5. For binary values, add “2#” before the value, e.g. 2#10101100.
(4) In Enter Present Value window, there is a history record for you to enter the repeated instruction by
double click the instruction.
Application example
As the above figure, in Online mode, force the var2 contact to be ON.
(1) Right click on the device D0 and select “Change Present Value” to modify current value.
mk:@MSITStore:C:\Program\Delta%20Industrial%20Automation\ISPSoft1.01\User...
2011-06-17
Page 3 of 4
(2) After the following dialog appears, key in the device name D0 and the current value 100 then click “OK”.
(3) The current value of the D0 register will be changed to 100.
mk:@MSITStore:C:\Program\Delta%20Industrial%20Automation\ISPSoft1.01\User...
2011-06-17
Page 4 of 4
mk:@MSITStore:C:\Program\Delta%20Industrial%20Automation\ISPSoft1.01\User...
2011-06-17
Page 1 of 3
5.9 Edit Register Memory (T, C, D)
ISPSoft provides register (T, C, D) editing functions such as register value editing, Read from PLC Device
Register, Write to PLC Device Register, save/open file and print. See below for the Edit Register Memory
window.
Users can designate the D register (except special D), the C register (high-speed counter is included) and the
T register to perform Read from PLC Device Register or Write to PLC Device Register. In addition, users can
also Save, Open or Print current values of the above registers.
(1) Click “PLC” “Edit Register Memory (T, C, D)”
(2) When Edit Register Memory window is displayed, click on the register and input the value of the register.
For example, click D41 → key in the value “1234” → press “Enter.” There are decimal, hexadecimal,
binary data format for the value input as shown below.
mk:@MSITStore:C:\Program\Delta%20Industrial%20Automation\ISPSoft1.01\User...
2011-06-17
Page 2 of 3
(3) After completing all the register values input, click “Transfer” to write values into designated PLC.
(4) Users can set the start and end address to perform partial transmission.
(5) Both exporting data to EXCEL and importing data from EXCEL to register editing area are available
(6) Before writing PLC data registers, make sure there will be no bad effects happen to the operating PLC.
Functions for operating the register:
1.
Read From PLC Device Register: read register values from the PLC through communication.
mk:@MSITStore:C:\Program\Delta%20Industrial%20Automation\ISPSoft1.01\User...
2011-06-17
Page 3 of 3
2.
Write to PLC Device Register: write register values into the PLC through communication
3.
Print: When the registers editing windows is activate, click the print icon on toolbar or select “Print”
command from the “File” menu. Users can select printing options to print the edited registers.
4.
Save: Click “File” > “Save(S)” to save the edited data register into the disk with the * .DVL file
format. (*footnote 1)
5.
Open: Click “File” > “Open(O)” to read * .DVL file.
6.
Clear All: clear all values of all registers (D, C, the high-speed counter and T).
7.
Function Title: edit Function Title.
*Footnote 1: The file format of the edited register for retrieve is the *.DVL.
mk:@MSITStore:C:\Program\Delta%20Industrial%20Automation\ISPSoft1.01\User...
2011-06-17
Page 1 of 3
5.10 Edit Bit Memory (M, S)
ISPSoft provides bit memory (M, S) editing functions such as bit status editing, Read from PLC, Write to PLC,
save/open file and print. See below for the Edit Bit Memory window.
(1) Click “PLC” “Edit Bit Memory (M, S)” from the menu bar.
(2) Users can double click on the device to set ON/OFF in the editing window.
(3) When editing is completed, select “Write to PLC” or “Read from PLC” for data transmission. Please make
mk:@MSITStore:C:\Program\Delta%20Industrial%20Automation\ISPSoft1.01\User...
2011-06-17
Page 2 of 3
sure there will be no bad effects happen to the operating PLC.
(4) Write to PLC
(5) Read from PLC
Functions for operating the register:
1.
Read from PLC: read the state from PLC internal device (M, S).
2.
Write to PLC: write the state into PLC internal device (M, S).
3.
Print: When Edit Bit Memory window is activate, click the print icon on toolbar or select “Print” command
from the “File” menu. Users can select printing options to print the edited devices.
4.
Save: Click “File” “Save(S)” to save the edited data register into the disk with the * .DVB file
format.
5.
Open: Click “File” “Open(O)” to read * .DVB file.
6.
Block setting: Users can select a block containing several status boxes and right-click to set the block
state as ON or OFF.
mk:@MSITStore:C:\Program\Delta%20Industrial%20Automation\ISPSoft1.01\User...
2011-06-17
Page 3 of 3
*
Footnote 1: The file format of the edited register for retrieve is the *.DVB.
mk:@MSITStore:C:\Program\Delta%20Industrial%20Automation\ISPSoft1.01\User...
2011-06-17
Page 1 of 2
5.11 Edit File Register
DVP-SA/SX/SC/EH/EH2/EH2L/SV models provide file register editing function to read/write through ISPSoft.
(1) Click “Tools” “Edit File Register Memory” from menu bar.
(2) When Edit Register Memory window is displayed, click on the register and input the value of the register.
For example, click D41 → key in the value “1234” → press “Enter.” There are unsigned decimal, signed
decimal and hexadecimal data format for the value input as shown below.
mk:@MSITStore:C:\Program\Delta%20Industrial%20Automation\ISPSoft1.01\User...
2011-06-17
Page 2 of 2
(3) After completing all the register values input, click “Transfer” to write values into designated PLC. Users
can set the start and end address to perform partial transmission.
(4) Before writing, please make sure there will be no bad effects happen to the operating PLC.
Functions for operating file register memory:
1. Read from PLC: read data from PLC file register.
2. Write to PLC: write the edited data into PLC.
3. Print: When Edit File Register Memory window is activate, click the print icon on toolbar or select “Print”
command from the “File” menu. Users can select printing options to print the edited file register memory.
4. Save: Click “File” > “Save(S)” to save file register memory data with *. WFT extension file name. (*footnote
1)
5. Open: Click “File” > “Open(O)” to read * .WFT file.
6. Clear: clear all file register content.
7. Title: edit Title.
*
Footnote 1: The file format of the edited register for retrieve is *.WFT.
mk:@MSITStore:C:\Program\Delta%20Industrial%20Automation\ISPSoft1.01\User...
2011-06-17
Page 1 of 1
5.12 Format PLC Memory
ISPSoft provides clear PLC memory function and is only valid when PLC is ON
(1) Click “PLC” “Format PLC Memory…” from menu bar.
(2) Click OK then click Yes to confirm clearing PLC program memory.
(3) If Reset PLC Memory is selected, the program memory and all the related data includes RTC will be
cleared. When initial setup is completed, click to power up PLC again.
mk:@MSITStore:C:\Program\Delta%20Industrial%20Automation\ISPSoft1.01\User...
2011-06-17
Page 1 of 2
5.13 Send Modified Program
DVP-SA/SX/SC/EH/EH2/SV/ES2/EX2 models allow users to modify a part of the program or devices when it
is in RUN condition. The limit for modification is less than 15 steps. The function is valid only for ladder
diagram mode.
Note:
Before executing Online Edit function, please confirm that the machine operating environment is safe from
unexpected faults due to the modified program.
(1) Enter the "Online mode by clicking
(2) Click “Online Edit Mode”
, and the program comparison between PLC and ISPSoft will start.
.
(3) Modify on-line program.
(4) Modification is completed.
mk:@MSITStore:C:\Program\Delta%20Industrial%20Automation\ISPSoft1.01\User...
2011-06-17
Page 2 of 2
(5) Click “Compile”
to compile the program.
(6) Click “Send Change”
to send the modified program to PLC.
(7) Click OK to complete the program transmission.
mk:@MSITStore:C:\Program\Delta%20Industrial%20Automation\ISPSoft1.01\User...
2011-06-17
Page 1 of 1
5.14 Memory Card Service
DVP- EH/EH2 models support memory card service. Users can read/write the program inside the data backup
memory card (DVP-256FM) through ISPSoft
Step1: Click “PLC” “Memory Card Service” “PLC Memory Memory Card…”
Step2: Select “PLC => Memory Card” or “Memory Card => PLC” then click “OK” to transfer PLC program
between PLC main memory and the memory card.
mk:@MSITStore:C:\Program\Delta%20Industrial%20Automation\ISPSoft1.01\User...
2011-06-17
Page 1 of 1
5.15 PLC ID Setting
Users can adopt this function to set the PLC ID in the PLC. When ID setting is enabled, the program ID and
PLC ID must be consistent so that programs upload/download can be processed
Step1: Click “PLC” “PLC ID Setting”
Step2: Enter and confirm the PLC ID number (setting range: 4~8 characters), and the status bar will display
“PLC ID Enabled” after clicking OK. (See the figure below)
mk:@MSITStore:C:\Program\Delta%20Industrial%20Automation\ISPSoft1.01\User...
2011-06-17
Page 1 of 1
5.16 PLC Information
ISPSoft provides users with the PLC information detecting function.
Click “PLC” “PLC Information” from the menu bar.
PLC internal status and firmware version will be displayed, including PLC version, scan time, PLC state,
I/O points and other information.
mk:@MSITStore:C:\Program\Delta%20Industrial%20Automation\ISPSoft1.01\User...
2011-06-17
Page 1 of 1
5.17 Communication Auto-Detect
ISPSoft editor can auto-detect the PLC communication protocol
Detecting communication (Users can click Close to terminate the communication)
Detecting completed. (Detected information is displayed)
Communication error (Please check communication settings)
mk:@MSITStore:C:\Program\Delta%20Industrial%20Automation\ISPSoft1.01\User...
2011-06-17
Page 1 of 1
6.1 Communication Setting
ISPSoft can detect applicable PC COM port and allow users to choose one of applicable COM port to
connect to PLC.
Connection Setup: If the Station Address is set to 1, PC will connect to PLC with Station Address 1
(D1121/D1255). Setting range: 0 ~ 255.
Setup Responding Time: Set the auto query times (1~50 times) and query interval time (3~10 seconds)
when transmission errors occur during the communication.
Protocol: ISPSoft allows users to set the communication baud rate of DVP-PLC models as 9600, 19200,
38400, 57600 and 115200 bps.
Method: Click “Tools” “Communication Setting…”
mk:@MSITStore:C:\Program\Delta%20Industrial%20Automation\ISPSoft1.01\User...
2011-06-17
Page 1 of 1
6.2 Change PLC Type
This function provides users the flexibility to change the PLC type in the project.
Note: PLC type cannot be changed if subroutine password is set up in the project.
Step1: Click “Tools” “Change PLC Type…” Scroll down the list of the PLC type and select a type to be
changing. Click “OK” to proceed changing.
Case1: If a lower level type is selected, an alarm message will pop up to remind you the program code may
be lost. Please confirm no program damage will occur due to this operation
mk:@MSITStore:C:\Program\Delta%20Industrial%20Automation\ISPSoft1.01\User...
2011-06-17
Page 1 of 2
6.3 Program Setting
Subroutine Password Setting
The subroutine password is used to protect subroutine programs when you upload programs from PLC
without comments and variables. Users need to download the program with subroutine password to PLC first.
When users upload the program from PLC without comment and variables, all of the POUs will be assigned
this password to prevent users from opening it.
Users can adopt this function to set the subroutine password in the project.
Step1: Click “Tools” “Program Setting” “Subroutine Password Setting”
Step2: Enter the password and confirmation. The password must be 4 to 8 characters. Then press “OK”. If the
subroutine password is set successfully, the window will change to unlock password window and the status
bar will show the string of “locked”. (see the figure as below)
Program ID Setting
You can adopt this function to set the program ID in the project. If you want to download the program to the
PLC and the program is set. The program ID of the project must be consistent with the PLC. Otherwise, a
message will show up to inhibit downloading.
mk:@MSITStore:C:\Program\Delta%20Industrial%20Automation\ISPSoft1.01\User...
2011-06-17
Page 2 of 2
Step1: Click “Tools” “Program Setting” “Program ID Setting”
Step2: Enter and confirm the program ID number (setting range: 4~8 characters), and the status bar will
display “Program ID Enabled” after clicking OK. (See the figure below)
mk:@MSITStore:C:\Program\Delta%20Industrial%20Automation\ISPSoft1.01\User...
2011-06-17
Page 1 of 1
6.4 Set RTC
Users can set the RTC settings of DVP-SA/SX/SC/EH/EH2/EH2L/SV/ES2/EX2 models to be the same as
computer RTC or defined by user.
Step1: Click “Tools” “Set RTC…”
Step2: Select the item in the dialog and click Synchronize.
mk:@MSITStore:C:\Program\Delta%20Industrial%20Automation\ISPSoft1.01\User...
2011-06-17
Page 1 of 2
6.5 TC-01 Key Setup
Set TC-01 Password Key
Users can adopt this function to set the password key into TC-01.
Step1: Click “Tools” “TC-01 Key Setup” “Set TC-01 Password Key”
Step2: Fill in the Password Key and confirmation fields and click OK.
Clear TC-01 Password key
Users can adopt this function to clear the password key in TC-01.
Step1: Click “Tools” “TC-01 Key Setup” “Clear TC-01 Password Key”
mk:@MSITStore:C:\Program\Delta%20Industrial%20Automation\ISPSoft1.01\User...
2011-06-17
Page 2 of 2
Step2: Click Yse to clear the TC-01 password key.
mk:@MSITStore:C:\Program\Delta%20Industrial%20Automation\ISPSoft1.01\User...
2011-06-17
Page 1 of 1
6.6 Clear MRU List
The function Clear MRU List can remove MRU list from the File sub-menu.
Step1: Click “Tools” “Clear MRU List”
After executing Clear MRU List, the MRU list in the File menu is cleared.
mk:@MSITStore:C:\Program\Delta%20Industrial%20Automation\ISPSoft1.01\User...
2011-06-17
Page 1 of 10
6.7 Import/Export
Import Variables
Import Variables can be conducted in 2 ways: import global variables and import local variables. When the
current editing window is global variable table and Import function is executed, variables will be imported to
global variable table. However when editing window is ladder diagram editor, variables will be imported to
local variable table of ladder editor.
Step1: Click “Tools” ” Import/Export” “Import Variables…”
Step2: Select the file to be imported by click “Browser” button, and click OK.
mk:@MSITStore:C:\Program\Delta%20Industrial%20Automation\ISPSoft1.01\User...
2011-06-17
Page 2 of 10
Clear Table before Importing:
Yes: All of the global variables will be erased before importing.
No: The imported variables will be add to the end of the current global variable table
Conflict Option:
When certain variable has been existed in current global variable table, there are 3 options for processing
import function:
Replace: Replace the existed variable with the variable in the importing file.
Ignore: Skip the existed variable
Ask when happen: Display a message to ask for replace/Ignore confirmation from users.
Export Variables
Export Variables can be conducted in 2 ways: export global variables and export local variables. When the
current editing window is global variable table and Export function is executed, variables in global variable
table will be exported. However when editing window is ladder diagram editor, variables in local variable table
will be exported.
Step1: Click “Tools” ” Import/Export” “Export Variables…”
Step2: Check the “Files name” field in the dialog and click Save.
mk:@MSITStore:C:\Program\Delta%20Industrial%20Automation\ISPSoft1.01\User...
2011-06-17
Page 3 of 10
Import Program
Users can add programs into the opened project from a file.
Step1: Click “Tools” “Import/Export” “Import Programs”.
Step2: Select the file to be imported and click Open. The file extension is “*.mpu”.
mk:@MSITStore:C:\Program\Delta%20Industrial%20Automation\ISPSoft1.01\User...
2011-06-17
Page 4 of 10
Case1: If the same POU has been existed in the opened project, a message will pop up as below to prohibit
users from importing the same POU into the project.
Case 2: If the imported file is protected by a password, users need to enter the correct password to unlock the
password protection as below.
Export Programs
Export function blocks of the opened project to a file.
Step1: Click “Tools” “Import/Export” “Export Programs"
mk:@MSITStore:C:\Program\Delta%20Industrial%20Automation\ISPSoft1.01\User...
2011-06-17
Page 5 of 10
Step2: Check the programs listed in the dialog and click OK. The file extension is “*.mpu”.
File Name: The name for the exported file. The extension name is “*.mpu”
Drive/Path: The path of the exported file
Protection Option: If password setting is clicked to be enabled. Users have to enter the password before
importing this file. (See as below)
mk:@MSITStore:C:\Program\Delta%20Industrial%20Automation\ISPSoft1.01\User...
2011-06-17
Page 6 of 10
Import Function Block
Users can add function blocks into the opened project from a file.
Step1: Click “Tools” “Import/Export” “Import Function Blocks"
Step2: Select the file to be imported and click Open. The file extension is “*.fbu”.
mk:@MSITStore:C:\Program\Delta%20Industrial%20Automation\ISPSoft1.01\User...
2011-06-17
Page 7 of 10
Case1: If the same POU has been existed in the opened project, a message will pop up as below to prohibit
users from importing the same POU into the project.
Case 2: If the imported file is protected by a password, users need to enter the correct password to unlock the
password protection as below.
Export Function Block
Export function blocks of the opened project to a file.
Step1: Click “Tools” “Import/Export” “Export Function Blocks"
mk:@MSITStore:C:\Program\Delta%20Industrial%20Automation\ISPSoft1.01\User...
2011-06-17
Page 8 of 10
Step2: Check the function blocks listed in the dialog and click OK.
File Name: The name for the exported file. The extension name is “*.pou”
Drive/Path: The path of the exported file
Protection Option: If password setting is clicked to be enabled. Users have to enter the password before
importing this file. (See as below)
mk:@MSITStore:C:\Program\Delta%20Industrial%20Automation\ISPSoft1.01\User...
2011-06-17
Page 9 of 10
Import User Preference
ISPSoft allows users to define the environment of program editor and operating system. Personal preference
can also be imported from a “*.pfs” file.
The current editor information is saved in the “sys” directory of the software installation path. Users can find a
“preference.pfs” file in that directory.
If users want to return to default setting of the environment, import the file “preference_default.pfs” in this
directory.
Step1: Click “Tools” “Import/Export” “Import Preference"
Step2: Select the file to be imported and click Open. The file extension is “*.pfs”.
Export User Preference
Users can export the user-defined editing preference to a file.
Step1: Click “Tools” “Import/Export” “Export Preference"
mk:@MSITStore:C:\Program\Delta%20Industrial%20Automation\ISPSoft1.01\User...
2011-06-17
Page 10 of 10
Step2: Fill in the “Files name” field in the dialog and click Save. The file extension is “*.pfs”.
mk:@MSITStore:C:\Program\Delta%20Industrial%20Automation\ISPSoft1.01\User...
2011-06-17
Page 1 of 2
6.8 Language
ISPSoft provides users with different display languages for operating interface. It supports Chinese
(Simplified), Chinese (Traditional), and English.
Click “Tools” > “Language” and select from the list.
mk:@MSITStore:C:\Program\Delta%20Industrial%20Automation\ISPSoft1.01\User...
2011-06-17
Page 2 of 2
mk:@MSITStore:C:\Program\Delta%20Industrial%20Automation\ISPSoft1.01\User...
2011-06-17
Page 1 of 1
6.9 Options
In Options, users can set up the functions including Auto-save conditions, Workspace, Output Window,
Variable Table and editor environment as below.
Click “Tools” > “Option…” and the Options window will appear.
mk:@MSITStore:C:\Program\Delta%20Industrial%20Automation\ISPSoft1.01\User...
2011-06-17
Page 1 of 1
Simulator
When simulator is activated, the ISPSoft window will be shown as below. The icons in the frames are
simulator functions.
mk:@MSITStore:C:\Program\Delta%20Industrial%20Automation\ISPSoft1.01\User...
2011-06-17
Page 1 of 1
7.1 Start Simulator
1.
Create a new a file or open an existed file.
2.
Click icon
on toolbar to start simulator. ISPSoft will display
on status bar after
simulator is started.
3.
When simulator is activated, users can perform communication functions such as monitoring, program
download/upload without setting the communication interface first. The operating mode is same as the
actual PLC connecting situation.
4.
Click icon
on toolbar to start debug mode. Users can switch between Message area and Debug
Mode Monitor Devices area from bottom.
Note:
The simulator provides users the program testing function without connecting with PLC. However, the actual
result might not be completely the same as connecting with PLC. The program should be tested on PLC
before running in field applications.
mk:@MSITStore:C:\Program\Delta%20Industrial%20Automation\ISPSoft1.01\User...
2011-06-17
Page 1 of 2
7.2 Introduction to the Simulator Icons
The icons of simulator are shown as below:
Simulator icons
Explanation
mk:@MSITStore:C:\Program\Delta%20Industrial%20Automation\ISPSoft1.01\User...
2011-06-17
Page 2 of 2
Simulator
Toolbar
Starts simulator
Reset: The value in D1171 which records the running times of PLC debug
mode will be set to 1, D1170 which records the command position of scan run
and step run will be set to 0, monitoring value will be set to 0, and status to be
Off.
Debug Mode: This function is used for debugging in PLC run, step run and
scan run to check the error of program.
Run: Execute the run times set by users.
Run Times: Run times for running PLC in debug mode. The function is same as
actual running PLC, but it will stop when reaching the set run times.
Stop Scan Run: to stop scan run.
Scan Run: When users click this icon, the simulator will execute every
instruction continuously until Stop is clicked or the break point appeared.
Step Run: Execute a step once when clicking this icon for one time.
mk:@MSITStore:C:\Program\Delta%20Industrial%20Automation\ISPSoft1.01\User...
2011-06-17
Page 1 of 1
7.3 Introduction to the Debug mode
Click icon
on toolbar to start debug mode. Users can switch between Message area and Debug Mode
Monitor Devices area from bottom:
Functions of Debug Mode
1.
ISPSoft will write the program into simulator when debug mode is activated. In addition, the scan time
will be fixed and set to 100ms. Users can also set the scan time by D1039 according to the approximate
actual scan time of PLC. In debug mode, users can set several break points in ladder diagram mode
and instruction mode. The program will stop at the break point when executing Scan Run.
2.
Right-click to set the break point on the instruction pointed by cursor. After setting, there will be a red
dot on the left of instruction (shown as below):
Note:
1.
The run time of timers and counters could differ according to the efficiency of user’s PC. The working
behavior of timer is same as ES/SA series PLC.
The following instructions are not supported by simulator mode: WDT, REF, REFF, MTR, DHSCS, DHSCR,
DHSZ, SPD, PLSY, PWM, PLSR, IST, TKY, HKY, DSW, SEGL, ARWS, ASC, FROM, TO, RS, PRUN, VRRD,
VRSC, ABS, PID, MODRD, MODWR, FWD, REV, STOP, RDST, RSTEF, SWRD, DELAY, GPWM, FTC, CVM,
MEMR, MEMW, MODRW, PWD, RTMU, RTMD, RAND, DABSR, ZRN, PLSV, DRVI, DRVA, DPPMR, DPPMA,
DCIMR, DCIMA, DPTPO, HST, DCLLM.
mk:@MSITStore:C:\Program\Delta%20Industrial%20Automation\ISPSoft1.01\User...
2011-06-17
Page 1 of 1
8.1 About
Information including Delta website, ISPSoft program version and copyright statement will be displayed.
mk:@MSITStore:C:\Program\Delta%20Industrial%20Automation\ISPSoft1.01\User...
2011-06-17
Page 1 of 1
8.2 Help
Click Help and ISPSoft User Manual will be executed.
mk:@MSITStore:C:\Program\Delta%20Industrial%20Automation\ISPSoft1.01\User...
2011-06-17
Page 1 of 3
Appendix
Data: Keyboard Operation Keys and Shortcuts
Users can use the keyboard to select any menu command on the menu bar and toolbar. The following tables
summarize the available Keyboard operation keys and shortcuts for ISPSoft. Most of the keyboard shortcuts
are displayed on the right-hand side of each menu command when you pull down the menu.
Keyboard Operation Keys
Functions
Operation Keys (Keyboard Shortcuts)
Move editing block up
[↑]
Move editing block down
[↓]
Move editing block left
[←]
Move editing block right
[→]
Move editing block to the front of the
[Home]
network
Move editing block to the root position of the
[End]
network
Move to the next page
[Page Down]
Move to the previous page
[Page Up]
Cancel, quit or close the selected function
[Esc]
Menu bar and General Toolbar
File Menu Functions
Operating Procedure
Operation Keys
(Keyboard Shortcuts)
Create a new file
“File” > “New(N)”
[Ctrl] + [N]
Open an old file
“File” > “Open(O)”
[Ctrl] + [O]
Save a editing file
“File” > “Save(S)”
[Ctrl] + [S]
Save current file to other file
name or project
Close current editing file
“File” > “Save As(A)”
“File” > “Close Project”
Icon
[Ctrl] + [Alt] + [S]
--
Print current editing file, i.e.
mk:@MSITStore:C:\Program\Delta%20Industrial%20Automation\ISPSoft1.01\User...
2011-06-17
Page 2 of 3
instruction / ladder diagram/
comments…
“File” > “Print”
Select and set printer
“File” > “Printer Setup”
End ISPSoft
“File” > “Exit(X)”
[Alt] + [X]
Find the text
“Edit” > “Find…”
[Ctrl] + [F]
Replace the text
“Edit” > “Replace…”
[Ctrl] + [H]
“Edit” > “Goto…”
[Ctrl] + [J]
Undo an action
“Edit” > “Undo(U)”
[Ctrl] + [Z]
Redo an action
“Edit” > “Redo(R)”
[Ctrl] + [Alt] + [Z]
Select the entire document
“Edit” > “Select All(A)”
Delete the selected content
“Edit” > “Delete”
[Delete]
Cut a block
“Edit” > “Cut(T)”
[Ctrl] + [X]
Copy a block
“Edit” > “Copy(C)”
[Ctrl] + [C]
Paste a block
“Edit” > “Paste(P)”
[Ctrl] + [V]
[Ctrl] + [A]
mk:@MSITStore:C:\Program\Delta%20Industrial%20Automation\ISPSoft1.01\User...
--
--
2011-06-17
Page 3 of 3
mk:@MSITStore:C:\Program\Delta%20Industrial%20Automation\ISPSoft1.01\User...
2011-06-17