1
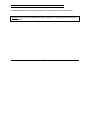
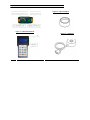
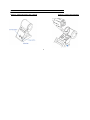
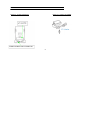
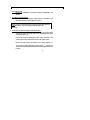
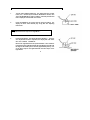
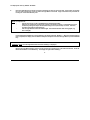
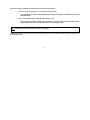
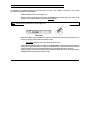
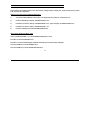
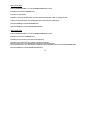
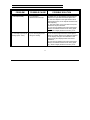
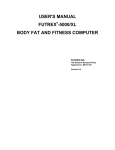
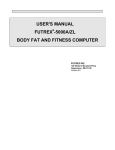
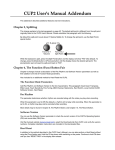
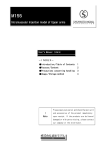
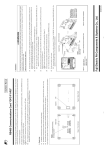
USER'S MANUAL
FUTREX7-62A/ZL
Body Composition Analyzer
(Percent Body Fat)
FUTREX, INC.
130 Western Maryland Parkway
Hagerstown, MD 21740
Version 1.0
FUTREX-62A/ZL USER'S MANUAL
This manual provides you with all the information needed to operate the FUTREX-62. For simplicity, in this manual the
“FUTREX-62” signifies the FUTREX-62A/ZL Userʼs Manual.
Table of Contents
INTENDED USE .................................................................................................................................................................................... 1
MAJOR COMPONENTS........................................................................................................................................................................ 2
Main Body............................................................................................................................................................................. 2
Optical Standard .................................................................................................................................................................. 2
Light Wand ........................................................................................................................................................................... 2
Smart Label Printer (Optional)......................................................................................................................................... 3-4
PREPARATION ..................................................................................................................................................................................... 5
Connecting Power ............................................................................................................................................................... 5
Connecting the Light Wand ................................................................................................................................................ 5
Connecting the Smart Label Printer .................................................................................................................................. 5
BODY FAT MEASUREMENT PROCEDURE..................................................................................................................................... 6-9
LOCATING THE BICEPS MEASURING SITE .................................................................................................................................... 10
SYSTEM OPTIONS ............................................................................................................................................................................. 11
Unit Settings ....................................................................................................................................................................... 11
Date and Time Settings ..................................................................................................................................................... 12
Reading Analysis Settings................................................................................................................................................ 13
Company Name Entry........................................................................................................................................................ 13
Printer Settings .................................................................................................................................................................. 14
Beeper Settings ................................................................................................................................................................. 14
Bias Adjustment................................................................................................................................................................. 15
GENERAL SPECIFICATIONS ....................................................................................................................................................... 16-17
TROUBLESHOOTING......................................................................................................................................................................... 18
Copyright 8 2007, FUTREX, INC.
Phone: 1-800-545-1950 (USA) or 1-301-733-9368 (International)
FAX:
1-301-733-9398
e-mail:
[email protected]
INTENDED USE
The FUTREX-62 intended use is for estimating percent body fat in males and females ages five years and older.
CAUTION: The performance of the FUTREX-62 for subjects using diuretics or estrogen replacement therapy has not
been established.
1
MAJOR
MAJOR
COMPONENTS
COMPONENTS
Figure 2.0 - Optical Standard
Figure 1.0 - Main Body Interfaces
Figure 3.0 - Light Wand
MAJOR COMPONENTS
Figure 4.0 - Smart Label Printer (SLP) –Optional
Figure 4.1 - Printer Paper Installation
3
MAJOR COMPONENTS
Figure 4.2 – Printer Connections
Figure 4.3 – Printerʼs AC Adapter
4
PREPARATION
1. Connecting Power
Ensure the FUTREX-62 is powered using the FUTREX-62ʼs A/C
Adapter.
2. Connecting the Light Wand
Ensure the Light Wand [Figure 3.0] Connector is attached to the
Main Body [Figure 1.0] Light Wand Connector.
NOTE: Futrex recommends always leaving the Light Wand attached
to the Main Body. This will avoid possible damage to the
connector.
3. Connecting the Optional Smart Label Printer (SLP)
Connect the Futrex RS232 cable to the printerʼs serial port [Figure
4.2] and the other end of the cable to the FUTREX-62 main body
serial port [Figure 1.0].
Connect the printerʼs AC-Adapter [Figure 4.3] to the back of the
printer [Figure 4.2] and the other end to an AC power outlet.
Ensure that Futrex paper is installed in the printer [Figure 4.1].
Turn the printer ON by pressing its power button
[Figure 4.0].
The printerʼs status light should be green indicating that the printer
is ready.
5
BODY FAT MEASURING PROCEDURE
1.
Turn the power ON/OFF SWITCH on. The display will show "© 2006
Futrex, Inc.", followed by the software identification number, then
"Press the ENTER KEY to begin a reading", and finally the date and
time is displayed at the bottom of the screen.
2.
Press the ENTER key to proceed with the body fat reading. The
display will show “Press ZeroAdj key” along with zero adjusting
instructions.
NOTE: It is important that the silver stripe on the Optical Standard
is aligned with the silver stripe on the Light Wand.
3.
Press the ZeroAdj key. The display will flash “Reading…”. Once the
zero adjustment has been completed, the display will read "Enter
Sex:" and “1=MALE 2=FEMALE”.
Remove the Light Wand from the Optical Standard. Then install the
Light Shield on the Light Wand (allow the Light Wand to protrude from
the edge of the shield by about 1/8 inch (approximately 3mm)). Line
up the silver stripe on the Light Wand with the silver stripe on the
Light Shield.
6
NOTE: The Light Shield is provided to avoid external light from
interfering with the estimations of percent body fat. Therefore, this
shield must always be used when making a measurement.
4.
Enter Userʼs Sex
Press KEY 1 for MALE or KEY 2 for FEMALE gender.
5.
Enter Userʼs Birth Date
6.
Enter Userʼs Height in inches or centimeters (Refer to page 11 to set unit in either English or Metric units). Use
keyboard numbers to enter the height, then press the ENTER key.
Enter two digits for the month and press the ENTER key
Enter two digits for the day and press the ENTER key
Enter four digits for the year and press the ENTER key
Note: The above order will change based on date format (Refer to page 12 to set date format).
NOTE: The FUTREX-62 cannot be used on individuals whose height is less than 50 in. (125 cm)
or taller than 90 in. (225 cm).
7.
Enter Userʼs Weight in lbs or kgs. (Refer to page 11 to select either English or Metric units). Use keyboard numbers
to enter the weight, then press the ENTER key.
NOTE: The FUTREX-62 cannot measure individuals weighing less than 50 lbs (25 kgs.) or more
than 500 lbs (225 kgs.).
7
The display will then say "READY TO READ."
8.
Place the Light Wand on the center of biceps of dominant arm (the arm you write with). Press firmly; use enough
force to leave a slight ring on the arm when the Light Wand is removed. Page 10 describes the procedure for
locating the exact measurement point.
NOTE: It is important to:
!
Aim the silver stripe on the Light Wand directly toward the shoulder.
!
Keep the arm relaxed (do not permit the subject to flex his/her muscles). A relaxed biceps can be
achieved by having the subject seated while resting his arm (elbow bent) on a table. The hand
should be open with the palm facing up.
!
Use the Light Shield to block the external light. Avoid measurements under strong lights (e.g.
direct sunlight).
Press the Measurement Button on the Light Wand. The display will flash "Reading..." When the measurement has
been completed, the display will read "Remove & Replace and press the button the Light Wand or press the ENTER
key".
CAUTION: Do not move the Light Wand while the word "Reading" is displayed.
Remove the Light Wand and then replace it on the same point on the biceps for a second measurement. Press the
Measurement Button or the ENTER key. The display will again flash "Reading..."
8
When the reading is completed, two alternate body fat results will be displayed:
•
Either the “1-FAT Analysis Option” will display the following results:
•
•
Percent Body Fat; Fat and Lean Weight; Basel Metabolic Rate; Body Water (in percentage and liters); and
Body Mass Index,
Or, the “3-Fat Analysis Option” will display the following results:
•
Percent Body Fat; Fat and Lean Weight; Essential, Reserve, and Excess Fat (with recommendations); Basel
Metabolic Rate; Body Water (in percentage and liters); and Body Mass Index
NOTE: Refer to page 13 to select either the 1-Fat or 3-Fat Analysis.
If additional people are to be measured, follow on screen instructions to proceed. When all measurements are finished, turn
Power Switch to OFF.
9
LOCATING THE BICEPS MEASURING SITE
The estimation must always be performed at the same site on the arm -- the midpoint of the biceps. This is easily
accomplished using the following technique:
!
Unfold the Biceps Locator into a straight ruler.
!
Place the edge of the Biceps Locator labeled TO UNDERARM at the lower edge of the crease of the
underarm (i.e. the anterior axillary crease of the dominant arm).
NOTE: The arm must be relaxed with the elbow slightly bent.
!
Measure the length of the arm between the underarm crease and the center of the elbow crease (i.e. the
acromion), using the scale printed on the Biceps Locator.
!
!
!
Remember the number on the ruler next to the elbow crease.
Locate this same number on the ruler starting from the UNDERARM end. This estimate represents half way
between the armpit and the elbow (i.e. "belly" of the biceps muscle). More technically stated: Measure
along the anterior line of the biceps halfway between the antecubital fossa and the acromion.
Using a pen, place a small line on the side of the arm adjacent to the Biceps Locator. This is the site where
FUTREX-62 measurements should always be made.
SYSTEM OPTIONS
System options allow English or Metric units, data and time, reading analysis, company info., printer, beeper status, and bias
to be set to the userʼs preference.
Entering and navigating the SYSTEM OPTIONS menu:
1)
Turn power ON/OFF SWITCH to ON position. The display will show and stroll “© 2006 Futrex, Inc.”
2)
Press the OPTION key to display “SYSTEM OPTIONS 1 of 3”
3)
Press KEY 4 to switch to display “SYSTEM OPTIONS 2 of 3”, repeat to display “SYSTEM OPTIONS 3 of 3”
4)
Press KEY 4 to return to display “SYSTEM OPTIONS 1 of 3”
5)
Press the CLEAR key to exit the SYSTEM OPTIONS menu
How to set the English and Metric units?
Access “SYSTEM OPTIONS 1 of 3” (see SYSTEM OPTIONS Steps 1 and 2)
Press KEY 1 to enter the ENG/MET menu
Press KEY 1 to switch between English and Metric standards (current status will be displayed)
Press the CLEAR key to exit the ENG/MET menu
Press the CLEAR key to exit the SYSTEM OPTIONS menu
11
How to set the date?
Access “SYSTEM OPTIONS 1 of 3” (see SYSTEM OPTIONS Steps 1 and 2)
Press KEY 2 to enter the DATE/TIME menu
Press KEY 1 to set the date
Press KEY 1 to change the date format (current format will be displayed) or KEY 2 to change the date
Follow on-screen instructions when changing the date (current date will be displayed)
Press the CLEAR key to exit the DATE/TIME menu
Press the CLEAR key to exit the SYSTEM OPTIONS menu
How to set the time?
Access “SYSTEM OPTIONS 1 of 3” (see SYSTEM OPTIONS Steps 1 and 2)
Press KEY 2 to enter the DATE/TIME menu
Press KEY 2 to set the time (current time will be displayed)
Press KEY 1 to increment the hour or KEY 2 to increment the minute
Note: Hour cycles from 1 to 12 AM and PM and the minute cycles from 00 to 59.
The seconds will reset to zero after the time is adjusted. Press the ENTER key to save and exit the DATE/TIME menu
Press the CLEAR key to exit the SYSTEM OPTIONS menu
12
How to set the reading analysis (1-Fat or 3-Fat analysis)?
Access “SYSTEM OPTIONS 1 of 3” (see SYSTEM OPTIONS Steps 1 and 2)
Press KEY 3 to enter the ANALYSIS menu
Press KEY 1 to switch between 1-FAT and 3-FAT analysis (current status will be displayed)
Press the CLEAR key to exit the SET ANALYSIS menu
Press the CLEAR key to exit the SYSTEM OPTIONS menu
How to enter a company information? (Only for Use with the Optional SLP Printer)
Access “SYSTEM OPTIONS 2 of 3” (see SYSTEM OPTIONS Steps 1, 2, and 3)
Press KEY 1 to enter the SET CO. INFO. menu
Press KEY 1, 2, or 3 to edit companyʼs information lines 1, 2, or 3 accordingly (current information will be displayed).
Follow on-screen instructions to enter and save company information.
Note: A maximum of 54 characters (18 characters on 3 lines) can be entered.
Press the CLEAR key to exit the SET CO. INFO. menu
Press the CLEAR key to exit the SYSTEM OPTIONS menu
13
How to turn off the optional printer?
Access “SYSTEM OPTIONS 2 of 3” (see SYSTEM OPTIONS Steps 1, 2, and 3)
Press KEY 2 to enter the PRINTER ON/OFF menu
Press KEY 1 to switch the printer on and off (current status will be displayed)
Press the CLEAR key to exit the PRINTER ON/OFF menu
Press the CLEAR key to exit the SYSTEM OPTIONS menu
How to turn the beeper off?
Access “SYSTEM OPTIONS 2 of 3” (see SYSTEM OPTIONS Steps 1, 2, and 3)
Press KEY 3 to enter the BEEPER ON/OFF menu
Press KEY 1 to switch the beeper on and off (current status will be displayed)
Press the CLEAR key to exit the BEEPER ON/OFF menu
Press the CLEAR key to exit the SYSTEM OPTIONS menu
14
How to adjust the bias?
Access “SYSTEM OPTIONS 3 of 3” (see SYSTEM OPTIONS Steps 1, 2, and 3)
Press KEY 1 to enter the SET BIAS ADJ. menu
Press KEY 1 to set the fat bias or KEY 2 to set the water bias
Press KEY 1 to adjust the bias (current bias will be displayed)
Follow the on-screen instructions to set and save the bias
Note: The bias can be adjusted from -10.0 to 10.0
Press the CLEAR key to exit the SET BIAS ADJ. menu
Press the CLEAR key to exit the SYSTEM OPTIONS menu
15
GENERAL SPECIFICATIONS
1)
MEASUREMENT
! Measuring Principle:
Near Infrared Interactance Technique based on technology from the United
States Department of Agriculture.
! Measuring Range:
3% to 45%
2)
AGE LIMITS
Five years and older
3)
POWER SOURCE:
A/C adapter
4)
DIMENSIONS:
Main Body - 4.7 x 9.5 x 2.2 inches
Light Wand - 2.3 (dia.) x 0.8 (length) inches
5)
WEIGHT:
2 lbs. (total) (1 kg.)
16
6)
ACCESSORIES:
Optical Standard
Users Manual
Light Shield
Biceps Locator
A/C Adapter
Carrying Case
Smart Label Printer**
Serial Cable for printer**
Printer Paper (rolls)**
AC Adapter for printer**
x1
x1
x1
x1
x1
x1
x1
x1
x2
x1
**Optional
7)
ACCURACY OF THE DEVICE
Futrex instruments are as accurate as the Hydrostatic Weighing,
the universally considered “Gold Standard” in body
composition analysis.
CE 0459
17
TROUBLESHOOTING
PROBLEM
POSSIBLE CAUSE
POSSIBLE SOLUTION 1) Bad Repeatability
a) Inconsistent
measurement technique.
a) Make sure you are applying enough pressure
between the Light Wand and the Subject's arm.
b) The silver stripes on the Light Wand must be
aligned with the line on the Optical Standard when
Zero Adjusting.
c) The silver stripe on the Light Wand must point
toward the subject's shoulder.
d) Use the Light Shield to block the external light.
Always avoid measurements under strong lights
(e.g. direct sunlight) because errors may occur.
2) Unusually high body fat
readings (40% - 50%)
a) Too much light present
during the reading.
a) Do not lift the Light Wand from the Subject's
biceps until either "Remove and Replace" appears
on the display during the first estimation or the
percent body fat is displayed after the second
estimation.
b) Use the Light Shield to block the external light.
Always avoid measurements under strong lights
(e.g. direct sunlight) because errors may occur.
18
Printed in U.S.A.