Transcript
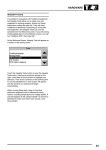
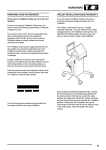
HARDWARE
Now look at the back of the trolley and locate the
power leads hanging out of the two power
transformer units. Plug the right hand lead into the
power port at the right rear of the TestBook. The
identifying symbol above this port is as shown in the
previous section.
Next,carefully lower the TestBook onto the trolley
platform so it fits securely within the locating rim and
so that the name "TestBook" shows right way up at
the front of the trolley. Find the two Torx screws and
two plastic wire clips from the small parts bag then
plug the AC mains feed cable into the socket on the
side of the trolley (but do not plug the other end into
a power socket yet). Lead the cable down the the
side of the trolley, securing it it with the cable clips
which should be attached with the Torx screws to
the two pre-threaded holes.These clips protect the
feed plug and socket from strain or disengagement if
the cable should be snagged or pulled.
The next stage is to install the portable DeskJet
printer into the trolley. Place the printer into the
cradle on the trolley. Note that the power and printer
interface sockets are positioned on the same side of
the trolley as the mains feed cable and switch (i.e.
on the right as viewed from the back of the trolley).
Connect the printer power cable (small connector)
and printer interface cable. Note that the power
connector should be rotated slightly on insertion to
ensure that it goes fully home, and butts firmly
against the printer case.
10