Transcript
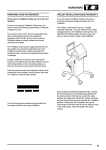
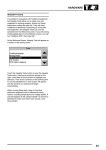
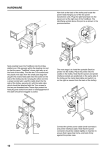
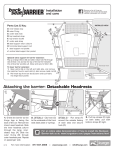
HARDWARE
BATTERY RESTORATION PROCEDURE
(TESTBOOK 1)
BATTERY REPLACEMENT PROCEDURE
(TESTBOOK 1)
Perform this procedure at the end of the working
day. It should take less than fifteen minutes. If it
takes longer, the battery didn’t need restoration.
If the previous steps fail to restore acceptable
battery life, it should be replaced using the following
procedure.
1. Leave TestBook "ON" at the Welcome screen.
2. Without turning TestBook off, unplug the
external power supply. Check to see that the
green light on the front panel changes to the
amber light.
3. Wait for the internal battery to discharge
completely. The display may go blank after a
while, but wait until the amber light on the front
panel next to the battery symbol goes out
completely (5-15 minutes, depending on
battery condition).
4. Plug TestBook back into an external power
supply.
5. Leave TestBook plugged in overnight. The
TestBook itself does not need to be left
switched ON.
6. The battery should last longer the following
day. If the battery life is still less than five
minutes, then the battery should be replaced.
Required Tool: Torx T15 screwdriver
1. Obtain a new TestBook battery from the
Helpdesk. The part number for a replacement
battery is 5063-0425.
2. Turn OFF TestBook and unplug the power
supply from the power point.
3. Locate the battery cover on the front of
TestBook, just to the left of the CD access
door, and remove the cover by pulling outward
on the bottom side.
4. Unplug the battery wiring from TestBook at the
left-hand side. This is done by gently tugging
the wires just above the battery at the far left
hand side.
5. Use a Torx T-15 screwdriver to remove the
metal clip that holds the battery in place.
Remove the old battery, noting how it was
positioned.
6. Install the new battery in the same position that
the previous one was in.
7. Put the metal clip back in place and tighten the
T-15 screw only until snug. Do not over-tighten.
8. Plug the wiring from the new battery into
TestBook. The plastic connector is keyed so
that it will only go in one way.
9. Tuck the battery wires in above the battery.
Use care to make sure that they will not be
pinched when the cover is re-installed.
10. Re-install the battery cover by placing the top
edge in place first, and then snapping the
bottom side in.
11. Leave TestBook plugged in overnight for the
battery to charge.
NOTE: Always recycle used batteries
according to local country regulations.
23