1
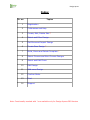
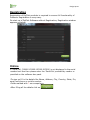
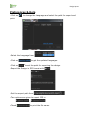
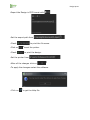
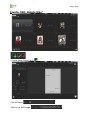
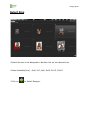
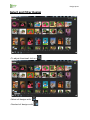
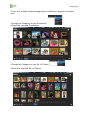
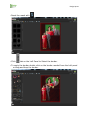
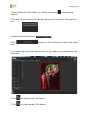
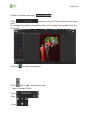
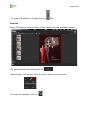
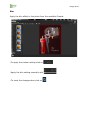
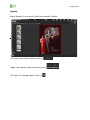
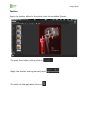
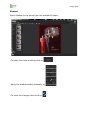
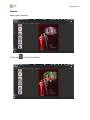
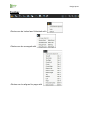
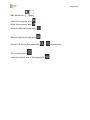
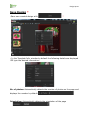
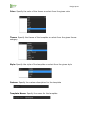
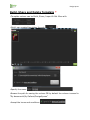
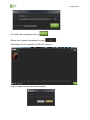
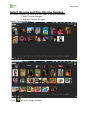
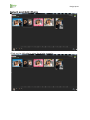
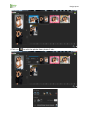
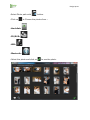
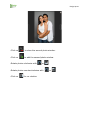
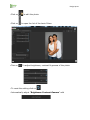
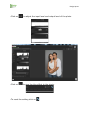
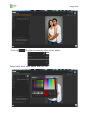
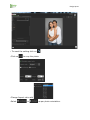
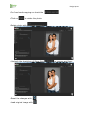
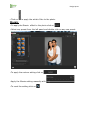
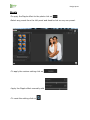
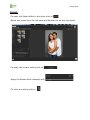
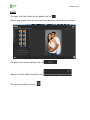
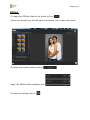
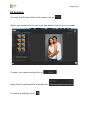
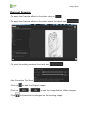
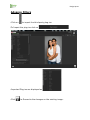
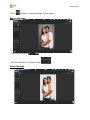
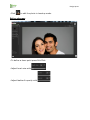
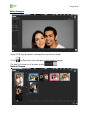
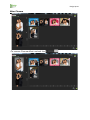
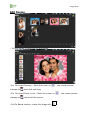
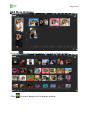
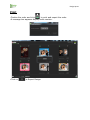
Design Xpress User Manual Design Xpress Index Sr. no Topics 1 Registration 2 Preferences and Help 3 Create, Edit, Delete Size * 4 Select and Filter Design 5 Get More and Import Design 6 Create Own Design * 7 Build, Share and Delete Template * 8 Select Chroma and Non-Chroma Designs 9 Select and Edit Photo 10 Edit Design 11 Add more Design 12 Confirm Order 13 Print 14 Support Note: Functionality marked with * are available only for Design Xpress PRO Version Design Xpress Registration Registration of DgFlick products is required to ensure full functionality of Products. Registration is very easy. On start up of DgFlick Software without Registration; Registration window appears as below. Online If 'Serial No' (XXXXX-XXXXX-XXXXX-XXXXX) is not displayed in the serial number text box then please enter the 'Serial No' provided by vendor or provided on the software box pack. • To sign up fill in the details like Name, Address, City, Country, State, Pin, email and phone or mobile number. • Fields marked with * are compulsory. • After filling all the details click on Design Xpress Offline • If you do not have Internet connection then you can Register Offline by clicking on • If 'Serial No' (XXXXX-XXXXX-XXXXX-XXXXX) is not displayed in the serial number text box then please enter the 'Serial No' provided by vendor or provided on the software box pack. • To generate your Dgkey click on Design Xpress Dg Key & Registration Key are must to complete Registration. • In Offline registration we can register the software via three ways Telephone, Email-Id, Web. • Get the 'Activation Key' by Telephone / Email-Id / Web Telephone: Call at 022-6775 7575 and provide your 'E-mail id', 'Mobile' and 'DgKey' to support executive. DgFlick support exucutive will provide the 'Registration Key'. After receiving the 'Registration Key', fill it in the form and click on button to activate the software. Web : Visit www.dgflick.com • If you are an existing user fill in the details like 'Email' and 'Password' click on button • Software gets Installed. Design Xpress Preferences & Help • Click on to change the Language and select the path for export and print. • Select the Language from • Click on • Click on to get the updated languages. to set the path for exporting the design. • Export the Design in JPG format with • Set the export path from • Two options are given to export JPG in , • Check to print the file name. Design Xpress • Export the Design in PDF format with • Set the export path from • Check to print the file name. • Click on to set the printer. • Check to print the design. • Set the printer from • After all the changes click on • To apply the changes restart the software. • Click on to get the Help file. Design Xpress Create, Edit, Delete Size* • Create New Product with • Define Name • Define the Ref.Image Design Xpress • Define Page size • Insert comments from • Click on • From to save the created Product. , Size Information is displayed as shown below: • Edit the Product with • Delete the Product with Design Xpress Select Size • Select the size to be designed or double click on the desired size. • Sizes Available(Inch) : 4x6, 5x7, 6x8, 8x10, 8x12, 12x18 • Click on to Select Designs. Design Xpress Select and Filter Design • To adjust thumbnail click on • Select all designs with • Deselect all designs with Design Xpress • There are multiple themes categorized in different categories to select from • Change the Category as per Orientation • Select the required Orientation. • Change the Category as per No. of Photos • Select the required No. of Photos. Design Xpress • Change the Category as per Theme •Select the required Theme. • Change the Category as per Style • Select the required Style. Design Xpress • Change the Category as per Color • Select the required Color. Design Xpress • Change the Category as per Type • Select the required Category. Design Xpress Get More and Import Design • Click to get more designs from DgFlick website • Click to import designs from hard-disk, Cd drive or pen drive. • Select different Designs folder by clicking on Browse and selecting location. • The Last 15 path selected for Designs folders will be saved in the path list box. • Click to import the designs. • Click to go to select Product Window. • Click to go to my design window. Design Xpress Create Own Design* • Click to create new design. Design Xpress • Click tab on the Left Panel to Select the backgrounds or fill the solid color. • To apply the background double click on the Background from the Left panel. • Select different backgrounds folder by clicking on Browse and selecting location. • The Last 15 path selected for background folders will be saved in the path list box. • Adjust thumbnail size with • Click button on the Left Panel to Select the ready tone. • To change the ready tone double click on the ready tone needed from the Left panel. Design Xpress • Click tab on the Left Panel to select the solid color for the background. • Use color picker to select the color anywhere from the whole screen. • Click tab on the left panel to insert the photos. • Select the photo to be inserted on the page & double click on the photo or drag and drop the photo needed from the Left panel. Design Xpress • Select different photos folder by clicking on Browse and selecting location. • The Last 15 path selected for photo folders will be saved in the path list box • Adjust thumbnail size with • Sort photo by Design Xpress • Click tab on the Left Panel to Select the Mask. • To change the mask double click on the mask needed from the Left panel. • Select different mask folder by clicking on Browse and selecting location. • The Last 15 path selected for mask folders will be saved in the path list box • Adjust thumbnail size with • Click to rotate mask 90 degrees. • Click to rotate mask 180 degrees. • Click to rotate mask 270 degrees. • Click to flip mask horizontally. • Click to flip mask vertically. Design Xpress • Reset the mask with • Click tab on the Left Panel to Select the border. • To apply the border double click on the border needed from the Left panel or drag and drop the border. Design Xpress • Select different border folder by clicking on Browse and selecting location. • The Last 15 path selected for border folders will be saved in the path list box • Adjust thumbnail size with • Click button on the Left Panel to Select the ready tone. • To change the ready tone double click on the ready tone needed from the Left panel. • Click to rotate border 90 degree. • Click to rotate border 180 degree. Design Xpress • Click to rotate border 270 degree. • Click to flip border horizontally. • Click to flip border vertically. • Reset border with • Click tab on the Left Panel to Select the clipart. • To apply the Clipart double click on the Clipart needed from the Left panel or drag and drop the clipart. • Select different cliparts folder by clicking on Browse and selecting location. • The Last 15 path selected for clipart folders will be saved in the path list box Design Xpress • Adjust thumbnail size with • Click button on the Left Panel to Select the ready tone. •To change the ready tone double click on the ready tone needed from the Left panel. • Click on • Click to reset the changes. tab to add / change the title. Add or change Title’s: • Type • Size • Style Design Xpress • Color • Use color picker to select the color anywhere from the whole screen available on Left panel. • Ready presets can be used from Design Xpress • To apply the effects on Design click on Tab. Colorize Apply /Change the colorize effect to the photo from the available Presets. • To apply the manual setting click on •Now change the opacity, color & level of photo manually with • To reset the changes, click on Design Xpress Blur Apply the blur effect to the photo from the available Presets. • To apply the custom setting click on • Apply the blur setting manually with • To reset the changes done click on Design Xpress Opacity Apply Opacity to the photo from the available Presets. • To apply the custom setting click on • Apply the opacity setting manually with • To reset the changes done click on Design Xpress Feather Apply the feather effect to the photo from the available Presets. • To apply the custom setting click on • Apply the feather setting manually with • To reset the changes done click on Design Xpress Shadow Apply Shadow to the photo from the available Presets. • To apply the custom setting click on • Apply the shadow setting manually by • To reset the changes done click on Design Xpress Glow Apply Glow to the photo from the available Presets. • To apply the custom setting click on • Apply Glow on photo manually by • To reset the changes done click on Design Xpress Outline Select the photo and apply Outline from the available Presets. • To apply the custom setting click on • To apply outline manually can be done by • To reset the changes done click on Design Xpress Rotation Apply Rotation to the photo from the available Presets. • To apply the custom setting click on • To rotate the photo can be rotated manually by • To flip photo horizontally click on • To flip photo vertically click on • To reset the changes done click on Design Xpress Presets Apply given presets. Click on to reset the effects. Design Xpress Toolbar • Photos can be locked and Unlocked with • Photos can be arranged with • Photos can be aligned to page with Design Xpress • Two or more objects can be aligned with •Set Equal spacing between the objects with • Set Equal sizes to the photo with • Apply Rotation to the object on board with Design Xpress • Edit photo with • Undo the property with • Redo the property with • Show & Hide safe area with • Show & Hide Grid lines with • Zoom In & Zoom Out page with • Fit to screen with • View the Actual size of the page with , respectively. Design Xpress Save Design * • Save own created design with * • In the Template Info. window by default the following details are displayed OR type the desired information: No. of photos: Automatically detects the number of photos on the page and displays the number by default Orientation: Automatically detects the orientation of the page Design Xpress Color: Specify the color of the theme or select from the given color Theme: Specify the theme of the template or select from the given theme category Style: Specify the style of the template or select from the given style Custom: Specify the custom description for the template Template Name: Specify the name for the template Design Xpress • Click to save the template. •Template is saved as per the given information. Design Xpress Build, Share and Delete Template * • Template volume can be Build ,Share, Import & Get More with * • Build own created templates through * • Specify the name • Browse the path for saving the volume OR by default the volume is saved in “My documents\My Galleria\DesignXpress” • Accept the terms and conditions Design Xpress • To build own templates click on * • Share own created templates through • Templates will be shared on DgFlick’s website. • Login is required to share the template. * Design Xpress • If new user sign Up with DgFlick. • After Login the following window is displayed. • Accept the terms and conditions • To share own created templates click on * • Click to get designs from DgFlick website. • Click to import designs from hard-disk, Cd drive or pen drive. Delete Template * • Click on • Click to delete the template. to delete the template. Design Xpress Select Chroma and Non-Chroma Designs In Design Xpress Plus there are two kinds of designs available: 1. With Chroma Designs. 2. Without Chroma Designs. • Select Chroma designs. • Select Non-Chroma designs. • Click to go to design window. Design Xpress Select and Edit Photo • Click on the left side to view the photo properly. Design Xpress • Click on to edit the photo from photo 1 tab. Design Xpress • Select Photo path with • Click on button. to Choose the photos from : • Hard disk: • CD/DVD: • USB: • Bluetooth: • Select the photo and click on to use the photo. Design Xpress • Click on to close the second photo window. • Click on to add the second photo window. • Rotate photos clockwise with or • Rotate photos counterclockwise with • Click on for no rotation. or Design Xpress • Click on • Click on • Click on to edit the photo. to open the list of the basic filters. To adjust brightness, contrast & gamma of the photo. • To reset the setting click on • Automatically adjust “Brightness-Contrast-Gamma” with Design Xpress • Click on to adjust the color tones. • To reset the setting click on • Automatically adjust “Color tones” with Design Xpress • Click on to adjust the RGB color Design Xpress • Click on to adjust the input level and output level of the photo. • Click on to give the blur effect to the photo. • To reset the setting click on Design Xpress • Click on To give the colorize effect to the photo. Select color from color palate and click OK. Design Xpress • OR click on and select any color from whole window. • Adjust the Opacity from • To reset the setting click on Design Xpress • Click on to give the feather effect to the photo. • Adjust the Feather effect • To reset the setting click on • Click on to give the Opacity effect to the photo. • Adjust the Opacity with Design Xpress • To reset the setting click on • Click on to crop the photo. • Change Aspect ratio with • Select or as per photo orientation. Design Xpress Landscape Portrait • Adjust the width, height and units with Design Xpress • For free hand cropping un-check the • Click on to rotate the photo. • Rotate photo with • Uncheck the check box of Show Grid • Reset the changes with • Load original image with to remove grid lines. Design Xpress • Click on to apply the artistic filter to the photo. Mosaic • To apply the Mosaic effect to the photo click on • Select any preset from the left panel and double click on any one preset. • To apply the custom setting click on • Apply the Mosaic setting manually with • To reset the setting click on Design Xpress Ripple • To apply the Ripple effect to the photo click on •Select any preset from the left panel and double click on any one preset. • To apply the custom setting click on • Apply the Ripple effect manually with • To reset the setting click on Design Xpress Shift • To apply the Shift effect to the photo click on • Select any preset from the left panel and double click on any one preset. • To apply the custom setting click on • Apply the Shift effect manually with • To reset the setting click on Design Xpress Splash • To apply the Splash effect to the photo click on • Select any preset from the left panel and double click on any one preset. • To apply the custom setting click on • Apply the Splash effect manually with • To reset the setting click on Design Xpress Implode • To apply the implode effect to the photo click on •Select any preset from the left panel and double click on any preset. • To apply the custom setting click on • Apply the implode setting manually with • To reset the setting click on Design Xpress Swirl • To apply the Swirl effect to the photo click on • Select any preset from the left panel and double click on any one preset. • To apply the custom setting click on • Apply the Swirl effect manually with • To reset the setting click on Design Xpress Illusion • To apply the illusion effect to the photo click on • Select preset from the left panel and double click on any preset. • To apply the custom setting click on • Apply the preset setting manually with • To reset the setting click on Design Xpress 3DGird • To apply the 3DGrid effect to the photo click on • Select any preset from the left panel and double click on any one preset. • To apply the custom setting click on • Apply the 3DGrid effect manually with • To reset the setting click on Design Xpress Softlense • To apply the Softlense effect to the photo click on • Select any preset from the left panel and double click on any one preset. • To apply the custom setting click on • Apply the Softlense effect manually with • To reset the setting click on Design Xpress Oil Painting • To apply the Oil paint effect to the photo click on •Select any preset from the left panel and double click on any one preset. • To apply the custom setting click on • Apply the Oil painting effect manually with • To reset the setting click on Design Xpress Sepia • To apply the Sepia effect to the photo click on • To apply the Sepia effect to the photo check the check box • To reset the setting uncheck the check box Design Xpress Charcoal Drawing • To apply the Charcoal effect to the photo click on • To apply the Charcoal effect to the photo check the check box • To reset the setting uncheck the check box • Use Correction Tool from • Click on • Click on Click to load the Original image. / to see the image Before /After changes. to Overwrite the changes on the existing image. Design Xpress Advance Filters • Click on to import the third party plug-ins. • To Import the plug-ins click on • Imported Plug-ins are displayed as • Click to Overwrite the changes on the existing image. Design Xpress • Click to apply chroma settings to the photo. Before changes • Pick the color with • Set the feather & Tolerance with After Changes Design Xpress • Make correction with •Keep CTRL key pressed to activate the correction mode. •Keep Shift key pressed to revert the correction mode. • Click to Overwrite the changes on the existing image. Design Xpress • Click to edit the photo in touchup mode. Before changes • To define a clone point press Alt+Click. • Adjust brush size with • Adjust feather & opacity with Design Xpress After changes • Keep CTRL key pressed to activate the correction mode. • Click to Overwrite the changes on the existing image. • To Apply chroma on all photos check Before Chroma Design Xpress After Chroma • To remove Chroma effect uncheck the Design Xpress • Click on to edit the photo from photo 2 tab. • Select Photo path with • Adjust Thumbnail size with button. Design Xpress • Click on to delete the second photo window. • Navigate the photos from and left and right respectively. Design Xpress Edit Design • To Edit design Double click on the design. • For On-board Panning – Move the cursor on changes to now click and drag. • For On-board Zoom in-out – Move the cursor on changes to , the mouse pointer now scroll the mouse. • For On-Board rotation -rotate the image with , the mouse pointer Design Xpress • Add/Change Background, Clipart, Border, Mask, Title, Effect from the respective tabs. • Click on to go to Design window. • Save changes with • Design Xpress Add More Designs • Click on • Click to import more designs from select design window. to import designs to the design window. Design Xpress • Filter the selected design according to Orientation, No. of Photos, Theme, Style, Color, Type from. • Select all the deigns. • Click on to go to confirm order. Design Xpress Confirm Order Select & Deselect the Designs: Option available for all the individual designs. • To Select – check the • To Deselect – uncheck the Design Xpress • Specify the area of photo individually from • Crop: Crop the image as per the selected size. • Fit to Size: Fit the photo in the selected size. • Change Quantity: Option available for all the individual images. • Change Quantity and Area of all the designs Globally from: • Change quantity Prints from • Change area of all the designs from • Apply change in all Designs from Design Xpress Print • Finalize the order and click to print and export the order. •A message box appears display order number. • Click on to Export Design. Design Xpress • A message box appears. • Click to view the exported designs. Design Xpress Support For additional technical support, please contact DgFlick support at Email: [email protected] Call @ +91 22 6775 7575 DgFlick Solutions Pvt. Ltd. 203 / 204, Shreeji Arcade, M. G. Road, Borivali (East) Mumbai 400066 India. Email: [email protected] Tel.:+91 22 6775 7575 Fax:+91 22 6775 7576 022-6775-7575 www.dgflick.com