1
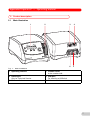
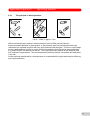
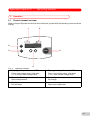
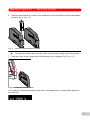
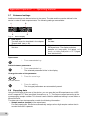
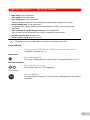
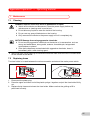
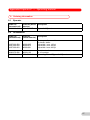
Operating Eppendorf on see p. Tab. Fig. p. manual Eporator® Operating manual 4309 900.010 Eppendorf Eporator® Operating manual Copyright© 2012 Eppendorf AG, Hamburg. No part of this publication may be reproduced without the prior permission of the copyright owner. Eppendorf® and the Eppendorf logo are registered trademarks of Eppendorf AG, Hamburg, Germany. Eppendorf Eporator® is a registered trademark of Eppendorf AG, Hamburg, Germany. Excel® and Microsoft® are registered trademarks of Microsoft Corporation in the United States and other countries. Registered trademarks are not marked in all cases with ™ or ® in this manual. 4309 900.010-03/122012 Eppendorf Eporator® — Operating manual Table of contents 1 1 Table of contents Operating instructions . . . . . . . . . . . . . . . . . . . . . . . . . . . . . . . . . . . . . . . . . . . . . . . . . . . . 5 1.1 1.2 1.3 1.4 2 7 8 8 9 Intended use. . . . . . . . . . . . . . . . . . . . . . . . . . . . . . . . . . . . . . . . . . . . . . . . . . . . . . . . User profile . . . . . . . . . . . . . . . . . . . . . . . . . . . . . . . . . . . . . . . . . . . . . . . . . . . . . . . . . Information on product liability . . . . . . . . . . . . . . . . . . . . . . . . . . . . . . . . . . . . . . . . . . Safety instructions on the device . . . . . . . . . . . . . . . . . . . . . . . . . . . . . . . . . . . . . . . . Warnings for intended use . . . . . . . . . . . . . . . . . . . . . . . . . . . . . . . . . . . . . . . . . . . . . 10 10 10 10 11 Installation . . . . . . . . . . . . . . . . . . . . . . . . . . . . . . . . . . . . . . . . . . . . . . . . . . . . . . . . . . . . . 12 4.1 4.2 4.3 5 Main illustration . . . . . . . . . . . . . . . . . . . . . . . . . . . . . . . . . . . . . . . . . . . . . . . . . . . . . . Delivery package . . . . . . . . . . . . . . . . . . . . . . . . . . . . . . . . . . . . . . . . . . . . . . . . . . . . . Features . . . . . . . . . . . . . . . . . . . . . . . . . . . . . . . . . . . . . . . . . . . . . . . . . . . . . . . . . . . . 2.3.1 The principle of electroporation. . . . . . . . . . . . . . . . . . . . . . . . . . . . . . . . . . . . . Safety . . . . . . . . . . . . . . . . . . . . . . . . . . . . . . . . . . . . . . . . . . . . . . . . . . . . . . . . . . . . . . . . . 10 3.1 3.2 3.3 3.4 3.5 4 5 5 5 5 5 6 Product description . . . . . . . . . . . . . . . . . . . . . . . . . . . . . . . . . . . . . . . . . . . . . . . . . . . . . . 7 2.1 2.2 2.3 3 Using this manual. . . . . . . . . . . . . . . . . . . . . . . . . . . . . . . . . . . . . . . . . . . . . . . . . . . . . Danger symbols and danger levels . . . . . . . . . . . . . . . . . . . . . . . . . . . . . . . . . . . . . . . 1.2.1 Hazard symbols . . . . . . . . . . . . . . . . . . . . . . . . . . . . . . . . . . . . . . . . . . . . . . . . 1.2.2 Degrees of danger . . . . . . . . . . . . . . . . . . . . . . . . . . . . . . . . . . . . . . . . . . . . . . Symbols used. . . . . . . . . . . . . . . . . . . . . . . . . . . . . . . . . . . . . . . . . . . . . . . . . . . . . . . . Glossary . . . . . . . . . . . . . . . . . . . . . . . . . . . . . . . . . . . . . . . . . . . . . . . . . . . . . . . . . . . . Preparing installation . . . . . . . . . . . . . . . . . . . . . . . . . . . . . . . . . . . . . . . . . . . . . . . . . 12 Selecting the location . . . . . . . . . . . . . . . . . . . . . . . . . . . . . . . . . . . . . . . . . . . . . . . . . 12 Installing the instrument . . . . . . . . . . . . . . . . . . . . . . . . . . . . . . . . . . . . . . . . . . . . . . . 12 Operation . . . . . . . . . . . . . . . . . . . . . . . . . . . . . . . . . . . . . . . . . . . . . . . . . . . . . . . . . . . . . . 13 5.1 5.2 5.3 5.4 5.5 Control element overview . . . . . . . . . . . . . . . . . . . . . . . . . . . . . . . . . . . . . . . . . . . . . . Recommendations for sample preparation. . . . . . . . . . . . . . . . . . . . . . . . . . . . . . . . . 5.2.1 DNA preparation . . . . . . . . . . . . . . . . . . . . . . . . . . . . . . . . . . . . . . . . . . . . . . . 5.2.2 Electroporation medium . . . . . . . . . . . . . . . . . . . . . . . . . . . . . . . . . . . . . . . . . 5.2.3 Growth and preparation of cells . . . . . . . . . . . . . . . . . . . . . . . . . . . . . . . . . . . 5.2.4 Temperature . . . . . . . . . . . . . . . . . . . . . . . . . . . . . . . . . . . . . . . . . . . . . . . . . . Performing electroporation . . . . . . . . . . . . . . . . . . . . . . . . . . . . . . . . . . . . . . . . . . . . . 5.3.1 Switching on the device . . . . . . . . . . . . . . . . . . . . . . . . . . . . . . . . . . . . . . . . . 5.3.2 Inserting cuvette . . . . . . . . . . . . . . . . . . . . . . . . . . . . . . . . . . . . . . . . . . . . . . . 5.3.3 Electroporation . . . . . . . . . . . . . . . . . . . . . . . . . . . . . . . . . . . . . . . . . . . . . . . . Regeneration of the cells . . . . . . . . . . . . . . . . . . . . . . . . . . . . . . . . . . . . . . . . . . . . . . Determination of the transformation efficiency . . . . . . . . . . . . . . . . . . . . . . . . . . . . . . 13 14 14 15 15 15 16 16 16 18 18 18 3 Eppendorf Eporator® — Operating manual 5.6 5.7 5.8 6 22 23 23 24 Cleaning . . . . . . . . . . . . . . . . . . . . . . . . . . . . . . . . . . . . . . . . . . . . . . . . . . . . . . . . . . . 25 Replacing fuses . . . . . . . . . . . . . . . . . . . . . . . . . . . . . . . . . . . . . . . . . . . . . . . . . . . . . 25 Technical data . . . . . . . . . . . . . . . . . . . . . . . . . . . . . . . . . . . . . . . . . . . . . . . . . . . . . . . . . . 26 8.1 8.2 8.3 8.4 8.5 9 General errors . . . . . . . . . . . . . . . . . . . . . . . . . . . . . . . . . . . . . . . . . . . . . . . . . . . . . . Error messages . . . . . . . . . . . . . . . . . . . . . . . . . . . . . . . . . . . . . . . . . . . . . . . . . . . . . 6.2.1 Operational error. . . . . . . . . . . . . . . . . . . . . . . . . . . . . . . . . . . . . . . . . . . . . . . 6.2.2 Device error . . . . . . . . . . . . . . . . . . . . . . . . . . . . . . . . . . . . . . . . . . . . . . . . . . Maintenance . . . . . . . . . . . . . . . . . . . . . . . . . . . . . . . . . . . . . . . . . . . . . . . . . . . . . . . . . . . 25 7.1 7.2 8 18 18 19 20 20 Troubleshooting . . . . . . . . . . . . . . . . . . . . . . . . . . . . . . . . . . . . . . . . . . . . . . . . . . . . . . . . 22 6.1 6.2 7 Programs . . . . . . . . . . . . . . . . . . . . . . . . . . . . . . . . . . . . . . . . . . . . . . . . . . . . . . . . . . 5.6.1 Loading program. . . . . . . . . . . . . . . . . . . . . . . . . . . . . . . . . . . . . . . . . . . . . . . 5.6.2 Saving program. . . . . . . . . . . . . . . . . . . . . . . . . . . . . . . . . . . . . . . . . . . . . . . . Enhanced settings . . . . . . . . . . . . . . . . . . . . . . . . . . . . . . . . . . . . . . . . . . . . . . . . . . . Exporting data . . . . . . . . . . . . . . . . . . . . . . . . . . . . . . . . . . . . . . . . . . . . . . . . . . . . . . Power supply . . . . . . . . . . . . . . . . . . . . . . . . . . . . . . . . . . . . . . . . . . . . . . . . . . . . . . . Ambient conditions . . . . . . . . . . . . . . . . . . . . . . . . . . . . . . . . . . . . . . . . . . . . . . . . . . . Weight/dimensions . . . . . . . . . . . . . . . . . . . . . . . . . . . . . . . . . . . . . . . . . . . . . . . . . . . Interfaces . . . . . . . . . . . . . . . . . . . . . . . . . . . . . . . . . . . . . . . . . . . . . . . . . . . . . . . . . . Operating mode . . . . . . . . . . . . . . . . . . . . . . . . . . . . . . . . . . . . . . . . . . . . . . . . . . . . . 26 26 26 26 26 Ordering information . . . . . . . . . . . . . . . . . . . . . . . . . . . . . . . . . . . . . . . . . . . . . . . . . . . . 27 9.1 9.2 Eporator . . . . . . . . . . . . . . . . . . . . . . . . . . . . . . . . . . . . . . . . . . . . . . . . . . . . . . . . . . . 27 Accessories . . . . . . . . . . . . . . . . . . . . . . . . . . . . . . . . . . . . . . . . . . . . . . . . . . . . . . . . 27 10 Transport, storage and disposal . . . . . . . . . . . . . . . . . . . . . . . . . . . . . . . . . . . . . . . . . . . 28 10.1 10.2 10.3 10.4 4 Storage. . . . . . . . . . . . . . . . . . . . . . . . . . . . . . . . . . . . . . . . . . . . . . . . . . . . . . . . . . . . Decontamination before shipment . . . . . . . . . . . . . . . . . . . . . . . . . . . . . . . . . . . . . . . Transport . . . . . . . . . . . . . . . . . . . . . . . . . . . . . . . . . . . . . . . . . . . . . . . . . . . . . . . . . . Disposal . . . . . . . . . . . . . . . . . . . . . . . . . . . . . . . . . . . . . . . . . . . . . . . . . . . . . . . . . . . 28 28 28 29 Eppendorf Eporator® — Operating manual 1 Operating instructions 1 Operating instructions 1.1 Using this manual Please read this operating manual completely before using the device for the first time. Please view this operating manual as part of the product and keep it somewhere easily accessible. When passing the device on to third parties, be sure to include this operating manual. If this manual is lost, please request another one. The current version can be found on our website www.eppendorf.com. 1.2 Danger symbols and danger levels 1.2.1 Hazard symbols 1.2.2 Toxic substances Electric shock Hazard point Material damage Degrees of danger The degree of danger is a part of a safety note and distinguishes the possible results of non-observance from each other. DANGER Will lead to severe injuries or death. WARNING May lead to severe injuries or death. CAUTION May lead to light to moderate injuries. NOTICE May lead to material damage. 1.3 Symbols used Depiction Meaning You are requested to perform an action. 1. 2. Perform these actions in the sequence described. • Text List. Terms and key names from the software. References useful information. 5 Eppendorf Eporator® — Operating manual 1.4 Glossary A Arcing If electrical voltage is applied between two parallel electrodes, a current flows in an evenly distributed layer. If the voltage exceeds a critical value, this layer contracts to a narrow circuit with high current density: an electric arc. The electrode material melts at this location, and explosive evaporation occurs. The cuvette can be destroyed under these conditions. E Electrical field strength Ratio of potential difference between two electrodes (in V) and the distance between these electrodes (electrode gap; in cm). However, this only applies if the electrical field is homogeneous, as with parallel plate electrodes (for example, in Eppendorf electroporation cuvettes). T Time constant 6 Time during which the voltage decreases to the value U/e. Eppendorf Eporator® — Operating manual 2 2 2.1 Product description Product description Main illustration Abb. 1:Main Illustration 1 2 3 6 Fig. 1: 4 5 Main Illustration 1 Operating controls 2 Cuvette carrier In the cuvette shaft 3 RS232 port Only for Technical Service 4 USB port For inserting a USB stick 5 Mains switch 6 Mains connection socket 7 Eppendorf Eporator® — Operating manual 2.2 Delivery package Number Description 1 Eppendorf Eporator 1 Mains cable 1 Cuvette carrier 5 Electroporation cuvette, 1 mm width of slit 5 Electroporation cuvette, 2 mm width of slit 1 Eporator operating manual 2.3 Features The Eporator is inserted for the electroporation. It contains a capacitor that is discharged during electroporation using a resistor, thus generating an exponential discharge curve. A voltage between 200 V and 2 500 V can be set. The exponential pulse generated by the Eporator is transferred to a disposable electroporation cuvette that contains the biological sample. Unlike devices from other manufacturers, the Eporator features an integrated cuvette carrier with cuvette holder. The construction of the Eporator minimizes the risk of short circuits. This also applies in the case of prohibited, high salt concentrations or maximum voltage. Even in the most unlikely situation of an electric arc in the cuvette, no bacterial suspension can escape from the cuvette and contaminate the device. The Eporator is easy to operate. None of the device components require user-maintenance. The experimental electroporation data can be saved on a USB stick and evaluated on a PC. Application protocols for the electroporation of various bacteria and yeast strains can be found on the Eppendorf home page www.eppendorf.com. 8 Eppendorf Eporator® — Operating manual 2.3.1 The principle of electroporation DNA and bacteria Electrical charge DNA in bacteria 200 V - 2 500 V; approx. 5 ms With the electroporation method, macromolecules such as DNA can be placed in electrocompetent bacteria or yeast strains. In the process, small-volume samples with high resistance are exposed to pulses with very high electrical field strengths. The short, high voltage pulses create temporary holes or pores in the cell membrane, through which macromolecules, e.g. plasmid DNA, can diffuse into the cell. The holes close after removal of the electrical field and a period of regeneration. The inserted plasmid DNA can then be transcribed and replicated in the cell. Unlike chemical transformation, electroporation is characterized by high transformation efficiency and simple execution. 9 Eppendorf Eporator® — Operating manual 3 3 3.1 Safety Safety Intended use The Eporator is intended for indoor use only and enables the simple and safe electroporation of bacteria and yeast strains using standard protocols. 3.2 User profile This device must only be used by skilled personnel with the appropriate training. Before using the device, read the operating manual carefully and familiarize yourself with the device's mode of operation. 3.3 Information on product liability In the following cases, the protection provided by the device may be impaired. The liability for the function of the device passes to the operator if: • The device is not used in accordance with the operating manual. • The device is used outside of the range of application described in the preceding chapters. • The owner has made unauthorized modifications to the device. 3.4 Safety instructions on the device Depiction Meaning WARNING Follow the operating manual. 10 Eppendorf Eporator® — Operating manual 3.5 WARNING! WARNING! WARNING! WARNING! CAUTION! NOTICE! Warnings for intended use WARNING! Damage to health from toxic, radioactive or aggressive chemicals as well as infectious liquids and pathogenic germs. Observe the national regulations for handling these substances, the biological security level of your laboratory, the material safety data sheets and the manufacturer's application notes. Wear personal protective equipment (PPE). WARNING! Lethal voltages inside the device. Ensure that the housing is always closed and undamaged so that no parts inside the device can be contacted by accident. Do not remove the housing of the device. Do not allow any liquids to enter the inside of the housing. Do not allow the device to be opened by anyone except service personnel who have been specifically authorized by Eppendorf. WARNING! Risk of electrical shock from damage to the device or mains cable. The device may only be switched on if the device and mains cable are undamaged. Only use devices which have been professionally installed or repaired. WARNING! Danger from using an incorrect power supply. Only connect the device to voltage supplies which correspond with the electrical requirements on the name plate. Only use sockets with a protective grounding conductor and a suitable mains cable. CAUTION! Poor safety due to incorrect accessories and spare parts. The use of accessories and spare parts other than those recommended by Eppendorf may impair the safety, functioning and precision of the device. Eppendorf cannot be held liable for any damage resulting from the use of non-recommended accessories and spare parts or from the improper use of such equipment. Only use accessories and original spare parts recommended by Eppendorf. NOTICE! Damage to device due to infiltration of liquids. When electroporation is performed in electroporation cuvettes that do not have lids, liquid can enter the device. Only use electroporation cuvettes with lids. 11 Eppendorf Eporator® — Operating manual 4 4 4.1 Hint! Installation Installation Preparing installation Retain the transport carton and packing material for subsequent safe transport or storage. Check all parts for any transport damage. 4.2 Selecting the location Please select the location for the Eporator according to the following criteria: • Mains connection (230 V/120 V/100 V) according to the name plate. This is located on the rear side of the device. • At least 10 cm away from adjacent devices and walls. • Solid bench with stable, horizontal and even work surface. 4.3 WARNING! Installing the instrument WARNING! Danger from using an incorrect power supply. Only connect the device to voltage supplies which correspond with the electrical requirements on the name plate. Only use sockets with a protective grounding conductor and a suitable mains cable. 1. Connect the provided mains cable to the mains connection socket of the Eporator and the power supply. 2. Switch on the Eporator at the mains power switch. 12 Eppendorf Eporator® — Operating manual 5 5 5.1 Operation Operation Control element overview Before using the Eporator for the first time, familiarize yourself with the operating controls and the display. Abb. 2:Operating controls 1 2 P2 P1 6 menu enter 5 exit Fig. 2: Operating controls Start 3 4 1 P1 program key with control LED Press: load voltage value. Hold down (> 2 s): save current voltage value. 2 P2 program key with control LED Press: load voltage value. Hold down (> 2 s): save current voltage value. 3 Press the Start key Start electroporation 4 Arrow keys Set voltage 5 Exit key Exit the menu 6 menu/enter key Select menu parameter 13 Eppendorf Eporator® — Operating manual Abb. 3:Display 1 Fig. 3: 2 5 Display 4 3 1 Actual voltage value (in V) 2 Actual discharge time (in ms) 3 Voltage symbol Voltage symbol appears after electroporation and disappears after the cuvette carrier has been removed. 4 Cuvette symbol Cuvette symbol appears when a cuvette is inserted. 5 Set voltage (in V) 5.2 Recommendations for sample preparation Independent of the device, the success of an electroporation is influenced by a variety of factors: • Quality and concentration of the inserted DNA • Quality and concentration of the cells • Resuspension medium of the DNA and cells 5.2.1 DNA preparation • DNA quality: In order to obtain a high transformation efficiency, the DNA solution should be pure and free of salts. • Buffer: DNA dissolved in TE buffer is acceptable if the DNA was dissolved in approx. ten times the quantity of electrocompetent cells. • Salt concentration: DNA from enzyme reactions (e.g. ligation) can be immediately used for • • • 14 electroporation if the salt concentration is under 5 M. If the ionic strength of the reaction combination is too high, it can be reduced via dilution or ethanol precipitation. After ethanol precipitation, the DNA can be resuspended in sterile, demineralized water or TE buffer. Incubation: Before electroporation, do not incubate the DNA with the cell suspension too long. Generally, the DNA should be added to the cells one minute before electroporation and the solution should be incubated at 0 °C. Long incubation times can lead to DNA degradation due to the DNases in the cell suspension. DNA concentration:The concentration of DNA can significantly influence the transformation efficiency. Frequency and efficiency: The frequency is defined as the number of transformed cells per surviving cells. The efficiency is defined as transformed cells per μg DNA. You can obtain a high frequency by using high DNA concentrations. High efficiency is achieved by using high cell concentration. Reducing the DNA concentration helps prevent co-transformations of the same cell. Eppendorf Eporator® — Operating manual 5.2.2 Electroporation medium • Sensitivity of the cells: The cells are sensitive to external influences because electroporation creates temporary pores in the cell membrane. • Electrolysis of the medium: During electroporation, the electrolysis of the medium • significantly influences the characteristics of the medium (e.g. the pH value). Many cells can die if fresh medium is not immediately added after electroporation for the recovery of the cells (see Regeneration of the cells on p. 18). Ionic strength of the medium: The ionic strength of the medium must be taken into account during electroporation of cells. In order to keep the resistance of the medium as high as possible, salts must be removed from the cell and DNA preparation. Ions remaining in the cell suspension often come from the culture medium. Higher transformation efficiency can be obtained by removing salts from the DNA solution and cell preparations. Generally, the lowest possible ionic solution that cells can withstand is preferred. 5.2.3 Growth and preparation of cells • Growth phase of cells: For optimum electroporation efficiency use bacterial (e.g. E. coli) or yeast cells in the exponential growth phase. • Preparation of cells: Thoroughly wash the cells in order to remove the growth medium that affects electrocompetence. • Concentration of cells: Use a final concentration of cells of about 1-3 x 10¹¹ cells/mL. If this value is exceeded, the homogenity of the electrical field can be affected. • Requirements for an electroporation: Each bacteria strain and yeast strain has optimal conditions that must be determined empirically. These conditions include: – The cell volume – The quantity of the specific plasmid – The used field strength (E). For E. coli, a field strength of 12-19 kV/cm is generally required to reach a maximum transformation efficiency. The field strengths are calculated from the voltage used and the distance of the electrodes (E = V/cm). 5.2.4 Temperature • Cooling electroporation cuvettes: Electroporation of microorganisms produces the best results at low temperatures (0-4 °C). Cool the electroporation cuvettes to 0 °C before electroporation. Remove residual moisture from the electroporation cuvette before inserting it in the Eporator. 15 Eppendorf Eporator® — Operating manual 5.3 5.3.1 Performing electroporation Switching on the device Press the mains power switch on the rear of the device to switch on the device. 5.3.2 Hint! Inserting cuvette To increase the efficiency of the electroporation, the electroporation cuvette can be cooled prior to filling. Remove residual liquids from the cuvette before further use. The integrated cuvette carrier is located at the front of the device to the right of the control panel. Proceed as follows: 1. Remove cuvette carrier from the device. The cuvette mount is now freely accessible for the insertion of the electroporation cuvette. Hint! Eppendorf electroporation cuvettes are sterilized with gamma rays and individually packaged. They are available in 3 different sizes. Width of slit and filling quantity are noted on the cuvettes. • 1 mm (up to 100 μL filling quantity) • 2 mm (up to 400 μL filling quantity) • 4 mm (up to 800 μL filling quantity) 2. Remove the electroporation cuvette from the individual packaging. 3. Remove the lid of the electroporation cuvette. 4. Fill the electroporation cuvette with the sample. The slit between the plate electrodes must be filled without bubbles. Eppendorf electroporation cuvettes can be labeled using a matte window. Hint! 5. Place the locking lid on the electroporation cuvette. NOTICE! 16 NOTICE! Damage to device due to infiltration of liquids. When electroporation is performed in electroporation cuvettes that do not have lids, liquid can enter the device. Only use electroporation cuvettes with lids. Eppendorf Eporator® — Operating manual 6. Place the electroporation cuvette in the cuvette mount with the plastic nose pointed towards the back (Fig. 4 on p. 17). Abb. 4:Insert the electroporation cuvette Fig. 4: Insert the electroporation cuvette Operate the cuvette carrier with two hands to prevent the cuvette carrier from tipping. Hint! 7. Slide the carrier in the cuvette shaft of the Eporator until it engages (Fig. 5 on p. 17). Abb. 5:Insert the cuvette carrier Fig. 5: Insert the cuvette carrier In the display, the actual parameters of the last run disappear and a cuvette symbol appears in the lower line. 17 Eppendorf Eporator® — Operating manual 5.3.3 Electroporation 1. Set a voltage between 200 V and 2 500 V using the arrow keys. After switching on the device, the last set voltage is always displayed. The most frequently used voltages can be saved and accessed using the program keys (see Programs on p. 18). Start 2. Press the Start key to start the electroporation process. • Charge and a progress bar appear in the display during loading. • A signal tone sounds after the discharge. • After the electroporation, the actual voltage (act), the discharge time of the performed electroporation, and a voltage symbol appear in the display. 3. Remove cuvette holder from the device. The cuvette symbol and voltage symbol disappear. 4. Remove electroporation cuvette from the cuvette holder and carefully transfer the sample to the corresponding medium without bubbles. 5.4 Regeneration of the cells Example for the bacterium E. coli: 1. After the electroporation, immediately place about 1 mL fresh medium (without selection chemicals) on the cells. A rich medium is best suited for this, e.g. the SOC medium for E. coli. 2. Carefully resuspend cells and transfer them to a new tube. 3. Incubate cells at optimal growth temperature (e.g. 37 °C for E. coli) for one hour at light vibration (e.g. with the Eppendorf Thermomixer comfort). 5.5 Determination of the transformation efficiency After the recovery period, the cells should be plated with a selection medium. To determine the efficiency, streak different cell concentrations and use this information to calculate the number of transformers/μg DNA. 5.6 Programs A program contains a saved voltage setting for quick access to frequently used settings. 5.6.1 Loading program The programs 1 and 2 are stored with the following parameters at delivery: • Program key P1: 1 700 V (e.g. for E. coli electroporation in 1 mm electroporation cuvettes) • Program key P2: 2 500 V (e.g. for E. coli electroporation in 2 mm electroporation cuvettes) 18 Eppendorf Eporator® — Operating manual Press desired program key The control LED above the pressed program key illuminates blue, the voltage is displayed. 5.6.2 Saving program 1. Use the arrow keys to set the voltage. P1 P2 2. Hold down the desired program key for at least 2 seconds. A signal tone sounds. Voltage stored appears in the display. The control LED over the pressed program key illuminates blue. The voltage is saved under the corresponding program number (1 to 2). 19 Eppendorf Eporator® — Operating manual 5.7 Enhanced settings Additional settings can be carried out in the menu. The date and time can be defined in the device in order to track exported data. The following settings are available: Abb. 6:Menu display 1 2 4 Fig. 6: Menu display 3 1 Data export The data export is described in the chapter "Export data" (see p. 20). 2 Date Set date. 3 Time Set time. 4 Signal tone Set signal tone. The display switches between vol1 (very quiet), vol2 (quiet), vol3 (loud), vol4 (very loud) and vol OFF (signal tone switched off). Open menu. 1. Press menu/enter key. menu enter Switch between parameters 2. Press menu/enter key. The selected parameter blinks in the display. menu enter Change the value of the parameter 3. Press the arrow keys. Exit the menu. exit 5.8 4. Press the exit key. The changed parameters are automatically saved. Exporting data Using the USB port at the rear of the device, you can save the last 50 experiments on a USB stick in separate TXT files (see Main illustration on p. 7). The files are named according to the corresponding sample number. This format is well-suited for additional editing in a text editor or Microsoft Excel. The data sets of an electroporation contain the following information: • Sample number (sample) of the experiment For each experiment, the device automatically assigns a four-digit sample number that is counted from 0001 upwards. 20 Eppendorf Eporator® — Operating manual • Date (date) of the experiment • Time (time) of the experiment • Set voltage (set) of the experiment Voltage that was selected for the corresponding experiment using the arrow keys. • Actual voltage (act) of the experiment Voltage that was actually applied to the electroporation cuvette in the corresponding experiment. Time constant of the discharge curve (tc) of the experiment Time constant of the discharge curve of the corresponding experiment. Software version (sw) of the device Serial number (serial no) of the device • • • Date and time can be specified in the enhanced settings (see p. 20). Hint! Insert USB stick 1. Insert a standard USB stick in the USB port at the rear of the device. (see Main illustration on p. 7) Open menu. menu enter 2. Press menu/enter key. The menu is displayed and a cursor blinks in the export display exp OFF. Activate parameter 3. Press one of the arrow keys. The selection item exp ON is displayed. Export data Start 4. Press the Start key. The data transfer is started. The main screen is displayed after the export is completed. 21 Eppendorf Eporator® — Operating manual 6 6 6.1 Troubleshooting Troubleshooting General errors Many factors can contribute to a low transformation efficiency: • The set voltage: Specific voltage parameters exist for each microorganism. Some cells die during electroporation. If the field strength is too high or too low, a low transformation efficiency is achieved. The expected survival rate varies between 20 % and 80 % of inserted cells. The electroporation of E. coli requires an impulse of approximately 5 ms and field strengths between 12 kV/cm and 19 kV/cm. You should check the transformation efficiency at different voltages in order to optimize conditions. Application protocols for the electroporation of various bacteria and yeast strains can be found on the Eppendorf home page www.eppendorf.com. • The cells: Generally, cells are transformed most efficiently when they are in an early to medium log phase. Different growth conditions can improve the transformation efficiency (see Growth and preparation of cells on p. 15). If too many cells are killed, the electroporation conditions for the strain must be optimized and the DNA preparation and cell preparation for toxic or organic substances must be inspected (see DNA preparation on p. 14). After electroporation, cells (especially E. coli) must be immediately transferred to a rich medium in order to obtain good results. Even a small delay in completing this step can lead to a significantly lower transformation efficiency (see Regeneration of the cells on p. 18). • The DNA: The quantity and quality of the DNA used should be checked before electroporation. Incorrectly concentrated or degraded DNA leads to low transformation efficiency. Salts and other components that can have a toxic effect on cells must be removed from the DNA preparation before the preparation process. The DNA preparation should be added to the cells no longer than one minute before the electroporation. DNase present in cell preparation can degrade the DNA and thereby cause a low transformation efficiency (see DNA preparation on p. 14). • The temperature: Electroporation cuvettes should be cooled to 0 °C - 4 °C before electroporation (see Temperature on p. 15). This produces better results than with electroporation cuvettes at room temperature. If frozen cells are used, electroporation should be performed immediately after thawing. Frozen cells can be stored a maximum of 6 - 12 months in 10 % - 15 % glycerine at -80 °C. • Deviating voltages during transformation: The voltage applied to the electroporation cuvette (act) greatly differs from the set voltage (set) A too low resistance has several causes: – The cells were washed and resuspended in a buffer with a too high ionic strength. – The cells were not sufficiently cleaned during the preparation. After insufficient washing, growth medium residue, which has been carried along, leaves behind unwanted salts. – Lysed cells are in the preparation. They contribute to the reduction of the resistance of the medium. – The salt concentration in the DNA preparation is too high. 22 Eppendorf Eporator® — Operating manual 6.2 Hint! Error messages If the proposed measures repeatedly fail to remedy the fault, contact your local Eppendorf partner. The addresses of our distributors can be found on our website www.eppendorf.com. The addresses of our sales offices can be found on the second to last page of this operating manual. Quit all error messages with the Exit key. 6.2.1 Operational error Symptom/ message Display remains dark Cause • The device was not connected to the mains supply or the mains power switch was not switched on. Remedy Check the mains connection and the power cable. Switch on the device. The display shows: function not available • A key that is not available in the Message disappears after The display shows: no cuvette • The Start key was pressed 1. Insert an electroporation cuvette. 2. Start electroporation (see Inserting cuvette on p. 16). The display shows: no USB stick • The export command was 1. Insert a USB stick in the USB port of the device. 2. Repeat the export command (see Exporting data on p. 20). The display shows: USB stick full • A USB stick with no storage 1. Insert a USB stick with sufficient storage capacity in the USB port of the device. 2. Repeat the export command (see Exporting data on p. 20). The display shows: no export • The export of the data from the 1. Insert a standard USB stick in current device state was pressed (e.g. the Exit key in the main display). before an electroporation cuvette was inserted. activated before a USB stick was inserted in the USB port of the device. capacity was inserted in the USB port of the device. device has failed. • All existing electroporation protocols have already been saved on the USB stick. The display shows: no protocol • The export of data has failed. No exportable protocols are located in the device. about 2 seconds. the USB port of the device. 2. Repeat the export command (see Exporting data on p. 20). 1. Perform electroporation 2. Repeat the export command (see Exporting data on p. 20). 23 Eppendorf Eporator® — Operating manual 6.2.2 Device error Symptom/ message 24 Cause Remedy The display shows: Hardware error • Device error 1. Quit the error message with the Exit key. 2. Perform the electroporation again. If the error message appears again: switch the device off and on. The display shows: internal error • Device error 1. Quit the error message with the Exit key. 2. Perform the electroporation again. If the error message appears again: switch the device off and on. Eppendorf Eporator® — Operating manual 7 Maintenance 7 Maintenance 7.1 Cleaning DANGER! NOTICE! DANGER! Electric shock as a result of penetration of liquid. Switch off the device and disconnect it from the power supply before any maintenance or cleaning work is carried out. Do not allow any liquids to enter the inside of the housing. Do you use any spray disinfectants on the housing. Only reconnect the device to the power supply once it is completely dry. NOTICE! Damage from using aggressive chemicals. Do not use any aggressive chemicals on the device or its accessories, such as strong and weak bases, strong acids, acetone, formaldehyde, halogenated hydrocarbons or phenol. If the device becomes contaminated with aggressive chemicals, clean it immediately with a mild cleaning agent. Wet a cloth with a mild cleaning fluid and demineralized water and remove the contamination on the outside of the device. 7.2 Replacing fuses The fuse holder is located between the mains connection socket and the mains power switch. 1 2 1. Disconnect the power plug. 2. Press the upper and lower end of the plastic springs 1 together and pull the fuse holder 2 fully out. 3. Replace faulty fuses and reinsert the fuse holder. Make sure that the guiding rail 3 is positioned correctly. 25 Eppendorf Eporator® — Operating manual 8 8 8.1 Technical data Technical data Power supply Mains power connection 100 V to 240 V ±10 %, 50 Hz to 60 Hz Automatic adjustment to the voltage Power consumption: 20 W Charging time: < 10 s 8.2 Ambient conditions Environment: For indoor use only. Ambient temperature: 5 °C to 40 °C Relative humidity: 10 % to 95 % Atmospheric pressure: 79.5 kPa to 106 kPa Degree of contamination: 2 8.3 Weight/dimensions Weight: 3.2 kg Dimensions: Width: 19 cm (7.48 in.) Height: 12.5 cm (4.92 in.) Depth: 27.5 cm (10.83 in.) 8.4 Interfaces USB: USB 2.0 RS232: Only for Technical Service 8.5 Operating mode Power-on time: 26 10 %, 120 s max Eppendorf Eporator® — Operating manual 9 9 9.1 Ordering information Ordering information Eporator Order no. (international) Order No. (North Description America) 4309 000.019 4309 000.027 9.2 Eppendorf Eporator Accessories Order no. (international) Order No. Description (North America) 4307 000.569 4307 000.593 4307 000.623 940001005 940001013 940001021 Electroporation cuvettes 50 pieces, sterile Gap width 1 mm, 100 μL Gap width 2 mm, 400 μL Gap width 4 mm, 800 μL 4308 078.006 940001102 Cuvette stand for 16 cuvettes 4309 900.010 4309 900.010 Operating Manual Eppendorf Eporator 27 Eppendorf Eporator® — Operating manual 10 Transport, storage and disposal 10 Transport, storage and disposal 10.1 Storage Rel. humidity Air pressure In transport packaging -25 to 55°C Air temperature 10 to 95% 70 to 106 kPa Without transport packaging 10 to 95% 70 to 106 kPa -5 to 45°C 10.2 Decontamination before shipment If you are shipping the device to the authorized Technical Service for repairs or to your authorized dealer for disposal please note the following: WARNING! Risk to health from contaminated device. WARNING! 1. Follow the instructions in the decontamination certificate. This can be found in a PDF file on our homepage (www.eppendorf.com/decontamination). 2. Decontaminate all the parts you want to dispatch. 3. Enclose the fully-completed decontamination certificate for returned goods (incl. the serial number of the device) with the dispatch. 10.3 Transport Only transport the device in the original packaging. 28 Air temperature Rel. humidity Air pressure General transportation -25 °C to 60 °C 10 % to 95 % 30 kPa to 106 kPa Air freight -40 °C to 55 °C 10 % to 95 % 30 kPa to 106 kPa Eppendorf Eporator® — Operating manual 10.4 Disposal In case the product is to be disposed of, the relevant legal regulations are to be observed. Information on the disposal of electrical and electronic devices in the European Community: Within the European Community, the disposal of electrical devices is regulated by national regulations based on EU Directive 2002/96/EC pertaining to waste electrical and electronic equipment (WEEE). According to these regulations, any devices supplied after August 13, 2005, in the business-to-business sphere, to which this product is assigned, may no longer be disposed of in municipal or domestic waste. To document this, they have been marked with the following identification: Because disposal regulations may differ from one country to another within the EU, please contact your supplier if necessary. In Germany, this is mandatory from March 23, 2006. From this date, the manufacturer has to offer a suitable method of return for all devices supplied after August 13, 2005. For all devices supplied before August 13, 2005, the last user is responsible for the correct disposal. 29 Your local distributor: www.eppendorf.com/worldwide Eppendorf AG · 22331 Hamburg · Germany · Tel: +49 40 53801-0 · Fax: +49 40 538 01-556 · E-mail: [email protected] Eppendorf North America, Inc. · 102 Motor Parkway · Hauppauge, N.Y. 11788-5178 · USA Tel: +1 516 334 7500 · Toll free phone: +1 800-645-3050 · Fax: +1 516 334 7506 · E-mail: [email protected] Application Support Europe: Tel: +49 1803 666 789 (Preis je nach Tarif im Ausland; 9 ct/min aus dem dt. Festnetz; Mobilfunkhöchstpreis 42 ct/min) [email protected] North America: Tel: +1 800 645 3050 · E-mail: [email protected] Asia Pacific: Tel: +60 3 8023 6869 · E-mail: [email protected]