1
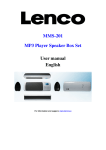
MP3 PLAYER USER MANUAL
ITMP-505
★ Please read this manual carefully before operating your unit
★ Keep this manual convenient for reference.
Catalogue
PREFACE---------------------------------------------------------------------------------------------------------------------------------------------------3
NOTICE------------------------------------------------------------------------------------------------------------------------------------------------------3
FEATURE---------------------------------------------------------------------------------------------------------------------------------------------------4
1. Buttons and the functions----------------------------------------------------------------------------------------------------------------------------5
1.1 MSC/VOI Operation -----------------------------------------------------------------------------------------------------------------------6
1.2 FM Operation---------------------------------------------------------------------------------------------------------------------------------7
1.3SYSOperation---------------------------------------------------------------------------------------------------------------------------------8
2. Operation Process-------------------------------------------------------------------------------------------------------------------------------------8
2.1 Open/Close Player -----------------------------------------------------------------------------------------------------------------------8
2.2 ModeSelection-------------------------------------------------------------------------------------------------------------------------------9
2.3 MSC(Music Mode) -------------------------------------------------------------------------------------------------------------------------9
2.3.1 Play Music----------------------------------------------------------------------------------------------------------------------------------9
2.3.2 Operation of Music Menu--------------------------------------------------------------------------------------------------------------10
2.4 VOI ( Voice Mode ) -----------------------------------------------------------------------------------------------------------------------14
2.4.1 Play Voice---------------------------------------------------------------------------------------------------------------------------------14
2.4.2 Operation of Voice Menu--------------------------------------------------------------------------------------------------------------14
2.5 FM (FM Mode) -----------------------------------------------------------------------------------------------------------------------------16
2.5.1 FM-------------------------------------------------------------------------------------------------------------------------------------------17
2.5.2 Operation of FM Menu-----------------------------------------------------------------------------------------------------------------17
2.6 SYS (System Setting) ------------------------------------------------------------------------------------------------------------------19
2.6.1 Backlight Time---------------------------------------------------------------------------------------------------------------------------19
2.6.2 Power off----------------------------------------------------------------------------------------------------------------------------------20
2.6.3 Replay Set --------------------------------------------------------------------------------------------------------------------------------20
2.6.4 Contrast------------------------------------------------------------------------------------------------------------------------------------21
2.6.5 Language----------------------------------------------------------------------------------------------------------------------------------21
2.6.6 Auto Music Transfer--------------------------------------------------------------------------------------------------------------------22
1
2.6.7 Memory Info------------------------------------------------------------------------------------------------------------------------------22
2.6.8 Edition--------------------------------------------------------------------------------------------------------------------------------------22
2.6.9 Default-------------------------------------------------------------------------------------------------------------------------------------23
2.6.10 Exit----------------------------------------------------------------------------------------------------------------------------------------23
2.7 USB Connection--------------------------------------------------------------------------------------------------------------------23
3. Technical Specification----------------------------------------------------------------------------------------------------------------------24
4. Appendix: User's Guide of AMT----------------------------------------------------------------------------------------------------------25
Introduction-------------------------------------------------------------------------------------------------------------------------------25
Notice--------------------------------------------------------------------------------------------------------------------------------------25
Operation---------------------------------------------------------------------------------------------------------------------------------25
4.1 System Startup and Functions--------------------------------------------------------------------------------------------------25
4.2 Supported Music File Type------------------------------------------------------------------------------------------------------26
4.3 AMT Window and Dynamic Function Configuration---------------------------------------------------------------------------26
4.4 Tone Quality, File Size and Conversion Speed---------------------------------------------------------------------------------27
4.5 Menu-------------------------------------------------------------------------------------------------------------------------------28
4.6 Safe File Folder (RAWDATA) -----------------------------------------------------------------------------------------------28
4.7 Uninstall AMT--------------------------------------------------------------------------------------------------------------------28
5.Warranty------------------------------------------------------------------------------------------------------------------------------------29
2
PREFACE
Please read the data along with the player carefully before you use it, so that you can operate it conveniently and fast.
If the information of the book changes, we are sorry not to inform you separately.
NOTICE
1. Do not use the player in the extra hot, cold, dusty or damp environments.
2. Please confirm the lock key is unlocked before use.
3. Do not let the player knock against any hard objects, otherwise it may cause the surface of the player to scratch or result
in any inner components of being damaged.
4. In the following states please change the battery:
a. A hollow battery icon displays on the screen.:
b. The system shuts down automatically, and it shuts down quickly when you open it again.
c. When you press the key there is no reaction or after you turn it on it shows "Low Battery".
5. Try to avoid using the player in an extra dry environment, in order to protect it from static.
6. Do not disconnect the player from PC when it is downloading or uploading or formatted, otherwise it may cause an error;
7. If LCD shows "Flash Error" after power on, please connect with PC by USB cable to format player's hard drive. And then
power on again;
8. The player supports the function of automatic music transformer (AMT). The requirements and limits about running AMT,
please refer to the appendix (User's Guide of AMT).
Instructions shall caution users that modifications not approved by the party responsible for compliance
could void user’s authority to operate the equipment.
The following or equivalent as appropriate:
“NOTE: This equipment has been tested and found to comply with the limits for a Class B digital device, pursuant to Part 15
of the FCC Rules. These limits are designed to provide reasonable protection against harmful interference in a residential
3
installation. This equipment generates, uses and can radiate radio frequency energy and, if not installed and used in
accordance with the instructions, may cause harmful interference to radio communications. However, there is no guarantee
that interference will not occur in a particular installation.
If this equipment does cause harmful interference to radio or television reception, which can be determined by turning the
equipment off and on, the user is encouraged to try to correct the interference by one or more of the following measures:
•
Reorient or relocate the receiving antenna.
•
Increase the separation between the equipment and receiver.
•
Connect the equipment into an outlet on a circuit different from that to which the receiver is connected.
•
Consult the dealer or an experienced radio/TV technician for help.”
Statement that the product complies with Part 15 (i.e. “This device complies with Part 15 of the FCC Rules. Operation is
subject to the following two conditions: (1) This device may not cause harmful interference, and (2) this device must accept
any interference received, including interference that may cause undesired operation.”
FEATURES
1. Supports automatic music transformer (AMT), which can transform the format of WMA, WAV, OGG, & CD to MP3;
2. Supports 8 kinds of EQ;
3. Supports playing files in three-layer directory;
4. Supports browsing Folder;
5. Supports A-B replay;
6. Remembers the position of operation when the player shuts down and can restart from the last position once turned on;
7. Supports FM radio function;
8. Supports the update of software;
9. Supports FAT16 and FAT32 file system;
10. Supports Windows 98(should install driver) /2000 / XP / Vista / Windows 7 / MAC OS-X;
11. Supports power on and shut off by cartoon.
4
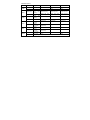
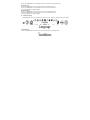
1. Buttons and the functions
1. VOL2. VOL+
3. LAST
4. NEXT
5. PLAY/PAUSE
6. NECK STRING HOLE
7. USB JACK
8. HOLD
9. LCD
10. MODE
11. REC
12. HEADPHONE JACK
Attention: If there is no operation of the player within 5 seconds in all menus of each mode, the player will return
to the main menu of the mode automatically;
5
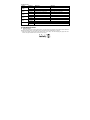
1.1 MSC/VOI Operation
Button
PLAY/
STOP
Operation
Pause State
Main Menu
Submenu
Return to
menu
Shut off
Short Press
Pause
Play
Long Press
Shut off
Select
song
playing
Shut off
Return to top mode
menu
Shut off
Select next song
Select next menu
Select next menu
Select next
continuously
Select next menu
continuously
Short Press
NEXT
next
and
Long Press
Fast forward
Select next
continuously
Short Press
Select
song
playing
Select last song
Long Press
Fast backward
LAST
Short Press
VOL+
Long Press
Short Press
VOLLong Press
MODE
Play State
Short Press
Long Press
last
and
song
menu
Select last menu
Select last song
Select last menu
continuously
continuously
Volume
Volume increase
/
increase
Volume
Volume
increase
/
increase
continuously
continuously
Volume
Volume decrease
/
decrease
Volume
Volume
decrease
/
decrease
continuously
continuously
Enter
into
Enter into main
Enter into submenu
main menu
menu
Stop playing and enter into top mode menu
6
main
Select last menu
Select last menu
continuously
/
/
/
/
Confirm
return
and
1.2 FM Operation
Button
Operation
PLAY/
STOP
Short Press
Long Press
Short Press
NEXT
Long Press
Short Press
LAST
Long Press
VOL+
VOLMODE
Tuning
mode
Switch
to
Preset mode
Shut off
Increase
0.1MHz
gradually
Increase
0.1MHz
search
continuously
Decrease
0.1MHz
gradually
Decrease
0.1MHz
search
continuously
Preset mode
Auto scan
Main menu
Submenu
Select
next
preset channel
Shut off
Increase
0.1MHz
gradually
Stop
scanning
Shut off
Return to FM
mode
Shut off
Return to main
menu
Shut off
/
Select next menu
Increase
0.1MHz search
continuously
/
Select next menu continuously
Decrease
0.1MHz
gradually
/
Select last menu
Decrease
0.1MHz search
continuously
/
Select last menu continuously
Short Press
Volume increase
/
/
Long Press
Volume increase continuously
/
/
Short Press
Volume decrease
/
/
Long Press
Volume decrease continuously
/
Short Press
Enter into main menu
/
/
Enter
into
submenu
Long Press
Stop FM reception and enter into top mode menu
7
Confirm
return
and
1.3 SYS Operation
Button
Operation
PLAY/
STOP
NEXT
LAST
VOL+
VOLMODE
Main menu
Submenu
Short Press
Return to top mode menu
Return to main menu
Long Press
Shut off
Shut off
Short Press
Select next menu
Select next menu
Long Press
Select next menu continuously
Select next menu continuously
Short Press
Select last menu
Select last menu
Long Press
Select last menu continuously
Select last menu continuously
Short Press
/
/
Long Press
/
/
Short Press
/
/
Long Press
Short Press
Long Press
/
Enter submenu
Enter into top mode menu
/
Confirm and return to main menu
2. Operation Process
2.1
Open/Close Player
When you want to turn on and turn off the player, you only need to long press the "PLAY" button. Please confirm the
strength of the battery before you operate the player, and make sure the "HOLD" button is unlocked.
1. In the shut off state, long press the "PLAY" button will turn on the player, and after displaying the graphic intro for 2
seconds, the player will enter into the main menu of the player.
8
2. In the working state, long press the "PLAY" button will shut off the player;
3. In the process of power on,if the player is in "HOLD" state, it will close after displaying the information;
And also in the process of power on, if the battery is low, the player will shut off after displaying the information.
2.2 Mode Selection
1.
2.
3.
In any mode, long press "MODE" button will enter into the top mode menu;
Short press "NEXT/LAST" button to switch among all kinds of modes;
Short press "MODE" button can enter into the main menu of the corresponding mode.
2.3 MSC(Music Mode)
Supports playing files in 3 classes directory;
Supports playing music, pause, adjusting volume, fast forward, fast backward, A-B replay, repeat mode, equalizer
selection, etc;
Supports browsing folder, delete files and delete folder (delete all files in this folder).
2.3.1 Play Music
1. In the top mode menu, select the icon of "MSC", short press "MODE" button, the player will enter into the main menu of
music mode, and it will play music automatically;
9
2.
3.
Short press "PLAY" button, will pause or play music;
In the state of playing music, long press "NEXT" or "LAST" buttons, the player will fast forward or backward scan the
active song;
4. Short press "NEXT" or "LAST" button, select next or last song;
5. Press "VOL+" or "VOL-" button to adjust the volume, and the range of volume is 31 steps;
6.
In the pause/stop state or in music menu, long press "MODE" button, the player will return to the top mode menu.
2.3.2
Operation of Music Menu
Music menu includes play menu and stop menu.
Play Menu: EQ, Repeat, A-B Replay, Replay Times, Replay Gap and Exit;
Pause Menu: Browse Folder, Delete File, Delete All Files and Exit.
1. Short press "MODE" button and enter into main menu;
2. Short press "NEXT" or "LAST" button to switch menu item;
3. Short press "MODE" button to confirm the selection or enter into the submenu;
10
4. Short press "PLAY" button, returns to last menu until enter into the main menu of music mode.
EQ: includes Normal, Pop, Rock, Jazz, Headphone, Live and Bass;
a. In playing state, short press "MODE" button and enter into Play Menu, select "Repeat";
b. Short press "MODE" again to confirm selection and enter into submenu;
c. Press "NEXT/LAST" to select different EQ mode, EQ be changed and saved synchronization;
d. Short Press "MODE" to confirm selection, and return to the main menu of music mode.
Repeat: includes Repeat All, Repeat One, Normal, Random, Repeat Folder and Preview;
a. In playing state, short press "MODE" button and enter into Play Menu, select "Repeat";
b. Short press "MODE" again to confirm selection and enter into submenu;
c. Press "NEXT/LAST" to select different repeat mode;
d. Short Press "MODE" to confirm selection, and return to the main menu of music mode.
A-B Replay:Set the A, B point of replay;
11
a. In playing state, short press "MODE" button and enter into Play Menu, select "A-B Replay";
b. Short press "MODE" button and return to the main interface of music mode, "A-B" icon begins flicker;
c. Short press "NEXT" button to set the A, B point of replay, and player will replay between the A, B point;
d. Short press "LAST" button to cancel the A, B point, and "A-B" icon flickers waiting to be set;
e. Short press "PLAY" button to cancel the A, B point and return to the main menu of music mode;
f. Short press "MODE" button also to cancel the A, B point and enter into the Play Menu.
Replay Times:Set the times of A-B replay;
a. In playing state, short press "MODE" button and enter into Play Menu, select "Replay Times";
b. Short press "MODE" again to confirm selection and enter into submenu;
c. Press "NEXT / LAST" to select different numbers;
d. Short Press "MODE" to confirm selection, and return to the main menu of music mode.
Replay Gap:Set the gap of A-B replay;
a. In playing state, short press "MODE" button and enter into Play Menu, select "Replay Gap";
b. Short press "MODE" again to confirm selection and enter into submenu;
c. Press "NEXT/LAST" to select different seconds;
d. Short Press "MODE" to confirm selection, and return to the main interface of music mode.
Browse Folder: Set the current folder, which you want to play;
12
a. In pause state, short press "MODE" button and enter into Pause Menu, select "Browse Folder";
b. Short press "MODE" again to confirm selection and enter into submenu;
c. Press "NEXT/LAST" button to select different folder;
d. Short press "VOL+" ("VOL-") button to enter into (exit) folder. And if the folder is root folder, press "VOL-" button to return
to the main interface of music mode;
e. Short Press "MODE" to confirm selection, and return to the main interface of music mode to play the first song in this
folder.
Delete File: Delete the current file, which is playing;
a. In pause state, short press "MODE" button and enter into Pause Menu, select "Delete File";
b. Short press "MODE" again to confirm selection and enter into submenu;
c. Press "NEXT/LAST" button to select "Yes" or "No";
d. Short Press "MODE" to confirm deleting, and return to the main interface of music mode.
Delete All Files:Delete all files in the current folder;
a. In pause state, short press "MODE" button and enter into Pause Menu, select "Delete All Files";
b. Short press "MODE" again to confirm selection and enter into submenu;
c. Press "NEXT/LAST" button to select "Yes" or "No";
13
d. Short Press "MODE" to confirm deleting, return to the main interface of music mode, and the player in the state of "No
File".
Attention: the player will return to the top mode menu after displays "No File" without any operation in two
seconds.
2.4 VOI (Voice Mode)
Supports A-B replay, pause, adjusting volume, fast forward, fast backward, A-B replay, repeat mode and delete files;
2.4.1 Play Voice
1. In the top mode menu, select the icon of "VOI", short press "MODE" button, the player will enter into the main interface of
voice mode, and it will play voice automatically;
2. Short press "PLAY" button, will pause or play voice;
3. In the state of playing voice, long press "NEXT" or "LAST" buttons, the player will fast forward or backward scan the
active voice;
4. Short press "NEXT" or "LAST" button, select next or last voice;
5. Press "VOL+" or "VOL-" button to adjust the volume;
2.4.2 Operation of Voice Menu
Voice menu includes play menu and stop menu.
Play menu: Repeat, A-B Replay and Exit;
Pause menu: Delete File, Delete All Files and Exit;
1.
Short press "MODE" button and enter into main menu;
14
2.
3.
4.
Short press "NEXT" or "LAST" button to switch menu item;
Short press "MODE" button to confirm the selection or enter into the submenu;
Short press "PLAY" button, returns to last menu until enter into the main interface of voice mode.
Repeat: includes Repeat Folder, Repeat One, Normal, Random and Preview;
a. Short press "MODE" button and enter into voice menu, select "Repeat";
b. Short press "MODE" again to confirm selection and enter into submenu;
c. Press "NEXT/LAST" to select different repeat mode;
d. Short Press "MODE" to confirm selection, and return to the main interface of voice mode.
A-B Replay:Set the A, B point of replay;
a. Short press "MODE" button and enter into voice menu, select "A-B Replay";
b. Short press "MODE" button and return to the main interface of voice mode, "A-B" icon begins flicker;
c. Short press "NEXT" button to set the A, B point of replay, and player will replay between the A, B point;
d. Short press "LAST" button to cancel the A, B point, and "A-B" icon flickers waiting to be set;
e. Short press "PLAY" button to cancel the A, B point and return to the main interface of voice mode;
f. Short press "MODE" button also to cancel the A, B point and enter into the voice menu.
15
Delete File: Delete the current file, which is playing;
a. Short press "MODE" button and enter into voice menu, select "Delete File";
b. Short press "MODE" again to confirm selection and enter into submenu;
c. Press "NEXT/LAST" button to select "Yes" or "No";
d. Short Press "MODE" to confirm deleting, and return to the main interface of voice mode.
Delete All Files: Delete all files in the folder of "VOICE";
a. Short press "MODE" button and enter into voice menu, select "Delete All Files";
b. Short press "MODE" again to confirm selection and enter into submenu;
c. Press "NEXT/LAST" button to select "Yes" or "No";
d. Short Press "MODE" to confirm deleting, return to the main interface of voice mode, and the player in the state of "No
File".
Attention: the player will return to the top mode menu after displays "No File" in two seconds.
2.5 FM (FM Mode)
FM Mode supports 76MHz—108MHz radio reception, preset, tuning, auto scan, save channel, and delete channel.
16
2.5.1 FM
1. In the top mode menu, select the icon of "FM", short press "MODE" button, the player will enter into the main interface of
FM mode;
2. Short press "NEXT/LAST" button to turn the frequency by 0.1MHz step;
3. Long press "NEXT/LAST" button to turn the frequency continuously automatically until get a new channel;
4. Short press "PLAY" button to switch to first preset channel, and short press "PLAY" again to next preset channel; if there
is no preset channel, pressing "PLAY" button is invalidated;
5. Press "VOL+/VOL-" button to adjust volume;
6. Short press "MODE" to enter into FM submenu.
2.5.2 Operation of FM Menu
FM Main Menu includes Save Channel, Auto Scan, Delete Channel, Delete All Channels, Normal Frequency,
Japanese Frequency and Exit;
1. In the state of radio reception, short press "MODE" to enter into FM main menu;
2. Press "NEXT/LAST" button to switch menu item;
3. Short press "MODE" to enter into FM submenu or confirm the selection;
4. Short press "PLAY" button to return to last menu until the main interface of FM mode.
Save Channel:
a. Short press "MODE" button and enter into FM main menu, select "Save Channel";
17
b. Short press "MODE" button to save current channel, and return to the main interface of FM mode;
Attention: the player can save 30 channels at most, if you want to save a channel that has beyond 30, the player
will save the channel on the last position. And all channels will be organized automatically by frequency from low
to high.
Auto Scan:
a. Short press "MODE" button and enter into FM main menu, select "Auto Scan";
b. Short press "MODE" button again and return to the main interface of FM, the player will scan all the frequency and save
the channel automatically.
Delete Channel:
a. Short press "MODE" button and enter into FM main menu, select "Delete Channel";
b. Short press "MODE" button again to confirm and enter into FM submenu;
c. Short press "NEXT/LAST" button to select the channel, which you want to delete;
d. Short press "MODE" button to confirm deleting the current channel, and return to the main interface of FM;
e. Short press "PLAY" button to cancel deleting the current channel, and return to FM main menu;
f. If there’s no saved channel before the player enter into "Delete Channel", it will display "No Channel" on LCD.
Delete All Channels:
a. Short press "MODE" button and enter into FM main menu, select "Delete All Channels";
b. Short press "MODE" button again to confirm and enter into FM submenu;
c. Short press "NEXT/LAST" button to select "Yes" or "No";
18
d. Short press "MODE" button to confirm deleting all channels, and return to the main interface of FM.
Normal Frequency:
a. Short press "MODE" button and enter into FM main menu, select "Normal Frequency";
b. Short press "MODE" button to confirm selection and return to the main interface of FM;
c. The range of FM frequency: 87MHz~108MHz.
Japanese Frequency:
a. Short press "MODE" button and enter into FM main menu, select "Japanese Frequency";
b. Short press "MODE" button to confirm selection and return to the main interface of FM;
c. The range of FM frequency: 87MHz~108MHz.
2.6
SYS (System Setting)
Includes Backlight Time, Power Off, Replay Set, Contrast, Language, Audio Auto Transform, Memory Info, Edition,
Default and Exit;
1. In the top mode menu, select the icon of "SYS", short press "MODE" button, the player will enter into the main menu of
system setting;
2. Press "NEXT/LAST" button switch menu item;
3. Short press "MODE" button to enter into submenu of system setting;
4. Short press "PLAY" button to return to last menu until the top mode menu;
2.6.1 Backlight Time
1. Short press "MODE" button and enter into main menu of system setting, select "Backlight Time";
19
2. Short press "MODE" button again to confirm and enter into submenu;
3. Press "NEXT/LAST" button to select 0 (always light), 5, 10, 20 or 60 seconds;
4. Short press "MODE" button to confirm selection, and return to the main menu of system setting.
2.6.2 Power off:
1. Short press "MODE" button and enter into main menu of system setting, select "Power Off";
2. Short press "MODE" button again to confirm and enter into submenu;
3. Short press "NEXT/LAST" button to choose "Off Time" or "Sleep Time";
4. Short press "MODE" button to confirm and enter into selection of time;
5. In Off Time, press "NEXT/LAST" button to select 0 (Cancel), 10, 20 … or 60 seconds;
6. In Sleep Time, press "NEXT/LAST" button to select 0 (Cancel), 10, 20 … or 120 minutes;
7. Short press "MODE" button to confirm selection, and return to the main menu of system setting.
Attention: Off Time means the player in idle state and without any operation in the time you set, it will
automatically power off; Sleep Time means the player will power off immediately whether in working sate or idle
state, when the time you set arrives.
2.6.3 Replay Set
1. Short press "MODE" button and enter into main menu of system setting, select "Replay Set";
20
2. Short press "MODE" button again to confirm and enter into submenu;
3. Short press "NEXT/LAST" button to choose "Manual Mode" or "Auto Mode";
4. Short press "MODE" button to confirm selection.
Attention: Manual Mode means that you should set Replay Times and Gap manually when playing music; Auto
Mode means A-B replay continually without setting Replay Times and Gap.
2.6.4 Contrast
1. Short press "MODE" button and enter into main menu of system setting, select "Contrast";
2. Short press "MODE" button again to confirm and enter into submenu;
3. Press "NEXT / LAST" button to select level of 1-16, and the contrast will be changed synchronous, but it won’t be saved;
4. Short press "MODE" button to confirm selection, and return to the main menu of system setting.
2.6.5 Language
1. Short press "MODE" button and enter into main menu of system setting, select "Language";
2. Short press "MODE" button again to confirm and enter into submenu;
3. Press "NEXT/LAST" button to select the language of 12 nations;
4. Short press "MODE" button to confirm selection, and return to the main menu of system setting.
21
2.6.6 Auto Music Transfer:
Transform other audio format to the format of MP3.
1. Short press "MODE" button and enter into main menu of system setting, select "Auto Music Transfer";
2. Short press "MODE" button again to confirm and enter into submenu;
3. Press "NEXT/LAST" button to select "Open" or "Close";
4. Short press "MODE" button to confirm selection, and return to the main menu of system setting.
2.6.7 Memory Info
1. Short press "MODE" button and enter into main menu of system setting, select "Memory Info";
2. Short press "MODE" button again to confirm and enter into submenu;
3. Short press "MODE" button to return to the main menu of system setting.
2.6.8 Edition
1. Short press "MODE" button and enter into main menu of system setting, select "Edition";
2. Short press "MODE" button again to confirm and enter into submenu;
3. Short press "MODE" button to return to the main menu of system setting.
22
2.6.9 Default
1. Short press "MODE" button and enter into main menu of system setting, select "Default";
2. Short press "MODE" button again to confirm and enter into submenu;
3. Press "NEXT/LAST" button to select "Yes" or "No";
4. Short press "MODE" button to confirm selection, and return to the main menu of system setting.
Attention: Restore the original factory default settings, includes the menu setting.
2.6.10 Exit
1. Short press "MODE" button and enter into main menu of system setting, select "Exit";
2. Short press "MODE" button to confirm selection, and return to the top mode menu.
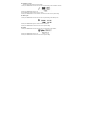
2.7 USB Connection
The player can connect with PC and transmit data by USB port
1. Check USB port on your PC;
2. Connect the player to PC's USB port using USB cable (it also can use the extended USB line) ;
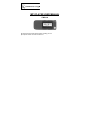
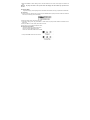
3. After connecting with the USB port, the USB interface will be displayed on LCD, as the right picture shows;
4. If the function of AMT has been opened, and then the player connects with PC, PC will automatically add two disks mark:
one is play’s U disk, another is AMT CDROM;
5. When the player downloads the other format audio files, it will transform the files to MP3 format and then store them in the
player’s U disk;
23
6. When the player transmits files, the USB interface will show "BUSY" on LCD. If the transmission has finished, it will show
"IDLE" on LCD;
7. With the connection of player and PC by USB cable, you also can exit USB mode to play music:
a. Short press "PLAY" button, the player will exit USB mode automatically. Then, the player will power on and enter into
the mode, which it was in before shut off or plug in USB;
b. On PC desktop, click My Computer icon, and then right-click Removable Disk (player’s disk) to select menu of Eject
(J). The player will exit USB mode automatically. Then, the player will power on and enter into the mode, which it was
in before shut off or plug in USB;
8. Attention: When the player shows "BUSY", please do not unplug from the USB port.
3. Technical Specification
Flash Memory
64M/128M/256M/512M/1G/2G/4G(inside)
Voltage
1.5V*1(AAA/LR03 battery)
Power Supply
Noise Level
About 12 hours
(AAA Battery, Vol 12, 128kbps 44.1KHz MP3)
> 85dB
LCD Display
STN128x32
MPEG1/2/2.5 Layer3
Supported format
8kbps – 320kbps, 8kHz – 48kHz
Supports transforming the format of WMA, OGG, AAC, WAV, APE, WV, FLAC and CD to MP3 by
AMT
24
FM Radio
Multilanguage Display
Frequency scope: 76MHz – 108MHz
Number of channels: 30
Simple Chinese, English, Traditional Chinese, German, French, Italian, Spanish, Portuguese,
Japanese, Korean, Danish and Swedish
4. Appendix: User's Guide of AMT
Introduction
AMT is the green software, which can convert the audio files automatically in OS. It means that AMT will transform the
supported audio files to MP3 type files, and then store the MP3 files to the player.
Notice
1. AMT supports running in Windows 2000 / XP / Vista OS ;
2. Running AMT bases on the technique of virtual CDROM, so please pay attention to do not close the PC's function of
CDROM Autorun before running AMT (the default of CDROM Autorun is opened in OS).
3. If the function of CDROM Autorun does not be opened before running AMT, it will display a virtual CDROM in My
Computer. Please double click the virtual CDROM, or open the virtual CDROM and then double click "Start.exe", which
will make the AMT run.
4. If the player is unplugged from the PC, AMT will terminate automatically.
5. When AMT runs automatically, some anti-virus software would catch it and stop running AMT. If some anti-virus software
shows the dialog box to ask whether AMT should be run, please permit running AMT or modify the setting of anti-virus
software to make AMT run normally.
Operation
4.1 System Startup and Functions
When a MP3 player is plugged onto a PC, AMT will be uploaded and running behind automatically. Meanwhile, a music
icon will be shown in the right-bottom corner of the screen as follows.
25
In static status, the program does not use system time, and the color of the icon represents the connection
status between MP3 player and PC. Red stands for connected MP3 player, and black stands for unconnected MP3 player.
When files are copied, pasted or dragged onto MP3 player plugged onto the USB port, ATM will convert pre-defined
supported music files into MP3 type music files and then save them into corresponding position on MP3 player. As for
original music files, they will not be copied onto MP3 player. During the conversion, AMT icon will indicate the process by
animation. If some music files could not be converted normally due to certain reason, AMT will copy the original music files
into MP3 player.
4.2
Supported Music File Type
Currently, file types, like WMA, RM, OGG, AAC (m4a), CD, WAV, APE, WV, FLAC, MP1, MP2 are supported to be
converted automatically.
4.3
AMT Window and Dynamic Function Configuration
Click on AMT icon, and AMT control window will be shown in the right-bottom corner of the screen as follows. Program
working status could be configured in the window, and the window could be closed by clicking on AMT icon or the close sign
in the right-top corner of the window.
26
●
●
●
●
●
●
●
●
●
●
●
Description of contents in the window is as follows.
Automatic-conversion: While being chosen, automatic-conversion function will start up; otherwise, all files will be copied
into MP3 player directly.
WMA: WMA automatic-conversion flag. While being chosen, WMA file will be converted into MP3 file.
RM: RM automatic-conversion flag. While being chosen, rm/ra audio file will be converted into MP3 file.
OGG: OGG automatic-conversion flag. While being chosen, OCG file will be converted into MP3 file.
AAC (m4a): AAC automatic-conversion flag. While being chosen, AAC file will be converted into MP3 file. AAC audio
format only with m4a as the extended name is supported.
CD: CD automatic-conversion flag. While being chosen, CD file will be converted into MP3 file.
WAV: WAV automatic-conversion flag. While being chosen, WAV file will be converted into MP3 file.
APE: APE automatic-conversion flag. While being chosen, APE file will be converted into MP3 file.
WV: WV automatic-conversion flag. While being chosen, WV file will be converted into MP3 file.
FLAC: FLAC automatic-conversion flag. While being chosen, FLAC file will be converted into MP3 file.
Tone Quality Option: "Normal", "Preferable" and "Good".
Notice: RM file conversion needs support of Windows Plug-in, which means RM file conversion could be done only after
RealPlayer is installed. For other file formats, no extra resources are needed.
4.4
Tone Quality, File Size and Conversion Speed
There are 3 Tone Quality options, and different options have different output file sizes. If "Normal" is chosen, the
output file size is the smallest and the conversion speed is the fastest, and under this mode, the original WMA file will have
almost the same size as the converted MP3 file. If "Preferable" is chosen, the converted MP3 file will be 1.5 times bigger
size than that of the original WMA file. If "Good" is chosen, the converted MP3 file will be 2 times bigger size than that of the
original WMA file, and the conversion speed will be the slowest. The same situation occurs to OCG and AAC files, and only
the converted MP3 file will have bigger size than that of MP3 file converted from WMA file when original files have same
velocity.
For conversion of other file types, three tone quality options are corresponding to three MP3 encoding rates -128Kbps,
192Kbps, and 256Kbps. For CD, audio track could be dragged or copied and pasted onto MP3 player directly.
27
4.5
Menu
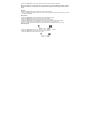
Right-click on AMT icon, and menu will be shown on corresponding position as follows.
4.6
Safe File Folder (RAWDATA)
AMT generates default safe file folder "RAWDATA" automatically. If there is no file folder "RAWDATA" found on the
MP3 player plugged onto the PC, AMT will generate file folder "RAWDATA" automatically on the MP3 player. When files are
copied or dragged into file folder "RAWDATA", AMT will not do the conversion, which means if original file copy is needed, it
could be copied into file folder "RAWDATA" directly.
4.7
Uninstall AMT
When the MP3 player is unplugged from the PC, AMT system will terminate automatically and the icon will be
removed from the right-bottom of the screen. If there are still other MP3 players being connected to the PC, the program will
not terminate until all MP3 players are unplugged.
28
Limited Warranty: 90 Days Labor, One Year Parts
Innovative Technology Electronics Corp. (IT) warrants the product to be free from “Defects” in materials under normal use
for a period of “One Year” from the date of the original purchase. The Warranty is “Not” transferable. IT agrees, within the
initial “90 Day” period, to repair the product if it is determined to be defective at “No Charge”. It is further agreed that IT will
cover the cost to repair or replace damaged “Parts” only for a total period of “One Year” from the date of the original
purchase. The warranty does not cover cosmetic damage, antennas, AC cords, cabinets, headbands, ear-pads, or damage
due to line power surges, connection to improper voltage supply or settings, misuse, mishandling, accident, acts of God or
attempted repair by an unauthorized service agent.
To obtain service, the original purchaser MUST present a sales receipt / proof of purchase indicating date of purchase,
amount paid, and place of purchase. Send the unit prepaid to the address below in the original packaging or reasonable
substitute to prevent damage. You “Must” include your full name, shipping address and telephone number. No return will be
shipped back to a PO Box. Please include your check or money order in the amount of $12.00, payable to Innovative
Technology Electronics Corp. to cover handling and return shipping charges. (IT) will not be responsible for delays or
unprocessed claims resulting from a purchaser’s failure to provide any or all of the necessary information.
Send all inquires or returns to:
Customer Service Dept.
Innovative Technology Electronics Corp.
4 Anchor Way, Port Washington, NY 11050
Tel : 1-877-ITECH-97 (1-877-483-2497)
EMAIL: [email protected]
There are no express warranties except as listed above.
REPAIR OR REPLACEMENT AS PROVIDED UNDER THIS WARRANTY IS THE EXCLUSIVE REMEDY OF THE
CUSTOMER, (IT) SHALL NOT BE LIABLE FOR ANY INCIDENTAL OR CONSEQUENTIAL DAMAGES FOR BREACH OF
ANY EXPRESS OR IMPLIED WARRANTY ON THIS PRODUCT EXCEPT TO THE EXTENT PROHIBITED BY
APPLICABLE LAW. ANY IMPLIED WARRANTY OF MERCHANTABILITY OR FITNESS FOR A PARTICULAR PURPOSE
ON THIS PRODUCT IS LIMITED IN DURATION TO THE DURATION OF THIS WARRANTY.
Some states do not allow the exclusion or limitation of incidental or consequential damages, or limitations on how long an
implied warranty lasts, so the above exclusions or limitations may not apply to you. This warranty gives you specific legal
rights and you may also have other rights, which vary from state to state.
29


![0 [转换] - E](http://vs1.manualzilla.com/store/data/005652607_1-2481a9abdfba0e217374eff291a1529a-150x150.png)