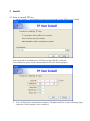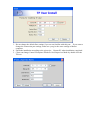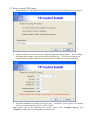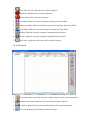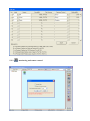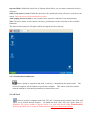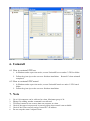
1
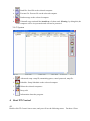
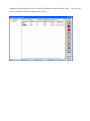
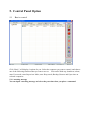
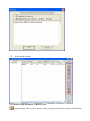
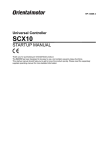
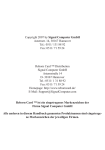
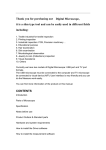
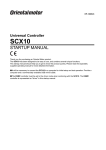
TP Control & TP User For Reborn Card Top Version User Manual . Content 1. System Requirement ..................................................................................................................... 3 1-1 Reborn card ....................................................................................................................... 3 1-2 Windows operating system ............................................................................................... 3 1-3 Client computers ............................................................................................................... 3 1-4 Master computer ............................................................................................................... 3 2. 3. Install............................................................................................................................................. 4 2-1 How to install TPUser ....................................................................................................... 4 2-2 How to install TPControl .................................................................................................. 6 TP Control Option ......................................................................................................................... 7 4. 3-1 TP Control main menu....................................................................................................... 8 3-2 Supervisor Password input and partition select area ......................................................... 8 3-3 TP Control main menu....................................................................................................... 8 3-4 Command control panel .................................................................................................... 9 Start TP Control ...........................................................................................................................11 5. 6. 7. 4-1 ................................................................................................................................................11 Control Panel Option .................................................................................................................. 13 5-1 Basic control ................................................................................................................... 13 5-2 Advanced control ............................................................................................................ 14 5-3 System ............................................................................................................................. 21 Uninstall ...................................................................................................................................... 27 6-1 How to uninstall TPUser ................................................................................................. 27 6-2 How to uninstall TPControl ............................................................................................ 27 Note ............................................................................................................................................. 27 1. System Requirement 1-1 Reborn card 1. REBORN CARD PLUS VERSION: v7.38 or REBORN CARD TOP VERSION. 1-2 Windows operating system 1. Supports Windows XP SP2/2003Server/Vista/Win7 2. Install TPControl or TPUser in Windows. 1-3 Client computers 1. On every client computer, install TPUser program in Supervisor mode. 2. It is highly recommended to setup auto-login Windows on client computers so that it will not stop at the Reborn Boot up menu. Note: Master can not control or detect Client computers if they stop at Reborn boot up menu. 3. For Windows XP, 2003Server, Vista, Win7, please install by Administrator. 4. For Windows XP, please update Service Pack 2 and install [.Net Framework2.0] provided by Microsoft to ensure IE block function. http://www.microsoft.com/net/ 5. Setup TCP/IP protocol and make sure the network between Master and Client computers has been connected. (Client computers can see Master computer through Network Places) 1-4 Master computer 1. Setup TCP/IP protocol and make sure the network between Master and Client computers are connected. (Master computer can see Client computers through Network Places) 2. The firewall option in Windows XP/Vista/Win7 must be disabled. 2. Install 2-1 How to install TPUser 1. On the client PCs, start Windows in supervisor mode and execute TPUser.exe to install. You can decide to use Multicast or TCP/IP to get the client PC connected. To use Multicast, please use the default multicast IP as the following figure. 2. To use TCP/IP, please input Master computer’s IP address and lock it as the following figure, so that the Client computer can be connected. 3. Do not change the default Port settings if you are not familiar with this part. If you want to change the connection port settings, make sure you give the same settings to Master computer. 4. Finish the installation according to the given tips. Restart PC when installation completed. 5. Client can change Control IP anytime in Reborn Card Supervisor Mode by double click the TP icon. 2-2 How to install TPControl 1. On the Master PC, start Windows in supervisor mode and execute TPControl.exe to install. 2. Setup Control Password to protect the control program from being abused. Do not change the default Port settings if you are not familiar with this part. If you want to change the connection port settings, make sure you give the same settings on all client computers. 3. Finish the installation according to the given tips. Restart PC is not required. It is normal if the screen turns into black for one or two seconds. Note: When you see the following two screens, please click “Continue anyway” and “Unblock” to make sure Control program can work well. 3. TP Control Option Execute TP Control icon on desktop to start TP Control. 3-1 TP Control main menu There are five main control areas. Each number stands for a sub-area Computers displaying area Groups displaying area Command control panel Supervisor Password input and System Partition select area Information area 3-2 Supervisor Password input and partition select area 1. Supervisor password of Reborn Card is required to access command. 2. Select system partition that you want to enter and control. 3-3 TP Control main menu By using Client map function, you can design your own class map by drawing the computer icon. 3-4 Command control panel 3-4-1 Basic 1. Wake Up On LAN: Wake up the selected computers. 2. Shutdown: Shutdown the selected computers. 3. Reboot: Reboot the Selected Computers. 4. User Mode: Make the selected computers booting into User Mode 5. Supervisor Mode: Make the selected computers booting into Supervisor Mode 6. Keep Mode: Make the selected computers booting into Keep Mode 7. Backup: Make the selected computers running Backup function. 8. Restore: Make the selected computers running Restore function. 9. Sync time: synchronize the time of the selected computer 3-4-2 Advanced 1. Setup Parameter: Remotely setup the card parameters on the selected computer 2. Monitor and Control: Monitor and Control the selected computer 3. Lock key: Remotely lock mouse and keyboard of the selected computer 4. IE Lock: Remotely lock Windows Internet Explore. 5. Send file: Send file to the selected computer 6. Execute file: Execute file on the selected computer 7. Send message to the selected computer 8. Uninstall setup: uninstall the install.exe of reborn card. Warning: by doing this, the client computer will be in open mode and will not be protected. 3-4-3 System 1. Advanced setup: setup IP, transmitting ports, control password, map file. 2. Schedule: Setup Schedule on the selected computer. 3. Delete the selected computers. 4. Group edit 5. Information about the program. 4. Start TP Control 4-1 Double click TP Control icon to start, and you will see the following menu. For those Client computers which assign the correct Control IP to Master computer will auto login. start to remotely control the computer you selected. Now you can 5. Control Panel Option 5-1 Basic control Click “Basic” will display 9 options for you. Select the computer you want to control, and choose one of the following functions that you want to access. You can do Wake up, shutdown, reboot, enter User mode, enter Supervisor Mode, enter Keep mode, Backup, Restore and Sync time on selected computers. 5-1-1 warning message You can input a warning message and select the post time when you place a command. 5-2 Advanced control 5-2-1 Remote Setup Parameter of Reborn Card Setup parameter allows you to remotely setup or change the parameter settings of the Reborn Card. Select a group or computers, input Supervisor Password and click “setup parameter” command on the control panel, the Reborn Card settings of the first computer in the group will display. After complete the change, click OK to send. The receiving computers will restart to take effect. You can also use this function to check the card settings on each computer if needed. Password settings, Options, Disk Info are available options to change. 5-2-1-1 Password Settings By using “Send Parameter” option, you can remotely setup or change the password of the Reborn Card on the selected computers. 5-2-1-2 Options By using “Send Parameter” option, you can remotely setup or change the Option settings of the Reborn Card on the selected computers. 5-2-1-3 Disk Info By using “Send Parameter” option, you can remotely setup or change the Restore Schedule of the Reborn Card on the selected computers. In Disk Info, only “Restore Period” is available to change. 5-2-2 monitoring and remote control Operate Mode: Enable the check box of Operate Mode allows you to remote control the selected computer. Same to the source screen: Enable the check box, the monitored screen will not be resized on your screen. Only one screen can be monitored at a time. Auto looping screen seconds: 0~60 seconds can be setup for each run of screen monitoring. Note: The more clients’ screen capture, the lower performance on the video due to the net traffic limitation. The interval time setup bar will appear while moving the mouse to the top. 5-2-3 Lock keyboard and mouse Select a group or computers and click “Lock key” command on the control panel. The selected computers will be unable to operate the computer. This can be used when teacher want the student to listen and pay attention to what teacher said. 5-2-4 IE Lock Select a group or computers and click “IE Lock” command on the control panel. This will allow you to restrict Internet Explore. To disable the lock, click “IE Lock” again. Note: For Windows XP, please update to Service Pack 2 at least and install [.Net Framework2.0] provided by Microsoft to ensure IE block function. http://www.microsoft.com/net/ 5-2-5 Send File Select a group or computers and click “Send File” command on the control panel. Input supervisor password and select an Operating System of the receiving computers. Input the directory of sending and receiving computers, or a file/parameter to execute if needed. 5-2-6 Execute File Select a group or computers and click “Execute File” command on the control panel. Input supervisor password and select an Operating System of the receiving computers. Input the directory of sending and receiving computers, or a file/parameter to execute if needed. 5-2-7 Send Message Click this icon can send message to the selected computers. Message displaying time can be setup 30 seconds, 60 seconds, 2 minutes, 5 minutes and 10 minutes. 5-3 System 5-3-1 Advanced setup Click advanced setup will display the control password and default port we use for this program. If you are not familiar with this part, please do not change it. If you want to change the settings on Control PC, please make sure you also setup the same settings for the Client PCs. Control Password: Setup your own control password can protect this program from being abused. Client map file: You can draw your true class map and apply on the program. Multicast IP: the default Multicast IP is 255.0.1.50 TCP Port: the default TCP port is 4510 Monitor Port: the default Monitor Port is 4520 Send File Port: the default Send File Port is 4530 Watchdog time-out: the default time for sending packet is 1000 millisecond 5-3-2 Schedule Setup Schedule on the selected computer. Schedule function allows you to setup events at a specific time. When time is up, the group computers will auto-execute the commands according to the profile and events that you edit. 5-3-2-1 Add a Profile Click new profile to create and edit a profile. Profile Name: Give a name to this profile. Enable “Active” check box to activate this Profile. Group: Select a group to run this function. “Schedule” function controls only one group at a time. Group can not leave blank. System: Select an operating system to run this function. Password: Input the supervisor password of the cards that you set in this group of computers. Only those computers with matched password will execute the Schedule. Password can leave blank if no supervisor password is setup on the card. Timing mode: Select a time mode to run the “Schedule”. Daily, weekly, monthly, or any given date are available options. 5-3-2-2 Click new event to edit Time: Setup the startup time of the event. Give a reasonable time for each event to run. If the responding time is not enough, the event will be bypass and continue the next event. Event: The available events in option are Wake up on LAN, Reboot, Shutdown, User Mode, Supervisor Mode, Kept mode, Backup, Restore, and Send File. After setting up the schedule, the menu will be like the following figure. Click the “active” check box, the computer will auto run the event according to your schedule. 5-3-3 Delete Click can delete the computer that is no longer used but still on the list. 5-3-4 Edit Group Click can manage groups and computers. 6. Uninstall 6-1 How to uninstall TPUser 1. In Windows under supervisor mode, execute UninstallUser.exe under C:\TPUser folder. 2. Follow the given tips on the screen to finish un-installation. Restart PC when uninstall completed. 6-2 How to uninstall TPControl 1. In Windows under supervisor mode, execute UninstallControl.exe under C:\TPControl folder. 2. Follow the given tips on the screen to finish un-installation. 7. Note 1. 2. 3. 4. 5. 6. Up to 100 computers can be collected at a time. Maximum group is 20. During file sending, another command is not allowed. TPControl cannot be run on more than one computer at a time. Check if the supervisor password is correctly input when control is not available. Check if the Client correctly assign Control PC’s IP address. Do not setup the same Computer Name. Copyright ©2009 Signal Computer GmbH. All rights reserved. All product names mentioned herein are registered product or brand names and property of their respective owners. We reserve the right to modify the information contained in this manual as required. Reborn Card Support: Signal Computer GmbH Asternstr. 14 30167 Hannover Germany E-Mail: [email protected] Internet: http://www.signalcomputer.com oder http://cms.signalnet.de