1
First Choice For Security Professionals
6. Recording
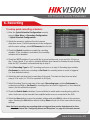
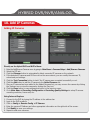
To setup quick recording schedule:
1. Enter the Quick Schedule Configuration menu by
going to Main Menu > Recording Configuration
> Quick Schedule Configuration.
2. Select the camera to configure from the camera
drop down menu. If all the cameras are to be configured
with the same settings, select All Cameras from the list.
3. Check the Enable checkbox to enable the recording
schedule. If the checkbox is unchecked, the recording
schedule will be disabled.
4. Check the 24/7 checkbox if you would like to record continuously or on event for 24 hours a
day, 7 days a week. If you wish to schedule different time frames for Monday through Sunday,
leave the 24/7 checkbox unchecked and skip to step 6.
5. Select Recording Type for 24/7 recording and move on to step 8. Recording type includes
Continuous for continuous recording or On Event for recording when an event is triggered
(i.e. from detected motion).
6. Select the start and stop time for each day of the week. The start and stop time are listed
using a 24 hr cycle (i.e. 18:00 is equivalent to 6:00pm).
7. Select Recording Type for each day of the week. Recording type includes Continuous for
continuous recording or On Event for recording when an event is triggered (i.e. from detected
motion) for the selected time period.
8. Check the Enable Audio checkbox if you would like to enable audio recording along with the
video. Audio can only be recorded if an amplified audio source is connected to the DVR.
9. Select the Save button to save the schedule settings and select Exit to return to the previous
menu. Selecting the Exit button without clicking Save will quit out of the menu without saving
settings.
Note: On Event recordings are recordings that are triggered from motion detection and/or from
an external alarm See ”Configuring Alarms and Exceptions” on page 61 of the user manual.
www.hikvisionusa.com