1
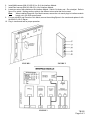
SUBJECT:
INTERFACE MODULE TO ALLOW AN SIID CONTROLLER TO BE USED WITH BDV,
EXECUTIVE, OR PARALLEL COIN MECHANISM
MODELS AFFECTED:
REASON:
Any SIID vender to be used with a BDV, Executive, or Parallel Coin Mechanisms.
To provide kits and installation instructions for an interface module.
ORDER:
495,053,800.04
Interface Module BDV Kit
Includes: 1 – 804,913,410.01
SIID Firmware (Eprom)
1 – 495,053,700.03
Interface Module
1 – 804,913,520.01
BDV Coin Mech Harness
1 – 804,913,500.01
Mdb Harness
1 – 804,913,490.01
Dex Interface Harness
Note: In the Interface Module set the #3 dip switch to "ON", all others "OFF".
ORDER:
495,053,900.04
Interface Module Executive Kit
Includes: 1 – 804,913,410.01
SIID Firmware (Eprom)
1 – 495,053,700.03
Interface Module
1 – 804,913,510.01
Executive Coin Mech Harness
1 – 804,913,500.01
Mdb Harness
1 – 804,913,490.01
Dex Interface Harness
Note: In the Interface Module set the #2 dip switch to "ON", all others "OFF".
ORDER:
495,054,100.04
Interface Module Parallel Kit
Includes: 1 – 495,053,700.03
Interface Module
1 – 804,913,490.01
Dex Interface Harness
1 – 804,913,500.01
Mdb Harness
1 – 804,913,410.01
SIID Firmware (Eprom)
Note: In the Interface Module set the #1 dip switch to "ON", all others "OFF".
Also, see page 3 for Interface Module Upgrade Procedure for 1000L Coin Operation.
To Install Kit:
1.
2.
3.
4.
5.
Unplug the vender.
Using the Velcro strip on the Interface Module, install the module to the vertical bulkhead behind the
vender controller. See figure 1, page 2.
Identify the coin mechanism to be used – BDV, Executive, or Parallel.
Install the coin mech on the access door.
Install the Coin Mech Interface Harness:
A) For BDV use J4 Interface Module Connector (8 pin) – harness (804,913,520.01).
B) For Executive use J4 Interface Module Connector (8 pin) – harness (804,913,510.01).
Also Executive interfaces to the control board via 15 pin connector. See figure 3, page 2.
C) For Parallel use J7 Interface Module Connector (16 pin) – harness from mech.
Page 1 of 3
6.
7.
8.
Install Mdb harness (804,913,500.01) in J5 of the Interface Module.
Install Dex harness (804,913,490.01) in J6 of Interface Module.
Locate two sets of dip switches on the Interface Module. Switch 2 is factory set – Do not adjust. Refer to
figure 3 for switch 1 settings as they relate to the different coin mechs that can be used.
Note:
When installing Executive Coin Mech harness, ensure the coin mech plugs in interface module
board, not in the SIID control board.
9. For use with BDV and Executive Coin Mech, remove the existing Eprom in the vender and replace it with
the 804,913,410.01 Eprom.
10. Plug in vender and test for proper operation.
FIGURE 1
FIGURE 2
FIGURE 3
TB 505
Page 2 of 3
INTERFACE MODULE UPGRADE PROCEDURE
Purpose: This procedure will layout the steps required to upgrade the Dixie-Narco Interface Module for
1000L coin operation on a parallel coin mechanism.
1) Remove cover from the European Interface module by removing the four screws.
2) With PLCC chip extractors, carefully remove the EPROM. The white label identifies the EPROM. Take
care when removing the EPROM not to damage the socket or bend the pins.
3) Locate EPROM 400.21. Insert the new EPROM in the same position as the one removed.
4) Set the dip switches on the Interface Module to the following settings:
SW1
2
OFF
1
ON
3
OFF
4
X
Note: X = don't care. The switch can be set in any position.
5) Reprogram the parallel coin mechanism to accept the 1000L coin and token using the Mars Alpha Route
Terminal. Please follow the user manual. The coins should be mapped in the following fashion:
Output Line
Coin Value
A
50
B
100
C
200
D
1000
E
token
F
500
6) On the SIID Controller, ensure that the 410.31 EPROM is Installed. This EPROM must be used to ensure
proper operation.
7) Verify proper operation by inserting the various coins, including the 1000L coin, into the coin mechanism.
8) Place the lid on the Interface Module and insert the four screws.
TB 505
Page 3 of 3