1
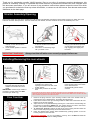
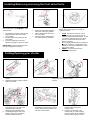
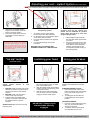
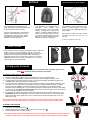
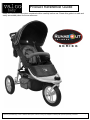
Thank you for purchasing a quality VALCO product. Due to our policy of continuous product development, this
product is constantly evolving. It is possible that some features or procedures outlined here have changed since
this document was written. If you are unsure of any procedure outlined here please contact the store from which
you purchased it to obtain the most up to date information, or contact us via the internet. See relevant web contact
addresses on the back page.
Stroller Assembly/Opening
Remove the stroller from the carton and dispose of all packaging immediately including the black rubber protectors on either side of the
brake bar and front wheel protector. The front wheel forks, rear wheels, front bar and hood all need to be installed prior to use.
1.
2.
Lay the stroller flat on the floor and
carefully cut the cable tie which
holds the frame.
Lift the handle upward to a vertical
position.
IMPORTANT WARNING:
1.
2.
Lift the front wheel housing upward
so that the stroller frame unfolds
from beneath.
Press down on the locking hinge
with your hand or foot.
1.
Secure the frame closed by
swinging the fold latches (located
on both sides of the frame) and
fully engaging them tightly onto
the frame.
Always test that all latches are securely engaged before use.
Installing/Removing the rear wheels
1.
1.
Pressing on the centre hub button,
insert the SQR axle through the
outside of the metal hub in each
wheel.
IMPORTANT: Insert through outside of
the wheel - the side which does NOT
have the nylon brake cog)
Your front bar
2.
Pressing the axle button, insert the
protruding long axle into the
opening in the tube at the rear of the
stroller chassis.
Repeat this procedure for the other
side.
1.
To remove the wheel simply
press the axle button in the centre
of the wheel hub and
simultaneously pull the wheel
outward.
If your brakes do not engage, check to see that the nylon brake cogs are on the INSIDE of each wheel when it is
attached to the chassis. If not, remove the wheel and SQR axle and re-insert the SQR axle from the other side of the
wheel, so that the cog will be on the inside of the wheel.
1.
2.
3.
4.
5.
Remove the plugs from the nylon housing at either side of the stroller frame by
pressing each inner “release button” and pulling the plug upward.
Insert the bar ends into the nylon housing located on either side of the frame. Be sure
that the bar is securely engaged
Adjust the front bar by simultaneously pressing the 2 red buttons and swivelling the
bar (forward or backward). NEVER use your stroller with the front bar in the lowest
position. This position is ONLY for use when folding the stroller!
To remove the front bar: Feeling the side of the nylon housing that sits below the
frame at each side (facing inward), locate the release “button.”
Press the release button inward while simultaneously pushing upward on the bar
housing. Repeat for the other side.
IMPORTANT WARNING: The front bar IS NOT a restraining device. ALWAYS re-insert the
plugs into the housing when there is nothing inserted.