1
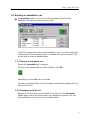
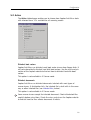
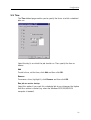
Windows NT/2000/XP/2003
User manual
For network and single users
Sophos Anti-Virus for Windows NT/2000/XP/2003
About this manual
This user manual explains how to use Sophos Anti-Virus for
Windows NT/2000/XP/2003 and how to configure
virus scanning
virus alerts
disinfection
logging
Sophos Anti-Virus services and service accounts.
The manual also provides help in resolving common problems.
Where to find installation and update instructions
For installation instructions, find your network type in the list below and use
the installation guide indicated.
Windows NT, 2000 or 2003 server and Windows workstations
If you want automatic updates via the internet, see the
Enterprise Manager installation guide.
Otherwise, see the
Sophos Anti-Virus Windows NT server installation guide, the
Sophos Anti-Virus Windows 2000 server installation guide or the
Sophos Anti-Virus Windows 2003 server installation guide.
Windows NT/2000/XP peer-to-peer network
See the Sophos Anti-Virus Windows NT/2000/XP peer-to-peer network
installation guide.
Windows NT/2000/XP workstations connected to a NetWare server
See the Sophos Anti-Virus NetWare server installation guide.
Windows NT/2000/XP workstations connected to a Unix server
See the Sophos Anti-Virus Unix server installation guide.
Single Windows NT/2000/XP computer
See the Sophos Anti-Virus Windows NT/2000/XP single user installation
guide.
For update instructions, see the Sophos Anti-Virus update guide for your
network type (or the Sophos Anti-Virus installation guide in the case of a
single user or peer-to-peer network).
2
Contents
Technical support
UK (24 hours):
(+44) 1235 559933
[email protected]
USA (24 hours):
(+1) 888 767 4679
[email protected]
Australia (24 hours): (+61) 2 9409 9111
[email protected]
France:
[email protected]
(+33) 1 40 90 20 90
Germany (24 hours): (+49) 6136 91193
[email protected]
Italy:
(+39) 02 662810 0
[email protected]
Japan (24 hours):
(+81) 45 227 1800
[email protected]
Singapore (24 hours): (+65) 6776 7467
[email protected]
FAQs and virus information are available on the Sophos website
www.sophos.com
If you contact technical support, provide as much information as possible,
including Sophos software version number(s), operating system(s) and patch
level(s), and the exact text of any error messages.
Copyright © 2002–2004 by Sophos Plc
All rights reserved. No part of this publication may be reproduced, stored in a
retrieval system, or transmitted, in any form or by any means, electronic, mechanical,
photocopying, recording or otherwise unless you are either a valid licensee where the
documentation can be reproduced in accordance with the licence terms or you
otherwise have the prior permission in writing of the copyright owner.
Any name should be assumed to be a trademark unless stated otherwise. InterCheck
and Sophos are registered trademarks of Sophos Plc.
3
Sophos Anti-Virus for Windows NT/2000/XP/2003
Contents
Using Sophos Anti-Virus
1 Using the Sophos Anti-Virus window
6
2 Using InterCheck Monitor
14
3 Disinfection
15
4 On-screen log messages
18
Configuration
5 Scanning mode configuration options
26
6 Alerts configuration options
37
7 Global configuration options
45
8 Managing Sophos Anti-Virus services
51
Troubleshooting
9 Troubleshooting
58
Glossary and index
4
Glossary
64
Index
67
Using Sophos Anti-Virus
Using the Sophos Anti-Virus window
Using InterCheck Monitor
Disinfection
On-screen log messages
Sophos Anti-Virus for Windows NT/2000/XP/2003
1 Using the Sophos Anti-Virus window
This section is relevant for both standalone and server-based installations.
The Sophos Anti-Virus window enables you to perform immediate scans,
and, if the logged-on user has sufficient privileges, to further control and
configure the Sophos Anti-Virus services. It is not a
Windows NT/2000/XP/2003 service.
Depending on their rights, users may not be able to access certain options
in the Sophos Anti-Virus window. This is mentioned, where relevant, in the
following sections.
Overview of the Sophos Anti-Virus window (section 1.1).
Running an immediate scan (section 1.2).
Scheduling scans (section 1.3).
Starting and stopping InterCheck (section 1.4).
6
Using Sophos Anti-Virus
1.1 Overview of the Sophos Anti-Virus window
This section describes the main features of the Sophos Anti-Virus window.
Closing the Sophos Anti-Virus window does not shut down any of the
Sophos Anti-Virus services, although any immediate scans currently in
progress will be terminated.
To open the window, click Start|Programs|Sophos Anti-Virus|Sophos
Anti-Virus.
Button
bar
Tabs
File
list
On-screen
log
Tabs
There is a tabbed page for each type of scan.
Different tabs may be displayed. This depends on the status of the user and
on which components of Sophos Anti-Virus are installed.
A light on the left of each tab is illuminated when that mode is active or
scanning. The tabs are as follows:
Immediate to run a scan at any time.
7
Sophos Anti-Virus for Windows NT/2000/XP/2003
Scheduled for scanning automatically at set times, as long as the
computer is switched on.
IC Server (InterCheck Server) for central reporting. This page appears on
any computer that has InterCheck Server installed (usually only the
server).
IC Client (InterCheck Client) for on-access scanning. This page appears
on any computer that has InterCheck Client installed.
SAVI (Sophos Anti-Virus Interface) lists SAVI-aware applications and
displays information about scanning.
The Scheduled and IC tabs are available only if the user running the Sophos
Anti-Virus window is an Administrator.
The SAVI tab is available only if an Administrator user has run an
application that uses SAVI (incuding SAV32CLI).
The button bar
The buttons are shortcuts to commonly-used menu options.
Starts scanning.
ends scanning.
Opens a dialog box in which you can configure scanning.
Opens a dialog box in which you can configure virus alerts.
Connects you to Sophos virus analyses on the Sophos website.
File list
On the Immediate tabbed page, the file list shows the drives, paths and files
that can be scanned on demand.
On the Scheduled tabbed page, the file list is replaced with the scheduled
job list.
The on-screen log
This contains information about the current session.
If an Administrator user opens the Sophos Anti-Virus window, it also
displays the scheduled and InterCheck log messages reported since the
service was started.
8
Using Sophos Anti-Virus
1.2 Running an immediate scan
An immediate scan is a virus scan of the computer, or parts of the
computer, that you can carry out at any time.
The file list shows items that can be included in scans. An illuminated light
to the left of an item indicates that it is selected and will be scanned. Click
on the light to select or deselect items.
1.2.1 Starting an immediate scan
Ensure the Immediate tab is selected.
To scan all the selected drives, paths and files, click GO.
Alternatively, on the File menu, click Go.
To scan any individual item in the immediate mode display, double-click its
icon in the file list.
1.2.2 Immediate mode file list
By default, all local drives are included in the file list on the Immediate
tabbed page, and all local hard drives are selected for scanning. You can
change the items in the file list as described below.
9
Sophos Anti-Virus for Windows NT/2000/XP/2003
1.2.3 Adding new items for immediate scanning
To add new items for immediate scanning, click Add. The Enter item details
dialog box is displayed.
Area
Specify the drive, folder or file to be scanned. Both mapped and UNC path
names can be entered and wildcards can be included. Alternatively, click
Browse to select from available items, or use the drop-down menu to select
all Local hard drives.
File types
Only files defined as executables are scanned, unless All is selected. See
section 7.2 to find out how to change the files defined as executables.
Subfolders
Subfolders are scanned if this option is selected.
1.2.4 Removing or editing items for immediate scanning
To remove an item, click on its path name to highlight it. Then click
Remove.
To edit the details of an item in the file list, highlight its path name and click
Edit. The Enter item details dialog box (described above) is displayed.
10
Using Sophos Anti-Virus
1.3 Scheduling scans
A scheduled scan is a scan of the computer or parts of the computer that
takes place at a pre-specified time.
To set up a scheduled scan, click the Scheduled tab.
This tabbed page lists the available scheduled scanning jobs. An illuminated
light to the left of a job indicates that it is selected and will run, as long as
the computer is switched on at the time. Click this light to activate or
deactivate jobs.
1.3.1 Default scheduled mode job list
A default job called Daily scans the computer at 21:00 every day, as long as
it is switched on.
11
Sophos Anti-Virus for Windows NT/2000/XP/2003
1.3.2 Adding a new scheduled job
To add a new scheduled job, click Add on the Scheduled tabbed page.
You are prompted to enter a job name. Type a name and click OK.
The Scheduled Job Configuration dialog box is displayed.
Use the File list and Time tabbed pages to specify what is scanned and
when. For more information about using this dialog box, see section 5.
1.3.3 Removing a scheduled job
Highlight the name of the job to be removed and click Remove.
1.3.4 Editing a scheduled job
Highlight the name of the job you want to edit and click Edit.
The Scheduled Job Configuration dialog box is displayed.
For more information about using this dialog box, see section 5.
12
Using Sophos Anti-Virus
1.4 Starting and stopping InterCheck
If InterCheck Client is installed on the computer, you will see an
IC Client tab. On-access scanning is installed.
If InterCheck Server is installed on the computer, you will see an
IC Server tab. Central virus reporting is installed.
The IC Server and IC Client tabbed pages display information about
InterCheck.
If installed, the InterCheck Server and InterCheck Client are both active by
default.
To start or stop the InterCheck Server or InterCheck Client, click the
appropriate tab, then click GO or STOP. The InterCheck Client and
InterCheck Server will retain this setting, even after you restart the
computer. This means that InterCheck will remain inactive until you go back
to the Sophos Anti-Virus window and start it again.
When InterCheck Client is inactive, the InterCheck Monitor icon in the
system tray is displayed in grey instead of red (see section 2).
13
Sophos Anti-Virus for Windows NT/2000/XP/2003
2 Using InterCheck Monitor
The function of InterCheck Monitor is to confirm that the InterCheck Client
is active. When it is active, a red lightning flash is displayed in the system
tray.
When it is inactive the lightning flash is greyed out.
By default, InterCheck Monitor is launched on Windows NT/2000/XP/2003
at startup.
If no lightning flash is visible, click Start|Programs|Sophos
Anti-Virus|InterCheck Monitor.
To display InterCheck Monitor, double-click the lightning flash in the system
tray.
InterCheck Monitor displays
the total number of items filtered (i.e. checked against the list of
authorised items by the InterCheck Client)
the status of the Client (active or inactive)
the last item filtered.
To display the InterCheck Monitor menu, click the left-hand side of its title
bar. You can open the Sophos Anti-Virus window from this menu.
Closing InterCheck Monitor does not stop InterCheck.
14
Using Sophos Anti-Virus
3 Disinfection
This section provides some general information about disinfection. It does
not explain how to disinfect a computer of specific viruses, as disinfection
methods are varied and can be virus-specific.
It is recommended that you get information about the virus (see below),
then either use the Sophos website for help with disinfection or contact
Sophos technical support.
3.1 Getting information about the virus
If Sophos Anti-Virus reports a virus, first isolate the infected computers from
the network and internet.
Write down the name of the virus. Then, from an uninfected computer, look
up its virus analysis on the Sophos website. The virus analysis search page
is located at
www.sophos.com/virusinfo/analyses
The analysis tells you what types of files the virus infects, and provides
information about disinfection. It may also include a link to detailed
disinfection instructions. Use these instructions to help you disinfect the
computer. If there are no instructions, contact Sophos technical support.
3.2 Disinfection
Sophos Anti-Virus can disinfect many viruses automatically. This includes
almost all macro viruses
most boot sector viruses
some executable file viruses.
To attempt automatic disinfection, enable automatic disinfection for
immediate scanning (see section 5.2 to find out how) then click the GO
button to run a full scan of the computer.
If the number of viruses reported in the on-screen log decreases, continue
running scans until no viruses are found.
If disinfection fails, you should carry out a manual disinfection, specific to
that virus and Windows NT/2000/XP/2003. This is described on the Sophos
website, either in its virus analysis, or on the web page that describes how
to disinfect that type of virus.
15
Sophos Anti-Virus for Windows NT/2000/XP/2003
The following sections contain some information about manual disinfection.
3.2.1 If the virus has infected a document
Sometimes you can manually edit the macros from infected documents.
However, contact Sophos technical support before you attempt manual
disinfection of a macro virus.
3.2.2 If the virus has infected an executable file
It is impossible to guarantee executable files will be fully restored after
disinfection, as different viruses affect files in different ways. Restored files
may be unstable and put valuable data at risk.
It is essential that you delete infected executables (even if you have
successfully disinfected them) and replace them from backups. After
replacement, run another immediate scan of the computer.
3.2.3 If the virus has infected a floppy disk boot sector
If you have a floppy disk with an infected boot sector, copy the valuable
data from the disk to a clean location, and reformat the disk.
3.2.4 If the virus has infected a hard disk boot sector
Do not turn the computer off. If you turn it off it may not boot again.
Before attempting disinfection, back up any important data on the disk.
You disinfect hard disk boot sectors using the SAV32CLI program, as
described below. The program is located by default at
C:\Program Files\Sophos SWEEP for NT\SAV32CLI.exe
How you carry out this procedure depends on whether the virus is a master
boot sector virus or a DOS boot sector virus.
Master boot sector virus
Open a command prompt and change to the Sophos Anti-Virus folder. Enter
SAV32CLI -MBR
If the computer cannot start Windows NT/2000/XP, or if disinfection fails,
contact Sophos technical support.
16
Using Sophos Anti-Virus
DOS boot sector virus
Open a command prompt and change to the Sophos Anti-Virus folder. Enter
SAV32CLI -BS=<drive letter> -DI
If the computer cannot start Windows NT/2000/XP, or if disinfection fails,
contact Sophos technical support.
3.3 Recovering from virus side effects
How you recover from a virus infection depends on how the virus affected
the infected computer. Some viruses leave you with no side-effects to deal
with. Others have such extreme side effects that you have to restore a hard
disk or replace the BIOS in order to recover.
Some viruses gradually make minor changes to data. This type of corruption
can be very hard to detect. Read the virus analysis on the Sophos website,
and check files carefully after disinfection.
Sound backups are crucial. If you did not have them before you were
infected, ensure you create or obtain them in case of future infections.
Sometimes you can recover data from disks damaged by viruses. Sophos
can supply utilities for repairing the damage caused by some viruses.
Contact Sophos technical support for help.
17
Sophos Anti-Virus for Windows NT/2000/XP/2003
4 On-screen log messages
This chapter describes messages that can appear in the on-screen log in the
Sophos Anti-Virus window.
For help with resolving errors, contact Sophos technical support.
4.1 Message categories
There are three kinds of log message:
Administrative messages, which list the times that jobs are started and
stopped, and information on the number of viruses detected during a job.
Virus-detected messages, which include the virus name, where it was
found, and the action taken.
Error messages, which alert the user to other problems encountered
during the job.
This chapter describes the virus-detected messages and the error messages.
Administrative messages are self-explanatory.
The sections in square brackets in the messages below indicate information
that varies.
18
Using Sophos Anti-Virus
4.2 Virus detected messages
Double-clicking on a virus name connects you to that virus’s analysis on the
Sophos website.
Virus: [virus name] detected in [location]
[Action]
This message is displayed if a virus is found during an immediate or
scheduled scan. The [location] is one of
[filename]
Drive [drive name]:
Sector [sector number]
Disk [..]
Cylinder [..]
Head [..]
Sector [..]
The [action] taken depends on the settings on the Action tabbed page of the
Immediate Mode, Scheduled Job or InterCheck Client Configuration dialog
box (see section 5.2), and is one of the following:
No action taken
No action is taken if you have configured Sophos Anti-Virus not to
disinfect boot sectors or documents, and not to rename, delete, shred,
move or copy any infected files.
File deleted
The file in which the virus was found has been deleted.
File renamed to [filename]
The [filename] is the old name with the file extension changed to a
number. For example, if a virus was named VIRUS.EXE it would be
renamed to VIRUS.000, or VIRUS.001 if there is already a file called
VIRUS.000, and so on.
File shredded
The infected file has been deleted and cannot be recovered.
19
Sophos Anti-Virus for Windows NT/2000/XP/2003
File moved to [new location]
The [new location] is the location specified on the Action tabbed page of
the Configuration dialog box (see section 5.2).
File copied to [new location]
The [new location] is the location specified on the Action tabbed page of
the Configuration dialog box (see section 5.2).
Error [problem]
The [problem] is one of
deleting [file]
renaming to [filename]
shredding [file]
moving to [location]
copying to [location].
The file could not be deleted, renamed, shredded, moved or copied. If the
infected file was found on a floppy disk, check that the disk is not writeprotected.
If it is not deleted or shredded, the infected file remains unchanged and may
be able to infect other disks and files.
Has been disinfected
Sophos Anti-Virus has automatically disinfected an item. Run an immediate
scan to ensure the computer is now free of viruses (see section 1.2).
Error: Disinfection failed
Sophos Anti-Virus was unable to disinfect a document or boot sector. See
the Sophos website for information about disinfecting specific viruses.
The infected item remains unchanged and may be able to infect other disks
and files.
20
Using Sophos Anti-Virus
Virus: [report source] report:
[Message]
At [time]
User [user]
Node [network address]
The [message] contains the text of the report.
Virus fragment: [virus name] detected in [location]
No action taken
This message includes the name and location of the fragment. The [location]
is one of
[filename]
Drive [drive name]:
Sector [sector number]
Disk [..]
Cylinder [..]
Head [..]
Sector [..]
Sophos Anti-Virus does not remove virus fragments. See section 9.4.
21
Sophos Anti-Virus for Windows NT/2000/XP/2003
4.3 Error messages
Error: InterCheck report:
[Message]
At [time]
User [user]
Node [network address]
This is an error reported by InterCheck. The description of the error is
contained in the [message].
Error: Could not start InterCheck Server.
Could not open InterCheck marker file [filename]
At [time]
InterCheck requires read and write access to its COMMS folder (normally a
subfolder of the Sophos SWEEP for NT folder called COMMS) to enable it to
communicate with clients.
Error: Could not open [filename]
The file called [filename] was on the list of files to be scanned, but could not
be opened for examination. Check that the file is not in use or already open.
Error: Could not read [filename]
The file called [filename] was on the list of files to be scanned, but could not
be read. This might indicate that the file or the disk is corrupt.
Error: Sector size of drive [drive] is too large
Sophos Anti-Virus will only currently scan disk sectors of 2Kb or less. It is
highly unlikely that your machine will ever contain sectors larger than this.
Error: Could not open report file [filename/folder]
The filename and folder of the report file are specified on the Report tab of
the Configuration dialog box (see section 5.3). Sophos Anti-Virus cannot
open the report file if its filename is not valid, or if it does not have sufficient
access rights to the folder. Note that the report file lists the current user for
immediate scans and the service user for scheduled scans.
22
Using Sophos Anti-Virus
Error: Log file [filename] could not be opened.
Log data will not be saved.
The location of the log file is specified by clicking Set Log Folder on the File
menu (see section 7.1). Sophos Anti-Virus cannot open the log file if it does
not have sufficient access rights to the folder. Note that the log file reports
the service user and not the current user.
23
Sophos Anti-Virus for Windows NT/2000/XP/2003
24
Configuration
Scanning mode configuration options
Alerts configuration options
Global configuration options
Managing Sophos Anti-Virus services
Sophos Anti-Virus for Windows NT/2000/XP/2003
5 Scanning mode configuration options
This section describes how to configure the three different modes of
scanning:
Immediate scanning.
Scheduled scanning (for which you specify a different configuration for
each scheduled job).
On-access (InterCheck) scanning.
The different scanning modes are described in section 1.
Each mode has its own configuration dialog box which enables you to
specify which items that mode should scan and what action it should take
on discovering a virus.
To open the required configuration dialog box, in the Sophos Anti-Virus
window, click the tab for the scanning mode you would like to configure.
Then click the Configuration button.
The sub-sections in this section describe each tabbed page you will find in
the configuration dialog boxes. Some tabbed pages are only available for
certain types of scan.
26
Configuration
5.1 Mode
The Mode tabbed page enables you to configure scanning activity. It is
available for all scanning modes.
Scanning level
Quick scanning checks only those parts of each file that are likely to contain
viruses. This level is sufficient for normal operation.
Full scanning examines the complete contents of each file. This level is more
secure but is much slower than Quick.
Full scanning is needed in order to detect some viruses, but should only
be enabled on a case-by-case basis (e.g. on advice from Sophos technical
support).
Priority
Set Sophos Anti-Virus to run at Low priority if you want to minimise the
impact on system performance. Note that this increases the time Sophos
Anti-Virus takes to scan the system.
This option is not available in IC Client mode.
27
Sophos Anti-Virus for Windows NT/2000/XP/2003
Scan inside archive files
Select this if you want Sophos Anti-Virus to check for viruses inside archive
files. Archive types checked include: ARJ, BZIP2, CMZ, GZIP, InstallShield
CAB, RAR, RAR3, RedHat Package Manager (RPM), Stuffit, TAR, Unix
archive, ZIP. You can find a full list of file types scanned in the Sophos
Anti-Virus for Windows NT/2000/XP/2003 ReadMe.
By default, files compressed with dynamic compression utilities (PKLite,
LZEXE and Diet) are also checked.
InterCheck provides automatic protection from viruses in compressed files,
because access to every unrecognised item (e.g. a newly decompressed file)
is only granted after that item has been virus checked.
Include Macintosh viruses
Select this if you want Sophos Anti-Virus to look for viruses inside Macintosh
files. It checks executable Macintosh files, irrespective of their file extension.
Scan mailboxes
Select this option if you want Sophos Anti-Virus to scan emails and
attachments in Outlook Express mailboxes.
Add scan results to central checksum file
This option is no longer relevant.
28
Configuration
5.2 Action
The Action tabbed page enables you to choose how Sophos Anti-Virus deals
with infected items. It is available for all scanning modes.
Disinfect boot sectors
Sophos Anti-Virus can disinfect most boot sector viruses from floppy disks. It
will not automatically disinfect hard disk boot sectors. See the virus analysis
section of the Sophos website to find out how to disinfect hard disk boot
sectors.
This option is not available in IC Server mode.
Disinfect documents
Sophos Anti-Virus can disinfect documents infected with most types of
macro viruses. If disinfection fails, the infected file is dealt with in the same
way as other infected files (see Infected files, below).
This option is not available in IC Server mode.
Some macro viruses corrupt the infected document. Check disinfected files
carefully before using them. Check the virus analysis on the Sophos website
to find out how the virus affects documents it infects.
29
Sophos Anti-Virus for Windows NT/2000/XP/2003
Disinfect programs
Sophos Anti-Virus can disinfect programs. However, it is not recommended
that you check this option by default. If Sophos Anti-Virus locates a virus in
a program, look up the virus analysis for the virus on the Sophos website to
find out how to disinfect it.
You should subsequently replace the program from a clean backup.
This option is not available in IC Server mode.
Disinfect mailboxes
Sophos Anti-Virus can disinfect emails and attachments in Outlook Express
mailboxes. All infected emails and attachments that can be disinfected,
including those that are multiply-infected, are disinfected in one scan. At the
end of the scan, Sophos Anti-Virus reports any emails or attachments that it
could not disinfect.
Infected files
Sophos Anti-Virus can make an infected file safe in several ways other than
disinfection.
Renaming or moving an executable file reduces the likelihood of it being run.
Deleting or shredding the file disposes of it. Shredding is a more secure type
of deletion that overwrites the contents of the file.
If you choose to move or copy files, you can select a folder for infected files
from the browser.
The Infected files option is not available in IC Client mode and does not
apply to infected mailboxes.
Request confirmation
If you select this option, Sophos Anti-Virus will ask for confirmation before it
does anything that involves changing infected items (i.e. disinfection and
renaming, deleting, shredding or moving infected files). If you also select
Disinfect mailboxes, Sophos Anti-Virus will ask for confirmation only before
disinfecting the first email or attachment that it finds to be infected; it does
not ask for confirmation before performing subsequent disinfections of the
same mailbox in the same scan.
This option is only available in immediate mode. It is enabled by default.
30
Configuration
5.3 Report
The Report tabbed page enables you to configure the report file for each
immediate or scheduled scan.
Sophos Anti-Virus generates a separate report file for the immediate job and
for each scheduled job. This file is provided for the user. It is not the same
as the continuous log file.
The report file is written as the current user for immediate scans and as the
service user for scheduled scans.
Report mode
Select List filenames if you want Sophos Anti-Virus to record the name of
every item scanned in the report file. Otherwise only infected items are
recorded.
Report file
Enter a location for the report file or accept the default. This file is deleted
and recreated each time the job is run.
31
Sophos Anti-Virus for Windows NT/2000/XP/2003
5.4 File list
The File list tabbed page enables you to specify the files to be scanned by a
scheduled job.
The file list shows drives and files to be scanned in a scheduled job. You can
modify the list by using the Add, Remove and Edit buttons.
The default file list is the same as that for immediate mode, except that
local floppy drives are not listed.
The files available for scanning here might not be the same as those
available in immediate mode. This is because the scheduled scan runs with
the Sophos Anti-Virus service’s user rights, which may differ from those of
the current user.
32
Configuration
5.5 Time
The Time tabbed page enables you to specify the times at which scheduled
jobs run.
Select the day(s) on which the job should run. Then specify the time as
follows.
Add
To add a time, set the time, click Add and then click OK.
Remove
To remove a time, highlight it, click Remove and then click OK.
Run job on service startup
Select this option if you want this scheduled job to run whenever the Sophos
Anti-Virus service is started (e.g. when the Windows NT/2000/XP/2003
computer is booted).
33
Sophos Anti-Virus for Windows NT/2000/XP/2003
5.6 Check
The Check tabbed page enables you to specify the kinds of files that
InterCheck checks when they are accessed. It is available for InterCheck
Client mode only.
Check files
Defined in executable list examines the file types specified in the list of
executables. You can change this list by clicking Executables on the Options
menu.
Automatically detected as executable type examines all files accessed,
irrespective of their extension, looking at their structure to determine
whether they should be checked.
The latter option is for determining whether a file is an OLE document,
which should be checked for macro viruses. Windows programs are also
detected in this manner.
34
Configuration
When
On read is selected by default. InterCheck checks files as they are accessed.
On write and On rename. If these options are selected, InterCheck will
check files as they are closed or renamed.
These options give you a greater degree of protection against viruses that
write to the computer's hard drive and/or rename files. However, the
increased InterCheck activity may affect the performance of your computer.
Removable media
Check boot sectors when disk first accessed. By default, InterCheck checks
the boot sectors of all removable media when they are first used.
Allow access to drives with infected boot sectors. Select this if you want
InterCheck to allow you to access drives with infected boot sectors. This
option enables you to copy files from a floppy disk infected with a boot
sector virus.
Do not boot a computer from an infected disk. Doing so could infect the
computer.
35
Sophos Anti-Virus for Windows NT/2000/XP/2003
5.7 Exclusions
The Exclusions tabbed page enables you to exclude certain items from
checking by InterCheck. It is available for InterCheck Client only.
File exclusions
Apply file exclusions prevents InterCheck from checking those file types
already excluded from immediate and scheduled scans. You can see a list of
these by clicking Exclusion List on the Options menu (see section 7.3).
Exclude checking of remote files prevents InterCheck from checking files on
network drives.
Volume exclusions
Any drive or drives selected here are excluded from checking by InterCheck.
The Exclude display shows a list of all possible drive mappings, whether or
not the mapping is valid for a particular user. Drives that are unmapped for
the current user are marked.
Exclude local fixed disks excludes all local fixed disks, whether they are
specified in the volume exclusions display or not.
Exclude CDROM drives excludes all CD-ROM drives, whether they are
specified in the volume exclusions display or not.
36
Configuration
6 Alerts configuration options
This section describes how to configure the alert options available for
notifying users about
scanning activity
virus finds
errors.
These options are configured in the Notification configuration dialog box. To
open the dialog box, open the Sophos Anti-Virus window and click the
Alerts button.
See the sub-sections of this section to find out about the tabbed pages in the
Notification configuration dialog box.
37
Sophos Anti-Virus for Windows NT/2000/XP/2003
6.1 Common options
The following options appear on every tabbed page.
Disable notification
Used to turn off the form of notification whose tabbed page is currently
selected.
Job specification
If you select All jobs, all configuration options selected for that form of
notification apply to immediate mode, all scheduled jobs, and (where
available) InterCheck Client.
Specific jobs enables you to choose different notification settings for
immediate mode, for each individual scheduled job and for InterCheck
Client. If a specific job is not explicitly configured, it inherits the settings of
the <default> job.
Notification level
You can choose from four levels of notification:
No messages.
Virus detected messages only.
Virus detected and error messages.
All messages, including general information, such as the time a job
started.
The notification level setting does not affect the level of information placed
in the report file, the on-screen log or the log file.
38
Configuration
6.2 Desktop messaging
The Desktop Messaging tabbed page controls the message displayed when
a virus is discovered.
User defined message
The message in this text box is added to the end of the standard
virus-detected message.
39
Sophos Anti-Virus for Windows NT/2000/XP/2003
6.3 Event Logging
The Event Logging tabbed page enables the administrator to specify the
type of notification added to the Windows NT/2000/XP/2003 event log.
In this dialog box, you tailor event logging individually for specific jobs (i.e.
you can specify which type of message is recorded for each job selected).
40
Configuration
6.4 InterCheck Logging
The InterCheck Logging tabbed page specifies how local installations of
Sophos Anti-Virus send log messages to the COMMS directory of an
InterCheck Server on another computer.
Path to InterCheck Server
In the Path to InterCheck Server text box, specify a UNC path, e.g.
\\<Server>\INTERCHK\COMMS
Sophos Anti-Virus needs a user account to log in to the network. It uses the
same account as auto-updating.
Messages are logged by the InterCheck Server and may generate additional
alerts.
41
Sophos Anti-Virus for Windows NT/2000/XP/2003
6.5 Network Messaging
The Network Messaging tabbed page enables you to configure Sophos
Anti-Virus to send a network message to named machines or users.
Due to limitations in the LAN Manager messaging system, only one message
is delivered per computer name or username. Even if a username is logged
in to several computers, only the first computer receives the message. It is
therefore recommended that you enter computer names rather than
usernames.
Windows 95/98/Me computers must be running the WinPopup application
in order to receive messages.
42
Configuration
6.6 SMTP email
The SMTP email tabbed page enables you to configure Sophos Anti-Virus to
send email alerts. Mail is sent after each event (for InterCheck Server or
InterCheck Client) or at the end of a job (for immediate and scheduled
scanning).
You can add and remove email addresses for the recipients of the messages.
You must enter details of the server. Click Configure SMTP to display the
Set up SMTP dialog box.
In the SMTP server text box, enter the host name or IP address of the
SMTP server.
In the SMTP 'Sender' address text box, enter the email address that alert
messages appear to come from. Bounces and non-delivery reports are sent
to this address. If no address is entered, no non-delivery reports are sent.
43
Sophos Anti-Virus for Windows NT/2000/XP/2003
6.7 SNMP
The SNMP trap is sent to a specified destination immediately after a virus is
found by InterCheck Client, or at the end of an immediate or scheduled
scan.
You must enter the IP address of the recipient in the SNMP Trap
destination text box.
Click the Test button to send an SNMP trap to the destination.
44
Configuration
7 Global configuration options
This section describes the global configuration options accessible from the
menu bar in the Sophos Anti-Virus window. It contains the following
information:
How to change the location of the Sophos Anti-Virus log folder (section
7.1).
How to change the files defined as executables for all scanning modes
(section 7.2).
How to exclude files or file types from scanning by all scanning modes
(section 7.3).
How to restore the default configuration (section 7.4).
How to clear the Sophos Anti-Virus log (section 7.5).
How to purge the InterCheck checksum file (section 7.6).
How to specify an immediate mode configuration for all nonAdministrator users (section 7.7).
How to disable the progress bar displayed during a scan (section 7.8).
These options are independent of the scanning mode tabbed pages.
45
Sophos Anti-Virus for Windows NT/2000/XP/2003
7.1 Set Log Folder
Sophos Anti-Virus maintains a continuous log of all its activity. This log file
contains administrative messages along with on-screen log messages
(section 4), and is aimed at the administrator.
The log file is generated in addition to the report file, which is aimed at the
user (see section 5.3).
Note that the log file is written as the Sophos Anti-Virus service user and not
as the current user.
By default the log file is saved in the Sophos SWEEP for NT directory, but
this can be changed by doing the following.
1. In the Sophos Anti-Virus window, on the File menu, click Set Log Folder.
2. In the Log folder dialog box, specify a folder and click OK.
You should refer to networked resources by UNC names because mapped
drives are only available when a user is logged on to the machine.
The Browse control only shows those files and folders to which Sophos
Anti-Virus has access.
This option is only available if you are logged on with Administrator rights.
46
Configuration
7.2 Executables
You can configure the types of files that are scanned if Sophos Anti-Virus is
set to scan only executables by doing the following:
1. On the Options menu, click Executables.
2. In the Executable file extensions dialog box, select Files with no extension
if you also want to include such files.
3. To add or remove extensions from the list, click Add or Remove.
See section 1.2.3 to find out how to make Sophos Anti-Virus check all files
rather than just executables.
This option is only available if you are logged on with Administrator rights.
47
Sophos Anti-Virus for Windows NT/2000/XP/2003
7.3 Exclusion List
If you want to exclude any files from scanning, enter them in the exclusion
list as follows:
1. On the Options menu, click Exclusion List.
2. To add or remove extensions from the list, in the File exclusion list dialog
box, click Add or Remove.
All files listed are excluded from immediate and scheduled scans. By
default, they are also excluded from on-access checking by InterCheck.
If you do not want to exclude these files from on-access scanning, do the
following:
1. In the Sophos Anti-Virus window, click the IC Client tabbed page.
2. Click the Configuration button.
3. In the InterCheck Client Configuration dialog box, click the Exclusions tab.
4. Deselect Apply file exclusions.
See also section 5.7.
This option is only available if you are logged on with Administrator rights.
48
Configuration
7.4 Restore Defaults
If you want to set all settings back to their defaults, on the Options menu,
click Restore Defaults.
You are asked for confirmation.
This option deletes all scheduled jobs.
If you are not logged on as Administrator, this option only affects immediate
scan settings.
7.5 Clear Log
The on-screen log provides a record of activity in the current session, and of
all the scheduled and InterCheck activity since the service was started. It
also reflects the information added to the continuous log file on disk.
To clear the on-screen log, on the Options menu, click Clear Log. This does
not affect the continuous log file on disk.
7.6 Purge Checksums
The checksum file contains the items authorised by InterCheck on the local
workstation.
To clear the checksum file, on the Options menu, click Purge checksums.
This option is only available if you are logged on with Administrator rights.
49
Sophos Anti-Virus for Windows NT/2000/XP/2003
7.7 Security
Administrators can set up an immediate job configuration that is used by all
non-Administrators.
On the Options menu, click Security.
In the Security settings dialog box, click Configure. In the Admin Defined
User Mode Configuration dialog box, select the configuration options for
users’ installations. The options in this dialog box are described in section 5.
Click Defaults if you want to return the configuration options to their default
condition.
Select Enforce immediate configuration if you want to prevent
non-Administrator users from changing their immediate job configuration.
7.8 Progress Bar
You can choose whether or not the progress bar is displayed during
immediate and scheduled scans.
To enable or disable this option, on the View menu, click Progress Bar.
In order to display the progress bar, Sophos Anti-Virus has to count the
items to be scanned before starting. You can save time by disabling this
option. This does not affect any jobs that are already running.
The progress bar is set separately for immediate and scheduled modes.
50
Configuration
8 Managing Sophos Anti-Virus services
This section describes the Sophos Anti-Virus services and service accounts
and how to manage them.
8.1 About the Sophos Anti-Virus services and
Windows NT/2000/XP/2003
Under Windows NT/2000/XP/2003 (but not Windows XP Home), services
can be run independently of users, and their access rights do not depend on
the logged-on user. This affects Sophos Anti-Virus’s structure and the way it
is installed and run.
Sophos Anti-Virus for Windows NT/2000/XP/2003 has two distinct
components, with different functions and privileges:
The Sophos Anti-Virus window.
The Sophos Anti-Virus services.
8.1.1 The Sophos Anti-Virus window
The Sophos Anti-Virus window is not a Windows NT/2000/XP/2003
service. It operates with the same privileges as the currently logged-on user.
8.1.2 The Sophos Anti-Virus services
There are three Sophos Anti-Virus services.
Sophos Anti-Virus.
Sophos Anti-Virus Network.
Sophos Anti-Virus Update.
These services run even when a user is not logged on and may have
different user rights from the currently logged-on user.
The Sophos Anti-Virus and Sophos Anti-Virus Network services use the
service accounts defined when Sophos Anti-Virus is installed, although they
can be changed later (see section 8.2).
Sophos Anti-Virus service
This service uses a default account unless you selected Enable scheduled
scanning of network resources in the SOPHOS Setup - InterCheck Support
and Network Access dialog box during installation. In this case, it uses the
account you specified at the time.
51
Sophos Anti-Virus for Windows NT/2000/XP/2003
Sophos Anti-Virus Network service
This service is used to store the account required to access the network.
It is used by the auto-upgrade account and the InterCheck logging
messaging module.
Sophos Anti-Virus Update service
This service is used to perform the auto-update. Its service account is set to
System by the installation program and should not be changed by the user.
52
Configuration
8.2 Managing the Sophos Anti-Virus services under Windows NT
Click Start|Settings|Control Panel to open Control Panel and double-click
Services. The Services dialog box is displayed.
8.2.1 To stop and restart Sophos Anti-Virus services
To stop and restart a Sophos Anti-Virus service, in the Services dialog box,
click Stop, then click Start. To specify whether or not a service starts
automatically, refer to section 8.2.2.
8.2.2 Changing the user account used by Sophos Anti-Virus services
Double-click the relevant entry in the Services dialog box to display its
Service dialog box.
53
Sophos Anti-Virus for Windows NT/2000/XP/2003
The Startup Type section is used to specify whether or not startup is
automatic. The Log On As section is used to set the account name and
password. The service has to be stopped and restarted for any changes to
take effect.
8.3 Managing the Sophos Anti-Virus services under
Windows 2000/XP/2003
On Windows 2000/XP, open the Control Panel by clicking
Start|Settings|Control Panel. Double-click Administrative Tools then
double-click Services.
On Windows 2003, at the taskbar, click
Start|Administrative Tools|Services.
To view the properties of a service, double-click it.
54
Configuration
8.3.1 To stop and restart Sophos Anti-Virus services
If you want to stop and restart a service, double-click it. In its Properties
dialog box, click the General tabbed page.
To stop and restart the service, click Stop then Start.
At the same page, you can specify whether or not startup is automatic and
choose parameters for startup from this screen.
55
Sophos Anti-Virus for Windows NT/2000/XP/2003
8.3.2 Changing service user accounts
If you want to change the account details for a service, double-click it. In its
Properties dialog box, click the Log On tabbed page.
Here you can set the account name and password. The service has to be
stopped and restarted for any changes to take effect.
56
Troubleshooting
Sophos Anti-Virus for Windows NT/2000/XP/2003
9 Troubleshooting
This section provides answers to some common problems that you may
encounter when using Sophos Anti-Virus for Windows NT/2000/XP/2003.
Section 4 describes error messages in the on-screen log.
If your problem is not described in either of these sections, refer to the
Sophos website www.sophos.com which includes frequently asked
questions (FAQs), virus analyses, the latest IDEs, product downloads and
technical articles.
If your problem is not described on the website, contact Sophos technical
support.
9.1 Incorrect access rights (NTFS)
The Administrator account should have full control of all the folders Sophos
Anti-Virus creates. Everyone must have the following access rights:
\Sophos SWEEP for NT
Read and execute
\Sophos SWEEP for NT\COMMS
Read, write and execute
\Sophos SWEEP for NT\INFECTED
No access
\Sophos SWEEP for NT\LISTS
Read, write and execute
\Sophos SWEEP for NT\REPORTS
Read, write and execute to their own
report files
The installation program assigns these rights automatically. However, if they
change, Sophos Anti-Virus may, for example, be unable to start InterCheck
or open the log or report files.
If problems occur, log in as the local Administrator and amend the access
rights using Windows Explorer.
The COMMS and REPORTS folders are only created if the InterCheck Server
is enabled.
9.2 Scanning runs slowly
Full scan
By default, Sophos Anti-Virus performs a quick scan, which scans only the
parts of files likely to contain viruses. However, if scanning is set to full, it
scans everything, and takes significantly longer to carry out a scan. See
section 5.1.
58
Troubleshooting
Full scanning is needed in order to detect some viruses, but should only be
enabled on a case-by-case basis (e.g. on advice from Sophos technical
support).
Checking all files
By default, Sophos Anti-Virus checks only files defined as executables. If it
is configured to check all files, the process takes longer. See section 1.2.3
and section 7.2.
Network drives selected
Network drives can be much larger than local hard disks, so take
significantly longer to scan. Most network interfaces provide much slower
access than the local hard disk, which can further slow down the scan.
Scan locally where possible.
Progress bar displayed
If the progress bar is displayed, Sophos Anti-Virus must count all the items it
will scan. This can take several minutes on large network drives. Enable or
disable the progress bar by opening the Sophos Anti-Virus window and
clicking Progress Bar on the View menu.
9.3 Auto-updating fails to happen
The central installation directory (CID) has not been updated
Ensure you have updated the CID that the computers on the network check
for updates. You can use SAVAdmin to check which CID this is.
In SAVAdmin, locate a computer that has not auto-updated. Scroll right to
the Central Installation Directory column. The CID that the computer
checks for updates is displayed in the column.
If this CID is not the one you updated, update it now.
For more information about installing and using SAVAdmin, see the
SAVAdmin installation guide.
Insufficient rights to installation directory
Auto-upgrading uses the Sophos Anti-Virus Network service. This needs to
be registered as an account which has sufficient rights to access the CID.
See section 8 for more information. Check that Setup.exe and Wsweepnt.cfg
are in the CID (they are present by default).
59
Sophos Anti-Virus for Windows NT/2000/XP/2003
Sophos Anti-Virus service fails to start
Ensure that the password for the Sophos Anti-Virus service account is still
valid, and that the service has not been disabled. See section 8 for more
information.
9.4 Virus fragment reported
If a virus fragment is reported, contact Sophos technical support for advice.
The report of a virus fragment indicates that part of a file matches part of a
virus. There are three possible causes:
Variant of a known virus
Many new viruses are based on existing ones, so that code fragments typical
of a known virus may appear in files infected with a new one. If a virus
fragment is reported, it is possible that Sophos Anti-Virus has detected a
new virus, which could become active.
Corrupted virus
Many viruses contain bugs in their replication routines that cause them to
infect target files incorrectly. An inactive portion of the virus (possibly a
substantial part) may appear within the host file, and this is detected by
Sophos Anti-Virus. A corrupted virus cannot spread.
Database containing a virus
When running a full scan, Sophos Anti-Virus may report that there is a virus
fragment in a database file.
9.5 Virus not disinfected
If Sophos Anti-Virus has not attempted to disinfect a virus (‘No action
taken’), check that automatic disinfection is selected (see section 5.2).
If Sophos Anti-Virus could not disinfect the virus (‘Disinfection failed’), it
may be that it cannot disinfect that type of virus (see section 3).
You should also check the following:
If dealing with a disk or removable media, make sure that it is not
write-protected.
If dealing with files on an NTFS volume, make sure that Sophos AntiVirus has sufficient access rights.
Sophos Anti-Virus will not disinfect a virus fragment because it has not
found an exact virus match.
60
Troubleshooting
9.6 Sophos Anti-Virus reports errors
After a scan, Sophos Anti-Virus may report that some errors were found.
There are two main reasons for errors:
File is corrupt
It can therefore not be scanned by Sophos Anti-Virus.
File is encrypted
If the file contains macros (for example it is a .doc or .xls file), only the main
body of the file will have been encrypted (not the macros). You may be
warned that the file is encrypted, but the parts of the file that can contain
macro viruses will still be scanned.
61
Sophos Anti-Virus for Windows NT/2000/XP/2003
62
Glossary and index
Sophos Anti-Virus for Windows NT/2000/XP/2003
Glossary
Boot sector:
The first part of the operating system to be read into
memory when a computer is switched on (booted).
The program stored in the boot sector is then
executed, which loads the rest of the operating
system from the system files on disk.
Boot sector virus:
A type of virus that subverts the initial stages of the
booting process. A boot sector virus attacks either
the master boot sector or the DOS boot sector.
Checksum:
A value calculated from item(s) of data. InterCheck
creates a list of checksums of the files on the
computer. If the checksum of a file is found to have
changed, the file is sent for scanning because it may
have become infected with a virus.
CID
Central installation directory; a central copy of
Sophos Anti-Virus files from which Sophos Anti-Virus
is installed and updated automatically on the server
and workstations. You must create a different CID for
each platform on the network, and remember to keep
every CID up to date.
DOS boot sector:
The boot sector which loads the BIOS and DOS into
RAM and starts their execution. A common point of
attack by boot sector viruses.
Executables:
By default Sophos Anti-Virus will check only files it
defines as executables (even when full scanning is
enabled). It is possible to configure Sophos Anti-Virus
to check all files (section 1.2.3), or to change the list
of files defined as executables (section 7.2).
Full scan:
If configured to full scanning, Sophos Anti-Virus
scans all files and all parts of files in the area it has
been configured to scan. A full scan takes
significantly longer than a quick scan. It is
occasionally necessary in order to locate certain
viruses. See section 5.1.
64
Glossary and index
IDE
Virus identity file; enables Sophos Anti-Virus to
detect a specific virus. You need IDEs to protect your
network against viruses discovered since your version
of Sophos Anti-Virus was compiled.
Immediate scan:
A virus scan that is triggered by the user from the
Sophos Anti-Virus window. It is possible to configure
what is scanned, how it is scanned and what action
should be taken if a virus is found.
InterCheck/InterCheck Client: A component of Sophos Anti-Virus that intercepts
files as they are accessed, and uses checksumming
to determine whether or not they should be sent for
virus scanning. It can be installed on servers, then
switched off if found to affect performance.
InterCheck Server:
A component of Sophos Anti-Virus that enables
workstations to send virus alerts to a central location.
Macro virus:
A type of virus that uses macros in a data file to
become active in memory and attach itself to other
data files. Unlike other types of virus, macro viruses
can attain a degree of platform independence.
Master boot sector:
The first physical sector on the hard disk (sector 1,
head 0, track 0) which is loaded and executed when
the computer is switched on (booted). It contains the
partition table as well as the code to load and
execute the boot sector of the ‘active’ partition.
NTFS:
Windows NT File System.
Polymorphic virus:
A self-modifying encrypted virus.
Quick scan:
The default scan type. Sophos Anti-Virus scans only
the parts of files that can potentially contain
executable code.
SAVAdmin:
A Sophos administration tool that enables you to
copy and paste installations of Sophos Anti-Virus
between Windows NT/2000/XP/2003 computers on
a network, and check they are up to date. See also
the SAVAdmin user manual.
65
Sophos Anti-Virus for Windows NT/2000/XP/2003
Scheduled scan:
A virus scan that is scheduled by the user to take
place at a particular time. As with immediate
scanning, it is possible to configure what is scanned,
how it is scanned and what action should be taken if
a virus is found. Sophos Anti-Virus for
Windows NT/2000/XP/2003 by default carries out a
scheduled scan at 9pm every day.
SMTP:
Simple Mail Transport Protocol; the delivery system
for Internet email.
SNMP:
Simple Network Management Protocol; a set of
protocols used for sending messages around a
network.
SWEEP:
A less common term used to describe the component
of Sophos Anti-Virus that carries out immediate and
scheduled scanning.
UNC:
Universal Naming Convention; a standard system for
naming network drives, e.g. the UNC directory
\\MAIN\USERS\ would refer to the USERS directory
on the server called MAIN.
Virus:
A computer program that can spread across
computers and networks by attaching itself to a
program (such as a macro or boot sector) and
making copies of itself.
Worm:
A type of virus that doesn’t need a carrier program in
order to replicate. Worms replicate themselves then
use communications between computers (e.g. email
programs) to spread.
66
Glossary and index
Index
A
access rights
Sophos Anti-Virus window 58
alert messages 38
archive files
scanning 28
auto-update
troubleshooting 59
B
boot sector virus
disinfection 29
C
COMMS directory 41
communications directory 58
D
dealing with viruses 15
disinfection 15
boot sector 29
documents 29
mailboxes 30
removing infected files 30
unsuccessful 60–61
documents
disinfection 29
infected executables
dealing with 30
infected files
dealing with 30
InterCheck Client
configuring 26–36
InterCheck Server
COMMS directory 41
L
LISTS directory 58
log file 31, 38, 46, 49
M
Macintosh viruses
checking for 28
macro virus 34
mailboxes
disinfection 30
scanning 28
N
notification level 38
O
on-screen log 18, 38
P
E
progress bar 50, 59
error messages
in the on-screen log 18
executables 59
dealing with infected 30
Q
F
recovery after virus attack 17
report file 38
REPORTS directory 58
floppy disk
copying files from infected 35
disinfecting boot sector 29
full scan 27, 58
H
hard disk
disinfecting boot sectors 29
I
immediate scan
configuring 26–36
INFECTED directory 58
quick scan 27
R
S
scanning
archive files 28
compressed files 28
mailboxes 28
priority 27
scheduled scan
configuring 26–36
shredding files 30
67
Sophos Anti-Virus for Windows NT/2000/XP/2003
Sophos Anti-Virus
checking for Macintosh viruses 28
priority 27
scanning archive files 28
scanning level 27
Sophos Anti-Virus services 51
managing under Windows 2000/XP/2003 54
managing under Windows NT 53
Sophos Anti-Virus window
access rights 51
V
virus
Macintosh 28
macro 34
virus fragment 60
68
200403