1
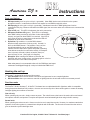
American DJ
®
User Instructions
Arcbeam 150
Intelligent Lighting Fixture
DMX-512
MIDI
CAPABLE
Features
• 6,000 hr. 150W GE Arcstream lamp.(ZB-AS-150)
• 11 dichroic colors plus White.
• 11 gobos plus Spot.
• Separate gobo / color wheel, with smooth stepper
motors.
• Strobes in every color - 1 -13 flashes per second.
• Split colors.
• X/Y mirror movement with stepper motors.
• 180˙ pan 110˙ tilt full micro-stepping
mirror.
• Micro stepping.
• Up to 8 StarTec H150’s and/or StarTec™
Arcbeam 150’s and/or StrobeTec’s can
be controlled by the SAB/19C™
• DMX-512 protocal & MIDI capable
• XLR hook-up / link up to 16 heads without
controller - run off built-in programs.
• Full Focusing.
• Fan cooled.
• Automatic Dip Switch Assignment
(only when all heads are on same circuit).
• Uses 4 DMX Channels.
Model:
Description
The StarTec™Arcbeam 150 by American DJ® is an
Intelligent lighting fixture with a 6,000 hr. 150W Arc
discharge lamp, which operates at 4,200 degrees
Kalvin for superior high temperature color.
The Arcbeam 150™ features: 11 dichroics plus
white, 11 gobos plus spot beam, 1,400 step smooth
stepper motors, split colors, strobes in every color
from 1 -13 flashes per second, full focusing, 180
degree mirror pan/110 degree mirror tilt, DMX512 protocol, & is MIDI capable. Controlled by
the SAB/19C™; run up to 16 heads alone or 8
heads with the controller. The SAB/19C™ will
control the StarTec™ Arcbeam 150, the StarTec™
H150, & the StrobeTec™, and has automatic DMX assignment: when connecting controller to unit,
controller automatically assigns DMX channel to
each individual heads.
The StarTec™ Arcbeam 150 is designed for club,
mobile and concert use.
The StarTec™ Arcbeam 150 has a 1 year limited
warranty.
ARCBEAM150
SPECIFICATIONS:
Working Position: Any safe position
Voltage: 120V
Lamp: ZB-AS-150 150W GE Arcstream
Weight: 20 lbs.
Size: 10.25” x 7.5” x 19”
Specifications subject to change without notice.
© American DJ® Los Angeles, CA 90058 - Startec™ Arcbeam 150 User Manual page 1
American DJ
®
User Instructions
Front panel features
1.
2.
3.
4.
DMX output socket (pin 3 hot, pin 2 cold, pin 1 grounded). Other DMX devices can be linked in to the system
through this socket. In stand alone mode the unit outputs its own DMX through this socket.
DMX input plug (pin 3 hot, pin 2 cold, pin 1 grounded). A dedicated controller or DMX lighting board can be
connected to this plug. Because unit buffers the DMX signal, the user must make sure connectors are connected the right way.
Power on LED (red). This LED is lit whenever the unit is powered up.
DMX present / Audio beat LED (green). This LED is on constantly
when DMX is being received (it may flicker in time with the DMX
4
frames), and goes out when DMX is not received. If the LED is
not lit, then the unit is in stand alone mode and the LED will flashwhen an audio beat is detected.
5. Dip Switches. Dip switches 1-9 set the DMX channel
3
that the unit will respond the (in binary code). channel 1 is
1
2
6 5
the first valid DMX channel. If all switches 1-9 are off, the
unit will automatically set its own DMX channel. Dip switch10 sets the stand alone system daisychain (operating
units without acontroller in sound active mode), for example:
head 1 (master) off.head 2 (slave) on,head 3 (slave) on,
head 4 (slave) off, etc. (See page 3 for diagram).
6. Microphone. When running units without a controller, the
StrobeTec will move, change colors, and change gobos to the be
beat of the music via its internal microphone.
Note: when power is not connected to the unit, the DMX input and output
connectors are bridged through by a relay to maintain the DMX circuit.
Hooking the unit up
The Startec™ Arcbeam150 can be used in two ways:
1. Stand Alone Mode: where the unit listens to the music and generates its own complex lightshow.
2. DMX Control Mode: where you connect a controller or lighting board to the unit and control its movement yourself.
Stand alone mode
The StarTec™ H150, Strobetec™, & StarTec™ Arcbeam have a sophisticated built-in lightshow, which is compatible
among these three American DJ® products - the user can connect any mix of these units together to create an amazing
intelligent lighting show without a controller!
One unit only
When operating only one unit - simply connect to power. The unit will react to the beat of the music via its own internal
microphone controller, and produce a complex and dynamic sound animated light show using its built-in memory.
Several units
When operating more than one unit - fixtures can also be run in stand alone mode. However, for maximum stand alone
operation, hook units together in a master/slave daisychain with XLR cable. The first unit will control the other units to
give an automatic synchronized light show.
© American DJ® Los Angeles, CA 90058 - Startec™Arcbeam 150 User Manual page 2
American DJ
User Instructions
®
Connect the DMX out (the socket) on the first unit (master) to the second unit (slave) using a balanced XLR lead. Repeat
this connection for all units.
Note: If the Strobetec™ is being connected in a master/slave with StarTec™ H150 or StarTec™ Arcbeams, make the
H150 orArcbeam the first (master) in the daisychain.
2-channel stand alone operation
To add further interest to the light show, the user can set each unit to either follow the first unit (master) or to do
something in contrast to the first unit. For example, set up four units, two on the he left and two on the right. Set the two
on the outside to do one thing, and the two in the middle to do a variation or something different from the first.
Set dip switch 10 ‘off’ to make all units work the same, or set dip switch 10 ‘on’ to make units work differently
ie: head 1 (master) dip switch 10 ‘on’, head 2 slave) dip switch 10 ‘off’, head 3 (slave) dip switch 10 ‘on’,
head 4 (slave) dip switch 10 ‘off’ etc. (See diagram below ). If only two units are linked together, a better light show
will be obtained by setting the dip switch 10 is ‘on’ on the second unit.
Note: Dip switch 10 has no effect on the first unit (master) in the DMX line (the one generating the light show).
Stand Alone Operation diagram - Female XLR
Output for Stand Alone.
Male XLR
Input.
For optimum light show effect in Stand Alone Mode, follow this diagram for Dip Switch settings :
Head 1 - Master
ON
Head 3 - Slave
ON
1 2 3 4 5 6 7 8 9 10
1 2 3 4 5 6 7 8 9 10
ETC.
Head 4 - Slave
Head 2 - Slave
ON
ON
1 2 3 4 5 6 7 8 9 10
1 2 3 4 5 6 7 8 9 10
Special options in stand alone mode
In stand alone mode, you can also set three options which affect the way the unit produces its light show, by setting the
other 9 dip switches (1-9):
• All dip switches ‘on’: Display mode - unit ignores audio and runs slowly through various patterns.
•
Dip switch1 ‘off’, 2-9 ‘on’: Slow mode - unit responds to audio but always moves slowly and gently.
No strobing is used.
•
1 ‘on’, 2 ‘off’, 3-9 ‘on’: Strobe disable mode - unit behaves in normal stand-alone mode but will not use strobbing.
These options only need to be set on the first unit in the DMX line if several units are connected together.
Set switches before unit is turned on.
When connecting a DMX source while these special options are set, the unit will have a start channel of 1.
© American DJ® Los Angeles, CA 90058 - Startec™ Arcbeam 150 User Manual page 3
American DJ
®
User Instructions
DMX control mode
DMX is a control system which allows 512 lighting control channels to be sent down one piece of wire. The DMX signal
‘flows’ in one direction starting at the controller, through each unit, to the last in line.
Note: The DMX signal is ‘buffered’ in each unit and can only flow one way through the unit, into the plug, and out of the
socket. Connecting the DMX cables to the wrong connectors will block DMX signal.
Setting the ‘base channel’
When using DMX, all units will receive all channels. The user must tell each unit which channel to respond to (its ‘base
channel’). There are two ways to do this:
• Set the dip switches to the binary equivalent of the channel unit is to respond to (see page for help).
•
Use the Auto Channel Set feature, which will configure the system automatically.
The unit actually responds to two DMX channels, one each for beam rotation and for color/gobo. If dip switches are set
to DMX channel 1 (switch 1 ‘on’, all others off), then channel 1 will control beam rotation and channel 2 will be color/gobo.
The next free channel is therefore in more detail how to work out the channel numbers.
Note: If the user wants two units to behave exactly the same, set both units to the same channel.
The user may change the dip switches while the units are running. The new settings will take effect immediately. There
is no need to reset them.
Auto Channel Setting
The ‘Auto Channel Set’ feature of the units takes away all the fuss and confusion of fiddling with dip switches and working out binary numbers. Simply switch all the dip switches to ‘off’, connect up the DMX cables, turn on the power and the
units will automatically number themselves; the first unit will operate on channels 1-2, the second on 3-4, and so on.
Make sure that the DMX cabling is all connected and that the first unit in the DMX line is turned on last. If it does not
work, turn the first unit in the DMX line off and on again, or change its dip switches.
If the user does not want the numbering to start at channel 1, set the dip switches on the first unit to the channel you want
to start at. All the other units will then set themselves to the correct channels following that one.
Note: If any unit cannot determined what channel it should set itself to, it will choose channel 1. You can force the ‘Auto
Channel Set’ to be repeated by changing the switches on the first unit in the DMX line or by turning it off and on again.
Once running, if the dip switches are changed on the first unit, the ‘Auto Set’ is repeated. All units further down the
DMX line which are in ‘Auto Set’ mode will be reconfigured. If any unit in the DMX line is not in ‘Auto Set’ mode, the numbering will restart at that unit.
If dip switches are changed on a unit which was in auto set mode (switches were all ‘off’), the unit will immediately take
on the new channel set. If you go back to the ‘Auto Set’ mode, the unit will remain at the channel it was previously set to
until it receives an ‘Auto Set’ command from further up the DMX line.
Hooking the unit up
When powering up the unit, it will go through an initialization routine where it moves all the motors to their zero positions.
The unit may make some quite alarming noises but this is normal. The initialization routine takes about 15 seconds, after
© American DJ® Los Angeles, CA 90058 - Startec™ Arcbeam 150 User Manual page 4
American DJ
®
User Instructions
which the unit will begin to respond to DMX input, or to sound if no DMX is connected. The unit will not turn on its lamp
until after initialization, and then only if its control channels are not all at zero.
Unit in stand alone mode
If the unit is in stand alone mode, the user has no control over the units at all. To control units at any time, connect the
units to a DMX source. See special options which affect how the unit behaves in stand alone mode; see page 3.
Note: If connecting other manufactors’ products to the DMX output while the unit is in stand alone mode, units may not
respond correctly.
Unit in DMX controlled mode
The unit responds to two DMX channels, starting at the one set on the dipswitches (or the one following the last channel
of the previous unit if auto-channel set has been used).
the user can either use a dedicated controller or any other DMX lighting controller to operate the unit; also, connecting
another unit in stand alone mode will generate its own lightshow.
On the first channel (beam rotation), control will be found at ‘zero’ position where there is no movement. As control
increases from zero, full speed rotation will be clockwise, gradually slowing to a stop at the central control position. The
beam will then rotate counterclockwise, gradually increasing speed until just before the maximum control value, at which
point will stop.
The second channel (color/gobo) has three sections. Below about 5% of the control range the unit will be in blackout.
Between 5% and 80%, the unit scans slowly through its colored patterns. The unit senses the speed of the controller
movement and matches its movement speed as closely as possible. If the control is moved very slowly, the colors will
change very slowly. If the control is moved very quickly, the unit will change colors as fast as it can.
There is a limit to how fast the unit can move; if the control is moved faster than that, the unit will lag behind slightly. If the
user suddenly starts moving the control in the opposite direction, the unit will slow down before reversing direction to keep
in control of the movement.
Note: If the controller is changing faster then the unit can move, the movement may be a bit unpredictable. Slow down the
control movements until the unit can match the speed.
From 80% to 100% the unit will enter the ‘strobe zone’. The unit will strobe slowly (about one flash per second) at 80%,
and will strobe full speed (about 10 flashes per second) at 100%. The unit will only strobe in white.
Capatibility with other units
The StarTec™ Arcbeam150 is compatible with other American DJ® products, the Strobetec™ and the StarTec™ H150.
These three intelligent fixtures are designed to synchronize with each other in ‘stand alone mode ’ or can be controlled
together by the StarTec™ Arcbeam controller (SAB/19C™), which is sold separately. Up to 16 heads can be linked in
standby mode, and up to 8 heads can be controlled by the SAB/19C. Again, when daisychaining units, use the Arcbeam
150 or H150 as the master when linking with the Strobetec™.
Note: In DMX controlled mode, the user will probably want to use the more complex units (Arcbeam or H150) on different
DMX channels than the Strobetec™.
© American DJ® Los Angeles, CA 90058 - Startec™ H150 User Manual page 5
American DJ
®
User Instructions
If you have problems (‘trouble shooting’)
Listed below is a few common problems the user may encounter, with solutions.
No light from the unit.
Check if the ‘Power On’ (red) LED is lit and the fan is running. If not there is no main supply. Check the fuse in the back
panel.
Check if lamp is alright. The user should be able to see some light escape through he fan. If power is present but lamp is
not alright, lamp may need to be replaced.
Note: If the unit is in standby mode because all its control channels are at ‘zero’ position, it may have turned the lamp off.
Set some controls to non-zero positions.
If the lamp is alright, check if the gobo wheel is in blackout position. If a controller is being used, change the gobo. If in
stand alone mode, tap the microphone a few times.
Unit not responding to DMX.
If the DMX LED (green) on the the rear of the unit is lit, the unit is definitely receiving DMX but is probably not responding
to the channel in which the user thinks it is. Check the dipswitch settings. If using auto set, check the dipswitch settings
on the first unit in the line.
If the DMX LED is not lit, check that the DMX cables are connected properly and are wired correctly (pin 3 is ‘hot’; on
some other DMX devices pin 2 may be ‘hot’). Also, check that all cables are connected to the right connectors; it does
not matter which way round they are.
If it is a bad connection, the DMX LED on and off lights may flash when cables are wiggled (but remember it may also be
the unit sensing audio!)
If DMX connectors are fairly short, ordinary microphone cables may be used. For longer runs, this may cause data
transmission problems (which will show up as random or incorrect movements); for best result, use proper balanced data
transmission cable.
Unit does not respond properly when controller is on fast chase
If the controller is changing very rapidly, the unit may not be able to keep up. It will ‘average’ the changes, which may
result in it doing things not expected. Either slow down the chase down, or set positions which are closer together.
Unit moves very slow in stand alone mode
Check that the dipswitches are not set to the special option settings. Set a special mode which makes the unit move
slowly all the time.
Unit does not respond to sound
Check to see if the unit is receiving DMX (the green LED should be off). Also check that the unit is not set to ‘display’
mode (see page 3) if it does not respond to sound in this mode. Tapping the microphone should cause the LED to flash
(quiet or high pitched sounds will not activate the unit).
Unit blacks out in stand alone mode
Some of the units’ built-in patterns include special effects such as blackout sweeps. When connecting two units up, only
one is ever blackened out at once, and the blackout ‘swaps’ between the units.
If problems are not resolved
Contact your American DJ® dealer for service.
© American DJ® Los Angeles, CA 90058 - Startec™ Arcbeam 150 User Manual page 6
American DJ
DMX implementation
User Instructions
®
- Using any standard U.S.I.T.T. DMX Control Board.
Mirror Pan (Channel 0) - Looking into mirror
DMX 0
128
255
Result
Left
Central
Right
Gobo (Channel 3)
DMX 0
24
38
58
72
88
102
120
128
158
174
190
210
222
226
230
234
238
242
246
250
254
Mirror Tilt (Channel 1) - Looking into mirror
DMX 0
128
255
Result
Top
Central
Bottom
Color (Channel 2)
DMX 10
26
42
58
75
91
107
123
140
156 172
188
205
221
237 253
Result
White
Red
Blue
Green
Yellow
Cyan
Orange
Pink
Neon Green
UV Purple
Magenta
Aqua
Aqua
Magenta
UV Purple
Neon Gren
Result
Blackout
Open
Laser
Star
Slice
Tunnel
Heart
Eurostars
Sunburst
Triangles
Slash
Bubbles
Segment
Bubbles
Slow strobe
Strobe 2
Strobe 3
Strobe 4
Strobe 5
Strobe 6
Strobe 7
Fast strobe
Note: Gobo controller ‘snaps’ to the next gobo.
Intermediate values will give mixed colors.
Lamp Replacement
Do not touch lamp with bare hands! Unscrew two knobs
on lamp hatch on back of unit. Replace lamp,
reassemble.
ON/OFF Lamp Switch
ON/OFF Lamp Switch
Turn Lamp Switch one way for ‘ON’, switch other
way, lamp turns ‘OFF’ but fan s stays on to cool unit.
Fuse
Power Cord
© American DJ® Los Angeles, CA 90058 - Startec™ Arcbeam 150 User Manual page 7
American DJ
®
User Instructions
Standard DMX-512 Dipswitch Setting Codes
Follow the procedure below to set dipswitches to certain channels.
Dip switch 1 adds 1 to the channel number when turned ‘on’
Dip switch 2 adds 2 channels
Dip switch 3 adds 4 channels
Dip switch 4 adds 8 channels
Dip switch 5 adds 16 channels
Dip switch 6 adds 32 channels
Dip switch 7 adds 64 channels
Dip switch 8 adds 128 channels
Dip switch 9 adds 256 channels
For example, If the user desired to use a channel number not in the diagram above, such as 28, turn ‘on’ dip
switchs 5, 4, and 3: ie(16 channels +8 channels + 4 channels = 28 channels )
Here are some other examples,
• to set a channel of 9, turn ‘on’ switches 4 and 1: (8 + 1 = 9)
• for a channel of 50, turn ‘on’ 6,5, and 2: (32 + 16 + 2 = 50)
Important Note about Controlling Units via DMX
When using the StarTec™ Arcbeam 150, StarTec™ H150, or StrobeTec with American made (US) DMX controllers
other than the American DJ® SAB/19C™ (ie. N.S.I., Omni, Leprecon etc.), the user must change XLR cable output
pins 2 & 3. These two pins must be switched only on the male XLR plug that will input into DMX controller
(see diagram below). If there are any questions about this procedure, contact your local American DJ® dealer.
There is no need to change wiring when units are being used with their own pre-programs ( ie. linked without
controller).
With ADJ SAB/19C™
XLR MALE SOCKET
HOT 2
1 EARTH
other US DMX controllers
XLR MALE SOCKET
COLD 3
1 EARTH
3 COLD
DATA IN
2 HOT
DATA IN
© American DJ® Los Angeles, CA 90058 - Startec™ Arcbeam 150 User Manual page 8