1
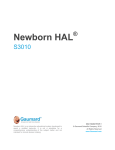
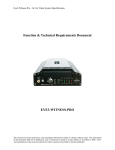
Print Audit Facilities Manager User Manual Table of Contents Installation & Setup ............................................................................................1 IMPORTANT: Before you begin ................................................................................ 1 Installation ..................................................................................................................... 1 Setup .............................................................................................................................. 1 Customizing Scan Settings......................................................................................... 2 Accessing your Print Audit Facilities Manager Account......................................... 3 Looking at Different Views.................................................................................3 Technical View.............................................................................................................. 3 Supplies View ............................................................................................................... 4 TCO View ...................................................................................................................... 4 Detail View..................................................................................................................... 4 Financial View............................................................................................................... 4 Device Detail Screen ................................................................................................... 5 Model Assignment Screen.......................................................................................... 8 Setup Menu .........................................................................................................8 Change Password........................................................................................................ 8 Manual Input ................................................................................................................. 9 Settings .......................................................................................................................... 9 TCO Calculator ............................................................................................................. 9 Toner Stock Management .......................................................................................... 9 CPC Assignment .......................................................................................................... 9 Import/Export................................................................................................................. 9 User Management...................................................................................................... 10 Reporting Menu.................................................................................................10 Asset Reports ............................................................................................................. 10 Error Reports............................................................................................................... 10 History Reports ........................................................................................................... 11 Email Reports ............................................................................................................. 11 Report Scheduler ....................................................................................................... 11 Installation & Setup IMPORTANT: Before you begin The following items are required for a successful installation of Print Audit Facilities Manager. Please review this list and ensure all requirements are met before beginning installation. Network Requirements: TCP/IP configured Port 21 (preferred) or Port 22 (available July 25, 2005) must be open for automatic transmission of collected data Obtain a valid network username and password to allow Windows Task Scheduler to perform automatic collection of device metrics System Requirements: Windows 2000/XP Network connection Internet connected browser Installation 1. Point an internet browser to http://www.printaudit.com/downloads/exe/dca_setup.zip 2. You will then be prompted to download dca_setup.zip. Save the file to the PC in any desired location. If you are not prompted to download the file, your browser security settings may be too high. Set your security settings to allow files to be downloaded from this website. You may then need to resubmit the web form to access the file. 3. Extract the contents of the zip file, and run the program DCA_setup.exe. This will bring you to the Print Audit DCA Installation Wizard. Follow the prompts to complete installation. 4. Call Print Audit Technical Support at 1-877-412-8348 in North America or 1-403-685-4932 world-wide to obtain your activation code when prompted at the end of installation. You will be given your code and guided through the setup. Setup 1. Once your valid activation code is entered, the Print Audit DCA will automatically do a communication check and will tell you if it is successful. If it is not successful, please ensure you have met all requirements from section 1.1. 2. Select Create Task Schedule to setup regular scanning intervals. The Task Scheduler is a component that is integrated within Microsoft Windows. The Task Scheduler contains a list of “tasks” to run at scheduled intervals. 1 Print Audit Facilities Manager will schedule a task to scan the network once per hour. You will be prompted to enter a valid network username and password so that scans can be performed without anyone logged into the system. Ideally this should be an administrator’s username and password. 3. Select Open Windows Task Scheduler to view the task that was created. The task can be modified from the default settings from here. 4. Select Run Test Scan and Send to perform an initial scan and device discovery. 5. At the end of your call with Print Audit Technical Support, you will be given a username and password to access the secure Print Audit Facilities Manager website. Customizing Scan Settings You can customize scan settings using the left side of the main configuration screen immediately after setup, or at any time by selecting PFDCA Configuration from the Programs menu. QuickScan: The default setting which scans a range of 254 IP addresses based on the IP address of the host computer. Broadscan/Custom: Allows you to select any host IP and subnet mask, for a larger or smaller scan range. Custom IP Range: Allows you to specify up to three IP ranges to scan. Network Timeout: You may wish to increase this to 150ms if scans are returning missing information. Enable PJL/Enable Broadcast: Not applicable to Print Audit Facilities Manager Save: Select Save to retain any changed settings. 2 Accessing your Print Audit Facilities Manager Account Point any internet-connected web browser to http://www.printaudit.com/facilitiesmanager.asp and enter your login and password information. Looking at Different Views There are 5 main “dashboard” views within Print Audit Facilities Manager. From any dashboard view, you can expand one or more customers, to view device-specific information, as well as view any “red flags” that alert you to a problem with a specific device. Financial view Detail View Technical view Supplies View TCO View Setup and Reporting Menus Expand Customer Model and Assignment Link Collapse Customer Device list and Device information Device Detail Link Technical View • Supplies Status • Location • Device Status • Asset Number • Daily Page Count • Model Description • Serial Number • Red Flag Alerts • IP Address 3 Supplies View • Serial Number • Toner Levels or Status • Last Order Date • Depletion Date • Stock Level TCO View • Serial Number • Monthly Total Cost of Ownership • Monthly Equipment Cost • Monthly Maintenance Cost • Monthly Toner Cost • Monthly Paper Cost Detail View • Serial Number • Assigned Cost-per-Copy • IP Address • Cost-per-Copy Delta (per copy) • Month Page Count • Monthly Delta • Page Coverage • Actual Cost-per-Copy Financial View • Serial Number • Monthly Total • IP Address • Assigned Cost-per-Copy • Monthly Page Count • Utilization 4 Device Detail Screen The Device Detail screen is accessed by clicking on any device name from any dashboard view, and shows comprehensive information about that specific device. 1 2 7 8 3 9 10 11 12 4 13 15 14 6 5 16 17 1. Device Description 2. Model Description 3. Model Image 4. Rated Duty Cycle & Maintenance Interval 5. Link to Maintenance Screen (Refer to 2.7) 6. Link to Follow-up Screen (Refer to 2.8) 7. Basic Device Information • IP Address, Location, Serial #, Firmware 8. Page Counts • Yesterday, Weekly, Monthly, Life, Color (Monthly), Black (Monthly) 9. Monthly Total Cost of Ownership with link to TCO Screen (Refer to 2.9) 10. Dealer Savings 11. Cost per page 12. Current Utilization 13. Current Printer Display 14. Link to 24-hour Printer Display (Refer to 2.10) 15. Current Printer Status 16. Toner Levels 17. Online Ordering Feature 18. Last Order Date 5 18 Maintenance The maintenance screen allows you to keep track of maintenance performed, look up parts information for the device, and generate a simple record of warranty information. Follow Up The follow up feature allows you to set intervals that will trigger “Red Flag” alerts, which will appear on the Technical View dashboard. Select either Life Page Count, or Pages Printed from the time of creating the record, and then enter the value that it is to be triggered at. TCO View The Total Cost of Ownership view gives you a comprehensive look at the cost components involved in operating the device. Monthly total cost of ownership Dealer savings Link to the settings screen Paper cost, calculated by number of pages printed multiplied by the cost of one sheet Monthly maintenance cost calculated according to default settings Actual toner cost, based on pages printed, page coverage, and cartridge cost Monthly equipment cost calculated as a function of purchase date and depreciation period Toner cost based on OEM cartridges Energy cost, calculated using the KWH cost, and the number of hours the device was in standard vs powersave mode Select date button You can change any numbers in WHITE boxes, and click “Recalculate” 6 To save any recalculations as the new defaults, click “Save” 24-hour Printer Display The 24-hour display features records the display of a device each half hour, and places it in a table. This allows you to view any recurring problems that may need further attention. 7 Model Assignment Screen The Model Assignment Screen is accessed via the Technical View dashboard by clicking on any Model link, and allows you to add or change a model assignment. Each device is assigned a corresponding model to gather non-MIB information such as duty cycle, maintenance interval, etc. Simply select the model that matches your device from the drop down menu, and select to update the models using the button at the bottom of the screen. If you cannot find the proper corresponding model in the drop down menu, click “Email Missing Model”, and a request will be sent to Print Audit Technical Support to add an additional model record. Setup Menu There are several features in Print Audit Facilities Manager that require manual setup of device or organization specific information. The Setup menu, located on any of the main dashboard views, will allow you to activate these features. Change Password Change Password under the Setup menu allows you to change your access password for www.printaudit.com/facilitiesmanager.asp. It is advisable to change your password periodically to obtain maximum security. After clicking Save, your password will be changed. Please use the new password next time you login to http://www.printaudit.com/facilitiesmanager.asp. 8 Manual Input Manual Input allows you to enter specific device information for devices that are not able to tell Print Audit Facilities Manager what that information is. Device vitals, toner cartridge information, page coverages, monthly values, and financial values can be entered here. 1. Select customer from drop-down menu 2. Select device from scroll-down menu 3. Manually enter desired device information 4. Click Update Settings The Settings selection allows you to choose which components are included in cost per copy calculations, and what to charge for each component. Check the components you which to include, and enter in any applicable cost figures. TCO Calculator The TCO Calculator can be used as a quick TCO reference. Data entered here will not be transferred into any other Print Audit Facilities Manager data or calculation. Simply enter all the information you would like to include in the calculation, and click Calculate TCO. Any information not entered will remain as zero in the calculation. Toner Stock Management The Toner Stock Management function allows you to keep track of your toner inventory for each device. The information entered here will activate the Stock Level and Depletion fields in the Supplies View. 1. Select customer 2. Enter quantities of toner inventory 3. Click Update to save information, or Cancel to return to previous stock information CPC Assignment The CPC Assignment function allows you to set the actual cost per copy paid by a customer. Select the customer you wish to set a CPC rate for from the scroll-down menu. Click Use CPC to be able to select one of three different methods to set CPC: 1. By Customer: Set a single CPC for each customer 2. By Monochrome vs Color: Set a different CPC for monochrome and color devices 3. By Device: Set a different CPC for each device Import/Export The Import/Export function allows you to download or upload client data via an XML or CSV file. 9 User Management The User Management function allows you to add, delete, and update user account information. Dealers are able to add new end user customers under their account. Reporting Menu The Reporting Menu allows you to set up asset, error, and history reports, as well as schedule automatic reporting. The Reporting Menu is accessible through any of the main dashboard views. Asset Reports The Asset Reports feature allows you to view 5 different types of reports for your print and copy assets: Page Count Hourly, Page Count Daily, Page Count Monthly, Toner Levels, and Introduction Date vs. Page Count. Error Reports Error reports show the frequency of different types of errors such as low toner, out of paper, service requested, paper jam, etc. 10 History Reports The History Reports function gives you a comprehensive look at historical data of your devices, from costs to page coverages. Email Reports After any “Show Report” button is clicked, the selected report will appear with an option to email it. Type in the desired email address and click Send, and it will be sent to the desired address. Report Scheduler The Report Scheduler function allows you to set up automatically generated reports that will be sent to a specified email address. A list of set up reports will appear in the table on the right hand side of the screen. Support Should you require assistance with the Facilities Manager, please do not hesitate to contact our technical support. Print Audit - North America 877.41.AUDIT (28348) http://www.printaudit.com [email protected] Print Audit - Australia/New Zealand +61 3 95243131 http://www.printauditaustnz.com [email protected] Print Audit - Europe +44(0)1483 726206 http://www.printauditeurope.com [email protected] Print Audit – South Africa +27 82 562 3468 http://www.printauditsa.com [email protected] 11