1
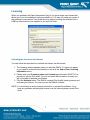
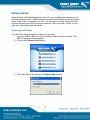
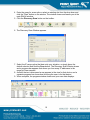
Rapid Assessment Key v2 User Manual Table Of Contents Overview ............................................................................................................................. 2 What's New in Print Audit Rapid Assessment Key v2 ......................................................... 3 Technical Overview of the Discovery Process .................................................................... 4 Protocols Used ................................................................................................................ 4 General Process .............................................................................................................. 4 Is Network Traffic a Problem? ......................................................................................... 5 How Do I Reduce Network Traffic If I Am Concerned?.................................................... 5 Requirements...................................................................................................................... 6 Licensing ............................................................................................................................. 7 Activating the license via the Internet .............................................................................. 7 Activating the license via a file......................................................................................... 8 Getting Started .................................................................................................................... 9 Creating your First Scan .................................................................................................. 9 Sites .................................................................................................................................. 11 Creating a New Site....................................................................................................... 11 Selecting an Existing Site .............................................................................................. 12 Deleting a Site ............................................................................................................... 12 Locking and Unlocking Sites.......................................................................................... 13 Scan Information ............................................................................................................... 15 Gathering Device Information ........................................................................................ 15 Discovery Scan.............................................................................................................. 16 Refresh Scan ................................................................................................................. 18 IP Report ....................................................................................................................... 18 Device Walking.............................................................................................................. 20 Assigning Costs and Toner Ratings to Devices............................................................. 21 Viewing Scan Information.................................................................................................. 22 Selecting a Scan............................................................................................................ 22 Customizing the View .................................................................................................... 23 Available View Columns ................................................................................................ 26 Working with Reports ........................................................................................................ 27 Creating a Report .......................................................................................................... 27 Printing a Report............................................................................................................ 28 Exporting a Report to PDF............................................................................................. 28 Removing a Report........................................................................................................ 29 Importing and Exporting Scan Information ........................................................................ 30 Importing Scan Information............................................................................................ 30 Exporting Scan Information ........................................................................................... 31 Available Scan Export Formats ..................................................................................... 32 Updating the Software....................................................................................................... 33 Automatic Updates ........................................................................................................ 33 Manual Updates............................................................................................................. 33 Frequently Asked Questions ............................................................................................. 34 Overview Welcome to the Print Audit Rapid Assessment Key v2, also referred to in this documentation as the RAKv2. You can use this tool to quickly gather information on your networked TCP/IP based printers. Once you gather the information you can export it or use it to create reports. This manual consists of several different sections. What's New in Print Audit Rapid Assessment Key v2 Requirements Getting Started Managing Sites Locking and Unlocking Sites Gathering Device Information Viewing Scan Information Importing and Exporting Scan Information Also, please check out the Frequently Asked Questions at the end of this manual for answers to some of the more common general questions about the RAKv2. 2 What's New in Print Audit Rapid Assessment Key v2 Version 2 of our Rapid Assessment Key has several important improvements/changes over version 1. It has been completely re-designed and re-written to provide a faster, more reliable tool. Here are just some of the changes/improvements: Re-designed to be extremely fast and can scan multiple devices at one time. Auto-detect of SNMP version. Can use the much faster SNMPv2 protocol if the device supports it. New engine/dat file architecture similar to popular virus scanning programs. This new architecture allows us to issue much smaller updates when we release scanning improvements. Smaller updates allows for faster automatic updating. High quality hardware keys. The USB keys we use for the software are high quality keys from respected manufacturers. Separate scans database file. No more need to keep track of several separate scan .csv files, all scans are stored in one file called "scans.dat" to allow easier data backups and improve data management. Automatic data backups. When the RAKv2 starts it automatically creates a backup of your "scans.dat" file to protect your data. Site management. You can now create separate "sites" for your customers. When you perform scans at a site the scans are automatically associated with that site. Integrated reporting. The reporting tool has been fully integrated into RAKv2 instead of being a separate application. Improved report quality. The image quality of the graphical reports is greatly improved. Improved scanning accuracy. RAKv2 has improved support for several manufacturers. Also implements an "all good or no go" philosophy. If the scan of a device only partially completes, the scan data is discarded. Configurable views. You can fully customize the columns that are displayed, along with column order and column size. You can also sort the data on any column. Site Scan History. This integrated view shows all devices that have been found at a site along with the latest information retrieved for that device so there is no need to hunt through an individual scan for a specific device. Color coding of the rows allows you to see at a glance which devices have “stale” data. Security. You can password protect RAKv2, and selectively lock/unlock sites. Locked sites can only be viewed if you have the password, while un-locked sites can be viewed by anyone using the key. 3 Technical Overview of the Discovery Process This topic is a technical overview of how the Print Audit Rapid Assessment Key v2 discovers printers on the network. Its main audience is IT personnel who want a greater understanding of how using the RAKv2 will impact their network. Protocols Used The RAKv2 uses SNMP (Simple Network Management Protocol) for the majority of its scanning. It uses SNMPv2 wherever possible to cut down on network "chatter", but will fallback to SNMPv1 for devices that do not support SNMPv2. Currently there is no support for SNMPv3. The RAKv2 also uses ICMP (ping) packets to aid in device discovery. General Process The RAKv2 uses the following steps to scan each IP address when doing a Discovery scan. 1. The RAKv2 pings the IP address to see if it gets a valid response. It will wait the "Ping Timeout" as specified in the Advanced Discovery Settings, and if no valid response will retry the "Ping Retries" amount. If no valid ping response it assumes there is nothing listening at that IP address and moves to the next. 2. If there is a valid ping response, the RAKv2 then uses SNMP to try and retrieve a standard SNMP value from the device. If nothing is returned it will re-try with the "SNMP discovery" time out value in the Advanced Discovery Settings and will retry with the "SNMP retries" value. It will re-try this step for each community in the "Communities" list in the Advanced Discovery Settings. If there is nothing found RAKv2 stops scanning this IP address and assumes something is there, but it does not support SNMP. 3. If a valid SNMP value is returned the RAKv2 then attempts to get information from the public standard Printer MIB. Again, it will use the "SNMP discovery" timeout and the "SNMP retries" value for this. If nothing is found then the RAKv2 assumes this is a valid SNMP device, but not a printer/copier. 4. If information is found here, the RAKv2 then scans the device using the "SNMP request" and "SNMP retries" values. 4 Is Network Traffic a Problem? Not really. The packets are fairly small, and the scan runs for a short period of time. However, there are some suggestions to reduce the amount of traffic related to discovery. See below. How Do I Reduce Network Traffic If I Am Concerned? There are a couple of things you can do to reduce traffic on the network that is caused by the discovery process. Each one is listed below along with pros and cons. 1. Limit the number of communities. As long as devices in the organization use the "public" community, or use a standard private community, then you should be able to get away with having only one or two "Communities" in the Advanced Discovery Settings. The more communities you have, the longer the overall scan will take and the more SNMP requests are generated. 2. Lower the number of SNMP retries. You can lower the SNMP retries value to reduce overall traffic. However, it is possible that devices will be missed during the scan. 3. Load a list of specific IP addresses into the Discovery Scan Window. You can avoid most of the traffic involved with discovery altogether if you load the list of IP addresses you know correspond to printers into the Discovery scan window. For example, if you know you have five devices, adding those IP addresses via file import or manual entry can save hundreds of SNMP requests to IP addresses that are not associated with devices. Once the initial discovery is complete, do a Refresh Scan instead of a Discovery Scan. A Refresh Scan re-uses community settings, etc. and can skip much of the discovery process. 5 Requirements Using the Rapid Assessment Key v2 requires the following: Windows 2000 or newer operating system with Internet Explorer 4.01SP2 or later installed. An available USB 1.1 or 2.0 port. A minimum of 10MB free on the USB key and on the computer running the software. A TCP/IP based network. SNMP enabled network printers 6 Licensing When you purchase the Rapid Assessment Key v2 you get a single-user license that allows you to run the software from the provided key. You may not make any copies of the software for any reason. Print Audit does not support running the software from a USB key other than the one supplied to you by Print Audit. Activating the license via the Internet You can follow the steps below to activate the license via the Internet: 1. The licensing window appears when you start the RAKv2. If it does not appear, or you need to activate a new license you can click the Help->View Licensing Information menu. 2. Please enter your Customer name and License key information EXACTLY as provided to you by Print Audit. If you do not enter the information correctly you will not be able to activate your license. 3. Click the Activate button. The RAKv2 contacts Print Audit's licensing server and activates your license. You can now use the RAKv2 software. NOTE: You must have an active Internet connection to activate the software. If you have any problems activating the license over the Internet please contact Print Audit. 7 Activating the license via a file If there is a problem with activating the license via the Internet you can activate via a license file. You must contact Print Audit in order to obtain a valid license file before continuing. Once you receive a valid license file from Print Audit you can activate it as follows: 1. When you start the RAKv2 the Licensing Window appears. If it does not appear, or you need to activate a new license you can click the Help->View Licensing Information menu. 2. Please enter your Customer name and License key information EXACTLY as provided to you by Print Audit. If you do not enter the information correctly you will not be able to activate your license. 3. Click the Activate license from a file option. 4. Click the Activate button. The Select the License File window appears. Use the window to find the license file that Print Audit supplied and click the Open button. You can now use the RAKv2 software. 8 Getting Started Using the Print Audit Rapid Assessment Key v2 is very straightforward and easy to do once you learn the basics. RAKv2 gathers information from network printers by doing a "scan". Each "scan" is assigned to a "site". You can create as many sites as you like, and scan as many devices as you like for each site. Once you have a "scan" you can view, sort, report and export the results. Creating your First Scan You can follow the steps below to create your first scan. 1. Insert the RAKv2 USB drive into an available USB port on the computer. The RAKv2 Launcher window appears. 2. Click on the Perform a Scan button. 3. This starts RAKv2 and displays the Select a Site window. 9 4. Enter the name for a new site or select an existing site from the drop down and click the "Start" button on the window. The window closes and leaves you at the main RAKv2 window. 5. Click the Discovery Scan button on the toolbar. 6. The Discovery Scan Window appears. 7. Select the IP range option that best suits your situation, or simply leave the default selection and click the Scan button. The Discovery Scan Window closes and a progress bar appears that shows you how many IP addresses in the range(s) it has scanned. 8. As each device is discovered a row appears in the view for that device, and a separate progress bar shows how far along the scan is for that device. 9. When complete, the progress window closes and your scan data displays. 10 Sites The Print Audit Rapid Assessment Key v2 (or RAKv2) allows you to create "sites". A site can be a physical location where you are performing a scan, a specific customer, or whatever makes sense for your business. Sites contain IP address range information and all scans performed at the site. This allows you to visit several different places with the RAKv2 and easily organize the information you gather. Creating a New Site Follow the steps below to create a new site: 1. Click the Select Site button on the RAKv2 toolbar. 2. 3. 4. 5. The Select Site window appears. Click the Create a new site option. Enter the new site name in the box. Click the Start button. RAKv2 creates your new site and the Select Site window closes. 11 Selecting an Existing Site Follow the steps below to select an existing site: 1. Click the Select Site button on the RAKv2 toolbar. The Select Site window appears. 2. Click the Select an existing site option. 3. Select the site from the drop down. 4. Click the Start button. RAKv2 opens the site and displays the Site Scan History. Deleting a Site Follow the steps below to delete a site: 1. Select the site you want to delete using the steps above. 2. Go to the File->Delete Site menu item. A dialog appears asking you if you are sure you want to delete the site. Please note, deleting a site deletes all scans and other information associated with the site. 3. Click Yes to delete the site. RAKv2 deletes the site and displays the Select Site window to allow you to create or select a different site. 12 Locking and Unlocking Sites The Print Audit Rapid Assessment Key v2 allows you to password protect sites on a case-by-case basis. For example, you could choose to lock "Site A" so that only individuals who know the password can view the data, and leave "Site B" unlocked so that anyone can view the data. When you first lock a site, the RAKv2 prompts you for a password to use for locked sites. RAKv2 uses this password for ALL of your sites, not just the current one. The next time you lock a site RAKv2 asks you to re-enter the password before you lock the site. If you need to change the password, please see the section below on changing the key password. To lock a site: 1. Select the site you want to lock. 2. Click the File->Lock Site menu. The Lock/Unlock Options window appears. 3. Click the option that you want to apply and click the OK button. 4. The Set Password window appears. Please enter the password you want to use in the Password box and enter it again in the Verify box. If you already set a password, re-enter the password you previously set. 5. Click OK to set the password. NOTE: If you need to change the password see the section below on changing the password. There is no way to retrieve your password if you forget it, so choose a password you know you will remember. To un-lock a site: 1. Select the site you want to un-lock. 2. Click the File->Unlock Site menu item. The Lock/Unlock Options window appears. NOTE: If File->Unlock site is grayed out then the current site is not locked. 3. Click the option that you want to apply and click the OK button. NOTE: Unlocking all sites does not remove/change your password. 13 To change your password: 1. Click the Tools->Set Key Password menu item. The Change Password dialog appears. 2. 3. 4. 5. Enter your current password in the Password box. Enter your new password in the New box. Re-enter your new password in the Verify box. Click the OK button to change your password. NOTE: This changes the password for ALL sites. If you enter a blank password in both Password and Verify, it removes the password from the key. This means that anyone can view your sites whether or not they were locked. There is no way to retrieve your password if you forget it, so choose a password you know you will remember. 14 Scan Information Gathering Device Information Once you have created a site, the next step is to gather information on your networked printer/copier devices. You can gather this information in several ways. Each is outlined below. Discovery Scan - The discovery scan is the main option for gathering information. It uses an IP address range that you select and attempts to gather printer information from each IP address. It is called "Discovery" because it has to visit each IP address and discover if there is a device there, and if the device is a printer/copier that it can get information from. Refresh Scan - You can do a refresh scan after a successful discovery scan. A refresh scan does not complete a discovery scan, it simply re-visits the IP addresses that you have already found and refreshes the information. If you know no new devices have been added to the network that you care about then the refresh scan is your fastest option. IP Report - The IP report is similar to a discovery scan except that it does not actually scan the devices. Instead it creates a simple text file that shows every IP address that the RAKv2 found and what the current status of the IP address is. Device Walk - The RAKv2 includes a Device Walk tool. This tool allows you to get all the information present from an SNMP device. Generally you only need to complete a Device Walk if requested to by technical support. Assigning Costs and Toner Ratings - You can manually assign black/white and color costs as well as pages per toner cartridge for a device for reporting purposes. 15 Discovery Scan The discovery scan is the main option for gathering information. It uses an IP address range that you select and attempts to gather printer information from each IP address. It is called "Discovery" because it has to visit each IP address and discover if there is a device there, and if the device is a printer/copier that it can get information from. To start a discovery scan: 1. Select the site you want to use. 2. Click the Discovery Scan button on the toolbar. The Discovery Scan Window appears. 3. Select the IP address or addresses that you want to scan. You have several options here to choose from. 4. Click the Scan button on the Discovery Scan window. The window closes and a progress bar appears showing the progress in scanning the IP addresses. 5. When the RAKv2 finds a printer/copier at an IP address it adds it to the scan view and a separate progress bar displays in the view to show how far along the scan is for that device. 16 6. When the RAKv2 has scanned all devices in the IP ranges the progress window closes and you can view all of the information. 7. Click Cancel on the progress window to cancel the scan at any time. If any errors occurred while scanning devices, a window appears at the end of the scan asking you if you want to view the errors. If you experience any time out errors when scanning, or you have devices on your network that are not showing up, you may need to adjust the scan time outs and other scan parameters. See the section below for changing advanced scanning options. To change the advanced discovery settings: 1. Select the site you want to use. 2. Click the Discovery Scan button on the toolbar. The Discovery Scan Window appears. 3. Click the Advanced button on the Discovery Scan Window. The Advanced Discovery Settings Window appears. 4. Make the changes to the options that you feel are necessary. 5. Click the OK button to accept your changes. 17 NOTE: Changes to these settings apply to all scans that you do from that point forward. Each site can have its own advanced discovery settings. Refresh Scan The Refresh scan option allows you to re-scan a list of previously discovered IP addresses. A new scan is still created, but it allows you to skip much of the discovery process. The result is faster scans and less network traffic usage. To start a refresh scan: 1. Select the site you want to use. 2. Select the scan you want to refresh, or you can refresh from the Scan History. 3. Click the Refresh Scan button on the toolbar. A progress window appears that shows you how far along it is in the list of IP addresses. When a device is contacted, a separate progress bar displays in the view for that IP address. 4. When the scan is complete, the RAKv2 switches to the new scan or simply updates the Site Scan History depending on what you selected in step 2. NOTE: The refresh scan uses the same Advanced settings as what was used in the last Discovery scan for the selected site. If you need to change the settings you need to go into the Discovery Scan window and complete a new discovery scan. IP Report The IP Report is a simple text based file that lists all IP addresses found during a Discovery Scan and what the status of a particular IP address is. This is useful for troubleshooting or for finding out which IP addresses are in-use on your network. To create an IP report: 1. Select the site you want to use. 2. Click the Discovery Scan button on the toolbar. The Discovery Scan Window appears. 3. Select the IP address or addresses that you want to scan. You have several options here to choose from. 18 4. Click the IP Report button on the Discovery Scan window. The window closes and a progress bar appears showing the progress while scanning the IP addresses. 5. When done, the RAKv2 opens the file so you can view the results. NOTE: The IP addresses are listed in the order that the scan was completed, not in the order that the scan was started. Due to how the RAKv2 can scan multiple devices at once the IP addresses might not be in the order expected. 6. Click Cancel on the progress window to cancel the scan at any time. IMPORTANT: The IP Report file is called RAKIPReport.txt and is created in the same folder as the parak2.exe. RAKv2 overwrites this file every time you do an IP Report. If you want to save the results you should create a copy of the file. 19 Device Walking The RAKv2 comes with a Device Walk tool. A "device walk" is a text file that contains all SNMP information available from a device. Generally, you would only complete a device walk if requested to by technical support. To do a device walk: 1. Click the Tools->Walk Device menu item. The Device Walk Tool window appears. 2. Enter the IP address of the device you want to walk. As a shortcut you can select a device in the device view before you start the walk and the IP address is populated for you. 3. Select the walk options. 4. Click the Walk button. The RAKv2 starts to walk the device and the progress bar indicates the scan is running. As the actual size of the walk cannot be determined beforehand, the progress bar indicates activity, not overall progress. The walk file is created in the same directory as the main parak2.exe, and is named <IPAddress>Walk.txt where <IPAddress> corresponds to the IP address of the device. If the walk times out for any reason you may need to adjust the "SNMP request" time out value in the Advanced Walk Settings. 20 Assigning Costs and Toner Ratings to Devices The Print Audit Rapid Assessment Key v2 allows you to assign costs and pages per toner cartridge for the devices in a site. The RAKv2 uses these costs and ratings in some of the reports you can create. You can assign a different cost per page for mono pages and color pages. These values are saved with the device, so changes made in one scan affect all scans for that site. To assign values to a device: 1. Select the site you want to use. 2. Select a scan containing the device. 3. Click on the device or devices that you want to change. You can use a combination of SHIFT-CLICK and CTRL-CLICK to select multiple devices. 4. Click the Edit->Edit Selected Printers menu item. The Editing Printers window appears. 5. Enter in the new values and click the OK button. NOTE: If you leave a box blank, no changes are made to the existing values. You can also double-click in the column you want to change and enter a new value to make manual changes. 21 Viewing Scan Information Once you have scanned devices for information using the Discovery Scan or Refresh Scan features you can view the results in the scan view. You can easily switch between any scan you have done for a site, as well as customize the view. Once you have selected your scan you can also create reports based on the information. Selecting a Scan You can easily view the results of any scan you do for a site. Scans are stored by the date and time that the scan was created, and are automatically loaded into the Previous scans drop down on the Device Scans tab of the main Print Audit Rapid Assessment Key v2 window. Standard Scans Each scan you do, whether it is a Discovery scan or a Refresh scan is stored in a database. Each scan is stored by the date and time it was scanned. To select a standard scan: 1. Select the site you want to use. 2. Click the Previous scans drop down box. A list of all scans for the site appears. 3. Click the date and time corresponding to the scan you want to view. The scan results appear in the view. 22 Site Scan History There is a special type of scan called the "Site Scan History". This scan contains the results of the latest scan for every device ever scanned at that site. So for example, if you scanned two IP addresses on one discovery scan, then scanned a different one on another scan, all three devices will display for the "Site Scan History". There are a few differences between the Site Scan History and a standard scan. They are: 1. You cannot use the Site Scan history in a comparison report or a comparison export; however, you can use it in a regular report or export. 2. When you do a Refresh Scan on the Site Scan History, the RAKv2 does not switch to the latest standard scan. It stays on the Site Scan History. You can turn on color coding on the view to determine if data is "stale" or not. To select the Site Scan History: 1. Select the site you want to use. 2. Click the Previous scans drop down box. A list of all scans for the site appears. 3. Click the "<Site Scan History>" item to select the history. Customizing the View There are several different ways you can customize the view in the Print Audit Rapid Assessment Key v2. Once you set up the view to your preferences, it is automatically saved when you exit the RAKv2 tool so that it is available the next time you use the software. 23 Showing and Hiding Columns The RAKv2 is capable of displaying up to 26 columns. Some of them might not be important to everyone so you can choose to display whichever columns you want. The steps are as follows: 1. Click the Edit->Show/Hide View Columns menu item. The Show/Hide View Columns window appears. 2. Check the box to the left of a column name to display the column, or clear the box to hide the column. 3. When you are done choosing which columns to display, click the OK button. Ordering the Columns You can move the columns into any order that you want. The steps are as follows: 1. Left-click and hold the mouse button down on the header of the column you want to move. 2. Move the mouse to the left or right. A gray line appears showing where the new position of the column will be. 3. Release the mouse button. The column moves to the new position. 24 Sorting the Data You can sort the data in either ascending or descending order on any column. The steps are as follows: 1. Left-click the column header of the column you want to sort. Re-sizing the Columns You can change the width of each individual column to your liking. You have three options when it comes to resizing the columns. They are as follows: 1. Click the Edit->Auto Size Columns menu item. When checked, the RAKv2 automatically resizes columns to the appropriate width for that column. 2. Left-click and hold the mouse button down on the line in-between the column headers to the right of the column you want to size. Moving the mouse left or right will change the size. NOTE: You cannot size the columns this way if Auto Size Columns is checked. 3. Double-click on the column header of a column. This will do a "one time" automatic resizing of that column. Color Coding the Site Scan History You can choose to color code the Site Scan History view. Color coding assigns background colors to "stale" data in the Site Scan history so you can quickly determine if device data on the history is up to date or not. Rows with the default background color are up to date as of the latest scan. Rows with a light green background are one scan out of date. Rows with a light yellow background are two scans out of date. Rows with a light red background are three scans out of date. To turn color coding on and off: 1. Click the Edit->Color Code Scan History menu item. When checked color coding is enabled. Please note that his only affects the Site Scan History view, not a standard scan. Resetting the View At any time, you can reset the view to the default view built into the software. To reset the view: 1. Click the Edit->Reset View to Default menu item. The columns reset to the standard settings, removing your changes. 25 Available View Columns The Print Audit Rapid Assessment Key v2 can display up to 26 columns of information for every device it scans. Please note that not all columns are supported by all devices. Below is a list and a brief description of the column. IP Address - The current IP address of the device. Vendor - The manufacturer of the device. If "OTHER" is displayed then no vendor could be determined for the device. Name - The name of the device. Black - The current level of black toner/ink in the device. Cyan - The current level of cyan toner/ink in the device. Magenta - The current level of magenta toner/ink in the device. Yellow - The current level of yellow toner/ink in the device. Life Count - The total number of pages that the device has output in its life time. Color Count - The total number of color pages the device has output in its life time. Is Color - If checked the device is capable of color printing/copying. Serial - The serial number of the device. LCD - The current readout of the LCD display on the device. Status - The current error state of the device, if any. Location - The location of the device. Asset No - A user-defined number assigned to the device. You can use this column to give your own internal inventory/device numbers to the device. BW Cost - A user-defined per page cost for black and white pages from the device. Used on some reports. Color Cost - A user-defined per page cost for color pages from the device. Used on some reports. Pages Per Cartridge - A user-defined value that indicates the number of pages that can be printed from a toner cartridge for the device. Used on the Toner Coverage report. Print Mono - The number of black and white pages that were printed by the device in its life time. Print Color - The number of color pages that were printed by the device in its life time. Copier Mono - The number of black and white pages that were copied by the device in its life time. Copier Color - The number of color pages that were copied by the device in its life time. Fax - The total number of pages sent to fax in its life time. First Scanned - The first date/time that the device was scanned by the RAKv2. Last Scanned - The most recent date/time that the device was scanned by the RAKv2. MAC Address - The unique hardware network address of the device. 26 Working with Reports Once you have scanned information from your devices you can create several reports based on that information. When you create a report it displays as a tab in the main Print Audit Rapid Assessment Key v2 window. You can then print the report or export it to PDF format. Once you are done you can remove the report. Creating a Report Follow the steps below to create a report: 1. Select the site you want to use. 2. Select the scan you want to report on. 3. Click the File->Create Report menu item or click the Create Report button on the toolbar. 4. The Select a Report window appears. 5. Click on the report you want to create. The report appears highlighted in the grid. 6. Enter the number of decimal places to display in the Decimal places to display box if it is different from what you want. You can choose between 2 and 4 decimal places. This only affects reports that display costs. 7. Click the Compare to drop down to select a scan to use for comparison, or leave it at <None Selected>. 8. Click the OK button. The RAKv2 creates the report and it displays in a tab in the main window. 27 Printing a Report Follow the steps below to print a report: 1. Create a report according to the section above, or click the tab of an already existing report to select it. 2. Click the File->Print Report menu item or click the Print Report button on the toolbar. 3. A dialog appears asking you to select your printer. 4. Select your printer and click the Print button. The RAKv2 prints the report to the printer you selected. Exporting a Report to PDF Follow the steps below to export a report to PDF: 1. Create a report according to the section above, or click the tab of an already existing report to select it. 2. Click the File->Export Report menu item or click the Export Report button on the toolbar. 3. A dialog appears asking you to select the destination of the PDF file. 4. Click the Save button on the dialog. The RAKv2 saves the report in PDF format. NOTE: Exporting to PDF requires that the RAKv2 installs a software component to the computer running the RAKv2 software. If the component is not present you will be prompted to install it. You must have administrative rights to the computer to install this component. If you do not install it you cannot export reports to PDF when running RAKv2 on that computer. 28 Removing a Report Follow the steps below to remove a report: 1. Click the tab of an existing report to select it. 2. Click the File->Remove Report menu item or click the Remove Report button on the toolbar. 3. A dialog appears asking you to confirm removing the report. 4. Click the Yes button. RAKv2 removes the report from the main view. 29 Importing and Exporting Scan Information You can use the Print Audit Rapid Assessment Key v2 to import scan files into your site and/or export the scan information to one of several file formats. Instructions to import or export are included below. Importing Scan Information You can use the Print Audit Rapid Assessment Key v2 to import scan files into your site. You can use this functionality to share scan information among colleagues as well as for migrating data from the original version of the Rapid Assessment Key to the this version. Currently the RAKv2 only supports importing RAKv1 format scan files and the RAKv2 XML format. To import scan information: 1. Select the site you want to use. 2. Click the File->Import Scan menu item. The Import a Scan window appears. 3. Click the Files of type drop down to select the type of file to import. 4. Use the window to select the file(s) you want to import. You can CTRL-CLICK and SHIFT-CLICK to select multiple files. 5. Click the Open button to start the import. A progress window appears showing the progress of each file. 6. If any errors occur during the import a dialog appears asking you if you want to view the errors. NOTE: Each scan file is imported as a separate scan for the site. The date of the scan is taken from the file. Older RAKv1 files may not import correctly if they do not have a MAC address present. 30 Exporting Scan Information The Print Audit Rapid Assessment Key v2 allows you to export the scan information to one of several file formats. You can then use the exported information in other thirdparty programs. To export scan data: 1. Select the site you want to use. 2. Select the scan you want to export. 3. Click the File->Export Scan menu item. The Export Scan Window appears. 4. Click the Export Format drop down to select the export format you want to use. 5. Click the Compare to drop down to select a scan to use in a comparison export, or leave it at <None Selected>. 6. Click the OK button. The Export Scan window appears. 31 7. Use the window to select the destination and file name and click Save. A progress window appears that shows the devices being exported. 8. If any errors occur during the export a message displays asking if you want to view the log. Click Yes to view the log. Available Scan Export Formats Here is a list of the currently available export formats and a brief description. RAK v2 View - This exports the scan information with the same columns in the same order as your current view. Columns are separated by commas. RAKv1 Comma-delimited - This exports the scan information in the same format as the scan files from our first version of the Rapid Assessment key. RAKv2 XML Format - This exports the data in our own custom XML format. Compass - This exports the data in the format needed by Compass. You cannot do a comparison export with this format. La Crosse Nextgen - This exports the data in the format needed by La Crosse Nextgen. You cannot do a comparison export with this format. Toshiba Encompass Format - This exports the scan data in the format required by Toshiba's Encompass system. You must use a comparison export for this format. 32 Updating the Software From time to time, updates will be made available for the Print Audit Rapid Assessment Key v2. You must have an active Internet connection to successfully update the software. You can update the key in one of two ways as outlined below. Automatic Updates The RAKv2 automatically checks when it starts to see if there are any updates available. If an update is available an update window appears with the latest patch notes and asks you if you want to update the software. Click the Update button to complete the update or Cancel to close. If you choose to update the RAKv2 closes until updates are downloaded and installed. To turn automatic updating on and off, click the Tools->Automatically Check For Updates menu item. If checked, RAKv2 checks for new updates when you start the software. Manual Updates You can manually check for updates at any time. Click the Help->Check for Updates menu item to have the RAKv2 check for updates. If updates are available an update window appears with the latest patch notes. Click Update to complete the update or Cancel to close. If you choose to update, the RAKv2 closes until the updates are downloaded and installed. 33 Frequently Asked Questions Here are the answers to some of the most commonly asked questions about the Print Audit Rapid Assessment Key v2. 1. Why should I upgrade to RAKv2 from my current version of the RAK? The new version of the Rapid Assessment Key has been re-written from the ground up to provide faster, more accurate scanning. We will not be providing any new updates to functionality or scanning for the original version of the RAK so upgrading is highly recommended. 2. How do I get volumes from my non-networked devices? Print Audit offers several products that you can use for a variety of situations. If you want to get volumes for local printers, walk-up copiers, etc., please see our website at http://www.printaudit.com for information on our Print Audit suite of products. 3. Why is my device not showing up in the Discovery Scan? There are several reasons as to why a particular device may not show up. Here are some of the most common: a. The device was not turned on or was unreachable at that time. b. The device does not support SNMP. Check with your vendor representative. c. The device supports SNMP, but SNMP is shut off at the device. Check with your vendor representative. d. The device has SNMP activated, but it is set to use a private SNMP community. Check with your vendor representative. e. A time out occurred on the device, check the ScanErrors.txt file on your key to see if there are any errors logged. If there are time out errors you can try increasing the time outs. An IP Report of the device's IP address can also provide valuable information as to why it may not have been scanned. 4. My device shows up, but many of the columns of information are blank. Why? The level of information that an individual device provides varies greatly manufacturer by manufacturer and even among devices from the same manufacturer. So in some cases the information is just not available. However, we are constantly improving our scan engine to get as much information as we can from as many devices as possible. If there is a particular device you are concerned about please contact our technical support for more information. 34 5. Can I run the Rapid Assessment Key software from a different USB key drive? Not at this time. We only support running the Rapid Assessment Key software from the USB key drives the software is shipped on. 6. I am having problems using the Rapid Assessment Key, or I have a question that is not answered here. Who do I contact? In North America, you can call our toll-free number at 1-877-41-AUDIT (28348) or click here to Contact Print Audit. Please visit our website at http://www.printaudit.com for our worldwide support options and for our online knowledge base. 35