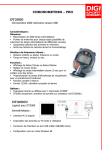
1
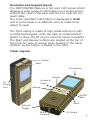
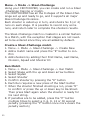
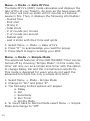
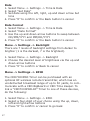
Contact us:
USA
Competitive Edge Dynamics
P.O. Box 486, Orefield, PA 18069-0486
Phone: (610) 366-9752
Fax: (610) 366-9680
Email: [email protected]
www.cedhk.com
Europe
Double-Alpha Academy B.V.
Elzenweg 33b
5144MB Waalwijk
Netherlands
Phone: +31 416 660 464
Fax: +31 416 392 040
Email: [email protected]
www.doublealpha.biz
CED7000PRO
User Manual
V1.0
Table of Contents
Introduction............................................................1
Overview and keypad layout......................................2
Auxiliary jacks.........................................................3
Battery & charging...................................................3
Caring for your device...............................................4
Menu navigation.......................................................4
Menu.....................................................................5
Mode
Run timer..........................................................6
Match...............................................................7
Steel challenge.................................................11
Stop watch......................................................12
Repetitive........................................................13
Spy.................................................................14
Rate of fire......................................................15
Simple mode...................................................15
Settings
Auto start........................................................16
Alarm clock......................................................16
Time & date.....................................................16
Backlight.........................................................17
RFID...............................................................17
Sound.............................................................18
Max match size................................................19
Shot counter....................................................20
Printing...........................................................20
Languages.......................................................20
Restore default.................................................20
Clear memory..................................................21
Self check.......................................................21
Auto shut off....................................................21
Firmware version..............................................22
Delay.................................................................22
Par
Clear all par.......................................................23
Single par..........................................................23
Par series..........................................................24
Multi par...........................................................24
Auto par............................................................25
RO tools
3min countdown.................................................26
5min countdown.................................................26
Custom countdown.............................................26
Export/Import
Export data file..................................................26
Import data file..................................................27
CED7000PRO PC Application...................................27
Updating the firmware.........................................30
Data Transfer......................................................30
WinMSS.............................................................31
Warranty..............................................................33
www.ced7000pro.com...........................................34
Introduction
Congratulations on purchasing the CED7000PRO Shot
Activated Timer, the most advanced timer in the market.
The CED7000PRO is packed full of features never before
available on a Shot Timer.
This timer includes full match scoring capabilities, SteelChallenge scoring, upload and download of data, and a
huge array of the most advanced features ever packed
into a Shot Timer!
Take the time to familiarize yourself with your new timer
by reading this manual and watching the video tutorials
available on www.ced7000pro.com
Main features of the CED7000PRO:
• IPSC Match Mode - match and practice scoring made
easy.
• Steel-Challenge - score your Steel-Challenge match or
training directly on the timer.
• Score printing - print your results directly to a wireless
printer (sold separately).
• Import/Export of matches and training sessions.
• Multilingual capabilities, including English, German,
Italian, Spanish and French.
• Full color LCD display.
• Session and accumulative Shot counter.
• Rate of Fire measuring.
• Digital sensitivity and filters
• Improved ergonomics and buttons
• Aux out plugs
• USB charging and software updates
1
Overview and keypad layout
The CED7000PRO features a full color LCD screen which
displays a wide range of information on a single screen
without the need to flip back and forth to view the relevant data.
The most important information is displayed in bold
and in some cases in a different color to make them
easier to read.
The front casing is made of high grade aluminum with
a rubberized keypad, while the back is constructed of
plastic to allow the RF chip to transmit (when included).
The Start and Review buttons are located at the top of
the timer for ease of access while holding in the hand.
Another review button is placed in the front.
Timer Layout:
Review
Start
Microphone
Review
Arrows &
Enter
IR
Printer
Port
Scoring
On/Off
Back
Menu
External
Trigger
USB &
Charging
5V Output
2
Auxiliary jacks
The CED7000PRO has three jacks/sockets, all positioned
at the bottom of the timer. The mini USB plug is used
for both charging and data transfer to and from the
timer. It also allows for updating the timer’s operating
software.
• Check www.ced7000pro.com to ensure your timer is
running the latest software version.
The left Auxiliary port is used for an external microphone or an external activation button. The right Auxiliary port is used for the CED External Horn.
Battery and charging
About the Battery
Please follow these guidelines:
• Do not leave the device exposed to a heat source or
in a high-temperature location, such as in direct sun
-light in an unattended vehicle.
• Do not puncture or incinerate the device or battery.
• When storing the device for an extended time, store
within the following temperature range: from 32 to 77F
(from 0 to 25C).
• Contact your local waste disposal department to dispose of the device/battery in accordance with applicable local laws and regulations.
The CED7000PRO utilizes a lithium-ion rechargeable
battery which is located inside the unit. The battery can
be charged by plugging in the supplied charger or by
connecting it to a PC via the USB cable.
First time charge
Please charge your new timer for at least 12 hours
before using it the first time. This is important to the
longevity of your battery.
3
On-going charges
The timer typically charges from empty to full within
5.5 hours or less. Note - the timer will turn off automatically when fully charged, and the display will turn off.
PC charging
Make sure the unit is off before plugging it in to the PC
USB port. If the timer is plugged in to the PC when it
is on, it will switch to USB mode (see Export/Import
section of the manual). Note - The timer will turn off
automatically when fully charged.
Battery replacement
Typically, the lithium-ion rechargeable battery will offer 2 or more years of reliable service before needing
replacement. Replacement batteries are available at
your CED distributors, and should be replaced only by
an authorized dealer.
Turning on the “Auto Shut Off” feature
The Auto Shut off, when set to 10min, will turn the
timer off if no shot or button press is recorded for 10
minutes. When the Auto Shut off is set to “off” the
timer will never shut itself off. This can lead to draining the power if the timer is accidentally left on in your
range bag.
Factory default is set to “10min”
To set this feature:
1. Select Menu -> Settings -> Auto Shut Off.
2. Select 10min (or off).
3. Press “E”.
Battery indicator
The battery indicator consists of 7 levels, from empty
to full. Make sure you charge your CED7000PRO Timer
when the battery indicator shows red.
4
Caring for your device
• To prevent corrosion, thoroughly dry and clean the
mini-USB port and the surrounding area before charg
ing or connecting to a computer
• Do not store the device where prolonged exposure to
extreme temperatures can occur
• Avoid chemical cleaners and solvents that can cause
damage
• Do not press down hard on the LCD display with your
finger as the screen may be dislodged
• Do not apply excessive force when working the controls of the timer. Beneath the buttons are small micro
switches not design to be handled roughly
• To maximize battery life over time, ensure that the
battery is fully discharged once every 3 months. To do
so, simply turn the Auto Shut Off feature off and let
the battery drain. Remember to switch on Auto Shut
Off immediately thereafter to save battery life when
the timer is in use
On/Off
To switch On the timer, press the back/power button. To
shut Off, press and hold the back/power button for 1.5
seconds.
Menu navigation
Every effort was made to ensure navigation is as simple
as possible.
At the very top of the screen, left to the battery icon,
you find a title bar that shows which menu item you are
currently in. This helps you navigate the levels of the
menu.
Menu button
Press the Menu button at any stage to go back to the
main menu (header - Menu).
5
Back button
The back button will take you back one step in the
menu hierarchy. If the back button is pressed while
in the main menu, the timer will switch back to either
Run Timer, Match or Steel-Challenge modes, depending
which one was used last.
Arrow buttons
Use the Up and Down arrow keys to navigate between
menu items. Use the Left, Right, Up and Down arrow
keys to navigate to and highlight the item you wish to
select.
Selection confirmation
To confirm a change within a certain menu item, press
the Enter (E) button. Otherwise press the back button.
Menu -> Mode -> Run timer
The Run Timer mode is the basic function mode of the
timer. In it, the user can press the Start, get the activation delay, the beep and record shots. The screen
displays the overall time, first shot, last shot, individual
shot splits (last 4 shots), Start Delay and String number.
To get to the Run Timer Mode do the following:
1. Turn on the Timer
2. If not already in the Run Timer mode, select Menu ->
Mode -> Run Timer.
3. Press the Start button at the top of the unit to start
countdown.
4. The timer then records the time & shots.
5. Press the Review button for reviewing the results
(scroll up and down to view the individual shots and
split times).
6. Press the Back button to get back to the Run Timer
screen or press the Start button to immediately run
the timer again.
6
Auto Start
Once the timer has finished the countdown, regardless
whether any shots have been recorded or not, you must
press the Review button to run the timer again.
However, if the Auto Start is set to “On”, there is no
need to press the Review button to start again, just
press the Start button.
This feature is there as a safety, to prevent accidental
activation of the timer before the previous run has been
registered.
The Match mode
Menu -> Mode -> Match
The CED7000PRO can function as a complete IPSC/
USPSA scoring system to run any size match. A match
can be created directly within the Timer by manually
creating stages and shooters or by downloading a match
created online at www.ced7000pro.com or by using
WinMSS.
The CED7000PRO supports 4 match sizes:
1. 200 shooters and 60 stages
2. 400 shooters and 30 stages
3. 800 shooters and 15 stages
4. 1500 shooters and 8 stages
Setting this option can be done under the “settings”
One of the Timer’s unique features is the ability to score
shooters, and store the information directly in the Timer.
The CED7000PRO has five scoring buttons:
1. A button - to record A zone hits
2. C button - to record C/B zone hits
3. D button - to record D zone hits
4. M button - to record misses
5. P button - to record penalties
The first step is to create a match (a match can be regarded as a training session as well).
7
Create Match
1. Select Menu -> Mode -> Match -> Create New
2. Enter a Name for your match using the arrow but
tons
3. Press “E” to save the name and return to the create
match screen.
4. Create Stages
5. Enter maximum stage points using the up and down
arrow buttons
6. Press “E”
7. Enter the maximum points for disappearing targets
(called “bonus points”)
8. Press “E”
9. Press the down button and repeat steps 6-9 to create more stages.
10. Press Back
11. Select Create Shooters
12. Enter First Name Using the arrow buttons and press
“E”
13. Enter Last Name Using the arrow buttons and
press “E”
14. Select Division
15. Select Category
16. Select Power Factor
17. Select Squad
18. Select shooter ID (leave the default ID suggested
by the system if you do not have any specific ID
requirements*)
19. Press Save
20. Repeat steps 13-20 to add additional shooters
21. Press Back to go back to previous menu
* Shooter ID ranges from 1 to 1500.
Note
You can create a match using your personal computer
either through WinMSS or via www.ced7000pro.com
More on this on the respective chapters.
8
Important!
When creating a match in WinMSS and importing to the
timer, you must assign all shooters to squads number 1
and up. Do not place shooters in squad 0 or unassigned,
as the timer cannot handle that.
Run Match
1. Select Menu -> Mode -> Match -> Run Match
2. Select Stage
3. Select Squad
4. Select Shooter
At this point, the Timer is ready to Run the shooter of
your choice. Note that you can, using the up and down
arrow buttons, choose a different shooter to run first
through the stage.
As you run the shooters, they will be removed one by
one from the list of shooters in the squad who need to
shoot that stage. Once the last shooter has been scored,
a notice will appear informing you that “all shooters in
squad X have been scored on stage Y”.
5. Press Start to activate the Timer
6. Once shots have been recorded, you have two op
tions: A. Score or, B. Re-Shoot. Selection is made
with the up and down arrow buttons
7. Selecting Re-Shoot will get you back to point 4
8. Select Score and press “E”
9. Using the A, C, D, M, P* buttons, enter the shooter’s
hits on all targets
10. Once the last hit has been scored a summary screen
will appear showing the stage time and hits
* Pressing the P (Penalty) button will pop up a penalty
selection: 1 or -1 which means either add a penalty
or subtract a penalty (if one or more have been added
before). You can add several penalties at once, such as
may be needed in case of a foot fault.
9
** Holding down any scoring button for 1.5 seconds
(A, C or D) will auto-complete all hits to the value of
the button pressed down. So if you hold down the A
button, all hits will be auto-completed as A’s to the total
number of hits required on the stage.
11. Select Save, or Back to modify the scores or ReShoot (back to point #5)
12. If Printing is set to Enable then you are given the
option to print to the wireless printer (see printing
section).
View Results
1. Menu -> Mode -> Match -> Results
2. Select from: Match (entire match), Stage or Verify
List
3. Choose Division
Note
Shooters who appear in red have incomplete scores.
Complete scores appear in black font.
Modify match
Menu -> Mode -> Match -> Modify Match
You can modify match data manually by selecting the
type of modification you would like to perform: modify
results, modify shooter’s data or modify stages.
This also allows you to use your timer as a personal
score keeper program – even if the timer is not the
timer used to record the shooting! You can manually
enter the time and points for each shooter – and get
precise match results calculated for you and your training buddies.
Note that modifying a stage that has already been
scored will delete all records entered on that stage.
10
Menu -> Mode -> Steel-Challenge
Using your CED7000PRO, you can create and run a Steel
-Challenge training or match.
The CED7000PRO has all the 8 stages of the Steel-Challenge set up and ready to go, and it supports all major
Steel-Challenge Divisions.
Each shooter is called up in turn, and shoots his 5 (or 4)
runs on each stage. It is possible to record only some
runs, and return later to complete the shooters results.
The Steel-Challenge match is created in a similar fashion
to a Match, with the exception that stages are not needed to be entered since they are all added by default.
Create a Steel-Challenge match
1. Menu -> Mode -> Steel-Challenge -> Create New
2. Add a match name and press the “E” button to confirm
3. Add shooters by adding their First Name, Last Name,
Division, Squad and Shooter ID
Run Match
1. Menu -> Mode -> Steel-Challenge -> Run Match
2. Select Stage with the up and down arrow buttons
3. Select Squad
4. Select Shooter
5. Confirm shooter by pressing the “E” button
6. Each Run requires a new press of the Start button
7. When the shooter finished shooting a run, press “E”
to confirm or press the up or down key to Re-Shoot.
Then press Start again when the shooter is ready for
his next string.
8. If penalties are to be added, press the “P” button
multiple times to select a 3, 6, 9, 12 or 30 second
penalty (pressing the “P” button once more clears the
penalty section)
11
9. Press the Down button to move on to the next string
10. Repeat steps 6-9 for all Runs
11. Once all Runs have scored, press the Down button
and press “E” to confirm or select Back to amend
scores
Creating a Steel-Challenge match or a training session
can also be done online at www.ced7000pro.com
Data export
Match and Steel Challenge data can be exported from
the timer to WinMSS, www.ced7000pro.com or other
websites which support the use of the CED7000PRO.
See Export/Import chapter for more information.
Menu -> Mode -> Stopwatch
A Stopwatch is a handy tool to have available on the
range, to time sequences and motion of targets, props,
positions, as well as the distances between various
points of reference. Sometimes, it is simply used for
recording the times of other shooters being watched.
The CED7000PRO provides this function with its built-in
Stopwatch mode.
When selected, the CED7000PRO timer acts as a Stopwatch. When in this mode, both the microphone and
buzzer on the timer are disconnected and will not function.
1. Select Menu -> Mode -> Stopwatch.
2. To activate press the Start button.
3. To record splits, press the Start button as many
times as needed.
4. Press Review to stop and review the splits.
5. Press the Back or the Start button to go back to
point #2.
12
The review screen displays the overall time as well as
any splits recorded. Use the up and down arrow buttons
to browse through the splits.
Each activation of the Stopwatch is recorded as a string
(string 1, string 2 etc) and can be viewed later by
pressing the right and left arrow buttons on the review
screen.
Menu -> Mode -> Repetitive
This feature of the CED7000PRO is ideal for PPC, UIT,
Police, & Military qualification type courses where a
series of simulated “exposures” at fixed intervals are
required. This function simulates the effect of a turning
target system where the “Face” and “Edge” times are
selected by the user, as well as the desired number of
times it is to be repeated.
1. Select Menu -> Mode -> Repetitive.
2. Press the “E” button to set the Face time.
3. Use the left and right arrow buttons to move between
seconds and fractions of seconds.
4. Press the up and down arrow buttons to set the Face
time required.
5. Press “E” to confirm.
6. Set the Edge time by following steps 3-5.
7. Set Repetitions by pressing the up and down arrow
buttons.
8. Press “E” to go to the Timer Repetitive Mode.
9. Press Start to activate the timer.
The start of the selected “Face” period is indicated by
the pressing of the “Start” button and the sounding of
the buzzer. If the Auxiliary jack is in use, a 5 volt D.C.
impulse will be emitted in direct conjunction with the
buzzer, which allows the user to activate a real turning
target relay if so desired. At the end of the set Par time,
13
the buzzer (and 5 volt impulse if in use) will beep for
0.3 seconds indicating the end of the “Face” period, and
the beginning of the “Edge” period. After the selected
EDGE time expires, the sequence will start again, and
continue doing so until it has completed the full amount
of repeats that have been pre-set into the timer.
Menu -> Mode -> Spy
Designed to allow the user to SPY on and to learn from
other shooters. When the “Spy Mode” is selected, the
timer will switch automatically to “Instant” Start Delay
activation, and will turn up the sensitivity to level 8.
Additionally, the buzzer will not sound when the timer
is activated. Pressing the START button will silently and
instantly activate the timer, allowing the recording of
shots fired in local proximity to the timer. The higher
sensitivity level setting will enable the timer to pick up
shots from a greater distance enabling the user to record (monitor) another shooters’ performance.
1. Select Menu -> Mode -> Spy
2. Press the Start button to activate.
3. Follow the Run Timer section for more information.
Note
1. To switch back to normal mode, go to Menu -> Mode
-> Run Timer.
2. In Spy mode, the timer may also pick up other
interferences as well due to the heightened sensitivity setting level. In some cases, where a stage of fire
may involve long distances, the timer may fail to
register all shots due to the distance and sensitivity
limitations.
14
Menu -> Mode -> Rate Of Fire
The Rate Of Fire (ROF) mode calculates and displays the
rate of fire of your firearm. As soon as the beep goes off,
the timer will pick up shots until it records a 2 second
pause in fire. Then, it displays the following information:
- Overall time
- First shot
- String #
- Total shots
- # of rounds per minute
- # of rounds per second
- Fastest split
- Last 4 shots with their time and splits
1. Select Menu -> Mode -> Rate of Fire
2. Press “E” to acknowledge you read the popup.
3. Press Start to begin recoding your ROF.
Menu -> Mode -> Simple Mode
The advanced features of the CED7000PRO Timer can be
turned off by choosing “Simple Mode”. In this mode, the
timer will only run as a simple shot timer with the option
to change Delay, Par and the microphone’s sensitivity.
This mode is designed for users who do not want the
advanced functions but only a simple shot timer.
1. Select Menu -> Mode - Simple Mode
2. Change to “On” and press “E”
3. The following limited options will appear
a. Delay
b. Par
c. Sensitivity
d. Run Timer
e. Simple Mode
4. To revert back to Normal Mode select Menu -> Simple
Mode and change to “Off”
15
Menu -> Settings -> Auto start
The CED7000PRO is designed to prevent accidental loss
of results. In order to re-activate the Start button, the
Review button must be pressed at least once. The user
can override this function by setting the Auto Start to
On. In such a case, the user can press the Start button
at any stage to run the timer again without the need to
press the Review button.
1. Select Menu -> Settings -> Auto Start
2. Select “On” and press “E”
Menu -> Settings -> Alarm clock
The CED7000PRO provides a basic alarm clock feature.
To program the Alarm Clock, the Time & Date settings
must first be programmed and active. See that section
of this instruction manual for details.
1. Select Menu -> Settings -> Alarm Clock
2. Set the time with the up and down arrow buttons,
set to “On” and press “E”
3. A small alarm clock icon will be displayed next to the
time at the bottom of the screen to indicate that the
alarm clock is on
4. To disable, select “Off” and press “E”.
Menu -> Settings -> Time & Date
Time
1. Select Menu -> Settings -> Time & Date
2. Select “Set Time”
3. Set time using the left, right, up and down arrow
buttons
4. Press “E” to confirm or the Back button to cancel
Note - Remember to set the AM/PM settings.
16
Date
1. Select Menu -> Settings -> Time & Date
2. Select “Set Date”
3. Set date using the left, right, up and down arrow but
tons
4. Press “E” to confirm or the Back button to cancel
Date Format
1. Select Menu -> Settings -> Time & Date
2. Select “Date Format”
3. Use the up and down arrow buttons to swap between
DD/MM/YYYY and MM/DD/YYYY
4. Press “E” to confirm or the Back button to cancel
Menu -> Settings -> Backlight
There are 7 levels of backlight settings from darker to
brighter (1 is the darkest, 7 is the brightest).
1. Select Menu -> Settings -> Backlight
2. Choose the desired level of brightness via the up and
down arrow buttons
3. Press “E” to confirm or Back to cancel
Menu -> Settings -> RFID
The CED7000PRO Timer can be purchased with an
optional RF wireless remote transmitter, which has an
unobstructed broadcast range of up to 50 yards, to communicate with a CED BigBoard or CED Time Keeper. To
link a “CED7000PRO-RF” Timer to one of these devices,
do the following:
1. Select Menu -> Settings -> RFID
2. Select a four-digit of your choice using the up, down,
left and right arrow buttons
3. Press “E” to confirm or cancel to go back
17
Then enter the same number into either the CED BigBoard or CED Time Keeper to be linked with. Once completed, the CED7000PRO Timer will transmit recorded
times instantly to the linked unit as they are recorded
on the timer. The CED Time Keeper will also display the
number of shots and the split times as well.
Menu -> Settings -> Sound
The Sound option groups three features: the timer’s
beep level, microphone’s sensitivity and filter settings.
The beep level can be set to High, Low or Silent.
There are 8 levels of microphone sensitivity, 1 being
the least sensitive and 8 the most sensitive. The correct
sensitivity level depends on the shooting range (indoor
or outdoor), the firearm being used, the distance to
the shooter and other variables. A good starting point
would be level 4 or 5 and adjust from there.
The 3rd feature is the Filter. The Filter can be set from
0.02sec to 0.09sec and tells the Timer not to record
shots within the selected timeframe.
This makes it possible to avoid recording echoes bouncing off walls or barricades, mostly an issue on indoor
ranges.
Beep
1. Select Menu -> Settings -> Sound -> Beep
2. Select High/Low/Silent using the up and down arrow
buttons
3. Press “E” to confirm or Back to cancel
Sensitivity
1. Select Menu -> Settings -> Sound -> Sensitivity
2. Select from 1 to 8 using the up and down arrow but
tons
3. Press “E” to confirm or Back to cancel
18
Filter
1. Select Menu -> Settings -> Sound -> Filter
2. Select from 0.02sec to 0.09sec using the up and
down arrow buttons
3. Press “E” to confirm or Back to cancel
Beep -> Silent
The CED7000PRO Timer can be used for Cowboy Fast
Draw and other applications where a visual start instead
of sound is required. In selecting this function, the CED7000PRO Timer activates quietly but still produces a 5V
output from its AUX jack allowing a visual start signal to
be synchronized to the timer. All other functions remain
as normal.
Menu -> Settings -> Max match size
The CED7000PRO can be used to record and score
matches and training sessions. The user can choose between four different maximum match sizes:
1. 200 shooters and 60 stages
2. 400 shooters and 30 stages
3. 800 shooters and 15 stages
4. 1500 shooters and 8 stages
The above only sets the maximum available shooter/
stage ratio in terms of memory capacity.
For example, if you want to setup a 14 stage match with
15 shooters, you can select option 1, 2 or 4 as all three
will handle at least 15 stages. However, if your match
consists of 14 stages with 220 shooters, you are limited
to option 1 or 2 as option 4 will not handle over 200
shooters.
1. Select Menu -> Settings -> Max Match Size
2. Select from the options available using the up and
down arrow buttons
3. Press “E” to confirm or Back to cancel
19
Menu -> Settings -> Shot Counter
Did you ever wonder how many rounds you shot in a
practice session or over a certain period of time? The
CED7000PRO can count the accumulated number of
shots the timer picked up either on a specific date or
over time. Both variables, the Session Counter and the
Total Counter can be reset if needed. Think of these two
counters as the KM counter in your car - trip counter
and overall KM counter with the exception that you can
reset both in the CED7000PRO.
1.
2.
3.
4.
Select Menu -> Settings -> Shot Counter
View Session and Total counters
Scroll to the desired counter and Press “E” to reset
Confirm Yes/No with the up and down arrow buttons
and press “E” to confirm.
Menu -> Settings -> Printing
Set Enable to allow for wireless score printing or Disable to disallow this option.
When set to “Enable” the timer will ask if you wish to
print each time a score is recorded in the Match Mode,
or modified in the Modify Match. If set to Disabled, the
printing option will not appear.
Menu -> Settings -> Languages
Here you can select between the five available languages stored in the timer. English, which is the default
language, German, Italian, French or Spanish.
Menu -> Settings -> Restore Default
The user can reset the timer to the original default settings, by selecting from the menu “Restore Default” and
then selecting Yes, which will return the timer to the
original factory settings.
1. Select Menu -> Settings -> Restore Default
2. Select Yes/No
3. Press “E” to confirm or Back to cancel
20
Menu -> Settings -> Clear Memory
The user can clear the Timer’s memory (all recorded
shots, scores, time, matches etc), by selecting from the
menu “Clear Memory”. Clearing the memory will not affect any menu settings set by the user.
1. Select Menu -> Settings -> Clear Memory
2. Select Yes/No
3. Press “E” to confirm or Back to cancel
Menu -> Settings -> Self Check
The CED7000PRO incorporates a self-diagnostic test
program enabling the user to check systematically if the
timer is functioning properly. This provides additional
quality control with fast, and easy self check capabilities
in case the timer has been dropped or possibly damaged
in some way.
The program will then give the user instructions to be
followed, which will in turn test each button, key, and
the LCD display for possible damage. When completed,
if all parts and functions are operational, the program
will indicate that the diagnostics have been completed.
If a button or key function is defective, the program will
not continue indicating to the user that repair is required. If the LCD display is damaged, the user will be
able to visually see dead pixels during the diagnostics
program.
1. Select Menu -> Settings -> Self Check
2. Follow instructions on screen
Menu -> Settings -> Auto Shut Off
To preserve battery life, we recommend using the Auto
Shut Off function. The Auto Shut Off will switch off the
Timer after 10min of inactivity. No data will be lost when
the Timer is switched off. When the Timer is powered up
21
again, it will return to the same screen it was on before
the shut off.
1. Select Menu -> Settings -> Auto Shut Off
2. Select between 10min and Off
3. Press “E” to confirm or Back to cancel
Menu -> Settings -> Firmware Version
The CED7000PRO is a software driven timer and as
such there may be firmware updates from time to time,
to incorporate new features. The firmware version indicates which firmware the Timer is currently running.
1.
2.
3.
Select Menu -> Settings -> Firmware Version
View the firmware version
Press “E” or Back to go back
Note
In case of device memory failure, you can restore to
default firmware by pressing the A and P buttons simultaneously for 2 seconds. For more information, visit
www.ced7000pro.com.
Menu -> Delay
The CED7000PRO provides four types of Start delays.
A Fixed three-second delay from the time the START
button is pressed to the activation of the buzzer and
clock.
A Random delay provides a randomly selected “two to
five” second delay, designed to eliminate any anticipation during individual practice.
An Instant enables total control for the user by activating the timer instantly upon pressing the Start button.
Additionally, the user can choose a custom delay, by selecting the Custom setting and entering a specific delay
up to 9.9 seconds.
22
1. Select Menu -> Delay
2. Select the desired Delay type by pressing the up and
down arrow buttons
3. Press “E” or confirm or Back to go back
Note
1. To set Custom delay, move right with the right arrow
button and set the required custom delay then press
“E” to confirm.
2. The selected Delay time will be displayed at the top
left corner in Run Timer, Match and Steel-Challenge
modes.
Menu -> Par -> Clear All Par
Selecting this option will clear all previous set Pars on
the Timer.
1. Select Menu -> Par -> Clear All Par
2. Select Yes/No
3. Press “E” or confirm or Back to go back
Menu -> Par -> Single Par
A single Par time can be set allowing the user to create
a fixed interval of time. Single Par time ranges from 0.6
seconds to 999.99 seconds. Since the Start buzzer duration beeps for 0.5 seconds, the first Par time accepted
by the timer is 0.6 seconds from the Start signal.
1. Select Menu -> Par -> Single Par
2. Set the desired Par time using the arrow buttons.
3. Press Start to activate or Back to go back
Note
1. Pressing the Start button to confirm takes the user to
the Run Timer Mode with the selected Par settings. The
Par setting will remain on Run Timer mode until all Pars
are cleared (see section above).
23
2. The timer will continue to record shots even after the
selected Par time has elapsed. This allows accurate
review of all late shots and their exact time fired.
When a Par time is set, the second beep will sound
at the exact pre-set time for a 0.3 second duration.
Menu -> Par -> Par Series
A Par Series is a set of single Pars put together in a
sequence, each of which is activated by a separate
press on the Start button. The CED7000PRO allows for
a maximum of 20 Par Series to be programmed in.
1. Select Menu -> Par -> Par Series
2. Set the desired Par time and number of Pars using
the arrow buttons.
3. Press Start to activate or Back to go back
Note
The user has to set Par Series N before Par Series N+1
can be set. For example, Par Series 1 has to be set before Par Series 2 can be set.
Menu -> Par -> Multi Par
A Multi Par is a set of pars put in a sequence off one activation (one start beep). The CED7000PRO Timer can
set up to 20 Pars which will beep once after the other.
Each par setting is timed after the previous Par - take
the following scenario as an example:
Par 1: 1sec
Par 2: 3.5sec
Par 3: 2sec
In this case Par 1 will beep exactly one second after the
Start signal (at 1 second), the second Par will beep 3.5
seconds after the first Par (at 4.5 seconds) and Par 3
will beep 2 seconds after the second Par (at 6.5 seconds).
24
1. Select Menu -> Par -> Multi Par
2. Set the desired Par time using the arrow buttons.
3. Press Start to activate or Back to go back
Note
The user has to set Multi Par N before Multi Par N+1 can
be set. For example, Multi Par 1 has to be set before
Multi Par 2 can be set.
Menu -> Par -> Auto Par
In Auto Par (Automatic Par) setting, both Par and Delay
times are selected for a number of strings up to a maximum of 20. Once the Start button is pressed and the
timer activated, it will run all strings programmed automatically until completed.
Example:
String 1 Par 3.0
Delay 2.0 sec.
String 2 Par 5.0
Delay 3.0 sec.
String 3 Par 6.5
Delay 3.0 sec.
String 4 Par 3.0
sec.
sec.
sec.
sec.
The example above shows that four Par strings were
programmed to function consecutively, each with a different Par time and a different Delay between each Par
setting. The timer will begin after the preset delay, with
the first Par time of 3.0 seconds, followed by a 2 second
delay. Each new Par time string will begin with the buzzer and clock counting from zero and the buzzer resounding at the end of selected Par time, followed by the
given delay, and then the starting of the next Par string
and so on until the last Par time string programmed has
been completed.
25
1. Select Menu -> Par -> Auto Par
2. Set the desired Auto Par time and Delay using the
arrow buttons.
3. Press Start to activate or Back to go back
Menu -> RO tools -> 3min Countdown
A three minute countdown is activated when this feature is selected. This is typically used when an RO
allows for a three min stage view. At the end of the
countdown the timer will beep several times.
1. Select Menu -> RO Tools -> 3min Countdown
2. Press Start to begin countdown
Menu -> RO tools -> 5min Countdown
Same as above but offering a 5min Countdown.
1. Select Menu -> RO Tools -> 5min Countdown
2. Press Start to begin countdown
Menu -> RO tools -> Custom Countdown
This feature allows the user to set a custom countdown
of between 1 and 10 minutes.
1. Select Menu -> RO Tools -> Custom Countdown
2. Set the desired countdown time using the up and
down arrow buttons
3. Press “E” to confirm
4. Press Start to begin countdown
Menu -> Export/Import -> Export Data File
The CED7000PRO Timer can export its entire database
- strings, matches and Steel-Challenge along with all
shooters’ information to an external file which can later
be processed by external software, like WinMSS or our
website ced7000pro.com.
26
1. Select Menu -> Export/Import -> Export Data File
2. Select Yes to confirm that you will overwrite older
export file (if any exist)
3. Press “E” to confirm
4. Wait a few seconds until the process is complete
5. Press Back to return to menu
Note
The Timer can only export a single file at any given
time. Older files will be overwritten. The export includes
both Match and Steel Challenge regardless whether that
data is populated on the timer or not (empty data will be
exported if no data exit).
Menu -> Export/Import -> Import Data File
The CED7000PRO Timer can import external database
files which match the Timer’s database exactly. The
Timer will not accept any other file types and/or file
structures which do not match the structure the Timer
expects to read.
1. Select Menu -> Export/Import -> Import Data File
2. Select Yes to confirm that you will overwrite the exist
ing database of the Timer
3. Press “E” to confirm
4. Wait a few seconds until the process is complete
5. Press Back to return to menu
CED7000PRO PC Application
The CED7000PRO PC Application allows you to easily
import and export data to and from your timer. The software can be downloaded from www.ced7000pro.com/
downloads.
System requirements:
- Win Xp and above
- Mini USB cable (supplied with the timer)
27
- ASP .NET framework version 4 or above (the software
will install this if does not exist on the user’s machine)
- This software is not MAC compatible.
Application screenshots
Note that the status displays: Timer not connected
since the CED7000PRO is not yet connected to the PC.
28
Upon successful timer connection to the PC, the status
changes to Ready:
The application has three main sections:
1. CED7000PRO
a. Export Data From Timer
b. Import Data To Timer
c. Update Firmware
2. WinMSS
a. Download Data From WinMSS
b. Upload Data To WinMSS
3. Safely un-plug
29
Updating the Firmware
1. Download the latest firmware file from www.ced
7000pro.com and save it on your PC
2. Turn the timer On and connect to the PC via the mini
USB cable
3. Ensure Status shows Ready
4. Click Update Firmware
5. Locate the previously saved firmware file
6. Click Open
7. Once the Status changes to Finished, click the large
button “Click here to finish and safely un-plug your
timer”.
8. The timer will reset and update to the new firmware.
9. Go to settings->firmware and ensure you are run
ning the latest firmware file by comparing to the ver
sion stated on www.ced7000pro.com
Data Transfer
You can create an IPSC match/training session or a
Steel-Challenge match/training session using www.
ced7000pro.com. The data transfer allows you to easily
download or upload the data to and from your timer.
Export:
1. On the Timer: select Menu -> Export/Import and
click Export. The Export process may take up to 60
seconds to complete
2. Connect the timer to the PC using the mini USB cable
3. Ensure Status on PC application shows “Ready”
4. Click Export Data From Timer
5. Choose the folder you wish to save the file in and
click Save
6. On www.ced7000pro.com click the relevant upload
button and locate your previously saved file
7. Click the safely un-plug button upon finish
Import:
1. Connect the timer to the PC using the mini USB cable
2. Ensure Status is Ready
30
3. Download database file from www.ced7000pro.com or
WinMSS
4. Click Import Data To Timer
5. Locate your previously saved file and click Open, wait
until complete.
6. Click the safely un-plug button upon finish!
7. On the timer, go to Menu-Export/Import and select
Import. The import process might take up to a minute
to complete
The timer has a import/export section in its memory,
and as you import the data from the PC to the timer –
you still have to then import that data from the import/
export area into the timer properly, to use is in the
Match Mode or Steel-Challenge. Think of it as a doublestage import/export. You first import or export to the
staging area, and then make the second step to export
out of the timer or into the active memory area.
WinMSS
The CED7000PRO can be link to WinMSS to import and
export data using our CED7000PRO PC Application. Users can now create a match on WinMSS and download
it to one or more timers as a complete match or only
selected stages to each timer.
Once shooters are scored on the timer or on several
timers, the data can be uploaded and merged back to
WinMSS via the ced7000pro application.
31
Download Data From WinMSS
1. Create a match in WinMSS
2. In WinMSS - top menu bar click Competition -> Match
-> Export/Backup
3. Select a folder to save the data in (the default loca
tion is “my documents”)
4. Ensure the timer is connected to the PC and that the
application shows “Ready”
5. On the CED7000PRO application select Download
Data From WinMSS
6. Choose the folder you just saved the WinMSS data in
7. Click OK
8. Click the safely un-plug button once finished
transferring the data to the timer!
9. On the timer - select Menu -> Export/Import ->
Import and select Yes
The data is now loaded in the timer. You are ready to
run the match!
Note
It is important that no changes be made to shooter’s or
stage information. This will create conflicts on upload.
Upload Data To WinMSS
When you are ready to upload the scored match back to
WinMSS, follow these steps:
You first need to do an “export data” on the timer!
1. Connect the timer to the PC and ensure the applica
tion shows Ready
2. Click Upload Data To Timer and select the same
folder you saved the WinMSS data in while exporting
from WinMSS
3. Launch WinMSS
4. On WinMSS click Competition -> Match -> Import/
Restore
5. Select the folder WinMSS has the data in (see step
2). Tip - WinMSS should now show the match name
under match information within the popup window.
6. Click Yes when prompted that the match already ex
ists.
7. Click OK to confirm popup.
32
Note
If you use multiple timers to score different stages, follow steps 1 and 2 for all timers and only then proceed
with steps 3-7.
WinMSS is now updated with all recorded results from
your timer/s.
Warranty
If your CED7000PRO breaks due to defective parts or
workmanship, we will replace it for you within the first
two years. This warranty does not cover any failures attributable to abuse, mishandling, failing to follow operating instructions, alterations, or accident. If you accidentally break it, we will repair it at cost for you. All claims
must be accompanied by the original sales receipt or
written proof of purchase, and be returned in a properly
packaged manner with shipping charges prepaid. We are
proud of our product and we want you to be too.
Returns or warranty service should be directed through
your purchase location or directly to Double-Alpha
Academy or Competitive Edge Dynamics depending on
your location. If you should encounter any problems or
wish to correspond on any matter, please write or fax to
us with details of the problem and if needed, a return
authorization will be provided.
** 30 DAY MONEY BACK GUARANTEE **
The CED7000PRO was designed to provide the optimum
Timer at an affordable price. We want you to be completely satisfied with our product. If you are not satisfied, simply return it to us with receipt of purchase, in
undamaged condition within 30 days for a full refund.
33
www.ced7000pro.com
ced7000pro.com is the official website of the CED7000PRO timer. In addition to product and accessory information and video tutorials, it features a comprehensive FAQ section and a download page where you will
find the latest firmware files to download to your timer.
ced7000pro.com is also used as a match/training creation tool, similar to WinMSS, but simplified. You can
quickly create an IPSC/Steel-Challenge Match or training session and download it to your timer. When you
are finished scoring, simply upload the data back to the
website and generate reports - print or download them
as PDF files which you can print or email.
34