1
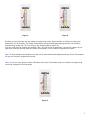
Section 6 - Fine Tuning with the button adjustment feature
Button adjustment is designed for fine tuning a motorcycle that has a Power Commander installed with the
proper map to match your modifications
Please note: there is a video on the Power Commander CD-ROM that demonstrates button adjustment.
Button adjustment
1. Put the Power Commander in button programming mode by firmly holding down all 3 buttons while
turning the bike on (figure A). Note the buttons may feel stiff
2. When the Power Commander is in button programming mode, pressing the Low, Mid, or High buttons
will select that RPM range, and the L.E.D will indicate what the setting is
Figure A
3. "Zero" indicated by two L.E.D's lit in the middle, means that the buttons are not affecting the fuel being
delivered by the map (figure B)
A movement of one led represents a 4% change on Power Commander II's and a 2% change on Power
Commander III's except for the Power Commander III's on the Kawasaki Drifter and the Ducati's, which
are 4%
Figure B
4. Tapping a button will richen that RPM range, which is shown by the L.E.D climbing closer to the rich end
of the led scale (figure C). Holding down a button will lean that RPM range, which is shown by the L.E.D
dropping closer to the lean end of the led scale (figure D)
1
Figure C
Figure D
5. When you are through with the button programming mode, leave the bike on without touching the
buttons for 20-30 seconds. The Power Commander will save the button settings and go out of button
programming mode, the L.E.D will drop to the lowest position (figure E)
You can verify this by twisting the throttle. The L.E.D will move up and down (not the full range) as you
open and close the throttle when the Power Commander is not in button programming mode
Note: If while adjusting the buttons you wait 10-20 seconds between adjustments the Power Commander
will go out of button programming mode
Note: if you turn your ignition switch off before the Power Commander goes out of button programming
mode the changes will not be saved
Figure E
2