1
Agilent 75000 SERIES C
Using Agilent Instrument Basic
with the E1406A Command Module
User’s Manual
Copyright © Agilent Technologies Inc., 1992 - 2006
*E1406-90070*
Manual Part Number: E1406-90070
Microfiche Part Number: E1406-99070
Printed: September 2012 Edition 1 Rev 3
Printed in Malaysia E 0912
Certification
Agilent Technologies certifies that this product met its published specifications at the time of shipment from the factory. Agilent
Technologies further certifies that its calibration measurements are traceable to the United States National Institute of Standards and
Technology (formerly National Bureau of Standards), to the extent allowed by that organization’s calibration facility, and to the calibration
facilities of other International Standards Organization members.
Warranty
This Agilent Technologies product is warranted against defects in materials and workmanship for a period of one (1) year from date of
shipment. Duration and conditions of warranty for this product may be superseded when the product is integrated into (becomes a part
of) other Agilent products. During the warranty period, Agilent Technologies will, at its option, either repair or replace products which
prove to be defective.
For warranty service or repair, this product must be returned to a service facility designated by Agilent Technologies. Buyer shall prepay
shipping charges to Agilent and Agilent shall pay shipping charges to return the product to Buyer. However, Buyer shall pay all shipping
charges, duties, and taxes for products returned to Agilent from another country.
Agilent warrants that its software and firmware designated by Agilent for use with a product will execute its programming instructions
when properly installed on that product. Agilent does not warrant that the operation of the product, or software, or firmware will be
uninterrupted or error free.
Limitation Of Warranty
The foregoing warranty shall not apply to defects resulting from improper or inadequate maintenance by Buyer, Buyer-supplied products
or interfacing, unauthorized modification or misuse, operation outside of the environmental specifications for the product, or improper site
preparation or maintenance.
The design and implementation of any circuit on this product is the sole responsibility of the Buyer. Agilent does not warrant the Buyer’s
circuitry or malfunctions of Agilent products that result from the Buyer’s circuitry. In addition, Agilent does not warrant any damage that
occurs as a result of the Buyer’s circuit or any defects that result from Buyer-supplied products.
NO OTHER WARRANTY IS EXPRESSED OR IMPLIED. Agilent SPECIFICALLY DISCLAIMS THE IMPLIED WARRANTIES
OF MERCHANTABILITY AND FITNESS FOR A PARTICULAR PURPOSE.
Exclusive Remedies
THE REMEDIES PROVIDED HEREIN ARE BUYER’S SOLE AND EXCLUSIVE REMEDIES. Agilent SHALL NOT BE LIABLE
FOR ANY DIRECT, INDIRECT, SPECIAL, INCIDENTAL, OR CONSEQUENTIAL DAMAGES, WHETHER BASED ON CONTRACT, TORT, OR ANY OTHER LEGAL THEORY.
Notice
The information contained in this document is subject to change without notice. Agilent Technologies MAKES NO WARRANTY OF
ANY KIND WITH REGARD TO THIS MATERIAL, INCLUDING, BUT NOT LIMITED TO, THE IMPLIED WARRANTIES OF
MERCHANTABILITY AND FITNESS FOR A PARTICULAR PURPOSE. Agilent shall not be liable for errors contained herein or for
incidental or consequential damages in connection with the furnishing, performance or use of this material. This document contains
proprietary information which is protected by copyright. All rights are reserved. No part of this document may be photocopied, reproduced,
or translated to another language without the prior written consent of Agilent Technologies, Inc. Agilent assumes no responsibility for the
use or reliability of its software on equipment that is not furnished by Agilent.
U.S. Government Restricted Rights
The Software and Documentation have been developed entirely at private expense. They are delivered and licensed as "commercial
computer software" as defined in DFARS 252.227- 7013 (Oct 1988), DFARS 252.211-7015 (May 1991) or DFARS 252.227-7014 (Jun
1995), as a "commercial item" as defined in FAR 2.101(a), or as "Restricted computer software" as defined in FAR 52.227-19 (Jun 1987)(or
any equivalent agency regulation or contract clause), whichever is applicable. You have only those rights provided for such Software and
Documentation by the applicable FAR or DFARS clause or the Agilent standard software agreement for the product involved.
Agilent C-Size Using IBASIC With the E1406A Command Module
Edition 1 Rev 3
Copyright © 1992-2006 Agilent Technologies, Inc. All Rights Reserved.
i
Printing History
The Printing History shown below lists all Editions and Updates of this manual and the printing date(s). The first printing of the manual
is Edition 1. The Edition number increments by 1 whenever the manual is revised. Updates, which are issued between Editions, contain
replacement pages to correct the current Edition of the manual. Updates are numbered sequentially starting with Update 1. When a new
Edition is created, it contains all the Update information for the previous Edition. Each new Edition or Update also includes a revised copy
of this printing history page. Many product updates or revisions do not require manual changes and, conversely, manual corrections may
be done without accompanying product changes. Therefore, do not expect a one-to-one correspondence between product updates and
manual updates.
Edition 1 (Part Number E1406-90070). . . . . . . . . . . . . . . . . . . . . . . . . June 1992
Edition 1 Rev 2 (Part Number E1406-90070) . . . . . . . . . . . . . . . . . . . July 2006
Edition 1 Rev 3 (Part Number E1406-90070). . . . . . . . . . . . . . September 2012
Safety Symbols
Instruction manual symbol affixed to product.
Indicates that the user must refer to the manual for specific WARNING or CAUTION
information to avoid personal injury or damage to the product.
Alternating current (AC).
Direct current (DC).
Indicates hazardous voltages.
Indicates the field wiring terminal that must
be connected to earth ground before operating
the equipment—protects against electrical
shock in case of fault.
or
WARNING
Frame or chassis ground terminal—typically
connects to the equipment’s metal frame.
CAUTION
Calls attention to a procedure, practice, or condition that could cause bodily injury or death.
Calls attention to a procedure, practice, or condition that could possibly cause damage to
equipment or permanent loss of data.
WARNINGS
The following general safety precautions must be observed during all phases of operation, service, and repair of this product.
Failure to comply with these precautions or with specific warnings elsewhere in this manual violates safety standards of design,
manufacture, and intended use of the product. Agilent Technologies assumes no liability for the customer’s failure to comply with
these requirements.
Ground the equipment: For Safety Class 1 equipment (equipment having a protective earth terminal), an uninterruptible safety earth
ground must be provided from the mains power source to the product input wiring terminals or supplied power cable.
DO NOT operate the product in an explosive atmosphere or in the presence of flammable gases or fumes.
For continued protection against fire, replace the line fuse(s) only with fuse(s) of the same voltage and current rating and type.
DO NOT use repaired fuses or short-circuited fuse holders.
Keep away from live circuits: Operating personnel must not remove equipment covers or shields. Procedures involving the removal of
covers or shields are for use by service-trained personnel only. Under certain conditions, dangerous voltages may exist even with the
equipment switched off. To avoid dangerous electrical shock, DO NOT perform procedures involving cover or shield removal unless you
are qualified to do so.
DO NOT operate damaged equipment: Whenever it is possible that the safety protection features built into this product have been
impaired, either through physical damage, excessive moisture, or any other reason, REMOVE POWER and do not use the product until
safe operation can be verified by service-trained personnel. If necessary, return the product to an Agilent Technologies Sales and Service
Office for service and repair to ensure that safety features are maintained.
DO NOT service or adjust alone: Do not attempt internal service or adjustment unless another person, capable of rendering first aid and
resuscitation, is present.
DO NOT substitute parts or modify equipment: Because of the danger of introducing additional hazards, do not install substitute parts
or perform any unauthorized modification to the product. Return the product to an Agilent Technologies Sales and Service Office for
service and repair to ensure that safety features are maintained.
ii
Agilent 75000 Series C Documentation
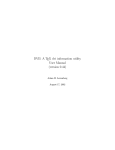
Suggested
Sequence for Using
the Manuals
C-Size VXIbus Systems Installation and Getting Started Guide. Contains
step-by-step instructions for all aspects of plug-in module and mainframe
installation.
Agilent E1406A Command Module User’s Manual. Contains information on
downloading user tables to modify (if necessary) configurations set up using the
Installation and Getting Started Guide, information on using an RS-232 terminal as
a "front panel" to your C-size system, and information on how interrupts are used.
A command reference for the Agilent E1406A Command Module command set is
included.
Using Agilent Instrument BASIC with the E1406A Command Module.
Contains information on the version of Agilent Instrument Basic which can be
installed in Flash ROM in your Agilent E1406A Command Module.
Plug-In Module User’s Manuals. Contain programming and configuration
information for the plug-in modules. These manuals contain examples for the most
commonly-used functions and give a complete SCPI command reference for the
module.
Installation and Getting
Started Guide
Instrument Applications*
Plug-in Module User’s
Manuals
Using Command Module functions
Mainframe User’s
Manuals
* For Scanning Voltmeter Applications, refer to the Agilent E1326A/E1411A 5 1/2 Digit Multimeter
User’s Manual.
Suggested Sequence for Using the Manuals
iii
Related Documents
Agilent E1401A Mainframe User’s Manual. Contains installation information to
prepare the mainframe for use and shows how to install plug-in manuals. This
manual also contains a detailed hardware description of the mainframe.
Agilent Instrument BASIC User’s Handbook. Includes three books: Agilent
Instrument BASIC Programming Techniques , Agilent Instrument BASIC
Interfacing Techniques, and Agilent Instrument BASIC Language Reference .
Beginner’s Guide to SCPI. Explains the fundamentals of programming
instruments using the Standard Commands for Programmable Instruments (SCPI)
language. We recommend this guide to anyone who is programming with SCPI for
the first time.
Tutorial Description of the General Purpose Interface Bus. Describes the
technical fundamentals of the General Purpose Interface Bus (GPIB). This
document also includes general information on IEEE 488.2 Common Commands.
We recommend this document to anyone who is programming with IEEE 488.2 for
the first time.
IEEE Standard 488.2-1987, IEEE Standard Codes, Formats, Protocols, and
Common Commands. Describes the underlying message formats and data types
used in TMSL and defines Common Commands. You will find this document
useful if you need to know the precise definition of certain message formats, data
types, or Common Commands. Available from: The Institute of Electrical and
Electronic Engineers, Inc.; 345 East 47th Street; New York, NY 10017; U.S.A.
VXIbus System Specifications. Available from Agilent Technologies.
The VMEbus Specification. Available from: VMEbus International Trade
Association; 10229 N. Scottsdale Road, Suite E; Scottsdale, AZ 85253; U.S.A.
iv
About this Manual
Manual Content
This manual contains information on the use of IBASIC as implemented in the
Agilent E1405/E1406 Command Modules. The manual is part of a manual set that
includes the C-Size VXIbus Systems "Installation and Getting Started Guide" and
various plug-in module user’s manuals.
Chapter 1: Product
Overview
This chapter contains a functional, electrical, and physical description of the Agilent
E1406A Command Module.
Chapter 2: Modifying Your
Configuration
This chapter explains how the Command Module’s resource manager function
configures your VXIbus system. It also contains information on using user-tables to
override the (default) configuration performed by the resource manager.
Chapter 3: Using the
Display Terminal Interface
This chapter shows you how to use an RS-232 terminal to operate instruments in
the Series C mainframe. The terminal is connected to the Command Module via the
Module’s RS-232 port.
Chapter 4: Status and
Interrupts
This chapter describes the status system structure used by the Command Module
and how interrupts are enabled and serviced.
Chapter 5: Downloading
Device Drivers
This chapter contains information on downloading device drivers into non-volatile
memory using both GPIB and RS-232 connections.
Chapter 6: Downloading a
New Operating System
This chapter contains information on downloading a new operating system into the
E1406A Command Module flash RAM using both GPIB and RS-232 connections.
It also contains a description of Command Module commands which are active
when you are using the Loader instrument.
Chapter 7: System
Instrument Command
Reference
The command reference contains a detailed description of Command Module
commands which are active when you are using the System instrument. It includes
information on the choice of settings and examples showing the context in which
the command is used.
Appendix A: Specifications
Appendix B: Error
Messages
Appendix C: Command
Module A16 Address Space
Appendix D: Sending
Binary Data Over RS-232
This section contains a list of the Agilent E1406A Command Module’s operating
specifications.
This section lists the error messages associated with the Command Module and
their possible causes.
This appendix contains an address map of the A16 address space inside the
Command Module. It includes information on how to determine the base address of
a device whose registers are mapped into A16 space.
This Appendix contains information on transferring binary files over an RS-232
interface. It includes information on how these files are coded for transmission.
v
vi
Table of Contents
Getting Started
Using This Chapter . . . . . . . . . . . .
Selecting IBASIC Mode of Operation . .
Comparing Modes of Operation . .
System Controller Mode Operation
Talk/Listen Mode Operation . . . .
Setting IBASIC Mode of Operation . . .
.
.
.
.
.
.
.
.
.
.
.
.
.
.
.
.
.
.
.
.
.
.
.
.
.
.
.
.
.
.
.
.
.
.
.
.
.
.
.
.
.
.
.
.
.
.
.
.
.
.
.
.
.
.
.
.
.
.
.
.
.
.
.
.
.
.
.
.
.
.
.
.
.
.
.
.
.
.
.
.
.
.
.
.
.
.
.
.
.
.
.
.
.
.
.
.
.
.
.
.
.
.
.
.
.
.
.
.
.
.
.
.
.
.
.
.
.
.
.
.
.
.
.
.
.
.
.
.
.
.
.
.
.
.
.
.
.
.
.
.
.
.
.
.
.
.
.
.
.
.
.
.
.
.
.
.
1-1
1-1
1-1
1-2
1-4
1-6
Using this Chapter . . . . . . . . . . . . . . . . . . . .
Using a Terminal . . . . . . . . . . . . . . . . . . . . .
Selecting the IBASIC Instrument . . . . . . . . .
IBASIC Display . . . . . . . . . . . . . . . . . .
UTILS Keys . . . . . . . . . . . . . . . . . . . .
Control Key Sequences . . . . . . . . . . . . . . .
Edit Mode . . . . . . . . . . . . . . . . . . . . . .
Entering Program Lines . . . . . . . . . . . . . .
Listing the Program . . . . . . . . . . . . . . . .
Inserting Lines . . . . . . . . . . . . . . . . . . .
Deleting and Recalling Lines . . . . . . . . . . . .
Editing in IBASIC . . . . . . . . . . . . . . . . . . . .
Automatic Syntax Checking . . . . . . . . . . . .
Upper or Lower Case Letters? . . . . . . . . . . .
Copying Lines (By Changing Line Numbers) . . .
More Details about Edit Mode . . . . . . . . . . .
A Closer Look at Listing a Program . . . . . . . .
Renumbering a Program . . . . . . . . . . . . . .
Deleting Multiple Lines . . . . . . . . . . . . . .
Making Programs Readable . . . . . . . . . . . .
Deleting a Program . . . . . . . . . . . . . . . . .
Clearing IBASIC Memory . . . . . . . . . . . . .
IBASIC vs. HP Series 200/300 Editing Differences
Securing Programs . . . . . . . . . . . . . . . . . . . .
.
.
.
.
.
.
.
.
.
.
.
.
.
.
.
.
.
.
.
.
.
.
.
.
.
.
.
.
.
.
.
.
.
.
.
.
.
.
.
.
.
.
.
.
.
.
.
.
.
.
.
.
.
.
.
.
.
.
.
.
.
.
.
.
.
.
.
.
.
.
.
.
.
.
.
.
.
.
.
.
.
.
.
.
.
.
.
.
.
.
.
.
.
.
.
.
.
.
.
.
.
.
.
.
.
.
.
.
.
.
.
.
.
.
.
.
.
.
.
.
.
.
.
.
.
.
.
.
.
.
.
.
.
.
.
.
.
.
.
.
.
.
.
.
.
.
.
.
.
.
.
.
.
.
.
.
.
.
.
.
.
.
.
.
.
.
.
.
.
.
.
.
.
.
.
.
.
.
.
.
.
.
.
.
.
.
.
.
.
.
.
.
.
.
.
.
.
.
.
.
.
.
.
.
.
.
.
.
.
.
.
.
.
.
.
.
.
.
.
.
.
.
.
.
.
.
.
.
.
.
.
.
.
.
.
.
.
.
.
.
.
.
.
.
.
.
.
.
.
.
.
.
.
.
.
.
.
.
.
.
.
.
.
.
.
.
.
.
.
.
.
.
.
.
.
.
.
.
.
.
.
.
.
.
.
.
.
.
.
.
.
.
.
.
.
.
.
.
.
.
.
.
.
.
.
.
.
.
.
.
.
.
.
.
.
.
.
.
.
.
.
.
.
.
.
.
.
.
.
.
.
.
.
.
.
.
.
.
.
.
.
.
.
.
.
.
.
.
.
.
.
.
.
.
.
.
.
.
.
.
.
.
.
.
.
.
.
.
.
.
.
.
.
.
.
.
.
.
.
.
.
.
.
.
.
.
.
.
.
.
.
.
.
.
.
.
.
.
.
.
.
.
.
.
.
.
.
.
.
.
.
.
.
.
.
.
.
.
.
.
.
.
.
.
.
.
.
.
.
.
.
.
2-1
2-2
2-2
2-3
2-4
2-5
2-6
2-6
2-7
2-8
2-9
2-10
2-10
2-10
2-11
2-11
2-12
2-13
2-13
2-13
2-15
2-15
2-16
2-17
.
.
.
.
.
.
.
.
.
.
.
.
.
.
.
.
.
.
.
.
.
.
.
.
.
.
.
.
.
.
.
.
.
.
.
.
.
.
.
.
.
.
.
.
.
.
.
.
.
.
.
.
.
.
.
.
.
.
.
.
.
.
.
.
.
.
.
.
.
.
.
.
.
.
.
.
.
.
.
.
.
.
.
.
.
.
.
.
.
.
.
.
.
.
.
.
.
.
.
.
.
.
.
.
.
.
.
.
.
.
.
.
.
.
.
.
.
.
.
.
.
.
.
.
.
.
.
.
.
.
.
.
.
.
.
.
.
.
.
.
.
.
.
.
.
.
.
.
.
.
.
.
.
.
.
.
.
.
.
.
.
.
3-1
3-1
3-1
3-2
3-2
3-4
3-6
3-7
3-9
Creating and Editing Programs
Using RAM Volumes
How to Use This Chapter . . . . . . . . . .
RAM Volumes . . . . . . . . . . . . . . . .
Volatile vs. Nonvolatile RAM Volumes
System Memory Space Assignments .
Creating RAM Volume 16 . . . . . . .
Creating Nonvolatile RAM Volume 1 .
Creating Volatile RAM Volumes . . .
Checking a Volume’s Format . . . . .
In Case of Difficulty . . . . . . . . . . . . .
.
.
.
.
.
.
.
.
.
.
.
.
.
.
.
.
.
.
.
.
.
.
.
.
.
.
.
.
.
.
.
.
.
.
.
.
.
.
.
.
.
.
.
.
.
.
.
.
.
.
.
.
.
.
Table of Contents 1
Mass Storage Concepts
How to Use This Chapter . . . . . . . . . . . . . . . . .
File Systems . . . . . . . . . . . . . . . . . . . . . . . .
Volumes, Directories, and Files . . . . . . . . . . .
LIF File Structure . . . . . . . . . . . . . . . . . . .
DOS File Structure . . . . . . . . . . . . . . . . . .
Specifying the Directory, File, and Volume . . . . .
Specifying a Default Directory/Volume . . . . . . .
Managing Files . . . . . . . . . . . . . . . . . . . . . . .
Creating Directories . . . . . . . . . . . . . . . . .
Cataloging Files . . . . . . . . . . . . . . . . . . .
Saving Programs . . . . . . . . . . . . . . . . . . .
Re-Saving Programs . . . . . . . . . . . . . . . . .
Getting Programs . . . . . . . . . . . . . . . . . . .
Copying Files . . . . . . . . . . . . . . . . . . . .
Copying an Entire Volume . . . . . . . . . . . . . .
Renaming Files . . . . . . . . . . . . . . . . . . . .
Purging Files . . . . . . . . . . . . . . . . . . . . .
Purging DOS Directories . . . . . . . . . . . . . . .
Autostarting Programs . . . . . . . . . . . . . . . .
IBASIC File Types . . . . . . . . . . . . . . . . . . . . .
ASCII Files . . . . . . . . . . . . . . . . . . . . . .
BDAT Files . . . . . . . . . . . . . . . . . . . . . .
DIR Files . . . . . . . . . . . . . . . . . . . . . . .
DOS/HP-UX Files . . . . . . . . . . . . . . . . . .
Using Wildcards . . . . . . . . . . . . . . . . . . . . . .
Enabling/Disabling Wildcards . . . . . . . . . . . .
File Names with Extensions . . . . . . . . . . . . .
IBASIC Commands that use Wildcards . . . . . . .
Behavior Differences between LIF and DOS File Systems
ASCII and BDAT Files on DOS Disks . . . . . . .
SAVE on DOS and LIF . . . . . . . . . . . . . . .
RE-SAVE on DOS and LIF . . . . . . . . . . . . .
COPY to/from DOS and LIF . . . . . . . . . . . . .
DOS/HP-UX File Extensibility . . . . . . . . . . .
In Case of Difficulty . . . . . . . . . . . . . . . . . . . .
.
.
.
.
.
.
.
.
.
.
.
.
.
.
.
.
.
.
.
.
.
.
.
.
.
.
.
.
.
.
.
.
.
.
.
.
.
.
.
.
.
.
.
.
.
.
.
.
.
.
.
.
.
.
.
.
.
.
.
.
.
.
.
.
.
.
.
.
.
.
.
.
.
.
.
.
.
.
.
.
.
.
.
.
.
.
.
.
.
.
.
.
.
.
.
.
.
.
.
.
.
.
.
.
.
.
.
.
.
.
.
.
.
.
.
.
.
.
.
.
.
.
.
.
.
.
.
.
.
.
.
.
.
.
.
.
.
.
.
.
.
.
.
.
.
.
.
.
.
.
.
.
.
.
.
.
.
.
.
.
.
.
.
.
.
.
.
.
.
.
.
.
.
.
.
.
.
.
.
.
.
.
.
.
.
.
.
.
.
.
.
.
.
.
.
.
.
.
.
.
.
.
.
.
.
.
.
.
.
.
.
.
.
.
.
.
.
.
.
.
.
.
.
.
.
.
.
.
.
.
.
.
.
.
.
.
.
.
.
.
.
.
.
.
.
.
.
.
.
.
.
.
.
.
.
.
.
.
.
.
.
.
.
.
.
.
.
.
.
.
.
.
.
.
.
.
.
.
.
.
.
.
.
.
.
.
.
.
.
.
.
.
.
.
.
.
.
.
.
.
.
.
.
.
.
.
.
.
.
.
.
.
.
.
.
.
.
.
.
.
.
.
.
.
.
.
.
.
.
.
.
.
.
.
.
.
.
.
.
.
.
.
.
.
.
.
.
.
.
.
.
.
.
.
.
.
.
.
.
.
.
.
.
.
.
.
.
.
.
.
.
.
.
.
.
.
.
.
.
.
.
.
.
.
.
.
.
.
.
.
.
.
.
.
.
.
.
.
.
.
.
.
.
.
.
.
.
.
.
.
.
.
.
.
.
.
.
.
.
.
.
.
.
.
.
.
.
.
.
.
.
.
.
.
.
.
.
.
.
.
.
.
.
.
.
.
.
.
.
.
.
.
.
.
.
.
.
.
.
.
.
.
.
.
.
.
.
.
.
.
.
.
.
.
.
.
.
.
.
.
.
.
.
.
.
.
.
.
.
.
.
.
.
.
.
.
.
.
.
.
.
.
.
.
.
.
.
.
.
.
.
.
.
.
.
.
.
.
.
.
.
.
.
.
.
.
.
.
.
.
.
.
.
.
.
.
.
.
.
.
.
.
.
.
.
.
.
.
.
.
.
.
.
.
.
.
.
.
.
.
.
.
.
.
.
.
.
.
.
.
.
.
.
.
.
.
.
.
.
.
.
.
.
.
.
.
.
.
.
.
.
.
.
.
.
4-1
4-1
4-1
4-2
4-3
4-4
4-7
4-9
4-9
4-9
4-10
4-11
4-12
4-13
4-13
4-14
4-14
4-14
4-15
4-17
4-17
4-17
4-17
4-17
4-18
4-18
4-18
4-19
4-22
4-22
4-22
4-22
4-23
4-23
4-24
.
.
.
.
.
.
.
.
.
.
.
.
.
.
.
.
.
.
.
.
.
.
.
.
.
.
.
.
.
.
.
.
.
.
.
.
.
.
.
.
.
.
.
.
.
.
.
.
.
.
.
.
.
.
.
.
.
.
.
.
.
.
.
.
.
.
.
.
.
.
.
.
.
.
.
.
.
.
.
.
.
.
.
.
.
.
.
.
.
.
.
.
.
.
.
.
.
.
.
.
.
.
.
.
.
.
.
.
.
.
.
.
.
.
.
.
.
.
.
.
.
.
.
.
.
.
.
.
.
.
.
.
.
.
.
.
.
.
.
.
.
.
.
.
.
.
.
.
.
.
.
.
.
.
.
.
.
.
.
.
.
.
.
.
.
.
.
.
.
.
.
.
.
.
.
.
.
.
.
.
.
.
.
.
.
.
.
.
.
.
.
.
.
.
.
.
.
.
.
.
.
.
.
.
.
.
.
.
.
.
.
.
.
.
.
.
.
.
.
.
.
5-1
5-1
5-3
5-4
5-8
5-10
5-12
5-12
5-13
5-15
5-16
5-21
5-22
System Controller Mode Operation
Using This Chapter . . . . . . . . . . . . .
System Controller Mode Overview . . . .
Controlling Instruments/GPIB Devices . .
Using the GPIB/IBASIC Interfaces .
Communicating with Instruments . .
Communicating with GPIB Devices .
Controlling RS-232/422 Peripherals . . .
Assigning the RS-232/422 Interface .
Configuring the RS-232 Interface . .
Communicating via RS-232 Interface
Serial Interface Examples . . . . . .
Storing/Retrieving Data . . . . . . . . . .
Steps to Store Data . . . . . . . . . .
2 Table of Contents
.
.
.
.
.
.
.
.
.
.
.
.
.
.
.
.
.
.
.
.
.
.
.
.
.
.
.
.
.
.
.
.
.
.
.
.
.
.
.
.
.
.
.
.
.
.
.
.
.
.
.
.
.
.
.
.
.
.
.
.
.
.
.
.
.
.
.
.
.
.
.
.
.
.
.
.
.
.
.
.
.
.
.
.
.
.
.
.
.
.
.
.
.
.
.
.
.
.
.
.
.
.
.
.
Storing Data to IBASIC Memory . . . . . .
Storing Data to Disks . . . . . . . . . . . . .
Storing Data to RAM Volumes . . . . . . .
Enabling Interrupts and Events . . . . . . . . . . .
Interrupts and Events Overview . . . . . . .
Enabling Instrument Interrupts . . . . . . . .
Enabling GPIB Device Interrupts . . . . . .
Enabling Branching on Events . . . . . . .
Servicing Events and Interrupts . . . . . . .
Synchronizing Instrument/Device Operations . . .
Controlling Instruments/GPIB Devices . . .
Synchronizing Instrument/Device Operations
Passing Control to External Computer . . . .
.
.
.
.
.
.
.
.
.
.
.
.
.
.
.
.
.
.
.
.
.
.
.
.
.
.
.
.
.
.
.
.
.
.
.
.
.
.
.
.
.
.
.
.
.
.
.
.
.
.
.
.
.
.
.
.
.
.
.
.
.
.
.
.
.
.
.
.
.
.
.
.
.
.
.
.
.
.
.
.
.
.
.
.
.
.
.
.
.
.
.
.
.
.
.
.
.
.
.
.
.
.
.
.
.
.
.
.
.
.
.
.
.
.
.
.
.
.
.
.
.
.
.
.
.
.
.
.
.
.
.
.
.
.
.
.
.
.
.
.
.
.
.
.
.
.
.
.
.
.
.
.
.
.
.
.
.
.
.
.
.
.
.
.
.
.
.
.
.
.
.
.
.
.
.
.
.
.
.
.
.
.
.
.
.
.
.
.
.
.
.
.
.
.
.
.
.
.
.
.
.
.
.
.
.
.
.
.
.
.
.
.
.
.
.
.
.
.
.
.
.
.
.
.
.
.
.
.
.
.
.
.
.
.
.
.
.
.
.
.
.
.
.
.
.
.
.
.
.
.
.
.
.
.
.
.
.
.
.
.
.
.
.
.
.
.
.
.
.
.
.
.
.
5-23
5-24
5-26
5-28
5-28
5-30
5-36
5-39
5-42
5-47
5-47
5-48
5-54
Using This Chapter . . . . . . . . . . . . . . . . . . . .
Talk/Listen Mode Overview . . . . . . . . . . . . . . .
Using PROGram Commands . . . . . . . . . . . . . . .
Downloading and Uploading IBASIC Programs .
Controlling/Querying Programs . . . . . . . . . .
Controlling Instruments . . . . . . . . . . . . . . . . .
Assigning Instruments to Interfaces . . . . . . . .
Controlling Instruments with IBASIC Computer .
Controlling Instruments with External Computer .
Controlling RS-232/422 Peripherals . . . . . . . . . . .
Storing/Retrieving Data . . . . . . . . . . . . . . . . .
Enabling Interrupts and Events . . . . . . . . . . . . . .
Synchronizing Instrument/Device Operations . . . . . .
Synchronize Instruments Using IBASIC Computer
Synchronize Instruments Using Two Computers .
.
.
.
.
.
.
.
.
.
.
.
.
.
.
.
.
.
.
.
.
.
.
.
.
.
.
.
.
.
.
.
.
.
.
.
.
.
.
.
.
.
.
.
.
.
.
.
.
.
.
.
.
.
.
.
.
.
.
.
.
.
.
.
.
.
.
.
.
.
.
.
.
.
.
.
.
.
.
.
.
.
.
.
.
.
.
.
.
.
.
.
.
.
.
.
.
.
.
.
.
.
.
.
.
.
.
.
.
.
.
.
.
.
.
.
.
.
.
.
.
.
.
.
.
.
.
.
.
.
.
.
.
.
.
.
.
.
.
.
.
.
.
.
.
.
.
.
.
.
.
.
.
.
.
.
.
.
.
.
.
.
.
.
.
.
.
.
.
.
.
.
.
.
.
.
.
.
.
.
.
.
.
.
.
.
.
.
.
.
.
.
.
.
.
.
.
.
.
.
.
.
.
.
.
.
.
.
.
.
.
.
.
.
.
.
.
.
.
.
.
.
.
.
.
.
.
.
.
.
.
.
.
.
.
.
.
.
.
.
.
.
.
.
.
.
.
.
.
.
.
.
.
.
.
.
.
.
.
.
.
.
.
.
.
.
.
.
.
.
.
6-1
6-1
6-4
6-4
6-8
6-10
6-10
6-11
6-11
6-12
6-12
6-13
6-14
6-14
6-14
Talk/Listen Mode Operation
IBASIC Command Reference
Using This Chapter . . . . . . . . . . . . .
IBASIC Commands Not Supported . . . .
IBASIC Commands - Alphabetical Listing
IBASIC Commands - by Function . . . . .
IBASIC Command Differences . . . . . .
.
.
.
.
.
.
.
.
.
.
.
.
.
.
.
.
.
.
.
.
.
.
.
.
.
.
.
.
.
.
.
.
.
.
.
.
.
.
.
.
.
.
.
.
.
.
.
.
.
.
.
.
.
.
.
.
.
.
.
.
.
.
.
.
.
.
.
.
.
.
.
.
.
.
.
.
.
.
.
.
.
.
.
.
.
.
.
.
.
.
.
.
.
.
.
.
.
.
.
.
.
.
.
.
.
.
.
.
.
.
.
.
.
.
.
.
.
.
.
.
.
.
.
.
.
7-1
7-1
7-2
7-6
7-10
.
.
.
.
.
.
.
.
.
.
.
.
.
.
.
.
.
.
.
.
.
.
.
.
.
.
.
.
.
.
.
.
.
.
.
.
.
.
.
.
.
.
.
.
.
.
.
.
.
.
.
.
.
.
.
.
.
.
.
.
.
.
.
.
.
.
.
.
.
.
.
.
.
.
.
.
.
.
.
.
.
.
.
.
.
.
.
.
.
.
.
.
.
.
.
.
.
.
.
.
.
.
.
.
.
.
.
.
.
.
.
.
.
.
.
.
.
.
.
.
.
.
.
.
.
.
.
.
.
.
.
.
.
.
.
.
.
.
.
.
.
.
.
.
.
.
.
.
.
.
.
.
.
.
.
.
.
.
.
.
.
.
.
.
.
.
.
.
.
.
.
.
.
.
.
.
.
.
.
.
.
.
.
.
.
.
.
.
.
.
.
.
.
.
.
.
.
.
.
.
.
.
.
.
.
.
.
.
.
.
.
.
.
.
.
.
.
.
.
.
.
.
.
.
.
.
.
.
.
.
.
.
.
.
.
.
.
.
.
.
.
.
.
.
.
.
.
.
.
.
8-1
8-1
8-4
8-4
8-5
8-6
8-7
8-8
8-16
8-26
SCPI Command Reference
Using This Chapter . . . . . . . . .
SCPI Conformance Information . .
SCPI Command Overview . . . . .
SCPI Command Format . . .
SCPI Command Types . . . .
SCPI Command Parameters .
SCPI Response Data Formats
DIAGnostic Subsystem Commands
PROGram Subsystem Commands .
SYSTem Subsystem Commands
.
.
.
.
.
.
.
.
.
.
.
.
.
.
.
.
.
.
.
.
.
.
.
.
.
.
.
.
.
.
.
.
.
.
.
.
.
.
.
.
Table of Contents 3
Common Command Reference
Using this Chapter . . . . .
Common Command Groups
Test/Identity Commands . .
Synchronization commands
Status and Event Commands
Macro Commands . . . . .
.
.
.
.
.
.
.
.
.
.
.
.
.
.
.
.
.
.
.
.
.
.
.
.
.
.
.
.
.
.
.
.
.
.
.
.
.
.
.
.
.
.
.
.
.
.
.
.
.
.
.
.
.
.
.
.
.
.
.
.
.
.
.
.
.
.
.
.
.
.
.
.
.
.
.
.
.
.
.
.
.
.
.
.
.
.
.
.
.
.
.
.
.
.
.
.
.
.
.
.
.
.
.
.
.
.
.
.
.
.
.
.
.
.
.
.
.
.
.
.
.
.
.
.
.
.
.
.
.
.
.
.
.
.
.
.
.
.
.
.
.
.
.
.
.
.
.
.
.
.
.
.
.
.
.
.
.
.
.
.
.
.
.
.
.
.
.
.
.
.
.
.
.
.
.
.
.
.
.
.
.
.
.
.
.
.
.
.
.
.
.
.
.
.
.
.
.
.
9-1
9-1
9-2
9-3
9-3
9-6
Floating Point Math . . . . . . . . . . . . . . . . . . . . . .
Timeout when Entering Data from a Device . . . . . . . . . .
Enter from a Device with no Enter List does not Wait . . . .
Format Off Enter to a String Does Not Look for Length Word
String Variable Entry . . . . . . . . . . . . . . . . . . . . . .
Nested I/O . . . . . . . . . . . . . . . . . . . . . . . . . . .
Subprograms and ON Conditions . . . . . . . . . . . . . . .
.
.
.
.
.
.
.
.
.
.
.
.
.
.
.
.
.
.
.
.
.
.
.
.
.
.
.
.
.
.
.
.
.
.
.
.
.
.
.
.
.
.
.
.
.
.
.
.
.
.
.
.
.
.
.
.
.
.
.
.
.
.
.
.
.
.
.
.
.
.
.
.
.
.
.
.
.
.
.
.
.
.
.
.
.
.
.
.
.
.
.
.
.
.
.
.
.
.
.
.
.
.
.
.
.
A-1
A-2
A-2
A-3
A-3
A-4
A-4
IBASIC and HP Series 200/300 Differences
4 Table of Contents
Chapter 1 Contents
Using This Chapter
1-1
Selecting IBASIC Mode of Operation 1-1
Comparing Modes of Operation . . . . . . . . . . . . . . . . . . . . . . . . . . . . . . . 1-1
System Controller Mode Operation . . . . . . . . . . . . . . . . . . . . . . . . . . . . . 1-2
Talk/Listen Mode Operation . . . . . . . . . . . . . . . . . . . . . . . . . . . . . . . . . 1-4
Setting IBASIC Mode of Operation
1-6
Chapter
1
Getting Started
Using This Chapter
This chapter presents the basics of how to get started using IBASIC. You should be
familiar with the operation of your C-Size mainframe, Command Module, and any
instrument modules you will be using. This chapter contains the following sections:
• Choosing IBASIC Mode of Operation . . . . . . . . . . . . . . . . . . 1-1
• Setting IBASIC Mode of Operation . . . . . . . . . . . . . . . . . . . . 1-6
1
Selecting IBASIC
Mode of Operation
Comparing Modes of
Operation
After you have installed and configured the mainframe, Command Module, and
plug-in module(s) you will need to choose a mode of operation for IBASIC.
IBASIC can run in either System Controller mode or Talk/Listen mode. The mode
is set with the Sys Control - Talk/Listen switch on the Command module (bit 7 on
the "GPIB Address" DIP switch).
To help you choose the mode of operation for your application, the following table
compares major functions for System Controller and Talk/Listen mode. See System
Controller Mode Operation or Talk/Listen Mode Operation for summaries of these
functions. After you select the mode of operation, see Setting IBASIC Mode of
Operation in this chapter to set the mode of operation.
System Controller vs. Talk/Listen Mode Operations
Function
Create/Edit IBASIC
Programs
Use RAM Disks
Control
Internal Instruments
System Controller Mode
Use RS-232 Terminal
Use Terminal Emulator
Use DOS and LIF file systems
Use ASCII, BDAT, and DOS/HP-UX files
Store programs/data to RAM volumes
Use DOS and LIF file systems
Use ASCII, BDAT, and DOS/HP-UX files
Store programs/data to external SS80 disk or tape
IBASIC computer via IBASIC interface
Terminal via User interface
Control GPIB Devices
IBASIC computer via GPIB interface
Control RS-232/422
Peripherals
RS-232 peripherals via built-in RS-232 port
RS-232/422 peripherals via Agilent E1324A modules
Use External Disks
Talk/Listen Mode
Same as System Contoller mode
Same as System Controller mode
Cannot access disks from
IBASIC computer
Same as System Controller mode
plus can use external (GPIB)
computer
External computer via (external)
GPIB interface
Same as System Controller mode
Getting Started 1-1
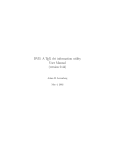
System Controller
Mode Operation
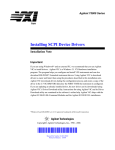
Figure 1-1 shows typical System Controller mode configuration. There are three
primary functions for System Controller mode:
• Create/Edit IBASIC Programs
• Use Mass Storage Devices
• Control Instruments/Devices/Peripherals
GPIB
GPIB
DEVICES
GPIB
PORT
Figure 1-1. System Controller Mode Operation
1-2 Getting Started
Creating/Editing IBASIC
Programs
Using
Mass Storage
Devices
Controlling Instruments/
Devices/
Peripherals
In System Controller mode, you can create/edit IBASIC programs with an RS-232
computer or supported terminal and GET/SAVE program files. To create and edit
IBASIC programs, you can access the IBASIC computer from a supported
terminal, or from an RS-232 computer acting in terminal emulator mode. See the
Agilent E1406A Command Module User’s Manual for supported terminals.
In System Controller Mode, you can save programs and data to an external SS80
disk or tape drive on the GPIB, or to RAM volumes on the RAM disk. You can
create up to 16 RAM volumes (RAM VOLs). RAM VOL 1 can be nonvolatile or
volatile, while RAM VOLs 0 and 2 through 16 can be volatile only. The IBASIC
computer can create DOS or LIF file systems and can use ASCII, BDAT, or
DOS/HP-UX files.
In System Controller mode, you can control the System instrument, plug-in module
instruments, and the IBASIC instrument using the IBASIC computer via the
IBASIC interface or using the front panel or supported terminal via the User
Interface.
You can control external GPIB1 devices (such as printers, voltmeters, disks, etc.)
using the IBASIC computer via the GPIB interface. (If an external computer is
connected as an GPIB device, the computer should be configured as non-Active
Controller and Non-System Controller.)
When the interface is assigned to IBASIC, you can control an external RS-232
peripheral with the IBASIC computer via the built-in RS-232 interface. Or, you can
control external RS-232/422 peripherals via the serial interfaces on up to seven
Agilent E1324A plug-in modules.
1
The General Purpose Interface Bus (GPIB) is the implementation of the ANSI/IEEE 488.1 Standard Digital
Interface for Programmable Instrumentation.
Getting Started 1-3
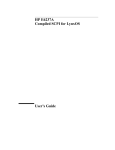
Talk/Listen Mode
Operation
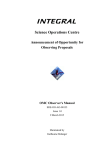
Figure 1-2 shows typical Talk/Listen mode configuration. There are three primary
functions for Talk/Listen mode:
• Create/Edit IBASIC Programs
• Use Mass Storage Devices (RAM Volumes Only)
• Control Instruments/Devices/Peripherals
GPIB
DEVICES
GPIB
GPIB
PORT
Figure 1-2. Talk/Listen Mode of Operation
1-4 Getting Started
Creating/Editing IBASIC
Programs
In Talk/Listen mode, you can create/edit IBASIC programs with an RS-232
computer or supported terminal and GET/SAVE programfiles. To create and edit
IBASIC programs, you can access the IBASIC computer via from a supported
terminal, or from an RS-232 computer acting as a terminal emulator. See the
Agilent E1406 Command Module User’s Manual for supported terminals. You can
also access the IBASIC computer from an external computer via GPIB.
Creating/editing IBASIC programs is the same for Talk/Listen mode as for System
Controller mode. In Talk/Listen mode, you can download programs to the IBASIC
computer from an external (GPIB) computer.
Using
Mass Storage
Devices
Controlling Instruments/
Devices/
Peripherals
In Talk/Listen Mode, you can save programs and data to IBASIC memory or to
RAM volumes on the RAM disk. You can create up to 16 RAM volumes (RAM
VOLs). RAM VOL 1 can be nonvolatile or volatile, while RAM VOLs 0 and 2
through 16 are always volatile. The IBASIC computer can create DOS or LIF
(Logical Interchange Format) file systems on RAM volumes and can use ASCII,
BDAT, and DOS/HP-UX files.
In Talk/Listen mode, you can control the System instrument, plug-in module
instruments, and the IBASIC instrument using the IBASIC computer via the
IBASIC interface and a supported terminal via the User Interface. With Talk/Listen
mode, an external computer and the IBASIC computer can both control instruments.
You can control external GPIB devices (such as printers, voltmeters, disks, etc.)
using an external computer via the (external) GPIB interface. For Talk/Listen
mode, the IBASIC computer cannot control external GPIB devices.
When the interface is assigned to IBASIC, you can control an external RS-232/422
peripheral via the serial interfaces on up to seven Agilent E1324A plug-in modules.
Controlling RS-232/422 peripherals with Talk/Listen mode is the same as with
System Controller mode.
Note
System software will let you assert control of external RS232 devices via the
built-in RS-232 interface. This is not generally recommended, since it will leave
you without access to the User Interface unless you are using a plug-in Serial
Interface card and a terminal to access the User Interface.
Getting Started 1-5
1
Setting IBASIC
Mode of Operation
WARNING
SHOCK HAZARD. Only service-trained personnel who are aware of the
hazards involved should install, remove, or configure the system.
Before you removing or installing a plug-in module, disconnect AC
power and field wiring from the mainframe.
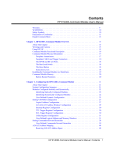
The IBASIC mode of operation is set on the "GPIB Address" switch #1 (labeled
"Controller") on the lower front right side of the IBASIC Command Module. See
Figure 1-3 for the switch location.
Setting the "Controller" switch to "1" and selecting RESET from the System
Instrument menu or cycling the C-size mainframe power sets System Controller
mode. Setting the "Controller" switch to "0" and selecting RESET from the
System Instrument menu or cycling Agilent E1400 power sets Talk/Listen mode.
Figure 1-3. Setting IBASIC Mode of Operation
1-6 Getting Started
Chapter 2 Contents
Using this Chapter
2-1
Using a Terminal
2-2
Selecting the IBASIC Instrument
IBASIC Display . . . . . . . . .
UTILS Keys . . . . . . . . . . .
Control Key Sequences . . . . . .
Edit Mode . . . . . . . . . . . . .
Entering Program Lines . . . . .
Listing the Program . . . . . . .
Inserting Lines . . . . . . . . . .
Deleting and Recalling Lines . . .
.
.
.
.
.
.
.
.
.
.
.
.
.
.
.
.
.
.
.
.
.
.
.
.
.
.
.
.
.
.
.
.
.
.
.
.
.
.
.
.
.
.
.
.
.
.
.
.
.
.
.
.
.
.
.
.
.
.
.
.
.
.
.
.
.
.
.
.
.
.
.
.
.
.
.
.
.
.
.
.
.
.
.
.
.
.
.
.
.
.
.
.
.
.
.
.
.
.
.
.
.
.
.
.
.
.
.
.
.
.
.
.
.
.
.
.
.
.
.
.
.
.
.
.
.
.
.
.
.
.
.
.
.
.
.
.
.
.
.
.
.
.
.
.
.
.
.
.
.
.
.
.
.
.
.
.
.
.
.
.
.
.
.
.
.
.
.
.
.
.
.
.
.
.
.
.
.
.
.
.
.
.
.
.
.
.
.
.
.
.
.
.
.
.
.
.
.
.
2-2
2-3
2-4
2-5
2-6
2-6
2-7
2-8
2-9
Automatic Syntax Checking . . . . . . . . . . . .
Upper or Lower Case Letters? . . . . . . . . . . .
Copying Lines (By Changing Line Numbers) . . .
More Details about Edit Mode . . . . . . . . . . .
A Closer Look at Listing a Program . . . . . . . .
Renumbering a Program . . . . . . . . . . . . . .
Deleting Multiple Lines . . . . . . . . . . . . . .
Making Programs Readable . . . . . . . . . . . .
Deleting a Program . . . . . . . . . . . . . . . . .
Clearing IBASIC Memory . . . . . . . . . . . . .
IBASIC vs. HP Series 200/300 Editing Differences
.
.
.
.
.
.
.
.
.
.
.
.
.
.
.
.
.
.
.
.
.
.
.
.
.
.
.
.
.
.
.
.
.
.
.
.
.
.
.
.
.
.
.
.
.
.
.
.
.
.
.
.
.
.
.
.
.
.
.
.
.
.
.
.
.
.
.
.
.
.
.
.
.
.
.
.
.
.
.
.
.
.
.
.
.
.
.
.
.
.
.
.
.
.
.
.
.
.
.
.
.
.
.
.
.
.
.
.
.
.
.
.
.
.
.
.
.
.
.
.
.
.
.
.
.
.
.
.
.
.
.
.
.
.
.
.
.
.
.
.
.
.
.
.
.
.
.
.
.
.
.
.
.
.
.
.
.
.
.
.
.
.
.
.
.
.
.
.
.
.
.
.
.
.
.
.
.
.
.
.
.
.
.
.
.
.
.
.
.
.
.
.
.
.
.
.
.
.
.
.
.
.
.
.
.
.
.
.
.
.
.
.
.
.
.
.
.
.
.
.
.
.
.
.
.
.
.
.
.
.
.
2-10
2-10
2-11
2-11
2-12
2-13
2-13
2-13
2-15
2-15
2-16
Editing in IBASIC
Securing Programs
.
.
.
.
.
.
.
.
.
.
.
.
.
.
.
.
.
.
.
.
.
.
.
.
.
.
.
.
.
.
.
.
.
.
.
.
.
.
.
.
.
.
.
.
.
.
.
.
.
.
.
.
.
.
.
.
.
.
.
.
.
.
.
.
.
.
.
.
.
.
.
.
2-10
2-17
2
Chapter
Creating and Editing Programs
Using this Chapter
This chapter shows you how to create and edit programs using a remote RS-232
terminal or terminal emulator. General IBASIC editing information is also in this
chapter.
The user interface to IBASIC follows the model of other mainframe instruments.
IBASIC is selected like the instruments, and can use the display only when it is the
selected instrument.
Important
This chapter assumes that you are familiar with general remote terminal or terminal
emulator operation. If this is your first time using a terminal or terminal emulator,
refer to the tutorials in Chapter 2 or 3 of the Mainframe Manual before attempting
to use this chapter.
NOTE
If you get "ERROR 2 MEMORY OVERFLOW" when running a program, one or
more local variables are too large for the default memory size (32768 bytes). For
example, the command INTEGER RDGS (16500) creates an integer array requiring
33000 bytes and will generate an error when you run the program. You can solve
this problem by changing the local variables to common variables with the COM
command (e.g., COM INTEGER RDGS (16500)) or by increasing memory size
with the PROG:MALL command (e.g., OUTPUT 80903;"PROG:MALL 50000").
Creating and Editing Programs
2-1
1
Using a Terminal
Selecting the IBASIC
Instrument
From a remote RS-232 terminal (or computer with terminal emulator), you can
execute IBASIC commands, develop and debug programs, and interact with
running programs. Programs can be edited with IBASIC’s full screen editor. Refer
to the Mainframe User’s Manual for information on supported terminals and how to
connect a terminal to the mainframe.
When an RS-232 terminal (or emulator) is connected to the mainframe, the terminal
will be automatically "captured" whenever mainframe power is cycled or the
System Instrument is reset. When captured, the terminal displays the "Select an
instrument" menu. A typical terminal display is:
To select the IBASIC Instrument, press the terminal’s function key corresponding to
the word IBASIC. For example, in the above display, press f5.
NOTES
2-2
If the terminal has not been captured or does not display "Select an Instrument", you
can select the IBASIC instrument by executing the SIIBASIC command from the
terminal.
Creating and Editing Programs
IBASIC Display
After selecting the IBASIC instrument, you should see a display similar to this (the
display contents are explained below):
Status
Instrument Name/
Logical Address
PRINT/OUTPUT 2
Messages
DISP Messages/
INPUT Prompt
Command/Input
Error Message/
Stepline
SoftKey Labels
Instrument Name/Logical Address: Means you are using the IBASIC instrument.
This line does not scroll off the display.
PRINT/OUTPUT 2 Messages: These 18 or 19 lines display PRINT or OUTPUT
2 messages. These lines are also used for program editing in Edit Mode.
DISP Messages/INPUT Prompt: This line displays DISP messages and prompts
from INPUT statements.
Command/Input: This line displays commands and user-entered data in response
to the INPUT statement. These lines scroll horizontally, if necessary (up to 160
characters).
Error Message/Stepline: This line displays error messages or the stepline (during
single stepping).
Status: Shows the state of the program as follows:
• Running: A command is being executed from the command input line, a
program is running, or a program line is being executed by the STEP key.
• Paused: Program is paused (execute the CONT command to resume).
• Editing: You are in Edit Mode.
• Input?: IBASIC is waiting for you to respond to an INPUT command.
• Idle: No program activity (none of the above operations).
Creating and Editing Programs
2-3
As with the front panel, when you select another instrument and then re-select
IBASIC, the state of IBASIC will be the same as it was when last selected. All
DISPs, prompts, error messages, user softkey labels, and input are re-written upon
re-selecting IBASIC, but any PRINTs are not re-written.
UTILS Keys
As shown in the previous figure, one of the function keys is labelled UTILS. The
UTILS key allows you to select the IBASIC utility function keys. After pressing
UTILS, you will see these function key labels (each key is explained below):
RST_INST
Resets the IBASIC instrument (equivalent of a BASIC Reset) and clears all IBASIC
input and output buffers (user interface and remote). RST_INST aborts a running
program but does not destroy the program (see the *RST command in chapter 9 for
details).
CLR_INST
Clears the user interface input and output buffers for IBASIC (remote buffers are
not cleared) and returns to the IBASIC instrument display (IBASIC_240: _). Press
CLR_INST whenever IBASIC is busy (except during power-on/reset sequence), is
not responding, or to abort a command being entered from the terminal.
CLR_INST will not abort a running program (use RST_INST for this).
PAUSE
Pauses a running program. Notice that there is not a Continue key available as a
soft key. To continue a program after pressing PAUSE, type and execute the
CONT command.
2-4
Creating and Editing Programs
STEP
Executes a program line-by-line starting with the first program line.
RUN
Begins execution of a program.
RCL_PREV
Recalls the last command entered via the user interface. After recalling a
command, it can be edited or re-executed (by pressing Enter). You can recall from
a stack of previously executed commands by repeatedly pressing RCL_PREV.
When you reach the bottom of the stack (the last line in the buffer), pressing
RCL_PREV does nothing except to cause a beep. In Edit Mode, RCL_PREV
recalls the last program line deleted with the DEL_LN key. Only the last deleted
line (one line) can be recalled.
RCL_NEXT
Accesses commands in the opposite order to that of RCL_PREV. Pressing
RCL_NEXT does nothing until you have pressed RCL_PREV at least twice.
RCL_PREV key does not operate in Edit Mode.
SEL_INST
Returns to the Select an instrument menu.
Control Key Sequences
These functions are available by way of the following Control key sequences:
Clear Instrument = CTRL C
Select an instrument menu = CTRL D
Reset Instrument = CTRL R
Recall Prev = CTRL F
Back Space = CTRL H
Delete Char = CTRL X
Recall Next = CTRL B
Clear-to-End = CTRL L
Insert Line = CTRL O
Clear Line = CTRL U
Run = CTRL G
Pause = CTRL P
Cont = CTRL Y
Step = CTRL T
Move cursor to beginning of line = CTRL A
Move cursor to end of line = CTRL Z
Creating and Editing Programs
2-5
Edit Mode
Edit Mode allows you to create a program or to modify, add, or delete program
lines in an existing program. You can get into Edit Mode by typing:
EDIT
followed by pressing Enter.
If there is no program in memory when you enter Edit Mode, the cursor appears on
a line with the number 10, which is the default line number of the first program line.
A typical display in Edit Mode is:
At this point, you can begin entering program lines.
Entering Program
Lines
NOTE
To enter a program line, just type the IBASIC command characters at the keyboard.
If you make any errors while typing, use the Back Space key or the left and right
arrow keys to move the cursor to the erroneous character(s) and re-type them. The
Back Space key erases characters as it moves the cursor. The left and right arrow
keys do not erase characters (usually, you will need to use the Delete key to remove
unwanted characters when using the left and right arrow keys). When editing, the
display is in insert mode. That is, typed characters will be inserted into the string at
the present cursor position.
If you move the cursor off of a line with the up or down arrow key, the line is not
entered and changes made to that line are lost.
When the typed-in program line is exactly the way you want it, press Enter to store
the line. (The cursor can be anywhere on the line when you store it; the system
reads the entire line regardless of cursor position.)
2-6
Creating and Editing Programs
For example, you can type-in the following program pressing Enter after each line:
After entering the last line of the program, press EXIT to exit Edit mode. To
execute the program, either press UTILS - RUN or type RUN and press Enter.
NOTE
Listing the Program
There are many ways to exit Edit Mode. Your choice depends upon what you want
to do next. Pressing any one of the following utility keys exits Edit Mode and
returns to the IBASIC instrument display: PAUSE, RUN, STEP, ESC,
CLR_INST, or RST_INST.
You can list the program by executing the following command:
LIST Enter
The system lists the program on the terminal display (default) or whichever device
is the current PRINTER IS device.
Creating and Editing Programs
2-7
Inserting Lines
Lines can be easily inserted into a program. As an example, assume that you want
to insert a line between line 20 and line 30 in the existing program. In Edit Mode
(type EDIT, press Enter), use the up or down arrow key to place the cursor on line
30 and press the INS_LN key. The program display "opens" and a new line
number appears between line 20 and line 30:
You can now begin typing. For example, type the following WAIT statement and
press Enter:
WAIT .5
Notice that as you entered the line, the line number for the next inserted line appears
automatically. You can insert as many lines as you want with one insert operation.
While inserting lines, the system numbers the new lines in increments of 1 starting
with previous line number. If you insert more lines than are available between the
current line and the next line, the next program line is renumbered to allow the
insert operation to continue.
To cancel insert mode, press f1 (INS_LN) again. You can also cancel insert mode
with an operation that causes a new current line to appear (such as scrolling with the
up/down arrow keys).
2-8
Creating and Editing Programs
Deleting and Recalling
Lines
Lines can be deleted one at a time or in blocks. In Edit Mode, pressing f2
(DEL_LN) deletes the line with the cursor on it. For example, to delete line 21, use
the up/down arrows to move the cursor to line 21. Press f2. Line 21 is deleted and
the display shows:
If you press DEL_LN by mistake, you can recover the line by pressing UTILS RCL_PREV and then store it by pressing Enter. Only the last deleted line (one
line) can be recovered with this method.
When not in Edit Mode, you can use the DEL command to delete one or more
program lines. However, when deleting a small number of lines, using the f2
(DEL_LN) key has these advantages:
• You can see the line before you delete it.
• Using DEL_LN saves the line in the recall buffer (the DEL command does
not).
Therefore, DEL is more useful for deleting blocks of lines (described later in
"Deleting Multiple Lines").
Creating and Editing Programs
2-9
1
Editing in IBASIC
Automatic Syntax
Checking
This section introduces you to some general concepts and skills involved in creating
and editing IBASIC programs.
Before storing a program line, the IBASIC computer checks for syntax errors and
also changes the letter-case of keywords and identifiers. Immediate syntax
checking is a big advantage of writing programs on the IBASIC system. Many
programming errors can be detected during program entry. This increases the
chances of having a program run properly and cuts debugging time. If the syntax of
the line is correct, the line is stored, and the next line number appears in front of the
cursor.
If the system detects an error in the input line, it displays an error message at the
bottom of the display and places the cursor at the location responsible for the error.
For example, in the following program line, we have omitted the trailing quote:
10 PRINT "Short Message
Error 949 Syntax error at cursor
Keep in mind that there is an endless variety of human mistakes that might occur,
and that IBASIC is not very good at dealing with even slight ambiguities. As a
result, you may not always agree with its diagnosis of the exact error or the error’s
location. (As in the above example, the error is flagged at the leading quote even
though the error is caused by a missing trailing quote.) However, an error message
always means that something needs to be fixed. For a complete list of errors and
their meanings, refer to the Error Appendix in the Agilent Instrument BASIC
Language Reference manual.
Upper or Lower Case
Letters?
The IBASIC computer can recognize the upper- and lower-case requirements for
most elements in a statement. You can type an entire statement using all upper-case
or all lower-case letters. If the syntax is correct, and there are no "keyword
conflicts" (discussed below), the system stores the program line. Upon LISTing or
EDITing the program, however, the system uses these conventions:
• Keywords are all upper-case letters (CAT, GET, DISP, etc.)
• All variable names are listed with the first letter in upper-case and the rest in
lower case (Var1, Rdgs, etc.).
This means that you usually do not have to bother with the Shift key when entering
a program line. If there is a "keyword conflict", however, an error is reported. A
keyword conflict occurs when you try to use a keyword as an identifier (variable
name, line label, or subprogram name). If you need to use a keyword as an
identifier, just change the letter-case of at least one letter in the identifier name. For
example, change CAT to Cat or cAT and then press Enter again. A word
containing a mixture of upper- and lower-case letters is assumed to be an identifier.
The system’s assumptions about keywords versus identifiers won’t cause problems
if the line has the proper syntax. However, if you are guessing at a keyword or
syntax, don’t assume that you got the line right just because no error was reported
when you stored it. For example, assume that you are trying to PRINT a statement
to print a blank line; however, you misspell the keyword PRINT:
100 PRINY
2-10
Creating and Editing Programs
The system does not report an error, because the line could legitimately be
interpreted as an implied call to a subprogram named "Priny". In general, if the
system puts lower-case letters in something you thought was a keyword, then it
wasn’t recognized as a keyword.
Copying Lines (By
Changing Line
Numbers)
Although the IBASIC computer supplies a line number automatically, you are not
forced to use that number if you don’t want to. To change the line number, simply
back up the cursor and type in the line number you want to use. (The display
automatically goes to overwrite mode when editing line numbers.) You can do this
to existing lines as a way of copying them to another part of the program.
When you change a line number and store the line, the program is automatically
scrolled so that the line just stored is one line above the current-line position. In
other words, when you copy a line to a new location, the new location is displayed.
Here are some points to keep in mind when changing line numbers:
• Changing the line number of an existing line causes a copy operation, not a
move. The line still exists in its original location.
• An existing line is replaced by any line entered with the same line number.
• Be careful that you don’t accidentally replace a line because of a typing
mistake in the line number.
More Details about
Edit Mode
The EDIT command allows a line identifier parameter. For example, the following
command tells the IBASIC computer to place the program on the display so that
line 140 is in the current-line position.
EDIT 140
The line identifier also can be a line label. This makes it very easy to find a specific
program segment without needing to remember its line number. For example,
assume that you want to edit a sorting routine that begins with a line labeled
Go_sort:. Simply type:
EDIT GO_SORT
The line labeled Go_sort: is placed in the middle of the display.
When the line identifier is not supplied, IBASIC assumes a line number as follows:
• If this is the first EDIT after a power-up, SCRATCH, SCRATCH A, or
GET, the assumed line number is 10.
• If EDIT is done immediately after a program has paused because of an error,
the number of the line that generated the error is assumed.
• At any other time, EDIT assumes the number of the line that was being
edited the last time you were in Edit Mode.
Creating and Editing Programs
2-11
A Closer Look at
Listing a Program
All or part of your program can be displayed or printed by executing a LIST
statement. The LIST statement allows parameters that specify both the range of
lines to be listed and the printer address.
If you execute the LIST command without any parameters, the entire program is
listed on the system printer. The default system printer after a power-on or
SCRATCH A is the mainframe display (when using the front panel) or the terminal
display (when using a terminal). The system printer can be changed using the
PRINTER IS statement.
Starting and ending line numbers can be specified in the LIST statement. For
example, the following command lists lines 100 through 200, inclusively.
LIST 100,200
The following example lists the last portion of the program, from line 1850 to the
end.
LIST 1850
The line identifiers can also be labels. For instance, the following command lists
the program from the line labeled "Rocket" to the end.
LIST Rocket
You can specify a different system printer and then use the LIST statement. For
example:
PRINTER IS 701
LIST
The parameter 701 identifies the printer connected to the mainframe’s GPIB
interface (select code 7). The printer itself has an address setting of 01. To
designate the front panel or terminal display as the system printer, execute:
PRINTER IS 1
You can also specify the printer in the LIST statement. For example, the following
command sends the entire program listing to an GPIB printer (address 01) without
changing the system printer selection.
LIST #701
To specify both a printer and a range of lines, specify the printer number, a
semicolon, and then the line numbers. For example, this command lists lines 200
through 500 to an external printer.
LIST #701;200,500
2-12
Creating and Editing Programs
Renumbering a
Program
After an editing session with many deletes and inserts, the appearance of your
program can be improved by renumbering. This also helps make room for long
inserts. Renumber programs with the REN command. The following example
renumbers the entire program in memory using a beginning number of 10 and
incremental line numbers of 10 (default values):
REN
You can also specify starting line number and the interval between lines. For
example, the following example renumbers the entire program, using 100 for the
first line number and an increment of 5.
REN 100,5
If the increment (second parameter) is not specified, 10 is assumed. For example,
the command below renumbers the entire program, using 1000 for the first line
number and an increment of 10.
REN 1000
You can also renumber only a specified portion of a program. For example, the
following command renumbers only line numbers in the range 1000 to 2000:
REN 1000,10 IN 1000,2000
Deleting Multiple Lines
The DEL command can be used to delete several lines in a single operation. Blocks
of program lines can be deleted by using two line identifiers in the DEL command.
The first number or label identifies the start of the block to be deleted. The second
number or label identifies the end of the block to be deleted. The line identifiers
must appear in the same order they do in the program. For example, the following
command deletes lines 100 through 200, inclusively.
DEL 100,200
This command deletes all the lines from the one labeled "Block2" to the end of the
program.
DEL Block2,32766
Making Programs
Readable
This IBASIC language makes it easy to write self-documenting programs. Besides
IBASIC’s standard REM (remark) statement, additional documentation features are:
•
•
•
•
Descriptive keywords (such as REPEAT. . UNTIL, LOOP, and so forth)
Descriptive variable names (up to 15 characters)
Descriptive line labels (up to 15 characters)
End-of-line comments.
Creating and Editing Programs
2-13
Contrast Between
Documented and
Undocumented Programs
Although this section deals primarily with commenting methods, all of the above
features work together to make a readable program. The following examples show
two versions of the same program. The first version is uncommented and uses
"traditional" variable names.
5 !RE-SAVE "TAX1"
10 PRINTER IS 1
20 A=.03
30 B=.03
40 X=0
50 Y=0
60 C=A+B
70 PRINT "Item
Total
Total"
80 PRINT "Price Tax
Cost"
90 PRINT "-------------------------------"
100 P=0
110 INPUT "input item price",P
120 D=P*C
130 E=P+D
140 X=X+D
150 Y=Y+E
160 DISP "tax =";D;"item cost =";E
170 WAIT 5
180 PRINT P,X,Y
190 GOTO 100
200 END
The second version uses the features of Agilent’s IBASIC language to make the
program more easily understood.
5 !RE-SAVE "TAX2"
10 !This program computes the sales tax for
20 !a list of prices. Item prices are input
30 !individually. The tax and total cost for
40 !each item are displayed. The running
50 !totals for tax and cost are printed on
60 !the display.
70 !
80 !Sales tax rates are assigned on lines X and x.
90 !The rates used in this program were in effect
100 !as of 1/1/90
110 !
120 PRINTER IS 1
!Use display for printout
130 State_tax=.03
!State tax = 3%
140 City_tax=.03
!City tax = 3%
150 !
160 Total_tax=0
!Initialize variables
170 Total_cost=0
2-14
Creating and Editing Programs
180 Tax_rate=State_tax+City_tax
190 !Print column headers
200 PRINT "Item
Total
Total"
210 PRINT "Price Tax
Cost"
220 PRINT "-------------------------------"
230 !
240 LOOP
250 Price=0
260 INPUT "input item price",Price
270 Tax=Price*Tax_rate
280 Item_cost=Price+Tax
290 Total_tax=Total_tax+Tax !Accumulate totals
300 Total_cost=Total_cost+Item_cost
310 DISP "Tax =";Tax;"Item cost =";Item_cost
320 WAIT 5
330 PRINT Price,Total_tax,Total_cost
340 END LOOP
!Repeat loop for next item
350 END
Commenting Methods
There are two methods for including comments in your programs. The use of an
exclamation point is shown in the second example program. The exclamation point
marks the boundary between an executable statement and comment text. There
does not have to be an executable statement on a line containing a comment.
Therefore, the exclamation point can be used to introduce a line of comments, to
add comments to a statement, or simply to create a "blank" line to separate program
segments. Exclamation points may be indented as necessary to help keep the
comments neat.
The REM statement can also be used for comments. The exclamation point is
neater and more flexible, but the REM statement provides compatibility with other
BASIC languages. The REM keyword must be the first entry after the line
identifier and must be followed by at least one blank.
Deleting a Program
Clearing IBASIC
Memory
You can use the SCRATCH command to delete all program lines from the IBASIC
computer’s memory. SCRATCH also clears all variables that are not in COM. (See
the "Instrument BASIC Programming Techniques" manual for a description of
COM.)
You can use the SCRATCH C command to clear all variables from the IBASIC
computer’s memory. The current program and any softkey definitions are left
intact.
You can use the SCRATCH A command to clear almost everything from the
IBASIC computer’s memory, restoring the system to its power-on state. The only
things that are not cleared are the Recall buffers and the real-time clock.
Creating and Editing Programs
2-15
IBASIC vs. HP Series
200/300 Editing
Differences
IBASIC Edit Mode is similar to that used on HP Series 200/300 BASIC language
computers. However, there are some differences. If you are familiar with the
Series 200/300 computers you will want to note the following IBASIC Edit Mode
differences.
• You cannot execute a command while in IBASIC Edit Mode. On Series
200/300 computers, you can execute a line in Edit Mode by entering the line
without a line number. This feature is commonly used with a program line
such as:
10 !RE-SAVE "Progname"
You can then re-save the program by deleting the line number and ! and
executing the command. This cannot be done in IBASIC.
• In IBASIC, each program line is split into two fields; the line number field
(first 5 characters) and the text field. Pressing Shift left arrow moves the
cursor to the beginning of the text field, not to the beginning of the line
number field as on Series 200/300 computers.
• The IBASIC editor is almost always in insert mode. That is, it inserts
characters into the line rather than overwriting them. On Series 200/300
Computers, a key allows you to toggle between insert mode and overwrite
mode. The IBASIC editor automatically goes into overwrite mode when you
are editing the line number field of the program line. Only numbers and
spaces can be typed into the line number field.
• In IBASIC Edit Mode, the up arrow key moves the cursor to the program
line above the present line. The down arrow key moves to the program line
below the present line. This is opposite to the directions on Series 200/300
Computers.
• In IBASIC Edit Mode, the RCL_PREV key recalls only the most recently
deleted line. The recall buffer is only 1 line deep and is cleared whenever
you exit Edit Mode.
• It is possible to enter program lines from the command input line (outside of
Edit Mode) that will be too long to handle in Edit Mode. When this
happens, IBASIC will place an asterisk (*) at the beginning of the program
line. If you try to edit the line (by deleting the asterisk) the line will be
truncated by the editor. HP Series 200/300 computers behave in a similar
manner but do not place the asterisk at the beginning of the line.
2-16
Creating and Editing Programs
1
Securing Programs
CAUTION
With the IBASIC system, you can use the SECURE statement to prevent program
line(s) from being edited or listed.
Once a program is secured, it cannot be unsecured. Therefore, you should keep an
unsecured back-up copy of all programs.
Executing this command prevents lines 30 through 60 of an existing program from
being edited or listed:
SECURE 30, 60
Here is what the program might look like--either with the editor or as the output of a
LIST statement:
10 ! Example of SECUREd program.
20 ! Begin password check routine.
30*
40*
50*
60*
70 ! End of password check.
80 END
If you want to secure the entire program, use this statement:
SECURE
Creating and Editing Programs
2-17
2-18
Creating and Editing Programs
Chapter 3 Contents
How to Use This Chapter 3-1
RAM Volumes
3-1
Volatile vs. Nonvolatile RAM Volumes
System Memory Space Assignments .
Creating RAM Volume 16 . . . . . . .
Creating Nonvolatile RAM Volume 1 .
Creating Volatile RAM Volumes . . .
Checking a Volume’s Format . . . . . .
In Case of Difficulty
3-9
.
.
.
.
.
.
.
.
.
.
.
.
.
.
.
.
.
.
.
.
.
.
.
.
.
.
.
.
.
.
.
.
.
.
.
.
.
.
.
.
.
.
.
.
.
.
.
.
.
.
.
.
.
.
.
.
.
.
.
.
.
.
.
.
.
.
.
.
.
.
.
.
.
.
.
.
.
.
.
.
.
.
.
.
.
.
.
.
.
.
.
.
.
.
.
.
.
.
.
.
.
.
.
.
.
.
.
.
.
.
.
.
.
.
.
.
.
.
.
.
.
.
.
.
.
.
.
.
.
.
.
.
.
.
.
.
.
.
.
.
.
.
.
.
.
.
.
.
.
.
.
.
.
.
.
.
.
.
.
.
.
.
3-1
3-2
3-2
3-4
3-6
3-7
Chapter
3
Using RAM Volumes
How to Use This
Chapter
You can create from 1 to 16 RAM volumes in system memory and an additional
RAM volume in USER NRAM or optional plug-in memory. Like volumes on a
disk drive, RAM volumes are used for storing programs and data. This chapter
describes the type of RAM volumes and shows you how to create each type of
RAM volume.
1
RAM Volumes
You can initialize RAM volumes in either LIF or DOS formats. You have these
choices for creating RAM Volumes:
• You can create RAM Volume 1 in volatile or nonvolatile system memory.
• You can create RAM volume 0 and volumes 2 through 15 in volatile system
memory only.
• You can create RAM volume 16 in nonvolatile user NRAM or optional
plug-in memory.
NOTE
Volatile vs. Nonvolatile
RAM Volumes
When you reserve space for RAM Volume 1 using DIAG:RDISK:CRE, RAM
Volume 1 is placed in nonvolatile System Memory. If you do not reserve space for
RAM Volume 1, it will be placed in volatile System Memory. RAM Volumes 0
and 2 through 15 are always placed in volatile System Memory.
Data stored in volatile memory is lost when power is removed or the mainframe is
reset; data in nonvolatile memory is retained when power is removed. When RAM
Volume 1 is in non-volatile memory, each 256-byte sector has a checksum
associated with it. When a sector is written to, a checksum is computed and stored.
Whenever the sector is read from, the checksum is re-computed and compared to
the stored checksum. If the two checksums are different, "ERROR 88 Read data
error" is generated to indicate the RAM Volume is corrupted. This ensures that a
corrupt RAM Volume is detected before the data on it is used.
On volatile RAM volumes (including RAM Volume 1 if it is volatile) and RAM
Volume 16, no checksum is saved. The access to volatile RAM is done at the
fastest possible speed with a minimum of overhead. Read/write operations on
RAM Volume 1 is about 20% slower when in non-volatile memory vs. volatile
memory.
Using RAM Volumes 3-1
System Memory Space
Assignments
Figure 3-1 shows typical system memory space consisting of softloaded instrument
drivers (optional), User NRAM, Nonvolatile RAM Volume 1, and volatile RAM
Volumes 0, and 2 through 15.
Figure 3-1. System Memory Space Assignments
CAUTION
Softloaded Instrument Drivers, User Nonvolatile RAM (NRAM), and RAM
Volume 1 compete for the nonvolatile memory space. This means that changing a
memory area invalidates the memory area(s) above it as shown in Figure 3-1. The
order in which memory is allocated is very important. For example, creating or
changing the size of the Instrument Driver area after creating NRAM and RAM
Volume 1, invalidates NRAM and RAM Volume 1. Similarly, creating NRAM or
changing the size of NRAM invalidates a previously created RAM Volume 1 and
any data in RAM Volume 1 is destroyed.
Always allocate nonvolatile memory in this order:
1. Softload instrument drivers, if any.
2. Create User NRAM, if any.
3. Create RAM Volume 1.
After reserving this space, DO NOT change the size of the Instrument Driver area
or change the size of User NRAM.
3-2 Using RAM Volumes
Creating RAM
Volume 16
RAM Volume 16 allows you to use User NRAM or optional plug-in memory as a
RAM Volume. Access to RAM Volume 16 is the same as for volatile RAM
volumes (i.e., no checksums are computed and access is as fast as possible). When
creating RAM volum 16, keep these things in mind:
• With the INITIALIZE command, the size parameter is ignored and the
resulting size of the RAM volume will fill the space allocated for it by the
DIAG:FILES 1,. . . and DIAG:FILES 2,. . . commands.
• If the memorydefined by the DIAG:FILES 1 and DIAG:FILES 2 command
is no longer available (that is, you set NRAM to 0 or softloaded a driver
which moved the base of NRAM), you must use the DIAG:FILES 1 and
DIAG:FILES 2 commands to reset the addresses of RAM volume 16 before
attempting to use it again. Failure to do this may result in a system crash.
NOTE
Procedure
The following procedure and example assume you are placing RAM Volume 16 in
User NRAM. If you want to place RAM Volume 16 in plug-in memory, skip steps
1 through 3, determine the starting address (refer to the plug-in memory
documentation) , and continue with steps 4 and 5.
1. Allocate space in Nonvolatile User RAM (NRAM) by executing
DIAG:NRAM:CRE<#bytes> from the System Instrument (this destroys any
existing data in NRAM).
2. Re-Boot the system by executing DIAG:BOOT from the System Instrument
or by cycling mainframe power.
3. Find the starting address for NRAM by executing DIAG:NRAM:ADDR?
from the System Instrument.
4. Reserve RAM volume 16 space by using the DIAG:FILES 1,<start address>
and the DIAG:FILES 2, <end address> commands. Where
<start address> is the starting address for NRAM
<end address> is <start address> + number of bytes reserved for RAM
Volume 16.
5. To initialize RAM Volume 16, from the IBASIC instrument, execute one of
the following commands:
INITIALIZE "LIF:MEMORY,0,16"
Initialize RAM Volume 16 in LIF format
INITIALIZE "DOS:MEMORY,0,16"
Initialize RAM Volume 16 in DOS format
NOTES
Since you are not specifying a size in the INITIALIZE command, the default size
fills reserved memory.
The minimum size for a DOS disk is 2560 bytes.
The minimum size for a LIF disk is 1536 bytes.
Using RAM Volumes 3-3
Example: Creating RAM
Volume 16
CAUTION
This example creates RAM Volume 16 (in DOS format), 15k bytes long, in User
NRAM.
If NRAM has already been created, executing the following command destroys any
existing information in NRAM.
From the System Instrument, execute:
DIAG:NRAM:CRE 15000
Reserve 15k bytes of User RAM (NRAM)
DIAG:BOOT
Re-boot the system to create NRAM
From the System Instrument, execute:
DIAG:NRAM:ADDR?
Determine starting address for NRAM (in this example, starting
address = +16252928)
From the IBASIC Instrument, execute:
OUTPUT 80930;"DIAG:FILES 1,16252928"
Define starting address for RAM Volume
OUTPUT 80930;"DIAG:FILES 2,16267928"
Define ending point for RAM Volume (start address + #bytes)
INITIALIZE "DOS:MEMORY,0,16"
Initialize RAM Volume 16 (DOS format) to fill reserved NRAM
Creating Nonvolatile
RAM Volume 1
CAUTION
3-4 Using RAM Volumes
When you reserve space for RAM Volume 1, it will be placed in nonvolatile
memory. This procedure shows you the steps involved in creating a nonvolatile
RAM Volume 1. This procedure can be done in either System Controller or
Talk/Listen mode. An example showing how to create a nonvolatile RAM Volume
1 containing 100 sectors of 256 bytes each, follows this procedure.
Re-initializing a RAM Volume destroys any data currently stored on that volume
(volatile and nonvolatile).
Procedure
1. Check the maximum RAM volume space available (this is an optional step),
by executing DIAG:RDISK:CRE? MAX from the System Instrument.
2. Reserve RAM Volume 1 space by executing DIAG:RDISK:CRE<size>
from the System Instrument. Where <size> = (Number of Sectors x 258) +
24. Each sector requires 258 bytes (256 bytes for data, 2 bytes for
checksum). The extra 24 bytes is for a header. For LIF format, the
minimum number of sectors is 6, so the minimum size = (6 x 258) + 24 =
1572 bytes). For DOS format, the minimum number of sectors is 10, so the
minimum size = (10 x 258) + 24 = 2604 bytes. (NOTE: If you did not
reserve enough memory space, ERROR 67 Bad mass storage parameter is
generated when you execute the INITIALIZE command in the next step.)
3. Re-Boot the system by executing DIAG:BOOT from the System Instrument
or by cycling mainframe power.
4. To initialize RAM Volume 1, from the IBASIC instrument, execute one of
the following commands:
INITIALIZE "LIF:MEMORY,0,1",<n>
Initialize RAM Volume 1 in LIF format
INITIALIZE "DOS:MEMORY,0,1",<n>
Initialize RAM Volume 1 in DOS format
Where: <n> = number of 256-byte sectors; 6 sectors minimum for LIF; 10
sectors minimum for DOS. If you do not specify a size, the default size is
the size of reserved memory determined by INT [(size of RDISK - 24) /
258]. For example, if you use DIAG:RDISK:CRE 65536, the default size
for nonvolatile RAM Volume 1 = INT [(65536 - 24) / 258] = 253 sectors.
Example: Creating
Nonvolatile RAM Volume 1
This example creates nonvolatile RAM Volume 1 (in LIF format) with 100 sectors.
From the System Instrument, execute:
DIAG:RDISK:CRE? MAX
Return the number of bytes available for RAM Vol. 1
DIAG:RDISK:CRE 25824
Reserve 100, 258 byte sectors (256 bytes for data and a 2 byte
checksum in each sector) plus 24 bytes for the header.
DIAG:BOOT
Re-boot the system
From the IBASIC Instrument, execute:
INITIALIZE "LIF:MEMORY,0,1",100
Initialize RAM Volume 1 (LIF format) for 100 sectors of
nonvolatile RAM
Using RAM Volumes 3-5
Creating Volatile RAM
Volumes
Procedure
You can create RAM Volume 1 as nonvolatile or volatile and RAM Volumes 0 and
2 through 15 as volatile. (When you do not reserve space for RAM Volume 1, it
will be placed in volatile memory.) This procedure shows you the steps involved in
creating volatile RAM Volumes. You can do this procedure in either System
Controller or Talk/Listen mode. An example showing how to create a volatile
RAM Volume 1 and a RAM Volume 2 follows this procedure.
1. To create volatile RAM Volume 0 execute one of the following commands
from the IBASIC instrument:
INITIALIZE "LIF:MEMORY,0,0", <n>
Initialize volume 0 in LIF format
INITIALIZE "DOS:MEMORY,0,0",<n>
Initialize volume 0 in DOS format
Where: <n> = number of 256-byte sectors; 6 sectors minimum for LIF, 10
sectors minimum for DOS. If you do not specify <n>, the default size is
1056 sectors.
2. To create volatile RAM volume 1 (if nonvolatile RAM Volume 1 space has
not been assigned) , execute one of the following commands from the
IBASIC instrument:
INITIALIZE "LIF:MEMORY,0,1", <n>
Initialize volume 1 in LIF
INITIALIZE "DOS:MEMORY,0,1", <n>
Initialize volume 1 in DOS
3. Repeat step 2 for each RAM volume you want to create each time
incrementing the volume number (last field) in the command. For example,
to initialize volume 2 for 50 sectors:
INITIALIZE "LIF:MEMORY,0,2",50
Initializes volume 2 in LIF
INITIALIZE "DOS:MEMORY,0,2",50
Initializes volume 2 in DOS
Example: Creating Volatile
RAM Volumes
This example creates volatile RAM Volume 1 (in DOS format) with 100 sectors of
256 bytes and volatile RAM Volume 2 (in LIF format) with 20 sectors of 256 bytes.
From the System Instrument, execute:
DIAG:RDISK:CREATE 0
Ensure 0 memory space for nonvolatile RAM Volume 1
DIAG:BOOT
Re-boot the system
From the IBASIC Instrument, execute:
INITIALIZE "DOS:MEMORY,0,1",100
Initialize RAM Volume 1 (DOS format) for 100 sectors of volatile
RAM
INITIALIZE "LIF:MEMORY,0,2",20
Initialize RAM Volume 2 (LIF format) for 20 sectors (256 bytes
each) of volatile RAM
3-6 Using RAM Volumes
Checking a Volume’s
Format
You can determine whether or not a disk or RAM volume is initialized and the type
of format (DOS or LIF) by cataloging the disk volume with the CAT command.
The CAT command returns the contents of a mass storage volume (LIF format) or
volume/directory (DOS format).
CAT ":,700,0,0"
CAT ":,700,1"
CAT ":MEMORY,0,0"
Checks hard disk volume 0
catalog
Checks flexible disk catalog
Checks RAM Volume 0 catalog
If the disk volume is initialized, a catalog is displayed showing the contents of the
volume. You can determine whether the volume is DOS or LIF by looking at the
catalog header. A LIF header/file listing is distinguished by the Volume Label
"HP75K" and looks like this:
Using RAM Volumes 3-7
A DOS header/directory listing is distinguished by the Format "DOS" label and
looks like this:
For a flexible disk or the hard disk, if the disk or disk volume has not been
initialized, "ERROR 85 Media uninitialized" occurs.
If a RAM Volume has not been initialized, "ERROR 76 Incorrect unit code in
msvs" occurs.
3-8 Using RAM Volumes
1
In Case of Difficulty
Mass Storage Error Message
Cause
Error 52 Improper mass storage volume specifier.
The characters used for mass storage volume specified do not form a valid specifier. This
could be a missing colon, too many parameters, illegal characters, etc.
Error 53 Improper file name.
The file name is too long or has characters that are not allowed. (Can also occur when using
"*" or "?" in a file name when wildcards are not enabled or when a wildcard was used in
other than the right-most position of a file name.) A LIF file name can be up to 10
characters long and is case dependant. LIF file names may contain any letter of the alphabet
(upper and lower case), the digits 0-9, and the underscore character (_). You can also use
the international characters: CHR$(160) - CHR$(254). A DOS file name can be up to 8
characters long with an optional extension name of up to 3 characters. DOS file names may
contain any letter of the alphabet, the digits 0-9, the international characters CHR$(160) CHR$(254), and these characters:
!#$%()-^_{}~
Error 54 Duplicate file name.
The specified file name already exists. It is illegal to have two files with the same name on
one LIF volume or in a DOS directory.
Error 55 Directory overflow.
Although there may be room on the media for the file, there is no room for another file
name. LIF Disks initialized by Agilent Instrument BASIC have room for over 100 entries in
the directory. Small RAM volumes allow fewer entries.
Error 56 File name is undefined.
The specified file name does not exist or a wildcard operation did not match any file. Check
the contents of the disk with a CAT command.
Error 58 Improper file type.
Many mass storage operations are limited to certain file types.
Error 59 End of file or buffer found.
For files: No data left when reading a file, or no space left when writing a file. For buffers:
No data left for an ENTER, or no buffer space left for an OUTPUT or user RAM volume
too small.
Error 60 End of record found in random mode.
Attempt to ENTER or OUTPUT a field that is larger than a defined record.
Error 62 Protect code violation.
Failure to specify the protect code of a protected file, or attempting to protect a file of the
wrong type.
Error 64 Mass storage media overflow.
The disk is full. (There is not enough free space for the specified file size, or not enough
contiguous free space on a LIF disk.) Or you have specified a size for a nonvolatile RAM
volume that is larger than the reserved memory.
Error 66 INITIALIZE failed.
Too many bad tracks found. The disk is defective, damaged, or dirty.
Error 67 Illegal mass storage parameter.
A mass storage command contains a parameter that is out of range, such as a negative
record number or an out of range number of records. Also occurs if you did not reserve
enough memory space for a nonvolatile RAM volume.
Error 68 Syntax error occurred during GET.
One or more lines in the file could not be stored as valid program lines. (These lines will be
stored as commented lines.) Also occurs if the first line in the file does not start with a valid
line number.
Error 72 Drive not found or bad address.
The mass storage unit specifier contains an improper device selector, the disk drive is still
powering-up, or no disk drive is connected.
Error 73 Improper device type in mass storage volume
specifier.
The volume specifier has the correct general form, but the characters used for a device type
are not recognized.
Error 76 Incorrect unit number in mass storage
volume specifier.
Uninitialized RAM volume or the volume specifier contains a unit number that does not
exist on the specified device.
Error 77 Operation not allowed on open file.
The specified file is assigned to an I/0 path name which has not been closed.
Error 78 Invalid mass storage volume label.
Usually indicates that the media has not been initialized on a compatible system. Could also
be a bad disk. Can also occur when switching disk formats (DOS, LIF)
Error 79 File open on target device.
Attempt to copy an entire volume with a file open on the destination disk.
Error 80 Disk changed or not in drive.
No disk in the drive or the drive door was opened while a file was assigned.
Error 81 Mass storage hardware failure.
Also occurs when the disk is pinched and not turning. Try reinserting the disk.
Error 82 Mass storage volume not present.
Hardware problem or drive does not exist.
Error 83 Write protected.
Attempting to write to a write-protected disk. This includes many operations such as
PURGE, INITIALIZE, CREATE, SAVE, OUTPUT, etc.
Error 84 Record not found.
Usually indicates that the media has not been initialized.
Error 85 Media not initialized.
Error 87 Record address error.
Usually indicates a problem with the media.
Error 88 Read data error.
The media is damaged, or a nonvolatile RAM Volume is corrupted.
Error 89 Checkread error.
Error detected when reading data. The media is probably damaged.
Using RAM Volumes 3-9
Mass Storage Error Message
Cause
Error 90 Mass storage system error.
Usually a problem with the hardware or the media.
Error 93 Incorrect volume code in mass storage
volume specifier.
The volume specifier contains a volume number that does not exist on the specified device.
Error 183 Permission denied.
Attempt to PURGE or write to a read only file
Error 189 Too many open files.
Only a fixed number of files can be open at one time. Close some of the files.
Error 291 Too many matches.
Too many matches on wildcard operation.
Error 292 Wildcards not allowed.
Some mass storage commands such as CREATE, INITIALIZE, and SAVE do not allow
wildcards.
Error 293 Operation failed on some files.
The wildcard operation attempted does not succeed on all files found. When using
wildcards and copying files from DOS to LIF, you may have DOS file names that are not
legal LIF names. When this happens, legal files are copied, illegal files are skipped, and
this error is generated.
Error 294 Wildcard matches >1 item.
A wildcard operating in File Name Completion mode expanded to more than one file name.
Error 295 Improper destination type.
Multiple files must be copied to directory not file.
Error 296 Unable to overwrite file.
Unable to overwrite file during copy operation.
Error 460 Directory not empty.
Attempt to PURGE a directory containing files (you must PURGE files first)
3-10 Using RAM Volumes
Chapter 4 Contents
How to Use This Chapter 4-1
File Systems
4-1
Volumes, Directories, and Files . . . . . .
LIF File Structure . . . . . . . . . . . . . .
DOS File Structure . . . . . . . . . . . . .
Specifying the Directory, File, and Volume
Specifying a Default Directory/Volume . .
Managing Files
IBASIC File Types
Using Wildcards
.
.
.
.
.
.
.
.
.
.
.
.
.
.
.
.
.
.
.
.
.
.
.
.
.
.
.
.
.
.
.
.
.
.
.
.
.
.
.
.
.
.
.
.
.
.
.
.
.
.
.
.
.
.
.
.
.
.
.
.
.
.
.
.
.
.
.
.
.
.
.
.
.
.
.
.
.
.
.
.
.
.
.
.
.
.
.
.
.
.
.
.
.
.
.
.
.
.
.
.
.
.
.
.
.
.
.
.
.
.
.
.
.
.
.
.
.
.
.
.
4-1
4-2
4-3
4-4
4-7
4-9
Creating Directories . . .
Cataloging Files . . . . .
Saving Programs . . . . .
Re-Saving Programs . . .
Getting Programs . . . . .
Copying Files . . . . . .
Copying an Entire Volume
Renaming Files . . . . . .
Purging Files . . . . . . .
Purging DOS Directories .
Autostarting Programs . .
ASCII Files . . . .
BDAT Files . . . .
DIR Files . . . . .
DOS/HP-UX Files
.
.
.
.
.
.
.
.
.
.
.
.
.
.
.
.
.
.
.
.
.
.
.
.
.
.
.
.
.
.
.
.
.
.
.
.
.
.
.
.
.
.
.
.
.
.
.
.
.
.
.
.
.
.
.
.
.
.
.
.
.
.
.
.
.
.
.
.
.
.
.
.
.
.
.
.
.
.
.
.
.
.
.
.
.
.
.
.
.
.
.
.
.
.
.
.
.
.
.
.
.
.
.
.
.
.
.
.
.
.
.
.
.
.
.
.
.
.
.
.
.
.
.
.
.
.
.
.
.
.
.
.
.
.
.
.
.
.
.
.
.
.
.
.
.
.
.
.
.
.
.
.
.
.
.
.
.
.
.
.
.
.
.
.
.
.
.
.
.
.
.
.
.
.
.
.
.
.
.
.
.
.
.
.
.
.
.
.
.
.
.
.
.
.
.
.
.
.
.
.
.
.
.
.
.
.
.
.
.
.
.
.
.
.
.
.
.
.
.
.
.
.
.
.
.
.
.
.
.
.
.
.
.
.
.
.
.
.
.
.
.
.
.
.
.
.
.
.
.
.
.
.
.
.
.
.
.
.
.
.
.
.
.
.
.
.
.
.
.
.
.
.
.
.
.
.
.
.
.
.
.
.
.
.
.
.
.
.
.
.
.
.
.
.
.
.
.
.
.
.
.
.
.
.
.
.
.
.
.
.
.
.
.
.
.
.
.
.
.
.
.
.
.
.
.
.
.
.
.
.
.
.
.
.
.
.
.
.
.
.
.
.
.
.
.
.
.
.
.
.
.
.
.
.
.
.
.
.
.
.
.
.
.
.
.
.
.
.
.
.
.
.
.
.
.
.
.
.
.
4-9
4-9
4-10
4-11
4-12
4-13
4-13
4-14
4-14
4-14
4-15
.
.
.
.
.
.
.
.
.
.
.
.
.
.
.
.
.
.
.
.
.
.
.
.
.
.
.
.
.
.
.
.
.
.
.
.
.
.
.
.
.
.
.
.
.
.
.
.
.
.
.
.
.
.
.
.
.
.
.
.
.
.
.
.
.
.
.
.
.
.
.
.
.
.
.
.
.
.
.
.
.
.
.
.
.
.
.
.
.
.
.
.
.
.
.
.
.
.
.
.
.
.
.
.
.
.
.
.
.
.
.
.
.
.
.
.
.
.
.
.
.
.
.
.
.
.
.
.
.
.
.
.
4-17
4-17
4-17
4-17
4-17
.
.
.
.
.
.
.
.
.
.
.
.
.
.
.
.
.
.
.
.
4-18
Enabling/Disabling Wildcards . . . . . . . . . . . . . . . . . . . . . . . . . . . . . . . . 4-18
File Names with Extensions . . . . . . . . . . . . . . . . . . . . . . . . . . . . . . . . . 4-18
IBASIC Commands that use Wildcards . . . . . . . . . . . . . . . . . . . . . . . . . . . 4-19
Behavior Differences between LIF and DOS File Systems 4-22
ASCII and BDAT Files on DOS Disks
SAVE on DOS and LIF . . . . . . . .
RE-SAVE on DOS and LIF . . . . . .
COPY to/from DOS and LIF . . . . . .
DOS/HP-UX File Extensibility . . . .
In Case of Difficulty
4-24
.
.
.
.
.
.
.
.
.
.
.
.
.
.
.
.
.
.
.
.
.
.
.
.
.
.
.
.
.
.
.
.
.
.
.
.
.
.
.
.
.
.
.
.
.
.
.
.
.
.
.
.
.
.
.
.
.
.
.
.
.
.
.
.
.
.
.
.
.
.
.
.
.
.
.
.
.
.
.
.
.
.
.
.
.
.
.
.
.
.
.
.
.
.
.
.
.
.
.
.
.
.
.
.
.
.
.
.
.
.
.
.
.
.
.
.
.
.
.
.
.
.
.
.
.
.
.
.
.
.
.
.
.
.
.
4-22
4-22
4-22
4-23
4-23
Chapter
4
Mass Storage Concepts
How to Use This
Chapter
In System Controller Mode, IBASIC can access RAM volumes and external SS-80
disk and tape drives. In Talk/Listen Mode, IBASIC can access Ram Volumes only.
This chapter describes how to use these mass storage devices, discusses the LIF and
DOS file systems, and shows you how to manage files in either system. This
chapter contains the following sections:
•
•
•
•
•
File systems (LIF and DOS)
Managing files
IBASIC file types
Using wildcards
Behavior differences between LIF and DOS file systems.
All commands shown in this chapter are executed from the IBASIC instrument
(refer to Chapter 2 for more information on how to access the IBASIC instrument).
NOTE
IBASIC uses SS80 drivers that operate GPIB disk drives such as the HP 9122,
9127, 9133, 9144, and 9153 drives.
When initializing in LIF, the default value for the Initializing Option is 0. When
initializing in DOS, the default value for the Initializing Option is 2 for the HP
9122, 9127, and 9133 drives; 16 for the HP 9153 drive; and 0 for any other drive.
The default values do not apply when the GPIB address of the disk drive is 8 or 9
(you must specify values). Refer to your disk drive manual for more information.
1
File Systems
Volumes, Directories,
and Files
IBASIC supports both LIF (HP’s Logical Interchange Format) and MS-DOS file
systems. The LIF file system is identical to that used by HP Series 200/300 BASIC
language computers. LIF is a flat file system, that is, it cannot support
subdirectories. The DOS file system is identical to that used on Personal Computers
(PCs). The DOS file system is hierarchical, that is, it supports subdirectories.
The information on a mass storage device is organized into volumes, directories,
and files. To describe volumes, directories, and files we will use a file cabinet as an
analogy. As shown in Figure 4-1, the mass storage device (disk drive or RAM disk)
is analogous to the file cabinet itself.
A volume is where the directory, subdirectories (DOS only), and files are stored and
is represented by one of the drawers in the cabinet. The hard disk can have up to 6
volumes, the RAM disk can have up to 17 volumes, and a flexible disk has only one
volume.
Mass Storage Concepts 4-1
Figure 4-1. Mass Storage/File Cabinet Analogy
LIF File Structure
If the volume was formatted in LIF, each drawer of the file cabinet contains a large
folder that represents the LIF directory. This directory holds the names and
contents of all files on the volume. A file can be either an IBASIC program file or a
data file (voltmeter readings, for example). Figure 4-2 is a graphical representation
of a typical LIF directory and a number of files. The directory has no name and is
shown in a box; the files are shown without boxes.
Figure 4-2. Typical LIF Directory/Files
4-2 Mass Storage Concepts
DOS File Structure
If the volume was formatted in DOS, each drawer of the file cabinet contains a large
folder that represents the DOS root directory. Within the folder are a number of
named tab dividers each representing a lower-level directory (sometimes called
subdirectories). Each lower-level directory can contain a number of program or
data files. It can also contain the names of even lower-level directories. Similarly,
these lower-level directories can also contain files or the names of even lower-level
directories, and so on. This hierarchical directory/file structure is known as the DOS
file structure.
Figure 4-3 is a graphical representation of the directories and files in a typical DOS
file structure. The root directory and lower-level directories are shown in boxes and
files are shown without boxes. Directories are arranged in levels. When you format
a DOS disk volume, an unnamed root directory is created automatically on that
volume. The root directory is the highest level on the volume. When you create a
directory within the root directory, the new directory is a level below the root.
From this directory, you can create directories at the next lower level, and so on.
Figure 4-3. DOS File Structure
Mass Storage Concepts 4-3
Specifying the
Directory, File, and
Volume
Files are identified by specifying the following information:
• The directory path where the file resides (DOS format only)
• The file name
• The mass storage volume specifier (MSVS)
The syntax of the file specifier is:
Directory Path
(DOS Format Only)
To access a directory or file, you must specify its location in the hierarchical
directory structure. You do this by listing the directories that trace a path to the
directory or file of interest. This is called a directory path. Typically, you begin the
path with a backslash (\) to indicate the root directory. You then list every directory
in the path, in hierarchical order, and separate directory names and file names with a
backslash. (You can also use forward slashes (/) to separate names.) Figure 4-4
shows a typical directory path from the root to the file "PROG_A" . In a command,
this path is expressed as:
"\USERS\PETE\PROG_A"
Figure 4-4. Typical Directory Path
4-4 Mass Storage Concepts
The directory path to a file begins at either the root level or the current working
directory. Each mass storage device has a current working directory. The current
working directory is the directory specified by the most recent MASS STORAGE
IS (or MSI) command on that drive. (If no MSVS is specified in a command, the
file is assumed to be on the drive specified by the most recent MSI command.) If
the directory or file is located in a directory at a level below your current working
directory, you need only specify the route (without a leading slash or backslash)
from the current directory. For example, if you are currently in the USERS
directory, then the path to PROG_A is as shown Figure 4-5. In a command, this
path is expressed as:
"PETE\PROG_A"
Figure 4-5. Path from USERS Directory
LIF File Names
NOTE
1
A LIF file name can be up to 10 characters long and is case dependant. For example
the file names "File1", "FILE1", "file1" and "FiLe1" represent different files. In
IBASIC1, LIF file names may contain any letter of the alphabet (upper and lower
case), the digits 0-9, and the underscore character (_). You can also use the ASCII
characters: CHR$(160) - CHR$(254). Spaces are ignored when used in a file
name. A LIF file name longer than 10 characters generates an error.
In IBASIC revision A.06.00 and earlier, the LIF file name characters were limited
to letters of the alphabet (upper and lower case), the digits (0-9), the underscore
character, and the ASCII characters chr$(160) through chr$(254).
Later versions of HP Series 200/300 BASIC and RMB-UX allow virtually any character to appear in a LIF file
name. IBASIC uses the more restrictive character set described above.
Mass Storage Concepts 4-5
DOS File Names
A DOS file name can be up to 8 characters long with an optional extension name of
up to 3 characters. A period "." separates the file name from the extension. For
example:
DOS file names are case independent. Although the name characters are stored as
upper case ASCII in the DOS directory, the file may be referenced without regard
to case. For example the file names "File1", "FILE1", "file1" and "FiLe1" all
represent the same DOS file "FILE1". DOS file names may contain any letter of the
alphabet, the digits 0 - 9, and these characters:
!#$%()-^_{}~
Spaces are ignored when used in a file name or extension. If you enter a DOS file
name longer than 8 characters, it is truncated to 8 characters and no error is given.
Similarly, if the extension name is longer than 3 characters, it is truncated to 3
characters and no error is given. If the name has more than one period, the first
period is retained and separates the name from the extension. The extension name
is then truncated at or before the second period and any remaining characters are
ignored. For example "FILE1.AB.CDE" becomes "FILE1.AB".
Volume Specifier
The Volume Specifier directs a mass storage command to a particular volume on
the appropriate disk drive. The following shows a typical Volume Specifier.
GPIB Address
The GPIB Address is the GPIB address of the disk drives. The first digit
(left-most) specifies the GPIB interface (typically 7). The last two digits specify the
GPIB address setting of the disk drives. In the above example, the interface
address is 7 and the disk drive address is 00, resulting in a combined address of 700.
For the ramainder of this chapter the disk drive address is assumed to be 00.
The Unit Number specifies which disk drive to access. For disk drives with GPIB
address 00 through 07, unit 0 is the hard disk drive and unit 1 is the flexible disk
drive. For disk drives with GPIB address 08 or 09 the GPIB device address is set to
00 and the unit numbers are reversed; unit 0 is the flexible disk drive and unit 1 is
the hard disk drive. In the above example, the hard disk drive will be accessed. If
you do not have a hard disk, the flexible disk is always volume 0.
4-6 Mass Storage Concepts
The Volume ID specifies which volume to access (for hard disk only). If you have
only 1 volume on the hard disk, you do not need to specify a volume ID. However,
if the hard disk contains multiple volumes, you must specify a volume ID whenever
you access the hard disk. Omitting the volume ID will direct the command to
volume 0.
NOTE
Volumes on the hard disk are numbered consecutively from 0. For example, if the
hard disk is partitioned into four volumes, the volume IDs are 0, 1, 2, and 3.
The following command examples show how to access files in both LIF and DOS
formats. Studying these examples will help to clarify the various volume, directory,
and file specifiers and the differences between using DOS or LIF format. You will
learn more about these individual commands later in this chapter.
Specifying a Default
Directory/Volume
When using mass storage commands, you can specify the directory path (DOS
format only) and volume in each command. You can also specify default values
using the MASS STORAGE IS command (or its abbreviation MSI). After
specifying a default directory/volume, all mass storage operations that do not
specify a source or destination with either a directory path or a volume specifier will
use the default directory/volume. For example, to set the default volume to volume
1 of the hard disk, execute:
MASS STORAGE IS ":,700,0,1"
or:
MSI ":,700,0,1"
If the volume is DOS format, you can also specify the current working directory:
MSI "\PROGRAMS\VOLTMET:,700,0,1"
or:
MSI "\PROGRAMS\VOLTMET"
If the default volume is already 700,0,1
NOTE
After re-booting the mainframe (cycling power or DIAG:BOOT), the default MSI
is set to the mass storage device where an autostart program was found (see
Autostarting Programs, later in this chapter). If no autostart program was found, the
default MSI is set to the root directory (DOS only) on the last valid mass storage
volume found during the power-on search sequence (search order = flexible disk,
RAM Volume 1, second, and volume 0 of the hard disk last).
The following examples use the CAT command to show how to access volumes,
directories, and files in both LIF and DOS formats with and without the use of the
MSI command. The CAT command simply lists the directories or files on a mass
storage device (you’ll learn more about CAT in the next section). Studying these
examples will help to clarify the various volume, directory, and file specifiers and
the differences between using DOS or LIF format.
Mass Storage Concepts 4-7
LIF Examples
CAT ":,700,0,0"
Catalogs vol. 0 of hard disk
or:
MSI ":,700,0,0"
Sets default drive/volume to hard disk, volume 0
CAT
Catalogs default drive/volume
CAT ":,700,1"
Catalogs flexible disk
or:
MSI ":,700,1"
Sets default drive to flexible disk (flexible disks can only have 1
volume)
CAT
Catalogs default drive
DOS Examples
CAT "\PROGRAMS\VOLTMET:,700,0,1"
Catalogs files in Programs\Voltmet directory on volume 1 of hard
disk
MSI "\PROGRAMS\VOLTMET:,700,0,1"
Sets current directory path to Programs\Voltmet. Sets default
drive/volume to hard disk, volume 1.
CAT
Catalogs current directory on default drive and volume
MSI "\:,700,0,1"
Returns current directory path to root. Sets default drive/volume
to hard disk, volume 1.
If you want to specify a file that is not in the current working directory or on the
default drive/volume, just specify the volume/directory in any of the mass storage
commands. For example, if MSI is set to the hard disk and you want to catalog the
flexible disk, execute:
CAT ":,700,1"
4-8 Mass Storage Concepts
1
Managing Files
Creating Directories
This section describes how to manage files (SAVE, GET, COPY etc.) in both the
LIF and DOS file systems.
You can create subdirectories on a DOS formatted disk or RAM volume using the
CREATE DIR command. For example, to create a subdirectory named
PROGRAMS directly below the root on volume 1 of the hard disk, execute:
CREATE DIR "\PROGRAMS:,700,0,1"
After creating a subdirectory, you can use the same command to create
subdirectories below it. For example, to create a subdirectory named VOLTMET
under the PROGRAMS directory, execute:
CREATE DIR "\PROGRAMS\VOLTMET:,700,0,1"
Cataloging Files
LIF Examples
DOS Examples
You can use the CAT command to determine the contents of a mass storage
volume. The CAT command returns the contents of a mass storage volume (LIF
format) or volume/directory (DOS format) to the PRINTER IS device (unless
otherwise specified in the CAT command).
CAT ":,700,0,0"
Catalogs hard disk volume 0
CAT ":,700,1"
Catalogs flexible disk
CAT ":MEMORY,0,0"
Catalogs RAM Volume 0 (the term MEMORY is optional, CAT
":,0,0" can also be used)
CAT "\PROGRAMS\VOLTMET:,700,0,1"
Catalogs PROGRAMS\VOLTMET directory on hard disk volume
1
CAT "\PROGRAMS\VOLTMET:,700,1"
Catalogs PROGRAMS\VOLTMET directory on flexible disk
CAT "\PROGRAMS\VOLTMET:MEMORY,0,1"
Catalogs PROGRAMS\VOLTMET directory on RAM Volume 1
Mass Storage Concepts 4-9
Saving Programs
You can write a program to a mass storage device using the SAVE command. The
SAVE command creates an ASCII file (LIF) or DOS/HP-UX file (DOS) (these file
types are discussed later in this chapter) and copies program lines into that file.
The following examples show how to save the program "TEST" to the various mass
storage devices.
LIF Examples
DOS Examples
4-10 Mass Storage Concepts
MSI ":,700,0,0"
Sets default drive/volume to hard disk, volume 0
SAVE "TEST"
SAVEs the file on the default drive/volume
SAVE "TEST:,700,0,0"
SAVEs the file on hard disk, volume 0
SAVE "TEST:,700,1"
SAVEs the file on flexible disk
SAVE "TEST:MEMORY,0,0"
SAVEs the file to RAM Volume 0
SAVE "\PROGRAMS\VOLTMET\TEST:,700,0,1"
SAVEs TEST program under PROGRAMS\VOLTMET directories
on volume 1 of hard disk
MSI "\PROGRAMS\VOLTMET:,700,0,1"
Sets current directory path to PROGRAMS\VOLTMET. Sets
default drive/volume to hard disk, volume 1
SAVE "TEST"
SAVEs program to current directory path on the default drive and
volume
SAVE "\PROGRAMS\VOLTMET\TEST:,700,1"
SAVEs TEST program under PROGRAMS\VOLTMET directories
on flexible disk
SAVE "\PROGRAMS\VOLTMET\TEST:MEMORY,0,1"
SAVEs TEST program under PROGRAMS\VOLTMET directories
on RAM Volume 1
Re-Saving Programs
LIF Examples
DOS Examples
After you have created a program file (with the SAVE command), you can use
RE-SAVE whenever you need to write the program back to the file. This allows
you to edit or update an existing program and then easily replace the program in the
same file. (If the file does not already exist, RE-SAVE behaves like the SAVE
command and creates the file for the program.) The following examples show how
to RE-SAVE the program "TEST" to the various mass storage devices.
MSI ":,700,0,0"
Sets default drive/volume to hard disk, volume 0
RE-SAVE "TEST"
RE-SAVEs the file on the default drive/volume
RE-SAVE "TEST:,700,0,0"
RE-SAVEs the file on hard disk, volume 0
RE-SAVE "TEST:,700,1"
RE-SAVEs the file on flexible disk
RE-SAVE "TEST:MEMORY,0,0"
RE-SAVEs the file to RAM Volume 0
RE-SAVE "\PROGRAMS\VOLTMET\TEST:,700,0,1"
RE-SAVEs TEST program under PROGRAMS\VOLTMET
directories on volume 1 of hard disk
MSI "\PROGRAMS\VOLTMET:,700,0,1"
Sets current directory path to PROGRAMS\VOLTMET. Sets
default drive/volume to hard disk, volume 1
RE-SAVE "TEST"
RE-SAVEs program to current directory path on the default drive
and volume
RE-SAVE "\PROGRAMS\VOLTMET\TEST:,700,1"
RE-SAVEs TEST program under PROGRAMS\VOLTMET
directories on flexible disk
RE-SAVE "\PROGRAMS\VOLTMET\TEST:MEMORY,0,1"
RE-SAVEs TEST program under PROGRAMS\VOLTMET
directories on RAM Volume 1
Mass Storage Concepts 4-11
Getting Programs
In System Controller Mode, you can retrieve a program from either disk drive or
from a RAM volume. In Talk/Listen Mode, you can retrieve a program from a Ram
Volume only.
The GET command retrieves a program or program segment from an ASCII or
HP-UX file and places it in the IBASIC computer. When GET is followed by the
file name only (no line numbers used), it clears any existing program from the
IBASIC computer’s memory and retrieves the specified program. By adding line
numbers to the GET command, you can append program lines to an existing
program and/or run the program at a specified line. Refer to Agilent Instrument
BASIC Programming Techniques manual for more information on appending and
running programs with GET.
The following examples show how to get the program "MY_PROG" from either
disk drive or a RAM volume.
LIF Examples
DOS Examples
4-12 Mass Storage Concepts
MSI ":,700,0,0"
Sets default drive/volume to hard disk, volume 0
GET "TEST"
GETs file from the default drive/volume
GET "TEST:,700,0,0"
GETs file from hard disk, volume 0
GET "TEST:,700,1"
GETs file from flexible disk
GET "TEST:MEMORY,0,0"
GETs file from RAM Volume 0
GET "\PROGRAMS\VOLTMET\TEST:,700,0,1"
GETs TEST program from PROGRAMS\VOLTMET directories
on volume 1 of hard disk
MSI "\PROGRAMS\VOLTMET:,700,0,1"
Sets current directory path to PROGRAMS\VOLTMET. Sets
default drive/volume to hard disk, volume 1
GET "TEST"
GETs program from current directory path on the default drive
and volume
GET "\PROGRAMS\VOLTMET\TEST:,700,1"
GETs TEST program from PROGRAMS\VOLTMET directories
on flexible disk
GET "\PROGRAMS\VOLTMET\TEST:MEMORY,0,1"
GETs TEST program from PROGRAMS\VOLTMET directories
on RAM Volume 1
Copying Files
LIF Examples
DOS Examples
Copying an Entire
Volume
CAUTION
Examples
(LIF and DOS)
The COPY command allows you to copy an individual file or an entire volume.
Any type of file can be copied. You can copy a file to the same volume or to a
different volume. When you copy a file to the same volume, the new file name
must be different from the existing file name (if it is in the same directory). You
can copy DOS files to LIF volumes and vice versa. Refer to "Copy to/from DOS
and LIF" later in this chapter for more information.
MSI ":,700,0,0"
Sets default drive/volume to hard disk, volume 0
COPY "TEST" to "TEST:,700,1"
COPYs file from the default drive/volume to flexible disk using
the same file name
COPY "TEST:,700,1" to "PROG_1:,700,0,0"
COPYs file from flexible disk to hard disk volume 0 using a
different file name
MSI ":,700,0,0"
Sets default drive/volume to hard disk, volume 0
COPY "TEST:MEMORY,0,0" to "PROG_1"
COPYs file from RAM Volume 0 to default mass storage volume
using different file name
COPY "\PROGRAMS\VOLTMET\TEST:,700,0,1" to "TEST:,700,1"
COPYs TEST file from PROGRAMS\VOLTMET directories on
volume 1 of hard disk to flexible disk (if the flexible disk is
formatted in DOS, "TEST" goes to the current directory since no
path was specified)
MSI "\PROGRAMS\VOLTMET:,700,1"
Sets current directory path to PROGRAMS\VOLTMET. Sets
default drive/volume to flexible disk
COPY "TEST" to "\PROGRAMS\VOLTMET:,700,0,1"
COPYs file from current directory path on the default drive and
volume to \PROGRAMS\VOLTMET directories on hard disk
volume 1
COPY "\PROGRAMS\VOLTMET\TEST:MEMORY,0,1" to
"\DCVOLT\PROG1:,700,1"
COPYs TEST file from PROGRAMS\VOLTMET directories on
RAM Volume 1 to file PROG1 on DCVOLT directory of flexible
disk
The COPY command also allows you to copy the entire contents of a mass storage
volume to another volume. You cannot copy a larger volume to a smaller volume.
You can copy a smaller volume to a larger volume, however the size of the larger
volume will be reduced to the size of the smaller volume. When you copy a LIF
volume to a DOS volume, the DOS volume will be converted to LIF and vice versa.
Copying a volume destroys all previous data on the destination volume.
COPY ":,700,1" to ":,700,0,2"
COPYs volume from flexible disk to hard disk volume 2
Mass Storage Concepts 4-13
COPY ":MEMORY,0,1" to ":,700,0,2"
COPYs RAM Volume 1 to hard disk volume 2
Renaming Files
The RENAME command allows you to change the name of a file without
disturbing the file’s contents. For example, to change the name of a file from
"CHTRY" to "CHTEST", use the following command:
RENAME "CHTRY" TO "CHTEST"
Using RENAME to Move
DOS Files/Directories
You can also use the RENAME command to change a file’s location in DOS
directories and/or the DOS hierarchy. For example, the following command moves
the file "TEST" from the "VOLTMET" directory (on the default volume) to the
higher level directory "PROGRAMS":
RENAME "\PROGRAMS\VOLTMET\TEST" TO "\PROGRAMS\TEST"
You can also move a DOS directory to a different place in the DOS hierarchy. The
following command moves the directory MYDIR to the next higher level in the
DOS hierarchy:
RENAME "\USERS\DAVE\MYDIR" TO "\USERS\MYDIR"
By preceding the file name with a backslash or slash in the "new name" part of the
command, you can move a file to the root. The following command moves the file
"PROG_1" from its present directory to the root:
RENAME "\PROGRAMS\VOLTMET\PROG_1" TO "\PROG_1"
Purging Files
You can erase a file with the PURGE command. Purging a file deletes the directory
entry for the file and releases the space reserved for the file. For example, the
following command removes the file "CHTRY" from the current default volume:
PURGE "CHTRY"
Purging DOS
Directories
You can use the PURGE command to remove DOS files and directories. The
following restrictions apply to PURGE on DOS directories:
• PURGE works only with closed files and directories. You cannot purge a
file currently open with an ASSIGN or a directory which is the current
working directory of any DOS disk.
• A directory must be empty (must not contain any files or directories) before
it can be purged. This means that to purge a directory, you must first purge
all of its files and lower-level directories.
4-14 Mass Storage Concepts
Autostarting Programs
NOTE
You can create an autostart program that will automatically be retrieved and RUN
by IBASIC whenever the mainframe is re-booted (power cycled or DIAG:BOOT
command executed). You identify the file containing an autostart program by
naming the file "AUTOST". You can save this program to the root directory of a
flexible disk, RAM Volume 1, or volume 0 of the hard disk. Whenever the system
is re-booted, IBASIC searches for an autostart file on the flexible disk first, RAM
volume 1 second, and volume 0 of the hard disk last. After the mainframe and disk
drive power-up sequences are completed, IBASIC runs the first autostart program it
found. Even if you are autostarting from RAM volume 1 there will be a startup
delay while the system checks for an autostart file on the floppy disk.
If you do not have a hard disk, the autostart search order becomes RAM volume 1
first and flexible disk second. If you do not have a flexible disk, the search order is
RAM volume 1 first and hard disk second.
After re-booting the mainframe, the default MSI is set to the mass storage device
where an autostart program was found. If no autostart program was found, the
default MSI is set to the root directory (DOS only) on the last valid mass storage
volume found during the power-on search sequence (search order is the same as for
the autostart program).
CAUTION
Always test a program before saving it as "AUTOST". It is possible to create a
corrupt autostart program (on RAM volume 1 or the hard disk) that may lock-up the
mainframe whenever it is re-booted.
If you have a flexible disk, you can recover from this situation by inserting a
flexible disk containing a functional autostart file. The system will then find the
flexible disk autostart file before it finds the corrupt file.
If you do not have a flexible disk and the corrupt autostart file is in RAM volume 1,
you can press the Reset Instr key (front panel) or CTRL R (terminal) during the
power-on sequence while "Testing ROM" is being displayed. Pressing this key
aborts the normal power-on sequence and performs DIAG:BOOT:COLD instead.
You can then PURGE or EDIT the corrupt autostart file.
If you do not have a flexible disk and the corrupt file is on the hard disk, you can
select the IBASIC instrument during the power-on sequence and press Reset Instr
(front panel) or CTRL R (terminal) while "IBASIC booting" or "IBASIC busy" is
being displayed. Pressing this key aborts the normal power-on sequence. You can
then PURGE or EDIT the corrupt autostart file.
Mass Storage Concepts 4-15
Capturing a Display
The DIAG:IBAS:DISP<device> command allows IBASIC to "capture" a display
following a re-boot. In addition, the IBASIC instrument will automatically be
selected on the display device following a re-boot. This command can be used
without an autostart program, but is particularly useful when used with an autostart
program. For example, immediately following re-boot, IBASIC can capture a
display and display user INPUT prompts or a warning such as "Warning: Power
Failure--reset all external equipment".
Example: Autostart with
Display Capture
The following example captures the built-in RS232 interface (BUILtin) and runs an
autostart program whenever the system is re-booted. You can also capture a
terminal on a plug-in RS-232 card (1 - 7). Refer to the SCPI Command Reference
for more information on these parameters.
From the IBASIC instrument, execute the following command:
OUTPUT 80930;"DIAG:IBAS:DISP BUIL" Capture display after
re-boot
Now enter the following program:
10 DISP "This is an autostart test"
20 END
Display message
To save this program as an autostart program, execute one of these commands:
SAVE "AUTOST:,700,0,0"
SAVE "AUTOST:,700,1"
SAVE "AUTOST:,MEMORY,1"
Save autostart file on hard disk
volume 0
Save autostart file on flexible
disk
Save autostart file on RAM
volume 1
Now, when the system is re-booted, IBASIC will capture the display, get and run
the AUTOST file, and display "This is an autostart test".
NOTE
Initial PRINT commands from an autostart program may not be displayed if
IBASIC re-boots before the display system does. This is most likely to happen
when the autostart file is in RAM Volume 1. You can prevent this problem by
using a short WAIT command (e.g., WAIT 5) as the first line in the autostart
program or by using the DISP command instead of PRINT.
To return IBASIC to its normal mode of not capturing a display following re-boot,
execute this command from the IBASIC instrument:
OUTPUT 80930;"DIAG:IBAS:DISP NONE"
4-16 Mass Storage Concepts
1
IBASIC File Types
ASCII Files
The IBASIC file system supports four different file types: ASCII, BDAT, DIR and
DOS/HP-UX.
ASCII files are stored on the disk as a series of variable length records. Each record
consists of a 16-bit word followed by the number of bytes designated in the length
word. If the length word contains an odd number, there is a one byte pad character
at the end of the record so that all records start on an even byte boundary. The end
of the file is denoted by a length word containing -1. ASCII files are created with
the command:
CREATE ASCII "<filename>",size
Where size is the number of 256 byte blocks reserved for the file. The number of
records in the file can continue to grow until 256 x size bytes are used. Attempting
to write more than this to the file generates an IBASIC error 59 "End of file or
Buffer found".
BDAT Files
BDAT files are stored on the disk as a 256 byte system record followed by a series
of fixed length records. They are created with the command:
CREATE BDAT "<filename>",number_of_records[,record_size]
Where number_of_records is the maximum number of records that can be stored in
the file and record_size is the size of each record. If the record_size is not specified,
it defaults to 256 bytes.
Only the first 12 bytes of the BDAT system record are used. These 12 bytes
contain three 4 byte integers with the following information:
• Integer 0: The 256 byte block containing the logical end of file.
• Integer 1: The offset of the End Of File in the above block.
• Integer 2: Maximum number of records as specified in CREATE BDAT.
The file directory contains the record length of each record as specified in the
CREATE BDAT command.
DIR Files
DIR files are DOS directories or subdirectories. They are created with the
command:
CREATE DIR "<directory name>"
DIR files can only be created on DOS disks or DOS RAM volumes.
DOS/HP-UX Files
DOS and HP-UX files are identical file types. DOS/HP-UX type files are created
with the command:
CREATE "<filename>",size
Where size is the number of bytes needed for the file. The record length for a
DOS/HP-UX file is 1 thus the number of bytes is the same as the number of 1 byte
records.
Mass Storage Concepts 4-17
NOTE
When executing the CAT command (CATalog) on a DOS/HP-UX file on a DOS
disk, "DOS" is returned as the file type. On a LIF disk, "HP-UX" is returned as the
file type. This is done to be compatible to some other Agilent products.
1
Using Wildcards
The wildcard characters allow you to use one command to perform operations on a
number of files or to "complete the name" of file names you may be unsure of.
The wildcard characters are an asterisk "*" and a question mark "?". When
wildcards are enabled, the "*" represents any number of characters in a file name.
For example, AB* matches file names such as AB, ABC, ABX, ABCD, etc. If the
"*" does not appear at the end of the name, any characters after the "*" are ignored.
For example, XY*Z matches XY, XYA, XYABC, etc. The "?" represents a single
character in a file name. For example, A?B matches AAB, ABB, A2B, etc. If the
"?" appears at the end of the name as in AB?, it matches AB, ABC, ABX, etc.
Enabling/Disabling
Wildcards
NOTE
The WILDCARDS DOS and WILDCARDS OFF commands enable and disable
wildcards, respectively. IBASIC defaults to WILDCARDS OFF. The
"SCRATCH A" command resets IBASIC to WILDCARDS OFF. SCRATCH
does not change the wildcards setting. When wildcards are not enabled, including
"*" or "?" in a DOS or a LIF file name is illegal and generates "ERROR 53
Improper file name".
The term WILDCARDS DOS is not limited to the DOS file system. It applies to
wildcard operations on a LIF disk as well. The "DOS" term refers to the way
wildcards are expanded to match file names. The wildcard expansion closely
follows how the MS-DOS operating system treats wildcards.
Wildcards are only legal in the right most name in a DOS directory path (i.e.
\DIR1\A*.X). If wildcards are used in other than the right-most position (i.e.
\DIR*\ABC.X), an "ERROR 53 Improper file name" is generated.
File Names with
Extensions
4-18 Mass Storage Concepts
When using a DOS filename extension, a period is used to separate the filename
from the extension. Since the period is not stored as part of the actual name, this
has some rather subtle implications when using wildcards. If a wildcard is used that
has no period, it only matches files that do not have extension names. For example,
XY* matches XYA and XYB but not XY.A. Similarly, XY*.A matches XYA.A,
XY.A, XYZ.A, and so on. AB*X.C matches AB.C, ABC.C ABCX.C, and so on.
Using "*" matches all files with no extension names and "*.*" matches all files.
LIF files do not allow the period in a file name (and LIF does not have extensions)
so using "*" or "*.*" on a LIF disk matches all files on the disk.
IBASIC Commands
that use Wildcards
Multiple Name Expansion
Mode
LIF Examples
DOS Examples
Name Completion Mode
Wildcards operate in either the multiple name expansion mode or name completion
mode. The mode used depends on the command being executed.
The CAT and PURGE commands operate in multiple name expansion mode. This
means the wildcard name expands to as many names as can be matched. If the
operation attempted does not succeed on all files found, an "ERROR 293 Operation
failed on some files" is generated.
WILDCARDS DOS
Enables wildcards
CAT "T*:,700,0,0"
Catalogs all files starting with T on volume 0 of hard disk
CAT "CH??:,700,0,0"
Catalogs all 4-letter files starting with CH on volume 0 of hard
disk
PURGE "VOLT*:,700,0,0"
PURGEs all files starting with the letters VOLT on volume 0 of
hard disk.
WILDCARDS DOS
Enables wildcards
CAT "\F*:,700,0,1"
Catalogs all subdirectories and files (without extensions) starting
with "F" on root directory of hard disk volume 1
CAT "\F*.*:,700,0,1"
Catalogs all subdirectories and files (with or without extensions)
starting with "F" on root directory of hard disk volume 1
CAT "\PROGRAMS\*.TXT:,700,0,1"
Catalogs all files with TXT extension on PROGRAMS
subdirectory of hard disk volume 1
CAT "\PROGRAMS\AMPS.*:,700,0,1"
Catalogs all file named AMPS (with or without extensions) on
PROGRAMS subdirectory on hard disk volume 1
CAT "\PROGRAMS\CH??.*:,700,0,1"
Catalogs all 4-letter file names starting with CH (with any
extension) on PROGRAMS subdirectory on hard disk volume 1.
PURGE "\PROGRAMS\VOLTS.*:,700,0,1"
PURGEs all files named VOLTS (with any extension) in the
PROGRAMS directory on volume 1 of hard disk.
PURGE "\PROGRAMS\*.CAP:,700,0,1"
PURGEs all files with CAP extension in the PROGRAMS
directory on volume 1 of hard disk.
PURGE "\PROGRAMS\*.*:,700,0,1"
PURGEs all files in the PROGRAMS directory on volume 1 of
hard disk.
The ASSIGN, GET, MASS STORAGE IS, MSI, RENAME, and RE-SAVE
commands operate in File Name Completion mode. This means the wildcard name
can match a single file name only. If it matches more than one file name, "ERROR
294 Wildcard matches> 1 item" is generated.
Mass Storage Concepts 4-19
LIF Examples
DOS Examples
Commands that do not use
Wildcards
Wildcards and the COPY
Command
WILDCARDS DOS
Enables wildcards
GET "TE*"
GETs file starting with TE from the default drive/volume
RENAME "CH*" TO "CHTEST"
Re-names file starting with CH to CHTEST on default drive
RE-SAVE "TE*"
RE-SAVEs the file on default drive/volume
WILDCARDS DOS
Enables wildcards
GET "\PROGRAMS\VOLTMET\TE*:,700,0,1"
GETs file starting with TE* (no extension) from
PROGRAMS\VOLTMET subdirectories on volume 1 of the hard
disk
MSI "\PROGRAMS\VO*:,700,0,1"
Sets default directories/drive to PROGRAMS\ directory starting
with VO on volume 1 of hard disk
RENAME "\PROGRAMS\VOLT\CH*" TO
"\PROGRAMS\VOLT\CHTEST"
Re-names file starting with CH to CHTEST in
PROGRAMS\VOLT directories
RE-SAVE "\PROGRAMS\VOLTMET\TE*:,700,0,1"
RE-SAVEs file starting with TE under PROGRAMS\VOLTMET
directories on volume 1 of hard disk
The CREATE, INITIALIZE, and SAVE commands do not allow wildcards
("ERROR 292 Wildcards not allowed" is generated).
The COPY command operates in multiple name expansion mode on the first
parameter and name completion mode on the second. This allows you to copy many
files in one operation. If either COPY parameter does not match any file, "ERROR
56 File name is undefined" occurs. If the second parameter is NULL (i.e. "" or
":,0",. . .) it is assumed to refer to the current mass storage directory.
With wildcards enabled, the following situations are handled by COPY:
• If the source matches a single file name, the destination can match a single
file name, a single directory name, or it must not exist (in which case it is
created by the copy).
• If the source matches multiple file names, the destination must match a
single directory name.
LIF Examples
4-20 Mass Storage Concepts
WILDCARDS DOS
Enables wildcards
COPY "TE*:,700,0,0" to ":,700,1"
COPYs file from hard disk volume 0 to flexible disk
DOS Examples
WILDCARDS DOS
Enables wildcards
COPY "\PROGRAMS\VOLTMET\TE*:,700,0,1" to ":,700,1"
COPYs file starting with TE from PROGRAMS\VOLTMET
directories on volume 1 of hard disk to flexible disk (if the flexible
disk is formatted in DOS, "TEST" goes to current directory since
no path was specified)
COPY "\PROGRAMS\VOLTMET\*.*:,700,1" to
"\PROGRAMS\VOLTMET:,700,0,1"
COPYs all files from \PROGRAMS\VOLTMET directory on
flexible disk to \PROGRAMS\VOLTMET directory on hard disk
volume 1.
1
Behavior
Differences
between LIF and
DOS File Systems
Several file system operations in IBASIC behave differently depending on whether
the target disk is a LIF or a DOS disk. The purpose for this is to simplify moving
files between IBASIC and either a DOS or HP Series 200/300 computer. This
allows IBASIC files written on DOS disks to be compatible with DOS software and
files written on LIF disks to be compatible with HP Series 200/300 BASIC software.
ASCII and BDAT Files
on DOS Disks
The DOS file system does not directly support ASCII and BDAT files. There is no
field in the DOS directory to save information indicating whether a file is ASCII,
BDAT or DOS/HP-UX so this information must be stored in the file itself. IBASIC
does this by creating a 512 byte header on ASCII and BDAT files. This header is a
256 byte LIF disk header followed by a 256 byte LIF directory containing 1 file
entry. The contents of the file begin immediately following the header. Any file
whose first 512 bytes are not recognized as a LIF header followed by a LIF
directory, is assumed to be a DOS/HP-UX file.
SAVE on DOS and LIF
The SAVE and RE-SAVE commands allow you to save a program in a disk file.
To allow this file to be edited on an HP Series 200/300 BASIC or a DOS computer
(using a standard DOS text editor) IBASIC identifies the type of disk and file being
used and stores the information as follows:
• When saving to a DOS disk, IBASIC creates a DOS/HP-UX file and saves
the program as a series of ASCII strings each terminated by a
carriage-return/line-feed (CR/LF). This is the standard DOS text format and
allows the resulting file to be edited by a DOS text editor.
• When saving to a LIF disk, IBASIC creates an ASCII file and saves each
string with no terminator (the length word in each ASCII record eliminates
the need for a string terminator). This is the same format used by SAVE on
HP Series 200/300 BASIC computers so the resulting file can be retrieved
directly by one of these computers.
Mass Storage Concepts 4-21
RE-SAVE on DOS
and LIF
If the file being RE-SAVED does not already exist, RE-SAVE behaves exactly as
described previously with SAVE. If however, the file already exists, IBASIC
preserves the file type and stores the information as follows:
• When a program is re-saved to an ASCII file on a LIF disk, or to a
DOS/HP-UX file on a DOS disk, there is no change since these are the
default file types on the respective disks.
• When a program is re-saved to an existing file, the original file type is
retained.
• When a program is re-saved to a DOS/HP-UX file on a LIF disk,
carriage-returns are removed automatically and only the line-feed portion of
the line terminator is saved. This allows the program to be edited on an
HP-UX machine since HP-UX uses only the LF as the line terminator.
COPY to/from DOS
and LIF
When copying files from a LIF to a DOS disk, file types are preserved by the copy.
An ASCII, BDAT and HP-UX file from a LIF disk copies directly to an ASCII,
BDAT, or DOS file (respectively) on a DOS disk. There are, however, two things
you must remember to avoid problems:
• LIF and DOS file names are not always compatible
• COPY does not re-format text files (CR/LF <> LF)
When using wildcards and copying files from DOS to LIF, you may have DOS file
names that are not legal LIF names. When this happens, the files with legal names
are copied, files with illegal names are skipped, and ERROR 293 - Operation failed
on some files - is generated when the COPY finishes.
When copying DOS/HP-UX text files such as those generated by the SAVE or
RE-SAVE, be aware that a text file on a LIF disk that contains LF terminators still
contains only the LF terminators when copied to a DOS disk. The reverse is also
true. A text file on a DOS disk containing CR/LF terminators still contains CR/LF
terminators when it is copied to a LIF disk. This is not a problem for the IBASIC
GET command since it handles either format regardless of the type of disk being
used. However, this is a problem for some HP Series 200/300 BASIC computers so
you need to be aware of the file type when exchanging programs on one of these
computers.
4-22 Mass Storage Concepts
DOS/HP-UX File
Extensibility
LIF files are stored in a contiguous group of sectors on the disk. This means that a
LIF file cannot expand beyond the size at which it was created. In addition, the
order of files in the LIF directory is the same as the order of the file data area on the
LIF disk.
The DOS file system does not require that files be saved contiguously on the disk.
A DOS file may be split into several allocation units that can be scattered anywhere
on the disk. This capability allows DOS files to be expanded as long as there is free
space left on the DOS disk.
In IBASIC, ASCII and BDAT files on a DOS disk are created with a fixed size that
cannot be expanded. However, file space for a DOS/HP-UX file on a DOS disk is
not allocated when the file is created; it is allocated as the file is written. Thus the
size specified in the CREATE command is ignored and the DOS/HP-UX file can
expand up to the amount of available space on the DOS disk.
When using a LIF disk, you must specify adequate size when creating DOS/HP-UX
files since the file cannot be expanded later.
Mass Storage Concepts 4-23
1
In Case of Difficulty
Mass Storage Error Message
Cause
Error 52 Improper mass storage volume specifier.
The characters used for mass storage volume specified do not form a valid specifier. This
could be a missing colon, too many parameters, illegal characters, etc.
Error 53 Improper file name.
The file name is too long or has characters that are not allowed. (Can also occur when using
"*" or "?" in a file name when wildcards are not enabled or when a wildcard was used in
other than the right-most position of a file name.) A LIF file name can be up to 10
characters long and is case dependant. LIF file names may contain any letter of the
alphabet (upper and lower case), the digits 0-9, and the underscore character (_). You can
also use the international characters: CHR$(160) - CHR$(254). A DOS file name can be
up to 8 characters long with an optional extension name of up to 3 characters. DOS file
names may contain any letter of the alphabet, the digits 0-9, the international characters
CHR$(160) - CHR$(254), and these characters:
!#$%()-^_{}~
Error 54 Duplicate file name.
The specified file name already exists. It is illegal to have two files with the same name on
one LIF volume or in a DOS directory.
Error 55 Directory overflow.
Although there may be room on the media for the file, there is no room for another file
name. LIF Disks initialized by Agilent Instrument BASIC have room for over 100 entries
in the directory. Small RAM volumes allow fewer entries.
Error 56 File name is undefined.
The specified file name does not exist or a wildcard operation did not match any file. Check
the contents of the disk with a CAT command.
Error 58 Improper file type.
Many mass storage operations are limited to certain file types.
Error 59 End of file or buffer found.
For files: No data left when reading a file, or no space left when writing a file. For buffers:
No data left for an ENTER, or no buffer space left for an OUTPUT or user RAM volume
too small.
Error 60 End of record found in random mode.
Attempt to ENTER or OUTPUT a field that is larger than a defined record.
Error 62 Protect code violation.
Failure to specify the protect code of a protected file, or attempting to protect a file of the
wrong type.
Error 64 Mass storage media overflow.
The disk is full. (There is not enough free space for the specified file size, or not enough
contiguous free space on a LIF disk.) Or you have specified a size for a nonvolatile RAM
volume that is larger than the reserved memory.
Error 66 INITIALIZE failed.
Too many bad tracks found. The disk is defective, damaged, or dirty.
Error 67 Illegal mass storage parameter.
A mass storage command contains a parameter that is out of range, such as a negative
record number or an out of range number of records. Also occurs if you did not reserve
enough memory space for a nonvolatile RAM volume.
Error 68 Syntax error occurred during GET.
One or more lines in the file could not be stored as valid program lines. (These lines will be
stored as commented lines.) Also occurs if the first line in the file does not start with a
valid line number.
Error 72 Drive not found or bad address.
The mass storage unit specifier contains an improper device selector, the disk drive is still
powering-up, or no disk drive is connected.
Error 73 Improper device type in mass storage volume
specifier.
The volume specifier has the correct general form, but the characters used for a device type
are not recognized.
Error 76 Incorrect unit number in mass storage
volume specifier.
Uninitialized RAM volume or the volume specifier contains a unit number that does not
exist on the specified device.
Error 77 Operation not allowed on open file.
The specified file is assigned to an I/0 path name which has not been closed.
Error 78 Invalid mass storage volume label.
Usually indicates that the media has not been initialized on a compatible system. Could also
be a bad disk. Can also occur when switching disk formats (DOS, LIF).
Error 79 File open on target device.
Attempt to copy an entire volume with a file open on the destination disk.
Error 80 Disk changed or not in drive.
No disk in the drive or the drive door was opened while a file was assigned.
Error 81 Mass storage hardware failure.
Also occurs when the disk is pinched and not turning. Try reinserting the disk.
Error 82 Mass storage volume not present.
Hardware problem or drive does not exist.
Error 83 Write protected.
Attempting to write to a write-protected disk. This includes many operations such as
PURGE, INITIALIZE, CREATE, SAVE, OUTPUT, etc.
Error 84 Record not found.
Error 85 Media not initialized.
Usually indicates that the media has not been initialized.
Error 87 Record address error.
Usually indicates a problem with the media.
Error 88 Read data error.
The media is damaged, or a nonvolatile RAM Volume is corrupted.
Error 89 Checkread error.
Error detected when reading data. The media is probably damaged.
4-24 Mass Storage Concepts
Mass Storage Error Message
Cause
Error 90 Mass storage system error.
Usually a problem with the hardware or the media.
Error 93 Incorrect volume code in mass storage
volume specifier.
The volume specifier contains a volume number that does not exist on the specified device.
Error 183 Permission denied.
Attempt to PURGE or write to a read only file
Error 189 Too many open files.
Only a fixed number of files can be open at one time. Close some of the files.
Error 291 Too many matches.
Too many matches on wildcard operation.
Error 292 Wildcards not allowed.
Some mass storage commands such as CREATE, INITIALIZE, and SAVE do not allow
wildcards.
Error 293 Operation failed on some files.
The wildcard operation attempted does not succeed on all files found. When using
wildcards and copying files from DOS to LIF, you may have DOS file names that are not
legal LIF names. When this happens, legal files are copied, illegal files are skipped, and
this error is generated.
Error 294 Wildcard matches >1 item.
A wildcard operating in File Name Completion mode expanded to more than one file name.
Error 295 Improper destination type.
Multiple files must be copied to directory not file.
Error 296 Unable to overwrite file.
Unable to overwrite file during copy operation.
Error 460 Directory not empty.
Attempt to PURGE a directory containing files (you must PURGE files first)
Mass Storage Concepts 4-25
4-26 Mass Storage Concepts
Chapter 5 Contents
Using This Chapter
5-1
System Controller Mode Overview
5-1
Controlling Instruments/GPIB Devices
5-3
Using the GPIB/IBASIC Interfaces . . . . . . . . . . . . . . . . . . . . . . . . . . . . . 5-4
Communicating with Instruments . . . . . . . . . . . . . . . . . . . . . . . . . . . . . . 5-8
Communicating with GPIB Devices . . . . . . . . . . . . . . . . . . . . . . . . . . . . . 5-10
Controlling RS-232/422 Peripherals 5-12
Assigning the RS-232/422 Interface .
Configuring the RS-232 Interface . .
Communicating via RS-232 Interface
Serial Interface Examples . . . . . .
Storing/Retrieving Data
.
.
.
.
.
.
.
.
.
.
.
.
.
.
.
.
.
.
.
.
.
.
.
.
.
.
.
.
.
.
.
.
.
.
.
.
.
.
.
.
.
.
.
.
.
.
.
.
.
.
.
.
.
.
.
.
.
.
.
.
.
.
.
.
.
.
.
.
.
.
.
.
.
.
.
.
.
.
.
.
.
.
.
.
.
.
.
.
.
.
.
.
.
.
.
.
.
.
.
.
.
.
.
.
.
.
.
.
.
.
.
.
5-12
5-13
5-15
5-16
5-21
Steps to Store Data . . . . . . . .
Storing Data to IBASIC Memory
Storing Data to Disks . . . . . . .
Storing Data to RAM Volumes .
.
.
.
.
.
.
.
.
.
.
.
.
.
.
.
.
.
.
.
.
.
.
.
.
.
.
.
.
.
.
.
.
.
.
.
.
.
.
.
.
.
.
.
.
.
.
.
.
.
.
.
.
.
.
.
.
.
.
.
.
.
.
.
.
.
.
.
.
.
.
.
.
.
.
.
.
.
.
.
.
.
.
.
.
.
.
.
.
.
.
.
.
.
.
.
.
.
.
.
.
.
.
.
.
.
.
.
.
.
.
.
.
.
.
.
.
.
.
.
.
5-22
5-23
5-24
5-26
.
.
.
.
.
.
.
.
.
.
.
.
.
.
.
.
.
.
.
.
.
.
.
.
.
.
.
.
.
.
.
.
.
.
.
.
.
.
.
.
.
.
.
.
.
.
.
.
.
.
.
.
.
.
.
.
.
.
.
.
.
.
.
.
.
.
.
.
.
.
.
.
.
.
.
.
.
.
.
.
.
.
.
.
.
.
.
.
.
.
.
.
.
.
.
.
.
.
.
.
.
.
.
.
.
.
.
.
.
.
.
.
.
.
.
.
.
.
.
.
.
.
.
.
.
.
.
.
.
.
.
.
.
.
.
.
.
.
.
.
.
.
.
.
.
.
.
.
.
.
5-28
5-30
5-36
5-39
5-42
Enabling Interrupts and Events 5-28
Interrupts and Events Overview .
Enabling Instrument Interrupts . .
Enabling GPIB Device Interrupts
Enabling Branching on Events .
Servicing Events and Interrupts .
Synchronizing Instrument/Device Operations 5-47
Controlling Instruments/GPIB Devices . . . . . . . . . . . . . . . . . . . . . . . . . . . 5-47
Synchronizing Instrument/Device Operations . . . . . . . . . . . . . . . . . . . . . . . . 5-48
Passing Control to External Computer . . . . . . . . . . . . . . . . . . . . . . . . . . . . 5-54
Chapter
5
System Controller Mode Operation
Using This Chapter
This chapter shows how to use the IBASIC computer in System Controller mode to :
•
•
•
•
•
NOTE
Control instruments and external GPIB devices
Control external RS-232/422 peripherals
Store/retrieve data to disks and memory
Enable instrument/device interrupts
Synchronize instrument/device operations
All example programs in this chapter are assumed to have been downloaded into the
IBASIC computer. See Chapter 2 - Creating and Editing Programs to create
programs from sources other than an HP 9000 Series 200/300 computer. See
Chapter 6 - Talk/Listen Mode Operation to create and download programs from an
HP 9000 Series 200/300 computer.
1
System Controller
Mode Overview
Figure 5-1 shows typical functions using the IBASIC computer for System
Controller mode operation.
Controlling Instruments/GPIB Devices
The IBASIC computer communicates with internal instruments (the System
instrument, plug-in module instruments, and the IBASIC instrument) via the
IBASIC interface. Use OUTPUT 809ss; to send commands to a register based or
message based instrument and ENTER 809ss; to return data from the instrument,
where 09 = primary address of the Agilent C-size mainframe at power-on and ss =
the instrument’s secondary address.
Message based instruments can also be accessed by logical address using OUTPUT
16[XX]XX or ENTER 16[XX]XX where [XX]XX is 0000-0255. The first two
digits of [XX]XX are not required for logical addresses 00-99. This permits access
to message based devices at other than secondary addresses.
For System Controller mode only, IBASIC computer communicates with external
GPIB devices via the GPIB interface. For interface select code 7, use OUTPUT
7ppss to send commands to a device and ENTER 7ppss to return data from the
device, where pp = device primary address and ss = secondary address.
System Controller Mode Operation 5-1
Use the GPIB interface commands ABORT, CLEAR, LOCAL, LOCAL
LOCKOUT, PASS CONTROL, REMOTE, SPOLL, and TRIGGER to control
GPIB device states via the GPIB interface. Or, use the IBASIC interface
commands ABORT, CLEAR, LOCAL, LOCAL LOCKOUT, REMOTE, SPOLL,
and TRIGGER to control instrument states via the IBASIC interface.
C-size Mainframe
GPIB
GPIB
GPIB
Figure 5-1. System Controller Mode Operations
Controlling RS-232/422 Peripherals
Control external RS-232 and RS-422 peripherals with the IBASIC computer via
the serial interfaces. Up to seven Agilent E1324A plug-in modules can be installed
in an Agilent C-size mainframe. When the RS-232/422 ports on an Agilent E1324A
plug-in module are assigned to IBASIC, use OUTPUT 21; and ENTER 21; to
control RS-232/ RS-422 peripherals via Agilent E1324A module #1,..., OUTPUT
27; and ENTER 27; via Agilent E1324A module #7.
5-2 System Controller Mode Operation
Storing/Retrieving Data
For System Controller mode, data returned from instruments, GPIB devices, or
RS-232/422 peripherals can be stored on external SS-80 disks or tapes, in RAM
volumes, or in IBASIC memory. For this discussion we will be assuming a 9153
disk drive (one hard drive and one 3.5 inch floppy disk drive) at GPIB address 0.
Use MSI ":,700,0" to store data to the external 9153 hard disk;
MSI ":,700,1" to store data to the 3.5 inch disk; or
MSI ":,0, <RAM Volume #>" to store data to nonvolatile or volatile RAM volumes.
Use OUTPUT @File and ENTER @File to access data files, where ASSIGN @File
TO "File" creates the path to the file.
Enabling Interrupts and Events
Interrupts can be sent to the IBASIC computer from external GPIB devices or from
internal instruments when the appropriate interface is enabled with ENABLE INTR
<sc>, where <sc> = interface select code. The IBASIC computer can be
programmed to service interrupts and non-interrupt events with ON CYCLE, ON
ERROR, ON INTR, ON KEY, or ON TIMEOUT.
Synchronizing Instruments/GPIB device operations
The IBASIC computer can be used to control operations between instruments and
GPIB devices, to synchronize instrument/device operations with the IBASIC
computer, and to pass control from the IBASIC computer to an external computer.
1
Controlling
Instruments/GPIB
Devices
In System Controller mode the IBASIC computer can communicate with internal
instruments (the System instrument, plug-in module instruments, and the IBASIC
instrument) via the IBASIC interface and with external GPIB devices via the GPIB
interface. This section shows how to:
• Use GPIB/IBASIC interface commands
• Communicate with instruments via the IBASIC interface
• Communicate with GPIB devices via the GPIB interface
NOTE
Using the GPIB/IBASIC
Interfaces
You can also use the READIO and WRITEIO commands which allow for more
flexibility in controlling instruments/devices with the IBASIC computer. See the
READIO and WRITEIO commands in Chapter 7 - IBASIC Command Reference
for information on these commands.
The IBASIC computer uses a GPIB (General Purpose Interface Bus) interface to
communicate with external GPIB devices, IBASIC interfaces (select codes 8 and
16) to communicate with internal instruments, and serial interfaces to communicate
with external RS-232/422 peripherals (see Figure 5-1).
System Controller Mode Operation 5-3
This discussion shows how to use the GPIB and IBASIC interfaces. See
Controlling RS-232/422 Peripherals in this chapter for information on using the
serial interfaces.
NOTE
GPIB/IBASIC Interface
Capabilities
Although the OUTPUT and ENTER statements are used to communicate with
instruments and devices, GPIB and IBASIC interface commands, such as CLEAR
and TRIGGER, can be used to control instrument or GPIB device states for actions
such as setting instruments or devices to a known state, sending Trigger messages
to the instruments or devices, etc.
GPIB Interface Commands
A standard GPIB interface connects the IBASIC computer to external GPIB devices
via the GPIB port on the Agilent C-size mainframe controller. (If you are not
familiar with GPIB, see Tutorial Description of the General Purpose Interface Bus
for an introduction to the GPIB interface.) IBASIC supports all GPIB interface
(bus) messages except Parallel Poll (PPOLL, PPOLL CONFIGURE, and PPOLL
UNCONFIGURE) and SEND.
GPIB
C-size Mainframe
GPIB
GPIB
GPIB
Figure 5-2. Controlling Instruments/GPIB Devices
IBASIC Interface Commands
The IBASIC interface connects the IBASIC computer to internal instruments in the
Agilent C-size mainframe. The IBASIC interface is very similar to the GPIB
5-4 System Controller Mode Operation
interface as supported by IBASIC, except PASS CONTROL is not used by the
IBASIC interface.
The IBASIC Select Code 8 interface is NOT a physical interface and does not have
exact equivalents for the ATN, IFC, REN, EOI, and SRQ lines of the GPIB
interface. The IBASIC Select Code 8 interface is designed to act very much the
same as the GPIB interface, where applicable.
The Select Code 16 interface uses similar commands but with differing results (see
summary on next page).
GPIB/IBASIC Interface Command Comparisons
The following table summarizes the interface commands used for the GPIB and
IBASIC interface, assuming an interface select code of 7 for the GPIB interface. In
the table, pp = the external GPIB device primary address, and ss = the internal
instrument or GPIB device secondary address. See Chapter 7 - IBASIC Command
Reference in this manual for further information on the interface commands.
NOTE
Specific actions in response to an interface command may be different for each
instrument/device. See the appropriate Agilent 75000 Plug-In Module User’s
Manual for information on instrument actions. See the appropriate user manual for
information on GPIB device actions.
System Controller Mode Operation 5-5
Summary of GPIB/IBASIC Interface Commands
Command
GPIB Interface Actions
ABORT
ABORT 7 breaks GPIB interface
handshakes in progress
CLEAR 7 clears all GPIB
devices. CLEAR 7ppss clears
selected GPIB device.
CLEAR
LOCAL
LOCAL
LOCKOUT
PASS
CONTROL
REMOTE
SPOLL
LOCAL 7 returns all GPIB
devices to LOCAL state.
LOCAL 7ppss returns selected
device to LOCAL state. LOCAL
LOCKOUT is cancelled on
LOCAL 7.
LOCAL LOCKOUT 7 prevents
GPIB devices set to REMOTE
state from being operated from
the front panel.
PASS CONTROL 7pp passes
Active Controller function to
external computer.
REMOTE 7 sets GPIB REN line
true. REMOTE 7ppss sets
selected device to REMOTE
state.
SPOLL (7ppss) performs a Serial
Poll of selected GPIB device.
TRIGGER
TRIGGER 7 sends Trigger
message to all addressed GPIB
devices. TRIGGER 7ppss sends
a trigger message to selected
GPIB device.
Interface select code 7 for GPIB interface
Interface select code 8 and 16 for IBASIC
interface
pp = device primary address
ss = instrument/device secondary address
5-6 System Controller Mode Operation
IBASIC Interface Select
Code 8 Actions
ABORT 8 sets interface to
REMOTE "REN" true.
CLEAR 8 clears all instruments.
CLEAR 809ss clears selected
instrument.
LOCAL 8 returns all instruments
to LOCAL state. LOCAL 809ss
returns selected instrument to
LOCAL state. LOCAL
LOCKOUT is cancelled on
LOCAL 8.
LOCAL LOCKOUT 8 prevents
instruments set to REMOTE
state from being operated in
LOCAL mode.
PASS CONTROL does NOT
apply to this interface.
REMOTE 8 sets "REN" true.
REMOTE 809ss sets the selected
instrument to REMOTE state.
SPOLL (809ss) performs a Serial
Poll of selected instrument.
TRIGGER 8 sends Trigger
message to all addressed
instruments. TRIGGER 809ss
sends a trigger message to
selected instrument.
IBASIC Interface Select
Code 16 Actions
I/O operation not allowed
CLEAR 16 clears all message
based instruments. CLEAR
16[XX]XX clears the selected
message based instrument.
LOCAL 16 sends Clear Lock to
all message based instruments.
LOCAL 16[XX]XX sends Clear
Lock to the selected message
based instrument.
I/O operation not allowed.
PASS CONTROL does NOT
apply to this interface.
REMOTE 16 is not allowed.
REMOTE 16[XX]XX sends Set
Lock to the selected message
based instrument.
SPOLL (16[XX]XX) performs a
Serial Poll of the selected
message based instrument.
TRIGGER 16 is not allowed.
TRIGGER 16[XX]XX sends a
word serial trigger message to
the selected message based
instrument.
Interface Command
Examples
Four examples follow to show some ways the interface commands can be used to
control instrument and GPIB device states. See Synchronizing Instruments/GPIB
Devices in this chapter for examples using PASS CONTROL, SERIAL POLL, and
TRIGGER. See Chapter 7 - IBASIC Command Reference for additional details on
the interface commands.
Example: Aborting Interface
Activity (ABORT)
ABORT 7
For System Controller mode ONLY, ceases activity on GPIB
interface (select code 7)
Example: Clearing
Instrument/Device (CLEAR)
CLEAR 80914
Clears the internal instrument at secondary address 14
CLEAR 722
For System Controller mode only, clears the GPIB instrument at
address 722
CLEAR 1601
Sends a Word Serial Clear command to the message based device
at logical address 1.
Example: Enabling Local
State (LOCAL)
LOCAL 80914
Places an internal instrument at secondary address 14 in the
LOCAL state.
LOCAL 722
For System Controller mode only, places GPIB device at address
722 in the LOCAL state.
Example: Setting Remote
State (REMOTE)
REMOTE 80901
Sets instrument at secondary address 01 to REMOTE state
REMOTE 722
For System Controller mode only, sets GPIB device at address
722 to REMOTE state
System Controller Mode Operation 5-7
Communicating with
Instruments
NOTE
For System Controller mode (and Talk/Listen mode), the IBASIC computer
communicates with internal instruments via the IBASIC interface (interface select
code 8) (see Figure 5-2). Since the IBASIC computer can communicate with many
internal instruments, each instrument must have a unique address.
When System Controller mode is set, the IBASIC computer is the System
Controller and has exclusive control over internal instruments. Thus, for System
Controller mode, an external computer cannot access internal instruments via GPIB.
The address of an internal instrument for the IBASIC computer is 809ss, where ss =
the secondary address of the instrument. For the Agilent C-size mainframe, internal
instruments consist of the System instrument, plug-in module instruments, and the
IBASIC instrument. The address of the System instrument is 80900 and the address
of the IBASIC instrument is 80930. The default primary address of the Agilent
C-size mainframe is 09. Neither the System instrument or the IBASIC instrument
are message based devices, so they cannot be accessed from the Select Code 16
interface. Select Code 16 can be used to access any message based instrument
using its logical address.
Use OUTPUT 809ss; to send commands to instruments via the IBASIC interface
and use ENTER 809ss; to return data from instruments, where 8 = IBASIC
interface select code (fixed), 09 = the instrument’s primary address (programmable
from the System instrument), and ss = the instrument’s secondary address (00
through 30).
Communicating with
Module Instruments
NOTE
To control a plug-in module instrument with the IBASIC computer, use OUTPUT
809ss; and ENTER 809ss; statements where ss = the secondary address of the
instrument. An example follows which uses the IBASIC computer to control an
Agilent E1410A DMM at address 80903 to make DC voltage measurements.
See the appropriate Plug-In Module User’s Manual for typical programs to control
plug-in module instruments. To use the examples in those manuals for the IBASIC
computer, change the instrument address from 709ss to 809ss. Otherwise, the listed
programs can be used as shown for the IBASIC computer.
5-8 System Controller Mode Operation
Example: Making DCV
Measurement with
Instrument
This program makes a DC voltage measurement using an Agilent E1410A DMM at
address 80903. The input to the DMM is via the DMM rear panel terminals. The
measurement result is displayed on the terminal connected to the built-in RS232
interface. See Figure 5-3 for typical connections.
C-size Mainframe
Figure 5-3. Example: Measure DCV with Instrument
5 !RE-SAVE "MEAS_DCV"
10 ASSIGN @E1410 to 80903
20
30
40
50
60
70
Assign DMM to the IBASIC
instrument
CLEAR @E1410
Clear DMM/interface
OUTPUT @E1410;"*RST"
Reset DMM
OUTPUT @E1410;"MEAS:VOLT:DC?" Make DCV measurement
and query result
ENTER @E1410;Volts
Enter result
PRINT "E1410A Voltage = ";Volts Display results
END
A typical result is: E1410A Voltage = 1.254377
NOTE
The same program could be used with Select Code 16 by changing line 10 to "10
ASSIGN @E1410 TO 1624" if the DMM is set to logical address 24.
System Controller Mode Operation 5-9
Comunicating with the
System Instrument
To control the System instrument with the IBASIC computer, use OUTPUT 80900
and ENTER 80900 statements. An example to read the time of day follows. See the
Agilent 75000 Mainframe User’s Manual for System instrument operations.
This program uses the IBASIC computer to read and display the time of day using
the System instrument’s internal clock. The System instrument’s address is 80900.
5
10
20
30
40
!RE-SAVE "TIMECHEK"
OUTPUT 80900;"SYST:TIME?"
ENTER 80900;H,M,S
PRINT H,M,S
END
A typical return (4:15:30 P.M.) is: 16
Comunicating with the
IBASIC Instrument
15
Query time of day
Enter time of day
Display time of day
30
The IBASIC instrument is treated the same as any internal instrument in the
mainframe. Use OUTPUT 80930; and ENTER 80930; statements to control the
IBASIC instrument from the IBASIC computer. A typical way to use the IBASIC
instrument is to configure the RS-232/422 serial ports. See Controlling RS-232/422
Peripherals in this chapter for details.
Although the IBASIC instrument is addressed as an internal instrument, the
IBASIC instrument is NOT a physical instrument and acts more like a
message-based device than a register-based device. In the Agilent C-size
mainframe, all plug-in module instruments (DVM, counters, etc.) are register-based
devices.
Therefore, if the *WAI command is used on the IBASIC instrument (as would be
the case for a register-based instrument to wait for command completion), sending a
command to IBASIC will terminate very quickly. This occurs since the IBASIC
computer begins executing the command (is running) separately from the IBASIC
instrument that issued the command.
To force the IBASIC instrument to wait for the command or program completion,
use the IBASIC instrument command PROG:WAIT? instead. The IBASIC
instrument will then wait for the IBASIC computer to enter the idle (STOPped) or
paused (PAUSe) state. See Chapter 8 - SCPI Command Reference for a description
of the PROG:WAIT? command.
Communicating with
GPIB Devices
NOTE
For System Controller mode only, the IBASIC computer can communicate with
external GPIB devices via the GPIB interface. External GPIB devices can be
measurement devices (such as voltmeters or counters); a computer which is
compatible with GPIB (such as an HP 9000 Series 200/300 computer) as long as the
computer is NOT the System Controller; or one or more Agilent C-size mainframes.
In System Controller mode, the Agilent E1406 is always the System Controller,
although it may be the Active Controller or Non-Active Controller.
5-10 System Controller Mode Operation
For System Controller mode, the IBASIC computer communicates with external
GPIB devices (and the internal disks) via the GPIB interface. Use OUTPUT 7ppss;
to send commands to devices and ENTER 7ppss; to return data from devices, where
7 = the (assumed) GPIB interface select code, pp = the device’s primary address,
and ss = the device’s secondary address. Use the ABORT, CLEAR, TRIGGER, etc.
commands for other operations. An example follows.
NOTE
Example: Making DCV
Measurement with GPIB
Device
See Synchronizing Instruments/Devices in this chapter for more examples of
controlling external GPIB devices using the IBASIC computer.
This program shows one way to use the IBASIC computer to control an Agilent
3457A voltmeter at primary address 22 to make DC voltage measurements.
5 !RE-SAVE "ASGNPATH"
10 ASSIGN @Hp3457 to 722
20 CLEAR @Hp3457
30 OUTPUT @Hp3457;"DCV"
40 ENTER @Hp3457;A
50 PRINT "3457A Voltage = ";A
Assign I/O path to Agilent
3457A voltmeter
Clear Agilent 3457A voltmeter
Make Agilent 3457A voltage
measurement
Enter Agilent 3457A
measurement
Display Agilent 3457A
measurement
60 END
A typical return is: Agilent 3457A Voltage = 1.234674
System Controller Mode Operation 5-11
1
Controlling
RS-232/422
Peripherals
In System Controller mode (and in Talk/Listen mode), the IBASIC computer can
control external RS-232C or RS422 peripherals via an RS-232 or RS-422 interface
on an Agilent E1324A Data Communications module (interface select codes 21
through 27) (see Figure 5-4). The internal RS232 interface is used to communicate
with the controlling terminal. The steps involved in controlling RS-232/422
peripherals are:
1. Assign the interface to IBASIC
2. Configure the interface for your operation
3. Communicate with peripherals via the interface
C-size Mainframe
Figure 5-4. Controlling RS-232/422 Peripherals
Assigning the
RS-232/422 Interface
Assigning the Built-In
Interface
Assigning Agilent E1324A
Interfaces
For the IBASIC computer to communicate with RS-232/422 peripherals via an
Agilent E1324A plug-in serial interface, the interface must first be assigned to the
IBASIC computer.
The default assignment for the built-in RS-232 interface is the User Interface
(display system). Since there is no other means of controlling the IBASIC
compluter unless a terminal is assigned to a Agilent E1324A serial interface, this
serial interface should not be used to control other devices.
You assign an Agilent E1324A serial interface to the IBASIC computer by setting
the LADD switch on the module to 241, 242, ...,247. Up to seven Agilent E1324A
5-12 System Controller Mode Operation
modules can be installed in an Agilent C-size mainframe. The following table
shows interface assignments by module number:
Interface Assignments
Module #
LADD
...:SER[n]*
<sc>**
Built-in
1
2
3
4
5
6
7
None
241
242
243
244
245
246
247
0
1
2
3
4
5
6
7
9
21
22
23
24
25
26
27
* = [n] value in SYST:COMM:SER[n]... commands
** = <sc> value in OUTPUT <sc>; and ENTER <sc>;
NOTE
See the Agilent 75000 Installation and Getting Started Guide for an explanation of
Logical Addressing. See the Agilent 75000 Series B Agilent E1324A RS-232/422
Data Comm Module User’s Manual for the LADD switch locations.
When the Agilent E1324A module(s) are assigned to the IBASIC computer, the
IBASIC instrument and the module(s) form a single instrument. Since the IBASIC
instrument has Logical Address (LADD) 240 (secondary address 30), to assign one
Agilent E1324A module (module #1) set the module Logical Address to LADD
241. To assign two modules, set module #1 LADD to 241 and set module #2
LADD to 242. For three modules set LADDs 241, 242, 243, etc.
NOTE
Configuring the
RS-232 Interface
To enable the new Agilent E1324A port assignments, you must cycle mainframe
power after setting the LADD switches. The LADD settings must be sequential
starting with 241 (241, 242,...,247). Other LADD combinations, such as 241, 243,
... will result in one or more modules not being assigned to IBASIC.
After an RS-232 interface is assigned to IBASIC, you can configure the interface
using SYST:COMM:SER[n]... commands. See Chapter 8 - SCPI Command
Reference for SYST:COMM:SER[n]... command information.
To configure the RS-232 interface, you must direct the configuration commands to
the IBASIC instrument using OUTPUT 80930;"SYST:COMM:SER[n]:..."
commands, where [n] is the interface number.
System Controller Mode Operation 5-13
Example: Configure RS-232
Interface
CAUTION
This example configures the built-in RS-232 interface and stores the parameters.
The parameters are stored in nonvolatile RAM (when using the built-in interface),
or an EEPROM on the plug-in interface (when using a plug-in interface). After
storing the parameters, the corresponding serial interface is set to these values on
power-up.
Card parameters can be changes as often as desired but the EEPROM has a limited
number of write cycles (10,000) so the DIAG:COMM:SER[n]:STORE command
should not be used excessively when dealing with a plug-in interface.
5 !RE-SAVE "SETPARAM"
10 Ib=80930.
IBASIC instrument address
20 CLEAR Ib
Clear input/output buffers
30 OUTPUT Ib;"*CLS"
Clear status/error queue
70 OUTPUT Ib;"SYST:COMM:SER1:BAUD 9600"
Set 9600 baud rate
80 OUTPUT Ib;"SYST:COMM:SER1:BITS 8"
Set 8 data character bits
90 OUTPUT Ib;"SYST:COMM:SER1:PAR:CHECK OFF"
Disable receive data parity checks
100 OUTPUT Ib;"SYST:COMM:SER1:PAR:TYPE NONE"
Incoming data must not include parity bit. No parity bit
transmitted.
110 OUTPUT Ib;"SYST:COMM:SER1:SBIT 1"
Set one stop bit
150 OUTPUT Ib;"SYST:COMM:SER1:TRAN:AUTO ON"
Links transmit pacing to receive pacing protocol
160 OUTPUT Ib;"SYST:COMM:SER1:PACE XON"
Enable XON/XOFF pacing
170 OUTPUT Ib;"SYST:COMM:SER1:PACE THR:STOP 6144"
Set XOFF threshold for 80 characters
180 OUTPUT Ib;"SYST:COMM:SER1:PACE THR:STAR 2048"
Set XON threshold for 20 characters
220 OUTPUT Ib;"SYST:COMM:SER1:CONT:DTR ON"
Set DTR control line ON
230 OUTPUT Ib;"SYST:COMM:SER1:CONT:RTS ON"
Set RTS control line ON
270 OUTPUT Ib;"DIAG:COMM:SER1:STORE"
Store in nonvolatile RAM
280 END
5-14 System Controller Mode Operation
Communicating via
RS-232 Interface
When an RS-232 interface is assigned to IBASIC and the interface is configured for
the desired operation, the IBASIC computer can communicate with an external
RS-232 peripheral using OUTPUT <sc>; and ENTER <sc>; statements. Where
<sc> = 9 for the built-in, or 21 through 27 for the plug-in interfaces.
Example: Control Printer via
Agilent E1324A Interface
This program controls an external RS-232 printer at select code 21 using the
RS-232 interface on Agilent E1324A module #1. Note that the interface must have
been assigned to IBASIC by setting LADD 241 and cycling mainframe power. For
this example, the default settings for pacing and modem control lines are used. (See
Serial Interface Commands for default settings.)
5 !RE-SAVE "GET_CAT"
10 Ib=80930.
IBASIC instrument address
20 CLEAR Ib
Clear input/output buffers
30 OUTPUT Ib;"*CLS"
Clear status/error queue
40 OUTPUT Ib;"SYST:COMM:SER1:BAUD 9600"
Set 9600 baud rate
50 OUTPUT Ib;"SYST:COMM:SER1:BITS 8"
Set 8 data character bits
60 OUTPUT Ib;"SYST:COMM:SER1:PAR:CHEC OFF"
Disable receive data parity checks
70 OUTPUT Ib;"SYST:COMM:SER1:PAR:TYPE NONE"
Incoming data must not include parity bit. No parity bit
transmitted.
80 OUTPUT Ib;"SYST:COMM:SER1:SBIT 1"
Set one stop bit
90 PRINTER IS 21
Direct data output to select code 21
100 PRINT "This line should appear on the printer at"
110 PRINT "select code 21 followed by a CATALOG"
120 PRINT "of the current disk"
130 CAT
140 END
System Controller Mode Operation 5-15
Serial Interface
Examples
The following example programs demonstrate several ways to use an RS-232 serial
interface on an Agilent E1324A plug-in module. These examples assume that an
RS-232 terminal is attached to the RS-232 port.
This program demonstrates line oriented ENTER and OUTPUT operations on a
serial port.
10
! RE-SAVE "LINE_IO"
20
DIM Line$[80]
30
Serial=921
40
!
50
! ENTER and OUTPUT lines on Select Code 9.
60
!
70
! With a Terminal connected to the built-in RS-232 port
80
! and that port assigned to IBASIC, this program
90
! demonstrates simple line-by-line I/O using the
100 ! ENTER and OUTPUT statements.
120 ! The program will remain in the ENTER statement appending
130 ! typed characters to the Line$ string until a Line Feed
140 ! character is received signifying an end-of-line. The
150 ! Line Feed is not placed in the ENTERed string.
160 !
170 ! A Carriage Return immediately followed by a Line Feed
180 ! will be treated as a Line Feed.
200 ! Carriage Return = CNTL-M
210 ! Line Feed
= CNTL-J
220 !
230 ! As you type on the terminal you will not normally see
240 ! any characters being echoed.
250 !
260 ON ERROR GOTO Error_check ! Set up to trap errors
270 CLEAR Serial
!Clear the receive and transmit buffers
280 I=1
! keep a count of lines
290 DISP "Entering lines from the terminal..."
300 LOOP
310
!OUTPUT prompt to terminal, then ENTER response
320
OUTPUT Serial;"Enter a line terminated with LF (CNTL-J):"
330
ENTER Serial;Line$
340
! Echo the response to the terminal
350
OUTPUT Serial USING "K,X,DDD,3(K)";"Line",I,": ’",Line$,"’"
360
! Continue to LOOP until an error or BREAK is detected
370
I=I+1
! increment the line count
380 END LOOP
390 !
400 Error_check:!
410 ! Get the ENTER Status to determine what caused the error.
420 Err=READIO(Serial,4)
5-16 System Controller Mode Operation
430
440
450
460
470
480
500
510
520
530
540
550
560
570
580
BEEP
! Signal an error
DISP ""
! Clear the display line
OUTPUT Serial;ERRM$ !Print error message on terminal
!
! Look at each bit of the returned status to determine
! which error condition(s) were detected.
OUTPUT Serial;"Error(s) detected on Select Code";Serial
IF BIT(Err,11) THEN OUTPUT Serial;" Buffer error"
IF BIT(Err,10) THEN OUTPUT Serial;" Device error"
IF BIT(Err,9) THEN OUTPUT Serial;" BREAK"
IF BIT(Err,8) THEN OUTPUT Serial;" Framing error"
IF BIT(Err,7) THEN OUTPUT Serial;" Parity error"
IF BIT(Err,6) THEN OUTPUT Serial;" Overrun error"
OUTPUT Serial;"End of Program"
END
This program demonstrates serial I/O with ENTER USING to get a single character
at a time from a serial port without requiring a Line Feed (or Carriage Return / Line
Feed) after each character.
10
! RE-SAVE "CHAR_IO"
20
DIM Char$[1]
30
Serial=921
40
!
50
! ENTER single characters on Select Code 9.
70
! With a Terminal connected to the built-in RS-232 port, and the
80
! port assigned to IBASIC, this program demonstrates entering
90
! character at a time with ENTER and USING.
120 ! The program will wait in the ENTER for a character to
130 ! be typed on the terminal. Then it will display the
140 ! character (if it is printable) and the numeric value
150 ! of the received character on the terminal.
170 ON ERROR GOTO Error_check ! Set up to trap errors
180 CLEAR Serial
! Empty receive and transmit buffers
190 DISP "Entering characters from the terminal..."
200 OUTPUT Serial;"Type some characters on the terminal:"
210 LOOP
220
ENTER Serial USING "#,A";Char$
230
Code=NUM(Char$)
240
IF Code>31 AND Code <127 THEN
250
OUTPUT Serial USING "K,X,DDD,X,3(K)";"Code
=",Code,"’",Char$,"’"
260
ELSE
270
OUTPUT Serial USING "K,X,DDD,X,K";"Code
=",Code,"<non-printing>"
280
END IF
290
!Continue to LOOP until an error or BREAK is detected
300 END LOOP
System Controller Mode Operation 5-17
310 !
320 Error_check:!
330 ! Get the ENTER Status to determine what caused the error.
340 Err=READIO(Serial,4)
350 BEEP
! Signal an error
360 DISP ""
! Clear the display line
370 OUTPUT Serial;ERRM$ !Print error message on terminal
380 !
390 ! Look at each bit of the returned status to determine
400 ! which error condition(s) were detected.
420 OUTPUT Serial;"Error(s) detected on Select Code";Serial
430 IF BIT(Err,11) THEN OUTPUT Serial;" Buffer error"
440 IF BIT(Err,10) THEN OUTPUT Serial;" Device error"
450 IF BIT(Err,9) THEN OUTPUT Serial;" BREAK"
460 IF BIT(Err,8) THEN OUTPUT Serial;" Framing error"
470 IF BIT(Err,7) THEN OUTPUT Serial;" Parity error"
480 IF BIT(Err,6) THEN OUTPUT Serial;" Overrun error"
490 OUTPUT Serial;"End of Program"
500 END
This program demonstrates the use of READIO and WRITEIO on the serial
interface with ON CYCLE to allow non-blocking I/O. The program will not wait in
an I/O statement if no characters are available, but will return to the main program
and continue processing. Since the RS-232 interfaces in the Agilent E1406 is
buffered at the interrupt level by the operating system, with appropriate protocols
set up, This method will allow very flexible serial I/O with no loss of characters.
10
! RE-SAVE "CYCLE_IO"
20
Serial=921
30
CLEAR Serial
!Empty the receive and transmit buffers
40
!
50
! Demonstrate non-blocking serial I/O using an ON CYCLE
60
! subroutine to read and echo characters typed on the
70
! serial interface. The main loop of this program executes
80
! repeatedly while every 0.1 seconds the serial interface
90
! is checked to see if any characters have been received.
100 !
110 OUTPUT Serial;"Typed characters will be echoed..."
120 Quit=0
! Initialize the Quit flag
130 ON CYCLE .1 GOSUB Serial_io !Set the ON CYCLE interval
140 LOOP
! The main program loop
150
FOR I=1 TO 10000
160
DISP "n =";I,"n*n =";I^2
170
IF Quit THEN GOTO Quit_code
180
NEXT I
190 END LOOP
200 Quit_code:!
210 DISP ""
5-18 System Controller Mode Operation
220 OUTPUT Serial;"End of Program"
230 STOP
240 !
250 Serial_io:!
260 ! This subroutine is executed every ON CYCLE interval.
270 ! It checks to see if any characters have been received
280 ! and then echoes back to the serial interface. If a
290 ! carriage return is received, a line feed is echoed as
300 ! as well. If the Escape character is received, the Quit
310 ! variable is set which tells the main program to terminate.
330 !
340 ! Read serial interface status and mask off all but the error bits
360 Status=BINAND(READIO(Serial,3),DVAL("FC0",16))
370 IF Status THEN
380
OUTPUT Serial;""
390
OUTPUT Serial;"Serial card error detected:"
400
OUTPUT Serial;" Status = ";DVAL$(Status,16);"h"
410
Quit=1
! Quit if an error occurred
420
RETURN
430 END IF
440 Cnum=READIO(Serial,1)
! read a character
450 IF Cnum=-1 THEN RETURN
! return if no characters
460 !
470 IF Cnum=27 THEN
! quit if CNTL-Z is typed
480
Quit=1
490
OUTPUT Serial;""
! force a CR/LF output
500
RETURN
510 END IF
520 ! Echo the received character back to the terminal
530 ! and loop until the WRITEIO of the character succeeds.
540 Write_loop:!
550 WRITEIO Serial,1;Cnum
560 IF (READIO(Serial,2)) THEN GOTO Write_loop
570 !
580 IF Cnum=13 THEN
!Do Line Feed after Carriage Return
590
Cnum=10
600
GOTO Write_loop
610 END IF
611 GOTO Serial_io
! empty receive buffer before returning
620 RETURN
630 !
640 END
System Controller Mode Operation 5-19
1
Storing/Retrieving
Data
This section gives guidelines to store and retrieve data collected from internal
instruments, GPIB devices, or RS-232/422 peripherals into IBASIC memory or into
mass storage devices (external SS-80 disk or tape drives or RAM volumes).
See Chapter 4 - Managing IBASIC Files for information about IBASIC file types.
See the Agilent Instrument BASIC Programming Techniques Manual for
information about directing data flow and the Agilent Instrument BASIC Interfacing
Techniques Manual for information about using I/O paths.
For System Controller mode, the IBASIC computer can store data collected from
internal instruments, external GPIB devices, or external RS-232/422 peripherals
(see Figure 5-5). Data can be stored to and retrieved from the IBASIC memory or
mass storage devices (external SS-80 disk or tape drives or RAM volumes). In this
chapter we are assuming an external HP 9153 disk drive (hard disk plus floppy
disk) at GPIB address 0.
GPIB
GPIB
GPIB
Figure 5-5. Storing/Retrieving Data
5-20 System Controller Mode Operation
Steps to Store Data
There are seven main steps to store data in data files on a disk drive, or in volatile
and nonvolatile RAM volumes on the RAM disk
(see Figure 5-6):
(1)
(2)
(3)
(4)
Define a file/array in the IBASIC computer
Specify the default mass storage device
Create a data file on the mass storage device
Assign an I/O path name to the data file
(5) Enter data into IBASIC computer variables/arrays
(6) Write the data into the data file
(7) Close the I/O path to the data file
GPIB
Figure 5-6. Steps to Store Data
The following table summarizes typical commands to store data from instruments,
GPIB devices, or RS-232/422 peripherals to a disk and to RAM volumes using
these seven steps. For IBASIC operation, ASCII, BDAT, and DOS/HP-UX files
can be created on mass storage devices. Note that only steps (1) and (5) are
required to store data in IBASIC memory.
System Controller Mode Operation 5-21
Storing Data to Disks/RAM Vols
Step
Typical Commands
REAL Volts Array(1:10)
MSI ":,700,0" (20 MByte hard disk)
MSI ":,700,1" (3.5 inch disk)
MSI ":,<unit> <volume>,"
MSI ":,0,0" - MSI ":,0,16" (RAM vols)
CREATE <type> "file_name", size a
Create Data File
Assign I/O Path
ASSIGN @Path_name TO "file_name"
Enter Data into Computer
ENTER 809ss;variable (Instruments)
ENTER 7ppss;variable (GPIB devices)
ENTER 9; variable
(RS-232)
ENTER <sc>; variable (Agilent E1324A)b
Write Data to Data File
OUTPUT @Path_name; variable
Close I/O Path to Data File
ASSIGN @Path_name TO *
<type> can be ASCII, BDAT, or DOS/HP-UX
<sc> = 21 for Agilent E1324A module #1,..., = 27 for module #7
1 Define Computer variables
2 Specify Mass Storage
3
4
5
6
7
a
b
Storing Data to IBASIC
Memory
For System Controller mode, the IBASIC computer can store data from
instruments, GPIB devices, and RS-232/422 peripherals into IBASIC memory. An
example follows to store data into IBASIC memory (variable space).
Example: Storing Data to
IBASIC Memory
This program uses an Agilent E1410A DMM instrument at address 80903 to make
10 DC voltage measurements. The results are stored in IBASIC memory and are
then displayed on the terminal.
5
10
20
30
40
50
60
70
80
!RE-SAVE "STOR_MEM"
REAL Dcv_rgs(1:10)
Create IBASIC computer array
for 10 readings
OUTPUT 80903;"CONF:DCV"
Configure DMM for DC
voltage measurements
OUTPUT 80903;"TRIG:COUN 10" Set system for 10 triggers
OUTPUT 80903;"INIT"
Trigger DMM, store the
readings in DMM memory
OUTPUT 80903;"FETC?"
Get readings from DMM
memory
ENTER 80903;Dcv_rgs(*)
Enter readings into IBASIC
memory
PRINT USING "#,K,/";Dcv_rgs (*) Display readings on terminal
END
A typical return is:
5-22 System Controller Mode Operation
3.245637
3.245385
.
.
3.244967
10 readings
Storing Data to Disks
For System Controller mode, the IBASIC computer can store data from
instruments, GPIB devices, or RS-232/422 peripherals to the 20 MByte hard disk or
to the 3.5 inch disk. The disks are specified as the default mass storage device with
the MASS STORAGE IS (MSI) address for the disk. Typically, the MSI address for
the 20 MByte hard disk is ":,700,0" and the address for the 3.5 inch disk is
":,700,1".
Example: Storing Data to
Disk
This program shows a way to store instrument data to a hard disk using the IBASIC
computer. As shown in Figure 5-7, an Agilent E1410A DMM at address 80903 (a)
makes 10 voltage measurements and (b) sends the results to the IBASIC computer
where they are stored in REAL array Dcv in IBASIC memory.
Figure 5-7. Storing Data to Disk
The results are then stored on the hard disk in ASCII data file "Volts" (c) and are
retrieved from the data file and displayed on the terminal (d). Note that line 320
(close I/O path) is not necessarily required, since line 360 closes the I/O path and
then reopens the path. The ASSIGN statement (line 170) is required to reset the file
pointer back to the beginning of the file.
NOTE
This program can be used to save data to the 3.5 inch disk by changing line 70 to 70
MASS STORAGE IS ":,700,1". See Storing Data to RAM Volumes for information
on storing data to RAM volumes.
5
10
20
30
40
!RE-SAVE "STOR_HD"
! Step 1: Define Computer File/Array
!
REAL Dcv (1:10)
Dimension REAL array in IBASIC memory
!
System Controller Mode Operation 5-23
50
70
80
90
100
120
130
140
150
160
170
180
190
210
220
230
240
250
260
280
290
300
320
330
340
360
370
380
390
400
410
! Step 2: Specify MSI Device
MASS STORAGE IS ":,700,0"
Set 20 MByte hard disk as MSI device
ON ERROR GOTO Already_Created
If ASCII file "Volts" is already created, do not attempt to create
data file
!
! Step 3: Create Data File
CREATE ASCII "Volts",10
If not already created, create ASCII file "Volts" with length of 10
(256-byte) blocks
Already_Created: OFF ERROR Turn off ERROR message
!
! Step 4: Assign I/O Path to Data File
!
ASSIGN @File TO "Volts";FORMAT ON
Assign I/O path to data file "Volts". Use FORMAT ON since
ASCII file is specified
!
! Step 5: Enter Data into Computer File
FOR I = 1 to 10
Begin loop to make 10 DCV
readings
OUTPUT 80903;"MEAS:VOLT:DC?" Make 10 DCV readings
ENTER 80903; Dcv(I)
Save reading in IBASIC
computer array Dcv
NEXT I
Increment count
!
! Step 6: Output Data to Data File
OUTPUT @File;Dcv(*)
Send data to file "Volts" on
hard disk
!
! Step 7: Close I/O Path to Data File
ASSIGN @File to *
Close I/O path to file "Volts"
!
! Display data on terminal
ASSIGN @File TO "Volts";FORMAT ON
Reassign I/O path to file "Volts"
FOR I = 1 to 10
Loop to transfer 10 readings to
terminal
ENTER @File; A(I)
Transfer reading to terminal
PRINT USING "#,K,/";A(I)
Display reading on terminal
NEXT I
Increment count
END
A typical return is:
5-24 System Controller Mode Operation
3.245637
3.245385
.
.
3.244967
10 readings
Storing Data to RAM
Volumes
After a RAM volume has been created on the RAM disk, you can store data from
instruments, GPIB devices, or RS-232/422 peripherals to data files on RAM
volumes. You can create nonvolatile or volatile RAM volume 1 and/or volatile
RAM volumes 0 and 2 through 16. See Chapter 4 - Managing IBASIC Files for
information on creating and using RAM volumes.
Example: Storing Data to
RAM Volume
This program shows one way to use the IBASIC computer to store instrument data
on (volatile) RAM volume 1 (RAM VOL1). As shown in Figure 5-8, an Agilent
E1410A DMM at address 80903 (a) makes 10 DC voltage measurements and sends
the results to the IBASIC computer, which are stored in array Dcv in IBASIC
memory.
The results are then sent to the RAM disk and stored in DOS data file "Volts_1" on
RAM VOL1 (b). The results are then retrieved from "Volts_1" and displayed on the
terminal (c). Note that line 330 (close I/O path) is not necessarily required, since
line 370 automatically closes the I/O path and then reopens the path.
Figure 5-8. Storing Data to a RAM Volume
5
10
20
30
40
50
60
70
80
!RE-SAVE "STOR_RAM"
! Step 1: Define Computer File/Array
!
REAL Dcv (1:10)
Dimension REAL array in
IBASIC memory
!
! Step 2: Specify MSI Device
!
INITIALIZE "DOS:MEMORY,0,1",10Initialize RAM VOL 1 to DOS
format
MASS STORAGE IS ":MEMORY,0,1"Set RAM VOL 1 as MSI
device
System Controller Mode Operation 5-25
90
100
110
120
130
140
150
160
170
180
190
200
210
220
230
240
250
260
270
280
290
300
310
320
330
350
360
370
380
390
400
410
420
5-26 System Controller Mode Operation
ON ERROR GOTO Already_Created
If DOS file "Volts_1" is already created, do not attempt to create
data file
!
! Step 3: Create Data File
!
CREATE "Volts_1",1
If not already created, create DOS file "Volts_1"
Already_Created: OFF ERROR Turn off ERROR message
!
! Step 4: Assign I/O Path to Data File
!
ASSIGN @File TO "Volts_1";FORMAT OFF
Assign I/O path to data file "Volts_1". Use FORMAT OFF since
DOS file is specified.
!
! Step 5: Enter Data into Computer File
!
FOR I = 1 to 10
Begin loop to make 10 DCV readings
OUTPUT 80903;"MEAS:VOLT:DC?"
Make 10 DCV readings
ENTER 80903; Dcv(I)
Save reading in IBASIC computer array Dcv
NEXT I
Increment count
!
! Step 6: Output Data to Data File
!
OUTPUT @File;Dcv(*)
Send data to file "Volts_1" on RAM VOL 1
!
! Step 7: Close I/O Path to Data File
!
ASSIGN @File to *
Close I/O path to "Volts_1"
! Display data on terminal
!
ASSIGN @File TO "Volts_1";FORMAT OFF
Reassign I/O path to file "Volts_1"
FOR I = 1 to 10
Loop to transfer readings to terminal
ENTER @File; A(I)
Transfer reading to terminal
PRINT USING "#,K,/";A(I)
Display reading on terminal
NEXT I
Increment count
END
1
Enabling Interrupts
and Events
Interrupts and Events
Overview
This section gives guidelines to:
•
•
•
•
Enable instrument interrupts
Enable GPIB device interrupts
Enable program branching for events
Service interrupts and events
For System Controller mode, the IBASIC computer can sense and respond to
interrupts from instruments via the IBASIC interface or from external GPIB
devices via the GPIB interface. (The IBASIC computer does not recognize
interrupts from the Serial interfaces.)
The IBASIC computer can also sense and respond to events input to the IBASIC
computer. Interrupts and events can be used to alert the IBASIC computer to
suspend its operation and to determine what service is required (see Figure 5-9).
GPIB
GPIB
GPIB
Figure 5-9. Enabling/Servicing Interrupts/Events
Interrupt and Event Types
Events and interrupts can cause the IBASIC computer to branch to a service
routine when the interrupt or event occurs. This is called event-initiated
branching. For IBASIC, the commands to enable event-initiated branching are the
ON CYCLE, ON ERROR, ON KEY, and ON TIMEOUT event commands and the
ON INTR interrupt command.
The following table summarizes the actions resulting from execution of the ON
CYCLE, ON INTR, ON ERROR, ON KEY, and ON TIMEOUT commands. For
event-initiated branching to occur, interrupts must be explicitly enabled, while
events are automatically enabled when the associated event command is executed.
System Controller Mode Operation 5-27
Command
ON CYCLE
ON ERROR
ON INTR
ON KEY
ON TIMEOUT
Conditions for
Event-Initiated Branches
Type
Event
Event
Interrupt
Event
Event
Initiates Branching When:
Specified number of seconds have elapsed
Trappable error occurs
IBASIC or GPIB interface generates interrupt
Specified terminal softkey is pressed
I/O timeout on IBASIC, GPIB, or Serial interface
Four conditions are required for an interrupt or an event to cause the IBASIC
computer program to take an event-initiated branch, as shown. In this manual, the
term "event-intiated branch" refers to a computer branch taken as a result of an
interrupt from the IBASIC or GPIB interface OR as a result of a non-interrupt
event, such as an error message or interface timeout.
•
•
•
•
Event-initiated branch is defined
Interrupt or event is enabled
Interrupt or event occurs and is logged
Interrupt priority vs. system priority
Event-Initiated Branch is Defined
For interrupts and events, you must define an event-initiated branch with an
ON-event-branch statement and create a service routine. A service routine is any
legal branch location for the type of branch specified (GOSUB, GOTO, CALL, or
RECOVER).
Interrupt or Event is Enabled
Before an event-initiated branch can be initiated by an interrupt from an IBASIC or
GPIB interface, the interface must be enabled to interrupt with an ENABLE INTR
<sc> command. Events are automatically enabled when an ON-event-branch
command (such as ON CYCLE or ON ERROR) is executed. For example:
ON INTR 8 GOSUB Chk_data
Branches to subroutine Chk_data when an interrupt occurs on
the IBASIC interface.
ON CYCLE 600 CALL Chime
Branches to subprogram Chime when the ON CYCLE event
occurs (every 10 minutes).
Interrupt or Event Occurs and is Logged
For event-initiated branching to occur, the interrupt or event must occur and be
logged by the IBASIC system. For example, if an undefined softkey is pressed but
the event has not been set up (with ON KEY) to cause an event-initiated branch,
there will be no action other than a beep to indicate an error.
Interrupt Priority is Greater than System Priority
The priority for the interrupt or event must be greater than the current system
priority as set with SYSTEM PRIORITY. See Servicing Interrupts and Events for
details on priority.
5-28 System Controller Mode Operation
Enabling Instrument
Interrupts
There are four actions required to enable an instrument to generate an interrupt to
the IBASIC computer via an IBASIC interface (see Figure 5-10):
•
•
•
•
Enable Instrument Standard Events
Enable Instrument Service Request
Enable Branching on IBASIC Interrupt
Enable IBASIC Interface Interrupts
C-size Mainframe
Figure 5-10. Enabling Instrument Interrupts
System Controller Mode Operation 5-29
Enabling Instrument
Standard Events
The first action to enable instrument interrupts is to enable the Standard Events
which can set bit 5 (ESB) of the instrument’s Status Byte Register.
Figure 5-11 shows the minimum instrument status register set for an instrument in
the mainframe. The Standard Event Status Group consists of a Standard Event
register and a Standard Event Enable register.
Figure 5-11. Instrument Status Registers
To enable the condition(s) which will set the bit 5 in the Status Byte register, use
*ESE <mask>. You can check the conditions currently enabled with the *ESR?
command. For example:
*ESE 1
Enables Operation Complete (OPC) (bit 0)
*ESE 33
Enables the OPC bit and the Command Error (CME) (bit 5)
(relative bit weights are 1 and 32).
The following table shows the Standard Event Register conditions for an instrument
which are recognized by IBASIC. If one or more bits are enabled (with *ESE) and
the Standard Event(s) occurs, bit 5 of the Status Byte register is set.
Instrument Standard Event Status Register
Bit 7
Bit 6
Bit 5
Bit 4
Bit 3
Bit 2
Bit 1
Bit 0
Not Used
by IBASIC
User
Request
(URQ)
Command
Error
(CME)
Execution
Error
(EXE)
Instrument
Dependent
(DDE)
Query Error
(QYE)
Request
Control
(RQC)
OperationCom
plete(OPC)
Value=128
Value=64
Value=32
Value=16
Value=4
Value=2
Value=1
5-30 System Controller Mode Operation
Value=8
Enabling Instrument
Service Request
The next step is to enable an Instrument Service Request (SRQ) which is generated
from the instrument’s Status Byte Register. Use *SRE <mask> to enable the
condition(s) which will generate an SRQ to the IBASIC interface. The Status Byte
register for an instrument follows.
Instrument Status Byte Register
Bit 7
Bit 6
Bit 5
Bit 4
Operation
Status Bit
(OPR)
Service
Request
(RQS)
Standard
Event Bit
(ESB)
Message
Available
(MAV)
Value=128
Value=64
Value=32
Value=16
Bit 3
Bit 2
Bit 1
Bit 0
Value=2
Value=1
Always 0
Value=8
Value=4
The Questionable Data/Signal Status Register always sends a 0 to the Status Byte
Register (bit 3). Only the "Program Running" condition of the Operation Status
Register is reflected in the Status Byte Register (bit 7). When an IBASIC program
is running, bit 7 is set; when a program is not running, bit 7 is cleared (bit 7 is
read-destructive).
Bit 6 (SRQ) is used to generate the SRQ to the IBASIC interrupt. When bits 4, 5,
or 7 are enabled AND are set true, bit 6 is set true and generates an SRQ signal to
the IBASIC interface. You can enable any combination of bits 4, 5, and 7 on the
Status Byte Register. For example:
OUTPUT 80903;"*SRE 16"
When bit 4 (MAV) of the instrument at secondary address 03
goes true, bit 6 is set and an SRQ is generated to the IBASIC
interface.
System Controller Mode Operation 5-31
Enabling Branching on
IBASIC Interrupt
When an instrument and an IBASIC interface are enabled to interrupt, the IBASIC
computer can be programmed to branch to a service routine when an interrupt is
received from the IBASIC interface.
The ON INTR 8, <priority> GOTO/GOSUB/RECOVER/CALL command defines
an event-initiated branch to be taken when an interrupt is received from the IBASIC
interface. The <priority> parameter sets the software priority for the interrupt. (See
Software Priority in this chapter for information on software priority.) For
example:
ON INTR 8 GOSUB 500
Branches program to line 500 when an interrupt is received from
the IBASIC interface. Software priority is 1 (default)
ON INTR 8,3 CALL Service
Branches program to subprogram Service on IBASIC interface
interrupt. Software priority is 3
ON INTR is disabled by DISABLE INTR or DISABLE and deactivated by OFF
INTR. When an interrupt occurs on the IBASIC interface, an implicit DISABLE
INTR is performed for the interface. Another ENABLE INTR must be performed
to re-enable the interface.
Example: Enabling
Instrument Interrupts
This example shows a way to interrupt the IBASIC computer after an Agilent
E1410A DMM has taken 10 DC voltage measurements.
10 ! RE-SAVE "INTR8"
20 COM @E1410
30 ASSIGN @E1410 TO 80904.
40 CLEAR @E1410
Get DVM’s attention
50 OUTPUT @E1410;"*CLS;*RST"
Clear status and reset hardware
60 WAIT .2
Wait for instrument reset
70 OUTPUT @E1410;"SAMPLE:COUNT 10"
Set number of readings to take
80 OUTPUT @E1410;"*ESE 1;*SRE 32"
Enable interrupt on operation complete
90 ON INTR 8 CALL Service1410
Configure routine for interrupt
100 ENABLE INTR 8;2
Enable SRQ interrupts on Select Code 8
110 OUTPUT @E1410;"INIT;*OPC"
Initiate measurements and tell instrument to set OPC bit in ESE
5-32 System Controller Mode Operation
120 !
130 ! Wait here for interrupts
140 ! to be serviced
150 !
160 LOOP
170 END LOOP
180 END
190 !
200 ! Service Routine for DVM
210 !
220 SUB Service1410
230 COM @E1410
Have access to instrument address
240 REAL Volts(1:10)
Configure variable storage
250 OUTPUT @E1410;"FETCH?"
Request measurement results
260 ENTER @E1410;Volts(*)
Enter results
270 Stats26=SPOLL(@E1410)
Clear "SRQ"
280 OUTPUT @E1410;"*ESR?"
Clear Standard Event Status Register
290 ENTER @E1410;Esr
Read status
300 FOR I=1 TO 10
310
PRINT "Volts ";I;" = ";Volts(I)
320 NEXT I
330 ENABLE INTR 8
Re-enable for next interrupt
340 OUTPUT @E1410;"INIT;*OPC"
Re-start measurement process
350 SUBEND
A typical return is:
Volts 1 = -1.052826
Volts 2 = -.8443604
.
.
Volts 10 = -.367774
10 Readings repeat until Basic Reset
System Controller Mode Operation 5-33
Enabling IBASIC Interface
Interrupts
The IBASIC interface, when enabled, can signal the computer that an instrument
interrupt has occurred. Although an instrument is enabled to send an SRQ to the
IBASIC interface, the interface must also be enabled to relay the interrupt to the
IBASIC computer. Use ENABLE INTR 8;[<mask>] or ENABLE INTR
16;[<mask>]to enable the IBASIC interface to signal an interrupt to the IBASIC
computer. The register map for the IBASIC interface follows.
IBASIC Interface Registers for Select Codes 8 and 16
Bit 15
Bit 14
Bit 13
Bit 12
Value=
16384
Bit 6
Value=
8192
Bit 5
Bit 10
End-orIdentify
(EOI)
Not Used
Value=
-32768
Bit 7
Bit 11
Value=
4096
Bit 4
Value=
2056
Bit 3
Value=64
Value=32
Value=16
Value=8
Bit 8
Not Used
Value=
1024
Bit 2
Not Used
Value=128
Bit 9
Value=4
Value=
512
Bit 1
Value=
256
Bit 0
Service
Request
(SRQ)
Not Used
Value=2
Value=1
The IBASIC interfaces (select code 8 and 16) only recognize the SRQ (Service
Request) bit (bit 1, value = 2) and EOI (End-Or-Identify) bit (bit 11, value = 2048).
Thus, to enable an IBASIC interface to generate an interrupt to the IBASIC
computer the allowable values are:
ENABLE INTR 8;2
Enables SRQ interrupts only
ENABLE INTR 8;2048
Enables EOI interrupts only
ENABLE INTR 16;2050
Enables SRQ and EOI interrupts
You can set an IBASIC interface timeout value with the ON TIMEOUT command.
With a timeout value, the computer can branch to a service routine when the
handshake response from an instrument takes longer than the timeout value. See
Using the ON TIMEOUT Event in this chapter for details.
5-34 System Controller Mode Operation
Enabling GPIB Device
Interrupts
For System Controller mode ONLY, the IBASIC computer can detect and service
interrupts from external GPIB devices via the GPIB interface (see Figure 5-12).
There are three actions required to enable an interrupt from an external GPIB device
via the GPIB interface:
• Enable GPIB Device Service Request
• Enable Branching on GPIB Interface Interrupt
• Enable GPIB Interface Interrupts
GPIB
GPIB
GPIB
GPIB
Figure 5-12. Enabling GPIB Device Interrupts
Enabling GPIB Device
Service Request
Most GPIB devices have a Status Byte Register (or equivalent) which can be
enabled to send an interrupt signal to the GPIB interface. See the device’s user
manual for information on enabling the Status Byte register to generate an interrupt
signal to the GPIB interface.
Enabling Branching on
GPIB Interrupt
When an GPIB device and the GPIB interface are enabled to interrupt, the IBASIC
computer can be programmed to branch to a service routine when an interrupt is
received from the GPIB interface. The ON INTR <sc>,
<priority>GOTO/GOSUB/RECOVER/CALL command defines an event-initiated
branch to be taken when an interrupt is received from the GPIB interface.
The <priority> parameter sets the software priority (from 1 to 15) for the interrupt.
See Software Priority in this chapter for information on software priorities. ON
INTR is disabled by DISABLE INTR or DISABLE and deactivated by OFF INTR.
NOTE
The software priority setting can affect the actions for ON INTR interrupts. See
Software Priority for details.
System Controller Mode Operation 5-35
For example:
ON INTR 7 GOSUB 500
Branches program to line 500 when an interrupt is received
from the GPIB interface (select code 7) (software priority 1)
ON INTR 7,3 CALL Service
Branches program to subprogram Service on GPIB interface
interrupt (select code 7) (software priority 3)
Enabling GPIB Interface
Interrupts
The GPIB interface Service Request (SRQ), when enabled, generates an interrupt
request to the IBASIC computer. As shown in Figure 5-13, there are two types of
interrupts: the service request (SRQ) which originates at the GPIB device, and the
hardware interrupt which indicates a specific condition at the interface.
To enable an external GPIB device to interrupt the IBASIC computer, the GPIB
interface must be enabled with an ENABLE INTR <sc>;[<mask>] command. The
following table defines the events that can cause the GPIB interface to generate an
interrupt signal to the IBASIC computer.
Figure 5-13. GPIB Interface Interrupts
5-36 System Controller Mode Operation
GPIB Status Register 4 Interrupt Status
Bit 15
Bit 14
Bit 13
Bit 12
Bit 11
Bit 10
Bit 9
Bit 8
Active Controller
Parallel Poll
Con- figuration
Change
My Talk
Address
Received
My Listen
Address
Received
EOI Received
SPAS
Remote/
Local
Change
Talker/
Listener
Address
Change
Value=-32768
Value=16384
Value=8192
Value=4096
Value=2056
Value=1024
Value=512
Value=256
Bit 7
Bit 6
Bit 5
Bit 4
Bit 3
Bit 2
Bit 1
Bit 0
Trigger Received
Handshake Error
Unrecognized
Universal
Command
Secondary
Command While
Addressed
Clear Received
Unrecognized
Addressed
Command
SRQ Received
IFC* Received
Value=128
Value=64
Value=32
Value=16
Value=8
Value=4
Value=2
Value=1
* Since the Agilent E1406 is always System Controller, this bit will never cause an interrupt
Example: Branching on
GPIB Interrupt
This program shows a way to enable branching to a service routine on interrupt
from an Agilent 3456A DVM.
10 ! RE-SAVE "INTR7"
20 REAL Reading
30 ASSIGN @Hp3456 TO 722
Assign address
40 CLEAR @Hp3456
Clear state of DVM
50 OUTPUT @Hp3456;"SM104T4"
Interrupt on measurement complete
60 ON INTR 7 GOSUB Get_reading
Configure for service branching
70 ENABLE INTR 7;2
Enable SRQ interrupt
80 TRIGGER @Hp3456
Start measurement sequence
90 !
100 ! Loop here and display count and results
110 !
120 LOOP
130 DISP Count_,Reading
140 END LOOP
150 Get_reading:!
Routine to service interrupt
160 Stats=SPOLL(@Hp3456)
Clear instrument SRQ
170 ENTER @Hp3456;Reading
Read voltage
180 Count_=Count_+1
Increment counter
190 ENABLE INTR 7
Re-enable interrupts on interface
200 TRIGGER @Hp3456
Restart measurement
210 RETURN
Return to calling program
220 END
System Controller Mode Operation 5-37
Enabling Branching
on Events
In addition to recognizing and servicing interrupts from the GPIB or IBASIC
interface, the IBASIC computer can be enabled to recognize and service events
when a predefined action occurs. With the ON-event-branch commands, the
IBASIC computer can be enabled to branch (event-initiated branching) to a line
label, line number, or subprogram when the event occurs.
Figure 5-14 shows the events and interrupts recognized by the IBASIC computer
which can initiate computer branching. See Chapter 7 - IBASIC Command
Reference for additional information on the ON-event-branch commands. See
Enabling Instrument Interrupts or Enabling GPIB Device Interrupt s for
information on computer branching on interrupts.
(GPIB)
C-size Mainframe
GPIB
GPIB
DEVICES
Figure 5-14. Interrupts/Events for Program Branching
The following table summarizes the actions resulting from execution of the ON
CYCLE, ON ERROR, ON KEY, and ON TIMEOUT commands. Recall that for
event-initiated branching to occur, interrupts must be explicitly enabled, while
events are automatically enabled when the associated event command is executed.
Events Recognized by the IBASIC Computer
Event Command
ON CYCLE <seconds>
ON ERROR
ON KEY <key selector>
ON TIMEOUT <sc>,<seconds>
5-38 System Controller Mode Operation
Initiates Progrzam Branching When:
Specified number of seconds have elapsed
Trappable error occurs
Specified terminal softkey is pressed
I/O timeout on IBASIC, GPIB, or Serial Interface
Using the ON CYCLE Event
NOTE
ON CYCLE <seconds>, [<priority>] GOTO, GOSUB, RECOVER, or CALL
initiates an event-initiated branch each time the specified number of <seconds>
has elapsed. ON CYCLE is disabled by DISABLE and is deactivated by OFF
CYCLE. If the cycle time is so short the computer cannot service it, the interrupt is
lost.
The software priority set can affect the actions for ON CYCLE events. See Software
Priority for details.
For example:
ON CYCLE 1 GOSUB One_sec
Transfers program execution to subroutine One_sec each second.
ON CYCLE 3600,3 CALL Chime
Transfers program execution to subprogram Chime once every
hour (priority = 3)
Using the ON ERROR Event
The ON ERROR GOTO, GOSUB, RECOVER, or CALL command defines and
enables an event-initiated branch which results from a trappable error. ON ERROR
has the highest priority (17) of any event-initiated branch and this priority cannot be
changed. ON ERROR can interrupt any event-initiated service routine. ON
ERROR is deactivated by OFF ERROR, but is not affected by DISABLE.
For example:
ON ERROR GOTO 1200
Transfers program execution to line 1200 when a trappable error
occurs
ON ERROR CALL Report
Transfers program execution to subprogram Report when a
trappable error occurs
Using the ON KEY Event
The ON KEY <key selector> [LABEL <prompt>], [<priority>] GOTO, GOSUB,
RECOVER, or CALL command initiates an event-initiated branch when the
specified terminal softkey is pressed.
The valid range for the <key selector> parameter is 1-7. The LABEL of any key is
bound to the current ON KEY definition, so when a definition is changed or
restored the LABEL changes accordingly. ON KEY is disabled by DISABLE,
deactivated by OFF KEY, and temporarily deactivated when the program is paused
or executing INPUT commands.
NOTE
The software priority set can affect the actions for ON KEY events. See Software
Priority for details.
System Controller Mode Operation 5-39
For example:
ON KEY 1 GOTO 150
Transfers program execution to line 150 when softkey 1 is
pressed
ON KEY 5 LABEL "Chime",3 CALL Chime
Transfers program execution to subprogram Chime (priority 3)
when softkey 5 is pressed
Using the ON TIMEOUT
Event
NOTE
The ON TIMEOUT < select code>, <seconds> GOTO, GOSUB, RECOVER, or
CALL command initiates an event-initiated branch when an I/O timeout occurs on
the IBASIC, GPIB, or Serial interface.
The IBASIC computer does not recognize the ON INTR interrupt from the Serial
interfaces (select codes 9 and 21 - 27), but does recognize the ON TIMEOUT event
for the Serial interfaces.
Since there is no default system timeout, if ON TIMEOUT is not in effect for the
interface an instrument, GPIB device, or RS-232/422 peripheral can cause the
program to wait indefinitely.
When ON TIMEOUT is in effect, the specified branch occurs if an INPUT or
OUTPUT is active on the interface and the interface has not responded within the
number of <seconds> specified.
ON TIMEOUT has an effective software priority of 16 which cannot be changed.
Timeouts apply to ENTER and OUTPUT statements, and to PRINTER IS devices
when they are external. ON TIMEOUT is deactivated by OFF TIMEOUT.
DISABLE does not affect ON TIMEOUT.
For example:
ON TIMEOUT 8, 10 GOTO 770
Causes the program to branch to line 770 if the IBASIC interface
has not responded within 10 seconds after any I/O statement
ON TIMEOUT 7,5 GOSUB Message
Causes the program to branch to subroutine Message if the GPIB
interface has not responded within 5 seconds after any I/O
statement
5-40 System Controller Mode Operation
Servicing Events and
Interrupts
For event-initiated branching to occur an interrupt or event must occur and be
logged by the IBASIC system. If an undefined softkey is pressed but the event has
not been set up with ON KEY to cause an event-initiated branch, no action (other
than a beep to indicate an error) occurs.
When the IBASIC computer receives an interrupt or event which has been set-up, if
the computer is enabled to branch (with ON INTR, ON CYCLE, etc.) the event or
interrupt will be serviced by the computer. The way interrupts and events are
serviced depends on the interrupt or event software priority and the service routine
system priority.
Example: Servicing
Interrupts and Events
This program shows a way to service interrupts from an instrument and from an
GPIB device using ON CYCLE, ON ERROR, ON KEY, and ON TIMEOUT. It
will continuously display a count and voltage. Pressing F1 prints the current MSI
catalog and returns to counting. You must do a Basic Reset to exit.
10 ! RE-SAVE "EVENTS"
20 ASSIGN @E1410 TO 80904
Assign address of E1410
30 ASSIGN @Hp3456 TO 722
Assign address of Agilent3456
40 CLEAR @E1410
Get DVM’s attention
50 OUTPUT @E1410;"*CLS;*RST"
Clear status and reset hardware
60 WAIT .2
Give time for reset
70 ON CYCLE 1 GOSUB Take_reading Interrupt every 1 second
80 ON KEY 1 LABEL "CAT" GOSUB Cat_ CAT disc on key 1 depression
90 LOOP
100 ON ERROR GOTO Over1
Set for error condition
110 PRINT 1/0
Force error
120 PAUSE
If no error, then pause
130 Over1:OFF ERROR
Turn off error branching
150 ON TIMEOUT 7,.1 GOTO Over2 Enable timeout detection on 7
160 ENTER @Hp3456;Volt
Request a reading which was not made because it was not
requested
170 PAUSE
If reading received, pause
180 Over2:! off timeout 7
Turn off timeout detection
190 DISP Count_,Dcvolt
Display E1410 reading and count
200 END LOOP
220 Take_reading:
ON CYCLE routine
230 OUTPUT @E1410;"MEAS:VOLT:DC?" Request measurement
240 ENTER @E1410;Dcvolt
Read results
250 Count_=Count_+1
Increment count
260 RETURN
Return from interrupt
270 Cat_:CAT ":,700"
280 RETURN
290 END
System Controller Mode Operation 5-41
Priority Definitions
The interrupt or event software priority is the priority assigned to an interrupt or
to an event with an ON INTR or ON-event command. The range is 1 through 15,
with 15 being the highest software priority. ON TIMEOUT has an effective
software priority of 16, while ON ERROR has an effective software priority of 17.
The priorities of ON TIMEOUT and ON EVENT cannot be changed.
The service routine system priority is the priority of the service routine currently
being executed. If no service routine is currently executing, the system priority is 0.
If a service routine is currently executing, the system priority is the same as the
software priority assigned for the routine. The system priority can be changed with
the SYSTEM PRIORITY command. See Changing System Priority in this chapter
for details.
Software Priority
An interrupt or some events can be assigned a software priority with an
ON-event-branch <priority> command, where <priority> = 1 through 15 with 15
being the highest priority. The following table shows the software priority
structure for the IBASIC system
IBASIC Software Priorities for Events and Interrupts
Event/Interrupt
ON CYCLE
ON ERROR
ON INTR
ON KEY
ON TIMEOUT
Logging Events and
Interrupts
Range
1 - 15
17
1 - 15
1 - 15
16
Notes
Highest priority - cannot be changed
Priority cannot be changed
To service interrupts or events, the IBASIC computer first logs the occurrence of an
interrupt or event which is enabled to branch (with ON INTR, ON CYCLE, etc.).
Then, the interrupt/event’s software priority is checked against the priority of the
service routine currently executing (the system priority).
If the system priority is higher than the software priority assigned to the interrupt or
event, the interrupt or event will not be serviced until the currently-executing
service routine completes.
NOTE
Example: Servicing Events
by IBASIC Computer
IBASIC only services events or interrupts at the end of a line execution.
For example, consider the following two lines of code, and assume the system
priority = 0 (no service routine currently executing).
100 ON KEY 1,3 Call Key_1
Causes the program to branch to subprogram Key_1 when
softkey k1 is pressed and assigns software priority 3 to the event
110 ON KEY 2,4 Call Key_2
Causes the program to branch to subprogram Key_2 when
softkey k2 is pressed, and assigns software priority 4 to this event.
Figure 5-15 shows a typical sequence of actions when softkey k1 is pressed and
then softkey k2 is pressed. If k2 is pressed after k1 is pressed, but while Key_1 is
5-42 System Controller Mode Operation
executing, Key_1 execution is temporarily interrupted and the Key_2 routine is
executed. When Key_2 is finished, Key_1 resumes execution where it was
temporarily interrupted. This is because softkey k2 was assigned a higher software
priority than k1.
Figure 5-15. Higher Software Priority Takes Precedence
In contrast, Figure 5-16 shows a typical sequence of actions when k1 is pressed
after k2 is pressed. In this case, Key_2 finishes execution before executing Key_1.
The event of pressing k1 is logged but not serviced until the routine with higher
software priority completes.
Figure 5-16. Lower Software Priority Event Must Wait
Changing System Priority
The system priority assigned to an executing service routine is set by the software
priority of the event or interrupt which caused the branch to the service routine. For
example, if an event has software priority 5, the service routine has system priority
System Controller Mode Operation 5-43
5 when it begins execution (the service routine has system priority 0 when not
executing).
If you do not want the service routine to be disturbed by events or interrupts of
higher software priority you can use the SYSTEM PRIORITY command to set the
system priority to a higher level than would normally occur as a result of the
computer branch. You can determine the current system priority with
SYSTEM$("SYSTEM PRIORITY") which returns a string value from 0 through
15.
Example: Changing
System Priority
For this program segment, when KEY 2 (softkey 2, software priority 2) is pressed,
the system priority for subroutine Key_2 is set to 2. To ensure that Key_2
operation is not disturbed by pressing KEY 3 (software priority 3), line 370 sets
system priority to 3 so that a priority of 4 or greater is required to interrupt the
Key_2 routine. When the routine finishes execution, the system priority is
lowered to 0.
10 ! RE-SAVE "PRIORITY"
20 ON KEY 1 LABEL "ALPHA",1 GOSUB Key_1
Pressing Key 1 starts the Key_1 routine, which displays the
letters of the alphabet.
30 ON KEY 2 LABEL "COUNT",2 GOSUB Key_2
Pressing Key 2 starts the Key_2 routine, which counts from 1 to
1000. If the Key_1 routine is running it is interrupted. The
Key_1 routine will resume after the Key_2 routine is finished.
40 ON KEY 3 LABEL "END",3 GOTO Key_3
Exit routine if Key 3 is pressed. If the Key_2 routine is running
the exit will not happen until it is finiched.
50 LOOP
Loop and wait for an interrupt
60 WAIT .2
70 A=A+1
80 END LOOP
90 Key_1:!
Key_1 routine displays the alphabet
100 FOR C=32 TO 64
110
WAIT .1
120
C$=CHR$(C)
130
DISP C$
140 NEXT C
150 RETURN
5-44 System Controller Mode Operation
160 Key_2:!
Key_2 routine counts from 1 to 1000
170 SYSTEM PRIORITY 3
180 FOR I=1 TO 1000
190
DISP I
200 NEXT I
210 SYSTEM PRIORITY 0
220 RETURN
230 Key_3:!
Key_3 routine exits thre program once the Key_2 routine stops
running.
240 DISP "End Program"
250 END
Servicing Pending
Interrupts/Events
If the IBASIC computer is interrupted while executing a program line, all interrupts
and events are logged and line execution continues until the line is completely
executed or until the line is exited as a result of a user-defined function. When the
line is exited, IBASIC begins servicing all pending interrupts/events in the
following order.
1. Highest software priority first, lowest software priority last.
2. Events with the same software priority and interface select code (such as
softkeys with the same software priority) are serviced in the order they
occurred.
Logging of other events/interrupts may still take place when current
events/interrupts are being serviced. Thus, events/interrupts of higher hardware
priority will interrupt the current activity to be logged.
Events/interrupts which also have higher software priority will interrupt the current
activity to be serviced. As a result, events/interrupts of high hardware and software
priority can potentially be serviced many times between program lines.
System Controller Mode Operation 5-45
1
Synchronizing
Instrument/Device
Operations
Controlling
Instruments/GPIB
Devices
This section gives guidelines to use the IBASIC computer in System Controller
mode to:
• Control instruments/GPIB devices
• Synchronize instruments/GPIB devices
• Pass control to external computer
For System Controller mode, the IBASIC computer can control both internal
instruments and external GPIB devices. Use OUTPUT 809ss; and ENTER 809ss; to
control instruments via the IBASIC interface, where ss=the instrument’s secondary
address.
Assuming an GPIB interface select code of 7, use OUTPUT 7ppss; and ENTER
7ppss; statements to control external GPIB devices via the GPIB interface, where
pp=the device’s primary address and ss=the device’s secondary address. Similar
results can be achieved using Select Code 16 and the message based device logical
address. The examples in this section will all use Select Code 8.
Example: Controlling
Instruments/Devices
This example shows a way to use the IBASIC computer in System Controller mode
to control an internal instrument (Agilent E1410A DMM at address 80903) and an
external GPIB device (an Agilent 3457A DMM at address 722) to make DC voltage
measurements. See Figure 5-17 for typical connections.
C-size Mainframe
GPIB
PORT
Figure 5-17. Controlling Instrument Devices
5-46 System Controller Mode Operation
5 !RE-SAVE "GPIB_INS"
10 ASSIGN @E1410 to 80903
Assign I/O path to Agilent E1410A
20 ASSIGN @Hp3457 to 722
Assign I/O path to Agilent 3457A DMM
30 OUTPUT @E1410;"MEAS:VOLT:DC?"
Make DCV measurement with Agilent E1410A DVM
40 ENTER @E1410;A
Enter Agilent E1410A DVM measurement
50 PRINT "Agilent E1410A Voltage = ";A
Display E1410A measurement
60 OUTPUT @Hp3457;"PRESET"
Sets Agilent 3457A DVM to DC volts, autoranging, and
synchronous trigger. The reading is then automatically triggered
by the ENTER: command.
70 ENTER @Hp3457;B
Triggers and enters Agilent 3457A DVM measurement
80 PRINT "Agilent 3457A Voltage = ";B
Display Agilent 3457A measurement
90 END
A typical return is:
Synchronizing
Instrument/Device
Operations
With System Controller mode, several methods are available to synchronize
operations among instruments, GPIB devices, and the IBASIC computer. Four ways
to synchronize instruments and devices discussed in this section are to use:
•
•
•
•
Synchronization Using Ports
Agilent E1410A Voltage = 2.343657
Agilent 3457A Voltage = 3.241458
Agilent E1406 Ports
The IBASIC computer
The *OPC? command
The *OPC command
For System Controller mode, the IBASIC computer and the Agilent E1406 TRIG
OUT and EVENT IN ports can be used to synchronize operations between
instruments and GPIB devices. (See the E1406A Command Module User’s Manual
for an explanation of TRIG OUT and EVENT IN port operations.)
System Controller Mode Operation 5-47
Example: Synchronization
Using Ports
This program uses the Agilent E1400 Trig Out and Event In ports to synchronize an
external multimeter (Agilent 3457A at address 722) to an internal multimeter
(Agilent E1410A and Agilent E1345A multiplexer at address 80914). Since
synchronization is independent of the IBASIC computer, readings must be stored in
Agilent 3457A reading memory. See Figure 5-18 for typical connections.
C-size Mainframe
Figure 5-18. Synchronizing Using Ports
The sequence of operation is:
1. INIT (line 50) closes multiplexer channel number 100.
2. Channel 100 closure generates a pulse at the Trig Out port that triggers the
multimeter to take a reading.
3. When the reading is complete, the reading is stored in multimeter memory.
4. The multimeter then outputs a pulse from its Voltmeter Complete port to the
Event In port on the Agilent E1406. This pulse signals the multiplexer to
advance to the next channel in the scan list.
5. Steps (2) - (4) are repeated until all channels have been scanned.
10 ! RE-SAVE "PORTSYNC"
20 DIM A(15)
30 CLEAR 722
Clear GPIB voltmeter
40 OUTPUT 722;"PRESET"
Preset voltmeter to known state
50 OUTPUT 722;"MEM FIFO"
Set voltmeter memory for first-in first-out operation
60 OUTPUT 722;"TBUFF ON"
Turn voltmeter trigger buffer ON
70 OUTPUT 722;"TRIG EXT"
Set voltmeter to look for external trigger
80 OUTPUT 722;"NRDGS 1,AUTO"
Set number of readings per trigger to one
90 OUTPUT 80914.;"*RST"
Reset multiplexer
5-48 System Controller Mode Operation
100 OUTPUT 80914.;"OUTP ON"
Activate trigger output on action complete
110 OUTPUT 80914.;"TRIG:SOUR EXT"
Set multiplexer trigger source to external
120 OUTPUT 80914.;"SCAN:PORT ABUS"
130 OUTPUT 80914.;"SCAN (@100:115)"
Set up multiplexer scan
140 OUTPUT 80914.;"*OPC?"
Ask for operation complete indication
150 ENTER 80914.;B
Wait for operation complete
160 OUTPUT 80914.;"INIT"
Initiate scanning sequence
170 ENTER 722;A(*)
Read data array from voltmeter
180 FOR I=0 TO 15
190 PRINT A(I)
Display data
200 NEXT I
210 END
Synchronization Using
IBASIC Computer
Example: Synchronization
Using IBASIC Computer
The IBASIC computer can be used to provide synchronization to instruments or
GPIB devices by triggering the instrument or device via the Agilent E1406 TRIG
OUT port.
This program uses the Agilent E1406 Trig Out port to synchronize an external
GPIB device (Agilent 3457A DVM at address 722) to an internal instrument
(Agilent E1345A multiplexer at address 80914). The IBASIC computer enters each
reading and sends a TRIGGER command to advance the multiplexer to the next
channel in the scan list. See Figure 5-19 for typical connections.
C-size Mainframe
Figure 5-19. Synchronizing Using a Computer
System Controller Mode Operation 5-49
The sequence of operation is:
1. INIT (line 50) closes multiplexer channel number 100.
2. Channel 100 closure causes a pulse on Trig Out port that triggers the
multimeter to take a reading.
3. When the reading is complete it is sent to the IBASIC computer (line 70).
4. The IBASIC computer sends the TRIGGER command (line 90) to the
multiplexer, which advances it to the next channel in the scan list.
5. Steps (2) - (4) are repeated until all channels have been scanned and all
readings taken.
5 !RE-SAVE "COMPSYNC"
10 OUTPUT 722;"TRIG EXT;DCV"
Set DVM to external trigger, DC voltage measurements
20 OUTPUT 80914;"OUTP ON"
Enable TRIG OUT port
30 OUTPUT 80914;"TRIG:SOUR BUS"
Set multiplexer to advance scan on TRIGGER
40 OUTPUT 80914;"SCAN (@100:110)"
Specify scan list (channels 100 to 110)
50 OUTPUT 80914;"INIT"
Close first channel (starts scanning cycle)
60 FOR I=1 TO 10
Loop 10 times
70
ENTER 722;A
Enter reading (IBASIC computer waits until reading taken and
received)
80
PRINT A
Display reading on terminal
90
TRIGGER 80914
Trigger multiplexer to advance to next channel
100 NEXT I
Increment count
110 END
5-50 System Controller Mode Operation
Synchronization Using
*OPC?
The *OPC? command causes a specified instrument to place an ASCII "1" in the
instrument’s Output Queue (see Figure 5-11) when all pending operations (such as
making voltage measurements or outputting a voltage) are complete.
By requiring the IBASIC computer to read the *OPC? response before continuing
program execution, you can provide synchronization between one or more
instruments and the IBASIC computer.
Example: Synchronization
Using *OPC?
This program uses the *OPC? (operation complete query) command to synchronize
operations between two instruments and the IBASIC computer. The example uses
an Agilent E1328A D/A Converter module (DAC) at address 80909 and an Agilent
E1410A DMM at address 80903.
The application requires the DAC to output a voltage to a device under test (DUT).
After the voltage is applied, the DMM measures the response from the DUT. Using
the *OPC? command ensures the voltage measurement will be made only after the
voltage is applied by the DAC. See Figure 5-20 for typical connections.
C-size Mainframe
Figure 5-20. Synchronizing Using *OPC?
5 !RE-SAVE "OPCSYNC"
10 OUTPUT 80909;"SOUR:VOLT1 5;*OPC?"
Configure DAC to output 5V on channel 1. Place a "1" in the
DAC’s Output Queue when done.
20 ENTER 80909;A
Wait for *OPC? response from
DAC
30 OUTPUT 80903;"MEAS:VOLT:DC?"Measure DC voltage on DUT
with DMM
40 ENTER 80903;A
Enter DUT voltage reading
50 PRINT "DUT Voltage =";A
Display DUT voltage reading
60 END
System Controller Mode Operation 5-51
Synchronization Using *OPC
The *OPC command causes the specified instrument to set bit 0 (Operation
Complete) in its Standard Event Register (see Figure 5-11) when all pending
operations for the instrument are complete.
By enabling the Operation Complete bit in the Standard Event Register (with *ESE
1); bit 5 of the Status Byte Register (with *SRE 32); an IBASIC interface interrupt
(with ENABLE INTR 8); and an event-initiated branch (with ON INTR 8), the
computer can do other operations while waiting for the interrupt to occur (when
instrument operations are complete).
Although either *OPC or *OPC? can be used for synchronization, the advantage of
using *OPC is that the computer can do other operations while waiting for the
response caused by *OPC. However, when using *OPC the Operation Complete bit
(bit 0) in the Standard Event Register must be the only bit enabled. If other bits are
also enabled, this method may not work properly.
Example: Synchronization
Using *OPC
This example uses an Agilent E1328A D/A Converter module (DAC) at address
80909 and an Agilent E1410A DMM at address 80903. The application requires the
DAC to output a voltage to a device under test (DUT). After the voltage is applied,
the DMM measures the response from the DUT. See Figure 5-21 for typical
connections.
C-size Mainframe
Figure 5-21. Synchronizing Using *OPC
In contrast to the *OPC? example, this program uses the *OPC command to
synchronize the IBASIC computer and the two instruments. The advantage of using
*OPC rather than *OPC? is the IBASIC computer can do other operations while
waiting for the instrument(s) to complete operations.
However, for this method the Operation Complete bit (bit 0) must be the only
enabled bit in the Standard Event Status Register (*ESE 1). If other bits (such as
error bits) are enabled, this method may not work properly.
5-52 System Controller Mode Operation
10
20
!RE-SAVE "OPCSYNC2"
OUTPUT 80909;"*CLS"
Clear all status structures on DAC
30 OUTPUT 80909;"*ESE 1"
Enable Standard Event Register OPC bit (bit 0)
40 OUTPUT 80909;"*SRE 32"
Enable Status Byte Register ESB bit (bit 5) to send SRQ when
DAC completes operations
50 OUTPUT 80909;"SOUR:VOLT1 5;*OPC"
Configure DAC, set Operation Complete bit when done
60 ON INTR 8 GOTO Meas
Branch to Meas (line 80) when DAC operations complete
70 ENABLE INTR 8;2
Enable IBASIC interface to interrupt on SRQ
80 LOOP
90 ! (Computer can do other operations here)
100 END LOOP
110 Meas: !
120 OUTPUT 80903;"MEAS:VOLT:DC?"
Measure DC voltage with DMM
130 PRINT "DUT Voltage =";A
Display reading on terminal
140 END
Passing Control to
External Computer
For proper GPIB operation, only one computer on the GPIB can be the System
Controller. However, one computer can be the System Controller while another
computer is the Active Controller. For System Controller mode only, the IBASIC
computer wakes up as the System Controller and the Active Controller.
Thus, for System Controller mode the Active Controller function can be passed
from the IBASIC computer to an external computer via the GPIB interface with the
PASS CONTROL command. In general, the external computer should not be set for
System Controller function when using PASS CONTROL. This permits IBASIC to
perform a RESET or ABORT 7 to regain Active Controller function.
Example: Passing Control
to External Computer
This example shows a way to use the IBASIC computer as the Active Controller to
store data in the external GPIB hard disk and then pass Active Controller function
to an external computer so that the data can be transferred to the external computer.
For this program, System Controller mode must be set and the external computer
(HP 9000 Series 200/300 computer with GPIB interface 7) should be set for
Non-System Controller function. See Figure 5-22 for typical connections.
System Controller Mode Operation 5-53
C-size Mainframe
GPIB
PORT
GPIB
Figure 5-22. Passing Control
Run this program first in the HP 9000 Series 200/300 computer:
10
20
30
! RE-SAVE "PASSCTL2"
REAL Volts(1:10)
Create array for readings
ON INTR 7 GOTO Have_control
Set up branch on PASS CONTROL
40 ENABLE INTR 7;-32768.
Enable detection of PASS CONTROL
50 !
60 ! Wait here until control passed
70 !
80 LOOP
90
DISP "WAITING FOR CONTROL ";Count_
100 Count_=Count_+1
110 END LOOP
120 Have_control:OFF INTR 7
Deactivate interrupt
130 ASSIGN @File TO "DATA1:,700" Set up path to file
140 ASSIGN @Comp709 TO 709
Set up path to Command Module
150 ENTER @File;Volts(*)
Read data from file
160 ASSIGN @File TO *
Close data file
170 FOR I=1 TO 10
Print selected results
180 PRINT Volts(I)
190 NEXT I
200 PASS CONTROL @Comp709
Return control
210 DISP "DONE"
220 END
5-54 System Controller Mode Operation
Run this program second in the IBASIC computer:
10 ! RE-SAVE "PASSCTL1"
20 REAL Volts(1:10)
Create array for readings
30 ON ERROR GOTO Already_there
If already created then skip
40 CREATE BDAT "DATA1:,700,0",50 Create data file
50 Already_there:!
60 ASSIGN @File TO "DATA1:,700,0" Set up path to file
70 ASSIGN @E1410 TO 80903.
Set up path to DVM
80 ASSIGN @Comp721 TO 721
Set up path to HP Series 200/300
90 CLEAR @E1410
Get the DVM’s attention
100 OUTPUT @E1410;"*CLS;*RST"
Clear its status and reset hardware
110 WAIT .2
Give it time to reset
120 OUTPUT @E1410;"SAMPLE:COUNT 10"
Configure for 100 measurements
130 OUTPUT @E1410;"INIT;:FETCH?"
Initiate and retrieve measurements
140 ENTER @E1410;Volts(*)
Read measurements in array
150 OUTPUT @File;Volts(*)
Store measurements to file
160 ASSIGN @File TO *
Close file
170 ON INTR 7 GOTO Active_control
Set up branch for PASS CONTROL
180 ENABLE INTR 7;-32768.
Enable detection of PASS CONTROL
190 PASS CONTROL @Comp721
Pass control to HP Series 200/300
200 !
210 ! Wait until other computer passes control back
230 LOOP
240 DISP "WAITING FOR CONTROL ";Count_
250 Count_=Count_+1
260 END LOOP
270 !
280 Active_control:OFF INTR 7
Deactivate interrupt
290 DISP "CONTROL RETURNED"
300 ASSIGN @File TO "DATA1:,700,0""
Set up path to file
310 ENTER @File;Volts(*)
Read data from file into array
320 ASSIGN @File TO *
Close file
330 FOR I=1 TO 10
Print selected results
340 PRINT Volts(I)
350 NEXT I
360 DISP "DONE"
370 END
System Controller Mode Operation 5-55
5-56 System Controller Mode Operation
Chapter 6 Contents
Using This Chapter
6-1
Talk/Listen Mode Overview 6-1
Using PROGram Commands6-4
Downloading and Uploading IBASIC Programs . . . . . . . . . . . . . . . . . . . . . . 6-4
Controlling/Querying Programs . . . . . . . . . . . . . . . . . . . . . . . . . . . . . . . 6-8
Controlling Instruments
6-10
Assigning Instruments to Interfaces . . . . . . . . . . . . . . . . . . . . . . . . . . . . . 6-10
Controlling Instruments with IBASIC Computer . . . . . . . . . . . . . . . . . . . . . . 6-11
Controlling Instruments with External Computer . . . . . . . . . . . . . . . . . . . . . . 6-11
Controlling RS-232/422 Peripherals 6-12
Storing/Retrieving Data
6-12
Enabling Interrupts and Events 6-13
Synchronizing Instrument/Device Operations 6-14
Synchronize Instruments Using IBASIC Computer . . . . . . . . . . . . . . . . . . . . . 6-14
Synchronize Instruments Using Two Computers . . . . . . . . . . . . . . . . . . . . . . 6-14
Chapter
6
Talk/Listen Mode Operation
Using This Chapter
This chapter gives guidelines to use Talk/Listen mode operation to:
•
•
•
•
•
•
NOTES
Use PROGram commands
Control instruments
Control RS-232/422 peripherals
Store/retrieve data to memory
Enable instrument interrupts and events
Synchronize instrument operations
This chapter does not show how to use an external computer to control external
GPIB devices. See your computer manual for these applications.
All example programs in this chapter are written for an HP 9000 Series 200/300 (or
equivalent) computer. If you use a different computer, see your computer manual
for possible syntax differences.
In this chapter, the term "external computer" means any computer which is
compatible with GPIB operation, such as an HP 9000 Series 200/300 computer or
equivalent. The term "GPIB computer" also refers to the external computer.
1
Talk/Listen Mode
Overview
Figure 6-1 shows typical functions for Talk/Listen mode operation. Talk/Listen
mode is very similar to System Controller mode except that System Controller
mode allows more IBASIC computer functions.
With Talk/Listen mode you can control instruments using both an external
computer via the GPIB interface and the IBASIC computer via the IBASIC
interface. However, you cannot access any external GPIB devices (including the
disk drives) from the IBASIC computer while in Talk/Listen mode. In System
Controller mode an external computer cannot be used for instrument control
directly but you can access external GPIB devices (including the disk drives) using
the IBASIC computer.
Talk/Listen Mode Operation 6-1
C-size Mainframe
GPIB
GPIB
GPIB
(GPIB )
GPIB
709ss
Figure 6-1. Talk/Listen Mode Operation
6-2 Talk/Listen Mode Operation
Using PROGram Commands
With Talk/Listen mode, you can create programs on an external computer and
download a program to the IBASIC computer. Only one program at a time can be
resident in the IBASIC computer. The downloaded program can be queried and
controlled using the PROGram subsystem commands.
Controlling Instruments
For Talk/Listen mode, the IBASIC computer or the external computer can control
an instrument. At any one time, an instrument can be assigned to the external
computer, to the IBASIC computer, or unassigned (not assigned to either).
You can use the ABORT, CLEAR, LOCAL, LOCAL LOCKOUT, REMOTE,
SPOLL, and TRIGGER commands to control an assigned instrument’s state from
the external computer or from the IBASIC computer. (PASS CONTROL is not
supported in Talk/Listen mode.)
Controlling RS-232/422 Peripherals
For Talk/Listen mode, when the interface is assigned to IBASIC you can control
external RS-232 peripherals via the built-in RS-232 interface or control external
RS-232 and RS-422 peripherals via Agilent E1324A plug-in module interfaces.
Storing/Retrieving Data
For Talk/Listen mode, the IBASIC computer can store/retrieve data to IBASIC
memory and to RAM volumes, but not to the 20 MByte hard disk or the 3.5 inch
disk.
Enabling Interrupts and Events
For Talk/Listen mode, the IBASIC computer can detect and service interrupts from
the IBASIC interfaces and from defined events, but not from external GPIB devices.
Synchronizing Instrument Operations
For Talk/Listen mode, the IBASIC computer can synchronize operations between
instruments, but not between instruments and external GPIB devices. You can also
synchronize instruments operations using both the IBASIC computer and an
external computer.
Talk/Listen Mode Operation 6-3
1
Using PROGram
Commands
With Talk/Listen mode, you can download a program created on an external
computer (HP 9000 Series 200/300 or equivalent) to the IBASIC computer and
control/query the downloaded program using the PROGram subsystem commands.
Only one program at a time can be downloaded to the IBASIC computer. Figure 6-2
shows the main functions and associated PROGram subsystem commands to
download and control/query IBASIC programs.
C-size Mainframe
GPIB
GPIB
Figure 6-2. Using PROGram Subsystem Commands
Downloading and
Uploading IBASIC
Programs
Programs created on an HP 9000 Series 200/300 (or equivalent) computer can be
downloaded to the IBASIC computer using PROGram:DEFine commands and can
be uploaded from the IBASIC computer using the PROGram:DEFine? command.
The path to download programs is from the external computer to the IBASIC
instrument (address 70930) via the GPIB interface. The IBASIC instrument accepts
the program lines from the external computer and sends the "shell" IBASIC
program to the IBASIC computer.
Downloading Programs
Program lines are downloaded to the IBASIC computer using indefinite length
block parameters. For indefinite length block data, END must immediately follow
the last byte of block data to force termination of the program message.
For example, OUTPUT @IBASIC;"PROG:DEF #0" indicates that the program
lines which follow are to be sent in indefinite block parameter format. Thus, an
END statement is required after the last line of the program to be downloaded.
6-4 Talk/Listen Mode Operation
Example: Downloading
Program Lines to IBASIC
Computer
This program shows one way to download program lines to the IBASIC computer
from an HP 9000 Series 300 computer. The actual program to be stored in the
IBASIC computer (downloaded in lines 140 to 170) is:
10 FOR I = 1 TO 100
20
PRINT I
30 NEXT I
40 END
The program listing is:
90 !RE-SAVE "DOWNLD1"
100 ASSIGN @IBASIC to 70930
Assign I/O path to IBASIC instrument from GPIB computer
110 CLEAR @IBASIC
Clear IBASIC instrument
120 OUTPUT @IBASIC;"*RST;*CLS;PROG:DEL:ALL"
Reset IBASIC instrument, and delete any downloaded program
130 OUTPUT @IBASIC;"PROG:DEF #0"
Program lines to be downloaded in indefinite length block format
140 OUTPUT @IBASIC;" 10 FOR I = 1 TO 100"
First line of downloaded program
150 OUTPUT @IBASIC;" 20
PRINT I"
160 OUTPUT @IBASIC;" 30 NEXT I"
170 OUTPUT @IBASIC;" 40 END" END
Last line of downloaded program with EOI asserted
180 END
NOTE
Example: Downloading
Previously Stored Programs
This program only downloads the code to the IBASIC computer. You must run the
program from the IBASIC computer.
The previous downloading program example is acceptable for a small program.
However, for a large program or one which has been previously stored, typing the
line entries may be cumbersome or time-consuming. This example shows a way to
download the same previously-stored program from an HP 9000 Series 300
computer to the IBASIC computer.
The file (called DOWNLD3 in the program) is assumed to be stored on floppy disk.
To use this program, substitute the file name you want to download in place of
DOWNLD3 in line 30.
In the program, lines 10 through 40 dimension an array and assign I/O paths, while
lines 80 through 100 configure the IBASIC instrument to accept the program to be
downloaded (downloading format is indefinite length block parameter).
Lines 110 through 150 takes one program line at a time from DOWNLD3 and sends
it to the IBASIC computer, until all program lines are transferred, and the program
Talk/Listen Mode Operation 6-5
then goes to Done. Line 210 lists the downloaded program lines on the IBASIC
display, line 220 runs the program, and line 230 closes the I/O path to DOWNLD3.
5
10
20
30
40
50
60
80
90
100
110
120
130
140
150
160
170
180
190
210
220
230
240
!RE-SAVE "DOWNLD4"
DIM In$[160]
Dimension array In$ long enough for IBASIC program line
ASSIGN @IBASIC to 70930.
Assign IBASIC instrument to Series 300 computer
ASSIGN @File TO "DOWNLD3:,700,1";FORMAT ON
Assign I/O path to file "DOWNLD3"
ON END @File GOTO Done
!
! Configure IBASIC for downloaded program
CLEAR @IBASIC
Clear IBASIC instrument
OUTPUT @IBASIC;"*RST;*CLS;PROG:DEL:ALL"
Reset/clear IBASIC instrument, and delete program in IBASIC
computer.
OUTPUT @IBASIC;"PROG:DEF #0"
Send program lines in indefinite length block parameter form
LOOP
In$=" "
ENTER @File;In$
OUTPUT @IBASIC;In$
END LOOP
Done: !
OUTPUT @IBASIC;" " END
END required for indefinite length block parameter form
!
! List and run downloaded program
OUTPUT @IBASIC;"PROG:EXEC ’LIST’"
Program lists on current display system connected to IBASIC
OUTPUT @IBASIC;"PROG:STATE RUN"
ASSIGN @File TO *
END
The contents of DOWNLD3are:
5
10
20
30
40
6-6 Talk/Listen Mode Operation
!RE-SAVE "DOWNLD3"
FOR I = 1 TO 100
PRINT I
NEXT I
END
Uploading Programs
To upload a program from the IBASIC computer to an external computer, use
OUTPUT 70930;"PROGram:DEFine?" followed by ENTER statements to the
external computer. Program lines from downloaded IBASIC programs are uploaded
to the external computer in definite length block response data format.
Example: Uploading
Program Lines
This example uploads the previous 4-line IBASIC program from the IBASIC
computer and prints it on the IBASIC display.
10 ! RE-SAVE "UPLOAD2"
20 DIM In$[160]
Allocate for max length line
30 ASSIGN @IBASIC TO 70930.
Set path to IBASIC instrument
40 CLEAR @IBASIC
Get IBASIC’s attention
50 OUTPUT @IBASIC;"PROG:DEF?" Request program upload
60 !
70 ! Now strip off the Definite Length Block Header
80 !
90 ENTER @IBASIC USING "#,A";Pound$[1,1] Read the #
100 ENTER @IBASIC USING "#,A";Length$[1,1]
110 Length=VAL(Length$[1,1])
120 FOR I=1 TO Length
130
ENTER @IBASIC USING "#,A";N$[I,I]
140 NEXT I
150 !
160 ! The remainder of upload is actual program lines separated
170 ! by CR/LF and terminated with EOI on LF. Enable interrupt
180 ! on recognizing EOI with last request.
190 !
200 ON INTR 7 GOTO Done
Enable branch on Interrupt
210 ENABLE INTR 7;2048
Enable EOI interrupt
220 LOOP
Loop until EOI received
230 ENTER @IBASIC;In$
240 PRINT In$
250 END LOOP
260 Done: !
270 END
The actual program listing, which must be in the IBASIC computer, is:
10
20
30
40
Controlling/Querying
Programs
FOR I = 1 TO 10
PRINT I
NEXT I
END
In addition to downloading and uploading IBASIC programs, the PROGram
subsystem commands can be used to control and query downloaded programs. A
summary of the PROGram commands follows. See Chapter 8 - SCPI Command
Reference for further information on the PROGram subsystem commands.
Talk/Listen Mode Operation 6-7
Naming IBASIC Programs
Cataloging IBASIC
Programs
Deleting IBASIC Programs
Assigning Values to
Program Variables
Only one program can be resident in the IBASIC computer at a time. If desired, you
can name the program with PROGram:NAME and return the program name with
the PROGram:NAME? command. If a downloaded program has a name,
PROGram:NAME? returns the name. If the program is not named or a program is
not downloaded, PROGram:NAME? returns "PROG".
You can also use the PROGram:CATalog? command to see if a progam already
exists. If the program exists, PROGram:CATalog? returns the name. If no program
has been created, PROGram:CATalog? returns the null string (""). A program can
be created with PROG:DEF# or by typing in any IBASIC command from the
Display system connected to IBASIC.
Use PROGram:DELete:ALL to delete a downloaded IBASIC program from
IBASIC memory. A downloaded program in the RUNning state cannot be deleted.
Sending PROGram:DELete:ALL when the program is running results in a
"PROGRAM CURRENTLY RUNNING" error and the program is not deleted. You
can use PROG:STATE STOP to stop the program before sending PROG:DEL:ALL.
When a variable is defined in a downloaded program, you can assign a value to the
variable using PROGram:NUMBer <varname>,<nvalue> from an external
computer. PROGram:NUMBer? will return the current value of the variable. If
<varname> is longer than 12 characters, a delimiter (’) is required. For example:
OUTPUT 70930;"PROG:NUMB B,10"
Assigns value 10 to variable B
OUTPUT 70930;"PROG:NUMB ’number_devices’,1"
Assigns value of 1 to number_devices. Delimiter required since
variable name is longer than 12 characters.
Set Contents of Program
Strings
When a string variable or array is defined in a downloaded program, you can use
PROGram:STRing <varname>,<svalue> to set the contents of the variable or array.
You can use PROGram:STRing? to return the current contents of the variable or
array. For example:
OUTPUT 70930;"PROG:STR B, ’B = Result’"
String assigned to variable B$ is ’B = Result’
Assigning IBASIC Memory
Space
If required, you can use PROGram:MALLocate <nbytes>|DEFault to reserve
IBASIC memory space for subroutine stack space and variables other than COM
variables. When DEFault is specified, the Agilent E1406 calculates the amount of
space required. You can use PROGram:MALLocate? to return the amount of space
currently allocated, when the IBASIC program is STOPped .
Using Program Wait
PROGram:WAIT and PROG:WAIT? cause the IBASIC instrument to wait until the
current operation is complete before executing the next command. For example:
10
20
30
6-8 Talk/Listen Mode Operation
OUTPUT 70930;"PROG:DEF #0" END
Defines a zero-length program so commands can be sent to the
IBASIC computer
OUTPUT 70930;"PROG:EXEC ’WAIT 5’;WAIT?"
Wait 5 seconds, then WAIT? returns a "1"
ENTER 70930;Value
Returns 1 to indicate end of WAIT time
NOTE
Setting SRQ at Program End
Using *WAI or *OPC? for this example will not work, since *WAI or *OPC? will
not wait for the IBASIC computer to finish its command, but will only wait for the
IBASIC instrument to read and send the command.
On occation you may wish to generate an SRQ (Service ReQuest) when a program
ends, so that you can continue with another routine, notify the operator, etc. The
following program segment should be run from the external computer after you
have downloaded a program to the IBASIC controller, and will accomplish this:
!Download the program you wish to run to the IBASIC controller
!Set up the controller to recognize SRQ. This program would be
100 OUTPUT @IBAS; "*ESE 1;*SRE 32"
Set the controller to generate an SRQ on OPC (OPeration
Complete)
200 OUTPUT @IBAS;"PROG:STATE RUN"
Run the program
300 OUTPUT @IBAS;"PROG:WAIT;*OPC"
Wait for program to end and set OPC
!Continue with the rest of your program
Setting Program State
Executing IBASIC
Commands
PROGram:STATe RUN|PAUSe|STOP|CONTinue sets the state of a downloaded
program, and PROGram:STATe? returns the current state of the program. See the
PROGram:STATe command in Chapter 8 - SCPI Command Reference for the
effects of changing program states.
PROGram:EXECute <’program_command’> executes the IBASIC command
specified. However, PROGram:EXECute ’RUN’ will not be executed if a
downloaded program is currently running. For example:
OUTPUT 70930;"PROG:EXEC: ’LIST’"
Lists the program lines of a downloaded program
OUTPUT 70930;"PROG:EXEC: ’RUN’"
Causes a program not in RUNning state to run
Storing Downloaded
Programs
Programs which have been downloaded to the IBASIC computer can be stored in a
non-volatile RAM volume and used for autostarting. See Chapter 2 - Creating and
Editing Files for details.
For Talk/Listen mode, the IBASIC computer cannot address an GPIB disk, so
downloaded programs cannot be stored on these disks. The program to be
downloaded can be stored in the disks from an external computer, retrieved by the
external computer, and then downloaded via the PROGram subsystem commands.
See Chapter 8 - SCPI Command Reference for information on the PROGram
commands.
Talk/Listen Mode Operation 6-9
1
Controlling
Instruments
For Talk/Listen mode, instruments (plug-in module instruments, the System
instrument, and the IBASIC instrument) can be controlled by an external computer
via the GPIB interface or by the IBASIC computer via the IBASIC interfaces (see
Figure 6-3).
C-size Mainframe
GPIB
GPIB
GPIB
(GPIB)
GPIB
GPIB
Figure 6-3. Instrument Control - Talk/Listen Mode
Assigning Instruments
to Interfaces
An instrument can be controlled by only one interface at a time. For an interface to
control an instrument, the instrument must first be assigned to the interface. An
instrument can be assigned to GPIB, select code 8, select code 16, or can be
unassigned (assigned to no interface).
Any combination of instruments can be assigned or unassigned. For example, an
Agilent E1410A voltmeter instrument could be assigned to the GPIB interface and
an Agilent E1332A counter instrument assigned to the IBASIC select code 8
interface at the same time.
In Figure 6-3, the System instrument is shown assigned to the IBASIC select code 8
interface, the module instruments are shown as unassigned, and the IBASIC
instrument is shown assigned to the GPIB interface.
Select code 16 can acquire only message based instruments. Since neither the
SYSTEM or IBASIC are message based, they cannot be controlled using select
code 16.
6-10 Talk/Listen Mode Operation
GPIB and IBASIC can arbitrate between secondary address instruments only. It is
possible to program an instrument from both select code 8 and select code 16 if it
has both a secondary and logical address. Please see Synchronizing
Instrument/Device Operations later in this chapter for more information on
handling this type of arbitration. To minimize arbitration problems, select code 16
should be used only for devices at non-secondary addresses.
NOTE
Controlling
Instruments with
IBASIC Computer
NOTE
Controlling
Instruments with
External Computer
You will usually not need to assign instruments unless you use an external
computer and the IBASIC computer to control of the same instrument. See
Synchronizing Instrument/Device Operations to assign instruments to computers for
two-computer operation.
For Talk/Listen mode, controlling instruments with the IBASIC computer is
identical to that for System Controller mode. See Controlling Instruments/GPIB
Devices in Chapter 5 - System Controller Mode Operation for more information
and examples.
For Talk/Listen mode, the IBASIC computer is not connected to the GPIB interface,
so external GPIB devices cannot be controlled by the IBASIC computer in
Talk/Listen mode.
As shown in Figure 6-3, with Talk/Listen mode an external computer (such as an
HP 9000 Series 200/300 computer) can control instruments via the GPIB interface.
For an HP 9000 Series 200/300 computer, use OUTPUT 709ss; and ENTER 709ss;
statements to communicate with an instrument at secondary address ss.
See the appropriate Agilent 75000 Plug-In Module User Manual for information to
control an instrument from an external computer when an HP 9000 Series 200/300
(or equivalent) computer is used. See the appropriate plug-in manual and your
computer manual to control instruments from an external computer if you use
another computer.
You can also control instrument states with the ABORT, CLEAR, LOCAL,
LOCAL LOCKOUT, REMOTE, SPOLL, and TRIGGER commands. See Using the
GPIB/IBASIC Interfaces in Chapter 5 - System Controller Mode Operation for
details.
Talk/Listen Mode Operation 6-11
1
Controlling
RS-232/422
Peripherals
In Talk/Listen mode (and in System Controller mode), the IBASIC computer can
control external RS-232C peripherals via the built-in RS-232 interface (interface
select code 9) or via an RS-232 or RS-422 interface on an Agilent E1324A Data
Communications module (interface select codes 21 through 27).
NOTE
Controlling RS-232/422 peripherals is identical to the operation for System
Controller mode. See Controlling RS-232/422 Peripherals in Chapter 5 - System
Controller Mode Operation for information and examples.
1
Storing/Retrieving
Data
NOTE
For Talk/Listen mode, data collected from instruments or external RS-232/422
peripherals can be stored in IBASIC memory or in RAM volumes.
Storing data to IBASIC memory or to RAM volumes is identical to the operation
for System Controller mode. See Storing/Retrieving Data in Chapter 5 - System
Controller Mode Operation for information and examples.
With Talk/Listen mode, the IBASIC computer cannot access an GPIB SS-80 disk
or tape drive and an external computer must be used to store data from external
GPIB devices to the disks. See your computer manual for procedures to store data
to the internal disks.
C-size Mainframe
Figure 6-4. Storing/Retrieving Data
6-12 Talk/Listen Mode Operation
1
Enabling Interrupts
and Events
NOTE
With Talk/Listen mode the IBASIC computer can detect and service an interrupt
from the IBASIC interface and the ON CYCLE, ON ERROR, ON KEY, and ON
TIMEOUT events (see Figure 6-5). However, with Talk/Listen mode the IBASIC
computer cannot detect or service interrupts from the GPIB interface.
Enabling instrument interrupts and events is identical to the operation for System
Controller mode. See Enabling Interrupts and Events in Chapter 5 - System
Controller Mode Operation for information and examples.
C-size Mainframe
Figure 6-5. Enabling Interrupts and Events
Talk/Listen Mode Operation 6-13
1
Synchronizing
Instrument/Device
Operations
Synchronize
Instruments Using
IBASIC Computer
NOTE
Synchronize
Instruments Using
Two Computers
This section gives guidelines to synchronize instrument operations with the IBASIC
computer when Talk/Listen mode is set. It also gives guidelines to synchronize
instrument/GPIB device operations using an external computer and the IBASIC
computer when Talk/Listen mode is set.
For Talk/Listen mode, the IBASIC computer can synchronize operations between
instruments, but cannot synchronize operations between instruments and external
GPIB devices. Some methods of synchronization use triggering (TRIGGER
command) and the Operation Complete (*OPC and *OPC?) commands.
See Synchronization Using IBASIC Computer, Synchronization Using *OPC?, and
Synchronization Using *OPC in Chapter 5 - System Controller Mode Operation for
some example ways to synchronize instrument operations using the IBASIC
computer.
A primary advantage of using Talk/Listen mode is that both an external computer
(GPIB computer) and the IBASIC computer can be used to control instruments. In
addition, the GPIB computer can control external GPIB devices via GPIB (the
IBASIC computer cannot control external GPIB devices in Talk/Listen mode).
You will probably use only one computer to control any given instrument.
However, you may want to "share" control of an instrument by first controlling the
instrument with the IBASIC computer and then shifting control to the external
computer or vice-versa. In this case, you will need to assign the instrument to the
appropriate computer.
Instrument Assignment
Overview
Before an instrument can be controlled by an external computer or by the IBASIC
computer, the instrument must be assigned to the computer via one of 3 interfaces
(select code 8, select code 16, and the GPIB interface). Figure 6-6 shows the
method used to assign instruments to the external computer or to the IBASIC
computer. There are four aspects of assigning an instrument to a computer:
•
•
•
•
6-14 Talk/Listen Mode Operation
Requesting the instrument
Arbitrating the request
Releasing the instrument
Assigning the instrument
GPIB:
GPIB:
GPIB
GPIB
GPIB:
Figure 6-6. Assigning Instruments to Computers
Requesting an Instrument
At any one time, an instrument can be assigned to the IBASIC computer via the
IBASIC select code 8 or select code 16 interface , to an external computer via the
GPIB interface, or can be unassigned (not assigned to either computer).
To request an instrument, the computer requesting the assignment issues an
addressed command (such as OUTPUT) containing the primary and secondary
address (or the logical address if select code 16 is being used) of the instrument to
be assigned. Any addressed command will request instrument assignment, since the
address statement actually initiates the request.
For example, OUTPUT 709ss; from the external computer requests assignment of
the instrument at primary address 09 and secondary address ss to the external
computer. Or, OUTPUT 809ss; from the IBASIC computer requests assignment of
the instrument at primary address 09 and secondary address ss to the IBASIC
computer.
Arbitration with select code 16 only occurs when a device has both a secondary
address and a logical address. For example, a device with a logical address of 8
would normally be assigned a secondary address of 1 (LADD/8). In this situation
OUTPUT 80901, OUTPUT 1608, and OUTPUT 160008 all refer to the same
device. If so, arbitration must take place if the instrument is to function properly.
To avoid confusion over this matter you should keep the use of select code 16 to a
minimum, using it only for devices at non-secondary addresses. With a small
amount of care in setting up the system it is usually possible to place all instruments
at secondary addresses and avoid the use of select code 16 entirely.
Talk/Listen Mode Operation 6-15
Arbitrating an Assignment
Request
When the assignment request is issued from an interface the arbiter grants or
denies the request. If the instrument is already assigned to another interface the
request is denied until the instrument is released by the computer to which the
instrument is assigned (see Releasing an Instrument). A denial is denoted by the
lack of communication with the instrument, as though the instrument did not exist.
For example, suppose the System instrument is assigned to the external computer.
A request to assign the System instrument to the IBASIC computer will be denied
until the System instrument is released by the external computer.
For the IBASIC computer, when an assignment request is denied the IBASIC
interface will "hang" and not continue. For the external computer, the GPIB
interface may or may not hang, depending on the other devices on the bus. You will
have to detect "hanging" with the ON TIMEOUT capability and retry until
successful.
NOTE
Releasing an Instrument
NOTE
Devices at non-secondary addresses are not arbitrated and can only be accessed via
select code 16.
To release an assigned instrument from a computer (to unassign the instrument),
use LOCAL 709ss to release an assigned instrument at secondary address=ss from
the external computer, use LOCAL 809ss to release an assigned instrument at
secondary address=ss from the IBASIC computer, or use LOACL 16[XX]XX to
release an assigned instrument at logical address=[XX]XX from the IBASIC
computer.
If an instrument is not assigned to either side, an addressed LOCAL command first
acquires it and then releases it.
Releasing all Assigned Instruments
Use LOCAL 7 to release all assigned instruments from the external computer. Use
LOCAL 8 or LOCAL 16 to release all assigned instruments from the IBASIC
computer. After the assigned instruments are released with a LOCAL 7 or LOCAL
8 command, you must send a REMOTE 7 or REMOTE 8 to allow the instruments
to be released again. The transition from REMOTE to LOCAL of the interface will
release all assigned instruments. This is not necessary for select code 16 since it
does not try to completely emulate GPIB operations as does select code 8.
Do not Send LOCAL Immediately
When sending OUTPUT 709ss; or OUTPUT 809ss; from the computer, do not send
LOCAL 709ss or LOCAL 809ss to release the instrument until the command
associated with the OUTPUT statement has completed. The act of releasing the
instrument will clear the input and output buffers and may abort a command before
6-16 Talk/Listen Mode Operation
it completes. This is applicable only to register based devices manufactured by
Agilent.
Instrument Status Information is Retained
When a register based instrument is released from an interface, the input/output
information is lost but status information (such as SPOLL, SRQ, and ERRORS) is
retained.
Suppose an instrument at address 80903 generated an SRQ which was logged but
not serviced by the IBASIC computer before a LOCAL 80903 command was
generated. In this case, this instrument is released from the IBASIC computer
(unassigned).
If the instrument is then assigned to the external computer, the SRQ interrupt for
the instrument is still retained. This may cause the external computer to respond to
an interrupt generated, but not serviced by, the IBASIC computer.
Assigning the Instrument
When the assignment request has been granted by the arbiter (the instrument is
currently unassigned), the instrument is assigned to the computer. Once an
instrument is assigned to an interface it cannot be assigned to another interface until
the instrument is released with a LOCAL command from the computer which
"owns" the instrument.
An instrument is assigned to an interface when an addressed command, such as
OUTPUT 709ss;, CLEAR 709ss, OUTPUT 809ss;, TRIGGER 809ss, etc. is issued
from the interface. If the addressed instrument is already assigned to another
computer, the request is denied.
Example: Using Timeout
Value with Instrument
Request
When a computer requests assignment of an instrument, the arbiter checks the status
of the instrument. If the instrument is assigned to another computer, the arbiter
denies the request until the other computer releases the instrument.
If the computer to which is instrument is assigned is running a long (or continuous)
program, the requesting computer may have to wait indefinitely for the instrument
to be released. This program shows one way to use ON TIMEOUT so that the
requesting computer will wait a specified time before cancelling and re-initiating a
request for the instrument.
For this example, assume an Agilent E1410A DMM at secondary address 03 is
assigned to the IBASIC computer and the IBASIC computer is running the
following (downloaded) program. With this program, the instrument is
continuously assigned (line 20) and then released (line 40) by the IBASIC computer.
5 !RE-SAVE "ASSIGN1"
10 LOOP
20
OUTPUT 80903;"MEAS:VOLTS:DC?"
30
ENTER 80903;A
40
LOCAL 80903
50
DISP A
60 END LOOP
Talk/Listen Mode Operation 6-17
The above program poses no problem for instrument assignment until the external
computer requests assignment of the instrument. If the request occurs before the
instrument has been released by the IBASIC computer, the request is denied and the
external computer may "hang" indefinitely awaiting the instrument assignment.
To avoid this, the following program allows the external computer to wait for 0.1
seconds (line 110) when requesting the instrument assignment (line 120). If the
request is denied (instrument was not released by the IBASIC computer), the
program returns to line 120 and tries the request again.
This loop continues until the request is granted and the instrument is assigned to
the external computer. When the instrument is assigned, the instrument makes a
DC voltage measurement and returns the result to the computer CRT. The
instrument is then released from the external computer.
90
100
110
120
130
140
150
160
170
180
NOTE
!RE-SAVE "ASSIGN2"
LOOP
ON TIMEOUT 7,.1 GOTO Line
Line: OUTPUT 70903;"MEAS:VOLT:DC?"
OFF TIMEOUT 7
ENTER 70903;A
DISP A
LOCAL 70903
END LOOP
END
Line 120 might better be replaced by State = SPOLL (70903). The SPOLL
operation will request data and force a timeout even though other GPIB devices on
the bus (such as an GPIB Bus Analyzer) may be in the LISTEN mode. In this case,
the OUTPUT statement will not "hang".
ON TIMEOUT can also be used on the IBASIC side, but is not necessry since
IBASIC will wait for the arbiter to grant the request. This is a capability not
possible on the GPIB side.
6-18 Talk/Listen Mode Operation
Chapter 7 Contents
Using This Chapter
7-1
IBASIC Commands Not Supported 7-1
IBASIC Commands - Alphabetical Listing
IBASIC Commands - by Function
IBASIC Command Differences
7-6
7-10
7-2
Chapter
7
IBASIC Command Reference
Using This Chapter
This chapter shows the Agilent Instrument BASIC (IBASIC) commands supported
by the IBASIC instrument in the Agilent E1406. It includes alphabetical and
functional listings of supported IBASIC commands.
When an IBASIC command for the Agilent E1406 differs from that shown in the
Agilent Instrument BASIC Language Reference Manual, the command is described
in the IBASIC Command Differences section of this chapter.
1
IBASIC Commands
Not Supported
The following table shows IBASIC commands described in the Agilent Instrument
BASIC Language Reference Manual but not supported by the IBASIC instrument
in the Agilent E1406.
IBASIC Commands Not Supported by Agilent E1406
Command
DRAW
GCLEAR
MOVE
PEN
Description
Draw line on display
Clears the graphics display
Move logical/physical pens from current position
Selects pen used for plotting
IBASIC Command Reference 7-1
1
IBASIC Commands
Alphabetical Listing
The following table shows an alphabetical listing of IBASIC commands supported
by the IBASIC instrument. Unless indicated by a * entry, the command is
implemented by the IBASIC instrument as described in the Agilent Instrument
BASIC Language Reference Manual. See the IBASIC Command Differences
section of this chapter for a description of * entry commands.
Command
Description
* = See IBASIC Command Differences section for command description
** = See Chapter 2 - Creating and Editing Programs for command description
ABORT*
Ceases activity on specified interface
ABS
Returns absolute value of its argument
ACS
Arccosine function
AND
Logical AND
ASCII
See CREATE ASCII
ASN
Arcsine function
ASSIGN
Assign I/O path name and attributes
ATN
Arctangent function
BASE
Lower bound of array
BDAT
See CREATE BDAT
BEEP
Produces audible tone
BINAND
Returns bit-by-bit, logical AND of its arguments
BINCMP
Returns bit-by-bit complement of its argument
BINEOR
Returns bit-by-bit, exclusive OR of its arguments
BINIOR
Returns bit-by-bit, inclusive OR of its arguments
BIT
Returns 1 or 0 for value of specified bit
CALL
Call specified SUB subprogram
CASE
See SELECT...CASE
CAT
Lists contents of mass storage directory
CHR$
Converts numeric value to ASCII character
CLEAR*
Clears devices or interfaces
CLEAR SCREEN
Clear contents of alpha display
CLS
See CLEAR SCREEN
COM
Dimensions COMMON memory area
CONT
Resumes execution of PAUSed program
CONTROL
See PASS CONTROL
COPY
Copy file or disk
COS
Returns cosine of angle of argument
CREATE
Creates an HP-UX file
CREATE ASCII
Creates an ASCII file
CREATE BDAT
Creates a BDAT file
CREATE DIR
Creates a DOS (HFS) directory
CRT
Returns 1, the device selector of the CRT display
DATA
Contains data which can be read by READ
DEF FN
Start of FUNCTION subprogram
DEG
Selects degrees as angle measure
DEL
Deletes selected program line(s)
DIM
Dimension REAL arrays, strings, and string arrays
DISABLE
Disables some event-initiated branches
DISABLE INTR
Disables interrupts from an interface
DISP
Sends display items to CRT display
DIV
Returns integer part of quotient
7-2 IBASIC Command Reference
Command
Description
* = See IBASIC Command Differences section for command description
** = See Chapter 2 - Creating and Editing Programs for command description
DROUND
Round expression to specified number of digits
DVAL
Converts character string to a REAL whole number
DVAL$
Converts whole number into equivalent string
EDIT**
Allows user to edit program
ELSE
See IF...THEN
ENABLE
Reenable branches suspended by DISABLE
ENABLE INTR
Enable interrupts on specified interface
END
End of main program
END IF
See IF...THEN
END LOOP
See LOOP
END SELECT
See SELECT...CASE
END WHILE
See WHILE
ENTER
Input data and assign values entered to variables
EOL
See ASSIGN and PRINTER IS
ERRL
Returns 1 if most recent error occurred in line
ERRLN
Returns program line number of most recent error
ERRM$
Returns error message text for most recent error
ERRN
Returns number of most recent program error
ERROR
See OFF ERROR and ON ERROR
EXOR
Returns 1 or 0, basied on logical exclusive-OR
EXP
Raises e to power of the argument
FN
Transfer execution to user-defined function
FNEND
See DEF FN
FOR..NEXT
FOR...NEXT loop
FORMAT
See ASSIGN
FRACT
Returns fractional part of value of argument
GET
Reads ASCII or DOS (HP-UX) file
GOSUB
Transfer execution to specified subroutine
GOTO
Transfer execution to specified line/label
IF...THEN
Provides conditional branching
IMAGE
Image specifier for ENTER, OUTPUT, PRINT, etc.
INITIALIZE
Formats mass storage media
INPUT
Assigns keyboard inputs to program variables
INT
Returns greatest integer <= expression
INTEGER
Declare INTEGER var and dim INTEGER arrays
INTR
See OFF INTR and ON INTR
IVAL
Converts string into an INTEGER
IVAL$
Converts an INTEGER into a string
KBD
Returns 2, the keyboard select code
LEN
Returns number of characters in argument
LET
Assigns values to variables
LGT
Returns logarithm (base 10) of argument
LIST
Lists program or definitions in memory
LOCAL*
Returns specified devices to local state
LOCAL LOCKOUT*
Prevents returning specified device to local state
LOG
Returns logarithm (base e) of argument
LOOP
Repeat loop until EXIT IF statement is logically true
LWC$
Replace uppercase with lowercase characters
MASS STORAGE IS
Specifies system mass storage device
IBASIC Command Reference 7-3
Command
Description
* = See IBASIC Command Differences section for command description
** = See Chapter 2 - Creating and Editing Programs for command description
MAX
Returns largest value in list of arguments
MAXREAL
Returns largest REAL number available
MIN
Returns smallest value in list of arguments
MINREAL
Returns smallest REAL number available
MOD
Returns the remainder of a division
MODULO
Returns integer remainder of a division
MSI
See MASS STORAGE IS
NEXT
See FOR...NEXT
NOT
Returns 1 if argument is 0, returns 0 otherwise
NUM
Returns ASCII value of first character in argument
OFF CYCLE*
Cancels branches enabled with ON CYCLE
OFF ERROR
Cancels branches enabled with ON ERROR
OFF INTR
Cancels branches enabled with ON INTR
OFF KEY
Cancels branches enabled with ON KEY
OFF TIMEOUT
Cancels branches enabled with ON TIMEOUT
ON CYCLE*
Enables branch when specified time has elapsed
ON ERROR
Enables branch when error is generated
ON INTR
Enables branch when interrupt is generated
ON KEY
Enables branch when softkey is pressed
ON TIMEOUT
Enables branch when I/O timeout occurs
OR
Returns 1 or 0 - based on inclusive-or of arguments
OUTPUT
Outputs items to specified destination
PASS CONTROL
Pass Active Controller function to GPIB device
PAUSE
Suspends (pauses) program execution
PI
Returns approximate value for pi
POS
Returns first position of substring within string
PRINT
Sends items to PRINTER IS device
PRINTER IS
Specifies system printing device
PRIORITY
See SYSTEM PRIORITY
PROUND
Returns argument value, rounded to power-of-ten
PRT
Returns 701, default selector for external printer
PURGE
Deletes a file from a directory
RAD
Selects radians as angle measure
RANDOMIZE
Selects a seed for the RND function
RANK
Returns number of dimensions in an array
READ
Reads values from DATA statements
READIO*
Provides additional I/O reading capabilities
REAL
Reserves storage for REAL variables and arrays
RECOVER
See ON... statements
REM
Allows comments in a program
REMOTE*
Places specified device(s) in REMOTE state
REN
Renumber program lines for program in memory
RENAME
Changes file or directory name
REPEAT...UNTIL
Loop until the UNTIL statement is logically true
RE-SAVE
Creates/rewrites ASCII or HP-UX file
RESTORE
Specifies DATA statement using with next READ
RETURN
Return execution to line following invoking GOSUB
REV$
Returns string formed by reversing char sequence
RND
Returns a pseudo-random number 0 <num<1
7-4 IBASIC Command Reference
Command
Description
* = See IBASIC Command Differences section for command description
** = See Chapter 2 - Creating and Editing Programs for command description
ROTATE
Returns integer value of shift with wrap-around
RPT$
Returns string repeated specified number of times
RUN
Begins program execution at specified line
SAVE
Creates ASCII or HP-UX file and copies lines to file
SCRATCH
Erases all or selected portions of memory
SECURE
Protects program lines so they cannot be listed
SELECT...CASE
Provide conditional execution of program segments
SGN
Returns 1, 0, or -1 for pos, zero, neg arguments
SHIFT
Returns integer value of shift without wrap-around
SIN
Returns the sine of the argument
SIZE
Returns number of elements of array dimension
SPOLL*
Returns serial poll response of selected device
SQRT
Returns square root of argument
STEP
See FOR...NEXT
STOP
Terminates execution of program
SUB
First statement in a SUB subprogram
SUBEND
See SUB
SUBEXIT
Allows multiple exits from a SUB subprogram
SYSTEM ID
See SYSTEM$
SYSTEM PRIORITY
Sets system priority to specified value
SYSTEM$
Returns system status and configuration
TAB
See PRINT and DISP
TABXY
See PRINT
TAN
Returns tangent of angle of argument
TIMEDATE
Returns value of real-time clock
TIMEOUT
See OFF TIMEOUT and ON TIMEOUT
TRIGGER*
Sends TRIGGER message to selected devices
TRIM$
Returns string without leading/trailing ASCII spaces
UNTIL
See REPEAT...UNTIL
UPC$
Replace lowercase with uppercase characters
USING
See DISP, ENTER, LABEL, OUTPUT, and PRINT
VAL
Converts string expression to numeric value
VAL$
Returns string representation of argument value
WAIT
Wait before executing next statement
WHILE
Execute loop as long as WHILE is true
WIDTH
See PRINTER IS
WILDCARDS
When enabled, use to represent file names
WRITEIO*
Provides additional I/O write capability
IBASIC Command Reference 7-5
1
IBASIC Commands
by Function
The following table shows a functional grouping of IBASIC commands supported
by the IBASIC instrument. Unless indicated by a * entry, the command is
implemented by the IBASIC instrument as described in the Agilent Instrument
BASIC Language Reference Manual. See the IBASIC Command Differences
section of this chapter for a description of * entry commands. See Chapter 10 of
the Agilent Instrument BASIC Programming Techniques Manual for further
information on IBASIC commands by function.
General Math Operations
Category
Relational
Operators
General Math
Functions
7-6 IBASIC Command Reference
Command
=
<>
<
<=
>
>=
+
x
/
^
Description
Equality
Inequality
Less than
Less than or equal to
Greater than
Greater than or equal to
Addition operator
Subtraction operator
Multiplication operator
Division operator
Exponentiation operator
ABS
DIV
DROUND
EXP
FRACT
INT
Returns agrument absolute value
Returns integer portion of division
Returns rounded value of expression
Raises base e to specified power
Returns fractional part of expression
Returns integer part of expression
LET
LGT
LOG
MAX
MAXREAL
MIN
Assigns values to variables
Returns logarithm (base 10) of argument
Returns logarithm (base e) of argument
Returns largest value in list of arguments
Returns largest number available
Returns smallest value in list of arguments
MINREAL
MOD
MODULO
PI
PROUND
Returns smallest number available
Returns remainder of integer division
Returns the modulo of division
Returns approximation of pi
Returns value rounded to power of ten
RANDOMIZE
RND
SGN
SQRT (or
SQR)
Modifies seed used by RND
Returns pseudo-random number
Returns sign of argument
Returns square root of argument
General Math Operations (cont’d)
Category
Binary
Functions
Trigonometric
Functions
Command
BINAND
BINCMP
BINEOR
BINIOR
Description
Returns bit-by-bit logical -and of two args
Returns bit-by-bit complement of argument
Returns bit-by-bit exclusive-or of two args
Returns bit-by-bit inclusive-or of two args
BIT
ROTATE
SHIFT
ACS
ASN
ATN
COS
Returns state of specified bit in argument
Returns shifted value, with wraparound
Returns shifted value, without wraparound
Returns the arcosine of argument
Returns the arcsine of argument
Returns the actangent of argument
Returns cosine of argument
DEG
RAD
SIN
TAN
Sets degrees as unit of angle measurement
Sets radians as unit of angle measurement
Returns sine of argument
Returns tangent of argument
Array/String/Logical Operations
Category
Array
Operations
String
Operations
Logical
Operators
Command
BASE
RANK
SIZE
&
CHR$
DVAL
DVAL$
IVAL
Description
Returns lower bound of array dimension
Returns number of dimensions in array
Returns number of elements in array dim
Concatenates two string expressions
Converts numeric value to ASCII character
Converts alternate-base to numeric value
Converts numeric value to alternate-base
Converts alternate-base to INTEGER number
IVAL$
LEN
LWC$
NUM
POS
Converts INTEGER number to alternate-base
Returns number of characters in string
Returns lowercase value of string
Returns decimal value of first char in string
Returns position of string in string expression
REV$
RPT$
TRIM$
UPC$
VAL
VAL$
AND
EXOR
NOT
OR
Reverses order of characters in string
Repeats characters in string number of times
Removes leading/trainling blanks from string
Returns uppercase value of string
Converts string of numerals to numeric value
Returns string representing numeric value
Returns 1 or 0 based on logical AND of 2 args
Returns 1 or 0 based on exclusive-or of 2 args
Returns 1 or 0 based on complement of arg
Returns 1 or 0 based on inclusive-or of 2 args
IBASIC Command Reference 7-7
Program Control Operations
Category
Entry/
Editing
Debugging
Program
Control
Command
EDIT**
LIST
REM and !
REN
SECURE
ERRL
ERRLN
ERRM$
ERRN
CALL
CONT
DEF FN/FNEND
END
FN
Description
Allows user to edit program
Lists program lines to system printer
Allows comments on program lines
Renumber lines for program in memory
Protects program lines - cannot be listed
Indicates if error occurred on specific line
Returns line number of most recent error
Returns text of last error message
Returns most recent program execution error
Transfer program execution to subprogram
Resumes execution of PAUSed program
Defines bounds of function subprogram
Stops program execution - marks end of prog
Calls user-defined function
FOR...NEXT
GOSUB
GOTO
IF..THEN ELSE
LOOP/EXIT IF/END LOOP
Defines loop to be repeated number of times
Transfers program to specified subroutine
Transfers program to specified line
Conditional execution of program segment
Looping with conditional exit
PAUSE
REPEAT...UNTIL
RETURN
SELECT...CASE
STOP
Suspends program execution
Execute prog segment until condition is true
Transfer back to main prog from subroutine
Execute one program segment of several
Terminates program execution
Defines bounds of a subprogram
SUB/SUBEND
Transfer control from subprog
SUBEXIT
Wait specified number of seconds
WAIT
Execute prog segment whle cond is true
WHILE
** = See Chapter 2 - Creating and Editing Programs for command description
7-8 IBASIC Command Reference
Instrument Control Operations
Category
Device
Input/Output
Interface
Control
Event-Initiated
Branching
Command
ASSIGN
BEEP
CRT
DATA
DISP
Description
Assigns I/O path to mass storage or devices
Produces audible tone
Returns device selector or CRT
Specifies data accessible via READ
Outputs items to CRT display
ENTER
IMAGE
INPUT
KBD
OUTPUT
Inputs data from device, file, or string
ENTER, OUTPUT, DISP, PRINT formats
Inputs data from keyboard to variables
Returns device selector of the keyboard
Outputs items to device, file, or string
PRINT
PRINTER IS
PRT
READ
READIO*
Outputs items to PRINTER IS device
Specifies device for PRINT, CAT, LiST
Returns device selector of external printer
Inputs data from DATA lists to variables
Provides additional I/O read capabilities
RESTORE
SYSTEM$
TAB
TABXY
TIMEDATE
WRITEIO*
ABORT*
CLEAR*
CLEAR SCREEN
CLS
LOCAL*
READ accesses specified DATA statement
Returns system status/configuration
Moves print position to specified point
Specifies print position on internal CRT
Returns value of real-time clock
Provides additional I/O write capabilities
Terminate interface activity
Places specified devices in known state
Clear contents of alpha display
See CLEAR SCREEN
Returns specified devices to LOCAL atate
LOCAL LOCKOUT*
PASS CONTROL
REMOTE*
SPOLL*
TRIGGER*
ENABLE/DISABLE
ENABLE INTR/DISABLE
ON CYCLE*/OFF CYCLE*
ON ERROR/OFF ERROR
Disables front-panel control of devices
Pass Active Controller function to device
Places specified devices in REMOTE state
Returns Serial Poll byte from device
Sends Trigger message to specified devices
Enables/disables event-initiated branching
Enables/disables interrupts set by ON INTR
Enables/disables interrupts set by ON CYCLE
Sets up event-initiated branch for prog error
ON KEY...LABEL/OFF KEY Sets up event-initated branch for softkeys
Sets up event-initiated branch for I/O timeout
ON TIMEOUT/OFF
Sets min priority level for event-init branches
TIMEOUT
SYSTEM PRIORITY
* = See IBASIC Commend Differences section for command description
IBASIC Command Reference 7-9
Mass Storage/Memory Operations
Category
Mass
Storage
Memory
Allocation
Command
ASSIGN
CAT
COPY
CREATE
CREATE ASCII
CREATE BDAT
CREATE DIR
Description
Assign I/O path and attributes to a file
List mass storage directory contents
Copy mass storage files and volumes
Creates HP-UX file on mass storage media
Creates ASCII file on mas storage media
Creates BDAT file on mass storage media
Creates DOS (HFS) directory on mass media
GET
INITIALIZE
MSI
PURGE
RENAME
SAVE/RE-SAVE
WILDCARDS
COM
DIM
INTEGER
REAL
SCRATCH
Reads ASCII file into memory as a program
Formats mass storage media (Lif directory)
Specifies defaul t mass storage device
Deletes file from directory
Changes a file’s name
Creates/rewrites ASCII or HP-UX file
When enabled, use to represent file names
Dimension, reserve memory for common area
Dimension, reserve memory for REAL var
Dimension, reserve memory for INTEGER
var
Dimension, reserve memory for full-prec var
Erase all or selected portions of memory
1
IBASIC Command
Differences
This section describes the IBASIC commands supported by the IBASIC instrument
in the Agilent E1406 which are not described in the Agilent Instrument BASIC
Language Reference Manual or have a description different from that shown in the
Agilent Instrument BASIC Language Reference Manual.
Each command description assumes the command is issued from the IBASIC
computer.
NOTE
See Chapter 1 in the Agilent Instrument BASIC Language Reference Manual for a
description of IBASIC command structure and syntax drawings.
7-10 IBASIC Command Reference
ABORT
Keyboard Executable
Programmable
In an IF...THEN...
Yes
Yes
Yes
For the IBASIC interfaces (select code 8 or 16), ABORT does nothing, since no
operations are occurring except under IBASIC control. For the GPIB interface
(select code 7) (System Controller mode only), ABORT ceases activity on the
GPIB interface.
Item
interface select code
I/O path name
Description
numeric expression, rounded to
an integer
name assigned to the IBASIC
or GPIB interface
Range
7 for GPIB and 8 for IBASIC
-
Example Statement
ABORT 7
For System Controller mode ONLY, ceases activity on GPIB
interface (select code 7)
Semantics
CLEAR
Executing ABORT ceases activity on the specified interface - other interfaces may
not be specified. If the IBASIC computer is the System controller but is not
currently the Active Controller, executing ABORT 7 causes the IBASIC computer
to assume active control. See the ABORT command in the Agilent Instrument
BASIC Language Reference Manual for a summary of GPIB bus actions for the
ABORT command.
Keyboard Executable
Programmable
In an IF...THEN...
Yes
Yes
Yes
For the IBASIC interfaces (select code 8 or 16), when the instrument(s) are
assigned to the IBASIC computer, CLEAR 8 or CLEAR 16 sets all acquired
instruments to a pre-defined, instrument-dependent state., while CLEAR 809ss
sets the acquired instrument at secondary address ss to a pre-defined,
instrument-dependent state.
IBASIC Command Reference 7-11
For the GPIB interface (select code 7) (System Controller mode only), CLEAR 7
sets all external GPIB devices to a pre-defined, instrument-dependent state, while
CLEAR 7ppss sets the external GPIB instrument at primary address pp and
secondary address ss to a pre-defined, device-dependent state.
Item
I/O path name
device selector
Example Statements
Comments
Description
name assigned to a device or devices
numeric expression, rounded to an integer
Range
any valid name (see ASSIGN)
(see Glossary)
CLEAR 80901
Clears the instrument at secondary address 01, if the instrument
is assigned to IBASIC
CLEAR 722
For System Controller mode only, clears external GPIB
instrument at address 22
The IBASIC computer must be the active controller to execute a CLEAR 7
command. When interface 8 is specified, the CLEAR is sent to all devices which
are assigned to IBASIC (owned by IBASIC) and are addressed to listen.
CLEAR 8 and CLEAR 16 do the following to an instrument owned by IBASIC:
•
•
•
•
Clears the input buffer and output queue.
Resets the command parser.
Disables any operation that would prevent *RST execution.
Disables the Operation Complete and Operation Complete Query modes.
CLEAR 8 and CLEAR 16 do not affect:
• Any settings or stored data in the instrument except the Operation Complete
and Operation Complete Query modes.
• Any instrument operation in progress except as stated above.
• The Status Byte Register, except to clear the Message Available (MAV) bit
as a result of clearing the Output Queue.
See the CLEAR command in the Agilent Instrument BASIC Language Reference
Manual for a summary of GPIB bus actions for the CLEAR command.
CLEAR 9 and CLEAR 21 - 27:
For the Serial interfaces, CLEAR clears the receive and transmit buffers, but does
not affect baud rate or other configuration settings.
7-12 IBASIC Command Reference
LOCAL
Keyboard Executable
Programmable
In an IF...THEN...
Yes
Yes
Yes
For the IBASIC interfaces (select code 8 and 16), LOCAL 8 or LOCAL 16 places
all instruments which are assigned to IBASIC in the LOCAL state, while LOCAL
809ss or 16[XX]XX places an assigned instrument at secondary address ss in the
LOCAL state. For message based devices the LOCAL command also issues a
word-serial Clear Lock.
For the GPIB interface (select code 7) (System Controller mode only), LOCAL 7
places all external GPIB devices in the LOCAL state, while LOCAL 7ppss places
an external GPIB device at primary address pp and secondary address ss in the
LOCAL state.
Item
I/O path name
device selector
Example Statements
Semantics
Description
name assigned to a device or devices
numeric expression, rounded to an integer
Range
any valid name (see ASSIGN)
(see Glossary)
LOCAL 7
For System Controller mode only, places all external GPIB
devices in the LOCAL state.
LOCAL 80901
Places an internal instrument at secondary address 01 in the
LOCAL state
• If only interface select code 8 is selected, all instruments on the interface
which are assigned to IBASIC are returned to their LOCAL state and any
LOCAL LOCKOUT is cancelled.
• If only interface select code 7 is selected (System Controller mode only),
all GPIB devices on the interface are returned to their LOCAL state and
any LOCAL LOCKOUT is cancelled.
• If a primary address is included, the LOCAL command is sent to a specific
listener and LOCAL LOCKOUT is not disabled for any other instrument or
device.
• For interface select code 8 (IBASIC), when a LOCAL 8 command is sent,
all instruments previously assigned to the IBASIC computer are released
(unassigned). However, a REMOTE 8 must be sent following the LOCAL
command for a subsequent LOCAL command to release assigned
instrument(s). For example, LOCAL 80903 releases an instrument at
secondary address 03 if the instrument was previously assigned to IBASIC.
• See the LOCAL command in the Agilent Instrument BASIC Language
Reference Manual for a summary of GPIB bus actions for the LOCAL
command.
IBASIC Command Reference 7-13
LOCAL LOCKOUT
Keyboard Executable
Programmable
In an IF...THEN...
Yes
Yes
Yes
For the IBASIC interface (select code 8), executing LOCAL LOCKOUT prevents
all instruments that are assigned to IBASIC and are set to the REMOTE state from
being operated from their virtual front panels on the terminal.
For the GPIB interface (select code 7), executing LOCAL LOCKOUT prevents all
external GPIB devices which are set to the REMOTE state from being operated
from their own front panels.
Item
I/O path name
interface select code
Semantics
7-14 IBASIC Command Reference
Description
Range
name assigned to an interface select code any valid name (see ASSIGN)
numeric expression, rounded to an integer 7 for GPIB and 8 for IBASIC
• The IBASIC computer must be the Active Controller to execute LOCAL
LOCKOUT. LOCAL LOCKOUT does not cause interface reconfiguration
but issues a universal command which is received by all devices on the
interface, whether addressed or not. (Some Agilent E1406 User Interface
operations such as menu control and display scrolling are still active in Local
Lockout mode.)
• If an internal instrument is in the LOCAL state when LOCAL LOCKOUT is
sent, the instrument remains in the LOCAL state. LOCAL LOCKOUT does
not become effective until the instrument receives a REMOTE message and
is addressed to listen. If an instrument is in the REMOTE state when
LOCAL LOCKOUT is sent, Agilent E1406 front panel control is
immediately disabled for that instrument.
• After executing LOCAL LOCKOUT via the IBASIC interface (select code
8), you can enable front panel keyboard control by sending the LOCAL 8
command or by cycling power. The LOCAL 809ss (ss = secondary address)
command enables the front panel for that instrument, but a subsequent
REMOTE command disables it.
• Sending LOCAL 8 removes LOCAL LOCKOUT for all instruments
assigned to IBASIC and places them in the LOCAL state (releases the
instruments). When the instrument is assigned to IBASIC, sending LOCAL
809ss (ss = secondary address) places the selected instrument in the
LOCAL state (releases the instrument).
• For System Controller mode only, sending LOCAL 7 removes LOCAL
LOCKOUT for all external GPIB devices and places them in the LOCAL
state. Sending LOCAL 709ss (ss = secondary address) places selected
external GPIB devices in the LOCAL state.
OFF CYCLE
Keyboard Executable
Programmable
In an IF...THEN...
No
Yes
Yes
This statement cancels event-initiated branches previously defined and enabled by
an ON CYCLE statement.
Example
Statement
Semantics
ON CYCLE
OFF CYCLE
Cancels event-initiated branches previously defined with ON
CYCLE
When OFF CYCLE is executed, any pending ON CYCLE branches for the
affected interface(s) are lost and further ON CYCLE events are ignored.
Keyboard Executable
Programmable
In an IF...THEN...
No
Yes
Yes
This statement defines and enables an event-initiated branch to be taken each time
the specified number of seconds has elapsed.
Item
Description
seconds
numeric expression, rounded to
the nearest 0.01 second
numeric expression, rounded to an
integer. Default = 1
name of a program line
integer constant identifying a
program line
name of a SUB subprogram
priority
line label
line number
subprogram name
Example Statements
Semantics
Range
0.01 through 167772.16
1 through 15
any valid name
1 through 32 767
any valid name
ON CYCLE 1 GOTO 1200
Go to line 1200 every second, with (default) software priority 1
ON CYCLE 3600, 12 CALL Report
Call subprogram Report every hour, with software priority 12
• The most recent ON CYCLE (or OFF CYCLE) definition overrides any
previous ON CYCLE definition. If the new ON CYCLE definition occurs in
IBASIC Command Reference 7-15
•
•
•
•
•
READIO
a different context from the previous ON CYCLE definition, the old
definition is restored when the calling context is restored, but the time value
of the new ON CYCLE definition remains in effect.
The highest software priority for ON CYCLE is 15 which is less than the
(fixed) priority of 16 for ON TIMEOUT and 17 for ON ERROR. CALL
and GOSUB service routines get the priority specified in the ON... statement
which set up the event-initiated branch. The system priority is not changed
when a GOTO branch is taken.
Any specified line label or line number must be in the same context and the
ON CYCLE statement. CALL and GOSUB will return to the next line that
would have executed if ON CYCLE had not occurred, and the system
priority is restored to that existing before ON CYCLE.
RECOVER forces the program to go directly to the specified line in the
context containing the ON CYCLE statement. When RECOVER forces a
change of context, the system priority is restored to that existing in the
original (defining) context at the time the original context was exited.
CALL and RECOVER remain active when the context changes to a
subprogram, unless the change in context is caused by a
keyboard-originated call. GOSUB and GOTO remain active when the
context changes to a subprogram, but the branch cannot be taken until the
calling context is restored.
ON CYCLE is disabled by DISABLE and deactivated by OFF CYCLE. If
the cycle value is so short that the computer cannot service it, the interrupt
from the event is lost.
Keyboard Executable
Programmable
In an IF...THEN...
Yes
Yes
Yes
READIO (and WRITEIO) provide interface control functions not available with
ENTER and OUTPUT. For IBASIC, READIO reads the contents of the specified
hardware register for the:
•
•
•
•
GPIB interface (select code 7)
IBASIC interface (select code 8) (VXI device registers)
Built-in RS-232C interface (select code 9)
Agilent E1324A RS-232C/422 interfaces (select codes 21-27)
READIO also reads the specified byte or word of IBASIC memory (select codes
9826 and -9826). You can use parameter 9827 to read the address of a variable in
IBASIC memory.
NOTE
Unexpected results may occur with select codes 9826 and 9827.
7-16 IBASIC Command Reference
Item
select code
register number or
memory address
Example Statements
Description
numeric expression, rounded to
an integer
numeric expression, rounded to
an integer
Range
1 through 31; ±9826;
9827
hardware-dependent
PRINT "VXI Card LADD, Reg#" = READIO(8, Ladd*256 +Reg)
Display contents of register I for instrument at logical address
LADD, where register address = 256*LADD + Register#
Write_status = READIO(9,2)
Assign the value in register 2 of the built-in RS-232 port to
variable
Peek_byte = READIO(9826,Mem_addr)
Read a byte of data from IBASIC memory address Mem_addr
Mem_addr = READIO(9827,Array(I))
Read address of variable in IBASIC memory
Semantics
READIO and WRITEIO are added to provide I/O functions not available with
OUTPUT and ENTER. For IBASIC, READIO can be used with:
•
•
•
•
GPIB Interface (select code 7)
IBASIC Interface (select code 8) (VXI device registers)
RS-232/422 Serial Interfaces (select codes 9, 21-27)
IBASIC Memory (select codes 9826, 9827)
Using READIO With GPIB Interface (Select Code 7)
To use READIO from the IBASIC computer via the GPIB interface (select code 7),
the Agilent E1406 must be set for System Controller mode. The READIO registers
for the GPIB interface follow.
READIO Registers for GPIB Interface
Register
Title
Interrupt Enable/Request Status
3
Interrupt Status
4
Controller Status and Address
5
Interrupt Status 0 (*)
17
Interrupt Status 1 (*)
19
Interface Status
21
Control-Line Status
23
Command Pass-Through
29
Data-Line Status(*)
31
* = READIO operation changes state of the interface
GPIB READIO Register 3
Interrupt Enable/Request Status
IBASIC Command Reference 7-17
Bit 7
Bit 6
Bit 5
Bit 4
Bit 3
Bit 2
Bit 1
Bit 0
Interrupt
Enabled
Interrupt
Requested
X
X
X
X
X
X
Value=128
Value=64
Value=32
Value=16
Value=8
Value=4
Value=2
Value=1
X = Bit not implemented on internal GPIB (interface select code 7)
GPIB READIO Register 4
Interrupt Status
Bit 15
Bit 14
Bit 13
Bit 12
Bit 11
Bit 10
Bit 9
Bit 8
Active Controller
Parallel Poll
Configuration Change
My Talk
Address
Received
My Listen
Address
Received
EOI Received
SPAS
Remote/
Local Change
Talker/
Listener
Address
Change
Value=-32768
Bit 7
Trigger
Received
Value=16384
Bit 6
Hand-shake
Error
Value=128
Value=64
Value=8192
Bit 5
Unrecognized
Universal
Command
Value=32
Value=4096
Bit 4
Secondary
Command
While
Addressed
Value=16
Value=2048 Value=1024 Value=512
Bit 3
Bit 2
Bit 1
Clear
Unrecognize SRQ
Received
Received
d Addressed Command
Value=8
Value=4
Value=2
GPIB READIO Register 5
Bit 7
System
Controller
Value=128
Bit 6
Not Active
Controller
Value=64
Value=256
Bit 0
x
Value=1
Controller Status and Address
Bit 5
Bit 4
Bit 3
Bit 2
Bit 1
Bit 0
X
X
X
X
X
X
Value=32
Value=16
Value=8
Value=4
Value=2
Value=1
Bit 7 is set (1) if the interface is the System Controller.
Bit 6 is set (1) if the interface is not the current Active Controller and clear (0) if it is
the Active Controller.
X = Bit not implemented on internal GPIB (interface select code 7).
7-18 IBASIC Command Reference
GPIB READIO Register 17
Bit 7
MSB
Interrupt
Value=128
MSB of Interrupt Status
Bit 6
Bit 5
Bit 4
Bit 3
Bit 2
Bit 1
Bit 0
LSB
Interrupt
Byte
Received
Ready
for Next
Byte
End
Detected
SPAS
Remote
/Local
Change
My
Address
Change
Value=64
Value=32
Value=16
Value=8
Value=4
Value=2
Value=1
Bit 7 set (1) indicates an interrupt has occurred whose cause can be determined by
reading the contents of this register.
Bit 6 set (1) indicates an interrupt has occurred whose cause can be determined by
reading Interrupt Status Register 1 (READIO Register 19).
Bit 5 set (1) indicates a data byte has been received.
Bit 4 set (1) indicates this interface is ready to accept the next data byte.
Bit 3 set (1) indicates an End (EOI with ATN=0) has been detected.
Bit 2 set (1) indicates a Remote/Local State change has occurred.
Bit 0 set (1) indicates a change in My Address has occurred.
GPIB READIO Register 19
Bit 7
Trigger
Received
Bit 6
Handshake
Error
Value=128 Value=64
Bit 5
Unrecognized
Command
Group
Value=32
Bit 4
Bit 3
Clear
Secondary
Received
Command
While Addressed
Value=16
Value=8
LSB of Interrupt Status
Bit 2
My Address
Received (MLA
or MTA)
Value=4
Bit 1
SRQ
Received
Bit 0
IFC
Received
Value=2
Value=1
Bit 7 set (1) indicates a Group Execute Trigger command has been received.
Bit 6 set (1) indicates an Incomplete-Source-Handshake error has occurred.
Bit 5 set (1) indicates an unidentified command has been received.
Bit 4 set (1) indicates a Secondary Address has been sent while in the
extended-addressing mode.
Bit 3 set (1) indicates the interface has entered the Device-Clear-Active State.
Bit 2 set (1) indicates My Address has been received.
Bit 1 set (1) indicates a Service Request has been received.
Bit 0 set (1) indicates the Interface Clear message has been received.
IBASIC Command Reference 7-19
GPIB READIO Register 21
Interface Status
Bit 7
Bit 6
Bit 5
Bit 4
Bit 3
Bit 2
Bit 1
Bit 0
REM
LLO
ATN True
LPAS
TPAS
LADS
TADS
LSB of
Last
Address
Value=128
Value=64
Value=32
Value=16
Value=8
Value=4
Value=2
Value=1
Bit 7 set (1) indicates this interface is in the Remote State.
Bit 6 set (1) indicates this interface is in the Local Lockout State.
Bit 5 set (1) indicates the ATN signal line is true.
Bit 4 set (1) indicates this interface is in the Listener-Primary-Addressed State.
Bit 3 set (1) indicates this interface is in the Talker-Primary-Addressed State.
Bit 2 set (1) indicates this interface is in the Listener-Addressed State.
Bit 1 set (1) indicates this interface is in the Talker-Addressed State.
Bit 0 set (1) indicates this is the least-significant bit of the last address recognized by
this interface.
GPIB READIO Register 23
Bit 7
ATN True
Value=128
Bit 6
Bit 5
DAV True NDAC 1
True
Value=64 Value=32
Bit 4
NRFD 1
True
Value=16
Control-Line Status
Bit 3
Bit 2
EOI True SRQ 2
True
Value=8 Value=4
Bit 1
Bit 0
IFC True REN
True
Value=2 Value=1
A set bit (1) indicates the corresponding line is currently true, while a 0 indicates the
1
line is currently false. Only if addressed to TALK, otherwise not valid.
2
Only if Active Controller, else not valid.
GPIB READIO Register 29
Command Pass-Through
Bit 7
Bit 6
Bit 5
Bit 4
Bit 3
Bit 2
Bit 1
Bit 0
DIO8
DIO7
DIO6
DIO5
DIO4
DIO3
DIO2
DIO1
Value=128
Value=64
Value=32
Value=16
Value=8
Value=4
Value=2
Value=1
This register can be read during a bus holdoff to determine which Secondary
Command has been detected.
7-20 IBASIC Command Reference
GPIB READIO Register 31
Bus Data Lines
Bit 7
Bit 6
Bit 5
Bit 4
Bit 3
Bit 2
Bit 1
Bit 0
DIO8
DIO7
DIO6
DIO5
DIO4
DIO3
DIO2
DIO1
Value=128
Value=64
Value=32
Value=16
Value=8
Value=4
Value=2
Value=1
A set bit (1) indicates the corresponding GPIB data line is currently true, while a 0
indicates the line is currently false.
Using READIO With IBASIC Interface (Select Code 8)
For READIO and the IBASIC interface, the form to read the value of a register on
an instrument is Read_addr = READIO (8, Ladd*256 + Reg#) where Ladd is
the Logical Address of the instrument, and Reg# is the register number for the
instrument. A 16-bit INTEGER number is returned.
Using READIO With Serial Interfaces (Select Codes 9, 21-27)
To use READIO with the RS-232/422 serial interfaces, the built-in RS-232 port
must first be assigned to IBASIC with DIAG:COMM:SER:OWNER IBASIC sent
to the System instrument and/or the Agilent E1324A plug-in module (s) must be
assigned to IBASIC by setting the LADDR switch(es) to 241, 242, ..., 247.
Then, the first Agilent E1324A module (module #1) has LADD 241 and select code
21, the second module has LADD 242 and select code 22,...,and the seventh module
has LADD 247 and select code 27. Note that LADDs must be sequential and
contiguous. For example, you cannot use LADD 242 without having LADD 241.
With READIO/WRITEIO, the program can send an RS-232C BREAK signal and
read the status of the interface. (This cannot be done with ENTER/OUTPUT.) The
READIO register map for the RS-232/422 serial interfaces (select codes 9, 21-27)
follows.
IBASIC Command Reference 7-21
READIO Register Map for Serial Interfaces
Reg #
1
Title
Card Identification
Read Data Register
Returns
0 for built-in and plug-in modules
Decimal code for character returned or -1 if no
character was received (does not wait for a
character).
2
Write Data Status
3
Port Status
4
ENTER Status
0 if the last WRITEIO to WRITEIO Register 1 was
successful, 1 if unsuccessful.
Status of the serial port (changes state of interface) see Bit Map following.
Status of the last ENTER statement. See Bit Map
following.
5
Port Configuration
Buffer Size
0
6
32-bit quantity reflecting current port configuration.
Size of the port’s I/O buffers.
Bit Map for READIO Registers 3 and 4
Bit
15-1211
10
9
8
Information
Bit
Information
Parity Error
7
Unused
Overrun Error
6
Buffer Error*
DCD Line Status
5
Device Error**
RI Line Status
4
Break Error***
Framing Error
* = Received data buffer overflow
** = Errors not covered by other bits
*** = Break was received (framing error often present)
Bit
3
2
1
0
Information
DSR Line Status
CTS Line Status
RTS Line Status
DTR Line Status
Using READIO With IBASIC Memory (Select Codes 9826, 9827)
To use READIO with the IBASIC memory, use select code 9826 to read ("Peek") a
byte of data from a register or use select code -9826 to read a word of data from the
register. Select code 9827 is used for the address of a variable or array element .
For example, Peek_byte=READIO (9826, Mem_address) reads a byte of data from
memory while Peek_word=READIO (-9826 , Mem_address) reads a word of data
from memory. An example way to find the address of an array in IBASIC memory
is:
10 INTEGER A(1:10)
20 Addr = READIO (9827,A(1))
7-22 IBASIC Command Reference
REMOTE
Keyboard Executable
Programmable
In an IF...THEN...
Yes
Yes
Yes
For the IBASIC interface (select code 8), REMOTE 8 places all addressed
instruments in the REMOTE state. REMOTE 16 is not supported. REMOTE
809ss and REMOTE 16[XX]XX send the word-serial Set Lock command.
For the GPIB interface (select code 7) (System Controller mode only), REMOTE 7
places all external GPIB devices having remote/local capabilities in the REMOTE
state.
Item
I/O path name
interface select code
Example Statement
Semantics
Description
name assigned to a device or devices
numeric expression, rounded to an integer
Range
any valid name (see ASSIGN)
7 for GPIB, 8 for IBASIC
REMOTE 722
For System Controller mode only, sets external GPIB device at
primary address 22 to REMOTE state
If only the interface select code (7 or 8) is specified, the REMOTE state for all
devices on the interface having remote/local capabilites is enabled. If primary
addressing is used, only the specified devices are placed in the REMOTE state.
When the IBASIC computer is the System Controller, or at power-on or reset, or
when ABORT is executed interface devices are automatically enabled for the
REMOTE state and switch to REMOTE when they are addressed to listen.
See the REMOTE command in the Agilent Instrument BASIC Language Reference
Manual for a summary of GPIB bus actions for the REMOTE command.
IBASIC Command Reference 7-23
SPOLL
Keyboard Executable
Programmable
In an IF...THEN...
Yes
Yes
Yes
For the IBASIC interface (select code 8 or 16), SPOLL returns an integer
containing the Serial Poll response from an addressed internal instrument. SPOLL
returns the weighted sum of all bits which are set in the addressed instrument’s
Status Byte Register.
For the GPIB interface (select code 7) (System Controller mode only), SPOLL
returns an integer containing the Serial Poll response from an addressed external
GPIB device. SPOLL returns the weighted sum of all bits which are set in the
addressed instrument’s Status Byte Register.
NOTE
See the appropriate Agilent 75000 Plug-In Module User’s Manual for a description
of the instrument’s Status Byte Register. See the appropriate device programming
manual for a description of external GPIB device Status Byte Registers.
Item
I/O path name
device selector
Example Statements
Semantics
Description
name assigned to a device
numeric expression, rounded to an
integer
Range
any valid name (see ASSIGN)
must include a primary address
(see Glossary)
Dvm_stat=SPOLL(80901)
Sends Serial Poll to internal instrument at secondary address 01
and clears bit 6 (RQS) of the instrument’s Status Byte Register
Ext_stat=SPOLL(722)
For System Controller mode only, sends Serial Poll to external
GPIB device at primary address 22 and clears bit 6 (RQS) of the
device’s Status Byte Register
The SPOLL command, like the *STB? Common Command, returns the weighted
sum of all set bits in an instrument’s or device’s Status Byte Register. However,
SPOLL differs from *STB? in that SPOLL clears bit 6 (RQS) of the Status Byte
Register, while *STB? does not clear bit 6 of the register.
The IBASIC computer must be the Active Controller to execute SPOLL on
interface 7.
See the SPOLL command in the Agilent Instrument BASIC Language Reference
Manual for a summary of GPIB bus actions for the SPOLL command.
7-24 IBASIC Command Reference
TRIGGER
Keyboard Executable
Programmable
In an IF...THEN...
Yes
Yes
Yes
For the IBASIC select code 8 interface executing TRIGGER 809ss triggers the
instrument at secondary address=ss.
For the IBASIC select code 16 interface TRIGGER 16[XX]XX sends a word-serial
trigger command to a selected device.
For the GPIB interface (select code 7 - System Controller mode only), executing
TRIGGER 7 triggers all external GPIB devices that are addressed to listen, while
executing TRIGGER 7ppss triggers the external GPIB device at primary address pp
and secondary address ss.
Item
I/O path name
device selector
Example Statements
Semantics
Description
name assigned to a device or devices
numeric expression, roundd to an
integer
Range
any valid name (see ASSIGN)
(see Glossary)
TRIGGER 80901
Sends a trigger to an internal instrument at secondary address 01
TRIGGER 70922
For System Controller mode ONLY, sends a trigger to an
external GPIB device at secondary address 22
If only the interface select code (7 or 8) is specified, all instruments or devices on
that interface that are addressed to listen are triggered. If a primary or secondary
address is used, only the addressed instrument or device is triggered.
TRIGGER triggers an internal instrument or external GPIB device when all the
following conditions are true:
• The instrument’s or device’s trigger source is set to BUS (TRIG:SOUR BUS
command)
• The instrument or device is in the Wait For Trigger state.
• The instrument or device is addressed to listen.
See the TRIGGER command in the Agilent Instrument BASIC Language Reference
Manual for a summary of GPIB bus actions for the TRIGGER command.
IBASIC Command Reference 7-25
WRITEIO
Keyboard Executable
Programmable
In an IF...THEN...
Yes
Yes
Yes
WRITEIO (and READIO) provides interface functions not available with ENTER
and OUTPUT. For IBASIC, WRITEIO writes data to the specified hardware
register for the:
•
•
•
•
GPIB interface (select code 7)
IBASIC interface (select code 8) (VXI instrument registers)
Built-in RS-232C interface (select code 9)
Agilent E1324A RS-232C/422 interfaces (select codes 21-27).
WRITEIO also writes a specified byte or word to IBASIC memory (select codes
9826 and -9826). Use parameter 9827 to execute MC 68000 object code in memory.
Item
select code
register # or memory address
register or memory data
Example Statements
Semantics
Description
numeric expression,
rounded to an integer
numeric expression,
rounded to an integer
numeric expression,
rounded to an integer
Range
1 through 31; -31 through
-1; ±9826; 9827
-231 through +231 - 1
(hardware-dependent)
-231 through +231 - 1
WRITEIO 8,Ladd*256+Reg#;Set_pctl
Write data to register of instrument, where register address =
LADD*256 + Reg#
WRITEIO 9,1;Data_ser
Write data to register 1 of built-in RS-232C serial port
WRITEIO 9827,Jsr_address;DO_data
Use for CSUB execution
Since the Agilent E1406 does not support STATUS and CONTROL, READIO and
WRITEIO are added to provide interface functions not available with OUTPUT
and ENTER. For IBASIC, WRITEIO can be used with:
•
•
•
•
7-26 IBASIC Command Reference
GPIB Interface (select code 7)
IBASIC Interface (select code 8) (VXI instrument registers)
RS-232/422 Serial Interfaces (select codes 9, 21-27)
IBASIC Memory (select codes 9826, 9827)
Using WRITEIO With GPIB Interface (Select Code 7)
To use WRITEIO with the GPIB interface (select code 7), the Agilent E1406 must
be set for System Controller mode. To use WRITEIO with the GPIB interface, use
a positive select code value to write a byte of data to a register or use a negative
select code value to write a word of data to the register. The WRITEIO registers for
the GPIB interface follow.
WRITEIO Registers for the GPIB Interface
Register
Title
Reset Interface*
0
Interrupt Enable
3
Release Holdoff
4
MSB of Interrupt Mask
17
LSB of Interrupt Mask
19
Auxiliary Command Register
23
Address Register
25
Serial Poll Response
27
Parallel Poll Register
29
Data Out Register
31
* Equivalent to RESET 7
GPIB WRITEIO Register 3
Interrupt Enable
Bit 7
Bit 6
Bit 5
Bit 4
Bit 3
Bit 2
Bit 1
Enable Interrupt
X
X
X
X
X
X
Bit 0
X
Value=128
Value=64
Value=32
Value=16
Value=8
Value=4
Value=2
Value=1
X = bits 6 through 0 not implemented on GPIB interface (interface select code 7).
IBASIC Command Reference 7-27
GPIB WRITEIO Register 4
Bit 7
Value=128
Bit 6
Value=64
Bit 5
Value=32
Release Holdoff
Bit 4
Value=16
Bit 3
Value=8
Bit 2
Value=4
Bit 1
Value=2
Bit 0 X
Value=1
x = Writing anything to this register releases NDAC holdoff. If
non-zero, accept last secondary address as valid. If zero, do not
accept last secondary address(stay in LPAS or TPAS).
GPIB WRITEIO Register 17
Bit 7
Unused
Bit 6
Unused
Value=128
Value=64
Bit 5
Byte
Received
Value=32
MSB of Interrupt Mask
Bit 4
Bit 3
Ready for End
Next Byte Detected
Value=16 Value=8
Bit 2
SPAS
Value=4
Bit 1
Bit 0
Remote/
My Address
Local Change Change
Value=2
Value=1
Setting a bit of this register enables an interrupt for the specified condition.
GPIB WRITEIO Register 19
Bit 7
Trigger
Received
Value=128
Bit 6
Bit 5
Bit 4
HandshakeE Unrecognized Secondary
Command While
rror
Command
Addressed
Group
Value=64
Value=32
Value=16
LSB of Interrupt Mask
Bit 3
Clear
Received
Value=8
Bit 2
Bit 1
Bit 0
SRQ
IFC
My Address
Received Received
Received
(MLA or MTA)
Value=4
Value=2 Value=1
Setting a bit of this register enables an interrupt for the specified condition.
GPIB WRITEIO Register 23
Bit 7
Bit 6
Bit 5
Set
X
X
Value=128
Value=64
Value=32
Auxiliary Command Register
Bit 4
Bit 3
Value=16
Value=8
Bit 2
Bit 1
Bit 0
Auxiliary Command Function
Value=4
Value=2
Value=1
Bit 7 is set (1) for a Set operation and clear (0) for a Clear operation.
Bits 6 and 5 are "don’t cares".
Bits 4 through 0 are Auxiliary-Command-Function-Select bits.
NOTE
The commands shown in the following table can be sent to the interface by
sending the specified numeric values to GPIB WRITEIO Register 23.
7-28 IBASIC Command Reference
GPIB WRITEIO Register 23 - Auxiliary Commands
Decimal Value
0
128
1
129
2
130
3
131
4
132
5
133
6
134
7
135
8
136
9
137
10
138
11
139
12
140
13
141
14
142
15
143
16
144
17
145
18
146
19
147
20
148
21
149
22
150
152
Auxiliary Command Description
Clear Chip Reset
Set Chip Reset
Release ACDS holdoff. If Address Pass Through is set, it indicates an invalid secondary
has been received.
Release ACDS holdoff. If Address Pass Through is set, it indicates a valid secondary
has been received.
Release RFD holdoff.
Same command as decimal 2 (above).
Clear holdoff on all data.
Set holdoff on all data.
Clear holdoff on EOI only.
Set holdoff on EOI only.
Set New Byte Available (nba) false.
Same command as decimal 5 (above).
Pulse the Group Execute Trigger line, or clear the line if it was set by decimal command
134.
Set Group Execute Trigger line.
Clear Return To Local (rtl).
Set Return To Local (must be cleared before the device is able to enter the Remote state).
Causes EOI to be sent with next data byte.
Same command as decimal 8 (above).
Clear Listener State (also cleared by decimal 138).
Set Listener State.
Clear Talker State (also cleared by decimal 137).
Set Talker State.
Go To Standby (gts; controller sets ATN false).
Same command as decimal 11 (above).
Take Control Asynchronously (tca; ATN true).
Same command as decimal 12 (above).
Take Control Synchronously (tcs; ATN true).
Same command as decimal 13 (above).
Does not apply to Agilent E1406.
Does not apply to Agilent E1406.
Clear the Interface Clear line (IFC).
Set Interface Clear (IFC maintained > 100 usec).
Clear the Remote Enable (REN) line
Set Remote Enable
Request control (after TCT is decoded, issue this to wait for ATN to drop and receive
control).
Same command as decimal 17 (above).
Release control (issued after sending TCT to complete a Pass Control and set ATN false).
Same command as decimal 18 (above).
Enable all interrupts.
Disable all interrupts.
Pass Through next Secondary Command.
Same command as decimal 20 (above).
Set TI delay to 10 clock cycles (2 us at 5 MHz).
Set TI delay to 6 clock cycles (1.2 us at 5 MHz).
Clear Shadow Handshake.
Set Shadow Handshake.
Set RSV2.
IBASIC Command Reference 7-29
GPIB WRITEIO Register 25
Bit 7
Bit 6
Bit 5
Enable
Dual
Addressing
Disable
Listen
Disable
Talker
Value=128
Value=64
Value=32
Bit 4
Address Register
Bit 3
Bit 2
Bit 1
Bit 0
Value=2
Value=1
Primary Address
Value=16
Value=8
Value=4
Bit 7 set (1) enables the Dual-Primary-Addressing Mode.
Bit 6 set (1) invokes the Disable-Listen function.
Bit 5 set (1) invokes the Disable-Talker function.
Bits 4 through 0 set the device’s Primary Address (same address bit definitions as
READIO Register 5). Writing to this register also sets the Agilent E1406 non-volatile
mainframe address to the value of the Primary Address.
GPIB WRITEIO Register 27
Bit 7
DeviceDependent
Status
Value=128
Bit 6
Request
Service
(RSV1)
Value=64
Bit 5
Bit 4
Serial Poll Response Byte
Bit 3
Bit 2
Bit 1
Bit 0
Value=2
Value=1
Device-Dependent Status
Value=32
Value=16
Value=8
Value=4
Bits 7 and 5 through 0 specify the Device-Dependent Status.
Bit 6 sends an SRQ if set (1).
NOTE
Given an unknown state of the Serial Poll Response Byte, it is necessary to write
the byte with Bit 6 set to zero followed by a write of the byte with bit 6 set to the
desired final value. This will ensure that an SRQ will be generated if desired
(RSV1).
RSV2 can be used to set the SRQ bit with a Serial Poll automatically clearing this
bit. When RSV1 is used, you must clear bit 6 with another WRITEIO command.
7-30 IBASIC Command Reference
GPIB WRITEIO Register 29
Parallel Poll Response
Bit 7
Bit 6
Bit 5
Bit 4
Bit 3
Bit 2
Bit 1
Bit 0
DIO8
DIO7
DIO6
DIO5
DIO4
DIO3
DIO2
DIO1
Value=128
Value=64
Value=32
Value=16
Value=8
Value=4
Value=2
Value=1
A 1 sets the appropriate bit true during a Parallel Poll, while a 0 sets the
corresponding bit false. Initially, and when Parallel Poll is not configured, this register
must be set to all zeros.
GPIB WRITEIO Register 31
Bit 8
Bit 7
Bit 6
Bit 5
Bit 4
Data-Out Register
Bit 3
Bit 2
Bit 1
Bit 0
EOI*
DIO8
DIO7
DIO6
DIO5
DIO4
DIO3
DIO2
DIO1
Value = 256
Value=128
Value=64
Value=32
Value=16
Value=8
Value=4
Value=2
Value=1
* = Setting this bit asserts EOI with the data byte specified in bits 0 through 7
Using WRITEIO With IBASIC Interface (Select Code 8)
To use WRITEIO to write to instruments via the IBASIC interface (select code 8),
the form is WRITEIO 8, Ladd*256 + Reg#; Datum where Ladd is the Logical
Address of the instrument to be written to, Reg# is the register number on the
instrument, and Datum is a 16-bit INTEGER number.
Using WRITEIO With Serial Interfaces (Select Codes 9, 21-27)
To use WRITEIO for a serial interface, the built-in RS-232 port must first be
assigned to IBASIC with DIAG:COMM:SER:OWNER IBASIC sent to the System
instrument or the Agilent E1324A plug-in module(s) must be assigned to IBASIC
by setting the LADD switch(es) to 241, 242, ..., 247.
Then, the first Agilent E1324A module (module #1) has LADD 241 and select code
21, the second module has LADD 242 and select code 22,..., and the seventh
module has LADD 247 and select code 27. Note that LADDs must be sequential
and contiguous. For example, you cannot use LADD 242 without having LADD
241.
With READIO/WRITEIO, the program can send an RS-232C BREAK signal and
read the status of the interface. (This cannot be done with ENTER/OUTPUT.)
The WRITIO register map for the RS-232/422 serial interfaces follows.
WRITEIO Register Map for RS-232/422 Serial Interfaces
Reg #
Title
Action
Clears transmit/receive buffers*
Interface Reset
0
Write character to serial port without waiting
Write Data
1
Send break to serial port
Send Break
2
* = Does not change port settings such as baud rate, etc.
IBASIC Command Reference 7-31
There are two steps to write data to a serial interface using WRITEIO (and
READIO):
1. Use WRITEIO <sc>,1;Data to write data to the Write Data register
(WRITEIO register 1) for the code to be used.
2. Use READIO (<sc>,2) to read the results from READIO register 2 (Write
Data Status). If "0" is returned, the write to WRITEIO register 1 was
successful. If "1" is returned, the write was not successful, and the process
must be repeated.
For example:
100 WRITEIO 21,1;Data_ser
Writes data to WRITEIO register 1 (Write Data register)
110 A = READIO (21,2)
Reads READIO register 2 (Write Data Status register). If the
write was successful, 0 is returned. If unsuccessful, 1 is returned
and you should repeat the process.
Using WRITEIO With IBASIC Memory (Select Codes 9826, 9827)
To use WRITEIO with the IBASIC memory, use a positive select code value to
write a byte of data to a memory address or use a negative select code value to
write a word of data to a memory address. However, you cannot access memory
locations below 1E000h.
Using select code 9826 allows you to write directly into IBASIC memory
addresses. Using select code 9827 allows you to execute a machine-language JSR
("Jump to Subroutine") instruction.
Using select code 9826 lets you write directly into IBASIC memory addresses.
For example:
WRITEIO 9826, Mem_address; Data_byte
Writes a byte of data to IBASIC memory
WRITEIO -9826, Mem_address; Data_word
Writes a word of data to IBASIC memory
The second parameter in WRITEIO is the memory address of the byte or word to be
written and is interpreted as a decimal address. For example, an address of 100 000
is 10 5. The third parameter is also interpreted as a decimal number.
CAUTION
Writing into certain memory addresses may damage your computer’s
hardware. (See your computer manuals for a description of the computer
architecture.). To avoid this, only write into numeric array variables with
WRITEIO. Agilent Technologies cannot be held liable for any damages
caused by improper use of this feature.
7-32 IBASIC Command Reference
Using select code 9827 lets you execute an MC 68000 machine-language JSR
("Jump to Subroutine") instruction. One parameter can be specified in the
WRITEIO statement (DO_data in the example below), which will be written in the
processor’s DO register before the JSR instruction is executed and pushed onto the
A7 stack.
The following example program shows one way to place a machine-language
subroutine in an INTEGER array and then jumping to this subroutine.
10
20
100
110
115
120
130
140
DATA (INTEGER values of MC 68000 machine-language
DATA instructions go here.)
.
INTEGER Int_array (1:100)
READ Int_array(*), DO_data
!Read instructions
!
and DO register data
Jsr_addr=READIO(9827,Int_array(1))
!Get JSR address
WRITEIO 9827, Jsr_addr;DO_data
!Put data in DO, then do
PRINT "Returned from subroutine"
JSR
.
.
For this program, IBASIC first keeps a copy of the MC 68000 processor registers
D0 through D7 and A0 through A6 on the stack. Then the value represented by the
expression DO_data is placed in the DO register and is pushed onto the stack, and a
machine-language JSR instruction is executed. The value of the expression
Jsr_addr is the address of an INTEGER array that contains machine-language
instructions. The value of Jsr_addr is forced to an even address before the JSR is
executed.
The last instruction in the subroutine should return control to IBASIC with an RTS
("Return from Subroutine") instruction. IBASIC will first restore the processor
registers and pop the data value (from the stack) to the state they were in before the
JSR was performed (by the WRITEIO statement).
Register A7 (the stack pointer) must have the same value at the final RTS as it had
when IBASIC executed the JSR. The other processor register can be used freely in
the assembly routine. IBASIC then resumes program execution at the line following
the WRITEIO statement.
IBASIC Command Reference 7-33
7-34 IBASIC Command Reference
Chapter 8 Contents
Using This Chapter
8-1
SCPI Conformance Information 8-1
SCPI Command Overview 8-4
SCPI Command Format . . .
SCPI Command Types . . . .
SCPI Command Parameters .
SCPI Response Data Formats
.
.
.
.
.
.
.
.
.
.
.
.
.
.
.
.
.
.
.
.
DIAGnostic Subsystem Commands
8-8
PROGram Subsystem Commands
8-16
.
.
.
.
.
.
.
.
.
.
.
.
.
.
.
.
.
.
.
.
.
.
.
.
.
.
.
.
.
.
.
.
.
.
.
.
.
.
.
.
.
.
.
.
.
.
.
.
.
.
.
.
.
.
.
.
.
.
.
.
.
.
.
.
.
.
.
.
.
.
.
.
.
.
.
.
.
.
.
.
.
.
.
.
.
.
.
.
.
.
.
.
.
.
.
.
.
.
.
.
.
.
.
.
.
.
.
.
8-4
8-5
8-6
8-7
SYSTem Subsystem Commands . . . . . . . . . . . . . . . . . . . . . . . . . . . . . . . 8-26
Chapter
8
SCPI Command Reference
Using This Chapter
This chapter describes the Standard Commands for Programmable Instruments
(SCPI) commands which apply to the IBASIC instrument in the Agilent E1406.
Chapter contents are:
• SCPI Conformance Information shows SCPI commands implemented by
the IBASIC instrument.
• SCPI Command Overview summarizes SCPI command structure and
parameter types.
• SCPI Command Descriptions describes the SCPI commands which apply
to the IBASIC instrument. The SCPI commands must be sent to the IBASIC
instrument at secondary address 30. For example:
OUTPUT 80930;"DIAG:IBAS:DISP BUIL"
Command sent from IBASIC
OUTPUT 70930;"DIAG:IBAS:DISP BUIL"
Command sent from external controller
1
SCPI Conformance
Information
The following tables show the Standard Commands for Programmable Instruments
Standard Version 1990.0 SCPI confirmed commands and commands that are not
part of the 1990.0 SCPI standard but are implemented by the IBASIC instrument.
Commands that are not part of the SCPI Standard Version 1990.0 definition are
indicated by a [Not SCPI] entry in the Notes column. The SCPI commands must
be sent to the IBASIC Instrument at address 80930. For example:
SCPI Command Reference 8-1
DIAGnostic Subsystem Commands for IBASIC
Keyword
Parameter Form
DIAGnostic
:COMM
:SER[n]
:STORe
:FILESystem
:FILESystem?
:IBASic
:BLOCKsize
:BLOCKsize?
:DISPlay
:DISPlay?
:STACKsize
:STACKsize?
:SYNC
[:CLOCk]
[:CLOCk]?
Notes
[Not SCPI]
<parameter>,<value>
<parameter>
<bytes>
<parameter>
<bytes>
PROGram Subsystem Commands for IBASIC
Keyword
PROGram
:CATalog?
[:SELected ]
:DEFine
:DEFine?
:DELete
:EXECute
:MALLocate
:MALLocate?
:NAME
:NAME?
:NUMBer
:NUMBer?
:STATe
:STATe?
:STRing
:STRing?
:WAIT
:WAIT?
8-2 SCPI Command Reference
Parameter Form
Notes
[query only]
<program_code>
<progname>
<program_command>
<nbytes>|DEFault
<progname>
<varname> [,<nvalues>]
<varname>
RUN|PAUSe|STOP|CONTinue
<varname> [,<svalues>]
<varname>
[no query]
[no query]
SYSTem Subsystem Commands for IBASIC
Keyword
SYSTem
:COMMunicate
:SERial[n]
:CONTrol
:DTR
:DTR?
:RTS
:RTS?
[:RECeive]
:BAUD
:BAUD?
:BITS
:BITS?
:PACE
[:PROTocol]
[:PROTocol]?
:THReshold
:STARt
:STARt?
:STOP
:STOP?
:PARity
:CHECk
:CHECk?
[:TYPE]
[:TYPE]?
:SBITs
:SBITs?
:TRANsmit
:AUTO
:AUTO?
:PACE
[:PROTocol]
[:PROTocol?]
:ERRor?
Parameter Form
ON|OFF|STANdard|IBFull
ON|OFF|STANdard|IBFull
Notes
[Not SCPI]
[Not SCPI]
[Not SCPI]
[Not SCPI]
[Not SCPI]
<baud_rate>|MIN|MAX
[MIN|MAX]
7|8|MIN|MAX
[MIN|MAX]
XON|NONE
<characters>|MIN|MAX
[MIN|MAX]
<characters>|MIN|MAX
[MIN|MAX]
[Not SCPI]
[Not SCPI]
[Not SCPI]
[Not SCPI]
[Not SCPI]
[Not SCPI]
[Not SCPI]
1|0|ON|OFF
EVEN|ODD|ZERO|ONE|NONE
1|2|MIN|MAX
[MIN|MAX]
1|0|ON|OFF
XON|NONE
[Not SCPI]
[Not SCPI]
SCPI Command Reference 8-3
1
SCPI Command
Overview
This section summarizes SCPI command format and structure. See the Beginner’s
Guide to SCPI (available from your Agilent Technologies Sales and Support
Office) for a complete description of SCPI command formats and structure.
SCPI Command Format
As defined in the Standard Commands for Programmable Instruments Manual,
Standard Commands for Programmable Instruments (SCPI) commands are
organized into a hierarchial command structure and are grouped into subsystem
command groups.
The subsystem command structure generally consists of a top-level (root)
command and one or more lower-level commands. Each command consists of a
keyword and (possibly) one or more parameters. Commands can be abbreviated
or can be implied. Implied commands appear in square brackets ([]), but the
brackets are not sent with the command.
A colon (:) always separates a command from the next-level command. Unless
specified, a command always has a query version which is the command followed
by a question mark (?). Lower-level commands may or may not have parameters.
Parameters (when specified) can be required or optional. Optional parameters are
enclosed in square brackets ([]), but the brackets are not sent with the command.
For example, in the following command table, PROGram is the keyword for the
PROGram subsystem command group and is the root command, :CATalog? is a
first-level (required) command, [:SELected] is a first-level implied command,
:DEFine is a second-level command, and :DEFine? is the query version of
:DEFine.
Typical PROGram Subsystem Commands
Keyword
PROGram
:CATalog?
[:SELected ]
:DEFine
:DEFine?
Parameter
<program_code>
The parameter for :DEFine is <program_code>. Since the parameter is not
enclosed in square brackets ([]), it is a required parameter. You can use colons to
form commands using keywords from different levels. Two examples are:
PROGram:CATalog? and PROGram:SELected:DEFine <program_code>.
8-4 SCPI Command Reference
SCPI Command Types
SCPI commands can be required, abbreviated, or implied and usually have a
query form. In addition, some commands have what appears to be a variable
syntax.
Required
Commands
Commands in the syntax tables which are not enclosed in square brackets ([]) are
required commands and must be sent in the form shown. (See Abbreviated
Commands which follows.)
Abbreviated Commands
The command syntax shows most commands as a mixture of upper- and lower-case
letters. The upper-case letters indicate the short form of the command and must be
used. The lower-case letters are optional and can be used as desired in the
command. You can use all upper-case, all lower-case, or a mixture of letters.
For example, if the command syntax shows DEFine, then DEF or DEFINE is
acceptable. Other forms of DEFine, such as DEFIN or DE will generate an error.
Since upper-case and lower-case letters can be used, DeFiNe, def, define, etc. are
also acceptable.
Implied Commands
Implied commands appear in square brackets ([]) in the command syntax. (Note
that the brackets are not part of the command and are not sent to an instrument.)
When you send a lower-level command without sending the preceding implied
command, the instrument responds as if the implied command had been sent.
For example, since [:SELected] is an implied command for the PROGram
subsystem, PROGram:SELected:DEFine <program_code> and PROGram:DEFine
<program_code> are equivalent.
Query Commands
Variable Command Syntax
Unless noted, all SCPI commands have a query version formed by adding a
question mark (?) to the command. For example, PROG:DEF? is the query version
of the PROG:DEF command. In this manual, commands which do not have a
query version are indicated by [no query] in the subsystem command table.
Commands which are query ONLY are indicated by a [query only] entry in the table.
A few commands use what appears to be a variable syntax. For example, in
SYST:COMM:SER[n], the "n" is replaced by a number from 0 through 7. In this
case, no space is left between the command and the number since the number is
NOT a parameter, but is part of the command syntax. Since [n] is optional, if no
value is entered for "n", a default value is used.
SCPI Command Reference 8-5
SCPI Command
Parameters
Some SCPI commands have parameters which can be required or optional. In this
manual, <> denotes a required parameter and [] denotes an optional parameter.
The <> and [] notations are not part of the parameter and are not sent with the
command.
If you do not specify a value for an optional parameter, the instrument chooses a
default value. For example, consider the command
SYST:COMM:SER1:CONT:BAUD? [MIN|MAX]. The command sent without a
parameter returns the current baud rate.
The command sent with the MIN parameter returns the minimum baud rate
available, while the command sent with the MAX parameter returns the maximum
baud rate available. The following table summarizes SCPI command parameter
types.
SCPI Parameter Types
Parameter
Type
Numeric
Extended
Numeric
Boolean
String
Indefinite
Length
Block
Definite
Length
Block
Nondecimal
Numeric
Description
Decimal representation of numbers including
optional signs, decimal points and scientific
notation.
Same as Numeric plus MAX, MIN, and
DEFault parameter values.
Represents a single binary condition that is
either TRUE or FALSE. One of four possible
values: ON|OFF|1|0.
Contains virtually any set of ASCII characters.
Must begin with a single or double quote and
end with the same character (a delimiter).
Typically used to transfer large quantities of
related data. General form is
#0,<data_bytes><new line><^END>.
General form is #<num_digits><num_bytes>
<data_bytes> where <num_digits> specifies
how many digits are in <num_bytes> and
<num_bytes> specified the number of data
bytes in <data_bytes>.
Specify settings in hexadecimal, octal, or binary
formats.
8-6 SCPI Command Reference
Examples
100, 100., -1.23,
4.56e<space>3
100, 100., -1.23,
MAX, MIN, DEF Discrete
ON Boolean TRUE
OFF Boolean FALSE
’this is a string’
"this is also a string"
’single quote inside brackets [’’]’
OUTPUT @Box;"#0ABC",END
sends ABC as indefinite length block
parameter.
OUTPUT @Box;"#13ABC" sends
ABC as definite length block
parameter, where 1 = one digit
follows and 3 = 3 bytes in the digit.
#b0101 = binary for decimal 5
#Q71 = octal for decimal 57
#hFA = hexadecimal for decimal 250
SCPI Response Data
Formats
SCPI command response data is data returned from an instrument to the IBASIC
computer or to an external computer. The following table summarizes response
data formats.
Response Data Types
Response
Data Type Description
Real
Decimal numbers in fixed decimal notation or
in scientific notation.
Integer
Decimal representations of integer values
including optional signs.
Discrete
String
Returns short form of specific set of values.
Similar to string parameters, except use only
double quotes as delimiters.
Definite
Length
General form is #<num_digits><num_bytes>
<data_bytes>, where <num_digits> specifies
number of digits in <num_bytes> and
<num_bytes> specifies how many bytes of data
follow in <data_bytes>.
General form is
#0<data_bytes><new_line><^END>.
Format values as base 16 numbers. H and A-F
are always upper-case.
Format values as base 2 numbers. B is always
upper-case.
Indefinite
Length
Hexadecimal
Binary
Examples
1.23E+0, 1.23, -100.0
0, +100, -100
INT, EXT, POS, NEG
"This IS valid"
"SO IS THIS "" "
"I said, ""Hello!"""
#16SAMPLE
6 bytes of data
#2111.1,2.2,3.3
11 bytes of data
#19???+++!!!
9 bytes of data
#0this is a sample block
#0111111110000000011111111
#H0F0F, #H1A1A, #H2B2B Octal
#B00001111, #B00000000
SCPI Command Reference 8-7
:COMMunicate
1
DIAGnostic
Subsystem
Commands
For IBASIC, the DIAGnostic subsystem can be used to adjust the Agilent E1406
file system, set memory sizes, and adjust the IBASIC operating system clock time.
The DIAGnostic subsystem commands table for the IBASIC instrument follows.
DIAGnostic Subsystem Commands for IBASIC
Keyword
DIAGnostic
:COMM
:SER[n]
:STORe
:FILESystem
:FILESystem?
:IBASic
:BLOCKsize
:BLOCKsize?
:DISPlay
:DISPlay?
:STACKsize
:STACKsize?
:
SYNC
[:CLOCK]
[:CLOCK]?
Parameter Form
Description
<parameter>,<value>
<parameter>
Sets current RS-232 parameters as power-on defaults
Allows adjustment of IBASIC file system
Query IBASIC file system parameters
<bytes>
<parameter>
<bytes>
Sets memory size IBASIC requests from operating system
Query memory size - return is number of bytes
Use to connect IBASIC to display at power-on
Query current DISPlay parameter specified
Sets run-time stack size for IBASIC at power-on
Query stack size parameter
Set IBASIC clock to within one second of real-time clock
Query time difference between IBASIC and real-time clock
:COMMunicate
:SERial[n]:STORe
DIAGnostic:COMMunicate:SERial[n]:STORe stores the serial communications
parameters (such as BAUD, BITS, PARity, etc.) into non-volatile storage for the
serial interface specified by [n] in SERial[n].
Comments
• Until DIAG:COMM:SER[n]:STORe is executed, communication parameter
values are stored in volatile memory, and a power failure will cause the
settings to be lost.
• DIAG:COMM:SER(1-7):STOR causes an Agilent E1324A to store its
settings in an on-board EEROM. Since this EEROM write cycle takes
nearly one second to complete, wait for this operation to complete before
attempting to use that serial interface.
• The Agilent E1324A’s EEROM used to store its serial communication
settings has a finite lifetime of approximately ten thousand write cycles.
Even if your application program sent the STORe command once every day,
the lifetime of the EEROM would still be over 27 years. However, do not
use the STORe command to an Agilent E1324A more often than necessary.
• Related Commands: all SYST:COMM:SER[n]:... commands
Example
Store Settings for Agilent E1324A Module #3.
DIAG:COMM:SER3:STOR
Stores current settings for RS-232 parameters in Agilent E1324A
module #3 EEROM
8-8 SCPI Command Reference
:FILESystem
:FILESystem
Parameters
Parameter
1
2
3
4
5
6
7
8
9
10
11
12
13
14
15*
16*
17*
18*
19*
DIAGnostic:FILESystem <parameter>, <value> allows the user to adjust the
IBASIC file system by modifying parameters stored in nonvolatile RAM.
Modifying these parameters allows the user to trade memory use for performance.
The following table defines the DIAGnostic:FILESystem parameters and values
which can be set and shows the range of value and the default value. Unless
indicated, all values are 16-bit unsigned quantities.
Parameter Description
USER_START: Memory address of the start of a user-defined
RAM disk that will become memory volume ":,0,16" after it is
initialized. Zero means user RAM disk not present.
USER_END: Memory address one byte past the end of a
user-defined RAM disk. This value must be greater than
USER_START value.
FILE_BUFFER: One for each file which can be opened.
COPY_BUFFER: Used to copy files and during media
initialization. One/each task using file system.
SECTOR_BUFFER: Used by low-level disk read/write routines
for partial sector reads and writes.
Range of value
24 bits
Defaultvalue
0
24 bits
0
512 - 65535
1024 - 65535
2048
32768
512 - 65535
1024
FAT_BUFFER: Used for DOS disks to keep track of the file
512 - 65535
allocation table. One for each disk unit that can be on-line at a time.
TRANS_METHODS: Reserved - DO NOT CHANGE!
4 - 32
FILE_SYSTEMS: Reserved - DO NOT CHANGE!
3 - 32
3 - 32
MAX_UNITS: Maximum number of disks that can be on-line.
Any IBASIC command that causes a reference to the disk (MSI,
CAT, ASSIGN, etc.) puts the disk on-line if the disk exists.
0 - MAX_UNITS
INITIAL_UNITS: Memory is reserved for this many disks at
power-on. If more disks are required (up to MAX_UNITS),
memory is allocated when disks needed.
MAX_FILES: Maximum number of files that can be open at once
6 - 256
for the entire file system.
INITIAL_FILES: At power-on, memory is reserved for the
0 - MAX_FILES
number of files specified.
0 - 65535
DISK_WAIT: Number of seconds Agilent E1406 will wait for a
disk to power up while searching for the AUTOST program. If a
disk is not readable after this time, AUTOST is not performed.
0 or any nonAUTOSTART: If zero,IBASIC will not AUTOST, thus avoiding
zero number
the DISK_WAIT at power-on. If non-zero, IBASIC searches
available disks for an AUTOST program (see parameters 15-26).
DISK1_TYPE:
N/A
DISK1_SC: Select Code (and Primary Addr if type = 1)
N/A
DISK1_UNIT: Mass Storage Unit Number of disk
N/A
DISK1_VOL: Mass Storage Volume Number of disk
N/A
DISK2_TYPE:
N/A
4608
5
4
10
3
30
10
60
1
1
700
1
0
3
SCPI Command Reference 8-9
:FILESystem
Parameter
20*
21*
22*
23*
24*
25*
26*
27**
28***
1000
1001
10021015
1016
Parameter Description
DISK2_SC: Select Code (and Primary Addr if type = 1)
DISK2_UNIT: Mass Storage Unit Number of disk
DISK2_VOL: Mass Storage Volume Number of disk
DISK3_TYPE:
DISK3_SC: Select Code (and Primary Addr if type = 1)
DISK3_UNIT: Mass Storage Unit Number of disk
DISK3_VOL: Mass Storage Volume Number of disk
TMARRAY_START: Address of the beginning of the transfer
method array (query only). This is the address of the first element
of an array of four 32-bit pointers to transfer method functions for
disks (the functions that know how to physically read and write to
the disk).
FSARRAY_START: The address of the beginning of an array of
(FILESYSTEM) 32-bit pointers to structures describing the disk
types (LIF or DOS) the file system can recognize.
RAMVOL0_START (Query only): The starting memory address
of "MEMORY,,0,,0". If this RAMVOL has not been defined, 0 is
returned.
RAMVOL1_START (Query only): The starting memory address
of "MEMORY,,0,,1". If this RAMVOL has not been defined or it
is non-volatile, 0 is returned.
RAMVOL2_START - RAMVOL15_START (Query only): The
starting memory address of any of the nonvolatile RAM volumes 2
through 15. If the RAMVOL has not been defined, 0 is returned.
RAMVOL16_START (Query only): The starting memory address
of "MEMORY,,0,,16". If this RAMVOL has not been defined, 0
is returned.
Range of value
N/A
N/A
N/A
N/A
N/A
N/A
N/A
0-3
Defaultvalue
0
1
0
1
700
0
0
0-n
* = See Default Search Order for AUTOST in Comments
** = See Transfer Method Array in Comments
*** = See File Type Structures in Comments
Comments
• Default Search Order for AUTOST. Parameters 15 - 26 of the
DIAG:FILESystem command determine which disks the Agilent E1406 will
search for the AUTOST program. Three disks will be searched. The default
search order follows (the Volume # must be 0 for RAM volumes and 3.5
inch disks).
DISK 1 = 3.5 inch disk
- ":,700,1"
DISK 2 = Nonvolatile RAM Disk - ":0,1"
DISK 3 = Hard Disk Drive
- ":,700,0"
Parameters 15-18 describe the first disk searched. Parameters 19-22
describe the second disk searched. Parameters 23-26 describe the third disk
searched.
8-10 SCPI Command Reference
:FILESystem
• Disk Types 1 and 3 Recognized. The Agilent E1406 recognizes only disk
type 1 (GPIB SS80) and disk type 3 (MEMORY). Thus, the Default value
column for DISKn_TYPE (parameters 15, 19, and 23) must be 1 or 3.
• Disk Wait. Even when autostarting from a RAM volume, IBASIC will wait
for the floppy disk to power up to check for the "AUTOST" program on the
floppy. The wait time is set by parameter 13. If the floppy is recognized
before this time has elapsed, and there is no "AUTOST" program on the
floppy, IBASIC will boot on the RAM volume.
• Hard Disk Settings. The hard disk must be set to address 0 for the default
search to work. If you set your disk to a different address, modify the
DISKn_SC (parameters 16, 20, or 24) to the new address. For example, if
you set the hard disk to address 2, set DISK3_SC (parameter 24) to 702.
• Transfer Method Array. TMARRAY_START (parameter 27) defines the
address of the first element of an array of four 32-bit pointers to transfer
method functions for disks. The element numbers are:
Element #
0
1
2
3
Transfer Method
NULLDEV (returns ERR8 - don’t replace this!)
EXTERNAL (returns ss80tm)
INTERNAL (returns uninittm - can be redefined)
MEMORY (returns ramtm)
• File Type Structures. FSARRAY_START (parameter 28) defines the
address of the beginning of an array of (FILESYSTEMS) 32-bit pointers to
structures describing the disk types (LIF or DOS) that the file system can
recognize. The array is searched from high element to low element
whenever a disk is first checked to see if the disk contains a recognized file
system. If the disk is recognized, the search ends. The element numbers are:
Element #
0
1
2
n
File System Type
Unrecognized (do not replace this!)
LIF
DOS
(NULL) - marks the end of the list
Related Commands: None
Example
Disable AUTOSTART Search
DIAG:FILES 14,0
Since <value> is 0, the Agilent E1406 will not attempt to find an
AUTOST program and the DISK_WAIT (parameter 13) wait time
will not occur at power-on.
SCPI Command Reference 8-11
:FILESystem?
:FILESystem?
DIAGnostic:FILESystem? returns the current value for the
DIAGnostic:FILESystem parameter specified.
• Related Commands: DIAG:FILESystem
Comments
Example
Read AUTOSTART Parameter Value
DIAG:FILES? 14
Returns 1 if AUTOSTART (parameter 14) is enabled or returns 0
if AUTOSTART is disabled.
:IBASic:BLOCKsize
DIAGnostic:IBASic:BLOCKsize <bytes> sets the size of memory that IBASIC
requests from the operating system whenever more memory is required for program
storage.
Parameters
Name
bytes
Description
Sets size of memory
IBASIC will request.
Range
1024 - 65536 bytes
Default
8192 bytes
Comments
• Setting BLOCKsize. The bytes parameter can be set at any time, but
changes take effect only with the next system reset or power-on. Setting
bytes = 0 causes the operating system to use the default setting (8192 bytes).
• Related Commands: DIAG:IBAS:STAC
Example
Set IBASIC Memory Block Size
DIAG:IBAS:BLOCK 16384
After system reset or after cycling power, sets 16384 bytes as the
size of the memory block IBASIC will request if more memory is
required for program storage.
:IBASic
:BLOCKsize?
Example
DIAGnostic:IBASic:BLOCKsize? returns the current value for the
DIAGnostic:IBASic:BLOCKsize bytes parameter.
Read IBASIC Memory Block Size
DIAG:IBAS:BLOCK?
Returns the size of memory of the memory block IBASIC will ask
for after a system reset or power is cycled.
8-12 SCPI Command Reference
:IBASic:DISPlay
:IBASic:DISPlay
Parameters
Comments
DIAGnostic:IBASic:DISPlay <parameter> allows the built-in RS-232 port or
Agilent E1324A plug-in module RS-232 ports to be automatically connected to
IBASIC at power-on.
Name
NONE
BUILtin
Description
IBASIC not connected to any display
IBASIC is connected to built-in RS-232 port
if port is type A (see Comments)
Range
N/A
N/A
number
IBASIC is connected to Agilent E1324A
RS-232 port if port exists and is type A (see
Comments). number = 1 connects Agilent
E1324A #1 port, etc.
1-7
• Serial Ports Must be Assigned to User Interface. For the
DIAG:IBASic:DISPlay command to work, the RS-232 port(s) must be
assigned to the User Interface (port type A) with DIAG:COMM:SER:OWN
SYST. The Agilent E1324A serial ports are assigned to the User Interface
by setting the LADD switches to 1, 2,...,7.
• Related Commands: DIAG:FILESystem
Example
IBASIC Set on Built-in RS-232 Interface
DIAG:IBAS:DISP BUIL
When command is executed and power is cycled, the terminal
connected to the buiult-in RS-232 interface shows IBASIC_240:
:IBASic:DISPlay?
Example
DIAGnostic:IBASic:DISPlay? returns the current value for the
DIAGnostic:IBASic:DISPlay parameter specified.
Read DIAG:IBAS:DISP Parameter Value
DIAG:IBAS:DISP BUIL
Connects built-in RS-232 port to IBASIC computer after power is
cycled.
DIAG:IBAS:DISP?
Returns "BUIL" since the built-in RS-232 port is connected to
IBASIC.
SCPI Command Reference 8-13
:IBASic:STACKsize
:IBASic:STACKsize
DIAGnostic:IBASic:STACKsize <bytes> sets the run-time stack size allocated to
IBASIC at power-on. The IBASIC stack is used for arrays and variables which are
not in COM memory and for temporary storage when an IBASIC program is run.
DIAG:IBAS:STACK also sets the initial value returned by the
PROGram:MALLocate ? command after a power-on cycle.
Parameters
Name
bytes
Comments
• Setting STACksize. The bytes parameter can be set at any time, but the
change takes effect only with the next system reset or power-on. Setting
bytes = 0 causes the operating system to use the default setting (32768 bytes).
Description
Sets run-time stack size for
IBASIC at power-on.
Range
3072 bytes available memory
Default
32768 bytes
• Corrections for Memory Overflow Error. If ERROR 2 - Memory
Overflow occurs when the RUN command is issued for an IBASIC program,
the stack size is too small. To correct this, you can use the
DIAG:IBAS:STACK command to increase stack size, cycle power, and retry
the program.
• Corrections Using COM Blocks. You can also define large arrays in the
program in a COM block. Since COM memory is not taken from the stack
requirements for the program, you may be able to run the program without
cycling power.
• Related Commands:DIAG:IBAS:BLOC, PROG:MALL
Example
Set IBASIC Stack Size
DIAG:IBAS:STACK 16384
After system reset or cycling power, sets 16384 bytes as the size
of the run-time stack for IBASIC (the default value for the
PROG:MALL command).
:IBASic:
STACKsize?
Comments
Example
DIAGnostic:IBASic:STACKsize? returns the current value for the
DIAGnostic:IBASic:STACKsize bytes parameter.
Related Commands: DIAG:IBAS:STACK
Read IBASIC Run-Time Stack Size
DIAG:IBAS:STACK?
Returns the size of the run-time stack for IBASIC.
8-14 SCPI Command Reference
:IBASic:SYNC
:IBASic:SYNC
Parameters
Comments
DIAGnostic:IBASic:SYNC[:CLOCk] resets the IBASIC operating system clock
to within one second of the real-time clock.
None
• Setting Operating System Clock. All IBASIC times are derived from the
operating system clock. The operating system clock is set to the real-time
clock at system reset, at power-on, or when the real-time clock is set with
SYST:TIME.
• Operating System Clock Errors. The operating system clock may lose
time during certain operations when interrupts are turned off for more than
10 msec. The DIAG:IBASic:SYNC[:CLOCK] allows you to set the
operating system clock to within one second of the battery-backed real-time
clock.
• Operating System Clock Errors Effect on TIMEDATE. Since all IBASIC
times are derived from the operating system clock, errors in this clock will
affect the TIMEDATE reported by IBASIC and the time/date stamp on files
in the file system.
• Related Commands: SYST:TIME, SYST:TIMEDATE
Example
Set IBASIC Clock
DIAG:IBAS:SYNC
Sets the operating system clock time to within one second of the
real-time clock time.
:IBASic:SYNC?
DIAGnostic:IBASic:SYNC[:CLOCk]? returns the number of seconds difference
between the time on the real-time clock and the time on the operating system clock
to within one second. The result is accurate if the two clocks are within 12 hours of
each other.
Comments
• One Second Resolution Between Clocks. The resolution between the
real-time and IBASIC operating system clocks is one second. Therefore, a
returned value of 0 or -1 indicates the two clocks are synchronized.
• Clock Time Relationship. If the returned value is negative, the IBASIC
operating clock is behind the real-time clock. If the returned value is
positive, the IBASIC operating clock is ahead of the real-time clock.
• Related Commands: DIAG:IBAS:SYNC[:CLOCK]
Example
Read Clock Time Differences
DIAG:IBAS:SYNC?
Returns the time difference (in seconds) between the real-time
and operating system clock times
SCPI Command Reference 8-15
:CATalog?
1
PROGram
Subsystem
Commands
The PROGram subsystem provides the means to generate and control an IBASIC
program which is resident in the Agilent E1406. Using the PROGram subsystem,
you can list programs; create, download, and upload programs; execute downloaded
programs; and set or query the state of programs. The PROGram subsystem
commands table for IBASIC follows.
PROGram Subsystem Commands for the IBASIC Instrument
Keyword
Parameter Form
PROGram
:CATalog?
[:SELected]
:DEFine
:DEFine?
Description
Lists IBASIC program name, if any
<program_code>
Use to download IBASIC program
Use to upload IBASIC program
:DELete
:EXECute
:MALLocate
:MALLocate?
<progname>
<program_command>
<nbytes>|DEFault
Delete IBASIC program from Agilent E1406
Execute IBASIC command specified
Reserves memory for IBASIC arrays/variables
Query memory space allocated for IBASIC
:NAME
:NAME?
:NUMBer
:NUMBer?
<progname>
Assign a name to a downloaded IBASIC program
Query name of downloaded IBASIC program
Assign values to numeric program variables
Query value of numeric program variables
:STATe
:STATE?
:STRing
:STRing?
RUN|PAUSe|STOP|CONTinue
<varname> [,<nvalues>]
<varname>
<varname> [,<svalues>]
<varname>
Set state of downloaded IBASIC program
Query downloaded IBASIC program state
Set contents of string variables
Query contents of string variables
Wait to execute next command
WAIT query
:WAIT
:WAIT?
:CATalog?
PROGram:CATalog? lists the IBASIC program name. If an IBASIC program name
exists, the program name is returned. If no name is assigned to the program, PROG
is returned. If an IBASIC program is not downloaded, the null string ("") is
returned.
• Can Define Only One IBASIC Program. Only one IBASIC program can
be defined at a time.
Comments
• Related Commands: PROG:CAT
• *RST Condition: A reset entered via the interface sets the IBASIC program
to the STOPped state and changes the IBASIC program name to PROG. A
reset generated by IBASIC acts the same except it will not cause the IBASIC
program to go to the STOPped state.
Example
Query IBASIC Program
PROG:CAT?
Returns program name or returns PROG if name not assigned.
Returns "" (null string) if no IBASIC program is downloaded.
8-16 SCPI Command Reference
:DEFine
:DEFine
PROGram:DEFine <program_code> is used to create and download programs to
the Agilent E1406.
Comments
• Downloading IBASIC Programs. Only one IBASIC program can be
downloaded at a time. To download a new IBASIC program, you must first
delete (with PROG:DEL) an existing IBASIC program. Attempting to
download a new program without first deleting the existing program results
in an "Illegal Program Name" error.
• Using other PROG commands. You must define a program before you can
use PROG:EXECute or PROG:MALLocate. If necessary you can define a
dummy program with the following line of code from an external computer:
OUTPUT 70939;"PROG:DEF #0" END
• Rules for Downloading Programs. Downloaded programs must use
definite or indefinite length block parameters containing lines of program
code (SCPI parameter types are defined on page 8-6). Each line must be
separated by <CR> or <CR> <LF>. Any line with a syntax error is turned
into a comment and a "Program Syntax" error is generated.
• Downloaded Programs Exceeding Memory. When the size of a program
to be downloaded exceeds memory available in the Agilent E1406, program
lines are saved up to the point of memory overflow. When memory
overflow occurs, a "Program Syntax" error is generated.
• Uploading IBASIC Programs. IBASIC programs are uploaded (using
PROG:DEF?) as definite length block response data. For an IBASIC
program to be uploaded, the program must be in the PAUSed or STOPped
state. If a program is in the RUN state, a "Program Currently Running" error
is generated.
• Related Commands: PROG:DEL
• *RST Condition: A reset entered via the interface sets the IBASIC program
to the STOPped state and changes the IBASIC program name to PROG. A
reset generated by IBASIC acts the same except it will not cause the IBASIC
program to go to the STOPped state.
Example
Download IBASIC Program From External Computer
OUTPUT 70930;"*RST;*CLS;PROG:DEL:ALL"
Clears all status registers, and deletes IBASIC program if it
exists.
OUTPUT 70930;"PROG:DEF #0"
Downloads program using indefinite length block parameters.
OUTPUT 70930;" 10 DIM C$[80]"
Typical line for downloaded program using IBASIC and SCPI
commands.
OUTPUT 70930;" 40 END" END
Last line of downloaded program - must include the END
statement
SCPI Command Reference 8-17
DEFine?
DEFine?
PROGram:DEFine? uploads an IBASIC program from the Agilent E1406 into
an GPIB computer.
Comments
Related Commands: PROG:DEF
Example
Upload IBASIC Program to External Computer
OUTPUT 70930;"PROG:DEF?"
Uploads program using definite length block response data.
ENTER statement
See Chapter 6 - Talk/Listen Mode Operation for an example
:DELete
PROGram:DELete deletes a downloaded IBASIC program from IBASIC
memory in the Agilent E1406.
• Cannot Delete RUNning Programs. If an IBASIC program is in the RUN
state when PROGram:DELete:ALL is executed, a "Program Currently
Running" error is generated and the program is NOT deleted.
Comments
• This does not delete the selected program name, if one has been assigned
using the PROG:NAME command. If you query for the program name using
PROG:NAME? you will get the previously selected name, even though the
program is no longer in memory.
• Related Commands: PROG:STAT
Example
Delete IBASIC Program
PROG:DEL
Deletes IBASIC program if the program is not in the RUN state.
:EXECute
PROGram:EXECute <’program_command’> executes the IBASIC command
specified.
Parameters
Comments
Parameter Name
Program_command
Type
string
Range of Values
Supported IBASIC Commands
Default
None
• Cannot Execute RUNning Programs. If an IBASIC program is in the RUN
state when PROGram:EXECute is attempted, a "Program Currently
Running" error is generated and the command is NOT executed.
• An IBASIC program must already have been defined. If not, attempting
to use PROG:EXEC will generate an "Illegal Program Name" error.
• Illegal Commands. If the string data representing an IBASIC command is
not legal, a "Program Syntax Error" is generated.
• Related Commands: PROG:STAT
• *RST Condition: None
8-18 SCPI Command Reference
:MALLocate
Example
Execute IBASIC Command
PROG:EXEC ’BEEP’
:MALLocate
Parameters
Comments
Causes audible BEEP
PROGram:MALLocate <nbytes>|DEFault reserves memory space for IBASIC
arrays and variables and subprogram stack plus the temporary storage required
needed by a RUNning IBASIC program. Common variables are allocated from
System memory on demand.
Parameter Name
nbytes
Type
numeric
Range of Values
880 - available memory
Default
32768
• Using DEFault Setting. When the nbytes parameter is specified, nbytes
bytes of memory space are allocated for the IBASIC program arrays and
variables and temporary storage required by the RUNning program. When
DEFault is used, IBASIC calculates the amount of memory space required.
• An IBASIC program must already have been defined. If not, attempting
to use PROG:MALL will generate an "Illegal Program Name" error.
• Related Commands: DIAG:IBAS:STACK
Example
Allocating IBASIC Memory Space
PROG:MALL 50000
Allocates 50000 bytes of memory space for arrays and variables
and subprogram stack for temporary storage needed by a
RUNning IBASIC program.
:MALLocate?
Comments
Example
PROGram:MALLocate? returns the number of bytes allocated in IBASIC
memory for IBASIC arrays and variables and subprogram stack.
• Related Commands: PROG:MALL
Return IBASIC Memory Allocated
PROG:MALL?
Returns number of bytes reserved in IBASIC memory for IBASIC
arrays and variables.
:NAME
Comments
PROGram:NAME <progname> selects a named program for use with future
PROG commands. Since only a single program can be downloaded at any one time
with IBASIC, you will not need this command.
• Name Not Related to File Name. The IBASIC program name has NO
relationship to any file name from which the program may have been loaded.
• Related Commands: PROG:NAME?
• *RST Condition: A reset entered via the GPIB interface sets the IBASIC
program to the STOPped state and changes the IBASIC program name to
SCPI Command Reference 8-19
:NAME?
PROG. A reset generated by IBASIC acts the same except it will not cause
the IBASIC program to go to the STOPped state.
Example
Name IBASIC Program
PROG:NAME Volts
Selects program name Volts for future PROG commands.
:NAME?
PROGram:NAME? returns the selected program name (if any). Returns "PROG"
if no program name has been selected. Returns a null string ("") if no program is
downloaded.
Comments
Related Commands: PROG:NAME
Example
Return Program Name
PROG:NAME?
Returns program name (if any). Returns PROG if no program
name is assigned. Returns "" if no program is downloaded.
:NUMBer
PROGram:NUMBer <varname>, <nvalues> sets the value(s) of numeric
program variables or arrays in an IBASIC program.
Parameter Name
varname
nvalues
Parameters
Type
string
numeric
Range of Values
Any ASCII characters
Default
None
None
• IBASIC Program Must First Exist. If an IBASIC program is not defined
(as set with PROG:DEF), attempting to use PROG:NUMB generates an
"Illegal Program Name" error.
Comments
•
Using <varname>. The variable specified in <varname> must be an
existing variable in the IBASIC program or a "Illegal Variable Name" error
will be generated. <varname> can be either character data or string data.
• <varname> Over 12 Characters. If the variable name is longer than 12
characters, a delimiter (’) is required.
• Using <nvalues>. <n values> is a list of comma-separated numeric values
used to set <varname>. If <varname> cannot hold all the specified
<nvalues>, a "Parameter Not Allowed" error is generated.
• Related Commands: PROG:NUMB?
• *RST Condition: None.
Example
Assign Values to Variables
PROG:NUMB B,10
Assign a value of 10 to variable B
PROG:NUMB ’number_devices’,1
Assign value of 1 to variable number_devices. Delimiter required
since variable name is longer than 12 characters.
8-20 SCPI Command Reference
:NUMBer?
:NUMBer?
Comments
Example
PROGram:NUMBer? <varname> queries the value(s) of the specified numeric
variable in the IBASIC program. Variable contents are returned as a
comma-separated list.
Related Commands: PROG:NUMB
Return Value of Variable
PROG:NUMB B,10
Assign a value of 10 to variable B.
PROG:NUMB? B
Returns a value of 10.
:STATe
Parameters
Comments
PROGram:STATe <state>sets the state of an IBASIC program.
Parameter Name
state
Type
discrete
Range of Values
RUN | PAUSe | STOP |
CONTinue
Default
None
• IBASIC Program States. The following table shows the effect of setting
the STATe to the desired state from each of the possible current states. In
some cases, a "Settings Conflict" error is generated.
State Requested
RUN
CONTinue
PAUSe
STOP
Current State
RUN
Error (-221)
Error (-221)
PAUSe
STOP
PAUSe
RUN
RUN
PAUSe
STOP
STOP
RUN
Error (-221)
STOP
STOP
• Related Commands: None
• *RST Condition: A reset entered via the interface sets the IBASIC program
to the STOPped state and changes the IBASIC program name to PROG. A
reset generated by IBASIC acts the same except it will not cause the IBASIC
program to go to the STOPped state.
Example
Set IBASIC Program to RUN State
PROG:STAT:PAUS
Pauses IBASIC Program
PROG:STAT:CONT
Sets IBASIC Program to RUN state.
SCPI Command Reference 8-21
:STATe?
:STATe?
PROGram:STATe? queries the current state of the IBASIC program.
Comments
Related Commands: PROG:STAT
Example
Return State of IBASIC Program
PROG:STAT:PAUS
Pauses IBASIC Program.
PROG:STAT?
Returns PAUSe as IBASIC program state.
:STRing
PROGram:STRing <varname>, <svalues> sets the contents of string program
variables and arrays in an IBASIC program.
Parameter Name
svalues
Parameters
Type
numeric
Range of Values
Valid string characters
Default
None
• IBASIC Program Must First Exist. If an IBASIC program does not exist
(as set with PROG:DEF), attempting to use PROG:STR generates an "Illegal
Program Name" error.
Comments
• Using <varname>. The variable specified in <varname> must be an
existing variable in the IBASIC program or a "Illegal Variable Name" error
will be generated. <varname> can be either character data or string data.
• Using <svalues>. <svalues> is a list of comma-separated strings used to set
<varname>. If <varname> cannot hold all the specified <svalues>, a
"Parameter Not Allowed" error is generated.
• Related Commands: None
• *RST Condition: None.
Example
Assign Contents to String Variable
PROG:STR B, ’B = Result’
String assigned to variable B$ is ’B = Result’
:STRing?
PROGram:STRing? <varname> returns the contents of the specified string
variable in the IBASIC program.
Comments
Related Commands: PROG:STR
Example
Return Contents of Variable
PROG:STR B, ’B = Result’
Assign ’B = Result’ to variable B$.
PROG:STR?
Returns "B = Result" (double quotes are part of the return)
8-22 SCPI Command Reference
:WAIT
:WAIT
Parameters
Comments
PROGram:WAITcauses the Agilent E1406 to wait until the current program is in
the STOPped or PAUSed state before executing the next command.
None
• Related Commands. None
• *RST Condition: None.
Example
Set Program WAIT
PROG:WAIT
Commands to be executed do not execute until the current
IBASIC program is STOPped or PAUSed.
:WAIT?
Comments
Example
PROGram:WAIT? has the same effect as the PROG:WAIT command, except
PROG:WAIT? returns a value of 1 to indicate the IBASIC program is no longer
running.
• Related Commands: PROG:WAIT
Return WAIT Status
100 OUTPUT 70930;"PROG:WAIT?"
External computer waits until IBASIC program is STOPped or
PAUSed
200 ENTER 70930;A
Returns 1 when IBASIC program is STOPped or PAUSed
SCPI Command Reference 8-23
:WAIT?
SYSTem Subsystem
Commands
The SYSTEM command subsystem for the IBASIC Instrument allows you to
configure serial communications ports operations. The SYSTem subsystem
commands table for the IBASIC instrument follows.
SYSTem Subsystem Commands for IBASIC
Keyword
SYSTem
:COMMunicate
:SERial[n]
:CONTrol
:DTR
:DTR?
:RTS
:RTS?
[:RECeive]
:BAUD
:BAUD?
:BITS
:BITS?
:PACE
[:PROTocol]
[:PROTocol]?
:THReshold
:STARt
:STARt?
:STOP
:STOP?
:PARity
:CHECk
:CHECk?
[:TYPE]
[:TYPE?]
:SBITs
:SBITs?
:TRANsmit
:AUTO
:AUTO?
:PACE
[:PROTocol]
[:PROTocol]?
:ERRor?
8-24 SCPI Command Reference
Parameter Form
ON|OFF|STANdard|IBFull
ON|OFF|STANdard|IBFull
Description
Sets mode for modem control line DTR
Returns current mode of DTR line
Sets mode for modem control line RTS
Returns current mode of RTS line
<baud_rate>|MIN|MAX
[MIN|MAX]
7|8|MIN|MAX
[MIN|MAX]
Set transmit/receive baud rate
Returns current or allowable baud rate
Sets number of data bits in data frame
Returns number of bits in data frame
XON|NONE
Sets receive pacing protocol state
Returns receive pacing protocol state
<char_count>
[MIN|MAX]
<char_count>
[MIN|MAX]
Sets input buffer level at which XON sent
Returns current or allowable STARt level
Sets input buffer level to send XOFF
Returns current or allowable STOP level
1|0|ON|OFF
Enables/disables receive parity checks
Returns receive parity check state
Sets type of receive/transmit parity
Returns current parity type setting
Sets receive/transmit #stop bits
Returns #stop bits set
EVEN|ODD|ZERO|ONE|NONE
1|2|MIN|MAX
[MIN|MAX]
1|0|ON|OFF
Links/unlinks pacing protocol
Returns current pacing linkage
XON|NONE
Sets transmit pacing protocol
Returns pacing protocol state
Returns oldest error message
:COMMunicate
:COMMunicate
:SERial[n]:
Comments
The SYStem:COMMunicate:SERial[n]:... commands set and/or modify the
configuration of the serial interface(s) that are assigned to the IBASIC instrument.
The interface affected by the command is specified by a number (zero through
seven) which replaces the [n] in the :SERial[n] command.
• Assigning Ports to IBASIC. Assign the built-in RS-232 port to IBASIC
with DIAG:COMM:SER[:OWNER] IBASIC sent to the System instrument.
Assign the RS-232/422 ports on an Agilent E1324A plug-in module to
IBASIC by setting the Logical Address (LADDR) switches on the modules
to 241, 242, ...,247.
• Assigning a number to [n]. The number zero specifies the built-in RS-232
interface while one through seven specify an Agilent E1324A plug-in
module number. For example, Agilent E1324A module #1 is at logical
address 241 (when assigned to IBASIC), etc.
• Card Numbers Must be Contiguous. The Agilent E1324A module
installed at address 241 becomes card #1, the card at address 242 becomes
card #2, etc. The logical addresses for the Agilent E1324A modules must
start at 241 (to be assigned to IBASIC) and must be contiguous (no unused
logical addresses).
• Serial Communication Command Storage. Serial communications
commands take effect after the end of the program message containing the
command. Serial communication settings for the built-in RS-232 interface
are stored in non-volatile RAM and used at power-up and
DIAG:BOOT[:WARM].
• Serial communication settings for the Agilent E1324A Datacomm interface
are stored in its on-board non-volatile EEROM only after the
DIAG:COMM:SER[n]:STORe command is executed.
•
Example
Serial Communication Parameter Defaults. DIAG:BOOT:COLD sets the
serial communication parameters to the following defaults: BAUD 9600,
BITS 8, PARity NONE, SBITs 1, DTR ON, RTS ON, PACE XON.
Setting Baud Rate for Agilent E1324A Module Port
SYST:COMM:SER2:BAUD 9600
Sets baud rate 9600 for Agilent E1324A module #2 (must also
have module #1)
SCPI Command Reference 8-25
:COMMunicate
:COMMunicate
:SERial[n]
:CONTrol:DTR
SYSTem:COMMunicate:SERial[n]:CONTrol:DTR <dtr_cntrl> controls the
behavior of the Data Terminal Ready output line. DTR can be set to a static state
(ON|OFF), can operate as a modem control line (STANDard), or can be used as a
hardware handshake line (IBFull).
Parameters
Name
bytes
Comments
•
Description
Sets size of memory
IBASIC will request.
Range
1024 - 65536 bytes
Default
8192 bytes
<dtr_cntl> Parameter Definitions. The selected DTR control setting is in
effect after the end of the program message containing the DTR command.
The following table defines each value of dtr_cntrl:
Value
ON
OFF
Definition
DTR line is asserted
DTR Line is unasserted
STANdard
DTR will be asserted when the serial interface is ready to send output data. Data
will be sent as soon as the connected device asserts DSR (data set ready).
IBFull
While the input buffer is not yet at the :STOP level, DTR is asserted. When the
input buffer reaches the :STOP level, DTR will be unasserted.
• We recommend you set ...DTR and ...RTS to STANdard when operating a
modem.
• DIAG:BOOT:COLD will set ...DTR to ON
• Related Commands: SYST:COMM:SER[n]:CONT:RTS,
SYST:COMM:SER[n]:PACE:THR:STARt,
SYST:COMM:SER[n]:PACE:THR:STOP
• *RST Condition: No change
Example
Asserting the DTR Line
SYST:COMM:SER1:CONT:DTR ON
Sets the serial interface on Agilent E1324A module to assert the
DTR line
:COMMunicate
:SERial[n]
:CONTrol:DTR?
Example
SYSTem:COMMunicate:SERial[n]:CONTrol:DTR? returns the current setting
for DTR line control.
Query DTR Control Setting
SYST:COMM:SER1:CONT:DTR?
Query DTR Control setting for serial interface on Agilent
E1324A module #1
ENTER statement
Returns "ON", "OFF", "STAN", or "IBF"
8-26 SCPI Command Reference
:COMMunicate
:COMMunicate
:SERial[n]
:CONTrol:RTS
SYSTem:COMMunicate:SERial[n]:CONTrol:RTS <rts_cntrl> controls the
behavior of the Request To Send (RTS) output line. RTS can be set to a static state
(ON | OFF), can operate as a modem control line (STANdard), or can be used as a
hardware handshake line (IBFull).
Parameters
Name
bytes
Comments
• <rts_cntl> Parameter Definitions. The selected RTS control setting is in
effect after the end of the program message containing the RTS
command.The following table defines each value of rts_cntrl:
Value
ON
OFF
STANdard
IBFull
Description
Sets size of memory
IBASIC will request.
Range
1024 - 65536 bytes
Default
8192 bytes
Definition
RTS line is asserted
RTS line is unasserted
RTS will be asserted when the serial interface is able to send output data. Data
will be sent if the connected device asserts CTS (clear to send).
While the input buffer is not yet at the :STOP threshold, RTS is asserted.
When the input buffer reaches the :STOP threshold, RTS is unasserted.
• We recommend you set ...DTR and ...RTS to STANdard when operating a
modem.
• DIAG:BOOT:COLD will set ...RTS to ON
• Related Commands: SYST:COMM:SER[n]:CONT:DTR,
SYST:COMM:SER[n]:PACE:THR:STARt,
SYST:COMM:SER[n]:PACE:THR:STOP
• Related Commands: SYST:COMM:SER[n]:CONT:DTR
• *RST Condition: No change
Example
Unasserting the RTS Line
SYST:COMM:SER1:CONT:RTS OFF
Unasserts the RTS line for the serial interface on Agilent E1324A
module #1
:COMMunicate
:SERial[n]
:CONTrol:RTS?
Example
SYSTem:COMMunicate:SERial[n]:CONTrol:RTS? returns the current setting
for RTS line control.
Query RTS Control Line Setting
SYST:COMM:SER1:CONT:RTS?
Query RTS control line setting for serial interface on Agilent
E1324A module #1
ENTER statement
Returns "ON", "OFF", "STAN", or "IBF"
SCPI Command Reference 8-27
:COMMunicate :SERial[n] [:RECeive]:BAUD
:COMMunicate
:SERial[n]
[:RECeive]:BAUD
SYSTem:COMMunicate:SERial[n][:RECeive]:BAUD <baud> sets the baud
rate for the built-in RS-232 serial port or for the RS-232/422 ports on an Agilent
E1324A plug-in module.
Parameters
Name
bytes
Comments
•
Description
Sets size of memory
IBASIC will request.
Range
1024 - 65536 bytes
Default
8192 bytes
Attempting to set baud_rate to other than the values shown in the above
table generates error -222.
• Baud Rates. DIAG:BOOT:COLD sets default baud rate of 9600. MIN sets
baud rate of 300, MAX sets baud rate of 19200.
• *RST condition: No change.
Example
Setting Baud Rate to 1200
SYST:COMM:SER1:BAUD 1200
Set baud rate of 1200 bps for Agilent E1324A plug-in module #1
:COMMunicate
:SERial[n]
[:RECeive]:BAUD?
Example
SYSTem:COMMunicate:SERial[n][:RECeive]:BAUD? [MIN | MAX] returns
the current baud rate setting if no parameter is sent, returns the maximum allowable
setting if MAX is sent, or returns the minimum allowable setting if MIN is sent.
Query Current Baud Rate
SYST:COMM:SER1:BAUD?
Query baud rate for Agilent E1324A module #1
ENTER statement
Returns baud rate
8-28 SCPI Command Reference
:COMMunicate
:COMMunicate
:SERial[n]
[:RECeive]:BITS
SYSTem:COMMunicate:SERial[n][:RECeive]:BITS <bits> sets the number of
bits to be used to transmit and receive data.
Parameters
Name
bytes
Comments
• MIN|MAX Settings. MIN sets 7 stop bits and MAX sets 8 bits.
Attempting to set bits to other than values shown generates error -222.
Description
Sets size of memory
IBASIC will request.
Range
1024 - 65536 bytes
Default
8192 bytes
• Disallowed Bit Combinations. Although the ...BITS command operates
independently of the PARity[:TYPE] and the ...SBIT (stop bits) command,
two combinations of the ...BITS command are disallowed because of their
data frame bit width. The following table shows the possible combinations:
BITS
7
7
7
PARity[:TYPE]
NONE
NONE
Yes
SBITs
1
2
1
7
8
8
8
8
Yes
NONE
NONE
Yes
Yes
2
1
2
1
2
Frame Bits
9 - disallowed
10
10
11
10
11
11
12 - disallowed
• Default Data Width. DIAG:BOOT:COLD sets the default data width of 8
bits.
• Related Commands: SYST:COMM:SER[n]:PAR,
SYST:COMM:SER[n]:SBIT
• *RST Condition: No change
Example
Setting Data Width to 7 Bbits
SYST:COMM:SER1:BITS 7
Set data with to 7 bits for Agilent E1324A plug-in module #1
:COMMunicate
:SERial[n]
[:RECeive]:BITS?
Example
SYSTem:COMMunicate:SERial[n][:RECeive]:BITS? [MIN | MAX] returns
the current data width if no parameter is sent, the maximum allowable setting if
MAX is sent, or the minimum allowable setting if MIN is sent.
Query Current Data Width
SYST:COMM:SER1:BITS?
Query data width setting for Agilent E1324A plug-in module #1
ENTER statement
Returns 7 or 8
SCPI Command Reference 8-29
:COMMunicate
:COMMunicate
:SERial[n]
[:RECeive]:PACE
[:PROTocol]
SYSTem:COMMunicate:SERial[n][:RECeive]:PACE[:PROTocol] <protocol>
enables or disables receive pacing (XON/XOFF) protocol.
Parameters
Name
bytes
Description
Sets size of memory
IBASIC will request.
Range
1024 - 65536 bytes
Default
8192 bytes
Comments
• Using XON/XOFF thresholds. While ...PROT is XON, the serial interface
will send XOFF when the buffer reaches the ...STOP threshold, and XON
when the buffer reaches the ...STARt threshold.
• XON/XOFF Control Characters. The XON character is control Q (ASCII
1710, 1116). The XOFF character is control S (ASCII 1910, 1316).
• DIAG:BOOT:COLD sets ...PACE to XON.
• Related Commands: …[PROT]:THR:STAR,
…[PROT]:THR:STOP
• *RST Condition: No change
Example
Enable XON/XOFF Handshaking
SYST:COMM:SER1:PACE:PROT XON
Enable XON/XOFF handshake for Agilent E1324A plug-in
module #1
:COMMunicate
:SERial[n]
[:RECeive]:PACE
[:PROTocol]?
Example
SYSTem:COMMunicate:SERial[n][:RECeive]:PACE[:PROTocol]? returns the
current receive pacing protocol.
Query XON/XOFF Protocol
SYST:COMM:SER1:PACE:PROT?
Querries Agilent E1324A plug-in module #1 to see if XON/XOFF
protocol is enabled
ENTER statement
Returns "XON" if enabled or "NONE" if disabled
8-30 SCPI Command Reference
:COMMunicate
:COMMunicate
:SERial[n]
[:RECeive]:PACE
:THReshold:STARt
Parameters
Comments
SYSTem:COMMunicate:SERial[n][:RECeive]:PACE:THReshold
:STARt <char_count> configures the input buffer at which the specified interface
may send the XON character (ASCII 1116), assert the DTR line, and/or assert the
RTS line.
Parameter Name
char_count
Type
numeric
Range of Values
1 through 99 for built-in RS-232
1 through 8192 for Agilent
E1324A
Default
None
• Determining Input Buffer Size. To determine the input buffer size for the
serial interface you are using, send
SYST:COMM:SER[n]:PACE:THR:STAR? MAX. The returned value is the
buffer size.
• PACE:PROT XON Must be Set. ...THR:STAR has no effect unless
...PACE:PROT XON, ...CONT:DTR IBFull, or ..CONT:DTR IBFull has
been sent.
• ...STARt/STOP Default Value. The default STARt and STOP thresholds
for the built-in and plug-ins are:
Built-in RS-232
Plug-in Modules
STARt
10
2048
STOP
65
6144
• ...STARt must be set to less than ...STOP.
• Related Commands: ...PACE:PROT XON|NONE, ...CONT:DTR,
...CONT:RTS
• *RST Condition: No change
Example
Set Interface to Generate XON
SYST:COMM:SER1:PACE:THR:STAR 10
Set interface on Agilent E1324A to send XON when input buffer
contains 10 characters.
SCPI Command Reference 8-31
:COMMunicate
:COMMunicate
:SERial[n]
[:RECeive]:PACE
:THReshold:STARt?
SYSTem:COMMunicate:SERial[n][:RECeive]:PACE:THReshold
:STARt? [MIN | MAX] returns the current start threshold if no parameter is sent,
the maximum allowable setting if MAX is sent, or the minimum allowable setting if
MIN is sent.
• Determining Input Buffer Size. To determine the size of the input buffer
for the serial interface you are using, send
SYST:COMM:SER[n][:REC]:PACE:THR:STAR? MAX. The returned
value is the buffer size.
Comments
Example
Query Current STARt Threshold
SYST:COMM:SER1:PACE:THR:STAR?
Query start threshold value for serial interface on Agilent
E1324A module #1
ENTER statement
Return threshold value
:COMMunicate
:SERial[n]
[:RECeive]:PACE
:THReshold:STOP
SYSTem:COMMunicate:SERial[n][:RECeive]:PACE:THReshold:STOP
<char_count> configures the input buffer level at which the specified interface may
send the XOFF character (ASCII 1316), deassert the DTR line, and/or deassert the
RTS line.
Parameters
Comments
Parameter Name
char_count
Type
numeric
Range of Values
1 through 99 for built-in RS-232
1 through 8192 for Agilent
E1324A
Default
None
• Determining Input Buffer Size. To determine the size of the input buffer of
the serial interface you are using, send
SYST:COMM:SER[n]:PACE:THR:STOP? MAX. The returned value is the
buffer size.
• PACE:PROT XON Must be Set. ...THR:STOP has no effect unless
...PACE:PROT XON, ...CONT:DTR IBFull, or ..CONT:DTR IBFull has
been sent.
• STARt/STOP Default Value. The default STARt and STOP thresholds for
the built-in and plug-ins are:
Built-in RS-232
Plug-in Modules
STARt
10
2048
STOP
65
6144
• ...STOP must be set to greater than ...STARt.
• Related Commands: ...PACE:PROT XON|NONE, ...CONT:DTR,
...CONT:RTS
8-32 SCPI Command Reference
:COMMunicate
• *RST Condition: No change
Example
:COMMunicate
:SERial[n]
[:RECeive]:PACE
:THReshold:STOP?
Comments
Example
SYST:COMM:SER1:PACE:THR:STOP 80
Set serial interface on Agilent E1324A module #1 to send XOFF
when input buffer contains 80 characters.
SYSTem:COMMunicate:SERial[n][:RECeive]:PACE:THReshold:
STOP? [MIN | MAX] returns the current stop threshold if no parameter is sent,
the maximum allowable setting if MAX is sent, or the minimum allowable setting
if MIN is sent.
• Determining Size of Input Buffer. To determine the size of the input buffer
of the serial interface you are using, send
SYST:COMM:SER[n]:PACE:THR:STOP? MAX. The returned value will
be the buffer size.
Query Current Stop Threshold
SYST:COMM:SER1:PACE:THR:STOP?
Query STOP threshold for serial interface on Agilent E1324A
module #1
ENTER statement
Returns numeric value
:COMMunicate
:SERial[n]
[:RECeive]
:PARity:CHECk
Parameters
Comments
SYSTem:COMMunicate:SERial[n][:RECeive]:PARity:CHECk <check_cntrl>
controls whether or not the parity bit in received serial data frames will be
considered significant.
Parameter Name
check_cntrl
•
Type
boolean
Range of Values
1 | 0 | ON | OFF
Default
None
Parity Check Off. When check_cntrl is set to 0 or OFF, received data is
not checked for correct parity. Transmitted data still includes the type of
parity as set with ...PARity[:TYPE].
• Related Commands: SYST:COMM:SER[n]:PAR[:TYPE]
• *RST Condition: No change
Example
Set Parity Check ON
SYST:COMM:SER1:PAR:CHEC ON
Set parity check to ON for serial interface on Agilent E1324A
module #1
SCPI Command Reference 8-33
:COMMunicate
:COMMunicate
:SERial[n]
[:RECeive]
:PARity:CHECk?
Example
SYSTem:COMMunicate:SERial[n][:RECeive]:PARity:CHECk? returns the
state (ON/OFF) of parity checking.
Check Parity Status
SYST:COMM:SER1:PAR:CHEC?
Query parity check status (ON/OFF) for serial interface on
Agilent E1324A module #1
ENTER statement
Returns 1 if ON, 0 if OFF
:COMMunicate
:SERial[n]
[:RECeive]
:PARity[:TYPE]
SYSTem:COMMunicate:SERial[n][:RECeive]:PARity[:TYPE] <type>
configures the type of parity to be checked for received data, and generated for
transmitted data.
Parameters
Comments
Parameter Name
type
Range of Values
EVEN | ODD | ZERO | ONE |
NONE
Default
None
• PARity[:TYPE] Values: The following table defines each value of type:
Attempting to set type to other than values shown generates error -222.
Value
EVEN
ODD
ZERO
ONE
NONE
8-34 SCPI Command Reference
Type
discrete
Definition
If …PARity:CHECK is ON, the received parity bit must
maintain even parity. The transmitted parity bit will maintain
even parity.
If …PARity:CHECK is ON, the received parity bit must
maintain odd parity. The transmitted parity bit will maintain
odd parity.
If …PARity:CHECK is ON, the received parity bit must be a
zero. The transmitted parity bit will be a zero.
If …PARity:CHECK is ON, the received parity bit must be a
logic one. The transmitted parity bit will be a logic one.
A parity bit must not be received in the serial data frame. No
parity bit will be transmitted.
:COMMunicate
• Disallowed Combinations. Although the ...PARity[:TYPE] command
operates independently of the …BITS or …SBITs commands, two
combinations are disallowed because of their data frame bit width (see the
following table):
BITS
7
7
7
7
8
8
8
8
PARity[:TYPE]
NONE
NONE
Yes
Yes
NONE
NONE
Yes
Yes
SBITs
1
2
1
2
1
2
1
2
Frame Bits
9 - disallowed
10
10
11
10
11
11
12 - disallowed
• ...PAR:CHECK ON Must be Set. Received parity will not be checked
unless SYST:COMM:SER[n]:PAR:CHEC ON has been sent. Transmitted
data will include the specified parity whether …PAR:CHEC is ON or OFF.
• DIAG:BOOT:COLD sets PARity to NONE.
• Related Commands: …PAR:CHEC 1|0|ON|OFF, ,…SER[n]:BITS 7|8,
…SER[n]:SBIT 1|2
• *RST Condition: No change
Example
Set Parity Check/Generation ODD.
SYST:COMM:SER1:PAR ODD
Set ODD parity for serial interface on Agilent E1324A module #1
SYST:COMM:SER0:PAR:CHEC ON
Enable parity check/gen.
:COMMunicate
:SERial[n]
[:RECeive]
:PARity[:TYPE]?
Example
SYSTem:COMMunicate:SERial[n][:RECeive]:PARity[:TYPE]? returns the
type of parity checked and generated.
Query Type of Parity Checking Set
SYST:COMM:SER1:PAR?
Query parity type for serial interface on Agilent E1324A module
#1
ENTER statement
Returns EVEN, ODD, ZERO, ONE, or NONE
SCPI Command Reference 8-35
:COMMunicate
:COMMunicate
:SERial[n]
[:RECeive]:SBITs
SYSTem:COMMunicate:SERial[n][:RECeive]:SBITs <sbits> sets the number
of stop bits to be used to transmit and receive data.
Parameter Name
sbits
Parameters
Type
numeric
Range of Values
1 | 2 | MIN | MAX
Default
None
• Attempting to set sbits to other than the values in the above table generates
error -222.
Comments
• Disallowed Combinations. Although the ...SBITs command operates
independently of the …BITS or …PARity[:TYPE] commands, two
combinations are disallowed because of their data frame bit width. The
following table shows the possible combinations:
BITS
7
7
PARity[:TYPE]
NONE
NONE
SBITs
1
2
7
8
8
8
8
Yes
NONE
NONE
Yes
Yes
1
1
2
1
2
Frame Bits
9 - disallowed
10
10 7
10
11
11
12 - disallowed
• DIAG:BOOT:COLD sets SBITs to 1.
• Related Commands: SYST:COMM:SER[n]:BAUD
• *RST Condition: No change
Example
Setting 2 Stop Bits
SYST:COMM:SER1:SBITS 2
Sets 2 stop bits for serial interface on Agilent E1324A module #1
:COMMunicate
:SERial[n]
[:RECeive]:SBITs?
Example
SYSTem:COMMunicate:SERial[n][:RECeive]:SBITs? [MIN | MAX] returns
the current stop bit setting if no parameter is sent, the maximum allowable setting if
MAX is sent, or the minimum allowable setting if MIN is sent.
Query Current Stop Bit Setting
SYST:COMM:SER1:SBIT?
Query number of stop bits for serial interface for Agilent E1324A
module #1 (:REC is implied)
ENTER statement
Returns 1 or 2
8-36 SCPI Command Reference
:COMMunicate
:COMMunicate
:SERial[n]
:TRANsmit:AUTO
Parameters
Comments
SYSTem:COMMunicate:SERial[n]:TRANsmit:AUTO <auto_cntrl> when ON
sets the transmit pacing mode to be the same as that set for receive pacing. When
OFF, the transmit pacing mode may be set independently of the receive pacing
mode.
Parameter Name
auto_cntrl
Type
boolean
Range of Values
0 | 1 | OFF | ON
Default
None
• AUTO Always ON for Agilent E1324A. AUTO is always ON for an
Agilent E1324A. Trying to set OFF or 0 will generate an error.
• DIAG:BOOT:COLD sets ...AUTO to ON.
• Related Commands: SYST:COMM:SER[n]:REC:PACE:PROT,
SYST:COMM:SER[n]:TRAN:PACE:PROT
• *RST Condition: TRAN:AUTO ON
Example
Link Transmit Pacing With Receive Pacing
SYST:COMM:SER0:TRAN:AUTO ON
Link transmit/receive pacing for built-in RS-232 interface.
:COMMunicate
:SERial[n]
:TRANsmit:AUTO?
Comments
Example
SYSTem:COMMunicate:SERial[n]:TRANsmit:AUTO? returns the current state
of receive to transmit pacing linkage.
• AUTO Always ON for Agilent E1324A. AUTO is always ON for an
Agilent E1324A. In this case, ...AUTO? always returns a 1.
Query Receive to Transmit Linkage
SYST:COMM:SER0:TRAN:AUTO?
Query receive to transmit linkage for built-in RS-232 interface
ENTER statement
Returns 1 for AUTO ON, 0 for AUTO OFF
:COMMunicate
:SERial[n]
:TRANsmit:PACE
[:PROTocol]
Parameters
Comments
SYSTem:COMMunicate:SERial[n]:TRANsmit:PACE[:PROTocol] <protocol>
enables or disables the transmit pacing (XON/XOFF) protocol (built-in RS-232
interface only).
Parameter Name
protocol
Type
discrete
Range of Values
XON|NONE
Default
None
• XOFF Halts Data Transmission. Receipt of an XOFF character (ASCII
1910, 1316) will hold off transmission of data until an XON character (ASCII
1710, 1116) is received.
SCPI Command Reference 8-37
:COMMunicate
• DIAG:BOOT:COLD sets ...PACE to XON.
• Related Commands: SYST:COMM:SER[n]:TRAN:AUTO
• *RST Condition: No change
Example
Set XON/XOFF Transmit Pacing
SYST:COMM:SER0:TRAN:PACE:PROT XON
Set XON/XOFF transmit pacing for built-in RS-232 interface
:COMMunicate
:SERial[n]
:TRANsmit:PACE
[:PROTocol]?
Example
SYSTem:COMMunicate:SERial[n]:TRANsmit:PACE[:PROTocol]? returns
the current transmit pacing protocol.
Check Transmit Pacing Protocol
SYST:COMM:SER0:TRAN:PACE:PROT?
Query transmit pacing protocol state for built-in RS-232 interface
ENTER statement
Returns "XON" or "NONE"
SYSTem:ERRor?
SYSTem:ERRor? returns the oldest entry in the IBASIC instrument’s error/event
queue. The return contains an error number in range [-32768, 32767] and an error
message. 0, "No error" is returned when the queue is empty (no errors).
Comments
• Event/Error Queue Operation. The error queue is first-in, first-out. If
the queue overflows, the last error/event in the queue is replaced with error
-350, "Queue overflow".
• Clearing Event/Error Queue. The event/error queue is cleared on
power-up, when a *CLS command is received, or when the last error item is
read from the queue.
8-38 SCPI Command Reference
Chapter 9 Contents
Using this Chapter
9-1
Common Command Groups 9-1
Test/Identity Commands
9-2
Synchronization commands 9-3
Status and Event Commands 9-3
Macro Commands
9-6
Chapter
9
Common Command Reference
Using this Chapter
This chapter describes the IEEE 488.2 Common (*) Commands which apply to the
IBASIC Instrument. See the Tutorial Description of the General Purpose Interface
Bus for additional information on IEEE 488.2 Common Commands.
1
Common
Command Groups
The following table shows the Common Commands implemented by the IBASIC
Instrument by Command Group. In this chapter, Common Commands are
described alphabetically by Command Group.
The examples in this chapter assume the Common commands are issued by an
external computer and that Talk/Listen mode is set.
Common (*) Commands for the IBASIC Instrument
Group
Test/Identity
Commands
Synchronization
Commands
Status and Event
Commands
Macro Commands
Mnemonic
*IDN?
*RST
*TST?
*OPC
*OPC?
*WAI
*CLS
*ESE
*ESE?
*ESR?
*SRE
*SRE?
*STB?
*DMC
*EMC
*EMC?
*GMC?
*LMC?
*PMC
Description
Identification Query
Reset
Self-Test Query
Operation Complete
Operation Complete Query
Wait to Continue
Clear Status
Standard Event Enable
Standard Event Enable Query
Standard Event Query
Service Request Enable
Service Request Enable Query
Read Status Byte Query
Define Macro
Enable Macro
Enable Macro Query
Get Macro Contents Query
Learn Macro Query
Purge Macros
Common Command Reference 9-1
1
Test/Identity
Commands
The Test/Identity commands include *IDN?, *RST, and *TST?.
*IDN?
Comments
Identification query. Returns the identity of the IBASIC instrument.
The response from *IDN? consists of the following four fields (fields are separated
by commas):
•
•
•
•
Example
Manufacturer
Model number
Serial number (returns 0 if not available)
Firmware revision (returns 0 if not available)
5 !RE-SAVE "IDNQUERY"
10 DIM A$[50]
20 OUTPUT 70930;"*IDN?"
30 ENTER 70930;A$
40 PRINT A$
50 END
A typical IBASIC instrument response is:
*RST
Comments
Dimension array for ID fields
Queries identity of IBASIC
instrument
Places ID fields in array
Prints ID fields
Hewlett-Packard,IBASIC,0,A.03.00
Reset. Causes the IBASIC Instrument to perform a BASIC Reset.
*RST resets the IBASIC instrument as follows:
• Stops a running program (sets IBASIC to idle state), but does not delete the
program
• Resets variables (variables will then be out of context)
• Resets all interfaces assigned to IBASIC (internal IBASIC, GPIB, or Serial)
• Clears the selected display and exits EDIT mode
*RST does not affect:
•
•
•
•
•
Example
*TST?
The instrument address
The output queue
The Service Request Enable Register
The Standard Event Enable Register
Protected user data
OUTPUT 70930;"*RST"
Resets the IBASIC Instrument
Self-test query. Always returns a 0; no IBASIC self-test is performed.
9-2 Common Command Reference
1
Synchronization
commands
The synchronization commands include *OPC, *OPC?, and *WAI. These
commands can be used by IBASIC to ensure synchronization between an
instrument and the IBASIC computer or between multiple instruments. These
commands are not meant to be used on the IBASIC Instrument itself since the
Operation Complete event or Wait Event occurs when the IBASIC parser has
parsed a command--not when that command has finished being executed. Refer to
Synchronizing Instrument/Device Operations in Chapter 5 or to the Agilent E1406
User’s Manual for information on how these commands can be used with
instruments other than the IBASIC Instrument.
1
Status and Event
Commands
Status and event commands can be used to determine the status of the IBASIC
Instrument. For an SCPI instrument, the Status system consists of a Questionable
Data/Signal Status Register, an Operation Status Register, a Standard Event Status
Group, and a Status Byte Register.
However, the IBASIC instrument uses the Standard Event Status Group, the Status
Byte Register, and bit 14 (program running) of the Operation Status Register. For
the IBASIC Instrument, the Questionable Data/Signal Status Register always
returns 0.
The Standard Event Status Group consists of two registers (Standard Event and
Standard Event Enable) and is set by the *ESE and *ESR? commands. *ESE? can
be used to query the state of the Standard Event Enable Register.
The Status Byte Register is set/cleared by the *SRE and *STB? commands. *SRE?
can be used to query the state of the Service Request Enable on the Status Byte
Register. Note that bits 0 through 3 and bit 7 of the Status Byte Register are always
0. The Status Byte summary bit is bit 6 (RQS) on the Status Byte Register.
*CLS
Comments
Clear status command. The *CLS command clears the Standard Event Status
Group registers, the Status Byte register, and the error queue for the IBASIC
instrument.
*CLS also clears bits 4, 5, and 7 of the Status Byte register (*STB? must be sent to
clear bit 6.)
*CLS does not affect enabling bits in the Status Byte register or the Standard Event
Status Group registers. However, *CLS disables the operation complete function
(*OPC command) and the operation complete query function (*OPC? command).
Example
OUTPUT 70930;"*CLS"
Clears the Standard Event Status Group registers, Status Byte
register and the error queue for the IBASIC instrument.
Common Command Reference 9-3
*ESE <mask>
Comments
Standard Event Enable . Enables one or more events in the Standard Event
Enable Register to be reported in bit 5 (Standard Event summary bit) of the Status
Byte Register.
An event is enabled by specifying the appropriate decimal weight for *ESE
<mask>. To enable more than one event, specify the sum of the decimal weights.
Example
OUTPUT 70930;"*ESE 48"
Enables bits 4 and 5 of the Standard Event Enable Register for
the IBASIC Instrument. Respective decimal weights are 16 + 32
= 48.
*ESE?
Standard event enable query. Returns the weighted sum of all enabled bits in the
Standard Event Enable register.
Example
5 !RE-SAVE "ESEQUERY"
10 OUTPUT 70930;"*ESE?"
20 ENTER 70930;A
30 PRINT A
40 END
*ESR?
Comments
Standard Event Query. Returns the weighted sum of all set bits in the Standard
Event Register.
After reading the Standard Event Register, *ESR? clears the register. The events
recorded in the Standard Event Register are independent of whether or not those
events are enabled with the *ESE command.
Example
5 !RE-SAVE "ESRQUERY"
10 OUTPUT 70930;"*ESR?"
20 ENTER 70930;A
30 PRINT A
40 END
*SRE <mask>
Comments
Sends standard event enable
query
Places response in variable
Displays response
Query Standard Event Register
state
Place response in A
Displays response
Service Request Enable. *SRE identifies which Service Request events will
generate a Service Request (SRQ).
When a Service Request event occurs, the event sets a corresponding bit in the
Status Byte Register, whether or not the event has been enabled by *SRE. However,
when an event enabled by *SRE occurs, the event sets a bit in the Status Byte
Register and issues an SRQ to the computer.
9-4 Common Command Reference
An event is enabled to generate an SRQ by specifying its decimal weight in the
*SRE <mask> parameter. To enable more than one event, specify the sum of the
decimal weights for the events.
Example
*SRE?
Example
10 OUTPUT 70930;"*ESE 16"
Enables Execution Error bit (bit 4) of the Standard Event Enable
Register.
20 OUTPUT 70930;"*SRE 32"
Enables bit 5 of the IBASIC Instrument’s Status Byte Register.
This will generate an SRQ whenever an Execution Error occurs.
Service request enable query. Returns the weighted sum of all enabled events
(those enabled to generate SRQ) in the Status Byte register of the IBASIC
instrument.
5 !RE-SAVE "SREQUERY"
10 OUTPUT 70930;"*SRE?"
20 ENTER 70930;A
30 PRINT A
40 END
Query service request enable
Places response in variable
Displays response
If bits 4 and 5 are enabled to generate an SRQ, the return is 48 (16 for bit 4 + 32 for
bit 5).
*STB?
Comments
Read Status Byte Query. Returns the weighted sum of all set bits in the Status
Byte Register.
You can read the state of the Status Byte Register using the *STB? command or the
Serial Poll (SPOLL) command. Both commands return the weighted sum of all set
bits in the register. However, *STB? does not clear bit 6 (Service Request) of the
Status Byte Register, while SPOLL does clear bit 6 of the register.
No other Status Byte Register bits are cleared by either method except Message
Available (bit 4) which may be cleared as a result of reading the response to *STB?.
Example
5 !RE-SAVE "STBQUERY"
10 OUTPUT 70930;"*STB?"
20 ENTER 70930;A
30 PRINT A
40 END
Query Status Byte Register
contents for the IBASIC
Instrument
Places response in variable
Displays response
Common Command Reference 9-5
1
Macro Commands
*DMC <label>
Comments
The Macro commands (*DMC, *EMC, *EMC?, *GMC, *GMC?, *LMC, and
*PMC) can be used to define and use macros (a sequence of commands) to replace
a set of commands. Macros are particularly useful when using an external computer
with the mainframe in Talk/Listen mode. In this situation, macros can be used to
dramatically reduce the number of characters transferred over the GPIB bus which
reduces bus overhead and maximizes transfer speed. An example follows the
macro command descriptions that shows most macro operations.
Define Macro Command. Allows the user to assign a sequence of commands to a
macro label.
IBASIC executes the macro when it encounters the macro <label> as a command.
To define a macro, send *DMC followed by a string designating the macro label.
Following the <label>, send an Arbitrary Block Program Data element defining the
macro. The macro <label> may be either a command or a query.
The macro <label> cannot be the same as a Common Command or Common
Command Query, but it may be the same as a device-dependent command. If
macros are enabled, when a macro <label> is the same as a device-dependent
command, the device executes the macro rather than the device command.
PROGram commands that download character strings and numeric data are not
supported inside macros. These unsupported commands are: PROG:STRING,
PROG:NUMB, and PROG:DEF. For example, the following statement is not
supported and will cause errors:
OUTPUT @IBASIC:"*DMC ""M1"",#219 PROG:STRING A,’A=1’"
*EMC <number>
Comments
Enable Macro Command. Enables/disables macros for a device.
Sending *EMC 0 disables all macros. Sending *EMC <number> in the range
-32767 to +32767 enables macros. Standard rounding rules for <number> apply.
Example
*EMC?
*EMC 0.4
Disables all macros, since 0.4 rounds to 0.
*EMC -12.4
Enables macros, since <number> is in range of -32767 to
+32767.
Enable macro query. Allows user to determine if macros are enabled. The
*EMC? command returns 1 when macros are enabled or returns 0 when macros are
disabled.
9-6 Common Command Reference
*GMC?
Comments
Example
Get Macro Contents Query. Returns the current definition of a macro.
Send *GMC? followed by the <label> string of a macro. The device responds with
a Definite Length Arbitrary Block Response Data element containing the macro
definition.
*GMC? "SWEEP_SET"
Returns the macro definition for the macro "SWEEP_SET"
*LMC?
Learn macro query. Returns the labels of all currently defined macros. The return
consists of strings separated by commas. The return is the same whether macros are
enabled or disabled.
*PMC
Purge Macros Command. Deletes all macros in memory which were defined with
the *DMC command. All macro sequences and labels are removed from memory.
Macro Example
10
20
30
40
50
60
70
80
90
100
110
120
130
140
150
160
170
! RE-SAVE "MAN1"
ASSIGN @IBASIC TO 70930.
CLEAR @IBASIC
OUTPUT @IBASIC;"*RST;*CLS;:prog:del:all"
IBASIC reset, clear status, delete current program
OUTPUT @IBASIC;"prog:def #0"
Download following program
OUTPUT @IBASIC;"10 LOOP"
OUTPUT @IBASIC;"20 DISP I"
OUTPUT @IBASIC;"25 I=I+1"
OUTPUT @IBASIC;"30 END LOOP"
OUTPUT @IBASIC;"40 END" END
END of downloaded program
OUTPUT @IBASIC;"*PMC"
Purge current macros
OUTPUT @IBASIC;"*DMC ""R"",#214prog:state run"
Macro R = RUN program
OUTPUT @IBASIC;"*DMC ""C"",#215prog:state cont"
Macro C = CONTinue program
OUTPUT @IBASIC;"*DMC ""P"",#215prog:state paus"
Macro P = PAUSE program
OUTPUT @IBASIC;"*DMC ""S"",#215prog:state stop"
Macro S = STOP program
OUTPUT @IBASIC;"*DMC ""BEEP"",#216prog:exec ’BEEP’"
Macro BEEP causes a beep
OUTPUT @IBASIC;"*DMC ""GET_I"",#212prog:numb? i"
Macro GET_I will get value of I variable
Common Command Reference 9-7
180 OUTPUT @IBASIC;"*DMC ""ERR"",#19syst:err?"
Macro ERR queries error queue
190 OUTPUT @IBASIC;"*EMC 1"
Enable macros
200 OUTPUT @IBASIC;"R;ERR"
RUN program, check for errors
210 ENTER @IBASIC;In$
220 PRINT In$
Retrieve error (if any)
230 FOR I=1 TO 500
240 OUTPUT @IBASIC;"GET_I"
Get value of I from running IBASIC program
250 ENTER @IBASIC;I_
260 DISP I,I_
270 IF (I MOD 30)=0 THEN OUTPUT @IBASIC;"P;BEEP;C"
Every 30 counts pause, beep, continue
280 NEXT I
290 OUTPUT @IBASIC;"S"
STOP program
300 END
9-8 Common Command Reference
Appendix A Contents
Floating Point Math
A-1
Timeout when Entering Data from a Device
A-2
Enter from a Device with no Enter List does not Wait A-2
Format Off Enter to a String Does Not Look for Length Word A-3
String Variable Entry
A-3
Nested I/O
A-4
Subprograms and ON Conditions
A-4
Appendix
A
IBASIC and HP Series 200/300 Differences
The IBASIC language is similar to that used on HP Series 200/300 BASIC
language computers. However, there are some differences. If you are familiar with
the Series 200/300 computers you will want to note the following IBASIC
differences.
1
Floating Point Math
Since various HP Series 200/300 BASIC and IBASIC platforms use slightly
different floating point and transcendental functions, it is never a good idea to rely
on exact equality of floating point results.
The following sample program gives an example of why:
10 A=1-COS(0)
20 PRINT A
30 END
IBASIC prints 1.11022302463E-16
HP Series 200/300 BASIC prints 0
IBASIC and Series 200/300 Differences A-1
1
Timeout when
Entering Data from
a Device
When IBASIC times-out waiting for input from a device or gets an interface error,
an extra character is returned. The following example shows what happens for the
timeout case:
5
10
20
!RE-SAVE "TIMEOUT"
ON TIMEOUT 9,1 GOTO Tmout ! serial card
OUTPUT 9 USING "#,K";"AB" ! Send a 2 character string with
!no terminator.
30 ENTER 9,A$
! Enter the string this will time out
40 GOTO No_tmout
50 Tmout:
60 PRINT LEN(A$)
! IBASIC prints 3
70
! HP Series 200/300 BASIC prints 2
80 No_tmout:
90 !...
100 END
The solution for IBASIC is to strip the extra character from the string if a timeout is
detected. Add the following line to do this:
65
A$=A$[1,LEN(A$)-1]
A similar fix can be used for the device error case.
1
Enter from a Device
with no Enter List
does not Wait
10 ! Enter from the keyboard with no ENTER list
20 ENTER 2 ! HP Series 200/300 BASIC waits for the RETURN
! key
30
! IBASIC falls through without waiting
40 !...
50 ENTER 2,X$! Solution for IBASIC is to enter to
60
! A string but ignore the returned data.
70
! This operates the same in HP Series 200/300 BASIC
and IBASIC.
A-2 IBASIC and Series 200/300 Differences
2
Format Off Enter to
a String Does Not
Look for Length
Word
10
20
ASSIGN @F TO 9;FORMAT OFF
ENTER @F;A$
HP Series 200/300 BASIC expects a 4 byte length word to precede the string
characters. IBASIC does not look for a length word. It puts each character into the
string as it is received until an interface error, timeout or string overflow occur.
ENTERing numbers operates the same as HP Series 200/300 BASIC.
1
String Variable
Entry
If an input statement is used to enter into a string variable which has been
dimensioned to length n, and the user enters a string that is too long, an error is
generated and Ibasic remains in input state, but the variable is set equal to first n
characters which were entered. HP Series 200/300 BASIC does not assign anything
to that variable in this case.
For example, during the input in the following program:
10 DIM A$[4]
20 INPUT A$
30 PRINT A$
40 END
If the user enters "abcdef", this will cause an error to be reported, and the input will
be executed again. If the user then enters a return, on IBASIC A$ will be set to
"abcd", while on HP Series 200/300 BASIC it will be set to null string.
IBASIC and Series 200/300 Differences A-3
1
Nested I/O
HP Series 200/300 BASIC permits nesting of I/O statements to as many levels as
there are different interface select codes. HP Series 200/300 BASIC would permit
the following:
10 PRINTER IS 701
20 PRINT FNNested
30 END
40 DEF FNNested
50 OUTPUT 822;"string"
60 RETURN 0
70 FNEND
This program will not run in IBASIC as stated. To accommodate the same
functionality in IBASIC, the following can be done:
10 PRINTER IS 701
20 Result=FNNested
25 PRINT Result
30 END
40 DEF FNNested
50 OUTPUT 822;"string"
60 RETURN 0
70 FNEND
1
Subprograms and
ON Conditions
In IBASIC, when using an ON condition (such as ON KEY) to call a subprogram,
you cannot use parameter lists in the SUB statement. If you do, you will generate
Error 9 Improper number of parameters. On HP Series 200/300 BASIC
computers, the error occurs when the program line containing the ON condition is
executed. In IBASIC, the error occurs when the ON condition occurs. For
example, this program generates Error 9 in IBASIC when key 1 is pressed:
10 ON KEY 1 CALL SUB A
20 GOTO 20
30 END
40 SUB A(B)
50 !...
60 !...
70 SUBEND
A-4 IBASIC and Series 200/300 Differences