1
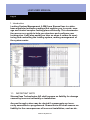
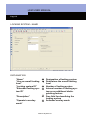
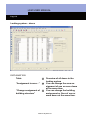
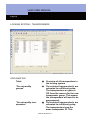
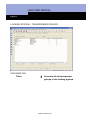
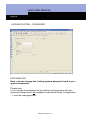
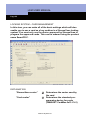
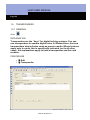
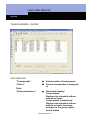
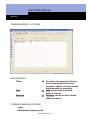
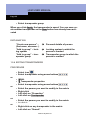
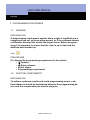
LSM MANUAL –
CARD MANAGEMENT
Version: July 2010
LSM USER MANUAL
Page 2
1.0
2.0
3.0
Introduction .............................................................................................. 5
1.1.
IMPORTANT NOTE
5
1.2.
UNDERSTANDING THIS MANUAL
7
MANAGING THE LOCKING SYSTEM .................................................... 9
1.3.
LOCKING SYSTEM
9
1.4.
TRANSPONDERS 25
1.5.
PERSONS
37
PROGRAMMING PROCESSES ............................................................ 42
1.6.
GENERAL
42
1.7.
POSITION COMPONENTS
1.8.
READ 43
1.9.
PROGRAMMING
42
45
1.10. RESETTING 46
4.0
MISCELLANEOUS................................................................................. 48
1.11. CREATING A REPLACEMENT CARD 48
1.12. PROCEDURE FOR DEFECTIVE CARDS
49
5.0
Service and Support............................................................................... 50
6.0
Glossary ................................................................................................. 51
Version: July 2010 v1.0
LSM USER MANUAL
Page 3
NOTE:
SimonsVoss Technologies AG reserves the right to make modifications to the product without notice. Consequently, descriptions and
representations in this documentation may vary from the most recent product and software versions. As a general principle, the original German version shall apply in the event of any doubt. Subject
to errors and misspellings.
These documents are based on the current programme status at
the time of printing. The information and data they contain may be
changed without advance notice and do not represent an obligation
on the part of the seller. The software and hardware designations
used in this manual are mainly registered trademarks and as such
are subject to the legal copyright protection law regulations.
Neither the manual nor extracts of it may be reproduced or disseminated by mechanical or electronic means, photocopying or
otherwise without our express written permission. The companies
and other pieces of data used in the examples are fictitious, any
similarities are therefore purely coincidental.
The editors of this LSM manual took great care when compiling this
text. However we cannot guarantee that it is free from errors. The
LSM editing team is not liable for technical or printing errors in this
manual. The descriptions provided in this manual are not of a guaranteed quality in the eyes of the law.
Please send any corrections or suggestions for improvement to
[email protected].
Thank you in advance for your support.
More information about SimonsVoss products can be found online
at www.simons-voss.de
Version: July 2010 v1.0
LSM USER MANUAL
Page 4
This manual applies to software without functional limitations. Functions
or views in a customer’s specific installation may deviate from these due
to the software modules activated.
Version: July 2010 v1.0
LSM USER MANUAL
Page 5
1. Introduction
Locking System Management (LSM) from SimonsVoss is a database-supported software package that enables you to create, manage and control complex locking plans efficiently. This documentation serves as a guide to help you structure and configure your
locking plan. It will also assist you later on when it comes to monitoring and controlling the locking system, making management of
the system easier.
1.1. IMPORTANT NOTE
SimonsVoss Technologies AG shall assume no liability for damage
caused by incorrect assembly or installation.
Access through a door may be denied if components are incorrectly assembled or programmed. SimonsVoss AG shall assume no
liability for the consequences of incorrect installation, such as deVersion: July 2010 v1.0
LSM USER MANUAL
Page 6
nied access to injured persons or persons at risk, damage to property or any other form of damage.
1.2.
Version: July 2010 v1.0
LSM USER MANUAL
Page 7
1.3. UNDERSTANDING THIS MANUAL
! MENU ITEMS
The LSM menu items are indicated in this manual by the ! symbol.
Examples
! Edit
! Area
HEADINGS AND CHECKBOXES
Headings and checkboxes shown in the screenshots are differentiated by the use of inverted commas.
Examples
“User Groups”
“Areas”
BUTTONS
Buttons shown in the screenshots are highlighted in grey.
Examples
OK
Apply
KEY COMBINATIONS
The key combination you can use to start the required functions is
shown in bold.
Ctrl+Shift+X
PATH SPECIFICATIONS
If an instruction refers to a directory on a drive, the path is provided
in italics.
Example
C:\Program files\SimonsVoss\LockSysGui\
Version: July 2010 v1.0
LSM USER MANUAL
Page 8
NOTE
The specification [CDROM] is a variable and describes the letter identifying the drive of the CDROM drive on the computer (e.g. “D”) on
which installation is to be carried out.
Version: July 2010 v1.0
LSM USER MANUAL
Page 9
2. MANAGING THE LOCKING SYSTEM
1.4. LOCKING SYSTEM
1.4.1 GENERAL INFORMATION ABOUT THE LOCKING SYSTEM
ICON
EXPLANATION
A locking system consists of a group of locks and the associated
transponders. In the software it is possible to create and manage
multiple locking systems simultaneously. They are represented by
a matrix.
PROCEDURE
• ! Edit
• ! Locking system
Version: July 2010 v1.0
LSM USER MANUAL
Page 10
EXPLANATION
“Name”
“Use as overall locking
level”
“Description”
"
"
Log generation
"
“Inheritance in the
hierarchy”
"
“Operate in overlay
mode ”
Enter the passwords
for the individual log
generations
“Old password ”
"
“New password”
"
“Confirm”
"
“Quality”
"
"
"
Designation of locking system
Determines the overall locking
level
Free field for describing the
locking system
Details of the log generation to
be used for hardware components: G1, G2 or G1+G2
The card medium is only available for G1
Authorisations from lower levels are passed on to the superordinate levels
Activates overlay mode
If you change the password for
the locking system, the existing
password is entered here
If you change the password for
the locking system, the new
password is entered here
Re-enter the password to confirm it
Indicator (red to green) to show
how secure the password is, at
least 64 bits is required
Version: July 2010 v1.0
LSM USER MANUAL
Page 11
1.4.2 LOCKING SYSTEM PROPERTIES
EXPLANATION
In the locking system properties you can modify or view all information relating to the locking system. You can navigate to the individual properties using the tabs at the top.
PROCEDURE
• ! Edit
• ! Locking system properties
or
• Right-click on the locking system icon in the hierarchy tree
• Left-click on Properties
Version: July 2010 v1.0
LSM USER MANUAL
Page 12
LOCKING SYSTEM – NAME
EXPLANATION
“Name”
“Use as overall locking
level”
“Locking system ID”
“Extended locking system ID”
“Description”
“Operate in overlay
mode”
" Designation of locking system
" Determines the overall locking
level
" Number of locking system
" Internal number of locking system as an additional distinguishing feature
" Free field for describing the
locking system
" Activates overlay mode
Version: July 2010 v1.0
LSM USER MANUAL
Page 13
LOCKING SYSTEM – LOCKS
EXPLANATION
Table
"
“Battery change”
"
Overview of all locks in the
locking system
Here, you can enter the date of
the battery change under
“Last”.
“Scheduled” battery changes
are shown in the alert monitor
and the action list for each lock.
In the action list for a particular
lock you can also enter the last
and a scheduled battery change
for several locks at the same
time.
Version: July 2010 v1.0
LSM USER MANUAL
Page 14
Locking system – doors
EXPLANATION
Table
"
“Assignment to area…” "
“Change assignment of "
building structure”
Overview of all doors in the
locking system
You can change the area assignment of one or more doors
at the same time.
You can change the building
assignment or floor of one or
more doors at the same time.
Version: July 2010 v1.0
LSM USER MANUAL
Page 15
LOCKING SYSTEM – TRANSPONDERS
EXPLANATION
Table
"
“Do not modify
groups”
"
“Do not modify transponders”
"
Overview of all transponders in
the locking system
The selected transponder(s) are
relocated to a different group.
The transponders are given a
TID from the reserve for the new
transponder group. This means
the transponders will need to be
programmed.
The selected transponder(s) are
relocated to a different group.
The transponders keep the
same transponder ID. This
Version: July 2010 v1.0
LSM USER MANUAL
Page 16
means the locks for which the
transponder’s old and new
transponder groups are or were
authorised will need to be programmed.
Version: July 2010 v1.0
LSM USER MANUAL
Page 17
LOCKING SYSTEM – TRANSPONDER GROUPS
EXPLANATION
Table
" Overview of all transponder
groups in the locking system
Version: July 2010 v1.0
LSM USER MANUAL
Page 18
LOCKING SYSTEMS – AREAS
EXPLANATION
Table
" Overview of all of the areas in the
locking system
Version: July 2010 v1.0
LSM USER MANUAL
Page 19
LOCKING SYSTEM – PASSWORD
EXPLANATION
Here, you can change the locking system password used to program components.
Please note:
If you change the password of an existing locking system with programmed components, all available components (locks, transponders,
...) must be reprogrammed.
Version: July 2010 v1.0
LSM USER MANUAL
Page 20
LOCKING SYSTEM – SPECIAL TIDS
EXPLANATION
Left-hand table
"
Right-hand table
"
“All”
"
“Deactivated”
"
“Activated”
"
Overview of all the transponder
IDs that are no longer active
Overview of all locks for which
the selected transponders in the
right-hand table are authorised.
You can implement restrictions
by selecting “Locks” in the
middle of the window
All of the transponders are displayed in the left-hand table
Only the deactivated transponders are displayed in the
left-hand table
Only the active transponders
Version: July 2010 v1.0
LSM USER MANUAL
Page 21
“Target”
"
“Actual”
"
are displayed in the left-hand
table
All of the locks for which the selected transponder is authorised in the matrix are displayed
All of the locks for which the
transponder is actually authorised are displayed
Version: July 2010 v1.0
LSM USER MANUAL
Page 22
LOCKING SYSTEM – CARD MANAGEMENT
In this view, you can make all of the basic settings which will also
enable you to use a card as a key medium in a SimonsVoss locking
system. You must only use the device approved by SimonsVoss to
program the approved cards. This can be ordered using the product
name SmartCD.C.
EXPLANATION
“SimonsVoss sector”
"
“Card reader”
"
Determines the sector used by
the card
Determines the standard programming device for cards
(OMNIKEY CardMan 5x21-CL 0)
Version: July 2010 v1.0
LSM USER MANUAL
Page 23
You can use a master card to
approve the SmartReaders also
required for the locks in the
locking system. Only then can
the locks evaluate the information on the user card.
This password protects access
to the master sector on the
card.
Here you can manually enter an
access password for the SmartReader.
Uses the standard SimonsVoss
password to initialise the SmartReader.
This setting prepares the SmartReader to be used in conjunction with an activation unit.
Reads an available card and
checks the master sector
Creates a master card
Resets a programmed master
card
Master card
"
“Access password”
"
“Enter password”
"
“Preset SmartReader
password”
"
“Shunt lock”
"
Read
"
Create
Reset
"
"
Reset card
"
A reset card is used to reset the
assigned SmartReaders in a
locking system. They can then
continue to be used in other
systems or after the password
has been changed.
“Access password”
"
“Enter password”
"
This password protects access
to the master sector of the card.
Here you can manually enter an
access password for the SmartReader.
Version: July 2010 v1.0
LSM USER MANUAL
Page 24
“Current locking system password”
Read
"
Create
Reset
"
"
"
Uses the locking system password to reset the SmartReader.
Reads and checks an available
card
Creates a reset card
Resets a programmed reset
card
Version: July 2010 v1.0
LSM USER MANUAL
Page 25
1.5. TRANSPONDERS
1.5.1 GENERAL
ICON
EXPLANATION
Transponders are the “keys” for digital locking systems. You can
use transponders to operate digital locks. At SimonsVoss, the term
transponders also includes cards as passive media. Where features
apply only to cards, this is specifically indicated, but in all other
cases, the explanations apply to both a transponder and the card
medium.
PROCEDURE
• ! Edit
• ! Transponder
Version: July 2010 v1.0
LSM USER MANUAL
Page 26
EXPLANATION
“Serial number”
“Owner”
"
"
„…“
“Type”
“Description”
"
"
"
“Assigned transponder "
gr.”
"
“Deactivated”
“Owner without assigned…”
Transponder group
"
Period of validity
"
Transponder issue
"
"
Serial number of transponder
Person transponder is assigned
to
Jumps to properties for person
Type of transponder, e.g. card
Free field for describing the
transponder
Transponder group to which
transponder belongs
Indicates whether transponder
is deactivated or not
Filter for selecting owners
Option of moving transponder
to a different transponder
group.
Period in which the transponder
functions (not possible for
cards)
Displays the form to be signed
1.5.2 TRANSPONDER PROPERTIES
EXPLANATION
In the transponder properties you can modify or view all information relating to the transponder. You can navigate to the individual
properties using the tabs at the top.
PROCEDURE
• ! Edit
• ! Transponder properties
Version: July 2010 v1.0
LSM USER MANUAL
Page 27
or
• Right-click on the person / transponder
• Left-click on Properties
• Left-click on Transponder
Version: July 2010 v1.0
LSM USER MANUAL
Page 28
TRANSPONDERS – NAME
EXPLANATION
“Serial number”
“M”
"
"
“Owner”
"
„…“
"
“Type”
“Description”
"
"
Deactivate
"
“Activate”
"
Serial number of transponder
Indicates the transponder in the
matrix
Person transponder is assigned
to
Links to the properties for the
person
Type of transponder
Free field for describing the
transponder
Button for deactivating a transponder
Button for activating a transponder
Version: July 2010 v1.0
LSM USER MANUAL
Page 29
Transponder issue
“Assigned transponder
gr. (target)”
"
"
“Assigned transponder
gr. (actual)”
"
Software reset
"
Displays the form to be signed
Target status: intended assignment of transponder to a
transponder group
Actual status: current assignment of transponder to a
transponder group
Button for resetting the software’s actual status
Version: July 2010 v1.0
LSM USER MANUAL
Page 30
TRANSPONDERS – DOORS
EXPLANATION
“Transponder”
“Owner”
"
"
Table
“Authorised doors”
Serial number of transponder
Person transponder is assigned
to
"
Selectable display.
Target status:
Displays the intended authorisations on locks
Target status (exceptions):
Displays the intended authorisations on locks based on
changes to the group rights
Actual status
Version: July 2010 v1.0
LSM USER MANUAL
Page 31
“Print view”
"
Displays the authorisations still
to be programmed on the locks
Displays the table in a printfriendly view
Version: July 2010 v1.0
LSM USER MANUAL
Page 32
TRANSPONDERS – ACTIONS
EXPLANATION
Table
"
Add
"
Remove
"
Provides an overview of the actions performed on the transponder. Entries can be created
automatically or manually.
Add can be used to create
manual entries
Remove can be used to delete
manual entries
POSSIBLE MANUAL ACTIONS
• Issue
• Withdrawal implemented
Version: July 2010 v1.0
LSM USER MANUAL
Page 33
• Withdrawal planned
Version: July 2010 v1.0
LSM USER MANUAL
Page 34
1.5.3 CREATING TRANSPONDERS
PROCEDURE
! Edit
! Transponder
New
For the serial number enter the number of the transponder
or leave the default number
• Select person
• Select the type of transponder
• Enter a description
•
•
•
•
OPTIONAL FUNCTIONS
• Display and select an existing owner
• Create new person
• Select locking system
Version: July 2010 v1.0
LSM USER MANUAL
Page 35
• Select transponder group
When you click Apply, the transponder is saved. You can now create another transponder as the New button has already been activated
EXPLANATION
“Create new person” –
(first name, surname...)
“Add to group” – locking system
“Add to group” – transponder group
"
Personal details of person
"
Locking system in which the
person is created
Transponder group in which the
person is created
"
1.5.4 EDITING TRANSPONDERS
PROCEDURE
or
or
or
or
• Select icon
• Select transponder using arrow buttons
• ! Edit
• ! Transponder properties
• Select transponder using arrow buttons
•
•
•
•
Select the person you want to modify in the matrix
Right-click
Left-click on “Properties”
Left-click on Transponder
• Select the person you want to modify in the matrix
• Ctrl+Shift+O
• Right-click on any transponder in the matrix
• Left-click on “Search”
Version: July 2010 v1.0
LSM USER MANUAL
Page 36
• Select object
• Define property (e.g. surname)
• Enter designation or part of designation you want to search
for
• Search
• Highlight the data record you want in the result set
• Select properties in “Navigation to view”
• Click on Execute to go to the transponder overview
then
• Modify data
• Apply
Version: July 2010 v1.0
LSM USER MANUAL
Page 37
1.6. PERSONS
1.6.1 GENERAL INFORMATION ABOUT PERSONS
ICON
EXPLANATION
The person is used to manage additional information and is the assigned owner of one or more transponders.
PROCEDURE
• ! Edit
• ! Person
or
• Right-click on a person
• Left-click on “Properties”
• Left-click on “Person”
Version: July 2010 v1.0
LSM USER MANUAL
Page 38
EXPLANATION
“First name”
"
“Surname”
“Title”
"
"
“Address”
“Tel”
"
"
“E-mail”
“Employee number”
"
"
“User name”
"
“Department”
"
“Site/Building”
"
First name of transponder
owner
Surname of transponder owner
Academic salutation of transponder owner
Address of transponder owner
Phone number of transponder
owner
E-mail of transponder owner
Employee number (must be
unique), can be modified
Specifies whether the person is
also an LSM user
Department of transponder
owner
Site/building in which the tran-
Version: July 2010 v1.0
LSM USER MANUAL
Page 39
“Employed from”
"
“Employed until”
"
“Date of birth“
"
“Cost centre”
"
“Comments”
"
Manage
"
sponder owner is located
Start date of employment contract
End date of employment contract
Date of birth of transponder
owner
Cost centre of transponder
owner
Free field for describing the
transponder owner
Transponders can be added or
removed
Version: July 2010 v1.0
LSM USER MANUAL
Page 40
1.6.2 CREATING A PERSON
PROCEDURE
• Edit
• Person
or
then
• Ctrl+Shift+P
•
•
•
•
•
New
In Manage, select a free transponder if necessary
Enter details of person
Apply
New
1.6.3 EDITING PERSONS
PROCEDURE
or
or
or
• Select icon
• Select person using arrow buttons
• ! Edit
• ! Person
• Select person using arrow buttons
•
•
•
•
Select the person you want to modify in the matrix
Right-click
! Properties
! Person
•
•
•
•
Right-click on any person in the matrix
! Search
Select object
Enter designation or part of designation you want to search
for
Version: July 2010 v1.0
LSM USER MANUAL
Page 41
then
•
•
•
•
Search
Highlight the data record you want in the result set
Select properties in “Navigation to view”
Click on Execute to go to the person overview
• Modify data
• Apply
Version: July 2010 v1.0
LSM USER MANUAL
Page 42
3. PROGRAMMING PROCESSES
1.7. GENERAL
EXPLANATION
A programming requirement applies when a right is modified and a
component has not yet been programmed, or if the software detects
a difference between the actual and target status. Before programming it is important to ensure that the view is up to date and the
data has been backed up.
ICON
PROCEDURE
(To display the programming requirement in the matrix)
• ! Options
• ! Extra columns
• Select object
• Programming requirement
1.8. POSITION COMPONENTS
EXPLANATION
To achieve optimum results and avoid programming errors, a defined distance should be maintained between the programming device and the components you want to program.
Version: July 2010 v1.0
LSM USER MANUAL
Page 43
NOTE
If the distance is too little or too great, errors may occur. When programming the card, please lay the card on the SmartCD.C.
1.9. READ
1.9.1 READ CARD
EXPLANATION
When you read the card, the data stored on it is read with the aid of
the SmartCD.C and if possible assigned to an owner.
PROCEDURE
•
•
•
Position card (see 1.8 Position components)
! Programming
! Read/reset card
Version: July 2010 v1.0
LSM USER MANUAL
Page 44
EXPLANATION
“Transponder data”
"
“The following data records contained …”
“Battery must be replaced”
"
“Software version”
"
…
"
M
"
"
All of the data on the card is
displayed: programmed data
records, the locking system ID,
transponder ID and time group
Indicates any defective data records
Status of transponder battery. If
the battery is low, a tick appears
in the box (does not apply to
cards)
Firmware status of transponder/card
Indicates the properties of the
read card
Indicates the read card in the
matrix
NOTE
When you read the card, it is simultaneously highlighted in the
locking plan.
Version: July 2010 v1.0
LSM USER MANUAL
Page 45
1.10. PROGRAMMING
1.10.1
PROGRAMMING A CARD
EXPLANATION
When you program the card, you tell it what its transponder ID is,
which locking system it belongs to, what the password for the locking system is and which time group it belongs to.
ICON
PROCEDURE
or
•
•
•
•
•
Position card (see 1.8 Position components)
Select card in matrix
! Programming
! Transponder
Program
•
•
•
•
Position card (see Position components)
Select card in matrix
! Click on the programming lightning icon in the toolbar
Program
Version: July 2010 v1.0
LSM USER MANUAL
Page 46
EXPLANATION
“Owner / Transponder”
"
“Programming device”
"
“Jump to next ...”
"
“Keep G1 records ...”
"
The owner and the serial number of the card are displayed
and can be selected. If a card
has already been programmed,
the owner and UID are displayed
The programming device required for the medium is automatically selected.
When this option is selected,
you jump to the next unprogrammed transponder (in alphabetical order) and the window stays open
When this option is selected,
data records from other locking
systems are not overwritten. An
additional data record is written
when you program the transponder, assuming that there is
another free data record available (does not apply to cards)
1.11. RESETTING
1.11.1
RESETTING A CARD
EXPLANATION
When a card is reset, the data stored on it is removed and the
card’s actual status is deleted in the software.
PROCEDURE
• Position card (see 1.8 Position components)
• Select person in the matrix
• ! Programming
Version: July 2010 v1.0
LSM USER MANUAL
Page 47
• ! Read/reset card
•
Note
If a card is not recognised, it can be reset by specifying the sector
number and the locking system password.
Version: July 2010 v1.0
LSM USER MANUAL
Page 48
4. MISCELLANEOUS
1.12. CREATING A REPLACEMENT CARD
USE
This procedure should be used when a card has been lost.
EXPLANATION
When you create a replacement card, the original card is blocked
and a new one is created with the same authorisations and a similar
designation.
PROCEDURE
•
•
•
•
•
•
Right-click on the original card
! New
! Replacement transponder
Confirm query with Yes
Enter additional information and confirm
Enter new serial number
RESULTS
• Card needs to be programmed
• Affected locks need to be programmed
• The card's ID number is permanently blocked
Version: July 2010 v1.0
LSM USER MANUAL
Page 49
1.13. PROCEDURE FOR DEFECTIVE CARDS
EXPLANATION
If a card is defective, you must tell the software that the old card no
longer works before programming a new one.
PROCEDURE
or
then
• Right-click on the original card
• ! Properties
• ! Transponder
• ! Edit
• ! Transponder
• Select card using arrow buttons
If you are working with a large number of data records, it is
much easier to select it using the search function. To do
this, highlight the field to be searched, then select the magnifying glass in the icon list and enter the search term in the
screen that appears.
•
•
•
•
•
•
Software reset
Select reason
Enter additional information if required
Confirm twice with Yes
You can now start programming the new card
RESULTS
• Actual status of the original card is reset
NOTE
Resetting the software and then programming another card
can lead to a security loophole. It is possible to create two
cards with the same data. It must be ensured that the original
card really is defective. Otherwise a replacement card must be
created (see 0
Version: July 2010 v1.0
LSM USER MANUAL
Page 50
Creating a replacement card).
Version: July 2010 v1.0
LSM USER MANUAL
Page 51
5. Service and Support
PRODUCT SUPPORT
If customers have any questions relating to products from SimonsVoss Technologies AG, the general support team will be happy to
help:
Tel
+49 (0) 1805 78 3060
The product hotline does not offer support for the LSM Business
and Professional software.
SOFTWARE SUPPORT
SUPPORT STANDARD
For customers with a chargeable Support Standard software
agreement, the following support options are also available:
E-mail
[email protected]
Tel +49 (0) 1805 57 3060
SUPPORT PREMIUM
For customers with a chargeable Support Premium software
agreement, the following support options are also available:
E-mail
[email protected]
Tel +49 (0) 1805 57 3060
Online support tool
• Short call to LSM hotline
• Launch LSM
• ! Help
• ! SimonsVoss Online Support
Version: July 2010 v1.0
LSM USER MANUAL
Page 52
6. Glossary
A
D
Access lists
Storage of transponder
data in the locks with access
control
function.
Please note the valid
health and safety and data
protection
regulations
when using this data.
Database-supported
Software that stores data
in a specified structure,
the database. The locking
system database includes
the locking plan and the
locking systems.
Alerts
Door
You have the option of
saving additional information on the door, which
also manages the locks.
You can use alerts to
promptly display certain
statuses.
Area
The area is a combination
of several doors.
Audit-compliant
A log is described as
audit-compliant if the information about changes
in a system in the database is archived such that
it can be found again and
traced, cannot be changed
and is protected from falsification.
C
Checkbox
Option of selecting a
property in the graphic
interface
E
Emergency opening
Procedure for opening a
lock without an authorised
transponder. Emergency
opening is protected by
passwords.
Event
An event is a change in
status reported to LSM via
the network.
Export
During the export process,
the selected locking plan
data is transferred to the
PocketPC.
Version: July 2010 v1.0
LSM USER MANUAL
Page 53
locking system after processing.
F
Filter
A filter limits the view to
data grouped / sorted by
the selected property
L
Lock
Lock can be understood
as meaning SimonsVoss
products that evaluate an
authorisation and enable
opening.
G
Group authorisation
Group authorisations provide the option of authorising several transponders
to several locks at the
same time.
GUI
Graphical User Interface
for operating the software.
H
Handheld
A handheld / PocketPC is
a small computer that can
be used for mobile programming.
Hierarchy
Hierarchy is a system of
elements that are superordinate or subordinate to
one another.
Locking plan
The locking plan contains
all the authorisation and
system information, user
management and may include several locking systems.
Locking system
The locking system structures the created transponders and doors and
manages access authorisations.
LON
LON is a wired communication system for building
automation. SimonsVoss
components can network
technology and products
that meet this standard
and therefore be operated
online
I
Import
During the import process
the exported locks are
transferred back to the
LSM Mobile
Software for a handheld /
PocketPC for mobile man-
Version: July 2010 v1.0
LSM USER MANUAL
Page 54
agement and programming of the locking system.
M
Matrix
The matrix is the graphical
view of authorisations in
LSM.
N
Network
The SimonsVoss network
enables the locks to be directly addressed without
the programming device.
Network address
The network address allows you to clearly recognise each lock node,
which is fitted on the door
and stored in the software
as being assigned to the
door.
O
OMRON mode
All product versions can be operated in OMRON mode. If you
would like the Smart Relay to
transfer the transponder data to
an external system and a remote opening command to be
sent to the cylinder when transfer is activated from the Smart
Relay by the external system,
select this option on both the
Smart Relay and the cylinder.
Please note: If you use this configuration, it is no longer possible to open the cylinder using
the transponder! Please refer to
the Smart Relay Manual for an
exact description.
Overlay mode
In overlay mode 8 transponder IDs are reserved
for a created transponder
and programmed into the
authorised locks. If the
first transponder is lost,
the transponder ID is deactivated in the software
and the new transponder
is assigned the next transponder ID from the reserve TIDs. When the
transponder is used to
open a lock, the system
recognises that this is one
of the 7 reserve TIDs and
deactivates the previous
transponder ID.
P
Password
The security of passwords
depends on the complexity and length of the
password. Passwords are
used to protect the locking
Version: July 2010 v1.0
LSM USER MANUAL
Page 55
used in the time zone
plans.
system in several parts of
the system
Period of validity
The period of validity is a
time frame in which the
transponder will function.
The transponder is deactivated outside this time
frame.
R
Person
Person allows you to store
additional
information
about a user.
Reset
During the reset process
the data on the object is
deleted and the actual status of the software set to
“ unprogrammed”
”
PocketPC
A handheld / PocketPC is
a small computer that can
be used for mobile programming of locks.
Programming requirement
Programming is required if
there is a difference between the actual and target status, either due to a
change in access authorisations or configurations.
Public holiday
National or company-specific
holiday or period of several
days off.
Public holiday list
A public holiday list is a
compilation of selected
public holidays and is
Reserve
A reserve shows the number of G1 transponder IDs
in the selected transponder group.
S
Search
Search enables you to
jump directly to an object
in the locking system or
database
T
Task list
List of tasks available in
the system
Time group
A transponder can be assigned to a time group and
when used in conjunction
with a time zone plan, creates time-controlled access.
Version: July 2010 v1.0
LSM USER MANUAL
Page 56
Time group name
Time group name is the
pre-defined time group
name assigned to the time
group number of a transponder
Time group number
The time group number of
a transponder can be set
individually and is specified by the administrator.
The transponder is approved or rejected in a
lock time zone plan according to this group.
Time zone
Time zones are areas that
can only be accessed by
certain
transponder
groups at certain times.
Time zone plan
Object for time-controlled
access on locks for areas
and transponders. Public
holiday lists can also be
incorporated here.
Transponder
The transponder is the
“ electronic key”
” in the
system 3060.
Transponder group
The transponder groups is
a combination of several
transponders for managing group rights.
W
WaveNet
WaveNet is an extremely
flexible SimonsVoss network that can use both
wired and wireless connections.
Write access
The right to make changes. Certain roles in LSM
user management, such
as using handheld devices, managing a network
or configuring a network,
require write access in the
database before they can
be performed.
Version: July 2010 v1.0