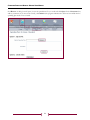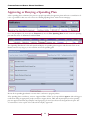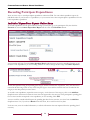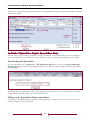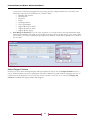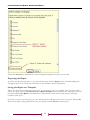
1
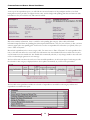
Master User Manual
Last Updated: August, 2010
Released concurrently with CDM v.1.0
All information in this manual referring to
individuals or organizations (names, addresses,
company names, telephone numbers, social
security numbers, etc.) is fictitious and used
strictly for illustration. Any reference to an
actual individual or organization is coincidental
and completely unintentional.
National Resource Center for Participant-Directed Services
CONSUMER DIRECTION MODULE: MASTER USER MANUAL
Contents
Contents ............................................................................................................................................................................................... 1
Introduction ........................................................................................................................................................................................ 1
Terms of Use, Modification and Redistribution .................................................................................................................. 1
Version and Attribution History............................................................................................................................................. 1
Working with Participants’ Non-Financial Information
Creating a New Participant File ....................................................................................................................................................... 1
From the File Section .................................................................................................................................................................... 1
From the Participant Form .......................................................................................................................................................... 1
Download a Blank Participant Form ..................................................................................................................................... 1
Add Information to the Participant Form ............................................................................................................................ 2
Upload the Participant Form................................................................................................................................................... 3
Finding a Participant’s File ............................................................................................................................................................... 4
Advanced Search ....................................................................................................................................................................... 4
Participant Quick Search .......................................................................................................................................................... 4
Master Participant List Search ................................................................................................................................................. 5
Changing a Participant’s File Status ................................................................................................................................................ 7
Viewing a Participant’s File Status History .................................................................................................................................... 8
Creating a New Note in a Participant’s File ................................................................................................................................... 9
Viewing a Note in a Participant’s File ...........................................................................................................................................10
Responding to a Note in a Participant’s File ............................................................................................................................... 11
Assigning a Support Broker ............................................................................................................................................................ 12
Assigning an FMS Entity ................................................................................................................................................................ 13
Assigning a Medical Provider ......................................................................................................................................................... 14
Editing or Deleting a Medical Provider ........................................................................................................................................15
Assigning a Participant Rep ............................................................................................................................................................ 16
Assigning a Legal Guardian ............................................................................................................................................................ 17
Documenting a Home Visit............................................................................................................................................................ 18
1. Update Last In-Person Monitoring Date ........................................................................................................................18
2. Enter Visit Note ..................................................................................................................................................................18
Documenting a Phone Call............................................................................................................................................................. 20
1. Update Last Phone Monitoring Date ..............................................................................................................................20
CONSUMER DIRECTION MODULE: MASTER USER MANUAL
2. Enter Phone Call Note.......................................................................................................................................................20
Printing a Participant’s File ............................................................................................................................................................. 22
Working with Participants’ Non-Financial Information
Creating a Participant Budget ......................................................................................................................................................... 23
Creating a Participant Budget: Enter a Dollar Amount ........................................................................................................23
Creating a Participant Budget: Via the Assessment Module.................................................................................................24
Creating a Participant Budget: Via the Spending Plan ...........................................................................................................24
Viewing and Printing a Spending Plan..........................................................................................................................................25
Creating or Editing a Spending Plan .............................................................................................................................................26
Online Spending Plan..................................................................................................................................................................26
1.
Edit this Plan (Valid for Drafted Status only) ...........................................................................................................26
2.
Make Copy of Plan, and select Budget and/or Date Range ...................................................................................27
3.
Create Blank Spending Plan .........................................................................................................................................27
Spending Plan Spreadsheet ........................................................................................................................................................28
Downloading the Spreadsheet ..............................................................................................................................................28
Filling out the Spending Plan ................................................................................................................................................29
Uploading/Submitting the Spending Plan ..........................................................................................................................30
Approving or Denying a Spending Plan .......................................................................................................................................32
Recording Participant Expenditures .............................................................................................................................................34
Individual Expenditure Report: Online Entry ........................................................................................................................34
Individual Expenditure Report: Spreadsheet Entry ...............................................................................................................35
Downloading the Spreadsheet ..............................................................................................................................................35
Filling out the Expenditure Report Spreadsheet ................................................................................................................35
Uploading the Expenditure Report Spreadsheet ...............................................................................................................37
Batch Expenditure Upload.........................................................................................................................................................37
Downloading the Batch Expenditure File...........................................................................................................................37
Filling out the Batch Expenditure File.................................................................................................................................37
Uploading the Batch Expenditure File ................................................................................................................................38
Viewing Participant Expenditures .................................................................................................................................................40
Editing Participant Expenditures...................................................................................................................................................41
Assessment Module Introduction..................................................................................................................................................43
Creating a New Assessment ........................................................................................................................................................... 43
Viewing and Printing an Assessment ............................................................................................................................................45
CONSUMER DIRECTION MODULE: MASTER USER MANUAL
Monitoring and Oversight Tools
Viewing a Report ..............................................................................................................................................................................46
Exporting a Report ..........................................................................................................................................................................47
Printing a Report ..............................................................................................................................................................................48
Navigating within a Report ............................................................................................................................................................. 49
Searching within a Report ............................................................................................................................................................... 50
Ad Hoc Reporting............................................................................................................................................................................51
Choose Search Criteria ...........................................................................................................................................................51
Set Search Options ..................................................................................................................................................................51
Select Output Columns ..........................................................................................................................................................52
Exporting the Report..............................................................................................................................................................53
Saving the Report as a Template ..........................................................................................................................................53
Viewing Database Records (Audit Log) .......................................................................................................................................54
CONSUMER DIRECTION MODULE: MASTER USER MANUAL
Introduction
This manual walks you through most of the tasks that can be completed by a CDM user. It is recommended that you
first read and understand CDM Basics: Introductory Manual for Staff and Administrators before you continue
with this manual. The CDM Basics manual introduces you to the navigation and tools of the CDM.
The instructions for the tasks may be slightly different in your program, depending on any customizations made by
your program administrator. You are free to change this manual to better reflect those customizations and to share
your changes with your colleagues (please see the Terms of Use below).
Terms of Use, Modification and Redistribution
CDM support and marketing materials created by the National Resource Center for Participant-Directed Services are
licensed under a Creative Commons Attribution-Share Alike 3.0 United States License. Permissions beyond the scope
of this license can be requested by emailing [email protected].
In plain language, this means that you are free to use, copy, distribute, and modify the support materials, as long as the
following three conditions are met:
1. Any redistributed or modified materials retain this license
2. Any redistributed or modified materials include a statement crediting the original development of these
materials to the National Resource Center for Participant Directed Services
3. The Version and Attribution table (see below) must be updated to reflect your contribution to the materials
Version and Attribution History
Date
General description of changes
Primary author(s)
05/2010
Original creation of manual
08/2010
Updated with financial processes and new
enhancements released 08/2010 as CDM v 1.0.
Source code for that release is available at
www.cdm.codeplex.com
Zak Arthur
Edited by Buddy Rutzke
(NRCPDS)
Buddy Rutzke (NRCPDS)
Author contact
information
(optional)
[email protected]
[email protected]
CONSUMER DIRECTION MODULE: MASTER USER MANUAL
Working with Participants’ Non-Financial
Information
Creating a New Participant File
There are two ways to create a new participant file. You can enter them online through the File section, or you can fill
out and upload a Participant Form.
From the File Section
Go to the CDM Homepage and click on the File icon. Next, click the Create File tab, which is below the File icon.
Now, enter the new participant’s personal information into the appropriate fields in all of the tabs (Personal, Program,
etc.). When finished click Save File.
From the Participant Form
To enter a new participant into the CDM using the Participant Form, you must download a blank form, add the
participant’s information, then upload the form and verify the information is correct before saving.
Download a Blank Participant Form
To download a blank Participant Form, go to the Participant Form page, either through the QuickLinks section on
your homepage or from any section of a participant file (except the Financial section). If neither of these links is
available, you do not have permission to view the Participant Form and you must create the new participant file from
the File section.
1
CONSUMER DIRECTION MODULE: MASTER USER MANUAL
Once you click on the link, you will see the page below. Click on the Download Blank Form link. Save the blank
Participant Form somewhere on your computer.
NOTE
If you will often be creating new participant files in the CDM using the Participant Form, it
is a good idea to keep a copy of this blank form file on your computer.
Add Information to the Participant Form
Open the blank Participant File. You will see a page that corresponds to the Personal section of the participant file in
the CDM. Enter all the information you can into this page. If a field has a label that is bolded with an asterisk, this
means that it is a required field. Also, several of the fields will be dropdown menus, so it is easy to enter the correct
information quickly.
Once you have entered all of the personal information, move on to the next worksheet by clicking on the Program
Info tab at the bottom of the Excel spreadsheet. The different worksheets in this file correspond roughly to the
different tabs within the CDM participant file. Go through all of these tabs and enter all the necessary information.
Save the file.
2
CONSUMER DIRECTION MODULE: MASTER USER MANUAL
Upload the Participant Form
After you have completed and saved the Participant Form, return to the page in the CDM from where you
downloaded the blank form. Click Browse, locate the form that you saved and click Open, then click Submit.
Now you see the new participant file. However, the changes have not yet been saved. Verify that the uploaded
information is correct, the click Save File. If you see a confirmation message that says “File has been saved”, then
you are done. If there is required information missing or some information is not valid, you will see a user message
that will tell you which information you must check before you can save.
3
CONSUMER DIRECTION MODULE: MASTER USER MANUAL
Finding a Participant’s File
NOTE
Finding a participant’s file is crucial! You will often have to find a participant’s file in order
to complete many of the tasks in the CDM.
•
•
•
Advanced Search
Participant Quick Search
Master Participant Search
Advanced Search
To conduct an Advanced Search, go to File. Each field is searchable, so you do not need to fill out each field. Also,
you do not have to fill in an entire filed; for example, you can enter “S” in the Last Name field to return all
participants with a last name beginning with “S.” Once you have entered the information you want to search by, click
Search. To clear all the fields you have entered, click Reset.
Participant Quick Search
Use this box to find a participant’s file quickly. Go to the homepage. Begin typing all or part of a participant’s last
name and it will display all names that match your criteria. For example, if you enter “sm,” then all participants with a
last name beginning with “sm” will display. Scroll down to the correct name and hit View File. Your browser will
navigate to the page shown below.
4
CONSUMER DIRECTION MODULE: MASTER USER MANUAL
Locate the participant you are searching for and click View File.
Master Participant List Search
Navigate to the homepage and click on the Master Participant List.
Note: If you don’t have this table on your homepage, just use one of the other methods for locating a participant file.
5
CONSUMER DIRECTION MODULE: MASTER USER MANUAL
A table will open up with the names of the participants. Click View File in order to go to a participant’s file. Or, you
can click Details to quickly view a few key bits of information, such as the participant’s support broker’s name. Please
note that you may have to search through the pages in order to locate the participant, as shown below in step three.
6
CONSUMER DIRECTION MODULE: MASTER USER MANUAL
Changing a Participant’s File Status
Go to the participant’s file. Scroll down to the bottom of the page. Go to the Status drop-down menu and select the
appropriate new status for the participant. When finished, click Save File.
For some file statuses, after this step you will simply see a confirmation message. For other statuses, such as Closed, a
new window will open where you will enter the reason for the status change. Choose the reason from the dropdown
menu, enter an estimated date of return (if appropriate, otherwise leave it blank), and click Save.
NOTE
If the Status Reason pull-down menu does not include the right status change reason, be
sure to suggest to your program administrator that a new reason be added.
7
CONSUMER DIRECTION MODULE: MASTER USER MANUAL
Viewing a Participant’s File Status History
Go to the participant’s file. Click View Status History. Your web browser will navigate to the page below.
If your user role has the correct permissions, you can also edit the participant’s File Status from here by clicking on
Edit. If you opt to change the participant’s file status from here, your browser will navigate to the page below. If you
do not need to edit the participant’s file, click Close.
To change the participant’s file status, click on the drop-down menu. When you are finished, click Close.
8
CONSUMER DIRECTION MODULE: MASTER USER MANUAL
Creating a New Note in a Participant’s File
From the participant’s file, go to the Notes section and click Add Note. Your Web browser will navigate to the page
shown below.
Fill-in the Subject and Note fields, just as you would with an e-mail. Using the drop-down box, indicate the Type of
message. Check the box in front of the recipient(s) that you want to Send Notifications To. Finally, don’t forget to
scroll down to the bottom of the page and click Save Note.
9
CONSUMER DIRECTION MODULE: MASTER USER MANUAL
Viewing a Note in a Participant’s File
Go to the participant’s file. Next, click on the Notes tab. Find the correct note and click View.
You will now see the text of the original note and any responses that have been made. You can also respond to a note
by clicking Respond, or navigate back to the list by clicking Back to List.
10
CONSUMER DIRECTION MODULE: MASTER USER MANUAL
Responding to a Note in a Participant’s File
Go to the participant’s file. Next, click on the Notes tab. Notes regarding the participant will be stored here. Now,
click Respond.
Type your response in the Response field. Next, check the user role that you want to Send Notification To. Your
web browser will navigate to the page below.
Indicate the Case Note Status and the Resolution Type. Finally, click Save Response.
11
CONSUMER DIRECTION MODULE: MASTER USER MANUAL
Assigning a Support Broker
Prerequisites: participant file must already be created and the support broker must be added as a user in the CDM.
Go to the participant’s file > Support Broker tab.
From the Agency pull-down menu, select the agency of the support broker. If the support broker does not work for
an agency, choose “None Selected.” Once you have selected the agency, click Go. The contact information for the
agency you selected will be displayed below the Agency pull-down menu.
Next, from the Support Broker pull-down menu, which now displays the names of all the support brokers working
for the agency you selected. Find the name of the support broker you want to assign to this participant and then click
Go. The support broker’s contact information is now displayed below the Support Broker pull-down menu.
Click Save File. The support broker will now have access to appropriate parts of this participant’s file and will receive
alerts and notifications about this participant.
12
CONSUMER DIRECTION MODULE: MASTER USER MANUAL
Assigning an FMS Entity
Go to the participant’s file > FMSA Admin tab.
From the FMSA Admin pull-down menu, select the FMSA administrator. Once you have selected the administrator,
click Go. The contact information for the administrator you selected will be displayed below the FMSA Admin pulldown menu.
Click Save File. The FMSA administrator will now have access to appropriate parts of this participant’s file and will
receive alerts and notifications about this participant.
13
CONSUMER DIRECTION MODULE: MASTER USER MANUAL
Assigning a Medical Provider
Go to the participant’s file > Medical Provider tab.
To add a new medical provider, or to edit a provider’s personal information, click Add Medical Provider.
Fill in the fields as appropriate and select the provider’s Specialty. When finished, click Update Medical Provider.
14
CONSUMER DIRECTION MODULE: MASTER USER MANUAL
Editing or Deleting a Medical Provider
Go to the participant’s file > Medical Provider tab.
To update and or edit a provider’s personal information, click Edit. To delete a provider, click Delete. When
finished, click Save File.
15
CONSUMER DIRECTION MODULE: MASTER USER MANUAL
Assigning a Participant Rep
Go to the participant’s file > Participant Rep tab.
Enter the participant representative’s information into the fields. When finished, click Save File.
16
CONSUMER DIRECTION MODULE: MASTER USER MANUAL
Assigning a Legal Guardian
Go to the participant’s file > Legal Guardian tab.
Fill in the personal information of the legal guardian. When finished, click Save File.
17
CONSUMER DIRECTION MODULE: MASTER USER MANUAL
Documenting a Home Visit
1. Update Last In-Person Monitoring Date
Go to the participant’s file > Program tab. Change the date fields for Last In-Person Monitoring Date. Click Save.
2. Enter Visit Note
Go to the participant’s file > Notes tab. Click Add Note.
The screen will refresh. Fill in the Subject and Note fields as appropriate. From the Type dropdown menu, select
Monitoring Visit. Check the boxes next to the user roles that should receive notifications about this phone
monitoring. Next, scroll down and click Save Note.
18
CONSUMER DIRECTION MODULE: MASTER USER MANUAL
19
CONSUMER DIRECTION MODULE: MASTER USER MANUAL
Documenting a Phone Call
1. Update Last Phone Monitoring Date
Go to the participant’s file > Program tab. Update the date fields for Last Phone Monitoring. Click Save.
2. Enter Phone Call Note
Go to the participant’s file > Notes tab. Click Add Note.
The screen will refresh. Fill in the Subject and Note fields as appropriate. From the Type dropdown menu, select
Phone Monitoring. Check the boxes next to the user roles that should receive notifications about this phone
monitoring. Next, scroll down and click Save Note.
20
CONSUMER DIRECTION MODULE: MASTER USER MANUAL
21
CONSUMER DIRECTION MODULE: MASTER USER MANUAL
Printing a Participant’s File
There are three ways to print a participant’s file. The first step in all of these methods is to go to the participant’s file.
The first way is to click on Print File, located just below the Employee tab.
The second way is to download the Participant Form. To do this, click on the Forms link. This will bring you the
Participant Form page. In the Get Participant Form box, enter the participant’s last name then click Get Form. This
will enable you to download a spreadsheet with most of the participant’s information.
NOTE
The Print File and Forms links will always appear in the same location in the participant
file, whether you are in the FMSA Admin tab, Support Broker tab, or Medical Provider tab,
etc.
If you do not see the Forms link, then you do not have permission to use this feature.
The third way is to click on Print at the bottom of the page. This link is available from anywhere within the CDM.
Clicking on it will open a new window. This window is a print-friendly version of the CDM. From this window, you
can print directly from your browser, but you must print each tab within the participant file separately.
22
CONSUMER DIRECTION MODULE: MASTER USER MANUAL
Working with Participants’ Financial
Information
Creating a Participant Budget
There are several ways to enter a budget for a participant, depending on how the budget amount is calculated in your
program:
•
•
•
If the budget amount is calculated before it is entered into the CDM, go to Creating a Participant Budget:
Enter a Dollar Amount.
If the budget amount is calculated using the CDM’s assessment module, go to Creating a Participant Budget:
Via the Assessment Module.
If the budget amount is calculated at the same time that a spending plan is created, then go to Creating a
Participant Budget: Via the Spending Plan.
Creating a Participant Budget: Enter a Dollar Amount
Start from: Participant’s file > Financial tab > Budget sub-tab.
Click on the Add Budget button. A new screen will appear. Enter the required information and click Insert. New
spending plans for this participant can now be created using this budget.
23
CONSUMER DIRECTION MODULE: MASTER USER MANUAL
Creating a Participant Budget: Via the Assessment Module
After creating an assessment within the assessment module, when you click Save, the Calculated Budget Amount is
automatically forwarded to the program administrator for approval. Once the program administrator approves that
assessment and budget, then a spending plan can be created.
Refer to the assessment module instructions for more details.
Creating a Participant Budget: Via the Spending Plan
Prerequisite: Administrators must check the box for the setting Spending Plan Download without Budget in
order to use this method. That setting is located in Admin > Application Settings > State Customization.
If the budget is developed at the same time as the spending plan, simply follow the instructions for downloading a
spending plan (Participant File > Financial > Get Spending Plan) and check the box labeled “Let me enter budget on
spreadsheet” before clicking Download.
When you open the spending plan spreadsheet, you will be able to edit the budget information at the top right that is
normally not editable. Follow the directions for completing the spending plan and be sure to enter the appropriate
information into the budget cells before uploading the spending plan.
24
CONSUMER DIRECTION MODULE: MASTER USER MANUAL
Viewing and Printing a Spending Plan
Go to the participant’s file > Financial tab > View Spending Plans sub-tab.
You will see a table summarizing every spending plan ever drafted for this participant. Click View. The “Spending
Plan Details” table will expand. At the top of the table is the budget and spending plan summary information. Within
the table, each spending plan category is displayed, along with the category subtotal and a Details button. Click the
Details button to view each line item within any spending plan category.
To print, click the Print link at the bottom of the page. A new window will open that is more print-friendly. Click
Expand for all the categories you want to display in the printed version. Then, print your browser window. This is
usually done by going into the File menu and clicking Print, or you can press Ctrl + P.
25
CONSUMER DIRECTION MODULE: MASTER USER MANUAL
Creating or Editing a Spending Plan
If you will have internet access while you are creating the spending plan, then follow the instructions for the online
spending plan. If you will not have internet access, such as if you will be bringing a laptop into the participant’s home,
then follow the instructions for the spending plan spreadsheet.
NOTE
Information within a spending plan can only be edited by submitting a new plan with
changes made in order to replace the old one.
However, if you have administrative permission, you can edit the start date, end date, or
status of a spending plan. To do this, go to the participant’s file > Financial tab > View
Spending Plans sub-tab. Make your changes, then click Save.
Online Spending Plan
Go to the participant’s file and then click on the Financial tab then the Submit Spending Plan tab. On the bottom
half of the page is “Option 2: Create Online”. In that area, click Edit Online.
A new window will open with three options:
1.
Edit this Plan (Valid for Drafted Status only)
Choose this option if you have already started a spending plan and saved it, but did not submit it. You must
also select the spending plan that you started from the Select Spending Plan dropdown menu. This option
will only work if the spending plan you select shows “drafted” in parentheses.
NOTE
If you want to edit a spending plan that has already been submitted, then you must make
a copy of the submitted spending plan, make your changes, then resubmit the new
version.
26
CONSUMER DIRECTION MODULE: MASTER USER MANUAL
2.
Make Copy of Plan, and select Budget and/or Date Range
Choose this option if you want to work from a copy of a spending plan that was previously submitted. This is
helpful if you want to submit a new version of a spending plan that has already been submitted, or if the
participant’s next spending plan will be similar to their previous one.
Once you select this option, new fields will appear. The Budget dropdown menu lists all available approved
budgets for this participant. Choose the budget that covers the period for which you want to create a
spending plan.
The Spending Plan Date Range is the period during which the spending plan, if approved, will be valid.
Enter the beginning and end date, and be sure that the spending plan date range falls within the budget date
range. For example, if the budget has a start date of July 1, 2010, then the spending plan start date must be
July 1, 2010 or later.
3.
Create Blank Spending Plan
Choose this option if you want to start fresh with a blank spending plan. If you select this option, you will be
required to choose a budget and set the spending plan date range, just like in Option 2.
Now that you have chosen one of the three options, click Get Spending Plan. The Spending Plan Details table will
expand. Each spending plan category is displayed next to a blue plus sign. Click the plus sign in order to expand the
details for that category. You can enter information into any white field. The pale blue fields will calculate
automatically as you enter information.
When you are done entering information for one category, you can click the plus sign next to the category title again
to collapse those details. Then, click on the plus sign of the next category to begin entering those details.
27
CONSUMER DIRECTION MODULE: MASTER USER MANUAL
NOTE
If your spending plans include service or item codes and the administrator has enabled
drop-down menus to be used in those fields, then the codes will auto-complete. Just
start typing the code and the rest will
While you are working, be sure to click Save often. This will save your work, so if you are timed-out by the CDM or
are unable to do all the work on this spending plan at once, you will not lose everything you have entered. This will
save the spending plan with a “Drafted” status. When you want to edit it, follow the directions for Option 1: Edit this
Plan when you first open the online spending plan window.
The final step in creating an online spending plan is to click Save and Submit. This will save the spending plan and
notify the program administrator that it is ready to be approved. Once you submit the spending plan, you will be
unable to edit it (although you can copy it to create a new one).
Remember, until you click Save and Submit, the spending plan is not complete and will not be approved or denied.
Spending Plan Spreadsheet
There are three steps to creating a spending plan using the spreadsheet. You will download and save the spending plan
spreadsheet, enter the information into the spending plan, then upload the spending plan into the CDM.
Downloading the Spreadsheet
Go to the participant’s file > Financial tab > Get Spending Plan sub-tab.
28
CONSUMER DIRECTION MODULE: MASTER USER MANUAL
From the Available Spending Plans dropdown menu, choose which spending plan you want to open. If you want to
start from scratch, select Blank. If you want to copy a previously submitted spending plan, choose that spending plan
from the dropdown menu.
From the Use Budget dropdown menu, select the approved budget from which you want to create a spending plan.
If you are copying a previously submitted spending plan, you can choose to either enter a new date range or to use the
date range of the spending plan that you are copying. Make this selection in the Effective Date Range dropdown
menu.
Designate the beginning and end dates of the spending plan. Remember that the spending plan effective dates must
fall within the dates of the budget that you chose from the Use Budget dropdown menu.
Finally, click Download. A download dialog box will appear. Name the file, and choose where to save it. It is a good
idea to have a standard naming format and a folder where you save spending plans.
NOTE
If you copied an existing spending plan and chose to use the same effective dates, you
will receive a user message telling you that another version of the spending plan exists,
so this plan will have a different version number if you submit it. Click Confirm to
continue.
Filling out the Spending Plan
Now that you have downloaded the spending plan spreadsheet, it is time to open it and to fill it out. As you are
working, remember to save the file often.
At the top of the spending plan you will find the contact information of the participant and his or her fiscal
management services provider, the support broker name, and the budget and spending plan dates and amounts. This
information is for your reference only and usually cannot be edited. In some programs, you will be able to edit the
budget and spending plan summary information.0
29
CONSUMER DIRECTION MODULE: MASTER USER MANUAL
Below the summary information, there is a table for each spending plan category. Enter spending plan information
into the white cells in these tables. Do not enter any information into the shaded cells. The shaded cells automatically
calculate, so any changes made to these cells will not be saved and might generate an error message.
The last cell in each row shows the cost of each line item. At the bottom right of each spending plan category table,
the subtotal for the spending plan category is displayed. These values update automatically as you fill out the
spreadsheet.
The last table in the spreadsheet is the spending plan summary. Here you will see the subtotals for each category, the
total cost of the spending plan, and the amount remaining (which is calculated by subtracting the spending plan total
cost from the approved budget amount). Make sure that the Amount Remaining is a positive number, or else the
spending plan total cost exceeds the approved budget amount, and the spending plan will be denied.
Once you have completed all of the spending plan categories, save and close the spreadsheet.
Uploading/Submitting the Spending Plan
After you complete and saved the spending plan, return to the CDM and go to the participant’s file > Financial tab
> Submit Spending Plan sub-tab. The top half of the page will be labeled “Option 1: Upload File”. In this section,
30
CONSUMER DIRECTION MODULE: MASTER USER MANUAL
click Browse. A dialog box will open. Locate the spreadsheet file you saved and click Open. In the Comments box,
add any comments if you have them. Finally, click Submit. The program administrator will now be notified that the
spending plan needs to be reviewed.
31
CONSUMER DIRECTION MODULE: MASTER USER MANUAL
Approving or Denying a Spending Plan
After a spending plan is submitted, the person or people responsible for approving them will receive a notification. It
is also a good idea for that user role to have the “Pending Spending Plans” table on their homepage.
Go to the participant’s file, then click the Financial tab, then the View Spending Plan sub-tab. Locate the spending
plan with the status of “Submitted” and click View.
The “Spending Plan Details” table will expand and display the spending plan categories and subtotals. Click on the
Details button in any category to view each line item in the spending plan.
Review all the spending plan details to ensure that it conforms to program policies.
If the spending plan is satisfactory, enter an “Approved Date of Plan” at the top and click Approve. This will trigger a
notification telling the appropriate people (usually the support broker, FMS, and the participant) that the spending
plan was approved and that the participant can begin paying for the items and services designated in the plan. The
“Current Status” in the top left of the table will also display “approved”.
32
CONSUMER DIRECTION MODULE: MASTER USER MANUAL
If the spending plan is unsatisfactory, choose an option from the Select Denial Reason dropdown menu and click
Reject. This will trigger a notification telling the appropriate people (usually the support broker and participant) that
the spending plan needs modification.
33
CONSUMER DIRECTION MODULE: MASTER USER MANUAL
Recording Participant Expenditures
There are three ways to record participant expenditures within the CDM. You can submit expenditure reports by
individual either via your browser or a spreadsheet, or you can enter more than one participant’s expenditures into the
batch expenditure spreadsheet.
Individual Expenditure Report: Online Entry
To record expenditures for one person directly through your browser, go to the participant’s file, then click the
Financial tab then the Submit Expenditure Report sub-tab. Click the Edit Online button.
A new window will open. From the Select Spending Plan dropdown menu, choose the spending plan that covers
the dates of the expenditures you are recording. There is no need to change the date range. Click Show Payments.
A table will expand showing each spending plan category and the total amount of payments, if any, that have been
entered in this date range. Click on any of the blue plus signs to view each line item that has been recorded in that
category in the time period you chose above.
To record a new expenditure, expand the correct category. At the bottom of the category, click on the Add Row
dropdown menu. This menu contains the items that were approved in that category in the participant’s spending plan.
Choose the item that corresponds to the expenditure you are recording. Click Add.
A new row will be created and will import the spending plan data for the item that you chose from the Add Row
dropdown menu. Or, if you chose <Blank> from that menu, the row will not have any data.
In the new row, enter the needed information, or edit the information that was imported from the spending plan if
necessary.
34
CONSUMER DIRECTION MODULE: MASTER USER MANUAL
Repeat these steps with all of the expenditures. Be sure to click Save often. When you are done, click Save a final time
and close the window.
Individual Expenditure Report: Spreadsheet Entry
There are three steps to recording expenditures using the spreadsheet. You will download and save the expenditure
report spreadsheet, enter the information into the expenditure report, then upload the spreadsheet into the CDM.
Downloading the Spreadsheet
Go to the participant’s file > Financial tab > Get Expenditure Reports sub-tab. From the Approved Spending
Plans dropdown menu, choose the spending plan that covers the dates for which you will be recording expenditures.
Click Download.
A download dialog box will appear. Name the file, and choose where to save it. It is a good idea to have a standard
naming format and a folder where you save expenditure reports.
Filling out the Expenditure Report Spreadsheet
Now that you have downloaded the expenditure report spreadsheet, it is time to open it and to fill it out. As you are
working, remember to save the file often.
35
CONSUMER DIRECTION MODULE: MASTER USER MANUAL
At the top of the expenditure report, you will find the contact information of the participant and his or her fiscal
management services provider, the support broker name, and the budget and spending plan dates and amounts. This
information is for your reference only and cannot be edited.
Below the summary information, there is a table for each spending plan category. These tables will include
information imported from the spending plan. This imported information is only for your reference, so that you know
what was approved in the spending plan. It will not be saved as an expenditure line item when you upload, unless you
enter a “Date of Payment”.
Record each expenditure in the correct category table. You must enter a “Date of Payment” for each expenditure line
item, or that line item will not be saved. Only enter information into the unshaded cells in these tables. Do not enter
any information into the shaded cells. The shaded cells automatically calculate, so any changes made to these cells will
not be saved and might generate an error message.
The last cell in each row shows the total cost of the recorded expenditure. At the bottom right of each category table,
the subtotal for that category is displayed. These values update automatically as you fill out the spreadsheet.
The last table in the spreadsheet includes the subtotals of expenditures recorded for each category and the total
expenditures recorded in this report.
36
CONSUMER DIRECTION MODULE: MASTER USER MANUAL
Once you have completed entering all expenditures, save and close the spreadsheet.
Uploading the Expenditure Report Spreadsheet
NOTE
Never include an expenditure payment record in more than expenditure report
spreadsheet upload. It is always best to start a new report by downloading a new, blank
expenditure report spreadsheet from a participant’s file. You are able to upload more
than one spreadsheet for any date range if some expenditures are entered later than
others or if the spreadsheet does not have enough lines.
After you complete and save the expenditure report, return to the CDM and go to the participant’s file > Financial
tab > Submit Expenditure Report sub-tab. The top half of the page is labeled “Option 1: Upload File”. In this
section, click Browse. A dialog box will open. Locate the spreadsheet file you saved and click Open. Click Submit.
Batch Expenditure Upload
The batch expenditure upload enables you to record expenditures for many participants using a single spreadsheet.
This process involves three steps: downloading the spreadsheet, filling it out, and uploading it.
Downloading the Batch Expenditure File
From the Quick Links section of your homepage, click on the Expenditure Batch Processing link. A new page will
load. The top half of this page is the area from which you will download the blank expenditure file. First, choose the
date range that encompasses the expenditures you will be recording. Click Download.
A download dialog box will open. Name the file, and choose where to save it. It is a good idea to have a standard
naming format and a folder where you save expenditure reports.
Filling out the Batch Expenditure File
Now that you have downloaded the batch expenditure spreadsheet, it is time to open it and to fill it out. As you are
working, remember to save the file often.
37
CONSUMER DIRECTION MODULE: MASTER USER MANUAL
The file you see now displays every line item from every approved spending plan that is or was active during the date
range you designated during the download process. The numbers from the spending plan are imported into this
spreadsheet, but no line item will be saved into the CDM unless you enter a “Date of Payment”.
Each spending plan category has its own range of columns in the batch expenditure file. You may need to scroll to the
right to find the unshaded cells within the columns for the line item category of the expenditure you are recording. Do
not enter information into shaded cells, as this will not be saved to the CDM and may generate an error.
For each expenditure, locate the correct participant and line item. Enter a “Date of Payment” and scroll to the right
until you come to the unshaded columns in that row. Enter the expenditure details. If the details were already
imported from the spending plan, double check them and edit them to reflect actual expenses if needed.
The last column of the spreadsheet contains the totals for each line item recorded. These are the most important
figures to check. They do not update based on the other line item information you enter.
Once you have completed entering all expenditures, save and close the spreadsheet.
Uploading the Batch Expenditure File
After you complete and save the expenditure batch file, return to the same page of the CDM from where you
downloaded the batch expenditure file. Under “Upload monthly expenditures batch file”, click Browse. Locate the
file, click Open, then click Upload.
38
CONSUMER DIRECTION MODULE: MASTER USER MANUAL
The CDM will check the spreadsheet data in several ways. If it finds something that may be an error, it will return an
error message. Most of these messages will include a line and column number. Go back to the spreadsheet and view
that cell to make sure that it contains the correct type of data (e.g. a decimal instead of text). Make the necessary
changes, save the file, and then upload it into the CDM again.
Once you have fixed any data entry errors, you will see a table displaying all the information that the CDM took from
the spreadsheet. Double check this information. Be sure that all the expenditures you want to enter are there, and that
there are none you did not mean to enter. Especially make sure the last column displays the correct total amount.
If the data in the table are correct, click Commit Changes. Otherwise, click Upload New File to make changes to
the spreadsheet and upload it again.
39
CONSUMER DIRECTION MODULE: MASTER USER MANUAL
Viewing Participant Expenditures
Go to the participant’s file > Financial tab > View Expenditure Reports sub-tab.
All of the participant’s previously approved spending plans are listed in the Available Spending Plans dropdown
menu. From this menu, choose the spending plan that you want to compare expenditures against.
Set the Date Range fields to the range that contains the expenditures you want to view. If you want to view all
expenditures that were recorded under the spending plan you chose, ignore the date range fields and just check the
box below. Click Go.
In the image below, the search will return expenditures that had a date of payment in June of 2010 and that were
approved under the spending plan that ends on 07/31/2010.
A table will display with each spending plan category. The total spending during the selected period for each category
is displayed on the right side of the table. Click Details to view each expenditure recorded for any category.
40
CONSUMER DIRECTION MODULE: MASTER USER MANUAL
Editing Participant Expenditures
Got to the participant’s file > Financial tab > Submit Expenditure Report sub-tab. Click the Edit Online button.
A new window will open. From the Select Spending Plan dropdown menu, choose the spending plan that covers
the dates of the expenditures you want to edit. If you want to view only expenditures from a particular date range
within the spending plan date range, then you can change the Date Range start or end dates. Click Show Payments.
A table will expand showing each spending plan category and the total amount of payments, if any, that have been
entered in this date range. Find the category that contains the expenditure you want to edit and click on the blue plus
sign. The category will expand to show all of the category expenditures that have been entered during the date range
selected.
Find the expenditure to be edited. If there are multiple expenditures that are similar, the easiest way to identify the
correct expenditure is by the “Date of Payment”.
Repeat this step with any other expenditures that need to be edited. Finally, click Save and close the window.
41
CONSUMER DIRECTION MODULE: MASTER USER MANUAL
NOTE
The CDM database logs all the changes made to participant files, so even though the
participant file will only display the updated expenditure, administrators do have records
of edited expenditures.
42
CONSUMER DIRECTION MODULE: MASTER USER MANUAL
Assessment Module Introduction
Using the assessment module, you can generate a budget based on the participant’s functional characteristics and the
level and frequency of assistance needed with any activity of daily living (ADL) and instrumental activity of daily living
(IADL). The program administrator can configure the formulas that determine the effect that each piece of
assessment information will have on the budget. The assessment instructions are applicable only in programs that use
the assessment module.
Creating a New Assessment
Go to the participant’s file > Assessments tab. A table will display any previous assessments created for this
participant. Click New Assessment at the bottom of the page.
A new assessment will appear. Enter the date.
If the participant has no previous assessment, then all the fields will be blank. If the participant has a previous
assessment, then the information from the most recent assessment will be copied into this new one. It is vital that you
double check every detail of the assessment to make sure that old information is either still valid or has been updated.
Fill out the assessment according to your program’s policies and procedures. Check the box next to each functional
characteristic of the participant. Then, enter the details for each ADL and IADL. To do this, click on the plus sign in
the first column of the ADL and IADL tables. Enter the details regarding each activity. For each ADL or IADL the
participant does not need help with, set the Level of Assistance dropdown menu to “Not Applicable”.
43
CONSUMER DIRECTION MODULE: MASTER USER MANUAL
Be sure to click Save often as you work. For security, the CDM is set to automatically log you out if you are inactive
for a certain amount of time. Saving often will ensure that you don’t lose your work if this happens.
When you have completed entering all the assessment details, click Submit. This will save your work, lock the
assessment so it cannot be edited, and send a notification to the administrator to let them know that the assessment
has been done and the budget is ready to be approved or denied.
44
CONSUMER DIRECTION MODULE: MASTER USER MANUAL
Monitoring and Oversight Tools
Viewing and Printing an Assessment
Go to the participant’s file > Assessments tab. A table will display any previous assessments created for this
participant. Locate the assessment you want to view, then click on that assessment’s date.
The window will display the assessment. To view the details of any of the recorded ADLs or IADLs, click the plus
sign in the first column of those tables.
To print the assessment, click View Printable Copy at the bottom of the page. The page will refresh with a printfriendly version of the assessment. Scroll to the bottom and click Print. The print dialog box for your browser will
open.
45
CONSUMER DIRECTION MODULE: MASTER USER MANUAL
Viewing a Report
Go to the Forms/Reports area.
Locate the desired report and click View.
If the report requires more information, such as a date range, you will see a page like the one below. Enter any
information needed and click Run Report.
The report will open in a new window. From here, you can browse or search the data in the report, or print or export
it (see below).
46
CONSUMER DIRECTION MODULE: MASTER USER MANUAL
Exporting a Report
Open any report. From the “Business Objects” toolbar, click on the export icon, which looks like a disk.
A new window opens with export options. From the dropdown menu, choose the format into which you want to
export. Your options include crystal reports (.rpt), PDF, Word (.doc), MS Excel (.xls), or rich text (.rtf).
Select the page range you want to export, and then click OK. The report will then be exported into the format you
selected.
NOTE
You can get a free Crystal Report viewer from the SAP via the following link:
http://www.businessobjects.com/forms/crystalreports/viewer/
47
CONSUMER DIRECTION MODULE: MASTER USER MANUAL
Printing a Report
Open any report. From the “Business Objects” toolbar, click on the print icon.
A new window will open with print options. Choose the page range that you want to print and click OK. A PDF file
will open. In the top left corner of the window with the PDF open, click the print icon.
The standard print dialog box will open. Adjust settings as needed and click OK.
48
CONSUMER DIRECTION MODULE: MASTER USER MANUAL
Navigating within a Report
In reports with multiple pages, you can navigate to a different page by clicking on one of the arrows in the “Business
Objects” toolbar. Or, in the text box to the right of the page numbers, you can enter a page number and then click on
the icon to the right of this text box to go directly to that page.
49
CONSUMER DIRECTION MODULE: MASTER USER MANUAL
Searching within a Report
Open any report . From the “Business Objects” toolbar, find the binoculars icon. The text box to the left of this icon
is the search box. Enter a term that you want to find, such as a participant’s name, then click on the binoculars icon.
If the search term you entered is somewhere in the report, the page where it is located will display with the search
term highlighted. If the search term is not anywhere in the report, then the search box will say End of Search.
50
CONSUMER DIRECTION MODULE: MASTER USER MANUAL
Ad Hoc Reporting
Click Ad Hoc Reporting in the Quick Links section of your homepage (if the link is not there, then you do not have
the level of permission needed to access this tool). The ad hoc reporting search criteria table displays.
Choose Search Criteria
The first step is to determine which participants will be included in the report. Start by choosing your first criterion
and the comparison option, then enter the criterion input. The criterion input field has an auto-complete feature that
can help you avoid typos. Click Add to save the criterion.
Here is an example of how to enter a search criterion that will return all female participants. The criterion type is set
to “Gender”, the comparison option is set to “Equals”, and the user has entered “f”, so the option “Female” has
appeared above the field. Click Add.
You can add as many criteria as you like. Below is an example of input criteria that will return all participants that are
female, have an active file status, and have a budget that is greater than $1,000.
The Remove button will delete the search criterion in that row.
Set Search Options
The search options box is on the right of the “Search Criteria” table. Each option is explained here:
•
•
•
•
Load a Saved Report Template: If any report templates have previously been saved, you can select them
from this dropdown menu. If you select a template and click Go, the search criteria, output columns and
search options from the template will load.
Query Type: Choose “And” if you want the report to display participants that satisfy all search criteria.
Choose “Or” if you want the report to display participants that meet any of the search criteria.
Sort By: This setting determines the order in which the report results are displayed.
Effective Date: Values for same search criteria may change over time. One example is the “support broker
agency”. Since a participant could be served by different agencies at different times, you need to tell the CDM
which date to consider. In the example shown in the image below, the Effective Date is set to 08/01/2009,
51
CONSUMER DIRECTION MODULE: MASTER USER MANUAL
•
so the report would show participants that were being served by “Helping Hands LLC” on that day. The
following search criteria are modified by the “Effective Date”:
o Spending Plan Amount
o File Status ID
o File Status
o FMSA
o Has Representative
o Has Legal Guardian
o Support Broker First Name
o Support Broker Last Name
o Support Broker Agency
Date Range for Payments: If you are using “Payments” as a search criterion, this range determines which
payments are included in the search. In the example in the image below, the date range is set to 01/01/2009 –
12/31/2009, so the report would display participants that had more than $5,000 in expenditures recorded in
the year 2009.
Select Output Columns
Now that you have chosen which participants will be included in the report, click the Output Columns button to
choose which information from those participants’ files will be displayed. A popup window will appear with a list of
columns that can be displayed. You can select any of these columns one-by-one, or you can choose Display All
Columns. Click Save. The popup window will disappear.
52
CONSUMER DIRECTION MODULE: MASTER USER MANUAL
Finally, click Search. The “Search Results” table will expand and display the report you have built.
Exporting the Report
To analyze the data, print the report, or save and send the report, click the Export button. A download dialog box
will appear. Open or save the file. The information is now available in an Excel spreadsheet.
Saving the Report as a Template
If there is a report that you will run more than once, you may want to save it as a template. Once you have created
and run the report, click the Save Selections into a Report Template. When prompted, enter a descriptive name for
the report and click Save Report. The CDM will now remember the search criteria, search options, and output
columns for this report.
Next time you want to run this report, go to the “Search Options” pull-down menu, locate your report, and click Go.
Review all the report settings and make any necessary changes and click Search to run the report.
53
CONSUMER DIRECTION MODULE: MASTER USER MANUAL
Viewing Database Records (Audit Log)
This tool enables administrators to view any changes that have been made to the CDM database. From the Quick
Links table on your homepage, click Ad Hoc Reporting > Audit Log tab.
From the Table Name dropdown menu, choose the database table you want to view. Set the Date Range and click
Search.
A table will display below with every record that was changed during the date range you chose. The “Changed By”
column gives the user ID of the person that changed the value. The “Date” shows when the change was made. Every
column includes the title of the database field, the old value, and the new value. If a field was changed during the date
range, the title, old and new values will be in bold.
Click Export at the top right to export the date to an Excel spreadsheet for printing, analysis, saving and sharing.
54
NRCPDS
Boston College
314 Hammond Street
Chestnut Hill, MA 02467
(617) 552-6727 Fax: (617) 552-1975
www.participantdirection.org
The National Resource Center for Participant-Directed Services provides research-based technical assistance on all aspects of
designing, implementing, managing and evaluating participant-directed programs.
1