1
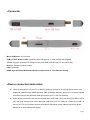
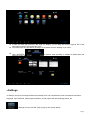
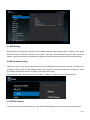
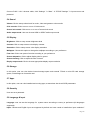
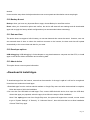
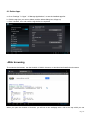
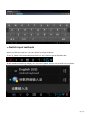
Kaos ATV2 Manual Page 1 Declaration: This user manual includes all the information for safe and correct operation of the Kaos ATV2 device. To avoid accidents and device damage, please go through these contents carefully before using the device. Please keep the device away from high temperatures, humid and dusty environments. Do not drop, hit or knock the device. Do not power off the device when it is formatting or upgrading, etc, otherwise an operation system (OS) error may occur. Most OS errors can be solved with a simple reset of the device. Do not dis-assemble the device. Do not clean it with alcohol, thinner or benzene. We retain the right to upgrade and modify the device without giving notice. Disclaimer: While we are responsible for the warranty and after-sale services, the user is responsible for his own data written into the device. We are not responsible for the loss of any data or related. The device is not water-proof. All the pictures in this manual are purely for reference. Page 2 1.Connector Micro-USB Power: 5V 1A Power USB 2.0 HOST & Micro USB: Connecting with USB devices; or data transfer with computer T-Flash: Supports expansion of storage memory from 2GB to 32GB using TF card (micro-SD) Recover: Firmware recovery button LED: Power light HDMI: High Definition Multimedia Interface output (male) to TV or Monitor display 2.Device a) connection Instruction Insert the Kaos ATV2 into your TV or Monitor HDMI port (if there is not enough space around your HDMI port, please use the HDMI extension cable included in the box). Set your TV to receive signals from the ATV2 into this particular HDMI port (refer to your TV set user manual). b) Power supply connection: take out the included Micro USB cable, plug it into the ATV2's Micro USB 2 port, then plug the other end of the cable's full-USB 2 into your TV′s USB port. (If there is no USB 2.0 port on your TV or you need to connect an external USB power supply, please connect the power adapter for a more stable power supply. Page 3 c) This device uses the 2.4GHz wireless airmouse. Plug the 2.4GHz receiver into the USB Host port. Or plug into the micro-USB OTG port using the included micro-USB converter. If only a wireless mouse is plugged in, the device will provide a soft keyboard from the operation system. If the device detects a physical keyboard, the soft keyboard will be hidden by the OS automatically. d) Mouse left button for “OK”, right button for “Return”, scroll wheel for Page Up and Page Down. Hold left button to drag icon or Copy & Paste file. Hold middle button for Properties. 3.Boot state After power on for about 10 seconds, the boot screen will appear. In about one minute, the main screen will display: Page 4 4.Main interface introduction Hold down the left button of your mouse on any icon to drag it anywhere you like. You can similarly drag any app shortcut onto the main screen. Drag any icon into the top “X” (it turns red) to delete it: Page 5 Move your cursor to any (empty) space and drag towards left or right to turn to the next page. You can also use the mouse wheel for scrolling to the next page. 4.1 Function column Page 6 Return button: return to Previous Page. Main menu button: click it anytime to return to Main Menu. Program button: click to check all the running programs. Volume decrease button: click to decrease Volume. Volume increase button: click to increase Volume. Shutdown button: in any page, click this button to power off the device. Properties button: when in different apps, it shows different contents. It is equivalent to Windows properties button. Search button: located in the top left corner of the desktop, click this icon to search the web or apps. Program tools button: located in the top right corner of the desktop, click this icon to see installed apps. 4.2 Status bar The right bottom corner is the status bar. It shows the status of the T-Flash (micro-SD) Card, USB connection, Time, Wifi and Downloads, etc. Click a status bar icon to pop up the respective hidden menu. 4.3 Application Click to show all the installed apps and setup tools icon. Page 7 If there are more app icons than the page can display, you can drag the cursor to right or left for the next page to see the rest of the app icons. You can launch any app directly or drag it to anywhere onto the desktop if you want. Click “WIDGETS” shortcuts on the desktop. to access; keep pressing on widgets to make them into 5.Settings In Settings, the user can setup the device according to his own requirements, such as network connection, language, input methods, video output resolution, sound output and check storage space, etc. Settings is on the tool bar. Click to pop up the screen below: Page 8 5.1 WIFI Setting When opened, the Wifi player will search for available wireless router signals within 30 meters. User simply chooses a router access point named on the screen, input the correct password and can then access the internet. If the access point is not locked with a password, the Wifi player will connect to the internet directly. 5.2 Wired network setup If there is no wifi, you can use an ethernet (LAN / RJ45) cable to access the internet. But first, you have to buy a USB 2.0 ethernet (LAN / RJ45) Adapter and plug one end into the ATV2's USB Host or OTG ports. (Note: The network supported is limited, so please ensure the correct type). Connect RJ45 / LAN / ethernet cable, click “Settings” “More” “Ethernet” tick “Use Ethernet” 5.3 PPPOE Settings If your family or office network is Dial-Up, then click PPPOE Settings and input the account and password. Page 9 Connect RJ45 / LAN / ethernet cable, click “Settings” “More” “PPPOE Settings” input account and password. 5.4 Sound Volume: Click to setup volume level for music, video and games or other media Click sounds: Click to turn on or turn off click sounds Screen lock sound: Click to turn on or turn off screen lock sound Audio output mode: User can choose HDMI or SPDIF audio output mode 5.5 Display Brightness: Click to setup screen brightness level Contrast: Click to setup screen color display contrast Saturation: Click to setup screen color display saturation Wallpaper: Choose this option to change the wallpaper according to your preference Font size: Click to set system font size according to your preference Screen adaptation: Click to adjust display size for games Screen trimming: Click to adjust the size of screen Display output mode: Click to choose appropriate display output resolution 5.6 Storage In this option, user can view device internal storage space and external T-Flash or micro-SD card storage space, uninstall apps or format the card. 5.7 Apps In this option, user can view installed and running apps; at same time also check DDR parameters. 5.8 Security User can set a password. 5.9 Language & input Language: user can set the Language for system menus according to country or preference (60 languages supported) Input: Chinese and English input are supported by default and user needs to install other input methods if Page 10 desired. Users can also setup here the keyboard and mouse cursor speeds and simulation mouse step length. 5.10 Backup & reset Backup: when you have very important files or apps, choose Backup in case files are lost. Reset: when you choose this option and confirm, the device will erase all user settings and all downloaded apps and re-apply the factory default configurations (not recommended unless necessary). 5.11 Date and time The device does not support a built-in battery, so user-set date and time cannot be saved. However, user can set automatic date & time so when the machine connects to the internet, the date and time will update automatically to the correct time and date for your area. 5.12 Developer options USB debugging: USB debugging is for developers to copy data between a computer and the ATV2, to install apps on the device without notification and to read log data. 5.13 About device This option shows current system information. 6.Download & Install Apps To download apps from the internet, ensure that the extension of the app is .apk or it will not be recognized. Users have two methods to install apps: 1.Download apps from the various android markets or Google Play store and after the download is complete, follow the steps to finish the installation. 2.You can also use USB disk to install apps. First, connect USB disk with device, then open the USB disk, choose the apps you prepared, select the apps, then follow the steps to finish installation. Note: if the .apk apps are not from Google Play store, the system will regard it as not safe, so user needs to go to “System Settings” “Security” “Unknown Source”, then tick inside the box to allow installation of these Third Party apps. Page 11 6.1 Delete Apps a. Go to “Settings” “Apps” “Manage Applications”, to see the installed apps list b. Click the app icon you want to delete, and the delete dialog box will pop up c. Click “Uninstall”, then wait until the app-delete is completed 7.Web browsing To connect to the Internet, use the Android 4.0 built-in browser, or download and install other browsers. When you open the Android 4.0 browser, you will see a new webpage with a 'tab' at the top which you can Page 12 click “+” to add another new webpage, or click “-“ to close the webpage. Most browsers use this method of 'tabs' to organise web browsing. 8.Local playback You can use the File Manager to navigate and browse through your external TF (micro-SD) card, a connected USB flash drive or external HDD and play back any of the music, videos, pictures and files in them. 8.1 Music Click “Settings” “Music” to play music. The device can also play local videos but you need to download and install a Media Player first (there are many media players among the more than 600,000 apps in the Google Play store). 9.Use virtual keyboard The ATV2 supports a connected mouse, with a soft keyboard. If the device detects a connected physical keyboard, the soft keyboard will be hidden. Page 13 10.Switch input methods When you click any input box, you can choose your input methods. To set up, please click the desktop keyboard icon at the bottom right of the status bar. All the installed methods will display as in the picture below, and you can choose one you prefer: Page 14 Question & Answer Screen flicker or unstable operation: please check if the HDMI cable has been connected tightly. System keeps restarting: please check if the device is getting enough power supply. Sometimes, external HDD can cause power drops. Please plug an additional power supply for external HDD or other external devices. Cannot find file in micro-SD card or another drive: please check all the connections of the device and ensure you have ticked off micro-SD and USB Host in “Settings” Specifications OS Android 4.0 Main Chip Allwinner A10 / 1GHz Cortex-A8 Memory 1GB Storage 4GB Graphical processor 2D/ 3D/ OpenGL ES2.0 (AMD Z430) / OpenVG1.1 (AMD Z160) @ 27M Tri/sec Network Wireless 802.11 b/g/n, WAPI (Ralink 8188) Expand Memory Micro TF (micro-SD) 2 to 32GB IO/Ports Micro USB x2; USB 2.0 x1; HDMI x1; Micro-SD x1 Keyboard virtual keyboard; supports 2.4GHz wireless keyboard, fly mouse Audio AAC, AAC+, eAAC+, AMR-NB, AMR-WB, QCP, MP3, WMA, WAV, MIDI, M4A WMV/ASF/MP4/3GP/3G2M4V/AVI/MJPEG/RV10/DivX/VC-1/MPEG-2/ Video Android Apps MPEG-4/H.263/H.264/1280*720P HD 30 fps, 1080P/720*480 D1 30fps Youtube, Twitter, Angry Birds, Office, Gmail, Browser, Skype. HDMI 1080P & 2160P Power Input Powered by USB cable Micro USB to USB (male) cable; Micro USB to USB (female) adapter; Accessory Unit Size HDMI female to male cable 9.7*2.8*1.2cm Total weight 0.2kg Page 15