1
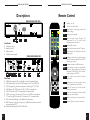
USER MANUAL ODM-300
USER MANUAL ODM-300
Editing Name, Line Up etc.
Receiver Settings
EDITING CHANNEL NAME
Choose the required channel. Select MENU. Select 4 (Installation). Select 4
(Channel Setup). Select 8 ( Manually Input PID's). Select 5 (New Name). In
the New Name MENU the name can be edited by highlighting the new character
and presssing OK. A character can be deleted by pressing DELETE. When the
name is correct press STORE, you will now move back to the MANUALLY
INPUT PID's screen. Pressing STORE again will update the channel name of the
present channel. Pressing 6 (Add This Channel To The Channel List) will add a
new channel to the channel list with the new name and other settings.
RECEIVER
SETTINGS
Message
Cause
Action
Select MENU. Select 4 (Installation). Select 2 (Receiver Setup).
Option 1 adjusts the length of time the programme information is displayed on the
screen after channel change. This can be adjusted between Off and 31 seconds.
Option 2 changes the video output mode between PAL, NTSC & Auto (Auto will
output PAL when decoding PAL and NTSC when decoding NTSC).
Option 3 switches RGB Output On or Off.
Option 4 changes screen format between 4:3 & 16:9 (only if widescreen transmission).
Option 5 when Off if channel PID's are changed by user to incorrect values these
will not be automatically updated by the receiver, when new channels or deleted
channels are found these will not be added to channel list. When On new channels
or deleted channels found will be added to channel list and PID's will be changed
automatically if these have been modified by user to incorrect values.
Option 6 sets the receiver MENU language.
Option 7 sets default Soundtrack Language.
Option 8 sets Subtitle Language or switches subtitles Off.
Press STORE to save any changes.
SORTING CHANNEL LINE UP
The channel line up can be organised to suit your requirements. When in TV mode
the TV channels will be organised and when in RADIO (press RADIO to change
between TV/RADIO) mode the RADIO channels will be organised. Select MENU.
Select 3 (Organise Channels). Highlight the required channel using the arrow
keys, press OK to "lift", move to new position and press OK to "drop". A channel
can be deleted by highlighting, pressing DELETE then DELETE to confirm.
Press STORE to save changes.
PARENTAL CONTROL
Parental control can be switched ON to prevent unauthorised viewing. Select MENU.
Select 1 (Parental Control). Highlight required option and press OK then STORE
to save change. Block 12 & Block 16 will only operate if the broadcaster transmits
the correct viewing age details with the programme.
TIME SETTING
Select MENU. Select 4 (Installation). Select 3 (Time). Tick option 2 to have the
time set by the broadcaster over the air or don't tick this option and set the time by
highlighting option 1 then use the arrow keys right/left to change +/- GMT until
the correct time is displayed at the bottom of the MENU. Press STORE to save
new settings before exiting.
13
CHANGE PARENTAL & INSTALLATION PIN's
Select MENU. Select either 1 (Parental Control) or 4 (Installation) depending
which PIN you would like to change. Select 5 (Change PIN). Key in new PIN
then key in again to confirm. The Parental & Installation PIN is factory set to 0000
which disables the PIN feature. Setting to any other value sets the PIN active.
Factory default PIN is 3259 which will always work in the event that you
loose your PIN.
FACTORY RESET
A factory reset sets receiver to default values and all stored channels are lost.
Select MENU. Select 3 (Organise Channels). Simultaneously press channel up/
down on the receiver front panel. You will be prompted to press OK to confirm
factory reset. Press OK on handset to perform factory reset.
14