1
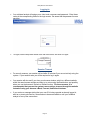
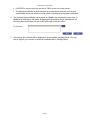
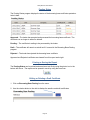
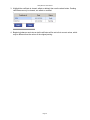
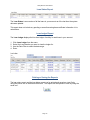
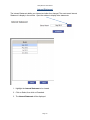
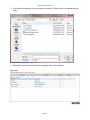
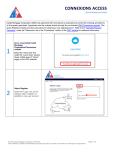
StuckyNet-Link.NET User Interface Manual StuckyNet-Link User Manual Contents Introduction Technical Information General Information Logging In & Out Session Timeout Changing Your Password Working with the Borrowing Base Creating a New Certificate Posting Status Editing or deleting a Draft Certificate Reviewing Historical Certificates Calculating Availability Reports Loan Status Report Loan Ledger Report Interest Statement Ineligible History Uploading Supporting Documentation Uploading Files Uploaded Files History Page 2 StuckyNet-Link User Manual Introduction StuckyNet-Link offers you 24-hour access to your current loan status, ledger, and ineligible balances through a user-friendly web interface. Additionally the system enables you to complete your borrowing base posting online and frees you from the costly burden of printing, packaging, and shipping back up reports, saving you hundreds of dollars per month. If you’ve used the Internet before, you will immediately feel comfortable navigating your way through your loan information in StuckyNet-Link. All the familiar web elements are here, from menus and hyperlinks to tables and forms. We want your experience with StuckyNet-Link to be easy to use and understand. Both novice and experienced Internet users can benefit from the information in this booklet. Please read through it once to get an overview of what StuckyNet-Link has to offer and then keep it for reference if you should need it at a later time. Technical Information Minimum System Requirements Microsoft Internet Explorer 7 or greater with 128-bit encryption 56Kbps modem or other high speed Internet connection Internet Service Provider (i.e. MSN, AOL, Earthlink…) Also Recommended Workstation access to electronic copies of supporting documentation Scanner for converting paper documents to an electronic format Microsoft Excel, Lotus Notes, or other spreadsheet software Page 3 StuckyNet-Link User Manual Logging In Your collateral analyst will assign you a client code, username and password. Enter these codes in the corresponding fields on the login screen. Be aware that the password is case sensitive. To logoff, use the drop down arrow in the top right corner, and click on Logoff. Session Timeout For security reasons, your session will end after 20 minutes if you are not actively using the system. If your session ends you will be required to log in again. Your session will also end if you close your browser window, switch to a different website within the same browser window and then try to return using the Back button, and possibly when you use the browser’s Refresh or Reload function. For these reasons, it is recommended that you use the system’s menu options to move through the website instead of using your browser’s Back, Forward, and Refresh buttons. If you receive a message stating that your user ID is being reported as already logged in, wait ten or twenty minutes for a new session to become available or call your collateral analyst to free up the connections. Page 4 StuckyNet-Link User Manual Changing Your Password You will be required to change your password both the first time you log in and on a periodic basis. When required to change passwords you will be prompted to do so immediately after logging into the system. To change your password you must enter your current password, a new password, and the same new password in the Confirm Password field. Passwords are case sensitive. If you forget your password, please call your collateral analyst and it will be reset. Page 5 StuckyNet-Link User Manual Creating a New Borrowing Base Certificate 1. Click on Borrowing Base Posting from the menu. 2. Enter a reference number in the ‘Reference’ field under the heading ‘Borrowing Base Posting’. 3. The reference number can be from one to six characters. If you duplicate a certificate number, you will be warned that the certificate number has been used. You can choose to use the same certificate number or enter a new one. One recommended format for the certificate number is to use the date in the form of mmddyy, e.g. use 101112 for October 11, 2012. Hit ENTER; a blank certificate will be displayed i The text fields in blue are for your data entry. Page 6 StuckyNet-Link User Manual Hit ENTER to move to the next row and hit TAB to move to the next column. The beginning balances on each certificate are pulled directly from the most recently updated data and do not reflect any other saved or pending borrowing base certificates. 4. The borrowing base certificate can be saved as a Draft to be completed at a later time, or Saved to be submitted to the lender. Supporting documentation can be attached with the borrowing base certificates. Use the button to the right to attach the files. 5. After saving, the certificate will be displayed in a non-editable, printable format. You may print a copy for your records, or review the certificate later in Posting History. Page 7 StuckyNet-Link User Manual Posting Status The Posting Status program displays the status of the borrowing base certificates posted on today’s date. Approved – The lender has accepted and processed the borrowing base certificate. The certificate can no longer to edited or deleted. Pending – The certificate is waiting to be processed by the lender. Draft – The certificate will remain as a draft until it is saved in the Borrowing Base Posting program. Rejected – The lender has rejected the borrowing base certificate. Approved and Rejected certificates are cleared from this report each night. Printing or Saving the Report The Posting Status can be printed and saved as a text file by using the printer icon in the bottom left corner. The report can be opened in excel by using the excel icon. Editing or Deleting a Draft Certificate 1. Click on Borrowing Base Posting from the menu. 2. Use the rolodex button to the right to display the pending and draft certificates. Page 8 StuckyNet-Link User Manual 3. Highlight the certificate to viewed, edited or deleted, then use the select button. Pending certificates can only be viewed, not edited or modified. 4. Beginning balances and rates on draft certificates will be set to their current values, which may be different from the values of the original posting. Page 9 StuckyNet-Link User Manual Reviewing Historical Certificates 1. Click on Posting History from the menu. 2. Use the Date Filter to select the date range. 3. A list will be displayed of the certificates submitted within the date range and the files sent with the posting. Each certificate and file is displayed as a hyperlink. 4. Click the hyperlink for the posting or file you wish to review. The certificate will be displayed in a non-editable format. Printing or Saving the Report The Posting History can be printed and saved as a text file by using the printer icon in the bottom left corner. The reports can be opened in excel by using the excel icon. Page 10 StuckyNet-Link User Manual Calculating Availability New Collateral Balance = Collateral Balance + Sales/Additions – Credit Memos + Adjustments – Cash/Removals – Discounts + Non-AR Cash New Net Collateral = Lesser Of 1. (New Collateral Balance – Ineligibles) * Advance Rate – Reserves 2. Collateral Limit Total Collateral = Lesser Of 1. Sum of all New Net Collateral fields 2. Revolving Limit + Sum of non-revolving New Net Collateral fields 3. Total Line Limit Collections = Cash Removals New Loan Balance = Sum of Loan Balances – Collections + Advance Request New Availability = Total Collateral – New Loan Balance The availability calculation may involve factors not listed here. If this formula does not give you the same availability number as your borrowing base or loan status report, contact your collateral analyst. Page 11 StuckyNet-Link User Manual Loan Status Report The Loan Status is an overview of all the loans in your account as of the last time the system data was updated. This report does not include any pending or saved borrowing base certificate information in its calculations. Loan Ledger Report The Loan Ledger displays the line-item ledger of activity for each loan in your account. 1. 2. 3. 4. Click Loan Ledger from the menu. Select the Loan Number you want to view the ledger for. Use the Date Filter to select the date range. Enter. Printing or Saving the Reports The loan status report and the loan ledger report can be printed and saved as a text file by using the printer icon in the bottom left corner. The reports can be opened in excel by using the excel icon. Page 12 StuckyNet-Link User Manual Interest Statement The Interest Statement details your interest and other fees charged. The most recent Interest Statement is display in the rolodex. Open the rolodex to display older statements. 1. Highlight the Interest Statement to be viewed. 2. Click on Select, then click on Download. 3. The Interest Statement will be displayed. Page 13 StuckyNet-Link User Manual Ineligible History The Ineligible History displays the ineligibles and reserves for each loan in your account. 1. Click Ineligible History from the menu. 2. Select the Loan Number you want to view the ineligibles for. Hit Enter, the most recent record will be displayed 3. To view older records, select from the rolodex button. Page 14 StuckyNet-Link User Manual Uploading Files 1. Click on Upload Files from the StuckyNet menu. 2. Double click on the type you would like to upload in the File Type column. 3. Then click on Select File. Page 15 StuckyNet-Link User Manual 4. You will then be browsing in your computer or network. Select the file to uploaded and click Open. 5. Repeat the process until all the files are attached, then click on Upload. Page 16 StuckyNet-Link User Manual 6. After the files are uploaded, an Upload successful message is displayed in the Status. Upload History Upload History shows the names of the supporting documents that you’ve uploaded using StuckyNet-Link. 1. Click on Upload History on the menu. 2. Use the Date Filter to select the date range. 3. Enter to display files. Printing or Saving the Report The Upload History can be printed and saved as a text file by using the printer icon in the bottom left corner. The reports can be opened in excel by using the excel icon. Page 17