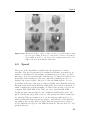
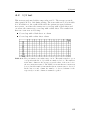
1
Movement detection in shifting light environments Preface This report was written as a part of my master assignment, spring 2005. I want to thank my supervisor Ketil Bø for guidance through the assignment. I also want to show my gratitude to Magnus Liseter for the effort he gave during testing of the algorithm, and for all encouragement and patience he has showed me during this period. Trondheim, 2005-06-16 Kristin Nygård Abstract The task of this assignment is to make an algorithm that can detect movement regardless of how the illumination is. Handling changes in illumination is an important part of creating a stable surveillance system. This problem has been attempted solved here by making a model of the scene which consists of the expectation value and the standard deviation value for each pixel. For every frame that is tested for movement a ratio p is calculated that is the relationship between the actual pixel value x, the expectation value µ and the standard deviation value σ. Three different methods were made that use these p values to look for movement. The method that turned out to work best under all conditions compares the p value for each pixel with the p values of its neighbours. This solution is based on the observation that the relation between the greyscale values of pixels in a small area doesn’t change. The system is tested both indoor and outdoor. It handles moving shadows and big changes in the illumination without triggering too many false alarms, and at the same time it detects movement under different illumination environments. When tested on a uniform scene it detected 87.7 % of the movement that was presented to the system. The hardest movement to detect were dark objects on a dark background. The system has a problem when the greyscale value of the moving object gets too similar to the greyscale value of the scene. And if the scene has some areas with monotonous texture and some areas with complex texture, the monotonous texture tends to get less sensitive. This problem is proposed solved by splitting the region of interest in several smaller areas, to make each area equally sensitive for movement. Contents 1 Introduction 1 2 Assignment 2.1 Definition . . . . . . . . . . . . 2.1.1 Additional requirements 2.1.2 Restrictions . . . . . . . 2.2 Equipment . . . . . . . . . . . . . . . . 3 3 3 4 4 3 State of the art 3.1 Background subtraction . . . . . . . . . . . . . . . . . . . . . . 3.2 Removing of shadows . . . . . . . . . . . . . . . . . . . . . . . . 5 5 6 . . . . 4 Possible solutions 4.1 Important factors . . . . . . . . . 4.1.1 Edges . . . . . . . . . . . 4.1.2 Shadows . . . . . . . . . . 4.1.3 Textures . . . . . . . . . . 4.2 Solutions . . . . . . . . . . . . . . 4.2.1 Adjust pixel values . . . . 4.2.2 Expectation value . . . . . 4.2.3 Compare with neighbours 4.2.4 Gabor filters . . . . . . . . 5 Solution 5.1 The algorithm . . . . . . . . . . . 5.1.1 The Training period . . . 5.1.2 The Testing period . . . . 5.1.3 Training the parameters . 5.2 TrollEye . . . . . . . . . . . . . . 5.2.1 Analysis Module . . . . . 5.2.2 GUI - MFC . . . . . . . . 5.2.3 Helping images - CxImage . . . . . . . . . . . . . . . . . . . . . . . . . . . . . . . . . . . . . . . . . . . . . . . . . . . . . . . . . . . . . . . . . . . . . . . . . . . . . . . . . . . . . . . . . . . . . . . . . . . . . . . . . . . . . . . . . . . . . . . . . . . . . . . . . . . . . . . . . . . . . . . . . . . . . . . . . . . . . . . . . . . . . . . . . . . . . . . . . . . . . . . . . . . . . . . . . . . . . . . . . . . . . . . . . . . . . . . . . . . . . . . . . . . . . . . . . . . . . . . . . . . . . . . . . . . . . . . . . . . . . . . . . . . . . . . . . . . . . . . . . . . . . . . . . . . . . . . . . . . . . . . . . . . . . . . . . . . . . . . . . . . . . . . . . . . . . . . . . . . . . . . . . 9 9 10 10 10 11 11 11 12 12 . . . . . . . . 13 13 13 16 20 21 22 23 24 6 Testing 25 6.1 The camera . . . . . . . . . . . . . . . . . . . . . . . . . . . . . 25 i CONTENTS 6.2 6.3 6.4 6.5 6.6 CONTENTS Outdoor scene - a car . . . . . . . . . 6.2.1 Scenario . . . . . . . . . . . . 6.2.2 Test results . . . . . . . . . . Outdoor scene - asphalt . . . . . . . 6.3.1 Scenario . . . . . . . . . . . . 6.3.2 Test results . . . . . . . . . . Indoor scene - a glass . . . . . . . . . 6.4.1 Scenario . . . . . . . . . . . . 6.4.2 Test results . . . . . . . . . . Speed . . . . . . . . . . . . . . . . . Performance test - Neighbour method 6.6.1 Scenario . . . . . . . . . . . . 6.6.2 Test results . . . . . . . . . . 7 Discussion 7.1 Outdoor scene - a car . . . . . . . . . 7.2 Outdoor scene - asphalt . . . . . . . 7.3 Indoor scene - a glass . . . . . . . . . 7.4 Evaluation of the methods . . . . . . 7.4.1 Covariance method . . . . . . 7.4.2 Threshold method . . . . . . 7.4.3 Neighbour method . . . . . . 7.5 Performance test - Neighbour method . . . . . . . . . . . . . . . . . . . . . . . . . . . . . . . . . . . . . . . . . . . . . . . . . . . . . . . . . . . . . . . . . . . . . . . . . . . . . . . . . . . . . . . . . . . . . . . . . . . . . . . . . . . . . . . . . . . . . . . . . . . . . . . . . . . . . . . . . . . . . . . . . . . . . . . . . . . . . . . . . . . . . . . . . . . . . . . . . . . . . . . . . . . . . . . . . . . . . . . . . . . . . . . . . . . . . . . . . . . . . . . . . . . . . . . . . . . . . . . . . . . . . . . . . . . . . . . . . . . . . . . . . . . . . . . . . . . . . . . . . . . . . . . . . . . . . . . . . . . . . . . . . . . 26 27 27 32 32 33 36 36 37 39 41 41 42 . . . . . . . . 45 45 46 47 47 47 47 48 48 8 Conclusion 51 8.1 Evaluation of the algorithm . . . . . . . . . . . . . . . . . . . . 51 9 Further work 53 A Test results 59 A.1 Total test . . . . . . . . . . . . . . . . . . . . . . . . . . . . . . 59 A.2 1/3 test . . . . . . . . . . . . . . . . . . . . . . . . . . . . . . . 61 Bibliography 59 B User manual 63 B.1 How to use ”Movement Detection” . . . . . . . . . . . . . . . . . 63 B.2 How to run with CxImage . . . . . . . . . . . . . . . . . . . . . 64 C CD 67 ii Chapter 1 Introduction Surveillance cameras are getting more and more common these days. People’s fear of terrorism and crime leads to a wish for more surveillance and to a bigger acceptance for cameras in public places. Surveillance cameras are also crucial for some industry to control the production. But to get useful information from all of these cameras it is important that someone watches them. If this job is done by a human, having surveillance cameras becomes quite expensive. To make this job less expensive it would be a great advantage to use a system that automatically raised an alarm if something suspicious happened. The process of making reliable surveillance systems for real-world scenes is problematic. It is difficult to make a computer understand what the camera captures. This is especially hard when the illumination changes during the day, as it does in most real-world scenes. For many surveillance tasks changes in the illumination are a big problem. Shadows can be mistaken to be objects and the sun escaping from a cloud can make the scene look completely different for the surveillance system. Outdoor scenes are the most complicated ones since the changes in illumination are greatest here. During day the daylight changes with the sun and the weather, and at night artificial illumination takes over. To make a trustworthy surveillance system it is essential to make it cope with changes in the illumination. This is why this assignment tries to make an algorithm for movement detection that is independent of changes in the illumination. Movement detection can be an important part of a surveillance system or it can work as a more simple system on its own. The assignment is described closer in chapter 2. This task treats only a part of the whole surveillance problem, but hopefully the resulting system can be an important part of a more complete surveillance system. Attempts to solve this task have been made earlier, either by removing 1 1 Introduction shadows from the scene or by other approaches. How others have tried to solve this problem earlier is addressed in chapter 3. Before a solution for this assignment was chosen several possible solutions were considered. Among these were calculating the expectation value and standard deviation value for each pixel, and then use this knowledge to analyse the background. Another possibility is to use Gabor filters for recognizing the textures. These ideas are further described in chapter 4. The solution that was chosen to be implemented here is based on the observation that the relationship between pixels in a small area doesn’t change. This solution is implemented with three slightly different alternative methods which are examined in detail in chapter 5. The algorithm will be tested with test scenarios of two different types; one indoor and one outdoor to gasp the differences in those environments. These tests are used to decide which method that works best. Next a performance test will be performed on the system with the chosen method. More about the test scenarios and the test results will be found in chapter 6. The test results will be discussed and analysed in chapter 7, the three methods will here be evaluated to see which one solves the task best. In chapter 8 the algorithm as a whole with the chosen method will be evaluated. And at the end in chapter 9 further work and possible improvements will be presented. 2 Chapter 2 Assignment In this chapter the assignment will be defined and restricted. The equipment available to solve the assignment will also be briefly introduced, they will be presented more thorough in later chapters. 2.1 Definition The task in this assignment is to develop a surveillance algorithm that can detect movement in a scene regardless of how the illumination is. This implies that the algorithm must be insensitive for changes in the illumination. Any changes in the scene caused by changes in the illumination should not be detected, but any other changes caused by moving objects in the scene should be detected and an alarm triggered. 2.1.1 Additional requirements The algorithm should be as fast as possible and must at least be able to run in real-time, this is essential to be able to use it in a surveillance system. To work well in real-time it should at least manage five frames per second. However the algorithm might have to cooperate with other modules in a complete surveillance system and all of these modules must be able to run together in real-time. Therefore it ought to be as fast as possible. It should also be able to handle the same light environments as the human eye can deal with. This means that as long as humans are able to see what is going on in the scene, so should the system do. 3 2 Assignment 2.1.2 Restrictions In some scenes there might be a little movement in the background from trees in the wind, curtains by the window or from similar events. The separation of this insignificant movement from other kind of movement is not a part of this assignment. 2.2 Equipment The equipment and software that are available to solve this assignment are the following. The surveillance system TrollEye is used for implementing the algorithm. Modules can be created in Microsoft Visual C++ to cooperate with TrollEye. More about TrollEye and the modules can be found in chapter 5.2. The camera used during the implementation and testing of this assignment is the web camera Logitech QuickCam Messenger. It has a video capture on up to 640 * 480 pixels and the frame rate is up to 30 frames per second. More about the camera is presented in chapter 6.1. 4 Chapter 3 State of the art There are many systems that handle movement detection in different matters. To succeed in a real-world environment it is important that the system handles changes in the illumination, this is especially important in outdoor environments. This problem has previously been attempted to be solved in different ways. Here is a short introduction to some of the attempts. 3.1 Background subtraction A common way to detect movement is by background detection. All pixels that represent the scene are recognized as background, and only those pixels that are not recognized as the background are of interest. These pixels might represent movement in the frame. In [1] they assume the following: ”In human vision, if the background illumination I is uniform and extensive, the difference ∆I in illumination is proportional to I over a wide range; this relationship is known as Weber-Fechner’s law and the ratio ∆I/I is called Weber-Fechner ratio.” Since they expect the illumination to be as mentioned, they think of the illumination reflectance as a constant. And they use the relation: σ f /µ f = σr /µr to exclude the illumination from the image. Here σ 2f and µ f are the variance and the mean of the reflected light, σr2 and µr are the variance and the mean of the object reflectance. This is done as a pre-processing step before thresholding. Their method depends on the illumination to be stable in the image; this might very well not be the case in real-world environments. Especially in night-time the strength of the illumination can vary a lot depending on where the light sources are and the distance from an object to the closest light source. This system extracts the objects in the image from 5 3 State of the art the background, which could be used as a pre-processing step in movement detection. But the system is to slow to work in real-time; it uses 30 seconds on one frame. It is however assumed in [2] that the distribution of the illumination intensity in a small region (5*5 pixels) does not change. This is a less harsh assumption than above. Mathematic models are made for background subtraction based on the reflection index, the intensity of the illumination and the bias of the imaging device for each pixel. The algorithm is quite stable, but doesn’t work as desired if the background changes or if something cast shadows into the frame. In [3] they use a hybrid change detection method that combines temporal difference methods and background subtraction methods, Adaptive Change Detection (ACD). In the background change detection it checks to see if the current image differs more than the standard deviation, σ, from the mean background image. This allows all the pixels to vary as much as the standard deviation from its mean value before it represents a region of changes. The method depends on some training so the mean and standard deviation values can be calculated. This training must be repeated if something in the background changes. 3.2 Removing of shadows To make background subtraction work it is common to remove the changes caused by illumination. A common pre-processing step before movement detection is to remove shadows from the image. This is done in [4] where they avoid the shadow problem by splitting the image up in two parts, one reflectance part and one illumination part. From these images they construct intrinsic images. This combined with the use of Principal Component Analysis (PCA) as an illumination eigenspace helps them to remove the illumination effects from the input image. They only remove the shadows from static objects like large buildings or trees. The algorithm succeeds quite well, but it is not fast enough for real-time processing. They also depend on some offline processing to calculate the intrinsic images. In [5] the same authors present a different method. They use intrinsic images here as well only in a slightly different manner. The methods must be trained in several illumination conditions without any moving objects. In [6] they propose a new method for extraction of background objects. This is done by using an Optical Flow method combined with a Split and Merge algorithm. The Optical Flow method assumes that the illumination is the same in two compared frames. Because of this assumption the illumination invariant procedure they use is essential. They need the procedure to remove 6 Removing of shadows all changes caused by illumination. To manage this they use an illumination invariant change detector. Here they have used a real-time variant of the Shading Model. The method works quite well, but is best indoor. This is a weakness since the illumination in outdoor scenes often is more complex than in indoor scenes. 7 3 State of the art 8 Chapter 4 Possible solutions To come up with a solution to this assignment, the first step is to find out more about the problem. Therefore scenes from surveillance problems are observed and commented here. When the problem is clearer it is time to think of possible ways to solve it. So some possible solutions are presented next. The solution that was chosen to be implemented will be presented in detail in the next chapter. 4.1 Important factors When addressing this task it is important to find out what characterize changes in the illumination, and what characterize actual movement in the scene. This can be done by studying a scene where the illumination changes. What changes and what does not change when the sun goes down? In figure 4.1 a surveillance scene is shown from three different times at day, and hence in three different illumination environments. Here are some observations made from this example scene and from other scenes. Figure 4.1: The same car shown in three different illumination environments. The leftmost is in daylight, the middle one is at dusk and the rightmost picture is at night. 9 4 Possible solutions 4.1.1 Edges The edges seem like a thing that would not change when the illumination changes, and therefore they might be a good basis for a movement detection algorithm. Since there is no movement all the edges should be at the same place. This assumption is of course correct, the edges are there. But when looking at the same scene under different illumination conditions it comes obvious that even though the edges are there, they might not be equally visible at all time. This is a direct consequence of the fact that the illumination might come from different angles and with different intensity. As an example, the pile of snow in front of the cars in figure 4.1 gets a lot of edges when the dusk comes that are not visible during daytime. Because of this an algorithm based on edge extraction might not be the best solution to this problem. 4.1.2 Shadows The shadows in the frame are also very dependent on the angle and the intensity of the illumination. They might vary both in size, darkness and direction. A shadow that moves because of changes in the illumination can act very similar to a moving object. This addresses another complication to the task, the shadow should not be detected, but the moving object should. Many applications use shadow removal as an important pre-processing step. Shadows can hardly be used to find movement in the frame since they are so light dependent. And if the only illumination is background illumination, as it can be in the middle of a cloudy day, there might not be any shadows at all. From the last two pictures in figure 4.1 a shadow over the front window will make an edge if an edge detection algorithm is used. This edge will move with the light and disappear in daylight. This is just an example on how shadows complicate movement detection. And it explains why many algorithms use shadow removal as a pre-processing step. 4.1.3 Textures The textures in the frame are quite stable. They get darker and darker until they appear as totally black, but the strongest contrasts will survive. It is therefore important to look at the shape and structure of the texture, not on how bright it is. In figure 4.1 the trees behind the car are well visible in daylight, at dusk only the biggest branches can be separated from the darkness and finally at night only the branches with the most snow on can be spotted. A reasonable assumption to make is that the relationship between pixels in a small area will remain. One bright spot will probably always be 10 Solutions slightly brighter than the darker neighbour spot. So it can be clever to look at each pixel and how it changes relative to its closest neighbours. 4.2 Solutions Now that the problem is investigated and appears clearer it is time to find a solution to the task. There are many ways to attack this problem, some of them will be discussed here. 4.2.1 Adjust pixel values One of the perhaps simplest solutions is to adjust the pixel values in the frame. So when the illumination gets darker, all the pixels are adjusted up to a brighter level. One problem with this solution is how to measure the illumination. This can be solved by having a light sensor put up in the frame or close to the frame. Or it can be solved by taking the average of the pixels’ greyscale values and use as a reference value, and this way try to keep a constant average. The problem with the first solution is that it requires extra equipment, and the latter is a bad solution since it uses the values that it is supposed to control to do the controlling. This might give an unwanted effect. Another problem occurs if there are differences in the illumination inside the frame. If the light sources changes during the day, the illumination will come from different angles and light up different aspects in the scene. This problem is hard to solve with this solution. A more complex solution will be needed to handle differences inside the frame. 4.2.2 Expectation value Another possible solution is to see how much the frame has changed from what is normal. This can be done by calculating the expectation value and the standard deviation for every pixel during a training period. The training period must contain changes in the illumination, but not any movement. Later every pixel value is compared with its own expectation value. If it differs more than for instance 2 times the standard deviation from the expectation value movement is defined to be in that pixel. To trigger an alarm it has to be movement in a certain number of pixels. Or better, it has to be movement in a connected group of pixels of a certain size. This solution is not good enough. Looking at how the pixel differs from its expectation value relative to the variance is a good measure on how much it differs from normal. But it doesn’t say anything about how much it was 11 4 Possible solutions expected to differ at this time. This information is crucial to tell if the pixel changes more than expected, and thereby tell that this pixel should trigger an alarm. This problem leads to the next solution. 4.2.3 Compare with neighbours A possibly better solution might appear by looking at how one pixel changes relatively to its neighbours. For this solution the expectation value and the standard deviation from the previous solution are used in a more complex manner. By looking at how the closest neighbours of the pixel differs from normal and assume that this pixel should behave as its neighbours, information about how much this pixel is expected to differ from normal can be achieved. So when there is movement in the frame, the neighbour pixels will not change after the usual pattern, and thereby they will trigger an alarm. This solution must also count all the alarm pixels to see if there are enough of them to conclude that there is movement in the scene. 4.2.4 Gabor filters A completely different possible solution that also analyses the texture is the use of Gabor filters to see if there are any significant changes in the picture caused by movement. Gabor filters can be used for many different tasks; among these are texture segmentation [7] and image representation. So Gabor filters are very suitable for both representation and analysation of textures. It might be possible to use Gabor filters to represent the images and look for changes in the filter that would represent movement. Changes that are caused by the illumination should be neglected. If this separation of changes succeeds it can be a good solution. A throughout understanding of Gabor filters is needed to make this work. It is also important that the solution can run in real-time, to be able to use it for its purpose at all. 12 Chapter 5 Solution Comparing each pixel with its neighbours is the method without any immediate unsolved problems. It seems promising and is worth an effort to see if the theory might work. This is why this solution is chosen as the solution with the best potential, and will therefore be implemented and tested. The implementation can be done in many different ways, and therefore three different, but similar, methods are implemented here to test which one works best. In this chapter the solution will be thorough described and the tools that are used will be presented in the end. 5.1 The algorithm The algorithm consists of two main steps, the training period and the testing period. These two steps will be presented here. In addition there is one optional step where the parameters used in the testing are trained to suitable values. This additional step will be presented at the end. In figure 5.1 an overview of the algorithm with the different steps is shown. 5.1.1 The Training period The goal of the training period is to calculate the expectation value µ, the standard deviation σ and the covariance values σ XY for all the pixels in the region of interest (ROI). The covariance values will be needed for the alternative covariance method. To achieve this, the system must be presented with images of the scene under different illumination environments. It is important that there is no movement in the frame during training. To save time and storage space the expectation value, the standard deviation and the covariance are accumulated after each frame. This gives correct expectation values, and a good approximation to the standard deviation values and the 13 5 Solution Figure 5.1: This is an overview of the algorithm with the three main steps, training, setting the parameters and testing. The broad arrows give the preferred route with training of the parameters. covariance values. The expectation values are calculated as in equation (1), from [8, pages 84-90]. µN = N ∑ n=1 xn N (1) xn is the greyscale value of pixel x in picture number n. N is the total number of pictures in the training set and µ N is the expectation value of pixel x after being trained with the training set of N pictures. To save time and storage space, the training should be performed at the same time as the pictures are taken. Because of this a problem occurs when trying to calculate the expectation value. Since time and storage space should be saved, N will 14 The algorithm be unknown until the last picture is taken. A way to calculate µ without having to store all the pictures is to sum together all the pixels and then at the end divide with N. This would give the correct result, but would provide a very large number, which is undesirable. A better way would be to rewrite the expression in (1) as seen in (2) and (3). µ N N = ∑ n=1 xN xn ∑nN=−11 xn ∑nN=−11 xn N − 1 x N = + = · + N N N N−1 N N µ N = µ N −1 · N − 1 xN + N N (2) (3) From equation (3) it comes evidently that µ can be updated correctly every time a new picture is added to the training set. Now new pictures can be added to the training set at any time and µ will always stay updated. Calculating the standard deviation σ from (4) and the covariance σ XY from (5) is not quite as easy. The formulas are from [8, pages 92-100]. (σ N )2 = N σ XY = N N ( xn − µ )2 ∑ N n=1 (4) N ( xi − µ X )( y j − µY ) N2 i =1 j=1 ∑∑ (5) µ needs to be known in advance for a correct calculation of both σ and σ XY . This is not possible when it is wanted that µ, σ and σ XY should be calculated in parallel. Therefore µ N will be used as an approximation to µ. This approximation is probably good enough since the correct values are not needed. The approximation gives a number that says something about how the pixel value usually varies which is all that is needed. Doing the same rewriting for equation (4) and equation (5) as for equation (1) gives equation (6) for σ and equation (7) for σ XY . (σ N )2 = (σ N −1 )2 · N N −1 σ XY = σ XY · N − 1 ( x N − µ N )2 + N N (6) ( N − 1)2 x N − µ XN N y j − µYN y N − µYN N xi − µ XN + ·∑ + ·∑ N N N N N2 j=1 i =1 (7) 15 5 Solution σ 2 can now be updated for every new picture that is added to the training set, when σ is needed the square root is taken. The equation for σ XY in (7) however needs to be simplified even more to equation (8), where sum Z is as in equation (9). N N −1 · σ XY = σ XY y N − µYN ( N − 1)2 x N − µ XN + · sum + · sum X Y N N N2 sum ZN = sum ZN −1 · N − 1 z − µ zN + N N (8) (9) This way both sum Z and σ XY can be updated continuous. After these calculations are made for the whole training set, models of the scene are achieved. The expectation values give the average picture of the scene, and the standard deviation tells how much each pixel varies from the expectation value. These models will be used in the testing period. The covariance values will be used in the alternative covariance method as described closer in the next part. 5.1.2 The Testing period The purpose of the testing period is to find out if a picture differs enough from the expected to raise an alarm. This is done by first finding out the relationship between the actual value x, the expectation value µ and the standard deviation value σ of each pixel. Then this ratio p is compared to the neighbouring pixels to test for alarm in every pixel. At the end it is important to find out if there are enough alarm pixels to conclude with movement in the frame. Three slightly different ways to compare pixels with its neighbours are explained. The first method, the neighbour method, uses the pixel’s p value and compares it with its eight neighbourhood. The second method, the covariance method, uses the covariance and the correlation between the pixels in an eight neighbourhood. And the third method, the threshold method, calculates the average p value and thresholds the p values scaled on the σ value. In figure 5.2 all the steps that the testing is build up from are shown. 16 The algorithm Figure 5.2: The steps in the testing period. There are three different methods to choose from to find alarm pixels, the neighbour method, the covariance method and the threshold method. Calculate p To get a measure on how much the pixel’s greyscale value differs from the expectation value, the p from equation (10) is used. x = µ + p ·σ (10) p tells how much this pixel varies from µ measured in σ. The first step in the testing part is therefore to calculate p for all the pixels in the image. p= x−µ σ (11) 17 5 Solution When the pixels are going to be compared with its neighbours, it is the value of p from (11) that will be compared. Compare with neighbours The comparison of one pixel with its neighbours can be done in many different ways. All ways that were tested out during the project will be presented here together with why they worked or not. One way is to compare the change in one pixel with the average change of its neighbours. But this turned out to be a bad solution since two pixels that differ from the expectation value in different directions will turn out as two pixels with normal values. Because of this taking the average of the neighbours is too inaccurate to work. A better solution can be achieved by comparing the way one pixel changes with each of the closest neighbours. If it changes more than usual from the other pixels it should give an alarm. This solution will be called the neighbour method. A slightly different approach to compare a pixel with its neighbours is to use the covariance values σ XY and correlation values ρ XY of all the pixels in an eight neighbourhood. By the first approach an assumption was made that pixels that are neighbours in an eight neighbourhood always will change in the same way. This might not be true in some border areas. But by comparing how much two pixels actually differs from each other with the correlation value of those two pixels, it might be possible to find out if they change relative to the standard deviation and each other as expected. The differences of the p values between two pixels will be compared with the correlation value between the same two pixels. This solution requires more computational time and more storage space than the former solution. And this increases with the number of neighbours each pixel should be compared with. The correlation values are calculated as in (12), from [8, page 99]. ρ XY = σ XY σ X · σY (12) With the neighbour method and the covariance method there is one more precaution that must be taken. One pixel that differs from the others because of noise can give an alarm to all the pixels that compare themselves to this pixel. This can be solved by comparing two pixels with each other only once. In an eight neighbourhood it can look like in figure 5.3. The pixel under consideration here is x, the ys and the ns are all the neighbours of x in an eight neighbourhood. All the ys will compare themselves with x and because of this x only have to compare itself to all the ns. This way x is compared to all its neighbours in an eight neighbourhood, but two pixels will only be compared once and some computation time is 18 The algorithm Figure 5.3: The figure shows how the pixels compare themselves with each other. The ys compare themselves to x, and x compares itself to the ns. saved as well. And by only giving an alarm when a pixel differs from two or more of its neighbours, changes in one pixel because of noise will only result in one alarm pixel. This way of comparing pixels are implemented for both the neighbour method and the covariance method. The third possible method is the threshold method. This method is slightly different from the other two methods since it doesn’t compare each pixel with its eight neighbourhood. In stead it calculates the average p value for all the pixels in the ROI, then all pixels that differs more than expected from the average scaled on the σ will be thresholded to be an alarm pixel. This method will detect the whole area of movement while the other two methods most likely will detect only the edges of the moving objects or the edges in the scene behind the moving object. Summate alarm pixels Because of noise there will most of the time be some alarm pixels in the ROI. It is therefore essential to find a way to decide if there are enough alarm pixels to raise an alarm. One way to do this is to summate all the alarm pixels together and then compare the number to a limit; if it exceeds the limit this frame should trigger an alarm. Some precautions can be taken to make sure that one pixel which differs from the rest of the pixels because of noise is not counted. It is possible to count all the pixels that are connected together in a group. This is a reasonable thing to do since a movement in the frame most likely would make a connected group of pixels to give alarms. The frame should raise an alarm if the biggest group of alarm pixels exceeds 19 5 Solution a limit. This is a better way to count the alarm pixels and is therefore implemented in this assignment. The limit, the size parameter, says how big the biggest group of connected alarm pixels is allowed to be. The connected groups of pixels are found by using an eight neighbourhood. 5.1.3 Training the parameters There are two parameters that the user can set which will influence how well the algorithm is working. But to adjust these manually to get the wanted result is not easy and can take time, so they will be trained to find appropriate values. The first parameter is the size parameter; it says how large a group of connected alarm pixels can be before the alarm is triggered. A reasonable size is 100 which is set as default and is used during training of the other parameter. Changing the size parameter might contribute to make the system better suited to some scenarios, but the other parameter has a bigger influence on the performance of the system, and has been the priority to train up. It would be ideally to train both parameters to the perfect match, but in order to keep the algorithm less complex and to save computation time, this has not been implemented. The user can though change this size parameter as preferred. The second parameter is the range parameter. It says how much the p values are allowed to differ from each other. Exactly what this parameter does varies in the three possible methods, but in all cases it controls how sensitive the algorithm should be to changes. The system gets more sensitive the smaller the range parameter is. The ideal value for this range parameter can vary a lot from scene to scene, and should be adjusted to every scene. So during the training of this parameter the system must be presented with normal situations, but with different illumination environments. This training is very similar to the first training period, but it should be shorter. It is sufficient to present the most extreme illumination situations. The system will then set the range parameter as low as possible, but still high enough to not give an alarm in any of the normal situations. This training is implemented with a binary search to find the most appropriate value. To make it easier for the user, the same training set or a subset of the first training set can be used here. This requires that the images are stored somehow and is not implemented here. It is important during both training periods that all the images that are presented are valid. Which means none of them should be too dark or too bright. It must always be possible to see what is going on in the scene. If some pictures are too dark or too bright the parameters discussed here and those in the algorithm will be wrong and the system will get insensitive. As a consequence of this some small elements of movement might not be detected. 20 TrollEye It is also important that the system is finished with the training before the parameters are trained. If the system gets more training, the parameters should be retrained afterwards since the model of the scene will be changed. 5.2 TrollEye TrollEye is an intelligent surveillance system and can be found at [9]. It takes care of the surveillance part of the assignment. In figure 5.4 a screenshot from TrollEye is shown. The screenshot is taken right after an alarm has been triggered by movement in the region of interest (ROI). The ROI is marked with a square right above the alarm message box. Here the alarm was triggered by a man entering the ROI as he was walking towards the car that was under surveillance. Figure 5.4: A screenshot of TrollEye in use. The screenshot was taken right after an alarm had been triggered by a man walking into the ROI. ROIs of size 100 x 100 pixels are the default in TrollEye as seen in figure 5.4, but these can easily be changed by moving the corners. When the size is as wanted ”Rectangular Window” can be chosen in TrollEye to make the ROI 21 5 Solution rectangular. The algorithm has implemented support for ROIs of any size as long as they are rectangular. It is recommended though to keep the ROI as small as possible since the speed of the algorithm is very dependent of the size of the ROI. The speed of the algorithm will be further discussed in chapter 6.5. All that is needed to do to implement a new algorithm for this assignment is to make a module that cooperates with TrollEye and raises an alarm when needed. This is done by implementing the module in Microsoft Visual C++ 6.0 by using a wizard (TrollEyeDllWz AppWizard ) to make all the necessary code for the interaction. There are four different types of modules that can be made to interact with TrollEye. These are: Grabber Card Modules Pre-Analysis Modules Analysis Modules Action Modules The Grabber Card Modules are used to specify where the cameras or other sensors are connected. The Pre-analysis Modules are used on the ROI in the frame if the area needs to be enhanced before the analysis. The Analysis Modules are the modules that contain the analysis algorithm; these modules can raise an alarm if needed. Finally the Action Modules are the modules that tell what action to take when an alarm is triggered. To implement the new algorithm in this assignment only one new Analysis Module has to be created. This module type will therefore be further investigated. The additional libraries that are used, MFC and CxImage, will also be mentioned. 5.2.1 Analysis Module The Analysis Module interacts with TrollEye in the following ways: TrollEye gives the user the opportunity to set the parameters if wanted. TrollEye returns the current frame to the module, analysis can be executed. The module analyses the frame and triggers an alarm if needed. The module returns the value of some selected parameters to TrollEye. The module decides which parameters that should be saved or not. In short the Analysis Module implemented in this assignment gets the current frame, analyses it as described above and returns an alarm if movement was detected. Since the module can return some selected 22 TrollEye parameters to TrollEye it is possible during testing to see for instance how many alarm pixels that are in the frame at any time. How to use this module with TrollEye are explained in the user manual found in appendix B. 5.2.2 GUI - MFC In this assignment Microsoft Foundation Classes (MFC) are used to implement the GUI. The only GUI that is needed to implement is a dialog to let the user interact with TrollEye to set the parameters. The dialog is also the place where the user chooses which mode to run in. In addition it is possible to choose which method to run. The dialog is presented i figure 5.5. Figure 5.5: The dialog used to let the user interact with the system. The fields in figure 5.5 are explained here: Choose mode: Choose between the three modes explained in chapter 5.1, Training, Train parameters and Testing. Choose method: Choose which method to use between Neighbour, Covariance and Threshold as described in chapter 5.1.2. This field is only temporary to make it easier to compare the three methods to find out which one is preferable. Range for sensitivity: This is the range parameter explained in chapter 5.1.3. Size of movement: This is the size parameter explained in chapter 5.1.3. 23 5 Solution 5.2.3 Helping images - CxImage To create helping images from the scenes the libraries from CxImage are used. The helping images that are implemented are the scene models used in the algorithm, the expectation values and the standard deviation, together with the alarm frame with all the alarm pixels marked out, and also the p values. All these helping images are mostly a help in the development phase, but can also be a contribution to understand the algorithm better. CxImage can be downloaded from [10]. The code that creates these images is commented out in the source code, so it is not needed to install CxImage to test the algorithm. If these images are wanted, CxImages must be installed and the code must be uncommented. How to do this is explained in the user manual in appendix B. 24 Chapter 6 Testing Two different kinds of test phases will be completed. First some tests are done to figure out how the three methods will work in different scenarios, and to find out which of the methods that works best. Secondly the chosen method will be tested more thorough to see how well it performs. In the first phase the system will be tested on scenarios from two different types of illumination environment; one indoor and one outdoor, both with significant changes in the illumination. The testing here will focus on how well the algorithm works under different circumstances and which of the three methods described in chapter 5 that works best. The test scenarios have been chosen to represent proper surveillance scenes, and also to test different aspects of the algorithm, but are practical restricted by limitations that follow a web camera with less than two meter cable. In the second phase, the chosen method will be tested on a uniform test scenario to see how well it actually works without being distracted by objects in the scene. At first the camera used during testing is described. Next the test scenarios with results will be presented, and then the speed on the algorithm both through training and testing will be tested. At the end the chosen method is presented and the performance test will be done. From the testing a large amount of pictures are stored. The pictures presented in this report are selected because they illustrate the performance of the tested method best. 6.1 The camera The camera used for testing the algorithm is Logitech QuickCam Messenger. It has a video capture on up to 640 * 480 pixels and the frame rate is up to 30 frames per second. The camera is shown in figure 6.1. This camera gives the following error source: It is too sensitive for light. The 25 6 Testing Figure 6.1: The camera: Logitech QuickCam Messenger. gain is kept constant to keep control of the illumination environment, but then the camera can not handle both regular daylight and the darkness that occurs at night. To compensate for this the algorithm is not tested during actual outdoor illumination, but it is tested so that the illumination observed in the camera goes from as bright as possible to as dark as possible. This way the algorithm will be presented with bright scenes and dark scenes and the shortcomings of the camera doesn’t matter that much. A bigger problem with this camera is how it handles bright and dark scenes. When the scene gets darker it is a growth in the amount of noise in the frame. And when the scene gets bright during daylight the picture might get completely white. This also contributes to make the algorithm less accurate, but mostly it reduces how bright and how dark scenes the algorithm can be trusted with. Avoiding this problem can be done by not using scenes that are too dark or too bright. 6.2 Outdoor scene - a car The first test scenario is made to see if the algorithm can handle an outdoor scene with mixed elements and some hard illumination conditions. 26 Outdoor scene - a car 6.2.1 Scenario This outdoor test scenario is of a car in a parking lot. If anything or anyone moves inside the region of interest (ROI) an alarm should be raised. The car will be parked on a grey asphalt ground with trees in the background. As seen in figure 6.2. Figure 6.2: At left is the scene of the car, at right is what the system sees. The scene will be presented with changes in the daylight and at night the only illumination source will be a street light. The system should accept all these different illuminations without raising an alarm. It should also detect movement in all kind of illumination. Something that makes this scene harder is that the car reflects light. In addition the ground of asphalt which normally is light grey gets darker and starts to reflect light if it has rained. A third thing that makes this scene more difficult is that the trees in the background move slightly in the wind. This movement will not raise an alarm since the trees also will move during training. The movement of the trees will only lead to less sensitivity to other kind of movement in that area. Test persons will approach the car and it will be the systems job to detect them once they enter the ROI. 6.2.2 Test results This scene was trained up with extreme illumination environments. When the sun came up, the asphalt became quite bright and the car would reflect some of the light. It was also trained with quite dark scenes as well as with scenes during different times of day, which got the shadows and reflection to be in different places dependent on the time of day. The ground was also wet of rain during the training. It was decided to run with constant gain, and this resulted in the camera not being able to accept very dark scenes, so the scene at night with the street light on turned out to be too dark for the 27 6 Testing camera. The training period was on 7799 training images, and the models used for this scene after the training period are shown in figure 6.3. Figure 6.3: The models used for the car scene after trained with 7799 images, to the left is the expectation value for each pixel and to the right is the standard deviation for each pixel. The scene was tested for all methods with a man approaching from the left, from the right and from the bottom of the scene under different illumination conditions. It was also tested to see if the methods handled very bright and very dark scenes. And finally the camera was covered with a black, a white and a textured sheet to see if the methods could handle this. The result for all three methods follows. Covariance method The covariance method needed a range parameter at 1500 to survive without false alarms in bright daylight. This range parameter did however achieve poor results during testing with movement in the scene. It did not recognize movement in any of the test cases, not even when the camera was completely covered up, both by a white sheet and a black sheet. The covariance method with a range parameter at 900 could handle normal illumination and very dark illumination. And it could also recognize some movement. In figure 6.4 one of the frames this method did recognize movement in are shown. 28 Outdoor scene - a car Figure 6.4: Covariance method, range = 900, a man approaching from the left. At left is the original frame, in the middle are the p values, and at right are the alarm pixels marked with white. As seen from figure 6.4 the person is over halfway through the frame before the alarm is triggered. This is later than desirable. In addition it is shown that the alarm pixels do not mainly react to the man, but on other aspects in the frame. When the man approached from right the alarm was triggered at an earlier moment, but when he approached from the bottom of the frame, no alarm was triggered at all. In figure 6.5 the scene that was to bright for the method with range parameter 900 is shown. As seen the covariance method has problem with the shadow at the right side of the car. Obviously this scene should be recognized as a normal scene, but the system triggered an alarm. Figure 6.5: Covariance method, range = 900, false alarm in the bright scene. At left is the original frame, in the middle are the p values, and at right are the alarm pixels marked with white. Threshold method The threshold method was tested with a range parameter at 0.2. This method also had problems with recognizing movement at the same time as it recognized normal frames as normal frames. In figure 6.6 some of the frames 29 6 Testing where movement was recognized by the threshold method are presented. As seen in the figure the only place in the frame that movement is recognized is at the hood of the car. Figure 6.6: Threshold method, range = 0.2, alarm frames with alarm pixels in white. At left is a man approaching from the right, in the middle is a man approaching from the left, and at right a man approaches from the bottom of the frame. The same test was performed at a brighter time of day, and the test results were not quite as good this time. The man could cross the frame both ways, and only when he approached from the bottom of the frame an alarm went of. Movement was also here only recognized at the hood of the car. This was also the case when the camera was covered up with a black sheet. In figure 6.7 it is evidently that it is mostly the hood that is sensitive for changes. The threshold method also raised an alarm when the camera was covered up with the other sheets. Figure 6.7: Threshold method, range = 0.2, camera covered with a black sheet. At left is the original image, in the middle are the p values, and at right are the alarm pixels marked with white. 30 Outdoor scene - a car Neighbour method The range parameter for the neighbour method was set to 1.15. It handled both very dark and very bright scenes without any false alarms, and it recognized all movement during training. It also handled the blocking of the camera very well. The only bad thing with this method is that it should have detected the movement at an earlier stage in some cases. But this method worked better than the two other methods. In figure 6.8 some of the frames that resulted in an alarm are shown. Figure 6.8: Neighbour method, range = 1.15, different alarm frames, to the left is a man approaching from the right, in the middle is a man approaching from the left, and in the right is a man approaching from the bottom of the frame. The illumination differs in the different rows, from dark to bright and regular illumination. 31 6 Testing Another example where the moving objects should have been detected at an earlier time was when some cars drove by. The cars where detected but at a later time than wanted. See figure 6.9 for examples. Figure 6.9: Neighbour method, range = 1.15, different alarm frames of three cars driving by. 6.3 Outdoor scene - asphalt This test is made mainly to compare the sensitivity of the asphalt in the car scene with asphalt that appears alone in a scene. The ROI is shaped like a flat rectangle to test if the algorithm handles rectangles that are not square. 6.3.1 Scenario This outdoor scene contains only asphalt. Under different times at day shadows from cars nearby gets into the ROI. The rain also complicates this scene both by making it dark and reflective, and also by making it appear different when some of the ground is dry and bright while the rest still is wet and dark. In figure 6.10 the scene is shown. 32 Outdoor scene - asphalt Figure 6.10: At the left is the scene of the asphalt with the ROI, at right is what the system sees of the scene. The scene will be tested with extreme illumination conditions and with persons and cars entering the ROI from different sides. It will also be covered up with sheets to see if the methods can handle that. 6.3.2 Test results The scene is trained in all kinds of daylight, with shadows and with the ground wet of rain. In short it is trained and tested under the same kind of conditions as the car scene. In figure 6.11 the models used for this scene are shown. The scene was trained with a training set of 12242 images. Figure 6.11: The models used for the asphalt scene after being trained with 12242 images, at left is the expectation value and at right is the standard deviation value for each pixel. During testing it became clear that none of the methods did very well when the asphalt was wet. The texture of the ground would change completely from being monotonous to having some very bright spots with reflection next to some very dark spots. Even though the system was trained with some frames of wet asphalt, the texture changed too much from time to time. This made all the methods generate false alarms at times when the asphalt was wet. The neighbour method was a little bit more stable than the two other methods, but did also have to raise some false alarms from time to time. In figure 6.12 some examples of the ground reflecting light are shown. When the results from each method are presented next, the results from the testing with wet asphalt will not be included. 33 6 Testing Figure 6.12: Four different examples of how the ROI can look when the wet asphalt reflects light. Covariance method The covariance method needed a range value at 1700 to handle most of the normal scenes, and with this value it recognizes movement. Some of the frames with movement that the covariance method recognized are shown in figure 6.13. Figure 6.13: Covariance method, range = 1700, frames of movement that were detected. At the top to the left is a man entering the scene from the right, at the top to the right is a man entering from the left, at the bottom are two different cars entering from the left. The pixels that were recognized as alarm pixels are marked with white. All the frames with movement that were presented to the covariance method were detected, but as seen the man in the top left image in figure 6.13 should preferably be detected at an earlier time. This method raised most false alarms of all the three methods. In addition it did not raise an alarm when the camera was blocked with a sheet. Threshold method It was hard to find a range value for the threshold method that gave a stable system which in addition detected movement. A range value at 0.025 turned out to be best option. With this range value the threshold method detected 34 Outdoor scene - asphalt movement very quickly and worked quite well with both bright and dark scenes. Examples with frames of movement that were detected by the threshold method are shown in figure 6.14. The threshold method detected movement in the first possible frame, sometimes even before the human eye could see any movement, as is the case in the first row of figure 6.14. Figure 6.14: Threshold method, range = 0.025, frames of movement that were detected. To the left are the original frames and to the right are the alarm pixels marked with white. In the 1st row is a car approaching from the top right, in the 2nd row is a car approaching from the right, in the 3rd row is a person approaching from the bottom and in the 4th row is a car approaching from the left. Even though the threshold method is very good at detecting movement, it is not so good at handling shadows. Because of this it raises many false alarms, but it doesn’t raise an alarm at all when the camera gets covered up with a sheet. Neighbour method The neighbour method was trained to use a range value at 0.5. This range value helped the neighbour method to detect movement at the same time as it handled big changes in the illumination. It also handled shadows and spots on the ground from the rain without raising false alarms. Some of the frames that were detected as movement are shown in figure 6.15. 35 6 Testing Figure 6.15: Neighbour method, range = 0.5, frames of movement that were detected. To the left are the original frames and to the right are the alarm pixels marked with white. In the 1st row is a man approaching from the right, in the 2nd row is a man approaching from the bottom, in the 3rd row is a car approaching from the top and in the 4th row is a car approaching from the left. The neighbour method could, as the other two methods, let the camera be covered up with a sheet without raising an alarm. 6.4 Indoor scene - a glass This test is of objects with texture on a single colour background indoor. It is made to see if the algorithm can handle complex objects indoor where the illumination will be more influenced by artificial lights. 6.4.1 Scenario This indoor test scenario is of a glass and a flower on a single colour background. This could be a scene from a museum or something similar where the objects should not be touched by the visitors. The illumination will during daytime be influenced by the daylight through a window, but at night the illumination will consist of several indoor light sources from different angles. Like in the other scenarios the system should detect any form for movement, and neglect all changes caused by illumination. The glass adds additional difficulties to the task since it reflects light. The scene will be 36 Indoor scene - a glass tested with hands trying to touch the objects, and the camera will be covered up, which should not be accepted by the system. 6.4.2 Test results This scene was trained up with extreme illumination environments. When the sun came in through the window, the background became quite bright and the glass would reflect some of the light. The models used for this scene are shown in figure 6.16. Figure 6.16: The models used for this scene, to the left is the expectation value for each pixel and to the right is the standard deviation value for each pixel. The scene was tested with hands who reached for the objects from different angles under different illumination conditions. One hand was bare and another hand had a dark glove on. Covariance method The covariance method used the range value 1750 and did not work very well. It didn’t raise any false alarms, but the scene could be partly or totally covered without raising any alarm. In figure 6.17 is an alarm scene shown, the alarm should obviously had come at an earlier time as the hand at this time almost covers the whole scene. 37 6 Testing Figure 6.17: Covariance method, range = 1750, a hand comes from the left. At left is the original frame and to the right is what triggered the alarm marked with white. Threshold method The threshold method used range value 0.08 and worked quite well, but had some more false alarms than wanted. In figure 6.18 some of the alarm frames it detected are shown. This method was the best at detecting movement, in addition it detected the covering up of the camera immediately. Neighbour method The neighbour method used the range value 0.8 and worked best of all the tested methods. It detected movement of objects with different greyscale values quite well. The detection was however not that good when the objects’ greyscale value were to close to the scene’s greyscale value. As seen in figure 6.19 the bare hand is not detected quite as well as the hand with the dark glove which is detected successfully. The neighbour method was not quite acceptable when covering up the camera. With a black sheet no alarm was raised, with a grey, textured sheet the alarm went of only a little late. But when covered with a white sheet the alarm went of immediately. It did however not raise many false alarms. 38 Speed Figure 6.18: Threshold method, range = 0.08. At the top a hand with a dark glove is approaching from above, and at the bottom a bare hand is approaching from above. At left are the original frames and to the right is the movement marked with white. 6.5 Speed The speed of the algorithm is essential since the system has to run in real-time. The speed is measured for training and all three test methods. It will also be measured for the training of parameters period, just to see that this can be done in reasonable time. But the speed of this period will be very dependent of the training set. The more times the parameter needs to be changed, the longer it takes. The speed of the algorithm will also be very dependent on the size of the region of interest (ROI), since all methods iterate through all the pixels in the ROI. In addition the speed will be dependent on which computer the system is running on. These tests are run on a personal computer with AMD Athlon XP 2700+ processor and 1024 MB RAM. At first the time was measured for the default size ROI which is 100 * 100 pixels. On this size all possible versions of the system ran with 15 frames per second (f/s). This speed turned out to be the fastest possible speed to be achieved with this camera in this program, so with this size on the ROI the algorithm is fast enough. When a bigger ROI was tested it was possible to see the differences in speed for the different methods. The size was 356 * 454 pixels in this test. 39 6 Testing Figure 6.19: Neighbour method, range = 0.8. At top a hand with a dark glove approaches from above and at bottom a bare hand approaches from above. At left are the original frames and at right are the alarm pixels marked with white. The training period can be performed in two ways. For the neighbour method and the threshold method it is enough to calculate the expectation values and the standard deviation values, but for the covariance method the covariance values must be calculated in addition. Here follows the speed calculated for all training and testing modes: Training without covariance: 11 f/s Training with covariance: 3 f/s Testing with neighbour method: 9 f/s Testing with threshold method: 10 f/s Testing with covariance method: 6 f/s Training parameters with neighbour method: 7 f/s Training parameters with threshold method: 8 f/s Training parameters with covariance method: 4 f/s As seen the covariance method is the one that uses the most time. Testing with the threshold method or the neighbour method can be performed with almost the same speed, although the threshold method is slightly faster. 40 Performance test - Neighbour method 6.6 Performance test - Neighbour method This test was performed on the neighbour method which turned out to work best in the previous tests. The background for this choice is documented in chapter 7.4.It is run on a uniform scene to test the performance independent of which objects that are in the scene. 6.6.1 Scenario The scenario for this test is a striped texture. In figure 6.20 the models used for this scene can be seen. The algorithm was trained up with a training set of 4049 images. Figure 6.20: The models used for the performance test after a training set of 4049 images. The expectation value for each pixel is to the left and the standard deviation value for each pixel is to the right. The average greyscale value was measured for every image. And the system was trained with average values between 40 and 130. At 40 it was very dark and it was difficult, but possible to see what happened in the scene. At 130 the scene was bright and clear and it was easy to see what was going on. The scene was tested indoor with no influence of daylight. This was done to get control of the illumination situation. For every fifth greyscale value the system was tested with movement of 8 different objects. The system was both tested with a range parameter that was trained for the whole scale from 40 to 130, and it was tested with a range parameter that was only trained to handle one third of the illumination conditions, from 70 to 100. The eight objects were the following: 1. A hand that was quite bright compared to the scene. 2. A piece of metal that had the same colour as the scene, but could reflect light. 3. A hand with a dark glove which was darker than the scene. 41 6 Testing 4. A dark stick which was darker than the scene, but could reflect light. 5. A bright stick which was brighter than the scene. 6. A piece of fabric with the same texture as the scene. 7. A grey stick which was about the same colour as the scene. 8. A piece of fabric that was both slightly darker and slightly brighter than the scene. The system was also tested with the camera covered up with a black and a white sheet. 6.6.2 Test results The complete test results can be found in appendix A. The main results are presented here in table 6.1. Table 6.1: The essential test results from the performance test. ”Including cc” means that the tests with the camera covered up are included in the results, ”without cc” means that those tests are not included in the results. The test with the range parameter that covered the whole range from 40 to 130 gave false alarms only a few times. During the whole testing period it raised false alarms at average values at 65, 97 and 126. It did not react when the darkness took over the scene and it was no longer possible to see what was going on. In the same way as it did not react when the camera was covered up with a black sheet. But it did raise an alarm when the average value got to 134, as it raised an alarm when the camera was covered up with a white sheet. Examples on how well the algorithm worked with this range parameter are shown in figure 6.21. 42 Performance test - Neighbour method Figure 6.21: Range = 0.61. Three examples of movement that were recognized by the system. At both sides a finger approaches the scene and is detected immediately, in the middle is a black stick that only gets detected because of a bright spot of reflection in the top. At some scenes it detected movement that was hard for a human to see, as in figure 6.22 where a vertical metal stick is lowered from above parallel with the stripes in the texture. The stick is hard to see but the system detected it every time. Figure 6.22: Range = 0.61. The original image with the metal stick is to the left and the alarm pixels are marked with white to the right. At this scene the average illumination level was at 110. When the system was tested with the range parameter that was trained for 70 to 100 it raised some more false alarms. When the average value was at 86, 87, 95, 96 and 96 the alarm went off without any movement. The system worked well on average greyscale values from 68 to 102. 43 6 Testing 44 Chapter 7 Discussion The test results from chapter 6 will be discussed here, along with why some methods worked and others didn’t work quite as well. The first phase with the outdoor and indoor scenes will be discussed, all the methods will be evaluated and the reason to why the neighbour method was chosen will be explained. Next the second phase with the performance test of the neighbour method will be discussed. 7.1 Outdoor scene - a car In the first test scenario the covariance method clearly did not work well enough. It was difficult to find a range parameter that handled the changes in illumination well and at the same time could detect movement. So in this test the covariance method failed. The threshold method performed likewise poor in this test. In several cases a man could walk cross the scene without trigging an alarm. This is clearly not good enough and also the threshold method failed this test. While the two other methods failed, the neighbour method achieved acceptable results. It recognized all movement in the scene, though it should have detected the moving objects earlier. It handled big changes in the illumination without problems and it raised an alarm when the camera was blocked with a sheet. All methods got problems when the moving object had a similar greyscale value as the scene. More contrast between the object’s greyscale value and the scene’s greyscale value means greater probability that the moving object will be detected. The car scene was tested with trees in the background that slightly moved with the wind. This resulted in a higher standard deviation than it normally should have had. This again led to insensitivity in the area where the trees were, which in this case was ok since the scene was tested mainly in front of the car. 45 7 Discussion From this test some problems with the methods came clear. In all three methods it seemed like the sensitivity for movement was not the same in the whole frame. In the threshold method movement was only detected at the hood of the car and the same tendencies could be seen in the other methods as well. The areas with the most distinctive texture and highest standard deviation will make the range value to increase, and therefore make the single colour textures with low standard deviation to be too insensitive to detect any moving objects. It was attempted to solve this problem by making the methods more dependent on the standard deviation values, but the attempt failed since a better combination of the parameters was hard to find. It is also worth mentioning that both the covariance and the threshold method work better when the distance between bright and dark is not to extreme. Under less varying illumination conditions also these methods achieved acceptable results. 7.2 Outdoor scene - asphalt In the second test the region of interest (ROI) of the asphalt scene was shaped as a flat rectangle to test if the system could handle other shapes than squares. This was proven to be true since the system detected movement at an early stage from all the sides of the rectangle. But the performance between the methods varied a bit even though all three methods worked much better in this test than in the previous test with the car. The covariance method was the method that raised most false alarms. It detected all objects that were moving in the frame, but could sometimes have detected the objects a little earlier. The threshold method on the other hand detected movement immediately after the object had entered the ROI. But also this method raised some false alarms because of shadows and bright light. The neighbour method detected movement almost as soon as the threshold method. This method was also the method that was most stable and raised the fewest false alarms. However the asphalt in this scene is much more sensitive for movement in all three methods than the asphalt in the car scene. This shows how improved the algorithm could get if it was possible to have different range values in different areas of the scene. When scenes with a very monotonous scene like asphalt are used, the system should have some additional methods to detect if the scene gets covered up. A blank sheet gets to similar to the scene and no objects will be standing out. 46 Indoor scene - a glass 7.3 Indoor scene - a glass The indoor scene of the glass and the flower did not work very well. The background was without texture which made this task more difficult. In addition both the background and the glass reflected light under some conditions. These areas that reflected light got a very high standard deviation and therefore these areas made problems for the algorithm. These are problems that it ideally should handle since reflection of light is very frequent in real-world scenes, but in this case the problem was not solved properly. In some cases the reflection triggered the alarm even though it shouldn’t. The covariance method seemed to be the worst one in this test scenario as well. It didn’t recognize movement before it took up most of the frame. But all methods had problems detecting movement when the moving object had the same, or close to the greyscale value as the scene. This scene was trained up with extreme illumination environments, from as bright as possible to as dark as possible. The difference between the pixels becomes less clear when extreme illumination is used, in addition the noise in the frame gets worse. This is not good for the performance of the algorithm. 7.4 Evaluation of the methods The three methods will here be evaluated separately to find out which method that worked best. 7.4.1 Covariance method The covariance method was the worst method in all the tests, in addition it was also the slowest method both during training and testing. For bigger ROIs it would not be able to work fast enough. It’s hard to say why this method performed so bad compared to the very similar neighbour method, but the comparison of the p values with the correlation values was probably not done in the best possible way. However this method turned out to be the overall worst method and will not be further tested. 7.4.2 Threshold method The threshold method was the second best method. It could sometimes be hard to find the right range value that would not produce too many false alarms, but that would produce alarms when needed. The threshold method was good at detecting the whole moving object, while the neighbour method 47 7 Discussion mostly detected the edges of the moving object. Sometimes this helped the threshold method to raise an alarm at a slightly earlier time than the neighbour method. The threshold method had one major disadvantage, the method used the average of all p values to separate the alarm pixels from the normal pixels. This problem is not essential when small objects are approaching the scene at a reasonable speed and gets detected right away, but when large objects approaches the scene in high speed the average value will be affected a lot by this object and faulty conclusions can be taken. The threshold method will not be tested any more as it is, but it can possible be used to help the neighbour method separate the moving object from the background once the alarm is detected. 7.4.3 Neighbour method The neighbour method seems to be the most stable method that can handle big changes in the illumination and at the same time detect movement. The neighbour method was the one that came out best of all the tests. This method proved to be the most stable method no matter how the scene looked, and it was also very fast; almost as fast as the threshold method. This is why this method was chosen as the best fitted to use in this system. Therefore the performance test was performed on the neighbour method. 7.5 Performance test - Neighbour method The test results from the performance test are quite good, but it came evidently that the system doesn’t handle dark objects very well when the scene itself is dark. It is important to remember that the performance of this test is very dependent of which objects the system was tested with. If there had been more bright objects the result would probably have been better, and if there were more dark objects the result would probably have been worse. This is why the test was performed with a mixture of dark and bright objects. The test of the whole range of illumination worked correctly on 87.7 % of the tested objects. When the test was concentrated to the middle part of the illumination it worked correctly on 91.4 % of the tested objects. This shows that the less the span of the illumination, the better is the performance. The result for the middle part with the first parameter was 89.3 % but this is without the covering up of the camera. The same result for the second parameter is 92.9 %. This shows that the performance gets better if the range parameter is trained after the actual illumination conditions that it is 48 Performance test - Neighbour method supposed to work under. But as the algorithm gets more sensitive for movement it gets more sensitive to noise as well. It is also obvious that the system works better the brighter the scene gets. At the brightest part the system recognizes 100 % of the movement. It is not surprising that the algorithm works best when the illumination is good, since this is when it is easiest for humans as well to see what is going on in the scene. The illumination in real-world scenes that are under surveillance should be as good as possible anyway. 49 7 Discussion 50 Chapter 8 Conclusion In this chapter the system as a whole with the use of the neighbour method will be evaluated. Some good and some weak properties of the algorithm will be pointed out and explained. 8.1 Evaluation of the algorithm The biggest weakness of this algorithm is that it needs to be trained up before it can do any use. It requires some insight from the user to train up the system the right way, and if something changes in the region of interest (ROI) the training must be redone. It is difficult to solve this in any other way. If an object was added to the scene it would have been nice if possible to gradually train up the system with the new object while the system is running. But to make the expectation values and the standard deviation values right, the system must know how the new object will react to different illumination situations. It is also possible that the new object interacts with how the rest of the scene is illuminated. It might reflect light or cast shadows on the other objects in the scene. Therefore the most correct way to solve this problem is to train the whole system again. This is time consuming and should not happen too often. The algorithm performed weakest in dark scenes. It has problems separating dark objects from the dark background. This weakness can partly be defended with the fact that real-world scenes should have a better illumination than in these tests. But the algorithm should be improved to work better with dark scenes. The algorithm handled shadows quite well. Even though moving shadows can look a lot like moving objects they have not contributed to raise many false alarms. The reason for this is probably than the shadows mostly have less 51 8 Conclusion defined edges that actual objects have. This combined with the fact that the underlying texture will not change results in that the differences of the neighbouring p values are not big enough to raise an alarm. The speed of the algorithm was good. For a ROI at 356 * 454 pixels it ran during testing with speed at 7 frames per second. This is satisfying speed for such a large ROI, and the system is able to run in real-time, possible also in combination with other modules. In the performance test the system worked quite well, it didn’t raise many false alarms, but it was good at detecting movement. But this was tested on a uniform scene, a problem in the more complex car test and glass test was that some parts in the ROI got insensitive to movement. The asphalt in the car scene hardly ever detected movement because the range value was too high, but in the asphalt test the range value could be smaller and therefore movement was detected immediately. As the system works now the range value will be sat after the most demanding pixels, which is not good for the algorithm. This problem could be solved by giving each pixel its own range value. Then every pixel would be equally sensitive for movement. But how can each pixel get its own adapted range value without making it to time consuming? This will be discussed in the next chapter. 52 Chapter 9 Further work The performance of the algorithm with the neighbour method was not always as good as hoped. Especially when the scene included complex objects and the illumination was extreme. Therefore the algorithm needs to be improved to work properly in a surveillance system. The main problem is that the range parameter has the same value for all pixels. A major improvement of the algorithm would be to find out how to give the different pixels suitable range values. To give each pixel its own value seems like the best solution, but it is also an unlikely solution. It is needed to know what a normal scene is to train the value properly. If one pixel is affected with noise, which it most likely will be from time to time, the range value will be sat higher than it should. Getting all the parameters suitable values in a low enough amount of time can also be hard to do. It might be possible though to split the ROI in many smaller areas, and then train the parameter in each of these areas as seen in figure 9.1. This method will not be too sensitive to noise, and it will give different areas in the ROI suitable range values. The challenge of making this work with the same system as used now is to decide how many alarm pixels that should be allowed in one area during the training of the parameters. If the number is too high, the range value will be too low and the system will raise many false alarms. If the number on the other hand is to low, the range value will be sat too high and the system will be too insensitive. How big the areas should be is also a problem that needs to be solved. The relationship between the size of the areas, the allowed numbers of alarm pixels in each area and the total size parameter for the whole ROI must be very carefully adjusted to make this solution work as wanted. If this succeeds it would definitive improve the algorithm. It would only be the time used to train the parameters that would increase. This part is not the essential part as long as it can be run in a reasonable time. A little more storing space will be needed but the algorithm should be able to run with the same speed as before during the testing period. 53 9 Further work Figure 9.1: The ROI at 100 * 100 pixels is here split into 10 * 10 areas as an example. Each area must train an individual range parameter. Now the algorithm has to deal with 100 areas with each their respective range value. x from figure 9.1 will be used to train up the parameters and y will be used during testing to make sure no connected area of alarm pixels is bigger than y % of the ROI. To make this algorithm as good as possible also the y value should be trained up to fit the scene if possible. It is difficult though since all the parameters depend on each others. One other thing that is essential for this algorithm to work is that the camera has to be totally stable. If the camera moves at all the system must be retrained. It might be possible to combine the system with an algorithm that could compensate for small movement of the camera. This way the system would be less vulnerable. An additional feature that could be added is a method to mark out the moving object in a better way. The neighbour method only marks the edges of the moving object and also some other areas in the scene. It could be desirable to mark out the whole object and not too much noise. The threshold method was much better at marking out the whole object and could perhaps be combined with the rest of the system just to mark out the moving object after an alarm has been detected. The threshold value must then be trained the same way as the range value. This way the advantages from both methods can be combined, the stable neighbour method gives a 54 correct detection of movement, and a more correct measure of where the movement is can be retrieved from the threshold method. 55 9 Further work 56 Bibliography [1] Akio Shio. An automatic thresholding algorithm based on an illumination-independent contrast measure. Computer Vision and Pattern Recognition, 1989. Proceedings CVPR ’89., IEEE Computer Society Conference, pages 632–637, 1989. [2] Naoya Ohta. A statistical approach to background subtraction for surveillance systems. Computer Vision, 2001. ICCV 2001. Proceedings. Eighth IEEE International Conference, pages 481–486, 2001. [3] Stefan Huwer and Heinrich Niemann. Adaptive change detection for real-time surveillance applications. Visual Surveillance, 2000. Proceedings. Third IEEE International Workshop, pages 37–46, 2000. [4] Yasuyuki Matsushita, Ko Nishino, Katsushi Ikeuchi, and Masao Sakauchi. Illumination normalization with time-dependent intrinsic images for video surveillance. Pattern Analysis and Machine Intelligence, IEEE Transactions, pages 1336–1347, 2004. [5] Yasuyuki Matsushita, Ko Nishino, Katsushi Ikeuchi, and Masao Sakauchi. Shadow elimination for robust video surveillance. Motion and Video Computing, 2002., pages 15–21, 2002. [6] Emrullah Durucan, Joel Snoeckx, and Yves Weilenmann. Illumination invariant background extraction. Image Analysis and Processing, 1999. Proceedings. International Conference, pages 1136–1139, 1999. [7] Thomas P. Weldon, William E. Higgins, and Dennis F. Dunn. Design of multiple gabor filters for texture segmentation. Acoustics, Speech, and Signal Processing, 1996. ICASSP-96. Conference Proceedings., 1996 IEEE International Conference, 1996. 2243-2246. [8] Ronald E. Walpole, Raymodn H. Myers, and Sharon L. Myers. Probability and Statistics for Engineers and Scientists. Prentice Hall, 6. edition, 1998. [9] http://www.odc-systems.com/. Internet 2004-05-28. [10] http://www.codeproject.com/bitmap/cximage.asp. Internett 2004-05-28. 57 BIBLIOGRAPHY 58 Appendix A Test results The objects that are used to make movement in the tests are the following: 1. A hand that was quite bright compared to the background. 2. A piece of metal that had the same colour as the background, but could reflect light. 3. A hand with a dark glove which was darker than the background. 4. A dark stick which was darker than the background, but could reflect light. 5. A bright stick which was brighter than the background. 6. A piece of fabric with the same texture as the background. 7. A grey stick which was about the same colour as the background. 8. A piece of fabric that was both slightly darker and slightly brighter than the background. These numbers are used to represent each their object in the top row of table A.1 and table A.2. A.1 Total test This test was performed with a range value at 0.61. The average greyscale value span from 40 to 130 during testing. The test result can be seen in table A.1. In addition to the result in the table the system was tested with two more scenes, one where the camera was covered up with a black sheet and one where the camera was covered up with a white sheet. The results from these two tests were as following: 59 A Test results Covered up with a black sheet: no alarm Covered up with a white sheet: alarm Table A.1: The performance test results, range = 0.61. The numbers in the top row corresponds with the 8 object that are numbered above. The numbers in the first column are the average greyscale values of the scene before the movement was started. The number 1 means that movement was detected and the number 0 means that the movement was not detected. In the last row and column the number of detected alarms for the respectively row and column are summed together. 60 1/3 test A.2 1/3 test This test was performed with a range value at 0.51. The average greyscale value span from 70 to 100 during testing. The test result can be seen in table A.2. In addition to the result in the table the system was tested with two more scenes, one where the camera was covered up with a black sheet and one where the camera was covered up with a white sheet. The results from these two tests were as following: Covered up with a black sheet: no alarm Covered up with a white sheet: alarm Table A.2: The performance test results, range = 0.51. The numbers in the top row corresponds with the 8 object that are numbered above. The numbers in the first column are the average greyscale values of the scene before the movement was started. The number 1 means that movement was detected and the number 0 means that the movement was not detected. In the last row and column the number of detected alarms for the respectively row and column are summed together. 61 A Test results 62 Appendix B User manual B.1 How to use ”Movement Detection” This user manual is meant for people that have some familiarity with TrollEye. To make use of the module TrollEye must be installed. The manual goes through how the module is added to TrollEye and how to use the model. How some helping images can be created by using CxImage are explained at the end. Add the module to TrollEye Open TrollEye. TrollEye can be downloaded from: http://www.odc-systems.com/. Add ”AnalyseMFC12.dll” to the Analysis Dlls: Double click ”System Setup”, choose ”Analysis Dlls”, add ”AnalyseMFC12.dll”. The module is now ready to be used in a configuration. Add the module to an alarm area Start new configuration. Add picture as normal scene. Add new alarm area. Add the ”Movement Detection” to the ”Analysis Methods”: Right click in the alarm area and choose ”Properties”. Choose ”Analysis Methods”. Delete existing method (”Pixel Difference”). Add ”Movement Detection” which 63 B User manual should be an option after adding the ”AnalyseMFC12.dll” to the Analysis Dlls. A properties dialog for the ”Movement Detection” module should open. Now the system is ready to be trained. Train the system Make sure ”Training” is chosen under ”Choose mode:”. Start training. Remember that the training set should not contain any movement, but many variations in the illumination. After training is finished the system is ready to train the parameters or to be tested with the default parameter. To train the parameters are recommended. Train parameter Make sure ”Train parameter” is chosen under ”Choose mode:”. Choose the wanted method and size of movement. The recommended method is the Neighbour method and the recommended size is 100. Start training. Remember that this training only have to contain the most extreme illuminations from the training set. No movement should occur here either. Now the system is ready to be tested with appropriate parameters. Test the system Make sure ”Testing” is chosen under ”Choose mode:”. Use the same method and size of movement as when the parameters were trained. Start testing. Now the system should raise an alarm when it detects movement in the alarm area. B.2 How to run with CxImage To generate images of the alarm frame with the alarm pixels marked out, or to receive images of the models used, CxImage needs to be installed and some code in the source code must be uncommented. Here are the steps to do this explained. 64 How to run with CxImage Install CxImage The libraries to CxImage can be downloaded from: http://www.codeproject.com/bitmap/cximage.asp. Install the package and change the settings as explained at the site. Uncomment code There are two things that need to be uncommented from ”expectedValue.cpp” to be able to run CxImage and receive the images of the alarm frame. The first is the include line in top of the file. The second is an if-block in the method ”Testing”. Both places are marked with a comment. When the changes are made the code must be built again and the new dll must be added to TrollEye’s Analysis Dlls. Images that are created If everything works as it should, the helping images are now created after an alarm is triggered. The images will be created in the same folder as the configuration file is stored. The images that can be created are the following: ”expected.bmp”: The expectation value for each pixel. ”stdev.bmp”: The standard deviation value for each pixel. The standard deviation value is added to the greyscale value 128. ”p.bmp”: The p value for each pixel. The p values are enlarged 10 times and added to the greyscale value 128. ”original.bmp”: The original alarm frame without any enchantments. ”alarm.bmp”: The original alarm frame with the alarm pixels marked with white. ”onlyAlarm.bmp”: The alarm pixels marked with white on a black background. 65 B User manual 66 Appendix C CD This CD includes the runnable ”Movement detection” module, the source code and this report as a pdf file. 67 C CD 68