1
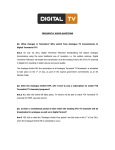
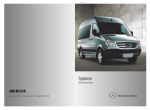
Australia 2015-1
Supplement to the Owner's Manual
Welcome to the world of Mercedes-Benz
Before you drive off, please familiarise yourself with your Mercedes-Benz and read this
Supplement and your Owner's Manual. This
will help you to obtain the maximum pleasure
from your vehicle and reduce the risk of
endangering yourself and others.
The equipment or model designation of your
vehicle may differ according to:
Rmodel
Rorder
Rcountry
variant
Ravailability
Mercedes-Benz is constantly updating its
vehicles to the state of the art.
Mercedes-Benz therefore reserves the right
to introduce changes in the following areas:
Rdesign
Requipment
Rtechnical features
Therefore, you cannot base any claims on the
illustrations or descriptions in this Supplement.
The technical documentation team at
Daimler AG wishes you safe and pleasant
motoring.
G WARNING
Various warning stickers are affixed to your
vehicle. Their purpose is to draw your attention, and the attention of others, to various
dangers. Therefore, do not remove any warning stickers unless the sticker clearly states
that you may do so.
If you remove the warning stickers, you or
others could be injured by failing to recognise
certain dangers.
The Owner's Manual for your vehicle has been
prepared by Daimler AG for vehicles sold in
Europe and predominately reflects the vehicle's features capabilities and performance
for vehicles sold in Europe. Your vehicle's features, capabilities and performance in Australia may differ from that set out in the Own-
er's Manual. The information contained in this
Supplement is subject to change subsequent
to date of printing. To obtain current and
accurate information on your vehicle, contact
your local authorised Mercedes-Benz dealer.
Symbols
$
%
!
+
X
YY
(Y
page)
Dis‐
play
Warning
Environmental note
Possible vehicle damage
Tip
Action required
Continuation symbol
Page reference
Display in the multifunction display
Contents
Introduction ........................................... 2
Addition .................................................. 4
ohne Éohne-ËÍ
1
2
Introduction
Protection of the environment
H Environmental note
Daimler's declared policy is one of integrated
environmental protection.
The objectives are for the natural resources
which form the basis of our existence on this
planet to be used sparingly and in a manner
which takes the requirements of both nature
and humanity into account.
You too can help to contribute towards protection of the environment by operating your
vehicle in an environmentally-responsible
manner. Fuel consumption and the rate of
engine, transmission, brake and tyre wear
depend on the following:
RYour vehicle's operating conditions
RYour own style of driving
You can influence both of these factors.
You should, therefore, observe the following:
Operating conditions
RAvoid driving short distances as this increases fuel consumption.
RMake sure that the tyre pressures are
always correct.
RDo not carry any unnecessary weight.
RKeep an eye on the vehicle's fuel consumption.
RRemove roof racks once they are no longer
required.
RA regularly serviced vehicle will contribute
to environmental protection. Therefore,
adhere to the service intervals.
RAlways have service work carried out at a
qualified specialist workshop, e.g. at a
Mercedes-Benz Service Centre.
Style of driving
RDo not depress the accelerator pedal when
starting the engine.
RDo not warm up the engine with the vehicle
stationary.
RAnticipate road and traffic conditions and
maintain a sufficient distance from the
vehicle in front.
RAvoid
frequent, sudden acceleration.
gear in good time and use each
gear only up to 2/3 of its maximum engine
speed.
RSwitch off the engine in stationary traffic.
RChange
Operating safety
G WARNING
Work incorrectly carried out on electronic
equipment and its software could stop this
equipment working. The electronic systems
are networked via interfaces. Tampering with
these electronics systems could cause malfunctions, even in systems that have not been
modified. Such malfunctions could seriously
impair the operating safety of your vehicle,
and thus your own safety.
Other work on or modifications to the vehicle
that have been carried out incorrectly could
also jeopardise operating safety.
G WARNING
Some safety systems only operate when the
engine is running. For this reason, do not
switch off the engine while driving.
Always have maintenance work carried out at
a qualified specialist workshop which has the
necessary specialist knowledge and tools to
carry out the work required. Mercedes-Benz
recommends that you use a Mercedes-Benz
Service Centre for this purpose.
In particular, work relevant to safety or on
safety-related systems must be carried out at
a qualified specialist workshop.
G WARNING
A heavy impact to the underbody, tyres or
wheels, e.g. due to the vehicle bottoming out
when driving off-road or over an obstacle at
high speed, can cause damage to your vehicle. This also applies to vehicles fitted with
underbody protection.
Introduction
In this case, have your vehicle checked at a
qualified specialist workshop which has the
necessary specialist knowledge and tools to
carry out the work required. Mercedes-Benz
recommends that you use a Mercedes-Benz
Service Centre for this purpose.
In particular, work relevant to safety or on
safety-related systems must be carried out at
a qualified specialist workshop.
Correct use
Observe the following information when using
your vehicle:
Rthe safety notes in this manual
Rthe "Technical data" section in this manual
Rnational road traffic regulations
Rnational road traffic licensing regulations
G WARNING
Various warning stickers are affixed to your
vehicle. Their purpose is to draw your attention, and the attention of others, to various
dangers. Therefore, do not remove any warning stickers unless the sticker clearly states
that you may do so.
If you remove the warning stickers, you or
others could be injured by failing to recognise
certain dangers.
Z
3
4
Changes as compared to the Owner’s Manual
Addition
Changes as compared to the Owner’s
Manual
Seat Belt Warning System
Warning lamp 7 in instrument cluster.
With the key in steering lock position 2, the
warning lamp will light up for a short time.
For further details about seat belts refer to
Owner’s Manual.
Brake Warning Lamp
The brake warning lamp will come on if insufficient brake fluid is in the reservoir (key in steering lock position 2 and parking brake released).
When the minimum mark on the reservoir is
reached, have the brake system immediately
checked for brake pad thickness and leaks.
To test the brake warning lamp, turn the key to
steering lock position 2. The brake warning lamp
comes on, and should go out when the engine is
running.
Seat belts
G WARNING
Seat belts are designed to bear upon the bony
structure of the body and should be worn low
across the front of the pelvis, or the pelvis,
chest and shoulders, as applicable; wearing
the lap section of the belt across the abdominal area must be avoided.
Seat belts should be adjusted as firmly as
possible, consistent with comfort, to provide
the protection for which they had been
designed. A slack belt will greatly reduce the
protection afforded to the wearer.
Care should be taken to avoid contamination
of the webbing with polishes, oils and chemicals and particularly battery acid. Cleaning
may safely be carried out using mild soap and
water. The belt should be replaced if webbing
becomes frayed, contaminated or damaged.
Belts should not be worn with straps twisted.
G WARNING
Each belt assembly must only be used by one
occupant; it is dangerous to put a belt around
a child being carried on the occupant’s lap.
No modifications or additions should be made
by the user which will either prevent the seat
belt adjusting devices from operating to
remove slack, or prevent the seat belt assembly from being adjusted to remove slack.
It is essential to replace the entire assembly
after it has been worn in a severe impact even
if damage to the assembly is not obvious.
Exterior Lamp Failure Indicator System
The centre High-mounted Stop Lamp is not
included in the exterior lamp failure indicator
system.
Fitment of Child Restraints to SLK-,
SL- and SLS series
These vehicles are not engineered/manufactured with an upper anchorage point to meet the
relevant Australian Regulation.
For this reason, Child restraints that require
upper anchor attachment clip to be secured to
the vehicle upper anchorage point can not be
installed. Please consult with an accredited
child restraint Installer if you are unsure if your
child restraint requires upper anchor attachment to the vehicle.
Child Restraints
Changes as compared to the Owner’s Manual
Do not use a rearward facing child restraint on
a seat protected by an airbag in front of it!
ment clip of the upper anchorage strap of child
restraining devices.
Addition
G DANGER
The use of ISOFIX lower anchorages is only
allowed for ISOFIX compatible child restraints
approved to AS/NZS 1754:2013. PLEASE
REFER TO THE VEHICLE OWNERS MANUAL FOR
INSTRUCTION ON FITMENT OF ISOFIX COMPATIBLE CHILD RESTRAINTS USING ISOFIX
LOWER ANCHORAGES IN THE VEHICLE.
Child Restraint Upper Anchor Fitting
Standard Equipment
X
To secure the upper anchorage strap to the
upper anchor fitting, securely fasten the
attachment clip 1, which is part of the upper
anchorage strap, to the upper anchor fitting ;.
i For safety, please make sure that the
Attachment clip installation.
Installation of Child Restraints
G DANGER
Child restraint anchorage points are designed
to withstand only those loads imposed by correctly fitted child restraints. Under no circumstances are they to be used for adult seat belt
harnesses or for attaching other items or
equipment to the vehicle.
Cars with foldable backseat rests: Always
lock backrest in its upright position when rear
seat bench is occupied by passengers, or the
extended cargo area is not in use. Check for
secure locking by pushing and pulling on the
backrest.
In order to facilitate the secure installation of
child restraining devices, your Mercedes-Benz is
equipped with two or three child restraint upper
anchorage fittings for the rear seat. These
anchorage points are provided for the attach-
5
attachment clip has attached to the upper
anchor fitting beyond the safety catch, as
illustrated.
X Cars with foldable backseat rests: Re-position seat backrest securely and latch after fitting child restraint.
Once the upper anchor strap attachment clip is
fastened, the child restraint itself can be
secured. Tighten the upper anchorage strap
according to the child restraint manufacturer's
instructions.
X B-Class, C-Class, CLS, E-Class, G-Class,
GLA, GL, GLE, S-Class, V-Class, Viano, Vito:
Head restraint must be installed and positioned such that the upper anchorage strap
can pass freely between the head restraint
and top of seat backrest. Make sure that the
upper anchorage strap is not twisted.
G DANGER
Mercedes-Benz Australia/Pacific Pty Ltd wish
to advise that the child restraint upper anchor
fitting installed to the rear seating position of
this vehicle MUST only be used with NEW
child restraint systems complying with AUSTRALIAN STANDARD AS/NZS 1754-2000,
2004, 2010 or 2013 versions.
THE UPPER ANCHOR FITTINGS(S) IS/ARE
NOT COMPATIBLE WITH OLDER CHILD
RESTRAINT SYSTEMS.
Z
Changes as compared to the Owner’s Manual
6
Addition
For fitting advice, please contact your authorized Mercedes-Benz passenger car dealer.
A-Class
The upper anchorages are located on the rear
side of the rear seat backrests.
Vehicles with through-loading facility
Vehicles with through-loading facility
Vehicles without through-loading facility
X
Move head restraint : upwards.
Release rear seat backrest = and fold it forwards.
X Route upper anchorage strap under head
restraint : between the two head restraint
bars.
X Securely fasten the attachment clip, which is
part of the upper anchorage strap, to the
upper anchor fitting ?.
Ensure that:
Rupper anchorage strap is not twisted.
Rupper anchorage strap is routed between
rear seat backrest = and luggage compartment cover ; if luggage compartment
cover ; is fitted.
X Swing back rear seat backrest = until it
engages.
The red lock verification indicator is no longer
visible.
X Move head restraint : back down again
slightly if necessary. Make sure that you do
not interfere with the correct routing of upper
anchorage strap.
X
Vehicles without through-loading facility
X
Upper anchorage strap with one belt
strap: route upper anchorage strap centrally
over the head restraint.
X Upper anchorage strap with two belt
straps: route the upper anchorage strap on
the left and right past the side of the head
restraint.
X Securely fasten the attachment clip, which is
part of the upper anchorage strap, to the
upper anchor fitting :.
X Make sure that the upper anchorage strap is
not twisted.
B-Class
The upper anchorages are located on the rear
side of the rear seat backrests.
Changes as compared to the Owner’s Manual
The upper anchorage points are fitted in the rear
compartment behind the outer head restraints
on the parcel shelf.
There is also another upper anchorage point
behind the central rear seat.
Vehicles with adjustable head restraints:
Upper anchorage strap with one belt
strap: push head restraint : upwards.
X Route the upper anchorage strap under head
restraint : between the two head restraint
bars.
or
X Upper anchorage strap with two belt
straps: route each upper anchorage strap on
the left and right past the side of head
restraint :.
X
Vehicles without adjustable head restraints
Upper anchorage strap with one belt
strap: route upper anchorage strap centrally
over the head restraint.
or
X Upper anchorage strap with two belt
straps: route the upper anchorage strap on
the left and right past the side of the head
restraint.
X
X
Press down the rear of cover ; in the direction of the arrow.
Cover ; is raised slightly at the front.
X Fold up cover ; of upper anchorage point
=.
X Upper anchorage strap with one belt
strap: route upper anchorage strap centrally
over the head restraint :.
X Upper anchorage strap with two belt
straps: route the upper anchorage strap on
the left and right past the side of the head
restraint :.
X Securely fasten the attachment clip, which is
part of the upper anchorage strap, to the
upper anchor fitting =.
X Make sure that the upper anchorage strap is
not twisted.
CLA Shooting Brake
The upper anchorages are located on the rear
side of the rear seat backrests.
All vehicles:
X
Securely fasten the attachment clip, which is
part of the upper anchorage strap, to the
upper anchor fitting ;.
X Make sure that the upper anchorage strap is
not twisted.
Vehicles with adjustable head restraints:
X
Move head restraint : back down again
slightly if necessary. Make sure that you do
not interfere with the correct routing of upper
anchorage strap.
GLA
The upper anchorages are located on the rear
side of the rear seat backrests.
Z
Addition
CLA and C-Class Coupé
7
Changes as compared to the Owner’s Manual
8
Vehicles with adjustable head restraints:
Upper anchorage strap with one belt
strap: push head restraint : upwards.
X Route the upper anchorage strap under head
restraint : between the two head restraint
bars.
or
X Upper anchorage strap with two belt
straps: route each upper anchorage strap on
the left and right past the side of head
restraint :.
Addition
X
Vehicles without adjustable head restraints
Upper anchorage strap with one belt
strap: route upper anchorage strap centrally
over the head restraint.
or
X Upper anchorage strap with two belt
straps: route the upper anchorage strap on
the left and right past the side of the head
restraint.
X
X
Move head restraint : upwards.
Fold up cover ; of upper anchorage point
=.
X Guide upper anchorage strap under head
restraint : between the two head restraint
rods.
X Securely fasten the attachment clip, which is
part of the upper anchorage strap, to the
upper anchor fitting =.
X Fold down cover ; of upper anchorage point
=.
X Move head restraint : back down again
slightly if necessary. Make sure that you do
not interfere with the correct routing of upper
anchorage strap.
X
C-Class Estate
The upper anchorage points are attached to the
rear of the rear seat backrests.
All vehicles:
X
Securely fasten the attachment clip, which is
part of the upper anchorage strap, to the
upper anchor fitting ;.
X Make sure that the upper anchorage strap is
not twisted.
Vehicles with adjustable head restraints:
X
Move head restraint : back down again
slightly if necessary. Make sure that you do
not interfere with the correct routing of upper
anchorage strap.
C-Class Saloon
The upper anchorage points are installed in the
rear compartment behind the head restraints on
the parcel shelf.
X
Move head restraint : upwards.
Remove combined luggage cover and net =.
X Route upper anchorage strap under head
restraint : between the two head restraint
bars.
X Securely fasten the attachment clip, which is
part of the upper anchorage strap, to the
upper anchor fitting ? on the back of the rear
seat backrest ;.
X Make sure that upper anchorage is not twisted.
X Move head restraint : back down again
slightly if necessary. Make sure that you do
not interfere with the correct routing of upper
anchorage strap.
X
Changes as compared to the Owner’s Manual
The upper anchorage points are attached to the
rear of the rear seat backrests.
X
Guide upper anchorage strap under head
restraint : between the two head restraint
rods.
X Securely fasten the attachment clip, which is
part of the upper anchorage strap, to the
upper anchor fitting =.
X Fold down cover ; of upper anchorage point
=.
X Slide down head restraint : until it engages.
Make sure that you do not interfere with the
correct routing of upper anchorage strap.
CLS Shooting Brake
X
Move head restraint : upwards.
Route upper anchorage strap under head
restraint : between the two head restraint
bars.
X Guide upper anchorage strap downwards
between luggage compartment cover = and
rear seat backrest ;.
X Securely fasten the attachment clip, which is
part of the upper anchorage strap, to the
upper anchor fitting ? on the back of rear
seat backrest ;.
X Make sure that upper anchorage strap is not
twisted.
X Move head restraint : back down again
slightly if necessary. Make sure that you do
not interfere with the correct routing of upper
anchorage strap.
The upper anchorage points are attached to the
rear of the rear seat backrests.
X
CLS Coupé
X
X
X
Move head restraint : upwards.
Remove luggage compartment cover ;.
X Route upper anchorage strap under head
restraint : between the two head restraint
bars.
X Securely fasten the attachment clip, which is
part of the upper anchorage strap, to the
upper anchor fitting ? on the back of rear
seat backrest =.
X Make sure that upper anchorage strap is not
twisted.
X Move head restraint : back down again
slightly if necessary. Make sure that you do
not interfere with the correct routing of upper
anchorage strap.
X
Move head restraint : upwards.
Fold up cover ; of upper anchorage point
=.
Z
Addition
GLC
9
Changes as compared to the Owner’s Manual
10
Addition
E-Class Saloon
upper anchor fitting ? on the back of the rear
seat backrest ;.
X Make sure that upper anchorage is not twisted.
X Move head restraint : back down again
slightly if necessary. Make sure that you do
not interfere with the correct routing of upper
anchorage strap.
E-Class Coupé
X
Move head restraint : upwards.
Fold up cover ; of upper anchorage point
=.
X Guide upper anchorage strap under head
restraint : between the two head restraint
rods.
X Securely fasten the attachment clip, which is
part of the upper anchorage strap, to the
upper anchor fitting =.
X Fold down cover ; of upper anchorage point
=.
X Move head restraint : back down again
slightly if necessary. Make sure that you do
not interfere with the correct routing of upper
anchorage strap.
X
E-Class Estate
X
Move head restraint : upwards.
Remove combined luggage cover and net =.
X Route upper anchorage strap under head
restraint : between the two head restraint
bars.
X Securely fasten the attachment clip, which is
part of the upper anchorage strap, to the
X
X
Press down the rear of cover 2 in the direction of the arrow.
Cover 2 is raised slightly at the front.
X Fold up cover ; of upper anchorage point
=.
X Upper anchorage strap with one belt
strap: route upper anchorage strap centrally
over the head restraint :.
X Upper anchorage strap with two belt
straps: route the upper anchorage strap on
the left and right past the side of the head
restraint :.
X Securely fasten the attachment clip, which is
part of the upper anchorage strap, to the
upper anchor fitting =.
X Make sure that the upper anchorage strap is
not twisted.
Changes as compared to the Owner’s Manual
GL
The upper anchorage points for the second row
of seats are located on the rear of the rear seat
backrests. For the third row of seats, use the
upper anchorage point in the luggage compartment floor.
X
Pull down cover 1.
Securely fasten the attachment clip 3, which
is part of the upper anchorage strap, to the
upper anchor fitting 2.
X Raise cover 1.
X
G-Class
X
Move head restraint upwards.
Remove the luggage cover and the net.
X Route upper anchorage strap under head
restraint between the two head restraint rods.
X Securely fasten the attachment clip :, which
is part of the upper anchorage strap, to the
upper anchor fitting ; on the luggage compartment floor.
X Make sure that upper anchorage strap is not
twisted.
X Tension upper anchorage strap. Comply with
the manufacturer's installations when doing
so.
X Move head restraint back down again slightly
if necessary. Make sure that you do not interfere with the correct routing of upper anchorage strap.
X
X
Move head restraint = upwards.
Fit the Child Restraint System with Upper
Anchor. Comply with the manufacturer's
installation instructions when doing so.
X Route upper anchorage strap under head
restraint = between the two head restraint
bars.
X Guide upper anchorage strap downwards
between luggage compartment cover : and
rear seat backrest ;.
X Securely fasten the attachment clip, which is
part of the upper anchorage strap, to the
upper anchor fitting ?.
Ensure that:
RUpper anchor attachment is securely fastened to the upper anchor fitting ?.
RUpper anchorage strap is not twisted.
RUpper anchorage strap is routed between
rear seat backrest ; and luggage compartment cover : if luggage compartment
cover is fitted.
RUpper anchorage strap is routed between
the rear seat backrest ; and the safety net
if the safety net is fitted.
X Tension upper anchorage strap. Comply with
the manufacturer's installation instructions
when doing so.
X Move head restraint = back down again
slightly if necessary. Make sure that you do
not interfere with the correct routing of upper
anchorage strap.
X
Z
Addition
E-Class Cabriolet
11
Changes as compared to the Owner’s Manual
Addition
12
GLE and GLE Coupé
S-Class
The upper anchorage points are located on the
rear side of the rear seat backrests.
Upper anchorage points are fitted in the rear
compartment behind the outer head restraints
on the parcel shelf.
X
Move head restraint = upwards.
Fit the Child Restraint System with Upper
Anchor. Comply with the manufacturer's
installation instructions when doing so.
X Route upper anchorage strap under head
restraint = between the two head restraint
bars.
X Guide upper anchorage strap downwards
between luggage compartment cover : and
rear seat backrest ;.
X Securely fasten the attachment clip, which is
part of the upper anchorage strap, to the
upper anchor fitting ?.
Ensure that:
RUpper anchor attachment is securely fastened to the upper anchor fitting ?.
RUpper anchorage strap is not twisted.
RUpper anchorage strap is routed between
rear seat backrest ; and luggage compartment cover : if luggage compartment
cover : is fitted.
RUpper anchorage strap is routed between
the rear seat backrest ; and the safety net
if the safety net is fitted.
X Tension upper anchorage strap. Comply with
the manufacturer's installation instructions
when doing so.
X Move head restraint = back down again
slightly if necessary. Make sure that you do
not interfere with the correct routing of upper
anchorage strap.
X
X
Route upper anchorage strap under the head
restraint between the two head restraint bars.
X Securely fasten the attachment clip, which is
part of the upper anchorage strap, to the
upper anchor fitting.
X Make sure that upper anchorage strap is not
twisted.
X Fold down cover : of upper anchorage point.
X Move the head restraint back down again
slightly if necessary.
Make sure that you do not interfere with the
correct routing of upper anchorager strap.
S-Class Coupé
Upper anchorage points are fitted in the rear
compartment behind the outer head restraints
on the parcel shelf.
X
X
Move head restraint : upwards.
Fold up cover ; of upper anchorage point
=.
Changes as compared to the Owner’s Manual
Guide upper anchorage strap under head
restraint : between the two head restraint
rods.
X Securely fasten the attachment clip, which is
part of the upper anchorage strap, to the
upper anchor fitting =.
X Fold down cover ; of upper anchorage point
=.
X Move head restraint : back down again
slightly if necessary. Make sure that you do
not interfere with the correct routing of upper
anchorage strap.
V-Class/Valente/Vito
The upper anchorage points of the single seat, 2seater bench or 3-seater bench are each located
on the rear side at the bases of the rear bench
seats.
not interfere with the correct routing of upper
anchorage strap.
Instructions for Safe Usage of the
Jack
G WARNING
DO NOT GET UNDER A VEHICLE THAT IS SUPPORTED BY A JACK.
RThe jack should be used on level, firm ground
wherever possible.
is recommended that the wheels of the
vehicle be chocked, and that no person
should remain in a vehicle that is being
jacked.
RNo person should place any portion of their
body under a vehicle that is supported by a
jack.
RIt
G-Class, GL, GLE
The jack is to be used without additional support
or plastic jacket.
C-Class Coupé, E-Class (excluding E300
BTH), E-Class Coupé, E-Class Cabriolet,
CLS, SLK
Single seat (example)
X
Move head restraint : upwards.
Fit the Child Restraint System with Upper
Anchor. Comply with the manufacturer's
installation instructions when doing so.
X Route upper anchorage strap under head
restraint : between the two head restraint
bars.
X Securely fasten the attachment clip, which is
part of the upper anchorage strap, to the
upper anchor fitting ;.
Ensure that:
RUpper anchor attachment is securely fastened to the upper anchor fitting ;.
RUpper anchorage strap is not twisted.
X Tension upper anchorage strap. Comply with
the manufacturer's installation instructions
when doing so.
X Move head restraint : back down again
slightly if necessary. Make sure that you do
X
G WARNING
Before lifting the vehicle with the jack :,
position the support ; between the base of
the jack and the ground.
Z
Addition
X
13
14
Changes as compared to the Owner’s Manual
Addition
Light-alloy Wheels and Steel Spare
Wheel
Some temporary and steel spare wheels require
different wheel bolts to the standard light-alloy
wheels. Please consult the owners manual for
further instruction.
G WARNING
For the steel spare wheel, only use the wheel
bolts provided in the tool case.
Tyres
Inflation pressures are specified on the tyre
label.
Spare Tyres
G WARNING
Drive with caution when using the temporary
use spare wheel as vehicle handling may be
affected. Re-install a standard wheel as soon
as possible.
Tyre Speed Rating
If your vehicle is factory equipped with an ”H”rated tyre, which has a speed rating of 130 mph
(210 km/h), an electronic speed limiter prevents your vehicle from exceeding the speed
rating.
Notwithstanding tyre speed rating, local speed
limits should be obeyed, and prudent driving
speeds appropriate to prevailing conditions
should be employed.
G WARNING
Never operate a vehicle at speeds greater
than the maximum speed rating of the tyres
with which it is equipped. Exceeding the maximum speed for which tyres are rated can lead
to sudden tyre failure, causing loss of vehicle
control, and resulting in personal injury and
possible death.
Instructions for Various Fuel Types
G WARNING
Daimler AG. recommends that your vehicle be
operated on fuel containing no more than 10%
ethanol. Use of fuel with an ethanol content
higher than 10 % may result in engine malfunction, starting and operating difficulties
and materials degradation. These adverse
effects could result in permanent damage to
your vehicle. Purchasing your fuel from a reputable supplier may reduce the risk of exceeding this 10% limit or of receiving fuel with
abnormal properties. It should also be noted
that when using ethanol blended fuels an
increase in fuel consumption can be expected
due to the lower energy content of ethanol.
For vehicles that operate on unleaded fuels:
Engine control unit adjusted ex-factory for operation on high octane fuel. Temporary operation
on low octane fuel is possible due to knock sensor. For permanent operation on low octane fuel
the engine control unit should be adjusted by
your authorized Mercedes-Benz passenger car
dealer.
For vehicles that operate on diesel fuel with
a diesel particulate filter:
If the vehicle is mostly driven for short distances, it is possible that the automatic cleaning of
the diesel particulate filter will be interrupted
before it is completed. This may lead to the
"check engine" light to be illuminated and
requirement to be presented to a MercedesBenz service centre for repair.
Therefore, if you frequently drive short distances, you should take a 20 minute trip on a
motorway or rural road at least every 500 km.
Changes as compared to the Owner’s Manual
15
Addition
Build date
The build date is found on the vehicle identification plate of your vehicle. The plate is located
in the drivers door aperture.
The month 1 and year 2 shown indicate the
date the vehicle was completed and the vehicle
driven or moved from the production line.
Z
16
Changes as compared to the Owner’s Manual
Addition
Vehicle Towing Capabilities and Towing Systems
The information in your Owner's Manual is specific to towing capabilities and systems for vehicles
predominantly offered in Europe.
If your vehicle is fitted with a genuine Mercedes-Benz towbar, please refer to the label “Towbar
Information” located on either the driver's side B-Pillar or on the towbar itself for information about
the towing system's capability.
If your vehicle is not fitted with a towbar or for up to date information regarding Australian vehicle
towing capabilities and towing systems, please contact your local authorised Mercedes-Benz
dealer.
Vehicle Towing Information for the Australian Market
Certain models must be fitted with a higher capacity cooling fan prior to towing to support the
Australian vehicle towing capacities. Please consult your local authorised Mercedes-Benz dealer to
confirm if this applies to your vehicle.
Failure to install a genuine Mercedes-Benz electric wiring kit for towbars may adversely affect
vehicle electric, assistance and stablisation systems and/or cause defects.
When towing a trailer/caravan, the specified mass limits for the trailer, trailer axle(s), towbar, tow
ball down load, vehicle front/rear axle limit, and gross vehicle mass must be observed at all times.
Even when these mass limits are observed, the unavoidable addition of mass to the rear of the
vehicle through the tow ball can sometimes result in uneven front/rear towing vehicle ride height
(rearward pitch).
Mercedes-Benz recommends vehicles be specified with AIRMATIC suspension, where available/
offered, to maintain a level front/rear towing vehicle ride height when towing a trailer/caravan.
Mercedes-Benz does not recommend and advises against the use of load-levelling or weight distribution attachments to towing systems to attempt to maintain a level front/rear ride height when
towing, as it may result in structural failure of the towing vehicle or tow bar.
Genuine Mercedes-Benz Towbars are available in Australia from authorized Mercedes-Benz dealers
to support the following trailer loads:
Vehicle
A-Class (W176)
B-Class (W246)
CLA Coupé/Shooting Brake (C117/
X117)
Model Variant
Max. Braked
Trailer Load
Max.
Unbraked
Trailer Load
Max. Towbar
Download
A200 CDI
1400 kg
735 kg
75 kg
A180
1200 kg
695 kg
75 kg
A200
1400 kg
695 kg
75 kg
A250 Sport/
4MATIC
1500 kg
730 kg
75 kg
B200 CDI
1400 kg
750 kg
75 kg
B180
1200 kg
710 kg
75 kg
B200
1400 kg
710 kg
75 kg
B250/4MATIC
1400 kg
735 kg
75 kg
CLA200
1400 kg
715 kg
75 kg
CLA200 CDI
1500 kg
750 kg
75 kg
Changes as compared to the Owner’s Manual
Model Variant
Max. Braked
Trailer Load
Max.
Unbraked
Trailer Load
Max. Towbar
Download
CLA250 Sport
4MATIC
1500 kg
750 kg
75 kg
GLA200 CDI
1500 kg
750 kg
75 kg
GLA250
4MATIC
1800 kg
750 kg
75 kg
C200/C200T
1800 kg
730 kg
75 kg
C250/C250T
1800 kg
740 kg
75 kg
C250 BT/
C250T BT
1800 kg
750 kg
75 kg
C200 BT/
C200T BT
1600 kg
750 kg
75 kg
C300 BTH
1600 kg
750 kg
75 kg
C-Class Coupé
(C204)
All except AMG
1800 kg
750 kg
75 kg
E-Class Saloon
(W212)
All except AMG,
E300BTH and
19" wheels1
1900 kg
750 kg
84 kg
E-Class Estate
(S212)
All except AMG
2100 kg
750 kg
84 kg
E-Class Coupé/
Cabriolet (A/
C207)
All except 19"
wheels1
1800 kg
750 kg
75 kg
CLS Shooting
Brake (X218)
CLS 250 CDI
2100 kg
750 kg
84 kg
CLS 350
2100 kg
750 kg
84 kg
All except AMG,
S300BTH and
S600L
2100 kg
750 kg
85 kg
GLE (W166)
TBC
TBC
TBC
TBC
GLE Coupé (C292)
TBC
TBC
TBC
TBC
GL(X166)
All
3402 kg
750 kg
272 kg
G-Class (W463) –
MY13 onwards
All
3175 kg
750 kg
255 kg
GLA (X156)
C-Class Saloon/
Estate (W205/
S205)
S-Class (W/V222)
1
Addition
Vehicle
17
C/A207 E-Class Coupe and Cabriolet, and W212 Saloon fitted with 19" wheels are not permitted to be fitted
with a towbar.
Z
Addition
18
Changes as compared to the Owner’s Manual
The information contained in the table above is subject to change subsequent to the date of printing.
To obtain current and accurate information on your vehicle, contact your local authorised MercedesBenz dealer.
Vehicle Identification Plate
Information
This vehicle has been fitted with a special security label. This Identification Plate has anti-counterfeit benefits and contains data to correctly
identify the vehicle, the Vehicle Identification
Number (VIN) has been imprinted on a specially
developed frangible window.
Care Instructions
Care should always be taken when cleaning,
washing or working in the proximity of the Identification Plate (commonly on the door sill).
Clean using a light cloth, no solvents or high
pressure spray should be used as it may damage
the unique information.
Care must be taken to avoid contact with the
frangible surface :.
Snow Chains
Mercedes-Benz authorizes snow chains to be
fitted to some larger wheel and tyre combinations in Australia (that are excluded from snow
chains fitment in the Owner's Manual).
Please contact an authorized Mercedes-Benz
dealer or service centre in Australia for more
information.
19
20
Publication details
Internet
Further information about Mercedes-Benz vehicles and about Daimler AG can be found on the
internet on the following websites:
www.mercedes-benz.com
www.daimler.com
Editorial office
You are welcome to forward any queries or suggestions you may have regarding this supplement to the technical documentation team at
the following address:
Daimler AG, HPC: CAC, Customer Service,
70546 Stuttgart, Germany
©Daimler AG: Not to be reprinted, translated or
otherwise reproduced, in whole or in part, without written permission from Daimler AG.
As at 24.04.2015
Éohne-ËÍ
ohne
Order no. 65159857 02 Part no. ohne Edition 2015-1