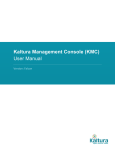
1
TelVue® Connect™
User Manual
TelVue® ConnectTM User Manual / v. 1.6 / June 2014
1
TelVue® Connect™ is a cloud-based Broadcast CMS that streamlines multi-user contribution,
transcoding, content management and scheduling.
You can use TelVue Connect to:
1.
2.
3.
4.
5.
aggregate content from contributing producers over any Internet connection
automatically transcode uploaded videos to your specs
automatically distribute content to your broadcast server
schedule series and automatically deliver that schedule, along with its content, to your
broadcast server
assign series to contributors to self-manage their episodes and timeslots
The TelVue Connect User Manual describes each step of the workflow in greater detail.
User icons ( =Admin,
=Program Coordinator,
permissions for which tasks.
=Contributors) represent which roles have
Table of Contents
Getting Started ................................................................................. 2
Organization Settings ....................................................................... 2
Manage User Accounts ..................................................................... 3
Change your Password ................................................................................... 4
Upload and Transcode Content ......................................................... 4
Enter Metadata ................................................................................. 6
Metadata Presets ........................................................................................... 9
Clear Content Storage ...................................................................... 9
Publishing and Moderation ............................................................. 10
Distribution .................................................................................... 12
Broadcast Server Integration ......................................................... 13
Create and Schedule Playlists ......................................................... 16
Create and Schedule Series ............................................................ 18
Fill a Series with Episodes .............................................................. 20
Cable Option ................................................................................... 21
TelVue Connect Media Exchange..................................................... 22
Video Producer Option .................................................................... 25
© 2014 TelVue Corporation.
TelVue® ConnectTM is a trademark of TelVue Corporation.
16000 Horizon Way, Suite 500, Mt. Laurel, NJ 08054
800-885-8886. www.telvue.com
TelVue® ConnectTM User Manual / v. 1.6 / June 2014
2
Getting Started
Log in to TelVue Connect, and you will be greeted by a series of tabs:
1.
2.
The Dashboard notifies you any upcoming unfilled slots in your schedule, and of all recent
activity such as video transcoding progress. You can fill any unfilled slots from this interface.
(Seen by
)
The Media tab is where you can upload videos through a drag-and-drop interface (or Browse
3.
for upload, on IE). (
Admins can see All Media.
Program Coordinators and
)
Contributors can only see their own.)
The Moderation tab is seen only by those designated as content Moderators. A Moderator
can choose which of the uploaded media are really ready for air, and has the power to put a
video on hold (“pending”), or publish it, or reject it.
4.
The Collections tab allows the
5.
Admin or
Program Coordinator to manage all Series and
Playlists in the system. The
Contributor will only see the Series to which s(he) has been
assigned, and will only have permission to Fill it with Episodes, not to Edit it.
On the Scheduling tab you can search and sort your schedule through several viewing
options: by channel, by day, by series, etc. You can also fill your schedule from this
6.
interface. (Seen by
)
The Activity tab displays every action that happens under your account, including transcoding
7.
progress. ( Admins can see all activity in the organization.
Program Coordinators and
Contributors see only their own.)
Contact Us displays contact information specific to your organization.
8.
The Administration tab is where the
Users, and Channels
Administrator configures your Organization Settings,
Organization Settings
Before creating your user accounts, the Admin should take the time to customize your organization’s
TelVue Connect settings.
a) Contact Us. This tab is seen by every user, but can only be edited by the Admin. Enter any
contact information relevant to Connect users, such as the email address or phone number of
your Connect Administrator or Program Coordinator. The Contact Us text area
supports Markdown, an easy way to format text, embed hyperlinks, create bulleted and
numbered lists, etc.
b) Organization Settings. This is done under the Administration tab, and gives you the
following choices:
© 2014 TelVue Corporation.
TelVue® ConnectTM is a trademark of TelVue Corporation.
16000 Horizon Way, Suite 500, Mt. Laurel, NJ 08054
800-885-8886. www.telvue.com
TelVue® ConnectTM User Manual / v. 1.6 / June 2014
3
1.
Profile:
•
Fill in organization information
•
Upload organization logo
2. Usage:
•
Displays remaining disk space
•
Choose auto-delete time frame to free up disk space
vs. your quota and delete old media.
•
Set maximum upload file size
3. Episode Tolerance: default is + or – five seconds, but the
Admin can adjust the margins. If program from Connect is 5 secs
long, Connect will truncate the last 5 secs before sending to the
Broadcast Server. If the program from Connect is 5 secs too short,
the Broadcast Server will play whatever continuity you have set for it.
4. Broadcast Servers: displays a list of integrated broadcast
servers. (Not to be confused with the list of integrated Channels. You
might be scheduling several channels on the same server. The Channel
listings are found in the pulldown under the Administration tab, under
“Channels”.)
5. Publishing/Moderation: If you check the “Moderate new
Contributors” option, every new Contributor’s uploads will
automatically be subject to the Moderation feature.
6. EULA: This is where the Administrator can put in an End User
License Agreement, and choose whether or not to require Connect
users to sign off on it before proceeding.
Manage User Accounts
Contributors can upload their videos, manage their own media including entering metadata,
manage and schedule episodes for their series.
Program Coordinators can do everything a Contributor can, and can additionally manage and
schedule all series and episodes, and manage all media for their organization.
The Administrator can perform all functions. It is the only role which can create users and adjust
the technical configurations. When creating new Program Coordinators or other Admins, the
Administrator also can assign Moderator permissions. (Note that Moderator is not a separate role, but
an additional level of permission granted to either Program Coordinators or Contributors.)
To create a new user, the Username and Email fields are required. Connect will send the new user an
e-mail for verification. The Admin can choose whether to pre-select a password, or allow the user to
create their own by clicking on the confirmation link in the email they receive.
You must fill in the Provider fields for Contributors. The “Provider” is the organization the user
represents, such as a school district, or department, or production house. If your organization has a
code for that Provider, enter that in the “Provider ID” field. If there is no code, we suggest something
like the domain name or other useful information pertaining to their group.
© 2014 TelVue Corporation.
TelVue® ConnectTM is a trademark of TelVue Corporation.
16000 Horizon Way, Suite 500, Mt. Laurel, NJ 08054
800-885-8886. www.telvue.com
TelVue® ConnectTM User Manual / v. 1.6 / June 2014
4
Change your Password
For security purposes, we recommend changing your password from time to time. Here’s how:
1.
2.
3.
4.
Login with your current username and password.
Navigate to the upper right of the web app, and select your username next to the “Log Out”
option.
This will direct you to the Edit User form, in which you can enter a new password and confirm
it.
Click Save.
Upload and Transcode Content
There are two ways to upload content to Connect:
1.
2.
Into the Media Library for later scheduling, or
Directly into a Series.
(Note: In Chrome, Firefox, or Safari, you can drag-and-drop multiple files to upload. In IE, use the
“Upload” button to choose your media. In Chrome, you can bulk upload an entire folder of
videos. You can also upload the VIDEO_TS folder directly from a DVD.)
Option 1 – Upload Video into the Media Library: Inside the Media tab, simply drag-and-drop your
video(s).
© 2014 TelVue Corporation.
TelVue® ConnectTM is a trademark of TelVue Corporation.
16000 Horizon Way, Suite 500, Mt. Laurel, NJ 08054
800-885-8886. www.telvue.com
TelVue® ConnectTM User Manual / v. 1.6 / June 2014
(Note: individual
visible only to
5
Contributors can only see their own “My Media” library. The “All Media” Library is
Program Coordinators and
Administrators.)
Option 2 – Upload Video as an Episode directly into a Series: In the Series tab, navigate to the
Series to which you want to upload new Episodes, click on the thumbnail, and you will see the upload
interface:
Drag and drop one or more videos. If you want to create an Episode for this Series using a video that
already exists in the Media Library, you can “Add from Media Library”, and it will take you to a list of
usable Media.
(Tip: A useful filter on that page is the “Videos that fit this series’ slots” option, which narrows the
choices to only videos that match the episode length for that particular series.)
Once a video has been uploaded, you can add the metadata even while Connect starts the automatic
transcode to your specs. The transcoding specs can only be set by a TelVue administrator, based on
your requirements. You can view the transcoding progress in the Activity tab. If the transcode fails for
any reason you will get e-mail notification.
As the video gets transcoded, Connect simultaneously creates a preview version of the content, which
can be accessed from both the Media index or the Media edit screens:
© 2014 TelVue Corporation.
TelVue® ConnectTM is a trademark of TelVue Corporation.
16000 Horizon Way, Suite 500, Mt. Laurel, NJ 08054
800-885-8886. www.telvue.com
TelVue® ConnectTM User Manual / v. 1.6 / June 2014
6
To upload a DVD:
- In Chrome, drag the VIDEO_TS folder on to the Connect media-upload page.
- In other browsers, drop the VOB files from the VIDEO_TS folder on the DVD onto Connect’s mediaupload page. Drop only the VOB files that start with VTS_, in other words, VTS_01_1.VOB,
VTS_01_2.VOB, and VTS_01_3.VOB, and so on. Connect will stitch the files into a single video the
background. Please be patient while this process happens. You may not see progress in the Activity
page right away.
Enter Metadata
Once a video has been uploaded, the Contributor should fill in some basic information about that
video. To get to the Metadata fields, click on the “Edit” option in the pulldown menu associated with a
particular video.
This takes you to the Media page, where the user will add Title and Short Summary (Required) and
Episode ID, if relevant. Please note that the Title you assign to a video in TelVue Connect is going to
be the filename of that video, once downloaded from TelVue Connect, whether for your own station, or
through the Media Exchange.
© 2014 TelVue Corporation.
TelVue® ConnectTM is a trademark of TelVue Corporation.
16000 Horizon Way, Suite 500, Mt. Laurel, NJ 08054
800-885-8886. www.telvue.com
TelVue® ConnectTM User Manual / v. 1.6 / June 2014
7
Additional metadata fields can be accessed through a separate Metadata sub-tab, seen from the Media
Edit window. These fields are optional, unless your organization has subscribed to the CableLabs
Metadata Feature in TelVue Connect.
© 2014 TelVue Corporation.
TelVue® ConnectTM is a trademark of TelVue Corporation.
16000 Horizon Way, Suite 500, Mt. Laurel, NJ 08054
800-885-8886. www.telvue.com
TelVue® ConnectTM User Manual / v. 1.6 / June 2014
8
1.
The Title and Summary fields from the Media Edit window automatically carry over into the
corresponding Metadata fields. Run time is automatically calculated and filled in by TelVue Connect.
2.
Categories can be assigned to a particular video by the Contributor, but the categories themselves are
managed by the Administrator. In a pull-down from the Administration tab is a “Categories” option,
where the Administrator can create, delete, and organize the categories and their hierarchy.
The Administrator can also choose to assign specific Categories to individual users. To do so, make
sure that your Organization Settings –> Metadata –> Assign Categories option is enabled, and then
when editing any individual users, you can assign categories on the Categories user sub-tab.
3.
There are optional fields for more information, such as the names of actors, director, etc.
© 2014 TelVue Corporation.
TelVue® ConnectTM is a trademark of TelVue Corporation.
16000 Horizon Way, Suite 500, Mt. Laurel, NJ 08054
800-885-8886. www.telvue.com
TelVue® ConnectTM User Manual / v. 1.6 / June 2014
9
Metadata Presets
A time-saving feature for commonly-repeated metadata fields in an organization is the Metadata
Preset Feature. Access the Metadata Presets feature under the Media Tab.
To create a Metadata Preset:
•
•
•
Go to: Metadata Presets –> New Preset –> Fill in the Preset name field
Fill in the fields which are most likely to be used repeatedly as you add media
Click on the “Create Preset” button, at the bottom of the page
To use a Metadata Preset:
•
•
•
•
In the Metadata sub-tab of each piece of media, choose your Preset name from the pulldown
next to “Fill Using Preset”
Choose from one of three choices in “Application Method”
• Overwrite: always replaces existing metadata with newly-entered values
• Merge: replaces existing metadata with newly-entered values only if the new value is
not blank
• Fill Empty: replaces existing metadata with newly-entered values only if existing
metadata is blank
Click “Fill from Preset” and tweak information as needed.
Review changes and Save.
Clear Content Storage
The “Clear Storage Space” option in the individual media pulldown menu is a housekeeping tool to
help you stay within your organization’s storage quota. This action deletes the broadcast video file
from TelVue Connect, while keeping the metadata and preview files intact. Use this option ONLY
AFTER your broadcast files have been distributed to your TelVue broadcast server.
“Cleared” assets can still be scheduled through TelVue Connect as long as the broadcast video file was
previously successfully delivered to the broadcast server being scheduled. Once the broadcast file has
been cleared from your TelVue Connect Media Library, its metadata will remain visible, but the
thumbnail will be faded, and the pulldown menu now has an additional option: “Transcode”.
© 2014 TelVue Corporation.
TelVue® ConnectTM is a trademark of TelVue Corporation.
16000 Horizon Way, Suite 500, Mt. Laurel, NJ 08054
800-885-8886. www.telvue.com
TelVue® ConnectTM User Manual / v. 1.6 / June 2014
10
“Transcode” allows for emergency recovery of a cleared asset within a limited time window. (This
feature has the added benefit of streamlining the workflow should an organization decide to change its
transcode profile.)
(Note: An organization’s content storage quota is determined in the initial TelVue Connect contract. To purchase more storage,
please contact [email protected])
Publishing and Moderation
Publishing
Publishing features add the concept of “Drafts” to media uploaded to Connect. A “Draft” is an item you
need to work on privately for a period of time before making it live in the system. When the content is
ready, the user clicks “Publish” and it is made live in the system, and optionally enters Moderation if
that user is a Moderated User.
Contact TelVue Customer Service if you would like Publishing enabled. ([email protected])
Moderation
Moderation is a feature which, at the time of this writing, is active by default on all Connect
accounts. If you would like it deactivated, please contact TelVue Customer Service.
Creating Moderators
You will see a “Moderator” checkbox while creating or editing a user account. Checking that grants
that user moderation abilities. Moderators see a “Moderation” tab in their user interface. In that tab is
their organization’s Moderation Queue, holding all uploads from Moderated Users that are awaiting
approval. A Moderator can choose which of the submitted media are ready for air, and has the power
to approve or reject submitted videos.
Difference Between Moderators and Admins
Like Moderators, Admins can always approve and reject content sitting in the moderation queue. The
main difference is that Moderators receive email notifications when there is moderation activity
(assuming “email notifications” is active on their user account).
© 2014 TelVue Corporation.
TelVue® ConnectTM is a trademark of TelVue Corporation.
16000 Horizon Way, Suite 500, Mt. Laurel, NJ 08054
800-885-8886. www.telvue.com
TelVue® ConnectTM User Manual / v. 1.6 / June 2014
11
Creating Moderated Users
A Moderated User is a user whose published uploads are subject to the approval of your Moderators
before they are made live in the system. A user in any role can be moderated, though making an
Admin moderated has no effect because an Admin by definition can edit and approve anything at will,
to include their own moderated content.
To create a Moderated User, check the “This user’s content is moderated” checkbox on their user
account. That user’s published uploads are now subject to the approval of your Moderators before
they are made live in the system.
Assuming Publishing and Moderation are active, users will see a
“Save Draft” and “Publish” option on the media-edit pages, along
with space for an optional comment to the Moderators. When a
Moderated User clicks “Publish”, the video will be marked
“Pending” and will enter the Moderation Queue. Moderators are
notified via email of the new item in the queue, and the
Moderated User’s comment is included in that email.
The user will not be allowed to
publish media until all required
metadata has been entered.
Compare that with what the
Moderator sees, when looking at
the same page for a video that
is “Pending”. Connect gives the
Moderator the power to
“approve” or “reject” this
video. Once approved, the
video’s status changes to
“Published”. Approved content
is now usable in the system,
whether that be for scheduling or distribution.
Upon approval or rejection, the Moderator may include a comment
back to the Moderated User to explain the reason for approval or
rejection. A new email is sent to the Moderated User with the
Moderator’s comment included. If rejected, the Moderated User may
make the appropriate changes and resubmit for approval.
Rescinding
Items in moderation are freely editable by Admins, Program Coordinators, and Moderators, but not
Contributors. When a Moderated Contributor submits an item for moderation, the item is locked. The
Contributor cannot make changes to it. For a Contributor to be able to edit an item in Moderation,
they must pull it out of moderation by “rescinding” it. They will see “Rescind” buttons in their
interface.
Moderated Program Coordinators do not see “Rescind” buttons on their moderated content, because
the permissions of their role allow them to freely edit content at any time, even while it is Pending and
Approved.
Changes to Published / Approved Items
Only Admins, Program Coordinators, and Moderators can make changes to published
items. Contributors are not permitted to make changes to published items. If you need to allow a
© 2014 TelVue Corporation.
TelVue® ConnectTM is a trademark of TelVue Corporation.
16000 Horizon Way, Suite 500, Mt. Laurel, NJ 08054
800-885-8886. www.telvue.com
TelVue® ConnectTM User Manual / v. 1.6 / June 2014
12
Contributor to make changes to an approved item, any of your Admins or Moderators may remove
“Approved” status from an item by clicking the “Undo Approval” button on the media.
Remember, Program Coordinators who are not Moderators will not see “Approve / Reject” or “Undo
Approval” buttons. Only Admins and Moderators have these moderation-type features.
Distribution
Once the videos are available, how do you distribute these to your broadcast server? There are
several options:
Server Integration
If you have a TelVue server, you can push both the content and schedule to the broadcast server.
Auto-Distribution
In the “Edit User” window, the Administrator can specify that a certain contributor’s uploads will go
directly to a designated server. The Auto-Distribution feature allows you to choose from a list of
integrated servers. Content specifically uploaded by that contributor, once Published, will
automatically get pushed to that server.
Push to Server
Admins and
Media Tab.
•
•
•
•
Program Coordinators can also push videos up to the broadcast server from the
Select the videos you want to transfer.
Click on the pull-down menu next to the bulk action gear icon
Choose “Distribute”
A pop-up will ask you to choose from the list of integrated servers
Manually Download Content
Admins and
Program Coordinators might want to download videos from Connect for a couple of
reasons:
1. Using Connect for consistent transcoding, but have uses for the video other than in the automatic
© 2014 TelVue Corporation.
TelVue® ConnectTM is a trademark of TelVue Corporation.
16000 Horizon Way, Suite 500, Mt. Laurel, NJ 08054
800-885-8886. www.telvue.com
TelVue® ConnectTM User Manual / v. 1.6 / June 2014
13
broadcast workflow, or
2. Manual transfer of the transcoded files to a broadcast server other than TelVue.
This is easily done by clicking on the download icon displayed with each individual media entry:
Downloading media files, however, is not necessary if your version of Connect is integrated with a
TelVue Broadcast Server. Read the next chapter on “Broadcast Server Integration” for detailed instructions
on how to set up automatic transfer of both media and scheduling information to a TelVue
broadcaster.
Broadcast Server Integration
(This section for Admins only) These two crucial steps are necessary for your scheduling data to
sync to your broadcast server, and for scheduled videos to be auto-transferred to your broadcast
server.
1. Add Connect to your Broadcast Server. If your TelVue Broadcast Server already has
Connect as an option, login to your Broadcast Server UI:
•
•
•
•
•
•
Click on the Config tab
Choose “Remote Servers”
Click on “New Remote Server”
Choose Connect from the “Server Type” pulldown.
The username has to be a valid Connect Admin account in your organization.
In the Host field, type “connect.telvue.com”.
© 2014 TelVue Corporation.
TelVue® ConnectTM is a trademark of TelVue Corporation.
16000 Horizon Way, Suite 500, Mt. Laurel, NJ 08054
800-885-8886. www.telvue.com
TelVue® ConnectTM User Manual / v. 1.6 / June 2014
14
(Note: If your TelVue Broadcast Server does not yet have a Connect option, please
[email protected] and we will help you set it up.)
(Tip: We recommend that you create a utility Admin account in your organization solely for the
purpose of synching to remote servers.)
2. Map the Channels on your Broadcast Server to Connect. Once you save the
Connect connection as a remote server in your Broadcast Server:
•
•
•
log back into Connect
navigate to (Admin>Channels)
click on “New Channel”, and you will get this form:
© 2014 TelVue Corporation.
TelVue® ConnectTM is a trademark of TelVue Corporation.
16000 Horizon Way, Suite 500, Mt. Laurel, NJ 08054
800-885-8886. www.telvue.com
TelVue® ConnectTM User Manual / v. 1.6 / June 2014
2.
15
You will have to fill out this form in Connect for each Channel on your Broadcast Server. The Channel
ID must match the Channel ID on your broadcast server. (To find the Channel ID in your broadcast
server, click any channel on the Broadcast Server dashboard, and it’s the number at the end of the
URL in the address bar in your browser.)
Scheduling data will begin to sync to your broadcast server once that connection is established. The
servers will look for new scheduling information roughly every five minutes. Once the scheduling
information is in sync, the Connect programming will show up in your Broadcast Server schedule like
this: (1) the first time slot, with red lettering, is still waiting for the content to upload; (2) the
second time slot, with blue lettering, has already pulled the video from Connect.
© 2014 TelVue Corporation.
TelVue® ConnectTM is a trademark of TelVue Corporation.
16000 Horizon Way, Suite 500, Mt. Laurel, NJ 08054
800-885-8886. www.telvue.com
TelVue® ConnectTM User Manual / v. 1.6 / June 2014
16
(Note: What if there is a conflict between the Broadcast Server and Connect programming? By
default, Connect will override any scheduling conflicts between Connect scheduling and local
application scheduling with each sync. But, if you need to protect all of your local scheduling events,
then uncheck the “Use Connect server schedule as Master” box, in the Broadcast Server’s Config>Edit
Schedule Settings:
Create and Schedule Playlists
Upon request, TelVue can activate the Playlist Option in an organization’s Connect account. The
Playlist Option adds the flexibility of grouping loose videos into a single block of programming, which
can then be scheduled any number of times.
Once the Playlist Option has been activated, the Program Coordinator will see a “Collections” tab in the
top nav bar, and under that will be displayed both “Series” and “Playlists”.
© 2014 TelVue Corporation.
TelVue® ConnectTM is a trademark of TelVue Corporation.
16000 Horizon Way, Suite 500, Mt. Laurel, NJ 08054
800-885-8886. www.telvue.com
TelVue® ConnectTM User Manual / v. 1.6 / June 2014
17
When creating a new playlist, the title is required, but the description is optional.
Once a playlist is created, you can click on the thumbnail, and then add media to the Playlist in same
way as you would to a Series: drag and drop a video onto the page, or pick from the existing media
library.
The added media appear in the playlist view and are assigned sequence numbers. You can reorder
the videos by dragging and dropping items. Changes are not saved until you click the “Save Order”
button on the top right.
From this screen can also delete items from playlist, or use the bulk selector. You will get a
confirmation dialog before being allowed to delete an item.
© 2014 TelVue Corporation.
TelVue® ConnectTM is a trademark of TelVue Corporation.
16000 Horizon Way, Suite 500, Mt. Laurel, NJ 08054
800-885-8886. www.telvue.com
TelVue® ConnectTM User Manual / v. 1.6 / June 2014
18
If your Playlist has already been scheduled, any changes you make – reordering, adding, or deleting
media – will automatically be made in every instance of the playlist on the broadcast schedule (unless
the playlist is already playing, in which case that instance will not change.)
There are a couple of ways to schedule a playlist:
(1) From the Schedule Tab, Click on a timeslot in the “Day” view and you will get a shadowbox from
which you can select your playlist. Pick a channel (until it is scheduled, a playlist has no assigned
channel). Fill in the beginning and end times. Click “Schedule”. Now you have large green block that
represents a scheduled playlist. (Note that scheduled Series show up as blue blocks.)
(2) You can also schedule directly from the playlist menu, by clicking the “Schedule” button next to
each playlist.
Note: if there is a scheduling conflict, you get a warning and the system will not allow it.
If playlist is shorter than the assigned timeslot, the playlist will repeat until the end of its allotted
time. If the last item does not fit in the allotted timeslot, TelVue Connect will ask the broadcast player
to truncate the end of the playlist to fit.
Playlists can be scheduled multiple times.
Create and Schedule Series
A Series is a collection of videos known as Episodes that will play over a number of
days/weeks/months. Series can only be created by
Administrators and
Program Coordinators,
and can be assigned to specific, trusted producers ( Contributors) to fill with Episodes. It is a way to
transfer the responsibility of filling a scheduled series to reliable content contributors.
1. Navigate to the “Series” tab
2. Click on “New Series”, and fill in some basic fields
(screen left):
Name of the Series
If you are using Connect to schedule more
than one Channel, select the Channel this Series is
meant to air on.
• Description. (Remember, this field will
help people search for your Series in
Connect. Include relevant details.)
• Duration, in HH:MM:SS. The Administrator
determines the margin of tolerance — that is,
whether this Series will accept a video that may be
a few seconds shorter or longer than the assigned
time slot.
• Assign this Series to the User who will be
responsible for filling it with Episodes. As Admin or
Program Coordinator, you can assign the series to a
specific, trusted Contributor. This means you
control precisely WHO is allowed to fill WHICH time
slots.
•
•
© 2014 TelVue Corporation.
TelVue® ConnectTM is a trademark of TelVue Corporation.
16000 Horizon Way, Suite 500, Mt. Laurel, NJ 08054
800-885-8886. www.telvue.com
TelVue® ConnectTM User Manual / v. 1.6 / June 2014
3.
19
Set the time slots for this particular Series on the right side of the form:
• Start time defaults to
the current day
• End time is
mandatory, whether it ends
after a date or a specific
number of episodes
• Type: choose Daily,
Weekly, or Monthly
• Time Slot: fill in as
HH:MM:SS
• Repeat every: 1-30
instances
• Check the day or
days of the week the Series
should air
• +Add Slot if you
want to create an additional
sequence of time slots for
this same Series (Note: the
limit is 8 slot rules)
4. Save, and your Series is scheduled.
You’ll notice the new Series is blank. A Series is just a bunch of timeslots that still require
videos. The Series is now ready to be filled with Episodes.
© 2014 TelVue Corporation.
TelVue® ConnectTM is a trademark of TelVue Corporation.
16000 Horizon Way, Suite 500, Mt. Laurel, NJ 08054
800-885-8886. www.telvue.com
TelVue® ConnectTM User Manual / v. 1.6 / June 2014
20
The Timeslot Exclusion Feature
The Exclusion Feature makes it possible to take a single timeslot out of a Series, and free it up for
some other program.
The “Exclude” button shows up under the “Schedule” tab, in the “All” view. Clicking the Exclude
button for a given timeslot will allow you to schedule into that area without conflict.
If you want to reverse that action, navigate over to the series schedule, and you will now see excluded
timeslots. To undo those exclusions, click on the x, and make sure to Save those changes. If an
excluded timeslot was already filled with new material, you get a warning and the system will not let
you undo the exclusion.
Fill a Series with Episodes
To earmark certain videos as Episodes for your Series, upload videos directly into the Series. Or, you
can designate previously-uploaded media to be Episodes.
Then, you still have to assign specific Episodes to specific time slots. This can be done from either the
Dashboard or the Scheduling tab.
The Dashboard conveniently shows a list of upcoming unfilled slots for Series assigned to you. From
the Dashboard, click on the “Fill” button, and when your choices pop up, click on the thumbnail of the
Episode for that Series you want to run in the time slot. It will populate the empty time slot.
If there is an empty slot coming up in your schedule, TelVue Connect will send you an email alert,
giving you seven days to deal with it. (If you don’t want an email alert, you can un-check that option
in your User Settings.
© 2014 TelVue Corporation.
TelVue® ConnectTM is a trademark of TelVue Corporation.
16000 Horizon Way, Suite 500, Mt. Laurel, NJ 08054
800-885-8886. www.telvue.com
TelVue® ConnectTM User Manual / v. 1.6 / June 2014
21
Cable Option
TelVue Connect offers a number of features for CableLabs®-compliancy for customers who require
CableLabs specific metadata and video format standards. The CableLabs related features include:
1.
2.
3.
Automatic video and audio transcoding to CableLabs SD and HD video standards
CableLabs Asset Distribution Interface (ADI) 1.1 metadata fields, , with options for
categorizing, licensing, and billing information
The ability to download metadata in the industry-specific CableLabs Asset Distribution
Interface (ADI) standard. This metadata can be captured and passed to the operator’s VOD
system to populate the on-demand program guide.
The Cable-specific metadata fields can be accessed through a separate Metadata sub-tab, seen from
the Media Edit window.
This Metadata page lists Required fields on the left, and Optional fields on the right.
© 2014 TelVue Corporation.
TelVue® ConnectTM is a trademark of TelVue Corporation.
16000 Horizon Way, Suite 500, Mt. Laurel, NJ 08054
800-885-8886. www.telvue.com
TelVue® ConnectTM User Manual / v. 1.6 / June 2014
22
Required Metatada
1.
You’ll notice that the Title and Summary fields from the Media Edit window automatically carry over
into the corresponding Required Metadata fields
2.
The contributor will see additional required fields for a brief title, licensing window, and rating
3.
The Administrator will see the fields for Billing ID and Provider information.
4.
Categories can be assigned to a particular video by the Contributor, but the categories themselves are
managed by the Administrator. In a pull-down from the Administration tab is a “Categories” option,
where the Administrator can create, delete, and organize the categories and their hierarchy. Admins
and Program Coordinators can predetermine which categories their Contributors may assign to media
in CableLabs metadata. If this feature is disabled under the Organization Settings –> Metadata
configuration, the Contributor will see all categories.
Optional Metadata
1.
Optional Metadata gives the contributor a chance to fill in more detailed information about the video,
including names of actors, director, etc.
2.
This is also where the contributor can indicate whether the video includes closed captioning.
Metadata Presets
A time-saving feature for commonly-repeated metadata fields in an organization is the Metadata
Preset Feature.
Download Metadata
Finally, the Metadata is downloadable via a “Metadata” icon, visible in each entry in the Media Library.
The Media itself is downloadable as usual.
Metadata Download
TelVue Connect Media Exchange
The TelVue Connect Media Exchange simplifies program syndication by automating the logistics of
program-sharing in the Cloud.
© 2014 TelVue Corporation.
TelVue® ConnectTM is a trademark of TelVue Corporation.
16000 Horizon Way, Suite 500, Mt. Laurel, NJ 08054
800-885-8886. www.telvue.com
TelVue® ConnectTM User Manual / v. 1.6 / June 2014
23
To use the Media Exchange:
1. A Syndicator determines the licensing terms to be attached to his or her content. The End User
License Agreement (EULA) is under the Administration tab, and gives you the option of writing your
own licensing terms, or choosing several versions of the Creative Commons license.
2. The option to “Syndicate” each piece of media is accessed through the pulldown menu on the right.
Once Syndicated, your media becomes visible in the Media Exchange.
3. An Affiliate can browse the Media Exchange, preview entire shows in the browser interface, and
“License” the selections for download or distribution to a broadcast server for playout. These are the
options an Affiliate sees in the Media Exchange:
© 2014 TelVue Corporation.
TelVue® ConnectTM is a trademark of TelVue Corporation.
16000 Horizon Way, Suite 500, Mt. Laurel, NJ 08054
800-885-8886. www.telvue.com
TelVue® ConnectTM User Manual / v. 1.6 / June 2014
24
Private Groups
The Private Group Feature in Media Exchange is an option for a group of
stations that might want to share some videos among themselves, but not
necessarily to the entire Connect user base.
Private Groups are visible only to the members of that group, and can be
accessed from the Group pull-down menu under the Media Exchange
tab. To browse within your group, just select the group name from that
menu.
To add media to a Private Group: Users of a Media Exchange Private Group
will see an “Edit Syndication” choice on the Actions menu beside each
media entry. Edit Syndication gives you a popup checklist, allowing the Syndicator to decide whether
to add this video to the public Media Exchange, or to any number of Private Groups to which this user
belongs.
If your organization is interested in setting up a Media Exchange Private Group, please contact
[email protected]
Series Syndication
You can syndicate an entire Series through the TelVue Connect Media Exchange. An Affiliate who
subscribes to a Syndicated Series will automatically get new episodes as these are added to the Media
Exchange by the Syndicator.
Series can be syndicated by checking off the “Syndicate (share this
series)” option in the Edit Series page. In order to syndicate a
Series, each individual episode must also be syndicated.
The Series then shows up in the “Series” tab of the Media
Exchange. When an Affiliate chooses to license this series, all
episodes will show up in their Media Library, and the Series will show
up in their Series tab. As new episodes are syndicated, these will
© 2014 TelVue Corporation.
TelVue® ConnectTM is a trademark of TelVue Corporation.
16000 Horizon Way, Suite 500, Mt. Laurel, NJ 08054
800-885-8886. www.telvue.com
TelVue® ConnectTM User Manual / v. 1.6 / June 2014
25
automatically be transferred to the Affiliate’s Media Library.
Video Producer Option
The TelVue Connect Video Producer is an add-on feature that allows you to produce
professional videos right in the TelVue Connect interface. Video Producer is perfect for creating ads or
sponsorship spots, community bulletin boards, promos and more. Starting with a wide variety of
dynamic styles and pre-licensed background music, you can produce these videos by simply adding
your own images, videos, and text.
The finished videos will show up in your Media Library, to be scheduled to your TelVue broadcast
server, or downloaded for use elsewhere. For organizations with the Video Producer feature, all users
in your organization can access this powerful tool. This allows contributors without any video
production expertise to create stunning videos to submit to you.
How to Create a Video:
Organizations with the Video Producer feature enabled in TelVue Connect will see the “Produce a
Video” option in the pulldown menu under the Media tab. Open it, and you will see this window:
Video Producer Opening Screen
Browse Music and Theme Styles. If this is your first time in Video Producer, click on “Change
Song” and “Change Style” to browse and preview the available music and visual themes.
© 2014 TelVue Corporation.
TelVue® ConnectTM is a trademark of TelVue Corporation.
16000 Horizon Way, Suite 500, Mt. Laurel, NJ 08054
800-885-8886. www.telvue.com
TelVue® ConnectTM User Manual / v. 1.6 / June 2014
26
Upload Elements. When you’re ready to start producing your own video, upload images and
videos in the storyboard interface. Your files must be less than 20MB for images, or 400MB for
video. This is also where you will add text captions.
Once your elements have been uploaded, they will show up as thumbnails in the storyboard view.
The storyboard interface displays each element as a thumbnail, with editing options
© 2014 TelVue Corporation.
TelVue® ConnectTM is a trademark of TelVue Corporation.
16000 Horizon Way, Suite 500, Mt. Laurel, NJ 08054
800-885-8886. www.telvue.com
TelVue® ConnectTM User Manual / v. 1.6 / June 2014
27
Edit Image and Text Elements. Each thumbnail has an “Edit” option on the lower left. Click
on “Edit”, and you can:
1.
“Rotate” the orientation of the element
2.
“Highlight” an image or caption to lengthen its duration and the overall length of your finished
montage. You can also highlight from the storyboard view by clicking on the star at the top left of
each thumbnail.
3.
“Reset” to return to default choices
4.
You can “Delete” from this interface, or by clicking on the “X” on the top right of each thumbnail
You can also Rotate, Highlight, Edit, Duplicate or Delete selected elements from the menu at the
bottom of the storyboard interface.
Adjust length and start position of each video clip
Edit Video Clips. With uploaded video clips, you have additional editing options:
1.
Clip Length – You can choose up to 10 seconds of an uploaded clip.
2.
Clip Starting Point – Use the slider to choose the starting point.
3.
Clip Audio – You can choose whether or not to include the audio
Re-arrange the Elements. Upload your elements in any order and drag them around in the
storyboard interface until you have the sequence you like. You can preview and change the style and
music at any time.
This slider adjusts the pacing and length of your video project
© 2014 TelVue Corporation.
TelVue® ConnectTM is a trademark of TelVue Corporation.
16000 Horizon Way, Suite 500, Mt. Laurel, NJ 08054
800-885-8886. www.telvue.com
TelVue® ConnectTM User Manual / v. 1.6 / June 2014
28
Change the Pacing. If you want to speed up or slow down the entire montage, click on the
“Video Options” link at the lower right of the storyboard, and you will get a “Video Pacing” popup with
“Automatic” checked by default. Uncheck “Automatic”, and you have the option of slowing down or
speeding up the pacing of elements within your theme.
It’s a Wrap! Once you are happy with your choices, preview one more time and then “Finalize” your
video. Under the TelVue Connect Activity tab, you will see the video first Render — and then TelVue
Connect will create a preview and a broadcast version of your video, ready for distribution.
If you change your mind after you have Finalized your video, you can go back to the Video options in
the Media Library, and either “Edit a Production” (which will automatically replace your video with the
new version), or “Edit a Copy of a Production” (which keeps both the original and the copy).
© 2014 TelVue Corporation.
TelVue® ConnectTM is a trademark of TelVue Corporation.
16000 Horizon Way, Suite 500, Mt. Laurel, NJ 08054
800-885-8886. www.telvue.com