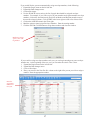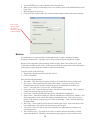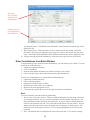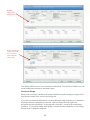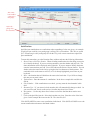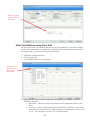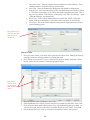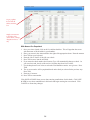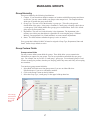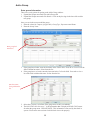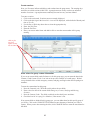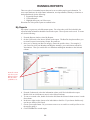
1
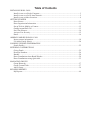
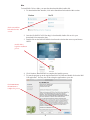
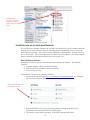
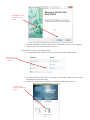
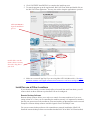
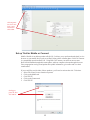
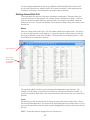
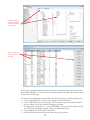
Table of Contents
INSTALLING ROLL CALL
Install for use on a Single Computer.............................................................................................3
Install for use on a Local Area Network.......................................................................................5
Install for use at Other Locations..................................................................................................9
GETTING STARTED
Enter License..............................................................................................................................11
Enter Organization Information..................................................................................................11
Set up Trial for Mobile or Connect.............................................................................................12
Getting Around Roll Call............................................................................................................13
Set Color Schemes......................................................................................................................14
Activate User Security................................................................................................................15
Email...........................................................................................................................................16
ADDING FAMILIES IN ROLL CALL
Import contact information.........................................................................................................18
Use Add a Family (Basic)...........................................................................................................20
LOOKING UP PEOPLE INFORMATION
Search Profiles............................................................................................................................22
ENTERING CONTRIBUTIONS
Giving Funds...............................................................................................................................25
Envelope Numbers......................................................................................................................26
Batches........................................................................................................................................28
Enter Contributions from Batch Window...................................................................................29
Enter Contributions using Quick Add.........................................................................................33
MANAGING GROUPS
Group Hierarchy.........................................................................................................................37
Group Custom Fields..................................................................................................................37
Add a Group................................................................................................................................39
RUNNING REPORTS
My Reports.................................................................................................................................44
INSTALLING ROLL CALL
Install for use on a Single Computer
If you will be accessing Roll Call from only ONE computer, you will want to download and
install the Standalone version of the software from http://www.bythebook.com/support/downloads/
Windows
To install Roll Call on a Windows computer, you must first download the Windows installer file.
1. To download the Windows installer, click on the Standalone link.
Click on Standalone link
under Windows.
2. Once the file (ROLLCALL13en.msi) is downloaded, double click on the file and choose
the run or open option.
3. The installation wizard will be presented. Click NEXT through all the steps.
4. Once the installation is complete, there will be a Roll Call icon on your desktop. Double
click on the icon to start the program.
Click NEXT through
the installer set up
wizard.
3
Mac
To install Roll Call on a Mac, you must first download the Mac installer file.
1. To download the Mac installer, click on the Standalone link under the Mac section.
Click on Standalone
link under the Mac
section.
2. Once the file (ROLLCALL13en.dmg) is downloaded, double click on it in your
downloads list to mount the dmg.
3. Double click on the RollCall Installer icon from the window that comes up and choose
OPEN.
Double click to
begin the installation
process.
4. Click Continue, then INSTALL to complete the installer process.
5. To start the program go to the Applications:Roll Call folder and double click on the Roll
Call application. You may also wish to drag the application to your doc.
Click CONTINUE,
then INSTALL to
complete the process.
4
Double click on
this icon to start the
program. You may
wish to drag it to your
dock.
Install for use on a Local Area Network
If you wish to have multiple computers in your office access Roll Call, you will want to install the
network version of the software. There are two components to the network version. First is the
Roll Call Server software. This can be run from a Windows or Mac machine. It does not need to
have a “Server OS”. The second component is the Roll Call Client software. The Client software
must be installed on each computer that needs to access Roll Call.
Roll Call Server Software
Install Roll Call Server software on the machine that will house the database. This machine
should be:
1. A robust computer with at least 2Gb of memory
2. Left on at all times with Roll Call Server running
3. Set to NOT go to sleep
To install Roll Call Server on a Windows machine:
1. Download the software from http://www.bythebook.com/support/downloads/ by clicking on
the Server link under the Windows section.
Click on the Server link in
the Windows section.
2. Run the file ROLLCALL_Server13en.msi by double clicking on the file in your
downloads list and choose the RUN or OPEN option.
3. The installer wizard will be presented. Click NEXT through each section.
5
Click NEXT through
the installer set up
wizard.
4. When the installation is finished, there will be a black Roll Call icon on your desktop.
5. Double click on the icon to start Roll Call Server
To install Roll Call Server on a Mac machine:
1. To download the Mac installer, click on the Server link under the Mac section.
Click on the Server
link under the Mac
section.
2. Once the file (ROLLCALL_Server13en.dmg) is downloaded, double click on it in your
downloads list to mount the dmg.
3. Double click on the Roll Call Installer icon from the window that comes up.
Double click to
begin the installation
process.
6
4. Click CONTINUE then INSTALL to complete the installation.
5. To start the program go to the Applications: Roll Call Server folder and double click on
the Roll Call Server application. You may also wish to drag the application to your doc.
Click CONTINUE to
begin the installtion
process.
Double click to start Roll
Call Server. You may also
want to drag to your doc.
6. Make sure to turn off App Nap if you are using Mac OSX 10.9 (Mavericks). See https://
bythebook.freshdesk.com/support/solutions/articles/1000017537-roll-call-is-running-slow-on-osx
Roll Call Client Software
Each machine on your network that requires access to Roll Call will need to have Roll Call Client
software installed on their computer.
To install Roll Call Client on a Windows machine:
1. Download the software from http://www.bythebook.com/support/downloads/ by clicking on
the Client link under the Windows section.
2. Run the file ROLLCALL_Client13en.msi by double clicking on the file in your
downloads list.
3. The installer wizard will be presented. Click NEXT through each section.
4. When the installation is finished, there will be a blue Roll Call icon on your desktop.
5. Double click on the icon to start Roll Call Client.
7
Click on the Client link
under the appropriate
section.
Click NEXT through
the installer set up
wizard.
To install Roll Call Client on a Mac machine:
1. To download the Mac installer, click on the Client link under the Mac section.
2. Once the file (ROLLCALL_Client13en.dmg) is downloaded, double click on it in your
downloads list to mount the dmg.
3. Double click on the Roll Call Installer icon from the window that comes up.
Double click to start
the installer wizard.
8
4. Click CONTINUE then INSTALL to complete the installer process.
5. To start the program go to the Applications: Roll Call Client folder and double click on
the Roll Call Client application. You may also wish to drag the application to your doc.
Click CONTINUE to
begin the installation
process.
Double click to start the
Client software. You may
also wish to drag this to
your dock.
6. Make sure to turn off App Nap if you are using Mac OSX 10.9 (Mavericks). See https://
bythebook.freshdesk.com/support/solutions/articles/1000017537-roll-call-is-running-slow-on-osx
Install for use at Other Locations
If your church does not have a central church office or has staff that work from home, you will
want to check out these different ways that Roll Call can be configured.
Remote Desktop Software
Remote desktop software allows you to take over control of a remote machine as if you were
sitting in front of it. Since you are controlling the machine remotely it is important to remember
that only one person can use the machine at a time and anything on that machine can be accessed.
Examples of remote desktop software would be logmein.com or GoToMyPC.com.
You can use remote desktop software with a standalone or network installation of Roll Call.
Install the remote desktop software on a machine that has Roll Call or Roll Call Client installed.
9
Internet Port Forwarding
Internet port forwarding allows you to access Roll Call via Roll Call Client from any machine
over the internet. To implement this option you will need to install Roll Call Server software on
a machine that is accessible from the internet, and that has fixed or dynamic IP address. For more
information on setting up this option see http://www.bythebook.com/PortForwarding.pdf
VPN
VPN or Virtual Private Networks create a network connection between your church LAN (local
area network) and a remote computer using the internet. This can be accomplished with software
or hardware. A popular option is Logmein’s Hamachi. For more information see http://www.
bythebook.com/VPN.pdf
Cloud Hosting
Another option is to have By the Book host your Roll Call Server software. We install Roll Call
Server on our servers in the cloud. Then you install Roll Call Client on your computers that need
access. For more information on this option see http://www.bythebook.com/church-software/roll-callon-the-cloud/
10
GETTING STARTED
Enter License
When you purchase Roll Call you will receive a license number. This license number must be
entered into the system. To do this:
1. Go to the File menu on the top menu.
2. Select Enter License.
3. Enter the number you received.
Enter your license
number, then press
the tab key. It will
fill out the allowed
users and records.
You will not need to enter a license number if you are using a trial.
Enter Organization Information
You will want to enter basic information about your organization. This information is used as a
return address on contribution statements.
To enter this information, click on Organization from the left side menu. Enter the following
information:
1. Organization – The name of your church or ministry.
2. Address – Your organization’s mailing address.
3. More Address – The second line of your organization’s mailing address.
4. City/State/Postal Code – The city, state and zip code portion of your mailing address.
5. Country – If you organization is not based in the US, enter the country here. If you enter
Canada, the contribution receipts will default to the Canadian format.
6. Phone 1 – Enter the phone number of your organization.
7. Phone 2 – Enter a secondary phone number for your organization.
8. Tax Number – This information is required if your organization is in Canada. This number
will be printed on the Canadian contribution receipts.
9. Bank Account – Enter your bank account number for reference if you’d wish.
10. Weekly Budget – This weekly budget amount will be used in budget vs actual reports.
11. Fiscal Year – Enter the month that your fiscal year begins.
12. Church Email – Enter an email address for your organization.
13. Church Website – Enter the URL for your organization’s website.
14. Click SAVE to save this information.
11
Click Organization, then enter
basic contact
information.
Click SAVE.
Set up Trial for Mobile or Connect
Mobile CheckIn is an add-on product to Roll Call. It allows you to perform church check in via a
browser on your mobile device such as an iPad, Galaxy tablet or Smart phone. Roll Call Connect
is a membership portal into Roll Call. Using Roll Call Connect your staff can access some
Roll Call information through their smart phone, tablet or computer at home through a browser.
Your congregation can log in and update their profile information, give online and view their
contributions.
If you would like to trial either of these products, you’ll need to activate the trial. To do that:
1. Select File>Enter License from the top menu.
2. Click on the Mobile tab.
3. Click TRY IT.
4. Click on the Connect tab.
5. Click TRY IT.
Click appropriate tab, then
click TRY IT.
12
For more detailed information on the set up of Mobile CheckIn and Roll Call Connect, check
out our Child Check In user manual or Roll Call Connect user manual. Video instructions are
available as well at http://www.bythebook.com/church-software/tutorials/
Getting Around Roll Call
To navigate Roll Call, there are really three main things to understand. The menus allow you
to get to certain areas of the program. For example, people, contributions or groups. The icons
allow you to perform certain functions against the data. For example, send emails, search the
database or save a set. The plus and minuses at the bottom of windows allow you to add or delete
from the list.
Menus
There are 2 main menus in Roll Call. The left sidebar contains the navigator menu. This allows
you to access different areas of the program. To expand or open up a menu on the left, click the
plus sign (on Windows) or the arrow (on Mac). The menu items will be displayed below. Click
on the function you would like to perform.
Top menu items
Left sidebar
menu. Click +
to expand the
menu item.
The top menu in Roll Call allows you to perform more administrative type functions. For
example, you can change your password, run utilities or set preferences from these menus. To
open up or expand top menu items, click on the menu name, and select the item you would like to
perform.
Icons
The following are the icons that will be on the top on most search screens in Roll Call. Click on
the icon to perform that action. The action will be performed against all records in the list. If you
only want to perform the action for certain records, highlight those records in the list then click on
the icon.
PRINT – Prints the list that is displayed on your search screen.
13
EMAIL – Sends an email to everyone in the list or everyone highlighted in the list.
TEXT – Sends a text to everyone in the list.
LETTERS – Creates a mail merge letter to the people in the list.
LABELS – Creates mailing labels for the people in the list.
SPREADSHEET – Displays the search list in a spreadsheet format.
ALL – Displays all records in the database.
SORT – Allows you to sort the records in a different order.
SEARCH – Allows the user to query the database and look for common characteristics.
SPECIAL – Will perform some common queries.
SETS – Will allow you to perform union and intersect comparisons of two different sets.
SAVE SET – Will allow you save a listing of records.
GET SET – Will allows you to retrieve a saved set or records.
SUBSET – Allows you to reduce a list to only the highlighted records.
PREFS – Allows you to change which fields are displayed on the search screen.
Icon bar to
print, email,
write letter,
etc.
Use plus (+)
and minus (-)
signs to add
and delete people records.
Plus and Minus Signs
You will notice a plus and minus sign below most “list” areas in the program. When you click
the plus sign, it allows you to add a record. When you click the minus sign, you will be deleting
a record. For example, let’s say you where in the Groups Search screen. When you click the plus
sign, it brings up the window to add a group. If you hit the minus will delete the group or groups
that are highlighted.
Set Color Schemes
You can customize the appearance of the Roll Call screens. To modify the appearance, go to the
Edit menu at the top and select Preferences. There are five different areas on the window that can
be customized.
Icon Bar Color - The icon bar is that top bar that contains the different icons or actions that can
be performed. Click on the … button to get a color palette to choose your color.
14
Menu Icon Color – This is the actual color of the icon pictures. You may choose Black or While.
Menu Icon Text Color – This is the text beneath the icon picture. Click the … button to choose
your color from the color palette.
Background Color – This is the background color of the various screens. Click the … button to
choose your color. Click on the reverse arrow to return to the default.
Hierarchical List Color – This is the color of the left sidebar menu. Click the … button to choose
your color. Click on the reverse arrow to return to the default.
Click Appearance
from the left list.
Click on the ... button to choose your
colors.
Activate User Security
If you would like to turn on the security system in Roll Call so that all users will need to log in,
you will need to give Administrator and Director a password. To do this:
1. Expand the Admin menu on the left sidebar menu.
2. Click on User Security.
3. Highlight Director.
4. Click the CHANGE PASSWORD button. Assign a password.
5. Click on Administrator.
6. Click the CHANGE PASSWORD button and assign a password.
Highlight Director.
Click CHANGE
PASSWORD.
15
To add additional usernames, click on the plus sign in the lower left of the window. A window
will pop up to enter the username and default password. To create a regular user, mark the option
for Standard. To create a user that will man a check in station, choose the option for Check In
(Client). Click OK to save this user. Next mark all the areas that they will be allowed to access.
After you click the
plus sign, you’ll get
this window to add
your user.
Choose the areas
that you want to
allow this user to
access. Click SAVE
& CLOSE.
Email
To send emails from Roll Call, each user will need to set up their outgoing email host
information. Roll Call works with most email providers. However there are some providers that
require a double handshake and those providers do not work with Roll Call. Yahoo and Hotmail
are two examples of outgoing email providers that do not work with Roll Call. Gmail works
great but depending on the type of account, you may be limited as to the number of emails you
can send in one day.
To configure the email settings, do the following:
1. Expand the Home menu on the left sidebar.
2. Select My Email Settings.
3. Choose your preference for Plain Text or HTML emails.
4. Enter the Return Address. This is the “from” email address. If a recipient replies to the
email this is the email address it will go to.
5. Enter the Mail Host Name. This is the Outgoing SMTP mail address required by your email
provider.
6. Enter the Username and Password for this email account if your provider requires
authentication.
16
7. Mark the box for the SSL if your provider requires SSL encryption.
8. Enter the Port Number, if your provider requires a specific port number.
9. Enter the No Emails/Minute. Your provider may throttle the number of emails that you can
send per minute. If so, enter that number here.
10. Click SAVE to save these settings.
Enter your outgoing
email host information. Click SAVE.
17
ADDING FAMILIES IN ROLL CALL
Import contact information
You can import contact information into Roll Call from a tab delimited text file. If you are
converting to Roll Call from a different program you will need to export the data into a format
that can be opened in a spreadsheet, like Excel. Open the spreadsheet, and save it in the file
format “tab delimited text” file (*.txt).
There are four different formats accepted for import. Each are described in more detail below.
One Row Per Person Custom
The one row per person means that there will be one row in the spreadsheet for each person in the
family. If you have a family of four, there would be one row with the dad’s information including
address. The second row would be the mom’s information including the address. The third row
would be child1’s information. And the fourth row would be child2’s information. We pull the
family together based on a match of the address information.
The custom format means that you can have the columns in any order you wish. The import
wizard will allow you to map the columns in your file to the fields in Roll Call. This format also
allows you to pull in custom fields.
To import this type of file, do the following:
1. Expand the People menu on the left sidebar
2. Click on Import
3. Choose the One Row Per Person Custom Format
4. Click NEXT
5. Choose a Default Association. This is used if the record doesn’t have an association
value. Association is the membership category (how are they involved in your church)
6. Choose a Default Family Position. This is used if the record doesn’t have this value. We
allow Husband, Wife, Adult, Youth, Child and Other.
Click LOAD FILE to
bring in the data from
your spreadsheet.
Enter the values that
will be used for these
fields if a value isn’t
present in the file.
7. Enter the line number where the data begins in your file. For example, if you had headers
in your file, the data probably starts on line 2. If you don’t have any headers, the data
probably starts on line 1.
8. Click LOAD FILE and navigate to the file you want to import. Highlight it, then click
OPEN.
9. In the lower section you will need to map the columns from your file to the fields in Roll
Call. Click on the header [Skip] and choose from the list of available fields.
10. Once you’ve mapped all the fields, click FINISH in the lower right to process the import.
18
Click SKIP to choose
the Roll Call field for
this column.
One Row Per Family Custom
In this file format, there will only be one row in the spreadsheet for each family unit. There will
be a column for family name, husband’s name, wife’s name, child1 name, child2 name, etc.
The custom format means that you can have the columns in any order you wish. The import
wizard will allow you to map the columns in your file to the fields in Roll Call. This format also
allows you to pull in custom fields.
To import this type of file, do the following:
1. Expand the People menu on the left sidebar
2. Click on Import
3. Choose the One Row Per Person Custom Format
4. Click NEXT
5. Choose a Default Association. This is used if the record doesn’t have an association
value. Association is the membership category (how are they involved in your church)
6. Choose a Default Family Position. This is used if the record doesn’t have this value. We
allow Husband, Wife, Adult, Youth, Child and Other.
7. Enter the line number where the data begins in your file. For example, if you had headers
in your file, the data probably starts on line 2. If you don’t have any headers, the data
probably starts on line 1.
8. Click LOAD FILE and navigate to the file you want to import. Highlight it, then click
OPEN.
9. In the lower section you will need to map the columns from your file to the fields in Roll
Call. Click on the header [Skip] and choose from the list of available fields.
10. Once you’ve mapped all the fields, click FINISH in the lower right to process the import.
Click LOAD FILE
to pull in your
spreadsheet.
Click SKIP and a list
of fields will be displayed. Choose the
appropriate field.
19
Use Add a Family (Basic)
The Add a Family screen is a great way to get the basic information about a family entered into
Roll Call quickly. To use the this screen:
1. Expand the People menu.
2. Click on Add a Family
Enter the family information.
Enter Family Information
The top section of this screen is where you enter the common family information. Enter the
following pieces of information
1. Type - Choose either Family or Organization.
2. Last Name – Enter the last name for the family, or organization name if you are entering a
business.
3. Primary Phone – Enter the home phone number for the family.
4. Unlisted – Mark this checkbox if the family wants the home phones unlisted.
5. Alt Phone – Enter a second home phone number if applicable for the family.
6. Street – Enter address line 1 of the families address.
7. More Address – Enter address line 2 if applicable. Typically an apartment or suite
number.
8. City – Enter the city portion of the families address.
9. State – Enter the state portion of the families address.
10. Postal Code – The zip code or postal code portion of the families address.
11. Do Not Send Mail – Mark this box if the family does not want to receive mail from your
organization.
12. Unlisted Address – Mark this box if the family wants their address unlisted.
13. Family Email – Enter the email address that should be used when sending “family”
emails.
14. Shepherd Area – Indicate the person, deacon or zone that is responsible for this family.
20
Enter Family Members Information
Use the lower section to enter the information for each family member. Use the plus sign in the
lower left corner to open up a row to add another family member.
1. Family Position - Choose Husband, Wife, Adult, Youth or Child to indicate their family
position.
2. First Name – Enter the first name of the family member.
3. Last Name – If the family member has a different last name, enter it here.
4. Date of Birth – Enter the family member’s birthday. Make sure to enter a 4 digit year.
5. Gender – Select the appropriate gender for the family member.
6. Association – Select the appropriate association or membership status for this family
member.
7. Cell Phone – Enter the cell phone number for this family member if they have one. Enter
the last name for the family, or organization name if you are entering a business.
8. Marital Status – Indicate the marital status for this family member.
9. Grade – If the family member is in elementary, middle or high school, enter their grade.
Values accepted are K – 12.
Enter family member information.
Click the + sign to
open up a row for
data entry.
Once you’ve completed entering the information for a family, click:
1. SAVE & CLOSE to save the information and close the window.
2. SAVE & VIEW to save the information and go to the Family Details screen.
3. SAVE & NEW to save the information and clear the window.
4. CANCEL to close the window without saving the information.
21
LOOKING UP PEOPLE INFORMATION
Search Profiles
Finding people in your database can be accomplished in a variety of ways.
1. Use the Find By area to search by common fields.
2. Use the Search box to find folks by Last Name or Keyword.
3. Use the Query Editor to find folks by other fields
Find By
The most common characteristics that people would want to search on can be found in the Find
By drop down box. These fields are Last Name, First Name, Association, Family Position, Email,
Street, City, Postal Code, Family Number, Badge No, Envelope Number and Keyword. To find a
person or listing of people using this method, do the following:
1. Expand the People menu.
2. Click on Search Profiles.
3. Select field you’ll be using as the find by criteria.
4. Enter the Value in the field to the right of the drop down box.
5. As you enter the field, the results will be displayed below in the people list.
Select criteria you
are searching by.
Enter the value
you are searching for.
Let’s take a look at an example where you are looking for a specific individual. You would
probably find them by their last name. From the Search Profiles window:
1. Leave Last Name selected in the Find by drop down.
2. Enter the last name to the right in the blank field.
3. The results show everyone with that last name.
4. Double click on the specific individual you are looking for.
In our next example, let’s say you are looking for a list of all your members. From the Search
Profiles window:
1. Change the Find By drop down to Association.
2. Select Member from the field to the right.
3. The results will show a list of all your members.
22
To find all your
members, choose
Association, then
select Member.
Search Field
The Search Field in the upper right corner can be used to find people based on their last name or
keywords. To find people using this method, do the following:
1. Expand the People menu.
2. Click on Search Profiles.
3. Enter the Name or Keyword in the search box.
4. Press the ENTER key on your keyboard to get your results.
Let’s look at an example where we’d like to get a list of all the people in our database that have
the keyword “Mechanic”. To accomplish this:
1. Expand the People menu.
2. Click on Search Profiles.
3. Enter Mechanic in Search Box.
4. Press ENTER key on keyboard.
Enter the keyword
you are looking for.
23
Customize Profile Window
Each Roll Call user can customize which fields are displayed in the Search Profiles window. To
select or de-select fields for display, do the following:
1. Expand the People menu on the left sidebar.
2. Click on Search Profiles.
3. Click on the PREFS icon on the top.
4. Double click on any of the fields on the left to move them to the selected column.
5. To remove a field from the window, double click on it from the selected column to
remove it.
6. Click SAVE & CLOSE button to save your preferences.
24
ENTERING CONTRIBUTIONS
Giving Funds
Before you can begin entering contributions in Roll Call, the giving funds must be defined. The
giving funds are the designations that people can contribute to. A new Roll Call database will
contain one giving fund, “General”. To add giving funds, do the following:
1. Expand the Contributions menu on the left side bar.
2. Click on Giving Funds
3. Click on the plus sign in the lower left of the Giving Fund summary window.
From Giving
Funds screen,
click on the plus
sign to add a
fund.
4. Enter the Fund name. This is the name that will be in the drop down box to select
designations from the Enter Contributions screen.
5. Enter the associated Account Number. This number is not mandatory.
6. If this giving fund is no longer valid or used, check the “Inactive” box.
7. If this fund is not tax deductible, mark the box for “Not on Receipt”. If this box is checked
any monies given to this fund will not be printed on the year-end tax statement.
8. Mark the Connect box, if you will be allowing online giving through Roll Call Connect and
would like this fund to be included in the list of available funds.
9. Mark Include in Budget, if you’d like any monies given to this fund to be reported as
“budged” giving in Roll Call Connect reports.
10. Select the Fund Color. This color will represent the fund in pie charts showing total giving.
Click on the “…” and click on color you’d like to use.
11. The GL Fund is used to map the giving funds to your accounting system. For example if you
have a giving fund of “Tithes & Offerings” and you want that to map to the General Income
Fund in your accounting system, you would enter General Income as the GL Fund. If you are
importing into Quickbooks and your fund is a sub-account, enter the Account, then a colon
then the sub account name, for example, Operating Income:General.
12. The GL Account Number is the account number to map to MYOB accounting.
13. GL Key is the number to map to Roll Call’s accounting system.
25
At a minimum
you must enter
the fund name.
Envelope Numbers
If your ministry uses envelope numbers to identify donors, you’ll want to assign those numbers
before you begin entering contributions.
To manually enter envelope numbers, do the following:
1. Expand the People menu on the left side bar.
2. Expand the Bulk changes menu.
3. Click on Envelopes.
4. Place your cursor in the Current Env No. column to the right of the person you wish to assign
a number. Enter the appropriate number.
5. Use the ENTER key on your keyboard to move down the list.
Place cursor in
current env no
field and enter
appropriate
number.
26
If you would like the system to automatically assign envelope numbers, do the following:
1. Expand the People menu on the left side bar.
2. Expand the Bulk changes menu.
3. Click on Envelopes.
4. Use the SEARCH icon to retrieve the list of people that should be assigned envelope
numbers. For example, if you’d like to give all your members and regular attenders envelope
numbers, click on the Associations tab, and click on Member and Regular attender to move
them to the selected column. Click QUERY in the lower right to return a list of those folks.
5. Click on the ASSIGN button in the lower right.
6. Mark the option to Auto Assign Envelope Numbers. Enter the starting number.
7. Click the SAVE & CLOSE button to assign those numbers and close the window.
Mark Auto Assign
option, enter starting number.
If you would re-assign envelope numbers each year, you can begin entering next years envelope
number now. At the beginning of the new year, you can make the switch. Here’s how:
1. Expand the People menu on the left side bar.
2. Expand the Bulk changes menu.
3. Click on Envelopes.
4. Place your cursor in the Next Env No. column to the right of the person you wish to assign a
number. Enter the appropriate number.
Enter the
appropriate
number for
next year.
27
5. Use the ENTER key on your keyboard to move down the list.
6. When you are ready to switch and use the “next” numbers, click on the ASSIGN button in the
lower right.
7. Mark the option for New Year.
8. Click SAVE & CLOSE to make the envelope number changes and close the current window.
In the assign
window, mark
the option for
“New Year”, click
SAVE & CLOSE.
Batches
All contributions are entered in Roll Call through a batch. A batch is nothing more than a
grouping of contributions. Typically, users will enter all the giving for a deposit in a batch.
Because of the integration with Accounting, batches must be either Cash or Non-Cash. Cash
contributions include all cash, checks, credit cards and ACH type transactions. Non-Cash batches
contain property gifts, things that cannot be deposited into the bank.
To create a batch, do the following:
1. Expand the Contributions menu on the left side bar.
2. Click on Add Batch.
Enter the following information:
1. Batch Date – This date will become the default for all contributions entered in this batch.
2. Description – Enter a qualifying description of this batch. Especially if you will have
multiple batches for the same day. Maybe this group of contributions is for the 9 a.m.
service. You could enter “9 a.m. service” as the description.
3. Anonymous Cash – Enter the amount of loose cash that was in the offering. This is cash that
cannot be associated with any specific donor.
4. Cash Fund – Enter the fund that the anonymous cash should be designated to.
5. Default Fund – Enter the fund that you’d like all contributions in this batch to default to. This
doesn’t mean that you can’t have other funds included in this batch. This is only used as a
default. If the majority of the giving is for Tithes & Offerings… make “Tithes & Offerings”
the default fund.
6. Batch Type – Select Cash for batches that will contain cash, checks, credit card, online, ACH
type contributions. Select Non-Cash for property or in-kind gifts.
7. Asset Fund – This is the fund to map non-cash gifts to the appropriate asset fund in your
accounting system.
8. Batch Control Count – This field can be used as a control count for the number of entries
expected in this batch. This field is not required, but by using it you may be able to catch
28
Enter batch
date, description
anonymous cash
and default fund.
Click plus sign to begin entering individual contributions.
any data entry errors. If the Batch Count and Batch Control Count do not match, they will be
displayed in red.
9. Batch Control Total – This field can be used as a control total for the amount expected in
this batch. This field is not required, but by using it you may be able to catch any data entry
errors. If the Batch Total and Batch Control Total do not match, they will be displayed in red.
10. To begin entering individual contributions, click on the plus sign in the lower left corner.
Enter Contributions from Batch Window
To begin entering cash or cash equivalent contributions, you will need to create a batch. To create
a new batch, do the following:
1. Expand the Contributions menu.
2. Click on Add Batch
3. Enter the batch header information as described in the previous section.
4. Click on the plus sign in lower left to begin entering the contributions.
To enter new contributions to an existing batch, find that batch by:
1. Expand the Contributions menu.
2. Click on Search by Batch.
3. Change the Find By Criteria to “Date”.
4. Select the date of the batch you are adding to.
5. Double click on the appropriate record
6. Click on the plus sign in the lower left to begin entering new contributions.
Basic
To record a donation, enter the following information:
1. Donor Name or Envelope Number. When recording contributions, the first thing you need to
do is identify the donor. If you use envelope numbers, enter the number and press tab. The
donor information will be displayed on the right side. If you use name to identify the donor,
enter the last name then press tab. You will be taken to the Select a Person window. You can
further reduce the names in the list by typing the first few characters of the first name. You
can double click on the name to select it, or if it is already highlighted, press Enter on your
keyboard.
2. Date – the donation date will default to the same as the batch date. If you’d like to change
29
3.
4.
5.
6.
this date you can enter it here.
Total Amount – Enter the amount of the contribution.
Check Number - If the contribution was a check, you may enter the check number in this
field.
Donation Type – If you entered a check number, this will automatically change to check. Or
you can select cash, check, credit card etc. from the drop down list of values.
Designation – Use the drop down list of values to select the fund that these monies were
given to.
Enter last name
of donor, press
tab, then select
from list.
Click SAVE &
NEW to enter
another contribution.
Click SAVE & NEW to enter a new contribution in this batch. Click SAVE & CLOSE to save the
current contribution and return to Batch window.
Split
A split donation is a single contribution that needs to be designated to 2 or more funds. To record
a split donation, enter the following information:
1. Donor Name or Envelope Number. When recording contributions, the first thing you need to
do is identify the donor. If you use envelope numbers, enter the number and press tab. The
donor information will be displayed on the right side. If you use name to identify the donor,
enter the last name then press tab. You will be taken to the Select a Person window. You can
further reduce the names in the list by typing the first few characters of the first name. You
can double click on the name to select it, or if it is already highlighted, press Enter on your
keyboard.
2. Date – the donation date will default to the same as the batch date. If you’d like to change
this date you can enter it here.
3. Total Amount – Enter the amount of the contribution.
4. Check Number - If the contribution was a check, you may enter the check number in this
field.
5. Donation Type – If you entered a check number, this will automatically change to check. Or
you can select cash, check, credit card etc. from the drop down list of values.
6. Amount – Notice the amount and designation fields underneath the contribution header
information. Place your cursor in the lower amount field, and reduce the amount so that is
matches the amount to be designated to the first fund. Press TAB. Note a 2nd line is created
with the remainder, so you can designated that amount.
7. Designation – Use the drop down list of values to select the fund that these monies were
given to.
30
Highlight
amount in the
middle section.
Reduce the amount
and press the TAB
key. A new line
with remainder
will open up.
Click SAVE & NEW to enter a new contribution in this batch. Click SAVE & CLOSE to save the
current contribution and return to the Batch window.
Connect to Pledge
When you are entering a contribution for an individual that has made a pledge, the pledge will be
listed near the bottom of the screen on the pledges tab.
If you enter a contribution and designate it to the fund that the donor pledged to, the contribution
and pledge should be automatically connected. Notice the Pledge ID to the right of the
designation and description fields. If the pledge ID is listed here, you know the contribution is
connected. If you need to change which pledge is connected to this contribution, use the Pledge
ID drop down to change the connection.
31
This contribution will be
connected to
this pledge.
Notice the
pledges that
this donor has.
Quid Pro Quo
Quid Pro Quo contributions are contributions where something of value was given. An example
of quid pro quo would be your youth group is selling CD’s as a fundraiser. The CD’s are worth
$15. If someone gives the youth group $50 for the CD, you’d want to enter that as a Quid Pro
Quo contribution.
To enter this transaction, go to the Donation Entry window and enter the following information:
1. Donor Name or Envelope Number. When recording contributions, the first thing you need to
do is identify the donor. If you use envelope numbers, enter the number and press tab. The
donor information will be displayed on the right side. If you use name to identify the donor,
enter the last name then press tab. You will be taken to the Select a Person window. You can
further reduce the names in the list by typing the first few characters of the first name. You
can double click on the name to select it, or if it is already highlighted, press Enter on your
keyboard.
2. Date – the donation date will default to the same as the batch date. If you’d like to change
this date you can enter it here.
3. Total Amount – Enter the amount of contribution. In the above example this would be the
$50.00.
4. Check Number - If the contribution was a check, you may enter the check number in this
field.
5. Donation Type – If you entered a check number, this will automatically change to check. Or
you can select cash, check, credit card etc. from the drop down list of values.
6. Designation – Use the drop down list of values to select the fund that these monies were
given to.
7. Click on the Quid Pro Quo tab. Select the item that was given. Enter the value of the item
given. In this example the item was the CD. The value was $15.
Click SAVE & NEW to enter a new contribution in this batch. Click SAVE & CLOSE to save the
current contribution and return to the Batch window.
32
Enter the quid pro
quo item and value
of item here.
Enter Contributions using Quick Add
The Quick Add screen is a simplified data entry screen for contributions. It also allows multiple
users to enter contributions into a single batch. All Quick Add contributions must be entered for
an existing batch. To use the Quick Add, do the following:
1. Expand the Contributions menu.
2. Click on Quick Add.
3. Use the drop down box to select the batch.
From Quick Add
window, select the
batch for these
contributions.
4. If the batch does not exist, click the plus sign to the right to create the batch. Enter the
following information.
a. Batch Date – This date will become the default for all contributions entered in this
batch.
b. Description – Enter a qualifying description of this batch. Especially if you will have
multiple batches for the same day. Maybe this group of contributions is for the 9 a.m.
service. You could enter “9 a.m. service” as the description.
33
c. Anonymous Cash – Enter the amount of loose cash that was in the offering. This is
cash that cannot be associated with any specific donor.
d. Cash Fund – Enter the fund that the anonymous cash should be designated to.
e. Default Fund – Enter the fund that you’d like all contributions in this batch to default
to. This doesn’t mean that you can’t have other funds included in this batch. This is
only used as a default. If the majority of the giving is for Tithes & Offerings… make
“Tithes & Offerings” the default fund.
f. Batch Type – Select Cash for batches that will contain cash, checks, credit card,
online, ACH type contributions. Select Non-Cash for property or in-kind gifts.
g. Asset Fund – This is the fund to map non-cash gifts to the appropriate asset fund in
your accounting system.
If the batch does not
exist, click plus sign,
then enter batch
details here.
Line at a Time
1. Once you select a batch, your cursor will be placed in the Donor field. Identify the donor by
entering a last name, envelope number or scanning the check.
2. Press TAB on your keyboard. If you’ve entered a last name to identify the donor, a Select
Person window will be returned. Select the appropriate donor.
Enter the last
name of the donor, then press
TAB. Pick from
the list.
3. Enter the Amount of the contribution. Press TAB
4. If the contribution was a check, you may enter the Check number in this field. Press TAB.
5. If you entered a check number, the Donation Type will automatically change to check. Or
you can select cash, check, credit card etc. from the drop down list of values. Press TAB.
6. Use the drop down list of values to select the Fund that these monies were given to.
34
7. If the contribution needs to be split between multiple funds, select Split from the drop down
list.
a. A new window will be displayed to allow you to split across multiple funds.
b. Reduce the highlighted amount to the amount for the first fund.
c. Press TAB.
d. A new line will be opened up.
e. Choose the fund for the second line.
f. Click SAVE & CLOSE when you have completed entering the split information.
Choose Split from the
fund drop down box.
Reduce the amount,
then press TAB to
open up a second
line.
8. The Account number will be populated based on the fund you selected in the previous step.
Press TAB.
9. Enter any Comments.
10. Press TAB to enter another
Click SAVE & CLOSE when you are done entering contributions for this batch. Click SAVE
& NEW to save these contributions in this batch and begin entering into a new batch. Click
CANCEL to discard any changes.
35
To pre-populate
the list with all
adults, mark this
box.
Simply enter amount
to the right of the
donor’s name. Change
designation if necessary.
With Names Pre-Populated
1. Once you select a batch, click on the List Adults checkbox. This will populate the screen
with the names of all the adults in your database.
2. Place your cursor in the Amount field to the right of the appropriate donor. Enter the amount.
3. Press TAB on your keyboard.
4. Enter the Check Number if the gift was a check.
5. Press TAB to move into the next field.
6. If you entered a check number, the Donation Type will automatically change to check. Or
you can select cash, check, credit card etc. from the drop down list of values.
7. Use the drop down list of values to select the Fund that these monies were given to. Press
TAB.
8. The Account number will be populated based on the fund you selected in the previous step.
Press TAB.
9. Enter any Comments.
10. Press TAB to enter another.
Click SAVE & CLOSE when you are done entering contributions for this batch. Click SAVE
& NEW to save these contributions in this batch and begin entering into a new batch. Click
CANCEL to discard any changes.
36
MANAGING GROUPS
Group Hierarchy
Groups are defined by the following classifications:
1. Campus. If your church has multiple campuses or locations with different groups and classes
at each site, you may want to define your groups at the campus level. The campus indicates
which site or location the group stems from.
2. Group Type. The next level in the hierarchy is group type. This tells us the general
classification of the group. Is the group a committee, a small group, a Sunday school class or
a youth group? Your church defines these group types or classifications. Roll Call’s default
group types are Group and Class.
3. Department. The next level in the hierarchy is the department. The department is the
ministry area within your church that is responsible for overseeing the group. Children’s
Ministry, Congregational Care, Youth and Music are some common departments.
4. Status. The status indicates whether the group is active or inactive.
Every group that is defined in Roll Call must be assigned a Group Type, Department, Name and
Status. Status always defaults to active.
Group Custom Fields
Group custom fields
You may want to define custom fields for groups. These fields allow you to customize the
information you capture for your groups. You can set up default custom field titles per group
type. For example, lets say we have a “small group”, group type. For each small group we need
to know an emergency contact, what they are studying, where they meet, and if they are accepting
new members.
To create these group custom field titles:
1. Select RollCall>Preferences from the top menu if you are on a Mac OR select
Edit>Preferences if you are on a Windows machine.
2. Click on the Group Custom on the left sidebar.
3. Select the Group Type, “small group” in the upper left drop down box.
Select Group
Custom, then
choose type.
Enter field
names.
37
4.
5.
6.
7.
Enter “Emergency Contact as Cstm 1.
Enter “Studying” as Cstm 2.
Enter “Meeting Location” as Cstm 3.
Enter “Accepting New Members” as Chk1.
Now each time you create a small group, there will be fields available to enter Emergency
Contact, Studying, Meeting Location, and Accepting New Members. You can customize each
group further by modifying the custom field titles for a specific group.
Group membership custom fields
Like group custom fields, you may want to define custom fields to track specific information for
each member in a group.
You can set up default custom field titles per group type. For this example, lets say we need
to know certain information about the worship team members. We’d create a group type of
“worship team”. For each of our worship team members we need to know what instrument
they play, can they read music, what is their voice type and how many times per month are they
available.
To create these group member custom field titles:
1. On a Mac Select RollCall>Preferences from the top menu. On a Windows machine, select
Edit>Preferences from the top menu.
2. Click on the Member Custom on the left sidebar.
3. Select the Group Type, “worship team” in the upper left drop down box.
4. Enter “Instrument” as Cstm 1.
5. Enter “Voice Type” as Cstm 2.
6. Enter “Days Available” as Cstm 3.
7. Enter “Read Music” as Chk1.
Now each time you create a worship team group, there will be membership fields available to
enter Instrument, Voice Type, Days Available, and Read Music. You can further customize each
group by modifying the custom field titles for group members.
Choose Member Custom.
Choose group
type then enter
field names.
38
Add a Group
Enter general information
There are several options for getting to the Add a Group window:
1. Expand the Groups menu and click Add a Group OR
2. Expand the Groups menu and click Search. Click on the plus sign in the lower left to add a
new group.
Once you are in the screen to add the group:
1. Enter the values for Campus (if applicable), Group Type, Department and Status.
2. Enter the Group Name.
Enter group definition here.
3. If the group has a leader, enter the last name in the Leader field. Press tab to view a list of the
folks with that last name. Select from the list.
4. If the group has a co-leader, enter the last name in the Co-Leader field. Press tab to view a
list of the folks with that last name. Select from the list.
Enter last name
then pick from the
list.
5. Select the Frequency to indicate if the group meets weekly or randomly.
6. The field “When does this meet?” is the information that is displayed in Roll Call Connect
for when the group meets. PLEASE NOTE: This information is not used by the check in
system. You need to enter sessions for child check in to work properly.
39
Enter general
information about
class.
7. Enter the Location of the group if applicable.
8. Enter the Address that will be displayed in Roll Call Connect for the meeting location.
9. The Start Date will default to today’s date. You may change it if you’d like.
10. Enter the End Date if you know the last day this group will meet. Keep in mind that on this
date the system will change that group to inactive.
Click SAVE & CLOSE to save the information and return to the Search screen. Click SAVE &
NEW to save the information and enter a new group.
Add Members
To enroll people into the group, press the Members tab. From within the members tab:
1. Click the plus sign in the lower left of the window. A new window will be displayed for you
to enter the Last Name and First Name (or portion of the last name) of the person you want to
enroll.
2. Select the appropriate person to enroll in the group.
3. Tab across to enter any of the custom field data for this person. If you need to define the
membership custom field names, click CHANGE TITLES and enter the name of the data
you’d like to capture.
Click on plus
sign, then enter
the last name
of the member.
40
Create sessions
Next, you’ll want to indicate which days and at what times the group meets. The meeting days
and times are called sessions in Roll Call. A group that meets weekly can have an unlimited
number of sessions. A group that meets randomly does not have any sessions defined.
To create a session:
1. Click on the session tab, if sessions are not currently displayed.
2. Click on the plus sign in the lower left. A row will be displayed, with a default of Sunday and
time of 12 a.m.
3. Use the Day of Week drop down box to select the appropriate day.
4. Enter the Start Time.
5. Enter the End Time.
6. Place your cursor under Room and double click to enter the room number of this group
meeting.
Click on plus
sign, then
update meeting
date and times.
Enter values for group custom information
If you set up custom fields (under Preferences) for this group type, you can enter the data in the
Custom (1) and Custom (2) tab. Lets look at our previous example of a small group. We had
set up custom fields to record emergency contact, studying, meeting location and accepting new
members.
To enter the custom data for this group:
1. Press the Custom(1) tab. The fields on this tab are the text fields.
2. Enter values for each of the custom fields Emergency Contact, Studying and Meeting
Location.
3. Press the Custom (2) tab. The fields on this tab are the check boxes and dates.
4. Check the box for Accepting New Members, if the answer is Yes.
If no custom fields are defined for this group type, you can define them for this specific group if
you’d like. Click on the CHANGE TITLES button to enter the name of the data you’d like to
capture. When you are done entering the titles, click CHANGE DATA to enter the actual data for
that field.
41
Enter any
custom information on this
tab.
Preferences
Use the preferences tab in the group screen to set your attendance roster preferences, check in
label preferences and grade/age range preferences.
Mark the following options for your Attendance Roster:
1. Birth Date or Special Needs - Choose which field you’d like displayed on the roster. You
may only choose one.
2. Show Year of Birth – Mark this box if you choose to include birthday and you want to display
the full birthdate.
3. Show Age – Mark this box if you’d like to display the child’s age.
4. Show Family No. – Mark this box if you’d like to show the group member’s family number.
5. List Parents – If you would like to display the parent’s names for the group member.
Make your
selections for the
attendance roster.
42
Enter the grade range or age range that is applicable for this group. This information will be used
to recommend classes in the child check in system. It will also be used in the Graduation utility.
1. From Age (Years & Months) - Enter the beginning age that a child is allowed in this class/
group.
2. To Age (Years & Months) – Enter the oldest age that a child is allowed in this class/group.
3. From Grade – Enter the beginning grade that a child is allowed in this class/group.
4. To Grade – Enter the last grade that a child is allowed in this class/group.
Enter label preferences for the
check in system.
Enter grade OR
age ranges for
this class/group.
Enter the following check in system preferences for this specific class or group. From Age (Years
& Months) - Enter the beginning age that a child is allowed in this class/group.
1. Number of Labels – Enter the number of nametags you’d like to print when a person checks
into this group.
2. Print Tag on Check Out – Mark this box if you’d like to print a name tag when the child
checks out of this class.
43
RUNNING REPORTS
There are quite a few standard reports that can be run to outline people type information. To
run a report that has to do with contact information, envelope numbers, birthdays, visitations or
background checks, do the following:
1. Expand the People Menu.
2. Click on Reports.
3. Highlight the report you’d like to run.
Directions for each specific report are outlined below.
My Reports
My reports is a great way to build custom reports. You select who you’d like included in the
report and what information should be listed in the report. These reports can be saved. To create
one, do the following:
1. From the Reports window, select My Reports.
2. On the Criteria tab, select who to include on the report. The Run For drop down allows you
to select Everyone, Associations, Groups, Keywords etc.
3. Once you’ve chosen your Run For category, choose the specific values. For example, if
you want a list of all your Members and Regular Attenders, you would choose to Run For
Associations. Then you would click over Members and Regular Attenders to the Selected
column.
From the criteria
tab, choose your
Run For criteria.
Pick the values
you’d like to see.
4. From the Columns tab, select the information or data you’d like included on the report.
Double click on a field name to move it to the Selected column.
5. To sort on a certain value, double click on the field from the Selected column to move it to the
Sort column.
6. In the lower right section, choose to list individuals or families. If you choose families only
one line per family will be listed.
7. Choose your output format. Do you want to create a csv or text file or would you like to view
the report to print it.
8. Click GENERATE to run the report.
44
From the columns
tab, select the fields
you’d like displayed
in the report.
Report results. Notice the buttons on
the right.
If you chose to print/spreadsheet the report, the results are displayed in the main section of the
Report Output Window. Use the scroll bars on the bottom and to the right of the report to scroll
up and down; left and right.
On the right side of the Report Output Window are actions that can be performed for the report.
1. Click on PAGE SETUP to set your printer and paper size and orientation.
2. Click on PREVIEW to preview the output. Do not send the report to the printer from this
preview window, it will only send the first page to the printer.
3. To change fonts, column sizes etc., click CUSTOMIZE. The report will be displayed in 4D
View, Roll Call’s spreadsheet program. Make your modifications here.
4. Click on PRINT to send the report to the printer.
5. Click ZOOM IN to make the font in the report larger on your screen.
45
6. Click ZOOM OUT to make the report font smaller on your screen.
7. To save the report as a tab delimited file or html document, click SAVE. Enter the location
and name of the file to be saved.
8. Click SAVE SET to save the list of people for use later within Roll Call.
9. Click CREATE LABELS to create address labels (3 across 10 down size) for this list of
people.
10. Click WRITE LETTER, to compose a mail merge letter to this list of people.
11. Click EMAIL to send an email to this list people or to email the report to another individual.
If you choose Email people, it will send the email to everyone listed in the report.
46