1
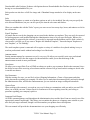
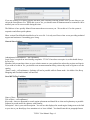
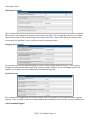
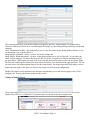
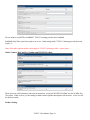
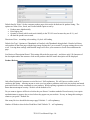
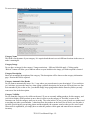
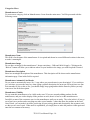
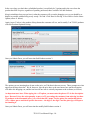
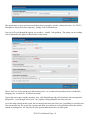
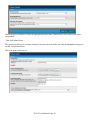
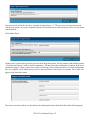
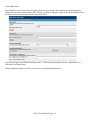
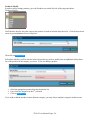
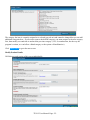
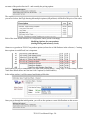
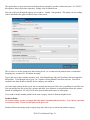
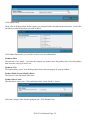
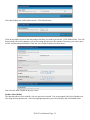
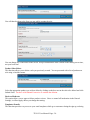
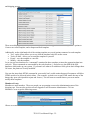
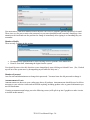
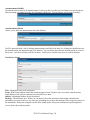
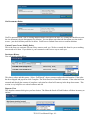
TULLC Shopping Cart User Manual
The shopping cart is really a full inventory and customer management system. Some of the features include:
Reports
Currently, displays the 'Current/Pending Sales', a 'Stock' report of all Products and a 'Web Traffic' report are
included.
Administration Levels
With a store of vast size you may need several people updating the store's content and the products you sell. The
store has two levels of ownership. One, the Administrators, who have access to every aspect of the store, and
Two, the Store Staff who only have access to certain specific areas. The main areas the staff cannot go to are the
'Configuration', 'Purchase History', 'Customer Viewing', and 'Reports'.
This gives you control over the "major" sections, while making it so you do not have to do "all" of the work.
Customer Viewing
Viewing a Customer's Information is as easy as clicking your mouse. You can view all details of a customer.
You can also mark a customer account as "Inactive" or "Active", or you can "Delete" an account.
Purchase History
Viewing a popular store's purchase history can be a real eye sore, which is why we allow you to sort the history
by several different columns allowing you to see the most current purchases, the purchases marked as invalid or
pending, at the top instead of having to scroll down or search several pages to find them.
Payment Methods
A variety of Payment Methods is the key to good ecommerce software and we are grabbing several of the
popular gateways to start off with and will then venture to the less popular. Installing a payment method is a
easy as choosing to "Activate" it.
Categories
Like other ecommerce packages, we allow you to easily organize your products using an unlimited amount of
Categories and SubCategories. In fact you can also make an unlimited level of tiers. Such As:
Main Category > SubCategory 1 > SubCategory 2 > SubCategory 3 > etc...
Another feature regarding the Categories is you can set them to "Invisible", meaning they are not viewable on
the Store Front by your Customers. However, the store lets you see them if you are the Administrator so that
you can ensure everything is displaying as it should be. The value in this is if you go out of stock on a product
and re-stocking may take several months – rather than show the product on the store, Out of Stock, you can
make it invisible; preserving all your pricing, photos and descriptions, the customer won't see that you are out of
stock. When stock is replenished, you simply have to make the product visible again and type in the amount of
inventory.
Manufacturers
Most products have a Manufacturer and we require that each product you enter be given a Manufacturer.
Whether each product has the same manufacturer or a different one has no affect to the software. The
Manufacturer value of a product is primary used for organization and for searches processed on the store front.
Products
You can create a variety of different products. Products with Options, such as, color and size, Products that are
TULLC User Manual Page -1-
Downloadable after Purchase, Products with Options that are Downloadable after Purchase (each set of options
having its own downloadable file), etc.
Each product can also have a Full Size image and a Thumbnail image attached to it for display on the store
front.
Sales
Putting certain products or certain set of product options on sale is also included. Not only can you specify the
sale start and finish dates, but you can also specify the time the sale starts and finishes.
When you combine this with the "Sales" report, you can even see how many days, hours, and minutes are left in
the current sale.
E-mail Templates
All emails that are sent by the shopping cart are stored in the database as templates. They can easily be exported
for backup purposes, and modified through the Administration Area to fit your specified needs. When a new
email template is required by the software, it can easily be imported into the database and if it finds a relatively
close match, it will ask you if you want to "Replace the Matched Template", "Insert the Import Template as a
new Template", or "Do Nothing".
The email template system is smart and will recognize a variety of variables to be replaced making it easy to
send out professional emails without hard coding a lot of the details.
Announcements
Posting announcements for customers to read, is very easy. We allow you to quickly write up a professional
announcement and tell it the date range to be shown and also enable you to attach an image to the
announcement to make it more professional.
Newsletters
We allow you to create Plain Text or HTML newsletters to send to your customers. Realize that customer's have
the ability to turn off the receiving of newsletters and the software will go based on their settings to decide who
is sent the newsletters.
Site Documents
With the owning of a store, you are likely to have Shipping Information, a Terms of Agreement, and other
policy documents regarding your company. We allows you to make these documents quickly and easily through
the Administration Area, and like the Announcements, you can include an image to add professionalism.
Contact Form
When working with customer's you need an easy way for them to communicate with you and/or your staff. We
allow you to build your own 'Contact Form' for customers to fill out regarding issues they are having or
questions regarding your company's policies.
Language Pack Phrases
All of the command phrases used throughout the Administration Area and the Store Front are stored in two files
appropriately named 'english.php'. This allows you to translate the phrases to a language more suitable to your
store and your target customers, though it will not translate your product data or descriptions.
This user manual will provide the documentation to use your shopping cart efficiently.
TULLC User Manual Page -2-
The first step is to sign into the Administration area of the shopping cart.
To do that, go to:
http://www.tullc.us/admin
On the right hand side of the page, enter:
Username: [email protected]
Password: TUonline1 (CASE MATTERS, type it exactly as you see it here – hint, that's the digit one)
The actions you need to mange your cart are all on the left side of the screen in the menu.
General Info:
-->Manual – will provide the manual you are reading now on the screen.
-->Configuration – sets the main configuration of the shopping cart system. We'll go into detail on this menu
item below, but we caution you to take steps to change this carefully. Please understand what you are doing in
this option because it affects, and can crash, your system if you make an error. While we have designed the
system to be user friendly and back itself up, we can't protect against all possibilities – so please understand
each option before you change it from the setting we have in place.
Administrator Settings:
TULLC User Manual Page -3-
If you are working on a catalog upgrade and don't want customers ordering product while you are doing so, you
can set the first option to Yes. While this is set to Yes, you should create an Announcement so customers can be
notified your cart is not accessible during this time.
The Redirect is how quickly Submit Form returns the next screen to you. We set this to 0.2 so the system is
responsive and allows quick updates.
Show version Check Module should always be set to No. It is only used for us when we are providing technical
support and assistance if something goes wrong.
General Store Settings:
Administrator Email Address – self explanatory.
Login Twice is required on some hosting companies. TULLC's host does not require it, so this should always
be set to No.
Members Only means that visitors to your website cannot see your product line unless they register and sign in.
If you wish to set this to Yes, you should create an announcement telling visitors they need to register to see the
catalog.
“Demo” mode – self explanatory. Ordering will not be possible while in Demo mode – the Add to Cart, Keep
Shopping and Checkout routines will not load.
Store META Tag Variables:
Name of Store – self explanatory
Title of Store – self explanatory
Keywords – these are important to search engine placement and should be as clear and explanatory as possible.
Separate keywords and/or key phrases with commas.
Description – this is your store description. You will see this displayed in search engine listings next to the link
to your site so you should pay close attention to it or leave it blank. You should enter this in paragraph format
TULLC User Manual Page -4-
in descriptive form.
Site Domain Variables
SSL Certificate Installed: Currently set to No, but can be changed if you decide to purchase a secure certificate.
This section is only important if you plan to take credit cards online. We currently have the cart set to Offline
Payment Processing so this section simply doesn't apply at this time. Please don't change the settings in this
screen unless you purchase a secure certificate from your hosting provider.
Language Pack Settings:
We currently have only the english language available, so these setting should be left as is. This system is
designed to easily translate the prompts of the system to another language and we will happily provide the
template, if you wish to provide a translation to an additional language.
Store Directories
This section of the configuration file tells the program where to find specific files required to make it operate
properly. There is simply no reason to change anything here and doing so will cause the system to malfunction.
Auto Thumbnail Support
TULLC User Manual Page -5-
This section governs how your product images are displayed and used. Image Magick is a product which
assists the software to effectively re-size and display the images in your catalog and is provided by your hosting
company.
Show Thumbnail in Modify – this setting allows you to view the current image during Modify>Product so you
can determine if you want to replace it.
Image Magick command – always “convert” no need to change this.
Image Height, Width and Quality - We have set the default image size to 100 x 100 pixels. If you reduce the
colors in your images to 256, this really keeps the file size down. Acceptable file formats for images are jpg,
gif, png, and tif. While image size may seem small, with the amount of product you have in the system, larger
file sizes will really bog the system down and cause it to frustrate your customers with page load times. We can
increase it here, but caution against doing so for the reasons noted. An image larger than 20kb simply won't be
displayed in the pages at all, unless we increase the image size in the system configuration.
Enable GD support is only applicable on a Windows based hosting server and does not apply to the TULLC
shopping cart. You can ignore any settings for this section.
Number of Items Per Row
These items control the display on the page of the online catalog, and set the default as 3. Because of the
product line at TULLC, we find that 3 is a good measure as you can see by the example below:
TULLC User Manual Page -6-
Number of Items Per Page:
Same as Number of Rows, except how many items you want to display on the page before a “Page 2, etc.” is
displayed. This number is set by personal preference only – it will determine how much up/down scrolling a
customer will have to do in the browser to view an entire page of products. This also affects how many
products a customer can view in the manufacturer/category display which is a list, rather than in columns as you
see on the front page. You can set this anywhere you want and 15 is just a good starting point.
As for the My Account/Purchases, we can only hope 30 is too small and we will have to change this at some
point. <grin>
Payment Information
Self-explanatory, except for the last item which is “programmer language” for how to display currency on the
screen. You can change this for other currencies such as the Euro, but it will affect the entire display, not just
for a customer who might be using a different language template. Since you are selling in US dollars, you
should probably display the currency in that format, even for foreign customers using a different language
template. We can certainly provide a link to a currency exchange site on the front of the store, and in each
product listing, and will be happy to assist with this if it is necessary.
Upload Information:
TULLC User Manual Page -7-
What Image Extensions do you want to accept on Uploads? Separate each extension with a comma.
(jpg,gif,png, tif) You should remember that you are limited by what the browser can display – currently the
options we have set as default.
What is the Maximum Size (in kilobytes) for an Uploaded Image? We have set the default image size to 20kb
file size – 100 x 100 pixels. If you reduce the colors in your images to 256, this really keeps the file size down.
Acceptable file formats for images are jpg, gif, png, and tif. While image size may seem small, with the amount
of product you have in the system, larger file sizes will really bog the system down and cause it to frustrate your
customers with page load times. We can increase it, but caution against doing so for the reasons noted. An
image larger than 20kb simply won't be displayed in the pages at all, unless we increase the image size here in
the system configuration
What Extensions do you want to accept on Downloadable Files? Separate each extension with a comma.
(.zip,.png) I expect we will have to add here if you want to provide a download service for Rate Files. Since I
didn't know the extension of those files I didn't add it in – it should be changed here.
What is the Maximum Size (in kilobytes) for a Downloadable File? This is currently set at 1meg (1024kb).
Again, if you implement downloadable rate files, this may have to be changed.
Date Information
How should the date be displayed? Returns a string formatted according to the given format string using the
given integer timestamp or the current time if no timestamp is given. In other words, timestamp is optional and
defaults to the value of the time on the hosting server. While this appears to be innocuous, it is critical to
updates in the database – so please don't change it unless you have an important reason to do so.
Number of hours you are ahead or behind from the servers' time. This affects a time display between your
computer and the computer hosting your files. Since you have offices in Ohio and Florida, and there is a time
difference between them, I have left this at the server time. There's simply no way to make it display the correct
time for both offices.
Mail Information:
TULLC User Manual Page -8-
Do you want to use SMTP or SendMail? TULLC's hosting provider uses Sendmail.
SendMail Only! Does your host require you to use -f when using mail()? TULLC's hosting provider does not
require -f.
None of the other options in this screen apply to TULLC's hosting provider – ignore them.
Online Counter, Web Traffic, Calendar and WYSIWYG editor:
These items are self-explanatory and need no instruction, except for WYSIWYG (What You See Is What You
Get) editor. If this is set to yes, the setting for hard return in product description will not work. Leave it at No
for the best results.
Product Listing:
TULLC User Manual Page -9-
Default Sort By Value? On the customer product pages, this sets the default sort for product listing. The
options are Name, Price, Stock, and Created which equate to sort by:
● Product name alphabetically
● Price high to low
● Quantity of Stock (which won't work initially in the TULLC store because they are all -1); and
● the date the product was created.
Direction of Sort – ascending or descending. Default: ASCending
Default List Type? Options are Thumbnails or Detailed, with Thumbnails being default. Detailed will show
each product on the front page with the large image forcing the 3 per row and 15 per page settings above to be
re-set. Leaving those settings with Detailed images will cause your customer to scroll across and down the
page.
List Portion of Description Shown? This setting affects the list pages only – and shows only 150 characters of
the description unless the customer clicks on the product where the entire description will be displayed.
Product Reviews:
Only allow Registered Customers to write Reviews? Self-explanatory. We will, however, add a word of
caution to this option – allowing anyone to write a review means a prankster could visit your website and attach
porn and all sorts of nasty comments on your products. While requiring registration is not absolutely secure, it's
better than no attempt at security. We have set the default to Yes.
Do you want to Approve all Reviews before they are Shown? Another method of forced security is to require
an administrator to approve the reviews before they appear on your website. It's easy to change this setting to
whatever you prefer. Default: No.
How many Reviews should be shown per page? Default: 5 – self explanatory.
Number of Words to show before 'Read More' link? Default: 35 – self explanatory.
TULLC User Manual Page -10-
The Final Step in the configuration is to click on Save Configuration. If you click on Reset Configuration, the
defaults will be set and your store is likely to malfunction.
Payment Methods:
There are several payment methods available, but we have set your system to Offline Processing. Should you
decide to take Paypal and/or credit card payments online, you can set them here through Activate Payment
Methods. However, even Paypal payments will require us to add some response programming to your pages, so
let us know and we'll be happy to set it up for you.
Categories:
Categories provide a fast method for your customers to access your products without browsing the catalog. On
the main menu of the website, the categories are listed and linkable so that your customer can go directly to the
product s/he is looking for:
Adding categories is fairly simple and straightforward. You can add sub-categories to existing categories to
further refine the navigation, but sub-categories will only be displayed once the customer is inside the Top
Level category.
TULLC User Manual Page -11-
To create a new category, click on Category>Create:
Category Name
This field is for the name of your category. It is required and shown in several different locations in the store, so
make it meaningful.
Category Image
Do you have an image for the category? Image restrictions – 20kb and 100x100 apply. Clicking on the
“Browse” button will allow you to indicate where on your hard drive the image you wish to upload is located.
Category Description
Enter in a meaningful description of the category. This description will be shown on the category information
page. Data in this field is required.
Category Automatic Line Breaks
Do you want to automatically insert '<br />' tags where you pressed enter in your description? If you set this to
yes, each time you press the enter key when typing a product description, the next text will begin on a new line.
Just remember if you set this to Yes, you should simply keep typing and not hit the Enter key unless you truly
want a new line in the description.
Category Visibility
Do you want this category to be visible on the store? If you are currently adding products for this category, and
you wish to display all the products at once, then it is best to set the category to 'Invisible' so none of the
customers can view the category until you are ready. The value in this is if you go out of stock on a product and
re-stocking may take several months – rather than show the product on the store, Out of Stock, you can make it
invisible; preserving all your pricing, photos and descriptions, the customer won't see that you are out of stock.
When stock is replenished, you simply have to make the product visible again and enter the new amount of
inventory.
TULLC User Manual Page -12-
Category Level
Select where you want this category created. If you choose Top-Level, that means it will be a "Main Category",
one that can be seen in the sidebar module. If you select to make it inside an already made category, then it is a
"Sub-Category" and is only visible when the customer is browsing inside the Top Level category.
Categories>Modify
When you click on Categories>Modify from the menu, you'll be presented with a drop down list of existing
categories, click on the arrow to choose the category you wish to change and click on Submit Form:
You'll then be taken to a form like Category>Create above to modify the chosen category.
Categories>Delete
We cannot caution you more strongly that this option is permanently destructive. If you delete a
category, all the products in that category will be deleted along with it. Please use this option with great
care. An error here is unrecoverable.
If you select Categories>Delete, all existing categories are presented on the screen with a small box beside
them. Clicking on the box will insert a check and schedule that category for deletion. You can delete multiple
categories at once.
Remove Parents of Sub-Categories as well is self explanatory – but very destructive.
Once you click Submit Form, the changes you requested are permanent.
TULLC User Manual Page -13-
Categories>Move
Manufacturers>Create
To create a new category, click on Manufacturers>Create from the main menu. You'll be presented with the
following screen:
Manufacturer Name
This field is for the name of the manufacturer. It is required and shown in several different locations in the store,
so make it meaningful.
Manufacturer Image
Do you have an image for the manufacturer? Image restrictions – 20kb and 100x100 apply. Clicking on the
“Browse” button will allow you to indicate where on your hard drive the image you wish to upload is located.
Manufacturer Description
Enter in a meaningful description of the manufacturer. This description will be shown on the manufacturer
information page. Data in this field is required.
Manufacturer Automatic Line Breaks
Do you want to automatically insert '<br />' tags where you pressed enter in your description? If you set this to
yes, each time you press the enter key when typing a product description, the next text will begin on a new line.
Just remember if you set this to Yes, you should simply keep typing and not hit the Enter key unless you truly
want a new line in the description.
Manufacturer Visibility
Do you want this manufacturer to be visible on the store? If you are currently adding products for this
manufacturer, and you wish to display all the products at once, then it is best to set the manufacturer to
'Invisible' so none of the customers can view the manufacturer until you are ready. The value in this is if you go
out of stock on a product and re-stocking may take several months – rather than show the product on the store,
Out of Stock, you can make it invisible; preserving all your pricing, photos and descriptions, the customer won't
see that you are out of stock. When stock is replenished, you simply have to make the product visible again and
enter the new amount of inventory.
TULLC User Manual Page -14-
Manufacturers>Modify
When you click on Manufacturer>Modify from the menu, you'll be presented with a drop down list of existing
manufacturers, click on the arrow to choose the manufacturer you wish to change and click on Submit Form:
Manufacturers>Delete
We cannot caution you more strongly that this option is permanently destructive. If you delete a
manufacturer, all the products for that manufacturer will be deleted along with it. Please use this option
with great care. An error here is unrecoverable.
If you select Manufacturer>Delete, all existing manufacturers are presented on the screen with a small box
beside them. Clicking on the box will insert a check and schedule that category for deletion. You can delete
multiple categories at once, by clicking on Submit Form.
Products>Create
In order to add products, go to the Products area on the left side of the page and choose Products>Create:
You'll then be asked to select the category and manufacturer the product is listed in from the drop down list.
The category and manufacturer must have been added before you can create a new product. Click the drop
down arrow to get an alphabetical list of categories and manufacturers.
TULLC User Manual Page -15-
Almost every product at TULLC has product options (referred to as Sub-Products in the software.) Creating
these options is not difficult, but is important. You should select YES for Sub-Products unless the product you
are entering has no multiple pricing tiers.
Sub-Products are easy to understand if you look at the printed catalog. Using, Page 27 of the catalog above,
Product 'Vault Door Black' shows one line item with 3 options (or Sub-Products).
In the online catalog, it will be entered and displayed like this:
But, first, you'll be asked to categorize the new product. You may add this product to as many categories as you
wish and it will be listed in each, by clicking to the box next to the category. A small green check mark will
appear next to the categories where this product will appear.
TULLC User Manual Page -16-
The next step is to Create Sub-Products (Options) for your products
(Also where you set pricing and inventory levels)
Once you Submit Form, you will enter into the modify Sub-Products section 1:
So far, we have not encountered a product in TULLC's catalog which requires more than one option. This is
basically saying, “How many drop down lists to you need?” and in every product case to date, the number here
is 1.
Without going into much detail, you might need more than 1 list if you had products with Size and Color
options.
In this case, we have 1 product with multiple selectable configurations – Vault Door, priced <25, priced >=25,
and priced at Refurb. So we only need 1 Option Set.
Once you click Submit Form, you'll be in the Sub-Product/Option Part 2 (image below) editing, which is where
you set the screen prompts and descriptions on the drop down menus, as well as the number of items ON the
drop down menus. Again, we find that 3 is the most common number of drop down menus option:
1. Qty. 1-25
2. Qty. 25+
3. Refurbished
TULLC User Manual Page -17-
In the case where you don't have refurbished product, it would only be 2 options and in the case where the
product has ONE set price, regardless of quantity purchased, there would be NO Sub-Products.
Keep in mind that what you type here is what the customer will see on the shopping cart, so you should be as
helpful as possible without being overly wordy. We find “Click Here for Pricing” to be effective for the Name
Option (arrow #1 below).
Again, Arrow 2 below is the number of drop downs the customer will see, and is usually 3 on TULLC products
with Sub-Products/Optional Pricing.
Once you Submit Form, you will enter into Sub-Products section 3:
The options you are inserting here do not set the price, we'll do that in the next screen. These prompts are what
appear on the drop down bar. We do, however, type the price here so the user knows how much each option
will add to his shopping cart, and the text here on one item is critically important to the software (see below).
An important note here: When typing the >=25 option, you must enter the phrase 25+ in the description
here. Because I force the order quantity to move to 25, preventing the customer from ordering less than
25 products at the discounted price, it is critical that this “name” on the option list contain that phrase
(25+) with no spaces and those specific characters – the digit 2, the digit 5 and the plus sign, with spaces
surrounding it.
Once you Submit Form, you will enter into the modify Sub-Products section 4:
TULLC User Manual Page -18-
The options here are enter each item on the drop downs separately or make each one the same. For TULLC,
this option is always Each One Separately. Simply click on Submit Form.
Next you will cycle through the options you set above – usually 3 sub-products. The option you are working
with is indicated in the upper left hand corner of the screen:
This is where we set the option price and stocking levels. As we entered each product when we loaded the
shopping cart, we entered -1 for infinite inventory.
Type in the correct price and the inventory level, click Submit Form and you'll be taken to the next option for
this product. Cycle through each of your 2 or 3 options clicking Submit Form after each one.
As for the other options on this screen, the are currently not being used, but I see a possibility for rate files here.
You can send the rate file up just like a picture and allow your customers to download them from the website
instead of mailing them. It's why I left it in the system rather than remove it at this point.
TULLC User Manual Page -19-
A special section on creating products with multiple options.
Adding New Products with Multiple Option Combinations
Adding a product such as the Eagle which has many configurations is somewhat tedious but not that difficult.
Each variation needs to be worked out before entering the information into the cart and that includes price.
Below you can see that the Eagle has the Housing and (4) four different options. This will give you 16
combinations.
(Option 1) Your first item,(option), will be the Housing with a price of $265.00
(Option 2) The second option will be the Housing Less Coin Mech (265.00-20.00) $245.00
(Option 3) The third option will be Housing, Less Trigger (265.00-5.00) $260.00
(Option 4) Housing Add Upper Lock (265.00+15.00) $280.00
(Option 5) Housing Add Lower Lock (265.00+25.00) $290.00
(Option 6) Housing, Add Lower Lock, Add Upper Lock (265+15+25) $305.00
(Option 7) Housing, Less Coinco,Less Trigger (265-20-5) $$240.00
(Option 8) Housing, Less Trigger, Add Upper Lock (265-20+15) $260.00
(Option 9) Housing, Less Trigger, Add Lower Lock (265-5+25) $285.00
(Otion 10) Housing, Less Trigger, Add Upper & Lower Locks (265-5+15+25) $300.00
(Option 11) Housing, Less Coinco, Add Upper Lock (265-20+15) $260.00
(Option 12) Housing, Less Coinco, Add Lower Lock (265-20+25) $270.00
(Option 13) Housing, Less Coinco,Add Upper & Lower Locks (265-20+15+25) $285.00
(Option 14) Housing, Less Coinco,Less Trigger, Add Upper Lock (265-20-5+15) $255.00
(Option 15) Housing, Less Coinco,Less Trigger, Add Lower Lock (265-20-5+25) $265.00
(Option 16) Housing, Less Coinco,Less Trigger, Add Upper & Lower Lock (265-20-5+15+25) $280.00
You do NOT need to type them as shown. This is left to your discretion. The price only needs to be typed for the
Main Item but you will need to enter the price for each combination in the shopping cart.
Whether you are modifying an existing product or creating a new one, you'll see the following screen:
TULLC User Manual Page -20-
Choose or type (in Products>Create) the appropriate product name, manufacturer, select YES to will it have
sub-products.
Then click Submit Form.
The next screen allows you to choose multiple Categories but most of the time only the highlighted category is
needed. Click Submit Form.
This is the next screen you see.
Note: This item is a sample for this manual only and NOT an actual product.
TULLC User Manual Page -21-
Your next screen will be the one above. Number of Option Sets is “1”. This gives you one drop-down menu
with all your options. If you put in multiple options it can be done but we found it much easier to use one menu
with all options.
Click Submit Form.
On this screen, you need to type what you want on the drop-down menu. For the products with multiple options
“Click Here for Options” seems to be self-explanatory. The next line is the total number of options in the set as
explained on page 1 of this section. Since we have a Housing, Coinco, Board and Lower Lock all combinations
give you 8 options. Click Submit and you will see the screen below with 8 spaces for options. This is what will
appear in the drop-down menu.
The next screen asks you how you should enter the information choose the default Enter Each One Separately.
TULLC User Manual Page -22-
Click Submit Form.
You will the be given 1 screen for each option. At the top your option will be printed such as Housing Only
200.00, the next screen will say Add Coinco. This lets you know what price to put in. For the housing 200.00 as
shown the next screen looks the same but says Add Coinco.
So for the next price you add the housing (200.00) + Coinco (20.00) and type in 220.00. Product stock is -1.
After this click Submit Form.
When all options are done you return to create so you can add another product.
TULLC User Manual Page -23-
Products>Modify
In order to add or change products, go to the Products area on the left side of the page and choose
Products>Modify.
You'll then be asked to select the category the product is listed in from the drop down list. Click the drop down
arrow to get an alphabetical list of categories.
Then click on Submit Form.
In Products>Modify, you'll be asked to select the product you wish to modify from an alphabetical drop down
list of the products in the category you chose. If you are adding a product,
●
●
●
Select the appropriate product from the drop down list.
Leave Link to Categories in the 2nd selection.
Click on Submit Form
If you wish to add the product to more than one category, you may choose multiple categories on this screen.
TULLC User Manual Page -24-
The category the item is currently assigned to is selected (greyed out) and cannot be changed but you can add
additional categories here. If you want to remove the default category, you must assign it to the new category
first, then modify a second time to uncheck the previous category. (Yes, it's cumbersome, but the way the
program is written, we can't allow a blank category or the system will malfunction.)
Click Submit Form to go to the next screen
Modify Product Details.
We'll discuss each section of this screen individually.
TULLC User Manual Page -25-
Product Name:
Pretty self explanatory. Be careful in this area with strange characters like > or < symbols or the @ sign. We're
not sure it would be accepted into the inventory database, though the quote (“) symbol can be used for inches.
However, because the single quote (') is a command in the programming language (PHP) we use, it is prohibited
in any fields in the database. Please spell out the word “feet” or use the abbreviation “ft.” instead of that
symbol.
Select a Manufacturer:
Again, self explanatory – the current manufacturer is listed here, but you can change it to any manufacturer
which has been added to the database previously by clicking on the down arrow in this field.
Product Thumbnail Image and Product Full Size Image:
Now, a note on images. We have set the default image size to 20kb file size – 100 x 100 pixels. If you reduce
the colors in your images to 256, this really keeps the file size down. Acceptable file formats for images are
jpg, gif, png, and tif. While image size may seem small, with the amount of product you have in the system,
larger file sizes will really bog the system down and cause it to frustrate your customers with page load times.
We can increase it, but caution against doing so for the reasons noted. An image larger than 20kb simply won't
be displayed in the pages at all, unless we increase the image size in the system configuration.
Arrow 1 - Clicking on the “Browse” button will allow you to indicate where on your hard drive the image you
wish to upload is located. Only fill out this field if you want to replace the current image. Just navigate to the
correct image, highlight the name, and click on open and it will add the image from your hard drive to the
database online. Remember, the first section is for the “thumbnail” or small picture which shows on the front
page of the catalog in the first section, and the 2nd section is for the catalog image.
Arrow 2 - If you'd like to view the current image for the product, click on the link in the #2 arrow above )[View
Image]), and a new browser page will open for you to view the current image in the database. Simply close the
new browser window to return to this page of the program.
Product Description:
TULLC User Manual Page -26-
As you enter your description, basic HTML is allowed in this field, but certainly not required. It is not
necessary, however, to enter coded paragraph breaks (<br>) because of another field below. Some basic
examples are:
<b>From this</b>
You get this
<big>From this</big>
<em>From this</em>
You get this
<sub>this</sub>
You get this
You get this
<sup>this</sup>
You get this
<ol>
<li>List Item 1</li>
<li>List Item 2</li>
<li>List Item 3</li>
</ol>
<ul>
<li>Bullet 1</li>
<li>Bullet 2</li>
<li>Bullet 3</li>
</ul>
This will create:
Which would create:
1. List Item 1
2. List Item 2
3. List Item 3
•
•
•
Bullet 1
Bullet 2
Bullet 3
For bold text simply type <b>in front of the text and </b> at the end of the text you want in bold. Just
remember, if you open the bold command, all text will remain in bold until you close it.
Product Automatic Line Breaks:
Here is where I referred above about not needing HTML to produce line breaks. If you set this to yes, each time
you press the enter key when typing a product description, the next text will begin on a new line. Just
remember if you set this to Yes, you should simply keep typing and not hit the Enter key unless you truly want a
new line in the description.
Will it have Sub-Products?:
I cannot stress enough how important this item is to the operation of your shopping system. Almost all
TULLC products have sub-products and it's critically important that you not change this if you are not sure of
the answer while modifying products. Please leave it at it's default setting during modification if you are not
sure.
Sub-products set the price for the options for the TULLC product line, so changing this incorrectly will wipe
TULLC User Manual Page -27-
out most of the product line itself – and certainly the pricing options.
The explanation of sub-products is fairly technical, but looking at your catalog will help you understand. As
you can see below, the Eagle housing has multiple options (sub-products) which effect the price of the order:
Each of the items on the list above is a sub-product, and is priced accordingly.
Modifying Options for your products
(Setting Pricing and inventory levels)
Almost every product at TULLC has product options (referred to as Sub-Products in the software.) Creating
these options is not difficult, but is important.
Sub-Products are easy to understand if you look at the printed catalog. Using, Page 27 of the catalog, Product
'Vault Door Black' shows one line item with 3 options (or Sub-Products).
In the online catalog, it will be entered and displayed like this:
Once you get through the initial portion, you will see the options to create Sub-Products on this screen:
TULLC User Manual Page -28-
When we loaded the initial catalog to the website we set this option to 'Yes' for each product which requires it so
the default will be yes. If you change it to No, all Sub-Products will be deleted.
Since we set the price and inventory levels in Sub-Products, changing this option to No will leave only your
product description with no pricing and “Out of Stock” status. If you want to delete a product, rather than
changing this, go through the Products>Delete menu option.
Once you Submit Form, you will enter into the modify Sub-Products section 1:
So far, we have not encountered a product in TULLC's catalog which requires more than one option. This is
basically saying, “How many drop down lists to you need?” and in every product case to date, the number here
is 1.
Without going into much detail, you might need more than 1 list if you had products with Size and Color
options.
In this case, we have 1 product with multiple selectable configurations – Vault Door, priced <25, priced >=25,
and priced at Refurb. So we only need 1 Option Set.
Once you click Submit Form, you'll be in the Sub-Product/Option Part 2 (image below) editing, which is where
you set the screen prompts and descriptions on the drop down menus, as well as the number of items ON the
drop down menus. Again, we find that 3 is the most common number of drop down menus option:
1. Qty. 1-25
2. Qty. 25+
3. Refurbished
In the case where you don't have refurbished product, it would only be 2 options and in the case where the
product has ONE set price, regardless of quantity purchased, there would be NO Sub-Products.
Keep in mind that what you type here is what the customer will see on the shopping cart, so you should be as
helpful as possible without being overly wordy. We find “Click Here for Pricing” to be effective for the Name
Option (arrow #1 below).
Again, Arrow 2 below is the number of drop downs the customer will see, and is usually 3 on TULLC products
with Sub-Products/Optional Pricing.
TULLC User Manual Page -29-
Once you Submit Form, you will enter into the create Sub-Products section 3:
The options you are inserting here do not set the price, we'll do that in the next screen. These prompts are what
appear on the drop down bar. We do, however, type the price here so the user knows how much each option
will add to his shopping cart, and the text here on one item is critically important to the software (see below).
An important note here: When typing the >=25 option, you must enter the phrase 25+ in the description
here. Because I force the order quantity to move to 25, preventing the customer from ordering less than
25 products at the discounted price, it is critical that this “name” on the option list contain that phrase
(25+) with no spaces and those specific characters – the digit 2, the digit 5 and the plus sign, with spaces
surrounding it.
Once you Submit Form, you will enter into the Sub-Products section 4:
TULLC User Manual Page -30-
The options here are enter each item on the drop downs separately or make each one the same. For TULLC,
this option is always Each One Separately. Simply click on Submit Form.
Next you will cycle through the options you set above – usually 3 sub-products. The option you are working
with is indicated in the upper left hand corner of the screen:
This is where we set the option price and stocking levels. As we entered each product when we loaded the
shopping cart, we entered -1 for infinite inventory.
Type in the correct price and the inventory level, click Submit Form and you'll be taken to the next option for
this product. Cycle through each of your 2 or 3 options clicking Submit Form after each one. You will be
returned to the main Products>Modify for the category you started at.
As for the other options on this screen, the are currently not being used, but I see a possibility for rate files here.
You can send the rate file up just like a picture and allow your customers to download them from the website
instead of mailing them. It's why I left it in the system rather than remove it at this point.
If you wish to modify another product in the same category, choose it from the dropdown list.
Products>Delete
We cannot caution you more strongly that this option is permanently destructive. If you delete a product,
it is unrecoverable. Please use this option with great care.
Products>Delete first brings up the category drop down list for you to choose the product category:
TULLC User Manual Page -31-
Click Submit Form.
Then, a list of all the products in that category are presented with a checkbox next to the name. Click in the
checkbox to select the products you wish to delete.
Click Submit Form twice (yes, you have to do it twice as confirmation).
Products>Move
This process is very simple – you select the category you want to move the product from, select the product,
then select the category to move it to.
Products>View
This option allows you to view all the products from a chosen category in a popup window.
Product Fields>Create>Modify>Delete
This process is not functional at this time.
Product Sales>Create
This function is easy to use. Click on Product Sales>Create for the 1st screen:
Select the Category of the Product going on sale. Click Submit Form.
TULLC User Manual Page -32-
Select the Product you wish to place on sale. Click Submit Form.
Click on the small box next to the sub-products for those you wish to put on sale. Click Submit Form. You will
be presented with a self explanatory screen for setting the sale price, the amount of inventory you wish to price
on sale, and the start and end dates of the sale for each Sub-Product you chose above.
Note: the time field is based on the server time.
Product Sales>Modify
This function allows you to modify a sale you previously created. You are presented with a list of products on
sale using the drop down menu. Select the appropriate product you wish to modify and click Submit Form.
TULLC User Manual Page -33-
You will then be taken to the form you saw while creating the sale:
You can change any of the items on the screen. Keep in mind that the time is based on the hosting server time,
not your local time.
Product Sales>Delete
This function allows you to delete a sale you previously created. You are presented with a list of products on
sale using a checkbox menu.
Select the appropriate product you wish to delete by clicking on the box next to the sale to be deleted and click
Submit Form. You have to hit Submit Form twice to confirm the deletion.
Reviews>Moderate
This option allows you to approve/delete product reviews. Since we turned off moderation in the General
Settings, it will not apply unless you change that setting.
Templates>E-mails
This function provides easy access to your email templates which go to customers during the sign-up, ordering
TULLC User Manual Page -34-
and shipping process.
There are multiple options contained on this single screen. In the upper left hand corner you have options to
Create a new email template, and to Import an email template.
Additionally, on the right hand side of the existing template are several options connected to each template:
● Test – on the screen allows you to see what the template looks like on the screen
● Test by E-Mail – allows you to email the template to yourself
● Export – save the template as a text file
● Modify – edit the template.
Let us just say here that there are “commands” contained in these templates to insert the appropriate data into
each one. These commands are surrounded by the curly brackets {} and refer to a data field in the SQL
databases which make up your system. If you aren't sure what to do with these fields, please don't change them.
Of course, the plain text is easily modified.
You can also insert basic HTML command in your emails, but I would caution that not all customers will allow
HTML emails to be delivered in their inbox. (For example, we don't ever accept HTML emails because of the
danger they pose with injectable trojans and viruses.) You will want to consider that as you create and/or
modify these templates.
Members>Create
Members are staff members. These are people you are granting access to the Administration area of the
shopping cart. You can also use this screen to upgrade a staff account to Administrator. Click on
Members>Create to get the following screen:
Choose to create a new account or upgrade an existing account. Click on Submit Form.
TULLC User Manual Page -35-
You must enter a valid email address because the user will receive a computer generated password via email.
There is no way for you to retrieve the password, so your users should be made aware they should pay close
attention to the email and note the password or change it immediately after signing in to something they can
remember.
Members>Modify
There are only 2 options in this section:
●
●
Downgrade from Administrator to Staff, limiting access to portions of the admin area.
Remove from Staff, eliminating the logon from the system.
You should be aware that this function occurs immediately upon clicking on Submit Form. (Yes, I locked
myself out of the system once by downgrading myself while the only user.)
Members>Password
Area for staff and Administrators to change their passwords. You must know the old password to change it.
Announcements>Create
Announcements are shown on your catalog page above all products. Announcements should be used to deliver
messages to your website visitors and can include anything, including product sales or general information you
need to disseminate.
Creating an announcement brings you to the following screen (we'll split it up into 2 graphics to make it easier
to include in this manual.)
TULLC User Manual Page -36-
Title – self explanatory. Remember this will display on your front page.
Announcement – the text of the announcement. You can use basic HTML in this portion of the document.
Announcement image – you can add an image to display on the announcement from your hard drive.
Image Alignment – Options are left, center or right. If you include an image how do you want to align it to the
text?
Image Vertical Alignment – Do you want to align the image with the top, middle or bottom of the paragraph?
The rest of the page:
Image Text Wrap – Wrap text above the image, around the image, or below the image?
Automatic Line Breaks – Yes, or No? Do you want to automatically insert '<br />' tags where you pressed enter
in your description? If you set this to yes, each time you press the enter key when typing a product description,
the next text will begin on a new line. Just remember if you set this to Yes, you should simply keep typing and
not hit the Enter key unless you truly want a new line in the description.
Start Date and Last Date – self explanatory – the dates you wish to run this announcement.
TULLC User Manual Page -37-
Announcements>Modify
Presents the same screens as in Announcement>Create (see above) so that you can change your site document
after presenting you with a list of the site documents which exist. You can choose one at a time to modify:
Announcements>Delete
Allows you to delete an announcement from the database.
You'll be presented with a list of existing announcements and allowed to mark, by clicking the checkbox next to
the announcement, the announcement(s) for deletion. You can delete more than one announcement at a time in
this screen – just check all that you'd like to delete. You'll have to Submit Form twice to confirm deletion.
Newsletters>Create
Title - Meaningful Title of the Newsletter.
From - What e-mail address should the newsletter appear from? Replace only if you don't want the master
email address of the website ([email protected]) to show.
Subject - Meaningful Subject for the Newsletter.
Message - The newsletter text. While you can attach a file to the newsletter which might contain the the
information you want to deliver, you must type something here to draw the attention of the recipient to what's in
the attachment. Many host companies do not allow blank emails with just an attachment to go through their
servers, hence the requirement here.
TULLC User Manual Page -38-
Attachment - Attach a file to the newsletter. This is particularly helpful if you have prepared a professionally
published flyer for a sale. Just browse to the location on your hard drive where the file is which you want to
attach.
HTML - Does the newsletter contain HTML? Yes/No You can also insert basic HTML command in your
newsletters, but I would caution that not all customers will allow HTML emails to be delivered in their inbox.
(For example, we don't ever accept HTML emails because of the danger they pose with injectable trojans and
viruses.) You will want to consider that as you create and/or modify your newsletter.
Automatic Line-Breaks - When you press 'enter' do you want it to be replaced with '<br />'? Unless you turn
on HTML above, this will be meaningless. If you use HTML, you should set this to yes.
Newsletters>Modify
Presents the same screens as in Newsletter>Create (see above) so that you can change your site document after
presenting you with a list of the site documents which exist. You can choose one at a time to modify:
Newsletters>Delete
You'll be presented with a list of existing newsletters and allowed to mark, by clicking the checkbox next to the
newsletters, the document(s) for deletion. You can delete more than one newsletter at a time in this screen – just
check all that you'd like to delete. You'll have to Submit Form twice to confirm deletion.
Newsletters>Send
Allows you to choose and send a newsletter previously created to all those customers who opted to receive mail
from you during registration.
Site Documents>Create
Site documents are those which apply to the site overall such as your warranty, credit applications, etc.
TULLC User Manual Page -39-
Title – self explanatory. Remember this will display on your front page under site documents as a link.
Document – the text of the document. You can use basic HTML in this portion of the document.
Document image – you can add an image to display on the document from your hard drive.
Image Alignment – Options are left, center or right. If you include an image how do you want to align it to the
text?
Image Vertical Alignment – Do you want to align the image with the top, middle or bottom of the paragraph?
Image Text Wrap – Wrap text above the image, around the image, or below the image?
Automatic Line Breaks – Yes, or No? Do you want to automatically insert '<br />' tags where you pressed enter
in your description? If you set this to yes, each time you press the enter key when typing a product description,
the next text will begin on a new line. Just remember if you set this to Yes, you should simply keep typing and
not hit the Enter key unless you truly want a new line in the description.
Viewable to Public? Yes/No – make this document viewable to the public as a link on the main page with the
Document Title.
Site Documents>Modify
Presents the same screens as in Documents>Create (see above) so that you can change your site document after
presenting you with a list of the site documents which exist. You can choose one at a time to modify:
TULLC User Manual Page -40-
Site Documents>Delete
You'll be presented with a list of existing announcements and allowed to mark, by clicking the checkbox next to
the site document, the site document(s) for deletion. You can delete more than one document at a time in this
screen – just check all that you'd like to delete. You'll have to Submit Form twice to confirm deletion.
Contact Form>Create, Modify, Delete
This is the form you customer fills out if they want to reach you. We have created this form for you so nothing
more needs to be done. If you delete it, your customer's won't have a way to reach you.
Purchases>History
You will see the screen below:
This shows orders and their status. “Select Full Details” shows customer and product information. If the order
has been shipped and payed for click Complete. The Write/Send is to Email the customer. If the order has been
returned and already has a status of complete a selection for refund will come up in the drop-down menu. This
section is very helpful to see orders both new and old.
Reports>View
The dropdown menu which gives you four choices. The Show the Stock of Each Product will show inventory as
infinite.
TULLC User Manual Page -41-
The next item on the list is View Pending/Current Product Sales. Use Purchases>History to review orders.
Show Traffic Statistics
This is the screen you will see. Choose the time frame you wish to view. You will see a report that lets you see
the traffic on the site. It will give you a yearly, monthly and daily summary of hits to the cart by customers, who
have logged in and others who are just browsing the site.
Show Demographic Statistics - this report will show you, if the customer filled out their detailed information,
such as female or male, info if they want emails and newsletters, and age group among other items.
Customers>View
The screen below will appear.
You can view a list of your customers ans choose which customer you wish to see details about. Just click on
the drop down menu beside the customer. Here is where you can delete a customer from the list. All you need to
do is click Delete.
Choose the action you wish and click Submit.
If you want to change the Status of a customer click Change Status from the first screen.
Here you can make a customer Inactive. Just click the option desired.
Third you can click “View Details” on the first screens drop-down menu. This will show you all the information
TULLC User Manual Page -42-
on this customer. At the bottom of this form you can put in a discount, if needed for this particular customer.
The discount will be reflected at check out on the shopping cart.
Calendar>View
Shows a calendar.
TULLC User Manual Page -43-