1
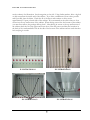
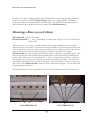
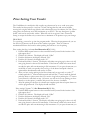
VENDMASTER 360º
Owners Manual
VENDRITE MANUFACTURING COMPANY CHICAGO, IL. 60647
Installation, Mounting, Programming &
Troubleshooting Guide.
Vend-Rite Manufacturing
2555WestArmitageAvenueChicago,IL60647 Phone773-772-6700•Fax773-772-2822
Table of Contents
Introduction
i
I N S T A L L A T I O N
M O U N T I N G
O F
&
Mounting your Vender
Mounting Base to Cabinet
1
2-4
5
PROGRA MMING
Price Setting your Vender
6-7
Accountability
7
Multi-Vend-
8
Electronic Display
8
Card Reader
TROUBLESHOOTING
4
More Template Tips
4
V E N D E R
Unpacking Your VendMaster 360
US/Canadian Coins
How To Create a Document
8-9
CHAPTE R
3
How To Customize This Manual
1
About the “Picture” Icons
1
Section Breaks are Key
2
About Pictures and Captions
2
How To Generate a Table of Contents
3
How To Create an Index
3
CHAPTE R
3
How To Customize This Manual
1
About the “Picture” Icons
1
Section Breaks are Key
2
About Pictures and Captions
2
How To Generate a Table of Contents
3
How To Create an Index
3
How To Change Headers and Footers
3
How To Save Time in the Future
4
How To Create a Document
4
More Template Tips
4
Index
5
D E S I G N
C U S T O M I Z A T I O N
Unpacking the VendMaster 360
PLEASE READ AND FOLLOW THESE INSTRUCTIONS WHILE UNPACKING AND INSTALLING YOUR
NEW VENDER. FAILURE TO DO SO WILL VOID YOUR VENDERS WARRANTY.
1.
Inspect the shipping carton for damage. Look for marks on the carton that could cause
concealed damage. If the carton has been punctured, carefully inspect for damage. The
trucking industry allows thirty (30) days from the date of delivery for a claim to be filed.
2.
Cut the banding straps and remove the top cover. Lift out the top liner pad and set aside (the
keys and hanger bracket are packed in the top inner pad). Remove the outer sleeve by lifting it
up over the vender. Lift vender out of the bottom pad. DO NOT THROW ANY OF THE
PACKING MATERIALS AWAY PRIOR TO YOUR INSPECTION OF THE
VENDER. DOING SO WILL ELIMINATE YOUR ABILITY TO FILE A CLAIM
WITH THE TRUCKING COMPANY.
3.
If you notice any damage and want to file a claim follow these steps:
•
•
•
•
4.
5.
6.
Call the trucking company that delivered the vender.
Give them the PRO Number (shipping number) off the bill of lading you signed prior to
delivery.
Schedule a date for inspection.
DO NOT THROW AWAY ANY OF THE PACKING MATERIALS.
Locate the following items before proceeding any further:
•
The vender keys, in a pouch stuck to the plexi-glass.
•
The hanger bracket, attached to the inside of the cardboard pad on top of
the vender.
Write down the serial number and both sets of key numbers and put in a safe place
Vender keys, coin return rod and “E” clip are in a package list pouch taped to the plexi-glass on the
front of the machine. Immediately record the key numbers and serial number (on a sticker
stuck to the inner left wall of your vending machine.)
1
D E S I G N
C U S T O M I Z A T I O N
Mounting your vender.
Important: Before starting, please read the instructions carefully. For a safe and secure
installation, proper assembly and full warranty coverage, follow installation completely.
This vender is guaranteed against any defects in material or workmanship for 18 months from the
date of delivery to original installation. This warranty does not apply if mounting instructions or
maintenance steps in operations manual are not followed, or if the machine has been subject to
abuse, misuse or accident. Properly maintained, this vender will give you many years of profitable
service.
BEFORE INSTALLATION
First, inspect cartons for tears, holes or obvious damage. Remove vender from shipping carton and save
all components of carton until after you have made the complete inspection of your new vender. Should
you notice any damage, immediately contact the transportation company to file a claim.
VENDER MOUNTING INSTRUCTIONS
Tools Required: Level, Screw or Nut Driver, Pencil, and Hardware appropriate for your wall
type.
When hanging the 360 you first need to locate the metal hanger bracket. This is attached to the top
pad of the packaging.
The only hardware that will be used to hang the machine is the hanger bracket that is included in
the shipping of the machine. If you are replacing an existing vending machine please remove all
hardware that was used to hang that machine and do not reuse those piece(s).
When identifying a spot in your store to hang the machine you must keep in mind that you need a
power source within 4 feet of the machine when hung.
The machine needs to be hung within the ADA specifications so please follow these directions
while hanging the machine:
USING A CONCEALED OUTLET
Measure 65” up from the floor and mark two small lines. Put the hanging Bracket on your level on
top of the 65” mark and mark all slotted holes in your Wall Mounting Bracket. (At this height,
your coin Mechanism will be within the suggested height range of the Americans with Disabilities
Act.) Drill out holes, and attach bracket using the correct hardware for your wall type. Make sure
to secure Mounting Bracket to at least two wall studs (See Illustration #1). The vender
weighs close to 360 pounds when filled with product. It is only as secure as the wall you
2
D E S I G N
C U S T O M I Z A T I O N
hang it on. For the safety of your customers, employees and business make sure the vender
is firmly attached to a sound wall.
With the hanger bracket firmly in place, have someone help you lift the vender up on to the
mounting bracket. Check the fit of the doors. Determine if you need to use shims to align the fit of
the cabinet doors. Check all three doors.
Now open the doors and mark the square outlet knock out hole on the inside right side of the
cabinet. (Illustration #2) Also mark the holes in the back of the cabinet just above the magazine
support bracket (see illustration below). You do not have to drive a screw thru every hole, but
remember to hit at least three studs using the correct hardware for your wall type.
Have someone help you remove the vender and cut out the outlet location. Install an outlet box in
the opening and run wires according to local code. Replace the vender on the hanger bracket, and
prior to tightening all the hardware, check the fit of the outlet knockout, the three doors, and the
placement of the shims, and tighten hardware.
USING AN EXISTING OUTLET
Measure and mark a line 65” up from the floor. Place a level on the mark and draw a level line
approximately 36” long, centered where you want to hang your vender. Place the wall mounting
bracket on top of the line and mark all slotted holes in the bracket. Make sure you have enough
cord to reach the outlet you will be using (At this height, your coin Mechanism will be within the
suggested height range of the Americans with Disabilities Act.). Drill out holes, and attach bracket
using the correct hardware for your wall type.
Make sure to secure to at least two wall studs. (See Illustration #1) The vender weighs close
to 360 pounds when filled with product. It is only as secure as the wall you hang it on. For
the safety of your customers, employees and business make sure the vender is firmly
attached to a sound wall.
With the hanger bracket firmly in place, have someone help you lift the vender up on to the hanger
bracket. Check the fit of the doors. Determine if you need to use shims to align the fit of the
cabinet doors. Check all three doors.
MOUNTING IN A WALL
Rough in an opening 45 1/2” W x 48 1/8” H in your wall at the desired location, within 6’ of a
110v outlet. The bottom of the opening can be no higher than 211/2” . This will put the coin
entrance area of the vender within the ADA (Americans with Disabilities Act) specifications.
Framing in the opening using 2x4 or 2x6 lumber, this will provide a opening of 42 1/2” W x 48
1/8” H, (the dimensions of the cabinet). Remember, your vender is only as secure as the wall
it is mounted in. Now with the opening roughed in, have someone help you lift the vender into
the opening. Shim the vender plum and level the machine. Check the fit of the three doors, adjust
the plum and level to adjust the fit of the doors. Tap the shims in tight against the side wall of the
cabinet.
Now remove the magazine, loosen the top two screws 2 full turns (do not remove) in the first and
twelve columns. Locate and remove the two screws on the lower part of the magazine (first and
3
D E S I G N
C U S T O M I Z A T I O N
twelve column). See illustration. Set the magazine to the side. Using fender washers, drive a lag bolt
or deck screw thru the inside wall of the cabinet. Try to drive a minimum of four screws per side
and if possible, thru the shims. Check the fit of the doors and continue to drive screws
approximately 8” apart on both sides of the cabinet. We recommend you also drive three to four
screws into the top and bottom of the cabinet. When driving screws into the bottom of the cabinet
you must first remove the package delivery shelf. After driving in screws to the top and bottom of
the cabinet check the fit of the upper and lower doors. Run the power cord thru the knockout in
the back of the vender or drill a hole in the side of the bottom of the cabinet and run cord thru that
hole and plug in vender.
ILLUSTRATION #1
ILLUSTRATION #2
ILLUSTRATION #3
ILLUSTRATION #4
4
D E S I G N
C U S T O M I Z A T I O N
Now that your vender is hanging securely on the wall and all3 doors are closing properly you will need
to check to make sure that all of the Product Empty switches are working properly. The Product
Empty switch tells the controller board the column is empty. This switch is located at the bottom of
each column and can be identified by its silver actuator switch (See Illustration 4).
Mounting a Base to your Cabinet
Tools Required: Screw or Nut Driver
Hardware Included: 3 ¼ - 20 x ¾ Roundhead, 3 washers, and 3 Kep nut, 5 # 10 hex-head sheet
metal screws.
Taped to the top of your base, in a small manila envelope, is the hardware that is to be used to
mount the base to your cabinet. All holes have been pre-drilled in our factor and all you need to do
is line up the holes on the base and the holes in the bottom of the cabinet. In order to line up these
holes you first need to remove the product delivery shelf from the inside of the cabinet
(Illustration #5). By removing the product delivery shelf you will expose 3 predrilled holes. Now
place the vender on the base and line up the predrilled holes on the base with the predrilled holes
on the vender. When holes are lined up insert a ¼ -20 x ¾ roundhead into each hole. Open the
base and place the washer and than the Kepnut on the screw and loosely tighten. Now take the 5
#10 hexhead sheet metal screws and line up the holes on the base bracket to the hole on the lower
back of the vender (Illustration #6). Insert a #10 into each hole and tighten. You will than need
to tighten kepnuts in the base.
We recommend that if you have purchased a base for your VendMaster 360 you will still need to
I I
ILLUSTRATION #5
ILLUSTRATION #6
5
Price Setting Your Vender
The VendMaster is a multi-price-able vender, any column can be set to vend at any price.
The vender has been preset to vend our 75¢ and 50¢ bags(the first and second column
moving left to right) and all soap, bleach, and softeners(the next 10 columns) for 50¢. When
using coins, the increases are in 05¢ increments up to $99.95. The new Sacagawea “golden
dollar” coin can be used in this vender. When the unit is set up(see Coinco coin mech
Setup) to accept the dollar coin you must have a minimum of 22 quarters to pay out change.
PROGRAM
To set pricing, you need to go into the program mode. When in the program mode you use
the first six (6) buttons on the front of the vender to program. There is a timeout
mechanism built into the board so when pushing the buttons to set the pricing
Price setting the first 6 columns See Illustration #7(G1-G6):
1. Push the RED square button on the controller board (located in the interior of the
right upper door).
2. Push the #11 button. The display will read “OPtn”
3. Push the #4 button, the display will read “Prc”
4. Push the #11 button, the display reads “G”
5. Push and hold the 1st button. The display will either start going up in value or it will
start going down in value at 05¢ increments. If the button is held in for more than 5
seconds the price will start increasing in 50¢ increments. If you pass the amount you
would like to vend your product for just let go of the button and push it back in
again and the denomination will reverse in value.
6. After you have set the pricing in the first column and you are ready to set the 2nd
column push the 11th button and than push and hold the 2nd button until the desired
price has been set (please note that if you wait to long before pushing the 11th button
you will need to start back at step 1, however you will not loose any pricing you have
already set to that point.). continue this process for the next 4 coulmns.
7. After the pricing for the first six columns are complete push the red square button to
exit the program mode. The display should read 0.00.
Price setting Columns 7-12 See Illustration #8(H1-H6):
1. Push the RED square button on the controller board (located in the interior of the
right upper door).
2. Push the #11 button. The display will read “OPtn”
3. Push the #4 button, the display will read “Prc”
4. Push the #12 button, the display reads “H”
5. Push and hold the 1st button. The display will either start going up in value or it will
start going down in value at 05¢ increments. If the button is held in for more than 5
seconds the price will start increasing in 50¢ increments. If you pass the amount you
6
would like to vend your product for just let go of the button and push it back in
again and the denomination will reverse in value
6. After you have set the pricing in the seventh column and you are ready to set the 8th
column, push the 12th button and than push and hold the 2nd button until the desired
price has been set (please note that if you wait to long before pushing the 12th button
you will need to start back at
step 1, however you will not loose any pricing you have already set to that point.).
continue this process for the next 4 coulmns.
7. After you have set the pricing for columns 7-12 push the red square button to exit
the program mode. The display should read 0.00.
#1
#4
#11
#1
ILLUSTRATION #7
#4
#11
ILLUSTRATION #8
Accounting Feature
You can record both total vend counts and the cash totals. This feature can NOT be reset
so we suggest you record these two totals before you put the vender into service.
1. Push the RED square button on the controller board (located in the interior of the
right upper
2. Push the #11 button, display should read “OPtn”
3. Push the #3 button, display should read “Acct”
4. Push the #7 button for VEND COUNT
5. Push the #8 button for CASH TOTALS
We recommend that you record these two totals now before the vender is put into
service
7
#12
Multi-Vend
This Feature, enabled will hold change for 20 seconds, allowing a customer to make another
purchase.
Disabled it will give change immediately after the cycle finishes. For example if a customer
inserts the new dollar coin into the machine and selects a box of soap priced at 50¢ if the
Multi-Vend option is Enabled the machine will hold the 50¢due to the customer allowing
them to make another selection. After 20 seconds if a selection has not been made they will
receive their change.
To enable or disable this option follow these instructions:
1. Push the red square button on the controller board. The display reads 12
2. Push the #11 button. The display reads “OPtn”
3. Push the #9 button. Display reads:
a. “MULy” which means that this feature has been enabled.
If you push the #9 button again
b. “MULn” which means that this feature has been disabled.
Electronic Display
The display will show you the vend price, credit amount, and controller programs.
When a button is pushed to dispense product, while that product is dispensing the display
will read the column of the button that was pushed, either G1-G6 or H1-H6.
If the display should read, “Fail” please refer to Trouble shooting section under “Fail”.
While programming vender the serene goes blank please refer to Trouble Shooting section
on “Blank Screen”.
Just below the display you will see two (2) indicator lights:
1. To show when the column selection is out of product.
2. To advise when correct change is necessary.
8
US/Canadian Coins and Dollar Coin
The coin mechanism that is used in your VendMaster is manufactured by CoinCo and is
model
9302-GX. It does have the capability to accept US or Canadian coins. Additionally this coin
mechanism will accept the US Sacagawea Golden dollar coin or the Canadian Loonie dollar
coin.
When setting your coin mechanism you will need to get to the rocker switches located
behind the Acceptor. To remove the acceptor you will need to pull up on the latches
located on the upper left and upper right side of the coin mechanism (See Illustration #9).
After the latches have been pulled up the Acceptor should fall forward and expose the
rocker switches
(See Illustration #10).
Latch
Latch
Rocker Switches
ILLUSTRATION #9
ILLUSTRATION #10
Switch A controls acceptance of US and/or Canadian Coins.
ON Accepts both US and Canadian Coins
OFF Rejects Canadian Coins.
Switch B Controls the level of 25¢change tube
Blow up of Rocker
Switches
ON Quarters are directed to cash box once tube has 18 quarters
On
1
2
3
OFF Quarters are put into change tube until it is full.
Switch C controls the acceptance of the dollar coin
ON Dollar coin accepted (Sacagawea or Loonie)
Off A
B
C
OFF Dollar coin rejected (Sacagawea or Loonie)
Power Indicator
9
TROUBLE SHOOTING YOUR VENDER
Motor Issues
Jammed Motor(s)
Individual Motor Reset (Illustration #11)
Box of Soap, Bleach, Softeners or Laundry Bags has been jammed and the
motor needs to be reset.
Step 1 Remove all boxes from the column, including box that is jammed.
Step 2 Push the red square button on the controller board display will read: “12”.
Step 3 Push the 11th button on the button bar display will read: “OPtN”
Step 4 Push the 5th button on the button bar display will read: “SLcT”
Step 5 Push the 11th button on the button bar the display will read: “G”
Step 6 If one of the first 6 columns needs to be reset, push that columns
corresponding button. (Buttons 1-6 control columns 1-6)
Step 7 When fixing columns 7-12 follow steps 1-4 then:
Step 8 Push the 12th button on the button bar the display will read “H”
The flipper arm will reset itself to the back of the machine.
Entire Machine Motor Reset (Illustration #12)
Step 1
Step 2
Step 3
Step 4
Remove jammed boxes form those columns that have a jam in it.
Push the red square button on the controllers board.
Push the 11th button on the button bar from the left.
Push the 6th button on the button bar from the left.
#5
#11 #12
#6
ILLUSTRATION #11
#11
ILLUSTRATION #12
10