1
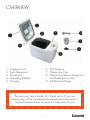
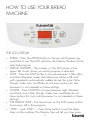
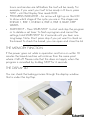
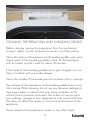
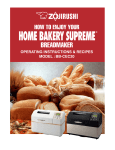
IMPORTANT SAFEGUARDS
SAVE THESE INSTRUCTIONS!
WHEN USING ELECTRICAL APPLIANCES, BASIC SAFETY
PRECAUTIONS SHOULD ALWAYS BE FOLLOWED
INCLUDING THE FOLLOWING:
1. READ ALL INSTRUCTIONS BEFORE USE.
2. Follow all warnings and instructions marked on the product.
3. Unplug this product from wall outlet when not in use and before
cleaning. Do not immerse appliance in water or other liquid.
Use a soft sponge and mild detergent when cleaning the inside
of the pan or kneading paddle. The cabinet may be cleaned
with a cloth, dampened with a mild soap and water solution.
4. Do not touch hot surfaces. Use mitts when handling hot
materials, and allow metal parts to cool before cleaning.
5. Close supervision is necessary when any appliance is used
near children.
6. Do not allow anything to rest on power cord. Do not plug in
cord where persons may walk on, or trip over it.
7. Do not operate any appliance with a damaged cord or
plug. Refer servicing of appliance to an authorized Kuissential
service center if the unit should malfunction or be damaged in
any manner.
8. This appliance is not intended for commercial use. It is for
household use only.
9. The use of attachments not recommended by manufacturer
may cause damage or injury.
10.Avoid contacting moving parts.
i
11.Do not use outdoors. Do not use appliance for other than
intended use.
12.Do not let cord hang over edge of table or counter, or touch
hot surfaces.
13.Do not place on or near a hot gas or electric burner, or in a
heated oven.
14.To disconnect, grip plug and pull from wall outlet. Never pull on
cord.
15.The unit may vibrate or move during the kneading process. Do
NOT place the unit near the edge of a countertop. Place the
unit securely where movement of the unit will not cause it to fall
off the countertop.
16.Always operate the bread machine on a dry and flat surface.
17.Do not place the appliance near any inflammable materials,
explosive and/or self-igniting gases.
18.Appliance is not intended for use by persons (including children)
with reduced physical, sensory or mental capabilities, or lack
of experience and knowledge, unless they have been given
supervision or instruction concerning use of the appliance by a
person responsible for their safety.
NOTE:
A. A short power-supply cord is provided to reduce the risk
resulting from becoming entangled in or tripping over a longer
cord.
B. Extension cords may be used if care is exercised in their use.
C. If extension cord is used: (1) the marked electrical rating of the
extension cord should be at least as great as the electrical
rating of the appliance, and (2) the longer cord should be
arranged so that it will not drape over the countertop or
tabletop where it can be pulled on by children or tripped over
unintentionally.
D. This appliance has a polarized plug (one blade is wider than
the other). As a safety feature, this plug will fit in a polarized
ii
outlet only one way. If the plug does not fit fully in the outlet,
reverse the plug. If it still does not fit, contact a qualified
electrician. Do not attempt to defeat this safety feature.
WARNING
Always take the bread pan out before adding the
ingredients. This is to make sure that no ingredients touch
the heating element. If ingredients touch the heating
element they can catch fire during the baking process.
Do not use ingredients for larger than the machine’s
capacity. The dough can spill over and touch the heating
element which can cause a fire.
Make sure the ventilation slits on the appliance are not
covered.
iii
THANK YOU FROM KUISSENTIAL
Thank you for purchasing our Bread
Machine. We are a young company and
your business means a lot to us.
This instruction manual will help teach you
how to use your new machine.
Please make sure to read it before you use
it for the first time.
If you have any questions or problems
please check out Kuissential.com or email
[email protected] and we promise to
help you out.
Thanks again. We hope you love your new
Bread Machine!
-Team Kuissential
TABLE OF CONTENTS
OVERVIEW
1
HOW TO USE YOUR BREAD MACHINE
The LCD Display
Memory Function
Display Window
The Baking Programs
Keep Warm Setting
Adding Fruits/Nuts and Auto Dispense
Setting the Delay Timer
3
4
5
5
6
7
7
8
BREAD BAKING
Ingredients Order
How to set up your bread machine
Taking out the Bread
9
10
10
11
BREAD BAKING TIPS
13
CLEANING AND CARE
21
OVERVIEW
1.
2.
3.
4.
5.
Appliance Lid
Auto Dispenser
Bread pan
Kneading Paddle
Housing
6. LCD Display
7. Measuring Cup
8. Measuring Spoon (Teaspoon
and Tablespoon size)
9. Lid Removal Hinge
Be sure your box includes ALL these parts. If you are
missing any of the included parts please send an email to
[email protected] and we will take care of you!
1
HOW TO USE YOUR BREAD
MACHINE
BEFORE FIRST USE, UNPACK THE APPLIANCE AND DISPOSE
OF THE PACKAGING MATERIAL. WIPE THE BREAD PAN,
KNEADING PADDLE, AND OUTER SURFACE OF THE
MACHINE WITH A DAMP CLOTH. DO NOT USE ANY
ABRASIVE SCRUBBERS OR CLEANING POWDERS. REMOVE
THE PROTECTIVE FILM ON THE CONTROL PANEL.
3
HOW TO USE YOUR BREAD
MACHINE
THE LCD DISPLAY
• MENU – Press the MENU button to choose which preset you
•
•
•
•
•
would like to use. The LCD will show the Display Number of the
selected program.
DISPLAY NUMBER – The number on the LCD screen in the
upper left corner shows you which program is selected.
LOAF – Press the LOAF button to choose between 1.5lbs, 2lbs
and Auto-Dispense mode. Auto-Dispense will be a 2lb loaf
with ingredients automatically added during the cycle. Note:
Dough, Cake, Jam, and Bake do not have options for size
because it is not needed on these settings.
COLOR – Press COLOR to choose between Light, Medium,
and Dark crust. Note: Dough, Cake, Jam, and Bake do not
have options for crust color because it is not needed on these
settings.
THE DISPLAY TIME – The time shown on the LCD screen will be
how long is left in the program.
“TIME” + and “TIME –“ – Press these buttons to set the delay
timer on the machine. The Display Time will tell you how many
4
hours and minutes are left before the loaf will be ready. For
example, if you want your loaf to be ready in 8 hours, press
TIME + until the Display Time reads 8:00.
• PROGRESS INDICATOR – An arrow will light up on the LCD
to show which stage of the cycle you are in. The stages are
KNEAD 1, RISE 1, KNEAD 2, RISE 2, RISE 3, BAKE, KEEP
WARM.
• START/STOP – Press START/STOP to start and stop the program
or to delete a set timer. To finish a program and cancel the
settings, hold START/STOP for 2 seconds until you hear one
long beep. Note: Don’t press stop if you just want to check on
the bread. To check the bread, you can open and close the lid.
THE MEMORY FUNCTION
If the power goes out while in operation and turns on within 10
minutes the bread machine will continue from the same point
where it left off. Please note that this does not apply when the
program is cancelled by holding STOP for 2 seconds.
THE DISPLAY LID
You can check the baking process through the display window
that is under the top flap.
5
THE BAKING PROGRAMS
PROGRAM 1: BASIC
This program bakes white and
mixed breads mainly consisting
of classic bread flour. The bread
will have a crispy crust.
Knead, Rise, and Bake time. It
can be used when you are in a
hurry.
PROGRAM 6: MULTIGRAIN
This program is for white and
PROGRAM 2: FRENCH
mixed breads mainly consisting
For light breads made from fine of wheat flour, rye flour or
flour. Normally the bread is
multigrain. The bread will have a
fluffy and has a crispy crust. This compact consistency.
is not suitable for baking recipes
requiring butter, margarine or
PROGRAM 7: SANDWICH
milk.
A preset for light breads made
from fine flour that would be
PROGRAM 3: WHOLE WHEAT good for making a sandwich.
For breads with heavy varieties
of flour that require a longer
PROGRAM 8: GLUTEN-FREE
phase of kneading and rising
This program is used if you are
(for example, whole wheat flour making gluten free bread.
and rye flour). The bread will be
more compact and heavy.
PROGRAM 9: DOUGH
This program is used to prepare
PROGRAM 4: SWEET
dough. In this program no
For breads with additives such baking is done.
as fruit juices, grated coconut,
raisins, dry fruits, chocolate or
PROGRAM 10: CAKE
added sugar. This bread will be This program has kneading and
light and airy because it has a
baking phases and can be used
long rising phase.
to make a cake.
PROGRAM 5: RAPID
This program has the fastest
6
THE BAKING PROGRAMS (CONT...)
PROGRAM 11: JAM
This is a program to make jams
and chutney.
Once the Home Made setting
has been pressed, click the
Home Made button again to set
the Knead 1 time. The Display
Time will be flashing and you can
press Time + or Time – to set the
time. When the desired time for
that cycle is chosen, press Home
Made to save it. Pressing Home
Made another time will move
you on to the next step in the
cycle.
PROGRAM 12: BAKE
This program only does baking.
It can be used to bake your
bread a little more if it was
too light or not baked through.
There is no kneading or resting
in this program.
PROGRAM ‘HOME-MADE’
Press the “Home Made” button
to access this setting. The display
number will read “P”.
All cycles in this program can be
customized.
Repeat the process until the
times for Knead 1, Rise 1,
Knead 2, Rise 2, Rise 3, and
Bake have been set.
THE KEEP WARM FUNCTION
After the baking cycle has completed, your machine will switch
to Keep Warm for about an hour. This prevents the bread from
becoming too moist.
You can stop the Keep Warm setting early by holding Start/Stop
for 2 seconds until you hear a long beep. Unplug the machine
when you are finished.
ADDING FRUITS/NUTS AND AUTO-DISPENSE MODE
If your recipe calls for fruits and nuts, do not add them at the
beginning with all the other ingredients. The machine will start
7
ADDING FRUITS/NUTS... (CONT...)
beeping after the Knead cycles to signal it is time to open the lid
and add the fruits and nuts.
You can also use the Auto-Dispenser by selecting this option using
the LOAF button. Lift the top flap found on the lid, make sure the
bottom of the dispenser is closed, and add the fruits and nuts (do
this after adding the main ingredients to the bread pan). Make
sure to cut the fruits and nuts into small pieces so they do not get
stuck. The default size for Auto-Dispense is 2 pounds.
Please note, the adding fruits/nuts alarm and Auto-Dispense
Mode only work on programs 1-8 because 9-12 do not use fruits
and nuts.
SETTING THE DELAY TIMER
When you select the program you will be using, the Display Timer
will show you how long it will be before the machine is finished.
For example, if the Display Timer reads “2:40” it will be done in 2
hours ands and 40 minutes.
You can set the machine to be finished at a later time by using
the Delay Timer. This is done by pressing the “Time +” and “Time -”
buttons.
Let’s say it is 9:00AM and you want your bread to be done at
5:00pm. All you need to do is press “Time +” until the display time
reads “8:00” which means the machine will be finished in 8 hours.
The maximum delay time is 13 hours.
Note: Do not use the Delay Timer when using ingredients that can
spoil such as eggs, milk, cream or cheese.
8
BAKING BREAD
BEFORE YOU START BAKING:
• READ ALL WARNINGS AND SAFETY INSTRUCTIONS
FOUND IN THIS MANUAL BEFORE USING THE BREAD
MACHINE!
• ALWAYS TAKE THE BREAD PAN OUT BEFORE ADDING
THE INGREDIENTS. THIS IS TO MAKE SURE THAT NO
INGREDIENTS TOUCH THE HEATING ELEMENT. IF
INGREDIENTS TOUCH THE HEATING ELEMENT THEY
CAN CATCH FIRE DURING THE BAKING PROCESS.
• DO NOT USE INGREDIENTS FOR LARGER THAN THE
MACHINE’S CAPACITY. THE DOUGH CAN SPILL OVER
AND TOUCH THE HEATING ELEMENT WHICH CAN
CAUSE A FIRE.
9
BREAD BAKING
INGREDIENTS ORDER
It is important to keep the yeast separate from the liquid and
salt until the bread-making process has begun. This is particularly
important when the dough will not be mixed for several hours.
When adding your ingredients, unless the recipes specifies
otherwise it is usually best to add liquids first, followed by the
dry ingredients, then make a small well for the yeast to go in to
without letting it touch the water, this way the yeast will not start to
activate until the machine starts.
SETTING UP YOUR BREAD MACHINE AND BAKING
1. Pull the bread pan upward out of the machine by first turning it
slightly counter clockwise to unlock it.
2. Insert the kneading paddle onto the drive shaft in the bread
pan. Make sure it is firmly in place. Tip: add some butter or oil
to the kneading paddle so it is easy to remove from the bread
when it is finished.
3. Put in the ingredients in the proper order (see above). Make
sure the yeast doesn’t touch salt or liquid!
4. Put the bread pan back in the machine slightly off center and
turn clockwise to lock it in place.
10
SETTING UP YOUR BREAD (CONT...)
5. Close the bread machine lid.
6. If you are using the auto-dispenser, put those ingredients in the
auto dispenser found under the top flap and close the top flap.
7. Plug in the machine and select the program you want to use by
pressing MENU.
8. Choose the color of the bread by pressing COLOR.
9. If you want to use the delay timer, set the timer now. The max
delay is 13 hours.
10.Press START to begin the program. The machine will go through
the different cycles until your bread is ready. You can watch
through the window found under the top flap. You can also
open the lid during the knead phase and when the autodispense alarm sounds. If you open the lid during the rise
phase, do not leave it open for long because the machine will
lose the warm air required to make the dough rise properly.
Don’t open the lid during the baking phase or the bread can
collapse!
TAKING OUT THE BREAD
When taking out the bread pan, always use pot holders or oven
gloves. Remove the bread pan from the machine by turning the
bread pan slightly counter clockwise and then lifting up. Hold the
bread pan tilted and shake lightly until the bread slides out of the
bread pan. If the bread does not slip off the kneading paddle,
carefully remove the kneading paddle.
Do not use any metal objects that may lead to scratches on the
non-stick coating. After removing the bread, immediately rinse the
bread pan with warm water. This prevents the kneading paddle
from sticking to the drive shaft and also makes cleanup easier.
Let the bread cool 15-30 minutes before eating.
11
WARNING
WHEN NOT IN USE, THE APPLIANCE SHOULD NEVER BE
PLUGGED IN TO A POWER SOURCE!
WARNING
If the display shows “H:HH” after the program has been
started, it means that the bread machine is too hot to
operate and needs to cool down.
Stop the program and unplug the power cord
immediately. Open the lid and let the machine cool
down completely before trying again.
If the display shows “L:LL” after the program has been
started, it means that the temperature inside of bread
pan is too low. This could happen if it is very cold near
the bread machine. If this is the case, please move
the machine to a warmer spot. If it isn’t cold, there
is a problem with the machine and you can email
[email protected] and we will help fix it.
12
BREAD BAKING TIPS
13
BREAD BAKING TIPS
INGREDIENTS
WATER
It is very important to get the amount of water just right because it
can make a dramatic difference in the end. Use a measuring cup
at eye level to get the level just right. We recommend the water
be 80 degrees F when it is placed in the baking pan.
REFRIGERATED/CHILLED INGREDIENTS
Anything that has been kept chilled will need to be brought up
to a temperature that is warm to the touch. Warming it in the
microwave for approximately 60 seconds should be enough.
MILK
Milk is used to enrich the bread and add flavor. Milk powder can
be used in place of fresh milk. Do NOT use fresh milk if using the
delay timer setting as it may spoil in that time.
EGGS
Like other chilled ingredients eggs will need to be room
temperature. This can be achieved by letting them sit on the
counter for 30 minutes or placing them in a bowl of very warm
water.
BUTTER OR BUTTER SUBSTITUTES
Be sure to melt or soften these in the microwave prior to adding to
the machine.
SALT
Do NOT use Iodized salt (iodine has an effect on yeast activity
and slows the first fermentation). Kosher, Sea salt and non-iodized
table salt work well. Salt is important to the bread baking process
14
INGREDIENTS (CONT...)
and contributes to its texture, flavor and will prevent it from rising
too much. Do not leave salt out, it adversely affects the flavor
and also inhibits yeast growth and gluten structure.
YEAST
Instant Active Dry is the best to use in the bread machine. Be sure
the packet is fresh and keep the yeast stored in the refrigerator to
ensure it does not get too warm as heat will kill yeast. Yeast will
expire/die and you cannot tell simply by visually inspecting. To tell
if the yeast is still fresh, pour one teaspoon of the yeast into 1/4
cup of warm water (around 110-115 degrees F), with the addition
of one teaspoon of sugar. Put aside for 5-10 minutes. The yeast is
dead or no longer activating if a foam is not covering the surface
of the water. This means the yeast is failing to ferment. If this is the
case, do not use any yeast from that package.
FLOURS
Bread flour creates a loaf that rises higher and is less dense
because of the high gluten content (higher protein=more gluten).
All-purpose flour will work, however the loaf created will not be
as high and will be a bit denser. Whole Wheat Flour (see notes
on whole wheat and whole grain flours) is made by grinding the
whole kernel. This includes both the bran and the germ. When
using this flour for baking, the end result will be a loaf that is more
dense and lower in height, than if using bread flour. Rye contains
a small amount of protein, but not enough to for sufficient gluten.
When baking breads with rye flours they will be dense.
SUGARS
There is a wide range of sugars that can be used in bread making.
The sugar provides food for the yeast, adds color and texture to
the crust and sweetness and flavor to the bread. When adding
15
INGREDIENTS (CONT...)
sugar please note that more than 2 tablespoons per cup of flour
will slow down the yeasts progress and will inhibit the bread from
rising nicely. Liquid sugars (like molasses or honey) will count
towards liquids in a ratio.
HERBS
Herbs (fresh or dried) can be used to add flavor to the bread. Far
less is needed if using dried herbs, only 1-2 teaspoons. If using
fresh herbs follow the recommendations in the recipe.
NUTS
Nuts may be added, but be sure to chop them finely. Add only
what the recipe calls for. Note that the height of the loaf may
be low when adding nuts, this is because the nuts cut the gluten
structure. If you add nuts and dried fruits be sure that their total
weight does not exceed that of the recommendation of the recipe.
Be sure to chop them well because their bulk will interfere with the
mixing process.
FRUITS
Dried fruits are used in some bread recipes. As mentioned in the
nuts category, their weight should not exceed the recommendation
listed in the recipe. If using fresh fruit, use only as directed, the
additional water content will affect the outcome of the volume of
the loaf.
BRAN
Bran may be added to increase the fiber content of the bread.
4-5 Tablespoons is recommended, more will affect the volume and
is NOT recommended for an optimal loaf of bread.
16
INGREDIENTS (CONT...)
WHEAT GERM
For a more nutty and earthy flavor, about 4 tablespoons of wheat
germ may be added.
SEEDS
Seeds may be added in for the addition of flavor and texture
however be careful when using larger, harder seeds as they may
scratch the non-stick coating.
OTHER INGREDIENTS
Citrus zests and peel, cinnamon, alcohol and extracts all have a
retarding effect on the dough. Cinnamon in particular can stop
the fermentation process all together. It is best to add these items
when in high quantities to fillings or topping where it will not affect
the quality of the dough.
BAKING WHOLE WHEAT OR MULTIGRAIN FLOURS
When using whole wheat or multigrain flours please note, the
quality of these flours can be greatly affected by many factors.
The quality of flour is impacted by storage, humidity, temperatures
and the growing season of the wheat crop. Occasionally, due to
poor weather, the wheat may not have as much gluten forming
potential and will not produce flour that is great for an excellent
loaf of bread.
In these cases, the bread may simply fail to rise, or fall after rising
because of insufficient gluten. If this is the case, the following things
may be done to solve the problem.
1. Be sure that 1/8 of the flour used is white bread flour, as
opposed to using all whole wheat flour.
17
BAKING WHOLE WHEAT OR MULTIGRAIN (CONT...)
2. Reduce the water used in the recipe by 1/8-1/4 cup, this can
be done in addition to tip 1.
If the above still fails to produce a loaf of bread the rises
sufficiently reduce the amount of dry yeast by 1 teaspoon.
Please take note that the loaf achieved with the methods above
will be smaller.
MEASURING
It is essential that the ingredients are measured accurately to
achieve optimal results. Be sure to use a liquid measuring cup for
liquids and a dry cup for dry ingredients and items like shortening.
When measuring dry ingredients it is important to level off the top
of the measuring cup with a straight edged spatula or the back of
a butter knife.
For the best results it is best to weigh the ingredients out using a
kitchen scale. Remember that fluid ounces and dry ounces are not
the same and liquids should NOT be weighed on a scale (unless
the scale has an option for measuring liquids), but measured in
a liquid measuring cup. The only items that should be measured
by volume (cups or spoons) when using this method are liquid (as
mentioned previously) or very small amounts, such as spices, yeast,
salt, etc. When measuring these, use the same method for leveling
off as mentioned above.
18
SLICING AND STORING YOUR BREAD LOAF
Let the bread cool before you slice and store it. For best results, use
a wire rack.
The best way to slice the bread would be by using a bread knife
and cutting like you are using a saw.
To store the bread, let it cool to room temperature and then wrap
it in plastic or foil.
NOTES
FOLLOW THE RECIPES AS WRITTEN
For optimal bread, use the ingredients as listed and follow the
recipes as they are written.
ELECTRICAL FLUCTUATIONS
The height, texture and color of the bread will all be affected by
electrical fluctuations. It is highly recommended that the bread
making unit is used where an electricity supply remains constant.
19
CLEANING AND CARE
21
CLEANING AND CARE
After you are finished using the machine, unplug the power cord
from the wall and let it cool down before using again.
Keep the bread machine away from splashing water and moisture
to avoid electrical shock. Please make sure to read all the
Warnings and Safety Instructions.
WARNING
THE PARTS AND ACCESSORIES OF THE BREAD
MACHINE ARE NOT DISHWASHER SAFE.
CLEANING THE CASING, LID AND BAKING
CHAMBER:
After the machine has cooled, remove all particles left behind
inside the baking area with a wet cloth or slightly wet sponge.
Wipe the casing and lid with a wet cloth or sponge. The lid can
be removed from the housing for easy cleaning. To remove the lid,
open it completely and line up the hinges, then lift it up one side at
a time.
Make sure the inside area dries fully.
22
CLEANING THE BREAD PAN AND KNEADING PADDLE
Before cleaning, remove the bread pan from the machine by
turning it slightly counter clockwise to unlock it and then pull up.
Clean the interior of bread pan and kneading paddle wish warm
soapy water. If the kneading paddle is stuck, fill the bread pan
with hot water and let it soak for about 30 minutes.
If the inside of the kneading paddle every gets clogged, you can
clean it carefully with a wooden skewer.
Clean the outside of the bread pan with a damp cloth or sponge.
The surfaces of the bread pan and kneading paddle have a nonstick coating. While cleaning, do not use any abrasive detergents,
cleaning powders or objects that may cause scratches on the
surface. Due to moisture and vapor the surface of various parts
may undergo changes in their appearance over a period of time.
This does not affect the quality or functional performance of the
appliance.
Never immerse the bread pan in water or any other liquid.
23
RECIPES
Please visit Kuissential.com and click on the ‘Bread
Machine’ product page to see some of our favorite
recipes. If you have a good recipe and want to add it to
our site please email it to [email protected]!
24