1
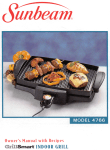
MODELS
4767 & 4768
Ow ner’s Manual with Recipes
™
INDOOR GRILL
Thank you for purchasing the OSTER HEALTHYCHEF™ INDOOR GRILL.
Before you use this product for the first time, please take a few moments
to read these instructions and keep it for reference. Pay particular attention
to the Safety Instructions provided. Please review the product service
and warranty statements. For your future reference, please note:
®
Date Product Received: _________________________________________
Service Number: ______________________________________________
(located on the bottom of the grill)
IMPORTANT SAFEGUARDS
When using electrical appliances, basic safety precautions should always be followed
including the following:
1. READ ALL INSTRUCTIONS, PRODUCT LABELS AND WARNINGS
BEFORE USING THE HEALTHYCHEF™ INDOOR GRILL.
2. Do not touch hot surfaces. Always use oven mitts when handling hot materials and
allow metal parts to cool before cleaning. Allow the Grill to cool thoroughly before
putting in or taking off parts. Always use the Grill handles when moving the Grill.
3. Before cleaning, when the Grill is not in use, unplug the Grill from the wall outlet.
NOTE: Make sure the Temperature Dial is in the “OFF” position
before unplugging.
4. To protect against risk of electrical shock, do not immerse the Temperature Control
in water or any other liquids.
5. Close supervision is always necessary when this or any appliance is used near children.
This Indoor Grill is not intended for use by children.
6. Do not operate this or any appliance with a frayed or damaged cord or plug or
after the appliance malfunctions or is dropped or has been damaged in any manner.
Return the appliance to an Authorized Sunbeam Service Center for examination,
repair or electrical or mechanical adjustment.
7. Do not use attachments not recommended by the manufacturer; they may cause fire,
electric shock or personal injury.
3
8. Do not use outdoors or for commercial purposes. Do not use this Indoor Grill
for other than its intended use.
9. Do not let the cord dangle over the edge of a tabletop or countertop or touch
hot surfaces.
10. Do not place the Indoor Grill near a hot gas or electric burner or in a heated oven.
11. A fire may occur if the Indoor Grill is covered or touching flammable materials,
including curtains, draperies, walls, etc., when in operation. Do not store any items
on top of the Indoor Grill when in operation.
12. Do not store any materials on this Grill when not in use.
13. Do not place any flammable materials on Indoor Grill, such as paper, cardboard,
plastic or any materials that may catch fire or melt.
14. Use extreme caution when moving the Grill if it contains hot oil or any other hot liquid.
15. Always attach Temperature Control to the Indoor Grill first and set Temperature Dial
to “OFF” position. Then plug cord into the wall outlet. To disconnect,
turn Temperature Dial to “OFF”, then remove plug from wall outlet.
16. Be sure that the base is securely fastened to the hot plate. See Instructions regarding
base on Pages 4 and 5.
17. To turn this appliance off, return Temperature Dial to the “OFF” position.
18. Do not place hands under base during cooking.
19. Do not place any combustible matter on grilling surface.
20. Do not place plastic cooking utensils on Grill surface when power is “ON.”
21. When removing plug from outlet, grip plug firmly and pull out.
SAVE THESE INSTRUCTIONS
T HIS U NIT I S FOR H OUSEHOLD USE O NLY
FOR PRODUCTS PURCHASED IN THE U.S. ONLY
To reduce the risk of electrical shock, this appliance has a polarized plug
(one blade is wider than the other). This plug fits a polarized outlet only one way;
if the plug does not fit fully into the outlet, reverse the plug. If it still does not fit,
contact a qualified electrician. Do not attempt to defeat this safety feature.
4
GETTING TO KNOW YOUR HEALTHYCHEF™ INDOOR GRILL
ARCHED GRILLING
SURFACE
BASE
READY
LIGHT
COOL-TOUCH
SAFETY HANDLES
POWER
CORD
TEMPERATURE
CONTROL
TEMPERATURE
DIAL
TEMPERATURE
CONTROL
RECEPTACLE
DIRECTIONS FOR GRILLING
1. Wash Grill Surface and Base in hot, soapy water. Rinse and dry thoroughly.
2. Attach Grill Plate to Base. Make sure that the clip on the bottom of the Grill Plate
clicks into place. (See Diagram on Page 5)
3. Set Temperature Dial to “OFF.” Insert Temperature Control into the Temperature Control
Receptacle and plug the Cord into a standard 120 volt AC outlet. If Temperature Control
is not completely inserted, abnormal heating may occur, resulting in accident or damage.
4. Set Temperature Dial to desired setting.
5. Ready Light goes off when correct cooking temperature is reached.
6. When food is completely cooked, it can be kept warm by setting Temperature Control
to “KEEP WARM.”
7. After use, set Temperature Dial to “OFF” position, unplug unit from outlet and then
unplug from Temperature Control Receptacle.
5
DIRECTIONS FOR CLEANING
1. Remove Termperature Control from Temperature Control Receptacle.
2. Grip Base with one hand and grip Safety Handle with other hand. Slowly pull up on
the Safety Handle while holding the Base down. Pull the Grill Plate forward to take
the Grill Plate off the Base. The clip will unsnap. If grill is hot, use oven mitt.
3. Rinse Grill Plate and Base and place in dishwasher. NOTE: Grill Base should be put on
the top dishwasher rack only. You can also wash in hot, soapy water.
4. Make sure Grill Plate and Base are completly dry before using.
KNOB
GRILL PLATE
TEMPERATURE
CONTROL
RECEPTACLE
SAFETY HANDLE –
GRIP HAND HERE
CLIP
BASE
6
C AUTIONS AND SUGGESTIONS
POWER CORD
1. If the power cord becomes worn-out, stop using the unit immediately
and contact your nearest Authorized Sunbeam Service Center for repair.
2. Be sure to use a 120 Volt AC/10 Ampere power supply.
3. In order to avoid electric shock or damage to the unit, do not rinse or immerse
the Temperature Control in water or any other liquid.
HANDLE WITH CARE
The Grill Plate surface is non-stick Xylan® coated.
1. DO NOT use sharp metal utensils or knives to cut food on the Grill Plate.
2. DO NOT place the Temperature Control on the Grill Plate surface. It may scratch
or damage the surface of the Grill Plate.
3. DO NOT use cleansers, nylon or metal brushes. It may scratch or damage the surface
of the Grill Plate.
4. When removing the Grill Plate, always grip the base of grill and safety handle.
5. After the unit has cooled, be sure to clean the Grill Plate with a slightly damp cloth
and then clean manually with warm, soapy water or place Grill in a dishwasher.
6. DO NOT use Grill Plate on unstable locations or near flammable materials such as
newspaper, PVC cloth, floor cushions, etc.
7. DO NOT wash Grill Plate with the Temperature Control connected.
QUESTIONS?
Sunbeam Consumer Service 1-800-526-2832 _____________________
www.sunbeam.com __________________________________________
7
R EC I P ES
CITRUS-MARINATED CHICKEN
2 lemons
2 tsp. thyme
2 oranges
1/2 tsp. black pepper
1/4 cup maple syrup
2-1/2 lbs. chicken wings and drumsticks
1 Tbsp. olive oil
Grate the zest from the lemons and orange. Squeeze the juice from the lemons and orange;
set the juices aside. In a small bowl, combine the grated lemon and orange zests and
the maple syrup. Set aside.
In a separate bowl, blend the reserved citrus juices, oil, thyme and pepper. Add the chicken
and turn to coat completely. Cover the bowl with plastic wrap. Marinate in the refrigerator
for at least 4 hours or overnight, turning the chicken occasionally.
Grill chicken, turning often or until almost cooked through. Brush the chicken with some of
the maple syrup mixture, turn and grill for 1 minute. Brush the chicken with the remaining
mixture, turn and grill for 1 more minute.
Y IELD : 4 S ERVINGS
TURKEY BURGERS
1-1/4 lb. ground turkey
1 Tbsp. Dijon mustard
1 Tbsp. Worcestershire sauce
2 garlic cloves, minced
1 small onion, minced
1/2 tsp. salt
1/4 tsp. black pepper
4 slices Monterey Jack cheese
4 bread rolls, split and toasted
In a bowl, mix together turkey, mustard, Worcestershire sauce, garlic, onion, salt and pepper.
Form into 4 patties.
Grill the patties turning once or until they are firm and cooked through. Put a piece
of cheese on each burger. Grill for about 30 seconds or until the cheese is melted.
Place each burger on a bun and serve with lettuce, tomato and onion (optional).
Y IELD : 4 S ERVINGS
8
LEMON-HONEY CHICKEN BREASTS
3 Tbsp. fresh lemon juice
1 Tbsp. honey
1 Tbsp. vegetable oil
1 tsp. soy sauce
1/4 tsp. ground ginger
4 skinless, boneless chicken breast halves
In a bowl, combine lemon juice, honey, oil, soy sauce and ginger.
Coat chicken breasts with mixture and let stand for 10 minutes.
Remove the chicken from the marinade, reserving the marinade.
Grill the chicken turning once and brushing with the reserved marinade
until cooked through.
Y IELD : 4 S ERVINGS
GRILLED CHICKEN CAESAR SALAD
3 garlic cloves
3 Tbsp. olive oil
1 tsp. grated lemon zest
1/2 tsp. salt
1/2 tsp. black pepper
12 slices French bread
3/4 lb. skinless, boneless
chicken breast halves
3 Tbsp. fresh lemon juice
6 to 8 anchovy fillets
2 Tbsp. mayonnaise
8 cups Romaine lettuce,
torn into bite-size pieces
1/4 cup grated Parmesan cheese
Mince 1 of the garlic cloves. In a bowl, mix together the minced garlic, 1 Tbsp. of the olive
oil, lemon zest, 1/4 tsp. of the salt and 1/4 tsp. of the pepper. Lightly brush 1 side of each
bread slice with the oil mixture. Put the chicken on a plate and rub the remaining oil
mixture over both sides. Set aside.
In an OSTER® Food Processor, combine the lemon juice, anchovies, mayonnaise and the
remaining oil, salt and pepper. With the machine running, drop the remaining garlic cloves
through the feed tube and process until puréed. Scrape the dressing into a large salad bowl.
Grill the chicken, turning once or until cooked through. Transfer to a clean plate.
Grill the bread for 1 minute on each side or until toasted.
Mix the chicken juices that have collected on the plate into the dressing. Cut the chicken
on an angle into thin strips. Add the Romaine and Parmesan to the dressing and toss to
coat. Add the toast and chicken, toss again and serve.
Y IELD : 4 S ERVINGS
9
PESTO-PEPPER SALMON STEAKS
1 cup chicken broth
5 garlic cloves, peeled
2 tsp. olive oil
2 cups packed fresh basil leaves
2 Tbsp. grated Parmesan cheese
2 Tbsp. fine, dry unseasoned breadcrumbs
1 Tbsp. fresh lemon juice, plus 1 lemon,
cut into wedges
1/2 tsp. salt
1/4 tsp. black pepper
2 cups frozen corn kernels, thawed
4 scallions, sliced
4 bell peppers, mixed colors,
halved lengthwise and seeded,
stems left on
4 salmon steaks (about 1 lb. total)
cut 1/2-inch thick
In a saucepan, combine the broth, garlic and oil. Bring to a boil over medium-high heat and
cook until reduced to about 1/4 cup, about 12 minutes. Let cool slightly and place in an
Osterizer® Blender along with the basil, Parmesan, breadcrumbs, lemon juice, salt and black
pepper and process until the pesto is smooth. In a bowl, place the corn, scallions and half
of the pesto and toss to combine.
Grill the pepper halves, cut sides toward the heat, for 8 minutes. Remove them from the grill
and spoon the corn mixture into them, dividing evenly.
Brush the salmon steaks lightly with some of the remaining pesto. Grill the salmon,
turning once and basting liberally with the remaining pesto until the salmon is firm and flakes
in the center when tested with the tip of a knife. Return the bell peppers to the grill to warm
for 1 minute.
Remove the salmon skin before eating. Serve the salmon and peppers with lemon wedges.
Y IELD : 4 S ERVINGS
10
GRILLED-ONION DIJON BURGERS
1 lb. lean ground beef
1/2 tsp. black pepper
1/2 cup fine unseasoned dry breadcrumbs
2 Tbsp. olive oil
1/4 cup + 2 Tbsp. Dijon mustard
1 large red onion, cut crosswise
1/4 cup dry red wine
into 1/2-inch rounds
1 large egg
1 large yellow onion, cut crosswise
2 tsp. tarragon
into 1/2-inch rounds
In a bowl, combine the beef, breadcrumbs, 2 Tbsp. mustard, 3 Tbsp. red wine, egg, 1 tsp.
tarragon and 1/4 tsp. pepper. Mix briefly, just to distribute the breadcrumbs and seasonings.
Shape the meat mixture into 4 patties.
In a different bowl, combine the remaining 1/4 cup mustard, 1 Tbsp. red wine, 1 tsp. tarragon,
1/4 tsp. pepper and the oil and blend well.
Brush the burgers and onion slices with half the mustard mixture and grill for 5 minutes.
Turn the burgers and onions and brush them with the remaining mustard mixture.
Grill for 2 to 4 minutes for medium-rare, 4 to 5 minutes for medium, 6 to 7 minutes
for well done, or until desired doneness.
Y IELD : 4 S ERVINGS
STUFFED GRILLED MUSHROOMS
1 cup reduced-sodium chicken broth
3 Tbsp. Dijon mustard
2 Tbsp. fresh lemon juice
1/2 tsp. Worcestershire sauce
12 large mushrooms, stems removed
and reserved
4 oz. Italian or French bread, crumbled
1/2 cup chopped parsley
4 scallions, thinly sliced
2 garlic cloves, minced
1/2 tsp. salt
1 tsp. olive oil
In a bowl, combine the broth, mustard, lemon juice and Worcestershire sauce. Add the
mushroom caps and toss to coat completely. Marinate at room temperature for 30 minutes.
Reserving the marinade, drain the mushroom caps and set aside. Chop the mushroom
stems and place them in a bowl. Add the bread, parsley, scallions, garlic, salt and oil.
Add the reserved marinade to the bread mixture and stir to moisten thoroughly.
Grill the mushrooms, stemmed side down, for 5 minutes, or until lightly browned.
Transfer the mushrooms to a flat surface, turn them stemmed sides up and spoon the
stuffing mixture into them, patting it down lightly. Return the mushrooms to the grill.
Cover the mushrooms with heavy-duty foil and grill for 8 minutes or until the stuffing
is hot.
Y IELD : 4 S ERVINGS
11
1-YEAR LIMITED WARRANTY
Sunbeam Products, Inc. warrants to the original purchaser, subject to the limitations and exclusions
set forth below, that this product shall be free, in all material respects, of mechanical and electrical
defects in material and workmanship from the date of purchase for one year. This warranty does not
cover normal wear of parts or damage resulting from any of the following: negligent use or misuse
of the product, use on improper voltage or current, use contrary to operating instructions or
disassembly, repair or alteration by any person other than an authorized service center.
Our obligation hereunder is limited to repair or replacement with a new or refurbished unit of the
same or a similar model of as good or better quality, at manufacturer’s option, of the product during
the warranty period, provided that the product, along with the model number and original dated
proof of purchase, is sent postage prepaid, directly to the following address:
For products purchased in the United States:
SUNBEAM APPLIANCE SERVICE STATION
Attention: Service Department
117 Central Industrial Row
Purvis , MS 39475
For products purchased in Canada:
SUNBEAM CANADA CORP., LTD.
c/o Service Tek
Please call 1-800-667-8623 or email us at
[email protected]
Do not return this product to the place of purchase or to the manufacturer; doing so may delay the
processing of your warranty claim.
Answers to questions regarding this warranty or for your nearest authorized service location may be
obtained by calling toll-free 1-800-597-5978 or by writing to Sunbeam – Consumer Affairs, at P.O.
Box 948389, Maitland, FL 32794-8389. Answers to questions regarding this warranty or for your
nearest Canadian authorized service location may be obtained by calling toll-free in Canada
1-800-667-8623. For warranty information or for an authorized service location outside of the
United States and Canada, please see the warranty service card inserted in the product packaging.
DISCLAIMER
Product repair or replacement as provided under this warranty is your exclusive remedy.
SUNBEAM PRODUCTS, INC. SHALL NOT BE LIABLE FOR ANY INCIDENTAL OR
CONSEQUENTIAL DAMAGES FOR BREACH OF ANY EXPRESS OR IMPLIED
WARRANTY ON THIS PRODUCT OR ANY PART THEREOF. EXCEPT TO THE EXTENT
PROHIBITED BY APPLICABLE LAW, SUNBEAM PRODUCTS, INC. DISCLAIMS ANY
IMPLIED WARRANTY OF MERCHANTABILITY OR FITNESS FOR A PARTICULAR
PURPOSE OF THIS PRODUCT OR ANY PART THEREOF. Some states and provinces
do not allow the exclusion or limitation of incidental or consequential damages, or allow
limitations on how long an implied warranty lasts, so the above limitations or exclusions
may not apply to you. This warranty gives you specific legal rights, and you may also have
other rights, which vary from State to State or Province to Province.
12
NOTES
15
NOTES
13
NOTES
14
©1999 Sunbeam Corporation or its affiliated companies. All rights reserved.
OSTER® is a registered trademark of Sunbeam Corporation or its affiliated companies.
HEALTHYCHEF™ is a trademark of Sunbeam Corporation or its affiliated companies.
Distributed by Sunbeam Products, Inc., Boca Raton, Florida 33431, or an affiliated company.
P.N. 101073