1
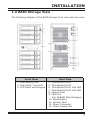
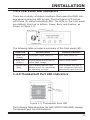
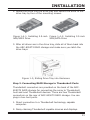
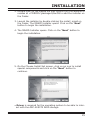
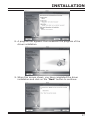
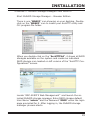
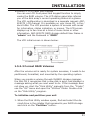
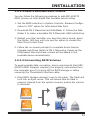
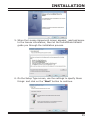
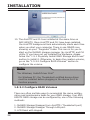
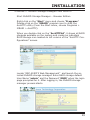
Thunderbolt™ Product
ARC-8050T2
(Thunderbolt 2 to 6Gb/s SAS RAID Storage)
Quick Start Guide
Version: 2.0
Issue Date: January, 2014
Copyright and Trademarks
The information regarding products in this manual is subject to change
without prior notice and does not represent a commitment on the part
of the vendor, who assumes no liability or responsibility for any errors
that may appear in this manual. All brands and trademarks are the
properties of their respective owners. This manual contains materials
protected under International Copyright Conventions. All rights
reserved. No part of this manual may be reproduced in any form or by
any means, electronic or mechanical, including photocopying, without
the written permission of the manufacturer and the author.
FCC Statement
This equipment has been tested and found to comply with the limits
for a Class B digital device, pursuant to part 15 of the FCC Rules.
These limits are designed to provide reasonable protection against interference in a residential installation. This equipment generates, uses,
and can radiate radio frequency energy and, if not installed and used
in accordance with the instructions, may cause harmful interference to
radio communications. However, there is no guarantee that interference will not occur in a particular installation.
Manufacturer’s Declaration for CE Certification
We confirm ARC-8050T2 has been tested and found compliant with
the requirements in the council directive relating to the EMC Directive
2004/108/EC. Regarding to the electromagnetic compatibility, the following standards were applied:
EN 55022: 2006, Class B
EN 61000-3-2: 2006
EN 61000-3-3: 1995+A1: 2001+A2: 2005
EN 55024:1998+A1:2001=A2:2003
IEC61000-4-2: 2001
IEC61000-4-3: 2006
IEC61000-4-4: 2004
IEC61000-4-5: 2005
IEC61000-4-6: 2006
IEC61000-4-8: 2001
IEC61000-4-11: 2004
Contents
1. Installation................................................................... 4
1.1 Before You First Installing...................................................4
1.2 Summary of RAID Storage Setup Steps.................................5
• For Mac OS X....................................................................5
• For Windows.....................................................................5
1.3 RAID Storage View.............................................................7
1.4 Locations of the Storage Component.....................................8
1.4.1 Drive Tray LED Indicators...............................................8
1.4.2 LCD Panel LED Indicators...............................................9
1.4.3 Thunderbolt Port LED Indicators......................................9
1.5 Setting Up RAID Storage................................................... 10
1.5.1 Physically Install RAID Storage and Drives...................... 10
1.5.2 Mac Users.................................................................. 14
1.5.2.1 Install the MRAID Software...................................... 14
1.5.2.2 Configure RAID Volumes.......................................... 18
1.5.2.3 Format RAID Volumes............................................. 21
1.5.2.4 Make A Bootable RAID Volume................................. 23
1.5.2.5 Unmounting RAID Volumes...................................... 23
1.5.3 Windows Users........................................................... 24
1.5.3.1 Install the MRAID Software...................................... 24
1.5.3.2 Configure RAID Volumes.......................................... 28
1.5.3.3 Format RAID Volumes............................................. 31
1.5.3.4 Unmounting RAID Volumes...................................... 31
2. Specification............................................................... 33
2.1 Overview........................................................................ 33
2.2 Features......................................................................... 35
INSTALLATION
1. Installation
This section describes how to install the ARC-8050T2 Thunderbolt 2
RAID storage with host computer and disks.
1.1 Before You First Installing
Thanks for purchasing the ARC-8050T2 as your RAID data storage.
The following manual gives simple step-by-step instructions for
installing and configuring the ARC-8050T2 RAID storage.
Unpack
Unpack and install the hardware in a static-free environment.
ARC-8050T2 RAID storage is packed inside an anti-static bag between two sponge sheets. Remove it and inspect it for damage. If
the ARC-8050T2 RAID storage appears damaged, or if any items
of the contents listed below are missing or damaged, please contact your dealer or distributor immediately.
Checklist
• 1 x ARC-8050T2 8-bays RAID storage unit
• 1 x Installation CD – containing driver, relative software, an
electronic version of this manual and other related manual
• 1 x RJ-45 LAN cable
• 1 x Thunderbolt cable
• 1 x Power cord
• 32 x Drive mounting screws (4 per drive tray)
• 1 x Quick start guide
System Requirements
• Computer with Thunderbolt connector
• Mac OS X 10.8.5 or higher
• Windows 7&8
“For Windows PC: the Thunderbolt certified device driver must be
installed before plugging in the device for it to function properly”
4
INSTALLATION
1.2 Summary of RAID Storage Setup Steps
• For Mac OS X
Step 1. Physically Install the Hardware (Chapter 1.5.1)
1. Install HDDs.
2. Connect power cord.
3. Connect Thunderbolt cable.
Step 2. Install the MRAID Software Package (Chapter 1.5.2.1)
1. Download the install_mraid installer from the website at
“http://www.areca.com.tw/support/s_ thunderbolt/thunder
bolt.htm”.
2. Double-click on the install_mraid zipped file.
3. Double-click on the install_mraid icon on the Finder.
4. Follow the installer on-screen steps to complete the installation.
Step 3. Configure RAID Volumes (Chapter 1.5.2.2)
1. Double-click on the “MRAID” icon on the desktop.
2. Double-click on the “ArcHTTP64”.
3. Locate “ARC-8050T2 Web Management” and launch the
McRAID storage manager.
4. Login User Name “admin” and the Password “0000”.
5. Click on the “Quick Create” to configure the volume.
6. Follow the on-screen steps to complete the configuration.
Step 4. Format RAID Volumes (Chapter 1.5.2.3)
1. Mac OS X recognizes that a new disk is available.
2. Follow the Disk Utility on-screen steps to initialize and partition your unit.
3. Icons for each new partition show up on your desktop.
4. They are now ready to use.
• For Windows
Step 1. Physically Install the Hardware (Chapter 1.5.1)
1. Install HDDs.
2. Connect power cord.
3. Connect Thunderbolt cable.
5
INSTALLATION
Step 2. Install the MRAID Software Package (Chapter 1.5.3.1)
1. Download the install_mraid installer from the website at
“http://www.areca.com.tw/support/s_ thunderbolt/thunder
bolt.htm”.
2. Double-click on the install_mraid zipped file.
3. Double-click on the “setup.exe” unzip file.
4. Follow the installer on-screen steps to complete the installation.
Step 3. Configure RAID Volumes (Chapter 1.5.3.2)
1. Double-click on the “MRAID” icon on the desktop.
2. Double-click on the “ArcHTTP64”.
3. Locate “ARC-8050 Web Management” and launch the
McRAID storage manager.
4. Login User Name “admin” and the Password “0000”.
5. Click on the “Quick Create” to configure the volume.
6. Follow the on-screen steps to complete the configuration.
Step 4. Format RAID Volumes (Chapter 1.5.3.3)
1. Click “Start” ==> right-click “Computer” and select “Manage”.
2. Click “Disk Management” in the left pane.
3. Scroll down to the bottom of the middle pane. Windows will
display a list of new drives attached to your system with a
label such as “Disk 1” or “Disk 2”, etc.
4. Right-click on the drive you want to partition and then again
to format it.
5. Once it’s formatted, Windows automatically assigns the next
available drive letter to it and then it will appear in Windows
Explorer.
6. They are now ready to use.
6
INSTALLATION
1.3 RAID Storage View
The following diagram is the RAID storage front view and rear view.
Front View
1. Disk Activity LED
2. Disk Fault / Link LED
3. LCD Panel with Keypad
Rear View
4.
5.
6.
7.
8.
9.
Thunderbolt Port1
Thunderbolt Port2
Thunderbolt Port1 Link LED
Thunderbolt Port2 Link LED
System Fan1
LAN Port
(For McRAID Web Manager)
10. Reset Button
11. System Fan2
12. Power Connector
13. Power Supply Fan
7
INSTALLATION
1.4 Locations of the Storage Component
The following components come with LEDs that inform ARC-8050T2
RAID storage managers about the operational status.
1.4.1 Drive Tray LED Indicators
Figure 1-1, Activity/Fault LED
The following table describes the RAID storage disk drive tray LED
behavior.
Tray LED
8
Normal Status
Problem Indication
1. Activity LED
(Blue)
1. When the activity LED
is lit, there is I/O activity on that disk drive.
2. When the LED is not
lit; there is no activity
on that disk drive.
N/A
2. Fault/Link LED
(Red/Green)
1. When the fault LED is
lit, there is no disk
present.
2. When the link LED is
lit, there is a disk present.
1. When the fault LED is off, the
disk is present and status is
normal.
2. When the fault LED is blinking
(2 times/sec.), the disk drive
has failed and should be hotswapped immediately.
3. When the activity LED is lit
and fault LED is fast blinking
(10 times/sec.) there is rebuilding activity on that disk
drive.
INSTALLATION
1.4.2 LCD Panel LED Indicators
There are a variety of status conditions that cause the RAID storage panel monitoring LED to light. The front panel LCD comes
with three (3) status-indicating LEDs. The LEDs on the front panel
are defined, from top to bottom, Power, Busy, and Caution, as
shown in Figure 1-2.
Figure 1-2, LCD Panel LED
The following table provides a summary of the front panel LED.
Panel LED
Normal Status
Problem Indication
1. Power LED
(Green)
Solid green, when power on.
Unlit, when power on.
2. Busy LED
(Amber)
Blinking amber during host accesses RAID storage.
Unlit or never flicker.
3. Caution LED
(Red)
Unlit indicates that the RAID
storage and all its components
are operating correctly.
Solid indicates that one or
more component failure/Urgent events have occurred.
1.4.3 Thunderbolt Port LED Indicators
Figure 1-3, Thunderbolt Ports LED
The following table describes the ARC-8050T2 SAS RAID storage
Thunderbolt port link LED behavior.
9
INSTALLATION
Thunderbolt Ports
Link LED
Status
Green light
1. Lit indicates RAID storage is powered and maintained
the daisy chain with other Thunderbolt devices.
2. Blinking (5 times/sec) that indicates RAID storage is
in sleep mode.
3. Blinking (1 time/sec) that indicates RAID storage is
powered down and maintained the daisy chain with
other Thunderbolt devices.
Amber light
There is a proper DisplayPort connection on that Thunderbolt port.
Red light
There is a proper DisplayPort to DVI connection on that
Thunderbolt port.
1.5 Setting Up RAID Storage
Setting up your ARC-8050T2 RAID storage involves these main
steps:
• Physically Install the RAID Storage and Drives
• Install the MRAID Software
• Configure RAID Volumes
• Format RAID Volumes
• Unmounting RAID Volumes
Details about these steps are described in the following sections.
1.5.1 Physically Install RAID Storage and Drives
Please follow the steps below in order they are given to ensure
that your ARC-8050T2 connected on your Thunderbolt computer.
Step 1. Install the Drives in the ARC-8050T2 RAID Storage
Your RAID storage supports up to 8 x 3.5-inch disk drives or 8 x
2.5-inch SAS or SATA 6.0Gb/s drives, each one contained in its
individual hole on the disk carrier. Each drive is hot-pluggable,
allowing you to remove and insert drives without shutting down
your RAID storage. Installation in this section describes how to
install or remove 3.5 inch drives in your RAID storage.
1. Gently slide the drive tray out from the ARC-8050T2 RAID
storage.
10
INSTALLATION
2. Install the drive into the drive tray and secure the drive to the
drive tray by four of the mounting screws.
Figure 1-4-1. Installing 2.5-inch
SAS/SATA Drive
Figure 1-4-2. Installing 3.5-inch
SAS/SATA Drive
3. After all drives are in the drive tray, slide all of them back into
the ARC-8050T2 RAID storage and make sure you latch the
drive trays.
Figure 1-5, Sliding Drive Tray into Enclosure
Step 2. Connecting RAID Storage to Thunderbolt Ports
Thunderbolt connectors are provided on the back of the ARC8050T2 RAID storage for connecting the array to Thunderbolt
host and next Thunderbolt devices. There are two Thunderbolt
connectors on the rear of ARC-8050T2 RAID storage. You can
plug-in two host ports.
1. Direct connection to a Thunderbolt technology capable
computer.
2. Daisy chaining Thunderbolt capable devices and displays.
11
INSTALLATION
• Thunderbolt Computer Port Connection
By installing Thunderbolt technology capable computer and
ARC-8050T2 Thunderbolt port using the Thunderbolt cable
which is included in your Thunderbolt capable computer. Then
connect ARC-8050T2 RAID storage and Thunderbolt technology
capable computer port as shown below:
Figure 1-6, Connecting to Thunderbolt Computer
• Daisy Chain Topologies
A single Thunderbolt technology daisy chain can have seven
devices, including the computer. Connect the cable to one of the
interface ports on the back of your ARC-8050T2 RAID storage
and to your Thunderbolt capable computer. The additional port
may be used to daisy chain compatible computer peripherals,
such as hard drives, monitors, and much more. A single Thunderbolt port supports hubs as well as a daisy chain of up to
seven Thunderbolt devices on, including the Thunderbolt capable computer.
12
INSTALLATION
Figure 1-7, Thunderbolt Computer Daisy Chain
Step 3. Connecting Monitor Port (Optional)
You can connect LAN port to the manager clinet system, if you
want to configure and manage the RAID storage from the clinet
system through out-of-band manager.
• LAN Port Connection
User can remote manage the RAID enclosure without adding
any user specific software (platform independent) via standard
web browsers directly connected to the 10/100Mbit RJ45 LAN
port. Connect LAN port of the ARC-8050T2 using the included
Ethernet cable and then to a LAN port or LAN switch.
Step 4. Connecting RAID Storage Power
To power the RAID storage:
1. Using the included power cord, connect this power cord to a
grounded electronical outlet and to the ARC-8050T2 RAID storage.
2. ARC-8050T2 RAID storage will automatically turn on when host
computer power on status is received from the thunderbolt
cable. It takes about 30 seconds to fully start up the RAID storage.
13
INSTALLATION
Figure 1-8, Connecting the Power to Enclosure.
3. ARC-8050T2 RAID storage automatically turns off when the
computer to which it is attached sleeps or is disconnected.
Note:
You can press and hold the “Reset” button for 3 seconds to
force the RAID storage AC power on or off.
When you are finished installing the ARC-8050T2 RAID storage,
you can set up the RAID volume using McRAID storage manager
or LCD to set up RAID volumes.
1.5.2 Mac Users
1.5.2.1 Install the MRAID Software
This section describes detailed instructions for installing the
Areca Mac driver & utility for the ARC-8050T2 on your Apple
Thunderbolt capable machine. You must have administrative
level permissions to install Mac OS X driver & utility. This can be
done in just a few steps!
1. Download the install_mraid installer from the website at
"http://www.areca.com.tw/support/s_ thunderbolt/thunderbolt.htm", the file name begins with “install_mraid” followed
by the version control or insert the ARC-8050T2 software CD
in the CD-ROM drive.
14
INSTALLATION
2. Double-click on the zipped file that comes from the website or
resides at <CDROM>\packages\MacOS to add the installer on
the Finder.
3. Launch the installer by double-clicking the install_mraid on
the Finder. The MRAID Installer opens. Click on the "Next"
button to begin the installation.
4. The MRAID Installer opens. Click on the "Next" button to
begin the installation.
5. On the Choose Install Set screen, click on an icon to install
special components and click on the "Next" button to
continue.
• Driver is required for the operating system to be able to interact with the ARC-8050T2 RAID storage.
15
INSTALLATION
• ArcHTTP has to be installed for GUI RAID console (MRAID
storage manager) to run. It also runs as a service or daemon
in the background that allows capturing of events for mail and
SNMP traps notification. Refer to the Chapter 5 ArcHTTP
Configuration on ARC-8050T2 user manual, for details about
the mail and SNMP traps configuration.
• CLI (Command Line Interface) provides the functionality
available in MRAID storage manager through a Command Line
Interface. You can set up and manage RAID storage inline. CLI
performs many tasks at the command line. You can download
CLI manual from Areca website or software CD <CDROM>\
DOCS directory.
6. On the Choose Alias Folder screen, click on an icon to choose
where you like to create aliases and click on the "Next"
button to continue.
7. On the Pre-Installation Summary screen, review your installation setting and click on the "Install" button to continue. If
you want to change any of your installation setting, click on
the "Previous" button.
16
INSTALLATION
8. A program bar appears that measures the progress of the
driver installation.
9. When this screen shows, you have completed the driver
installation and click on the "Next" button to continue.
17
INSTALLATION
10. After installation is completed, click on the "Done" button to
reboot your computer in order to complete installation.
11. The ArcHTTP and ArcCLI are installed at the same time on
ARC-8050T2. Once ArcHTTP and CLI have been installed,
the ArcHTTP background task automatically starts each time
when you start your computer. There is one MRAID icon
showing on your desktop. This icon is for you to launch the
McRAID storage manager (by ArcHTTP) and CLI utility. If
you have not yet installed the hardware, please follow the
“1.5.1 Physically Install RAID Storage and Drives” section to
install it. Otherwise, to begin the creation volume, go on the
“1.5.2.2 Configure RAID Volumes” section to configure the
volume.
1.5.2.2 Configure RAID Volumes
There are often multiple ways to accomplish the same configuration and maintenance tasks for your RAID storage. Your ARC8050T2 RAID storage can be configured by one of the following
methods:
1. McRAID Storage Manager from ArcHTTP. (Thunderbolt port)
2. McRAID Storage Manager Through LAN port.
3. LCD Panel with Keypad.
18
INSTALLATION
• Method 1: McRAID Storage Manager From ArcHTTP
Start McRAID Storage Manager – Browser Edition
There is one “MRAID” icon showing on your desktop. Doubleclick on the “MRAID” icon to locate your ArcHTTP utility and
CLI program file folder.
When you double-click on the “ArcHTTP64”, it shows all RAID
storages available on the system and create an individual
RAID storage icon located on left column of the “ArcHTTP Configurations” screen.
Locate “ARC-8050T2 Web Management” and launch the selected McRAID storage manager. Enter RAID storage default
User Name “admin” and the Password “0000” when the login
page prompted for it. After logging in, the McRAID storage
manager process starts.
19
INSTALLATION
Click on the “Quick Create” in the main menu, your volume is
automatically configured based on the number of disks in your
system. You can create a RAID set associated with exactly one
volume set. The user can change the Raid Level, Capacity,
Initialization Mode, and Stripe Size. A hot spare option is also
created, depending on the exist configuration. Click on the
“Confirm The Operation” check box and click on the “Submit”
button, the RAID set and volume set will start to initialize. If
you prefer to customize your volume set, please use the “Raid
Set Functions” and “Volume Set Functions”. See chapter 4 of
ARC-8050T2 user manual for information on customizing your
RAID volumes using McRAID storage manager. Otherwise, to
begin using the ARC-8050T2 right away, go on the next “Format the Volume” section to begin the formatting procedure.
• Method 2: McRAID Storage Manager Through LAN port
User can remote manage the RAID storage directly connected
to the 10/100Mbits RJ45 LAN port via standard web browsers.To configure ARC-8050T2 RAID storage using a LAN port,
you need to know its IP address. The default IP address will
be shown on the LCD initial screen. Launch your web browserbased McRAID storage manager by entering http://[IP Address] in the web browser. Enter RAID storage default User
Name “admin” and the Password “0000” when the login page
prompted for it. After logging in, the McRAID storage manager process starts. Follow the on-screen steps, responding
as needed, to configure RAID volume. See the Chapter 4 of
ARC-8050T2 user manual for information on customizing your
RAID volumes using McRAID storage manager.
20
INSTALLATION
• Method 3: LCD Panel with Keypad
You can use LCD front panel and keypad function to simply
create the RAID volume. The LCD status panel also informs
you of the disk array’s current operating status at a glance.
The LCD configuration is described in a separate manual: ARC8050T2_LCD manual. It is available on your Areca CD, in the /
docs folder. The LCD provides a system of screens with areas
for information, status indication, or menus. The LCD screen
displays up to two lines at a time of menu items or other
information. ARC-8050T2 RAID storage default User Name is
“admin” and the Password is “0000”.
The LCD initial screen is shown below:
1.5.2.3 Format RAID Volumes
After the volume set is ready for system accesses, it needs to be
partitioned, formatted, and mounted by the operating system.
When you create a volume through McRAID storage manager,
the Mac OS X recognizes that a new disk is avail, and displays a
message asking what you next want to do. If the message does
not show up, start the “Disk Utility” manually from the “Finder”,
use the “Go” menu and open the “Utilities” folder. Double-click
on the “Disk Utility” program.
To initialize and partition your unit
1. When the Disk Utility window opens, find and select the desired drive in the sidebar that represents your RAID storage
and click on the “Partition” button.
21
INSTALLATION
2. In the Partition Layout column, click on the “Current” to
show the drop-down menu and select the number of partitions that you want your RAID storage to have. Each partition
will appear as a separate drive on your computer.
3. Specify your Partition Information, Option setting and click on
the “Apply” button.
If you’re not sure which format to use, choose Mac OS X
Extended (Journaled).
4. When a message asks you to confirm you want to partition
the disk, click on the “Partition” button. This may take a
couple of minutes, depending on the size of the drives in your
RAID storage. When the partitioning is complete, icons for
each new partition show up on your desktop. They are now
ready to use.
22
INSTALLATION
1.5.2.4 Make A Bootable RAID Volume
You can follow the following procedures to add ARC-8050T2
RAID volume on Intel-based Mac bootable device listing.
1. Set the BIOS selection in System Controls: Advance Configuration to “EFI” option for Intel-based Mac boot.
2. Download OS X Mavericks and DiskMaker X. Follow the DiskMaker X to make a bootable OS X Mavericks USB install drive.
3. Restart your Mac and after you hear the chime sound, press
the Option (Alt) key until you see the option to choose the
flash drive to boot from.
4. Follow the on-screen prompts to complete Areca Volume
Upgrade and Clean Install of OS X Mavericks. Power up the
Intel-based Mac and Areca volume will be added in the
bootable device automatically.
1.5.2.5 Unmounting RAID Volumes
To avoid possible data corruption, Areca recommends that ARC8050T2 RAID storages volume(s) be properly unmounted from
the computer prior to turning off the RAID storage or safely
removing the Thunderbolt interface cable.
1. Drag RAID storage volume(s) icon to the trash. The Trash will
turn into an Eject arrow. This will assure that all data is
properly cleared from the system memory before the volume
is removed.
23
INSTALLATION
2. When the volume icon disappears from the desktop, RAID
storage can be disconnected from the computer.
1.5.3 Windows Users
1.5.3.1 Install the MRAID Software
This section describes how to install the MRAID software to
your operating system. The software installation includes device
driver, ArcHTTP and CLI utility.
In this scenario, you are installing the MRAID software in an
existing Windows system. You can use the installer to install
driver, ArcHTTP and CLI at once or “Custom” to install special
components. Follow the steps below to install the driver & utility
for Windows.
1. Download the install_mraid installer from the website at
"http://www.areca.com.tw/support/s_thunderbolt/thunderbolt.htm", the file name begins with “install_mraid” followed
by the version control or insert the ARC-8050T2 software CD
in the CD-ROM drive.
2. Double-click on the zipped file that comes from the website or
resides at <CDROM>\PACKAGES\Windows to unzip it.
Double-click on the "setup.exe" file for installing MRAID.
3. The screen shows Preparing to Install.
4. The MRAID Installer (or InstallShield Wizard) opens, preparing to install and click on the “Next” button to continue.
24
INSTALLATION
5. When the License Agreement screen appears, read and agree
to the license information; then let the InstallShield Wizard
guide you through the installation process.
6. On the Setup Type screen, use the settings to specify these
things: and click on the “Next” button to continue.
25
INSTALLATION
• “Complete” to install driver, ArcHTTP and CLI utility at once,
check the first box.
• “Custom” to install special components and change the program directory. When this “Custom” check box is checked, go
to the Custom Setup screen.
6-1. On the Custom Setup screen, click on an icon to install
special components and click on the “Next” button to
continue.
• Driver is required for the operating system to be able to interact with the ARC-8050T2 RAID storage.
• ArcHTTP has to be installed for GUI RAID console (McRAID
storage manager) to run. It also runs as a service or daemon
in the background that allows capturing of events for mail and
SNMP traps notification. Refer to the chapter 3 ArcHTTP Configuration on ARC-8050T2 user manual, for details about the
mail and SNMP traps configuration.
• CLI (Command Line Interface) provides the functionality
available in MRAID storage manager through a Command Line
Interface. You can set up and manage RAID storage inline. CLI
performs many tasks at the command line. You can download
CLI manual from Areca website or software CD <CDROM>\
DOCS directory.
26
INSTALLATION
7. When you reach the installation page, click on the “Install”
button to continue.
8. A program bar appears that measures the progress of the
driver installation.
When this screen completes, you have completed the MRAID
installation. If you have no ARC-8050T2 RAID storage unit yet
connected or powered on, a “MRAID Installer Information”
message displays.
9. After installation is complete, click on the “Finish” button to
exit the InstallShield Wizard.
27
INSTALLATION
10. The ArcHTTP and CLI are installed at the same time on
ARC-8050T2. Once ArcHTTP and CLI have been installed,
the ArcHTTP background task automatically starts each time
when you start your computer. There is one MRAID icon
showing on your “Programs” folder. This icon is for you to
start up the McRAID storage manager (by ArcHTTP) and CLI
utility. If you have not yet installed the hardware, please
follow the “1.5.1 Physically Install RAID Storage and Drives”
section to install it. Otherwise, to begin the creation volume,
go on the “1.5.3.2 Configure RAID Volumes” section to
configure the volume.
Note:
“For Windows, Install Driver First”
For Windows PC: the Thunderbolt certified device driver
must be installed before plugging in the device for it to
function properly.
1.5.3.2 Configure RAID Volumes
There are often multiple ways to accomplish the same configuration and maintenance tasks for your RAID storage. Your ARC8050T2 RAID storage can be configured by one of the following
methods:
1. McRAID Storage Manager from ArcHTTP. (Thunderbolt port)
2. McRAID Storage Manager Through LAN port.
3. LCD Panel with Keypad.
28
INSTALLATION
• Method 1: McRAID Storage Manager From ArcHTTP
Start McRAID Storage Manager – Browser Edition
Right-click on the “Start” menu and choose “Programs”.
Double-click on the “MRAID” program icon to start the
ArcHTTP utility (From the Start menu, choose Programs >
MRAID > ArcHTTP).
When you double-click on the “ArcHTTP64”, it shows all RAID
storages available on the system and create an individual
RAID storage icon located on left column of the “ArcHTTP Configurations” screen.
Locate “ARC-8050T2 Web Management” and launch the selected McRAID storage manager. Enter RAID storage default
User Name “admin” and the Password “0000” when the login
page prompted for it. After logging in, the McRAID storage
manager process starts.
29
INSTALLATION
Click on the “Quick Create” in the main menu, your volume is
automatically configured based on the number of disks in your
system. You can create a RAID set associated with exactly one
volume set. The user can change the Raid Level, Capacity,
Initialization Mode, and Stripe Size. A hot spare option is also
created, depending on the exist configuration. Click on the
“Confirm The Operation” check box and click on the “Submit”
button, the RAID set and volume set will start to initialize. If
you prefer to customize your volume set, please use the “Raid
Set Functions” and “Volume Set Functions”. See chapter 4 of
ARC-8050T2 user manual for information on customizing your
RAID volumes using McRAID storage manager. Otherwise, to
begin using the ARC-8050T2 right away, go on the next “Format the Volume” section to begin the formatting procedure.
• Method 2: McRAID Storage Manager Through LAN port
User can remote manage the RAID storage directly connected
to the 10/100Mbits RJ45 LAN port via standard web browsers.To configure ARC-8050T2 RAID storage using a LAN port,
you need to know its IP address. The default IP address will
be shown on the LCD initial screen. Launch your web browserbased McRAID storage manager by entering http://[IP Address] in the web browser. Enter RAID storage default User
Name “admin” and the Password “0000” when the login page
prompted for it. After logging in, the McRAID storage manager process starts. Follow the on-screen steps, responding
as needed, to configure RAID volume. See the Chapter 4 of
ARC-8050T2 user manual for information on customizing your
RAID volumes using McRAID storage manager.
• Method 3: LCD Panel with Keypad
You can use LCD front panel and keypad function to simply
create the RAID volume. The LCD status panel also informs
you of the disk array’s current operating status at a glance.
The LCD configuration is described in a separate manual: ARC8050T2_LCD manual. It is available on your Areca CD, in the /
docs folder. The LCD provides a system of screens with areas
for information, status indication, or menus. The LCD screen
displays up to two lines at a time of menu items or other
information. ARC-8050T2 RAID storage default User Name is
“admin” and the Password is “0000”.
30
INSTALLATION
The LCD initial screen is shown below:
1.5.3.3 Format RAID Volumes
After the volume set is ready for system accesses, it needs to be
partitioned, formatted, and mounted by the operating system.
The following steps show how to make any new disk arrays or
independent disks accessible to Windows system.
1. Click “Start” ==> right-click “Computer” and select “Manage”.
2. Click “Disk Management” in the left pane.
3. Scroll down to the bottom of the middle pane. Windows will
display a list of new drives attached to your system with a
label such as “Disk 1” or “Disk 2”, etc.
4. Right-click on the drive you want to partition and then again
to format it.
5. Once it’s formatted, Windows automatically assigns the next
available drive letter to it and then it will appear in Windows
Explorer.
1.5.3.4 Unmounting RAID Volumes
To avoid possible data corruption, Areca recommends that ARC8050T2 RAID storages volume(s) be properly unmounted from
the computer prior to turning off the RAID storage or safely
removing the Thunderbolt interface cable.
31
INSTALLATION
To unmount ARC-8050T2 RAID storage from a Windows system:
1. Click on the "Safely Remove Hardware and Eject Media" icon
in the notification area, at the lower right-hand side of your
screen, and then, in the list of devices, choose the Thunderbolt storage volume option that you want to remove.
Note:
You can also safely remove devices from the computer folder.
Click the "Start" button, click "Computer", right-click the
device you want to remove, and then click "Eject".
2. Windows will display a notification telling you it's safe to
remove the Thunderbolt storage volume. Now you can unplug
the Thunderbolt cable.
32
SPECIFICATION
2. Specification
This section presents a brief overview of the 6Gb/s SAS RAID storage,
ARC-8050T2. (Thunderbolt 2 to 6Gb/s SAS RAID storage)
2.1 Overview
Unleash Your Creativity Faster Than Ever
Thunderbolt 2 is full backward compatibility to the same cables
and connectors used with today’s Thunderbolt. It pushes speed to
20Gb/s and enables 4K video file transfer and display simultaneously. ARC-8050T2 is equipped with dual Thunderbolt 2 ports for
connecting to any Thunderbolt 2-enabled host such as the new Mac
Pro, and offers an additional Thunderbolt 2 port for daisy-chaining
other peripherals. The Thunderbolt daisy-chaining allows connection of up to six devices, so customers can connect ARC-8050T2
for massive amounts of video storage with a single Thunderbolt
connection to their host computer. ARC-8050T2 can meet the demand of users when working with rich, ultra- high resolution media
through Thunderbolt 2 interface.
Unparalleled Performance for 4K Workflow
ARC-8050T2 is the most complete 6Gb/s SAS 8-bay Thunderbolt
2 box with RAID control capabilities solution for both PC and Mac.
ARC-8050T2 incorporated on-board dual core 800Mhz RAID-OnChip and with 1GB DDR3-1333 memory to deliver true high performance hardware RAID protection against drive failure.This combination helps to provide a high performance storage device perfect
for the video editor working with Real time multi-stream HD and 4K
workflows. It runs efficiently without disruption or major drops in
performance to meet the requirements of 4K data workflow. It is so
quick it allows for 4K displays at the same time as daisy chaining
ARC-8050T2 and doing a simultaneous 4K output and file transfers
while maintaining maximum throughput.
33
SPECIFICATION
Enterprise-class Data Availability and Security
ARC-8050T2 supports the hardware RAID 6 engine to allow two
HDDs failures without impact the existing data and performance.
It allows users to hot swap drive in the event of a drive failure
with zero downtime. Its high data availability and protection derives from many advanced RAID features on ARC-8050T2 RAID
box design. Intelligent power On/Off function on storage turns
power in unison with the host computer power status. It can intelligently power down the unit after the thunderbolt host shuts down
everything for data integrity. ARC-8050T2 also supports a battery
backup option that protects all data in cache memory in the event
of unexpected power outage. Board-level hardware encryption
manages any kinds of drives attached to ARC-8050T2 without impacting the performance for higher levels of security.
Enabling an Easy-to-Manage Storage
Configuration and monitoring can be managed either through the
LCD control panel, Thunderbolt interface or LAN port. The intelligent cooling continuously adapts to environmental conditions by
automatically controlling the speed of the cooling fans for the rapidly growing demand from the video editing markets. You can even
configure ARC-8050T2 to intelligently spin down drives during
periods of inactivity to further reduce noise and save energy. Areca
solution of Thunderbolt 2 provides user the capability of adding
bootable drive via Thunderbolt on Apple thunderbolt-capable machine.
34
SPECIFICATION
2.2 Features
Controller Architecture
• 800 MHz dual core ROC for RAID core and SAS microcode
• 1GB on-board DDR3-1333 SDRAM with ECC protection
• Support bootable from RAID storage volume
• Controller level hardware encryption support
• Redundant flash image for adapter availability
• System status indication through LCD, LED and alarm buzzer
• Intelligent power On/Off function
• Battery backup module ready (Optional)
RAID Features
• RAID level 0, 1, 1E, 3, 5, 6, 10, 30, 50, 60, Single Disk or JBOD
• Multiple RAID selection
• Support up to 1MB stripe size
• Online array roaming
• Online RAID level/stripe size migration
• Support global hot spare and local hot spare
• Instant availability and background initialization
• Advanced configuration for smooth data streaming
• Disk scrubbing/ array verify scheduling support
• Multiple pairs SSD/HDD disk clone function
• SSD automatic monitor clone (AMC) support
• Complete configuration management suite
- McRAID manager – browser-based management tool (LAN or
Thunderbolt)
- Push Buttons and LCD Display panel for setup and status
- Command Line Interface (CLI) – scriptable configuration tool
- API libraries support – combine GUI with user management
utility
- SNMP support for remote monitoring
- SMTP support for email notification
Important:
Be sure to update the ArcMSR.kext driver shipping with Mac
OS X to V1.3.7 or later from the software CD or from the
Areca website.
35
SPECIFICATION
Function Advantages
Features
Benefits
Bootable Drive Support
Provide user the capability of adding bootable drive
via Thunderbolt on Apple thunderbolt-capable
machine.
Advanced Configuration
Provide optimized parameter to adjust controlled
firmware behavior for smooth data streaming.
Controller-level Hardware
Encryption
Board-level hardware encryption manages any
kinds of drives attached to ARC-8050T2 without
impacting the performance for higher levels of
security.
BBM Support
Support a battery backup option that protects all
data in cache memory in the event of unexpected
power outage.
Intelligent power On/Off
function
Turn ARC-8050T2 power in unison with the host
computer power status for data integrity.
Front Panel LCD and Buttons
Easy access for configuration and status report.
Product Features
36
Form Factor
Compact – 8 Bays Disk Tower
Host Connection
Two 20 Gb/s Thunderbolt Technology Ports
Disk Support
8 x 6Gb/s SAS/SATA 3.5”/2.5”HDDs/SSDs
OS Support
Mac OS X 10.8.5 or Higher
& Windows 7/8
Enclosure Management
Thunderbolt Port, LAN Port, and LCD
Cooling Fan
2 * 2700rpm/0.135A Brushless Fan
Operating Temperature
0 ~ 40 C
Operation Humidity
5% ~ 95 %, Non-condensing
Power Supply/In/out
270W / 90-256V AC / +12V/26A, +5V/18A, +3.3V/16A
Dimension (W x H x D)
5.7 x 11.8 x 11.4 in
(146 x 302 x 290 mm)
Weight (W/O Drives)
14.9 lbs / 6.8Kg