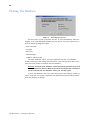
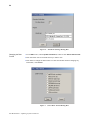
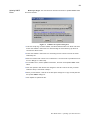
1
User Manual
LABType™SSO
Analysis
Software
for Windows®
OL-UD-0043-072002 Rev. 0
LabType™Software for Windows
User’s Guide
Version 3.8
July 2002
O n e L a m b d a , In c .
US & CANADA: 800-822-8824 (except greater Los Angeles area)
INTERNATIONAL: Contact your local distributor
21001 Kittridge Street, Canoga Park, CA 91303-2801
Telephone +1 818-702-0042 Fax +1 818 702-6904
Website: www.onelambda.com
©Copyright 2002, One Lambda, Inc., All Rights Reserved
OL-UD-0043-072002 Rev. 0
i
Contents
Chapter 1: Introduction
About This Manual................................................................. 1
System Requirements ........................................................... 2
Installing the LABType™ Software ........................................ 2
Chapter 2: Quick Start Guide
Import Data From LABScan 100™ ........................................ 3
Analyze Data—Select Specific Data...................................... 3
Analyze Data -- Select a Batch of Data ................................. 4
Reprocessing Previously Imported Data ............................... 6
Maintaining Data.................................................................... 6
Setting Up Your Printer.......................................................... 7
Exiting LABType™................................................................. 7
Chapter 3: LABType™ Navigation
Control Panel Buttons............................................................ 9
LABType™ Menus................................................................. 11
File Menu ............................................................................... 13
Edit Menu............................................................................... 14
Labscan100 Menu ................................................................. 14
Analysis Menu ....................................................................... 15
Maintenance Menu ................................................................ 15
Update Parameters Menu...................................................... 16
Reports Menu ........................................................................ 16
Chapter 4: Performing SSO Analysis
Importing Data From the LabScan 100™ .............................. 19
:
ii
Reprocessing a LabScan100 File ......................................... 20
Analyzing Data ...................................................................... 21
Batch Analysis....................................................................... 21
Adjusting Cut-off Values........................................................ 23
Correcting Computer Assigned Values ................................. 24
Displaying Reaction Patterns ................................................ 24
Entering Text Comments....................................................... 24
Chapter 5: Generating Reports
DNA Typing and Cell Information Report .............................. 25
Selected Alleles Report ......................................................... 25
Cell Combined Report ........................................................... 26
Displaying Data By Range .................................................... 28
Selecting A Range of Cell IDs ............................................... 31
Chapter 6: Maintaining Data
Maintaining Antigen/Allele Information .................................. 33
Maintaining Cell Information.................................................. 36
Maintaining DNA Readings ................................................... 41
Searching For and Sorting Data............................................ 43
Viewing LabScan 100 Raw Data........................................... 44
Exporting Data....................................................................... 45
Chapter 7: File Maintenance
Archiving Data ....................................................................... 47
Retrieving Archived Data....................................................... 48
Packing The Database .......................................................... 50
Rebuilding The Index ............................................................ 51
Updating System Parameters ............................................... 51
:
1
Chapter 1: Introduction
Welcome to LABType ™ Reverse SSO Analysis software. LABType is an rSSO
DNA typing solution. This software provides data analysis and HLA allele assignment.
This software is intended as a tool to assist in analyzing data, but the data must
be reviewed and, if required, corrected by a person with appropriate expertise. This
One Lambda Software product is designed to assist experienced personnel by suggesting typing results. However, all suggested typings must be carefully reviewed by
such qualified personnel to assure correctness. This software is meant as a laboratory
aid, not as a source of definitive results.
About This Manual
This manual contains step-by-step information you need to use the LABType
software. This manual contains the following task-oriented chapters:
Chapter 1: Introduction
This chapter contains an overview of the manual, system requirements, and
installation instructions.
Chapter 2: Quick Start Guide
This sections provides basic steps with very little detail, designed to get you up
and using LABType quickly. This section is designed for previous users of the
software who are already familiar with basic system functionality. This chapter
begins on page 3.
Chapter 3: Navigating in LABType ™
This section describes the menu structure of the LABType system. It also
describes content of sub menus and control panel functionality. This chapter
begins on page 9.
Chapter 4: SSO Analysis
This chapter provides step-by-step instruction for performing both Class I and
Class II analyses. It includes detail on changing computer assigned values,
adjusting cut-off values, and displaying reaction patterns. This chapter begins on
page 19.
Chapter 5: Generating Reports
This chapter discusses how to generate DNA Typing and Cell Information
reports, Selected Allele reports, and data-by-range-reports. This chapter begins
on page 25.
I n t r o d uc ti o n: A b o ut T h i s M a n u a l
2
Chapter 6: Data Maintenance
This chapter explains how to maintain antigen/allele information, sample information, and DNA information. Adding, editing, and deleting tasks are covered. This
chapter begins on page 33.
Chapter 7: File Maintenance
This chapter explains how to perform such routine “housekeeping” tasks as
archiving and retrieving data, and packing and rebuilding the database. This
chapter begins on page 47.
The manual also contains a table of contents at the front and an index at the
back to help you find what you are looking for.
In addition to the manual, an on-line Help system also accompanies the software.
To access the on-line help, click Help on the LABType Main menu, and then
select Contents.
System Requirements
The following is required to successfully install and run the LABType rSSO software, version 3.8.
• IBM compatible PC with Pentium II processor (Pentium III recommended)
• Minimum 5 Gigabyte hard drive
• 128 megabytes RAM
• VGA display
• Windows NT 4.0 or Windows 95 SR-2 or Windows 98 SE or Windows 2000.
Installing the LABType™ Software
If you do not yet have the LABType software installed on your computer, follow
these instructions to install it.
1 Close all other Windows applications before starting the installation process.
2 Insert the One Lambda CD in your CD ROM drive.
3 From Windows 95, Windows 98, Windows 2000 or Windows NT, select Start from
the Task Bar and then click Run.
4 From the Run window, in the Open box, type in the location of your CD ROM drive
followed by a backward slash and Labtype38.exe (e.g., D:\Labtype36.exe).
• Or, Click the Browse button to select your drive, and then double-click the
labtype38.exe file.
5 Click OK to begin the installation process. The install wizard usually places the
LABType software in your C:\labtype directory.
I nt r od u c t i o n : Sy s t e m Re qu i r e m e n t s
3
Chapter 2: Quick Start Guide
This section of the manual provides you with a basic procedural overview of how
to use some of the features of the LABType ™ software. This section is designed primarily for users who have basic familiarity with system functionality. Information is
covered in this chapter with less detail than elsewhere. Individual options are not
described, for example. More detailed information is available in subsequent sections
of this manual.
You can get additional help with the software by using the on-line Help that
shipped with the program. To use the Help, on the LABType Main menu, select Help,
and then click Contents.
This Quick Start Chapter provides basic instructions for:
• Importing data from the LabScan 100
• Selecting specific data to analyze
• Analyzing batches of data
• Reprocessing previously imported data
• Maintaining data: archiving, retrieving, and exporting data
• Setting up a printer for report printing
• Exiting the LABType Software
Import Data From LABScan 100™
1 On the Main menu, select LABScan 100, and then click Import Luminex File. The
Luminex Data Import/Report window will appear.
2 Check the boxes that correspond to the options you want to specify for the import.
3 Click the button that corresponds to how you want to import (report only, import
only, or import and report).
For more detailed instructions, see ”Importing Data From the LabScan 100™” on
page 19.
Analyze Data—Select Specific Data
Before you begin: You must have selected data to import from LABScan 100
1 On the Main menu, select Analysis, and then select the class you want to use.
2 In the SSO Analysis window, specify the Sample ID and the Cat./Lot ID that you
want to use.
Click the question mark button to display a list from which you can choose.
Q u i c k S t a r t G ui d e : I m p o r t D a t a F r o m L A B S c a n 1 0 0 ™
4
3 Click the Analyze button
to start the analysis.
4 Visually match the allele patterns and reactions by sorting the reaction table.
Click the arrow button
next to "RXN" to move all the columns containing posi-
tive reactions to the left. Then, click the arrow button next to a particular allele to
move all the beads that recognize that allele to the left.
5 You can adjust the cut-off values. Click the Adjust button to display the Revise
Cutoff / Raw Data window.
6 Click the Copy button to copy the Computer Assignment to the Corrected Assignment box.
7 You can run an Analysis Report and a Raw Data Report; or you can export data to
Excel format.
• To print an Analysis Report, click this button on the Analysis screen
• To print a Raw Data Report, click this button on the Analysis screen
• To export data to Excel Format, first Display Data By Range, and then click
this button on the Analysis/Reactivity Summary screen
8 When you are ready to save the analysis results, click the Save button on the Analysis screen.
Analyze Data -- Select a Batch of Data
Before you begin:
You must have
selected data to
import from LABScan 100.
1 On the Main menu, select Analysis, and then select SSO By Batch.
2 The DNA Analysis by Batch dialog box will appear.
3 Check the check box that indicates whether you want to analyze by session ID or
whether you want to specify a range of sample IDs.
If you choose to analyze a range of sample IDs, click the question mark buttons to
display a list of sample IDs from which to select the beginning and ending points for
the range.
4 To run all the samples in the batch, select the batch and then click Analyze
5 To select a subset of the batch, check the box "Select Specific Sample Within Batch
To Analyze".
If you select this option, you will need to select the sample IDs you want to include
in the analysis.
6 On the DNA Analysis by Batch screen, do the following:
Q ui c k S ta r t G u i d e : A na l y z e D a t a - - S e l e c t a B a t c h o f D a t a
5
Figure1: Selecting Sample IDs for Batch Analysis
• Click Include All to include all sample IDs (Include boxes are all checked);
OR,
• Click Exclude All to exclude all sample IDs (Include boxes are all clear).
Include boxes can be cleared or selected individually. If only a few sample IDs are
to be included, you may find it easier to Exclude All, and then select each sample ID
to include.
1 Click the Analyze button to start the analysis.
The analysis is done for all the included samples, one after the other.
As the analysis begins, the program displays a brief prompt to press "S" to stop the
analysis. While this message is on-screen, press the "S" key and then confirm that
you want to stop the analysis.
2 Visually match the allele patterns and reactions by sorting the reaction table.
• Click the arrow button
next to "RXN" to move all the columns containing
positive reactions to the left. Then, click the arrow button next to a particular
allele to move all the beads that recognize that allele to the left.
3 You can adjust the cut-off values. Click the Adjust button to display the Revise Cutoff / Raw Data window.
4 Click the Copy button to copy the Computer Assignment to the Corrected Assignment box.
5 You can run an Analysis Report and a Raw Data Report
• To run an Analysis Report, click the Print button on the Analysis screen.
• To run a Raw Data Report, click the PRN button on the Analysis screen.
6 When you are ready to save the analysis results, click the Save button
Analysis screen.
on the
Q u i c k S t a r t G ui de : A n a l y z e D a ta -- S e l e c t a B a t c h o f D a t a
6
Reprocessing Previously Imported Data
To reprocess previously imported data,
do the following:
1 On the Main menu, select Labscan100, and then click Reprocess Luminex File.
2 In the Reprocess Luminex Data window, specify the session ID of the session you
want to reprocess.
3 The processing options available to you are the same as those for the Import
Luminex File option.
Maintaining Data
You can archive records, retrieve records that you have archived, and export
data for use in other applications.
To archive data, do
the following:
1 On the Main menu select File, and then select Archive Data.
2 Choose whether to archive Cell Information or DNA Reaction Data.
3 Specify the beginning and end of the range of information you want to archive.
4 Indicate whether to include deleted records in the archive.
5 Indicate whether to delete records after archiving.
6 Click Archive Filename to open a dialog box in which you provide a name and location for the file to contain the archived records.
7 Click Save to finish naming the archive file.
8 Click OK to complete the archive task.
To retrieve data, do
the following:
1 On the Main menu select File, and then select Retrieve Data.
2 Choose whether to retrieve Cell Information or DNA Reaction Data.
3 Click Archive Filename to open a dialog box in which you select the location and
file name for the archive file. It will have an .arf file extension.
4 Specify the beginning and end of the range of information you want to retrieve.
5 Indicate whether to replace old records with new ones or whether to skip IDs
already on file.
6 Click OK to complete the retrieve task.
To export data, do
the following:
1 On the Main menu select File, and then select Export Data.
2 Choose whether to export Cell Information or DNA Reaction Data.
3 Specify the beginning and end of the range of information you want to export.
4 Indicate whether you want to include deleted records in the records that you export.
5 Select the file type for the export file.
6 Click Export Filename to open a dialog box in which you provide a name and location for the export file.
Q ui c k S ta r t G u i d e : R e p r o c e s s i n g P r e v i o u sl y Im p o r t e d Da t a
7
7 Click Save to finish naming the export file.
8 Click OK to complete the export task.
9 Click Yes to confirm the export.
Setting Up Your Printer
To set up the printer
you want to use, do
the following:
1 On the Main menu, select File, and then click Print Setup.
2 When you are finished setting options, click OK.
Exiting LABType™
To close LABType
and exit the program, do the following:
1 On the Main menu, select File, and then click Exit.
Q ui c k S t a r t G ui d e : S e t t i n g U p Y o u r P r i n te r
8
Q ui c k S ta r t G u i d e : E x i t i n g L A B T y p e ™
9
Chapter 3: LABType™ Navigation
You navigate within LABType ™ using a combination of buttons on the control
panel and menu selections from the Main menu. This chapter describes the control
panel buttons and the menu options that are available to you.
Figure 1: LABType Main Menu
Control Panel Buttons
The control panel allows you to move through records within a specific database
of the program, to perform basic file management operations and to take shortcuts to
key parts of the program. The function of each button on the control panel is shown
below:
First record
Displays the first record of the currently active database table.
L A B T y pe ™ N a v i g a t i o n : Co n t r o l P a n e l B u t t o ns
10
Previous record
Displays the previous record of the currently active database table.
Next record
Displays the next record of the currently active database table.
Last record
Displays the last record of the currently active database table.
New
Creates a new record.
Save
Saves any changes to the currently active database.
Cancel
Discards all changes that have been made since the last Save.
Exit
Exits the program on the control panel. (This button appears on other windows;
and, if clicked there, closes only that window.)
SSO Class I Analysis
Initiates the DNA SSO Class I Analysis process
SSO Class II Analysis
Initiates the DNA SSO Class II Analysis process.
L A B T y p e ™ N a v i g a t i o n: C o n t r o l P a ne l B u t t o ns
11
Update Parameters
Initiates the Parameter Settings function.
Cell Information Update
Initiates the Cell Information Update function, where you can update demographic and typing information.
Import Data
Initiates the Import Data function.
LABType™ Menus
Program options are accessed from the Main menu. Each menu option may have
additional sub-choices available. This section provides an overview of the Main
menu. Each Main menu option is described, in turn, in subsequent sections.
Main Menu
The Main menu gives you access to major functions of the program. The following options are among those included on the Main menu:
File
Use this option to archive and delete records, set up a printer, maintain the database and exit the program. The following options are available from this menu:
• Archive Data
• Retrieve Data
• Export Data
• Print Setup
• Exit
• Index Rebuild
• Pack Database
Edit
You can access text editing functions from this menu. The following options are
available:
• Undo
• Redo
L A B T y p e ™ N a v i g a t i o n : L A B T y p e ™ M e n us
12
• Copy
• Paste
• Cut
• Select All
LabScan 100
Use this option to bring data generated by the LabScan 100 system into LABType. These options are available:
• Import Luminex File
• Reprocess Luminex File
Analysis
This option provides access to the LABType analysis functions. The following
options are available:
• Cell Information
• SSO Class I
• SSO Class II
• SSO By Batch
Maintenance
Use this option to view and maintain some of the data supported by LABType.
Choose from among these options:
• Antigen/Alleles
• Cell Information
• DNA Readings
• LabScan Raw Data
Update Parameter
This option allows you to change report header information and to change the
date format used within the program. There are three options available:
• Set Date Format
• Update Parameter
• Update NMDP Code Table
Report
You can select from four types of report from this menu selection:
• DNA Typing and Cell Information
• Selected Allele(s)
• Cell Combined Report
• Display Data By Range (Export to Excel File Format)
L A B T y p e ™ N a v i g a t i o n: L A B T y p e ™ M e nu s
13
File Menu
Options on the File menu allow you to archive and retrieve data, set parameters
for printing, perform database maintenance, and exit the program. The following menu
options are available from the File menu:
Archive Data
This option allows you to archive records for:
• Cell Information
• DNA Reaction
Data can also be deleted from the active database when records are archived.
Retrieve Data
This option allows you to retrieve records for:
• Cell Information
• DNA Reaction
Export Data
This option allows you to export records for:
• Cell Information
• DNA Reaction
Print Setup
The print setup dialogue box allows you to select a printer and to define printing
parameters. If you do not use this option, this program uses your Windows® system printing defaults to print reports.
Index Rebuild
From this option, you can rebuild an index that has become corrupted.
Pack Database
From this option, you can compress the database and remove all records that
were previously marked for deletion.
LABType™ Navigation: File Menu
14
Warning: Using the Pack Database option permanently deletes all records
that are marked for deletion. Make sure that all records marked for deletion
should be removed from the database before you use this option.
Exit
Use this option to exit the program. If you have not saved all of your changes
when you select this option, you will be prompted to do so before you leave the program.
Edit Menu
Options on the Edit menu allow you to undo certain actions, redo some actions,
copy, cut, and paste text, as well as select multiple text elements, depending on the
task in progress. The following menu options are available from the Edit menu:
Undo
Un-does certain text changes.
Redo
Re-does text changes.
Copy
Copies selected text to clipboard for subsequent re-use.
Paste
Pastes text from clipboard.
Cut
Removes selected text.
Select All
Selects all available text.
Labscan100 Menu
The following options are available on the Labscan100 menu:
L A B T y p e ™ N a v i g a t i o n: E d i t M e n u
15
Import Luminex File
Use this option to import the data from the Labscan 100 bench-top analyzer into
LABType for analysis and reporting. You must import data before you can analyze it.
Reprocess Luminex File
Use this option to re-analyze Labscan data that has already been processed.
Analysis Menu
The following options are available on the Analysis menu:
Cell Information
Use this option to review information associated with a specific cell, update existing information, and create new cell records.
SSO Class I
Use this option to perform SSO Class I analysis.
SSO Class II
Use this option to perform SSO Class II analysis.
SSO by Batch
Use this option to perform batch analysis. You can select the batch either by
session ID or by range or Cell ID.
Maintenance Menu
Use the Maintenance menu to maintain antigen, cell, and DNA information. You
can also display Labscan raw data. The following options are available from this
menu:
L A B T y p e ™ N a v i g a t i o n : An a l y s i s M e n u
16
Antigen/Alleles
From this option, add or modify antigen/allele records and mark records for deletion.
Cell Information
From this option, add or modify cell information records and mark records for
deletion.
DNA Readings
From this option, add or modify DNA reading records and mark records for deletion.
LabScan Raw Data
From this screen, you can view and search the raw data imported from the LabScan 100.
Update Parameters Menu
The Update Parameters Menu is accessed from the Main menu. The following
options are available.
Update Parameter
This option allows you to define information to be used in the header for your
reports.
Select Date Format
This option allows you to select the date format to be used within the program
and on reports.
Update NMDP Code Table
This option allows you to import NMDP codes from the NMDP website.
Reports Menu
The following menu options are available on the Reports menu:
L A B T y p e ™ N a v i g a t i o n: U p da t e P a r a m e t e r s M e n u
17
DNA Typing and Cell Information
This choice generates a cell sample report.
Selected Alleles
This choice generates a report of selected alleles.
Cell Combined Report
This choice generates a report that contains combined corrected typings and
computer typings for each catalog ID/lot combination.
Display Data By Range
This choice allows you to specify a range of data and export it to Excel file format.
L AB T y pe ™ N a v i g a t i o n: R e p o r t s M e n u
18
L A B T y p e ™ N a v i g a t i o n: R e p o r t s M e n u
19
Chapter 4: Performing SSO Analysis
The DNA SSO Class I or Class II Analysis screens are available from the Analysis menu.
Before you can analyze results, you must have first imported data from the LabScan 100. Refer to “Importing Data From the LabScan 100™” on page 19 for information about how to do this.
Once you have imported data, you can either analyze individual samples or perform a batch analysis of the entire batch. Instructions for both methods are included
in this section of the manual. Refer to “Individual Sample Analysis” and “Batch Analysis” for more information.
Importing Data From the LabScan 100™
Select this option to import the Luminex data from the LabScan 100 system. You
must perform this import before you can analyze the data.
1 On the Main menu, click LabScan 100, and then select Import Luminex File. The
Luminex Import/Report dialog box will appear as depicted below:
Figure 1. LabScan Import/Report Dialog Box
2 Select a data file from the Luminex Data File dialog box. Display the list by clicking
the question mark button.
3 Enter a 2-character technician ID in the Tech ID field.
4 Select the SSO product you wish to use from the SSO Catalog ID list.
5 Select one of the following Import/Report options:
• If you plan to print the report using either Report Only or Import and Report,
and want to view it on-screen before you print it, check Preview Report First.
P e r f o r m i n g S SO An a l y s i s : Im p o r t i n g D a t a F r o m t h e L a b -
20
• If you want to start the analysis immediately after importing the data, check
Analyze After Import
• If you want “automated” analysis and reporting, check Analyze to Printer.
This will process the imported data without user intervention, and will print
reports for all imported samples automatically. You can cancel the analysis
cycle by pressing the “S” key between samples.
6 Begin the import by clicking one of the following buttons:
• Report Only generates a report but does not import or analyze the data.
• Import Data imports the data, but does not generate a report.
• Import and Report imports the data and generates a report.
Reprocessing a LabScan100 File
You can reprocess a LabScan100 file that has been previously imported. Follow
these instructions:
1 Instead of providing a Luminex Data File name as in a regular import, you must provide the Luminex Session Name.
2 All other processing options available to you are the same as those for the Import
Luminex File option.
When you imported the Luminex data you imported with the Analyze After Import
checkbox either checked or unchecked. If you selected Analyze After Import, the Analysis will start automatically after you import, and the Analysis window will display, as
reflected below.
Figure 2. LABType Data After Analysis
P e r f o r m i n g S S O An a l y s i s : Re pr o c e s si n g a L a b Sc an 1 0 0 F i l e
21
Analyzing Data
If you selected Import Only by leaving Analyze After Import Unchecked, you
will need to start-up the analysis after the import occurs. Do the following after you
import:
1 On the Main menu, click Analysis and then select Class I SSO or Class II SSO.
2 Select a Sample ID by clicking on the question mark (?) next to the Sample ID field,
and selecting a Sample ID from the list.
3 Click the Analyze button to perform the analysis. LABType will display either the
DNA Class I or Class II Analysis window, depending on the type of analysis you
selected.
• You can adjust cut-off values, if needed, by clicking the Adjust button. Refer
to “Adjusting Cut-off Values” on page 23 for more information about how to
make these adjustments.
• You can add free-form text comments to the results. Refer to “Entering Text
Comments” on page 24 for more information about how to annotate the
results.
• You can correct the computer-generated assignments, if needed. Refer to
“Correcting Computer Assigned Values” on page 24 for information about how
to do this.
• You can display reaction patterns from the analysis. Refer to “Displaying
Reaction Patterns” on page 24 for information about how to do this.
Batch Analysis
You can perform batch analysis after importing by following these steps:
1 On the Main menu, click Analysis and then click SSO By Batch.
2 The DNA Analysis By Batch dialog box appears:
Figure 3. DNA Analysis By Batch dialog box
3 Choose from among these options to specify how you want to process the batch.
• Check the By Session ID check box if you want to process a batch based on
the session ID.
P e r f o r m i ng SS O An a l y s i s : A n a l y z i ng D a t a
22
• Check the By Range box and specify a range of sample IDs if you want to process a batch based on a range of sample IDs.
• Check the By Tech ID check box if you want to process a batch based on a
particular technician ID.
• Check the By Cat# /Lot# check box if you want to process a batch based on a
particular catalog ID.
• Check the By Test date check box if you want to process a batch based on a
particular test date.
• Check the Not Yet Analyzed check box if you want to process a batch based
on status.
• If you want to select specific Sample IDs within each batch, check the Select
Specific Samples checkbox . If you check this box, you will see this screen
prior to analyzing:
Figure 4. Selecting Specific Sample IDs for Batch Analysis
Select Sample IDs to analyze by selecting or clearing the check box next to each
sample ID. Click Include All to include all sample IDs in the range. Click Exclude All
to clear all the check boxes.
Note: If your criteria for selecting the batch results in more than 96 matching samples, the Select Sample ID to Analyze dialog box will display whether or
not you have checked the Select Specific Samples check box. You can, if
desired, select samples to reduce the size of the batch, thereby reduce the processing time. Follow the directions above for selecting Sample IDs. If you do
not want to select sample IDs, click the Analyze button in the Select Sample IDs
dialog box.
4 Click Analyze to perform the analysis. After the analysis is complete, the DNA
Analysis window will appear, as depicted in Figure 2.
• You can adjust cut-off values, if needed, by clicking the Adjust button. Refer
to “Adjusting Cut-off Values” on page 23 for more information about how to
make these adjustments.
P e r f o r m i n g S S O An a l y s i s : B a t c h A na l y s i s
23
• You can add free-form text comments to the results. Refer to “Entering Text
Comments” on page 24 for more information about how to annotate the
results.
• You can correct the computer-generated assignments, if needed. Refer to
“Correcting Computer Assigned Values” on page 24 for information about how
to do this.
• You can display reaction patterns from the analysis. Refer to “Displaying
Reaction Patterns” on page 24 for information about how to do this.
Adjusting Cut-off Values
The Adjust button on the Analysis screen allows you to adjust cut-off values if
you need to.
Adjustments are made in the Cutoff column under Revised Settings. The impact
to the reaction will show up in the Rxn column.
Figure 5. Cutoff Adjustment Window
The Revise Cutoff/Raw Data screen contains the initial cutoff value (as of the
import). The “X” column is used to indicate beads that require user focus or attention.
There are two ways to adjust cutoff values.You can change the values directly in
the table by double-clicking on the value and typing the new one. When you have finished adjusting a value, click Update.
You can also adjust all cutoff values at one time by changing the percentage in
the spin box. This will adjust the value either up or down, depending on whether you
click the Up or Down arrows. When you are finished adjusting values, click
Apply.Until the point that you have saved your changes, you can undo all changes
and reset the values by clicking the Eraser button. Once you have saved, however,
your changes cannot be undone.
P e r fo r m i n g S S O A na l y si s : A dj u st i ng C ut - o f f V a l u e s
24
To reset cutoff values to predefined Defaults, click
.
Correcting Computer Assigned Values
If you need to, you can change the values that the software assigns. Follow
these steps to do this:
1 Make sure the Corrected Assignment panel is empty.
2 Click the Copy button to copy the computer assignment into the Corrected Assignment panel
3 Correct the assignments as required by changing the values from the keyboard.
4 Click the Save button to save the corrected results.
Displaying Reaction Patterns
You can display the reaction patterns by inserting the allele description into the
Show Patterns For panel. You can copy the allele description in one of two ways.
You can:
• Highlight the allele description and use the Windows Copy and Paste functions. With the allele description highlighted, simultaneously press Ctrl C.
Then, click in the Show Patterns For panel and simultaneously press Ctrl V.
• Highlight the allele description and drag it into the Show Patterns For panel by
clicking with the left mouse button, and dragging the allele description into the
panel, while holding down the mouse button.
After copying the allele description, click Show to display the reaction pattern.
Entering Text Comments
To associate text comments with a particular analysis, click in the Comments
panel and type your comments. You can type virtually as many characters as you
need to. Each text line will wrap at the right edge of the panel; however, only three
lines of text will be visible within the panel at one time. Use the arrow buttons to scroll
a multi-line display within the Comments panel so that you can read it.
P e r f o r m i n g S S O An a l y s i s : Co r r e c t i n g C o m p u t e r A s si g ne d Va l ue s
25
Chapter 5: Generating Reports
There are several report types from which you can choose. You can generate
the following report types:
• DNA Typing and Cell Information Report
• Selected Alleles Report
• Cell Combined Report
• Data Display By Range
To select a report type, choose Reports from the Main menu, and then select
the type of report you want to generate.
DNA Typing and Cell Information Report
You can select DNA Typing and Cell information to generate a cell sample report.
1 Enter a range of cell samples by selecting a beginning sample ID and an ending
sample ID from the drop down lists. Open the drop down lists by clicking on the
question marks (?). Refer to “Selecting A Range of Cell IDs” on page 31 for more
information about using the question mark button to select Cell IDs.
• Include Deleted Records
Select the appropriate button to indicate whether or not to include
deleted records.
• Sort By
Select the radio button corresponding to your choice. You can sort the
report by Cell ID, by Patient Name,
or by Patient ID.
2 Click OK to generate the report.
The following sample depicts header for the report, which shows what data is
included:
Selected Alleles Report
You can choose Selected Allele(s) to generate a report of selected alleles.
G e ne r a t i n g R e p o r t s: D N A T y p i n g a n d C e l l In f o r m a t i o n
26
Figure 1. Cell Sample DNA Typing For Selected Alleles
1 Enter a range of cell samples by selecting a beginning sample ID and an ending
sample ID from the drop down lists. To run the report for a single cell ID, specify the
same cell ID for the beginning and end of the range. Open the drop down lists by
clicking on the question marks (?). Refer to “Selecting A Range of Cell IDs” on
page 31 for more information on using the question mark button to select Cell IDs
2 Enter Antigen/Allele information by selecting from the drop down lists. Open the
drop down lists by clicking on the question marks (?).
• Include Deleted Records
Select the appropriate button to indicate whether or not to include
deleted records.
• Sort By
Select the radio button corresponding to your choice. You can sort the
report by Cell ID, by Patient Name,
or by Patient ID.
3 Click OK to generate the report
The following sample depicts the header for the report, which shows what data is
included.
Cell Combined Report
You can generate a cell combined report by specifying the cell IDs for which you
want to run the report.
Generating Reports: Cell Combined Report
27
1 Enter a range of cell samples by selecting a beginning sample ID and an ending
sample ID from the drop down lists. To run the report for a single cell ID, specify the
same cell ID for the beginning and end of the range. Open the drop down lists by
clicking on the question marks (?). Refer to “Selecting A Range of Cell IDs” on
page 31 for more information about using the question mark button to select Cell
IDs.
• Include Deleted Records
Select the appropriate button to indicate whether or not to include
deleted records.
• Sort By
Select the radio button corresponding to your choice. You can sort the
report by Cell ID, by Patient Name,
or by Patient ID.
2 Click OK to generate the report.
The following sample depicts the header for the report, which shows what data is
included.:
G e ne r a t i n g R e po r t s: C e l l C o m b i n e d R e p o r t
28
Displaying Data By Range
You can select data and export it to a Microsoft Excel spreadsheet. You have a
great deal of control over what is selected and exported, and how it is organized in the
Excel file.
1 On the Main menu, select Reports, and then select Display Data by Range.
2 In the Display Data By Range dialog box, specify the range of data you want to
select:
Figure 2. Selecting a Range of Data for Export
3 Choose from among these options to specify your data selection criteria.
• Check the By Session ID check box if you want to select based on the session
ID.
• Check the By Range box and specify a range of sample IDs if you want to
select based on a range of sample IDs. Refer to“Selecting A Range of Cell
IDs” on page 31 for more information on selecting sample IDs.
• Check the By Tech ID check box if you want to select based on a particular
technician ID.
• Check the By Cat# /Lot# check box if you want to select batch based on a particular catalog ID.
• Check the By Test date check box if you want to select based on a particular
test date.
• Check the Not Yet Analyzed check box if you want to select based on status.
• If you want to select specific Sample IDs within the selected group of records,
check the Select Specific Samples checkbox. If you check this box, you will
see this screen prior to analyzing:
Generating Reports: Displaying Data By Range
29
• Select Sample IDs to analyze by selecting or clearing the check box next to
each sample ID. Click Include All to include all sample IDs in the range.
Click Exclude All to clear all the check boxes.
4 When you are finished specifying the selection criteria you want to use, click Process to begin selecting data. The Analysis Reactivity Summary dialog box will
appear
Figure 3. Analysis Reactivity Summary Dialog Box
5 Select fields to include in the export file. Do one of the following:
• Highlight individual field names, one at a time by clicking them in the Field
Table. Click the Right arrow button to move the field name into the Selected
Fields list.
• Highlight adjacent field names in the Field Table by holding down the Shift key
while you click them in the Field Table. Click the Right arrow button to move
the field names into the Selected Fields list.
• Highlight non-adjacent field names in the Field Table by holding down the Ctrl
key while you click them in the Field Table. Click the Right arrow button to
move the field names into the Selected Fields list.
• To remove names from the Selected Fields list, highlight them in the Selected
Fields panel, and click the Left arrow button.
G e n e r a ti ng R e p o r t s: D i s p l a y i n g D a t a B y R a n g e
30
• To completely clear the Selected Fields list, click the double-headed Left
arrow button.
6 As you select fields, they will appear as column headings in the sample table that is
built in the bottom of the screen. Refer to Figure 3.
Figure 4. Completed Field Selection
7 You can change the order of the columns in this table (and therefore in the exported
Excel file) by clicking them and dragging them to where you want them in the table.
Refer to the following example, which depicts a new order for the columns.
Generating Reports: Displaying Data By Range
31
Figure 5. Field Orders Changed by Dragging
8 When you are finished selecting fields and have arranged them the way you want
to, click the Excel icon in the dialog box to export the information to an Excel file. If
you want to cancel the export, click the File Close icon
9 In the Save As dialog box that appears, type the name for the file, and specify a file
type if you don’t want to export in spreadsheet format. Then click Save.
Selecting A Range of Cell IDs
When you click on a question mark to select a range of cell IDs, the Cell Information Lookup screen will appear. Do the following to select cells:
Figure 6. Cell Information Lookup Screen
1 Select the Cell ID that you want to use by clicking in the gray margin to the left of
the cell ID, and then click Select.
2 The Cell ID will be inserted into the field from which you clicked the question mark.
3 Click the next question mark to make additional selections, or take the appropriate
action from the main screen to complete your task.
G e n e r a ti ng Re po r t s : Se l e c t i n g A R a n g e o f C e l l I Ds
32
G e n e r a t i n g R e p o r t s : S e l e c t i n g A R a n g e o f C e l l I Ds
33
Chapter 6: Maintaining Data
LABType ™ has several functions that allow you to maintain the data stored on
the system. This chapter explains how to maintain:
• Antigens/Alleles
• Cell Information
• DNA Readings information
You can use LABType’s built-in search tool to find data that you want to change
or delete. For example, you can find a particular cell information record by searching
for it using criteria that are maintained on the system. For more information see
“Searching For and Sorting Data” on page 43.
You can also export data to a variety of file formats for manipulation and use outside of LABType. This chapter explains how.
Maintaining Antigen/Allele Information
Use the Antigen/Allele Maintenance function to review and update the list of
available antigens. On the Main menu select Maintenance, and then select Antigens/
Alleles.
From this window you can:
• edit existing antigen/alleles
• create new antigen/alleles
• mark antigen/alleles for deletion
• unmark antigen/alleles
Editing Antigens/
Alleles
The Antigen/Allele Maintenance screen consists of two pages: the Antigen Selection page and the Data Entry page.
M a i n ta i ni n g D a t a : M a i nt a i n i n g A n t i g e n / A l l e l e I nf o r m a -
34
Figure 1. Antigen/Allele Selection Page
Figure 2. Antigen/Allele Data Entry Page
You can re-order the columns on the Selection page by clicking in the column
header and dragging it to a new position in the table. The next time you open this
page, the column order will be reset.
You select the antigen/allele you want to edit on the Selection page by clicking in
the gray margin to the left of the antigen name, and then you edit it by making
changes to the following fields on the Data Entry page.
Name of the antigen/allele.
To edit the name, you must first click the ID Correction button.
field is locked for editing.
Otherwise this
Locus
Locus name: A, B, C, DRB1, DRB3, DRB4, DRB5, DQA1, DQB1 DPA1, or DPB1,
for example
Loc Code
M a in ta i nin g Da t a : M ai nt a i n i n g A n t i g e n / A llel e I n fo r m a t io n
35
Single digit alphanumeric code assigned to the locus; not widely used
Splits of
Antigen splits; for example, A9 splits to A23 and A24
T or B
T cell or B cell designation
Overflow
Antigens that fall in the "other" category can be selected by typing program, but
may not be significant.
When you are finished making changes, click the Save icon
Creating New Antigens/Alleles
on the toolbar.
To add a new antigen/allele, do the following:
1 On the Main menu, select Maintenance, and then select Antigen/Allele.
2 Click the New
icon on the Control Panel.
3 The Data Entry page will appear and you can enter values in the fields as described
in “Editing Antigens/Alleles” on page 33
Figure 3. Antigen/Allele Data Entry
4 When you are finished adding antigen information, click the Save icon
toolbar to save the antigen.
Marking Antigens/
Alleles for Deletion
on the
To mark an Antigen/Allele for deletion, do the following:
1 On the Main menu, select Maintenance, and then select Antigen/Allele.
2 Select the antigen/allele you want to mark for deletion by clicking in the gray margin
next to the antigen/allele name or in the white cell to the left of the antigen/allele.
3 Click the Data Entry tab.
M a i n ta i ni n g D a t a : M a i nt a i n i n g A n t i g e n / A l l e l e I nf o r m a -
36
4 Click the Deleted check box.
5 Click the Save icon
to save your change.
6 The next time the database is packed, the antigen record will be removed from the
database.
Unmarking Deleted
Antigen/Alleles
Up until the point that you pack the database, records that have been marked for
deletion can be “unmarked” so that they will not be deleted. To unmark records, simply select the antigen you want to unmark and then click the Data Entry tab. Remove
the check in the Deleted checkbox, and then click the Save icon to save the change.
When the database is packed, the antigen record will not be deleted.
Note: Once you have packed the database, all records marked for deletion
are permanently deleted, so make sure you want to delete a record before
you mark it.
Maintaining Cell Information
There are two very similar ways to maintain cell information. One method uses
the Cell Information Maintenance window accessed from the Maintenance menu. The
other method uses the Cell Maintenance window accessed from the Analysis menu.
This is the Cell Information Maintenance window. Note that it has only two tabs.
Figure 4. Cell Information Maintenance Window
M a i n ta i ni n g Da t a : M ai nt a i n i n g C e l l I nf o r m a ti o n
37
This is the Cell Information window. Note that it has six tabs.
Figure 5. Cell Informaton Window
The first two pages of both screens are the same and serve the same purpose.
The Cell Information Maintnance window contains a tab called Data Entry. The Cell
Information window contains a tab called Information. These tabs contain the same
information.
It does not matter which method you use to maintain cell information; the key difference is that the Cell Information window contains extra tabs for adding and maintaining DNA and Serology information. These additional pages are illustrated below:
M a i n t a i n i ng D a t a : M ai nt a i n i n g C e l l In f o r m a t i o n
38
Use the Cell Information maintenance function to review and update cell information. On the Main menu select Maintenance, and then select Cell Information.
From this window you can:
• edit existing cell information
• create new cell records
• mark cell records for deletion
• unmark cell records
Editing Cell Information
The Cell Information Maintenance window consists of two pages:
Selection page and the Data Entry page.
M a i n ta i ni n g Da t a : M ai nt a i n i n g C e l l I nf o r m a ti o n
The Cell ID
39
Figure 6. Cell ID Selection Page
Figure 7. Cell Information Data Entry Page
You can re-order the columns on the Selection page by clicking in the column
header and dragging it to a new position in the table. The next time you open this
page, the column order will be reset.
You select the particular cell you want to edit on the Selection page by clicking in
the gray margin to the left of the cell identifier, and then you edit it by making changes
to the following fields on the data entry page (or on the Information page if you are
using the Cell Information window):
Cell ID
Unique identifier for this cell. To edit the name, you must first click the ID Correction button. Otherwise, this field is locked for editing.
Cell type
T or B cell
M a i n t a i n i ng D a t a : M ai nt a i n i n g C e l l In f o r m a t i o n
40
Sample Date
Date sample was taken
Name
Name of the patient associated with this cell.
names for the patient.
Enter
last, first, and middle
Family ID
Unique family ID, if patient is part of a family study
Relation
If patient is part of a family study, relationship to the target of the study
Patient ID
Unique patient ID assigned to this person
Sex
Sex of this patient
Birth Date
Patient’s date of birth
Race
Patient’s race
ABO
ABO blood type
Rh
Patient’s rhesus blood type
Center
Name of the center from which the cell was obtained
Disease
Disease associated with this patient
Logged by
Initials of person logging the information for this patient
Locked by
Initials of the person reviewing and locking in the results
Locked Date
Date results are locked in
Comments
Free-form text comments relevant to this patient
When you are finished making changes, click the Save icon on the Control Panel.
Creating New Cell
Records
To add a new cell record, do the following:
M a i n ta i ni n g Da t a : M ai nt a i n i n g C e l l I nf o r m a ti o n
41
1 On the Main menu, select Maintenance (or Analysis), and then select Cell Information.
2 Click the New icon
on the Control Panel.
The Data Entry page will appear and you can enter values in the fields as described
previously in “Editing Cell Information” on page 38. A Cell ID must be entered
before the record can be saved. The other fields are optional. Fill them in as
required by your center.
3 When you are finished adding cell information, click the Save icon
Control Panel.
Marking a Cell
Record for Deletion
on the
To mark a DNA Reading record for deletion, do the following:
1 On the Main menu, select Maintenance (or Analysis), and then select Cell Information.
2 Select the cell record you want to mark for deletion by clicking in the gray margin
next to it.
3 Click the Data Entry tab. If you used Analysis, click the Information tab.
4 Check the Deleted check box.
5 Click the Save icon
on the Control Panel to save your change.
The next time the database is packed, the cell record will be removed from the
database.
Unmarking Deleted
Cell Records
Up until the point that you pack the database, records that have been marked for
deletion can be “unmarked” so that they will not be deleted. To unmark records, simply select the cell record you want to unmark and then click the Data Entry tab.
Remove the check in the Deleted checkbox, and then click the Save icon to save the
change. When the database is packed, the cell record will not be deleted.
Note: Once you have packed the database, all records marked for deletion
are permanently deleted, so make sure you want to delete a record before
you mark it.
Maintaining DNA Readings
Use the DNA Readings Maintenance screen to review and update the list of
available readings. On the Main menu select Maintenance, and then select DNA
Readings.
From this window you can:
• Edit existing DNA Reading records
• Mark DNA Reading records for deletion
M a i n t a i n i n g Da t a : M a i n ta i ni n g D N A Re a di ng s
42
• Unmark DNA Reading records
Note that you cannot add DNA Reading Records.
Editing DNA Reading Records
The DNA Reading records screen consists of two pages:
Selection page and the Data Entry page.
The DNA Reading
Figure 8. DNA Reading Selection Page
Figure 9. DNA Readings Maintenance – Data Entry Page
You can re-order the columns on the Selection page by clicking in the column
header and dragging it to a new position in the table. The next time you open this
page, the column order will be reset.You select the DNA reading you want to edit on
the selection page by clicking in the gray margin to the left of the DNA reading, and
then you edit it by clicking the Data Entry Page tab and making changes to the following fields:
Cell ID
Unique ID for the specific cell. To edit the name, you must first click the ID Correction button. Otherwise this field is locked for editing.
Cell Type
T or B cell.
M a i n ta i ni n g Da t a : M ai nt a i n i n g D N A R e a d i n g s
43
Cat. ID/Lot
Catalog ID and lot number used to analyze the sample.
Viability
Unique lot for the tray
Reaction
Reaction score for each well.
When you are finished making changes, click the Save icon
on the tool-
bar.
Marking a DNA
Reading Record for
Deletion
To mark a DNA Reading record for deletion, do the following:
1 On the Main menu, select Maintenance, and then select DNA Reading.
2 Select the DNA record you want to mark for deletion by clicking in the gray margin
next to it.
3 Click the Data Entry tab.
4 Check the Deleted check box.
5 Click the Save icon on the Control Panel to save your change.
The next time the database is packed, the antigen record will be removed from
the database.
Unmarking Deleted
DNA Reading
Records
Up until the point that you pack the database, records that have been marked for
deletion can be “unmarked” so that they will not be deleted. To unmark records, simply select the reading record you want to unmark and then click the Data Entry tab.
Remove the check in the Deleted checkbox, and then click the Save icon to save the
change. When the database is packed, the antigen record will not be deleted.
Note: Once you have packed the database, all records marked for deletion
are permanently deleted, so make sure you want to delete a record before
you mark it.
Searching For and Sorting Data
On the Selection tab of each of the data maintenance windows, there are search
and sort fields that you can use to find information that meets certain criteria and to
sort the data by.
Searching for Data
Following is a portion of one of the data maintenance windows. It depicts how to
set-up the fields to perform a search. d
M a i n ta i ni n g D a t a : Se a r c h i n g F o r a n d So r ti ng D a t a
44
1 From the In Field Of drop down list, select the data field on which you want to base
your search. Note that you can search on fields that do not necessarily appear on
the screen.
2 In the Search for field type the criteria for which you want to search.
3 Click the New Search button to start the search. A pointer will appear next to any
single record that matches the criteria you entered. If more than one record
matches the criteria, then the first matching record will be indicated with the pointer.
4 If you want to, you can continue adding criteria to the search. The system will interpret any additional criteria as an “and” search. This means that it will only find
records that match both the first and any subsequent sets of criteria that you
enter. To add criteria, click the Add Criteria button and specify the additional criteria.
Sorting Data
You can sort the data by doing the following:
1 In the Sort By drop down list, select the field you want to sort by.
2 Click the Sort button. The data will be sorted by the field you specified in ascending
(lowest to highest) order.
Viewing LabScan 100 Raw Data
Use the View LabScan 100 Raw Data function to view the data that was imported
from the LabScan 100. On the Main menu, select Maintenance, and then select LabScan Raw Data.
Figure 10. LabScan Raw Data
On this screen you can view the imported LabScan data. The sample information from the current session ID is displayed in each row of this table.
You can re-order the columns on the Selection page by clicking in the column
header and dragging it to a new position in the table. The next time you open this
page, the column order will be reset.
M a i n ta i ni n g Da t a : V i e w i n g L a b S c a n 1 0 0 R a w D a t a
45
Select a row in the Reading Selection table, and then Click on the Data tab to
see particular data for each sample ID. You can view:
• Session ID
• Cell ID
• Catalog ID/Lot Number
• Control Information
• Bead Information
• Raw Data Values
• Reaction Information
Editing Raw Data
You cannot edit the data that has been imported from the LabScan. You can,
however use the ID correction button on the data entry screen to change the Cell ID.
1 Select the Cell ID you want to change from the LabScan Raw Data Selection
screen.
2 Click the Data Entry tab.
3 Click the ID Correction button.
This will open the Cell ID field for editing.
4 Make your change, and then click the Save icon on the Control Panel when you are
finished.
Exporting Data
You can export LABType data to an ASCII, Excel, or dBase file for manipulation
and use outside of LABType.
Exporting DNA
Reaction Data
1 On the Main menu select File, and then click Export. Select DNA Reaction Data.
2 Select the range of cell IDs that you want to export. Click the question marks to
select a beginning and ending cell ID for the range. The catalog IDs and lot numbers will fill with the corresponding data.
3 Indicate whether or not to include records that have been previously marked for
deletion in the export. Select Yes to include them; select No to exclude them.
4 Select the type of file format you want to export to: you can export to ASCII, Excel,
or dBase file formats.
5 Click Export Filename to open the Save As dialog box.
6 In the Export field of the Save As dialog box, type the file name that you want to
use, and then click Save. Note that the file type will correspond to the type you
selected in the Export dialog box.
• If you selected ASCII, the file type will be .txt
• If you selected Excel, the file type will be .xls
• If you selected dBase, the file type will be .dbf
7 Click OK to perform the export.
M a i nt a i ni n g D a t a : E x po r ti ng D a t a
46
Exporting Cell Information
1 On the Main menu select File, and then click Export. Select Cell Information.
2 Select the range of cell IDs that you want to export. Click the question marks to
select a beginning and ending cell ID for the range.
3 Indicate whether or not to include records marked for deletion in the export. Select
Yes to include them; select No to exclude them.
4 Select the type of file format you want to export to: you can export to ASCII, Excel,
or dBase file formats.
5 Click Export Filename to open the Save As dialog box.
6 In the Export field of the Save As dialog box, type the file name that you want to
use, and then click Save. Note that the file type will correspond to the type you
selected in the Export dialog box.
• If you selected ASCII, the file type will be .txt
• If you selected Excel, the file type will be .xls
• If you selected dBase, the file type will be .dbf
Click OK to perform the export.
M a i n ta i ni n g Da t a : E x p o r t i n g D a t a
47
Chapter 7: File Maintenance
This chapter address a variety of “housekeeping” tasks that LABType ™ supports.
Using commands on the File menu, you can archive data from your system that you no
longer need. If and when you need it, you can retrieve it and have it available for your
use.
You can also control some report parameters and update NMDP codes using the
Update Parameters menu.
This chapter provides instructions for completing these tasks:
• Archive and retrieve DNA Reactions
• Archive and retrieve Cell Information
• Pack the database
• Rebuild the database
• Change Report header information
• Change Date format
• Download NMDP Codes from the NMDP web-site
Archiving Data
The Archive Data option is available from the File menu. You can archive:
• Cell Information
• DNA Reaction
1 On the Main menu, select File and then click Archive Data.
2 Select one of the following, depending on what kind of information you want to
archive:
• Cell Information
• DNA Reaction
3 The appropriate dialog box will appear, depending on what you selected. Although
the windows for archiving each type of data are different, the procedure for
archiving and deleting records from these databases is the same for each type of
data. The examples in this chapter use the Cell Information screens.
F i l e M a i nt e na n c e : A r c hi v i ng D a t a
48
Figure 1. Archive and Delete Cell Information Screen
4 In the Archive and Delete Cell Information dialog box, specify the beginning and
ending cell IDs of the range you want to archive or delete. To archive a single
record, specify the same value for both the beginning and ending cell ID in the
range. Click the question mark button (?) to select specific cell IDs. For more information on selecting a range of data, see “Selecting A Range of Cell IDs” on
page 31.
5 Click Yes or No to specify if you wish to include deleted records in the archive.
6 Click Yes or No to specify if you want to delete records from the active database
after they are archived.
7 Specify a full name for the archived file in the Archive Filename field. The system
automatically adds the extension .ARF to the file name. Click the OK button to create the archived file. The system gives you a confirming message with a count of
the records archived.
Retrieving Archived Data
Figure 2. Retrieve Data Screen
F i l e M a i n t e n a nc e : R e t r i e v i ng A r c h i v e d D a t a
49
Figure 3. Retrieve DNA Reaction Data Screen
The Retrieve Data option is available from the File Menu. Use this option to
retrieve records that have previously been archived. With this function, you have the
option of replacing old records in the active file with retrieved records and you may
also choose not to retrieve records that already exist in the active file. You may
retrieve the following records types from archived files:
• Cell Information
• DNA Reaction
The procedure for retrieving records is the same for each of these two types of
record. To retrieve a specific type of record, do the following:
1 From the File menu, select Retrieve Data. This menu option has sub-menu
options. Select the record type from the sub-menu.
2 Click on the Archive Filename button to browse for the file on your system.
Archived files have the extension .ARF
3 Enter a beginning and ending cell ID for the range of records within the file that
you wish to retrieve. You can also click on the ? button to display a list of the
records in the file. To retrieve a single record, enter the same ID in the Beginning
and Ending fields.
4 Specify what to do if duplicate records exist:
• Click Replace Old Record With New to replace existing records in the active
database with a record from the retrieved file.
• Click Skip ID’s already on file to specify that you want to skip IDs that are
already part of your active database.
5 When you have defined the parameters for retrieving records, click the OK button to
retrieve the desired records. The system confirms the number of records retrieved.
F i l e M a i n t e n an c e : R e tr i e v i n g A r c h i v e d D a t a
50
Packing The Database
Figure 4. Pack Database Screen
Use this option to pack (compress) the size of a specific database within the
program or all of the databases available from this option. You may compress any or
all of the following categories of data:
• Cell Information
• Antigens
• DNA Tray
• DNA Readings
• LABScan 100 Raw Data
The Pack Database option not only compresses the size of a database,
thereby reducing the disk storage space required, it also removes all records, which
were previously marked for deletion from the database .
Warning: Using the Pack Database option permanently deletes all records
that are marked for deletion. Make sure that all records marked for deletion
can be removed from the database before you use this option.
To pack the database, click in the check boxes next to the category of data you
wish to compress. The system compresses the data and removes all files that were
previously marked for deletion.
F i l e M a i n t e n a nc e : P a c k i n g T h e D a t a b a s e
51
Rebuilding The Index
Figure 5. Index Rebuild Screen
Occasionally, you may experience circumstances that can affect the integrity of
the databases that make up this system. The Index Rebuild option, which is available
from the File menu, allows you to re-establish the integrity of the table structure by
rebuilding the index. You can select specific table indexes to be rebuilt or you can
select all tables to be rebuilt in one operation. The following database tables can be
rebuilt:
• Cell Information
• Antigens
• DNA Tray
• DNA Readings
• LABScan 100 Raw Data
1 From the Main Menu, select File, and then click Index Rebuild.
2 On the Index Rebuild Screen, check the box or boxes next to the tables you want to
rebuild.
3 Click OK to proceed with the rebuild, or click Cancel to exit without rebuilding any
indexes.
Updating System Parameters
You can update the following information:
• Report Header Information
• Date Format
• NMDP Codes
Updating Report
Header Information
1 On the Main menu, select Update Parameters, and then click Update Parameter.
2 In the Update Parameters dialog box, replace the text in the 3-line Headings box
with the information of your choosing.
3 When you have entered the information that you want to appear on report headers,
click Save. To close this window without changing any information, click Cancel.
F i l e M a i n t e n a n c e : R e b ui l d i ng T he In d e x
52
Figure 6. Parameter Settings Dialog Box
Changing the Date
Format
1 On the Main menu, select Update Parameters, and then click Select Date Format
2 Click the button next to the date format you want to use.
3 Click Save to change the date format. To close this window without changing any
information, click Cancel.
Figure 7. Select Date Format Dialog Box
F i l e M a i n t e n a nc e : U pd a t i n g S y st e m P a r am e t e r s
53
Updating NMDP
Codes
Before you begin: You must have an internet connection to update NMDP codes
from their website.
Figure 8. NMDP Code Update Dialog Box
1 Visit www.nmdp.org. On their website, find the dowload location for allele code lists.
Follow the website’s instructions for downloading the self-extracting zip file that
contains the allele codes.
2 Follow the website’s instructions for extracting the file numeric.txt from the downloaded zip file.
3 Note the location that numeric.txt is extracted to. You will need to provide that location to LABType in a later step.
4 On the Main menu, select Update Parameters, and then click Update NMDP Code
Table.
5 Click the question mark button and navigate to the file numeric.txt that you downloaded in Step 1 and saved in Step 2.
6 When you find the file, click OK in the File Open dialog box to copy the file path into
the Update NMDP dialog box
7 Click Update to update the file.
F i l e M ai nt e na n c e : U p da t i n g S y s te m P a r a m e t e r s
54
F i l e M a i n t e n a nc e : U pd a t i n g S y st e m P a r am e t e r s
A
Index
A
Adjusting cut-off values, 23
Analysis
batch, 21
Analysis menu, 12
options, 15
Analysis report
running
quick start instructions, 4
Analyze Data
selecting specific data
batch analysis, 3
Analyze data, 3
batch analysis, 4
Analyze Data -- batch, 4
Antigen/Alleles, 15
Antigens/Alleles
creating new, 35
editing, 33
maintaining, 33
marking for deletion, 35
Archive, 13
Archive data, 47
quick start instructions, 6
B
Batch analysis, 21
C
Cell Combined Report, 25
Cell IDs
selecting a range, 31
Cell Information, 11, 16
editing, 38
exporting, 46
maintaining, 36
Cell Record
marking for deletion, 41
Cell Records
creating, 40
deleting, 41
unmarking, 41
Cell sample, 17
generate, 16
Changing date format, 52
Computer assigned values, 24
correcting, 24
Control Panel, 9
Creating New Antigens/Alleles, 35
Creating New Cell Records, 40
Currently active database, 10
changes, 10
record, 9, 10
Cut-off values
adjusting, 23
reset to defaults, 24
D
Data
archiving, 6
display by range, 25
editing raw data, 45
exporting, 6, 45
importing from LabScan, 19
reprocessing
quick start instructions, 6
retrieving, 6
viewing raw data from LabScan
100, 44
Data Display By Range Report, 28
Database
packing, 50
Date format
changing, 52
Deleted records
unmarking, 36
Deleting
DNA records, 43
Deleting Antigens/Alleles, 35
Deleting Cell Records, 41
Deleting DNA Records, 43
Displaying reaction patterns, 24
DNA reaction data
exporting, 45
DNA Reading Records
editing, 42
marking to delete, 43
unmarking, 43
DNA Readings
maintaining, 41
DNA Records
deleting, 43
E
Edit menu, 14
Editing
Antigens/Alleles, 33
cell information, 38
DNA Reading Records, 42
Entering text comments, 24
Excel spreadsheet, 28
exporting to, 28
Exit, 10, 14
option, 13, 14
Exiting Lab Type, 7
Exporting Cell Information, 46
Exporting data, 45
exporting data
quick start instructions, 6
Exporting DNA Reaction Data, 45
F
File Menu
options, 13
G
Generating reports, 25
Getting Started, 3
H
housekeeping
archive data, 47
retrieve data, 47
I
Import Luminex File, 14
Importing Data from LabScan 100, 19
Importing LabScan Data
quick start instructions, 3
Index
rebuild, 13
rebuilding, 51
Initiates, 10, 11
DNA SSO Class II Analysis, 10
Import Data function, 11
Installation Instructions, 2
Introduction, 1
K
Key
shortcuts, 9
L
LabScan 100, 3
importing data, 3, 19
reprocessing data, 20
viewing raw data, 44
LabScan 100 menu, 12
LabScan100 Menu
options, 14
LabType
exiting, 7
M
Main menu, 11
Maintaining Antigens and Alleles, 33
Maintaining Cell Information, 36
Maintaining data, 6
quick start instructions, 6
Maintaining DNA Readings, 41
Maintenance menu, 12
options, 15
Menu
Analysis, 12
LabScan 100, 12
Main, 11
Maintenance, 12
Report, 12
Update Parameter, 12
Index
B
N
Navigation
cell information, 11
Class I analysis, 10
Class II analysis, 10
exit, 10
import data, 11
update parameters, 11
NMDP Codes
updating, 53
P
Pack Database, 14
Packing the database, 50
Print Setup, 13
Printer, 7
Printer set-up
quick start guide, 7
Q
Quick Start Guide, 3
R
Raw Data report
running
quick start instructions, 4
Reaction Patterns
displaying, 24
I nd e x
Rebuild, 13
index, 13
Rebuilding the Index, 51
Report Header
updating, 51
Report menu, 12
Reports
cell combined report, 25
Display Data By Range, 25
DNA
Typing
and
Cell
Information, 25
generating, 25
Selected Alleles, 25
selected alleles report, 25
Reports menu, 16
options, 16
Re-process Luminex File, 14
Reprocessing Data, 6
Reprocessing data
quick start instructions, 6
Reprocessing LabScan 100 files, 20
Retrieve data, 47
Retrieve records, 13
Retrieving data
quick start instructions, 6
Running reports, 25
Selection criteria
in batch analysis, 2
Setting Up Your Printer, 7
Software
installing, 2
SSO Analysis
performing, 19
T
Text comments
entering, 24
Typing and Cell Info. Report, 25
Typings
suggested only, 1
U
Unmarking Deleted Cell Records, 41
Unmarking Deleted DNA Records, 43
Unmarking Deleted Records, 36
Update Parameters menu, 12, 16
options, 16
Updating NMDP Codes, 53
Updating report header info., 51
V
S
Selected Alleles Report, 25
Selecting a range of cell IDs, 31
Viewing LabScan 100 Raw Data, 44