1
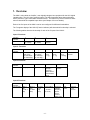
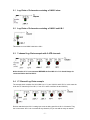
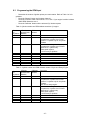
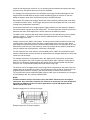
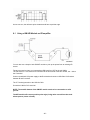
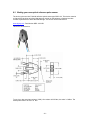
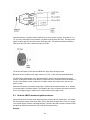
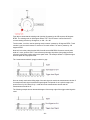
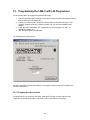
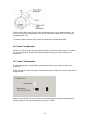
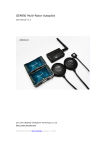
LMA-3 Multi-sensor Auxiliary Input Device
User Manual
Auxbox_Manual_1 7.doc
1.
Overview................................................................................................................................ 4
Differential Inputs ............................................................................................................... 5
2.
The Innovate Log-Chain concept .......................................................................................... 6
2.1
Log-Chain of 5 channels consisting of LMA-3 alone. ........................................................ 7
2.2
Log-Chain of 6 channels consisting of LMA-3 and LM-1 ................................................... 7
2.3
7-channel Log-Chain example with 2 AFR channels......................................................... 7
2.4
17-Channel Log-Chain example ........................................................................................ 7
3.
Connecting the LMA-3........................................................................................................... 8
3.1
Connecting the LMA-3 to an LM-1 ..................................................................................... 8
3.2
Using the LMA-3 as part of a Log-Chain ........................................................................... 8
3.3
Connecting external sensor signals................................................................................... 8
3.4
Powering external sensors ................................................................................................ 9
3.5
Connecting an RPM signal ................................................................................................ 9
3.6
Connecting Type K Thermocouples .................................................................................. 9
4.
Mounting and calibrating the LMA-3.................................................................................... 11
4.1
Calibrating the Acceleration Sensor to the mounting position ......................................... 11
5.
Setting up the input channels .............................................................................................. 12
5.1
Programming the LMA-3 with the setup buttons.............................................................. 12
6.
RPM measurement ............................................................................................................. 13
6.1
RPM Measurement basics............................................................................................... 13
6.1.1
Four-Stroke Engines................................................................................................. 13
6.1.2
Two-Stroke Engines ................................................................................................. 13
6.1.3
Rotary Engines (Wankel Engine) ............................................................................. 14
6.2
How the LMA-3 determines RPM .................................................................................... 14
6.3
Programming the RPM input ........................................................................................... 15
6.4
Using the LMA-3 with the Inductive Clamp...................................................................... 16
6.4.1
Inductive Clamp Usage ............................................................................................ 16
6.5
Using the RPM-Converter with pulsed RPM input (Tach) signals ................................... 17
7.
Measuring Pressures .......................................................................................................... 17
7.1
Measuring MAP ............................................................................................................... 17
7.2
Measuring boost/vaccum................................................................................................. 17
8.
Measuring Ignition Advance ................................................................................................ 18
8.1
Using a GM HEI Module as VR amplifier......................................................................... 20
8.2
Making your own optical reference pulse sensor............................................................. 21
8.3
How the LMA-3 measures ignition advance .................................................................... 22
8.3.1
Measurement Details................................................................................................ 23
9.
Measuring Frequencies, custom RPM, or speed ................................................................ 25
10.
Measuring duty cycle ........................................................................................................... 25
11.
Measuring external 5V sensors........................................................................................... 27
11.1
Calibrating external 5V inputs ...................................................................................... 27
11.1.1 Calibrate using built-in sensor power ....................................................................... 27
11.1.2 Calibrate using external sensor power ..................................................................... 27
11.1.3 Restoring a channel to factory calibration ................................................................ 28
12.
Programming the LMA-3 with LM Programmer................................................................... 30
12.1
Changing the device name .......................................................................................... 30
12.2
Updating the firmware .................................................................................................. 31
12.3
Input 1 Configuration.................................................................................................... 31
12.3.1 Measuring RPM........................................................................................................ 31
12.4
Input 2 Configuration.................................................................................................... 32
12.5
Input 3 configuration..................................................................................................... 32
12.5.1 Measuring Custom RPM .......................................................................................... 32
12.5.2 Measuring Frequency............................................................................................... 32
12.5.3 Measuring Speed ..................................................................................................... 33
12.5.4 Measuring Ignition Timing ........................................................................................ 34
12.6
Input 4 configuration..................................................................................................... 35
12.7
Input 5 Configuration.................................................................................................... 35
13.
Using the LMA-3 with LogWorks 1.x ................................................................................... 36
14.
Revision History................................................................................................................... 37
1.1
-2-
-3-
1. Overview
The LMA-3, also called the ‘AuxBox’, was originally designed as a peripheral for the LM-1 digital
Lambda meter. The LM-1 has 5 auxiliary inputs. The LMA-3 populates these inputs with either
built-in sensors or user-connectable external sensors. The LMA-3 may also be used as a standalone 5 channel MTS compatible input device (see Chapter 2 for more details).
Each of the five inputs of the LMA-3 can be user configured for different functionalities.
The 7-segment display of the LMA-3 (Function indicator) will show which functionality is selected.
The following tables show the functionality of each of the 5 inputs of the LMA-3:
Input 1 Functions
Function
Indicator
Functionality
1
2
=
RPM
(0..10230)
RPM
(0..20460)
External 0..5V
sensors
1
2
3
4
5
=
Thermocouple
EGT range
(0..1093 degC,
32..1999 degF)
Thermocouple
CHT range
(0..300 degC,
32..572 degF)
Side
Force
(+- 2g )
Side
Force
(+- 1g)
Side
Force
(+- 0.25g)
External 0..5V
sensors
1
2
F
=
Duty Cycle
Ignition Timing
Frequency
(straight
frequency,
Speed sensor,
Custom RPM
range
External 0..5V
sensors
Input 2 Functions
Function
Indicator
Functionality
Input 3 Functions
Function
Indicator
Functionality
Input 4 Functions
Function
Indicator
Functionality
1
2
3
4
F
d
=
MAP (1
bar)
(0..101.3
kPa)
MAP (3
bar)
(0..304.1
kPa)
Vaccuum
(0..30
inHg
Vacc)
Vaccum/Boos
t
(-14.7PSI…
29.4 PSI)
Frequency
(straight
frequency,
Speed
sensor,
Custom
RPM range
Duty
Cycle
External
0..5V
sensors
-4-
Input 5 Functions
Function
Indicator
Functionality
1
2
3
F
d
=
Acceleration
(+- 2g)
Acceleration
(+- 1g)
Acceleration
(+- 0.25g)
Frequency
(straight
frequency,
Speed
sensor,
Custom
RPM
range
Duty Cycle
External
0..5V
sensors
The LMA-3 also can act as a power supply for user supplied external sensors. The 5V output of
the LMA-3 can supply up to 300mA of current. For this functionality the LMA-1 must be connected
to a switched 12V source in the car. It converts the 12V to 5V to power the sensors.
When no external sensors need to be supplied with 5V power, the 12V connection can be left
open.
1.1
Differential Inputs
The LMA-3’s external connections are differential. This means that each input channel has 2 input
terminals. A + terminal and a – terminal. This is to eliminate ground offsets in the signal. Many
times the ground point of a sensor is at a different ground than the LMA-3. Because each
electronic device can only measure a voltage referenced to it’s own ground, differences in
grounding can introduce measurement errors. The LMA-3 measures the sensor signal’s ground
with the – input and them measures the difference between the + and the – input. This way it
“recreates” the sensor signal’s own ground reference as if this input were referenced directly to
that sensor’s ground.
The – input is NOT a ground itself. It is a ground reference input.
-5-
2. The Innovate Log-Chain concept
LogWorks 2.0 has the capability to log, display and analyze up to 32 engine parameters. Most
users will use less though. Each of the MTS components reads between 1 and 6 engine
parameters. To interface a multitude of MTS components to LogWorks with a single connection,
the Innovate LogChain concept was introduced.
The LMA-3 can be used as a MTS component in a Log-Chain.
Each of the MTS components has two serial ports (except the LM-1, which has only one). One
serial port is designated as IN-port, the other as OUT port. The OUT-port of one device is
connected to the IN-port of the next device and so on. This way devices can be ‘daisy-chained’ to
build a log-chain for up to 32 channels total. The OUT-port of the last device is connected to the
computer for logging or downloading of logged data.
The device that’s first in the chain is special. It determines the logging sample rate. The first
device in the chain sends a data packet containing its channel data (a sample) to the next device
(downstream, left to right in the diagram) every 81.92 milliseconds. The next device appends its
data to that packet and hands that packet to the next device downstream and so on. At each
device the packet grows in length. The devices in the chain synchronize their sampling of the
engine parameters to the packets, so that all the channels in a packet together represent the
same instance in time. At the downstream end of the log chain (OUT-port of the last device) a
computer or external logger can be connected to store or display the stream data. The XD-1
display is such a device.
This also means that the complete channel data set is ONLY available at the end of the logchain. A datalogger capable of recording the log-chain data-stream therefore MUST be
placed at the end of the log-chain. This includes lap-top computers or other loggers.
Commands for individual devices are sent ‘upstream’. A device (incl. a computer or an XD-1) can
send commands to the devices upstream of itself, but not downstream. Commands can include
start-stop recording, calibration/configuration commands and so on. Only the device directly
upstream of the command originator of course will receive the command. This device then
decides, depending on the command, whether to execute the command and whether to pass it
on. An example of a case where the command is executed but not passed on is the start-stop
record command. The first upstream device capable of logging internally will execute the
command, but not pass it on.
As said before, the first device is special because it is the synchronization source for the entire
chain. By plugging its IN-port with the supplied terminator connector, a device can detect that
requirement when it powers up. The terminator connector just connects the transmit and receive
line of the IN-port together. Each device sends a special command out on it’s IN port when it
powers up. This command is ignored and not passed on by any device if received on it’s OUT
port. If the sending device immediately receives that command on its IN-port again, because the
terminator is plugged in, it assumes it is the first and special device in the chain. The LM-1, having
only one serial port, is ALWAYS a special device and MUST be connected to the beginning of the
chain.
The following are some examples of Log-Chains using the LMA-3 and other MTS devices.
-6-
2.1
Log-Chain of 5 channels consisting of LMA-3 alone.
2.2
Log-Chain of 6 channels consisting of LMA-3 and LM-1
This allows to record LMA-3 data in the LM-1.
2.3
7-channel Log-Chain example with 2 AFR channels.
Notice that the LC-1’s are connected BEFORE the first LMA-3. LC-1’s should always be
connected before the first LMA-3.
2.4
17-Channel Log-Chain example
The example chain consists of a LM-1/LMA-2, a LC-1, two LMA-3’s and 2 XD-1’s. In this case the
chain has 17 channels (6 from LM-1, 1 from LC-1 and 5 each from the two LMA-3’s).
Devices attached to the LM-1’s analog input count as being part of the LM-1’s 6 channels. They
don’t count extra. XD-1’s do not contribute any channels, so you can add as many as needed.
-7-
3. Connecting the LMA-3
The LMA-3 looks like this:
3.1
Connecting the LMA-3 to an LM-1
Plug the supplied Mini-DIN8 to Mini-DIN8 cable in the LM-1 port of the LMA-3. Plug the other end
of the cable into the AUX-IN port of the LM-1.
The LMA-3 is now operable and is powered by the LM-1.
NOTE:
The 5V power supply for external sensors should not be used when the LMA-3 is solely
powered by the LM-1.
3.2
Using the LMA-3 as part of a Log-Chain
If the LMA-3 is the first device in the Log-Chain, it’s Serial IN port MUST be plugged by the
supplied Terminator plug. The Terminator is a 2.5mm Stereo connector with no cable attached.
3.3
Connecting external sensor signals
For each external connection you can connect the external sensor’s output to the CHx+
connection. Connect the CHx- connection to the ground of the sensor. Make sure the sensor
output signal does not exceed 5V. The LMA-3 is protected if sensor signals exceed that (up to
40V for most inputs), but it cannot measure beyond a 5V signal.
-8-
3.4
Powering external sensors
If you want to power external sensors, connect a switched 12V supply (switched on when the cars
ignition system is on) to the connection marked 12V on the left side. Connect the connection
marked GND to the cars chassis ground. At the connection marked 5V you can connect external
sensors. External sensors don’t HAVE to be powered by the LMA-3. The 5V output is a
convenience for external sensors when no 5V supply is available. The 5V supply can power
sensors with a total power consumption of up to 300mA.
3.5
Connecting an RPM signal
For RPM measurement you can either connect a tach signal to the CH1+ input or plug an
inductive clamp into the 3.5 mm stereo socket marked RPM. See chapter 6 for RPM
measurement details.
3.6
Connecting Type K Thermocouples
Thermocouples are used to measure temperatures by relying on the phenomena where a junction
of any two different metals ( Copper and Iron, for example ) will generate a small voltage. This
voltage is dependant upon which two metal are used, and the temperature of the junction. This
phenomena is known, formally, as the "Seebeck Effect". Because every junction of different
metals contributes its own voltage into the measurement, it is important to have as few junctions
between dissimilar metals as possible in order to record an accurate measurement. This is why
thermocouple wire is made completely of two different metals. The "Type K" thermocouple
included in the LMA-3 kit is composed of Cromel and Alumel; one lead being made of each ( the
red and yellow leads ). Do not look in the box for a thermocouple sensor to put onto the end
of the thermocouple wire. You can use the wire AS the sensor or use the wires to attach to
a Type K thermocouple.
To make a thermocouple, strip approximately 3/4" of insulation form one end of the thermocouple
wire. Twist the two exposed metal ends together. You may optionally solder them, also. But twist
them first. Do not solder them in parallel. This will form what is called the "Hot junction". This
"Hot junction" is what you will connect to the surface that you want to measure. This is usually
either: a) under the copper gasket of a sparkplug for cylinder head temperature (CHT) or, b)
clamped to a primary header tube for exhaust gas temperature (EGT).
There is also the "Cold junction." This is where the 2 leads of the thermocouple come together
again at the LMA-3 terminals. The LMA-3 has an internal temperature sensor at the T/C input
terminals. It uses this sensor to "offset" the effect of the "Cold junction" in the measurement. This
is called "Cold junction compensation". Once the effects of the cold junction are neutralized, the
LMA-3 can accurately read the temperature of the "Hot junction" which is the twisted lead pair at
the opposite end of the thermocouple wire.
One thing that is counter intuitive for many people is that the negative side of a thermocouple wire
is always red. There are many different types of thermocouple wire; types K, J and T being the
most popular. All have a red negative lead and a yellow, black, or blue positive lead respectively.
When connection the thermocouple to the TC terminals on the LMA-3, be sure to connect
the yellow lead to the + and red lead to the - terminals.
Several manufacturers offer EGT "thermocouple probes" which are actually inserted into the
exhaust gas stream through a hole in the headers or exhaust manifold. These provide a more
accurate measurement of exhaust gas temperature. They are commonly available in types K and
J. Only type K will currently work with the LMA-3. To use a thermocouple probe, connect the red
-9-
and yellow leads of the thermocouple wire to the yellow and red leads of the thermocouple probe.
The junction is inside the probe. You can not use normal copper wire to connect the
thermocouple probe to the LMA-3. You must use thermocouple wire to connect the probe. If
you do not, there will be an extra two-metal junction where the Copper wire meets the Constantan
wire of the probe. This extra junction will cause a large error in the temperature readings.
Most Thermocouple probes are of the “grounded junction” type. This means that the “hot junction”
is also connected to the probe’s body. As this body is connected for example to the exhaust
manifold, the sensor wires are essentially grounded through that. The same is true if a homemade thermocouple junction is used as described above by twisting the wires and if that wire-twist
is connected to some grounded engine part.
You can check if you have a grounded junction type by measuring between the probe body and
one of the Thermocouple wires. If you have continuity, you have a grounded junction.
The LMA-3 NEEDs a grounded junction.
If you don’t have a grounded junction, connect a wire between the TK- input of the LMA-3
and the ground terminal of the LMA-3.
- 10 -
4. Mounting and calibrating the LMA-3
In order to use the acceleration sensor of the LMA-3, care must be taken to mount the LMA-3
correctly on a horizontal surface in the car. The LMA-3 MUST be aligned with the direction of
travel. The following pictures show the four possible mounting positions.
The mounting position should not deviate more than 3 degrees from horizontal.
4.1
Calibrating the Acceleration Sensor to the mounting position
Lay the LMA-3 down on the mounting surface, but don’t mount it yet. Switch the LM-1 on to
power the LMA-3 or switch the 12V supply to the LMA-3 on if it is powered from a switched 12V
supply.
Press the ‘Calibrate’ button until the digit display shows a blinking C
If the mounting surface is not within the 3 degrees of horizontal, the acceleration sensor can’t be
calibrated for zero g and the LMA-3 shows a blinking E for Error:
After the zero g acceleration calibration is performed, hold the LMA-3 such that the side of the
LMA-3 pointing in the intended direction of travel points vertically up. Then press the Calibrate
button again until the blinking C shows up.
If the LMA-3 shows the blinking ‘E’, even when the device is calibrated on a flat, horizontal,
surface, the device may need to be reset. To reset the LMA-3’s accelerometers, place the device
on a flat, horizontal, surface and press and hold all three buttons together until the display shows
the letter ‘A’:
After this, re-try the above calibration procedure.
You can now mount the LMA-3.
- 11 -
5. Setting up the input channels
The LMA-3 can be programmed directly through the setup buttons on the LMA-3. LM Programmer
software version 3.05 (or later) allows you to program the LMA-3 via the LM Programmer
software. This is necessary for some of the more advanced functionality of the LMA-3. Some of
these advanced functions like speed sensing, frequency sensing, custom RPM, ignition advance
and so on require more user input data that cannot be supplied by the simple 3-button interface of
the LMA-3.
5.1
Programming the LMA-3 with the setup buttons
To program an input channel, repeatedly press the ‘Channel’ button until the channel number to
program appears on the LMA-3 digit display. Then repeatedly press the ‘Function’ button until the
digit display shows the intended function. The digit display will switch rapidly between indicating
the input channel number and the set function. The LEDs next to the channel and function
buttons will indicate which value is being displayed.
If the function selected is External input, the digit display shows a ‘=’ sign like this:
Refer to Chapter 1 for the different functions for the inputs.
- 12 -
6. RPM measurement
6.1
RPM Measurement basics
Most RPM measurement methods use the ignition system of the car as a convenient source of
RPM dependent pulses. Other methods use a TDC sensor (one pulse per rotation), cam sensor,
or fuel injection pulses (number of pulses/rotation is dependent on the fuel-injection system).
Some actually measure the AC frequency created by the car's alternator.
Because the number of pulses per crank rotation is dependent on the ignition system and engine
type, a universal RPM measurement method must be adaptable to the different environments
encountered. The typical ignition system consists of an ignition coil, a coil driver that switches
current to the coil on and off, and a distributor. When current is switched on to the coil, the coil
stores energy in its magnetic field. When the current is switched off, that energy gets discharged
at a very high voltage pulse on the coil’s secondary winding, creating a spark.
A capacitive discharge ignition system (CDI) uses a capacitor to store the spark energy. The
capacitor is charged to about 400V and then rapidly discharged over the ignition coil's primary
winding. The coil thus only acts as transformer and does not store energy (and can therefore be
smaller). The advantage of a CDI system is a very high and fast rising spark voltage (less
susceptible to spark fouling). The weakness of the CDI system is the very short duration spark,
which might not be long enough to ignite the mixture. Multispark ignition systems try to overcome
the inherent weakness by creating multiple spark pulses over some degrees of crank rotation to
increase the likelihood of igniting the mixture. The distributor switches the spark voltage to the
appropriate spark plug.
6.1.1 Four-Stroke Engines
On a typical 4-stroke engine each spark plug fires once for every two crank rotations. The coil on
a distributor-equipped 4-stroke has to create sparks for every cylinder. The number of ignition
pulses per crank rotation in this case is the number of cylinders divided by 2.
Some engines have one coil for every 2 cylinders instead of a distributor. The coil fires two spark
plugs at the same time. One spark is wasted because it fires one cylinder at the end of its exhaust
stroke. Therefore, this system is called a Waste Spark System. Each coil of a Waste Spark
System fires once for every crank revolution.
Other distributor-less 4-stroke engines use one ignition coil for every spark plug. This ignition
system fires each coil once for every 2 crank revolutions.
Coil-on-Plug ignition systems actually incorporate the ignition coil in a module that plugs directly
onto a spark plug and do not have a spark plug wire.
6.1.2 Two-Stroke Engines
On a 2-stroke engine there is a spark for every crank rotation, so the spark frequency doubles
compared to a 4-stroke.Very few multi-cylinder 2-strokes have distributors. For those that do, the
number of ignition pulses per crank rotation is equal to the number of cylinders. Most two-stroke
engines have one coil for every cylinder. The coil fires once for every crank revolution, the same
as on a 4-Stroke Waste Spark system.
- 13 -
6.1.3 Rotary Engines (Wankel Engine)
A rotary engine consists of a roughly triangle shaped rotor rotating in a roughly elliptical chamber.
The three spaces left between the chamber and the rotor go through the four cycles of a fourstroke engine for each rotation of the rotor. A single (or dual) spark plug at a fixed position in the
chamber ignites the mixture of each space in sequence. Therefore, a rotary engine requires 3
sparks for every rotation of the rotor. The mechanical power from the rotor is coupled to an
eccentric gear to the output shaft. This gear has a 3:1 gear ratio and the output shaft therefore
rotates 3 times faster than the rotor. The output shaft is the equivalent of the crankshaft on a
piston engine. Because RPMs are measured conventionally as the rotations of the crankshaft, the
rotary engine requires one spark for every 'crankshaft' rotation, the same as a two-stroke engine.
6.2
How the LMA-3 determines RPM
The LMA-3 measures RPM not by measuring the number of pulses over a time period, as a
tachometer does. That measurement would be too slow to provide adequate correlation between
input channels. Instead the LMA-3 measures the time between input pulses and from that
calculates RPM for each pulse measurement.
This measurement method has a few caveats though:
1. If the RPM pulse signal is derived from the ignition signal, a multi-spark ignition system
will trigger the measurement multiple times for each pulse. This throws the measurement
off because the LMA-3 does not know if the pulses are for each ignition event (one per
cylinder cycle) or because of multispark. This is specially problematic because the
number of multispark pulses also varies with RPM in a lot of ignition systems. Fortunately
many multispark ignition systems output a tach signal with only one pulse per engine
cycle. But some, notably Ford EDIS systems, output all pulses and therefore require a
special tach adapter.
2. Odd fire engines, like V-Twin motorcycle engines and odd-fire V6 engines have ignition
pulses that are not evenly spaced. For example a 60 degree V-Twin running at 10
degrees ignition advance will fire cyl. 1 at 10 degrees BTDC. Then fire cyl. Two 420
degrees later at 410 degrees. Then fire cyl 1 300 degrees later at 710 degrees. This
means the ignition pulses sent to the LMA-3 are alternating between 420 and 300
degrees apart and therefore the time between pulses alternates. The LMA-3 therefore
measures the times between ALL pulses for a complete engine cycle (2 rotations) and
averages the times between them.
- 14 -
6.3
Programming the RPM input
- Determine the number of ignition pulses per crank rotation. Refer to Table 2 or 3 for
guidance.
- Press the ‘Channel’ button until it shows channel 1.
- Press the ‘Function’ button until it shows 1 or 2. Use 1 if your engine’s redline is below
10000 RPM. Otherwise use 2.
- Press the ‘Calibrate’ button until the selected Cyl. Number apears
Table 2: Cylinder number and RPM calibrate number 4 Cyl engine
Number
of
Cylinders
4-Stroke
pulses/CrankRotation
Calibrate
Number
Comment
1
1/2
1
2
1
2
Use also when using inductive clamp
on spark wire or power wire of COP
system of 1 cylinder only for all cylinder
numbers
Use also when using inductive clamp
on spark wire or power wire of Waste
spark coil of 1 cylinder only.
Waste spark system:
1 coil for every 2 cylinders.
3
4
5
6
8
10
12
1-1/2
2
2-1/2
3
4
10
12
3
4
5
6
8
A
C
Table 3:: Cylinder number and RPM calibrate number 2 Cycle and Rotary Engine
Number
of
Cylinders
2-Stroke
pulses/CrankRotation
Calibrate
Number
Comment
1
1
2
2
2
4
Use also when using inductive clamp
on spark wire or power wire of COP
system of 1 cylinder only for all cylinder
numbers
Also use for rotary engine.
Use also when using inductive clamp
on spark wire or power wire of Waste
spark coil of 1 cylinder only.
Waste spark system:
1 coil for every 2 cylinders.
3
4
5
6
3
4
5
6
6
8
A
C
- 15 -
6.4
Using the LMA-3 with the Inductive Clamp
The inductive clamp measures the magnetic field created around a spark plug wire when spark
current flows. If a metallic shield covers the spark plug wire, the inductive clamp may not work
because the shield would short out the magnetic field. Like all inductive clamp rpm pickup
devices, some ignition systems like Capacitive Discharge Ignition (CDI) or multi-spark ignition
systems may not work properly with the inductive clamp pickup because the pulses created may
be too short in duration. Multi-spark systems confuse the ignition timing measurement because
the RPM converter cannot distinguish which ignition pulse belongs to which crank rotation. The
LAM-3 will work only on the tach output of the ignition system in this case.
The inductive clamp must be clamped around ONE lead only. Clamping it (for example)
around all wires of a coil-on-plug pack does not allow it to work because the magnetic
fields of the wires most likely cancel each other out.
6.4.1 Inductive Clamp Usage
- Plug the inductive clamp's 3.5mm audio plug into the RPM socket of the LMA-3.
- Clamp the Inductive Clamp on the spark plug wire of one cylinder so the wire is completely
surrounded by the clamp.
- Make sure the clamp is completely closed.
- Start the engine.
- Switch on the LM-1 unit.
The decimal point of the digit display of the LMA-3 should light up steadily. This indicates when a
valid RPM signal is detected. If it does not light up, or lights up intermittently, reposition or reverse
the clamp (try clamping it upside down). If the decimal point out only occasionally, that is OK. The
RPM converter will still convert, though its output might be noisy. A noisy output has spikes or
lengthy flat areas in the data log. [Note: to work properly with the inductive clamp pickup the LMA3 must be set up for the appropriate number of pulses per crank rotation.]
•
For a 4 stroke engine without waste spark ignition, this would be 1 pulse per 2 crank rotations.
This is the factory setting.
•
For a 4 stroke engine with waste spark ignition, or a 2 stroke engine, this would be 1 pulse per
crank rotation.
•
For a rotary engine, this would be 1 pulse per rotation. This is the same as for a 1-cyl 2-stroke
motor.
Note: On any distributor-less ignition system you can alternately clamp the inductive
clamp around one of the power wires on the primary side of the ignition coil or coil-onplug module.
- 16 -
6.5
Using the RPM-Converter with pulsed RPM input (Tach) signals
- Unplug the inductive clamp from the LMA-3 if connected.
- Connect the RPM signal to the CH1+ input screw terminal.
The decimal point of the digit display of the LMA-3 should light up steadily. This indicates when a
valid rpm signal is detected. If it does not light up, check your connections.
DO NOT CONNECT A PULSED RPM SIGNAL TO THE INDUCTIVE CLAMP INPUT. THIS
MIGHT DAMAGE THE LMA-3 OR LM-1. Again, this should just result in an error code, not
mechanical damage.
7. Measuring Pressures
The LMA-3 has a built in MAP sensor. To use it, connect a small ¼” hose between a
vacuum/boost connection AFTER the throttle body and the LMA-3 MAP input port.
It should be connected after the throttle body because the lowest pressure that can be measured
before the throttle body is atmospheric pressure (discounting some pressure losses from the
intake tract before the throttle body).
MAP stands for Manifold Absolute Pressure. This means that the sensor measures pressure
referenced to absolute vacuum, not atmospheric pressure like many vacuum and boost gauges.
Engine parameters like fueling, ignition timing, compressor efficiency and so on are dependent on
the MASS of air (in pounds per cubic foot or kg per cubic meter) entering the engine. As air is a
gas, it’s mass is dependent on it’s ABSOLUTE pressure, referenced to absolute vaccuum and it’s
temperature.
Most vaccuum and boost gauges are gauge pressure sensors. A gauge pressure sensor
measures the difference to atmospheric pressure, not the absolute pressure. So, without knowing
atmospheric pressure at the point where the sensor gets it from, the actual air-mass entering the
engine can’t be measured. Because the atmospheric pressure changes with altitude and weather,
the gauge pressures are not a precise metric. This is specially problematic for boost pressure
sensors, because their atmospheric reference source comes typically from inside the cabin or
engine compartment. The atmospheric pressure there can change with speed from aerodynamic
effects (ram pressure).
7.1
Measuring MAP
Function 1 of input 4 of the LMA-3 measures absolute pressure with a range of 0..1 bar (0..14.7
PSIa). This is the range intended for normally aspirated engines where the maximum intake
pressure can be atmospheric pressure.
Function 2 of input 4 of the LMA-3 measures absolute pressure with a range of 0..3 bar (0..44.1
PSIa). This is the range intended for boosted engines where the maximum intake pressure can be
up to 29.4 PSI above atmospheric pressure.
7.2
Measuring boost/vaccum
The LMA-3 can use it’s MAP sensor also as gauge pressure sensor if so desired. As stated
above, this is NOT the preferred way of measuring pressures, but it is possible. The LMA-3 will
measure the current atmospheric pressure in the intake tract when it starts up and stores this
- 17 -
value internally until it is started the next time. In vaccuum/boost measurement mode the LMA-3
will then subtract the measured value from the MAP value internally.
For this to work, the LMA-3 MUST be powered by a switched 12V source that switches on before
the engine is started, like the ignition power. This 12V source MUST stay active during cranking.
To give the LMA-3 a chance to measure atmospheric pressure, you must change the way you
start the engine. First, switch ignition on (powering the LMA-3), wait for 0.5 seconds, THEN crank
the engine (starter).
Function 3 of input 4 of the LMA-3 measures vaccuum with a range of 0..30 inHg (gauge) This is
the range intended for normally aspirated engines where the maximum intake pressure can be
atmospheric pressure.
Function 4 of input 4 of the LMA-3 measures vaccuum and boost pressure with a range -14.7 to
29.4 PSIg This is the range intended for boosted engines where the maximum intake pressure
can be up to 29.4 PSI above atmospheric pressure. Vaccuum is typically measured here as
negative PSI. But you can set up any metric you want with LogWorks 2.
8. Measuring Ignition Advance
Warning:
Measuring ignition advance is NOT a simple plug-and-play process. The variables
are many and you need to know what you are doing to do it right. Read this
chapter multiple times before attempting this and try to understand what you are
measuring.
The LMA-3 expects the spark reference pulse on input 1 and the crank
reference pulse on input 3.
Input 1 is simultaneously still used to measure RPM, but MUST be set to measure RPM.
The LMA-3 can measure ignition advance between 10 degrees ATDC to 50 degrees BTDC.
ADTC numbers will be negative, BTDC numbers will be positive. The LogWorks
equivalents are 0V = 50 degrees, 5V = -10 degrees.
Ignition advance is typically measured in degrees. This is the number of degrees before Topdead-center of a piston where the spark fires.
When the spark in an engine fires the mixture in the combustion chamber starts the burn process.
Because it takes time for the fire to consume the mixture, it has to be lighted before the piston hits
top dead center. During that burning process the pressure and temperature rises. The pressure
and temperature rise results not only from the energy released by the burning mixture, but also
the piston is still moving up, compressing the burning gas. At some point in this process the
pressure in the cylinder peaks and then falls off. The position of this pressure peak (in crank
angles) depends on the engine geometry (bore-stroke ratio, stroke-rod length ratio and so on), but
NOT on engine load or RPM. For many engines the ideal peak pressure position to extract the
maximum energy is between 14 and 20 degrees ATDC.
The time the mixture takes to burn is dependent on many variables. AFR, mixture density,
temperature and so on are some of the variables. The point of ignition advance is to time the
spark such, that the peak pressure point is reached at the ideal position. Earlier or later looses
power.
An engine typically does not have a “crank degree” sensor output of sufficient resolution.
Therefore ignition advance must be measured as a time measurement. An engine crankshaft
- 18 -
rotates at 360 degrees per revolution. So, by measuring the time between the spark pulse and a
reference pulse, the ignition advance time can be calculated.
For example if the reference pulse is at a 90 degree crank angle and the spark happens at 20
degrees BTDC at 6000 RPM, the engine rotates at 36000 degrees per second. So, the time
difference between spark pulse and reference pulse is 0.003055 seconds.
Most modern EFI systems have trigger wheels that create reference pulses through a hall effect
or variable reluctance sensor. These trigger wheels look like toothed gears with one or two teeth
missing (some instead have extra teeth).
Some systems also have only a single magnetic trigger reference from the flywheel or balancer
and use the starter ring gear to provide extra pulses. The extra pulses are needed by the ECU to
determine the exact crank angle when to fire the sparks for the different cylinders.
The LMA-3 is not concerned with firing multiple cylinders, but only with the timing of one cylinder
(typically cylinder 1). Therefore it does not need the additional pulses, but can identify the
reference trigger from each.
Another concern is the “phase” of the pulses. The timing can be measured either from the rising
or falling edges of the spark pulse to the rising or falling edges of the reference pulse. Which
pulse edge for each has to be known to allow accurate measurement. Very often this can be only
determined by trial and error. This means you have to go through all four possible combinations
until you measure the correct advance, verified with a timing light.
For this reason the use of the inductive clamp as RPM source is NOT recommended for spark
advance measurement, because its phase is undetermined can changes depending on which way
around you use the clamp.
For example if the source for the spark pulse is the negative side of the ignition coil (inductive
ignition), the negative side of the coil goes to ground (negative edge of pulse) to charge the coil.
When the coil discharges (spark happens) the voltage rises to several hundred volts and then
returns to 12V. In this case the spark pulse would use the rising edge.
The same is true for the trigger pulse from the trigger wheel. Depending on the sensor used, the
output pulses can be negative or positive. This can either be found out with an oscilloscope or by
programming the LMA-3 for one way or the other and finding out which is the correct one.
The tryout should be done at different RPMs, because under some circumstances you could get a
correct reading at idle, but a shift at a different RPM.
NOTE:
Variable reluctance sensors cannot be read by the LMA-3. VR sensors do not output a
clean pulse, but a short wave, whose 0 Volt crossover is measured. The wave amplitude is
dependent on RPM and sensor. For these applications a special VR amplifier like the
LM1815 needs to be used.
Example voltage trace of a VR sensor output:
Example output of a VR sensor amplifier:
- 19 -
As one can see, the reference pulse created would have a positive edge.
8.1
Using a GM HEI Module as VR amplifier
You can also use a simple 4-wire GM HEI module to pick up the pulses from an existing VR
sensor.
Those were used on many non-computerized GM cars from 1975 to the mid 1980s.
The VR sensor’s + wire needs to be connected to the W terminal of the HEI module, the – side to
the G terminal.
Connect a switched 12V power supply to the B terminal and connect a 390 Ohm 1/2W resistor
between B and C terminal.
The C Terminal goes also to the LMA-3s CH3+.
Ground the LMA-3s CH3- terminal.
NOTE: The metallic bottom of the GM HEI module needs to be connected to a solid
ground.
The HEI module will create a positive pulse edge (rising) when a tooth from the tooth
wheen passes (center of tooth).
- 20 -
8.2
Making your own optical reference pulse sensor
The device to be used is a Fairchild reflective optical sensor type QRC1133. This device contains
a infrared LED to shine an infrared light beam on a mark on the balancer or flywheel and also
contains a photodiode to detect the reflected light. The device can be ordered from:
www.digikey.com Part Number QRC-1133-ND.
This device looks like this:
To use it you also need two resistors (1/4W). One resistor is 330 Ohm, the other 3.3 kOhm. The
hookup schematic to be used is this:
- 21 -
Paint the balancer or flywheel surface flat black so as not to reflect any light. Then paint a ¼” to
1/3” (6-9 mm) white stripe on the balancer or flywheel at 90 degrees after TDC. The edge of the
stripe in rotation direction should be at the 90 degree mark. The sensor should be mounted at
TDC where the TDC mark is when the engine is at TDC.
The device will output a pulse with the NEGATIVE edge at the 90 degree mark.
Mount the device so that its front edge is about 0.15” (3.8 - 4 mm) from the flywheel/balancer.
The LED shines infrared light on the flywheel balancer, but the light is absorbed by the black
surface. So the photo detector in the device is off and the CH3+ connection should be between 3
and 5V. If the voltage is lower, replace the 3.3 kOhm resistor with a lower value, but don’t go
below 1 kOhm.
When the LED shines on the white stripe, light is reflected and the photo detector is on, drawing
current through the 3.3 kOhm resistor. The voltage at the CH3+ connection should be less than 1
Volt. If the voltage is higher, replace the 3.3 kOhm resistor with a higher value.
8.3
How the LMA-3 measures ignition advance
Ignition Advance is how many crank degrees before (or after) TDC the ignition fires. This means
the measurement system must know where TDC is and when the spark fires. There’s no sensor
on a car that directly measure crankshaft degrees. Therefore the LMA-3 needs to measure RPM
and the time difference between the TDC mark and the ignition firing.
Example:
- 22 -
At 6000 RPM an engine rotates 100 times/second. This means the crankshaft rotates 36000
degrees per second. So, if the spark fires 1 millisecond before TDC, the ignition advance is 36000
th
degrees/sec times 1/1000 second, or 36 degrees.
8.3.1 Measurement Details
To determine advance, the LMA-3 uses RPM and the time it takes the reference tooth to pass by.
It passes by once per revolution. The reference tooth is either the tooth after the missing tooth (or
teeth) on a missing-tooth trigger wheel, the extra tooth on a extra-tooth trigger wheel or simply the
mark tooth if only one tooth wheel or mark is used (called the Redneck Trigger, because it has
only one tooth).
For this to work, the RPM signal on Input 1 MUST have either a negative edge or positive edge
when a spark happens. A RPM signal on Input 1 that is derived from a trigger wheel without spark
offset, can’t be used. This is often the case if an RPM signal generated by an ECU, is used. In
that case the RPM signal needs to be tapped of the coil negative or the ignition drive signal. In the
case of getting the RPM signal from coil negative, typically a positive edge happens when the coil
fires. This assumes a regular inductive, not a CD ignition system. CD ignition systems typically do
have an RPM output, but the polarity of the pulse (which edge coincides with the spark event) is
depending on the manufacturer and device model.
On some dwell controlled ignition systems, like GM HEI, very often a potentiometer needs to be
used to attenuate the RPM signal so only the TRUE spark event is measured, not other edges in
the waveform. Below is an expample on how to connect such a potentiometer:
The importance of programming the correct pulse edge for both, the TDC reference signal and
spark signal is illustrated below:
We assume a 8 tooth trigger wheel (teeth 45 degrees apart) with one tooth missing. The wheel is
installed with the missing tooth at 180 degrees from TDC, the VR sensor is mounted at 90
degrees after TDC as in this illustration:
- 23 -
From this we know that the missing tooth (number 8) passes by the VR sensor at 90 degrees
BTDC. The missing tooth is 180 degrees before TDC. The VR sensor is offset from that in
counter-rotating direction by 90 degrees, so 180 – 90 = 90.
Tooth number 1 can’t be used as opening tooth, because it passes by 45 degrees BTDC. Tooth
number 8 can’t be used because it’s not there. So tooth number 7 is used. It passes by 135
degrees BTDC.
Now let’s look at the pulses that the LMA-3 would see at 6000 RPM. We asume a tach pulse
width of 1 msec, spark at TDC. Tooth reference pulse edge is positive (rising edge) and tach
reference pulse has a positive edge at the spark event. The example shows a 2 cylinder engine
with one spark at every spark event.
The “measurement window” (range) is shown in gray.
One can clearly see that the falling edge of the tach signal is outside the measurement window. If
for example the tach signal contains the spark signal of all sparks of an 8 cylinder engine, the
spark event of cyl. 8 instead of cyl 1 could fall into the measurement window and the
measurements would be off.
The following example shows what would happen if the wrong edge of the trigger wheel signal is
used:
- 24 -
One can see that the measurement window is shifted by the width (or time duration) of the Trigger
wheel pulse. Because in most cases that pulse width is fixed, the error translates to varying
number of degrees depending on RPM.
To set up the ignition measurement system of the LMA-3 with unknown edge trigger signals, all
four possible cases should be examined and verified with a timing light at at least 2 different
RPMs:
Case 1
Case 2
Case 3
Case 4
Trigger pulse positive edge
Trigger pulse positive edge
Trigger pulse negative edge
Trigger pulse negative edge
Spark reference positive edge
Spark reference negative edge
Spark reference positive edge
Spark reference negative edge
9. Measuring Frequencies, custom RPM, or speed
The LMA-3 has the capability to measure frequencies on channels 3, 4, and 5. It converts a
frequency signal (pulses per second) into a voltage (0..5V) to be logged in the LM-1 or a number
between 0 and 1023 to be logged directly by LogWorks. This is useful for measuring custom RPM
ranges, signals from speed sensors or the frequency of MAF sensors with frequency output (as
opposed to voltage output MAF sensors).
The range of frequencies that the LMA-3 can measure can be programmed by with LM
Programmer. The LMA-3 can be set to any frequency range between 0 and 30 Hz for the full
0..5V range to 0..15 kHz for the full 0..5V output (logging) range.
Also, LM Programmer has convenient conversions built in, so you don’t have to calculate the
resulting frequency ranges for speed sensing or RPM sensing yourself. See chapter 10.x for
details.
A frequency input signal must have an amplitude (voltage range of pulse) between 0.5V at the low
pulse point to minimum of 3V and maximum of 40 V at the high pulse range.
NOTE:
The custom RPM feature will work only for even fire tach signals, not for tach signals that
vary their time between pulses during an engine cycle. Use the input 1 RPM functions
instead.
10. Measuring duty cycle
To measure the duty cycle of a signal in channels 3, 4, and 5, the input signal must cover the
same voltage range as for a frequency signal. Duty cycle is defined as the ratio between the time
a signal is active and the total time of the active and inactive time. A signal can be either active
high ( the event, like injector open, happens when there is a high voltage) or active low (the event
happes when the measured signal is at ground or close to it).
Very often the injector duty cycle is to be measured by the LMA-3. A typical fuel injector is
connected to 12V on one side, while the other side is connected to ground when the ECU opens
the injector. Because the pulse is therefore active when the voltage on the pin is at ground,
negative duty cycle is measured.
- 25 -
So called peak-hold injectors (as opposed to saturated injectors), work differently. Their drive
signal first goes to ground for a high current opening pulse, then rises to 8-10 Volts for the hold
period. Because the LMA-3 sees everything above 2.5V as “high”, it will be able to see only the
peak period. On some peak-hold systems it is possible to connect the CHx+ input of the LMA-3 to
12V at the injector and connect the CHx- input to the injector signal to still measure correctly. But
that is not always the case. The LogWorks 2.0 Manual shows an alternative method. If the above
method works, it actually measures positive duty cycle.
- 26 -
11. Measuring external 5V sensors
Each of the 5 channels on the LMA-3 can be configured to accept input from an external 0..5V
sensor. Hookup is very straight forward, with ground going to the ‘-‘ input for the channel and the
positive sensor signal going to the ‘+’ input for the channel. Raw sensor data can be converted
into meaningful units and values using the input configuration features of LogWorks on a PC.
11.1 Calibrating external 5V inputs
LMA-3 external inputs are factory calibrated. However, depending on a number of factors it is not
unusual to see a small discrepancy between values read on an external voltmeter and those read
by LogWorks from an LMA-3. If higher precision is required, the LMA-3 can be field calibrated.
The following calibration instructions all assume that the input being calibrated has already been
configured for external input. Either using LM Programmer or the front panel interface.
11.1.1Calibrate using built-in sensor power
In order to calibrate using the built-in sensor power, the following steps must be taken.
•
Connect the LMA-3 to external 12V power
•
Connect a jumper wire between the 5V sensor output and the ‘+’ terminal for the input to
be calibrated
•
Press the Channel button until the channel number to be calibrated is displayed
•
Press and hold the Calibrate button while the channel number is still displayed
The LMA-3 will either display a lower case ‘c’ to indicate the Calibration has occurred for the
selected channel or an upper case ‘E’ to indicate that the calibration could not occur. Normally an
E indicates that the voltage being input is .1V or more off from 5V.
11.1.2Calibrate using external sensor power
In order to calibrate using external sensor power, the following steps must be taken.
- 27 -
•
Connect the ground from the external sensor supply to the GND connection on the LMA-3
•
Connect the +5V from the external sensor supply to the ‘+’ input of the channel to be
calibrated
•
Press the Channel button until the channel number to be calibrated is displayed
•
Press and hold the Calibrate button while the channel number is still displayed
The LMA-3 will either display a lower case ‘c’ to indicate the Calibration has occurred for the
selected channel or an upper case ‘E’ to indicate that the calibration could not occur. Normally an
E indicates that the voltage being input is .1V or more off from 5V.
11.1.3Restoring a channel to factory calibration
In order to restore an external input back to the factory default calibration, the following steps must
be taken.
•
Connect a jumper wire from the ‘+’ input of the channel to be restored to the GND
connection on the LMA-3
- 28 -
•
Press the Channel button until the channel number to be calibrated is displayed
•
Press and hold the Calibrate button while the channel number is still displayed
The LMA-3 will either display a lower case ‘d’ to indicate the defaults have been restored for the
selected channel or an upper case ‘E’ to indicate that the restoration could not occur. Normally an
E indicates that more than .1V is being detected on the selected input.
- 29 -
12. Programming the LMA-3 with LM Programmer
To connect the LMA-3 for programming follow these steps:
1. Insert the terminator plug (included 2.5 mm stereo connector without wire) into the Serial
IN port. Make sure it is seated fully.
2. Connect the 2.5mm to DB 2 computer interface cable into the Serial OUT port. Your
computer needs a serial port. If it does not have one, you will need a USB to serial
adapter.
3. Power the LMA-3 either from 12V, a 9V battery or by connecting it to an LM-1 as
described in chapter 3.1.
4. Start the LM Programmer application
The following screen will show up:
The LM Programmer software then shows in its first page the type and version number of the
firmware of the device.
12.1 Changing the device name
If multiple LMA-3’s are used in a Log-Chain, each MUST be given a unique name so that
LogWorks can identify each LMA-3. Just enter a name in the edit box in this page.
- 30 -
12.2 Updating the firmware
Click on the ‘Update Firmware’ button. You will be presented with a file dialog box that allows you
to select a firmware file. Firmware files end with the file extension .dld.
LMA-3 firmware file names start with: AUXB1 for AuxBox 1. The first part is followed by a dash,
then a V, then the version number without dots.
Example: LMA-3 firmware version 1.00 alpha release would have the file name AUXB1-V100A.dld
LAM-3 firmware version 1.00 would have the file name AUXB1-V100.dld
After you opened the firmware file, this new firmware will be downloaded in the LMA-3 device.
12.3 Input 1 Configuration
Click on the Input 1 tab in the top of the window.
12.3.1 Measuring RPM
The drop-down list at the top of the window allows you to select the different functionality for that
input. If RPM is selected, the area below the functionality selection shows as above.
The positive edge/negative edge selection is ONLY important if this input is also used as spark
reference signal for ignition advance measurement.
Select the cylinder count in the appropriate drop-down list.
- 31 -
12.4 Input 2 Configuration
Function 1 and 2 of Input 2 use the TK+ and TK- inputs.
The CH2+ and CH2- inputs are used ONLY of this input is set for “external 0..5V sensor”
When selecting one of the side-force modes for Input 2, the center window looks like this:
Select the travel direction of the car. Please note that changing this setting will effect the travel
direction setting for acceleration measurements on Input 5 as well.
12.5 Input 3 configuration
Input 3 has by default duty cycle measurement as function 1. See chapter 10 for details. Duty
Cycle measurement is also available on Inputs 4 and 5.
12.5.1Measuring Custom RPM
When using the custom RPM feature the center area looks like this:
On the left edit box you can specify the max RPM for this measurement channel. In the example
case the max RPM is 6000. This means that in LogWorks 6000 RPM is equivalent to 5Volt. This
allows LogWorks to have a higher RPM resolution (~ 6 RPM per step instead of 10 RPM when the
range is 0..10230 RPM). This functionality is also available for Inputs 4 and 5.
12.5.2 Measuring Frequency
The center section of the window changes to this:
- 32 -
You can enter any frequency between 10 Hz and 15000 Hz as full scale frequency. LMA-3
measures the frequency with a resolution of 0.1 % of the full scale frequency specified. So in
LogWorks 0 Hz is always 0 Volt, and the full-scale frequency is equivalent to 5 Volt.
This functionality is also available for Inputs 4 and 5.
12.5.3 Measuring Speed
Select the Speed sensing function in the topmost drop-down list. The center section of the window
changes to:
With the radio buttons you can select to use metric (km/h) or US (mph) units. In the left drop-down
list you select the max speed to be measured. The LMA-3 measures the speed with a resolution
of 0.1 % of the selected max speed.
In the right edit box you enter the pulses per mile the speed sensor produces. Speed sensors are
typically pulse sensors mounted either on the drive-shaft or wheel. To calculate the pulses per
mile (or km/h) click on the calculate button:
- 33 -
Select if you use a drive-shaft sensor or a wheel sensor. Enter the pulses per rotation created by
the sensor either as driveshaft rotation or wheel rotation. You also need to enter the wheel
diameter, and in case of a drive-shaft sensor, the final drive (differential) ratio.
The LM-Programmer will calculate the pulses per mile (km) for you.
This functionality is also available for Inputs 4 and 5.
12.5.4Measuring Ignition Timing
When selecting ignition timing (See chapter 9 for details) for input 3, the center of the window
changes to this:
Select the trigger wheel characteristics. The trigger tooth is the tooth after the last missing tooth (if
missing teeth), or the extra tooth when the wheel has extra teeth. If only one pulse is used, the
missing teeth/extra teeth input is ignored.
To enter the offset in degrees, measure the offset (in degrees) after TDC after the last missing
tooth. Also measure the offset of the sensor from TDC. Subtract the sensor offset from the tooth
offset to get the real offset of the Trigger tooth to be entered. The following picture shows an
example:
- 34 -
In this case the offset of the Trigger Tooth is 100 degrees (after TDC in rotation direction). The
sensor is mounted at 45 degrees after TDC. So the complete real offset from TDC is 55 (100 –
45) degrees after TDC.
To measure ignition advance, Input 1 MUST be configured for RPM measurement.
12.6 Input 4 configuration
Function 1,2,3 and 4 on this input are used for pressure measurement. See chapter 7 for details.
For Custom Frequency, Custom RPM, speed sensing and duty cycle inputs on Input 4, see
chapter 12.5
12.7 Input 5 Configuration
For Custom Frequency, Custom RPM, speed sensing and duty cycle inputs on Input 5, see
chapter 12.5
When selecting one of the acceleration measurement modes for Input 5, the center of the window
changes to this:
Select the travel direction of the car. Please note that changing this setting will effect the travel
direction setting for side force measurements on Input 2 as well.
- 35 -
13. Using the LMA-3 with LogWorks 1.x
When using LogWorks 1.1 (or 1.11), some of the AuxBox default settings are different from the
actual LMA-3. For those input channels on the LMA-3 that are not correctly handled, use the
Custom setup function of LogWorks to set the channel up correctly. The following table shows
how.
LogWorks Version 2 handles the LMA-3 default settings correctly
Input
Channel
Function 1
Function 2
1
0..10230 RPM
(LogWorks is correct)
2
0..1093 deg C or
32..2000 deg F
Thermocouple EGT
range
(LogWorks is correct)
0..20460 RPM
(LogWorks is
correct)
0..300 deg C or
32..572 deg F
Thermocouple CHT
range
(LogWorks is
correct)
3
Dwell 0..100%
(LogWorks is correct)
Manifold absolute
pressure (normally
aspirated)
0..101 kPa or
0..14.7 PSI or
0..1 bar
(LogWorks is correct)
4
5
Set as Custom
-2g = 0V
+2g = 5V
Or
-19.62 m/sec^2 = 0V
+19.62 m/sec^2 = 5V
Or
-64.37 ft/sec^2 = 0V
+64.37 ft/sec^2 = 5V
Function 3
Set as Custom
0 kPa = 0V
304 kPa = 5V
Or
0 PSI = 0V
44.1 PSI = 5V
Or
0 bar = 0V
3 bar = 5V
Set as Custom
-1g = 0V
+1g = 5V
Or
-9.81 m/sec^2 = 0V
+9.81 m/sec^2 = 5V
Or
-32.18 ft/sec^2 = 0V
+32.18 ft/sec^2 = 5V
Function E
User defined
custom settings
User defined
custom settings
User defined
custom settings
User defined
custom settings
Set as Custom
-0.25g = 0V
+0.25g = 5V
Or
-2.45 m/sec^2 = 0V
+2.45 m/sec^2 = 5V
Or
-8.05 ft/sec^2 = 0V
+8.05 ft/sec^2 = 5V
- 36 -
User defined
custom settings
14. Revision History
1.0 -- 8/23/04
Initial release.
1.1 -- 8/31/04
Corrected miscellaneous typographical errors.
1.2 -- 9/1/04
Corrected table 1 and section 6.
1.3 -- 9/20/04
Corrected miscellaneous typographical errors.
1.4 -- 8/19/2005
Changed to reflect functionality of firmware 1.1.
1.5 – 8/22/2005
Changes: Added 3-button Accel reset to 4.1 ( needs graphic), Changed 8.1 ( check graphic), Min
freq=30Hz 9.0,
1.6 – 1/8/2006
Changes: Intro text 1.0, Added Accel graphic to 4.1, fixed paragraph spacing 8.0, added new 11
on external input and calibration
1.7 – 1/8/2006
Changes: VR Sensor info, typographical errors, extra ignition info
- 37 -