1
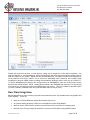
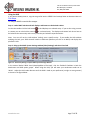
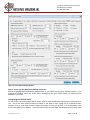
111 W. San Antonio Street, Suite 210-5 New Braunfels, TX 78130 Fax. (866) 434-3498 Modern Air Combat Environment (MACE) VRSG Integration Guide Copyright (c) 2013 Battlespace Simulations, Inc. All rights reserved. Printed in the United States. Battlespace Simulations, Modern Air Combat Environment, and the MACE and BSI logo are trademarks of Battlespace Simulations, Inc. MetaVR, Virtual Reality Scene Generator, VRSG, Metadesic, the phrase "geospecific simulation with game quality graphics", and the MetaVR logo are trademarks of MetaVR, Inc. Metadesic is protected by US Patent 7,425,952. All other trademarks are owned by their respective companies. Battlespace Simulations, Inc. 111 W. San Antonio St. Ste 210-5 New Braunfels, TX 78130 Phone: 210-857-9672 www.bssim.com www.bssim.com MetaVR, Inc. 80 Somerset Rd. Brookline, MA 02445 Phone: 617-739-2667 www.metavr.com Page 1 of 26 111 W. San Antonio Street, Suite 210-5 New Braunfels, TX 78130 Fax. (866) 434-3498 [email protected] [email protected] Version Information Date Author Notes 10 May 2011 Gary DeYoung Initial Release 9 Jun 2011 Gary DeYoung Added section for Mimic Mode settings 2 July 2012 J. Shane Carter 12 Sep 2012 Gary DeYoung Updated screenshots to match Q3 MACE release 8 Jan 2013 Kenny Duck Added Note on how/why to load Logitech Software under fig19 8 Jan 2013 Kenny Duck Corrected “Contents” error below and added “Joystick Slewable" pg 19 reference Contents Introduction.................................................................................................................................................. 3 First Steps .................................................................................................................................................... 3 Verify/Edit VRSG Settings ........................................................................................................................ 3 Copy/Merge VRSG Files........................................................................................................................... 5 Run-Time Integration .................................................................................................................................. 8 Configuring MACE to use VRSG MDS Elevation ..................................................................................... 9 Using the HUD ........................................................................................................................................ 13 Step 1: Load a MACE mission and Lock displays and Camera to the desired entities .................... 13 Step 2: Bring up the MACE System Settings window (View|Settings) and select Visual tab............ 13 Step 3: Ensure your Site/App/Entity Settings are Correct ................................................................. 14 Interpreting the HUD (Aircraft) ................................................................................................................ 14 CCRP Mode ........................................................................................................................................ 16 CCIP Mode ......................................................................................................................................... 17 Connecting to a JTAC or other Life-form ................................................................................................ 18 Ensure Your USB Device is Programmed Correctly .......................................................................... 18 Ensure Your MACE Instance is Set to Control the VRSG Visual (Ownship/Man-In-The-Loop) ........ 19 Ensure Your VRSG has the 'Joystick Slewable' Option Selected ...................................................... 19 Set Up a VRSG Channel as a Camera or Targeting Pod ........................................................................... 20 Step 1: Set VRSG to Joystick Slewable using VRSG Dashboard..................................................... 20 Step 2: Enable VRSG Visual (Camera) on Visual Tab of MACE System Settings ........................... 22 Step 3: Ensure HOTAS (or joystick device) is configured to control the Camera. ............................ 23 Step 4: Latch the Camera to an Entity in your MACE Mission .......................................................... 24 Camera/Targeting Pod Operation ........................................................................................................... 26 Free-Fly Mode .................................................................................................................................... 26 Target Track Mode ............................................................................................................................. 26 Ground Track Mode ............................................................................................................................ 26 www.bssim.com Page 2 of 26 111 W. San Antonio Street, Suite 210-5 New Braunfels, TX 78130 Fax. (866) 434-3498 Modern Air Combat Environment (MACE) VRSG Integration Guide Introduction Though you can use MACE with any image generator (IG) that has a DIS interface (or via a hosted DIS-to-CIGI interface), MACE and VRSG have several specific interoperability enhancements that taken together provide a compelling capability. In particular, MACE includes a HUD overlay, remote VRSG camera control via the HOTAS (including both UAV camera & targeting pod capabilities) and can use VRSG MDS tiles (in addition to DTED and SRTM) as an elevation data source -- resulting in perfect elevation correlation between MACE and VRSG. The following guide will show you how to set up MACE and VRSG to implement each of these capabilities. First Steps Verify/Edit VRSG Settings Make sure MACE and VRSG are set to communicate over your network via DIS. Your MACE DIS settings are configured on the DISNet tab of the MACE System Settings Window. Click View|Settings as shown below to open, then click on the DISNet tab: Figure 1: Click View|Settings to Open MACE System Settings Window www.bssim.com Page 3 of 26 111 W. San Antonio Street, Suite 210-5 New Braunfels, TX 78130 Fax. (866) 434-3498 Figure 2: DISNet Tab on MACE System Settings Window (for more information please see the MACE User's Manual) Ensure your DIS Broadcast IP is set correctly, so that MACE's DIS packets will reach any VRSG channels you wish to reach. Next, open your VRSG Dashboard and click the 'Advanced' button on the Startup Parameters tab. Then ensure your Destination Address shows a specific or broadcast IP that can communicate with your MACE computer. The DIS Port on your MACE DISNet tab must also match the UDP Port on your VRSG Dashboard. Click the 'Use High Order DRA' box (DRA = Dead Reckoning Algorithm) Set your Entity Timeout Period to 10 seconds www.bssim.com Page 4 of 26 111 W. San Antonio Street, Suite 210-5 New Braunfels, TX 78130 Fax. (866) 434-3498 Figure 3: VRSG Dashboard / Advanced Parameters Copy/Merge VRSG Files When MACE is installed, it copies several files into a VRSG subfolder under its installation directory. If MACE is installed in the default location, the path to the VRSG files will be: C:\Program Files (x86)\Battlespace Simulations\MACE\xml\DIS\VRSG (on 64-bit OSes) or C:\Program Files\Battlespace Simulations\MACE\xml\DIS\VRSG (on 32-bit OSes) Within the VRSG folder, you will find five sub-folders: Animations Effects Models Overlays Sounds www.bssim.com Page 5 of 26 111 W. San Antonio Street, Suite 210-5 New Braunfels, TX 78130 Fax. (866) 434-3498 Figure 4: VRSG Folders contain MACE - specific VRSG enhancements Each of these folders corresponds to a folder name under your VRSG installation directory. Within each "MACE" VRSG folder, there will be one or more files that you will need to either copy or merge into the equivalent VRSG folder. If you are already using VRSG with other simulations, you will probably need to merge some files. If you are using VRSG only with MACE, you can copy these files and overwrite the existing ones (i.e. no need to merge). www.bssim.com Page 6 of 26 111 W. San Antonio Street, Suite 210-5 New Braunfels, TX 78130 Fax. (866) 434-3498 Figure 5: VRSG Installed Directory Structure (typically under C:/Program Files (x86)/MetaVR/VRSG 5) For example, there are several .par and .ini files in MACE's VRSG/Effects folder, as shown below (the specific files below may change, don't worry if your files are slightly different). In this case, you would copy each of the particle (.par) files into C:/Program Files (x86)/MetaVR/VRSG 5/Effects. If you already have the DetMap.ini or FireMap.ini files in this folder, you may need to merge the MACE version with your current version (you can use any text editor). If you are using VRSG only with MACE, you can copy and replace these files, and do not need to merge them. If these files do not already exist, you can simply copy them into the VRSG 5/Effects folder. www.bssim.com Page 7 of 26 111 W. San Antonio Street, Suite 210-5 New Braunfels, TX 78130 Fax. (866) 434-3498 Figure 6: MACE's VRSG/Effects Folder Repeat this process for each file, in each directory, taking care to merge the .ini files where necessary. Pay particular attention to your ModelMap.ini, which includes all the DIS entity type enumerations VRSG needs to load the models for your entities. MACE includes two ModelMap files, one which includes model mappings for all the platforms and sites in MACE, and a second file (ModelMap with Cultural.ini) that includes model mappings for all known VRSG models, including cultural features (buildings, plants, trees, etc) as of VRSG 5.7. To use the 'ModelMap with Cultural.ini' file, simply rename it to "ModelMap.ini" (take care to back-up the version that excludes cultural entities). NOTE: Loading all the models in the 'ModelMap with Cultural.ini' file is generally not needed, as it will load every model in the VRSG library into memory. This is not feasible or advisable unless you have a suitable, dedicated video card (1GB dedicated video memory or more). Run-Time Integration BSI and MetaVR have worked closely to provide several features that are only available when using MACE and VRSG together. These are: Ability to use VRSG MDS tiles as MACE's elevation data source An optional Heads-Up Display (HUD) for use with MACE's Flyable Flight Models Ability to control VRSG camera remotely using HOTAS (use as UAV camera or targeting pod) Date and Time of Day (changes as simulation runs) sent to VRSG when running MACE mission www.bssim.com Page 8 of 26 111 W. San Antonio Street, Suite 210-5 New Braunfels, TX 78130 Fax. (866) 434-3498 Remote control of VRSG weather / sky models from MACE Configuring MACE to use VRSG MDS Elevation To configure MACE to use VRSG MDS tiles for elevation: 1. Start MACE and open the MACE System Settings window (Click View|Settings as shown below) Figure 7: Click View|Settings to Open MACE System Settings Window 2. Click on the 'Data Paths' tab (see Figure below) 3. Click on the 'Elevation Data' tab on the left to bring up the Elevation Data Paths. Figure 8: VRSG Elevation Paths Found and Added to MACE 4. Click the 'Add ...' button on the right; it will ask you to Browse for the folder containing the VRSG MDS files. Select the folder and then press 'OK': www.bssim.com Page 9 of 26 111 W. San Antonio Street, Suite 210-5 New Braunfels, TX 78130 Fax. (866) 434-3498 Figure 9: Browsing for MDS Elevation Folders 5. Repeat this process for each path you would like to add. Place these folders in the order you want them searched. For example, if you have lower resolution MDS tiles in a folder called "World Wide" and higher resolution MDS tiles in a folder called "Afghanistan", you would use the 'Move Up' and/or 'Move Down' buttons until the Afghanistan folder appeared before the World Wide folder in the search paths, as shown above in Figure 8. Because MACE supports DTED (1km, 90m and 30m) and SRTM (90m and 30m) in addition to VRSG elevation data, we still have to tell MACE which elevation data source to prefer. 6. Referring again to the Data Paths tab in the Figure above, click on the 'Elevation Types' button, and use the 'Move' commands to order the elevation data types (VRSG, DTED and SRTM) until they are listed in the order you want them used. Generally, if you are reading this, you probably want VRSG MDS elevation listed first meaning that each time it needs an elevation value, MACE will check the VRSG elevation data first, and only fall over to DTED and then SRTM (or SRTM and then DTED) if no valid elevation is found (which can happen if the location is outside the area where you have MDS coverage). For example, to use VRSG first, then DTED and then SRTM, set the Elevation Types as shown below: www.bssim.com Page 10 of 26 111 W. San Antonio Street, Suite 210-5 New Braunfels, TX 78130 Fax. (866) 434-3498 Figure 10: Use Elevation Types Tab to Set Search Order That's it! When you move your mouse around in the MACE mission area, it will tell you which elevation data source is being used. The default maximum area for VRSG elevation is 20,000 square miles. If you have 2 enough system RAM and think you can safely increase this number (and need to - 20,000 mi is a fairly large area and may be sufficient) you can do so by editing this file: C:\Program Files\Battlespace Simulations\MACE\xml\ElevationConfig\TerrainElevationDataLayerDefinitions-VRSG.xml. Note that MACE shows VRSG resolution as '30m' but in reality, MACE does not know the resolution of the VRSG elevation. Unlike DTED and SRTM, which have uniform resolution on a per-geocell basis, VRSG elevation can be denser or sparser within a geocell. In many cases, it is substantially better than 30m. www.bssim.com Page 11 of 26 111 W. San Antonio Street, Suite 210-5 New Braunfels, TX 78130 Fax. (866) 434-3498 Figure 11: MACE using VRSG elevation (maximum 20,000 square miles) Figure 12: MACE falls back to DTED1 (90m) outside of 20,000 square miles www.bssim.com Page 12 of 26 111 W. San Antonio Street, Suite 210-5 New Braunfels, TX 78130 Fax. (866) 434-3498 Using the HUD If you haven't already done so, copy the vrsg.txt file into the VRSG 5 the Overlays folder as discussed above in First Steps. To configure MACE to send HUD messages: Step 1: Load a MACE mission and Lock displays and Camera to the desired entities On the view toolbar click the lock button to lock displays to a selected entity. If you are also using a sensor or camera you can also lock the camera to a selected entity. The displays and camera lock do not have to be locked to the same entity and in many cases they are locked to separate entities. Note: You can still use the HUD without 'locking' onto a specific entity. If you enable the HUD without enabling the Lock, your VRSG view will switch to whichever platform you click on in MACE, and display that platform's HUD. Step 2: Bring up the MACE System Settings window (View|Settings) and select Visual tab Figure 13: Click View|Settings to Open MACE System Settings Window In the section labeled 'VRSG Visual (Ownship/Man-In-The-Loop)', click the 'Enabled' Checkbox in both the Attachment and HUD option groups. When using the HUD, you will want your attachment mode set to 'Mimic'. Adjust the HUD render distance until the HUD is sized to your preference (no right or wrong answer) as shown in the figure below. www.bssim.com Page 13 of 26 111 W. San Antonio Street, Suite 210-5 New Braunfels, TX 78130 Fax. (866) 434-3498 Figure 14: Visual Tab on Settings Window Step 3: Ensure your Site/App/Entity Settings are Correct Ensure the Site/App/Entity matches the Site/App/Entity of your VRSG Visual (out-the-window) instance. If you selected the ‘Enabled' box in the VRSG Visual (ownship) section your VRSG window you should now be attached to your entity. Interpreting the HUD (Aircraft) For this section, we have loaded a MACE mission south of Kabul, Afghanistan and locked our view onto an A10C. One of the more powerful features of MACE is the ability to take control over a constructive entity, transform it into a virtual entity, and then send it back again, all using your HOTAS. This is described in more detail in the MACE User's Manual. The HUD makes man-in-the-loop flight and weapons delivery much more www.bssim.com Page 14 of 26 111 W. San Antonio Street, Suite 210-5 New Braunfels, TX 78130 Fax. (866) 434-3498 realistic and user-friendly. MACE's VRSG HUD is loosely based on the A-10C HUD. The basic information displayed on the HUD is explained in the Figure below: Figure 15: HUD, No Assigned Target Now let's assign a ground target to the A-10 and take a look at the HUD again. In MACE, with the A-10 selected (click on the A-10 to make it the 'selected' platform), click on the 'Attack Mode' button and then click the MACE cursor on top of a ground target: www.bssim.com Page 15 of 26 111 W. San Antonio Street, Suite 210-5 New Braunfels, TX 78130 Fax. (866) 434-3498 Figure 16: Assign a Ground Target to the A-10 (Note: you can also do this via another VRSG channel functioning as a targeting pod - described in the 'Using the Camera / Targeting Pod' section of this document) CCRP Mode When a Guided munition is selected (for example, an AGM-65 Maverick or a GBU in the Paveway series) the HUD will automatically switch to Continuously Computed Release Point (CCRP) mode. In CCRP mode, you will see a box around your designated target and an Azimuth Steering Line with a Solution Cue. As you fly towards your target (cue off of the Azimuth Steering Line), you may see the CCRP reticle begin to flash. If you press the Weapon Release button on your Joystick (see the MACE User's Manual for how to configure your HOTAS device) when the CCRP reticle is flashing, you should hit (or come close) to your designated target. www.bssim.com Page 16 of 26 111 W. San Antonio Street, Suite 210-5 New Braunfels, TX 78130 Fax. (866) 434-3498 Figure 17: Ground Target, CCRP Mode CCIP Mode When you have an unguided munition selected, MACE automatically switches your HUD into Continuously Computed Impact Point (CCIP) mode. In CCIP mode, you fly towards your target (use the Azimuth Steering Line) and as you approach your release point, the Solution Cue will begin to fall. When the Solution Cue falls into the CCIP reticle in the center of the screen, the reticle will flash briefly. Release your weapon when the reticle flashes. Also in CCIP mode, you may see a third, blue reticle. This reticle indicates the location on the ground where your selected munition will impact. Generally this is only visible if you are flying at a low altitude. www.bssim.com Page 17 of 26 111 W. San Antonio Street, Suite 210-5 New Braunfels, TX 78130 Fax. (866) 434-3498 Figure 18: MACE Switches to CCIP Mode When Unguided Munitions are Selected Connecting to a JTAC or other Life-form In addition to controlling aircraft, in MACE you can also control life-form entities. For example, to configure MACE and VRSG to control a JTAC entity in MACE, follow the same procedure outlined above for attaching to the A-10, but instead latch onto the JTAC or other life-form. Ensure Your USB Device is Programmed Correctly When controlling a life-form, you will probably want to use a Gamepad rather than a HOTAS. This is very easy to manage in MACE because you can save different joystick configurations. A popular Gamepad configuration for MACE is shown below in Figure 19, and is included with your MACE installation as a Joystick Configuration called 'Logitech Gamepad'. Also review “Note” below Fig 19, since we recommend loading the Logitech Gaming Software provided with the controller. You do not need to use a Logitech Gamepad; if you have another brand, simply create and save your own Joystick Configuration. www.bssim.com Page 18 of 26 111 W. San Antonio Street, Suite 210-5 New Braunfels, TX 78130 Fax. (866) 434-3498 Figure 19: Logitech Gamepad - sample configuration NOTE: If you would like full configuration control of your Logitech Gamepad, we recommend you load the Logitech Gaming Software provided with the controller. For example, some members might want to swap the configuration of the mini joysticks (Movement/Direction shown in Fig 19). You can do this by opening the “Logitech Profiler” software, select “Device” tab, “Game Controllers…”, select “Logitech Dual Action USB”, “Settings”, then select “Enable swap mode”. Ensure Your MACE Instance is Set to Control the VRSG Visual (Ownship/Man-In-The-Loop) As shown above in Figure 14 - you must have the VRSG Visual (Ownship/Man-In-The-Loop option selected if you want to see a first-person shooter (FPS) perspective in VRSG, and if you want to see your soldier's "HUD" then you must enable the HUD option (also shown in Figure 14 above). Ensure Your VRSG has the 'Joystick Slewable' Option Selected If you forget to turn on the 'Joystick Slewable' option in VRSG, you won't be able to look up and down when connected to a life-form in MACE. If this is happening to you, please check the 'Joystick Slewable' option in VRSG, as shown below. To access this screen in VRSG, first open the VRSG Dashboard, click the 'Attach Options' tab and then the 'Advanced' Button in the 'Attach Mode' section. This will bring up the 'Attach Offsets' window, as shown below: www.bssim.com Page 19 of 26 111 W. San Antonio Street, Suite 210-5 New Braunfels, TX 78130 Fax. (866) 434-3498 Figure 20: Ensure 'Joystick Slewable' Is Selected Set Up a VRSG Channel as a Camera or Targeting Pod In addition to using VRSG for an out-the-window (OTW) view (for example, for your HUD), you can use your VRSG channel (or a second VRSG channel) to represent a Camera or Targeting Pod view. In practice, there is no significant difference between using a VRSG channel as a UAV camera or as a Targeting Pod. In MACE, you can program your HOTAS to control the camera axis, zoom in and out, boresight the camera, slew the camera to the entity's target, and for targeting pod applications, designate and/or lase a target. Step 1: Set VRSG to Joystick Slewable using VRSG Dashboard On the VRSG Dashboard, click the 'Attach Options' tab and then the 'Advanced' Button in the 'Attach Mode' section: www.bssim.com Page 20 of 26 111 W. San Antonio Street, Suite 210-5 New Braunfels, TX 78130 Fax. (866) 434-3498 Figure 21: VRSG Dashboard Then, in the 'Mimic Mode Offset' section, ensure that the 'Joystick Slewable' check box is checked. It is also advisable to set your z-axis offset to about -2 meters - this produces better results when attached to a life form or other ground entity in VRSG. Note that your camera offsets can also be set from MACE, on the Visual tab in the VRSG Visual (Camera) section. www.bssim.com Page 21 of 26 111 W. San Antonio Street, Suite 210-5 New Braunfels, TX 78130 Fax. (866) 434-3498 Figure 22: Mimic Mode Settings Step 2: Enable VRSG Visual (Camera) on Visual Tab of MACE System Settings Also, you can specify a particular Site/App/Entity as well to ensure the commands go to a specific VRSG channel; if you leave this set to 0/0/0, it will be received by all VRSG channels and may interfere with your Outthe-Window view. www.bssim.com Page 22 of 26 111 W. San Antonio Street, Suite 210-5 New Braunfels, TX 78130 Fax. (866) 434-3498 Figure 23: Check the 'Enabled' Box under VRSG Visual (Camera) Step 3: Ensure HOTAS (or joystick device) is configured to control the Camera. Click on the Joystick tab of your MACE System Settings Window. This tab is explained more fully in the main MACE User's Manual. In particular, you will need to assign joystick buttons/axis for the items in the lower section of the Joystick configuration screen. With the joystick(s) plugged in, press the Program button (which will change to a red 'Stop' button) and then click on the radio button next to the item you would like to configure. Then simply move the axis or press the button that you would like to assign for that item, as shown below. Repeat this for each item you would like to configure. When you are finished, first press the 'Stop' button and remember to name and save your Joystick configuration (using the Save button in the Configurations section, as shown below). Finally press the 'OK' button to close the Settings window. www.bssim.com Page 23 of 26 111 W. San Antonio Street, Suite 210-5 New Braunfels, TX 78130 Fax. (866) 434-3498 Figure 24: Configure your Joystick Device using the MACE System Settings Window Step 4: Latch the Camera to an Entity in your MACE Mission To latch the camera to a platform in your MACE mission, first click on the platform to which you'd like to latch the camera. Then, on the Entity Control Window, click the 'Latch VRSG Camera' button: www.bssim.com Page 24 of 26 111 W. San Antonio Street, Suite 210-5 New Braunfels, TX 78130 Fax. (866) 434-3498 Figure 25: Latch VRSG Camera Button on Entity Control Window Alternately, you can also set the camera lock on the View tab, in the section titled 'In-Mission View': Figure 26: Camera Can Also be Latched Using Camera Latch Button on View Tab Once latched, your VRSG camera will automatically change to the UAV View (master) Attach Mode in VRSG. You can also change the overlay for this mode by Clicking the 'Advanced' button. Figure 27: Latching the VRSG Camera Invokes UAV View (Master) Attach Mode www.bssim.com Page 25 of 26 111 W. San Antonio Street, Suite 210-5 New Braunfels, TX 78130 Fax. (866) 434-3498 Camera/Targeting Pod Operation As shown in the Figure above, using MACE you can configure your joystick HOTAS device to perform all the functions you will need to control a VRSG channel to simulate a camera and/or targeting pod (we recommend the Thrustmaster HOTAS Warthog as an excellent HOTAS device for MACE). You should configure your joystick to: move the camera axis zoom in zoom out designate a target lase a target boresight the camera slew the camera to the latched entity's target Your camera can be in any of three modes: Free-Fly Ground Track Target Track Free-Fly Mode When your camera is in Free-Fly mode (the default mode), it moves across the ground or sky as you fly. If move the camera axis using your HOTAS, you are changing the camera's elevation and azimuth. You can transition out of Free-Fly mode into Target Track mode by pressing the Target Designate button, or the Slew to Target button (but only if your entity already has an assigned target). Target Track Mode When you are in Target Track mode, your camera is locked onto your assigned target. Pressing the Target Designate button triggers this mode and sets the entity's assigned target to the camera location. If there are nearby entities, you can click the Target Designate button a second time to lock onto and track the nearest entity (even if it is a moving entity). If you mode the camera (other than zooming in or out) you will transition out of Target Track mode into Ground Track mode. If you press the Slew to Target button while already in Target Track mode, you will return to Free Fly mode. Ground Track Mode You enter Ground Track mode when you move the camera axis off of your target when you are in Target Track mode. In this mode, the camera continues to track the ground location as you fly. This allows you to move your camera around on the ground while not changing your assigned target. Once you find a new location that you would like to designate, simply click the Target Designate button to return to Target Track mode. Alternately, you can press the Slew to Target button to return your camera to your last assigned target (and re-enter Target Track mode). From either the Target Track or Ground Track modes, you can also return to Free-Fly mode by pressing the Boresight Camera button. In any mode, you can enable laser designation by pressing the Lase Target button. This is a toggle switch, so to turn off lasing, simply depress the button a second time. While you are lasing, the MACE entity will send out Designate PDUs (laser code 1111) and the entity's assigned target will be the location of the camera. www.bssim.com Page 26 of 26