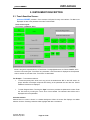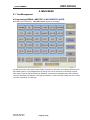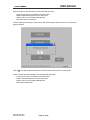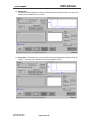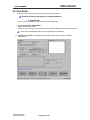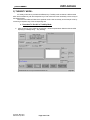
1
USER MANUAL prietest SMART prietest S Biochemistry Analyser USER MANUAL Version: 2.0.0.6 ROBONIK (INDIA) PVT. LTD. Plot No.: A-374, TTC, MIDC Industrial Area, Mahape, Navi Mumbai – 400 710. (INDIA) Tel.: +91 (22) – 67829700, Fax: +91 (22) – 67829701 [email protected] Website-www.robonik.in Version No.: RBK 2.0.0.6 Effective Date: Apr 2014 Page 1 of 146 USER MANUAL prietest SMART TABLE OF CONTENTS 1. GENERAL INFORMATION........................................................................................................ 4 1.1. WARRANTY INFORMATION: .............................................................................................. 4 1.2. TECHNICAL SERVICE: ..................................................................................................... 4 1.3. DISPOSAL INSTRUCTION: ................................................................................................ 4 1.4. CONTACTS: .................................................................................................................... 4 2. GENERAL SAFETY WARNINGS ............................................................................................. 5 2.1. DANGER – WARNINGS SYMBOLS: ..................................................................................... 5 2.2. USE OF THE INSTRUMENT: .............................................................................................. 6 3. INTRODUCTION .......................................................................................................................... 7 3.1. DESCRIPTION: ................................................................................................................ 7 3.2. FEATURES: .................................................................................................................... 7 3.3. TECHNICAL SPECIFICATION OF PRIETEST SMART: ........................................................ 8 4. PACKING, TRANSPORT AND STORAGE ............................................................................ 9 4.1. GENERAL WARNINGS: .................................................................................................... 9 4.2. PACKING: ....................................................................................................................... 9 4.3. INSTRUMENT TRANSPORTATION: ..................................................................................... 9 4.4. STORAGE OF INSTRUMENT: ............................................................................................. 9 5. INSTRUMENT DESCRIPTION ................................................................................................ 10 5.1. TOUCH SENSITIVE SCREEN: .......................................................................................... 10 5.2. PERSPECTIVE VIEW: ..................................................................................................... 11 5.3. PROBE:........................................................................................................................ 12 5.4. PERISTALTIC PUMP: ..................................................................................................... 12 5.5. INSTRUMENT WORKING PRINCIPLE: ............................................................................... 12 5.6. PRINTER: ..................................................................................................................... 14 6. PRECAUTIONS ......................................................................................................................... 15 7. INSTALLATION AND START-UP INSTRUCTIONS ........................................................... 16 7.1. PLACING THE INSTRUMENT:........................................................................................... 16 7.2. POWER SUPPLY:........................................................................................................... 16 7.3. PROTECTIVE GROUNDING: ............................................................................................ 16 7.4. START UP INSTRUCTIONS: ............................................................................................ 16 8. MAIN MENU ............................................................................................................................... 20 8.1. TEST MANAGEMENT: .................................................................................................... 20 A) Programming/ADDING a NEW TEST in BIOCHEMISTRY MODE: ....................................................................... 20 B) Programming/ADDING a NEW TEST in COAG MODE: ....................................................................................... 28 8.2. RECALLING / RUNNING A SAVED TEST (OPERATING THE PROGRAMMED TESTS) .... 31 A) Running a Saved Test (Operating the programmed tests) In Biochemistry Mode .................................................... 31 1) RUN BLANK / STANDARD : ............................................................................................................................................ 32 2) RUN SAMPLE:..................................................................................................................................................................... 39 B) Running a Saved Test (Operating the programmed tests) in Coag Mode: ............................................................... 44 1) CONTROL RUN ................................................................................................................................................................... 44 2) SAMPLE RUN ...................................................................................................................................................................... 48 3) QC Run .................................................................................................................................................................................. 53 C) Running a Saved Test (Operating the programmed tests) In Turbidity Mode ......................................................... 58 Procedure to Run the Sample in Turbidity mode. ........................................................................................... 58 Version No.: RBK 2.0.0.6 Effective Date: Apr 2014 Page 2 of 146 USER MANUAL prietest SMART 8.3. DIAGNOSTIC MANAGEMENT:.......................................................................................... 64 8.3.1. Abs Run: ................................................................................................................................................................. 64 8.3.3. Lamp Amplitude: ................................................................................................................................................... 70 8.3.4. Filter Amplitude: ................................................................................................................................................... 72 8.3.5. Temperature: ......................................................................................................................................................... 74 8.4. UTILITIES SCREEN: ....................................................................................................... 75 8.4.1. Export: ................................................................................................................................................................... 75 8.4.2. Import: ................................................................................................................................................................... 79 8.4.3. Pump Calibration: ................................................................................................................................................. 80 8.4.4. Set Filter Values: ................................................................................................................................................... 82 8.4.5. Printer: ON ............................................................................................................................................................ 83 8.4.6. Wash: ..................................................................................................................................................................... 84 8.4.7. Auto Run Mode: ..................................................................................................................................................... 85 8.4.8. Lamp: ON/ OFF .................................................................................................................................................... 86 8.4.9. Update Software: ................................................................................................................................................... 86 8.4.10. Flowcell Mode: .................................................................................................................................................... 89 8.4.12. Reagent Priority: ................................................................................................................................................. 91 8.4.13. Reagent Profile: ................................................................................................................................................... 94 8.4.14. Import V1.0 Database: ...................................................................................................................................... 100 9. PATIENT MANAGEMENT ..................................................................................................... 106 10. SHUT DOWN.......................................................................................................................... 109 11. PROGRAMMING MODES ................................................................................................... 112 A) BIOCHEMISTRY:- ...................................................................................................... 112 11.1. FIXED TIME: .......................................................................................................... 112 DIFFERENTIAL: .............................................................................................. 122 11.2. B) COAG MODE:- ........................................................................................................... 133 C) TURBIDITY MODE:- .................................................................................................. 138 12. TROUBLE SHOOTING: ....................................................................................................... 144 13. DECONTAMINATION ........................................................................................................... 145 13.1. DECONTAMINATION PROCEDURE .............................................................................. 145 13.2. PURPOSE OF DECONTAMINATION .............................................................................. 145 13.3. GENERAL CONSIDERATIONS ...................................................................................... 145 13.4. PROCEDURE .............................................................................................................. 145 14. SAFETY CLEARANCE CERTIFICATE............................................................................ 146 Version No.: RBK 2.0.0.6 Effective Date: Apr 2014 Page 3 of 146 USER MANUAL prietest SMART 1. GENERAL INFORMATION 1.1. Warranty Information: Each Instrument is completely tested and guaranteed for twelve months from delivery. The warranty applies to all the mechanical and electrical parts. It is valid only for proper installation, use, and maintenance in compliance with the instructions given in this manual. ROBONIK will at its discretion repair or replace parts, which may be found defective in the warranty period. The warranty does not include any responsibility for direct or indirect personal and material damages, caused by improper use or maintenance of the instrument. Parts that are inherently subject to deterioration are excluded from the warranty. In case of defects due to misuse of the instrument, any travel and man-hour expenses will be charged extra. 1.2. Technical Service: ROBONIK is always accessible to the customers for any kind of information about installation, use, maintenance, etc. When asking for service, please refer to this manual, and report the data reported on the identification label (serial number) Only qualified technicians are entitled to fix the instrument; the user, as described in this manual, should carry out routine maintenance. ROBONIK technical service or an authorized service center with specialized technicians, with suitable instrumentation and original spare parts only are always available for extraordinary maintenance (repair), under a yearly maintenance contract or on specific demand. 1.3. Disposal Instruction: In case of removal or disposal of instrument, following instructions need to be followed • Do not dispose in municipal waste; follow local regulations for instrument disposal. • Plastic parts, Electronic PCBs and components can be recycled, so return back the instrument to manufacturer. 1.4. Contacts: Manufacturer: American Quality Standards Registrars, ROBONIK (INDIA) PVT LTD A-374, TTC, MIDC Industrial Area, MAHAPE, NAVI MUMBAI –400710 INDIA Tel: +91-22-67829700, Fax: +91-22-67829701 1201 Orange Street, Suite 600, Wilmington, DE 19801, USA. Tel: +1 (281) 404-2140 E-mail: [email protected] Web.: www.aqsrusa.com Email: [email protected] Website: www.robonik.in Version No.: RBK 2.0.0.6 Effective Date: Apr 2014 Page 4 of 146 USER MANUAL prietest SMART 2. GENERAL SAFETY WARNINGS 2.1. Danger – warnings symbols: The following symbols are used to inform the user of the safety rules. This symbol indicates generic danger. It means that, serious damage can occur to the operator if described precautions are not observed. This symbol indicates HIGH ELECTRIC VOLTAGE. It is dangerous to touch any part having this label. Only qualified operators can access these components, after unplugging the instrument from the Supply. This symbol indicates that the instrument involves the handling of samples, which can be infected (urine or human serum). In this condition, infection or contamination might occur. Pay attention to the general safety warnings when in presence of such biological substances. Use Protective clothes, gloves and glasses. This symbol in the user manual indicates that damages to the instrument or erroneous results could occur if the given warnings are not followed. This symbol indicates a portion, which is particularly important, and should be studied carefully. This symbol indicates a Protective Earth or Ground terminal. General Symbols Symbol for “Manufacturer” Symbol for “ IN VITRO DIAGNOSTIC MEDICAL DEVICE” Version No.: RBK 2.0.0.6 Effective Date: Apr 2014 Page 5 of 146 USER MANUAL prietest SMART 2.2. Use of the Instrument: ¾ The instrument has to be used for the designated purposes under specified conditions, following proper procedures and safety rules, by qualified personnel. ¾ THIS MANUAL CONTAINS INSTRUCTIONS FOR OPERATION BY QUALIFIED PERSONNEL. ¾ A qualified user has to make sure that environmental condition is suitable, the installation is correct, the use and maintenance are proper, according to the general safety rules as well as to the particular precautions described in the manual. (However, Operator is not entitled to repair the instrument). ¾ A qualified technician is entitled to maintain and fix the instrument, according to the instructions given, using the original spare parts. ¾ Maintain room temperature and Humidity as specified in the manual. ¾ The instrument has to be used as described in this manual. If it is not used the protection provided by the instrument may be impaired. ¾ Alterations to the instrument are prohibited. The user is liable for any improper modification to the instrument, and for the deriving consequences. ¾ Should the instrument need extraordinary maintenance, contact MANUFACTURER service or authorized service center. Specialized technicians who will be able to repair the instrument using original spare parts will carry out the maintenance. ¾ Warning: In a domestic environment it may cause radio interference, in which case, you may need to take measures to mitigate the interference." ¾ An advisory that the electromagnetic environment should be evaluated prior to operation of the device. ¾ Warning: Do not use this device in close proximity to sources of strong electromagnetic radiation (e.g. unshielded international RF sources), as these may interfere with the proper operation. Version No.: RBK 2.0.0.6 Effective Date: Apr 2014 Page 6 of 146 USER MANUAL prietest SMART 3. INTRODUCTION 3.1. Description: prietest SMART is a programmable Biochemistry Analyzer with a user-friendly touch screen. It measures the optical densities of samples and it uses algorithm to calculate results, which are used for biochemical investigation. It is a photometer operating in the UV visible range. The instrument is an open photometer suitable for absorbance (optical density) measurement as well as sample concentration determination. It has a user-friendly program and capacity of storing the programmed analytical methods, Test Results and the QC results. It is intended for in vitro diagnostic use. 3.2. Features: • • • • • • • • • • • • • • Direct Access To Test By Touch of Key. TFT LCD Colour Display. Sophisticated Windows Based Software. Real Time Graph with Display of Absorbance Readings per Second. Auto Recalculation of Non Linear Kinetic Tests. Sample, QC Sample, Blank and Standard Run Count Facility. Patient Data Management. Multi Standard Run in All Modes. Levy Jennings Graphs and precision data. 384 Head 28 Column Stationary Head Thermal Printer, With Paper Sensor. Built in Stabilizer-Voltage Range 90-270 volts. Specially Designed Long Life Peristaltic Pump. Built In Incubator. Dual Reading Modes- Flow Cell & Cuvette. Version No.: RBK 2.0.0.6 Effective Date: Apr 2014 Page 7 of 146 USER MANUAL prietest SMART 3.3. Technical specification of prietest SMART: Technical Specification Parameters Values Human Machine Interface LCD touch screen Linear measurement range 0.000 to 3.000 Absorbance Units (A) ± 2 % or 0.007 whichever is higher, from 0 to 1.5 A, Photometric Accuracy ± 3 % from 1.5 A to 3.0 A Optical measurement Filter Photodiode Monochromatic Filter Wave Length High Quality Narrow band Interference 340, 405, 510, 546, 578, 630 nm & Two Optional Flow cell Sipping Volume up to 300-1000 μl Flow cell Volume 18 μl Cuvette Volume 500 μl Absorbance, End Point, Fixed Time, Kinetic, Analysis Mode Differential, Ratio,Coagulation & Multi-Point standard Concentration Calculation By factor or by standard Display 7" TFT LCD color Printer On board thermal 28 column, maintenance free Interface USB Power Wattage 50 watts Voltage 115 – 230 Volts ± 10%, 50 – 60 Hz Operating Position Operating Conditions On horizontal, flat, rigid and vibration free surface Temperature From 18ºC to 35ºC Relative Humidity Up to 85% Storage Conditions Temperature From – 10ºC to + 60ºC Relative Humidity Up to 85% Enclosure ABS Fire retardant Size (cm) 30 x 30 x18 (l x b x h) Weight 5 Kg. (Approx) Version No.: RBK 2.0.0.6 Effective Date: Apr 2014 Page 8 of 146 USER MANUAL prietest SMART 4. PACKING, TRANSPORT AND STORAGE 4.1. General Warnings: Instrument has to be decontaminated before packing for transportation. 4.2. Packing: Packaging is needed whenever the instrument is to be transported or shipped by courier or other means. To pack the instrument follow the instructions mentioned below: y Decontaminate the instrument as explained in decontamination chapter of this manual. y Put the instrument into the original packaging box; Instrument has to be properly protected by plastic protective material. Put copy of safety clearance certificate. (Specimen of Safety clearance certificate is attached at the end of this manual). y Mark the package with address, instrument identification and warning labels. 4.3. Instrument Transportation: The transportation of the instrument in unpacked condition must be limited within the room where it is used, to avoid damage. 4.4. Storage of Instrument: Before storing the instrument for a long period, pack it carefully as described above and store indoors. Relative humidity has to be less than 85%, and temperature between -10ºC and +60ºC. Version No.: RBK 2.0.0.6 Effective Date: Apr 2014 Page 9 of 146 USER MANUAL prietest SMART 5. INSTRUMENT DESCRIPTION 5.1. Touch Sensitive Screen: prietest SMART provides a Touch sensitive LCD panel for easy user interface. The Menus are displayed; the text of the parameter forms the TOUCH ZONE. Touch screen Layout For Example: In KINETIC Mode Above is the generic representation of a Test Screen. The Highlighted zones are TOUCH ZONES, which are active. On touching the “Touch Zone” of a parameter, a sub menu/menu is displayed or the requested action is carried out, and rest of the “Touch Zone” is deactivated. For Example: - To activate the selection. • To enter the primary filter value, touch any point in the shaded area “Pri” on the LCD screen. On proper selection the analyser responds with blinking of the parameter text and also the TOUCH ZONE and a submenu is displayed. • To enter Reagent Name: Touching the “Rgnt” touch zone provides an alphanumeric screen. Enter the Test name by touching the Touch zone of that variable. The selected value blinks and is displayed next to the parameter. Selection Indicator Selected item on screen is shown in a shaded background. When the screen first displays, the default selection is shown. Pressing a selection either highlights that item or activates it. Version No.: RBK 2.0.0.6 Effective Date: Apr 2014 Page 10 of 146 USER MANUAL prietest SMART 5.2. Perspective View: FRONT VIEW: Touch Screen Flowcell LID LED Incubator Printer Aspiration Switch Probe REAR VIEW: Version No.: RBK 2.0.0.6 Effective Date: Apr 2014 Page 11 of 146 USER MANUAL prietest SMART 5.3. Probe: The instrument is provided with a probe to aspirate the sample into the flow cell. The push button (Aspiration Switch) has to be pressed to activate the peristaltic pump. 5.4. Peristaltic Pump: The instrument is provided with a peristaltic suction pump. The aspiration push button switch activates the peristaltic pump. The pump is enabled during wash, “Aspirate sample” message and Air purging. 5.5. Instrument Working Principle: Instrument functional sequence: - Switch on the instrument - Program the test. - Aspirate the sample into the flow cell - The measures and the calculations are carried out according to the assay method Following is the diagram representing the fluid system of the instrument. The peristaltic pump is activated by the push button located on the probe. The sample is sucked into the flow cell for the photometric reading. Waste Sample Solution Peristaltic Pump Flow cell Direction of arrows represents liquid flow Sample is aspirated from the sample tube when aspiration switch is pressed. Aspirated sample is then carried to the flow cell, carefully pushing previous sample from the flow cell. Flow cell has 18µl reading volume. Version No.: RBK 2.0.0.6 Effective Date: Apr 2014 Page 12 of 146 USER MANUAL prietest SMART PRINCIPLE OF WORKING: Below is the diagram representing the main functional elements of the instrument. White light produced by the lamp is focused into a beam by lens and passes through the interference filter and monochromatic light beam falls on the sample. Part of the light is absorbed by the sample, the remaining is transmitted. The transmitted light is focused onto the photodiode. The photodiode converts the received light in to an electrical signal that is transformed into digital form from which the microcontroller calculates the optical density, taking in account of the blank and bichromatic selection. 1 2 2 1 LAMP 2 LENS 3 INTERFERENCE FILTERS 4 FLOW CELL 5 PHOTODETECTOR 3 4 AMPLIFIER MEMORY Version No.: RBK 2.0.0.6 Effective Date: Apr 2014 VOLTAGE TO FREQUENCY CONVERTER 5 RS232 PRINTER KEYPAD MICROCONTROLLER Page 13 of 146 DISPLAY USER MANUAL prietest SMART 5.6. Printer: A) Internal Printer (Thermal Printer) prietest SMART has a built in 20 column Thermal Printer. User has to take proper care to handle this delicate instrument. TIPS FOR CAREFUL USAGE OF PRINTER Do not pull the paper when loaded 1. Lift the paper lever carefully and load the paper 2. Keep the instrument clean and dust free prietest SMART gives line feed automatically wherever it is necessary for clear reading like a. While powering on b. In between character lines User may operate the instrument by disabling the printer from the utilities menu. How to insert the paper Insert the thermal paper roll by placing the sensitive side facing down. The sensitive paper side is recognizable by its smoother face. Before inserting the paper Version No.: RBK 2.0.0.6 Effective Date: Apr 2014 After inserting the paper Page 14 of 146 USER MANUAL prietest SMART 6. PRECAUTIONS λ Keep the place dry and clean. λ Check all the grounding wires properly. Repeat the readings, if Absorbance is more than 2.0 A. Use original Packing for transportation. λ Use clean Cuvettes. Check the blank absorbance of the cuvette at regular intervals. Check the temperature of cuvette block at regular intervals, especially before running Kinetic and Fixed Time tests. Check the linearity of the instrument at regular intervals using standards. λ Do not take any reading when the lid is open λ Incubate the cuvettes at set temperature for at least 30 minutes before using λ Incubate the reagents at set temperature for at least 30 minutes before using λ Wash the flow-cell immediately after high OD samples (1.5 A and above) λ Normally, avoid reading HIGH OD samples immediately after referencing. λ Wash the flow cell everyday morning before using and evening before closing down. Follow the shut down procedure before switching OFF the instrument. λ Do not use any sharp objects on the Touch Screen. Always use the STYLUS provided to operate the touch panel. Version No.: RBK 2.0.0.6 Effective Date: Apr 2014 Page 15 of 146 USER MANUAL prietest SMART 7. INSTALLATION AND START-UP INSTRUCTIONS While installing and setting up the instrument, the safety warnings and general precautions described in section 7 must be observed. 7.1. Placing the Instrument: Place the instrument on a flat working surface or bench top capable of supporting the weight of the instrument. A clearance of at least 3 inches around the instrument is required to assure optimal ventilation. Room temperature should be between 18ºC and 35ºC with a relative humidity below 85%. Protect it from direct sunshine and maintain the instrument in a clean, relatively dust free environment to ensure maximum performance. 7.2. Power supply: Once the instrument has been placed, plug it into a power source by using the locally available approved plug-in cable. Power cord should be CE, CSA and UL marked Voltage: 115 - 230 Volts ± 10%, 60- 50 Hz 7.3. Protective Grounding: Warning: Make sure that electrical power source is properly grounded. 7.4. Start Up Instructions: ¾ Procedure of Initialization 1. Switch ON the instrument. 2. It will display the Address screen as shown below – Version No.: RBK 2.0.0.6 Effective Date: Apr 2014 Page 16 of 146 USER MANUAL prietest SMART 3. The instrument initializes all the parameters internally, and carries out a power on self-test. 4. It will wash the Flow Cell while displaying the message string – “Washing Flowcell….” Version No.: RBK 2.0.0.6 Effective Date: Apr 2014 Page 17 of 146 USER MANUAL prietest SMART 5. After washing the flowcell, it will display the message “Press Aspirate Distilled Water to Start Up”. User must Aspirate the distilled water in order to proceed further. 6. It displays the string “Aspirating….” only after pressing the ASP switch to aspirate distilled water. • • • • If a printer is enabled, Model Name, Version Number, current date and time will be printed. Once initialization is over, a lamp located within the instrument will glow. This lamp requires 90 seconds for stabilization. After the instrument completes the above steps, a TEST MENU SCREEN appears. The instrument is now in IDLE mode, and ready for use. Version No.: RBK 2.0.0.6 Effective Date: Apr 2014 Page 18 of 146 USER MANUAL prietest SMART Version No.: RBK 2.0.0.6 Effective Date: Apr 2014 Page 19 of 146 USER MANUAL prietest SMART 8. MAIN MENU 8.1. Test Management: A) Programming/ADDING a NEW TEST in BIOCHEMISTRY MODE: When the unit is first turned on, ‘LIST TEST’ Screen appears on the display. For adding a new test, user needs to select “NEW” key present on the screen. It will display following screen after selecting this key. Enter Reagent Name by placing the cursor in the text box; it will display a keypad which helps to input the data of the particular parameter. After entering the Reagent Name select particular Test Type. Remember the selection of Test type is mandatory in order to save the created test. Let us create a test with “Cholesterol” as a test type. Version No.: RBK 2.0.0.6 Effective Date: Apr 2014 Page 20 of 146 USER MANUAL prietest SMART Now, select Mode key. After selecting this particular key it will display following screen. This screen shows 5 different modes namely – End Point, Kinetic, Fixed Time, Differential & Ratio. After selecting a particular mode it will display the parameter related to that mode. For example, if selected Endpoint mode it will display the screen as shown below. In this screen user can enter ‘Lag Time’ and ‘Linearity’ along with Reagent Volume and Sample Volume of the corresponding mode. *Note: The default value of Lag Time is 0 seconds. Version No.: RBK 2.0.0.6 Effective Date: Apr 2014 Page 21 of 146 USER MANUAL prietest SMART Enter the barcode for the related reagent. On selecting this option it will display following screen. Place the cursor in the textbox; it will display a keypad which will help the user to input corresponding data. Version No.: RBK 2.0.0.6 Effective Date: Apr 2014 Page 22 of 146 USER MANUAL prietest SMART Select “Unit” key present on the screen. It will display following screen. From this screen user can select the measuring unit for the particular test. Select “Temp: 37°C” key present on the screen. It will display following screen where user can select the required temperature needed to run the reagent. (*By Default the temperature is set to 37°C). Version No.: RBK 2.0.0.6 Effective Date: Apr 2014 Page 23 of 146 USER MANUAL prietest SMART Enter the “KFactor” for the related reagent. On selecting this option it will display following screen. Place the cursor in the textbox; it will display a keypad which will help the user to input corresponding data. (Remember its Default Value is always 1.000) User can select Primary or Secondary filters. For Filter Selection, one needs to select “Filter” key present on the screen. It will display following screen where user can set /select Primary and Secondary filters. Version No.: RBK 2.0.0.6 Effective Date: Apr 2014 Page 24 of 146 USER MANUAL prietest SMART Enter the “ASP Volume” for the related reagent. Following screen is displayed where user needs to place the cursor in the textbox. It will display a keypad which will help the user to input corresponding data. Its Aspiration Volume ranges from 300µl to 1000µl. Select “Factor” key present on the screen. Enter the Factor Value by placing the cursor in the textbox. It will display a keypad which will help the user to input corresponding data. Version No.: RBK 2.0.0.6 Effective Date: Apr 2014 Page 25 of 146 USER MANUAL prietest SMART To Select “Std” press “Factor” key present on the screen. It will toggle from factor to Standard. On selecting this particular key it will display following screen where user can enter number of Standards by placing the cursor in the textbox. It will display a keypad where user can enter min. 1 STD & max. 8 STD. Also user can select particular Graph Type and relative X/ Y Scale in the same section. (*Note: Factor and Standard are toggle keys.) For interpretation of specimen result (HI/LO), enter normal range given in the Reagent manual. Click on Range, Range button gets enabled. Following screen will appear after selecting the Range key. User must place the cursor in the respective textbox, and then enter the value with the help of keypad. Normal Values: The normal range for the concentration or the activity of the assay can be entered. If a test result is out of this range, the result will be flagged with L or H. Version No.: RBK 2.0.0.6 Effective Date: Apr 2014 Page 26 of 146 USER MANUAL prietest SMART Select QC key present on the screen. Following screen appears where user must place the cursor in the relative text box in order to enter the QC Values. QC refers to Quality Control which comprises of two values namely Normal Values & Abnormal Values. QC Ctrl1 → QC High Ctrl1 – Quality Control Normal High Value QC Low Ctrl1 – Quality Control Normal Low Value QC Ctrl2 → QC High Ctrl2 – Quality Control Abnormal High Value QC Low Ctrl2 – Quality Control Abnormal Low Value After entering all the test parameters, select “SAVE” key present on the screen. Version No.: RBK 2.0.0.6 Effective Date: Apr 2014 Page 27 of 146 USER MANUAL prietest SMART B) Programming/ADDING a NEW TEST in COAG MODE: Select “COAG” key from the List Test screen. It displays following screen where user can ADD a New Test and even View the created Test parameters. For adding a new test, user needs to select “NEW” key present on the screen. It will display following screen after selecting this key. Enter Reagent Name by placing the cursor in the text box; it will display a keypad which helps to input the data of the particular parameter. Version No.: RBK 2.0.0.6 Effective Date: Apr 2014 Page 28 of 146 USER MANUAL prietest SMART After selecting “Mode” key in COAG mode it will display the parameter related to that mode. It consists of ISI Value, Range (INR), and Control PT (sec). User needs to place the cursor in the particular text box which results in displaying the keypad which helps the user to input corresponding data. Select QC key present on the screen. Following screen appears where user must place the cursor in the relative text box in order to enter the QC Values. QC refers to Quality Control which comprises of two values namely Normal Values & Abnormal Values. Version No.: RBK 2.0.0.6 Effective Date: Apr 2014 Page 29 of 146 USER MANUAL prietest SMART (*NOTE: Whereas, in TURBIDITY mode tests are already created. User only needs to connect a selective key to run a particular test.) Version No.: RBK 2.0.0.6 Effective Date: Apr 2014 Page 30 of 146 USER MANUAL prietest SMART 8.2. RECALLING / RUNNING A SAVED TEST (Operating the Programmed Tests) In prietest SMART, user can recall/ run the test by selecting a particular test. The Programmed / Saved Test can be recalled/selected by List Tests. When the unit is first turned ON, the screen is displayed as shown below – A “List Tests” screen would look like the screen shown above. Select the test name and click on View key present on the screen. Suppose we have selected a particular test in Endpoint mode then it will display the screen in Endpoint mode. In this screen you can edit the test parameters. Similarly, you can edit the test parameters in Kinetic, Endpoint, Fixed time, Ratio and Differential mode by recalling the particular test. A) Running a Saved Test (Operating the programmed tests) In Biochemistry Mode 1. Run Std / Ctrl 2. Run Blank 3. Run Sample Version No.: RBK 2.0.0.6 Effective Date: Apr 2014 Page 31 of 146 USER MANUAL prietest SMART 1) RUN BLANK / STANDARD : In case of test with Blank/ Standard, user must first select “Blk/ Std Run” and then move forward to run sample. One should not run the sample before running the standard. Consider “GLUCOSE” test since it consists of both Blank and Standard. To Run Blank/ Standard in Endpoint Mode:Select a test in Endpoint mode (for e.g. GLUCOSE Test). This particular test consists of both Blank and Standard. Since the screen after initialization is displayed as shown below, user can directly select a test and then point to “Blk/Std Run” key. ¾ Follow the procedure given below for Running the test in Endpoint Mode. After selecting “Blk/ Std Run” it will enter into the Run screen for running blank first and then standard. 1) Checking Temperature: It will display this particular string in order to reach its absolute temperature. Version No.: RBK 2.0.0.6 Effective Date: Apr 2014 Page 32 of 146 USER MANUAL prietest SMART 2) After Checking the temperature it will display the string – “Press ASP switch to Aspirate Reference”. User must press the ASP switch to Aspirate the Reference Value. 3) Referencing... : This particular screen appears only when the instrument takes the reference value. So, wait for few seconds while the referencing is in process. Version No.: RBK 2.0.0.6 Effective Date: Apr 2014 Page 33 of 146 USER MANUAL prietest SMART 4) Air Purging...: After Referencing, it will wash the flowcell while displaying the message string “Air Purging...”. Following screen appears after taking the Reference Value. 5) Press ASP switch to Aspirate Blank It will display the message “Press ASP switch to Aspirate Blank”. User must press the ASP switch to Aspirate the Blank. Version No.: RBK 2.0.0.6 Effective Date: Apr 2014 Page 34 of 146 USER MANUAL prietest SMART 6) “Reading Values during Lag Time.....5”, this particular message appears only when reading the Blank Values. 7) Air Purging...: It will wash the flowcell while displaying the message string “Air Purging...”. Version No.: RBK 2.0.0.6 Effective Date: Apr 2014 Page 35 of 146 USER MANUAL prietest SMART 8) It will ask the user whether to re-run the Blank or else continue with the present obtained value for the Blank run. Select “Yes” to over-write the obtained blank value and “No” to continue with the same value. 9) Press ASP switch to Aspirate Standard 1 It will display the message “Press ASP switch to Aspirate Standard 1”. User must press the ASP switch to Aspirate the Standard Value. Version No.: RBK 2.0.0.6 Effective Date: Apr 2014 Page 36 of 146 USER MANUAL prietest SMART 10) “Reading Values during Lag Time.....5”, this particular message appears only when reading the Standard Values. 11) It will ask the user whether to re-run the standard or else continue with the present obtained value for the standard run. Select “Yes” to over-write the obtained standard value and “No” to continue with the same value. Version No.: RBK 2.0.0.6 Effective Date: Apr 2014 Page 37 of 146 USER MANUAL prietest SMART 12) Air Purging...: It will wash the flowcell while displaying the message string “Air Purging...”. 13) Finally it displays a dialogue box which reads as – “Accept std run values?”. User can select “Yes” for accepting the std value which implies that there is no need to run the standard each and every time when you select the same test. Or else can select “No” key to run the standard for fresh value. Version No.: RBK 2.0.0.6 Effective Date: Apr 2014 Page 38 of 146 USER MANUAL prietest SMART 14) After running Standard in Endpoint mode, one can select “Back” key to come out of the Run screen. 2) RUN SAMPLE: User can run the sample only after running Blank and Standard if selected any. ¾ To run the Sample in Endpoint Mode:Select a test in Endpoint mode like ‘GLUCOSE’. Since you have already run the blank and standard for the respective test, the instrument is now ready to run the sample related to that test. Select “Run” key from the List Test screen which results in displaying the screen as shown below. Follow the procedure given below for Running Sample in Endpoint Mode. 1) Checking Temperature: It will display this particular string in order to reach its absolute temperature. Version No.: RBK 2.0.0.6 Effective Date: Apr 2014 Page 39 of 146 USER MANUAL prietest SMART 2) Press ASP switch to Aspirate Reference: After inserting the flowcell in the block, it will display the message “Press ASP switch to Aspirate Reference”. User must press the ASP switch to Aspirate the Reference Value. 3) Referencing... : This particular screen appears only when the instrument takes the reference value. Here, wait for few seconds while the referencing is in process. Version No.: RBK 2.0.0.6 Effective Date: Apr 2014 Page 40 of 146 USER MANUAL prietest SMART 4) Air Purging...: After Referencing, it will wash the flowcell while displaying the message string “Air Purging...”. Following screen appears after taking the Reference Value. 5) Press ASP switch to Aspirate Sample After inserting the flowcell in the block, it will display the message “Press ASP switch to Aspirate Sample”. User must press the ASP switch to Aspirate the Sample. Version No.: RBK 2.0.0.6 Effective Date: Apr 2014 Page 41 of 146 USER MANUAL prietest SMART 6) “Reading Values during Lag Time.....5”, wait for few seconds while instrument is reading the sample. 7) Finally it displays a message string which reads as – “GLUCOSE Test Run Over” Select “Back” key to come out of the Run screen. Version No.: RBK 2.0.0.6 Effective Date: Apr 2014 Page 42 of 146 USER MANUAL prietest SMART 8) Air Purging...: It will wash the flowcell while displaying the message string “Air Purging...”. In other words it suggests that now the instrument is ready to read next sample. Or else select “Back” key to come out of the Run screen. Version No.: RBK 2.0.0.6 Effective Date: Apr 2014 Page 43 of 146 USER MANUAL prietest SMART B) Running a Saved Test (Operating the programmed tests) in Coag Mode: 1) CONTROL RUN If MNPT (i.e. Control PT) is not given in test parameter then user must select “Run Control” before running any sample. ¾ To run Control in COAG Mode:Select a test in COAG mode to determine Control PT i.e. MNPT. Select “Run Control” key from the List Test screen which results in displaying the screen as shown below. Follow the procedure given below for Running Control in COAG Mode. 1) Checking Temperature: It will display this particular string in order to reach its absolute temperature. 2) It will display a message string – “Checking Cuvette! Waiting for removal…….” along with a dialogue box which reads as – ‘Close Lid and Press OK’. And therefore user must close the lid and press OK key to proceed further. Version No.: RBK 2.0.0.6 Effective Date: Apr 2014 Page 44 of 146 USER MANUAL prietest SMART 3) Referencing... : This particular screen appears only when the instrument takes the reference value. So, wait for few seconds while the referencing is in process. 4) Select “Run Control” key present on the screen. Version No.: RBK 2.0.0.6 Effective Date: Apr 2014 Page 45 of 146 USER MANUAL prietest SMART 5) Insert Control (test-tube with adapter) in the cuvette block in order to start the running process. 6) Now dispense reagent. After dispensing close the lid and press ‘OK’ key. Version No.: RBK 2.0.0.6 Effective Date: Apr 2014 Page 46 of 146 USER MANUAL prietest SMART 7) “Reading......40”, this particular message appears only when reading the Control Values. 8) Finally it displays a result with a message string – “PT 001 Control Run Over”. This Control PT is nothing but MNPT in the calculations. Select “Back” key to come out of the Run screen. Version No.: RBK 2.0.0.6 Effective Date: Apr 2014 Page 47 of 146 USER MANUAL prietest SMART 2) SAMPLE RUN User can run the sample only after running Control if selected any. ¾ To run the Sample in COAG Mode:Select a test in COAG mode. Select “Run” key from the List Test screen which results in displaying the screen as shown below. Follow the procedure given below for Running Sample in COAG Mode. 1) Checking Temperature: It will display this particular string in order to reach its absolute temperature. Version No.: RBK 2.0.0.6 Effective Date: Apr 2014 Page 48 of 146 USER MANUAL prietest SMART 2) It will display a message string – “Checking Cuvette! Waiting for removal…….” alongwith a dialogue box which reads as – ‘Close Lid and Press OK’. And therefore user must close the lid and press ‘OK’ key to proceed further. 3) Referencing... : This particular screen appears only when the instrument takes the reference value. So, wait for few seconds while the referencing is in process. Version No.: RBK 2.0.0.6 Effective Date: Apr 2014 Page 49 of 146 USER MANUAL prietest SMART 4) Select “Run” key present on the screen in order to run sample. 5) Insert Sample Cuvette (sample test-tube with adapter) in the cuvette block in order to start the running process. Version No.: RBK 2.0.0.6 Effective Date: Apr 2014 Page 50 of 146 USER MANUAL prietest SMART 6) Now dispense reagent. After dispensing close the lid and press “OK” key. 7) “Reading......52”, this particular message appears only while taking the readings of the particular sample. Version No.: RBK 2.0.0.6 Effective Date: Apr 2014 Page 51 of 146 USER MANUAL prietest SMART 8) Finally it displays a result with a message string – “PQRS Test Run Over” Select “Back” key to come out of the Run screen. Version No.: RBK 2.0.0.6 Effective Date: Apr 2014 Page 52 of 146 USER MANUAL prietest SMART 3) QC Run User can run the Sample / QC only after running Control if selected any. ¾ To Run QC in COAG Mode:Select a test in COAG mode. Select “Run QC” key from the List Test screen which results in displaying the screen as shown below. Follow the procedure given below for Running QC in COAG Mode. 1) Checking Temperature: It will display this particular string in order to reach its absolute temperature. 2) For running QC select “Control 1” key present on the screen. Version No.: RBK 2.0.0.6 Effective Date: Apr 2014 Page 53 of 146 USER MANUAL prietest SMART 3) It will display a message string – “Checking Cuvette! Waiting for removal…….” alongwith a dialogue box which reads as – ‘Close Lid and Press OK’. And therefore user must close the Lid and Press OK key to proceed further. 4) Referencing... : This particular screen appears only when the instrument takes the reference value. So, wait for few seconds while the referencing is in process. Version No.: RBK 2.0.0.6 Effective Date: Apr 2014 Page 54 of 146 USER MANUAL prietest SMART 5) Select “Run QC” key present on the screen in order to Run QC. 6) Insert Sample Cuvette in the cuvette block in order to start the running process. Version No.: RBK 2.0.0.6 Effective Date: Apr 2014 Page 55 of 146 USER MANUAL prietest SMART 7) Now Close the Lid and Press OK key. 8) “Reading......35”, this particular message appears only when reading the QC Values. Version No.: RBK 2.0.0.6 Effective Date: Apr 2014 Page 56 of 146 USER MANUAL prietest SMART 9) Finally it displays a result with a message string – “PT 001 QC Run Over” Select “Back” key to come out of the Run screen. Version No.: RBK 2.0.0.6 Effective Date: Apr 2014 Page 57 of 146 USER MANUAL prietest SMART C) Running a Saved Test (Operating the programmed tests) In Turbidity Mode Procedure to Run the Sample in Turbidity mode. 1) After connecting a Key related to the ASO120, it reads the parameters related to that test while displaying a message string – “Key Reading” 2) If the Key Information matches with the parameters, then it will display the string “Key Reading Over! Press Run to Start Test.” Select Run key present on the screen. Version No.: RBK 2.0.0.6 Effective Date: Apr 2014 Page 58 of 146 USER MANUAL prietest SMART 3) Press ASP switch to Aspirate Reference: After inserting the flowcell in the block, it will display the message “Press ASP switch to Aspirate Reference”. User must press the ASP switch to Aspirate the Reference Value. 4) Referencing... : This particular screen appears only when the instrument takes the reference value. So, wait for few seconds while the referencing is in process. Version No.: RBK 2.0.0.6 Effective Date: Apr 2014 Page 59 of 146 USER MANUAL prietest SMART 5) Air Purging...: After Referencing, it will wash the flowcell while displaying the message string “Air Purging...”. 6) After inserting the flowcell in the block, it will display the message “Press ASP switch to Aspirate Sample”. User must press the ASP switch to Aspirate the Sample. Version No.: RBK 2.0.0.6 Effective Date: Apr 2014 Page 60 of 146 USER MANUAL prietest SMART 7) “Reading Values during Lag Time.....5”, it measures the Lag Time while reading the Sample Values. 8) “Reading Values during Read Time.....5”, this particular message appears only when taking the readings the Sample Values. Version No.: RBK 2.0.0.6 Effective Date: Apr 2014 Page 61 of 146 USER MANUAL prietest SMART 9) It displays a dialogue box which reads as –“Do you wish to Print Graph?”. Select ‘Yes’ to print the graph displayed on the screen. 10) Air Purging...: After Referencing, it will wash the flowcell while displaying the message string “Air Purging...”. Version No.: RBK 2.0.0.6 Effective Date: Apr 2014 Page 62 of 146 USER MANUAL prietest SMART 11) Finally it displays a message string “ASO120 Sample Run Over”. Select “Back” key to come out of the Run screen. Version No.: RBK 2.0.0.6 Effective Date: Apr 2014 Page 63 of 146 USER MANUAL prietest SMART 8.3. Diagnostic Management: Ref 8.3.1 Ref 8.3.2 Ref 8.3.3 Ref 8.3.4 Ref 8.3.5 8.3.1. Abs Run: This option helps the user to run the absorbance of each and every filter. It displays the Absorbance values for the selected filter. Also user may set the required temperature. 1) In Flow cell mode user needs to enter the Aspiration Volume for receiving the ABS Values of the corresponding filter. After selecting “Abs Run” key from the Diagnostics Management screen, it will display the screen as shown below. User must select the required filter and its corresponding Temperature. Version No.: RBK 2.0.0.6 Effective Date: Apr 2014 Page 64 of 146 USER MANUAL prietest SMART 2) Now enter the “Aspiration Volume”. (*Note: User can enter the Volume by placing the corresponding cursor in the textbox) 3) Select RUN key after entering the Aspiration Volume. Version No.: RBK 2.0.0.6 Effective Date: Apr 2014 Page 65 of 146 USER MANUAL prietest SMART 4) “Checking Temperature!” - It will check for the temperature whether it is up to the mark or not. If not it will set the temperature and then proceed further. 5) If Lamp is not Stabilized then it will display the message string – “Waiting for Lamp Warm Up……90”. It will take approximately 90 sec for lamp to get stabilized. Version No.: RBK 2.0.0.6 Effective Date: Apr 2014 Page 66 of 146 USER MANUAL prietest SMART 6) After entering the required “Aspiration Volume”, user must press the “ASP Switch to Aspirate Reference Value”. (*Note: User can enter the Volume by placing the corresponding cursor in the textbox.) 7) “Referencing….”:- This screen appears after pressing the ASP switch to get the reference value. Version No.: RBK 2.0.0.6 Effective Date: Apr 2014 Page 67 of 146 USER MANUAL prietest SMART 8) Air Purging...: After Referencing, it will wash the flowcell and displays the message string “Air Purging...”. Following screen appears after taking the Reference Value. 9) It will display the message “Press ASP switch to Aspirate Sample”. User must press the ASP switch to Aspirate the Sample. Version No.: RBK 2.0.0.6 Effective Date: Apr 2014 Page 68 of 146 USER MANUAL prietest SMART 10) Air Purging...: It will wash the flowcell while displaying the message string “Air Purging...”. 11) Finally it displays a message string which read as – “Absorbance Run Over !” Select “Back” key to come back to the Technical Diagnostics screen. Version No.: RBK 2.0.0.6 Effective Date: Apr 2014 Page 69 of 146 USER MANUAL prietest SMART 8.3.2. Filter Home: When selected, brings the filter wheel to the home position. 8.3.3. Lamp Amplitude: 1. “Press ASP switch to Aspirate Reference” This is an initial screen after selecting “Lamp Amplitude” key from the Diagnostics Management screen. It displays the message string “Press ASP switch to Aspirate Reference”. User must press the ASP Switch to proceed further. Version No.: RBK 2.0.0.6 Effective Date: Apr 2014 Page 70 of 146 USER MANUAL prietest SMART 2. “Reading Values……” After pressing ASP Switch, it will start reading values for Lamp Amplitude. 3. “Process Stopped By User” User can terminate the process in between by selecting “Stop” key present on the screen. This will display following screen which reads as - “Process Stopped by User!” At this point user can either select “Back” key to go back to the Diagnostics screen or else select the “Start” key to again start the process newly. Version No.: RBK 2.0.0.6 Effective Date: Apr 2014 Page 71 of 146 USER MANUAL prietest SMART 12) “Waiting for Lamp Warm Up………90”, this particular message appears only when the Lamp is not stabilized. 8.3.4. Filter Amplitude: It displays the Lamp amplitude of a single selected filter. Initially it will display the message string “Waiting for Lamp Warm Up…..90” only if lamp does not stabilize. Select a particular filter and view the Lamp Amplitude for the same. Version No.: RBK 2.0.0.6 Effective Date: Apr 2014 Page 72 of 146 USER MANUAL prietest SMART Insert Flowcell in the block. It will sense the Flowcell and then proceed further. After inserting the flowcell in the block, it will display the message “Press ASP switch to Aspirate Reference”. User must press the ASP switch to Aspirate the Reference Value. Version No.: RBK 2.0.0.6 Effective Date: Apr 2014 Page 73 of 146 USER MANUAL prietest SMART It will display the message string “Reading Values....” while reading the values for Lamp Amplitude. 8.3.5. Temperature: After selecting “Temperature” from the Diagnostic screen, it will display the screen as shown below to verify the set temperature. Whereas, “Back” key present on the screen allows you to come out of the Temperature screen. Version No.: RBK 2.0.0.6 Effective Date: Apr 2014 Page 74 of 146 USER MANUAL prietest SMART 8.4. Utilities Screen: Ref 8.3.1 Ref 8.3.2 Ref 8.3.3 Ref 8.3.4 Ref 8.3.5 Ref 8.3.6 Ref 8.3.7 Ref 8.3.8 Ref 8.3.9 Ref 8.3.10 Ref 8.3.11 Ref 8.3.12 Ref 8.3.13 Ref 8.3.14 8.4.1. Export: This Utility consists of following optionsPatient Data Test Result Database Log One can export the Patient Data, Test Results and Database from the instrument to the removable disks connected to the USB port of the instrument. Version No.: RBK 2.0.0.6 Effective Date: Apr 2014 Page 75 of 146 USER MANUAL prietest SMART Steps to transfer the Test Results to the removable disk (pen drive) ¾ Insert the pen drive in the USB Port of the instrument. ¾ Select “Utilities Management” from the main menu. ¾ Select “Export” from the Utilities Management. ¾ And finally select “Test Results”. The test results are transferred to the pen drive. After transferring the data the screen on the instrument appears as below. Click on OK. The test results are obtained in the excel sheet and can be seen on the computer. Steps to transfer the Patient details to the removable disk (pen drive) ¾ Insert the pen drive in the USB Port of the instrument. ¾ Select “Utilities Management” from the main menu. ¾ Select “Export” from the Utilities Management. ¾ Now select “Patient Data”. Version No.: RBK 2.0.0.6 Effective Date: Apr 2014 Page 76 of 146 USER MANUAL prietest SMART The Patient Data is transferred to the pen drive. After transferring the data the screen on the instrument appears as below. Click on OK. The Patient Details are obtained in the excel sheet and can be seen on the computer. Steps to view the Excel Sheet of test result and patient details 1. Insert the pen drive in USB Port of the Computer. 2. Locate the folder in YY/MM/DD format. 3. In this folder, Excel sheets of Test results and Patient details are displayed. The excel sheet of the Test result appears as shown below Patient Name Alisha Ronak Aaliya Jhanvi Aarya Taniya Version No.: RBK 2.0.0.6 Effective Date: Apr 2014 Sample ID 20140112001 20140112002 20140112003 20140112004 20140112005 20140112006 Test Name T BIL SGOT GLUCOSE GHB CREAT GLUCOSE Result 0.7 mg/dl 15.07 U/L 7.210 mg/dl 21.740 % 0.210 mg/dl 0.852 mg/dl Page 77 of 146 USER MANUAL prietest SMART The excel Sheet of the patient data (details) appears as shown below Name Alisha Ronak Ishwari Address Sector 11,Haja Road, 1st Main, Hajaribag New Delhi Main Road, Khurda, 752005 Dadar (West) Email Telephone No. Age Gender 25463321 25 Female 25465989 38 Male 25351925 21 Female [email protected] ljbjdc @ gmail.com ishwari.sonbarse@gmail. com Similarly the complete database can be exported by selecting the submenu database of the menu Export. Steps to transfer the database: ¾ Insert the pen drive in the USB Port of the instrument. ¾ Select “Utilities Management” from the main menu. ¾ Select “Export” from the Utilities Management. ¾ Now Select “Database” The Database is transferred to the pen drive. After transferring the data, the screen on the instrument appears as shown below. (*Note: If database does not contain all the files then it will give message in which missing files are mentioned as could not found.) Version No.: RBK 2.0.0.6 Effective Date: Apr 2014 Page 78 of 146 USER MANUAL prietest SMART 8.4.2. Import: This Utility is used to IMPORT the DATABASE. Initially database from instrument 1 has to be exported to the Removable disk. Then connect this removable disk to instrument 2. Now select Import database menu from main menu Utilities. The database from the removable disk gets transferred to the instrument 2. Note: The New Database Imported from the Removal Disk to Instrument 2 is overwritten on the existing Database. Version No.: RBK 2.0.0.6 Effective Date: Apr 2014 Page 79 of 146 USER MANUAL prietest SMART 8.4.3. Pump Calibration: The option of “Pump Calibration” allows the operator to adjust the volume being aspirated through the Flowcell. ¾ The adjustment of the peristaltic pump has two functions: 1. To adjust the volume of liquid aspirated into the flow cell. The volume of liquid must be enough to rinse Flowcell sufficiently, but not more than the reaction mixture 2. To adjust the volume aspirated during a wash cycle. If the aspiration volume is too high, air will be sucked into the flow cell. If aspiration volume is too low, not enough liquid will flush the Flowcell. Whenever this occurs it is necessary to adjust the aspiration volume. This is an initial screen after selecting “Pump Calibration” key from the Utilities Management screen. It displays the message string “Press ASP switch to Aspirate”. User must press the ASP Switch to proceed further. [*NOTE: The instrument is provided with a probe to aspirate the de-ionized water /sample into the flow cell. The push button (peristaltic Switch/ASP switch) has to be pressed to activate the peristaltic pump.] After Aspirating it will display the message string: - “Please Enter Remaining Volume and Press OK Button”. In Flowcell mode user needs to enter the Aspiration Volume by placing the cursor in the corresponding textbox. It will display a keypad which helps the user to enter the required aspiration volume. Version No.: RBK 2.0.0.6 Effective Date: Apr 2014 Page 80 of 146 USER MANUAL prietest SMART Enter residual/ remaining volume with the help of keypad. For example: After pressing the ASP Switch, If the volume remaining in the test tube is 250 µl; enter 250 in the textbox and then select “OK” key. Screen after entering the Aspiration Volume will be displayed as shown below. Now press “OK” key to carry out further procedure of Pump Calibration. Version No.: RBK 2.0.0.6 Effective Date: Apr 2014 Page 81 of 146 USER MANUAL prietest SMART After completing the whole procedure of Pump Calibration, it will display the message string – “Pump Calibration done successfully!” User can now select “Back” key to come out to the Utilities Management Screen. 8.4.4. Set Filter Values: The option of “Set Filter Values” allows the operator to enter the wavelength of the filters in seventh and eighth position. This option is to be used only in case of instruments where it is required to filters in 7th and 8th position. (7th and 8th Filter is optional) Version No.: RBK 2.0.0.6 Effective Date: Apr 2014 Page 82 of 146 USER MANUAL prietest SMART After selecting this particular option it will display following screen where user can enter the values for Filter 7 and Filter 8. 8.4.5. Printer: ON By selecting Printer ON/OFF, the printer can be Enable or Disabled according to the requirement. Version No.: RBK 2.0.0.6 Effective Date: Apr 2014 Page 83 of 146 USER MANUAL prietest SMART 8.4.6. Wash: Wash key is used to clean the inner side of the flow cell. Selecting “Wash” will allow the aspiration of water or cleaning of the Flowcell. [*Note: The instrument is provided with a probe to aspirate the de-ionized water /sample into the flow cell. The push button (peristaltic Switch/ASP switch) has to be pressed to activate the peristaltic pump.] Place the cursor in the textbox and enter the wash duration as per your requirement. Version No.: RBK 2.0.0.6 Effective Date: Apr 2014 Page 84 of 146 USER MANUAL prietest SMART Once this is done, a message string will be displayed - “Flowcell Wash Over”. Now user may select the “Back” key to come to the Utilities Management Screen. *Note - Default wash duration is 5 sec. Limit of wash duration is from 1 to 30 sec. 8.4.7. Auto Run Mode: It’s a toggle key between Auto and Manual mode. This option is specifically used for Sample Run. In Auto mode while running sample it will automatically increment the sample ID. Whereas if it is set to manual mode then user must manually feed the Sample ID to run next sample. Version No.: RBK 2.0.0.6 Effective Date: Apr 2014 Page 85 of 146 USER MANUAL prietest SMART 8.4.8. Lamp: ON/ OFF It is a toggle to switch the lamp ON and OFF. (Toggle: any instruction that works first one way and then the other; it turns something on the first time it is used and then turns it off the next time) 8.4.9. Update Software: This Utility is used to update the SOFTWARE. Version No.: RBK 2.0.0.6 Effective Date: Apr 2014 Page 86 of 146 USER MANUAL prietest SMART Steps to update the software ¾ Select Utilities from the main menu ¾ Select “Update Software” ¾ After selecting Update the screen will be displayed as shown belowClick on YES Update Software: For Updating any Software user must first connect the pen drive to the USB socket of the instrument. 1. Select “Update Software” from the Utilities Management screen. It will display a dialogue box which reads as – “Do you wish to update this software? “ 2. Now select “YES” key which results in displaying following screen. This screen is an Open window which consists of data folders in Storage Card. Now in this screen user needs to upload the window in order to browse the actual path of the required software. Version No.: RBK 2.0.0.6 Effective Date: Apr 2014 Page 87 of 146 USER MANUAL prietest SMART 3. Select “Hard Disk” from the Open Window 4. Browse for the path of “PrietestCE” (the folder in which you have copied the PrietestCE). Since it is copied in ‘PrietestSmart_exe_061113’; select this particular folder. Version No.: RBK 2.0.0.6 Effective Date: Apr 2014 Page 88 of 146 USER MANUAL prietest SMART 5. Now select the exe file named “PrietestCE”. Kindly note that this exe file is case sensitive. User should not change its name. * In this way one can update the required software for prietest SMART 8.4.10. Flowcell Mode: To Change Mode: Flow cell or Cuvette It is possible with prietest SMART to use either Flowcell or Cuvette to execute readings. The analyser is factory fitted with a Flowcell in the optical block. To operate the analyser with cuvettes select “Utilities Management” from the Main Menu and change the mode accordingly. In Flowcell mode, automatic pump calibration is implemented. While doing the pump calibration, kindly enter the exact measured residual volume out of 1000 µl. Refer to 8.3.3. for Pump Calibration. Version No.: RBK 2.0.0.6 Effective Date: Apr 2014 Page 89 of 146 USER MANUAL prietest SMART 8.4.11. Date/ Time: Select Date/ Time from Utilities Management. Since this utility is kept disabled for this particular version the screen will be displayed as shown below – Version No.: RBK 2.0.0.6 Effective Date: Apr 2014 Page 90 of 146 USER MANUAL prietest SMART 8.4.12. Reagent Priority: 1. Add reagent. 2. After adding the reagent, go to Utilities screen. 3. Select Reagent Priority key from the Utilities. Version No.: RBK 2.0.0.6 Effective Date: Apr 2014 Page 91 of 146 USER MANUAL prietest SMART 4. On selecting this particular key it will display the screen as shown below – 5. Now select the location where you want to fix the required reagent. For instant select the second location. Version No.: RBK 2.0.0.6 Effective Date: Apr 2014 Page 92 of 146 USER MANUAL prietest SMART 6. Select Reagent for priority. Here, we have selected “SGOT” 7. After selecting the required reagent select “Save” button present on the screen. Thus it gives priority to the reagent at the selected location. Finally the screen will be displayed as shown below. In this screen SGOT is located at the second position. Note: 1. User can remove the priority for selected reagent using Remove. 2. Reagents other than Priority are alphabetically sorted. 3. If reagent is edited then priority is automatically removed. Version No.: RBK 2.0.0.6 Effective Date: Apr 2014 Page 93 of 146 USER MANUAL prietest SMART 8.4.13. Reagent Profile: When we click on “Reagent Profile”, a set of default profiles are displayed on the screen. User may assign it to the patient. ¾ How to assign profile to the patient Let us see how to assign a Lipid profile to the patient. 1. Lipid Profile: This profile consists of three reagents namely Cholesterol, HDL Cholesterol and Triglycerides. Create these 3 tests in TEST MANAGEMENT screen. Version No.: RBK 2.0.0.6 Effective Date: Apr 2014 Page 94 of 146 USER MANUAL prietest SMART 2. For this click on “New” and then “Rgnt”. Enter Reagent Name & select particular test type. For e.g. to create a test of “Cholesterol”, select “CHOLESTEROL” as test type. 3. Enter all the parameters related to reagent and click on “Save”. Similarly, create reagents for HDL CHOLESTEROL and TRIGLYCERIDES. 4. Now run these Reagents one by one. For this, select a required reagent from the Home screen. After running the reagents, go to “Patient Management”. It will display the screen as shown below. Version No.: RBK 2.0.0.6 Effective Date: Apr 2014 Page 95 of 146 USER MANUAL prietest SMART 5. Now select each reagent one by one and allot sample IDs to them. For e.g. for Cholesterol (CHOL), we selected sample ID “0002”. 6. For HDL Cholesterol (HDL CHOL), we selected sample ID “0004” Version No.: RBK 2.0.0.6 Effective Date: Apr 2014 Page 96 of 146 USER MANUAL prietest SMART 7. And for Triglycerides (TRIG) we selected sample ID “0001”. 8. Now to allot sample IDs to patient, click on END. A screen will appear as shown below. Version No.: RBK 2.0.0.6 Effective Date: Apr 2014 Page 97 of 146 USER MANUAL prietest SMART 9. Now enter the details related to the patient such as Patient ID, Patient Name, Age, Gender, Address, Email, Tel. No., and Dr. Name. 10. After this click on “SAVE”. Version No.: RBK 2.0.0.6 Effective Date: Apr 2014 Page 98 of 146 USER MANUAL prietest SMART 11. Finally, PID is created and the results are sorted as per the profile. As all the Reagent comes under common profile (i.e. Lipid Profile) the screen will be displayed as shown below- Version No.: RBK 2.0.0.6 Effective Date: Apr 2014 Page 99 of 146 USER MANUAL prietest SMART 8.4.14. Import V1.0 Database: This utility consists of 3 steps: 1. Export Version 1.0 Database- Refer Section 8.4.1 2. Update Version 2 exe in Version1- Refer Section 8.4.9 3. Import Database1. Click on “Import V1.0 Data” to import database of Version 1.0 in Version 2.0. 2. A user prompt will appear and it will ask “Do you wish to Import the Version 1.0 Data? This will Delete All Current Data.” Version No.: RBK 2.0.0.6 Effective Date: Apr 2014 Page 100 of 146 USER MANUAL prietest SMART 3. Click on “Yes” unless you have version1.0 database and you wish to proceed further. Else click on “No”. If “Yes” is selected, “Importing Reagent …” message appears on the screen. 4. Select test type that you wish to assign it to the Reagent and click on “Import”. For e.g. message saying “Importing ReagentT BIL” appeared on the following screen. Version No.: RBK 2.0.0.6 Effective Date: Apr 2014 Page 101 of 146 USER MANUAL prietest SMART 5. Now the reagent name will be added in the “Imported Reagents” list. For e.g. T BIL is added in the list. 6. Now select “DIRECT BILIRUBIN” as test type. Version No.: RBK 2.0.0.6 Effective Date: Apr 2014 Page 102 of 146 USER MANUAL prietest SMART 7. Click on “Import”. 8. Now the reagent name will be added in the “Imported Reagents” list. For e.g. D BIL is added in the list. Likewise import all the reagents. Version No.: RBK 2.0.0.6 Effective Date: Apr 2014 Page 103 of 146 USER MANUAL prietest SMART 9. A message will appear saying “Importing Test Results.. Please Wait..!” It will take few minutes depending on the number of tests performed. 10. Finally a user prompt will appear saying “Version 1.0 Data Imported successfully..!” Version No.: RBK 2.0.0.6 Effective Date: Apr 2014 Page 104 of 146 USER MANUAL prietest SMART Version No.: RBK 2.0.0.6 Effective Date: Apr 2014 Page 105 of 146 USER MANUAL prietest SMART 9. PATIENT MANAGEMENT 1. Select “PATIENT MANAGEMENT” from the Main menu. 2. If Instrument is set to Auto mode then it will display following screen. User can select the particular test and view the patient results related to that test. Version No.: RBK 2.0.0.6 Effective Date: Apr 2014 Page 106 of 146 USER MANUAL prietest SMART 3. Whereas, in Manual mode it will display the Patient Details screen as shown below – 4. After selecting “Patient Management” in Manual mode it displays following screen- Version No.: RBK 2.0.0.6 Effective Date: Apr 2014 Page 107 of 146 USER MANUAL prietest SMART 5. On selecting “View History” in Manual mode it displays following screen. Version No.: RBK 2.0.0.6 Effective Date: Apr 2014 Page 108 of 146 USER MANUAL prietest SMART 10. SHUT DOWN ¾ Shut Down Procedure 1. Select “Shut Down” key. It will display a dialogue box which reads as – “Do you wish to Shutdown the system?”. Select “Yes” key if you want to shut down the system. It will then carry out the procedure for switching OFF the instrument. 2. It will wash the Flow Cell while displaying the message string – “Washing Flowcell….” Version No.: RBK 2.0.0.6 Effective Date: Apr 2014 Page 109 of 146 USER MANUAL prietest SMART 3. After washing the flowcell, it will display the message “Press Aspirate Priewash to Shut Down”. User must Aspirate the distilled water in order to proceed further. 4. It displays the string “Aspirating….” only after pressing the ASP switch to aspirate distilled water. Version No.: RBK 2.0.0.6 Effective Date: Apr 2014 Page 110 of 146 USER MANUAL prietest SMART 5. Now, user can switch OFF the instrument since it displays the message – “Please Shut Down the Instrument”. Version No.: RBK 2.0.0.6 Effective Date: Apr 2014 Page 111 of 146 USER MANUAL prietest SMART 11. PROGRAMMING MODES A) BIOCHEMISTRY:Fixed Time, Kinetic, Endpoint, Differential & Ratio comes under this mode i.e. Biochemistry mode. 11.1. FIXED TIME: Change in absorbance of sample is taken at programmed time interval and concentration is calculated either from the factor fed by the user or using standard. Recalling /Running (Operating) a pre-programmed test. Consider CREAT test in “FIXED TIME” mode. Since it consists of Standard, user needs to run standard before running sample. ¾ Following is the procedure to run the standard for CREAT test. 1. Checking Temperature: It will display this particular string in order to reach its absolute temperature. Version No.: RBK 2.0.0.6 Effective Date: Apr 2014 Page 112 of 146 USER MANUAL prietest SMART 2. Press ASP switch to Aspirate Reference: After inserting the flowcell in the block, it will display the message “Press ASP switch to Aspirate Reference”. User must press the ASP switch to Aspirate the Reference Value. 3. Referencing... : This particular screen appears only when the instrument takes the reference value. So, wait for few seconds while the referencing is in process. Version No.: RBK 2.0.0.6 Effective Date: Apr 2014 Page 113 of 146 USER MANUAL prietest SMART 4. Air Purging...: After Referencing, it will wash the flowcell while displaying the message string “Air Purging...”. Following screen appears after taking the Reference Value. 5. Press ASP switch to Aspirate Standard 1 After inserting the flowcell in the block, it will display the message “Press ASP switch to Aspirate Standard 1”. User must press the ASP switch to Aspirate the Standard Value. Version No.: RBK 2.0.0.6 Effective Date: Apr 2014 Page 114 of 146 USER MANUAL prietest SMART 6. “Reading Values during Lag Time.....5”, this particular message appears only when reading the Standard Values. 7. It will ask the user whether to re-run the standard or else continue with the present obtained value for the standard run. Select “Yes” to over-write the obtained standard value and “No” to continue with the same value. Version No.: RBK 2.0.0.6 Effective Date: Apr 2014 Page 115 of 146 USER MANUAL prietest SMART 8. It displays a dialogue box which reads as –“Do you wish to Print Graph?”. Select ‘Yes’ to print the graph displayed on the screen. 9. It displays a dialogue box which read as – “Accept std run values?”. User can select “Yes” for accepting the std value which implies that there is no need to run the standard each and every time when you select the same test. Or else can select “No” to run the standard for fresh value. Version No.: RBK 2.0.0.6 Effective Date: Apr 2014 Page 116 of 146 USER MANUAL prietest SMART 10. Air Purging...: Finally, it will wash the flowcell while displaying the message string “Air Purging...”. After completing the purging process user can select “Back” key to come out of the Run screen. Similarly, follow the steps mentioned below to run sample for CREAT test. 1. Checking Temperature: It will display this particular string in order to reach its absolute temperature. Version No.: RBK 2.0.0.6 Effective Date: Apr 2014 Page 117 of 146 USER MANUAL prietest SMART 2. Press ASP switch to Aspirate Reference: After inserting the flowcell in the block, it will display the message “Press ASP switch to Aspirate Reference”. User must press the ASP switch to Aspirate the Reference Value. 3. Referencing... : This particular screen appears only when the instrument takes the reference value. So, wait for few seconds while the referencing is in process. Version No.: RBK 2.0.0.6 Effective Date: Apr 2014 Page 118 of 146 USER MANUAL prietest SMART 4. Air Purging...: After Referencing, it will wash the flowcell while displaying the message string “Air Purging...”. Following screen appears after taking the Reference Value. 5. Press ASP switch to Aspirate Sample After inserting the flowcell in the block, it will display the message “Press ASP switch to Aspirate Sample”. User must press the ASP switch to Aspirate the Sample Value. Version No.: RBK 2.0.0.6 Effective Date: Apr 2014 Page 119 of 146 USER MANUAL prietest SMART 6. “Reading Values during Lag Time.....5”, this particular message appears only when reading the Standard Values. 7. It displays a dialogue box which reads as –“Do you wish to Print Graph?”. Select ‘Yes’ to print the graph displayed on the screen. Version No.: RBK 2.0.0.6 Effective Date: Apr 2014 Page 120 of 146 USER MANUAL prietest SMART 8. It displays a message string “CREAT Test Run Over”. 9. Air Purging...: Finally, it will wash the flowcell while displaying the message string “Air Purging...”. After completing the purging process user can select “Back” key to come out of the Run screen. Version No.: RBK 2.0.0.6 Effective Date: Apr 2014 Page 121 of 146 USER MANUAL prietest SMART 11.2. DIFFERENTIAL: Differential of Sample and Sample Blank is taken. Concentration is calculated either from the factor fed by user or by using standard. Recalling /Running (Operating) a pre-programmed test. Consider T-BIL test in Differential mode. Following is the procedure to run the sample for T-BIL test. 1) Checking Temperature: It will display this particular string in order to reach its absolute temperature. 2) Press ASP switch to Aspirate Reference: After inserting the flowcell in the block, it will display the message “Press ASP switch to Aspirate Reference”. User must press the ASP switch to Aspirate the Reference Value. Version No.: RBK 2.0.0.6 Effective Date: Apr 2014 Page 122 of 146 USER MANUAL prietest SMART 3) Referencing... : This particular screen appears only when the instrument takes the reference value. So, wait for few seconds while the referencing is in process. 4) Air Purging...: After Referencing, it will wash the flowcell while displaying the message string “Air Purging...”. Following screen appears after taking the Reference Value. Version No.: RBK 2.0.0.6 Effective Date: Apr 2014 Page 123 of 146 USER MANUAL prietest SMART 5) Press ASP switch to Aspirate Sample Blank After inserting the flowcell in the block, it will display the message “Press ASP switch to Aspirate Sample Blank”. User must press the ASP switch to Aspirate the Sample Blank Value. 6) “Reading Values during Lag Time.....5”, this particular message appears only when reading the Sample Values. Version No.: RBK 2.0.0.6 Effective Date: Apr 2014 Page 124 of 146 USER MANUAL prietest SMART 7) Air Purging...: After Referencing, it will wash the flowcell while displaying the message string “Air Purging...”. 8) Press ASP switch to Aspirate Sample After inserting the flowcell in the block, it will display the message “Press ASP switch to Aspirate Sample”. User must press the ASP switch to Aspirate the Sample Value. Version No.: RBK 2.0.0.6 Effective Date: Apr 2014 Page 125 of 146 USER MANUAL prietest SMART 9) “Reading Values during Lag Time.....5”, this particular message appears only when reading the Sample Values. 10) It displays a message string “T-BIL Test Run Over”. Select “Back” key to come out of the Run screen. Version No.: RBK 2.0.0.6 Effective Date: Apr 2014 Page 126 of 146 USER MANUAL prietest SMART 11) Air Purging...: Finally, it will wash the flowcell while displaying the message string “Air Purging...”. After completing the purging process user can select “Back” key to come out of the Run screen. Version No.: RBK 2.0.0.6 Effective Date: Apr 2014 Page 127 of 146 USER MANUAL prietest SMART 11.3. KINETIC: Multiple readings are taken at set temperature, at regular intervals and change in absorbance per minute is calculated. Concentration is calculated from the factor fed by the user or by using standard. Recalling /Running (Operating) a pre-programmed test. Consider SGOT test in Kinetic mode. Following is the procedure to run the sample for SGOT test. 1) Checking Temperature: It will display this particular string in order to reach its absolute temperature. 2) Press ASP switch to Aspirate Reference: After inserting the flowcell in the block, it will display the message “Press ASP switch to Aspirate Reference”. User must press the ASP switch to Aspirate the Reference Value. Version No.: RBK 2.0.0.6 Effective Date: Apr 2014 Page 128 of 146 USER MANUAL prietest SMART 3) Referencing... : This particular screen appears only when the instrument takes the reference value. So, wait for few seconds while the referencing is in process. 4) Air Purging...: After Referencing, it will wash the flowcell while displaying the message string “Air Purging...”. Following screen appears after taking the Reference Value. Version No.: RBK 2.0.0.6 Effective Date: Apr 2014 Page 129 of 146 USER MANUAL prietest SMART 5) Press ASP switch to Aspirate Sample After inserting the flowcell in the block, it will display the message “Press ASP switch to Aspirate Sample”. User must press the ASP switch to Aspirate the Sample Value. 6) “Reading Values during Lag Time.....5”, this particular message appears only when reading the Standard Values. Version No.: RBK 2.0.0.6 Effective Date: Apr 2014 Page 130 of 146 USER MANUAL prietest SMART 7) It displays a dialogue box which reads as –“Do you wish to Print Graph?”. Select ‘Yes’ to print the graph displayed on the screen. 8) It displays a message string “SGOT Test Run Over”. Version No.: RBK 2.0.0.6 Effective Date: Apr 2014 Page 131 of 146 USER MANUAL prietest SMART 9) Air Purging...: Finally, it will wash the flowcell while displaying the message string “Air Purging...”. After completing the purging process user can select “Back” key to come out of the Run screen. Version No.: RBK 2.0.0.6 Effective Date: Apr 2014 Page 132 of 146 USER MANUAL prietest SMART B) COAG MODE:It consists of only one test in this mode but with various combinations. Recalling /Running (Operating) a pre-programmed test. Sample Run User can run the sample only after running Control if selected any. ¾ To run the Sample in COAG Mode:Select a test in COAG mode. Select “Run” key from the List Test screen which results in displaying the screen as shown below. Follow the procedure given below for Running Sample in COAG Mode. 1) Checking Temperature: It will display this particular string in order to reach its absolute temperature. Version No.: RBK 2.0.0.6 Effective Date: Apr 2014 Page 133 of 146 USER MANUAL prietest SMART 2) It will display a message string – “Checking Cuvette! Waiting for removal…….” alongwith a dialogue box which reads as – ‘Close Lid and Press OK’. And therefore user must close the lid and press ‘OK’ key to proceed further. 3) Referencing... : This particular screen appears only when the instrument takes the reference value. So, wait for few seconds while the referencing is in process. Version No.: RBK 2.0.0.6 Effective Date: Apr 2014 Page 134 of 146 USER MANUAL prietest SMART 4) Select “Run” key present on the screen in order to run sample. 5) Insert Sample Cuvette (sample test-tube with adapter) in the cuvette block in order to start the running process. Version No.: RBK 2.0.0.6 Effective Date: Apr 2014 Page 135 of 146 USER MANUAL prietest SMART 6) Now dispense reagent. After dispensing close the lid and press “OK” key. 7) “Reading......52”, this particular message appears only when reading the Control Values. Version No.: RBK 2.0.0.6 Effective Date: Apr 2014 Page 136 of 146 USER MANUAL prietest SMART 8) Finally it displays a result with a message string – “PQRS Test Run Over” Select “Back” key to come out of the Run screen. Version No.: RBK 2.0.0.6 Effective Date: Apr 2014 Page 137 of 146 USER MANUAL prietest SMART C) TURBIDITY MODE:In Turbidity mode user is provided with different keys. Turbidity mode consists of 3 different tests which are accessible only with their respective keys. That means user must necessarily connect a key for the respective test. Test cannot be Added or Edited in this particular mode. User can directly run the Sample or QC by connecting a respective key of the corresponding test. Procedure To Run QC in Turbidity Mode 1. After connecting a Key related to the ASO120, it reads the parameters related to that test while displaying a message string – “Key Reading” Version No.: RBK 2.0.0.6 Effective Date: Apr 2014 Page 138 of 146 USER MANUAL prietest SMART 2. If the Key Information matches with the parameters, then it will display the string “Key Reading Over! Press Run to Start Test.” Select Run button present on the screen. 3. Press ASP switch to Aspirate Reference: After inserting the flowcell in the block, it will display the message “Press ASP switch to Aspirate Reference”. User must press the ASP switch to Aspirate the Reference Value. Version No.: RBK 2.0.0.6 Effective Date: Apr 2014 Page 139 of 146 USER MANUAL prietest SMART 4. Air Purging...: After Referencing, it will wash the flowcell while displaying the message string “Air Purging...”. 5. Press ASP switch to Aspirate Sample After inserting the flowcell in the block, it will display the message “Press ASP switch to Aspirate Sample”. User must press the ASP switch to Aspirate the Sample Value. Version No.: RBK 2.0.0.6 Effective Date: Apr 2014 Page 140 of 146 USER MANUAL prietest SMART 6. “Reading Values during Lag Time.....5”, it measures the Lag Time while reading the Sample Values. 7. “Reading Values during Read Time.....5”, this particular message appears only when taking the readings the Sample Values. Version No.: RBK 2.0.0.6 Effective Date: Apr 2014 Page 141 of 146 USER MANUAL prietest SMART 8. It displays a dialogue box which reads as –“Do you wish to Print Graph?” Select ‘Yes’ to print the graph displayed on the screen. 9. Finally it displays a message string “ASO120 QC Run Over”. Version No.: RBK 2.0.0.6 Effective Date: Apr 2014 Page 142 of 146 USER MANUAL prietest SMART 10. Air Purging...: Finally, it will wash the flowcell while displaying the message string “Air Purging...” After completing the purging process user can select “Back” key to come out of the Run screen. Version No.: RBK 2.0.0.6 Effective Date: Apr 2014 Page 143 of 146 USER MANUAL prietest SMART 12. TROUBLE SHOOTING: MESSAGES CAUSE /CORRECTIVE ACTION Check Light Path Clean the cuvette / Wash the flow cell thoroughly checks whether Instrument is aspirating the solution. Checking flowcell = 0 This error will come in flow cell mode if Flowcell is not inserted or not inserted properly. Insert the flow cell properly. Remove Cuvette This error will come in Cuvette mode while referencing. Remove the cuvette. Invalid Assay In Multi standard mode if standard are not proper then this error will appear. Check the calibrators and rerun the test. Version No.: RBK 2.0.0.6 Effective Date: Apr 2014 Page 144 of 146 USER MANUAL prietest SMART 13. DECONTAMINATION 13.1. Decontamination Procedure • If the instrument is to be shipped after being exposed to potentially hazardous material, it should be decontaminated. The following procedure outlines the method of decontaminating the instrument before packaging and shipment. 13.2. Purpose of Decontamination • Decontamination minimizes the risk to all who come in contact with the instrument during shipping, handling, and servicing. 13.3. General Considerations • Any laboratory instrument that has been used for clinical analysis is considered a biohazard and should be decontaminated prior to handling. Intact skin is generally considered an effective barrier against infectious Organisms; however, small abrasions and cuts may not be always be visible. Prophylactic gloves must be worn when handling instruments that have not been decontaminated. Gloved hands should be considered contaminated at all times and must be kept away from eyes, mouth and nose at all times. • Mucous membranes are considered prime entry routes for infectious agents. Wear eye protection and a surgical mask when there is a possibility of aerosols. • Eating and drinking while decontaminating instruments is not advisable. 13.4. Procedure • A solution of .5% Sodium Hypo Chlorite (NaOCL) solution (Bleach) is used. Commercial bleach is 5% NaOCL; household bleach is 3% NaOCL. When using commercial bleach, use a 10:1 mixture; if using household bleach, a 6:1 mixture is required. This is a caustic solution. It is important to wear gloves and eye protection when handling it. • Wipe down the carrier and all exposed surfaces of the unit with the bleach solution. Remove the top shroud of the instrument and wipe down the top surface of the instrument base, as well as the inside of the top shroud. • Reassemble the unit and discard the used gloves and towels. Version No.: RBK 2.0.0.6 Effective Date: Apr 2014 Page 145 of 146 USER MANUAL prietest SMART 14. SAFETY CLEARANCE CERTIFICATE Please complete all information requests on this form prior to returning the instrument to the manufacturer or your local distributor for servicing, repairs or return. Thank you for your cooperation. Customer Contact Address Position Dept Tel: Country Fax: Post Code Model No. Serial No. Accessories Returned Date of Purchase (if known) Complaint Has the equipment been exposed to any of the following: (*delete as applicable) a) Blood, body fluids, pathological specimens *YES/NO If YES, please specify b) Other Biohazard *YES/NO if YES, Please specify Version No.: RBK 2.0.0.6 Effective Date: Apr 2014 Page 146 of 146