1
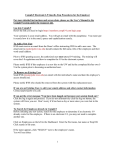
DCB Ethernet Tunnel Family
Configuration Guide
Introduction
Thank you for your purchase of the DCB Ethernet Tunnel. This guide will step you through a typical
installation as shown in the following diagram. The example shows a single server with a single client. A
single server is capable of supporting 1 to 8 clients in a star topology. Other topologies, such as a daisychain, are possible. Although the ET-6600 is used in the examples, the same configuration is used on the
entire ET family of products. An example of a daisy-chain installation is shown later in the guide.
This guide does not detail the user interface or how to initially configure the unit. You can refer to the
User's Manual for that information. However, for those wishing a quick start guide, this is the condensed
version of those instructions. The Ethernet Tunnel is configured through Ethernet-A using a web browser.
It has a default IP address of 192.168.0.1. To access the web server, use the URLhttp://192.168.0.1 or
https://192.168.0.1 . The Secure web URL (https) is used on the higher performance models, the ET6604 and ET-6620 models. The default username is admin and there is no password.
If the default IP address is incompatible with your network, you can change the address through the SerialA port. Configure the terminal for 9600 baud, 8 bits, no parity, one stop. Typically, one would lift DIP
switch 2 on the Ethernet Tunnel, then apply power. After about 15 seconds, you should see some
instructions. When done, make sure to lower DIP switch 2. Some models use a push button for this
purpose instead of DIP switches.
Network Information
Before we can begin, we need to gather information about your network. The following worksheet will
help you gather the required information.
Configuration Worksheet
Worksheet Item Description
Server Items
(A) The subnet mask for your private network. Typically this is something like 255.255.255.0. All
devices on your private network will have this same subnet mask.
(B) The subnet mask for your public network. Typically this is something line 255.255.255.192. This
value is assigned by your ISP and is based on the number of IP addresses they are providing you.
(C) The IP address of the Server ET on the private network. An example would be 10.1.0.2
(D) The IP address of the Server ET on the public network. This must be a public address visible on the
Internet. An example would be 12.96.67.11
(E) The IP address of the ISP router on the public network. An example would be 12.96.67.1
(F) The common passphrase. This is a secret passphrase that you will enter into all of your ET devices. It
is used to generate an initial AES encryption key. The passphrase is sensitive to case, spacing and
punctuation. You should always use a passphrase that has more than 20 characters and includes a mixture
of characters, numbers, punctuation, and spaces. However, you may not use the double quote or the
backslash character. An example would be: The 12 roSes arE esPecially loVely 2 daY.
Client Items
(G) The subnet mask for your public network. If you will be using a DHCP server, you can leave this item
blank. An example would be 255.255.255.0
(H) The IP address of the Client ET on the private network. Remember, this is logically the same private
network that the Server ET is on. An example would be 10.1.0.3
(I) The IP address of the Client ET on the public network. If a DHCP server is available on this network
segment, we recommend using it. If you will be using a DHCP server, you can leave this item blank. In
order for the Client ET to connect to the Server ET, this address must either be a public address visible on
the Internet, or the ISP router must be performing NAT or IP Address Sharing. An example would be
192.168.0.2
(J) The IP address of the ISP router on the public network. An example would be 192.168.0.1. If you will
be using a DHCP server, you can leave this item blank.
(K) The client user name. This a user name assigned to the client ET and will be used for authentication
with the server ET. The user name is sensitive to case, spacing and punctuation. You may not use a double
quote or the backslash characters. If you will be using more than one client, each client should be given a
unique user name. However, this is not a requirement and all clients could be given the same username
and passphrase.
(L) The client's passphrase. This is a secret passphrase that will be unique to the client. It will be used for
authentication with the server ET. It will also be used to generate AES session keys unique for this client.
However, this is not a requirement and all clients could be given the same username and passphrase.
ET Server Configuration Procedure
•
Administration / Set All Defaults - Make sure all options are set to their defaults.
•
Ethernet-A / IP Configuration
1. Enable Ethernet-A
2. Disable DHCP
3. Set the IP address to worksheet item (C).
4. Set the subnet mask to worksheet item (A).
•
Ethernet-B / IP Configuration
1. Enable Ethernet-B
2. Disable DHCP
3. Set the IP address to worksheet item (D).
4. Set the subnet mask to worksheet item (B).
•
Ethernet-B / Static Routes
1. Add a default routing entry to the ISP router: Target= 0.0.0.0, Netmask= 0.0.0.0, Gateway=
worksheet item (E).
•
Ethernet Tunnel / Configuration
1. Tunnel Ethernet-A Enabled.
2. Set the Common Passphrase to worksheet item (F).
3. Enable Server Mode
4. Set the Listen to Port to 22.
5. Disable Client Mode
•
Ethernet Tunnel / Users
1. Set User 1 to: worksheet item (K)
2. Set User 1's passphrase to: worksheet item(L)
•
•
Activate Changes
Save Configuration
ET Client Configuration Procedure
•
Administration / Set All Defaults - Make sure all options are set to their defaults.
•
Ethernet-A / IP Configuration
1. Enable Ethernet-A
2. Disable DHCP
3. Set the IP address to worksheet item (H).
4. Set the subnet mask to worksheet item (A).
•
Ethernet-B / IP Configuration
1. Enable Ethernet-B
2. If the network has a DHCP server, enable DHCP Client.
3. If the network does not have a DHCP server, Set the IP address to worksheet item (I).
4. If the network does not have a DHCP server, Set the subnet mask to worksheet item (G).
•
Ethernet-B / Static Routes
1. If the network does not have a DHCP server, set a default route through the ISP router.
Target= 0.0.0.0, Netmask= 0.0.0.0, Gateway= worksheet item (J).
•
Ethernet Tunnel / Configuration
1. Tunnel Ethernet-A Enabled.
2. Set the Common Passphrase, to worksheet item (F).
3. Disable Server Mode
4. Enable Client Mode
5. Set Connect to Server to worksheet item (D).
6. Set Connect to Port to 22.
7. Set User Name to: worksheet item (K)
8. Set User Passphrase to: worksheet item (L)
•
•
Activate Changes
Save Configuration
Dial-up Client
Instead of using a broadband connection for your client, you may want to use a dial-up connection as
shown in the following diagram.
Configuration of the Server Ethernet Tunnel is the same as our previous example. For the Client Ethernet
Tunnel, we will be configuring a dial-up PPP connection. Use the worksheet on the next page to collect
the needed information.
Dial-up Worksheet
Item Description
(H) The IP address of the Client ET on the private network. Remember, this is logically the same private
network that the Server ET is on. An example would be 10.1.0.3
(K) The client user name. This a user name assigned to the client ET and will be used for authentication
with the server ET . The user name is sensitive to case, spacing and punctuation. You may not use a
double quote or the backslash characters. If you will be using more than one client, each client should be
given a unique user name. However, this is not a requirement and all clients could be given the same
username and passphrase.
(L)The client's passphrase. This is a secret passphrase that will be unique to the client. It will be used for
authentication with the server ET . It will also be used to generate AES session keys unique for this client.
However, this is not a requirement and all clients could be given the same username and passphrase.
(M)Phone number of your Dial-up ISP.
(N) Username for your Dial-up account.
(O) Password for your Dial-up account.
ET Dial-up Client Configuration
• Administration / Set All Defaults - Make sure all options are set to their defaults.
•
Ethernet-A / IP Configuration
1. Enable Ethernet-A
2. Disable DHCP
3. Set the IP address to worksheet item (H).
4. Set to subnet mask to worksheet item (A).
•
Ethernet-B / IP Configuration
1. Disable Ethernet-B
•
Serial-B / Operating Mode
1. Set the Operating Mode to PPP
2. Configure the port options appropriate for your Modem.
•
Serial-B / PPP Options
1. Set the Connection Type to Modem
2. Set Dial-in to no.
3. Set Dial-out to yes.
4. Enter the phone number for your ISP worksheet item (M).
5. Enter the user name for your ISP account, worksheet item (N).
6. Enter the password for your ISP account, worksheet item (O).
7. Leave all other setting in their default state.
•
Serial-B / Static Routes
1. Add a default routing entry to your ISP– Target 0.0.0.0, Netmask 0.0.0.0
•
Serial-B / Modem Options
1. Set options appropriate for your modem.
•
Ethernet Tunnel / Configuration
1. Tunnel Ethernet-A Enabled.
2. Set a Common Passphrase to worksheet item (F).
3. Disable Server Mode
4. Enable Client Mode
5. Set Connect to Server to worksheet item (D).
6. Set Connect to Port to 22.
7. Set User Name to: worksheet item (K).
8. Set User Passphrase to: worksheet item (L).
•
•
Activate Changes
Save Configuration
Daisy-Chain Example
This example shows how to use the Ethernet Tunnels in a daisy-chained topology. At the ends of the
chain, you have a server and a client. In the middle of the chain, you have units operating as both a server
to the downstream unit and a client to the upstream unit. The units are daisy-chained using the serial ports.
A unit's Serial-B port is attached to the Serial-A port of the next unit in the chain.
ET Server Configuration
• Administration / Set All Defaults - Make sure all options are set to their defaults.
•
Ethernet-A / IP Configuration
1. Enable Ethernet-A
2. Disable DHCP
3. Set the IP address to 10.0.0.1
4. Set the subnet mask to 255.255.255.0
•
Ethernet-B / IP Configuration
1. Disable Ethernet-B
•
Serial-B / Operating Mode
1. Set the Operating Mode to PPP
2. Configure the port options appropriate for your application.
•
Serial-B / PPP Options
1. Set the Connection Type to direct.
2. Set the Local IP address to 10.2.0.1
3. Leave all other setting in their default state.
•
Ethernet Tunnel / Configuration
1. Tunnel Ethernet-A Enabled.
2. Set a Common Passphrase, for this example we will use: The roses are lovely in the winter.
Please note that the passphrase is sensitive to case, punctuation, and spacing.
3. Enable Server Mode
4. Set the Listen to Port to 22.
5. Disable Client Mode
•
Ethernet Tunnel / Users
1. Set User 1 to: John Doe
2. Set User 1's passphrase to: This is John Doe's secret passphrase.
•
•
Activate Changes
Save Configuration
First ET Client/Server Configuration
• Administration / Set All Defaults - Make sure all options are set to their defaults.
•
Ethernet-A / IP Configuration
1. Enable Ethernet-A
2. Disable DHCP
3. Set the IP address to 10.0.0.2
4. Set the subnet mask to 255.255.255.0
•
Ethernet-B / IP Configuration
1. Disable Ethernet-B
•
Serial-A / Operating Mode
1. Set the Operating Mode to PPP
2. Configure the port options appropriate for your application.
•
Serial-A / PPP Options
1. Set the Connection Type to direct.
2. Set the Local IP address to 10.1.0.2
3. Leave all other setting in their default state.
•
Serial-B / Operating Mode
1. Set the Operating Mode to PPP
2. Configure the port options appropriate for your application.
•
Serial-B / PPP Options
1. Set the Connection Type to direct.
2. Set the Local IP address to 10.2.0.2
3. Leave all other setting in their default state.
•
Ethernet Tunnel / Configuration
1. Tunnel Ethernet-A Enabled.
2. Set a Common Passphrase, for this example we will use: The roses are lovely in the winter.
Please note that the passphrase is sensitive to case, punctuation, and spacing.
3. Enable Server Mode
4. Set the Listen to Port to 22.
5. Enable Client Mode
6. Set Connect to Server to 10.2.0.1
7. Set Connect to Port to 22
8. Set User Name to: John Doe
9. Set User Passphrase to: This is John Doe's secret passphrase.
•
Ethernet Tunnel / Users
3. Set User 1 to: John Doe
4. Set User 1's passphrase to: This is John Doe's secret passphrase.
•
•
Activate Changes
Save Configuration
Second ET Client/Server Configuration
• Administration / Set All Defaults - Make sure all options are set to their defaults.
•
Ethernet-A / IP Configuration
1.
2.
3.
4.
Enable Ethernet-A
Disable DHCP
Set the IP address to 10.0.0.3
Set the subnet mask to 255.255.255.0
•
Ethernet-B / IP Configuration
1. Disable Ethernet-B
•
Serial-A / Operating Mode
1. Set the Operating Mode to PPP
2. Configure the port options appropriate for your application.
•
Serial-A / PPP Options
1. Set the Connection Type to direct.
2. Set the Local IP address to 10.1.0.3
3. Leave all other setting in their default state.
•
Serial-B / Operating Mode
1. Set the Operating Mode to PPP
2. Configure the port options appropriate for your application.
•
Serial-B / PPP Options
1. Set the Connection Type to direct.
2. Set the Local IP address to 10.2.0.3
3. Leave all other setting in their default state.
•
Ethernet Tunnel / Configuration
1. Tunnel Ethernet-A Enabled.
2. Set a Common Passphrase, for this example we will use: The roses are lovely in the winter.
Please note that the passphrase is sensitive to case, punctuation, and spacing.
3. Enable Server Mode
4. Set the Listen to Port to 22.
5. Enable Client Mode
6. Set Connect to Server to 10.2.0.2
7. Set Connect to Port to 22
8. Set User Name to: John Doe
9. Set User Passphrase to: This is John Doe's secret passphrase.
•
Ethernet Tunnel / Users
1. Set User 1 to: John Doe
2. Set User 1's passphrase to: This is John Doe's secret passphrase.
•
•
Activate Changes
Save Configuration
ET Client Configuration
• Administration / Set All Defaults - Make sure all options are set to their defaults.
•
Ethernet-A / IP Configuration
1. Enable Ethernet-A
2. Disable DHCP
3. Set the IP address to 10.0.0.4
4. Set the subnet mask to 255.255.255.0
•
Ethernet-B / IP Configuration
1. Disable Ethernet-B
•
Serial-A / Operating Mode
1. Set the Operating Mode to PPP
2. Configure the port options appropriate for your application.
•
Serial-A / PPP Options
1. Set the Connection Type to direct.
2. Set the Local IP address to 10.1.0.4
3. Leave all other setting in their default state.
•
Ethernet Tunnel / Configuration
1. Tunnel Ethernet-A Enabled.
2. Set a Common Passphrase, for this example we will use: The roses are lovely in the winter.
Please note that the passphrase is sensitive to case, punctuation, and spacing.
3. Disable Server Mode
4. Enable Client Mode
5. Set Connect to Server to 10.2.0.1
6. Set Connect to Port to 22
7. Set User Name to: John Doe
8. Set User Passphrase to: This is John Doe's secret passphrase.
•
•
Activate Changes
Save Configuration
Security Considerations
This guide would be incomplete without touching on some security issues. The Ethernet Tunnel's default
configuration has a strong security policy for the public network connection and a weak security policy for
the private network connection. This was chosen because most users will be tunneling their private
network across the Internet. However, this may be inappropriate for your application. You need to
determine which network connection is considered risky and which is considered safe. Its possible that
both may be safe or both may be risky.
So what do we mean by a strong security policy? The Ethernet Tunnel's default configuration does not
allow any access to the web interface from the public network interface, thus it may not be configured from
the public network. The only visible TCP port is the one used for the tunnel connection and that port is
only visible on the server tunnel. The tunnel connection is protected by an authentication handshake using
the SHA-1 algorithm and the conversation between the client and server tunnel are AES-128 encrypted.
The Ethernet Tunnel will respond to ping (ICMP echo), but that can be disable from the Administration /
Access Control page.
So what do we mean by a weak security policy? The web interface is open on the private network
interface. It has an easily guessed user name of admin and no password. Any client on the private network
may access the web server and all configuration traffic may be monitored.
The security settings can be modified from the Administration menu. Under the Administration menu you
will see the items Admin Password and Access Control. These pages will allow you to change the user
name and password and to select the interfaces open for configuration. You can also add IP filters to limit
which client IP addresses have access to the web server.
If both of your networks are considered risky, you have the option of disabling web configuration from
both interfaces. This should be done as the last configuration step, after which the only way to regain
access to the unit is through the serial interface. If you choose to do this, remember to store your settings
before you activate them.
One other item of concern is the configuration file. A valuable feature of the Ethernet Tunnel is the ability
to retrieve the configuration out of the unit and store it on a host computer. Please note that this
configuration file contains all user names and passphrases. You should take care to secure this file from
unauthorized users.