1
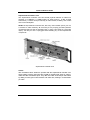
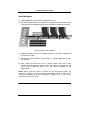
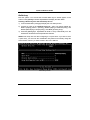
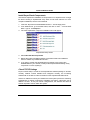
™ Quick Installation Guide Quick Installation Guide This guide is designed to help you quickly install Supertrak100 and configure your RAID array into a Windows NT 4.0 or Windows 2000 host system. Please read through this guide carefully before attempting to install Supertrak100. The steps are as follows: 1. 2. 3. 4. 5. 6. Unpack Supertrak100 Install Hardware Build Array Install SuperTrak100 Windows Driver Install SuperCheck Components Check TCP/IP Settings If you have any questions about these steps, consult the main User’s Manual. NOTE: Users should record their current CMOS (system setup) settings before making any changes. This preventative measure is aimed at protecting such information from loss, which may happen unpredictably and/or periodically during any hardware installation. Unpack Supertrak100 The Supertrak100 package should contain the following items: • • • • • Supertrak100 controller card Supertrak100 User’s Manual (1) 16MB 72-pin EDO SIMM Supertrak100 OS drivers & utility diskettes (3) Internal 18” Ultra ATA/100 80-wire/40-pin hard drive cables (6) If any of the items are missing or appear damaged, please contact your dealer or distributor immediately. NOTE: The Supertrak100 controller card ships with two removable protective labels that cover the audible alarm buzzer device and the battery which maintains the non-volatile RAM memory. These labels must be removed prior to installing the card. Quick Installation Guide Supertrak100 Controller Card The Supertrak100 controller card has several physical features of interest for purposes of installation: A SIMM socket for EDO memory, 6 IDE channel connections (1 “master” drive per channel), an alarm buzzer, a battery, and 4 LEDs on the card’s backplane. NOTE: The Supertrak100 controller card, like every other valuable part of your PC, is sensitive to static electricity. Be sure that you are properly grounded (Promise recommends that you wear an anti-static strap, or place a free hand on a grounded object), and that your PC is unplugged before installing any of the Supertrak100 components. Supertrak100 controller card Cables Ultra ATA/66/100 drive cables are provided with the Supertrak100 controller card. These cables must be used with Ultra ATA/66 or UltraATA/100 drives in order to realize full Ultra ATA/66/100 specs. They differ from older 40-wire/40-pin IDE cables by adding an extra ground wire between each data wire, resulting in an 80-wire/40pin cable. Quick Installation Guide Install Hardware 1) Install 16MB EDO memory into the SIMM slot on card. 2) Remove protective label for 3V (CR2032 or compatible) battery shipped with the card that supports NVRAM. Remove protective label for audible alarm buzzer. Typical controller card installation 4) Install the controller card into an available PCI slot on the system motherboard and secure it in place. 5) Set the hard drives to "Master", "Cable-Select", or “Single” (depending on drive specification. 6) Next, install hard drives into the PC chassis. Attach black end of Ultra ATA/66/100 cable and power cable to back of each drive. Connect the blue end of the Ultra ATA/66/100 cable to any IDE channel available on the Supertrak100. NOTE: Device support for drives is provided by the Supertrak100 system. No changes are necessary in the motherboard CMOS/BIOS Setup for resources or drive types regarding hard drive configuration. Changes may or may not be necessary for PCI device setup. Quick Installation Guide Build Array Boot the system. You will see the Promise BIOS sign-on banner appear on the screen. Press [Ctrl-F] to initialize SuperBuild and display the Main Menu. Creating a disk array from the Auto Setup screen 1) From the Main Menu press [1] to display the Auto Setup screen. 2) Choose an option in the “Optimize array for:” field. The choices offered are RAID 0 (striping), RA ID 1 (mirroring), RAID3 (striping w/ dedicated parity), and RAID5 (data striping w/ striped parity), and JBOD (spanning array). 3) Press the [Ctrl-Y] keys. SuperBuild will build an array automatically from the hard drives connected to the Supertrak100 controller. NOTE: Auto setup does not allow configuring a hot spare drive. If you wish to have a spare drive, you must use the View/Define Array Menu and manually assign the exact number of drives you want included. See User’s Manual. Auto setup screen Quick Installation Guide Install Windows NT or 2000 Driver At this point, you will be installing the Promise drivers into an existing Windows NT or 2000 system (on a boot drive that is separate from the SuperTrak array) or you will begin installing Windows NT or 2000 from scratch. Installing Driver in Existing Windows NT 4.0 System 1. From the “Start” menu, choose “Control Panel” in the “Settings.” 2. In the “Control Panel” window, double-click on the “SCSI Adapters” icon. 3. In the “SCSI Adapters” window, choose the “Drivers” tab. 4. Press the “Add” button. 5. Choose “Have Disk” in the “Install Driver” window (insert Driver diskette) 6. Enter the directory location of the driver in the text box (A: or use browse button to locate file). 7. Click on the filename “sptrak.inf” and press “Open” button. 8. Select “WinNT Promise SuperTrak66/100 Controller” and press “OK.” 9. “Select SCSI Adapter Option” will be displayed. Press “Install,” which initiates the installation operation. 10. After a successful installation, the “SCSI Adapter Setup” dialog box will appear which states that the, “WinNT Promise SuperTrak66/100 Controller” has been installed. 11. Restart the system. Installing Driver During New Install of Windows NT 4.0 1. a) Floppy Install: Boot the computer with the Windows NT installation diskettes. b) Floppyless Install: Boot from floppy and type “WINNT /B”. After files have been copied, the system will reboot. On the reboot, press <F6> when the message “Setup is inspecting your computer’s hardware configuration...” appears. c) CD-ROM Install: Boot from the CD-ROM and press <F6> when the message “Setup is inspecting your computer’s hardware configuration...”. 2. Press “S” to add the Supertrak100 controller. 3. Select “Other (requires disk provided by hardware manufacturer).” 4. Insert the Promise driver diskette into drive A: and press ENTER. 5. Select the “WinNT Promise SuperTrak66/100 Controller” and click “OK”. Quick Installation Guide NOTE: for CD installations, you must also specify the driver for your CD-ROM adapter (i.e. if using an ATAPI CD-ROM, specify the IDE 2.1 controller) 6. Follow the normal setup installation procedure. Windows 2000 Installing Driver in Existing Windows 2000 System After installing the Supertrak100 card and rebooting your system, Windows 2000 setup will show a “New Hardware Found” dialog box. 1. In the dialog box, choose “Driver from disk provided by hardware manufacturer” button. 2. Check “Search for a suitable driver for my device (recommended)” and then click the “Next” button. 3. In the “Locate Driver Files” dialogue box uncheck “Floppy Disk Drives”, check “Specify a location”, and then click the “Next” button. 4. In the A: drive, insert the SuperTrak100 driver diskette. 5. Type “A:\WIN2000” in the text box. Press “Enter”. 6. “Windows2000 Promise SuperTrak66/100 IDE RAID Controller” should be found. Click the “Next” button. 7. Click the “Yes” button in the “Digital Signature Not Found” dialogue box. 8. Click on the “Finish” button and reboot the system. Confirming Windows 2000 Installation 1. From Windows 2000, open the Control Panel from “My Computer” followed by the System icon. 2. Choose the “Hardware” tab, then click the “Device Manager” tab. 3. Click the “+” in front of “SCSI and RAID controllers. ”Windows2000 Promise SuperTrak66/100 IDE RAID Controller” should appear. Installing Driver During New Windows 2000 Installation 1a. Floppy Install: Boot the computer with the Windows 2000 installation diskettes. 1b. Floppyless Install: Boot from floppy and type “WINNT”. After files have been copied, the system will reboot. On the reboot, press <F6> after the message ““Press F6 if you need to install third party SCSI or RAID driver” appears. Quick Installation Guide 1c. CD-ROM Install: Boot from the CD-ROM. Press <F6> after the message “Press F6 if you need to install third party SCSI or RAID driver” appears. 2. When the “Windows 2000 Setup” window is generated, press “S” to Specify an Additional Device(s) 3. Insert the Promise Technology driver diskette into drive A: and press “Enter” key. 4. Choose ”Win2000 Promise SuperTrak66/100 Controller” from the list that appears on screen, then press the “Enter” key. 5. The Windows 2000 Setup screen will appear again saying “Setup will load support for the following mass storage devices:” The list will include ”Win2000 Promise SuperTrak66/100 IDE RAID Controller”. NOTE: If you need to specify any additional devices to be installed, do so at this time. Once all devices are specified, continue to step 6. 6. From the Windows 2000 Setup screen, press the Enter key. Setup will now load all device files and then continue the Windows 2000 installation. Quick Installation Guide Install SuperCheck Components This section explains the installation of components to run SuperCheck on a single file server housing a Supertrak100 array within a local area network. For more complex installations, see the User’s Manual. 1. Insert the “SuperCheck Install Diskette Number 1” into the floppy drive. 2. From Windows NT, go to the Start button, and click on “Run…” from the Start Menu. Type in: A:\setup.exe ↵ 3. The main SuperCheck component installation menu will appear. SuperCheck Setup screen 4. Select #4 Install All Components. 5. Reboot the system AFTER all software components have been installed in order to activate any installed NT services. 6. If you want to monitor the Supertrak100 from another PC(s) running Win 95/98/NT/2000 in your network, install just the SuperCheck Monitoring Utility component on to this system(s). Check TCP/IP Settings Proper TCP/IP setup is crucial for the Supertrak100 software package to function correctly. Without TCP/IP installed and configured correctly, the monitoring software will not be able to make connections to the Supertrak100 RAID server. Use the IP address for which your Windows NT host system (the server containing Supertrak100) is already configured to establish connections. Otherwise, use IP address 127.0.0.1 for all your TCP/IP configurations; this address will allow all TCP/IP requests to remain within the system. P/N: C6105ST10000000