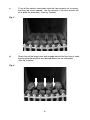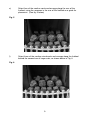
1
Stirling
MC & SC
COAL EFFECT GAS FIRE
User Instructions
These instructions should be read by the user before operating the
appliance and retained for future reference
Model No’s FSCC12MN, FSCC23MN, FSCC42SN, FSCC53SN are only
for use on Natural Gas (G20) at a supply pressure of 20 mbar in G.B.
/ I.E.
INSTALLATION INFORMATION
CONDITIONS OF INSTALLATION
It is the law that all gas appliances are installed only by a competent (e.g. CORGI
Registered) Installer, in accordance with the installation instructions and the Gas
Safety (Installation and Use) Regulations 1998. Failure to install appliances correctly could lead to prosecution. It is in your own interest and that of safety to
comply with the law.
The fire may be fitted below a combustible shelf provided that the shelf is at least
200mm above the top of the appliance and the depth of the shelf does not exceed
150mm.
The fire may be installed below combustible shelves which exceed 150mm deep
providing that the clearance above the fire is increased by 15mm for each 25mm
of additional overhang in excess of 150mm.
No purpose made additional ventilation is normally required for this
appliance when installed in G.B. When installed I.E. please consult document I.S. 813 : 1996 Domestic Gas Installation which is issued by the
National Standards Authority of Ireland. Any purpose made ventilation
should be checked periodically to ensure that it is free from obstruction.
If the chimney or flue has been previously used by appliances burning fuels other
than gas they must be swept prior to the installation of this fire.
If this appliance is fitted directly on to a wall without the use of a fireplace or surround, soft wall coverings such as wallpaper, blown vinyl etc. could be affected by
the heat and hot convection air and may discolour or scorch. This should be considered when installing or decorating.
The Model number of this appliance is as stated on the rating plate affixed to the
control panel of the fire and the appliance is manufactured by:BFM Europe Ltd
Trentham Lakes
Stoke on Trent
ST4 4TJ
2
ABOUT YOUR NEW STIRLING GAS FIRE
The Flavel Stirling range of coal effect gas fires incorporates a unique and highly
developed fuel bed which gives the realism of a loose coal layout combined with
realistic flames and glow. The use of durable ceramic material in the construction
of the fuelbed components ensures long and trouble free operation.
When first using the new fire a slight smell may be noticed. This is due to starch
used in the manufacture of the soft ceramic coals, it is non-toxic and will soon disappear.
Please take the time to fully read these instructions as you will then be able to
obtain the most effective and safe operation of your fire.
IMPORTANT SAFETY INFORMATION
WARNING
This appliance has a naked flame and as with all heating appliances a
fireguard should be used for the protection of children, the elderly and
infirm. Fireguards should conform to B.S. 8423 : 2002 (Fireguards for use
with gas heating appliances).
It is important that this appliance is serviced at least once a year by a CORGI
registered gas installer in G.B. and that during the service the fire is removed from
the fire opening and the chimney or flue visually checked for fallen debris or
blockages which must be removed. The chimney should also be checked to
ensure clearance of flue products. We recommend that during the annual service,
replacement of the Oxypilot is carried out. These are conditions of the
manufacturers guarantee.
After installation or during servicing a spillage test must always be carried
out.
Rubbish of any type must NEVER be thrown onto the fuel bed, this could affect
safe operation and damage the fire.
Any debris or deposits should be removed from the fuel bed from time to time.
This may be carried out by referring to the cleaning section as described later in
this book.
Only the correct number and type of coals must be used and only complete and
genuine replacement sets must be used.
Always keep furniture and combustible materials well clear of the fire and never
dry clothing or items either on or near to the fire. Never use aerosols or
flammable cleaning products near to the fire when it is in use.
3
The hard ceramic fuel bed remains hot for a considerable period after use
and sufficient time should be allowed for the fire to cool before cleaning etc.
The fire must only be operated with a fender which was supplied with the product.
OPERATING THE FIRE (MANUAL CONTROL MODELS)
The controls are located behind the ashpan cover which is situated behind the
Ashpan / Fender. The controls, comprise a control valve to adjust the gas flow and
a push button piezo igniter. To light the fire proceed as follows:1)
2)
Depress the control knob and turn anti-clockwise to the position
marked pilot. Hold in the control knob for a few seconds to allow the gas to
reach the pilot.
Continue to hold-in the control knob and press the igniter button. If the pilot
does not light, continue to press the igniter button until ignition occurs. When
the pilot has lit, continue to hold the control knob in for 5-10 seconds to allow
the thermocouple to heat up, if the pilot goes out when the control knob is
released, repeat the lighting sequence.
In the unlikely event of a failure of the igniter, the fire can be lit as follows :Depress the control knob and turn anti-clockwise to the position
marked pilot. Hold in the control knob for a few seconds to allow the gas to reach
the pilot. Insert the tip of a lit taper in behind the front ceramic coals on the left
hand side. This will light the pilot flame. When the pilot has lit, continue to hold
the control knob in for 5-10 seconds to allow the thermocouple to heat up, if the
pilot goes out when the control knob is released, repeat the lighting sequence.
3)
4)
After lighting, turn the control knob in the anti-clockwise direction to the high
position and the main burner will light. It is recommended that for most
efficient performance the fire is allowed to warm up for a few minutes with
the gas control on maximum.
The gas control can be turned clockwise from the maximum position to give
the desired heat output.
WARNING
If the fire goes out for any reason or is turned off and it is
necessary to re-light the fire it is important to allow the fire to cool
for 3 minutes before attempting to re-light it.
4
OPERATING THE FIRE - SLIDE CONTROL MODELS
The controls comprise a control lever, to turn the fire on and off and adjust the gas
rate. The control lever is located at the top right hand side of the fire. Depressing
the control lever fully operates the igniter and lights the pilot flame and ignition rate
gas. Once the pilot is established raising the lever allows medium and finally high
gas settings. The fire is turned off when the control lever is fully raised.
To light the fire proceed as follows:1)
2)
Depress the control lever fully downwards to the position marked. Hold
down the control lever for a few seconds to allow the gas to reach the pilot.
The fire will then begin its ignition sequence. If the pilot does not light,
continue to press the control lever until ignition occurs. The pilot flame can
be seen by looking underneath the front ceramic rail, above the burner heat
shield, at the front left hand side of the fuelbed. When the pilot has lit,
continue to hold the control lever down for 5-10 seconds to allow the
thermocouple to heat up, before releasing the lever apply one firm
downwards push to ensure that the f.s.d. valve is fully latched, if the pilot
goes out when the control lever is released, repeat the lighting sequence.
In the unlikely event of a failure of the igniter, firstly check the operation of the
1.5V battery and if necessary replace with a ‘AA’ size alkaline battery. It is
important that only an alkaline battery is used, otherwise premature battery
failure and leakage may result. If the appliance still fails to light the fire can be
lit as follows:
Depress the control lever fully downwards to the position marked. Hold in position
for a few seconds to allow the gas to reach the pilot. Insert the tip of a lit taper or
spill between the front ceramic and burner heat shield. This will light the pilot
flame and low rate gas.
When the pilot has lit, continue to depress the control lever in for 5-10 seconds to
allow the thermocouple to heat up before releasing the control lever apply one firm
downwards push to ensure that the f.s.d. valve is fully latched.
If the pilot goes out when the control lever is released, repeat the lighting
sequence.
3)
4)
5)
After lighting, move control lever up to the high position and the main burner
will light. It is recommended that for the most efficient performance the fire is
allowed to warm up for a few minutes the control lever set to high.
The gas control can be moved from the High to Low position to give the
desired heat output.
To turn the fire off, FULLY raise the control lever to the OFF position.
WARNING
If the fire goes out for any reason or is turned off and it is
necessary to relight the fire it is important to allow the fire to cool
for 3 minutes before attempting to re-light it.
5
Replacing the Battery
Unscrew Battery retaining cap situated at the front right of the fire and remove
battery. Replace in the reverse order using a 1.5V AA Alkaline Battery. It is
important that only an alkaline battery is used, otherwise premature battery
failure and leakage may result
SPILLAGE MONITORING SYSTEM
This appliance is fitted with a spillage monitoring system which shuts down the fire
if the evacuation of combustion products from the fire is affected by a partially or
fully blocked flue.
If this system operates the fire will go out. If this occurs, leave the fire for at least
three minutes then follow the lighting procedure as described in the previous
section. In the event of repeated operation a CORGI registered gas installer
must be called to investigate and rectify the cause.
CLEANING - WARNING
Before attempting any cleaning operation ensure that the fire has been allowed to
fully cool.
CLEANING THE BRASS AND PAINTED METAL PARTS
Dependent upon the trim option chosen for use with this fire, there is a variety of
methods that can be chosen to clean the trim. The trim should only be cleaned
using a clean, damp cloth. The trim is best cleaned by removing it from the fire
and placing it face up on a flat surface. The trim is easily replaced by
repositioning it on the fire and pushing it back onto the magnets.
The fender supplied with this fire is laquered to protect the finish and therefore
must only be cleaned using a clean damp cloth. Abrasive cleaners, chemical
cleaning agents or any type of polish must never be used as damage to the
finish may result.
CLEANING THE FUEL BED
We do not recommend cleaning of coals or fuelbed components as these are
fragile and damage may result. None of these parts must be washed or
exposed to any cleaning agents or water.
Any damaged parts must be replaced by contacting your dealer or telephoning
BFM Europe Ltd. on the number stated on the rear cover of this book. Coals must
only be replaced with a complete and genuine replacement set and the fire must
never be run with the wrong number or damaged coals. The fuelbed must be
carefully re-assembled as stated in the following section.
6
RE-ASSEMBLING FUEL BED AND COMMISSIONING
NOTE : The position of the fuel-bed components are critical to the
performance of the product. Therefore please ensure that the fuel-bed
components are positioned as described in the following section prior to
requesting a service call due to soot build up, poor flame pattern etc.
a)
Place the ribbed ceramic fuelbed base on top of the fuelbed support
and pull fully forwards to the burner. Make sure that the fuelbed
base is located centrally in the fire box. Ensure that the fuelbed
base fit fully down onto the fuel bed support and is not
lodged on the burner. See fig. 1below.
Fig. 1
b)
Position front ceramic rail on burner front ceramic support and ensure
that the locating channel in the front ceramic rail is correctly located
onto the lip on the burner front ceramic support. (See fig. 2 below)
Fig. 2
7
c)
Fit six of the medium sized coals onto the front ceramic rail, ensuring
that they are evenly spaced. Use the recess’s in the front ceramic rail
as a guide for placement. (See fig. 3 below)
Fig. 3
d)
.
Select four of the large coals and arrange behind the front row of coals,
ensuring that flame paths as indicated below are not interupted.
(See fig. 4 below)
Fig. 4
8
e)
Select four of the medium coals and arrange along the rear of the
fuelbed, using the recesses in the rear of the fuelbed as a guide for
placement. (See fig. 5 below)
Fig. 5
f)
Select three of the medium sized coals and arrange along the fuelbed
behind the second row of large coals, as shown below in Fig. 6
Fig. 6
9
g)
Select the two smallest coals and position to fill the gaps at each end of
the third row of coals, as shown. (See below fig. 7 below.)
Fig. 7
The exact position and fit of the coals may be finely adjusted to give the most
pleasing and random appearance.
Warning : Use only the coals supplied with the fire. When replacing the
coals remove the old coals and discard them. Fit a complete set of
coals of the correct type. Do not fit additional coals or any coals
other than a genuine replacement set.
To ensure that the release of fibres from these R.C.F (Refractory Ceramic
Fibre) articles is kept to a minimum, during installation and servicing we
recommend that you use a HEPA filtered vacuum to remove any dust
accumulated in and around the appliance before and after working on the
appliance. When replacing these articles we recommend that the replaced
items are not broken up, but are sealed within heavy duty polythene bags,
clearly labelled as “RCF waste”. RCF waste is classed as a “stable”, non
reactive hazardous waste and may be disposed of at a landfill licensed to
accept such waste Protective clothing is not required when handling these
articles, but we recommend you follow the normal hygiene rules of not
smoking, eating or drinking in the work area, and always wash your hands
before eating or drinking.
10
FITTING THE TRIM
Remove the protective tape from the trim and position onto the fixing
flange. The trim is secured with magnets.
USER REPLACEABLE PARTS
The only user replaceable parts on this fire are the fuelbed components and coals
which may be replaced as described in the above section. Replacement of any
other parts must be carried out by a competent person such as a CORGI
registered gas installer.
The part numbers of the user replaceable parts are as follows, these are available
from BFM Europe Ltd. who may be contacted at the address shown on the rear
cover.
Fuelbed Matrix (Base)
Replacement Coal Set
Front Ceramic Rail
B-55650
B-55630
B-55640
It is important to clean a fret in accordance with the instructions provided by your
retailer as these vary depending on the surface finish of the fret.
11
Due to our policy of continual improvement and development the exact
accuracy of descriptions and illustrations cannot be guarantee
Part no. B-103800
Issue 2
BFM Europe Ltd
Trentham Lakes
Stoke-on-Trent
Staffordshire
ST4 4TJ
www.bfm-europe.com
Telephone - General Enquiries :
Telephone - Service :
12
(01782) 339000
(0844) 7700169