1
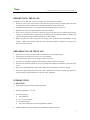
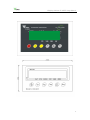
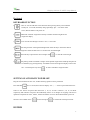
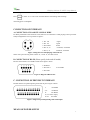
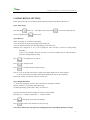
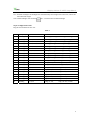
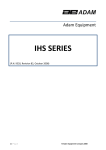
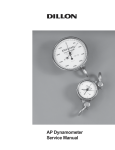
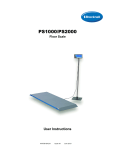
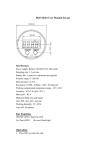
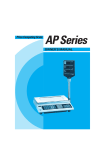
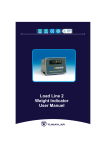
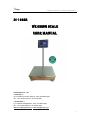
Weighing Indicator DI-166SS Usage Manual DI-166SS WEIGHING SCALE USER MANUAL Teraoka Seiko Co., Ltd. < Head office > 13-12 Kugahara 5-chome, Ohta-Ku, Tokyo 146-8580 Japan TEL: +81-3-3752-2131,FAX: +81-3-3752-2801 < Ohsaki office > 2-3-13 Ohsaki, Shinagawa-Ku, Tokyo 141-8566 Japan TEL: +81-3-5496-7600,FAX: +81-3-5496-7620 http://www.digisystem.com : email:[email protected] 1 Weighing Indicator DI-166SS Usage Manual CONTENT I. BEFORE USING THE SCALE II . PREPARING TO USE THE SCALE III . INTRODUCTION IV . LED DISPLAY SYMBOLS V . KEYBOARD FUNCTION VI . GENERAL FUNCTION VII . COUNTING FUNCTION OPERATION VIII . CONNECTION OF INTERFACE IX . MEANS OF POWER SUPPLY & CHARGING X . CALIBRATION XI . CONFIGURATION SETTINGS XII . ERROR SIGNAL XII . WARRANTY 2 Weighing Indicator DI-166SS Usage Manual BEFORE USING THE SCALE To enable you to use this scale correctly, we suggest you read this manual carefully. 1. Do not use scale in areas with excessive water and don’t spray the scale or indicator with water when cleaning. Erase all water from the scale and indicator with a clean dry duster cloth. 2. Load placed on platter must not exceed the maximum weighing capacity of the scale. 3. Keep the scale away from high temperature and damp conditions. 4. If the scale is not going to be used for some time, please clean and store it in a plastic bag under dry condition. A desiccant sachet is suggested to be included to prevent moisture build up. In addition, the internal rechargeable battery should be recharged very three months. 5. Before using the scale after a long period of storage, please ensure that the internal battery is fully charged. Note : Care should be taken not to leave the internal battery on charge for too long, as this may decrease life of battery. PREPARING TO USE THE SCALE 1. 2. 3. 4. 5. Put the scale on a firm level surface from vibrations for accurate weight readings. Adjust the four leveling feet to set the level of scale platform. Avoid operating the scale in direct sunlight or drafts of any kind. Take away any weight that might be on the platform before the scale is switched on. Once the scale has been switched on, it will go through a LED display test and then re-zero to be ready for use. 6. Please note when [BAT] LED is shine on the display, the internal battery needs to be charged. 7. All goods weighed should be placed in the centre of platform for accurate weighing. The footprint of the goods being weighed should not overstep the edges of platform. INTRODUCTION A. FEATURES 1. Dual-weighing units: Kilogram (kg) and pound (lb). 2. Working temperature: -5℃~40℃. 3. User-friendly design: Auto calibration AC / DC power supply Large LED display Auto power-off design to ensure the performance stability 4. Variable calibration settings depending on the different calibration division. 3 Weighing Indicator DI-166SS Usage Manual Standard division (under 10,000 internal resolution): Capacity and weight calibrations are available for accurate weighing. High precision division (over 10,000 to 40,000 internal resolution): Linearity, capacity and weight calibrations are available for accurate weighing. 5. Options RS-232 & RS-485 interface Print-out interface 6. High performance in A/D converter Conversion speed: up to 40 times / second Internal resolution: 400,000 External resolution: 1/1000 ~ 1/15000 Non-linearity: < 0.016% of full scale Input range of load cell: 0 ~ 20 mv Load cell excitation: + DC5V Load cell drive capacity: up to 4 350Ω or 1000Ω load cell B. POWER SUPPLY 1. 2. Rechargeable battery: DC 6V / 4Ah Adapter power: AC/DC 12V / 500mA C. LOW BATTERY WARNING Please note when [BAT] LED is shine on the display, the internal battery needs to be recharged. The scale will power off automatically without recharging after the low battery symbol shows upon for 20 to 30 hours on the display. As a recommendation, the scale should be fully recharged before using the scale again. LED light SYMBOLS STB : “Stable” indication Ct : “ Ct” unit NET : “Net Weight” indication Lb : “Lb” unit GROSS: BAT : “Gross” indication “Battery” indication kg : “kg” unit ZERO : ‘Zero’ indication 4 Weighing Indicator DI-166SS Usage Manual 5 Weighing Indicator DI-166SS Usage Manual Keyboard KEYBOARD FUNCTION 1. : Turn on / off. The indicator will be turned on when pressing the key. Press and hold The key for 1.5 seconds, the battery charge percentage ‘bpt - -’ will show on the screen, then the indictor will power off. 2. : Deduct the container weight. Press this key to deduct container weight and net weight will display. 3. : To re-zero the scale. Range of re-zero is ±2% of full scale. 3. : For lb/kg switch or selecting the backlight mode. Press this key to choose the desired weight unit. Press and hold it for 1.5 second to turn on/off backlight. 5. : Press this key to print out the current weight. Press 6. : For printing out the accumulative weight. All the printed weight will be added up and print out accumulatively by pressing this key. Accumulative time and weight will display on the screen for 1.5 second respectively. Press to clear the current weight to clear accumulative weight and time. SETTING OF AUTOMATIC POWER OFF Plug the circuit breaker JP1 into ‘off’, and the following operation can be performed: Press and hold for 1.5 second, the screen will display ‘off - -’, ‘- -’ refers to preset shut down time. There are five choices for preset shut down time: 3, 10, 15, 30 and 0. Choices 3, 10, 15, 30 denote respectively that indicator will power off automatically if there is no changes on weighing value and no operation on keyboard in 3mins, 10mins, 15mins and 30mins. Choice 0 denote that automatic power off function is not available. Press to select then press to confirm the selected preset time. BUZZER 6 Weighing Indicator DI-166SS Usage Manual After setting the function of automatic power off, the indicator will display ‘bp on’ or ‘bp off’. Press to select ‘on’ or ‘off’ to turn on/off the buzzer. Non-buzzing mode will help decreasing power consumption. CONNECTION OF INTERFACE A. CONNECTION OF LOAD CELL SIGNAL WIRE For better performance of the electronic scale, make sure to connect the 5 round pin plug to the 5 pin socket firmly and tighten the screw up. Please see figure 1: 1: Pin +IN 2: Pin -IN 3: Pin AGND 4: Pin +E, +S 5: Pin -E, +S +signal -signal shield +excitation, +feed back -excitation, -feed back Figure 1: Diagram of 5 round pin plug of the load cell NOTE: For 6 pin load cell, please connect +E, +S and –E, -S in short circuit. B. CONNECTION OF RS-232 (Please specify in the order if needed) RS-232 serial interface is a D-SUB-9 needle slot as figure 2 shows: 2: Pin RXD 3: Pin TXD 1 5: Pin GND 9: Pin TXD 2 Figure 2: Diagram of RS-232 slot C. CONNECTION OF PRINTOUT INTERFACE Printout interface is a parallel printing outlet with 25 pins as figure 3 shows: 1: Pin STRB 2~9: Pin D0-D7 11: Pin BUSY 10, 12~18: Pin: empty Pin GND 19~25: Figure 3: Diagram of parallel printing outlet with 25 pins MEANS OF POWER SUPPLY 7 Weighing Indicator DI-166SS Usage Manual A. RECHAEGEABLE BATTER The rechargeable batter is 6V/4.5Ah. The end of red line is positive pole, while the end of black line is negative pole. Connect the wiring terminals and tighten the screw up to fix battery well. The rechargeable battery should be charged through adapter by plugging the adapter into power supply to achieve automatic charge. B. AC/DC ADAPTER Insert DC plug of the adapter, whose specification is 12V/500mA, into a DC socket, insert the other end into relevant AC socket and connect to power supply. In case there is no AC supply and dry battery is used as substitute, do remember to pull out DC plug of the adapter, otherwise the indicator will fail to work. CALIBRATION 1. Open up the outer case of indicator before calibrate, plug the circuit breaker JP1 into ‘on’ . 2. Press and hold 3. Press for 1.5 second, indicator will display ‘CAL SP’. to enter calibration mode, ‘CAL 00’ which denotes that there is nothing being weighed on the scale will display on the screen. 4. Press to enter mode of automatic zero correction and ‘- - - - - -’ will display. After few seconds, the previous weight will show on the screen. 5. Load weight on the scale, say weight of 20kg. After stable indication displays, press to select digit position ( the selected digit position will blink). Digit position will carry forward to the right side when pressing every time. Press above operation till ’20.00’ is displayed, then press to set the digit among 0~9. Repeat the to confirm. 6. ‘- - - - - -’ will display on the screen automatically after finished the operation as Point 4 describe, indicating the scale enter into calibration and weighing mode. 7. If ‘20kg’ displays on the screen, it denotes the consistency with weigh value; in case of none consistency, please recalibrate again. will show denoting there is nothing 8. Offload the weight, reading ‘0.00kg’ will display and being weighted on the scale. 9. The scale will return to weighing mode after calibration is finished. Do remember to plug the circuit breaker into ‘off’ position. 8 Weighing Indicator DI-166SS Usage Manual CONFIGURATION SETTINGS Please open up the outer case of indicator before calibrate, plug the circuit breaker JP1 into ‘on’. Step 1: Enter Setup Press and hold until ‘CAL SP’ display on the screen. Press ‘SET’ will display. Press to enter into setup mode and to enter menu. Step 2: Division Either ‘d1 X.XXX’ or ‘d2 X.XXX’ will display. ‘d1’ is the division for single range display. (from 0.0001~50) ‘d2’ is the smaller division for the dual range display. (form 0.0001~50) Example: For a 60kg scale, if ‘d1’ is set to 0.02kg, the scale will show a division of 0.02kg among 0kg~60kg. If ‘d2’ is set to 0.005kg, the scale will show a division of 0.005kg from 0~30kg and show a division of 0.01kg among 30~60kg. Press to switch between ‘d1’ and ‘d2’. Press to change division. Press to confirm and enter into the next step. Note: If ‘d1’ is set, the scale will only be in single range display mode and ‘d2’ will be ignored. If ‘d2’ is set, the scale will only be in dual range display mode and ‘d1’ will be ignored. Please refer to Table 1 for division values of ‘d1’ and ‘d2’. Step 3: Display Resolution ‘n XXX.XX’ will display on screen. The value shown is the display resolution. Display resolution = (division) kg/ (full capacity) kg For dual range display, please refer to Tale 1 for value of ‘n’. Ignore the decimal point shown and take the value as a whole number. Example: tale ‘n 060.00’ as 6000, take ‘n 120.00’ as 12000. Press to change the value of the selected digit. Press to confirm value and enter in to the next step. Note: Please calibrate the scale again after changing ‘Division’ and ‘Display Resolution’ settings. 9 Weighing Indicator DI-166SS Usage Manual Step 4: Zero range / Zero tracking / Weigh Unit setup ‘Ut ABCD’ will display. A : Zero range when power on, 1~9 mean 10%~90%FS to zero, 0 mean not to zero B: Zero tracking range Press Press to change basic unit and press ‘ADD PRINGT’ to change secondary unit. to confirm. Note: 1. In normal weighing mode, indicator will only be able to switch between ‘kg’ and ‘lb’ by pressing if ‘Unit YX’ is set to ‘Unit 10’. 2. For the other digit combinations of ‘Unit YX’, indicator will only display the assigned unit as the basic unit. Step 5: Baud Rate ‘b XXXX’ will display on screen. The value shown is the baud rate. Press Press to switch between baud rate of 1200, 2400, 4800 and 9600. to confirm. Step 6: Serial Printout Port Configuration ‘Ads XX’ will display on screen. XX values decide the print mode. Press to select digit position of X. Press to change the value of the selected digit. Press to confirm and return to normal weighing mode. 1. XX=99: Indicator will not send out weight data unless when or is pressed in normal weighing mode. 2. XX=01~98: Indicator will send out data after received command. 3. XX=00: Indicator will send out continuous date automatically reach to 10 times per second. Step 7: Automatic Backlight ‘bAn X’ will display. Press to change value of ‘X’. 10 Weighing Indicator DI-166SS Usage Manual X=1: Automatic backlight. The backlight will on automatically when weight load on the scale, and will off after unload the weight. X=0: manual backlight. Press and hold for 1.5 second to turn on/off the backlight. Step 8: Configuration is done Plug the circuit breaker JP1 into ‘off’. Table 1 No. Capacity Division d1 Division d2 1 1.5000kg 0.0001, 0.0002, 0.0005 0.0001kg( (0~0.6kg), 0.0002kg (0.6~1.5kg), n=1500 2 3.0000kg 0.0002, 0.0005, 0.001 0.0002kg( (0~1.5kg), 0.0005kg (1.5~3kg), n=1500 3 6.0000kg 0.0005, 0.001, 0.002 0.0005kg( (0~3kg), 0.0001kg (3~6kg), n=1200 4 15.000kg 0.001, 0.002, 0.005 0.001kg( (0~6kg), 0.002kg (6~15kg), n=1500 5 30.000kg 0.002, 0.005, 0.01 0.002kg( (0~15kg), 0.005kg (15~30kg), n=1500 6 60.000kg 0.005, 0.01, 0.02 0.005kg( (0~30kg), 0.01kg (30~60kg), n=1200 7 150.00kg 0.01, 0.02, 0.05 0.01kg( (0~60kg), 0.02kg (60~150kg), n=1500 8 300.00kg 0.02, 0.05, 0.1 0.02kg( (0~150kg), 0.05kg (150~300kg), n=1500 9 600.00kg 0.005, 0.1, 0.2 0.05kg( (0~300kg), 0.1kg (300~600kg), n=1200 10 1000.0kg 0.1, 0.2, 0.5 0.1kg( (0~600kg), 0.2kg (600~1000kg), n=10000 11 1500.0kg 0.1, 0.2, 0.5 0. 1kg( (0~600kg), 0.2kg (600~1000kg), n=15000 12 2000.0kg 0.2, 0.5, 1 0.2kg( (0~1t), 0.5kg (1t~2t), n=10000 13 3000.0kg 0.2, 0.5, 1 0.2kg( (0~1.5t), 0.5kg (1.5t~3t, n=15000 14 5000.0kg 0.5, 1, 2 0.5kg( (0~3t), 1kg (3t~5t), n=10000 15 8000.0kg 1, 2, 5 1kg( (0~4t), 2kg (4t~8t), n=8000 16 10000kg 1, 2, 5 1kg( (0~5t, 2kg (5t~10t), n=10000 17 15000kg 1, 2, 5 1kg( (0~6t), 2kg (6t~15t), n=15000 18 20000kg 2, 5, 10 2kg( (0~10t), 5kg (10t~20t), n=10000 19 30000kg 2, 5, 10 2kg( (0~15t), 5kg (15t~30t), n=15000 20 40000kg 5, 10, 20 51kg( (0~30t), 10kg (30t~40t), n=8000 11