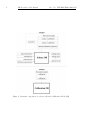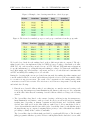
1
EUROPEAN SOUTHERN OBSERVATORY
VERY LARGE TELESCOPE
Phase 2 Proposal Preparation Tool
version 3 (P2PP3)
User Manual
Doc. No. VLT-MAN-ESO-19200-5167
Issue 5
30 July 2012
Rejkuba
30 July 2012
Prepared . . . . . .Marina
. . . . . . . . . . . . . . . . . . . . . . . . . . . . . . . . . . . .
Name
Date
Signature
Primas
Approved . . . . Francesca
. . . . . . . . . . . . . . . . . . . . . . . . . . . . . . . . . . . . . .
Name
Date
Signature
Comerón
Released . . . . Fernando
. . . . . . . . . . . . . . . . . . . . . . . . . . . . . . . . . . . . . .
Name
Date
Signature
ii
P2PP version 3 User Manual
Doc. No. VLT-MAN-ESO-19200-5167
This page was intentionally left almost blank
P2PP version 3 User Manual
Doc. No. VLT-MAN-ESO-19200-5167
iii
Change Record
Issue/Rev.
Date
Section/Parag. affected
Reason/Initiation/Documents/Remarks
Issue 1
23.09.09
all
Issue 2
30.06.10
5.4.4, 7.7,
Fig. 10, 11, and 15
Issue 3
22.12.11
Issue 4
27.06.12
Issue 5
30.07.12
Sec. 1, 2, 3
New Sec. 3.1
Minor changes in most sections
New Sec. 3.4
Minor changes in 4.1, 4.2, 4.3
New sections 5.6 and 5.7
Complete re-write of P2PP.
First release of P2PP version 3
with new functionalities and concepts
introduced to support Public Surveys
Release of P2PP version 3.1.4
Added information about the new
Twilight constraint and updated figures
P89: release of P2PP version 3.2
deployed on VISTA, VST and UT2 instruments
P90: release of P2PP version 3.3
deployed on all Paranal instruments
P90: added information on importing target
information into OBs
iv
P2PP version 3 User Manual
Doc. No. VLT-MAN-ESO-19200-5167
This page was intentionally left almost blank
P2PP version 3 User Manual
Doc. No. VLT-MAN-ESO-19200-5167
v
Contents
1 Introduction
1.1 P2PP3 Version . . . . . . . . . .
1.2 Supported platforms . . . . . . .
1.3 Where to obtain help and further
1.4 P2PP tutorials and test account
1.5 Further reading . . . . . . . . . .
1.6 Credits and acknowledgments . .
. . . . . . .
. . . . . . .
information
. . . . . . .
. . . . . . .
. . . . . . .
.
.
.
.
.
.
.
.
.
.
.
.
.
.
.
.
.
.
.
.
.
.
.
.
.
.
.
.
.
.
.
.
.
.
.
.
.
.
.
.
.
.
.
.
.
.
.
.
.
.
.
.
.
.
.
.
.
.
.
.
.
.
.
.
.
.
.
.
.
.
.
.
.
.
.
.
.
.
.
.
.
.
.
.
.
.
.
.
.
.
.
.
.
.
.
.
.
.
.
.
.
.
.
.
.
.
.
.
.
.
.
.
.
.
.
.
.
.
.
.
.
.
.
.
.
.
.
.
.
.
.
.
.
.
.
.
.
.
1
1
1
1
2
2
3
2 Basic Observation Blocks concepts
2.1 The VLT Data Flow System . . . . . . . . . . . . . . . . . . . . . .
2.2 Observation Blocks and templates . . . . . . . . . . . . . . . . . .
2.3 A note on calibration blocks and calibration templates . . . . . .
2.4 Scheduling Containers . . . . . . . . . . . . . . . . . . . . . . . . .
2.4.1 Concatenation . . . . . . . . . . . . . . . . . . . . . . . . .
2.4.2 Time Link . . . . . . . . . . . . . . . . . . . . . . . . . . . .
2.4.3 Group . . . . . . . . . . . . . . . . . . . . . . . . . . . . . .
2.5 Ranking Priorities for Observing Blocks and Scheduling Containers
.
.
.
.
.
.
.
.
.
.
.
.
.
.
.
.
.
.
.
.
.
.
.
.
.
.
.
.
.
.
.
.
.
.
.
.
.
.
.
.
.
.
.
.
.
.
.
.
.
.
.
.
.
.
.
.
.
.
.
.
.
.
.
.
.
.
.
.
.
.
.
.
.
.
.
.
.
.
.
.
.
.
.
.
.
.
.
.
4
4
4
7
7
8
9
10
10
3 Installing and starting P2PP
3.1 Service vs. Visitor Mode use of P2PP3
3.2 Downloading and installing P2PP . . .
3.3 The P2PP User name and password .
3.4 Phase 2 Delegation . . . . . . . . . . .
3.5 Starting P2PP . . . . . . . . . . . . .
.
.
.
.
.
.
.
.
.
.
.
.
.
.
.
.
.
.
.
.
.
.
.
.
.
.
.
.
.
.
.
.
.
.
.
.
.
.
.
.
.
.
.
.
.
.
.
.
.
.
.
.
.
.
.
.
.
.
.
.
.
.
.
.
.
.
.
.
.
.
.
.
.
.
.
.
.
.
.
.
.
.
.
.
.
.
.
.
.
.
.
.
.
.
.
.
.
.
.
.
.
.
.
.
.
.
.
.
.
.
.
.
.
.
.
.
.
.
.
.
.
.
.
.
.
.
.
.
.
.
14
14
14
14
15
15
. . . . . .
. . . . . .
. . . . . .
Interface
. . . . . .
.
.
.
.
.
.
.
.
.
.
.
.
.
.
.
.
.
.
.
.
.
.
.
.
.
.
.
.
.
.
.
.
.
.
.
.
.
.
.
.
.
.
.
.
.
.
.
.
.
.
.
.
.
.
.
.
.
.
.
.
.
.
.
.
.
.
.
.
.
.
.
.
.
.
.
.
.
.
.
.
.
.
.
.
.
.
.
.
.
.
.
.
.
.
.
.
.
.
.
.
.
.
.
.
.
.
.
.
.
.
.
.
.
.
.
.
.
.
.
.
.
.
.
.
.
16
16
16
17
18
21
5 Creating and editing Observation Blocks and the README file
5.1 Updating the information on Observing Runs . . . . . . . . . . . . . . . . . . . . . .
5.2 Creating a new OB and scheduling container . . . . . . . . . . . . . . . . . . . . . .
5.3 Subfolders . . . . . . . . . . . . . . . . . . . . . . . . . . . . . . . . . . . . . . . . . .
5.4 The View OB window . . . . . . . . . . . . . . . . . . . . . . . . . . . . . . . . . . .
5.4.1 Observation Description view . . . . . . . . . . . . . . . . . . . . . . . . . . .
5.4.2 Templates . . . . . . . . . . . . . . . . . . . . . . . . . . . . . . . . . . . . . .
5.4.3 Target View . . . . . . . . . . . . . . . . . . . . . . . . . . . . . . . . . . . . .
5.4.4 Constraint Set View . . . . . . . . . . . . . . . . . . . . . . . . . . . . . . . .
5.4.5 Time Intervals View . . . . . . . . . . . . . . . . . . . . . . . . . . . . . . . .
5.5 Modifying an existing OB . . . . . . . . . . . . . . . . . . . . . . . . . . . . . . . . .
5.6 Assigning Phase 1 Targets to OBs . . . . . . . . . . . . . . . . . . . . . . . . . . . .
5.7 Importing external lists of targets . . . . . . . . . . . . . . . . . . . . . . . . . . . . .
5.8 Import Survey Definition . . . . . . . . . . . . . . . . . . . . . . . . . . . . . . . . .
5.9 OB Reports and execution times . . . . . . . . . . . . . . . . . . . . . . . . . . . . .
5.9.1 Checking the expected execution time against the time allocated to your run
5.10 Finding charts and ephemeris files . . . . . . . . . . . . . . . . . . . . . . . . . . . .
5.10.1 Generic finding chart requirements . . . . . . . . . . . . . . . . . . . . . . . .
.
.
.
.
.
.
.
.
.
.
.
.
.
.
.
.
.
22
22
22
24
24
25
25
27
27
28
30
30
30
31
33
33
34
34
4 A quick overview of P2PP
4.1 The Local Cache . . . . . . . .
4.2 Phase 1 Information . . . . . .
4.3 Instrument Packages . . . . . .
4.4 The P2PP main Graphical User
4.5 Exiting P2PP . . . . . . . . . .
.
.
.
.
.
vi
P2PP version 3 User Manual
Doc. No. VLT-MAN-ESO-19200-5167
.
.
.
.
.
.
.
.
34
34
35
36
37
37
38
39
.
.
.
.
41
41
42
42
6 Making OBs reach the Observatory
6.1 Submitting your Phase 2 package (OBs and README file) in Service Mode . . . . . .
6.1.1 Submitting OBs and scheduling containers to the ESO Database . . . . . . . .
6.1.2 Submitting the README file to the ESO Database . . . . . . . . . . . . . . .
6.2 Notifying ESO of the submission of the Phase 2 package: p2pp-submit . . . . . . . . .
6.3 Certification of the Phase 2 package by ESO . . . . . . . . . . . . . . . . . . . . . . . .
6.3.1 Checking OBs and containers out of the ESO Database: the Database Browser
6.3.2 OB status . . . . . . . . . . . . . . . . . . . . . . . . . . . . . . . . . . . . . . .
6.3.3 Resubmitting OBs with modified finding charts or ephemeris files . . . . . . . .
6.3.4 Checking out the README file . . . . . . . . . . . . . . . . . . . . . . . . . . .
44
44
44
45
45
45
46
48
49
49
7 Important notes on the preparation of Service Mode observations
7.1 OBs are executed only once . . . . . . . . . . . . . . . . . . . . . . . . . .
7.2 Calibration Plans and additional calibration observations . . . . . . . . .
7.3 Execution overheads are part of the allocated time . . . . . . . . . . . . .
7.4 Independent execution of each OB . . . . . . . . . . . . . . . . . . . . . .
7.5 OB duration limited to one hour . . . . . . . . . . . . . . . . . . . . . . .
7.6 Need to maintain OBs simple . . . . . . . . . . . . . . . . . . . . . . . . .
7.7 The Constraint Set and its consistency with Phase 1 information . . . . .
7.8 Dealing with Target of Opportunity and Solar System target observations
Mode . . . . . . . . . . . . . . . . . . . . . . . . . . . . . . . . . . . . . .
51
51
51
52
52
52
53
53
5.11
5.12
5.13
5.14
5.15
5.10.2 Ephemeris file requirements . . . . . . . . . . . . . . . . . . . . . . . . . . . .
5.10.3 Attaching finding charts . . . . . . . . . . . . . . . . . . . . . . . . . . . . . .
5.10.4 Attaching ephemeris files . . . . . . . . . . . . . . . . . . . . . . . . . . . . .
Copying and pasting information among OBs: the OB properties option . . . . . . .
5.11.1 Copy-paste of OBs belonging to different observing runs . . . . . . . . . . . .
Moving OBs between runs . . . . . . . . . . . . . . . . . . . . . . . . . . . . . . . . .
Importing and exporting OBs in ASCII format: the IMPEX mechanism . . . . . . .
5.13.1 Producing exported OBs and containers and importing them . . . . . . . . .
5.13.2 Import/Export and attached files (finding charts, ephemeris, and configuration
files) . . . . . . . . . . . . . . . . . . . . . . . . . . . . . . . . . . . . . . . . .
OB verification . . . . . . . . . . . . . . . . . . . . . . . . . . . . . . . . . . . . . . .
The README file facility . . . . . . . . . . . . . . . . . . . . . . . . . . . . . . . . .
5.15.1 Preparing the README information . . . . . . . . . . . . . . . . . . . . . . .
A Highlighting, sorting, and
A.1 Selecting items . . . . .
A.2 Reshaping columns . . .
A.3 Reshaping windows . . .
customizing
. . . . . . . .
. . . . . . . .
. . . . . . . .
column
. . . . .
. . . . .
. . . . .
. . . . . .
. . . . . .
. . . . . .
. . . . . .
. . . . . .
. . . . . .
. . . . . .
in Service
. . . . . .
.
.
.
.
.
.
.
. 55
widths
56
. . . . . . . . . . . . . . . . . . . . . . 56
. . . . . . . . . . . . . . . . . . . . . . 56
. . . . . . . . . . . . . . . . . . . . . . 56
B Troubleshooting
57
C Acronym List
58
List of Figures
1
2
3
4
Schematic composition of a Science OB and a Calibration Block (CB). . . .
Schematic view of the Time Link container. . . . . . . . . . . . . . . . . . .
Example of an observing run with two identical groups. . . . . . . . . . . .
The inverted normalized group score and group contribution form the group
. . . .
. . . .
. . . .
rank.
.
.
.
.
. 6
. 8
. 11
. 11
P2PP version 3 User Manual
5
6
7
8
9
10
11
12
13
14
15
16
17
18
19
20
21
Doc. No. VLT-MAN-ESO-19200-5167
OBA is executed, raising its group score to 50.00%, and immediately after that the
OBB is executed raising its group score to 80.00%. . . . . . . . . . . . . . . . . . . .
OBB becomes non-observable for some reason. . . . . . . . . . . . . . . . . . . . . .
OBD is executed, increasing its group score to 50.00% (top), then OBB becomes
observable again and is executed (center), and after that OBF is executed, increasing
its group score to 80.00% (bottom). . . . . . . . . . . . . . . . . . . . . . . . . . . .
The P2PP login window. . . . . . . . . . . . . . . . . . . . . . . . . . . . . . . . . . .
The P2PP main GUI Obs/Calib Blocks view. . . . . . . . . . . . . . . . . . . . . . .
The P2PP main GUI Schedule view. . . . . . . . . . . . . . . . . . . . . . . . . . . .
The View OB window as it appears for a newly created OB. . . . . . . . . . . . . . .
The View OB window with the contents of a typical OB. . . . . . . . . . . . . . . .
The Target View OB window with the target information. . . . . . . . . . . . . . . .
The Constraint Set View OB window with the information about the observational
constraints for the OB. . . . . . . . . . . . . . . . . . . . . . . . . . . . . . . . . . . .
The Time Intervals View OB window with the information about possible absolute
time windows for the OB execution. . . . . . . . . . . . . . . . . . . . . . . . . . . .
The Import Survey Definition window. . . . . . . . . . . . . . . . . . . . . . . . . . .
The Attach Finding Chart window. . . . . . . . . . . . . . . . . . . . . . . . . . . . .
The Export window. . . . . . . . . . . . . . . . . . . . . . . . . . . . . . . . . . . . .
The Import window. . . . . . . . . . . . . . . . . . . . . . . . . . . . . . . . . . . . .
The README Edit window. . . . . . . . . . . . . . . . . . . . . . . . . . . . . . . .
The Database Browser window. . . . . . . . . . . . . . . . . . . . . . . . . . . . . . .
vii
. 12
. 12
.
.
.
.
.
.
.
12
15
18
19
23
24
27
. 28
.
.
.
.
.
.
.
29
32
35
39
40
43
46
viii
P2PP version 3 User Manual
Doc. No. VLT-MAN-ESO-19200-5167
This page was intentionally left almost blank
P2PP version 3 User Manual
1
Doc. No. VLT-MAN-ESO-19200-5167
1
Introduction
This manual describes how to use P2PP version 3 (P2PP3), the ESO Phase 2 Proposal Preparation
Tool that is used to define observations with VLT, VLTI, VISTA and VST instruments observations
preparation. For the preparations of observations for ESO telescopes and instruments operated in
La Silla please refer to the P2PP User Manual version 2.13.
P2PP3 is a Java-based application integrating a set of user interfaces that are needed to prepare the
Observation Blocks (OBs) with which instruments at ESO telescopes are operated and to provide
the observatory with ancillary execution information. P2PP and OBs are important pieces of the
VLT Data Flow System (used also at VISTA and VST, besides the VLT), which we will describe at
some length in Section 2.
The survey telescopes, VISTA and VST, are operated in the same way as ESO VLT in service
mode. The basic difference is in the size of the observing programmes selected for the Public Surveys
and their complexity. To assist the Public Survey teams with the challenge of preparing the large
number of observation blocks (OBs) and implementing more complex observing strategies ESO has
developed the new scheduling container concepts, which are described in detail in Section 2.4. These
are implemented in P2PP3 and are now also available for all VLT and VLTI instruments observation
preparation in addition to survey telescopes.
This manual is intended for users who have obtained time at VLT, VLTI, VISTA or VST and need
to prepare their OBs. It is neither a technical manual nor an installation guide.
1.1
P2PP3 Version
The P2PP version described in this manual is 3.3.
For the preparations of observations for the ESO La Silla telescopes and instruments please refer to
the P2PP User Manual version 2.13, and to the Web page at:
http://www.eso.org/sci/observing/phase2/P2PPTool.html
where the information on the latest version of P2PP for La Silla telescopes can be found.
1.2
Supported platforms
In principle, P2PP v3.3 will work within any operating system that supports Java Runtime Environment 1.6.0 or later. It will not work with old Java versions (1.5.x). It has been extensively tested
on Linux PCs, and ESO guarantees support for P2PP under Linux. Some testing has been done
under MacOS X as well. No testing was done for 64bit machines. Although P2PP will normally
work correctly on most platforms, there may be configuration problems. In such cases, ESO is only
able to provide technical support on a best-effort basis.
1.3
Where to obtain help and further information
• This User Manual is not intended to provide detailed instrument-specific information. Please
refer in such cases to the corresponding instrument User Manuals that can be found under the
instrument Web pages.
• The latest version of P2PP3, its corresponding on-site installation instructions, and this Manual
can be found at
http://www.eso.org/sci/observing/phase2/P2PPSurveys.html
2
P2PP version 3 User Manual
Doc. No. VLT-MAN-ESO-19200-5167
• Information on observation preparation procedures and Service Mode observing policies can be
found at the ESO User Support Department Web pages:
http://www.eso.org/sci/observing/phase2/
• For problem reports or technical information on P2PP3, please contact the User Support Department ([email protected])
• For questions regarding installation, functionality, use, or any other inquiries on P2PP3, please
contact the User Support Department ([email protected])
1.4
P2PP tutorials and test account
A special P2PP test account has been set up to allow access to P2PP3 also to users who want to use
it for practice purposes without working on an actual observing run. The account makes it possible
to define example OBs for any of the instruments currently supported by P2PP. The details of this
account are:
User name: 52052
Password: tutorial
Upon logging in using this account, P2PP will give you access to a test observing programme having
one run defined for each P2PP-supported instrument.
Video tutorials describing the P2PP3 functionalities with examples how to prepare observations are
available from:
http://www.eso.org/sci/observing/phase2/P2PPSurveys/P2PP3Documentation.html
1.5
Further reading
Details on the Basic Observation Blocks concept and rules for OBs for Service Mode observing runs
is available in the P2PP manual version 2.13 available from P2PP web page:
http://www.eso.org/sci/observing/phase2/P2PPTool/P2PPDocumentation.html
and on the Service Mode Guidelines web page of the User Support Department:
http://www.eso.org/sci/observing/phase2/SMGuidelines.html
Some sections of this manual are based on the following documents:
T. Bierwirth, P. Nunes, ”Requirements Specification: Public Survey Support with P2PP”, 2008,
Issue 1, VLT DOC XXXX
T. Bierwirth, D. Dorigo, P. Nunes, M. Chavan, ”Requirements Specification: Public Survey Support
with OT”, 2008, Issue 16, VLT DOC XXXX
The following selection of papers give additional information about the VLT Data Flow System, its
tools, and the ESO experience with Service Mode observing.
D. Silva, P. Quinn, ”VLT Data Flow Operations News”, 1997, The Messenger, 90, 12.
D.R. Silva, B. Leibundgut, P.J. Quinn, J. Spyromilio, M. Tarenghi, “Data flow system operations:
from the NTT to the VLT”, 1998, SPIE Proceedings 3349.
G. Giannone, A.M. Chavan, D.R. Silva, A.P. Krueger, G.E. Miller, “Long and Short Term Scheduling
Tools in ESO”, 2000, ADASS-IX, ASP Conf. Ser. 216, 211.
P2PP version 3 User Manual
Doc. No. VLT-MAN-ESO-19200-5167
3
A.M. Chavan, D.R. Silva, C. Boarotto, T. Canavan, R. Kemp, G. Giannone, “Front-end system for
the VLT’s Data-flow system”, 2000, SPIE Proceedings 4010.
D. Silva, “Service mode scheduling: a primer for users”, 2001, The Messenger, 105, 18.
P. Quinn, F. Comerón, R. Gilmozzi, G. Mathys, M. Péron, B. Pirenne, D. Silva, “VLT end-to-end
science operations: the first three years”, 2002, SPIE Proceedings 4844, 1.
F. Comerón, M. Romaniello, J. Breysacher, D. Silva, G. Mathys, ’Four years of Service Mode observing at the VLT: performance and user feedback’, 2003, The Messenger, 113, 32.
F. Comerón, ’Observing in Service Mode: The Experience at the European Southern Observatory’,
in Organizations and Strategies in Astronomy, vol. 5, ed. A. Heck, Kluwer Acad. Publ.
Information about the Public Surveys policies are available from:
http://www.eso.org/sci/observing/policies/PublicSurveys/.
1.6
Credits and acknowledgments
This manual is based on the P2PP v. 2.13 User Manual, written by Fernando Comerón and David
Silva, and much of its content is the same as in that manual. The author is very grateful to F. Comerón
and D. Silva for permission to use the structure of that document and adopt relevant sections and
part of the text that apply also to P2PP version 3.
P2PP version 3 is a software product of the Data Flow Infrastructure Department (and is a part of
the Data Flow System Project) of the ESO Software Development Division led by Michèle Péron.
It was developed under the leadership of Thomas Bierwirth by Paulo Nunes, Alisdair Manning, and
Dario Dorigo. It is based on the version 2.x of P2PP, which was developed under the leadership of
Maurizio Chavan by Carlo Boarotto, Tim Canavan, Bob Kemp, Nick Kornweibel, Cynthia Mavros,
Ron Lobo, and Paulo Nunes. Scientific oversight and requirements were provided by Fernando
Comerón, Francesca Primas, Ferdinando Patat, Marina Rejkuba, Magda Arnaboldi, and Lowell
Tacconi-Garman. Comments on an early draft of this document by Joerg Dietrich, Thomas Bierwirth,
and Magda Arnaboldi, have improved its presentation.
4
P2PP version 3 User Manual
2
Basic Observation Blocks concepts
2.1
Doc. No. VLT-MAN-ESO-19200-5167
The VLT Data Flow System
The VLT Data Flow System (DFS) is a set of protocols, interfaces and tools developed by ESO for
linking together the telescope and instruments with simple observation description tools, on-line data
processing capabilities, and automated data archiving. The VLT DFS is implemented for all ESO
Telescopes in Paranal and La Silla observatory. This includes the new survey telescopes VISTA and
VST.
P2PP is one of the DFS tools, and it is designed to provide astronomers with the interface needed to
define observing sequences that can then be executed by the telescope and instrument via the DFS.
An introduction to the DFS by D. Silva and P. Quinn can be found at The Messenger, vol. 90, p.12
(1997).
P2PP version 3 was developed for the use in Service Mode by Public Survey programmes on VISTA
and VST. In Period 89 its use has been expanded to UT2 instruments (X-SHOOTER, FLAMES and
UVES) Service and Visitor mode programmes and and in Period 90 (July 2012) its use was extended
to all Paranal telescopes. Service Mode users first define in detail their observing programmes that
are then executed by ESO staff astronomers when observing conditions are appropriate, taking into
account the priorities assigned by the Observing Programmes Committee (OPC), as well as priorities
set by the users in the definition of their programmes.
The basic unit for the observations, central to the VLT Data Flow System is the Observation Block
(OB). Its concept is briefly described in the section 2.2.
P2PP version 3 contains new functionalities with respect to previous versions of P2PP v. 2.x. These
include the introduction of the new structural units called scheduling containers, consisting of two or
more OBs. The new scheduling containers implemented in P2PP version 3 are groups of OBs, time
links of OBs, and concatenation of OBs. They were created to enable the implementation of more
complex observing strategies for programmes containing very large number of OBs, and to allow
their efficient scheduling. The scheduling containers are described in section 2.4.
2.2
Observation Blocks and templates
The concept of the Observation Block (OB) is central to the VLT Data Flow System. Astronomers
specify their programmes in terms of OBs, which contain all the information necessary to obtain a
”single” observation. These include the target position, the instrument and exposure setup parameters, and, in Service Mode, also the scheduling requirements, the time constraints, the finding charts,
and possibly also ephemerides lists. Such a single observation can contain in principle one or multiple
exposures, or even multiple instrument configurations with multiple exposures, although this is usually discouraged. The product of the execution of an OB is normally the smallest dataset consistent
with the scientific and technical goals of a given observing programme.
Science Observation Blocks (OBs) can be used to obtain scientific observations of an astronomical target, as well as reference data that require the observation of a specific target (such as
photometric standards).
Calibration Blocks (CBs) are used to acquire reference data such as lamp flat fields, biases,
comparison lamps, etc. that do not require the observation of an astronomical target.
The core of the OB is composed by a number of instrument-specific observation templates. The
templates that a typical science OB contains are:
• An acquisition template, describing how the target acquisition is to be performed: it includes
P2PP version 3 User Manual
Doc. No. VLT-MAN-ESO-19200-5167
5
the information on the basic instrumental setup necessary for the acquisition; for example,
which filter or slit is to be used in the (acquisition) observation, which exposure time the
acquisition image should have, which position angle on the sky the slit should have, etc.
• One or more science templates, describing the instrument setup and the exposure parameters:
for example, which mask should be loaded in a MOS observation, which grism should be used,
which grating central wavelength should be set, which jitter pattern should be obtained, what
integration time should each exposure have, etc.
• In some cases, the OB may end with an attached calibration template, such as for instance
an arc lamp exposure for precise wavelength calibration to be obtained right after the last
scientific exposure with the instrument in the same configuration.
The set of acquisition, science, and possible attached calibration templates in a given OB
compose the Observation Description.
In addition to the templates, a science OB contains other important, instrument-independent information:
• Target information, including coordinates, proper motion, and, for Solar System targets,
differential motion.
• The Constraint Set, to be used in Service Mode only, specifying under which external conditions (airmass, seeing, transparency, lunar illumination...) the OB can be executed.
• The Time Intervals information, also to be used in Service Mode only, specifying possible
intervals (date and time) when the OB need to be started.
• The Sidereal Time intervals, where the possible intervals are specified in local sidereal time
in which the OB need to be executed.
• The Calibration Requirements information, a free text field where comments can be given
to the Service Mode observer or where the Visitor Mode observer can include reminders on the
calibrations needed.
• Some instruments (e.g. VIRCAM, FORS1/2, VIMOS, FLAMES, NACO...) require the insertion in the templates of parameter files generated by instrument-specific observation preparation
software (SADT, FIMS, VMMPS, FPOSS, NAOS PS...)
• Optionally, one or more Finding charts, especially for use in Service Mode (exception: VST
and VISTA survey observations do not need finding charts).
• Also optionally, an Ephemeris file for moving targets providing their coordinates at different
dates.
Obviously, none of these items are present in Calibration Blocks (CBs).
Figure 1 gives a schematic view of the composition of a typical science observation (an OB) and
calibration block (CB). Note that Science OBs can include also calibration templates for the observation of reference sources such as standards stars, as well as attached calibrations as described in
Section 2.3. Given that only one set of target coordinates can be provided for each OB, and that only
one acquisition template is allowed per OB, the observations of a science target and a calibration
astronomical source (e.g. a telluric standard star) cannot be in the same OB.
In addition to acquisition, science, and calibration templates there are also test templates used for
technical maintenance of the instrument. These templates are not available to users.
6
P2PP version 3 User Manual
Doc. No. VLT-MAN-ESO-19200-5167
Figure 1: Schematic composition of a Science OB and a Calibration Block (CB).
P2PP version 3 User Manual
Doc. No. VLT-MAN-ESO-19200-5167
7
It is important to note that in general the components of OBs are not shared between OBs, and that
changes to one of these components in a given OB only affect that OB. For example, although it
is possible to define several OBs for the observation of a single target, changing the coordinates of
the target in one of the OBs will not automatically propagate the change to the other OBs whose
targets have the same name. Likewise, changing the value of any parameter within the templates
that compose an Observation Description will not propagate the change to all the other OBs having
Observation Descriptions with the same name. The same is true for the Constraint Set and for the
finding charts. Nevertheless, it is possible to copy components of an OB to one or more OBs by
means of the synchronization mechanism (Sect. 5.11).
The new functionality in P2PP3 includes the possibility to create ”template OBs” (and ”template
containers”, including several ”template OBs”), which can be automatically duplicated into a series
of OBs (or containers) with the same observational structure (observation description), updating
at the same time the coordinates in the OBs. This is done through the Import Survey Definition
option under the File menu (see Sect. 5.8). This functionality is specific to survey telescopes that
use input from the Survey Area Definition Tool (SADT). The scheduling containers are described in
Section 2.4.
2.3
A note on calibration blocks and calibration templates
It is important to distinguish between calibration blocks (CBs) and calibration templates, as
the term ’calibration’ has different meanings in those different contexts:
• Calibration blocks (CBs) were described before as those that do not require the observation
of an astronomical target. For this reason, they do not contain an acquisition template, and
they can contain only calibration templates. Examples of such calibration CBs are bias, dark,
screen flats, and arc lamp exposures.
• Science OBs for the observation of calibration sources are different from the calibration
blocks described above. Their contents are typically the same as those of normal science OBs,
but instead of science templates they use calibration templates having a functionality similar
to those of the science templates. The reason for distinguishing between these science and
calibration templates is that the information that goes into the headers of the resulting frames
makes those intended for calibration identifiable as such by the science archive and the data
reduction pipelines.
• Finally, attached calibration templates produce calibration frames at the end of an OB
with the instrument in the same configuration as in the last science exposure obtained.
2.4
Scheduling Containers
The motivation for the introduction of superstructures, scheduling containers, stems from the requirements for the observations with survey telescopes. These functionalities could be useful for the
normal Service Mode programmes for VLT, and have now been extended to all Paranal telescopes
and instruments.
The basic difference between the ”classical” VLT-based Service Mode observing programmes and
Public Surveys is that in the latter case the programmes are very few, but are massive, and that
identical observations are carried out on a very large set of targets with a large set of similar OBs.
Scheduling containers group several OBs of the same observing run in order to impose specific observation strategies (which are reflected in specific scheduling constraints at the telescope), hence
8
P2PP version 3 User Manual
Doc. No. VLT-MAN-ESO-19200-5167
Figure 2: Schematic view of the Time Link container.
influencing the applied OB execution order. This is fundamentally different from the ”classical” Service Mode schema for smaller VLT programmes, where OBs are individual units, and their scheduling
can only be mildly influenced by the PI of the programme, by assigning the relative priorities among
the (small number of) OBs. The huge number of OBs expected for Public Surveys makes this
prioritizing of individual OBs less practical.
The scheduling containers are defined and edited in P2PP. The creation of nested container and
subcontainer structures is not supported. All containers have to be defined at the outermost level,
i.e. directly underneath the respective observing run.
The scheduling priorities depend on the observing constraints, and the relative priorities of the
different programmes, but also on the priorities set for the individual OBs and containers. All
individual OBs and all containers must have a user priority assigned to them. The OBs belonging
to containers, inherit their user priority from the parent container. In other words, all OBs within a
container have the same user priority. In the following the three types of scheduling containers are
described, and their implications on the execution priorities are described. More detailed description
how different scheduling priorities of individual OBs and containers are combined is provided in
Section 2.5.
The usage of containers may help defining the best observing strategies, but it should be used with
care, because the OBs become linked - failure to observe some OB within a container (due to adverse
weather conditions, or some technical problem either within the OB or with the instrument), may
have consequences for the scheduling of that OB, but also of the other OBs within the container.
2.4.1
Concatenation
The concatenation container consists of two or more OBs that must be executed ”back-to-back”
without breaks. The sequence of the execution of OBs in a concatenation cannot be specified.
The following important rule applies to concatenations: if execution of one OB within a concatenation
fails, the whole concatenation fails and it must be repeated, irrespective whether any other OB of
the concatenation has been successfully executed or not.
The maximum allowed execution length of a concatenation is 1.0h (for possible exceptions please
check information on specific instruments Phase 2 web pages). The use of the concatenated OBs has
to be clearly justified in the phase 1 and phase 2 material.
P2PP version 3 User Manual
2.4.2
Doc. No. VLT-MAN-ESO-19200-5167
9
Time Link
The time link container defines a sequence of OBs that has to be executed in the given order,
respecting the relative time intervals specified for each linked OB (Fig. 2).
There are two kinds of time links:
• Open Time Link: only the lower time limit - earliest after previous - of the separation interval
is defined
• Closed Time Link: both lower- earliest after previous - and upper time limit - latest after
previous - are defined. Example: each OB should be executed between one and two weeks from
the previous one.
The following rules apply to the OBs in a time link container:
• The first OB can be executed at any suitable time. If the first OB has absolute time constraints
specified within the OB (in the Time Intervals view of the OB; see Section 5.4.5), the suitable
times are within the specified time window(s).
• All the other OBs within the time link container have only relative time constraints, indicating
the minimum and (possibly) the maximum time separation for the execution, after the successful
execution of the previous OB in the time link series. The time delay is expressed in days and
hh:mm format.
• After the successful execution of the first OB, an absolute time constraint is imposed on the
second OB, by adding the minimum, and maximum delays to the start time of the currently
successfully executed OB as the suitable time interval for execution of that OB.
• If the absolute time constraint window has passed, and the OB was not successfully executed,
the OB will get a status ”F” (Failed) - it will expire. The execution of the Time Link series in
this case continues with the next OB, which now has acquired absolute time constraints. Here
there are two distinct cases:
– The failed OB is not the very first OB of the time link.
In this case, the OB had already an absolute time constraint, and after it fails the next
OB acquires an absolute time window by adding the relative minimum and maximum
time delays to an assumed hypothetical execution for the failed OB in the middle of its
constraint window.
– The failed OB is the very first OB of the time link.
In this case, failure can only occur if this OB has one or more additional absolute time
constraints defined, which have nothing to do with the time link, and all of them have
expired. In this case the next OB acquires an absolute time window by adding its relative
minimum and maximum time delays to an assumed hypothetical execution of the failed
OB at the end of its last absolute time interval.
It should be noticed that, depending on the length of the relative time intervals, and the delays
between them, a failure of an OB in a sequence may result in a cascade of failing OBs.
• No absolute time constraints may be imposed on OBs in a time link, except for the first OB in
the series.
Essentially after the start of the execution of the time link series, the successive OBs acquire absolute
time windows. The presence of absolute time windows increases the priority for the execution of OBs
10
P2PP version 3 User Manual
Doc. No. VLT-MAN-ESO-19200-5167
when the time is suitable (i.e. within the time window), with respect to other OBs in the service
mode queue. However, the drawback is that, if the time window has passed the OB
is canceled (it acquires status ”F” - failed) and will not be executed at a later time.
Therefore, the time links should be used only where necessary.
2.4.3
Group
The group container is a simple collection of OBs that may be executed independently of each other
in any order. Placing the OBs in a group means that if one OB is executed from this group, the user
wishes that the other OBs belonging to the same group are executed preferentially before any other
part of the survey. This requirement is however soft (desirable), contrary to the hard requirement
(mandatory) in concatenations. If the execution of an OB within a group fails, the execution of the
other OBs continues, and the failed OB is re-inserted in the group for re-execution (if applicable).
Groups have an overall user priority, which is similar to an OB user priority in the case of independent
OBs. In addition, every OB belonging to a group is given a group contribution value, indicating how
much the group’s overall group score is increased by successfully executing that OB. The group score
introduces a new priority level within the ranking engine. Once the observations of a given group
have started, the group score is increased, thereby increasing the priority of the execution of all
the OBs in that group, with respect to other independent OBs, or with respect to other scheduling
containers that may have the same OB user priority or container user priority.
The typical use of groups may be envisaged by the following examples. The observing programme
contains several targets located very close to each othe on sky an foresee the observation of each
target with three OBs, e.g. one per wavelength (different grisms or filters). It is possible to choose
the following strategies:
• If possible, all observations of a single target should be completed, i.e. observed with all three
OBs, before a new target observation is started. This can be achieved by associating a group
of three OBs (one OB per wavelength) to each target.
• If possible, all observations at one wavelength (one grism or filter) should be finished for all
targets, before switching to observations at a different wavelength. This can be accomplished
by creating a group of OBs for every wavelength (grism or filter), each group containing OBs
for all targets.
2.5
Ranking Priorities for Observing Blocks and Scheduling Containers
The introduction of scheduling containers, and the expected large number of OBs with very similar
constraints within each Public Survey programme requires an automatic and intelligent ranking
algorithm. Also for service mode observations on the VLT an automatic ranking algorithm can help
the observer choose among the large number of different OBs. The ranking algorithm produces an
ordered list of OBs as a suggestion to the observer which OB to execute next. The rank order depends
on various criteria:
• absolute time constraints assigned to all sorts of OBs
• relative time constraints assigned to time link OBs (which are eventually translated to absolute
time constraints during OB execution; see below)
• the user priority assigned to individual OBs or to a container
• the group contribution assigned to group OBs
P2PP version 3 User Manual
Doc. No. VLT-MAN-ESO-19200-5167
11
Figure 3: Example of an observing run with two identical groups.
Figure 4: The inverted normalized group score and group contribution form the group rank.
We describe here briefly how the ranking based on these different priorities is computed. The algorithm described here was implemented first for VISTA (for more details see Bierwirth et al. 2010,
SPIE 7737, 19) , and it was later extended for use on VST, VLT and VLTI with minor adaptations
for specific instruments (e.g. adding filtering and ranking according to LST intervals, availability of
laser, MOS masks, and other hardware components, and due to several additional constraints such
as PWV and ATM). The ranking is done for each OB.
During the observing night, at some pre-defined time intervals, the ranking algorithm examines and
sorts the available OBs for execution, and in this way helps the selection of the most suitable OB(s)
for execution at any given moment. The result of the computation is the ranking string, which
concatenates several decision criteria. The criteria are sorted from more important to less important
and include the following:
1. First the non-observable OBs are filtered out, taking into account the current observing conditions (seeing, sky transparency, lunar illumination and distance) with respect to the constraints
set in the OBs. After that, the remaining observable OBs are ranked according to the following
criteria.
2. The observability class. Based on the current observing conditions (seeing, sky transparency,
lunar illumination and distance, wind speed and direction), as well as the target’s remaining
tracking time (depending on airmass constraint and sideral time) and observability within
absolute time windows set in the OBs (OBs are ranked based on how much time is left to
observe them within the suitable time window) the observability class for each OB that passed
the first filtering step is computed, assigning higher priority to those OBs which have smaller
probability to satisfy all the combined constraints.
The observability class for OBs is further modified by a push-pull (PP) factor. The C-ranked
(filler) programme OBs have a positive PP factor which pushes them towards the bottom, while
12
P2PP version 3 User Manual
Doc. No. VLT-MAN-ESO-19200-5167
Figure 5: OBA is executed, raising its group score to 50.00%, and immediately after that the OBB
is executed raising its group score to 80.00%.
Figure 6: OBB becomes non-observable for some reason.
Figure 7: OBD is executed, increasing its group score to 50.00% (top), then OBB becomes observable
again and is executed (center), and after that OBF is executed, increasing its group score to 80.00%
(bottom).
P2PP version 3 User Manual
Doc. No. VLT-MAN-ESO-19200-5167
13
the pre-imaging runs, carryover, Large Programme and Chilean runs, have a slightly negative
PP factor, pulling them towards the top of the ranked list of OBs.
3. The run class rank. The run class rank is the relative scientific priority between different runs
(programmes) set by the OPC. All the OBs that satisfy the current observing conditions are
ranked according to the run class rank priority.
4. User priority. The user priority is assigned to loose (independent) OBs and to scheduling
containers. All OBs belonging to a scheduling container have the same user priority, which
they inherit from their container. The user priority ranges from 1 to 10, where the lowest
number corresponds to the highest priority. The user priority is decided at the OB or container
level and input assigned to the OB/container by the user.
5. Group rank. The group rank is composed of group score and group contribution as explained
below. OBs belonging to a group are given a group contribution value, indicating how much the
overall group’s score is increased by executing that OB. The group contribution is an integer
in the range [1 .... MaxGrpContrib] and it is entered in P2PP in the Schedule tab window
(see Fig. 10). The group score is a dynamic value - it is calculated by summing up all group
contribution values of the executed OBs within the group.
In order to make different group scores comparable, they are normalized by the total group
contribution, and are expressed in terms of percentage with two significant decimal digits.
Finally, the normalized group score and contribution are inverted, such that the lower values
correspond to higher priorities (same as for user priority).
The contribution of group ranking to the overall rank of the OB can then be defined as follows:
group rank = <inverted normalized group score> <inverted normalized group contribution>
Whenever a group OB is executed, it raises the group’s (non-inverted) normalized score by its
(non-inverted) normalized group contribution, i.e. the update of the group score has to operate
on non-inverted values, before inverting the new score for updating the group rank. So, while
the user priority of an OB (or a container) is static, the group score is a dynamic ranking
criterion.
This is best illustrated with a practical example shown in Figures 3 to 7. In this example we
assume there is an observing run with two identical groups (with the same priorities based on
all other criteria). Group 1 contains 3 OBs (OBA , OBB , and OBC ), and group 2 also contains
three OBs (OBD , OBE , and OBF ). Series of Figures 3 to 7 illustrates how, once the execution
of a group is started, its priority increases with respect to the other group. Only when - due to
other constraints - that group has no more observable OBs to offer, the execution is switched
to the second group, but it returns to group 1 as soon as there are OBs observable again.
The final rank string, for all the observable OBs, i.e. OBs satisfying the condition 1 above, is
composed of the following substrings:
rank string =
<observability class>_
<run class rank>_
<user priority>_
<group rank>
14
3
P2PP version 3 User Manual
Doc. No. VLT-MAN-ESO-19200-5167
Installing and starting P2PP
To prepare the OBs for your observing run you need access to a P2PP installation. This chapter
describes how to install P2PP on your computer.
3.1
Service vs. Visitor Mode use of P2PP3
Service Mode users must have a local installation of P2PP available, since they prepare OBs at
their home institutes and then submit the OBs (including possible scheduling containers) to ESO for
review, scheduling and execution (see Section 6.1).
Visitor Mode users can prepare their observations prior to travelling to the observatory using P2PP.
At the observatory the OBs are exported from P2PP and then tranferred to the Observatory computers which run the Visitor Observing Tool (vOT), which has the same look and feel as P2PP3,
but has no support for scheduling containers. The Visitor Mode users should therefore NOT use the
scheduling containers when preparing their observations with P2PP3, as this information will be lost
when the OBs are transferred to vOT.
3.2
Downloading and installing P2PP
P2PP3 must be downloaded from the P2PP Web site:
http://www.eso.org/sci/php/phase2/P2PP3Download.html
That site provides the most updated information on the current version, supported platforms, installation instructions, and links for downloading.
You should follow the installation instructions provided on the Web page
http://www.eso.org/sci/observing/phase2/P2PPSurveys/P2PP3Install.html
step by step. Please pay special attention to the notes on the Local Cache; see also Section 4.1 in this
Manual. It is also important that you complete the registration process at the time of downloading
P2PP, as this allows ESO to keep track of the platforms in which P2PP is installed and to identify
possible needs for additional platform support.
3.3
The P2PP User name and password
When the time allocation process at ESO telescopes is finalized, the Principal Investigators (PIs)
receive an e-mail from ESO’s Observing Programmes Office containing the URL of a Web page where
the outcome of the process is described. The PIs can access that page by using their ESO User Portal
username and password.
The User Portal username and password must be used to log in P2PP.
The ESO User Portal username and password are completely under the control of the user. They
will work with P2PP even if they are changed.
In case you, as the PI of a program, have forgotten your User Portal username, password, or both,
please refer to the corresponding link(s) on the ESO User Portal login page (http://www.eso.org/UserPortal).
P2PP version 3 User Manual
Doc. No. VLT-MAN-ESO-19200-5167
15
Figure 8: The P2PP login window.
3.4
Phase 2 Delegation
Starting with Phase 2 preparation for Period 90 with P2PP 3.3 it is now possible for a PI of an
observing run to allow another user to create the OBs, READMEs, etc.using their own User Portal
account by delegating Phase 2 preparation permission to them. This means that there is no longer
a need for the PI to reveal their User Portal login credentials to anyone for this purpose.
The delegate need not be a Co-I on the proposal, but must be a registered User Portal user. Note
that unlike Data Access Delegation (with which a PI can delegate data access to multiple User
Portal users) Phase 2 Delegation can only be granted to one person per observing run at a time. A
different person can be chosen as the delegate for different runs of the same programme. Delegating
Phase 2 does not remove Phase 2 access permissions from the PI him/herself. Thus, PIs who use
Phase 2 delegation are kindly asked to coordinate Phase 2 preparation between themselves and their
delegate. Delegation can be viewed and administered though the Access Control ESO web page
(http://www.eso.org/ace).
Once a user has been granted Phase 2 permissions for a run they will see the run in P2PP (with a
small green check mark distinguishing it as a delegated run) after logging in with their own credentials.
3.5
Starting P2PP
Once you have installed P2PP, and recalled your User Portal username and password, you can
start using P2PP. The first time you use P2PP after a new installation from scratch, or the first
time that you use it in a previously existing installation but with a new username, you need an
Internet connection. In this way, information relevant for your observing runs will be automatically
downloaded from ESO and you will be able to start working on their preparation.
To start P2PP go to the bin/ directory of your P2PP3 installation and type:
./p2pp
A login window will appear (Fig. 8) prompting you for your ESO User Portal username and password.
If P2PP has been successfully installed, your network connection with ESO is working, and you have
approved programs in the ESO Database, you will get the main P2PP Graphical User Interface (GUI)
after a few seconds. You can then start working on your runs, as described in the next Chapters.
16
P2PP version 3 User Manual
4
Doc. No. VLT-MAN-ESO-19200-5167
A quick overview of P2PP
In this Chapter we describe some important concepts related to P2PP and its use with which you
should have some familiarity before beginning to use P2PP for the preparation of your OBs. Then,
we describe the main features of the P2PP version 3 Graphical User Interfaces (GUI).
4.1
The Local Cache
P2PP automatically saves all the information in your local working area as you work on your observing
runs. It also stores Phase 1 information (see Section 4.2) on all your observing runs once it has been
downloaded from the ESO database. The place where all this information is stored is the Local
Cache.
By default, the Local Cache directory (cache) is created in the P2PP root directory, this is, the
directory where you installed P2PP. An alternative location of the cache directory can be set by
changing the keyword CACHE.DIRECTORY within the config.properties file that is created in the
config sub-directory within the P2PP installation path. Note that multiple users with different User
Portal usernames use the same Local Cache directory.
4.2
Phase 1 Information
In the process of developing an observing programme from its conception to its execution, Phase 1
corresponds to the stage of submission of the proposal that is then reviewed by the OPC. The
programme is scheduled if its scientific merit is found by the OPC to be sufficiently high, if time for
it is available at the telescope, and if it is technically feasible.
At the time of submitting your proposal (Phase 1) you provided ESO with some basic information
that needs now to be used by P2PP. In particular,
• Your proposal was assigned a programme ID at the time of reaching ESO.
• Your proposal was submitted for a given Period.
• Your proposal contained one or more observing runs, each of them to be carried out with a
given instrument.
• In your proposal you applied for observations in either Visitor or Service Mode. In some
cases, the mode may have been changed by ESO with respect to your original request based
on criteria of technical feasibility or schedulability.
• In your proposal you applied for observations of specific targets, and have requested specific
observing constraints. This Phase 1 information is binding and any deviations from the
requested targets, or instrument setup must be approved prior to Phase 2 submission (for
service mode proposals) or in advance of a visitor mode run. Please refer to Phase 2 web pages
for procedure how to make programme change or waiver requests.
• Finally, before the beginning of the Phase 2, an Instrument Package version (see Section 4.3)
was assigned to each run in your proposal.
All these items (programme ID, Period, runs, instrument used in each run, mode, and instrument
package versions) need to be known to P2PP at the time that you start working on the preparation
of your observations. This information is downloaded from the ESO database and stored in a file in
your Local Cache.
P2PP version 3 User Manual
Doc. No. VLT-MAN-ESO-19200-5167
17
The first time that you start a P2PP session using a new installation of P2PP having a working
network connection, P2PP queries the ESO Database and downloads to your Local Cache all the
new Phase 1 information existing for programs defined under your User Portal username (even if you
change it), as well as all the instrument packages needed to prepare observations for your runs. If
no Phase 1 information for your username can be found in the Local Cache or downloaded from the
ESO Database, P2PP will issue an error message and will not be able to continue the session.
If you do not have a network connection available, you can still use P2PP provided that you have
previously downloaded the Phase 1 information for the run on which you wish to work, so that it is
already available in your Local Cache. This is very convenient in case you want to prepare your OBs
off-line on a laptop while traveling, for instance.
In case that there is already some Phase 1 information in your Local Cache, P2PP will not try to
update it unless you explicitly want it to do so. Section 5.1 gives detailed information on how to
update the Phase 1 information and section 5.6 provides instructions how to assign Phase 1 targets
to OBs.
4.3
Instrument Packages
As described in Chapter 2, P2PP works both with generic information and with information that
is instrument-dependent. The instrument-dependent part is contained in the so-called Instrument Packages (IPs).
An IP contains all the templates (acquisition, science, calibration) that are available for a given
instrument (see Section 2.2) and they need to exist in your local installation of P2PP in order for
you to start preparing OBs for that instrument. More technically, an IP contains an Instrument
Summary File with all the available optical elements and allowed ranges for each item defining the
instrumental setup, and multiple Template Signature Files containing the list of parameters that the
user should define within each template via P2PP.
The IP also contains some other instrument-specific items:
• The External Verification Module (EVM) checks the logical consistency of the OBs, as
well as their compliance with a number of rules and policies set by the Observatory in either
Service or Visitor Mode observing. The function of the EVM is described in Section 5.14.
• The External Time Reporting Module (ETRM) computes the total exposure and execution times of each OB (Sect. 5.9).
• The COnstraint Set MOdule (COSMO) contains the relevant constraints applicable to
each instrument whose value needs to be specified by Service Mode users.
• The README file definition, containing the entries to be filled by the user in the README
file, some of which are instrument-dependent (Sect. 5.15).
Each observing run has an IP associated to it in the ESO Database. At the time of downloading or
updating the Phase 1 information (Sections 4.2 and 5.1), the association between each observing run
and its assigned IP is updated in the Local Cache. If a run has an associated IP that is not available
in your Local Cache, the correct IP is automatically downloaded and installed. By default P2PP will
install the IPs in the instruments sub-directory in the P2PP root directory. An alternative location
can be set by changing the keyword INSTRUMENTS.DIRECTORY in the config.properties file that
is created in the config/ sub-directory within the P2PP installation path.
18
P2PP version 3 User Manual
Doc. No. VLT-MAN-ESO-19200-5167
Figure 9: The P2PP main GUI Obs/Calib Blocks view.
4.4
The P2PP main Graphical User Interface
Once you have successfully logged into P2PP, the P2PP main GUI will be displayed in your screen.
The appearance of the main P2PP GUI is similar to that shown in Figure 9.
The P2PP main GUI contains the following important areas, which are indicated in Figure 9:
• A Menu Bar giving access to a variety of P2PP functions, described under the corresponding
Sections of this Manual.
• An Icon Bar with the following icons from left to right:
1. OB icon - button used to make a new science OB
2. CB icon - button used to make a new calibration OB
3. Folder icon - button used to make a new folder
4. Green G icon - button used to make a new group container; this is active only when a
folder (either an observing run folder or a subfolder within the run) is selected; this is not
active when another container is selected.
5. Violet C icon - button used to make a new concatenation container; this is active only
when a folder (either an observing run folder or a subfolder within the run) is selected;
this is not active when another container is selected.
6. Brown T icon - button used to make a new time link container; this is active only when
a folder (either an observing run folder or a subfolder within the run) is selected; this is
not active when another container is selected.
P2PP version 3 User Manual
Doc. No. VLT-MAN-ESO-19200-5167
19
Figure 10: The P2PP main GUI Schedule view.
7. Red X icon - button used to delete the selected item.
8. Duplicate icon - button used to duplicate an object, either an OB or a container with all
its belonging OBs.
9. Edit Observation Block icon (OB icon + a pencil) - button to view and edit the selected
OB.
10. Verify icon (a stamp) - button to verify whether the content of the selected OBs and
containers is correct and follows phase 2 rules.
11. Readme icon - button to view and edit README file.
12. P2PP-submit icon (a whistle) - button to alert ESO that all phase 2 material has been
submitted.
• A Folders and Summary area. There are two main views available on the main P2PP GUI
window: the so-called OB view selected by clicking on the ”Obs/Calib Blocks” tab, and the
Schedule view selected by clicking on the ”Schedule” tab. In both cases the main window
displays in the left most column a list of folders with observing run IDs, information about
the observing mode (Visitor Mode (VM) or Service Mode (SM)), and the instrument used for
the observations for the given run. Folders can be expanded to show the tree view of OBs,
containers and/or other sub-folders present in the local cache by clicking on the small ”+”
symbol, or collapsed by clicking on the small ”-” symbol.
By default after login the Obs/Calib Blocks tab is selected providing the view of the run.
The Folders and Summary area shows only the name for folders and containers. For the OBs,
beside the name, there are also:
20
P2PP version 3 User Manual
Doc. No. VLT-MAN-ESO-19200-5167
– an icon indicating whether the information within an OB is complete (blue tick mark), or
not (red dot with a white cross)
– Local OB ID - this is an integer number
– ESO OB ID - this is the identification number assigned to the OB after its submission to
the ESO repository database
– Status of the OB - this status is always at (P)artially Defined when working in the Local
Cache (see Section. 6.3.2)
– Target name - target name can be changed in the target view of OB (see below)
– OD - observation description can be changed by editing the OD name field in the OB view
window (see below)
– CS - constraint set name can be changed by editing the appropriate field in the Constraint
set OB view window (see below)
– Acquisition - lists the name of the Acquisition template; this template is attached to the
OB in the OB view window
– Finding charts - lists the number of the attached finding charts and their names
– Ephemeris file - lists the attached ephemeris file names
By clicking on the Schedule tab above the list of observing runs, the schedule view is displayed
(Fig. 10). The schedule view lists names of all OBs and Containers and indicates in the same way
as in the ”Obs/Calib Blocks” view, whether the OB is complete or if there are basic parameters
missing.
The function of the Schedule view is to get an overview of the User Priorities for all the OBs and
scheduling containers, and to set-up the observing strategy for the run by adjusting the relative
execution priority between different OBs and scheduling containers.
The User Priority value can be edited by clicking on the number in the ”Priority” column. The default
value is 1, but it should be changed by the user. The lower the User Priority value, the higher the
priority for the execution of the given OB and/or container. The lowest priority is assigned to OBs
and containers with the User Priority value of 10, and the highest priority is marked by assigning
User Priority equal to 1.
The OBs belonging to Groups have the ”Contribution to Group” score. This is an integer number
with values from [1 .... MaxGrpContrib] and it is used to compute the dynamical group score and
therefore assign relatively higher priority to groups of OBs whose observations have already started.
For the details about the group score see Section 2.5.
The OBs belonging to the Time Link containers, that are not the first in the series, have the relative
time constraints ”Earliest After Previous” and ”Latest After Previous”, which can be edited in the
Schedule view. The time delay is expressed in days and hh:mm format. These time constraints are
relative in the sense that they refer to the time with zero point being the start time of the successful
execution of the previous OB in the series. For the rules regarding the execution of OBs within the
time link containers see Section 2.4.
When you first log into P2PP using a new installation, the Summaries area is empty since no OBs
exist yet in your Local Cache. Please note that this does not necessarily mean that no OBs for your
previous programmes exist in the ESO Database if you submitted them in the past! OBs that had
been previously submitted to the ESO Database under your username will not be downloaded to
your Local Cache, since for a number of reasons this would not be desired. The process for copying
OBs from the ESO Database to your Local Cache needs to be carried out explicitly and is described
in Section 6.3.1.
P2PP version 3 User Manual
4.5
Doc. No. VLT-MAN-ESO-19200-5167
21
Exiting P2PP
To exit P2PP, select the Exit option under the File menu, and then click on yes in the dialog box
that appears asking you to confirm your decision.
22
P2PP version 3 User Manual
5
Doc. No. VLT-MAN-ESO-19200-5167
Creating and editing Observation Blocks and the README file
This Chapter guides you through the OB preparation step-by-step in a generic (i.e. instrumentindependent) way. Some more specific steps necessary for preparation of survey OBs for VISTA and
VST are described in Section 5.8.
To follow easily the explanations given in this Chapter, we recommend that you have an open P2PP
session in front of you at the time of reading it and that you work on actual example OBs for one of
your existing observing runs. If you have access to P2PP but do not have your User Portal username
at hand, you still can do this by using the available tutorial account described in Section 1.4.
5.1
Updating the information on Observing Runs
As explained in Section 4.2, the first thing needed to start preparing your OBs is the Phase 1
information of your observing run. If you have approved observing runs but no Phase 1 information
for any of them is available in your Local Cache, it will be downloaded automatically from the ESO
Database. If you already have Phase 1 files in your Local Cache but wish to work on a new run
that is not there yet, such as one that has just been allocated time, you need to explicitly download
the Phase 1 information to your Local Cache and make it visible to P2PP. It may also be that
the Instrument Package version associated to your run has changed since the last time you worked
on it. For these reasons, it is convenient to start any new P2PP session by updating the Phase 1
information in your Local Cache. This is done by selecting the Download/Refresh Observing Runs
option under the File menu in the P2PP main GUI. Downloading/refreshing observing runs will
download all the Phase 1 information from the ESO Database into your Local Cache, overwriting
any previous Phase 1 files that may exist there.
If ESO has communicated to you the allocation of observing time to your observing run but you
cannot see it in P2PP, please make sure to use the Download/Refresh Observing Runs option
before contacting ESO.
5.2
Creating a new OB and scheduling container
We begin from the point at which you have started a P2PP session, logged in (Section 3.5), and
selected in the P2PP main GUI the folder (Section 4.4) corresponding to the observing run for which
you wish to prepare the observations.
• First you have to decide if the OB that you want to create is a Science OB or a Calibration Block
(CB) (Section 2.2) and whether the OB should be part of a scheduling container (Section 2.4).
• Click with the mouse to highlight the run for which you wish to create new OBs or containers.
If you wish to create directly independent OBs skip the creation of containers, and go to the
next item in the list.
• If the OBs is to be part of a scheduling container, create the appropriate container by clicking
on the icon G (group), C (concatenation), or T (time link). This will create the new item
within the run folder. To change the name of the container first click on the container to select
it, and then either press Enter, or use Rename option either from the File menu, or from the
menu available through the right-mouse button click. After typing the name press Enter. If
you then wish to create an OB within that container, click on the container to highlight it.
• Next, create an OB by clicking on the OB (or CB) Icon in the Icon Bar (Figure 9). A new
entry will immediately appear in the Summaries area with default information for the OB. You
P2PP version 3 User Manual
Doc. No. VLT-MAN-ESO-19200-5167
23
Figure 11: The View OB window as it appears for a newly created OB.
will notice a red dot next to the OB name: this means that the current content of the OB fails
to pass some basic verification criteria, as it should be since the OB is still empty.
• To change the name of the OB first click on it to select it, and then, either press Enter, or use
Rename option either from the File menu, or from the menu available through the right-mouse
button click. After typing the name press Enter. Needless to say, it is always convenient that
the chosen names are sufficiently descriptive to the user.
• To view and change the default contents of the OB, click on the View icon in the Icon Bar, or
double-click with the left mouse button on the OB name. The View OB window will pop up
as shown in Figure 11. The example given in this Figure corresponds to a VIRCAM run, hence
the list of templates visible in the center. If you are creating an OB for a different instrument,
the detailed contents of that area will differ from the one shown, although the rest of the layout
will be identical.
We describe in detail how to edit information in the View OB window in Section 5.4. For now,
what is important is that every change made to the OB in the View OB window is automatically
saved in your Local Cache.
• Once you are satisfied with the contents of your OB, there is no further action required. Since
changes are immediately saved in the Local Cache, you do not need to click any ’OK’ or
’Confirm’ buttons in order to preserve the changes made, but can simply close the window
clicking on the red dot in the upper left (for Mac OS X) or on the cross in the upper right
corner (for Linux OS).
You can now create a second OB by going back to the P2PP main GUI window and clicking again
on the OB icon. If the new OB that you wish to create is similar to the previous one, you can select
(highlight) the first OB and then either select Duplicate option from the Edit menu, or Duplicate
icon in the P2PP main GUI Icon bar, and a new OB will appear in the Summaries area having an
identical content as the original one, with the exception of the OB name to which a default number
will be added.
24
P2PP version 3 User Manual
Doc. No. VLT-MAN-ESO-19200-5167
Figure 12: The View OB window with the contents of a typical OB.
Note that you can duplicate more than one OB at once by highlighting all of them and then clicking
the Duplicate button. Copies of all the highlighted OBs will then appear in the Summaries area.
5.3
Subfolders
In some instances, particularly when working with observing runs consisting of a large number of
targets or OBs that can be grouped under a few categories, you may find useful to separate the OBs
under different subfolders.
Subfolders must be created under existing observing runs. You can do it by first clicking on the
relevant run, and then selecting the Folder icon in the P2PP main GUI Icon bar. This will create a
subfolder under the specified run.
Subfolders can be renamed in the same way as containers or OBs: first click on it to select it, and
then, either press Enter, or use Rename option either from the File menu, or from the menu available
through the right-mouse button click. After typing the name press Enter.
A word of caution: Working with subfolders can be confusing and may lead to the partial submission
of OB sets to the ESO Database if they are not handled carefully (Section 6.1). You are therefore
advised to use subfolders only if really necessary.
5.4
The View OB window
The View OB window is used to view or edit the contents of an OB. Its parts are indicated in
Figures 12, 13, 14, and 15 for the case of a Science OB.
P2PP version 3 User Manual
Doc. No. VLT-MAN-ESO-19200-5167
25
The Icon Bar at the top gives access to information about the Observation Description (the default
view when opening a newly created OB), about the Target, Constraint Set, and Time intervals.
Clicking on these icons changes the content of the View OB window.
The View OB window for calibration OBs is somewhat simpler, as the target information and execution conditions are not needed in that case. It only contains the information about the Observation
Description. There is no target, constraint set, nor time intervals icon.
5.4.1
Observation Description view
The Observation Description view of the OB is the default for the newly created OBs (Fig. 12). It
can be displayed by clicking on the Observation Description icon in the upper left (telescope dome
symbol). Below the Icon Bar, in the Observation Description view there are the following fields:
• OD Name - the name of the Observation Description (see Section 2.2 and Figure 1) can only
be changed in this View OB window.
• User Comments - free text field for user comments; please always use the User Comment field
in the observation of calibration sources to indicate the science OBs that they are intended to
calibrate.
• Instrument Comments - this field is active only for some instruments which require instrumentspecific information.
• Execution time - this field can be updated by clicking on the Recalculate button next to it
in order to obtain the estimate of the total execution time including the overheads (see the
corresponding instrument User Manuals).
• The Template area displays all the templates available for the instrument, grouped by template
types. Template types are selected from the pull-down menu. There are typically acquisition,
science, and calibration templates.
• The Acquisition Template and Observation Description grid in the bottom displays all
the templates that have been selected to compose the present OBs, with all their user-selected
parameters visible.
5.4.2
Templates
To define a valid OB, executable at the telescope, the OB must have a certain set of templates.
• In general, for a science OB you should begin by selecting the acquisition template appropriate
to the instrument mode that you wish to use; please consult the User Manual of the instrument
if you are unsure of which template to choose. Each science OB must contain one, and only
one, acquisition template.
To include the desired acquisition template in the OB, go to the Template Menu area and, under
the pull-down menu Template Type, select acquisition. This will display in the Template box
all the acquisition templates available for the instrument. Select the one to be used for this OB
by clicking on it, and then click on the Add button. Below the Template box, a column with
the list of parameters that need to be edited will appear, followed by another column with the
default values for these parameters. Editing is done by either clicking on the corresponding
box, deleting its content and replacing it by the correct one (such is the case for example for
the exposure time of the acquisition image), by choosing a value/item in the drop-down menu
26
P2PP version 3 User Manual
Doc. No. VLT-MAN-ESO-19200-5167
that appears when clicking in the entry (for example to choose filters or grisms from a list), by
clicking on the entry to get a box in which more items can be added in a list, or by ticking on
a checkbox (such as ’PSF Ref’ for NACO). Values appearing in red characters are not allowed,
and must be changed to a permitted one before the OB can be considered acceptable.
• The acquisition template must be followed by one or more science or calibration templates. The
selection of the science and calibration templates that compose the Observation Description
is made in a way analogous to the selection of the acquisition template, choosing the desired
template after having clicked on the pull-down menu and selected the corresponding template
type in order to display the possible choices. Once selected, the template must be appended to
the OB by means of the Add button as before.
As explained in Section 2.3, calibration templates may include observations of standard stars.
Unfortunately, at present and for historical reasons different instruments handle the observation
of calibration sources in somewhat different ways. For example, ISAAC, NACO, CRIRES, and
UVES have dedicated templates for the observation of standard stars that can be found under
the calib template type, while FORS1, FORS2, and VIMOS use the same templates for the
observations of both science targets and calibration stars and the difference is made by selecting
a flag within the template (see the corresponding User Manuals for more details).
Besides the Add button, two other buttons in the template menu are useful to speed up the process
of building OBs and to fix possible mistakes:
• The Delete button next to the Template box deletes a template that has been previously
attached to the OB. To use it, first click on any entry of the template that you want to delete.
The whole column with all parameters belonging this template will be highlighted. Make sure
that this is indeed the the column that you want to delete, since template deletions are not
reversible. Once you have checked this, you can click on the Delete button and the template
will disappear from the grid.
• The Duplicate button allows you to duplicate a template already appended to the OB. This
is useful when your OB must contain a succession of similar templates differing only in the
values of a few of their parameters, such as for instance a succession of exposures using similar
instrumental configurations and differing only in the filter. Also in this case, you must click
on any entry of the template to be duplicated to select it, and highlight the column. Clicking
on the Duplicate button will create a new column immediately following the one selected for
duplication and with identical contents. The parameter values of the new template can then
be modified as needed.
The Recalculate button allows to calculate or update the estimated execution time of the OB after
any changes in its templates has been introduced. Please see Section 5.9 for further details.
If your OB contains contiguous executions of the same template with only the parameter values
changing from a template to the next, the column in the grid listing the parameters will appear only
in front of the first template.
If you want to change the order of templates within the Observation Description, it is possible to
move a template to any new position within the OB just by clicking on the heading of the column of
values of the template that you want to move, and dragging it to its desired location within the OB.
Important note: As noted in Section 2.3, some instruments (e.g. ISAAC, UVES, NACO, VIMOS)
allow attached calibration templates such as flat field and wavelength calibration frames in order to
increase the accuracy of the calibration. In all cases, the attached calibration templates must
be located after the science template that produce the observations that they intend
P2PP version 3 User Manual
Doc. No. VLT-MAN-ESO-19200-5167
27
Figure 13: The Target View OB window with the target information.
to calibrate, since they inherit the same instrument configuration as the latest science template
executed.
5.4.3
Target View
The Target view of the OB (Fig. 13) is displayed by clicking on the Target icon in the View OB
window. Below the Icon Bar the Target View displays a series of fields, where the positional and
kinematic information of the target can be entered.
To complete the OB you need to enter the target information including the target name, its position,
its proper motion and, in case of a moving target, the differential motion in Right Ascension and
Declination, called respectively ’Diff RA’ and ’Diff Dec’ in P2PP. Please note the distinction between
proper motion and differential motion: the former applies typically to stars and stellar objects, and
the latter to Solar System objects. Proper motions must be introduced in units of arcseconds per
year, and differential motions in arcseconds per second. More information on the preparation of OBs
for the observation of Solar System targets in Service Mode can be found in Section 7.8. Finally,
you may also select the type of target from an extensive drop-down menu (Class field). This latter
information may be used in future archive searches.
Special note for Survey users: the target information is entered by importing the output of the
SADT (see Section 5.8). Do not change the target coordinates manually in OBs in which
SADT output file was imported!
5.4.4
Constraint Set View
The Constraint Set View OB window (Fig. 14) is displayed by clicking on the Constraint Set icon in
the View OB window. Below the Icon Bar, in the Constraint set view there is a series of clickable
fields and pull-down menu for Sky Transparency, where the information of the acceptable observation
constraints for the OB execution are specified.
In OBs intended to be executed in Service Mode, you must complete the entries under the Constraint
Set view. Here you specify the least favorable conditions under which your OB can be executed and
28
P2PP version 3 User Manual
Doc. No. VLT-MAN-ESO-19200-5167
Figure 14: The Constraint Set View OB window with the information about the observational
constraints for the OB.
still produce a useful scientific output. The OB will then be scheduled for execution when the seeing,
the lunar illumination, and the airmass are equal or smaller than the specified values, the Moon
angular distance greater, and the transparency conditions equal or better than specified.
A new Twilight constraint has been introduced in P2PP version 3.1.4 and is available for several
instruments. This constraint can be used to define the earliest time with respect to the end of the
astronomical twilight when the execution of the OB can be started. While the relation between the
time difference from the evening twilight end and sun elevation varies during the year, for Paranal due
to its low latitude this difference is small. Therefore the constraint is given in minutes as a difference
in time with respect to the end of astronomical twilight (i.e. the time when the solar elevation is −18
degrees). The default value of twilight constraint is 0. A negative number means that it is allowed
to start the observation before the end of the astronomical twilight, a positive number means start
the observation at least that many minutes after the end of the astronomical twilight.
In P2PP version 3.3 the following instrument specific constraints are supported in addition:
• baseline - used by VLTI instruments
• Strehl - used to assess the quality of observations using adaptive optics (AO)
• ATM (atmospheric turbulence model) used to denote whether AO is used or not;
• PWV (precipitable water vapor) - used by instruments operating in mid-IR
Additional information on these constraints are provided in the instruments User Manuals and Phase
2 web pages.
5.4.5
Time Intervals View
The Time Intervals View OB window (Fig. 15) is displayed by clicking on the Time Intervals icon,
in the View OB window. Below the Icon Bar, in the Time Intervals view there are two tabs: Time
intervals, and Sideral Time intervals.
P2PP version 3 User Manual
Doc. No. VLT-MAN-ESO-19200-5167
29
Figure 15: The Time Intervals View OB window with the information about possible absolute time
windows for the OB execution.
If your OB is time-critical, i.e. it has to be executed within some specific time interval(s), you must
specify the intervals of dates and times suitable for execution under the Time Interval tab of the
Time interval view. Here it is only possible to specify absolute time intervals, i.e., fixed dates when
your observations are feasible.
To add a new time interval click on New TI button. This will open a small pop-up window in which
Start and End date and time can be chosen. Either click inside the field where the date appears
to type the desired Start/End Date, or click on the arrow next to the date to get a window with a
calendar. In the calendar window click on the date to select it. To navigate to another month use
arrows on top of the calendar view. To change the Start/End time, click inside the field with hh:mm
format to type desired time. Finally, press OK button to confirm the choice. The new time interval
is then shown as a blue bar in the time intervals graphical overview.
It is also possible to edit and delete some existing time intervals. This is done by first selecting
the time interval through clicking on it with left mouse button - the selected time interval will be
highlighted (orange) - and then pressing either Edit or Delete button. The Edit button will pop-up
again the small window in which the Start/End Date and Time can be changed in the same way as
described above for adding a new time interval.
The time intervals that depend on the execution of other OBs, such as “OB number 2 must be
executed between 5 and 10 days after OB number 1”, must be specified in the P2PP main GUI
Schedule view (Figure 10 and Section 4.4). These relative time links are possible only for the OBs
that belong to a Time Link scheduling container. As described in Section 5 to create the OBs within
the time link container, first select the Observing run folder, then create the time link container by
clicking on the T icon in the icon bar, then select the time link container by clicking on it with the
left mouse button, and then click OB icon to create OBs within that time link container. For OB
name changes and editing of parameters see above.
Important note: Only the first OB within a Time Link scheduling container can have absolute
time constraints for its execution. All subsequent OBs in a time-linked sequence within a time link
30
P2PP version 3 User Manual
Doc. No. VLT-MAN-ESO-19200-5167
scheduling container do not have the Time Intervals View OB window and the Time Intervals icon
is not present among icons on the top Icon bar of the View OB window.
The Sidereal Time tab applies principally to observations with VLTI instruments, in which observations at precisely defined sidereal time intervals are needed in order to provide an adequate uv
plane coverage. VLTI users should specify in this area the list of sidereal times intervals in which
their observations can be carried out. In P2PP3 this tab is activated for all instruments. Please
contact [email protected] if in doubt if this should be used.
One specific restriction for the use of Sidereal Time constraints for Concatenations of OBs must
be observed. Given that the concatenated OBs must be observed back-to back without any other
observation in between, all the OBs belonging to a concatenation must have overlapping sidereal
time intervals. If ST interval(s) for one or more OBs does not overlap with at least some of the OBs
in the concatenation the concatenation will not be considered as valid for service mode scheduling.
5.5
Modifying an existing OB
The steps to be followed to modify an OB already existing under the folder for your observing run
are very similar to the ones described in the previous Section. In the P2PP main GUI, highlight the
OB whose contents you wish to modify by clicking on it. To view its contents either double-click with
the left mouse button, or click on the Edit Observation Block icon to display the View OB window.
The contents of the OB can then be changed as needed in the View OB window, and the changes
will be instantly saved to the Local Cache.
5.6
Assigning Phase 1 Targets to OBs
In the creation of the set of OBs for your run, you can take advantage of the information that you
already provided in the target list of your Phase 1 proposal. The names and coordinates of the
targets are stored by ESO in a database that is accessible from P2PP, from where they can be copied
and pasted into the OB.
To access the Phase 1 target coordinates select one or several OB and then right mouse button click
to Assign Phase 1 Target. This will open a new widow with the list of targets associated with the
run for for which you are preparing the OBs. Select with the left mouse button the target to update
the OB coordinates and the target name.
Please pay attention that the target name can only contain allowed characters: letters, digits, space,
+, -, or a dot (”.”). If in the proposal the target name had some other characters (e.g. ”$” to denote
mathematical symbols in LaTeX), then you will need to update the target name.
Alternatively to assigning Phase 1 target to several OBs at once, you may assign it to one OB, and
then use the copy-paste OB properties option described in Sect. 5.11. Please note that it is not
possible to copy more than one target at a time using this mechanism, although you can copy one
target to multiple OBs.
5.7
Importing external lists of targets
In case you wish to produce many similar OBs, for which only target information is different, it is
convenient to use the Import Target List option under the File menu in the P2PP main GUI.
First prepare an OB (so-called master OB) that contains the instrument setup, and all the other
parameters, except target information. Highlight this master OB and select the Import Target List
option under the File menu in the P2PP main GUI. A window will pop up allowing you to navigate
P2PP version 3 User Manual
Doc. No. VLT-MAN-ESO-19200-5167
31
your local folders and select the appropriate file. After selecting the file containing a target list in
ascii format, press the open button to automatically replicate the master OB into as many copies as
targets there are in the file, assigning a different target to each new copy.
The ASCII file with the targets list must contain one target per line, and the following information
must be given for each target:
• The target name, which can consist of nearly any combination of characters, numbers, and
spaces. However, special characters such as ’, ”, or /, should be avoided.
• The Right Ascension in hours, minutes, and seconds format. Hours, minutes, and seconds
can be separated either by colons (hh:mm:ss) or by spaces (hh mm ss).
• The Declination in sign, degrees, minutes, and seconds format. Degrees, minutes, and seconds
can be separated either by colons (+dd:mm:ss) or by spaces (+dd mm ss).
• The Equinox, expressed just as the year (e.g. 2000) or specifying the year’s reference (Julian
or Besselian, e.g., J2000 or B1950).
• The Proper motion in right ascension (µα cos δ), in arcseconds per year.
• The Proper motion in declination, in arcseconds per year.
• The Epoch of the coordinates.
These items must be separated by tab characters, rather than by spaces, so that the format can be
considered valid. Note also that the format conventions are somewhat rigid at the moment: no blank
spaces are accepted in front of the values, and the year indicating the equinox must be an integer
number (2000.0 or J2000.0 will not be accepted). On the other hand, all the seven items listed above
must be given for each object. The following example file contains a sample where the target data
are given in several valid formats:
Sz100 16 08 25.8 -39 06 01 J2000 +0.100 -0.231 2013.5
Sz102 16 08 29.7 -39 03 11 J2000 +0.108 -0.211 2013.5
Sz108A 16 08 42.7 -39 06 17 J2000 +0.132 -0.200 2013.5
Sz108B 16:08:42.8 -39:06:14.3 J2000 +0.087 -0.198 2013.5
Sz113
16 08 57 -39 02 22 2000 +0.089 -0.289 2013.5
Meritxell Sala 16 06 07 -39 00 19 B1950 +0.201 -0.208 2013.5
Par-Lup3 1 16 08 15.9 -39 03 01 J2000 +0.132 -0.253 2013.5
Importing a target list will duplicate the selected OB as many times as the number of targets in the
imported file. The procedure to use the mechanism is as follows:
Please note that only one master OB can be selected for target list import at a time. If you wish to
observe the same set of targets using several OBs on each of them, you must prepare a corresponding
number of master OBs and repeat the operation described for each of the master OBs, or alternatively
use a duplicate OB button.
5.8
Import Survey Definition
This section is specific to the survey observation preparation that uses the Survey Area Definition
Tool (SADT) to define the coordinates and offset positions for the area(s) of the sky to be observed.
32
P2PP version 3 User Manual
Doc. No. VLT-MAN-ESO-19200-5167
Figure 16: The Import Survey Definition window.
The user may define a “template” observing strategy composed of independent OBs or a more complex hierarchy of scheduling containers (group, concatenation, time link). All the parameters of
the OBs in this template must be filled in. This includes setting the User Priorities, contribution
to group, and time intervals, as applicable, in the Schedule view of the P2PP main window (Figure 10 and Section 4.4), opening the View OB window and selecting the appropriate acquisition and
observation templates, constraint set and time intervals.
The difference with respect to ”standard” OB creation is that, for the OBs within this template
structure, coordinates of the target fields and the Guide star setup files for pawprints 1-n (.paf files)
in VIRCAM science templates are not attached. All the other parameters, filters, execution times,
offset patterns, etc. have to be defined.
An OB prepared in such a way is called template OB. Several template OBs belonging to a container
are called template container. These template structures are basic survey units: they will be duplicated as many times as there are single unit areas of the survey (in survey jargon this unit of area
is called tile), defined in the SADT. The template OBs have a red dot next to them, indicating that
they are not complete - this is due to the fact that the information about the guide stars (.paf files)
is missing.
To update the template OB with the target and .paf files for each survey tile select the template OB
and then Import Survey Definition from the File menu in the main P2PP GUI. This will open
a dialog window (Fig. 16), where one can navigate to the directory where the files produced by the
SADT are located. These files are in .xml format. Select the appropriate file with the mouse and
click Open. After that, confirm the selection in the next dialogue window. This dialogue window
tells how many times the selected template OB or template scheduling container will be replicated this is equal to the number of tiles (number of different telescope pointings).
After answering yes to confirm the selection, the template OB is multiplied and updated with the
appropriate coordinates in the target section and .paf files in the observation template section. This
creates completed OBs (provided that all other parameters have been set correctly) - they have a
blue tick next to them indicating that the basic requirements are all satisfied. The names of the
newly created OBs are equal to the name of the template OB with the extension that refers to the
name of the .xml file, and incremental counters.
In the above example, a series of identical OBs, each pointing to a different part of the sky has been
defined.
If instead of a single OB, the template structure is a template container containing several template
OBs, it is possible to either import the SADT file at the container level, or at the level of individual
OBs.
P2PP version 3 User Manual
Doc. No. VLT-MAN-ESO-19200-5167
33
If you select a template container (e.g. group), and import the SADT file, the container will be
replicated N times (where N is the number of tiles in the .xml file) and its template OBs will be
updated with the coordinates and .paf files. This will result in N groups. Each group will have the
same number of OBs as the template group, and all the OBs in a single group will have the same
coordinates. The i-th (where i=1...N) group will have the coordinates of the i-th tile from the .xml
file.
5.9
OB Reports and execution times
Once a set of OBs has been defined, it may be convenient to produce different kinds of reports on
them without having to view their contents one by one in the View OB window. P2PP gives access
to five kinds of reports from the Reports menu of the P2PP main GUI:
• The Compare OB report allows to compare the contents of two selected OBs and highlight
their differences.
• The Execution Time report creates a pop-up window listing both the exposure time and
the estimated execution time for the selected OBs. The latter include an estimate of all the
operational overheads. Also included at the end of the report is the sum of the exposure and
execution time for all the selected OBs.
The execution time of an OB is also visible in the Execution Time entry on Observation Description View OB window. It is important to note that the execution time is not automatically
updated in this box whenever a change in the OB is made! Updating is easily done by clicking
on the Recalculate button on the right of the Execution Time box, which refreshes the contents
of the the box.
• The OB Breakdown report creates a pop-up window with the list of all the parameters and
values of each selected OB as a plain text file.
• The Verify report creates a pop-up window listing the result of the check done by the EVM,
the verification script described in detail in Section 5.14. This report can also be obtained by
clicking on the Verify icon (stamp) located in the Icon bar on top of the main P2PP GUI.
• The last report, Display in OBD (PAF) format, produces a plain text file with the list of
all parameters and values of selected OBs in a format that is used by BOB.
5.9.1
Checking the expected execution time against the time allocated to your run
The Execution Time report is especially useful. In Visitor Mode it allows you to have a fairly
accurate estimate of the time actually needed for the execution of your programme, including the
overheads, and thus allows you to predict if your observing plans based on the OBs that you have
prepared will fit in the nights that were assigned to you.
In Service Mode, the time allocated to your programme includes the average operational overheads as
described in detail in the User Manual of each instrument. These are the same overheads that P2PP
includes in the calculation of the execution time. Therefore, the execution time report produced
by P2PP gives you the amount of time that must be checked against the time allocated to your
observing run. Before submitting your Service Mode OBs (see Section 6.1), please check that the
total execution time, reported by P2PP, is within the limit of the time allocated to your run.
In addition, as specified in the Service Mode Guidelines Web pages,
http://www.eso.org/sci/observing/phase2/SMGuidelines/SMRules.html,
34
P2PP version 3 User Manual
Doc. No. VLT-MAN-ESO-19200-5167
Service Mode OBs and concatenations of OBs cannot normally exceed one hour of execution time,
unless a special waiver has been granted by ESO. The execution time report allows you to quickly
check if any of your OBs or concatenations exceeds this limit.
5.10
Finding charts and ephemeris files
Finding charts and ephemeris files for Service Mode runs must be submitted to the ESO Database
as a part of the OBs to which they belong. Visitor Mode observers may also use the finding chart
and ephemeris file facilities in P2PP for convenience during their observing runs.
Exceptionally, public surveys with VISTA and VST do not require finding charts.
5.10.1
Generic finding chart requirements
Finding charts for use in Service Mode must be prepared in JPEG format following a set of generic
requirements that are described under
http://www.eso.org/sci/observing/phase2/SMGuidelines/FindingCharts.html
There are also instrument-dependent requirements on the finding charts that can be found by selecting
the instrument from the pull-down instrument selector menu in the upper right of this web page.
Any software that produces JPEG files of sufficient quality and compliant with the requirements
indicated above can be used to produce finding charts. In particular, ESO distributes the Skycatbased finding chart tool, which provides a user-friendly interface for easily creating Service Mode
compliant finding charts in JPEG format starting from FITS files. This tool is distributed as part of
the FIMS, VMMPS, and GUIDECAM packages, but can be used also for the preparation of finding
charts for any instrument. It can be found under
http://www.eso.org/sci/observing/phase2/SMGuidelines/FindingCharts/FindingChartsCookbook.html
Please note that the size of the JPEG files that can be submitted as finding charts is
limited to a maximum of 1 Mbyte.
5.10.2
Ephemeris file requirements
Ephemeris files are plain ASCII files containing the positions and differential motions of moving
targets at given dates. The detailed requirements on the contents of ephemeris files for Service Mode
runs can be found under
http://www.eso.org/sci/observing/phase2/SMSpecial/MovingTargets.html
5.10.3
Attaching finding charts
Once you have created the JPEG files to be used as finding charts you must attach them to the
relevant OBs. To do this follow the steps:
• Highlight in the Summaries area of the P2PP main GUI the OBs to which a given finding
chart, or set of finding charts, must be attached.
• Select Attach Finding Chart(s) option from the Finding Charts menu of the P2PP main GUI.
A window like the one in Figure 17 will appear.
• From the Look In pull-down menu on the top, navigate to the directory where the JPEG finding
charts files to be attached are found.
P2PP version 3 User Manual
Doc. No. VLT-MAN-ESO-19200-5167
35
Figure 17: The Attach Finding Chart window.
• Select the desired finding charts from the list of files in the selected directory. It is possible
to attach more than one finding chart at a time. It is also possible to enter the name of the
desired finding chart directly in the File Name entry near the bottom of the window. You do
not need to attach all the finding charts for a given OB at once: more finding charts can be
added at a later time.
• Click on Open button to attach the selected finding charts to the highlighted OBs.
The attached finding charts now appear under the FindingCharts column in the Summaries grid of
the P2PP main GUI, listed with the name of the JPEG file. Since several finding charts may be
attached to a given OB and the file names can be long, the number of finding charts attached to
each OB is displayed in parentheses at the beginning of the entry.
The Finding Charts menu also allows you to Detach Finding Charts associated to an OB. A pop-up
menu presents the list of attached finding charts, from where the ones to be detached can be selected.
The Clear Finding Charts option detaches all the finding charts associated to an OB at once. Note
that at present it is not possible to detach finding charts from more than one OB at a time, even if
multiple OBs are selected in the P2PP main GUI.
The Finding Charts View option displays a window with the image of the finding charts attached
to an OB. The Next and Previous buttons at the bottom allows you to navigate among the finding
charts if there is more than one.
The Finding Charts View displays the finding charts as they will be visible to the observer, and is
thus extremely useful to judge on their readability. Users are thus strongly encouraged to use this
facility to verify that the provided finding charts are of sufficient quality before submitting them!
It is important to note that, once attached, the contents of the finding charts become a part of the
OB, and the file that was attached is not used anymore. A consequence of this is that, if a new JPEG
file is produced with different content but with the same name, the content will not be transferred
to the OB unless the finding chart is detached and attached again.
A step-by-step tutorial on the attachment of finding charts to OBs is available at:
http://www.eso.org/sci/observing/phase2/P2PPSurveys/P2PP3Documentation.html
5.10.4
Attaching ephemeris files
The attachment of ephemeris files to OBs follows steps entirely analogous to those described in the
previous Section for the finding charts, using the options available under the menu Ephemeris files
36
P2PP version 3 User Manual
Doc. No. VLT-MAN-ESO-19200-5167
in the P2PP main GUI. The procedure to detach an ephemeris file from an OB to which it has been
previously attached is also analogous. A simple ephemeris file viewing facility, displaying the content
of the ASCII file, is available under the View Ephemeris File option under the Ephemeris Files
menu.
Please note that, unlike for finding charts, only one ephemeris file can be attached to a given OB.
Like in the case of the finding charts, once an ephemeris file has been attached to an OB its name
will appear under the corresponding column in the Summaries area of the P2PP main GUI.
Finally, also in the case of ephemeris files their contents become a part of the OB once attached. As
a consequence, if a new ephemeris file is produced with different content but with the same name, the
content will not be transferred to the OB unless the ephemeris file is detached and attached again.
5.11
Copying and pasting information among OBs: the OB properties option
In previous Sections we have described how to create and modify individual OBs, and how to speed
up the process of creating the set of OBs for an observing run by duplicating entire OBs. It is also
possible however to copy information on specific parts of an OB into another OB or group of OBs by
means of the OB properties copy-paste mechanism available through the OB properties option
in the Edit menu of the main P2PP GUI.
The OB properties copy-paste mechanism allows one to select the Observation Description, the Acquisition Template, the Target information, the Constraint Set, the Finding Charts, the Time Intervals,
or the Sidereal Time Intervals, as well as Instrument Comments, and User Comments from a particular OB and to replace them in one or more destination OBs.
Let us assume in the following example that your observing run contains 15 OBs, consisting of the
observation of 3 targets in 5 different instrument setups that are identical for the 3 targets. You have
defined OBs in each setup for the first target, and now you need to produce two additional sets of OBs
identical to the ones that you have produced but having different target information. In principle,
you can do this by duplicating the first set of OBs twice, then editing the target information fields in
each OB to introduce the name and coordinates of the second or the third target as needed. In this
way, you would have to type the target information for the second and the third target five times,
one for each OB. The OB properties copy-paste mechanism allows you to save time and to minimize
the chances of typing mistakes by letting you type the target information only once for each target,
and then copying it to other OBs as needed.
To do this in the example outlined above, you can first duplicate the five OBs that contain each of
the setups to be used, and in one of the copies you can replace the information on the first target by
that of the second target. Then, under the Edit menu in the main P2PP GUI window, select the OB
Properties and then Copy Target option. Next, go to the Summaries grid under the P2PP main
GUI and highlight the rest of the OBs that were duplicated and in which the target information
needs to be replaced. Under the Edit menu in the P2PP main GUI, select again OB Properties and
then Paste to Selected OBs. This will copy the new target information to the highlighted OBs.
The preparation of the set of OBs for the third target can be carried out in an analogous way.
As an alternative to using copy and paste options under OB Properties within the Edit menu in the
main P2PP GUI, the same set of options is available through selecting OB Properties after clicking
with a right mouse button.
As explained at the beginning of this Section, other items of an OB can also be copied and pasted to
another OB or set of OBs. Typical examples in which this mechanism is useful may be for instance
when you decide to replace a grism by another one in a group of OBs with the same instrumental
setup, or when you change the transparency conditions acceptable in the execution of a Service Mode
programme, or when you realize that a slightly different slit width may be more adequate than the
P2PP version 3 User Manual
Doc. No. VLT-MAN-ESO-19200-5167
37
one that you initially set in your OBs, or when you decide to attach the same finding chart to a
group of OBs sharing the same target. In the first of these examples, the OB properties copy-paste
mechanism would apply to the Observation Description; in the second, to the Constraint Set; in the
third, both to the Acquisition Template and to the Observation Description, since the slit width
normally must be specified in both; and in the third, to the Finding Charts.
Important note: In OBs that contain attached .paf files the use of copy-paste of OB
properties has to be done with extreme care. For example in case of OBs for VIRCAM
survey observations with VISTA it is possible to copy target from one OB to another
OB which has attached .paf files with guide stars and AO stars that are located in a
different part of the sky. Clearly such OBs would fail at the telescope. Therefore it is
advised NOT to use copy-paste of Observation Description and Target OB properties
between OBs that have attached .PAF files.
5.11.1
Copy-paste of OBs belonging to different observing runs
The copy-paste mechanism also facilitates copying information across OBs belonging to different runs.
Common examples in which this capability may be useful is when adapting OBs from a run that used
similar setups or targets in a past period, or when multi-run programs with the same instrument in
a given period use similar OBs.
The procedure to synchronize information from OBs belonging to different runs is very similar to the
one described in the previous Section, with the caveat that the different runs are under different folders
in the Folders area of the P2PP main GUI. Thus, you need to first select the folder corresponding
to the program that contains the OB from which you want to copy the information, then select the
OB information to be copied, and then select the folder corresponding to the program containing the
target OBs where the information can then be pasted.
Only instrument independent components of the OB (target package, finding charts, and time intervals) can be synchronized among OBs belonging to different runs.
To copy the whole OBs with all their content from one run to another, simply highlight one or more
OBs in the folder of one run and then after selecting Copy option from the Edit menu from the P2PP
main GUI (or from the right-mouse button drop-down menu), click on the second run to highlight the
folder and then paste whole OBs there selecting Paste option in the Edit menu or under right-mouse
button drop-down menu.
5.12
Moving OBs between runs
It is possible to move OBs from one run to another, an option that can be useful if you wish to reuse
OBs originally defined for a past programme for a new one. To do this, select the run containing
the OBs that you want to move, and highlight the desired OBs in the Summaries area. Then, under
the Edit menu, select the Cut option. After that the selected OBs will be grayed-out. Select now
the destination run folder in the Summaries area and then under the Edit menu, select the Paste
option. You will be prompted to confirm this action. After answering yes the grayed-out OBs will
disappear from the first run, and will appear under the folder of the selected destination run. As
before, alternative to using options in the Edit menu is to use the same options from the drop-down
menu, which is available after clicking with the right-mouse button.
Moving OBs from one run to another will remove the OB from the original folder. In case you wish
to keep a copy of the OB under its original run, you are advised to use the Copy and Paste options
instead of Cut and Paste. Also, please note that OBs can be moved only among folders corresponding
to runs that use the same instrument.
38
P2PP version 3 User Manual
Doc. No. VLT-MAN-ESO-19200-5167
When moving OBs between runs all the information in the OBs (including the finding charts) is
transferred. Since finding charts contain the run ID to which they belong printed in them as part of
the contents of the JPEG file, this may cause inconsistencies between the labeling of finding charts
and the runs to which they belong. Users should be careful with this point, since obviously P2PP
cannot detect such inconsistencies related to information embedded in JPEG files.
5.13
Importing and exporting OBs in ASCII format: the IMPEX mechanism
The OBs that are automatically saved in your Local Cache are in binary format, and are always
associated to the observing run under which they were created. This is convenient as long as OBs
are created from scratch for a given observing run and generated one by one. However, on some
occasions you may find it useful to exchange with a collaborator OBs that each of you have prepared
under your own installations. Similarly, survey-like programmes containing OBs for a large number of
targets observed with a similar instrumental setup may be tedious to prepare if each OB needs to be
individually defined using P2PP, even taking into account the convenience offered by the copy-paste
mechanism defined in Section 5.11.
The Import/Export mechanism in P2PP, or IMPEX mechanism for short, allows you to save and
retrieve OBs from P2PP as human-readable lists of template parameter names and values in ASCII
format. The names of the ASCII files containing the parameters of exported OBs are taken from the
OB name followed by the .obx extension, and thus allow their easy identification.
After exporting containers, the newly created ASCII files containing the parameters of exported OBs
will have .obx extension, while there will also be one ASCII file per exported container with the
name of the container followed by the extension that depends on the container type: .con for a
concatenation, .grp for a group, and .tlk for a time link.
The advantages of the import/export mechanism can be summarized as follows:
• An exported OB contains all the information defined in it except for the run ID and User Portal
account ID (an ESO-internal number) of the PI, and can thus be imported under a different
folder from P2PP, thus allowing the exchange of OBs between different runs. Exported OBs
in ASCII format can also be easily exchanged among the coauthors of observing programmes.
• An exported container contains information about the number of OBs that belong to it, the
user priority of the container, the names of the children OBs and if applicable their relative
time delays or group contributions. Additional OBs can easily be added to a container, by
adding their names to the list. Also the relative group contributions and time delays can be
easily edited.
• ASCII files in the format of exported OBs are easy to generate by external applications without
the need to use P2PP. These ASCII files can then be imported from P2PP and thus transformed
into actual OBs.
Consider for example a survey program in which 200 stars from a catalog that lists their
coordinates and magnitudes need to be observed under a single instrument configuration, with
exposure times varying according to the magnitude. Preparing the OBs for each individual star
using P2PP, typing by hand its coordinates and needed exposure time, would be an extremely
time-consuming and error-prone task. The Impex mechanism allows you to greatly simplify
this process by following these steps:
– Using P2PP, create one sample OB for one of the targets with the desired Acquisition
Template, Observation Description and, if applicable (Service Mode), Constraint Set.
P2PP version 3 User Manual
Doc. No. VLT-MAN-ESO-19200-5167
39
Figure 18: The Export window.
– Export the OB as described in Section 5.13.1. This will produce a sample OB whose
content will be very similar to that of all the other OBs needed for the program, in which
only the file name, target name, coordinates, and exposure time will have to be changed.
– Write a program or script that reads the catalog of target names, positions and magnitudes;
calculates the exposure time based on the magnitude; determines the name of the output
file based e.g. on the target name (followed by the .obx extension); and produces this
output file with the same format as the sample file that was produced in the previous step,
replacing the target name, coordinates, and exposure time by the desired values.
– Again using P2PP, Import the files created in this way. This will turn them into actual
OBs, which can then be submitted to ESO in the case of a Service Mode program (see
Section 6.1) and will be automatically saved in your Local Cache in binary format as any
other OB created from inside P2PP.
5.13.1
Producing exported OBs and containers and importing them
The Import/Export mechanism is accessible from the P2PP main GUI under the File menu. To
export an OB or a container with all its belonging OBs to ASCII format, you should follow these
steps:
• Select in the Summaries area the OB that you wish to export. It is possible to select multiple
OBs at once (see Appendix A). If you select the container, then all its children OBs will be
exported together with it.
• Under the File menu, select Export. A window like the one shown in Fig. 18 will appear.
40
P2PP version 3 User Manual
Doc. No. VLT-MAN-ESO-19200-5167
Figure 19: The Import window.
• Select the directory where you wish to store the exported OB.
• Click the Select button. This will produce and save the exported OBs and container ASCII
files in the desired directory.
The subdirectory where exported OBs are saved must exist before the Select button is clicked.
Otherwise, it must be created using the Create New Folder button on the top of the Export window.
The steps to follow in order to Import OBs are similar:
• First, make sure that the folder selected in the P2PP main GUI is the one corresponding to
the observing run in which you wish to import the OBs. It is also possible to import individual
OBs to scheduling containers, by selecting the scheduling container name in the run folder.
• Under the File menu, select Import. A window like the one shown in Fig. 19 will appear.
• Using the pull-down directory menu, and the folders icon next to it navigate to where the ASCII
files to be imported can be found. The list of OBs in .obx format existing in that directory
will be displayed in the Files area.
• Highlight the .obx files that you wish to import.
• Once the selection is complete, click the Open button.
To Import scheduling container together with all its children OBs proceed in a similar way:
• First, make sure that the folder selected in the P2PP main GUI is the one corresponding to the
observing run in which you wish to import the scheduling container and its OBs. Scheduling
containers can only be imported at the run level.
• Under the File menu, select Import. A window like the one shown in Fig. 19 will appear.
• Using the pull-down directory menu, and the folders icon next to it navigate to where the
ASCII files to be imported can be found. The list of OBs in .obx format and the containers
in either .con or .grp or .tlk format, depending on the scheduling container type, existing in
that directory will be displayed in the Files area.
• Highlight the container files (.con and/or .grp and/or .tlk) that you wish to import.
P2PP version 3 User Manual
Doc. No. VLT-MAN-ESO-19200-5167
41
• Once the selection is complete, click the Open button.
If the files to be imported have not been created with P2PP, please be careful not to include special
characters like [ or ] in their names, since they would cause a failure at the time of importing the
files. Such characters cannot be entered when naming an OB from P2PP, but it is possible to do it
when creating .obx files from scratch.
5.13.2
Import/Export and attached files (finding charts, ephemeris, and configuration
files)
If the OBs to be exported contain attached files such as configuration parameters files, finding charts,
or ephemeris, these files will also be automatically saved to the selected export directory. Similarly,
at the time of importing an OB its attached files will be automatically imported as well. P2PP will
search for the files originally attached to imported OB in the same import/export directory where the
.obx file resides. In case that the files cannot be found there, P2PP will display a warning message
and will import the OB alone.
The P2PP import/export mechanism allows passing OBs from one run to another, since the runspecific information is removed at the time of exporting OBs. If the import/export mechanism is
used within the same run, there is no conflict when finding charts are imported. However, when
exporting and importing OBs from one run to another, users should be cautious as the run-specific
information in the finding chart (in particular, the label with the observing run ID that must be
included in each finding chart) will lead to inconsistencies.
5.14
OB verification
Once you have completed your OBs, P2PP offers you two options to verify their contents and ensure
that they will be executable at the telescope.
• The first and most basic level of verification is run automatically as you build up your OB. If
a science OB does not contain its mandatory acquisition template, or if any parameter in a
template of a science or calibration OB contains a non-permitted value (such as no filter selected
or a parameter value outside the permitted range), the OB will appear in the Summaries area
with a red dot next to it indicating that the OB cannot be considered as complete. If the
reason for the failure to verify is a non-permitted template value, viewing the contents of the
OB will display such problematic values in red.
• A higher level of verification is offered by the External Verification Modules (EVMs). The
main purpose of the EVMs is to perform a number of consistency checks across the templates
in an OB, as well as to ensure the compliance of Service Mode OBs with a rather extensive set
of rules that Service Mode users need to follow so that their runs can be scheduled. An example
of the first category of external verification is the check that the slit width in the acquisition
template of a long-slit OB is the same as in the ensuing science templates. An example of
the second category is the check that the duration of the OB does not exceed a certain limit
imposed by the needs of flexible scheduling. The EVMs can also be used to verify the contents
of OBs prepared for Visitor Mode observations.
The EVMs are instrument dependent, as different instruments have different sets of verification
rules.
Users can perform the verification anytime during the preparation of their OBs. To do it,
simply highlight the OB or group of OBs, or scheduling container to be verified, and select the
42
P2PP version 3 User Manual
Doc. No. VLT-MAN-ESO-19200-5167
Verify option under the Reports menu in the P2PP main GUI or click on the Verify icon. A
verification report will then appear in a pop-up window. In addition to information messages
on the checks performed on the OBs, the Verification report also issues error and warning
messages mainly related to Service Mode policies (Section 7). Error messages will prevent OBs
from reaching the ESO Database unless a P2PP Waiver has been submitted and approved
(see Section 6.1), while warning messages are intended to call your attention on rather unusual
setups to confirm that they are really wanted. However, some of them are also relevant for
the preparation of Visitor Mode OBs. Both Visitor Mode and Service Mode users are thus
encouraged to make use of this facility.
The external verification is automatically executed also when Service Mode OBs are submitted
to the ESO Database (see Section 6.1). If a verification error is encountered at the time of
submission, a pop-up window will appear asking the user to review carefully the report. Some
error conditions may be approved by means of a waiver (see the P2PP Web pages for a detailed
description of the Phase 2 Waiver Request procedures). If the reported error is waiverable and
if the waiver request was approved by ESO, clicking on yes in the pop-up window will proceed
with the check-in. However, if the waiver was not approved by ESO, or if the encountered error
cannot be waived the OB will not be accepted by the ESO Database and an error report will
be sent back to the user explaining the cause of the error, requesting a revision of the OBs.
Since this verification is performed at the time that the OB reaches ESO, the error report can
take several seconds before being received, or even minutes if a large set of OBs is submitted.
This can become very inconvenient if large sets of OBs are sent to the ESO database. For this
reason, Service Mode users are strongly encouraged to perform the Verification of their OBs
locally before submitting them to ESO using the Verify button or Verify Report1 .
5.15
The README file facility
An important part of the Phase 2 package is the ability of the user to provide the observatory with
a variety of ancillary information regarding execution conditions of the observations, indications on
special observations such as pre-imaging or Target-of-Opportunity runs, etc.
This information is provided through the README file facility, prepared and submitted from within
P2PP.
5.15.1
Preparing the README information
The README file preparation facility is accessible via the Readme icon in the icon bar of the P2PP
main GUI (see Figure 9), or through the View/Edit Readme option under the Readme menu in the
menu bar of the same window. This opens the README Edit window, whose layout is shown in
Figure 20.
The structure of the README file is fairly simple. A header, non-editable section contains generic
information on the run (its ID, the assigned instrument, the priority class A, B or C, the approved
time, the proposal type – normal, GTO, DDT, Large... –, and the name of the PI). Below there
are two main tabs. Readme tab contains first the Principal Investigator Email Address, which
must be given to ensure that the most recent contact information on the PI is available to ESO. Only
the address of the Principal Investigator must be entered, even in the case that the person preparing
the Phase 2 package is not the PI.
1
Note about approved waivers: when running the verification of OBs locally from P2PP Verify Report or using
Verify icon in the P2PP main GUI, the EVM does not connect to the server at ESO where the information about the
approved waivers is stored. Therefore even when a particular waiver has been granted, the script will still return the
error.
P2PP version 3 User Manual
Doc. No. VLT-MAN-ESO-19200-5167
43
Figure 20: The README Edit window.
The entry Estimated Total Execution Time must be manually filled with the output of the execution time report (see Section 5.9). The purpose of requiring a manual input, rather than automatically
populating this field, is to ensure that the user has verified the total amount of time required for the
execution of the OBs and its correspondence with the allocated time.
Below the Estimated Total Execution Time is a number of fields to be filled by the user providing
details on several aspects of the run. To maintain the appearance of the window compact, each of
these fields is accessible by clicking on its corresponding tag. The content that must be entered in
each of these fields is described in the README section of the Service Mode guidelines:
http://www.eso.org/sci/observing/phase2/SMGuidelines/ReadmeFile.html
Note that some of these fields are optional and must be filled only when relevant to the run, while
mandatory fields have a small red triangle next to them. For example, the fields General Description,
Critical Observing Conditions Constraints, and Time-Critical Aspects are mandatory, to ensure that
the proper information is not missing. In case that the question does not apply (for instance, if there
are no time-critical aspects associated with the run) this must be explicitly indicated.
The second tab is a checklist. It contains a number of questions that are used to remind the users
about some aspects that must be taken into account when preparing a Phase 2 package for the
assigned instrument. This part is instrument-dependent. All questions must be answered with either
yes or N/A (not applicable) for the Phase 2 package to be acceptable.
44
P2PP version 3 User Manual
6
Making OBs reach the Observatory
Doc. No. VLT-MAN-ESO-19200-5167
After reading the previous Chapters, the appropriate instruments’ User Manuals, and the documents
on observing run execution policies, you should be able to prepare the complete set of OBs and, in
Service Mode, the README file that will compose your observing run. The OBs (and eventually
also the finding charts, ephemeris files, and README file) are now stored in your Local Cache, this
is, they reside on your own machine. In this Chapter we describe what you should do to make this
material reach ESO so that the observations can be finally executed at the telescope. In addition, we
provide some insight on what happens to your OBs in the case of Service Mode observing after you
have submitted them. We also describe Service Mode procedures to resubmit OBs and README files
in case that problems requiring modification are discovered during the review of Phase 2 submission,
or at execution time.
6.1
Submitting your Phase 2 package (OBs and README file) in Service Mode
If your observing time has been allocated in Service Mode, your OBs and README file must be
submitted to the ESO Database. This is done directly from P2PP, once you consider your OBs
(including scheduling containers) and README file to be in their final form, and after running the
Verify process (see Section 5.14) to ensure that they are correctly defined and compliant with Service
Mode rules.
It is very important to remember that the submission of your Phase 2 package must always be finished
by communicating it to ESO by means of the p2pp-submit button (whistle icon; see Section 6.2).
This applies both in case that you are submitting for the first time Phase 2 material for a given run,
and in case that you are submitting additional or modified OBs.
6.1.1
Submitting OBs and scheduling containers to the ESO Database
• To submit the individual OBs to the ESO Database, highlight them and select the Check-in
option under the File menu in the P2PP main GUI.
• To submit the scheduling containers and all the OBs belonging to them to the ESO Database,
highlight the container and select the Check-in option under the File menu in the P2PP main
GUI. It is not possible to submit only a subset of OBs belonging to a scheduling
container. All OBs belonging to a scheduling container must be submitted at the
same time through submission of their parent container.
This will send all the selected OBs, as well as OBs belonging to the selected container through the
network to the P2PP Application Server at the ESO Headquarters in Germany. Please be sure when
preparing your OBs that any exceptions required to service mode procedures have been submitted
and approved as a Phase 2 Waiver Request. The Waiver Request process is described in detail in
the Service Mode Guidelines Web page:
http://www.eso.org/sci/observing/phase2/SMGuidelines/WaiverChanges.html
Please be careful if you used different subfolders to define your OBs (see Section 5.3). If you select
the parent folder in the Folders area, only the OBs and/or container OBs directly under the main
folder will be checked in. To submit the OBs under the subfolders, you must highlight OBs and/or
containers in each subfolder and check them in.
At the time of submitting OBs, any finding charts and ephemeris files attached to them are automatically submitted to the ESO Database.
P2PP version 3 User Manual
Doc. No. VLT-MAN-ESO-19200-5167
45
Upon arriving at the Application Server, and if the EVM for the instrument used is available (see
Section 5.14), the submitted OBs will be verified and stored in the ESO Database if no errors are
identified in them. If the OBs produce verification errors, they will be rejected and you will receive
a report indicating the causes of errors that need to be corrected before resubmitting them. As
stressed in Section 5.14, it is important that you run the verification procedure in your local P2PP
installation before checking in your OBs. This ensures that your OBs do not contain errors that
would prevent their entry in the ESO Database and can save much time, as the error report of the
verification performed by the P2PP Application Server can take from several seconds to minutes to
reach back to the user, depending on the load of the Application Server, the number of OBs to be
verified, and the network traffic. Most critical times are those approaching the Phase 2 deadline.
Users of P2PP 3.2 have submitted up to 3500 OBs within few hundreds of containers, but the users
submitting such huge numbers of OBs must count with response times for the verification report to
run that can be longer than a few minutes. Given that all OBs belonging to a container must be
submitted at the same time, submitting containers with more that 500 OBs may not be possible.
6.1.2
Submitting the README file to the ESO Database
The README file is submitted to the ESO Database in a separate step. Please note that using
the Check-in option under the File menu in the P2PP main GUI only submits the highlighted
OBs and OBs belonging to highlighted containers, but not the README file nor any non-highlighted
OBs/containers!
To submit the README file, simply use the Check-In Readme option under the Readme menu. This
will send the README file of the currently active run (the run highlighted in the folders area of the
P2PP main GUI) through the network to the ESO Database in a way analogous to the one described
in the previous Section for the OBs. Also, the content of the README file will be automatically
verified once it reaches the P2PP application server in Garching.
6.2
Notifying ESO of the submission of the Phase 2 package: p2pp-submit
The submission of the Phase 2 package is not completed until you have sent the corresponding notification to ESO. The way to send this notification is also embedded in P2PP with the p2pp-submit
icon (whistle) in the icon bar of the P2PP main GUI.
When you have completed the submission of the OBs and README file to the ESO Database, you
must click the p2pp-submit icon. This action will produce an automated report listing the material
found in the ESO Database for that run. This report is sent by email to the PI of the run at the
address listed in his/her User Portal account. In addition, p2pp-submit triggers the sending of a note
to the support astronomer in charge of reviewing the Phase 2 material for your run, thus starting the
process of your Phase 2 package that should eventually lead to the certification of your observations
as approved for execution. If you have prepared and submitted OBs for several different runs, the
p2pp-submit icon should be pressed once for each run, as different runs may be supported by different
support astronomers.
6.3
Certification of the Phase 2 package by ESO
When your OBs have entered the ESO Database, their status is automatically changed to Defined
(see Section 6.3.2 for a detailed description of the OB status) and a lock symbol appears next to
them in the Folders and Summaries grid of the main P2PP GUI. In addition, a unique identification
number (the ESO OB ID) is assigned to the OB upon entering the ESO Database.
46
P2PP version 3 User Manual
Doc. No. VLT-MAN-ESO-19200-5167
Figure 21: The Database Browser window.
After you notify ESO about your Phase 2 submission via p2pp-submit button (Section 6.2), a support
astronomer (at the ESO User Support Department) starts the task of reviewing your Phase 2 package.
The Phase 2 review process aims at ensuring that the Phase 2 package can be used as it is by the
astronomers carrying out the Service Mode observations. It pays attention to many aspects beyond
those that can be automatically checked by the P2PP verification facilities, such as the adequacy of
the intended strategy to the scientific goals of the programme. Normally, you will be contacted by
your support astronomer in case that any problems are identified during the review process or that
any suggestions to improve the efficiency of your programme can be made. This can take up to a
few weeks, given the number of runs normally handled.
Once your Phase 2 package is certified as executable, your OBs and README file change their status
to ’accepted’ (see Sect. 6.3.2) and are ready to be included in the Service Mode queues for scheduling
at the telescope, and the auxiliary material is made available to the Observatory.
6.3.1
Checking OBs and containers out of the ESO Database: the Database Browser
Your OBs continue to exist in your Local Cache after you have submitted them to ESO, but they are
locked and cannot be modified or submitted again to the ESO Database. Likewise, once the support
astronomer has started the review of your Phase 2 package, you will not be able to remove OBs from
the ESO Database.
It is possible however that during the certification process the support astronomer requests or suggests
modifications to be implemented in your OBs, or that later on problems are identified when trying
to execute the OBs that can only be solved by modifying them. This requires you to retrieve them
(check-out) from the ESO Database, make any changes needed, and submit them again (check-in).
The simplest way to retrieve submitted OBs is by selecting them in your P2PP main GUI window
(these are OBs with light gray colour and small lock symbol next to them), and then choosing
Check-out option from the File menu in the P2PP main GUI.
P2PP version 3 User Manual
Doc. No. VLT-MAN-ESO-19200-5167
47
Alternatively, for cases when the Local Cash is corrupted, or for some other reason the submitted
OBs are not visible in the main P2PP window, it is possible to retrieve the submitted OBs from
the ESO Database by first displaying the contents of the ESO Database. This is done by means
of the Database Browser (DBB), a useful browsing utility that allows you to display a variety
of information on the OBs that you have submitted to the ESO Database under your ESO-internal
account ID.
The DBB is started by selecting the View ESO Database ... option under the File menu in the
P2PP main GUI. This action will display a window similar to the one shown in Figure 21.
The DBB contains three main areas:
• The Selected Columns area allows the user to select the information to be displayed for each
OB by clicking on the corresponding checkbox. Most of the items are self-explanatory.
• The Selection Criteria area allows the user to filter out the OBs to be displayed according to a
large number of criteria, such as the program to which they belong, their status (Section 6.3.2),
or their contents. When a value is entered in a box, or selected in a drop-down menu, it
becomes a selection criterion for the subsequent database search. Please note that the dropdown menus allow for the simultaneous selection of several options. Again, the entries are
mostly self-explanatory.
• The display area presents a grid with the results of the database query showing the selected
columns for the OBs fulfilling the selection criteria specified. Clicking on the box with the title
of one particular criterion selects it for sorting in descending order, placing a downwards arrow
in the box; clicking twice selects it for sorting in ascending order.
In addition, there is an upper bar with the File menu, which offers two choices: a check-out and
exit (closing down the DBB).
After selecting the columns with the information that you wish to display and defining the selection
criteria if needed, press the Query button in the lower left corner to search the ESO Database and
display the result of the search.
If you need to Check Out OBs, first of all they need to have a status (Section 6.3.2) that allows this
operation. The OB status can be changed only by the support astronomer, who will communicate
to you when the appropriate status has been set.
The steps that need to be followed to check out an OB or a group of them are:
• Select in the DBB the OBs that you wish to check out.
• Under the File menu in the DBB, select the Check-out option.
This will remove the selected OBs from the ESO Database and will place them in your Local Cache.
If the checked-out OB already existed in your Local Cache (as will normally be the case if you are
using for check out the same P2PP installation that you used for producing the OBs), it will be
overwritten. Note that the lock symbol in front of the OB entry disappears and the OB is again
shown in black once the OB has been successfully checked out.
Selecting in DBB an OB that belongs to a container will check-out all OBs from that container.
However, only those OBs that have not yet been executed, and that have editable status (”D”, or
”-”, see Sect. 6.3.2) will be actually checked-out and the lock symbol next to them will disappear in
your main P2PP window. The other OBs (e.g. successfully executed, and accepted OBs with status
”C”, or ”+”) belonging to the scheduling container will still have the lock symbol. These OBs cannot
be edited.
48
P2PP version 3 User Manual
Doc. No. VLT-MAN-ESO-19200-5167
To check-in the revised OBs belonging to a container back to the Database, please select the container
in your P2PP main GUI window and then Check-In option from the File menu.
Please note that, as mentioned above, OBs that have editable status (i.e. status ”D”, or ”-”, see
Sect. 6.3.2) are removed from the ESO Database at the time of checking them out. In case of accidental
deletion of a checked-out OB from your Local Cache, the OB is thus lost.
6.3.2
OB status
The OB status is a flag assigned to each OB that describes the stage of its lifetime in which it is.
There are a variety of OB status flags, only a subset of which are of interest to the general user:
• Status ’P’ (partially defined): this is the initial OB status that is assigned to the OB, and is
maintained as long as it is not submitted to the ESO Database.
• Status ’D’ (defined): an OB is considered to be fully defined, and its status changes automatically to D, as soon as it reaches the ESO Database. In the ESO Database an OB keeps the
status D until a support astronomer starts reviewing it. OBs with status D can still be checked
out and then edited by the user who submitted them.
• Status ’+’ (accepted): the support astronomer changes that status to ’+’ once the OB has
been reviewed and certified as valid. OBs marked as ’+’ cannot be checked out for editing and
revision.
• Status ’-’ (rejected): the support astronomer sets the status to ’-’ when an OB presents any
problems preventing their certification. OBs with status ’-’ need to be checked out by the user
for modifications or repair. If OB with status ’-’ belongs to a scheduling container, the whole
scheduling container must be checked-out; however, only those OBs within the container with
’D’ or ’-’ status can be edited.
• Status ’C’ (Completed): the OB status is set to C when the OB has been completed within
specifications and thus will not be repeated. OBs with status C cannot be checked out.
• Status ’M’ (Must be repeated): this status is set when the OB has been executed but outside
the specified constraints. This OB will be re-inserted in the Service Mode queue to be executed
at a later time. OBs with status M cannot be checked out.
• Status ’A’ (Aborted): this status is set when an OB is aborted during execution. This OB
will be re-inserted in the Service Mode queue to be executed at a later time. OBs with status
A cannot be checked out.
• Status ’F’ (Failed): this status is set when an OB containing absolute time widow(s) or being
part of a time-linked container, and having acquired the absolute time window due to execution
of the previous OB, expires; i.e. when its absolute time window(s) is(are) in the past. OBs
with status F cannot be checked out, and this status is irreversible.
• Status ’T’ (Terminated): this status is set by the support astronomer for the OBs that belong
to runs that have been Terminated at the end of the observing period because the run is not
eligible for carryover status. OBs with status T cannot be checked out, and this status is
irreversible.
Through the OB status, the DBB thus gives you a way to check the progress of your observing
run. Nevertheless, you will usually find more useful to check the Run Status Web pages through
the Run-Related Tasks on the User Portal in order to obtain the same information. Those pages
contain useful links to the ambient conditions data and other ancillary information unavailable from
the DBB.
P2PP version 3 User Manual
6.3.3
Doc. No. VLT-MAN-ESO-19200-5167
49
Resubmitting OBs with modified finding charts or ephemeris files
When an OB that needs modification is checked out of the ESO Database its entire content is checked
out, including the finding charts and ephemeris file that it may contain. Finding charts and ephemeris
files are components of the OB and cannot be checked out and resubmitted separately. If a finding
chart or an ephemeris file common to several OBs needs to be modified, then all the affected OBs
need to be checked out, the conflicting finding chart or ephemeris file must be detached, a correct
finding chart or ephemeris file must be attached to all the affected OBs, and these OBs need to be
checked in again.
The submission of finding charts and ephemeris files takes place simultaneously with the OBs in a
manner that is transparent to the user, as noted in Section 6.1. This is also the case when an OB needs
to be resubmitted after a modification that does not affect its attached finding charts or ephemeris
file. However, if the finding chart or ephemeris file itself needs modification, two simple rules need
to be taken into account in order to keep the integrity and consistency of the ESO Database, so that
there is a one-to-one correspondence between finding chart or ephemeris file names and contents:
• It is not possible for a given run to have in the ESO Database two or more finding
charts or ephemeris files with the same name but different contents. If you try to
attach two finding charts or ephemeris files with the same name but different contents to two
OBs, the second one will be rejected at check-in time for this reason.
A more common case is the resubmission of an OB with a finding chart that has been modified,
but whose name has been kept unchanged. If this finding chart was not used by any other OB
that has been left in the ESO Database, this operation causes no conflict and is thus permitted.
However, if there are already in the Database OBs for the same run that use a finding chart
with the same name but different contents (for example, an older version of the finding chart),
the check-in attempt will fail and a corresponding message will be sent to the user. In such
cases the modified finding chart must be given a new name so that the OB can be checked in.
The exact same rule applies to ephemeris files, which must thus be renamed if a copy with the
same name but different contents exists already in the ESO Database.
• Conversely, it is not possible for a given run to have in the ESO Database two or
more finding charts or ephemeris files with the same contents but different names.
If you rename a finding chart that is attached to an OB already existing in the ESO Database
without changing the content of the finding chart, check-in will not be permitted for this reason.
If you do want to resubmit an OB with a finding chart that has identical content as another
finding chart already existing in the ESO Database, please rename it so that the name is also
identical. Also in this case, the same rule applies to ephemeris files.
Please remember to press the button p2pp-submit after having successfully submitted all your modified
OBs.
6.3.4
Checking out the README file
It is possible that during the review process of the Phase 2 package items are found in the README
file that require modification by the user. Examples of this may be incomplete or ambiguous information on the execution of the run, or requests for actions unsupported in Service Mode. If such
modifications are needed you will be contacted by your support astronomer and you will need to
modify the README file accordingly.
In order to be able to modify the README file, you must first check it out of the ESO Database.
This is done by means of the Check-Out Readme option under the Readme menu in the P2PP main
50
P2PP version 3 User Manual
Doc. No. VLT-MAN-ESO-19200-5167
GUI. Once the desired modifications are completed, you must check in the README file again as
indicated in Section 6.1.2 and click on p2pp-submit as indicated in Section 6.2.
It may be interesting to note a difference between the check out process of OBs and README files
regarding the contents of the ESO Database. As noted in Section 6.3.1, when an OB is checked out
its content is effectively removed from the ESO Database. This is not the case for the README
file: in some instances, the modifications required are sufficiently minor so that the run can continue
to be executed, or may affect only a subset of the submitted OBs while the remaining ones stay
executable. In those cases the previous version of the README file must be still available at the
Observatory while the required modifications are being made. For this reason, when the README
file is checked out of the ESO Database a copy of it is kept there, and it is replaced only when the
modified README file is checked in and accepted by the support astronomer.
P2PP version 3 User Manual
7
Doc. No. VLT-MAN-ESO-19200-5167
51
Important notes on the preparation of Service Mode observations
To make Service Mode observing efficient and reliable, ESO has set up a number of policies that
affect the planning of the observing strategy, the composition of the material to be prepared by users
at Phase 2, and particular aspects of OB preparation, both general and instrument-related. Giving
a complete description of these policies is beyond the scope of this manual. All Service Mode users
are thus referred to the documents on Service Mode observing that can be found in the Web pages
of the User Support Department:
http://www.eso.org/sci/observing/phase2/SMPhilosophy.html
as well to the article Service Mode Scheduling: a Primer for Users, by D. Silva, in The Messenger,
105, 18 (2001). Here we give only a quick review of important general aspects to keep in mind while
preparing OBs for your Service Mode runs.
7.1
OBs are executed only once
If your program requires an observation (either of a science or of a calibration target) to be executed
multiple times, you must provide as many individual OBs as executions are needed. It is not possible
to provide only one OB, and specify that it should be executed multiple times. OBs are repeated
only if the first execution produced results outside specifications.
The only exception to this rule are ToO and RRM observations. Users planning such observations
should consult policies for ToO and RRM on:
http://www.eso.org/sci/observing/phase2/SMSpecial/TOOObservation.html
and
http://www.eso.org/sci/observing/phase2/SMSpecial/RRMObservation.html.
In the case of OBs for the observation of calibration targets, if possible please use Concatenation
containers to link them to the science OBs. If this is not possible (e.g. because the science OBs are
already part of a time-linked container), then please use the User Comments field in the View OB
GUI to indicate the science OB(s) for which such calibrations are intended.
7.2
Calibration Plans and additional calibration observations
In order to ensure a baseline accuracy of the data obtained, ESO has implemented Calibration Plans
for each of its instruments. The Calibration Plan, which is described in detail in the User Manual
of each instrument, specifies a number of observations that the Observatory executes in both dayand nighttime, aiming at providing the necessary data to calibrate to a certain level of accuracy all
the scientific observations obtained. The calibration plan is implemented in both Visitor and Service
Mode.
It is very important at the time of planning an observing program, as well as when preparing the
Phase 2 material, to check in the User Manual of the corresponding instrument the details of the
Calibration Plan. In Service Mode, the execution of the Calibration Plan is not charged to the time
allocated to your observing run. Therefore, if you consider that the data obtained as a part of the
Calibration Plan will be sufficient for the scientific purposes of your run you do not need to produce
any additional OBs for calibration and you do not need to account for the time to be devoted to
such calibrations when preparing your proposal.
If you plan to use instrument setups that need to be calibrated but are not supported by the Calibration Plan (such as for instance observations in narrow-band filters with WFI), you need to provide
52
P2PP version 3 User Manual
Doc. No. VLT-MAN-ESO-19200-5167
your own OBs for calibration purposes. In this case, the execution of these OBs becomes a part of
the time allocated to your run and you need to include it in the overall execution time calculation.
7.3
Execution overheads are part of the allocated time
At the time of writing your proposal and of preparing your OBs, you must take into account that the
time allocated to your run is total execution time, this is, integration time plus execution overheads,
and not only integration time.
The computation of the overheads is based on predetermined values that have been measured by the
Observatory, or on average values when the overhead is variable such as in the case of a telescope
preset. The execution overheads that must be considered in the time accounting are thus the estimated
times based on these predetermined values, rather than the actual overheads that may be known
precisely only after the execution of the observations.
Execution overheads due to different actions (telescope preset, slit centering, instrument setup, detector readout, etc.) are described in detail in the User Manual of each instrument. Moreover, they can
be readily computed by P2PP using the Execution Time Report facility (see Section 5.9), which takes
into account the overhead values as published by the Observatory, and thus the official accounting
of execution time as carried out by ESO.
7.4
Independent execution of each OB
One of the key points of the efficiency of Service Mode observing is the ability to select at short notice
the OBs that best exploit the prevailing external conditions while taking into account the relative
priorities of the programs in the Service Mode queue. For this reason, there are only some limited
possibilities to request linked execution of OBs. These are implemented with the new scheduling
containers. For the use of scheduling containers please refer to Section 2.4.
As a consequence of this, users are not allowed to discount overheads by assuming that their OBs
will be executed in a given order or consecutively. At the time of planning the strategy of your
Service Mode run, you must assume that each OB will be executed separately from the rest, and
you must account for the execution overheads accordingly. Concatenation of OBs is accepted within
the Concatenation scheduling container, only if justified on sound scientific grounds and requested
in phase 1 proposal.
7.5
OB duration limited to one hour
Like in the case of linked OBs, OBs that take a long time to execute decrease the flexibility of Service
Mode observing. Moreover, the longer the OB, the higher the likelihood that the external conditions
degrade outside the specified constraints during the execution. Therefore, in order to preserve the
efficiency the observatory does not allow the submission of OBs with durations exceeding one hour of
execution time. In case that the scientific case of your Service Mode run justifies it, you may submit
a waiver request
(see http://www.eso.org/sci/observing/phase2/SMGuidelines/WaiverChanges.html)
to allow longer execution times. When such requests are approved, the observatory guarantees the
fulfillment of the user-specified constraint set (see Sections 5.4.4 and 7.7) only for the first hour of
execution, and the OB is considered as executed within specifications even if the conditions degraded
afterward.
The same rule as for the individual OBs is valid for the concatenated OBs: the total execution time
for all the OBs belonging to the Concatenation must be within 1 hour. In case that the scientific
P2PP version 3 User Manual
Doc. No. VLT-MAN-ESO-19200-5167
53
case of your Service Mode run justifies it, you may submit a waiver request to allow longer execution
times for the Concatenation of OBs. When such requests are approved, the observatory guarantees
the fulfillment of the user-specified constraint set (see Sections 5.4.4 and 7.7) only for the first hour of
execution, and the Concatenation is considered as executed within specifications even if the conditions
degraded afterward.
7.6
Need to maintain OBs simple
An additional advantage of Service Mode observing is the possibility to increase the observing efficiency by minimizing the number of changes in instrumental setup and the number of required calibrations by executing OBs having similar setup and calibration requirements on a given night. For this
reason, users are strongly advised to use only one instrument setup within a given OB whenever possible. The submission of OBs involving multiple instrument setups must be requested in advance using a
waiver request (see http://www.eso.org/sci/observing/phase2/SMGuidelines/WaiverChanges.html)
and may be denied by ESO in case that it involves an excessive load on the execution of the calibration
plan.
7.7
The Constraint Set and its consistency with Phase 1 information
As explained in Section 5.4.4, users can specify the limits on the conditions under which a given OB
can be executed. These specifications are then checked against the prevailing external conditions at
the time of deciding whether or not a given observation should be started. ESO will try to execute
the OBs under conditions that are those specified in the Constraint Set or better.
The Constraint Set is in general instrument-specific. However, the following items are common to
all the instruments:
• Sky transparency, for which four different situations can be specified:
– Photometric: No visible clouds, transparency variations under 2%.
– Clear: Less than 10% of the sky above 2 airmasses covered by clouds, transparency variations less than 10%.
– Variable, thin cirrus: transparency variations between 10 % and ∼20%.
– variable, thick cirrus: large transparency variations possible, essentially equivalent to no
constraint on the transparency conditions.
• Seeing: Whenever possible, the seeing is defined as the FWHM size in arcseconds of a point
source in the focal plane of the instrument. When this measurement is not possible, the FWHM
measured in the telescope’s guide probe or the measurement provided by the Astronomical
Seeing Monitor are used instead.
• Lunar illumination, expressed as the fraction of the visible lunar disk illuminated by the
Sun.
• Moon angular distance, i.e., the angle between the center of the lunar disk and the target
of the observation.
• The Airmass, i.e., the column density of the atmosphere in the direction to the source expressed as a multiple of the column density towards the zenith, is common to most instruments
except for MIDI. In this latter case it is superseded by the local sidereal time interval of the
observations.
54
P2PP version 3 User Manual
Doc. No. VLT-MAN-ESO-19200-5167
Other constraints are instrument-specific:
• The Twilight, i.e. the time in minutes with respect to the end of the astronomical twilight
(solar elevation of −18 degrees) when the observation can start. The default value is 0, negative number means that the observation can be done that many minutes before the end of
astronomical twilight, and the positive number means that the OB should be started only that
many minutes after the beginning of the night. Requesting large positive value for twilight
constraint may result in reduced amount of time available for observations of some targets,
and therefore this constraint should be used as positive value only when justified by scientific
requirements.
• The Strehl ratio, currently for NACO, SINFONI and CRIRES observations, as measured
in a reference filter on the target used for Adaptive Optics correction (see instrument-specific
documentation for more information). In these cases the Strehl ratio replaces the seeing as a
measurement of the data quality.
• The ATM or Atmospheric Turbulence Model, is used by AO instruments NACO, SINFONI
and CRIRES in order to specify the atmospheric model for the Adaptive Optics observation.
For the moment only one AO model is available, the so-called default Paranal model. In the
future this constraint may be changed to allows usage of different atmosphere models. NACO,
SINFONI and CRIRES OBs that do not require AO, should put ”no constraint” for ATM.
• The PWV or precipitable water vapor is used to schedule observations requiring observations in mid-IR where the measurement of PWV is important contributor to the atmospheric
transparency.
• The baseline, for VLTI observations, indicate the combination of Unit Telescopes or Auxiliary Telescopes with which the interferometric observations must be made. Typically several
baselines are offered each period and announced in the Call for Proposals.
Note that some of these constraints were already specified in the original observing proposal. This
is in fact a very important factor that is taken into account when deciding which Service Mode
programmes can have time allocated to them, based on the expected occurrence of any given set of
external conditions at the observatory. For this reason, ESO does not allow users to specify more
stringent constraints at Phase 2 than the ones specified at Phase 1. You can however relax the
constraints with respect to what you specified at Phase 1 in order to increase the range of conditions
under which your run can be executed, and thus improve the chances of execution:
• Transparency constraint:
– If you specified PHO (photometric) at Phase 1, you can specify any value in your OBs.
– If you specified CLR (clear) at Phase 1, you can specify Clear, Variable, thin cirrus, or
Variable, thick cirrus in your OBs.
– If you specified THN (variable, thin cirrus) at Phase 1, you can specify Variable, thin
cirrus or Variable, thick cirrus in your OBs.
• Moon constraint:
– If you specified d (dark) at Phase 1, you must specify Lunar illumination = 0.0 or greater
in your OBs (Lunar illumination = 0.0 is interpreted as ”Moon below the horizon”)
– If you specified g (grey) at Phase 1, you must specify Lunar illumination = 0.4 or greater
and Moon angular distance = 120 or less in your OBs.
P2PP version 3 User Manual
Doc. No. VLT-MAN-ESO-19200-5167
55
– If you specified n (no restriction) at Phase 1, you must specify Lunar illumination = 1.0
and Moon angular distance = 60 or less in your OBs.
• Seeing constraint:
– The Seeing specified in the constraint set of your OBs must be equal to that indicated in
the Phase 1 proposal or larger. If you specified n (no constraint) at Phase 1, you must set
it to 2.0 (the largest value allowed by P2PP) in your OBs. The only exception is NACO,
where n (no constraint) at Phase 1 translates at Phase 2 into 1.4 arcseconds, the largest
value allowed by the NACO Preparation Software.
Note also that a small subset of OBs may request photometric conditions even if clear transparency
was specified at Phase 1, if this is needed for the flux calibration of observations that can be obtained
under non-photometric conditions (for example, a set of identical OBs on the same field, of which
only one suffices to determine the photometric zeropoint). This is allowed as long as the execution
time of the OBs requiring photometric conditions does not exceed 20% of the total time allocated
to the run, and as long as accurate flux calibration is mandatory to reach the scientific goals of the
programme.
7.8
Dealing with Target of Opportunity and Solar System target observations in
Service Mode
Due to their nature, it is not possible in the case of Target of Opportunity (ToO) programmes to
submit in advance complete OBs with target positions specified. In this case, you must still submit
to ESO a set of OBs with the instrument setup fully defined as per normal Phase 2 submission
procedures (see Section 6.1), except for the target coordinates that must be left at the default values.
The actual coordinates and additional information must be communicated directly to the Observatory
when the target becomes known. Further information on ToO procedures can be found at:
http://www.eso.org/sci/observing/phase2/SMSpecial/TOOObservation.html
for Paranal.
Likewise, since it is not possible to predict the exact time when any given OBs will be executed, it is
not possible to introduce in advance in an OB the coordinates of Solar System targets to be observed
in Service Mode. In that case, OBs with the approximate coordinates of the target in the middle of the
observing period must be submitted, together with a file containing the ephemerides of the target over
an appropriate time interval. Further details on how to prepare the Phase 2 material for moving targets are given in http://www.eso.org/sci/observing/phase2/SMSpecial/MovingTargets.html.
56
P2PP version 3 User Manual
A
Doc. No. VLT-MAN-ESO-19200-5167
Highlighting, sorting, and customizing column widths
A.1
Selecting items
Selecting and highlighting items in the various Graphical User Interfaces (GUIs) composing P2PP is
done using standard conventions in mouse-driven events:
• Highlighting or selecting a single item is simply done by placing the cursor on it and clicking
the left button of the mouse.
• Highlighting multiple elements is done by holding down the Ctrl key (or equivalent in your
keyboard) while clicking with the left button of the mouse on each element to be selected. If
you wish to highlight a block of elements, you only need to click on the first one of the block,
and then on the last one while keeping the Shift (or equivalent) key pressed. If you wish to
highlight all the elements, click with the left mouse button on one element and then press Ctrl-a
key to select them all.
• Dragging and dropping elements is done by clicking with the left button of the mouse on the
element of interest and, while keeping the mouse button pressed, moving the cursor to the
desired position. Once that position is reached, the element can be dropped there by just
releasing the mouse button.
A.2
Reshaping columns
In order to display the full contents of a table entry, it is often useful to reshape the width of its
column with respect to its default width. The grid tables of P2PP (in the P2PP main GUI, the
Observation Description View OB window, the Database Browser window) can have their columns
reshaped by placing the cursor on the edge that must be moved, clicking the left button of the mouse,
and dragging the edge until the desired position.
A.3
Reshaping windows
In case you find it convenient to reshape the windows of the P2PP GUIs, this can be done by clicking
on the side or the corner of the window to be reshaped and dragging the cursor to the position in
the screen defining the desired edge of the window.
P2PP version 3 User Manual
B
Doc. No. VLT-MAN-ESO-19200-5167
57
Troubleshooting
In this Section we describe some of the most frequently encountered problems when installing or
using P2PP. If you are encountering a problem that is not described in this Section or elsewhere in
this manual, please contact the ESO User Support Department ([email protected]).
• ESO has sent me the announcement of allocation of time to my programme, but I
cannot see any of its observing run when starting P2PP.
If your Local Cache contains Phase 1 information on other existing runs in which you are PI, no
information on new observing runs is downloaded until you explicitly order P2PP to do so by
means of the Download/Refresh Observing Runs available under the File menu in the P2PP
main GUI. See Section 5.1.
• I am trying to start P2PP using a username and password that ESO gave me some
time ago, but I get a ’login incorrect’ error message.
Starting with P2PP v2.13 the old usernames and passwords that you had used in the past will
no longer work. Rather, you must use your ESO User Portal Password for logging into P2PP.
This username and password can be changed by you at any time (see the corresponding links
after logging into the User Portal on http://www.eso.org/UserPortal). Note that even if you
change the username and password you will still have access to P2PP, with the same cache
etc. as before.
If you have forgotten your ESO User Portal username, password, or both please refer to the
corresponding links on http://www.eso.org/UserPortal. Please note that for security reasons
this information can only be conveyed to the owner of the ESO User Portal account.
• P2PP does not allow me to check out OBs from the ESO Database, although I can
see them in the Database Browser.
As explained in Section 6.3.2, users cannot check out OBs that have been (or are being) reviewed
by ESO unless they are specifically allowed to do so by their support astronomers. In that case,
the support astronomer must change the OB status to one that allows checkout by the user.
58
C
P2PP version 3 User Manual
Acronym List
BOB: Broker of Observation Blocks
COSMO: COnstraint Set MOdule
CS: Constraint Set
DBB: Database Browser
DFS: Data Flow Systems
ETRM: External Time Reporting Modules
EVM: External Verification Module
GUI: Graphical User Interface
JDK: Java Development Kit
JRE: Java Runtime Environment
ID: Identifier
IP: Instrument Package
MOS: Multi-Object Spectrosocopy
OB: Observation Block
OD: Observation Description
OPC: Observing Programmes Committee
P2PP: Phase 2 Proposal Preparation tool
PI: Principal Investigator
SADT: Survey Area Definition Tool
SM: Service Mode
VM: Visitor Mode
Doc. No. VLT-MAN-ESO-19200-5167
P2PP version 3 User Manual
Doc. No. VLT-MAN-ESO-19200-5167
oOo
59