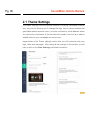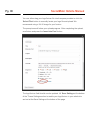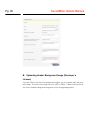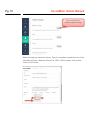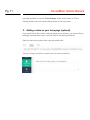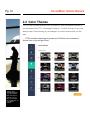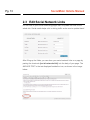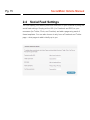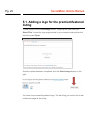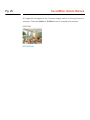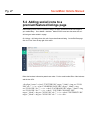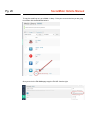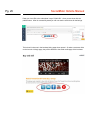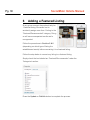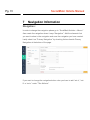
1
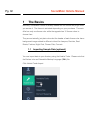
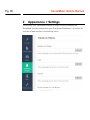
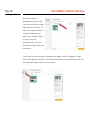
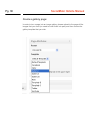
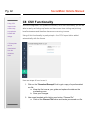
SocialMobi Hotsite Manual FY 2015 User’s step-by-step instructions on how to install and customize the SocialMobi Hotsites directory. SqueezeMobi http://squeezemobi.com/ http://squeezemobi.zendesk.com Table of Contents INTRODUCTION __________________________________________________________ 1 1 The Basics ____________________________________________________________ 2 2 Appearance > Settings __________________________________________________ 5 2.1 Theme Settings ______________________________________________________ 6 2.2 Color Themes ________________________________________________________ 12 2.3 Edit Social Network Links _______________________________________________ 13 2.4 Social Feed Settings __________________________________________________ 15 3 Adding Post Categories _________________________________________________ 16 4 Adding Free Listing ____________________________________________________ 18 5 Adding a Premium Listing _______________________________________________ 21 5.1 Adding a logo for the premium/featured listing ________________________________ 23 5.2 Adding a featured image ______________________________________________ 24 5.3 Adding a video for a premium/featured listing ______________________________ 26 5.4 Adding social icons to a premium/featured listing page_________________________27 6 Adding a Featured Listing _______________________________________________ 30 7 Navigation Information _________________________________________________ 31 8 CSV Functionality _____________________________________________________ 42 9 Domain Mapping________________________________________________________ 46 9.1 Modifying Domain in NameCheap _________________________________________ 47 9.2 Verifying Domains in Google Webmaster Tools (GoDaddy) _______________________ 48 9.3 How to Change A Record in goDaddy _______________________________________ 49 10 Support _____________________________________________________________ 50 11 Conclusion __________________________________________________________ 51 Our Products ____________________________________________________________ 52 SocialMobi Hotsite Manual Pg. 01 The manual contains instructions and visual references to help you in customizing SocialMobi Hotsites. INTRODUCTION Thank you for your continued support. We really appreciate you investing both your time and money by purchasing our products. SocialMobi Hotsites is a Wordpress theme that allows you to have a mobile “listing” website in any niche of your choice. This user manual contains instructions and visual references to help you in customizing your SocialMobi Hotsites. We highly recommend reading this manual thoroughly before starting on customizing your SMH. A restaurant listing might be used as an example in some sections to demonstrate some tasks. If you encounter issues or have any questions, you can contact our support desk at https://squeezemobi.zendesk.com and we will get back to you as soon as we can. SocialMobi Hotsite Manual Pg. 02 1 The Basics Basically, SocialMobi Hotsite is already loaded with the theme and plugin once you access it. The theme is activated depending on your purchase. The main offer has only one theme color while the upgrade has 12 theme colors to choose from. They are not actually just plain colors but the header of each theme color has a background image related to different niches like Lawyers, Dentists, Real Estate, Fashion, Night Club, Fitness Club, Cars etc. 1.1 Importing Sample Data (optional) You can import data to your directory using the Hotsite Tools. Please note that the file has to be an Extensible Markup Language (XML) file. Click Hotsite Tools>Import SocialMobi Hotsite Manual Pg. 03 From the new screen displayed, click Wordpress. Click the Choose File button and select the XML file from your computer then click Upload File and Import. In the next screen you will be prompted to assign posts to an existing user. Select the user from the drop down to assign each author to the user account that you are logged into your wordpress install with. Click each dropdown menu and select your username. SocialMobi Hotsite Manual Pg. 04 Click the box next to Download and Import File attachments. Finally, hit the submit button! Once the xml file is successfully uploaded click Activate. You are now ready to customize your SocialMobi Hotsites into a listing website that will bring you lots of money! SocialMobi Hotsite Manual Pg. 05 2 Appearance > Settings Customizing your SocialMobi Hotsites is easily done by accessing the SocialMobi Hotsites settings from your Wordpress Dashboard. Let us take an overview of each section in the settings menu. SocialMobi Hotsite Manual Pg. 06 2.1 Theme Settings The theme settings have the general options for making SocialMobi Hotsites your very own by allowing you to change the logo, favicon, phone number that gets dialed when the phone icon in your site is clicked on, email address where you receive the information of the business who sends it thru the form, add an embed video for your homepage and many more. Image below is the Theme settings section that you will customize with your logo, video and messages. After doing all the changes in this section you will have to click on the Save Settings just below the section. SocialMobi Hotsite Manual Pg. 07 A. Uploading Hotsite logo. The following images show how to change/upload your own custom logo and favicon. Click on the button to upload hotsite logo Click on the Upload button. This will open up a prompt/lightbox. Pg. 08 SocialMobi Hotsite Manual You can either drag your logo/favicon file into the space provided or click the „Select Files‟ button to manually locate your logo file and upload. We recommend using a 16x16 image for your favicon. The prompt area will show your upload progress. After completing the upload, scroll down and press the „Insert into Post‟ button. The logo/favicon field should now be updated. Hit „Save Settings at the bottom of the Theme Settings section to enable your logo/favicon in your whole site and not at the Save Settings at the bottom of the page. SocialMobi Hotsite Manual Pg. 09 B. Uploading Header Background Image (Developer’s License) If you don‟t like to use the niche background images, you can replace them with your own image. The size of the image has to be 1900 x 1200px. Please note that this is only for the header background image and not for the page background. SocialMobi Hotsite Manual Pg. 10 Click on this button to upload background image Select the image you wanted to upload. Once it‟s completely uploaded the rest of the information will open. Make sure the box for 1900 x 1200 is marked, then click the “Insert to Post” button. Pg. 11 SocialMobi Hotsite Manual Last step would be to click the “Save Settings” button at the bottom of Theme Settings section and not the save settings button at the very bottom. C. Adding a video on your homepage (optional) If you would like to add a video in the homepage of your directory, you can do that by pasting the embed code of your YouTube video to the space provided for. Open the video from youtube then copy the embed code. Then go to settings and paste the embed code on the space provided for. SocialMobi Hotsite Manual Pg. 12 2.2 Color Themes You can also choose different color schemes for your SocialMobi Hotsites (if you purchased the OTO – Developer‟s license + 12 color choices) so you can always keep it fresh-looking or just change it to a color scheme that you like best. - OTO1 includes a developer‟s license and 12 theme color schemes to choose from so go and get it fast! Theme colors available depends on your purchase. Main offer comes with only one (1) theme color while the upgrade has 12 color theme choices SocialMobi Hotsite Manual Pg. 13 2.3 Edit Social Network Links Put the links to your social networking pages here to update the links for the whole site. Social media helps a lot in driving traffic so be sure to update these! After filling up the fields, you can show your social network links on a page by pasting the shortcode [social-networks-link] into the body of your page. The ANCHOR TEXT is the text displayed beside the icon, as shown in the image below. SocialMobi Hotsite Manual Pg. 14 Save/Update/Publish your page and your social network links will display in the page. If you prefer to show only a few links like Facebook and Twitter, or if you do not have accounts in the other sites, simply leave the URL fields empty and the code will not display the links for those sites. SocialMobi Hotsite Manual Pg. 15 2.4 Social Feed Settings You can display your tweets, posts and other stuff in your Hotsites by using the social feed settings. Simply put the URL (for Facebook and RSS) or your username (for Twitter, Flickr, and Youtube) and add a page using each of these templates. You can also choose to only have a Facebook and Twitter page – what pages to add is totally up to you. SocialMobi Hotsite Manual Pg. 16 3 Adding Post Categories Categories help viewers display a more refined list of the business they are looking for. Follow the instructions below to add different categories to your SocialMobi Hotsites. Don‟t get confused here, a Post Category stands for a listing category. Since Wordpress is the platform for SocialMobi Hotsites, it sees the listings as „posts‟ and categories as „post categories‟. The following images show how to add a new category. SocialMobi Hotsite Manual Pg. 17 Put your category name in the „Name‟ field and leave the „Slug‟ field empty; Wordpress automatically writes the appropriate slug name for your category. Choose a parent category if you are adding a subcategory. Subcategories are also shown in the home page along with their parent category. Add a short description on the category to help differentiate it from the other categories. SocialMobi Hotsite Manual Pg. 18 4 Adding Free Listing Free listings are the most basic ones in the directory. Only minimal information about the business is shown. To add a free listing, go to „Add New Listing‟ under „Listings‟. SocialMobi Hotsite Manual Pg. 19 Put the business name in the title field and either add a description for the business into the post body text area or leave it blank. The option of leaving it blank is only for free listings. Below you will find the section marked as Free. Fill this section with the information needed for businesses under free listings. Please take note NOT to include the „http://‟ or „https://‟ part of the website URL. SocialMobi Hotsite Manual Pg. 20 Depending on your screen size and layout options, you will find a section labeled „Categories‟ either below the post body text area or to the right of it. Check the category where the business falls into. Please note, the „Featured/Recommended‟ and „Premium‟ categories are only for paid business listings. You can also use the +Add New Category link in the box to add a new category in which your current listing belongs to. Press the Update or Publish button to complete the process. SocialMobi Hotsite Manual Pg. 21 5 Adding a Premium Listing Premium listings are listings that show more information and images of a business. We recommend you charge for these businesses under Premium listings. Additionally these allow browsers to click through to see a dedicated page for that listing. To add a premium listing, follow the same steps in Section 4 and perform the tasks shown below. The following steps are also the same steps you need to do to convert a free listing into a premium listing. First, check „Premium‟ category. SocialMobi Hotsite Manual Pg. 22 Next, fill up the section labeled „Premium‟ just below the „Free‟. Sample data on a coupon can be found below. Coupon Title: Happy Hour Freebies Coupon Subtitle: Get free hours d'oeuvre with every drink that you order! Coupon Content: 7GH346DDZ Coupon Expired: Dec 25, 2013 SocialMobi Hotsite Manual Pg. 23 5.1 Adding a logo for the premium/featured listing To add a logo, click the Add Image button. A pop-up will open and click Select Files. Locate the logo image stored in your computer and double-click the file or press Open. Once the upload has been completed, click the Select Image button on the right. You have now successfully added a logo. The last thing you need to do is add a featured image for the listing. SocialMobi Hotsite Manual Pg. 24 5.2 Adding a featured image To add a featured image to the listing, click on the Add Media button found just above the post body text area. Follow the same steps in uploading a logo image. After the upload is complete, choose “upload to the post” from the drawdown menu, from the right click on Set Featured Image to show the “Set featured Image” button to the right then click it. Pg. 25 SocialMobi Hotsite Manual An image will now appear in the „Featured Image‟ section on the right corner of the page. Press the Update or Publish button to complete the process. SocialMobi Hotsite Manual Pg. 26 5.3 Adding a video for a premium/featured listing Adding a video to a premium business listing you will only need to put the Youtube video ID and not the whole embed code or URL of the video. Please note that only videos uploaded in YouTube are supported by SocialMobi Hotsite‟s theme. Open the youtube video and copy the ID. The ID is the code you see after “watch?=” Paste it in the space provided at the bottom of the premium section. SocialMobi Hotsite Manual Pg. 27 5.4 Adding social icons to a premium/featured listings page Before adding social icons of a premium listing to its page, upload the social icon images to your media library. Go to Media > Add New. Make sure the icons have the same size so it will look good when added in a page. Go Listings > All Listings then click edit of a premium/featured listing. On the Edit Post page click the "Text" from the top right of the editor. Below the business information paste these codes. Put the social media URLs of the business and the icon URL. <div align="center"><a href="TWITTER URL" target="_blank"><img src="ICON URL" alt="" /></a> <a href="LINKEDIN PAGE URL" target="_blank"><img src="ICON URL" alt="" /></a> <a href="FACEBOOK URL" target="_blank"><img src="ICON URL" alt="" /></a> <a href=" YOUTUBE CHANNEL URL" target="_blank"><img src="ICON URL" alt="" /></a> <a href="PINTEREST URL" target="_blank"><img src="ICON URL" alt="" /></a></div> SocialMobi Hotsite Manual Pg. 28 To copy the social icon url, go to Media > Library. Point your cursor to the icon you are going to use then click the Edit button below it. Once you are in the Edit Media page copy the File URL from the right. Pg. 29 SocialMobi Hotsite Manual Paste your icon URL to the code where it says "ICON URL". Once you are done click the publish button. After it's successfully saved you will now see the social icons for the listings. This is how it looks now in the business listing page when opened. So when a customer clicks on the icons in a listing's page, they will be directed to the social media page of the business. SocialMobi Hotsite Manual Pg. 30 6 Adding a Featured Listing At any given moment there should only be 1 featured listing. Be careful not to accidently assign more than 1 listing to the “Featured/Recommended” category. Doing so will cause unexpected results and is unsupported. Follow the procedures in Section 5 & 6 (depending on which type of listing the establishment wants) before converting it to a featured listing. Follow the step below to convert any listing to a featured listing. Simply check the box labeled as „Featured/Recommended‟ under the „Categories‟ section. Press the Update or Publish button to complete the process. SocialMobi Hotsite Manual Pg. 31 7 Navigation Information Navigation: In order to change the navigation please go to “SocialMobi Hotsites > Menus” then create the navigation where it says “Navigation”. Add the elements that you want to show in the navigation and save the navigation you have created. Lastly select it as “Primary Navigation” by checking the box beside Primary Navigation at the bottom of the page. If you want to change the navigation button color you have to add “set-a”, “setb” or “set-c” under “Title Attribute” Pg. 32 SocialMobi Hotsite Manual View all the created pages: In order to see all of the pages you have, go to HotSite Pages > All Pages. SocialMobi Hotsite Manual Pg. 33 Add Page To add a new page, go to HotSite Pages > Add New Hotsite Page and you will see the image below. Here you have to add Title, Text, select a parent if needed (this is how subpages works) and select a template if needed. Lastly, press Publish button. SocialMobi Hotsite Manual Pg. 34 Parent Template Choose templates B and C to change the subnavigation color. Pg. 35 SocialMobi Hotsite Manual View, Edit or Delete pages. In order to see, edit or eliminate a page you have to position the cursor over a page title and select one of the shown options. You can either move a page to the trash or delete it permanently. Moving it to trash will give you the opportunity to recover it but if you choose to delete it permanently you will have to go to the Trash tab to delete it permanently. If you select “Edit” The next screen will be shown: SocialMobi Hotsite Manual Pg. 36 Add images to a page: In order to add images to a page, go to click on the “Add Media” tab. You will see the next screen where you can select the file to upload to the site. SocialMobi Hotsite Manual Pg. 37 Once the image is uploaded you will see the next screen with the image data that you can edit. To have the image inserted to a specific page you are working on, choose “Insert to Page” from the dropdown then click the “Insert into Page” button at the bottom. If you want to set an image to represent the page, choose “Upload to Page” from the dropdown and select “Set Featured Image” from the left then click the “Set featured image” button at the bottom. SocialMobi Hotsite Manual Pg. 38 Create a gallery page: In order to turn a page into an image gallery, please upload to the page all the images that you need (no need to insert them into post) and then choose the gallery template that you wish. SocialMobi Hotsite Manual Pg. 39 Pop ups For making a popup you have to insert the next code in the text editor: [popup buttontitle="Popup Title" set=a] Random sample text quisque sed magna nulla, molestie pharetra massa. Cras ac elit tortor. Suspendisse a accumsan dolor. [/popup] Parameters reference: buttontitle: the text that is shown in the button set: choose between a, b or c. If you don‟t use this parameter, the default choice is “set-a” (e.g. [popup buttontitle="Popup Title"]) . Lastly, put the pop up content between [popup buttontitle="Popup Title" set=a] and [/popup] tags. Social Settings: You have to fill in the requested data and then when you create a page choose between the next templates: Facebook: Shows the Facebook wall in the page in which you selected this template. Flickr: Shows the albums and pictures of the user set on the page in which you selected this template. RSS: Shows the RSS feed of the url set on the page in which you selected this template. SocialMobi Hotsite Manual Pg. 40 Twitter: Shows the latest Tweets of the user set on the page in which you selected this template. YouTube: Shows the YouTube videos in the page in which you selected this template. You can also do this by inserting the next codes in the page text editor: SocialMobi Hotsite Manual Pg. 41 Facebook: [facebook-like-box] ( the default data is set on the Website Mobile Settings). [facebook-like-box url=”http://www.facebook.com/page”] Twitter: [latest-tweets] (the default data is set on the Website Mobile Settings) [latest-tweets username=”username”] RSS: [rss] (the default data is set on the Website Mobile Settings) [rss url=”http://www.example.com/feed”] Flickr: [flickr] (the default data is set on the Website Mobile Settings) [flickr username=”username”] YouTube: [youtube] (the default data is set on the Website Mobile Settings) [youtube username=”username”] SocialMobi Hotsite Manual Pg. 42 Using CSV C8 CSV Functionality import is the We have integrated CSV upload functionality. With this functionality you will be easiest way able to easily set listings up faster and have more time visiting and pitching to populate a local businesses and therefore have more recurring income. hotsite with listings. Using of this functionality is pretty simple – the CSV Import tab is added automatically with the theme. CSV template can be downloaded from the members area. Here are steps of how to use it: 1. Click on the “Download Example” link to get a copy of a preformatted csv file. a. Keep the first row as your guide and replace the data on the succeeding rows. b. Save your changes. 2. Use saved template with clicking on a button “Choose File” a. Click on the Choose File button and locate your saved csv file. Pg. 43 SocialMobi Hotsite Manual b. Click Open after selecting the csv file to be uploaded. 3. Clicking on the Create from CSV button will start the process of creating the listings. 4. Notification messages will be displayed after the process has finished. SocialMobi Hotsite Manual Pg. 44 A detailed description of the columns and data for your CSV file are listed A sample csv file with a few listings can be downloaded in the members area . below: A. post_title – This is used for the business name of the listing. Strictly required B. post_content – This field is intended for information about the business. It can be their “About Us” section and can also be used to display any other information the owner prefers. Allows HTML codes and loosely required (system will not produce an error but listing will look blank with an empty description) C. category – All (sub)categories that the listing is classified under can be defined here. If the listing is part of multiple categories, each category name must be separated by a comma and a space. (ie. Italian, Steakhouse, Seafood). – Strictly required - If the listing is under a premium plan then add “premium” in the category. (ex. Dentist, Premium) - If it is a featured listing then you will have to add “featured” in the category. Note that a featured listing is always marked as premium as well. (ex. Dentist, Premium, Featured) D. post_author - (optional) The username of the hotsite will automatically become the author. E. post_status – You can put either publish or draft. F. comment – (optional) either open or close G. address – This field is for the address of the business. Optional H. phone – This field is for the phone number of the busines. Optional I. website – This field is for the website of the business. Please note not to add the http://. (ex. www.site.com) Optional J. email – This field is for the email address of the business. Optional K. logo_url – This is a premium field and must be filled out only if the listing has opted to pay for a premium listing. The listing will be automatically listed under the premium category if any premium field has data. Optional L. coupon-title – This is a premium field that is for the listing‟s coupon title. It is shown on the individual page of the listing. M. coupon-subtitle – Can be used to further explain the details of the coupon. N. coupon-content – Can be used to store the coupon code(s). O. coupon-expires – Input the expiry date of the coupon here. SocialMobi Hotsite Manual Pg. 45 Fields A, C to J is for free listings. Fields K to O are optional but at least one of them must be filled out for a listing to be marked/flagged as premium. A listing can be manually upgraded to premium status by editing it in the Dashboard > Listings even if the listing does not have data for Field K to O. Once you import a CSV file, an algorithm will check whether any of the Premium fields (K to O) have been filled out. The listing will be automatically marked as Premium if so. The theme will also display a notification message on how many rows/listings were converted to premium listings for reference. What can be very interesting is adding logo in CSV file. You will do it by simply adding all images that you want to use them in the future as a logo in a Media library in the existing SocialMobi Hotsites. Copy the respective File URL of each uploaded image and paste it in the appropriate column (field K logo-url) in the CSV file (see reference below) Once you are done with uploading a CSV file you can go in “Listings” and see your automatically uploaded listings/posts, categorized according what you have entered as a category value. SocialMobi Hotsite Manual Pg. 46 9 Domain Mapping With Social Mobi Hotsites, it is possible to map your domain/sub-domain. To do that, go to Domain Mapping under Hotsite Tools from your dashboard. You will then be taken to a page where you will enter your domain then click Map Domain button. If it‟s a valid domain (you bought it) you will see it will show under the mapped domain. SocialMobi Hotsite Manual Pg. 47 9.1 Modifying Domain in NameCheap After mapping your domain, next would be to modify it. Open your domain in NameCheap then click on All Host Records from the left side. A form will then open and what you will only modify is the info at the top. The IP Address is found in the hotsites dashboard. The Record type has to be A (Address) and the TTL is 3600. Go back to your hotsite dashboard and copy the IP address of the server and enter it into the space provided for IP Address. Make sure to click Save Changes button once you‟re done. SocialMobi Hotsite Manual Pg. 48 9.2 Verifying Domains in Google Webmaster Tools (GoDaddy) - Log in to your Account Manager. - Click Web Hosting. - Next to the hosting account you want to use, click Launch. - Click the Google Webmaster Tools icon in the Options & Settings > Tools section. This step opens the Google Webmaster Tools screen. - Select any listed domains that you want to verify with Google Webmaster Tools. - Click the Verify icon in the Action bar. SocialMobi Hotsite Manual Pg. 49 9.3 How to Change A Record in goDaddy 1. Login to godaddy.com 2. Go to domains > all domains 3. Click the down arrow of your domain and choose Manage DNS 4. Click Add Record and the Add Record Zone pop-up page will open (image below) 5. Choose A (Host) under Record Type 6. Enter your domain name under Host 7. Enter the IP Address - 209.59.166.180 8. Choose 1 hour for TTL 9. Click Finish button when done. NOTE: Newly mapped domain takes at least 24 - 48 hours to propagate. SocialMobi Hotsite Manual Pg. 50 10 Support Please make sure you watch all the video tutorials in the download area. If you are still stuck be sure to check out the FAQ https://squeezemobi.zendesk.com/forums If you cannot find your answer there you can submit a ticket: https://squeezemobi.zendesk.com/home SocialMobi Hotsite Manual Pg. 51 11 Conclusion Hey guys, Thanks again for reading this guide. Thanks for investing your time. If you liked this product and want to be updated with what‟s cooking then sign up for our newsletter if you have not done so already! We look forward to being in touch. Here are also some links to our products that may be useful to you if you are in the mobile space: Newsletter http://offlinemobilemadness.squeezemobi.com/closing-method-guide/ SocialMobi Hotsite Manual Pg. 52 Our Products SqueezeMobillionaire https://www.squeezemobillionaire.com/sign-up/ MobiApp Domination http://login2apps.com/prices.html Mobi 911 Leads http://www.forumspecialoffers.com/showthread.php?1441-9-Red-Hot-Emergency-Niches-Come-ToMobile-Creating-595-Paydays-and-1000-mo-Recurring-Income&p=26782#post26782 Insta-Portfolio Pro http://www.forumspecialoffers.com/showthread.php?1225-Dead-Simple-Mobile-Consultant-WPTheme-Closes-1-000-Deal-at-IHOP!&p=24667#post24667 SocialMobi Hotsite Manual Pg. 53 WP Lead Celebrity http://www.forumspecialoffers.com/showthread.php?1245-SqueezeMobi-WP-Lead-Celebrity-30Increase-in-Results-amp-Instant-Local-Celebrity-Status Mobi Video Leads http://www.forumspecialoffers.com/showthread.php?1293-SqueezeMobi-Mobi-Video-Leads-OpensDoor-To-HUGE-In-Real-Estate-Niche WPMobi Niche Raider http://www.warriorplus.com/w/v/dp9bpj/ourotherproducts Mobile Treasure Island http://www.forumspecialoffers.com/showthread.php?725-Mobile-Treasure-Island-Expat-onTropical-Beach-Makes-500-in-40-Min-Proof Mobi Cash Cyclone – 9 Full Mobile Site Templates http://www.warriorplus.com/w/v/3xyvn9/otherproducts SocialMobi Hotsite Manual Pg. 54 Social Mobile Evolution http://socialmobileevolution.com/buy/ Offline Audit http://www.warriorplus.com/w/v/ffvbsl/closingguide Social Mobile Fusion http://www.warriorplus.com/w/v/b68mpg/closingguide Mega-Closer PLR Mobile Marketing Presentation (helps close those clients quick): http://www.warriorplus.com/w/v/bfby4k/closingguide SocialMobi Hotsite Manual Pg. 55 Social Media Mega-Closer Presentation http://www.warriorplus.com/w/v/lg5yfb/closingguide Mad Money Making Mobile Biz in a Box (create mobile landing pages in 10 mins): http://www.warriorplus.com/w/v/dcmt7f/closingguide Insta-Portfolio for Mobile Biz in a Box http://offlinemobilemadness.squeezemobi.com/ready-to-buy-instant-portfolio/ Mobile Niches Riches Landing Page Templates http://www.warriorplus.com/w/v/959r5s/closingguide SocialMobi Hotsite Manual Pg. 56 Insta-Portfolio for Mobile Niches Riches http://offlinemobilemadness.squeezemobi.com/insta-portfolio-oto-self2-0/ Insta-Portfolio 4.0 for Mobi Cash Cyclone http://mobicashcyclone.com/oto-pp-id-4519rf34/