1
Preface
My first book, “
µC/OS, The Real-Time Kernel ” is now 6 years old and the publisher has sold well
over 15,000 copies around the world. When I was asked to do a second edition, I thought it would
be a fairly straightforward task; a few corrections here and there, clarify a few concepts, add a
function or two to the kernel, etc. If you have a copy of the first edition, you will notice that
“µC/OS-II, The Real-Time Kernel” is in fact a major revision. For some strange reason, I wasn’t
satisfied with minor corrections. Also, when my publisher told me that this time, the book would
be a ‘hard cover’, I really wanted to give you your moneys worth. In all, I added more than 200
new pages, and re-wrote the majority of the pages I did keep. I added a porting guide to help you
port µC/OS-II to the processor of your choice. Also, I added a chapter that will guide you through
upgrading a µC/OS port to µC/OS-II.
The code for µC/OS-II is basically the same as that of µC/OS except that it contains a number of
new and useful features, is much better commented, and should be easier to port to processor
architectures. µC/OS-II offers all the features provided in µC/OS as well as the following new
features:
•
•
•
A fixed-sized block memory manager,
A service to allow a task to suspend its execution for a certain amount of time
(specified in hours, minutes, seconds and milliseconds),
User definable ‘callout’functions that are invoked when:
a task is created,
•
•
•
•
a task is deleted,
a context switch is performed,
a clock tick occurs.
A new task create function that provides additional features,
Stack checking,
A function returning the version of µC/OS-II,
And more.
µC/OS-II Goals
Probably the most important goal of µC/OS-II was to make it backward compatible with µC/OS (at least from an
application’s standpoint). A µC/OS port might need to be modified to work with µC/OS-II but at least, the application
code should require only minor changes (if any). Also, because µC/OS-II is based on the same core as µC/OS, it is just
as reliable. I added conditional compilation to allow you to further reduce the amount of RAM (i.e. data space) needed
by µC/OS-II. This is especially useful when you have resource limited products. I also added the feature described in
the previous section and cleaned up the code.
Where the book is concerned, I wanted to clarify some of the concepts described in the first edition and provide
additional explanations about how µC/OS-II works. I had numerous requests about doing a chapter on how to port
µC/OS and thus, such a chapter has been included in this book for µC/OS-II.
Intended Audience
This book is intended for embedded system programmers, consultants and students interested in real-time operating
systems. µC/OS-II is a high performance, deterministic real-time kernel and can be embedded in commercial products
(see Appendix F, Licensing). Instead of writing your own kernel, you should consider µC/OS-II. You will find, as I
did, that writing a kernel is not as easy as it first looks.
I’m assuming that you know C and have a minimum knowledge of assembly language. You should also understand
microprocessor architectures.
What you will need to use µC/OS-II
The code supplied with this book assumes that you will be using an IBM -PC/AT or compatible (80386 Minimum)
computer running under DOS 4.x or higher. The code was compiled with Borland International’s C++ V3.1. You
should have about 5 MBytes of free disk space on you hard drive. I actually compiled and executed the sample code
provided in this book in a DOS window under Windows 95.
To use µC/OS-II on a different target processor (than a PC), you will need to either port µC/OS-II to that processor
yourself or, obtain one from µC/OS-II official WEB site at http://www.uCOS-II.com. You will also need appropriate
software development tools such as an ANSI C compiler, an assembler, linker/locator and some way of debugging
your application.
The µC/OS Story
Many years ago, I designed a product based on an Intel 80C188 at Dynalco Controls and I needed a real-time kernel.
At my previous employer, I had been using a well known kernel (let’
s call it kernel ‘A’) but, found it to be too
expensive for the application I was designing. We then found a lower cost kernel ($1000 at the time) and started our
design with it. Let’
s call this kernel, kernel ‘B’. We spent about two months trying to get a couple of very simple tasks
to run. We were calling the vendor almost on a daily basis to get help making this work. The vendor claimed that this
kernel was written in C. However, we had to initialize every single object using assembly language code. Although
the vendor was very patient, we decided that we had enough of this. Our product was falling behind schedule and we
really didn’t want to spend our time debugging this low cost kernel. It turns out that we were one of this vendor’s first
customer and the kernel was really not fully tested and debugged!
To get back on track, we decided to go back and use kernel ‘
A’. The cost was about $5000 for development seat and
we had to pay a per usage fee of about $200 for each unit that we shipped! This was a lot of money at the time, but it
bought us some peace of mind. We got the kernel up and running in about 2 days! Three months into the project, one
of our engineers discovered what looked like a bug in the kernel. We sent the code to the vendor and sure enough, the
bug was confirmed as being in the kernel. The vendor provided a 90 day warranty but, that had exp ired so, in order to
get support, we had to pay an addition $500 per year for ‘maintenance’
. We argued with the salesperson for a few
months that they should fix the bug since we were actually doing them a favor. They wouldn’t budge! Finally, we
gave in, we bought the maintenance contract and the vendor fixed the bug six months later! Yes, six months later. We
were furious but most importantly, late delivering our product. In all, it took close to a year to get our product to work
reliably with kernel ‘A’. I must admit, however, that we never had any problems with it since.
As this was going on, I naively thought, “Well, it can’t be that difficult to write a kernel. All it needs to do is save and
restore processor registers”. That’s when I decided to try it out and write my own (part time at night and on weekends).
It took me about a year to get the kernel to be just as good (and in some ways better) than kernel ‘
A’. I didn’t want to
start a company and sell it because there were already about 50 kernels out there so, why have another one?
I then thought of writing a paper for a magazine. I first went to the “C User’s Journal (CUJ)” (the kernel was written
in C) which, I had heard, was offering $100 per published page when other magazines were only paying $75 per page.
My paper had 70 or so pages so, that would be a nice compensation for all the time I spent working on my kernel.
Unfortunately, the article was rejected! There were two reasons. First, the article was too long and the magazine
didn’t want to publish a series. Second, they didn’t want to have ‘
another kernel article’.
I then decided to turn to Embedded Systems Programming (ESP) magazine because my kernel was designed for
embedded systems. I contacted the editor of ESP (Mr. Tyler Sperry) and told him that I had this kernel I wanted to
publish in his magazine. I got the same response from Tyler as I did from the C Journal: “Not another kernel article?”
I told him that this kernel was different, it was preemptive, it was comparable to many commercial kernels and that he
could put the source code on the ESP BBS (Bulletin Board Service). I was calling Tyler two or three times a week
(basically begging him) until he finally gave in (he was probably tired of having me call him) and decide to publish the
article. My article got edited down from 70 pages to about 30 pages and was published in two consecutive months
(May 1992 and June 1992). The article was probably the most popular article in 1992. ESP had over 500 downloads
of the code from the BBS in the first month. Tyler may have feared for his life because kernel vendors were upset that
he published a kernel in his magazine. I guess that these vendors must have recognized the quality and capabilities of
µC/OS (was called µCOS then). The article was really the first that exposed the internals of a real-time kernel so,
some of the secrets were out.
Just about the time the article came out in ESP, I got a call back from Dr. Bernard Williams at R&D Publications
(publisher of CUJ), 6 months after the initial contact with CUJ. He had left a message with my wife and told her that
he was interested in the article!??! I called him back and told him something like: “Don’t you think you are a little bit
late with this? The article is being published in ESP.” Berney said: “No, No, you don’t understand, because the article
is so long, I want to make a book out of it.” Initially, Berney simply wanted to publish what I had (as is) so the book
would only have 80 or so pages. I said to him, “If I going to write a book, I want to do it right.” I then spent about 6
months adding contents to what is now know as the first edition. In all, the book had about 250 pages to it. I changed
the name of µCOS to µC/OS because ESP readers had been calling it ‘Mucus’which didn’t sound too healthy! Come
to think of it, maybe it was a kernel vendor that first came up with the name. Anyway, µC/OS, The Real-Time Kernel
was then born. Sales were somewhat slow to start. Berney and I projected that we would sell about 4000 to 5000
copies in the life of the book but at that rate, we would be lucky if it sold 2000 copies. Berney insisted that these things
take time to get known so, he continued advertising in CUJ for about a year.
A month or so before the book came out, I went to my first Embedded Systems Conference (ESC) in Santa Clara, CA
(September 1992). I then met Tyler Sperry for the first time and I showed him the first draft copy of my book. He very
quickly glanced at it and said something like: “Would you like to speak at the next Embedded Systems Conference in
Atlanta?” Not knowing any better, I said “Sure, what should I talk about?” He said what about “Using small real-time
kernels?” I said “Fine”. On the trip back from California, I was thinking “What did I get myself into? I’ve never
spoke in front of a bunch of people before! What if I make a fool of myself? What if what I speak about is common
knowledge? Those people pay good money to attend this conference.” For the next six months, I prepared my lecture.
At the conference, I had about 70+ attendees. In the first twenty minutes I must have lost one pound of sweat. After
my lecture, I had a crowd of about 15 or so people come up to me and say that they were very pleased with the lecture
and liked my book. I got re -invited back to the conference but could not attend the one in Santa Clara that year (i.e.
1993). I was able to attend the next conference in Boston (1994) and I have been a regular speaker at ESC ever since.
For the past couple of years, I’
ve been on the conference Advisory Committee. I now do at least 3 lectures at every
conference and each have average attendance of between 200 and 300 people! My lectures are almost always ranked
amongst the top 10% of the conference.
To date, we sold well over 15,000 copies or µC/OS, The Real-Time Kernel around the world. I received and answered
well over 1000 e-mails from the following countries:
In 1995, µC/OS, The Real-Time Kernel was translated in Japanese and published in a magazine called Interface in
Japan. µC/OS has been ported to the following processors:
Analog Devices AD21xx
Advanced Risc Machines ARM6, ARM7
Hitachi 64180, H8/3xx, SH series
Intel 80x86 (Real and PM), Pentium, Pentium-II, 8051, 8052, MCS-251, 80196, 8096
Mitsubishi M16 and M32
Motorola PowerPC, 68K, CPU32, CPU32+, 68HC11, 68HC16
Philips XA
Siemens 80C166 and TriCore
Texas instruments TMS320
Zilog Z-80 and Z-180
And more.
In 1994, I decided to write my second book: Embedded Systems Building Blocks, Complete and Ready-to-Use
Modules in C (ESBB) and contains over 600 pages. For some reason, ESBB has not been as popular as µC/OS
although it contains as much valuable information not found anywhere else. I always thought that it would be an ideal
book for people just starting in the embedded world.
In 1998, I opened the official µC/OS WEB site www.uCOS-II.com. I intend this site to contain ports, application
notes, links, answers to frequently asked questions (FAQs), upgrades for both µC/OS and µC/OS-II, and more. All I
need is time!
Back in 1992, I never imagined that writing an article would have changed my life as it did. I met a lot of very
interesting people and made a number of good friends in the process. I still answer every single e-mail that I receive.
I believe that if you take the time to write to me then I owe you a response. I hope you enjoy this book.
Acknowledgements
First and foremost, I would like to thank my wife for her support, encouragement, understanding and especially
patience. Manon must have heard the words “Just one more week!”about a dozen times while I was writing this book.
I would also like to thank my children James (age 8) and Sabrina (age 4) for putting up with the long hours I had to
spend in front of the computer. I hope one day they will understand.
I would also like to thank Mr. Niall Murphy for carefully reviewing most of the chapters and providing me with
valuable feedback. Special thanks to Mr. Alain Chebrou and Mr. Bob Paddock for passing the code for µC/OS-II
through a fine tooth comb.
I would like to thank all the fine people at R&D Technical books for their help in making this book a reality, and also
for putting up with my insistence on having things done my way.
Finally, I would like to thank all the people who have purchased µC/OS, The Real-Time Kernel as well as Embedded
Systems Building Blocks and who, by doing so, have encouraged me to pursue this interesting past-time.
Introduction
This book describes the design and implementation of µC/OS-II (pronounced "Micro C O S 2") which stands for
Micro-Controller Operating System Version 2. µC/OS -II is based on µC/OS, The Real-Time Kernel which was first
published in 1992. Thousands of people around the world are using µC/OS in all kinds of applications such as
cameras, medical instruments, musical instruments, engine controls, network adapters, highway telephone call boxes,
ATM machines, industrial robots, and many more. Nu merous colleges and Universities have also used µC/OS to
teach students about real-time systems.
µC/OS-II is upward compatible with µC/OS (V1.11) but provides many improvements over µC/OS such as the
addition of a fixed-sized memory manager, user definable callouts on task creation, task deletion, task switch and
system tick, supports TCB extensions, stack checking and, much more. I also added comments to just about every
function and I made µC/OS -II much easier to port to different processors. The source code in µC/OS was found in two
source files. Because µC/OS-II contains many new features and functions, I decided to split µC/OS-II in a few source
files to make the code easier to maintain.
If you currently have an application (i.e. product) that runs with µC/OS, your application should be able to run,
virtually unchanged, with µC/OS-II. All of the services (i.e. function calls) provided by µC/OS have been preserved.
You may, however, have to change include files and product build files to ‘point’to the new file names.
This book contains ALL the source code for µC/OS-II and a port for the Intel 80x86 processor running in Real-Mode
and for the Large Model. The code was developed on a PC running the Microsoft Windows 95 operating system.
Examples run in a DOS compatible box under the Windows 95 environment. Development was done using the
Borland International C/C++ compiler version 3.1. Although µC/OS-II was developed and tested on a PC, µC/OS-II
was actually targeted for embedded systems and can easily be ported to many different processor architectures.
µC/OS-II features:
Source Code:
As I mentioned previously, this book contains ALL the source code for µC/OS-II. I went through a lot of efforts to
provide you with a high quality ‘product’
. You may not agree with some of the style constructs that I use but you
should agree that the code is both clean and very consistent. Many commercial real-time kernels are provided in
source form. I challenge you to find any such code that is as neat, consis tent, well commented and organized as
µC/OS-II’s. Also, I believe that simply giving you the source code is not enough. You need to know how the code
works and how the different pieces fit together. You will find this type of information in this book. The organization
of a real-time kernel is not always apparent by staring at many source files and thousands of lines of code.
Portable:
Most of µC/OS-II is written in highly portable ANSI C, with target microprocessor specific code written in assembly
language. Assembly language is kept to a minimum to make µC/OS -II easy to port to other processors. Like µC/OS,
µC/OS-II can be ported to a large number of microprocessors as long as the microprocessor provides a stack pointer
and the CPU registers can be pushed onto and popped from the stack. Also, the C compiler should either provide
in-line assembly or language extensions that allow you to enable and disable interrupts from C. µC/OS-II can run on
most 8-bit, 16-bit, 32-bit or even 64-bit microprocessors or micro-controllers and, DSPs.
All the ports that currently exist for µC/OS can be easily converted to µC/OS-II in about an hour. Also, because
µC/OS-II is upward compatible with µC/OS, your µC/OS applications should run on µC/OS-II with few or no changes.
Check for the availability of ports on the µC/OS-II Web site at ‘www.uCOS-II.com’.
ROMable:
µC/OS-II was designed for embedded applications. This means that if you have the proper tool chain (i.e. C compiler,
assembler and linker/locator), you can embed µC/OS-II as part of a product.
Scalable:
I designed µC/OS-II so that you can use only the services that you need in your application. This means that a product
can have just a few of µC/OS-II’s services while another product can have the full set of features. This allows you to
reduce the amount of memory (both RAM and ROM) needed by µC/OS-II on a product per product basis. Scalability
is accomplished with the use of conditional compilation. You simply specify (through #define constants) which
features you need for your application/product. I did everything I could to reduce both the code and data space
required by µC/OS-II.
Preemptive:
µC/OS-II is a fully-preemptive real-time kernel. This means that µC/OS-II always runs the highest priority task that is
ready. Most commercial kernels are preemptive and µC/OS-II is comparable in performance with many of them.
Multi-tasking:
µC/OS-II can manage up to 64 tasks, however, the current version of the software reserves eight (8) of these tasks for
system use. This leaves your application with up to 56 tasks. Each task has a unique priority assigned to it which
means that µC/OS-II cannot do round robin scheduling. There are thus 64 priority levels.
Deterministic:
Execution time of all µC/OS-II functions and services are deterministic. This means that you can always know how
much time µC/OS-II will take to execute a function or a service. Furthermore, except for one service, execution time
of all µC/OS-II services do not depend on the number of tasks running in your application.
Task stacks:
Each task requires its own stack, however, µC/OS-II allows each task to have a different stack size. This allows you to
reduce the amount of RAM needed in your application. With µC/OS-II’
s stack checking feature, you can determine
exactly how much stack space each task actually requires.
Services:
µC/OS-II provides a number of system services such as mailboxes, queues, semaphores, fixed-sized memory
partitions, time related functions, etc.
Interrupt Management:
Interrupts can suspend the execution of a task and, if a higher priority task is awakened as a result of the interrupt, the
highest priority task will run as soon as all nested interrupts complete. Interrupts can be nested up to 255 levels deep.
Robust and reliable:
µC/OS-II is based on µC/OS which has been used in hundreds of commercial applications since 1992. µC/OS-II uses
the same core and most of the same functions as µC/OS yet offers more features.
Figures, Listings and Tables Convention:
You will notice that when I reference a specific element in a figure, I use the letter ‘F’followed by the figure number.
A number in parenthesis following the figure number represents a specific element in the figure that I am trying to
bring your attention to. F1-2(3) thus means look at the third item in Figure 1-2.
Listings and tables work exactly the same way except that a listing start with the letter ‘L’and a table with the letter
‘
T’.
Source Code Conventions:
All µC/OS-II objects (functions, variables, #define constants and macros) start with OS indicating that they are
Operating System related.
Functions are found in alphabetical order in all the source code files. This allows you to quickly locate any function.
You will find the coding style I use is very consistent. I have been adopting the K&R style for many years. However,
I did add some of my own enhancements to make the code (I believe) easier to read and maintain. Indention is always
4 spaces, TABs are never used, always at least one space around an operator, comments are always to the right of code,
comment blocks are used to describe functions, etc.
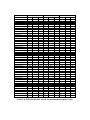
The following table provides the acronyms, abbreviations and mnemonics (AAMs) used in this book. I combine some
of these AAMs to make up function, variable and #define names in a hierarchical way. For example, the function
OSMboxCreate() reads like this: the function is part of the operating system (OS ), it is related to the mailbox
services (Mbox) and the operation performed is to Create a mailbox. Also, all services that have similar operation
share the same name. For e xample, OSSemCreate() and OSMboxCreate() perform the same operation but on
their respective objects (i.e. semaphore and mailbox, respectively).
Acronym,
Abbreviation or
Mnemonic
Meaning
Addr
Blk
Chk
Clr
Cnt
CPU
Ctr
Ctx
Cur
Del
Dly
Err
Ext
FP
Grp
HMSM
ID
Init
Int
ISR
Max
Mbox
Mem
Msg
N
Opt
OS
Ovf
Prio
Ptr
Q
Rdy
Req
Sched
Sem
Stat
Stk
Sw
Sys
Tbl
TCB
TO
Address
Block
Check
Clear
Count
Central Processing Unit
Counter
Context
Current
Delete
Delay
Error
Extension
Floating-Point
Group
Hours Minutes Seconds Milliseconds
Identifier
Initialize
Interrupt
Interrupt Service Routine
Maximum
Mailbox
Memory
Message
Number of
Option
Operating System
Overflow
Priority
Pointer
Queue
Ready
Request
Scheduler
Semaphore
Status or statistic
Stack
Switch
System
Table
Task Control Block
Timeout
Acronyms, abbreviations and mnemonics used in this book
Chapter contents:
Chapter 1, Sample Code
This chapter is designed to allow you to quickly experiment with and use µC/OS-II. The chapter starts by showing
you how to install the distribution diskette and describe the directories created. I then explain some of the coding
convent ions used. Before getting into the description of the examples, I describe the code used to access some of the
services provided on a PC.
Chapter 2, Real-Time Systems Concepts
Here, I introduce you to some real-time systems concepts such as foreground/background systems, critical sections,
resources, multitasking, context switching, scheduling, reentrancy, task priorities, mutual exclusion, semaphores,
intertask communications, interrupts and more.
Chapter 3, Kernel Structure
This chapter introduces you to µC/OS -II and its internal structure. You will learn about tasks, task states, task control
blocks, how µC/OS -II implements a ready list, task scheduling, the idle task, how to determine CPU usage, how
µC/OS-II handles interrupts, how to initialize and start µC/OS-II and more.
Chapter 4, Task Management
This chapter describes µC/OS-II’s services to create a task, delete a task, check the size of a task’s stack, change a
task’s priority, suspend and resume a task, and get information about a task.
Chapter 5, Time Management
This chapter describes how µC/OS-II can suspend a task’s execution until some user specified time expires, how such
a task can be resumed and how to get and set the current value of a 32-bit tick counter.
Chapter 6, Intertask Communication and Synchronization
This chapter describes µC/OS-II’s services to have tasks and ISRs (Interrupt Service Routines) communicate with one
another and share resources. You will learn how sempahores, message mailboxes and message queues are
implemented.
Chapter 7, Memory Management
This chapter describes µC/OS-II’s dynamic memory allocation feature using fixed-sized memory blocks.
Chapter 8, Porting µC/OS -II
This chapter describes in general terms what needs to be done to adapt µC/OS-II to different processor architectures.
Chapter 9, 80x86 Large Model Port
This chapter describes how µC/OS-II was ported to the Intel/AMD 80x86 processor architecture running in real-mode
and for the large model. Code and data space memory usage is provided as well as execution times for each of the
functions.
Chapter 10, Upgrading from µC/OS to µC/OS-II
This chapter describes how easy it is to migrate a port done for µC/OS to work with µC/OS-II.
Chapter 11, Reference Manual
This chapter describes each of the functions (i.e. services) provided by µC/OS -II from an application developer’s
standpoint. Each function contains a brief description, its prototype, the name of the file where the function is found,
a description of the function arguments and the return value, special notes and examples.
Chapter 12, Configuration Manual
This chapter describes each of the #define constants used to configure µC/OS-II for your application. Configuring
µC/OS-II allows you to use only the services required by your application. This gives you the flexibility to reduce
µC/OS-II’s memory footprint (code and data space).
Appendix A, Example Source Code
Fully commented source code for the examples and PC services (see Chapter 1) is provided in this appendix and
consist of 11 files.
Appendix B, µC/OS -II Microprocessor Independent Source Code
The source code for the portion of µC/OS -II that is not dependent on any specific processor is provided in this
appendix and consist of 9 files
Appendix C, 80x86 Real-Mode, Large Model Source Code
The source code for the 80x86 processor dependent functions is found in this appendix and consist of three files.
Appendix D, TO and HPLISTC
Presents two DOS utilities that I use: TO and HPLISTC. TO is a utility that I use to quickly move between MS-DOS
directories without having to type the CD (change directory) command. HPLISTC is a utility to print C source code in
compressed mode (i.e. 17 CPI) and allows you to specify page breaks. The printout is assumed to be to a Hewlett
Packard (HP) Laserjet type printer.
Appendix E, Bibliography
This section provides a bibliography of reference material that you may find useful if you are interested in getting
further information about embedded real-time systems.
Appendix F, Licensing
Describes the licensing policy for distributing µC/OS-II in source and object form.
µC/OS-II Web site:
To better support you, I created the µC/OS-II WEB site (www.uCOS-II.com). You can thus obtain information
about:
•
•
•
•
•
•
•
•
News on µC/OS and µC/ OS-II,
Upgrades,
Bug fixes,
Availability of ports,
Answers to frequently asked questions (FAQs),
Application notes,
Books,
Classes,
•
•
Links to other WEB sites, and
More.
Chapter 1.
Sample Code
This chapter provides you with three examples on how to use µC/OS-II. I decided to include this chapter
early in the book to allow you to start using µC/OS-II as soon as possible. Before getting into the examples,
however, I will describe some of the conventions I use throughout this book.
The sample code was compiled using the Borland International C/C++ compiler V3.1 and options were
selected to generate code for an Intel/AMD 80186 processor (Large memory model). The code was actually
ran and tested on a 300 MHz Intel Pentium-II based PC with can be viewed as a super fast 80186 processor
(at least for my purpose). I chose a PC as my target system for a number of reasons. First and foremost, it's
a lot easier to test code on a PC than on any other embedded environment (i.e., evaluation board, emulator
etc.): there are no EPROMs to burn, no downloads to EPROM emulators, CPU emulators, etc. You simply
compile, link, and run. Second, the 80186 object code (Real Mode, Large Model) generated using the
Borland C/C++ compiler is compatible with all 80x86 derivative processors from Intel, AMD or Cyrix.
1.00 Installing µC/OS-II
R & D Publications, Inc. has included a Companion Diskette to µC/OS-II, The Real-Time Kernel. The
diskette is in MS-DOS format and contains all the source code provided in this book. It is assumed that you
have a DOS or Windows 95 based computer system running on an 80x86, Pentium or Pentium-II processor.
You will need less than about 5 Mbytes of free disk space to install µC/OS-II and its source files on your
system.
Before starting the installation, make a backup copy of the companion diskette. To install the code provided
on the companion diskette, follow these steps:
1) Load DOS (or open a DOS box in Windows 95) and specify the C: drive as the default drive.
Insert the companion diskette in drive A:
Enter A:INSTALL [drive]
Note that [drive] is an optional drive letter indicating the destination disk on which the source code provided
in this book will be installed. If you do not specify a drive, the source code will be installed on the current
drive.
INSTALL is a DOS batch file called INSTALL.BAT and is found in the root directory of the
companion diskette. INSTALL.BAT will create a \SOFTWARE directory on the specified destination
drive. INSTALL.BAT will then change the directory to \SOFTWARE and copy the file
uCOS-II.EXE from the A: drive to this directory. INSTALL.BAT will then execute
uCOS-II.EXE, which will create all other directories under \SOFTWARE and transfer all source and
executable files provided in this book. Upon completion, INSTALL.BAT will delete uCOS-II.EXE
and change the directory to \SOFTWARE\uCOS-II\EX1_x86L where the first example code is
found.
Make sure you read the READ.ME file on the companion diskette for last minute changes and notes.
Once INSTALL.BAT has completed, your destination drive will contain the following subdirectories:
\SOFTWARE
The main directory from the root where all software-related files are placed.
\SOFTWARE\BLOCKS
The main directory where all ‘Building Blocks’are located. With µC/OS-II, I included a ‘building
block’that handles DOS-type compatible functions that are used by the example code.
\SOFTWARE\BLOCKS\TO
This directory contains the files for the TO utility (see Appendix E, TO). The source file is TO.C
and is found in the \SOFTWARE\TO\SOURCE directory. The DOS executable file
(TO.EXE) is found in the \SOFTWARE\TO\EXE directory. Note that TO requires a file
called TO.TBL which must reside on your root directory. An example of TO.TBL is also found
in the \SOFTWARE\TO\EXE directory. You will need to move TO.TBL to the root
directory if you are to use TO.EXE .
\SOFTWARE\uCOS-II
The main directory where all µC/OS-II files are located.
\SOFTWARE\uCOS-II\EX1_x86L
This directory contains the source code for EXAMPLE #1 (see section 1.07, Example #1) which is
intended to run under DOS (or a DOS window under Windows 95).
\SOFTWARE\uCOS-II\EX2_x86L
This directory contains the source code for EXAMPLE #2 (see section 1.08, Example #2) which is
intended to run under DOS (or a DOS window under Windows 95).
\SOFTWARE\uCOS-II\EX3_x86L
This directory contains the source code for EXAMPLE #3 (see section 1.09, Example #3) which is
intended to run under DOS (or a DOS window under Windows 95).
\SOFTWARE\uCOS-II\Ix86L
This directory contains the source code for the processor dependent code (a.k.a. the port) of
µC/OS-II for an 80x86 Real-Mode, Large Model processor.
\SOFTWARE\uCOS-II\SOURCE
This directory contains the source code for processor independent portion of µC/OS-II. This code is
fully portable to other processor architectures.
1.01 INCLUDES.H
You will notice that every .C file in this book contains the following declaration:
#include "includes.h"
INCLUDES.H allows every .C file in your project to be written without concern about which header file
will actually be included. In other words, INCLUDES.H is a Master include file. The only drawback is
that INCLUDES.H includes header files that are not pertinent to some of the .C file being compiled. This
means that each file will require extra time to compile. This inconvenience is offset by code portability.
There is an INCLUDES.H for every example provided in this book. In other words, you will find a
different
copy
of
INCLUDES.H
in
\SOFTWARE\uCOS-II\EX1_x86L,
\SOFTWARE\uCOS-II\EX2_x86L and \SOFTWARE\uCOS-II\EX3_x86L . You
can certainly edit INCLUDES.H to add your own header files.
1.02 Compiler Independent Data Types
Because different microprocessors have different word length, the port of µC/OS-II includes a series of type
definitions that ensures portability (see \SOFTWARE\uCOS-II\Ix86L\OS_CPU.H for the
80x86 real-mode, large model). Specifically, µC/OS-II’s code never makes use of C’s short , int and,
long data types because they are inherently non-portable. Instead, I defined integer data types that are
both portable and intuitive as shown in listing 1.1. Also, for convenience, I have included floating-point data
types even though µC/OS-II doesn’t make use of floating-point.
typedef
typedef
typedef
typedef
typedef
typedef
typedef
typedef
typedef
unsigned
unsigned
signed
unsigned
signed
unsigned
signed
float
double
#define
#define
#define
#define
#define
#define
BYTE
UBYTE
WORD
UWORD
LONG
ULONG
char
char
char
int
int
long
long
BOOLEAN;
INT8U;
INT8S;
INT16U;
INT16S;
INT32U;
INT32S;
FP32;
FP64;
INT8S
INT8U
INT16S
INT16U
INT32S
INT32U
Listing 1.1, Portable data types.
The INT16U data type, for example, always represents a 16-bit unsigned integer. µC/OS-II and your
application code can now assume that the range of values for variables declared with this type is from 0 to
65535. A µC/OS-II port to a 32-bit processor could mean that an INT16U would be declared as an
unsigned short instead of an unsigned int. Where µC/OS-II is concerned, however, it still
deals with an INT16U . Listing 1.1 provides the declarations for the 80x86 and the Borland C/C++
compiler as an example.
For backward compatibility with µC/OS, I also defined the data types BYTE, WORD, LONG (and their
unsigned variations). This allows you to migrate µC/OS code to µC/OS-II without changing all instances of
the old data types to the new data types. I decided to make this transition and break away from the old style
data types because I believe that this new scheme makes more sense and is more obvious. A WORD to some
people may mean a 32-bit value whereas I originally intended it to mean a 16-bit value. With the new data
types, there should be no more confusion.
1.03 Global Variables
Following is a technique that I use to declare global variables. As you know, a global variable needs to be
allocated storage space in RAM and must be referenced by other modules using the C keyword extern.
Declarations must thus be placed in both the .C and the .H files. This duplication of declarations, however,
can lead to mistakes. The technique described in this section only requires a single declaration in the header
file, but is a little tricky to understand. However, once you know how this technique works you will apply it
mechanically.
In all .H files that define global variables, you will find the following declaration:
#ifdef
#define
#else
xxx_GLOBALS
xxx_EXT
#define
#endif
xxx_EXT extern
Listing 1.2, Defining global macros.
Each variable that needs to be declared global will be prefixed with xxx_EXT in the .H file. ‘xxx’
represents a prefix identifying the module name. The module's .C file will contain the following declaration:
#define xxx_GLOBALS
#include "includes.h"
When the compiler processes the .C file it forces xxx_EXT (found in the corresponding .H file) to
"nothing" (because XXX_GLOBALS is defined) and thus each global variable will be allocated storage
space. When the compiler processes the other .C files, xxx_GLOBALS will not be defined and thus
xxx_EXT will be set to extern , allowing you to reference the global variable. To illustrate the concept,
let's look at uCOS_II.H which contains the following declarations:
#ifdef
#define
#else
#define
#endif
OS_EXT
OS_EXT
OS_EXT
OS_GLOBALS
OS_EXT
OS_EXT extern
INT32U
INT32U
INT32U
OSIdleCtr
OSIdleCtrRun;
OSIdleCtrMax;
uCOS_II.c contains the following declarations:
#define OS_GLOBALS
#include “includes.h”
When the compiler processes uCOS_II.C it makes the header file (uCOS_II.H) appear as shown
below because OS_EXT is set to "nothing":
INT32U
INT32U
INT32U
OSIdleCtr
OSIdleCtrRun;
OSIdleCtrMax;
The compiler is thus told to allocate storage for these variables. When the compiler processes any other .C
files, the header file (uCOS_II.H ) looks as shown below because OS_GLOBALS is not defined and
thus OS_EXT is set to extern.
extern INT32U
extern INT32U
extern INT32U
OSIdleCtr
OSIdleCtrRun;
OSIdleCtrMax;
In this case, no storage is allocated and any .C file can access these variables. The nice thing about this
technique is that the declaration for the variables is done in only one file, the .H file.
1.04 OS_ENTER_CRITICAL() and OS_EXIT_CRITICAL()
Throughout the source code provided in this book, you will see calls to the following macros:
OS_ENTER_CRITICAL() and OS_EXIT_CRITICAL(). OS_ENTER_CRITICAL()
is a macro that disables interrupts and OS_EXIT_CRITICAL() is a macro that enables interrupts.
Disabling and enabling interrupts is done to protect critical sections of code. These macros are obviously
processor specific and are different for each processor. These macros are found in OS_CPU.H. Listing 1.3
shows the declarations of these macros for the 80x86 processor. Section 9.03.02 discusses why there are two
ways of declaring these macros.
#define
OS_CRITICAL_METHOD
2
#if
#define
#define
#endif
OS_CRITICAL_METHOD == 1
OS_ENTER_CRITICAL() asm
OS_EXIT_CRITICAL()
asm
#if
#define
#define
#endif
OS_CRITICAL_METHOD == 2
OS_ENTER_CRITICAL() asm {PUSHF; CLI}
OS_EXIT_CRITICAL()
asm POPF
CLI
STI
Listing 1.3, Macros to access critical sections.
Your application code can make use of these macros as long as you realize that they are used to disable and
enable interrupts. Disabling interrupts obviously affect interrupt latency so be careful. You can also protect
critical sections using semaphores.
1.05 PC Based Services
The files PC.C and PC.H (in the \SOFTWARE\BLOCKS\PC\SOURCE directory) contain PC
compatible services that I used throughout the examples. Unlike the first version of µC/OS-II (i.e. µC/OS), I
decided to encapsulate these functions (as they should have been) to avoid redefining them in every example
and also, to allow you to easily adapt the code to a different compiler. PC.C basically contains three types
of services: character based display, elapsed time measurement and, miscellaneous. All functions start with
the prefix PC_ .
1.05.01 PC Based Services, Character Based Display
The display functions perform direct writes to video RAM for performance reasons. On a VGA monitor,
video memory starts at absolute memory location 0x000B8000 (or using a segment:offset notation,
B800:0000). You can use this code on a monochrome monitor by changing the #define constant
DISP_BASE from 0xB800 to 0xB000.
The display functions in PC.C are used to write ASCII (and special) characters anywhere on the screen
using X and Y coordinates. A PC’s display can hold up to 2000 characters organized as 25 rows (i.e. Y) by
80 columns (i.e. X). Each character requires two bytes to display. The first byte is the character that you
want to display while the second byte is an attribute that determines the foreground/background color
combination of the character. The foreground color is specified in the lower 4 bits of the attribute while the
background color appears in bits 4 to 6. Finally, the most-significant bit determines whether the character
will blink (when 1) or not (when 0). You should use the #define constants declared in PC.C (FGND
means foreground and BGND is background). PC.C contains the following four functions:
PC_DispClrScr() To clear the screen
PC_DispClrLine() To clear a single row (or line)
PC_DispChar()
To display a single ASCII character anywhere on the screen
PC_DispStr()
To display an ASCII string anywhere on the screen
1.05.02 PC Based Services, Elapsed Time Measurement
The elapsed time measurement functions are used to determine how much time a function takes to execute.
Time measurement is performed by using the PC’s 82C54 timer #2. You make time measurement by
wrapping the code to measure by the two functions PC_ElapsedStart() and
PC_ElapsedStop(). However, before you can use these two functions, you need to call the function
PC_ElapsedInit(). PC_ElapsedInit() basically computes the overhead associated with
the other two functions. This way, the execution time returned by PC_ElapsedStop() consist
exclusively of the code you are measuring. Note that none of these functions are reentrant and thus, you must
be careful that you do not invoke them from multiple tasks at the same time. The example in listing 1.4
shows how you could measure the execution time of PC_DispChar(). Note that time is in
microseconds (µS).
INT16U time;
PC_ElapsedInit();
.
.
PC_ElapsedStart();
PC_DispChar(40, 24, ‘A’, DISP_FGND_WHITE);
time = PC_ElapsedStop();
Listing 1.4, Measuring code execution time.
1.05.03 PC Based Services, Miscellaneous
A µC/OS-II application looks just like any other DOS application. In other words, you compile and link your
code just as if you would do a single threaded application running under DOS. The .EXE file that you create
is loaded and executed by DOS and execution of your application starts from main() . Because µC/OS-II
performs multitasking and needs to create a stack for each task, the single threaded DOS environment must
be stored in case your application wishes to quit µC/OS-II, and return to DOS. Saving the DOS environment
is done by calling PC_DOSSaveReturn(). When your application needs to return to DOS (and exit
µC/OS-II), you simply call PC_DOSReturn(). PC.C makes use of the ANSI C setjmp() and
longjmp() functions to save and restore the DOS environment, respectively. These functions are
provided by the Borland C/C++ compiler library and should be available on most other compilers.
You should note that a crashed application or invoking exit(0) without using PC_DOSReturn()
can leave DOS is a corrupted state. This may lead to a crash of DOS, or the DOS window within Windows
95.
PC_GetDateTime() is a function that obtains the PC’s current date and time, and formats this
information into an ASCII string. The format is “MM-DD-YY HH:MM:SS” and you will need at least 19
characters (including the NUL character) to hold this string. PC_GetDateTime() uses the Borland
C/C++ library functions gettime() and getdate() which should have their equivalent on other
DOS compilers.
PC_GetKey() is a function that checks to see if a key was pressed and if so, obtains that key, and
returns it to the caller. PC_GetKey() uses the Borland C/C++ library functions kbhit() and
getch() which again, have their equivalent on other DOS compilers.
PC_SetTickRate() allows you to change the tick rate for µC/OS-II by specifying the desired
frequency. Under DOS, a tick occurs 18.20648 times per second or, every 54.925 mS. This is because the
82C54 chip used didn’t get its counter initialized and the default value of 65535 takes effect. Had the chip
been initialized with a divide by 59659, the tick rate would have been a very nice 20.000 Hz! I decided to
change the tick rate to something more ‘exciting’and thus, decided to use about 200 Hz (actually 199.9966).
You will note that the function OSTickISR() found in OS_CPU_A.ASM contains code to call the
DOS tick handler one time out of 11. This is done to ensure that some of the housekeeping needed in DOS is
maintained. You would not need to do this if you were to set the tick rate to 20 Hz. Before returning to DOS,
PC_SetTickRate() is called by specifying 18 as the desired frequency. PC_SetTickRate()
will know that you actually mean 18.2 Hz and will correctly set the 82C54.
The last two functions in PC.C are used to get and set an interrupt vector. Again, I used Borland C/C++
library functions do accomplish this but, the PC_VectGet() and PC_VectSet() can easily be
changed to accommo date a different compiler.
1.06 µC/OS-II Examples
The examples provided in this chapter was compiled using the Borland C/C++ V3.1 compiler in a DOS box
on a Windows 95 platform. The executable code is found in the OBJ subdirectory of each example’s
directory. The code was actually compiled under the Borland IDE (Integrated Development Environment)
with the following options:
Compiler:
Code generation:
Model
Options
Assume SS Equals DS
Advanced code generation:
Floating point
Instruction set
Options
: Large
: Treat enums as ints
: Default for memory model
: Emulation
: 80186
: Generate underbars
Debug info in OBJs
Fast floating point
Optimizations:
Optimizations:
Global register allocation
Invariant code motion
Induction variables
Loop optimization
Suppress redundant loads
Copy propagation
Dead code elimination
Jump optimization
Inline intrinsic functions
Register variables:
Automatic
Common subexpressions:
Optimize globally
Optimize for:
Speed
It is assumed that the Borland C/C++ compiler is installed in the C:\CPP directory. If your compiler is
located in a different directory, you will need to change the path in the Options/Directories menu of the IDE.
µC/OS-II is a scalable operating system which means that the code size of µC/OS-II can be reduced if you are
not using all of its services. Code reduction is done by setting the #defines OS_???_EN to 0 in
OS_CFG.H. You do this to disable code generation for the services that you will not be using. The
examples in this chapter makes use of this feature and thus, each example declares their OS_???_EN
appropriately.
1.07 Example #1
The first example is found in \SOFTWARE\uCOS-II\EX1_x86L and basically consists of 13
tasks (including µC/OS-II’s idle task). µC/OS-II creates two ‘internal’tasks: the idle task and a task that
determines CPU usage. Example #1 creates 11 other tasks. The TaskStart() task is created by
main() and its function is to create the other tasks and display the following statistics on the screen:
1)
2)
3)
4)
5)
the number of task switches in one second,
the CPU usage in %,
the number of context switches,
the current date and time, and
µC/OS-II’s version.
The TaskStart() task also checks to see if you pressed the ESCAPE key indicating your desire to exit
the example and return to DOS.
The other 10 tasks are based on the same code, i.e. the function Task(). Each of the 10 tasks displays a
number (each task has its own number from 0 to 9) at random locations on the screen.
1.07.01 Example #1, main()
Example #1 does basically the same thing as the first example provided in the first edition of µC/OS,
however, I cleaned up some of the code and output to the screen is in color. Also, I decided to use the old data
types (i.e. UBYTE , UWORD etc.) to show that µC/OS-II is backward compatible.
A µC/OS-II application looks just like any other DOS application. You compile and link your code just as if
you would do a single threaded application running under DOS. The .EXE file that you create is loaded and
executed by DOS, and execution of your application starts from main() .
main() starts by clearing the screen to ensure we don’t have any characters left over from the previous
DOS session L1.5(1). Note that I specified to use white letters on a black background. Since the screen will
be cleared, I could have simply specified to use a black background and not specify a foreground. If I did this,
and you decided to return to DOS then you would not see anything on the screen! It’s always better to specify
a visible foreground just for this reason.
void main (void)
{
PC_DispClrScr(DISP_FGND_WHITE + DISP_BGND_BLACK);
OSInit();
PC_DOSSaveReturn();
PC_VectSet(uCOS, OSCtxSw);
RandomSem = OSSemCreate(1);
OSTaskCreate(TaskStart,
(void *)0,
(void *)&TaskStartStk[TASK_STK_SIZE-1],
0);
OSStart();
}
(1)
(2)
(3)
(4)
(5)
(6)
(7)
Listing 1.5, main()
A requirement of µC/OS-II is that you call OSInit() L1.5(2) before you invoke any of its other services.
OSInit() creates two tasks: an idle task which executes when no other task is ready-to-run and, a
statistic task which computes CPU usage.
The current DOS environment is then saved by calling PC_DOSSaveReturn() L1.5(3). This allows
us to return to DOS as if we had never started µC/OS-II. A lot happens in PC_DOSSaveReturn() so
you may need to look at the code in listing 1.6 to follow along. PC_DOSSaveReturn() starts by
setting the flag PC_ExitFlag to FALSE L1.6(1) indicating that we are not returning to DOS. Then,
PC_DOSSaveReturn() initializes OSTickDOSCtr to 1 L1.6(2) because this variable will be
decremented in OSTickISR() . A value of 0 would have caused this value to wrap around to 255 when
decremented by OSTickISR(). PC_DOSSaveReturn() then saves DOS’s tick handler in a
free vector table L1.6(3)-(4) entry so it can be called by µC/OS-II’s tick handler.
Next,
PC_DOSSaveReturn() calls setjmp() L1.6(5), which captures the state of the processor (i.e.,
the contents of all its registers) into a structure called PC_JumpBuf . Capturing the processor's context
will allow us to return to PC_DOSSaveReturn() and execute the code immediately following the
call to setjmp().
Because PC_ExitFlag was initialized to FALSE L1.6(1),
PC_DOSSaveReturn() skips the code in the if statement (i.e. L1.6(6)-(9)) and returns to the caller
(i.e. main() ). When you want to return to DOS, all you have to do is call PC_DOSReturn() (see
listing 1.7) which sets PC_ExitFlag to TRUE L1.7(1) and execute a longjmp() L1.7(2). This
brings the processor back in PC_DOSSaveReturn() (just after the call to setjmp() ) L1.6(5).
This time, however, PC_ExitFlag is TRUE and the code following the if statement is executed.
PC_DOSSaveReturn() changes the tick rate back to 18.2 Hz L1.6(6), restores the PC’s tick ISR
handler L1.6(7), clears the screen L1.6(8) and returns to the DOS prompt through the exit(0) function
L1.6(9).
void PC_DOSSaveReturn (void)
{
PC_ExitFlag = FALSE;
OSTickDOSCtr =
8;
PC_TickISR
= PC_VectGet(VECT_TICK);
OS_ENTER_CRITICAL();
PC_VectSet(VECT_DOS_CHAIN, PC_TickISR);
OS_EXIT_CRITICAL();
setjmp(PC_JumpBuf);
if (PC_ExitFlag == TRUE) {
OS_ENTER_CRITICAL();
PC_SetTickRate(18);
PC_VectSet(VECT_TICK, PC_TickISR);
OS_EXIT_CRITICAL();
PC_DispClrScr(DISP_FGND_WHITE + DISP_BGND_BLACK);
exit(0);
}
(1)
(2)
(3)
(4)
(5)
(6)
(7)
(8)
(9)
}
Listing 1.6, Saving the DOS environment.
void PC_DOSReturn (void)
{
PC_ExitFlag = TRUE;
longjmp(PC_JumpBuf, 1);
}
(1)
(2)
Listing 1.7, Setting up to return to DOS.
Now we can go back to main() in listing 1.5. main() then calls PC_VectSet() L1.5(4) to
install µC/OS-II’s context switch handler. Task level context switching is done by issuing an 80x86 INT
instruction to this vector location. I decided to use vector 0x80 (i.e. 128) because it’s not used by either DOS
or the BIOS.
A binary semaphore is then created L1.5(5) to guard access to the random number generator provided by the
Borland C/C++ library. I decided to use a semaphore because I didn’t know whether or not this function was
reentrant. I assumed it was not. Because I initialized the semaphore to 1, I am indicating that only one task
can access the random number generator at any time.
Before starting multitasking, I create one task L1.5(6) called TaskStart(). It is very important that
you create at least one task before starting multitasking through OSStart() L1.5(7). Failure to do this
will certainly make your application crash. In fact, you may always want to only create a single task if you
are planning on using the CPU usage statistic task. µC/OS-II’s statistic task assumes that no other task is
running for a whole second. If, however, you need to create additional tasks before starting multitasking, you
must ensure that your task code will monitor the global variable OSStatRdy and delay execution (i.e.
call OSTimeDly()) until this variable becomes TRUE . This indicates that µC/OS-II has collected its
data for CPU usage statistics.
1.07.02 Example #1, TaskStart()
A major portion of the work in example #1 is done by TaskStart() . The pseudo-code for this function
is shown in listing 1.8. The task starts by displaying a banner on top of the screen identifying this as example
#1 L1.8(1). Next, we disable interrupts to change the tick ISR (Interrupt Service Routine) vector so that it
now points to µC/OS-II’s tick handler L1.8(2) and, change the tick rate from the default DOS 18.2 Hz to 200
Hz L1.8(3). We sure don’t want to be interrupted while in the process of changing an interrupt vector! Note
that main() purposely didn't set the interrupt vector to µC/OS-II's tick handler because you don't want a
tick interrupt to occur before the operating system is fully initialized and running. If you run code in an
embedded application, you should always enable the ticker (as I have done here) from within the first task.
void TaskStart (void *data)
{
Prevent compiler warning by assigning ‘data’ to itself;
Display banner identifying this as EXAMPLE #1;
(1)
OS_ENTER_CRITICAL();
PC_VectSet(0x08, OSTickISR);
PC_SetTickRate(200);
OS_EXIT_CRITICAL();
(2)
(3)
Initialize the statistic task by calling ‘OSStatInit()’;
(4)
Create 10 identical tasks;
(5)
for (;;) {
Display the number of tasks created;
Display the % of CPU used;
Display the number of task switches in 1 second;
Display uC/OS-II’s version number
if (key was pressed) {
if (key pressed was the ESCAPE key) {
PC_DOSReturn();
}
}
Delay for 1 Second;
}
}
Listing 1.8, Task that creates the other tasks.
Before we create any other tasks, we need to determine how fast you particular PC is. This is done by calling
OSStatInit() L1.8(4). OSStatInit() is shown in listing 1.9 and starts by delaying itself for
two clock ticks so that it can be synchronized to the tick interrupt L1.9(1). Because of this,
OSStatInit() MUST occur after the ticker has been installed otherwise, your application will crash!
When µC/OS-II returns control to OSStatInit() , a 32-bit counter called OSIdleCtr is cleared
L1.9(2) and another delay is initiated, which again suspends OSStatInit() . At this point, µC/OS-II
doesn't have anything else to execute and thus decides to run the Idle Task (internal to µC/OS-II). The idle
task is an infinite loop that increments OSIdleCtr. The idle task gets to increment this counter for one
full second L1.9(3).
After one second, µC/OS-II resumes OSStatInit(), which saves
OSIdleCtr in a variable called OSIdleCtrMax L1.9(4). OSIdleCtrMax now contains the
largest value that OSIdleCtr can ever reach. When you start adding application code, the idle task will
get less of the processor's time and thus, OSIdleCtr will not be allowed to count as high (assuming we
will reset OSIdleCtr every second). CPU utilization is computed by a task provided b y µC/OS-II called
OSStatTask() which executes every second.
void OSStatInit (void)
{
OSTimeDly(2);
(1)
OS_ENTER_CRITICAL();
OSIdleCtr
= 0L;
OS_EXIT_CRITICAL();
OSTimeDly(OS_TICKS_PER_SEC);
OS_ENTER_CRITICAL();
OSIdleCtrMax = OSIdleCtr;
OSStatRdy
= TRUE;
OS_EXIT_CRITICAL();
(2)
(3)
(4)
(5)
}
Listing 1.9, Determining the PC’s speed.
1.07.03 Example #1, TaskN()
OSStatInit() returns back to TaskStart() and we can now create 10 identical tasks (all
running the same code) L1.8(5). TaskStart() will create all the tasks and no context switch will occur
because TaskStart() has a priority of 0 (i.e. the highest priority). When all the tasks are created,
TaskStart() enters the infinite loop portion of the task and continuously displays statistics on the
screen, checks to see if the ESCAPE key was pressed and then delay for one second before starting the loop
again. If you press the escape key, TaskStart() calls PC_DOSReturn() and we gracefully
return back to the DOS prompt.
The task code is shown in listing 1.10. When the task gets to execute, it tries to acquire a semaphore L1.10(1)
so that we can call the Borland C/C++ library function random() L1.10(2). I assumed here that the
random function is non-reentrant so, each of the 10 tasks must have exclusive access to this code in order to
proceed. We release the semaphore when both X and Y coordinates are obtained L1.10(3). The task displays
a number (between ‘0’and ‘9’) which is passed to the task when it is created L1.10(4). Finally, each task
delays itself for one tick L1.10(5) and thus, each task will execute 200 times per second! With the 10 task this
means that µC/OS-II will context switch between these tasks 2000 per second.
void Task
{
UBYTE
UBYTE
UBYTE
(void *data)
x;
y;
err;
for (;;) {
OSSemPend(RandomSem, 0, &err);
(1)
x = random(80);
(2)
y = random(16);
OSSemPost(RandomSem);
(3)
PC_DispChar(x, y + 5, *(char *)data, DISP_FGND_LIGHT_GRAY); (4)
OSTimeDly(1);
(5)
}
}
Listing 1.10,
Task that displays a number at random locations on the screen.
1.08 Example #2
Example #2 makes use of the extended task create function and µC/OS-II’s stack checking feature. Stack
checking is useful when you don’t actually know ahead of time how much stack space you need to allocate
for each task. In this case, you allocate much more stack space than you think you need and you let µC/OS-II
tell you exactly how much stack space is actually used up. You obviously need to run the application long
enough and under your worst case conditions to get proper numbers. Your final stack size should
accommodate for system expansion so make sure you allocate between 10 and 25% more. In safety critical
applications, however, you may even want to consider 100% more. What you should get from stack
checking is a ‘ballpark’figure; you are not looking for an exact stack usage.
µC/OS-II’s stack checking function assumes that the stack is initially filled with zeros when the task is
created. You accomplish this by telling OSTaskCreateExt() to clear the stack upon task creation
(i.e. you OR both OS_TASK_OPT_STK_CHK and OS_TASK_OPT_STK_CLR for the opt
argument). If you intend to create and delete tasks, you should set these options so that a new stack is cleared
every time the task is created. You should note that having OSTaskCreateExt() clear the stack
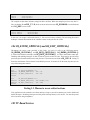
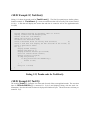
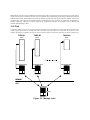
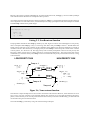
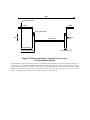
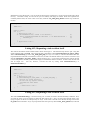
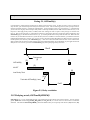
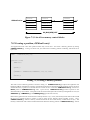
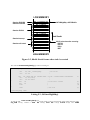
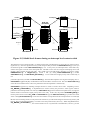
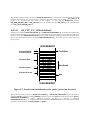
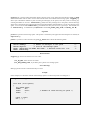
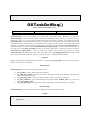
increases execution overhead which obviously depends on the stack size. µC/OS-II scans the stack starting at
the bottom until it finds a non-zero entry (see figure 1-1). As the stack is scanned, µC/OS-II increments a
counter that indicates how many entries are free (Stack Free).
Bottom-Of-Stack
礐 /OS-II 'Scans' stack
0x0000
0x0000
0x0000
0x0000
Stack Free
0x0000
0x0000
0x0000
Stack Growth
Stack Size
Stack Used
Top-Of-Stack
Figure 1-1 µC/OS-II Stack checking
The second example is found in \SOFTWARE\uCOS-II\EX2_x86L and consists of a total of 9
tasks. Again, µC/OS-II creates two ‘internal’tasks: the idle task and the task that determines CPU usage.
EX2L.C creates the other 7 tasks. As with example #1, TaskStart() is created by main() and
its function is to create the other tasks and display the following statistics on the screen:
1)
2)
3)
4)
5)
the number of task switches in one second,
the CPU usage in %,
the number of context switches,
the current date and time, and
µC/OS-II’s version.
1.08.01 Example #2, main()
main() looks just like the code for example #1 (see listing 1.11) except for two small differences. First,
main() calls PC_ElapsedInit() L1.11(1) to in itialize the elapsed time measurement function
which will be used to measure the execution time of OSTaskStkChk(). Second, all tasks are created
using the extended task create function instead of OSTaskCreate() L1.11(2). This allows us, among
other things, to perform stack checking on each task. In addition to the same four arguments needed by
OSTaskCreate() , OSTaskCreateExt() requires five additional arguments: a task ID, a
pointer to the bottom of the stack, the stack size (in number of elements), a p ointer to a user supplied Task
Control Block (TCB) extension, and a variable used to specify options to the task. One of the options is used
to tell µC/OS-II that stack checking is allowed on the created task. Example #2 doesn’t make use of the TCB
(Task Control Block) extension pointer.
void main (void)
{
PC_DispClrScr(DISP_FGND_WHITE + DISP_BGND_BLACK);
OSInit();
PC_DOSSaveReturn();
PC_VectSet(uCOS, OSCtxSw);
PC_ElapsedInit();
(1)
OSTaskCreateExt(TaskStart,
(2)
(void *)0,
&TaskStartStk[TASK_STK_SIZE-1],
TASK_START_PRIO,
TASK_START_ID,
&TaskStartStk[0],
TASK_STK_SIZE,
(void *)0,
OS_TASK_OPT_STK_CHK | OS_TASK_OPT_STK_CLR);
OSStart();
}
Listing 1.11, main() for example #2.
1.08.02 Example #2, TaskStart()
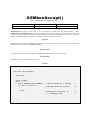
Listing 1.12 shows the pseudo code for TaskStart(). The first five operations are similar to those
found in example #1. TaskStart() creates two mailboxes that will be used by Task #4 and Task #5
L1.12(1). A task that will display the current date and time is created as well as five application tasks
L1.12(20).
void TaskStart (void *data)
{
Prevent compiler warning by assigning ‘data’ to itself;
Display a banner and non-changing text;
Install uC/OS-II’s tick handler;
Change the tick rate to 200 Hz;
Initialize the statistics task;
Create 2 mailboxes which are used by Task #4 and #5;
(1)
Create a task that will display the date and time on the screen; (2)
Create 5 application tasks;
for (;;) {
Display #tasks running;
Display CPU usage in %;
Display #context switches per seconds;
Clear the context switch counter;
Display uC/OS-II’s version;
if (Key was pressed) {
if (Key pressed was the ESCAPE key) {
Return to DOS;
}
}
Delay for 1 second;
}
}
Listing 1.12, Pseudo-code for TaskStart().
1.08.03 Example #2, TaskN()
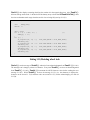
The code for Task1() checks the size of the stack for each of the seven application tasks. The execution
time of OSTaskStkChk() is measured L1.13(1)-(2) and displayed along with the stack size
information. Note that all stack size data are displayed in number of bytes. This task executes 10 times per
second L1.13(3).
void Task1 (void *pdata)
{
INT8U
err;
OS_STK_DATA data;
INT16U
time;
INT8U
i;
char
s[80];
pdata = pdata;
for (;;) {
for (i = 0; i < 7; i++) {
PC_ElapsedStart();
err = OSTaskStkChk(TASK_START_PRIO+i, &data);
time = PC_ElapsedStop();
if (err == OS_NO_ERR) {
sprintf(s, "%3ld
%3ld
%3ld
%5d",
data.OSFree + data.OSUsed,
data.OSFree,
data.OSUsed,
time);
PC_DispStr(19, 12+i, s, DISP_FGND_YELLOW);
}
}
OSTimeDlyHMSM(0, 0, 0, 100);
}
(1)
(2)
(3)
}
Listing 1.13, Example #2, Task #1.
Task2() displays a clockwise rotating wheel on the screen. Each rotation completes in 200 mS (i.e. 4 x
10 ticks x 5 mS/tick).
void Task2 (void *data)
{
data = data;
for (;;) {
PC_DispChar(70, 15,
OSTimeDly(10);
PC_DispChar(70, 15,
OSTimeDly(10);
PC_DispChar(70, 15,
OSTimeDly(10);
PC_DispChar(70, 15,
OSTimeDly(10);
}
}
'|',
DISP_FGND_WHITE + DISP_BGND_RED);
'/',
DISP_FGND_WHITE + DISP_BGND_RED);
'-',
DISP_FGND_WHITE + DISP_BGND_RED);
'\\', DISP_FGND_WHITE + DISP_BGND_RED);
Listing 1.14, Rotating wheel task.
Task3() also displays a rotating wheel but, the rotation is in the opposite direction. Also, Task3()
allocates storage on the stack. I decided to fill the dummy array to show that OSTaskStkChk() takes
less time to determine stack usage when the stack is close to being fully used up L1.15(1).
void Task3 (void *data)
{
char
dummy[500];
INT16U i;
data = data;
for (i = 0; i < 499; i++) {
dummy[i] = '?';
}
for (;;) {
PC_DispChar(70, 16, '|',
OSTimeDly(20);
PC_DispChar(70, 16, '\\',
OSTimeDly(20);
PC_DispChar(70, 16, '-',
OSTimeDly(20);
PC_DispChar(70, 16, '/',
OSTimeDly(20);
}
(1)
DISP_FGND_WHITE + DISP_BGND_BLUE);
DISP_FGND_WHITE + DISP_BGND_BLUE);
DISP_FGND_WHITE + DISP_BGND_BLUE);
DISP_FGND_WHITE + DISP_BGND_BLUE);
}
Listing 1.15, Rotating wheel task.
Task4() sends a message to Task5() and waits for an acknowledgement from Task5() L1.16(1).
The message sent is simply a pointer to a character. Every time Task4() receives an acknowledgement
from Task5() L1.16(2), Task4() increments the ASCII character value before sending the next
message L1.16(3). When Task5() receives the message L1.17(1) (i.e. the character) it displays the
character on the screen L1.17(2) and then waits one second L1.17(3) before acknowledging it to task #4
L1.17(4).
void Task4 (void *data)
{
char
txmsg;
INT8U err;
data = data;
txmsg = 'A';
for (;;) {
while (txmsg <= 'Z') {
OSMboxPost(TxMbox, (void *)&txmsg);
OSMboxPend(AckMbox, 0, &err);
txmsg++;
}
txmsg = 'A';
}
(1)
(2)
(3)
}
Listing 1.16, Task #4 communicates with task #5.
void Task5 (void *data)
{
char *rxmsg;
INT8U err;
data = data;
for (;;) {
rxmsg = (char *)OSMboxPend(TxMbox, 0, &err);
PC_DispChar(70, 18, *rxmsg, DISP_FGND_YELLOW+DISP_BGND_RED);
OSTimeDlyHMSM(0, 0, 1, 0);
OSMboxPost(AckMbox, (void *)1);
}
(1)
(2)
(3)
(4)
}
Listing 1.17, Task #5 receives and displays a message.
TaskClk() (listing 1.18) is a task that displays the current date and time every second.
void TaskClk (void *data)
{
struct time now;
struct date today;
char
s[40];
data = data;
for (;;) {
PC_GetDateTime(s);
PC_DispStr(0, 24, s, DISP_FGND_BLUE + DISP_BGND_CYAN);
OSTimeDly(OS_TICKS_PER_SEC);
}
}
Listing 1.18, Clock display task.
1.09 Example #3
Example #3 demonstrates some additional features of µC/OS-II. Specifically, example #3 uses the TCB
(Task Control Block) extension capability of OSTaskCreateExt(), the user defined context switch
hook (OSTaskSwHook() ), the user defined statistic task hook (OSTaskStatHook()), and
message queues.
The third example is found in \SOFTWARE\uCOS-II\EX3_x86L and again, consists of a total of
9 tasks. µC/OS-II creates two ‘internal’tasks: the idle task and the task that determines CPU usage.
EX3L.C creates the other 7 tasks. As with examples #1 and #2, TaskStart() is created by main()
and its function is to create the other tasks and display statistics on the screen.
1.09.01 Example #3, main()
main() (see listing 1.19) looks just like the code for example #2 except that the task is given a name
which saved in a user defined TCB extension L1.19(1) (the declaration for the extension is found in
INCLUDES.H and shown in listing 1.20). I decided to allocate 30 characters for the tas k name (including
the NUL character) to show that you can have fairly descriptive task names L1.20(1). I disabled stack
checking for TaskStart() because we will not be using that feature in this example L1.19(2).
void main (void)
{
PC_DispClrScr(DISP_FGND_WHITE + DISP_BGND_BLACK);
OSInit();
PC_DOSSaveReturn();
PC_VectSet(uCOS, OSCtxSw);
PC_ElapsedInit();
strcpy(TaskUserData[TASK_START_ID].TaskName, "StartTask");
OSTaskCreateExt(TaskStart,
(void *)0,
&TaskStartStk[TASK_STK_SIZE-1],
TASK_START_PRIO,
TASK_START_ID,
&TaskStartStk[0],
TASK_STK_SIZE,
&TaskUserData[TASK_START_ID],
0);
OSStart();
(1)
(2)
}
Listing 1.19, main() for example #3.
typedef struct {
char
TaskName[30];
INT16U TaskCtr;
INT16U TaskExecTime;
INT32U TaskTotExecTime;
} TASK_USER_DATA;
(1)
Listing 1.20, TCB extension data structure.
1.09.02 Example #3, Tasks
The pseudo code for TaskStart() is shown in listing 1.21. The code hasn’t changed much from
example #2 except for three things:
1)
2)
3)
A message queue is created L1.21(1) for use by Task1() , Task2() and Task3() ,
Each task has a name which is stored in the TCB extension L1.21(2) and,
Stack checking will not be allowed.
void TaskStart (void *data)
{
Prevent compiler warning by assigning ‘data’ to itself;
Display a banner and non-changing text;
Install uC/OS-II’s tick handler;
Change the tick rate to 200 Hz;
Initialize the statistics task;
Create a message queue;
(1)
Create a task that will display the date and time on the screen;
Create 5 application tasks with a name stored in the TCB ext.;
(2)
for (;;) {
Display #tasks running;
Display CPU usage in %;
Display #context switches per seconds;
Clear the context switch counter;
Display uC/OS-II’s version;
if (Key was pressed) {
if (Key pressed was the ESCAPE key) {
Return to DOS;
}
}
Delay for 1 second;
}
}
Listing 1.21, Pseudo-code for TaskStart() for example #3.
Task1() writes messages into the message queue L1.22(1). Task1() delays itself whenever a
message is sent L1.22(2). This allows the receiver to display the message at a humanly readable rate. Three
different messages are sent.
void Task1 (void *data)
{
char one
= '1';
char two
= '2';
char three = '3';
data = data;
for (;;) {
OSQPost(MsgQueue, (void *)&one);
OSTimeDlyHMSM(0, 0, 1,
0);
OSQPost(MsgQueue, (void *)&two);
OSTimeDlyHMSM(0, 0, 0, 500);
OSQPost(MsgQueue, (void *)&three);
OSTimeDlyHMSM(0, 0, 1,
0);
}
}
Listing 1.22, Example #3, Task #1.
(1)
(2)
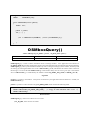
Task2() pends on the message queue with no timeout L1.23(1). This means that the task will wait
forever for a message to arrive. When the message is received, Task2() displays the message on the
screen L1.23(2) and delays itself for 500 mS L1.23(3). This will allow Task3() to receive a message
because Task2() will not be checking the queue for a whole 500 mS.
void Task2 (void *data)
{
INT8U *msg;
INT8U err;
data = data;
for (;;) {
msg = (INT8U *)OSQPend(MsgQueue, 0, &err);
PC_DispChar(70, 14, *msg, DISP_FGND_YELLOW+DISP_BGND_BLUE);
OSTimeDlyHMSM(0, 0, 0, 500);
}
(1)
(2)
(3)
}
Listing 1.23, Example #3, Task #2.
Task3() also pends on the message queue but, it is willing to wait for only 250 mS L1.24(1). If a
message is received, Task3() will display the message number L1.24(3). If a timeout occurs, Task3()
will display a ‘T’(for timeout) instead L1.24(2).
void Task3 (void *data)
{
INT8U *msg;
INT8U err;
data = data;
for (;;) {
msg = (INT8U *)OSQPend(MsgQueue, OS_TICKS_PER_SEC/4, &err); (1)
if (err == OS_TIMEOUT) {
PC_DispChar(70,15,'T',DISP_FGND_YELLOW+DISP_BGND_RED);
(2)
} else {
PC_DispChar(70,15,*msg,DISP_FGND_YELLOW+DISP_BGND_BLUE); (3)
}
}
}
Listing 1.24, Example #3, Task #3.
Task4() doesn’t do much except post L1.25(1) and pend L1.25(2) on a mailbox. This basically allows
you to measure the time it takes for these calls to execute on your particular PC. Task4() executes every
10 mS L1.25(3).
void
Task4 (void *data)
{
OS_EVENT *mbox;
INT8U
err;
data = data;
mbox = OSMboxCreate((void *)0);
for (;;) {
OSMboxPost(mbox, (void *)1);
OSMboxPend(mbox, 0, &err);
OSTimeDlyHMSM(0, 0, 0, 10);
}
(1)
(2)
(3)
}
Listing 1.25, Example #3, Task #4.
Task5() does nothing useful except it delays itself for 1 clock tick L1.26(1). Note that all µC/OS-II tasks
MUST call a service provided by µC/OS-II to wait for either time to expire or an event to occur. If this is not
done, the task would prevent all lower priority tasks from running.
void Task5 (void *data)
{
data = data;
for (;;) {
OSTimeDly(1);
}
}
Listing 1.26, Example #3, Task #5.
TaskClk() is a task that displays the current date and time every second.
(1)
1.09.03 Example #3, Notes
There are things happening behind the scenes and would not be apparent just by looking at EX3L.C.
EX3L.C contains code for OSTaskSwHook() that measures the execution time of each task, how
often each task executes, and keeps track of total execution time of each task. This information is stored in
the TCB extension so that it can be displayed. OSTaskSwHook() is called every time a context switch
occurs.
The execution time of the task being switched out is obtained by reading a timer on the PC through the
function PC_ElapsedStop() L1.27(1). It is assumed that the timer was started by calling
PC_ElapsedStart() when the task was switched in L1.27(2). The first context switch will
probably read an incorrect value but this is not critical. OSTaskSwHook() then retrieves the pointer to
the TCB extension L1.27(3) and, if an extension exist L1.27(4) for the task, a counter is incremented L1.27(5)
which indicates how often the current task has been switched out. Such a counter is useful to determine if a
particular task is running. Next, the execution time of the task being switched out is saved in the TCB
extension L1.27(6). A separate accumulator is used to maintain the total execution time L1.27(7). This
allows you to determine the percentage of time each task takes with respect to other tasks in an application.
Note that these statistics are displayed by OSTaskStatHook() .
void OSTaskSwHook (void)
{
INT16U
time;
TASK_USER_DATA *puser;
time = PC_ElapsedStop();
PC_ElapsedStart();
puser = OSTCBCur->OSTCBExtPtr;
if (puser != (void *)0) {
puser->TaskCtr++;
puser->TaskExecTime
= time;
puser->TaskTotExecTime += time;
}
(1)
(2)
(3)
(4)
(5)
(6)
(7)
}
Listing 1.27, User defined OSTaskSwHook().
µC/OS-II always calls a function called OSTaskStatHook() when you enable the statistic task (i.e.
the configuration constant OS_TASK_STAT_EN in OS_CFG.H is set to 1). When enabled, the
statistic task OSTaskStat() always calls the user definable function OSTaskStatHook().
This happens every second. I decided to have OSTaskStatHook() display the statistics collected by
OSTaskSwHook() . In addition, OSTaskStatHook() also computes the percentage of time
that each task takes with respect to each other.
The total execution time of all tasks is computed in L1.28(1). Then, individual statistics are displayed at the
proper location on the screen L1.28(2) by a function (i.e. DispTaskStat() ) that takes care of
converting the values into ASCII. Next, the percentage of execution time is computed for each task L1.28(3)
and displayed L1.28(4).
void OSTaskStatHook (void)
{
char
s[80];
INT8U i;
INT32U total;
INT8U pct;
total = 0L;
for (i = 0; i < 7; i++) {
total += TaskUserData[i].TaskTotExecTime;
DispTaskStat(i);
}
if (total > 0) {
for (i = 0; i < 7; i++) {
pct = 100 * TaskUserData[i].TaskTotExecTime / total;
sprintf(s, "%3d %%", pct);
PC_DispStr(62, i + 11, s, DISP_FGND_YELLOW);
}
}
if (total > 1000000000L) {
for (i = 0; i < 7; i++) {
TaskUserData[i].TaskTotExecTime = 0L;
}
}
(1)
(2)
(3)
(4)
}
Listing 1.28, User defined OSTaskStatHook().
Chapter 2
Real-Time Systems Concepts
Real-time systems are characterized by the fact that severe consequences will result if logical as well as timing
correctness properties of the system are not met. There are two types of real-time systems: SOFT and HARD. In a
SOFT real-time system, tasks are performed by the system as fast as possible, but the tasks don't have to finish by
specific times. In HARD real-time systems, tasks have to be performed not only correctly but on time. Most real-time
systems have a combination of SOFT and HARD requirements. Real-time applications cover a wide range. Most
applications for real-time systems are embedded. This means that the computer is built into a system and is not seen by
the user as being a computer. Examples of embedded systems are:
Process control:
Food processing
Chemical plants
Automotive:
Engine controls
Anti-lock braking systems
Office automation:
FAX machines
Copiers
Computer peripherals:
Printers
Terminals
Scanners
Modems
Robots
Aerospace:
Flight management systems
Weapons systems
Jet engine controls
Domestic:
Microwave ovens
Dishwashers
Washing machines
Thermostats
Real-time software applications are typically more difficult to design than non-real-time applications. This chapter
describes real-time concepts.
2.00 Foreground/Background Systems
Small systems of low complexity are generally designed as shown in Figure 2-1. These systems are called
foreground/background or super-loops. An application consists of an infinite loop that calls modules (that is,
functions) to perform the desired operations (background). Interrupt Service Routines (ISRs) handle asynchronous
events (foreground). Foreground is also called interrupt level while background is called task level. Critical operations
must be performed by the ISRs to ensure that they are dealt with in a timely fashion. Because of this, ISRs have a
tendency to take longer than they should. Also, information for a background module made available by an ISR is not
processed until the background routine gets its turn to execute. This is called the task level response. The worst case
task level response time depends on how long the background loop takes to execute. Because the execution time of
typical code is not constant, the time for successive passes through a portion of the loop is non-deterministic.
Furthermore, if a code change is made, the timing of the loop is affected.
Most high volume microcontroller-based applications (e.g., microwave ovens, telephones, toys, and so on) are
designed as foreground/background systems. Also, in microcontroller-based applications, it may be better (from a
power consumption point of view) to halt the processor and perform all of the processing in ISRs.
Background
Foreground
ISR
ISR
Time
ISR
Code execution
Figure 2-1, Foreground/background systems
2.01 Critical Section of Code
A critical section of code, also called a critical region, is code that needs to be treated indivisibly. Once the section of
code starts executing, it must not be interrupted. To ensure this, interrupts are typically disabled before the critical
code is executed and enabled when the critical code is finished (see also Shared Resource).
2.02 Resource
A resource is any entity used by a task. A resource can thus be an I/O device such as a printer, a keyboard, a display,
etc. or a variable, a structure, an array, etc.
2.03 Shared Resource
A shared resource is a resource that can be used by more than one task. Each task should gain exclusive access to the
shared resource to prevent data corruption. This is called Mutual Exclusion and techniques to ensure mutual exclusion
are discussed in section 2.19, Mutual Exclusion.
2.04 Multitasking
Multitasking is the process of scheduling and switching the CPU (Central Processing Unit) between several tasks; a
single CPU switches its attention between several sequential tasks. Multitasking is like foreground/background with
multiple backgrounds. Multitasking maximizes the utilization of the CPU and also provides for modular construction
of applications. One of the most important aspects of multitasking is that it allows the application programmer to
manage complexity inherent in real-time applications. Application programs are typically easier to design and
maintain if multitasking is used.
2.05 Task
A task, also called a thread, is a simple program that thinks it has the CPU all to itself. The design process for a
real-time application involves splitting the work to be done into tasks which are responsible for a portion of the
problem. Each task is assigned a p riority, its own set of CPU registers, and its own stack area (as shown in Figure 2-2).
TASK #1
TASK #2
TASK #n
Stack
Stack
Stack
Task Control Block
Status
Task Control Block
Status
Task Control Block
Status
SP
SP
SP
Priority
Priority
Priority
MEMORY
CPU
CPU Registers
SP
Context
Figure 2-2, Multiple tasks.
Each task typically is an infinite loop that can be in any one of five states: DORMANT, READY , RUNNING, WAITING
FOR AN EVENT, or INTERRUPTED (see Figure 2-3). The DORMANT state corresponds to a task which resides in
memory but has not been made available to the multitasking kernel. A task is READY when it can execute but its
priority is less than the currently running task. A task is RUNNING when it has control of the CPU. A task is
WAITING FOR AN EVENT when it requires the occurrence of an event (waiting for an I/O operation to complete, a
shared resource to be available, a timing pulse to occur, time to expire etc.). Finally, a task is INTERRUPTED when
an interrupt has occurred and the CPU is in the process of servicing the interrupt. Figure 2-3 also shows the functions
provided by µC/OS-II to make a task switch from one state to another.
WAITING
OSMBoxPost()
OSQPost()
OSQPostFront()
OSSemPost()
OSTaskResume()
OSTimeDlyResume()
OSTimeTick()
OSTaskDel()
OSTaskCreate()
OSTaskCreateExt()
DORMANT
OSMBoxPend()
OSQPend()
OSSemPend()
OSTaskSuspend()
OSTimeDly()
OSTimeDlyHMSM()
OSStart()
OSIntExit()
OS_TASK_SW()
READY
Interrupt
RUNNING
ISR
OSIntExit()
OSTaskDel()
Task is Preempted
OSTaskDel()
Figure 2-3, Task states
2.06 Context Switch (or Task Switch)
When a multitasking kernel decides to run a different task, it simply saves the current task's context (CPU registers) in
the current task's context storage area –it’s stack (see Figure 2-2). Once this operation is performed, the new task's
context is restored from its storage area and then resumes execution of the new task's code. This process is called a
context switch or a task switch. Context switching adds overhead to the application. The more registers a CPU has, the
higher the overhead. The time required to perform a context switch is determined by how many registers have to be
saved and restored by the CPU. Performance of a real-time kernel should not be judged on how many context switches
the kernel is capable of doing per second.
2.07 Kernel
The kernel is the part of a multitasking system responsible for the management of tasks (that is, for managing the
CPU's time) and communication between tasks. The fundamental service provided by the kernel is context switching.
The use of a real-time kernel will generally simplify the design of systems by allowing the application to be divided
into multiple tasks managed by the kernel. A kernel will add overhead to your system because it requires extra ROM
(code space), additional RAM for the kernel data structures but most importantly, each task requires its own stack
space which has a tendency to eat up RAM quite quickly. A kernel will also consume CPU time (typically between 2
and 5%).
Single chip microcontrollers are generally not able to run a real-time kernel because they have very little RAM.
A kernel can allow you to make better use of your CPU by providing you with indispensible services such as
semaphore management, mailboxes, queues, time delays, etc. Once you design a system using a real-time kernel, you
will not want to go back to a foreground/background system.
2.08 Scheduler
The scheduler, also called the dispatcher, is the part of the kernel responsible for determining which task will run next.
Most real-time kernels are priority based. Each task is assigned a priority based on its importance. The priority for each
task is application specific. In a priority-based kernel, control of the CPU will always be given to the highest priority
task ready-to-run. When the highest-priority task gets the CPU, however, is determined by the type of kernel used.
There are two types of priority-based kernels: non-preemptive and preemptive.
2.09 Non-Preemptive Kernel
Non-preemptive kernels require that each task does something to explicitly give up control of the CPU. To maintain
the illusion of concurrency, this process must be done frequently. Non-preemptive scheduling is also called
cooperative multitasking; tasks cooperate with each other to share the CPU. Asynchronous events are still handled by
ISRs. An ISR can make a higher priority task ready to run, but the ISR always returns to the interrupted task. The new
higher priority task will gain control of the CPU only when the current task gives up the CPU.
One of the advantages of a non-preemptive kernel is that interrupt latency is typically low (see the later discussion on
interrupts). At the task level, non-preemptive kernels can also use non-reentrant functions (discussed later).
Non-reentrant functions can be used by each task without fear of corruption by another task. This is because each task
can run to completion before it relinquishes the CPU. Non-reentrant functions, however, should not be allowed to give
up control of the CPU.
Task-level response using a non-preemptive kernel can be much lower than with foreground/background systems
because task-level response is now given by the time of the longest task.
Another advantage of non-preemptive kernels is the lesser need to guard shared data through the use of semaphores.
Each task owns the CPU and you don't have to fear that a task will be preempted. This is not an absolute rule, and in
some instances, semaphores should still be used. Shared I/O devices may still require the use of mutual exclusion
semaphores; for example, a task might still need exclusive access to a printer.
Low Priority Task
(1)
(2)
ISR
(3)
(4)
ISR makes the high
priority task ready
Time
(5)
(6)
Low priority task
relinquishes the CPU
High Priority Task
(7)
Figure 2-4, Non-preemptive kernel
The execution profile of a non-preemptive kernel is shown in Figure 2-4. A task is executing F2-4(1) but gets
interrupted. If interrupts are enabled, the CPU vectors (i.e. jumps) to the ISR F2-4(2). The ISR handles the event
F2-4(3) and makes a higher priority task ready-to-run. Upon completion of the ISR, a Return From Interrupt
instruction is executed and the CPU returns to the interrupted task F2-4(4). The task code resumes at the instruction
following the interrupted instruction F2-4(5). When the task code completes, it calls a service provided by the kernel
to relinquish the CPU to another task F2-4(6). The new higher priority task then executes to handle the event signaled
by the ISR F2-4(7).
The most important drawback of a non-preemptive kernel is responsiveness. A higher priority task that has been made
ready to run may have to wait a long time to run, because the current task must give up the CPU when it is ready to do
so. As with background execution in foreground/background systems, task-level response time in a non-preemptive
kernel is non-deterministic; you never really know when the highest priority task will get control of the CPU. It is up to
your application to relinquish control of the CPU.
To summarize, a non-preemptive kernel allows each task to run until it voluntarily gives up control of the CPU. An
interrupt will preempt a task. Upon completion of the ISR, the ISR will return to the interrupted task. Task-level
response is much better than with a foreground/background system but is still non-deterministic. Very few
commercial kernels are non-preemptive.
2.10 Preemptive Kernel
A preemptive kernel is used when system responsiveness is important. Because of this, µC/OS-II and most
commercial real-time kernels are preemptive. The highest priority task ready to run is always given control of the CPU.
When a task makes a higher priority task ready to run, the current task is preempted (suspended) and the higher
priority task is immediately given control of the CPU. If an ISR makes a higher priority task ready, when the ISR
completes, the interrupted task is suspended and the new higher priority task is resumed. This is illustrated in Figure
2-5.
Low Priority Task
ISR
High Priority Task
ISR makes the high
priority task ready
Time
Figure 2-5, Preemptive kernel
With a preemptive kernel, execution of the highest priority task is deterministic; you can determine when the highest
priority task will get control of the CPU. Task-level response time is thus minimized by using a preemptive kernel.
Application code using a preemptive kernel should not make use of non-reentrant functions unless exclusive access to
these functions is ensured through the use of mu tual exclusion semaphores, because both a low priority task and a high
priority task can make use of a common function. Corruption of data may occur if the higher priority task preempts a
lower priority task that is making use of the function.
To summarize, a preemptive kernel always executes the highest priority task that is ready to run. An interrupt will
preempt a task. Upon completion of an ISR, the kernel will resume execution to the highest priority task ready to run
(not the interrupted task). Task-level response is optimum and deterministic. µC/OS-II is a preemptive kernel.
2.11 Reentrancy
A reentrant function is a function that can be used by more than one task without fear of data corruption. A reentrant
function can be interrupted at any time and resumed at a later time without loss of data. Reentrant functions either use
local variables (i.e., CPU registers or variables on the stack) or protect data when global variables are used. An
example of a reentrant function is shown in listing 2.1.
void strcpy(char *dest, char *src)
{
while (*dest++ = *src++) {
;
}
*dest = NUL;
}
Listing 2.1, Reentrant function
Because copies of the arguments to strcpy() are placed on the task's stack, strcpy() can be invoked by multiple
tasks without fear that the tasks will corrupt each other's pointers.
An example of a non-reentrant function is shown in listing 2.2. swap() is a simple function that swaps the contents of
its two arguments. For sake of discussion, I assumed that you are using a preemptive kernel, that interrupts are enabled
and that Temp is declared as a global integer:
int Temp;
void swap(int *x, int *y)
{
Temp = *x;
*x
= *y;
*y
= Temp;
}
Listing 2.2, Non-Reentrant function
The programmer intended to make swap() usable by any task. Figure 2-6 shows what could happen if a low priority
task is interrupted while swap() F2-6(1) is executing. Note that at this point Temp contains 1. The ISR makes the
higher priority task ready to run, and thus, at the completion of the ISR F2-6(2), the kernel (assuming µC/OS-II) is
invoked to switch to this task F2-6(3). The high priority task sets Temp to 3 and swaps the contents of its variables
correctly (that is, z is 4 and t is 3). The high priority task eventually relinquishes control to the low priority task
F2-6(4) by calling a kernel service to delay itself for 1 clock tick (described later). The lower priority task is thus
resumed F2-6(5). Note that at this point, Temp is still set to 3! When the low-priority task resumes execution, it sets y
to 3 instead of 1.
LOW PRIORITY TASK
HIGH PRIORITY TASK
Temp == 1
while (1) {
x = 1;
y = 2;
ISR
swap(&x, &y);
{
Temp = *x;
(2)
O.S.
(1)
(5)
*x
*y
while (1) {
z = 3;
t = 4;
OSIntExit()
= *y;
= Temp;
(3)
O.S.
(4)
}
.
.
OSTimeDly(1);
}
Temp == 3!
Temp == 3
swap(&z, &t);
{
Temp = *z;
*z
= *t;
*t
= Temp;
}
.
.
OSTimeDly(1);
.
.
}
Figure 2-6, Non-reentrant function.
Note that this a simple example and it is obvious how to make the code reentrant. However, other situations are not as
easy to solve. An error caused by a non-reentrant function may not show up in your application during the testing
phase; it will most likely occur once the product has been delivered! If you are new to multitasking, you will need to be
careful when using non-reentrant functions.
We can make swap() reentrant by using one of the following techniques:
a) Declare Temp local to swap().
b) Disable interrupts before the operation and enable them after.
c) Use a semaphore (described later).
If the interrupt occurs either before or after swap(), the x and y values for both tasks will be correct.
2.12 Round Robin Scheduling
When two or more tasks have the same priority, the kernel will allow one task to run for a predetermined amount of
time, called a quantum, and then selects another task. This is also called time slicing. The kernel gives control to the
next task in line if:
a) the current task doesn't have any work to do during its time slice or
b) the current task completes before the end of its time slice.
µC/OS-II does not currently support round-robin scheduling. Each task must have a unique priority in your
application.
2.13 Task Priority
A priority is assigned to each task. The more important the task, the higher the priority given to it.
2.14 Static Priorities
Task priorities are said to be static when the priority of each task does not change during the application's execution.
Each task is thus given a fixed priority at compile time. All the tasks and their timing constraints are known at compile
time in a system where priorities are static.
2.15 Dynamic Priorities
Task priorities are said to be dynamic if the priority of tasks can be changed during the application's execution; each
task can change its priority at run-time. This is a desirable feature to have in a real-time kernel to avoid priority
inversions.
2.16 Priority Inversions
Priority inversion is a problem in real-time systems and occurs mostly when you use a real-time kernel. Figure 2-7
illustrates a priority inversion scenario. Task#1 has a higher priority than Task#2 which in turn has a higher priority
than Task#3. Task#1 and Task#2 are both waiting for an event to occur and thus, Task#3 is executing F2-7(1). At
some point, Task#3 acquires a semaphore (see section 2.18, Semaphores) that it needs before it can access a shared
resource F2-7(2). Task#3 performs some operations on the acquired resource F2 -7(3) until it gets preempted by the
high priority task, Task#1 F2-7(4). Task#1 executes for a while until it also wants to access the resource F2-7(5).
Because Task#3 owns the resource, Task#1 will have to wait until Task#3 releases the semaphore. As Task#1 tries to
get the semaphore, the kernel notices that the semaphore is already owned and thus, Task#1 gets suspended and
Task#3 is resumed F2-7(6). Tas k#3 continues execution until it gets preempted by Task#2 because the event that
Task#2 was waiting for occurred F2-7(7). Task #2 handles the event F2-7(8) and when it’s done, Task#2 relinquishes
the CPU back to Task#3 F2-7(9). Task#3 finishes working with the resource F2-7(10) and thus, releases the
semaphore F2-7(11). At this point, the kernel knows that a higher priority task is waiting for the semaphore and, a
context switch is done to resume Task#1. At this point, Task#1 has the semaphore and can thus access the shared
resource F2-7(12).
The priority of Task#1 has been virtually reduced to that of Task#3’s because it was waiting for the resource that
Task#3 owned. The situation got aggravated when Task#2 preempted Task#3 which further delayed the execution of
Task#1.
You can correct this situation by raising the priority of Task#3 (above the priority of the other tasks competing for the
resource) for the time Task#3 is accessing the resource and restore the original priority level when the task is finished.
A multitasking kernel should allow task priorities to change dynamically to help prevent priority inversions. It takes,
however, some time to change a task’
s priority. What if Task#3 had completed access of the resource before it got
preemp ted by Task#1 and then by Task#2? Had we raised the priority of Task#3 before accessing the resource and
then lowered it back when done, we would have wasted valuable CPU time. What is really needed to avoid priority
inversion is a kernel that changes the priority of a task automatically. This is called priority inheritance, and
unfortunately µC/OS-II doesn’t support this feature. There are, however, some commercial kernels that do.
Priority Inversion
(4)
(12)
Task 1 (H)
(8)
Task 2 (M)
(1)
(6)
(10)
Task 3 (L)
Task 3 Get Semaphore
(2)
Task 1 Preempts Task 3
(3)
Task 1 Tries to get Semaphore
(5)
Task 3 Resumes
(9)
Task 3 Releases the Semaphore
(11)
Task 2 Preempts Task 3
(7)
Figure 2-7, Priority inversion problem.
Figure 2-8 illustrates what happens when a kernel supports priority inheritance. As with the previous example, Task#3
is running F2-8(1) and then acquires a semaphore to access a shared resource F2-8(2). Task#3 accesses the resource
F2-8(3) and then gets preempted by Task#1 F2-8(4). Task#1 executes F2-8(5) and then tries to obtain the semaphore
F2-8(6). The kernel sees that Task#3 has the semaphore but has a lower priority than Task#1. In this case, the kernel
raises the priority of Task#3 to the same level as Task#1. The kernel then switches back to Task#3 so that this task can
continue with the resource F2-8(7). When Task#3 is done with the resource, it releases the semaphore F2-8(8). At this
point, the kernel reduces the priority of Task#3 to its original value and gives the semaphore to Task#1 which is now
free to continue F2-8(9). When Task#1 is done executing F2-8(10), the medium priority task (i.e. Task#2) gets the
CPU F2-8(11). Note that Task#2 could have been ready-to-run anytime between F2-8(3) and F2-8(10) without
affecting the outcome. There is still some level of priority inversion but, this really cannot be avoided.
Priority Inversion
(5)
(9)
Task 1 (H)
(11)
Task 2 (M)
(1)
(3)
(7)
Task 3 (L)
Task 3 Get Semaphore
(2)
Task 1 Completes
(10)
Task 1 Preempts Task 3
(4)
Task 1 Tries to get Semaphore
(Priority of Task 3 is raised to Task 1's)
(6)
Task 3 Releases the Semaphore
(Task 1 Resumes)
(8)
Figure 2-8, Kernel that supports priority inheritance.
2.17 Assigning Task Priorities
Assigning task priorities is not a trivial undertaking because of the complex nature of real-time systems. In most
systems, not all tasks are considered critical. Non-critical tasks should obviously be given low priorities. Most
real-time systems have a combination of SOFT and HARD requirements. In a SOFT real-time system, tasks are
performed by the system as quickly as possible, but they don't have to finish by specific times. In HARD real-time
systems, tasks have to be performed not only correctly but on time.
An interesting technique called Rate Monotonic Scheduling (RMS) has been established to assign task priorities based
on how often tasks execute. Simply put, tasks with the highest rate of execution are given the highest priority (see
Figure 2-9).
RMS makes a number of assumptions:
1.
2.
3.
All tasks are periodic (they occur at regular intervals).
Tasks do not synchronize with one another, share resources, or exchange data.
The CPU must always execute the highest priority task that is ready to run. In other words, preemptive
scheduling must be used.
Given a set of n tasks that are assigned RMS priorities, the basic RMS theorem states that all task HARD real-time
deadlines will always be met if the following inequality is verified:
∑
i
1
Ei
≤ n × 2 n − 1
Ti
Equation 2.1
where, Ei corresponds to the maximum execution time of task i and Ti corresponds to the execution period of task i. In
other words, Ei/Ti corresponds to the fraction of CPU time required to execute task i. Table 2.1 shows the value for
size n(21/n-1) based on the number of tasks. The upper bound for an infinite number of tasks is given by ln(2) or 0.693.
This means that to meet all HARD real-time deadlines based on RMS, CPU utilization of all time-critical tasks should
be less than 70 percent! Note that you can still have non-time-critical tasks in a system and thus use 100 percent of the
CPU's time. Using 100 percent of your CPU's time is not a desirable goal because it does not allow for code changes
and added features. As a rule of thumb, you should always design a system to use less than 60 to 70 percent of your
CPU.
Number of Tasks
1
2
3
4
5
.
.
.
Infinity
n(2 1/n -1)
1.000
0.828
0.779
0.756
0.743
.
.
.
0.693
Table 2.1
RMS says that the highest-rate task has the highest priority. In some cases, the highest-rate task may not be the most
important task. Your application will thus dictate how you need to assign priorities. RMS is, however, an interesting
starting point.
2.19 Mutual Exclusion
The easiest way for tasks to communicate with each other is through shared data structures. This is especially easy
when all the tasks exist in a single address space. Tasks can thus reference global variables, pointers, buffers, linked
lists, ring buffers, etc. While sharing data simplifies the exchange of information, you must ensure that each task has
exclusive access to the data to avoid contention and data corruption. The most common methods to obtain exclusive
access to shared resources are:
a) Disabling interrupts
b) Test-And-Set
c) Disabling scheduling
d) Using semaphores
2.19.01 Mutual Exclusion, Disabling and enabling interrupts
The easiest and fastest way to gain exclusive access to a shared resource is by disabling and enabling interrupts as
shown in the pseudo-code of listing 2.3.
Disable interrupts;
Access the resource (read/write from/to variables);
Reenable interrupts;
Listing 2.3, Disabling/enabling interrupts.
µC/OS-II uses this technique (as do most, if not all kernels) to access internal variables and data structures. In fact,
µC/OS-II provides two macros to allow you to disable and then enable interrupts from your C code:
OS_ENTER_CRITICAL() and OS_EXIT_CRITICAL(), respectively (see section 8.03.02, OS_CPU.H,
OS_ENTER_CRITICAL() and OS_EXIT_CRITICAL()). You need to use these macros in pair as shown in listing 2.4.
void Function (void)
{
OS_ENTER_CRITICAL();
.
.
/* You can access shared data in here */
.
OS_EXIT_CRITICAL();
}
Listing 2.4, Using µC/OS-II’s macros to disable/enable interrupts.
You must be careful, however, to not disable interrupts for too long because this affects the response of your system to
interrupts. This is known as interrupt latency. You should consider this method when you are changing or copying a
few variables. Also, this is the only way that a task c an share variables or data structures with an ISR. In all cases, you
should keep interrupts disabled for as little time as possible.
If you use a kernel, you are basically allowed to disable interrupts for as much time as the kernel does without affecting
interrupt latency. Obviously, you need to know how long the kernel will disable interrupts. Any good kernel vendor
will provide you with this information. After all, if they sell a real-time kernel, time is important!
2.19.02 Mutual Exclusion, Test-And-Set
If you are not using a kernel, two functions could ‘agree’that to access a resource, they must check a global variable,
and if the variable is 0 the function has access to the resource. To prevent the other function from accessing the
resource, howe ver, the first function that gets the resource simply sets the variable to 1. This is commonly called a
Test-And-Set (or TAS) operation. The TAS operation must either be performed indivisibly (by the processor) or you
must disable interrupts when doing the TAS on the variable as shown in listing 2.5.
Disable interrupts;
if (‘Access Variable’ is 0) {
Set variable to 1;
Reenable interrupts;
Access the resource;
Disable interrupts;
Set the ‘Access Variable’ back to 0;
Reenable interrupts;
} else {
Reenable interrupts;
/* You don’t have access to the resource, try back later; */
}
Listing 2.5, Using Test-And-Set to access a resource.
Some processors actually implement a TAS operation in hardware (e.g. the 68000 family of processors have the TAS
instruction).
2.19.03 Mutual Exclusion, Disabling and enabling the scheduler
If your task is not sharing variables or data structures with an ISR then you can disable/enable scheduling (see section
3.06, Locking and Unlocking the Scheduler) as shown in listing 2.6 (using µC/OS-II as an example). In this case, two
or more tasks can share data without the possibility of contention. You should note that while the scheduler is locked,
interrupts are enabled and, if an interrupt occurs while in the critical section, the ISR will immediately be executed. At
the end of the ISR, the kernel will always return to the interrupted task even if a higher priority task has been made
ready-to-run by the ISR. The scheduler will be invoked when OSSchedUnlock() is called to see if a higher
priority task has been made ready to run by the task or an ISR. A context switch will result if there is a higher priority
task that is ready to run. Although this method works well, you should avoid disabling the scheduler because it defeats
the purpose of having a kernel in the first place. The next method should be chosen instead.
void Function (void)
{
OSSchedLock();
.
.
/* You can access shared data in here (interrupts are recognized) */
.
OSSchedUnlock();
}
Listing 2.6, Accessing shared data by disabling/enabling scheduling.
2.19.04 Mutual Exclusion, Semaphores
The semaphore was invented by Edgser Dijkstra in the mid 1960s. A semaphore is a protocol mechanism offered by
most multitasking kernels. Semaphores are used to:
a) control access to a shared resource (mutual exclusion);
b) signal the occurrence of an event;
c) allow two tasks to synchronize their activities.
A semaphore is a key that your code acquires in order to continue execution. If the semaphore is already in use, the
requesting task is suspended until the semaphore is released by its current owner. In other words, the requesting task
says: "Give me the key. If someone else is using it, I am willing to wait for it!"
There are two types of semaphores: binary semaphores and counting semaphores. As its name implies, a binary
semaphore can only take two values: 0 or 1. A counting semaphore allows values between 0 and 255, 65535 or
4294967295, depending on whether the semaphore mechanism is implemented using 8, 16 or 32 bits, respectively.
The actual size depends on the kernel used. Along with the semaphore's value, the kernel also needs to keep track of
tasks waiting for the semaphore's availability.
There are generally only three operations that can be performed on a semaphore: INITIALIZE (also called CREATE),
WAIT (also called PEND), and SIGNAL (also called POST).
The initial value of the semaphore must be provided when the semaphore is initialized. The waiting list of tasks is
always initially empty.
A task desiring the semaphore will perform a WAIT operation. If the semaphore is available (the semaphore value is
greater than 0), the semaphore value is decremented and the task continues execution. If the semaphore's value is 0,
the task performing a WAIT on the semaphore is placed in a waiting list. Most kernels allow you to specify a timeout;
if the semaphore is not available within a certain amount of time, the requesting task is made ready to run and an error
code (indicating that a timeout has occurred) is returned to the caller.
A task releases a semaphore by performing a SIGNAL operation. If no task is waiting for the semaphore, the
semaphore value is simply incremented. If any task is waiting for the semaphore, however, one of the tasks is made
ready to run and the semaphore value is not incremented; the key is given to one of the tasks waiting for it. Depending
on the kernel, the task which will receive the semaphore is either:
a) the highest priority task waiting for the semaphore, or
b) the first task that requested the semaphore (First In First Out, or FIFO).
Some kernels allow you to choose either method through an option when the semaphore is initialized. µC/OS-II only
supports the first method. If the readied task has a higher priority than the current task (the task releasing the
semaphore), a context switch will occur (with a preemptive kernel) and the higher priority task will resume execution;
the current task will be suspended until it again becomes the highest priority task ready-to-run.
Listing 2.7 shows how you can share data using a semaphore (using µC/OS -II). Any task needing access to the same
shared data will call OSSemPend() and when the task is done with the data, the task calls OSSemPost(). Both of
these functions will be described later. You should note that a semaphore is an object that needs to be initialized
before it’s used and for mutual exclusion, a semaphore is initialized to a value of 1. Using a semaphore to access
shared data doesn’t affect interrupt latency and, if an ISR or the current task makes a higher priority task ready-to-run
while accessing the data then, this higher priority task will execute immediately.
OS_EVENT *SharedDataSem;
void Function (void)
{
INT8U err;
OSSemPend(SharedDataSem, 0, &err);
.
.
/* You can access shared data in here (interrupts are recognized) */
.
OSSemPost(SharedDataSem);
}
Listing 2.7, Accessing shared data by obtaining a semaphore.
Semaphores are especially useful when tasks are sharing I/O devices. Imagine what would happen if two tasks were
allowed to send characters to a printer at the same time. The printer would contain interleaved data from each task. For
instance, if task #1 tried to print “I am task #1!” and task #2 tried to print “I am task #2!” then the printout could look
like this:
I Ia amm t tasask k#1 #!2!
In this case, we can use a semaphore and initialize it to 1 (i.e. a binary semaphore). The rule is simple: to access the
printer each task must first obtain the resource's semaphore. Figure 2-9 shows the tasks competing for a semaphore to
gain exclusive access to the printer. Note that the semaphore is represented symbolically by a key indicating that each
task must obtain this key to use the printer.
The above example implies that each task must know about the existence of the semaphore in order to access the
resource. There are situations when it is better to encapsulate the semaphore. Each task would thus not know that it is
actually acquiring a semaphore when accessing the resource. For example, an RS-232C port is used by multiple tasks
to send commands and receive responses from a device connected at the other end of the RS-232C port. A flow
diagram is shown in Figure 2-10.
TASK 1
"I am task #1!"
Acquire Semaphore
SEMAPHORE
PRINTER
Acquire Semaphore
TASK 2
"I am task #2!"
Figure 2-9, Using a semaphore to get permission to access a printer.
The function CommSendCmd() is called with three arguments: the ASCII string containing the command, a pointer
to the response string from the device, and finally, a timeout in case the device doesn't respond within a certain amount
of time. The pseudo-code for this function is:
INT8U CommSendCmd(char *cmd, char *response, INT16U timeout)
{
Acquire port's semaphore;
Send command to device;
Wait for response (with timeout);
if (timed out) {
Release semaphore;
return (error code);
} else {
Release semaphore;
return (no error);
}
}
Listing 2.8, Encapsulating a semaphore.
Each task which needs to send a command to the device has to call this function. The semaphore is assumed to be
initialized to 1 (i.e., available) by the communication driver initialization routine. The first task that calls
CommSendCmd() will acquire the semaphore and thus proceed to send the command and wait for a response. If
another tas k attempts to send a command while the port is busy, this second task will be suspended until the semaphore
is released. The second task appears to have simply made a call to a normal function that will not return until the
function has performed its duty. When the semaphore is released by the first task, the second task will acquire the
semaphore and will thus be allowed to use the RS-232C port.
TASK1
CommSendCmd()
DRIVER
TASK2
RS-232C
CommSendCmd()
Semaphore
Figure 2-10, Hiding a semaphore from tasks.
A counting semaphore is used when a resource can be used by more than one task at the same time. For example, a
counting semaphore is used in the management of a buffer pool as shown in Figure 2-11. Let's assume that the buffer
pool initially contains 10 buffers. A task would obtain a buffer from the buffer manager by calling BufReq(). When
the buffer is no longer needed, the task would return the buffer to the buffer manager by calling BufRel(). The
pseudocode for these functions is shown in listing 2.9.
BUF *BufReq(void)
{
BUF *ptr;
Acquire a semaphore;
Disable interrupts;
ptr
= BufFreeList;
BufFreeList = ptr->BufNext;
Enable interrupts;
return (ptr);
}
void BufRel(BUF *ptr)
{
Disable interrupts;
ptr->BufNext = BufFreeList;
BufFreeList = ptr;
Enable interrupts;
Release semaphore;
}
Listing 2.9, Buffer management using a semaphore.
The buffer manager will satisfy the first 10 buffer requests (since there are 10 keys). When all semaphores are used, a
task requesting a buffer would be suspended until a semaphore becomes available. Interrupts are disabled to gain
exclusive access to the linked list (this operation is very quick). When a task is finished with the buffer it acquired, it
calls BufRel() to return the buffer to the buffer manager; the buffer is inserted into the linked list before the
semaphore is released. By encapsulating the interface to the buffer manager in BufReq() and BufRel(), the caller
doesn't need to be concerned with the actual implementation details.
Semaphores are often overused. The use of a semaphore to access a simple shared variable is overkill in most
situations. The overhead involved in acquiring and releasing the semaphore can consume valuable time. You can do
the job just as efficiently by disabling and enabling interrupts (see section 2.19.01, Mutual Exclusion, Disabling and
Enabling Interrupts). Let's suppose that two tasks are sharing a 32-bit integer variable. The first task increments the
variable while the other task clears it. If you consider how long a processor takes to perform either operation, you will
realize that you do not need a semaphore to gain exclusive access to the variable. Each task simply needs to disable
interrupts before performing its operation on the variable and enable interrupts when the operation is complete. A
semaphore should be used, however, if the variable is a floating-point variable and the microprocessor doesn't support
floating-point in hardware. In this case, the processing time involved in processing the floating-point variable could
affect interrupt latency if you had disabled interrupts.
BufFreeList
Next
Next
Next
0
10
BufReq()
BufRel()
Buffer Manager
Task1
Task2
Figure 2-11, Using a counting semaphore.
2.20 Deadlock (or Deadly Embrace)
A deadlock, also called adeadly embrace, is a situation in which two tasks are each unknowingly waiting for resources
held by each other. If task T1 has exclusive access to resource R1 and task T2 has exclusive access to resource R2, then
if T1 needs exclusive access to R2 and T2 needs exclusive access to R1, neither task can continue. They are
deadlocked. The simplest way to avoid a deadlock is for tasks to:
a) acquire all resources before proceeding,
b) acquire the resources in the same order, and
c) release the resources in the reverse order.
Most kernels allow you to specify a timeout when ac quiring a semaphore. This feature allows a deadlock to be broken.
If the semaphore is not available withing a certain amount of time, the task requesting the resource will resume
execution. Some form of error code must be returned to the task to notify it that a timeout has occurred. A return error
code prevents the task from thinking it has obtained to the resource. Deadlocks generally occur in large multitasking
systems and are not generally encountered in embedded systems.
2.21 Synchronization
A task can be synchronized with an ISR, or another task when no data is being exchanged, by using a semaphore as
shown in Figure 2-12. Note that, in this case, the semaphore is drawn as a flag, to indicate that it is used to signal the
occurrence of an event (rather than to ensure mutual exclusion, in which case it would be drawn as a key). When used
as a synchronization mechanism, the semaphore is initialized to 0. Using a semaphore for this type of synchronization
is using what is called a unilateral rendezvous. A task initiates an I/O operation and then waits for the semaphore.
When the I/O operation is complete, an ISR (or another task) signals the semaphore and the task is resumed.
ISR
POST
PEND
TASK
TASK
POST
PEND
TASK
Figure 2-12, Synchronizing tasks and ISRs.
If the kernel supports counting semaphores, the semaphore would accumulate events that have not yet been processed.
Note that more than one task can be waiting for the event to occur. In this case, the kernel could signal the occurrence
of the event either to:
a) the highest priority task waiting for the event to occur, or
b) the first task waiting for the event.
Depending on the application, more than one ISR or task could signal the occurrence of the event.
Two tasks can synchronize their activities by using two semaphores, as shown in Figure 2-13. This is called a bilateral
rendezvous. A bilateral rendezvous is similar to a unilateral rendezvous except both tasks must synchronize with one
another before proceeding.
PEND
POST
TASK
TASK
PEND
POST
Figure 2-13, Tasks synchronizing their activities.
For example, two tasks are executing as shown in listing 2.10. When the first task reaches a certain point, it signals the
second task L2.10(1) and then waits for a signal from the second task L2.10(2). Similarly, when the second task
reaches a certain point, it signals the first task L2.10(3) and then waits for a signal from the first task L2.10(4). At this
point, both tasks are synchronized with each other. A bilateral rendezvous cannot be performed between a task and an
ISR because an ISR cannot wait on a semaphore.
Task1()
{
for (;;) {
Perform operation;
Signal task #2;
Wait for signal from task #2;
Continue operation;
}
}
Task2()
{
for (;;) {
Perform operation;
Signal task #1;
Wait for signal from task #1;
Continue operation;
}
}
(1)
(2)
(3)
(4)
Listing 2.10, Bilateral rendezvous.
2.22 Event Flags
Event flags are used when a task needs to synchronize with the occurrence of multiple events. The task can be
synchronized when any of the events have occurred. This is called disjunctive synchronization (logical OR). A task
can also be synchronized when all events have occurred. This is called conjunctive synchronization (logical AND).
Disjunctive and conjunctive synchronization are shown in Figure 2-14.
Common events can be used to signal multiple tasks, as shown in Figure 2-15. Events are typically grouped.
Depending on the kernel, a group consists of 8, 16 or 32 events (mostly 32-bits, though). Tasks and ISRs can set or
clear any event in a group. A task is resumed when all the events it requires are satisfied. The evaluation of which task
will be resumed is performed when a new set of events occurs (i.e. during a SET operation).
Kernels supporting event flags offer services to SET event flags, CLEAR event flags, and WAIT for event flags
(conjunctively or disjunctively). µC/OS-II does not currently support event flags.
TASK
Semaphore
Events
OR
POST
PEND
TASK
ISR
DISJUNCTIVE SYNCHRONIZATION
TASK
Events
AND
Semaphore
POST
PEND
TASK
ISR
CONJUNCTIVE SYNCHRONIZATION
Figure 2-14, Disjunctive and conjunctive synchronization.
TASK
ISR
Events
(8, 16 or 32 bits)
Semaphore
Events
OR
POST
PEND
TASK
PEND
TASK
Semaphore
Events
AND
POST
Figure 2-15, Event flags.
2.23 Intertask Communication
It is sometimes necessary for a task or an ISR to communicate information to another task. This information transfer is
called intertask communication. Information may be communicated between tasks in two ways: through global data or
by sending messages.
When using global variables, each task or ISR must ensure that it has exclusive access to the variables. If an ISR is
involved, the only way to ensure exclusive access to the common variables is to disable interrupts. If two tasks are
sharing data each can gain exclusive access to the variables by using either disabling/enabling interrupts or through a
semaphore (as we have seen). Note that a task can only communicate information to an ISR by using global variables.
A task is not aware when a global variable is changed by an ISR unless the ISR signals the task by using a semaphore
or by having the task regularly poll the contents of the variable. To correct this situation, you should con sider using
either a message mailbox or a message queue.
2.24 Message Mailboxes
Messages can be sent to a task through kernel services. A Message Mailbox, also called a message exchange, is
typically a pointer size variable. Through a service provided by the kernel, a task or an ISR can deposit a message (the
pointer) into this mailbox. Similarly, one or more tasks can receive messages through a service provided by the kernel.
Both the sending task and receiving task will agree as to what the pointer is actually pointing to.
A waiting list is associated with each mailbox in case more than one task desires to receive messages through the
mailbox. A task desiring to receive a message from an empty mailbox will be suspended and placed on the waiting list
until a message is received. Typically, the kernel will allow the task waiting for a message to specify a timeout. If a
message is not received before the timeout expires, the requesting task is made ready-to-run and an error code
(indicating that a timeout has occurred) is returned to it. When a message is deposited into the mailbox, either the
highest priority task waiting for the message is given the message (called priority-based) or the first task to request a
message is given the message (called First-In-First-Out, or FIFO). Figure 2-16 shows a task depositing a message into
a mailbox. Note that the mailbox is represented graphically by an I-beam and the timeout is represented by an
hourglass. The number next to the hourglass represents the number of c lock ticks (described later) that the task will
wait for a message to arrive.
Mailbox
POST
TASK
PEND
TASK
10
Figure 2-16, Message mailbox.
Kernel services are typically provided to:
a)
b)
c)
d)
Initialize the contents of a mailbox. The mailbox may or may not initially contain a message.
Deposit a message into the mailbox (POST).
Wait for a message to be deposited into the mailbox (PEND).
Get a message from a mailbox, if one is present, but not suspend the caller if the mailbox is empty
(ACCEPT). If the mailbox contains a message, the message is extracted from the mailbox. A return code
is used to notify the caller about the outcome of the call.
Message mailboxes can also be used to simulate binary semaphores. A message in the mailbox indicates that the
resource is available while an empty mailbox indicates that the resource is already in use by another task.
2.25 Message Queues
A message queue is used to send one or more messages to a task. A message queue is basically an array of mailboxes.
Through a service provided by the kernel, a task or an ISR can deposit a message (the pointer) into a message queue.
Similarly, one or more tasks can receive messages through a service provided by the kernel. Both the sending task and
receiving task will agree as to what the pointer is actually pointing to. Generally, the first message inserted in the
queue will be the first message extracted from the queue (FIFO). In addition to extract messages in a FIFO fashion,
µC/OS-II allows a task to get messages Last-In-First-Out (LIFO).
As with the mailbox, a waiting list is associated with each message queue in case more than one task is to receive
messages through the queue. A task desiring to receive a message from an empty queue will be suspended and placed
on the waiting list until a message is received. Typically, the kernel will allow the task waiting for a message to specify
a timeout. If a message is not received before the timeout expires, the requesting task is made ready-to-run and an error
code (indicating a timeout occurred) is returned to it. When a message is deposited into the queue, either the highest
priority task or the first task to wait for the message will be given the message. Figure 2-17 shows an ISR (Interrupt
Service Routine) depositing a message into a queue. Note that the queue is represented graphically by a double I-beam.
The 10 indicates the number of messages that can be accumulated in the queue. A 0 next to the hourglass indicates
that the task will wait forever for a message to arrive.
Kernel services are typically provided to:
a) Initialize the queue. The queue is always assumed to be empty after initialization.
b) Deposit a message into the queue (POST).
c) Wait for a message to be deposited into the queue (PEND).
d) Get a message from a queue, if one is present, but not suspend the caller if the queue is empty (ACCEPT).
If the queue contained a message, the message is extracted from the queue. A return code is used to
notify the caller about the outcome of the call.
Queue
Interrupt
ISR
POST
10
PEND
TASK
0
Figure 2-17, Message queue.
2.26 Interrupts
An interrupt is a hardware mechanism used to inform the CPU that an asynchronous event has occurred. When an
interrupt is recognized, the CPU saves part (or all) of its context (i.e. registers) and jumps to a special subroutine called
an Interrupt Service Routine , or ISR. The ISR processes the event and upon completion of the ISR, the program returns
to:
a)
b)
c)
The background for a foreground/background system.
The interrupted task for a non-preemptive kernel.
The highest priority task ready-to-run for a preemptive kernel.
Interrupts allow a microprocessor to process events when they occur. This prevents the microprocessor from
continuously polling an event to see if this event has occurred. Microprocessors allow interrupts to be ignored and
recognized through the use of two special instructions: disable interrupts and enable interrupts, respectively. In a
real-time environment, interrupts should be disabled as little as possible. Disabling interrupts affects interrupt latency
(see section 2.27, Interrupt Latency) and also, disabling interrupts may cause interrupts to be missed. Processors
generally allow interrupts to be nested. This means that while servicing an interrupt, the processor will recognize and
service other (more important) interrupts as shown in Figure 2-18.
TIME
TASK
ISR #1
ISR #2
ISR #3
Interrupt #1
Interrupt #2
Interrupt #3
Figure 2-18, Interrupt nesting.
2.27 Interrupt Latency
Probably the most important specification of a real-time kernel is the amount of time interrupts are disabled. All
real-time systems disable interrupts to manipulate critical sections of code and re -enable interrupts when the critical
section has executed. The longer interrupts are disabled, the higher the interrupt latency. Interrupt latency is given by:
Maximum amount of time interrupts are disabled +
Time to start executing the first instruction in the ISR
Equation 2.2, Interrupt latency.
2.28 Interrupt Response
Interrupt response is defined as the time between the reception of the interrupt and the start of the user code which will
handle the interrupt. The interrupt response time accounts for all the overhead involved in handling an interrupt.
Typically, the processor's context (CPU registers) is saved on the stack before the user code is executed.
For a foreground/background system, the user ISR code is executed immediately after saving the processor's context.
The response time is given by:
Interrupt latency +
Time to save the CPU's context
Equation 2.3, Interrupt response, foreground/background system.
For a non-preemptive kernel, the user ISR code is executed immediately after the processor's context is saved. The
response time to an interrupt for a non-preemptive kernel is given by:
Interrupt latency +
Time to save the CPU's context
Equation 2.4, Interrupt response, Non-preemptive kernel.
For a preemptive kernel, a special function provided by the kernel needs to be called. This function notifies the kernel
that an ISR is in progress and allows the kernel to keep track of interrupt nesting. For µC/OS-II, this function is called
OSIntEnter(). The response time to an interrupt for a preemptive kernel is given by:
Interrupt latency +
Time to save the CPU's context +
Execution time of the kernel ISR entry function
Equation 2.5, Interrupt response, Preemptive kernel.
A system's worst case interrupt response time is its only response. Your system may respond to interrupts in 50 µS 99
percent of the time, but if it responds to interrupts in 250 µS the other 1 percent, you must assume a 250 µS interrupt
response time.
2.29 Interrupt Recovery
Interrupt recovery is defined as the time required for the processor to return to the interrupted code.
Interrupt recovery in a foreground/background system simply involves restoring the processor's context and returning
to the interrupted task. Interrupt recovery is given by:
Time to restore the CPU's context +
Time to execute the return from interrupt instruction
Equation 2.6, Interrupt recovery, Foreground/background system.
As with a foreground/background system, interrupt recovery with a non-preemptive kernel simply involves restoring
the processor's context and returning to the interrupted task. Interrupt recovery is thus:
Time to restore the CPU's context +
Time to execute the return from interrupt instruction
Equation 2.7, Interrupt recovery, Non-preemptive kernel.
For a preemptive kernel, interrupt recovery is more complex. Typically, a function provided by the kernel is called at
the end of the ISR. For µC/OS-II, this function is called OSIntExit() and allows the kernel to determine if all
interrupts have nested. If all interrupts have nested (i.e. a return from interrupt will return to task level code), the kernel
will determine if a higher priority task has been made ready-to-run as a result of the ISR. If a higher priority task is
ready-to-run as a result of the ISR, this task is resumed. Note that, in this case, the interrupted task will be resumed
only when it again becomes the highest priority task ready-to-run. For a preemptive ke rnel, interrupt recovery is given
by:
Time to determine if a higher priority task is ready +
Time to restore the CPU's context of the highest priority task +
Time to execute the return from interrupt instruction
Equation 2.8, Interrupt recovery, Non-preemptive kernel.
2.30 Interrupt Latency, Response, and Recovery
Figures 2-19, 2-20 and 2-21 show the interrupt latency, response, and recovery for a foreground/background system, a
non-preemptive kernel, and a preemptive kernel, respectively.
TIME
Interrupt Request
BACKGROUND
BACKGROUND
CPU Context Saved
ISR
User ISR Code
CPU context
restored
Interrupt Latency
Interrupt Response
Interrupt Recovery
Figure 2-19, Interrupt latency, response, and recovery
(Foreground/Background)
TIME
Interrupt Request
TASK
TASK
CPU Context Saved
ISR
User ISR Code
CPU context
restored
Interrupt Latency
Interrupt Response
Interrupt Recovery
Figure 2-20, Interrupt latency, response, and recovery
(Non-preemptive kernel)
You should note that for a preemptive kernel, the exit function either decides to return to the interrupted task F2-21A
or to a higher priority task that the ISR has made ready-to-run F2-21B. In the later case, the execution time is slightly
longer because the kernel has to perform a context switch. I made the difference in execution time somewhat to scale
assuming µC/OS-II on an Intel 80186 processor (see Table 9.3, Execution times of µC/OS-II services on 33 MHz
80186). This allows you to see the cost (in execution time) of switching context.
TIME
Interrupt Request
Interrupt Recovery
TASK
TASK
CPU Context Saved
ISR
A
Kernel's ISR
Exit function
CPU context
restored
Kernel's ISR
Entry function
User ISR Code
Interrupt Latency
Kernel's ISR
Exit function
CPU context
restored
Interrupt Response
B
TASK
Interrupt Recovery
Figure 2-21, Interrupt latency, response, and recovery
(Preemptive kernel)
2.31 ISR Processing Time
While ISRs should be as short as possible, there are no absolute limits on the amount of time for an ISR. One cannot
say that an ISR must always be less than 100 µS, 500 µS, 1 mS, etc. If the ISR's code is the most important code that
needs to run at any given time, then it could be as long as it needs to be. In most cases, however, the ISR should
recognize the interrupt, obtain data/status from the interrupting device, and signal a task which will perform the actual
processing. You should also consider whether the overhead involved in signaling a task is more than the processing of
the interrupt. Signaling a task from an ISR (i.e. through a semaphore, a mailbox, or a queue) requires some processing
time. If processing of your interrupt requires less than the time required to signal a task, you should consider
processing the interrupt in the ISR itself and possibly enable interrupts to allow higher priority interrupts to be
recognized and serviced.
2.32 Non-Maskable Interrupts (NMIs)
Sometimes, an interrupt must be serviced as quickly as possible and cannot afford to have the latency imposed by a
kernel. In these situations, you may be able to use the Non-Maskable Interrupt (NMI) provided on most
microprocessors. Since the NMI cannot be disabled, interrupt latency, response, and recovery are minimal. The NMI
is generally reserved for drastic measures such as saving important information during a power down. If, however,
your application doesn't have this requirement, you could use the NMI to service your most time-critical ISR.
Equations 2.9, 2.10 and 2.11 shows how to determine the interrupt latency, response and recovery of an NMI,
respectively.
Time to execute longest instruction +
Time to start executing the NMI ISR
Equation 2.9, Interrupt latency for an NMI.
Interrupt latency +
Time to save the CPU's context
Equation 2.10, Interrupt response for an NMI.
Time to restore the CPU's context +
Time to execute the return from interrupt instruction
Equation 2.11, Interrupt recovery of an NMI.
I have used the NMI in an application to respond to an interrupt which could occur every 150 µS. The processing time
of the ISR took from 80 to 125 µS and the kernel I used disabled interrupts for about 45 µS. As you can see, if I had
used maskable interrupts, the ISR could have been late by 20 µS.
When you are servicing an NMI, you cannot use kernel services to signal a task because NMIs cannot be disabled to
access critical sections of code. You can, however, still pass parameters to and from the NMI. Parameters passed must
be global variables and the size of these variables must be read or written indivisibly, that is, not as separate byte read
or write instructions.
NMIs can be disabled by adding external circuitry, as shown in Figure 2-22. Assuming that both the interrupt and the
NMI are positive going signals, a simple AND gate is inserted between the interrupt source and the processor's NMI
input. Interrupts are disabled by writing a 0 to an output port. You wouldn't want to disable interrupts to use kernel
services, but you could use this feature to pass parameters (i.e. larger variables) to and from the ISR and a task.
NMI Interrupt Source
Output
Port
To Processor's NMI Input
Figure 2-22, Disabling non-maskable interrupts.
Now, lets suppose that the NMI service routine needs to signal a task every 40 times it executes. If the NMI occurs
every 150 µS, a signal would be required every 6 mS (40 x 150 µS). From a NMI ISR, you cannot use the kernel to
signal the task, but you could use the scheme shown in Figure 2-23. In this case, the NMI service routine would
generate a hardware interrupt through an output port (i.e. bringing an output high). Since the NMI service routine
typically has the highest priority and, interrupt nesting is typically not allowed while servicing the NMI ISR, the
interrupt would not be recognized until the end of the NMI service routine. At the completion of the NMI service
routine, the processor would be interrupted to service this hardware interrupt. This ISR would clear the interrupt
source (i.e. bring the port output low) and post to a semaphore that would wake up the task. As long as the task services
the semaphore well within 6 mS, your deadline would be met.
Issues interrupt by writing
to an output port.
Semaphore
NMI Interrupt
NMI
ISR
ISR
POST
PEND
TASK
Figure 2-23, Signaling a task from a non-maskable interrupt.
2.33 Clock Tick
A clock tick is a special interrupt that occurs periodically. This interrupt can be viewed as the system's heartbeat. The
time between interrupts is application specific and is generally between 10 and 200 mS. The clock tick interrupt allows
a kernel to delay tasks for an integral number of clock ticks and to provide timeouts when tasks are waiting for events
to occur. The faster the tick rate, the higher the overhead imposed on the system.
All kernels allow tasks to be delayed for a certain number of clock ticks. The resolution of delayed tasks is 1 clock tick,
however, this does not mean that its accuracy is 1 clock tick.
Figures 2-24 through 2-26 are timing diagrams showing a task delaying itself for 1 clock tick. The shaded areas
indicate the execution time for each operation being performed. Note that the time for each operation varies to reflect
typical processing, which would include loops and conditional statements (i.e., if/else, switch and ?:). The processing
time of the ‘Tick ISR’has been exaggerated to show that it too is subject to varying execution times.
Case 1 (Figure 2-24) shows a situation where higher priority tasks and ISRs execute prior to the task, which needs to
delay for 1 tick. As you can see, the task attempts to delay for 20 mS but because of its priority, actually executes at
varying intervals. This will thus cause the execution of the task to jitter.
20 mS
Tick Interrupt
Tick ISR
All higher priority tasks
Call to delay 1 tick (20 mS)
Call to delay 1 tick (20 mS)
Call to delay 1 tick (20 mS)
Delayed Task
t1
(19 mS)
t2
(17 mS)
t3
(27 mS)
Figure 2-24, Delaying a task for 1 tick (case #1).
Case 2 (Figure 2-25) shows a situation where the execution times of all higher-priority tasks and ISRs are slightly less
than one tick. If the task delays itself just before a clock tick, the task will execute again almost immediately! Because
of this, if you need to delay a task for at least 1 clock tick, you must specify one extra tick. In other words, if you need
to delay a task for at least 5 ticks, you must specify 6 ticks!
20 mS
Tick Interrupt
Tick ISR
All higher priority tasks
Call to delay 1 tick (20 mS)
Call to delay 1 tick (20 mS)
Call to delay 1 tick (20 mS)
Delayed Task
t1
(6 mS)
t2
(19 mS)
t3
(27 mS)
Figure 2-25, Delaying a task for 1 tick (case #2).
Case 3 (Figure 2-26) shows a situation where the execution times of all higher-priority tasks and ISRs extend beyond
one clock tick. In this case, the task that tries to delay for 1 tick will actually execute 2 ticks later! In this case, the task
missed its deadline. This might be acceptable in some applications, but in most cases it isn't.
20 mS
Tick Interrupt
Tick ISR
All higher priority tasks
Call to delay 1 tick (20 mS)
Call to delay 1 tick (20 mS)
Delayed Task
t1
(40 mS)
t2
(26 mS)
Figure 2-26, Delaying a task for 1 tick (case #3).
These situations exist with all real-time kernels. They are related to CPU processing load and possibly incorrect
system design. Here are some possible solutions to these problems:
a) Increase the clock rate of your microprocessor.
b) Increase the time between tick interrupts.
c) Rearrange task priorities.
d) Avoid using floating-point math (if you must, use single precision).
e) Get a compiler that performs better code optimization.
f) Write time-critical code in assembly language.
g) If possible, upgrade to a faster microprocessor in the same family, e.g.,
8086 to 80186, 68000 to 68020, etc.
Regardless of what you do, jitter will always occur.
2.34 Memory Requirements
If you are designing a foreground/background system, the amount of memory required depends solely on your
application code.
With a multitasking kernel, things are quite different. To begin with, a kernel requires extra code space (ROM). The
size of the kernel depends on many factors. Depending on the features provided by the kernel, you can expect
anywhere from 1 Kbytes to 100 Kbytes. A minimal kernel for an 8-bit CPU that provides only scheduling, context
switching, semaphore management, delays, and timeouts should require about 1 to 3 Kbytes of code space. The total
code space is thus given by:
Application code size +
Kernel code size
Equation 2.12, Code space needed when a kernel is used.
Because each task runs independently of the other, each task must be provided with its own stack area (RAM). As a
designer, you must determine the stack requirement of each task as closely as possible (this is sometimes a difficult
undertaking). The stack size must not only account for the task requirements (local variables, function calls, etc.); the
stack size must also account for maximum interrupt nesting (saved registers, local storage in ISRs, etc.). Depending on
the target processor and the kernel used, a separate stack can be used to handle all interrupt-level code. This is a
desirable feature because the stack requirement for each task can be substantially reduced. Another desirable feature is
the ability to specify the stack size of each task on an individual basis (µC/OS-II permits this). Conversely, some
kernels require that all task stacks be the same size. All kernels require extra RAM to maintain internal variables, data
structures, queues, etc. The total RAM required if the kernel does not support a separate interrupt stack is given by:
Application code requirements +
Data space (i.e. RAM) needed by the kernel +
SUM(task stacks + MAX(ISR nesting))
Equation 2.13, Data space needed when a kernel is used.
If the kernel supports a separate stack for interrupts, the total RAM required is given by:
Application code requirements +
Data space (i.e. RAM) needed by the kernel +
SUM(task stacks) +
MAX(ISR nesting)
Equation 2.13, Data space needed when a kernel is used.
Unless you have large amounts of RAM to work with, you will need to be careful about how you use the stack space.
To reduce the amount of RAM needed in an application, you must be careful about how you use each task's stack for:
a)
b)
c)
d)
e)
large arrays and structures declared locally to functions and ISRs
function (i.e., subroutine) nesting
interrupt nesting
library functions stack usage
function calls with many arguments
To summarize, a multitasking system will require more code space (ROM) and data space (RAM) than a
foreground/background system. The amount of extra ROM depends only on the size of the kernel, and the amount of
RAM depends on the number of tasks in your system.
2.35 Advantages and Disadvantages of Real-Time Kernels
A real-time kernel, also called a Real-Time Operating System, or RTOS, allows real-time applications to be easily
designed and expanded; functions can be added without requiring major changes to the software. The use of an RTOS
simp lifies the design process by splitting the application code into separate tasks. With a preemptive RTOS, all
time -critical events are handled as quickly and as efficiently as possible. An RTOS allow you to make better use of
your resources by providing you with precious services such as semaphores, mailboxes, queues, time delays, timeouts,
etc.
You should consider using a real-time kernel if your application can afford the extra requirements: extra cost of the
kernel, more ROM/RAM, and 2 to 4 percent additional CPU overhead.
The one factor I haven't mentioned so far is the cost associated with the use of a real-time kernel. In some applications,
cost is everything and would preclude you from even considering an RTOS.
There are currently about 80+ RTOS vendors. Products are available for 8-, 16-, and 32-bit microprocessors. Some of
these packages are complete operating systems and include not only the real-time kernel but also an input/output
manager, windowing systems (display), a file system, networking, language interface libraries, debuggers, and
cross-platform compilers. The cost of an RTOS varies from $50 to well over $30,000. The RTOS vendor may also
require royalties on a per-target-system basis. This is like buying a chip from the RTOS vendor that you include with
each unit sold. The RTOS vendors call this silicon software. The royalty fee varies between $5 to about $250 per unit.
Like any other software package these days, you also need to consider the maintenance cost, which can set you back
another $100 to $5,000 per year!
2.36 Real-Time Systems Summary
Table 2.2 summarizes the three types of real-time systems: foreground/background, non-preemptive kernel, and
preemptive kernel.
Foreground/Background
Non-Preemptive Kernel
Interrupt latency
(Time)
MAX(Longest instruction,
User int. disable) +
Vector to ISR
Interrupt response
(Time)
Interrupt recovery
(Time)
Int. latency +
Save CPU’s context
MAX(Longest instruction,
User int. disable,
Kernel int. disable) +
Vector to ISR
Int. latency +
Save CPU’s context
Restore background’s context +
Return from int.
Restore task’s context +
Return from int.
Task response
(Time)
ROM size
Background
RAM size
Application code
Longest task +
Find highest priority task +
Context switch
Application code +
Kernel code
Application code +
Kernel RAM +
Application code
Preemptive Kernel
MAX(Longest instruction,
User int. disable,
Kernel int. disable) +
Vector to ISR
Interrupt latency +
Save CPU’s context +
Kernel ISR entry function
Find highest priority task +
Restore highest priority
task’s context +
Return from interrupt
Find highest priority task +
Context switch
Application code +
Kernel code
Application code +
Kernel RAM +
Services available?
Application code must provide
SUM(Task stacks +
MAX(ISR stack))
Yes
Table 2.2, Real-time systems summary.
SUM(Task stacks +
MAX(ISR stack))
Yes
Chapter 3
Kernel Structure
This chapter describes some of the structural aspects of µC/OS-II. You will learn:
•
•
•
•
•
•
•
•
How µC/OS-II handles access to critical sections of code,
What a task is, and how µC/OS-II knows about your tasks,
How tasks are scheduled,
How µC/OS-II can determine how much of CPU your application is using,
How do to write Interrupt Service Routines (ISRs),
What a clock tick is and how µC/OS-II handles it,
How to initialize µC/OS-II and,
How to start multitasking.
This chapter also describes the following application services:
•
•
•
•
•
•
OS_ENTER_CRITICAL() and OS_EXIT_CRITICAL(),
OSInit(),
OSStart(),
OSIntEnter() and OSIntExit(),
OSSchedLock() and OSSchedUnlock() and,
OSVersion().
3.00 Critical Sections
µC/OS-II like all real-time kernels need to disable interrupts in order to access critical sections of code, and re-enable
interrupts when done. This allows µC/OS-II to protect critical code from being entered simultaneously from either
multiple tasks or ISRs. The interrupt disable time is one of the most important specifications that a real-time kernel
vendor can provide because it affects the responsiveness of your system to real-time events. µC/OS-II tries to keep the
interrupt disable time to a minimum but, with µC/OS-II, interrupt disable time is largely dependent on the processor
architecture, and the quality of the code generated by the compiler. Every processor generally provides instructions to
disable/enable interrupts and your C compiler must have a mechanism to perform these operations directly from C.
Some compilers will allow you to insert in-line assembly language statements in your C source code. This makes it
quite easy to insert processor instructions to enable and disable interrupts. Other compilers will actually contain
language extensions to enable and disable interrupts directly from C. To hide the implementation method chosen by
the compiler manufacturer, µC/OS-II defines two macros to disable and enable interrupts: OS_ENTER_CRITICAL()
and OS_EXIT_CRITICAL(), respectively. Because these macros are processor specific, they are found in a file
called OS_CPU.H. Each processor port will thus have its own OS_CPU.H file.
Chapters 8, Porting µC/OS -II and chapter 9, 80x86, Large Model Port provide additional details with regards to these
two macros.
3.01 Tasks
A task is typically an infinite loop function L3.1(2) as shown in Listing 3.1. A task looks just like any other C function
containing a return type and an argument but, it never returns. The return type must always be declared to be void
L3.1(1).
void YourTask (void *pdata)
{
for (;;) {
/* USER CODE */
Call one of uC/OS-II’s services:
OSMboxPend();
OSQPend();
OSSemPend();
OSTaskDel(OS_PRIO_SELF);
OSTaskSuspend(OS_PRIO_SELF);
OSTimeDly();
OSTimeDlyHMSM();
/* USER CODE */
}
}
(1)
(2)
Listing 3.1, A task is an infinite loop.
Alternatively, the task can delete itself upon completion as shown in Listing 3.2. Note that the task code is not actually
deleted, µC/OS -II simply doesn’t know about the task anymore and thus that code will not run. Also, if the task calls
OSTaskDel(), the task code doesn’
t return back to anything.
void YourTask (void *pdata)
{
/* USER CODE */
OSTaskDel(OS_PRIO_SELF);
}
Listing 3.2, A task that deletes itself when done.
The argument L3.1(1) is passed to your task code when the task first starts executing. You will notice that the
argument is a pointer to a void. This allows your application to pass just about any kind of data to your task. The
pointer is a ‘universal’vehicle to pass to your task the address of a variable, a structure or even the address of a
function if necessary! It is possible (see Example #1 in Chapter 1) to create many identical tasks all using the same
function (or task body). For example, you could have 4 serial ports that are each managed by their own task. However,
the task code is actually identical. Instead of copying the code 4 times, you can create a task that receives as an
argument a pointer to a data structure that defines the serial port’s parameters (baud rate, I/O port addresses, interrupt
vector number, etc.).
µC/OS-II can manage up to 64 tasks, however, the current version of µC/OS -II uses two tasks for system use. Also, I
decided to reserve priorities 0, 1, 2, 3, OS_LOWEST_PRIO-3, OS_LOWEST_PRIO-2, OS_LOWEST_PRIO-1 and
OS_LOWEST_PRIO for future use. OS_LOWEST_PRIO is a #define constant which is defined in the file
OS_CFG.H. You can thus have up to 56 application tasks. Each task must be assigned a unique priority level from 0
to OS_LOWEST_PRIO – 2. The lower the priority number, the higher the priority of the task. µC/OS-II always
executes the highest priority task ready to run. In the current version of µC/OS-II, the task priority number also serves
as the task identifier. The priority number (i.e. task identifier) is used by some kernel services such as
OSTaskChangePrio() and OSTaskDel().
In order for µC/OS-II to manage your task, you must ‘create’a task. You create a task by passing its address along
with other arguments to one of two functions: OSTaskCreate() or OSTaskCreateExt().
OSTaskCreateExt() is an ‘extended’version of OSTaskCreate() and provides additional features. These
two functions are explained in Chapter 4, Task Management.
3.02 Task States
Figure 3-1 shows the state transition diagram for tasks under µC/OS-II. At any given time, a task can be in any one of
five states.
WAITING
OSTaskDel()
OSMBoxPost()
OSQPost()
OSQPostFront()
OSSemPost()
OSTaskResume()
OSTimeDlyResume()
OSTimeTick()
OSTaskCreate()
OSTaskCreateExt()
DORMANT
OSMBoxPend()
OSQPend()
OSSemPend()
OSTaskSuspend()
OSTimeDly()
OSTimeDlyHMSM()
OSStart()
OSIntExit()
OS_TASK_SW()
READY
Interrupt
RUNNING
ISR
OSIntExit()
OSTaskDel()
Task is Preempted
OSTaskDel()
Figure 3-1, Task States
The DORMANT state corresponds to a task (see Listing 3.1 or Listing 3.2) which resides in program space (ROM or
RAM) but has not been made available to µC/OS-II. A task is made available to µC/OS-II by calling either
OSTaskCreate() or OSTaskCreateExt(). When a task is created, it is made READY to run. Tasks may be
created before multitasking starts or dynamically by a running task. When created by a task, if the created task has a
higher priority than its creator, the created task is immediately given control of the CPU. A task can return itself or
another task to the dormant state by calling OSTaskDel().
Multitasking is started by calling OSStart(). OSStart() runs the highest priority task that is READY to run.
This task is thus placed in the RUNNING state. Only one task can be running at any given time. A ready task will not
run until all higher priority tasks are either placed in the wait state or are deleted.
The running task may delay itself for a certain amount of time by either calling OSTimeDly() or
OSTimeDlyHMSM(). This task is thus WAITING for some time to expire and the next highest priority task that is
ready-to-run is immediately given control of the CPU. The delayed task is made ready to run by OSTimeTick()
when the desired time delay expires (see Section 3.11, Clock Tick ).
The running task may also need to wait until an event occurs, by calling either OSSemPend(), OSMboxPend() or
OSQPend(). The task is thus WAITING for the occurrence of the event. When a task pends on an event, the next
highest priority task is immediately given control of the CPU. The task is made ready when the event occurs. The
occurrence of an event may be signaled by either another task or an ISR.
A running task can always be interrupted, unless the task or µC/OS-II disables interrupts. The task thus enters the ISR
state. When an interrupt occurs, execution of the task is suspended and the ISR takes control of the CPU. The ISR
may make one or more tasks ready to run by signaling one or more events. In this case, before returning from the ISR,
µC/OS-II determines if the interrupted task is still the highest priority task ready to run. If a higher priority task is
made ready to run by the ISR then the new highest priority task is resumed. Otherwise, the interrupted task is resumed.
When all tasks are either waiting for events or for time to expire then µC/OS-II executes the idle task,
OSTaskIdle().
3.03 Task Control Blocks (OS_TCBs)
When a task is created, it is assigned a Task Control Block, OS_TCB (see Listing 3.3). A task control block is a data
structure that is used by µC/OS-II to maintain the state of a task when it is preempted. When the task regains control
of the CPU the task control block allows the task to resume execution exactly where it left off. All OS_TCBs reside in
RAM. You will notice that I organized the fields in OS_TCB to allow for data structure packing while maintaining a
logical grouping of members. An OS_TCB is initialized when a task is created (see Chapter 4, Task Management).
Below is a description of each field in the OS_TCB data structure.
typedef struct os_tcb {
OS_STK
*OSTCBStkPtr;
#if OS_TASK_CREATE_EXT_EN
void
*OSTCBExtPtr;
OS_STK
*OSTCBStkBottom;
INT32U
OSTCBStkSize;
INT16U
OSTCBOpt;
INT16U
OSTCBId;
#endif
struct os_tcb *OSTCBNext;
struct os_tcb *OSTCBPrev;
#if (OS_Q_EN && (OS_MAX_QS >= 2)) || OS_MBOX_EN || OS_SEM_EN
OS_EVENT
*OSTCBEventPtr;
#endif
#if (OS_Q_EN && (OS_MAX_QS >= 2)) || OS_MBOX_EN
void
*OSTCBMsg;
#endif
INT16U
INT8U
INT8U
OSTCBDly;
OSTCBStat;
OSTCBPrio;
INT8U
INT8U
INT8U
INT8U
OSTCBX;
OSTCBY;
OSTCBBitX;
OSTCBBitY;
#if OS_TASK_DEL_EN
BOOLEAN
OSTCBDelReq;
#endif
} OS_TCB;
Listing 3.3, µC/OS-II’s Task Control Block
OSTCBStkPtr contains a pointer to the current top of stack for the task. µC/OS-II allows each task to have
its own stack but just as important, each stack can be of any size. Some commercial kernels assume that all
stacks are the same size unless you write complex hooks. This limitation wastes RAM when all tasks have
different stack requirements, because the largest anticipated stack size has to be allocated for all tasks.
OSTCBStkPtr is the only field in the OS_TCB data structure accessed from assembly language code (from
the context switching code). Placing OSTCBStkPtr at the first entry in the structure makes accessing this
field easier from assembly language code.
OSTCBExtPtr is a pointer to a user definable task control block extension. This allows you or the user of
µC/OS-II to extend the task control block without having to change the source code for µC/OS-II.
OSTCBExtPtr is only used by OSTaskCreateExt() and thus, you will need to set
OS_TASK_CREATE_EXT_EN to 1 to enable this field. You could create a data structure that contains the
name of each task, keep track of the execution time of the task, the number of times a task has been
switched-in and more (see Example #3). Note that I decided to place this pointer immediately after the stack
pointer in case you need to access this field from assembly language. This makes calculating the offset from
the beginning of the data structure easier.
OSTCBStkBottom is a pointer to the task’
s stack bottom. If the processor’s stack grows from high
memory locations to low memory locations then OSTCBStkBottom will point at the lowest valid memory
location for the stack. Similarly, if the processor’s stack grows from low memory locations to high memory
locations then OSTCBStkBottom will point at the highest valid stack address. OSTCBStkBottom is used
by OSTaskStkChk() to check the size of a task’s stack at run-time. This allows you determine the amount
of free stack space available for each stack. Stack checking can only occur if you created a task with
OSTaskCreateExt() and thus, you will need to set OS_TASK_CREATE_EXT_EN to 1 to enable this
field.
OSTCBStkSize is a variable that holds the size of the stack in number of elements instead of bytes. This
means that if a stack contains 1000 entries and each entry is 32-bit wide then the actual size of the stack is
4000 bytes. Similarly, a stack where entries are 16-bit wide would contain 2000 bytes for the same 1000
entries. OSTCBStkSize is used by OSTaskStkChk(). Again, this field is valid only if you set
OS_TASK_CREATE_EXT_EN to 1.
OSTCBOpt is a variable that holds ‘options’that can be passed to OSTaskCreateExt(). Because of this,
this field is valid only if you set OS_TASK_CREATE_EXT_EN to 1. µC/OS-II currently only defines three
options
(see
uCOS_II.H):
OS_TASK_OPT_STK_CHK,
OS_TASK_OPT_STK_CLR
and,
OS_TASK_OPT_SAVE_FP. OS_TASK_OPT_STK_CHK is used to specify to OSTaskCreateExt()
that stack checking is enabled for the task being created. OS_TASK_OPT_STK_CLR indicates that the stack
needs to be cleared when the task is created. The stack only needs to be cleared if you intend to do stack
checking. If you do not specify OS_TASK_OPT_STK_CLR and you create and delete tasks then, the stack
checking will report incorrect stack usage. If you never delete a task once it’
s created and your startup code
clears all RAM then, you can save valuable execution time by NOT specifying this option. Passing
OS_TASK_OPT_STK_CLR will increase the execution time of OSTaskCreateExt() because it will
clear the content of the stack.
The larger you stack, the longer it will take.
Finally,
OS_TASK_OPT_SAVE_FP tells OSTaskCreateExt() that the task will be doing floating-point
computations and, if the processor provides hardware assisted floating-point capability then, the
floating-point registers will need to be saved for the task being created and during a context switch.
OSTCBId is a variable that is used to hold an identifier for the task. This field is currently not used and has
only been included for future expansion.
OSTCBNext and OSTCBPrev are used to doubly link OS_TCBs. This chain of OS_TCBs is used by
OSTimeTick() to update the OSTCBDly field for each task. The OS_TCB for each task is linked when
the task is created and the OS_TCB is removed from the list when the task is deleted. A doubly linked list is
used to permit an element in the chain to be quickly inserted or removed.
OSTCBEventPtr is a pointer to an event control block and will be described later (see Chapter 6, Intertask
Communication & Synchronization ).
OSTCBMsg is a pointer to a message that is sent to a task. The use of this field will be described later (see
Chapter 6, Intertask Communication & Synchronization).
OSTCBDly is used when a task needs to be delayed for a certain number of clock ticks or a task needs to
pend for an event to occur with a timeout. In this case, this field contains the number of clock ticks that the
task is allowed to wait for the event to occur. When this value is zero the task is not delayed or has no timeout
when waiting for an event.
OSTCBStat contains the state of the task. When OSTCBStat is 0, the task is ready to run. Other values
can be assigned to OSTCBStat and these values are described in uCOS_II.H.
OSTCBPrio contains the task priority. A high priority task has a low OSTCBPrio value (that is, the lower
the number, the higher the actual priority).
OSTCBX, OSTCBY, OSTCBBitX and OSTCBBitY are used to accelerate the process of making a task ready
to run, or to make a task wait for an event (to avoid computing these values at runtime). The values for these
fields are computed when the task is created or when the task's priority is changed. The values are obtained
as follows:
OSTCBY
OSTCBBitY
OSTCBX
OSTCBBitX
=
=
=
=
priority >> 3;
OSMapTbl[priority >> 3];
priority & 0x07;
OSMapTbl[priority & 0x07];
Listing 3.4, Calculating OS_TCB members.
OSTCBDelReq is a boolean which is used to indicate whether or not a task requested that the current task be
deleted. The use of this field will be described later (see Chapter 4, Task Management).
The maximum number of tasks (OS_MAX_TASKS) that an application can have is specified in OS_CFG.H and
determines the number of OS_TCBs allocated by µC/OS-II for your application. You can reduce the amount of RAM
needed by setting OS_MAX_TASKS to the number of actual tasks needed in your application. All OS_TCBs are
placed in OSTCBTbl[]. Note that µC/OS-II allocates OS_N_SYS_TASKS (see uCOS_II.H) extra OS_TCBs for
internal use. One will be used for the idle task while the other will be used for the statistic task (if
OS_TASK_STAT_EN is set to 1). When µC/OS-II is initialized, all OS_TCBs in this table are linked in a singly linked
list of free OS_TCBs as shown in figure 3-2. When a task is created, the OS_TCB pointed to by OSTCBFreeList is
assigned to the task and, OSTCBFreeList is adjusted to point to the next OS_TCB in the chain. When a task is
deleted, its OS_TCB is returned to the list of free OS_TCBs.
OSTCBTbl[OS_MAX_TASKS+OS_N_SYS_TASKS-1]
OSTCBFreeList
OSTCBTbl[0]
OSTCBTbl[1]
OSTCBTbl[2]
OSTCBNext
OSTCBNext
OSTCBNext
OSTCBNext
0
Figure 3-2, List of free OS_TCBs
3.04 Ready List
Each task is assigned a unique priority level between 0 and OS_LOWEST_PRIO, inclusively (see OS_CFG.H). Task
priority OS_LOWEST_PRIO is always assigned to the idle task when µC/OS-II is initialized. You should note that
OS_MAX_TASKS and OS_LOWEST_PRIO are unrelated. You can have only 10 tasks in an application while still
having 32 priority levels (if you set OS_LOWEST_PRIO to 31).
Each task that is ready to run is placed in a ready list consisting of two variables, OSRdyGrp and OSRdyTbl[].
Task priorities are grouped (8 tasks per group) in OSRdyGrp. Each bit in OSRdyGrp is used to indicate whenever
any task in a group is ready to run. When a task is ready to run it also sets its corresponding bit in the ready table,
OSRdyTbl[]. The size of OSRdyTbl[] depends on OS_LOWEST_PRIO (see uCOS_II.H). This allows you to
reduce the amount of RAM (i.e. data space) needed by µC/OS-II when your application requires few task priorities.
To determine which priority (and thus which task) will run next, the scheduler determines the lowest priority number
that has its bit set in OSRdyTbl[]. The relationship between OSRdyGrp and OSRdyTbl[] is shown in Figure 3-3
and is given by the following rules:
Bit 0 in OSRdyGrp is 1 when any bit in OSRdyTbl[0] is 1.
Bit 1 in OSRdyGrp is 1 when any bit in OSRdyTbl[1] is 1.
Bit 2 in OSRdyGrp is 1 when any bit in OSRdyTbl[2] is 1.
Bit 3 in OSRdyGrp is 1 when any bit in OSRdyTbl[3] is 1.
Bit 4 in OSRdyGrp is 1 when any bit in OSRdyTbl[4] is 1.
Bit 5 in OSRdyGrp is 1 when any bit in OSRdyTbl[5] is 1.
Bit 6 in OSRdyGrp is 1 when any bit in OSRdyTbl[6] is 1.
Bit 7 in OSRdyGrp is 1 when any bit in OSRdyTbl[7] is 1.
OSRdyGrp
7
6
5
4
3
2
1
0
OSRdyTbl[OS_LOWEST_PRIO / 8 + 1]
Highest Priority Task
X
[0]
7
6
5
4
3
2
1
0
[1]
15 14 13 12 11 10 9
8
[2]
23 22 21 20 19 18 17 16
[3]
31 30 29 28 27 26 25 24
[4]
39 38 37 36 35 34 33 32
[5]
47 46 45 44 43 42 41 40
[6]
55 54 53 52 51 50 49 48
[7]
63 62 61 60 59 58 57 56
Y
Task Priority #
Task's Priority
0
0
Y
Y
Y
X
X
Lowest Priority Task
(Idle Task)
X
Bit position in OSRdyTbl[OS_LOWEST_PRIO / 8 + 1]
Bit position in OSRdyGrp and
Index into OSRdyTbl[OS_LOWEST_PRIO / 8 + 1]
Figure 3-3, µC/OS-II’s Ready List
The following piece of code is used to place a task in the ready list:
OSRdyGrp
|= OSMapTbl[prio >> 3];
OSRdyTbl[prio >> 3] |= OSMapTbl[prio & 0x07];
Listing 3.5, Making a task ready-to-run.
where prio is the task's priority.
As you can see from Figure 3-3, the lower 3 bits of the task's priority are used to determine the bit position in
OSRdyTbl[], while the next three most significant bits are used to determine the index into OSRdyTbl[]. Note
that OSMapTbl[] (see OS_CORE.C) is a table in ROM, used to equate an index from 0 to 7 to a bit mask as shown
in the table below:
Index
Bit mask (Binary)
0
1
2
3
4
5
6
7
00000001
00000010
00000100
00001000
00010000
00100000
01000000
10000000
Table 3.1, Contents of OSMapTbl[].
A task is removed from the ready list by reversing the process. The following code is executed in this case:
if ((OSRdyTbl[prio >> 3] &= ~OSMapTbl[prio & 0x07]) == 0)
OSRdyGrp &= ~OSMapTbl[prio >> 3];
Listing 3.6, Removing a task from the ready list.
This code clears the ready bit of the task in OSRdyTbl[] and clears the bit in OSRdyGrp only if all tasks in a group
are not ready to run, i.e. all bits in OSRdyTbl[prio >> 3] are 0. Another table lookup is performed, rather than
scanning through the table starting with OSRdyTbl[0] to find the highest priority task ready to run.
OSUnMapTbl[256] is a priority resolution table (see OS_CORE.C). Eight bits are used to represent when tasks are
ready in a group. The least significant bit has the highest priority. Using this byte to index the table returns the bit
position of the highest priority bit set, a number between 0 and 7. Determining the priority of the highest priority task
ready to run is accomplished with the following section of code:
y
= OSUnMapTbl[OSRdyGrp];
x
= OSUnMapTbl[OSRdyTbl[y]];
prio = (y << 3) + x;
Listing 3.7, Finding the highest priority task ready-to-run.
For example, if OSRdyGrp contains 01101000 (binary) then the table lookup OSUnMapTbl[OSRdyGrp] would
yield a value of 3, which corresponds to bit #3 in OSRdyGrp. Notes that bit positions are assumed to start on the right
with bit #0 being the rightmost bit. Similarly, if OSRdyTbl[3] contained 11100100 (binary) then
OSUnMapTbl[OSRdyTbl[3]] would result in a value of 2 (i.e. bit #2). The task priority (prio) would then be 26
(3 * 8 + 2)! Getting a pointer to the OS_TCB for the corresponding task is done by indexing into OSTCBPrioTbl[]
using the task's priority.
3.05 Task Scheduling
µC/OS-II always executes the highest priority task ready to run. The determination of which task has the highest
priority and thus, which task will be next to run is determined by the scheduler. Task level scheduling is performed by
OSSched(). ISR level scheduling is handled by another function (OSIntExit()) and will be described later. The
code for OSSched() is shown in Listing 3.8.
µC/OS-II's task scheduling time is constant irrespective of the number of tasks created in an application. OSSched()
exits if called from an ISR (i.e. OSIntNesting > 0) or if scheduling has been disabled because your application
called OSSchedLock() at least once (i.e. OSLockNesting > 0) L3.8(1). If OSSched() is not called from an
ISR and the scheduler is enabled then OSSched() determines the priority of the highest priority task that is ready to
run L3.8(2). A task that is ready to run has its corresponding bit set in OSRdyTbl[]. Once the highest priority task
has been found, OSSched() verifies that the highest priority task is not the current task. This is done to avoid an
unnecessary context switch L3.8(3). Note that µC/OS used to obtain OSTCBHighRdy and compared it with
OSTCBCur. On 8 and some 16-bit processors, this operation was relatively slow because comparison was made on
pointers instead of 8-bit integers as it is now done in µC/OS-II. Als o, there is no point of looking up OSTCBHighRdy
in OSTCBPrioTbl[] unless we actually need to do a context switch. The combination of comparing 8-bit values
instead of pointers and looking up OSTCBHighRdy only when needed should make µC/OS-II faster than µC/OS on 8
and some 16-bit processors.
void OSSched (void)
{
INT8U y;
OS_ENTER_CRITICAL();
if ((OSLockNesting | OSIntNesting) == 0) {
y
= OSUnMapTbl[OSRdyGrp];
OSPrioHighRdy = (INT8U)((y << 3) + OSUnMapTbl[OSRdyTbl[y]]);
if (OSPrioHighRdy != OSPrioCur) {
OSTCBHighRdy = OSTCBPrioTbl[OSPrioHighRdy];
OSCtxSwCtr++;
OS_TASK_SW();
}
}
OS_EXIT_CRITICAL();
(1)
(2)
(2)
(3)
(4)
(5)
(6)
}
Listing 3.8, Task Scheduler
To perform a context switch, we need to have OSTCBHighRdy point to the OS_TCB of the highest priority task
which is done by indexing into OSTCBPrioTbl[] using OSPrioHighRdy L3.8(4). Next, the statistic counter
OSCtxSwCtr is incremented to keep track of the number of context switches L3.8(5). Finally, the macro
OS_TASK_SW() is invoked to do the actual context switch L3.8(6).
A context switch simply consist of saving the processor registers on the stack of the task being suspended, and
restoring the registers of the higher-priority task from its stack. In µC/OS-II, the stack frame for a ready task always
looks as if an interrupt has just occurred and all processor registers were saved onto it. In other words, all that
µC/OS-II has to do to run a ready task is to restore all processor registers from the task’s stack and execute a return
from interrupt. To switch context, you should implement OS_TASK_SW() so that you simulate an interrupt. Most
processors provide either software interrupt or TRAP instructions to accomplish this. The interrupt service routine
(ISR) or trap handler (also called the ‘exception handler’
) MUST vector to the assembly language function
OSCtxSw(). OSCtxSw() expects to have OSTCBHighRdy point to the OS_TCB of the task to switch in and
OSTCBCur point to the OS_TCB of the task being suspended. Refer to chapter 8, Porting µC/OS -II for additional
details on OSCtxSw().
All of the code inOSSched() is considered a critical section. Interrupts are disabled to prevent ISRs from setting the
ready bit of one or more tasks during the process of finding the highest priority task ready to run. Note that
OSSched() could be written entirely in assembly language to reduce scheduling time. OSSched() was written in
C for readability, portability and also to minimize assembly language.
3.06 Locking and Unlocking the Scheduler
The OSSchedLock() function is used to prevent task rescheduling until its counterpart, OSSchedUnlock(), is
called. The code for these functions is shown in Listing 3.9 and 3.10. The task that calls OSSchedLock() keeps
control of the CPU even though other higher priority tasks are ready to run. Interrupts, however, are still recognized
and serviced (assuming interrupts are enabled). OSSchedLock() and OSSchedUnlock() must be used in pairs.
The variable OSLockNesting keeps track of the number of times OSSchedLock() has been called to allow for
nesting. This allows nested functions which contain critical code that other tasks cannot access. µC/OS-II allows
nesting up to 255 levels deep. Scheduling is re-enabled when OSLockNesting is 0. OSSchedLock() and
OSSchedUnlock() must be used with caution because they affect the normal management of tasks by µC/OS-II.
OSSchedUnlock() calls the scheduler L3.10(2) when OSLockNesting has decremented to 0 L3.10(1) and
OSSchedUnlock() is called from a task, because events could have made higher priority tasks ready to run while
scheduling was locked.
After calling OSSchedLock(), your application must not make any system call that will suspend execution of the
current task, i.e., your application cannot call OSMboxPend(), OSQPend(), OSSemPend(),
OSTaskSuspend(OS_PRIO_SELF), OSTimeDly() or OSTimeDlyHMSM() until OSLockNesting returns
to 0. No other task will be allowed to run, because the scheduler is locked out and your system will lock up.
void OSSchedLock (void)
{
if (OSRunning == TRUE) {
OS_ENTER_CRITICAL();
OSLockNesting++;
OS_EXIT_CRITICAL();
}
}
Listing 3.9, Locking the Scheduler
void OSSchedUnlock (void)
{
if (OSRunning == TRUE) {
OS_ENTER_CRITICAL();
if (OSLockNesting > 0) {
OSLockNesting--;
if ((OSLockNesting | OSIntNesting) == 0) {
OS_EXIT_CRITICAL();
OSSched();
} else {
OS_EXIT_CRITICAL();
}
} else {
OS_EXIT_CRITICAL();
}
}
}
(1)
(2)
Listing 3.10, Unlocking the Scheduler
You may want to disable the scheduler when a low priority task needs to post messages to multiple mailboxes, queues
or semaphores (see Chapter 6, Intertask Communication & Synchronization ) and you don’t want a higher priority task
to take control until all mailboxes, queues and semaphores have been posted to.
3.07 Idle Task
µC/OS-II alwa ys creates a task (a.k.a. the Idle Task) which is executed when none of the other tasks is ready to run.
The idle task (OSTaskIdle()) is always set to the lowest priority, i.e. OS_LOWEST_PRIO. OSTaskIdle()
does nothing but increment a 32 -bit counter called OSIdleCtr. OSIdleCtr is used by the statistics task (see
Section 3.08, Statistic Task ) to determine how much CPU time (in percentage) is actually being consumed by the
application software. The code for the idle task is shown below. Interrupts are disabled then enabled around the
increment because on 8-bit and most 16 -bit processors, a 32-bit increment requires multiple instructions which must
be protected from being accessed by higher priority tasks or an ISR. The idle task can never be deleted by application
software.
void OSTaskIdle (void *pdata)
{
pdata = pdata;
for (;;) {
OS_ENTER_CRITICAL();
OSIdleCtr++;
OS_EXIT_CRITICAL();
}
}
Listing 3.10, µC/OS-II’s Idle task.
3.08 Statistics Task
µC/OS-II contains a task that provides run-time statistics. This task is called OSTaskStat() and is created if you
set the configuration constant OS_TASK_STAT_EN (see OS_CFG.H) to 1. When enabled, OSTaskStat() (see
OS_CORE.C) executes every second and computes the percentage of CPU usage. In other words, OSTaskStat()
will tell you how much of the CPU time is used by your application, in percentage. This value is placed in the variable
OSCPUUsage which is a signed 8-bit integer. The resolution of OSCPUUsage is 1%.
If your application is to use the statistic task, you MUST call OSStatInit() (see OS_CORE.C) from the first and
only task created in your application during initialization. In other words, your startup code MUST create only one
task before calling OSStart(). From this one task, you MUST call OSStatInit() before you create your other
application tasks. The pseudo-code below shows what needs to be done.
void main (void)
{
OSInit();
/* Initialize uC/OS-II
/* Install uC/OS-II's context switch vector
/* Create your startup task (for sake of discussion, TaskStart())
OSStart();
/* Start multitasking
}
void TaskStart (void *pdata)
{
/* Install and initialize µC/OS-II’s ticker
OSStatInit();
/* Initialize statistics task
/* Create your application task(s)
for (;;) {
/* Code for TaskStart() goes here!
}
}
(1)*/
*/
(2)*/
(3)*/
(4)*/
(5)*/
*/
*/
Listing 3.11, Initializing the statistic task.
Because I mentioned that your application must create only one task (i.e. TaskStart() ), µC/OS-II has only three
tasks to manage when main() calls OSStart(): TaskStart(), OSTaskIdle() and OSTaskStat().
Please note that you don’
t have to call the startup task TaskStart() – you can call it anything you like. Your
startup task will have the highest priority because µC/OS-II sets the priority of the idle task to OS_LOWEST_PRIO
and the priority of the statistic task to OS_LOWEST_PRIO – 1 internally.
Figure 3-4 illustrates the flow of execution when initializing the statistic task. The first function that you must call in
µC/OS-II is OSInit() which will initialize µC/OS -II F3-4(1). Next, you need to install the interrupt vector that will
be used to perform context switches F3-4(2). Note that on some processors (specifically the Motorola 68HC11), there
is no need to ‘install’a vector b ecause the vector would already be resident in ROM. You must create TaskStart()
by calling either OSTaskCreate() or OSTaskCreateExt() F3-4(3). Once you are ready to multitask, you call
OSStart() which will schedule TaskStart() for execution because it has the highest priority F3-4(4).
Highest Priority
main()
TaskStart()
{
{
OSInit();
(1)
Install context switch vector; (2)
Create TaskStart(); (3)
OSStart();
}
Scheduler
OS_LOWEST_PRIO - 1
OS_LOWEST_PRIO
OSTaskStat()
{
OSTaskIdle()
{
Init uC/OS-II's ticker; (5)
OSStatInit():
(6)
OSTimeDly(2);
(7)
(4)
Scheduler
while (OSStatRdy == FALSE) { (8)
OSTimeDly(2 seconds);
(9)
}
Scheduler
2 ticks
After 2 ticks
(11)
OSIdleCtr = 0;
(12)
OSTimeDly(1 second); (13)
2 seconds
Scheduler
After 1 second
1 second
for (;;) {
OSIdleCtr++; (10)
}
for (;;) {
OSIdleCtr++; (14)
}
OSIdleCtrMax = OSIdleCtr; (15)
OSStatRdy
= TRUE;
(16)
for (;;) {
Task code;
}
for (;;) {
Compute Statistics; (17)
}
}
}
Figure 3-4, Statistic task initialization
TaskStart() is responsible for initializing and starting the ticker F3-4(5). This is necessary because we don’t want
to receive a tick interrupt until we are actually multitasking. Next, TaskStart() calls OSStatInit() F3-4(6).
OSStatInit() determines how high the idle counter (OSIdleCtr) can count up to if no other task in the
application is executing. A Pentium-II running at 333 MHz increments this counter to a value of 15,000,000 or so.
OSIdleCtr is still far from wrapping around the 4,294,967,296 limit of a 32-bit value. As processors get faster, you
may want to keep an eye on this potential problem.
OSStatInit() starts off by calling OSTimeDly() F3-4(7) which will put TaskStart() to sleep for two ticks.
This is done to synchronize OSStatInit() to the ticker. µC/OS-II will then picks the next highest priority task that
is ready to run, which happens to be OSTaskStat(). We will see the code for OSTaskStat() later but, as a
preview, the very first thing OSTaskStat() does is check to see if the flag OSStatRdy is set to FALSE F3-4(8)
and delays for 2 seconds if it is. It so happens that OSStatRdy is initialized to FALSE by OSInit() and thus,
OSTaskStat() will in fact put itself to sleep for 2 seconds F3-4(9). This causes a context switch to the only task
that is ready to run, OSTaskIdle(). The CPU stays in OSTaskIdle() F3-4(10) until the two ticks of
TaskStart() expire. After two ticks, TaskStart() resumes F3-4(11) execution in OSStatInit() and
OSIdleCtr is cleared F3-4(12). Then, OSStatInit() delays itself for one full second F3-4(13). Because no
other task is ready to run, OSTaskIdle() will again get control of the CPU. During that time, OSIdleCtr will be
continuously incremented F3-4(14). After one second, TaskStart() is resumed, still in OSStatInit() and, the
value that OSIdleCtr reached during that one second is saved in OSIdleCtrMax F3-4(15). OSStatInit()
sets OSStatRdy to TRUE F3-4(16) which will allow OSTaskStat() to perform CPU usage computation F3-4(17)
after its delay of 2 seconds expires.
The actual code for OSStatInit() is shown below.
void OSStatInit (void)
{
OSTimeDly(2);
OS_ENTER_CRITICAL();
OSIdleCtr
= 0L;
OS_EXIT_CRITICAL();
OSTimeDly(OS_TICKS_PER_SEC);
OS_ENTER_CRITICAL();
OSIdleCtrMax = OSIdleCtr;
OSStatRdy
= TRUE;
OS_EXIT_CRITICAL();
}
Listing 3.12, Initializing the statistic task.
The code for OSTaskStat() is shown in listing 3.13. We already discussed why we have to wait for OSStatRdy
in the previous paragraphs L3.13(1). The task code executes every second and basically determines how much CPU
time is actually consumed by all the application tasks. When you start adding application code, the idle task will get
less of the processor's time and thus, OSIdleCtr will not be allowed to count as high as it did when nothing else was
running. Remember that we save this maximum value in OSIdleCtrMax. CPU utilization is stored in the variable
OSCPUUsage and is computed L3.13(2) as follows:
OSIdleCtr
OSCPUUsage(%) = 100 × 1 −
OSIdleCtrMax
Once the above computation is performed, OSTaskStat() calls OSTaskStatHook() L3.13(3) which is a user
definable function that allows for the statistic task to be expanded. Indeed, your application could compute and
display the total execution time of all the tasks, what percentage of time is actually consumed by each task, and more
(see Example #3).
void OSTaskStat (void *pdata)
{
INT32U run;
INT8S usage;
pdata = pdata;
while (OSStatRdy == FALSE) {
OSTimeDly(2 * OS_TICKS_PER_SEC);
}
(1)
for (;;) {
OS_ENTER_CRITICAL();
OSIdleCtrRun = OSIdleCtr;
run
= OSIdleCtr;
OSIdleCtr
= 0L;
OS_EXIT_CRITICAL();
if (OSIdleCtrMax > 0L) {
usage = (INT8S)(100L - 100L * run / OSIdleCtrMax);
if (usage > 100) {
OSCPUUsage = 100;
} else if (usage < 0) {
OSCPUUsage = 0;
} else {
OSCPUUsage = usage;
}
} else {
OSCPUUsage = 0;
}
OSTaskStatHook();
OSTimeDly(OS_TICKS_PER_SEC);
}
(2)
(3)
}
Listing 3.13, Statistics Task.
3.09 Interrupts under µC/OS-II
µC/OS-II requires that an Interrupt Service Routine (ISR) be written in assembly language. If your C compiler
supports in-line assembly language, however, you can put the ISR code directly in a C source file. The pseudo code
for an ISR is shown below:
YourISR:
Save all CPU registers;
Call OSIntEnter() or, increment OSIntNesting directly;
Execute user code to service ISR;
Call OSIntExit();
Restore all CPU registers;
Execute a return from interrupt instruction;
(1)
(2)
(3)
(4)
(5)
(6)
Listing 3.14, ISRs under µC/OS-II.
Your code should save all CPU registers onto the current task stack L3.14(1). Note that on some processors like the
Motorola 68020 (and higher), however, a different stack is used when servicing an interrupt. µC/OS -II can work with
such processors as long as the registers are saved on the interrupted tas k’
s stack when a context switch occurs.
µC/OS-II needs to know that you are servicing an ISR and thus, you need to either call OSIntEnter() or,
increment the global variable OSIntNesting L3.14(2). OSIntNesting can be incremented directly if your
processor performs an increment operation to memory using a single instruction. If your processor forces you to read
OSIntNesting in a register, increment the register and then store the result back in OSIntNesting then you
should call OSIntEnter(). OSIntEnter() wraps these three instructions with code to disable and then enable
interrupts thus ensuring access to OSIntNesting which is considered a shared resource. Incrementing
OSIntNesting directly is much faster than calling OSIntEnter() and is thus the preferred way. One word of
caution, some implementation of OSIntEnter() will cause interrupts to be enabled when OSIntEnter()
returns. In these cases, you will need to clear the interrupt source before calling OSIntEnter() because otherwise,
your interrupt will be re-entered continuously and your application will crash!
Once the previous two steps have been accomplished, you can start servicing the interrupting device L3.14(3). This
section is obviously application specific. µC/OS-II allows you to nest interrupts because it keeps track of nesting in
OSIntNesting. In most cases, however, you will need to clear the interrupt source before you enable interrupts to
allow for interrupt nesting.
The conclusion of the ISR is marked by calling OSIntExit() L3.14(4) which decrements the interrupt nesting
counter. When the nesting counter reaches 0, all nested interrupts have completed and µC/OS -II needs to determine
whether a higher priority task has been awakened by the ISR (or any other nested ISR). If a higher priority task is
ready to run, µC/OS-II will return to the higher priority task rather than to the interrupted task. If the interrupted task
is still the most important task to run the OSIntExit() will return to its caller L3.14(5). At that point the saved
registers are restored and a return from interrupt instruction is executed L3.14(6). Note that µC/OS-II will return to the
interrupted task if scheduling has been disabled (OSLockNesting > 0).
The above description is further illustrated in figure 3-5. The interrupt is received F3-5(1) but is not recognized by the
CPU either because interrupts have been disabled by µC/OS-II or your application or, the CPU has not completed
executing the current instruction. Once the CPU recognizes the interrupt F3-5(2), the CPU vectors (at least on most
microprocessors) to the ISR F3-5(3). As described above, the ISR saves the CPU registers F3-5(4) (i.e. the CPU’
s
context). Once this is done, your ISR notifies µC/OS-II by calling OSIntEnter() or by incrementing
OSIntNesting F3-5(5). Your ISR code then gets to execute F3-5(6). Your ISR should do as little work as possible
and defer most of the work to the task. A task is notified of the ISR by calling either OSMboxPost(), OSQPost()
or OSSemPost(). The receiving task may or may not be pending at the mailbox, queue or semaphore when the ISR
occurs and the post is made. Once the user ISR code has completed, your need to call OSIntExit() F3-5(7). As
can be seen from the timing diagram, OSIntExit() takes less time to return to the interrupted task when there is no
higher priority task (HPT) readied by the ISR. Furthermore, in this case, the CPU registers are then simply restored
F3-5(8) and a return from interrupt instruction is executed F3-5(9). If the ISR made a higher priority task ready to run
then OSIntExit() will take longer to execute since a context switch is now needed F3-5(10). The registers of the
new task will be restored F3-5(11) and a return from interrupt instruction will be executed F3-5(12).
Time
Task Response
Interrupt Request (1)
礐 /OS-IIor your application
has interrupts disabled.
(2)
TASK
Vectoring
Interrupt Recovery
TASK
No New HPT or,
OSLockNesting > 0
Return from interrupt
(3)
(9)
Saving Context
Restore context
(4)
(8)
Notify kernel:
OSIntEnter() or,
OSIntNesting++
Notify kernel: OSIntExit()
(7)
User ISR code
(5)
(6)
Notify kernel: OSIntExit()
Interrupt Response
(10)
Restore context
(11)
ISR signals a task
Return from interrupt
New HPT
(12)
TASK
Interrupt Recovery
Task Response
Figure 3-5, Servicing an interrupt
The code for OSIntEnter() is shown in listing 3.15 and the code for OSIntExit() is shown in listing 3.16.
Very little needs to be said about OSIntEnter().
void OSIntEnter (void)
{
OS_ENTER_CRITICAL();
OSIntNesting++;
OS_EXIT_CRITICAL();
}
Listing 3.15, Notify µC/OS-II about beginning of ISR.
void OSIntExit (void)
{
OS_ENTER_CRITICAL();
if ((--OSIntNesting | OSLockNesting) == 0) {
OSIntExitY
= OSUnMapTbl[OSRdyGrp];
OSPrioHighRdy = (INT8U)((OSIntExitY << 3) +
OSUnMapTbl[OSRdyTbl[OSIntExitY]]);
if (OSPrioHighRdy != OSPrioCur) {
OSTCBHighRdy = OSTCBPrioTbl[OSPrioHighRdy];
OSCtxSwCtr++;
OSIntCtxSw();
}
}
OS_EXIT_CRITICAL();
}
(1)
(2)
(3)
(4)
Listing 3.16, Notify µC/OS-II about leaving an ISR.
OSIntExit() looks strangely like OSSched() except for three differences. First the interrupt nesting counter is
decremented in OSIntExit() L3.16(2) and rescheduling occurs when both the interrupt nesting counter and the
lock nesting counter (OSLockNesting) are both 0. The second difference is that the Y index needed for
OSRdyTbl[] is stored in the global variable OSIntExitY L3.16(3) This is done to avoid allocating a local
variable on the stack which, would need to be accounted for in OSIntCtxSw() (see Section 9.04.03,
OS_CPU_A.ASM, OSIntCtxSw()). Finally, If a context switch is needed, OSIntExit() calls OSIntCtxSw()
L3.16(4) instead of OS_TASK_SW() as it did in OSSched().
There are two reasons for calling OSIntCtxSw() instead of OS_TASK_SW(). First, half the work is already done
because the ISR has already saved the CPU registers onto the task stack as shown in L3.14(1) and F3-6(1). Second,
calling OSIntExit() from the ISR pushes the return address of the ISR onto the stack L3.14(4) and F3 -6(2).
Depending on how interrupts are disabled (see Chapter 9, Porting µC/OS -II), the processor’s status word may be
pushed onto the stack L3.16(1) and F3 -6(3) by OS_ENTER_CRITICAL() in OSIntExit(). Finally, the return
address of the call to OSIntCtxSw() is also pushed onto the stack L3.16(4) and F3-6(4). The stack frame looks like
what µC/OS-II expects when a task is suspended except for the extra elements on the stack F3-6(2), F3-6(3) and
F3-6(4). OSIntCtxSw() simply needs to adjust the processor’s stack pointer as shown in F3-6(5). In other words,
adjusting the stack frame ensures that all the stack frames of the suspended tasks look the same.
Implementation details about OSIntCtxSw() are provided in chapter 9, Porting µC/OS-II.
LOW MEMORY
(4)
Return address to caller of OSIntCtxSw()
(3)
Processor Status Word
(2)
Return address to caller of OSIntExit()
SP Points Here!
(5)
SP must be adjusted
to point here.
Saved Processor Registers
This new SP is saved into
the preempted task's OS_TCB.
(1)
(6)
Interrupt Return Address
Stack Growth
Processor Status Word
HIGH MEMORY
Figure 3-6, Cleanup by OSIntCtxSw().
Some processors like the Motorola 68HC11 require that you implicitly re -enable interrupts in order to allow for
nesting. This can be used to your advantage. Indeed, if your ISR needs to be serviced quickly and the ISR doesn’
t
need to notify a task a bout the ISR then, you don’t need to callOSIntEnter() (or increment OSIntNesting ) nor
OSIntExit() as long as you don’t enable interrupts within the ISR. The pseudo-code below shows this situation.
The only way a task and this ISR can communicate is thro ugh global variables.
M68HC11_ISR:
/* Fast ISR, MUST NOT enable interrupts */
All register saved automatically by ISR;
Execute user code to service ISR;
Execute a return from interrupt instruction;
Listing 3.17, ISRs on a Motorola 68HC11.
3.10 Clock Tick
µC/OS-II requires that you provide a periodic time source to keep track of time delays and timeouts. A tick should
occur between 10 and 100 times per second, or Hertz. The faster the tick rate, the higher the overhead imposed on the
system. The actual frequency of the clock tick depends on the desired tick resolution of your application. You can
obtain a tick source by either dedicating a hardware timer, or generating an interrupt from an AC power line (50/60 Hz)
signal.
You MUST enable ticker interrupts AFTER multitasking has started, i.e. after calling OSStart(). In other words,
you should initialize and tick interrupts in the first task that executes following a call to OSStart(). A common
mistake is to enable ticker interrupts between calling OSInit() and OSStart() as shown in listing 3.18.
void main(void)
{
.
.
OSInit();
/* Initialize µC/OS-II
.
.
/* Application initialization code ...
/* ... Create at least on task by calling OSTaskCreate()
.
.
Enable TICKER interrupts; /* DO NOT DO THIS HERE!!!
.
.
OSStart();
/* Start multitasking
}
*/
*/
*/
*/
*/
Listing 3.18, Incorrect way to start the ticker.
What could happen (and it has happened) is that the tick interrupt could be serviced before µC/OS -II starts the first
task. At this point, µC/OS-II is in an unknown state and will cause your application to crash.
µC/OS-II’s clock tick is serviced by calling OSTimeTick() from a tick ISR. The tick ISR follows all the rules
described in the previous section. The pseudo code for the tick ISR is shown in listing 3.19. This code must be written
in assembly language because you cannot access CPU registers directly from C.
void OSTickISR(void)
{
Save processor registers;
Call OSIntEnter() or increment OSIntNesting;
Call OSTimeTick();
Call OSIntExit();
Restore processor registers;
Execute a return from interrupt instruction;
}
Listing 3.19, Pseudo code for Tick ISR.
The code for OSTimeTick() is shown in listing 3.20. OSTimeTick() starts by calling a user definable function
(OSTimeTickHook()) which can be used to extend the functionality of OSTimeTick() L3.20(1). I decided to
call OSTimeTickHook() first to give your application a chance to do something as soon as the tick is serviced
because you may have some time critical work to do. Most of the work done by OSTimeTick() basically consist of
decrementing the OSTCBDly field for each OS_TCB (if it’s nonzero). OSTimeTick() follows the chain of
OS_TCB starting at OSTCBList L3.20(2) until it reaches the idle task L3.20(3). When the OSTCBDly field of a
task's OS_TCB is decremented to zero, the task is made ready to run L3.20(4). The task is not readied, however, if it
was explicitly suspended by OSTaskSuspend() L3.20(5). The execution time of OSTimeTick() is directly
proportional to the number of tasks created in an application.
void OSTimeTick (void)
{
OS_TCB *ptcb;
OSTimeTickHook();
ptcb = OSTCBList;
while (ptcb->OSTCBPrio != OS_IDLE_PRIO) {
OS_ENTER_CRITICAL();
if (ptcb->OSTCBDly != 0) {
if (--ptcb->OSTCBDly == 0) {
if (!(ptcb->OSTCBStat & OS_STAT_SUSPEND)) {
OSRdyGrp
|= ptcb->OSTCBBitY;
OSRdyTbl[ptcb->OSTCBY] |= ptcb->OSTCBBitX;
} else {
ptcb->OSTCBDly = 1;
}
}
}
ptcb = ptcb->OSTCBNext;
OS_EXIT_CRITICAL();
}
OS_ENTER_CRITICAL();
OSTime++;
OS_EXIT_CRITICAL();
(1)
(2)
(3)
(5)
(4)
(7)
(6)
}
Listing 3.20, Code to service a tick.
OSTimeTick() also accumulates the number of clock ticks since power up in an unsigned 32-bit variable called
OSTime L3.20(6). Note that I disable interrupts L3.20(7) before incrementing OSTime because on some processors,
a 32-bit increment will most likely be done using multiple instructions.
If you don't like to make ISRs any longer than they must be, OSTimeTick() can be called at the task level as shown
in listing 3.21. To do this, you would create a task which has a higher priority than all your application tasks. The tick
ISR would need to signal this high priority task by using either a semaphore or a message mailbox.
void TickTask (void *pdata)
{
pdata = pdata;
for (;;) {
OSMboxPend(...);
/* Wait for signal from Tick ISR */
OSTimeTick();
}
}
Listing 3.21, Code to service a tick.
You would obviously need to create a mailbo x (initialized to NULL) which would signal the task that a tick interrupt
occurred. The tick ISR would now look as shown in listing 3.22.
void OSTickISR(void)
{
Save processor registers;
Call OSIntEnter() or increment OSIntNesting;
Post a ‘dummy’ message (e.g. (void *)1) to the tick mailbox;
Call OSIntExit();
Restore processor registers;
Execute a return from interrupt instruction;
}
Listing 3.22, Code to service a tick.
3.11 µC/OS-II Initialization
A requirement of µC/OS-II is that you call OSInit() before you call any of its other services. OSInit()
initializes all of µC/OS-II’s variables and data structures (see OS_CORE.C).
OSInit() creates the idle task (OSTaskIdle()) which is always ready-to-run. The priority of OSTaskIdle()
is always set to OS_LOWEST_PRIO. If OS_TASK_STAT_EN and OS_TASK_CREATE_EXT_EN (see OS_CFG.H)
are both set to 1, OSInit() also creates the statistic task, OSTaskStat() and makes it ready-to-run. The priority
of OSTaskStat() is always set to OS_LOWEST_PRIO – 1.
Figure 3-7 shows the relationship between some of µC/OS-II’s variables and data structures after calling OSInit().
The illustration assumes that:
1.
2.
3.
OS_TASK_STAT_EN is set to 1 in OS_CFG.H
OS_LOWEST_PRIO is set to 63 in OS_CFG.H
OS_MAX_TASKS is set to a value higher that 2 in OS_CFG.H
The Task Control Blocks (OS_TCBs) of these two tasks are chained together in a doubly-linked list. OSTCBList
points to the beginning of this chain. When a task is created, it is always placed at the beginning of the list. In other
words, OSTCBList always points to the OS_TCB of last task created. The ends of the chain point to NULL (i.e. 0).
Because both tasks are ready-to-run, their corresponding bit in OSRdyTbl[] are set to 1. Also, because the bit of
both tasks are on the same row in OSRdyTbl[], only one bit in OSRdyGrp is set to 1.
OSRdyGrp
Ready List
OSTCBPrioTbl[]
1 0 0 0 0 0 0 0
OSRdyTbl[]
0
0
0
0
0
0
0
1
0
0
0
0
0
0
0
1
0
0
0
0
0
0
0
0
0
0
0
0
0
0
0
0
0
0
0
0
0
0
0
0
0
0
0
0
0
0
0
0
0
0
0
0
0
0
0
0
0
0
0
0
0
0
0
0
0
0
0
0
0
0
0
[0]
[1]
[2]
[3]
[4]
[5]
[6]
0
0
0
[OS_LOWEST_PRIO - 1]
[OS_LOWEST_PRIO]
OSTaskStat()
OS_TCB
OSTCBList
OSPrioCur
OSPrioHighRdy
OSTCBCur
OSTCBHighRdy
OSTime
OSIntNesting
OSLockNesting
OSCtxSwCtr
OSTaskCtr
OSRunning
OSCPUUsage
OSIdleCtrMax
OSIdleCtrRun
OSIdleCtr
OSStatRdy
=
=
=
=
=
=
=
=
=
=
=
=
=
=
=
0
0
0
NULL
NULL
0L
0
0
0
2
FALSE
0
0L
0L
0L
FALSE
OSTCBStkPtr
OSTCBExtPtr = NULL
OSTCBStkBottom
OSTCBStkSize = stack size
OSTCBId = OS_LOWEST_PRIO
OSTCBNext
OSTCBPrev
OSTCBEventPtr = NULL
OSTCBMsg = NULL
OSTCBDly = 0
OSTCBStat = OS_STAT_RDY
OSTCBPrio = OS_LOWEST_PRIO-1
OSTCBX = 6
OSTCBY = 7
OSTCBBitX = 0x40
OSTCBBitY = 0x80
OSTCBDelReq = FALSE
OSTaskIdle()
OS_TCB
OSTCBStkPtr
OSTCBExtPtr = NULL
OSTCBStkBottom
OSTCBStkSize = stack size
OSTCBId = OS_LOWEST_PRIO
OSTCBNext
OSTCBPrev
OSTCBEventPtr = NULL
OSTCBMsg = NULL
OSTCBDly = 0
OSTCBStat = OS_STAT_RDY
OSTCBPrio = OS_LOWEST_PRIO
OSTCBX = 7
OSTCBY = 7
OSTCBBitX = 0x80
OSTCBBitY = 0x80
OSTCBDelReq = FALSE
Task Stack
0
Task Stack
Figure 3-7, Data structures after calling OSInit()
µC/OS-II also initializes four pools of free data structures as shown in figure 3-8. Each of these pools are singly linked
lists and allows µC/OS-II to quickly obtain and return an element from and to a pool. Note that the number of free
OS_TCBs in the free pool is determined by OS_MAX_TASKS specified in OS_CFG.H. µC/OS -II automatically
allocates OS_N_SYS_TASKS (see uCOS_II.H) OS_TCB entries automatically. This of course allows for sufficient
task control blocks for the statistic task and the idle task. The lists pointed to by OSEventFreeList and
OSQFreeList will be discussed in Chapter 6, Intertask Communication & Synchronization . The list pointed to by
OSMemFreeList will be discussed in Chapter 7, Memory Management.
OS_MAX_TASKS
OSTCBFreeList
OS_TCB
OS_TCB
OS_TCB
OS_TCB
OSTCBStkPtr
OSTCBExtPtr
OSTCBStkBottom
OSTCBStkSize
OSTCBId
OSTCBNext
OSTCBPrev
OSTCBEventPtr
OSTCBMsg
OSTCBDly
OSTCBStat
OSTCBPrio
OSTCBX
OSTCBY
OSTCBBitX
OSTCBBitY
OSTCBDelReq
OSTCBStkPtr
OSTCBExtPtr
OSTCBStkBottom
OSTCBStkSize
OSTCBId
OSTCBNext
OSTCBPrev
OSTCBEventPtr
OSTCBMsg
OSTCBDly
OSTCBStat
OSTCBPrio
OSTCBX
OSTCBY
OSTCBBitX
OSTCBBitY
OSTCBDelReq
OSTCBStkPtr
OSTCBExtPtr
OSTCBStkBottom
OSTCBStkSize
OSTCBId
OSTCBNext
OSTCBPrev
OSTCBEventPtr
OSTCBMsg
OSTCBDly
OSTCBStat
OSTCBPrio
OSTCBX
OSTCBY
OSTCBBitX
OSTCBBitY
OSTCBDelReq
OSTCBStkPtr
OSTCBExtPtr
OSTCBStkBottom
OSTCBStkSize
OSTCBId
OSTCBNext
OSTCBPrev
OSTCBEventPtr
OSTCBMsg
OSTCBDly
OSTCBStat
OSTCBPrio
OSTCBX
OSTCBY
OSTCBBitX
OSTCBBitY
OSTCBDelReq
OS_EVENT
OS_EVENT
0
OS_MAX_EVENTS
OSEventFreeList
OSEventPtr
OSEventTbl[]
OSEventCnt
OSEventType
OSEventGrp
OSEventPtr
OSEventTbl[]
OSEventCnt
OSEventType
OSEventGrp
OS_Q
OS_Q
OS_EVENT
OSEventPtr
OSEventTbl[]
OSEventCnt
OSEventType
OSEventGrp
OS_EVENT
OSEventPtr
OSEventTbl[]
OSEventCnt
OSEventType
OSEventGrp
0
OS_MAX_QS
OSQFreeList
OSQPtr
OSQStart
OSQEnd
OSQIn
OSQOut
OSQSize
OSQEntries
OSQPtr
OSQStart
OSQEnd
OSQIn
OSQOut
OSQSize
OSQEntries
OS_Q
OSQPtr
OSQStart
OSQEnd
OSQIn
OSQOut
OSQSize
OSQEntries
OS_Q
OSQPtr
OSQStart
OSQEnd
OSQIn
OSQOut
OSQSize
OSQEntries
0
OS_MAX_MEM_PART
OS_MEM
OSMemFreeList
OSMemAddr
OSMemFreeList
OSMemBlkSize
OSMemNBlks
OSNFree
OS_MEM
OSMemAddr
OSMemFreeList
OSMemBlkSize
OSMemNBlks
OSNFree
OS_MEM
OSMemAddr
OSMemFreeList
OSMemBlkSize
OSMemNBlks
OSNFree
Figure 3-8, Free Pools
OS_MEM
OSMemAddr
OSMemFreeList
OSMemBlkSize
OSMemNBlks
OSNFree
0
3.12 Starting µC/OS-II
You start multitasking by calling OSStart() . Before you start µC/OS-II, however, you MUST create at least one of
your application tasks as shown in listing 3.23.
void main (void)
{
OSInit();
/* Initialize uC/OS-II
*/
.
.
Create at least 1 task using either OSTaskCreate() or OSTaskCreateExt();
.
.
OSStart();
/* Start multitasking! OSStart() will not return */
}
Listing 3.23, Initializing and Starting µC/OS-II.
The code for OSStart() is shown in listing 3.24. When called, OSStart() finds the OS_TCB of the highest
priority task that you have created (done through the ready list) L3.24(1). Then, OSStart() calls
OSStartHighRdy() L3.24(2) (see OS_CPU_A.ASM) for the processor being used.
Basically,
OSStartHighRdy() restores the CPU registers by popping them off the task’s stack and then, executes a return
from interrupt instruction which forces the CPU to execute your task’s code (see Section 9.04.01, OS_CPU_A.ASM,
OSStartHighRdy() for details on how this is done for the 80x86). You should note that OSStartHighRdy() will
never return to OSStart().
void OSStart (void)
{
INT8U y;
INT8U x;
if (OSRunning == FALSE) {
y
= OSUnMapTbl[OSRdyGrp];
x
= OSUnMapTbl[OSRdyTbl[y]];
OSPrioHighRdy = (INT8U)((y << 3) + x);
OSPrioCur
= OSPrioHighRdy;
OSTCBHighRdy = OSTCBPrioTbl[OSPrioHighRdy];
OSTCBCur
= OSTCBHighRdy;
OSStartHighRdy();
}
(1)
(2)
}
Listing 3.24, Starting multitasking.
Figure 3-9 shows the contents of the variables and data structures after multitasking has started. Here I assumed that
the task you created has a priority of 6. You will notice that OSTaskCtr indicates that three tasks have been created,
OSRunning is set to TRUE indicating that multitasking has started, OSPrioCur and OSPrioHighRdy contain the
priority of your application task and, OSTCBCur and OSTCBHighRdy both point to the OS_TCB of your task.
Ready List
OSRdyGrp
OSTime
OSIntNesting
OSLockNesting
OSCtxSwCtr
OSTaskCtr
OSRunning
OSCPUUsage
OSIdleCtrMax
OSIdleCtrRun
OSIdleCtr
OSStatRdy
=
=
=
=
=
=
=
=
=
=
=
0L
0
0
0
3
TRUE
0
0L
0L
0L
FALSE
1 0 0 0 0 0 0 1
OSRdyTbl[]
0
0
0
0
0
0
0
1
OSPrioCur
= 6
OSPrioHighRdy = 6
1
0
0
0
0
0
0
1
0
0
0
0
0
0
0
0
0
0
0
0
0
0
0
0
0
0
0
0
0
0
0
0
0
0
0
0
0
0
0
0
0
0
0
0
0
0
0
0
0
0
0
0
0
0
0
0
OSTCBPrioTbl[]
0
0
0
0
0
0
[0]
[1]
[2]
[3]
[4]
[5]
[6]
0
0
0
[OS_LOWEST_PRIO - 1]
[OS_LOWEST_PRIO]
YouAppTask()
OSTaskStat()
OS_TCB
OSTCBCur
OSTCBHighRdy
OSTCBList
0
OSTCBStkPtr
OSTCBExtPtr = NULL
OSTCBStkBottom
OSTCBStkSize = stack size
OSTCBId = 6
OSTCBNext
OSTCBPrev
OSTCBEventPtr = NULL
OSTCBMsg = NULL
OSTCBDly = 0
OSTCBStat = OS_STAT_RDY
OSTCBPrio = 6
OSTCBX = 6
OSTCBY = 0
OSTCBBitX = 0x40
OSTCBBitY = 0x01
OSTCBDelReq = FALSE
OS_TCB
OSTCBStkPtr
OSTCBExtPtr = NULL
OSTCBStkBottom
OSTCBStkSize = stack size
OSTCBId = OS_LOWEST_PRIO
OSTCBNext
OSTCBPrev
OSTCBEventPtr = NULL
OSTCBMsg = NULL
OSTCBDly = 0
OSTCBStat = OS_STAT_RDY
OSTCBPrio = OS_LOWEST_PRIO-1
OSTCBX = 6
OSTCBY = 7
OSTCBBitX = 0x40
OSTCBBitY = 0x80
OSTCBDelReq = FALSE
OSTaskIdle()
OS_TCB
OSTCBStkPtr
OSTCBExtPtr = NULL
OSTCBStkBottom
OSTCBStkSize = stack size
OSTCBId = OS_LOWEST_PRIO
OSTCBNext
OSTCBPrev
OSTCBEventPtr = NULL
OSTCBMsg = NULL
OSTCBDly = 0
OSTCBStat = OS_STAT_RDY
OSTCBPrio = OS_LOWEST_PRIO
OSTCBX = 7
OSTCBY = 7
OSTCBBitX = 0x80
OSTCBBitY = 0x80
OSTCBDelReq = FALSE
Task Stack
0
Task Stack
Task Stack
Figure 3-9, Variables and Data Structures after calling OSStart()
3.13 Obtaining µC/OS-II’s version
You can obtain the current version of µC/OS-II from your application by calling OSVersion(). OSVersion()
returns the version number multiplied by 100. In other words, version 1.00 would be returned as 100.
INT16U OSVersion (void)
{
return (OS_VERSION);
}
Listing 3.25, Getting µC/OS-II’
s version.
To find out about the latest version of µC/OS-II and how to obtain an upgrade, you should either contact the publisher
or check the official µC/OS-II WEB site at www.uCOS-II.com.
3.14 OSEvent???() functions
You probably noticed that OS_CORE.C has four functions that were not mentioned in this chapter. These functions
are OSEventWaitListInit(), OSEventTaskRdy(), OSEventTaskWait()and OSEventTO(). I
placed these functions in OS_CORE.C but I will explain their use in Chapter 6, Intertask Communication &
Synchronization.
Chapter 4
Task Management
We saw in the previous chapter that a task is either an infinite loop function or a function that deletes itself when it is
done executing. Note that the task code is not actually deleted, µC/OS-II simply doesn’t know about the task anymore
and thus that code will not run. A task look just like any other C function containing a return type and an argument but,
it must never return. The return type of a task must always be declared to be void. The functions described in this
chapter are found in the file OS_TASK.C. To review, a task must look as shown below.
void YourTask (void *pdata)
{
for (;;) {
/* USER CODE */
Call one of uC/OS-II’s services:
OSMboxPend();
OSQPend();
OSSemPend();
OSTaskDel(OS_PRIO_SELF);
OSTaskSuspend(OS_PRIO_SELF);
OSTimeDly();
OSTimeDlyHMSM();
/* USER CODE */
}
}
or,
void YourTask (void *pdata)
{
/* USER CODE */
OSTaskDel(OS_PRIO_SELF);
}
This chapter describes the services that allow your application to create a task, delete a task, change a task’s priority,
suspend and resume a task and, allow your application to obtain information about a task.
µC/OS-II can manage up to 64 tasks although µC/OS-II reserves the four highest priority tasks and the four lowest
priority tasks for its own use. This leaves you with up to 56 application tasks. The lower the value of the priority, the
higher the priority of the task. In the current version of µC/OS-II, the task priority number also serves as the task
identifier.
4.00 Creating a Task, OSTaskCreate()
In order for µC/OS-II to manage your task, you must ‘create’a task. You create a task by passing its address along
with other arguments to one of two functions: OSTaskCreate() or OSTaskCreateExt(). OSTaskCreate()
is backward compatible with µC/OS while OSTaskCreateExt() is an ‘extended’version of OSTaskCreate()
and provides additional features. A task can either be created using either function. A task can be created prior to the
start of multitasking or by another task. You MUST create at least one task before you start multitasking (i.e. before
you call OSStart()). A task cannot be created by an ISR.
The code for OSTaskCreate() is shown in listing 4.1. As can be seen, OSTaskCreate() requires four
arguments. task is a pointer to the task code, pdata is a pointer to an argument that will be passed to your task
when it starts executing, ptos is a pointer to the top of the stack that will be assigned to the task (see section 4.02,
Task Stacks) and finally, prio is the desired task priority.
INT8U OSTaskCreate (void (*task)(void *pd), void *pdata, OS_STK *ptos, INT8U prio)
{
void
*psp;
INT8U
err;
if (prio > OS_LOWEST_PRIO) {
return (OS_PRIO_INVALID);
}
OS_ENTER_CRITICAL();
if (OSTCBPrioTbl[prio] == (OS_TCB *)0) {
OSTCBPrioTbl[prio] = (OS_TCB *)1;
OS_EXIT_CRITICAL();
psp = (void *)OSTaskStkInit(task, pdata, ptos, 0);
err = OSTCBInit(prio, psp, (void *)0, 0, 0, (void *)0, 0);
if (err == OS_NO_ERR) {
OS_ENTER_CRITICAL();
OSTaskCtr++;
OSTaskCreateHook(OSTCBPrioTbl[prio]);
OS_EXIT_CRITICAL();
if (OSRunning) {
OSSched();
}
} else {
OSTCBPrioTbl[prio] = (OS_TCB *)0;
}
return (err);
} else {
OS_EXIT_CRITICAL();
(1)
(2)
(3)
(4)
(5)
(6)
(7)
(8)
(9)
(10)
(11)
(12)
return (OS_PRIO_EXIST);
}
}
Listing 4.1, OSTaskCreate()
OSTaskCreate() starts by checking that the task priority is valid L4.1(1). The priority of a task must be a number
between 0 and OS_LOWEST_PRIO, inclusively. Next, OSTaskCreate() makes sure that a task has not already
been created at the desired priority L4.1(2). With µC/OS-II, all tasks must have a unique priority. If the desired
priority is free then µC/OS-II ‘reserves’the priority by placing a non-NULL pointer in OSTCBPrioTbl[] L4.1(3).
This allows OSTaskCreate() to re-enable interrupts L4.1(4) while it sets up the rest of the data structures for the
task.
OSTaskCreate() then calls OSTaskStkInit() L4.1(5) which is responsible for setting up the task stack. This
function is processor specific and is found in OS_CPU_C.C. Refer to Chapter 8, Porting µC/OS-II for details on how
to implement OSTaskStkInit(). If you already have a port of µC/OS-II for the processor you are intending to use
then, you don’t need to be concerned about implementation details. OSTaskStkInit() returns the new
top-of-stack (psp) which will be saved in the task’s OS_TCB. You should note that the fourth argument (i.e. opt) to
OSTaskStkInit() is set to 0. This is because, unlike OSTaskCreateExt(), OSTaskCreate() does not
support options and thus, there are no options to pass to OSTaskStkInit().
µC/OS-II supports processors that have stacks that grow from either high memory to low memory or from low
memory to high memory. When you call OSTaskCreate(), you must know how the stack grows (see OS_CPU.H
(OS_STACK_GROWTH) of the processor you are using) because you must pass the task’s top-of-stack to
OSTaskCreate() which can either be the lowest memory location of the stack or the highest memory location of
the stack.
Once OSTaskStkInit() has completed setting up the stack, OSTaskCreate() calls OSTCBInit() L4.1(6)
to obtain and initialize an OS_TCB from the pool of free OS_TCBs. The code for OSTCBInit() is shown in listing
4.2 but is found in OS_CORE.C instead of OS_TASK.C. OSTCBInit() first tries to obtain an OS_TCB from the
OS_TCB pool L4.2(1). If the pool contained a free OS_TCB L4.2(2) then the OS_TCB is initialized L4.2(3). Note
that once an OS_TCB is allocated, we can re-enable interrupts because, at this point, the creator of the task ‘owns’the
OS_TCB and it cannot be corrupted by another concurrent task creation. We can thus proceed to initialize some of the
OS_TCB fields with interrupts enabled.
INT8U OSTCBInit (INT8U prio,
OS_STK *ptos, OS_STK *pbos, INT16U id,
INT16U stk_size, void *pext,
INT16U opt)
{
OS_TCB *ptcb;
OS_ENTER_CRITICAL();
ptcb = OSTCBFreeList;
if (ptcb != (OS_TCB *)0)
OSTCBFreeList
OS_EXIT_CRITICAL();
ptcb->OSTCBStkPtr
ptcb->OSTCBPrio
ptcb->OSTCBStat
ptcb->OSTCBDly
#if OS_TASK_CREATE_EXT_EN
ptcb->OSTCBExtPtr
ptcb->OSTCBStkSize
ptcb->OSTCBStkBottom
ptcb->OSTCBOpt
ptcb->OSTCBId
#else
{
= ptcb->OSTCBNext;
=
=
=
=
ptos;
(INT8U)prio;
OS_STAT_RDY;
0;
=
=
=
=
=
pext;
stk_size;
pbos;
opt;
id;
(1)
(2)
(3)
pext
stk_size
pbos
opt
id
=
=
=
=
=
pext;
stk_size;
pbos;
opt;
id;
#endif
#if OS_TASK_DEL_EN
ptcb->OSTCBDelReq
#endif
ptcb->OSTCBY
ptcb->OSTCBBitY
ptcb->OSTCBX
ptcb->OSTCBBitX
#if
= OS_NO_ERR;
=
=
=
=
prio >> 3;
OSMapTbl[ptcb->OSTCBY];
prio & 0x07;
OSMapTbl[ptcb->OSTCBX];
OS_MBOX_EN || (OS_Q_EN && (OS_MAX_QS >= 2)) || OS_SEM_EN
ptcb->OSTCBEventPtr = (OS_EVENT *)0;
#endif
#if
OS_MBOX_EN || (OS_Q_EN && (OS_MAX_QS >= 2))
ptcb->OSTCBMsg
= (void *)0;
#endif
OS_ENTER_CRITICAL();
OSTCBPrioTbl[prio]
= ptcb;
ptcb->OSTCBNext
= OSTCBList;
ptcb->OSTCBPrev
= (OS_TCB *)0;
if (OSTCBList != (OS_TCB *)0) {
OSTCBList->OSTCBPrev = ptcb;
}
OSTCBList
= ptcb;
OSRdyGrp
|= ptcb->OSTCBBitY;
OSRdyTbl[ptcb->OSTCBY] |= ptcb->OSTCBBitX;
OS_EXIT_CRITICAL();
return (OS_NO_ERR);
} else {
OS_EXIT_CRITICAL();
return (OS_NO_MORE_TCB);
}
(4)
(5)
(6)
(7)
}
Listing 4.2, OSTCBInit()
We disable interrupts L4.2(4) when we need to insert the OS_TCB into the doubly linked list of tasks that have been
created L4.2(5). The list starts at OSTCBList and the OS_TCB of a new task is always inserted at the beginning of
the list. Finally, the task is made ready to run L4.2(6) and OSTCBInit() returns to its caller (OSTaskCreate())
with a code indicating that an OS_TCB has been allocated and initialized L4.2(7).
We can now continue the discussion of OSTaskCreate() (see listing 4.1) Upon return from OSTCBInit(),
OSTaskCreate() checks the return code L4.1(7) and upon success, increments the counter of the number of tasks
created, OSTaskCtr L4.1(8). If OSTCBInit() failed, the priority level is relinquished by setting the entry in
OSTCBPrioTbl[prio] to 0 L4.1(12). OSTaskCreate() then calls OSTaskCreateHook() L4.1(9) which
is a user specified function that allows you to extend the functionality of OSTaskCreate(). For example, you
could initialize and store the contents of floating-point registers, MMU registers or anything else that can be associated
with a task. You would, however, typically store this additional information in memory that would be allocated by
your application. OSTaskCreateHook() can be declared either in OS_CPU_C.C (if OS_CPU_HOOKS_EN is set
to 1) or elsewhere. Note that interrupts are disabled when OSTaskCreate() calls OSTaskCreateHook().
Because of this, you should keep the code in this function to a minimum because it can directly impact interrupt
latency. When called, OSTaskCreateHook() receives a pointer to the OS_TCB of the task being created. This
means that the hook function can access all members of the OS_TCB data structure.
Finally, if OSTaskCreate() was called from a task (i.e. OSRunning is set to TRUE L4.1(10)) then the scheduler
is called L4.1(11) to determine whether the created task has a higher priority than its creator. Creating a higher priority
task will result in a context switch to the new task. If the task was created before multitasking has started (i.e. you did
not call OSStart() yet) then the scheduler is not called.
4.01 Creating a Task, OSTaskCreateExt()
Creating a task using OSTaskCreateExt() offers you more flexibility but, at the expense of additional overhead.
The code for OSTaskCreateExt() is shown in listing 4.3.
As can be seen, OSTaskCreateExt() requires nine (9) arguments! The first four arguments (task, pdata,
ptos and prio) are exactly the same as with OSTaskCreate() and also, they are located in the same order. I did
that to make it easier to migrate your code to use OSTaskCreateExt().
The id establishes a unique identifier for the task being created. This argument has been added for future expansion
and is otherwise unused by µC/OS -II. This identifier will allow me to extend µC/OS-II beyond its limit of 64 tasks.
For now, simply set the task’s ID to the same value as the task’s priority.
pbos is a pointer to the task’s bottom-of-stack and this argument is used to perform stack checking.
stk_size specifies the size of the stack in number of elements. This means that if a stack entry is 4 bytes wide then,
a stk_size of 1000 means that the stack will have 4000 bytes. Again, this argument is used for stack checking.
pext is a pointer to a user supplied data area that can be used to extend the OS_TCB of the task. For example, you can
add a name to a task (see Example #3), storage for the contents of floating-point registers during a context switch, port
address to trigger an oscilloscope during a context switch and more.
Finally, opt specifies options to OSTaskCreateExt() to specify whether stack checking is allowed, whether the
stack will be cleared, whether floating-point operations are performed by the task, etc. uCOS_II.H contains a list of
available options (OS_TASK_OPT_STK_CHK, OS_TASK_OPT_STK_CLR, and OS_TASK_OPT_SAVE_FP).
Each option consists of a bit. The option is selected when the bit is set (you would simply OR the above
OS_TASK_OPT_??? constants).
INT8U OSTaskCreateExt (void
(*task)(void *pd),
void
*pdata,
OS_STK *ptos,
INT8U
prio,
INT16U
id,
OS_STK *pbos,
INT32U
stk_size,
void
*pext,
INT16U
opt)
{
void
*psp;
INT8U
err;
INT16U
i;
OS_STK *pfill;
if (prio > OS_LOWEST_PRIO) {
return (OS_PRIO_INVALID);
}
OS_ENTER_CRITICAL();
(1)
if (OSTCBPrioTbl[prio] == (OS_TCB *)0) {
OSTCBPrioTbl[prio] = (OS_TCB *)1;
OS_EXIT_CRITICAL();
if (opt & OS_TASK_OPT_STK_CHK) {
if (opt & OS_TASK_OPT_STK_CLR) {
pfill = pbos;
for (i = 0; i < stk_size; i++) {
#if OS_STK_GROWTH == 1
*pfill++ = (OS_STK)0;
#else
*pfill-- = (OS_STK)0;
#endif
}
}
}
psp = (void *)OSTaskStkInit(task, pdata, ptos, opt);
err = OSTCBInit(prio, psp, pbos, id, stk_size, pext, opt);
if (err == OS_NO_ERR) {
OS_ENTER_CRITICAL;
OSTaskCtr++;
OSTaskCreateHook(OSTCBPrioTbl[prio]);
OS_EXIT_CRITICAL();
if (OSRunning) {
OSSched();
}
} else {
OSTCBPrioTbl[prio] = (OS_TCB *)0;
}
return (err);
} else {
OS_EXIT_CRITICAL();
return (OS_PRIO_EXIST);
}
(2)
(3)
(4)
(5)
(6)
(7)
(8)
(9)
(10)
(11)
(12)
(13)
}
Listing 4.3, OSTaskCreateExt()
OSTaskCreateExt() starts by checking that the task priority is valid L4.3(1). The priority of a task must be a
number between 0 and OS_LOWEST_PRIO, inclusively. Next, OSTaskCreateExt() makes sure that a task has
not already been created at the desired priority L4.3(2). With µC/OS-II, all tasks must have a unique priority. If the
desired priority is free then µC/OS-II ‘reserves’the priority by placing a non-NULL pointer in OSTCBPrioTbl[]
L4.3(3). This allows OSTaskCreateExt() to re-enable interrupts L4.3(4) while it sets up the rest of the data
structures for the task.
In order to perform stack checking (see section 4.03, Stack Checking) on a task, you must set the
OS_TASK_OPT_STK_CHK flag in the opt argument. Also, stack checking requires that the stack contain zeros (i.e.
it needs to be cleared) when the task is created. To specify that a task gets cleared when it is created, you would also
set OS_TASK_OPT_STK_CLR in the opt argument. When both of these flags are set, OSTaskCreateExt()
clears the stack L4.3(5).
OSTaskCreateExt() then calls OSTaskStkInit() L4.3(6) which is responsible for setting up the task stack.
This function is processor specific and is found in OS_CPU_C.C. Refer to Chapter 8, Porting µC/OS-II for details on
how to implement OSTaskStkInit(). If you already have a port of µC/OS-II for the processor you are intending
to use then, you don’t need to be concerned about implementation details. OSTaskStkInit() returns the new
top-of-stack (psp) which will be saved in the task’s OS_TCB.
µC/OS-II supports processors that have stacks that grow from either high memory to low memory or from low
memory to high memory (see section 4.02, Task Stacks). When you call OSTaskCreateExt(), you must know
how the stack grows (see OS_CPU.H of the processor you are using) because you must pass the task’s top -of-stack to
OSTaskCreateExt() which can either be the lowest memory location of the stack (when OS_STK_GROWTH is 0)
or the highest memory location of the stack (when OS_STK_GROWTH is 1).
Once OSTaskStkInit() has completed setting up the stack, OSTaskCreateExt() calls OSTCBInit()
L4.3(7) to obtain and initialize an OS_TCB from the pool of free OS_TCBs. The code for OSTCBInit() is shown
and described with OSTaskCreate() (see section 4.00)
Upon return from OSTCBInit(),
OSTaskCreateExt() checks the return code L4.3(8) and upon success, increments the counter of the number of
tasks created, OSTaskCtr L4.3(9). If OSTCBInit() failed, the priority level is relinquished by setting the entry in
OSTCBPrioTbl[prio] to 0 L4.3(13). OSTaskCreateExt() then calls OSTaskCreateHook() L4.3(10)
which is a user specified function that allows you to extend the functionality of OSTaskCreateExt().
OSTaskCreateHook() can be declared either in OS_CPU_C.C (if OS_CPU_HOOKS_EN is set to 1) or elsewhere
(if OS_CPU_HOOKS_EN is set to 0). Note that interrupts are disabled when OSTaskCreateExt() calls
OSTaskCreateHook(). Because of this, you should keep the code in this function to a minimum because it can
directly impact interrupt latency. When called, OSTaskCreateHook() receives a pointer to the OS_TCB of the
task being created. This means that the hook function can access all members of the OS_TCB data structure.
Finally, if OSTaskCreateExt() was called from a task (i.e. OSRunning is set to TRUE L4.3(11)) then the
scheduler is called L4.3(12) to determine whether the created task has a higher priority than its creator. Creating a
higher priority task will result in a context switch to the new task. If the task was created before multitasking has
started (i.e. you did not call OSStart() yet) then the scheduler is not called.
4.02 Task Stacks
Each task MUST have its own stack space. A stack MUST be declared as being of type OS_STK and MUST consist
of contiguous memory locations You can either allocate stack space ‘statically’(i.e. compile -time) or ‘dynamically’
(run-time). A static stack declaration looks as shown below. Both of these declarations are made outside a function.
static OS_STK
MyTaskStack[stack_size];
Listing 4.4, Static Stack
or,
OS_STK
MyTaskStack[stack_size];
Listing 4.5, Static Stack
You can allocate stack space dynamically by using the C compiler’s malloc() function as shown in listing 4.6.
However, you must be careful with fragmentation. Specifically, if you create and delete tasks then, eventually, your
memory allocator may not be able to return a stack for your task(s) because the heap gets fragmented.
OS_STK
*pstk;
pstk = (OS_STK *)malloc(stack_size);
if (pstk != (OS_STK *)0) {
Create the task;
}
/* Make sure malloc() had enough space */
Listing 4.6, Using ‘malloc()’to allocate stack space for a task
Figure 4-1 illustrates a heap containing 3 Kbytes or available memory that can be allocated with malloc() F4-1(1).
For sake of discussion, you create 3 tasks (task A, B and C) each requiring 1K. We will also assume that the first 1
Kbytes is given to task A, the second to task B and the third to C F4-1(2). Your application then deletes task A and
task B and, relinquishes the memory back to the heap using free() F4-1(3). Your heap now has 2 Kbytes of
memory free but, it’
s not contiguous. This means that you could not create another task (i.e. task D) that required 2
Kbytes. Your heap is thus fragmented. If, however, you never delete a task then using malloc() is perfectly
acceptable.
A
(1K)
3K
B
B
(1K)
(1K)
C
1K
(1K)
(1)
1K
(2)
(3)
Figure 4-1, Fragmentation.
µC/OS-II supports processors that have stacks that grow from either high memory to low memory or from low
memory to high memory. When you call either OSTaskCreate() or OSTaskCreateExt(), you must know
how the stack grows because you need to pass the task’
s top-of-stack to the task creation function. When
OS_STK_GROWTH is set to 0 in OS_CPU.H, you need to pass the lowest memory location of the stack to the task
create function as shown in listing 4.7.
OS_STK
TaskStack[TASK_STACK_SIZE];
OSTaskCreate(task, pdata, &TaskStack[0], prio);
Listing 4.7, Stack grows from LOW memory to HIGH memory
When OS_STK_GROWTH is set to 1 in OS_CPU.H, you need to pass the highest memory location of the stack to the
task create function as shown in listing 4.8.
OS_STK
TaskStack[TASK_STACK_SIZE];
OSTaskCreate(task, pdata, &TaskStack[TASK_STACK_SIZE-1], prio);
Listing 4.8, Stack grows from HIGH memory to LOW memory
This requirement affects code portability. If you need to port your code from a processor architecture that supports a
downward growing stack to an upward growing stack then you may need to do like I did in OS_CORE.C for
OSTaskIdle() and OSTaskStat(). Specifically, with the above example, your code would look as shown in
listing 4.9.
OS_STK
TaskStack[TASK_STACK_SIZE];
#if OS_STK_GROWTH == 0
OSTaskCreate(task, pdata, &TaskStack[0], prio);
#else
OSTaskCreate(task, pdata, &TaskStack[TASK_STACK_SIZE-1], prio);
#endif
Listing 4.9, Supporting stacks which grow in either direction.
The size of the stack needed by your task is application specific. When sizing the stack, however, you must account
for nesting of all the functions called by your task, the number of local variables that will be allocated by all functions
called by your task and, the stack require ments for all nested interrupt service routines. In addition, your stack must be
able to store all CPU registers.
4.03 Stack Checking, OSTaskStkChk()
It is sometimes necessary to determine how much stack space a task actually uses. This allows you to reduce the
amount of RAM needed by your application code by not over allocating stack space. µC/OS -II provides a function
called OSTaskStkChk() that provides you with this valuable information.
Refer to figure 4-2 for the following discussion. Stack checking is performed on demand as opposed to continuously.
Note that figure 4-2 assumes that stack grows from high memory to low memory (i.e. OS_STK_GROWTH is set to 1)
but, the discussion applies equally well to a stack growing in the opposite direction F4-2(1). µC/OS-II determines
stack growth by looking at the contents of the stack itself. To perform stack checking, µC/OS-II requires that the stack
get filled with zeros when the task is created F4-2(2). Also, µC/OS-II needs to know the location of the
bottom-of-stack (BOS) F4-2(3) and the size of the stack you assigned to the task F4-2(4). These two values are stored
in the task’s OS_TCB when the task is created.
LOW MEMORY
.OSTCBStkBottom
0
0
0
Free Stack Space
(3)
(2)
(6)
0
Deepest
Stack
Growth
(5)
Current
Location of
Stack Pointer
.OSTCBStkSize
(4)
Stack Growth
(7)
(1)
Used Stack Space
(8)
Initial TOS
HIGH MEMORY
Figure 4-2, Stack checking
In order for you to use µC/OS-II’s stack checking facilities, you MUST do the following:
1.
2.
3.
4.
Set OS_TASK_CREATE_EXT to 1 in OS_CFG.H.
Create a task using OSTaskCreateExt() and give the task much more space than you think it
really needs.
Set the opt argument in OSTaskCreateExt() to OS_TASK_OPT_STK_CHK +
OS_TASK_OPT_STK_CLR. Note that if your startup code clears all RAM and you never delete
tasks once they are created then, you don’t need to set the OS_TASK_OPT_STK_CLR option. This
will reduce the execution time of OSTaskCreateExt().
Call OSTaskStkChk() by specifying the priority of the task you desire to check.
OSTaskStkChk() computes the amount of free stack space by ‘walking’from the bottom of the stack and counting
the number of zero entries on the stack until a non-zero value is found F4-2(5). Note that stack entries are checked
using the data type of the stack (see OS_STK in OS_CPU.H). In other words, if a stack entry is 32 -bit wide then the
comparison for a zero value is done using 32 bits. The amount of stack space used F4-2(8) is obtained by subtracting
the number of zero value entries F4-2(6) from the stack size you specified in OSTaskCreateExt().
OSTaskStkChk() actually places the number of bytes free and the number of bytes used in a data structure of type
OS_STK_DATA (see uCOS_II.H). You should note that at any given time, the stack pointer for the task being
checked may be pointing somewhere between the initial Top-Of-Stack (TOS) and the deepest stack growth F4 -2(7).
Also, every time you call OSTaskStkChk(), you may get a different value for the amount of free space on the stack
until your task has reached its deepest growth F4-2(5).
You will need to run the application long enough and under your worst case conditions to get proper numbers. Once
OSTaskStkChk() provides you with t he worst case stack requirement, you can go back and set the final size of your
stack. You should accommodate for system expansion so make sure you allocate between 10 and 25% more. What
you should get from stack checking is a ‘ballpark’figure; you are not looking for an exact stack usage.
The code for OSTaskStkChk() is shown in listing 4.10. The data structure OS_STK_DATA (see uCOS_II.H) is
used to hold information about the task stack. I decided to use a data structure for two reasons. First, I consider
OSTaskStkChk() to be a ‘query’type function and I wanted to have all query functions work the same way –return
data about the query in a data structure. Second, passing data in a data structure is both efficient and allows me to add
additional fie lds in the future without changing the API (Application Programming Interface) of OSTaskStkChk().
For now, OS_STK_DATA only contains two fields: OSFree and OSUsed. As you can see, you invoke
OSTaskStkChk() by specifying the priority of the task you desire to perform stack checking on. If you specify
OS_PRIO_SELF L4.10(1) then it is assumed that you desire to know the stack information about the current task.
Obviously, the task must exist L4.10(2). To perform stack checking, you must have created the task using
OSTaskCreateExt() and you must have passed the option OS_TASK_OPT_STK_CHK L4.10(3). If all the
proper conditions are met, OSTaskStkChk() computes the free stack space as described above by ‘walking’from
the bottom of stack until a non-zero stack entry is encountered L4.10(4). Finally, the information to store in
OS_STK_DATA is computed L4.10(5). Note that the function computes the actual number of bytes free and the
number of bytes used on the stack as opposed to the number of elements. Obvio usly, the actual stack size (in bytes)
can be obtained by adding these two values.
INT8U OSTaskStkChk (INT8U prio, OS_STK_DATA *pdata)
{
OS_TCB *ptcb;
OS_STK *pchk;
INT32U
free;
INT32U
size;
pdata->OSFree = 0;
pdata->OSUsed = 0;
if (prio > OS_LOWEST_PRIO && prio != OS_PRIO_SELF) {
return (OS_PRIO_INVALID);
}
OS_ENTER_CRITICAL();
if (prio == OS_PRIO_SELF) {
prio = OSTCBCur->OSTCBPrio;
}
ptcb = OSTCBPrioTbl[prio];
if (ptcb == (OS_TCB *)0) {
OS_EXIT_CRITICAL();
return (OS_TASK_NOT_EXIST);
}
if ((ptcb->OSTCBOpt & OS_TASK_OPT_STK_CHK) == 0) {
OS_EXIT_CRITICAL();
return (OS_TASK_OPT_ERR);
}
free = 0;
size = ptcb->OSTCBStkSize;
pchk = ptcb->OSTCBStkBottom;
OS_EXIT_CRITICAL();
#if OS_STK_GROWTH == 1
while (*pchk++ == 0) {
free++;
}
#else
while (*pchk-- == 0) {
free++;
}
#endif
pdata->OSFree = free * sizeof(OS_STK);
pdata->OSUsed = (size - free) * sizeof(OS_STK);
return (OS_NO_ERR);
}
(1)
(2)
(3)
(4)
(5)
Listing 4.10, Stack checking function
4.04 Deleting a Task, OSTaskDel()
It is sometimes necessary to delete a task. Deleting a task means that the task will be returned to the DORMANT state
(see Section 3.02, Task States) and does not mean that the code for the task will be deleted. The task code is simply no
longer scheduled by µC/OS -II. You delete a task by calling OSTaskDel() and the code for this function is shown in
listing 4.11. Here, we start by making sure that you are not attempting to delete the idle task because this is not
allowed L4.11(1). You are, however, allowed to delete the statistic task L4.11(2). OSTaskDel() then checks to
make sure you are not attempting to delete a task from within an ISR which is again not allowed L4.11(3). The caller
can delete itself by specifying OS_PRIO_SELF as the argument L4.11(4). We then verify that the task to delete does
in fact exist L4.11(5). This test will obviously pass if you specified OS_PRIO_SELF. I didn’t want to create a
separate case for this situation because it would have increased code size and thus execution time.
Once all conditions are satisfied, the OS_TCB is removed from all the possible µC/OS-II data structures.
OSTaskDel() does this in two parts to reduce interrupt latency. First, if the task is in the ready list, it is removed
L4.11(6). We then check to see if the task is in a list waiting for a mailbox, a queue or a semaphore and if so, the task
is removed from that list L4.11(7). Next, we force the delay count to zero to make sure that the tick ISR wi ll not ready
this task once we re-enable interrupts L4.11(8). Finally, we set the task’s .OSTCBStat flag to OS_STAT_RDY.
Note that we are not trying to make the task ready, we are simply preventing another task or an ISR from resuming this
task (i.e. in case the other task or ISR called OSTaskResume() L4.11(9)). This situation could occur because we
will be re -enabling interrupts L4.11(11) so, an ISR can make a higher priority task ready which could resume the task
we are trying to delete. Instead of setting the task’s .OSTCBStat flag to OS_STAT_RDY, I could have simply
cleared the OS_STAT_SUSPEND bit (which would have been clearer) but, this takes slightly more processing time.
At this point, the task to delete cannot be made ready to run by another task or an ISR because, it’s been removed from
the ready list, it’s not waiting for an event to occur, it’s not waiting for time to expire and cannot be resumed. In other
words the task is DORMANT for all intents and purposes. Because of this, I must prevent the scheduler L4.11(10)
from switching to another task because, if the current task is almost deleted then it would not be able to be rescheduled!
At this point, we want to re -enable interrupts in order to reduce interrupt latency L4.11(11). We could thus service an
interrupt but because we incremented OSLockNesting the ISR would return to the interrupted task. You should
note that we are still not done with the deletion process because we need to unlink the OS_TCB from the TCB chain
and return the OS_TCB to the free OS_TCB list.
Note also that I call a ‘
dummy’ function (OSDummy()) immediately after calling OS_EXIT_CRITICAL()
L4.11(12). I do this because I want to make sure that the processor will execute at least one instruction with interrupts
enabled. On many processors, executing an interrupt enable instruction forces the CPU to have interrupts disabled
until the end of the next instruction! The Intel 80x86 and Zilog Z-80 processors actually work like this. Enabling and
immediately disabling interrupts would behave just as if I didn’t enable interrupts. This would of course increase
interrupt latency. Calling OSDummy() thus ensures that I will execute a call and a return instruction before
re-disabling interrupts. You could certainly replace OSDummy() with a macro that executes a ‘no-operation’
instruction and thus slightly reduce the execution time of OSTaskDel(). I didn’t think it was worth the effort of
creating yet another macro that would require porting.
We can now continue with the deletion process of the task. After we re-disable interrupts, re-enable scheduling by
decrementing the lock nesting counter L4.11(13). We then call the user definable task delete hook,
OSTaskDelHook() L4.11(14). This allows user defined TCB extensions to be relinquished. Next, we decrement
the task counter to indicate that there is one less task being managed by µC/OS-II. We remove the OS_TCB from the
priority table by simply replacing the link to the OS_TCB of the task being deleted with a NULL pointer L4.11(15).
We then remove the OS_TCB of the task to delete from the doubly-linked list of OS_TCBs that starts at OSTCBList
L4.11(16). You should note that there is no need to check for the case where ptcb->OSTCBNext == 0 because we
cannot delete the idle task which happens to always be at the end of the chain. The OS_TCB is returned to the free list
of OS_TCBs to allow another task to be created L4.11(17). Last, but not least, the scheduler L4.11(18) is called to see
if a higher priority task has been made ready to run by an ISR that would have occurred when we re-enabled interrupts
at step L4.11(11).
INT8U OSTaskDel (INT8U prio)
{
OS_TCB
*ptcb;
OS_EVENT *pevent;
if (prio == OS_IDLE_PRIO) {
return (OS_TASK_DEL_IDLE);
}
if (prio >= OS_LOWEST_PRIO && prio != OS_PRIO_SELF) {
return (OS_PRIO_INVALID);
}
OS_ENTER_CRITICAL();
if (OSIntNesting > 0) {
(1)
(2)
(3)
OS_EXIT_CRITICAL();
return (OS_TASK_DEL_ISR);
}
if (prio == OS_PRIO_SELF) {
(4)
prio = OSTCBCur->OSTCBPrio;
}
if ((ptcb = OSTCBPrioTbl[prio]) != (OS_TCB *)0) {
(5)
if ((OSRdyTbl[ptcb->OSTCBY] &= ~ptcb->OSTCBBitX) == 0) {
(6)
OSRdyGrp &= ~ptcb->OSTCBBitY;
}
if ((pevent = ptcb->OSTCBEventPtr) != (OS_EVENT *)0) {
(7)
if ((pevent->OSEventTbl[ptcb->OSTCBY] &= ~ptcb->OSTCBBitX) == 0) {
pevent->OSEventGrp &= ~ptcb->OSTCBBitY;
}
}
ptcb->OSTCBDly = 0;
(8)
ptcb->OSTCBStat = OS_STAT_RDY;
(9)
OSLockNesting++;
(10)
OS_EXIT_CRITICAL();
(11)
OSDummy();
(12)
OS_ENTER_CRITICAL();
OSLockNesting--;
(13)
OSTaskDelHook(ptcb);
(14)
OSTaskCtr--;
OSTCBPrioTbl[prio] = (OS_TCB *)0;
(15)
if (ptcb->OSTCBPrev == (OS_TCB *)0) {
(16)
ptcb->OSTCBNext->OSTCBPrev = (OS_TCB *)0;
OSTCBList
= ptcb->OSTCBNext;
} else {
ptcb->OSTCBPrev->OSTCBNext = ptcb->OSTCBNext;
ptcb->OSTCBNext->OSTCBPrev = ptcb->OSTCBPrev;
}
ptcb->OSTCBNext = OSTCBFreeList;
(17)
OSTCBFreeList
= ptcb;
OS_EXIT_CRITICAL();
OSSched();
(18)
return (OS_NO_ERR);
} else {
OS_EXIT_CRITICAL();
return (OS_TASK_DEL_ERR);
}
}
Listing 4.11, Task Delete
4.05 Requesting to delete a task, OSTaskDelReq()
Sometimes, a task may own resources such as a memory buffers or a semaphore. If another task attempts to delete this
task then, the resource would not be freed and thus would be lost. In this type of situation, you would need to
somehow signal the task that owns these resources to tell it to delete itself when it’s done with the resources. You can
accomplish this with the OSTaskDelReq() function.
Both the requestor and the task to be deleted need to call OSTaskDelReq(). The requestor code would look as
shown in listing 4.12. The task that makes the request needs to determine what condition(s) will cause a request for the
task to be deleted L4.12(1). In other words, your application will determine what condition(s) will lead to this decision.
If the task needs to be deleted then you call OSTaskDelReq() by passing the priority of the task to be deleted
L4.12(2). If the task to delete does not exist then OSTaskDelReq() returns OS_TASK_NOT_EXIST. You would
get this if the task to delete has already been deleted or, it has not been created yet. If the return value is OS_NO_ERR
then, the request has been accepted but the task has not been deleted yet. You may want to wait until the task to be
deleted does in fact delete itself. You can do this by delaying the requestor for a certain amount of time like I did in
L4.12(3). I decided to delay for one tick but you can certainly wait longer if needed. When the requested task
eventually deletes itself, the return value in L4.12(2) would be OS_TASK_NOT_EXIST and the loop would exit
L4.12(4).
void RequestorTask (void *pdata)
{
INT8U err;
pdata = pdata;
for (;;) {
/* Application code */
if (‘TaskToBeDeleted()’ needs to be deleted) {
while (OSTaskDelReq(TASK_TO_DEL_PRIO) != OS_TASK_NOT_EXIST) {
OSTimeDly(1);
}
}
/* Application code */
}
(1)
(2)
(3)
(4)
}
Listing 4.12, Requesting a task to delete itself.
The code for the task that needs to delete itself is shown in listing 4.13. This task basically needs to ‘poll’a flag that
resides inside the task’s OS_TCB. The value of this flag is obtained by calling OSTaskDelReq(OS_PRIO_SELF).
When OSTaskDelReq() returns OS_TASK_DEL_REQ L4.13(1) to its caller, it indicates that another task has
requested that this task needs to be deleted. In this case, the task to be deleted releases any resources owned L4.13(2)
and calls OSTaskDel(OS_PRIO_SELF) to delete itself L4.13(3). As previously mentioned, the code for the task
is not actually deleted. Instead, µC/OS-II will simply not schedule the task for execution. In other word, the task code
will no longer run.
You can, however, re -create the task by calling either OSTaskCreate() or
OSTaskCreateExt().
void TaskToBeDeleted (void *pdata)
{
INT8U err;
pdata = pdata;
for (;;) {
/* Application code */
if (OSTaskDelReq(OS_PRIO_SELF) == OS_TASK_DEL_REQ) {
Release any owned resources;
De-allocate any dynamic memory;
OSTaskDel(OS_PRIO_SELF);
} else {
/* Application code */
}
}
(1)
(2)
(3)
}
Listing 4.13, Requesting a task to delete itself.
The code for OSTaskDelReq() is shown in listing 4.14. As usual, we need to check for boundary conditions. First,
we notify the caller in case he requests to delete the idle task L4.14(1). Next, we must ensure that the caller is not
trying to request to delete an invalid priority L4.14(2). If the caller is the task to be deleted, the flag stored in the
OS_TCB will be returned L4.14(3). If you specified a task with a priority other than OS_PRIO_SELF then, if the task
exist L4.14(4), we set the internal flag for that task L4.14(5). If the task does not exist, we return
OS_TASK_NOT_EXIST to indicate that the task must have deleted itself L4.14(6).
INT8U OSTaskDelReq (INT8U prio)
{
BOOLEAN stat;
INT8U
err;
OS_TCB *ptcb;
if (prio == OS_IDLE_PRIO) {
return (OS_TASK_DEL_IDLE);
}
if (prio >= OS_LOWEST_PRIO && prio != OS_PRIO_SELF) {
return (OS_PRIO_INVALID);
}
if (prio == OS_PRIO_SELF) {
OS_ENTER_CRITICAL();
stat = OSTCBCur->OSTCBDelReq;
OS_EXIT_CRITICAL();
return (stat);
} else {
OS_ENTER_CRITICAL();
if ((ptcb = OSTCBPrioTbl[prio]) != (OS_TCB *)0) {
ptcb->OSTCBDelReq = OS_TASK_DEL_REQ;
err
= OS_NO_ERR;
} else {
err
= OS_TASK_NOT_EXIST;
}
OS_EXIT_CRITICAL();
return (err);
}
(1)
(2)
(3)
(4)
(5)
(6)
}
Listing 4.14, OSTaskDelReq().
4.06 Changing a Task’s Priority, OSTaskChangePrio()
When you create a task, you assign the task a priority. At run-time, you can change the priority of any task by calling
OSTaskChangePrio(). In other words, µC/OS-II allows you to change priorities dynamically.
The code for OSTaskChangePrio() is shown in listing 4.15. You cannot change the priority of the idle task
L4.15(1). You can either change the priority of the calling task or another task. To change the priority of the calling
task you can must either specify the ‘old’ priority of that task or specify OS_PRIO_SELF and
OSTaskChangePrio() will determine what the priority of the calling task is for you. You must also specify the
‘new’(i.e. desired) priority. Because µC/OS -II cannot have multiple tasks running at the same priority, we need to
check that the desired priority is available L4.15(2). If the desired priority is available, µC/OS-II reserves the priority
by loading ‘something’in the OSTCBPrioTbl[] thus reserving that entry L4.15(3). This allows us to re-enable
interrupts and know that no other task can either create a task at the desired priority or have another task call
OSTaskChangePrio() by specifying the same ‘new’priority. This is done so that we can pre -compute some
values that will be stored in the task’s OS_TCB L4.15(4). These values are used to put or remove the task in or from
the ready list (s ee section 3.04, Ready List).
We then check to see if the current task is attempting to change its priority L4.15(5). Next, we need to see if the task
for which we are trying to change the priority exist L4.15(6). Obviously, if it’s the current task then this test will
succeed. However, if we are trying to change the priority of a task that doesn’t exist then, we must relinquish the
‘reserved’priority back to the priority table, OSTCBPrioTbl[] L4.15(17), and return an error code to the caller.
We now remove the pointer to the OS_TCB of the task from the priority table by inserting a NULL pointer L4.15(7).
This will make the ‘
old’priority available for reuse. Then, we check to see if the task for which we are changing the
priority is ready-to-run L4. 15(8). If it is, it must be removed from the ready list at the current priority L4.15(9) and
inserted back in the ready list at the new priority L4.15(10). Note here that we use our pre-computed values L4.15(4)
to insert the task in the ready list.
Ift he task is ready then, it could be waiting on a semaphore, a mailbox or a queue. We know that the task is waiting for
one of these events if the OSTCBEventPtr is non-NULL L4.15(11). If the task is waiting for an event, we must
remove the task from the wa it list (at the old priority) of the event control block (see section 6.00, Event Control Block)
and insert the task back in the wait list but this time at the new priority L4.15(12). The task could be waiting for time
to expire (see chapter 5, Time Management) or the task could be suspended (see section 4.07, Suspending a Task,
OSTaskSuspend()). In these cases, items L4.15(8) through L4.15(12) would be skipped.
Next, we store a pointer to the task’s OS_TCB in the priority table, OSTCBPrioTbl[] L4.15(13). The new priority
is saved in the OS_TCB L4.15(14) and the pre-computed values are also saved in the OS_TCB L4.15(15). After we
exit the critical section, the scheduler is called in case the new priority is higher than the old priority or the priority of
the calling task L4.15(16).
INT8U OSTaskChangePrio (INT8U oldprio, INT8U newprio)
{
OS_TCB
*ptcb;
OS_EVENT *pevent;
INT8U
x;
INT8U
y;
INT8U
bitx;
INT8U
bity;
if ((oldprio >= OS_LOWEST_PRIO && oldprio != OS_PRIO_SELF) ||
(1)
newprio >= OS_LOWEST_PRIO) {
return (OS_PRIO_INVALID);
}
OS_ENTER_CRITICAL();
if (OSTCBPrioTbl[newprio] != (OS_TCB *)0) {
(2)
OS_EXIT_CRITICAL();
return (OS_PRIO_EXIST);
} else {
OSTCBPrioTbl[newprio] = (OS_TCB *)1;
(3)
OS_EXIT_CRITICAL();
y
= newprio >> 3;
(4)
bity = OSMapTbl[y];
x
= newprio & 0x07;
bitx = OSMapTbl[x];
OS_ENTER_CRITICAL();
if (oldprio == OS_PRIO_SELF) {
(5)
oldprio = OSTCBCur->OSTCBPrio;
}
if ((ptcb = OSTCBPrioTbl[oldprio]) != (OS_TCB *)0) {
(6)
OSTCBPrioTbl[oldprio] = (OS_TCB *)0;
(7)
if (OSRdyTbl[ptcb->OSTCBY] & ptcb->OSTCBBitX) {
(8)
if ((OSRdyTbl[ptcb->OSTCBY] &= ~ptcb->OSTCBBitX) == 0) {
(9)
OSRdyGrp &= ~ptcb->OSTCBBitY;
}
OSRdyGrp
|= bity;
(10)
OSRdyTbl[y] |= bitx;
} else {
if ((pevent = ptcb->OSTCBEventPtr) != (OS_EVENT *)0) {
(11)
if ((pevent->OSEventTbl[ptcb->OSTCBY] &= ~ptcb->OSTCBBitX) == 0) {
pevent->OSEventGrp &= ~ptcb->OSTCBBitY;
}
pevent->OSEventGrp
|= bity;
pevent->OSEventTbl[y] |= bitx;
}
}
OSTCBPrioTbl[newprio]
ptcb->OSTCBPrio
ptcb->OSTCBY
ptcb->OSTCBX
ptcb->OSTCBBitY
ptcb->OSTCBBitX
OS_EXIT_CRITICAL();
OSSched();
return (OS_NO_ERR);
} else {
OSTCBPrioTbl[newprio]
OS_EXIT_CRITICAL();
return (OS_PRIO_ERR);
}
=
=
=
=
=
=
ptcb;
newprio;
y;
x;
bity;
bitx;
(12)
(13)
(14)
(15)
(16)
= (OS_TCB *)0;
(17)
}
}
Listing 4.15, OSTaskChangePrio().
4.07 Suspending a Task, OSTaskSuspend()
It is sometimes useful to explicitly suspend the execution of a task. This is accomplished with the
OSTaskSuspend() function call. A suspended task can only be resumed by calling the OSTaskResume()
function call. Task suspension is additive. This means that if the task being suspended is also waiting for time to
expire then the suspension needs to be removed and the time needs to expire in order for the task to be ready-to-run. A
task can either suspend itself or another task.
The code for OSTaskSuspend() is shown in listing 4.16. As usual, we check boundary conditions. First, we must
ensure that your application is not attempting to suspend the idle task L4.16(1). Next, you must specify a valid priority
L4.16(2). Remember than the highest valid priority number (i.e. lowest priority) is OS_LOWEST_PRIO. Note that
you can suspend the statistic task. You may have noticed that the first test L4.16(1) is replicated in L4.16(2). I did this
to be backward compatible with µC/OS. The first test could be removed to save a little bit of processing time but, this
is really insignificant so I decided to leave it.
Next, we check to see if you specified to suspend the calling task L4.16(3) by specifying OS_PRIO_SELF. You
could also decided to suspend the calling task by specifying its priority L4.16(4). In both of these cases, the scheduler
will need to be called. This is why I created the local variable self which will be examined at the appropriate time.
If we are not suspending the calling task then we will not need to run the scheduler because the calling task is
suspending a lower priority task.
We then check to see that the task to suspend exist L4.16(5). If the task to suspend exist, we remove it from the ready
list L4.16(6). Note that the task to suspend may not be in the ready list because it’s waiting for an event or for time to
expire. In this case, the corresponding bit for the task to suspend in OSRdyTbl[] would already be cleared (i.e. 0).
Clearing it again is faster than checking to see if it’
s clear and then clearing it if it’s not. We then set the
OS_STAT_SUSPEND flag in the task’
s OS_TCB to indicate that the task is now suspended L4.16(7). Finally, we call
the scheduler only if the task being suspended is the calling task L4.16(8).
INT8U OSTaskSuspend (INT8U prio)
{
BOOLEAN
self;
OS_TCB
*ptcb;
if (prio == OS_IDLE_PRIO) {
return (OS_TASK_SUSPEND_IDLE);
}
if (prio >= OS_LOWEST_PRIO && prio != OS_PRIO_SELF) {
return (OS_PRIO_INVALID);
}
OS_ENTER_CRITICAL();
if (prio == OS_PRIO_SELF) {
prio = OSTCBCur->OSTCBPrio;
self = TRUE;
} else if (prio == OSTCBCur->OSTCBPrio) {
self = TRUE;
} else {
self = FALSE;
}
if ((ptcb = OSTCBPrioTbl[prio]) == (OS_TCB *)0) {
OS_EXIT_CRITICAL();
return (OS_TASK_SUSPEND_PRIO);
} else {
if ((OSRdyTbl[ptcb->OSTCBY] &= ~ptcb->OSTCBBitX) == 0) {
OSRdyGrp &= ~ptcb->OSTCBBitY;
}
ptcb->OSTCBStat |= OS_STAT_SUSPEND;
OS_EXIT_CRITICAL();
if (self == TRUE) {
OSSched();
}
return (OS_NO_ERR);
}
(1)
(2)
(3)
(4)
(5)
(6)
(7)
(8)
}
Listing 4.16, OSTaskSuspend().
4.08 Resuming a Task, OSTaskResume()
As mentioned in the previous section, a suspended task can only be resumed by calling OSTaskResume(). The
code for OSTaskResume() is shown in listing 4.17. Because we cannot suspend the idle task we must verify that
your application is not attempting to resume this task L4.17(1). You will note that this test also ensures that you are
not trying to resume OS_PRIO_SELF (OS_PRIO_SELF is #defined to 0xFF which is always greater than
OS_LOWEST_PRIO) because this wouldn’t make sense.
The task to resume must exist because we will be manipulating its OS_TCB L4.17(2) and, it must also have been
suspended L4.17(3). We remove the suspension by clearing the OS_STAT_SUSPEND bit in the OSTCBStat field
L4.17(4). For the task to be ready-to-run, the OSTCBDly field must be zero L4.17(5) because there are no flags in
OSTCBStat to indicate that a task is waiting for time to expire. The task is made ready-to-run only when both
conditions are satisfied L4.16(6). Finally, the scheduler is called to see if the resumed task has a higher priority than
the calling task L4.17(7).
INT8U OSTaskResume (INT8U prio)
{
OS_TCB
*ptcb;
if (prio >= OS_LOWEST_PRIO) {
return (OS_PRIO_INVALID);
}
OS_ENTER_CRITICAL();
if ((ptcb = OSTCBPrioTbl[prio]) == (OS_TCB *)0) {
OS_EXIT_CRITICAL();
return (OS_TASK_RESUME_PRIO);
} else {
if (ptcb->OSTCBStat & OS_STAT_SUSPEND) {
if (((ptcb->OSTCBStat &= ~OS_STAT_SUSPEND) == OS_STAT_RDY) &&
(ptcb->OSTCBDly == 0)) {
OSRdyGrp
|= ptcb->OSTCBBitY;
OSRdyTbl[ptcb->OSTCBY] |= ptcb->OSTCBBitX;
OS_EXIT_CRITICAL();
OSSched();
} else {
OS_EXIT_CRITICAL();
}
return (OS_NO_ERR);
} else {
OS_EXIT_CRITICAL();
return (OS_TASK_NOT_SUSPENDED);
}
}
(1)
(2)
(3)
(4)
(5)
(6)
(7)
}
4.09 Getting Information about a Task, OSTaskQuery()
Your application can obtain information about itself or other application tasks by calling OSTaskQuery(). In fact,
OSTaskQuery() obtains a copy of the contents of the desired task’s OS_TCB. The fields that are available to you
in the OS_TCB depend on the configuration of your application (see OS_CFG.H). Indeed, because µC/OS -II is
scalable, it only includes the features that your application requires.
To call OSTaskQuery() , your application must allocate storage for an OS_TCB as shown in listing 4.18. This
OS_TCB is in a totally different data space as the OS_TCBs allocated by µC/OS-II. After calling OSTaskQuery(),
this OS_TCB will contain a snapshot of the OS_TCB for the desired task. You need to be careful with the links to other
OS_TCBs (i.e. OSTCBNext and OSTCBPrev); you don’t want to change what these links are pointing to! In general,
you would only use this function to see what a task is doing –a great tool for debugging.
OS_TCB MyTaskData;
void MyTask (void *pdata)
{
pdata = pdata;
for (;;) {
/* User code
*/
err = OSTaskQuery(10, &MyTaskData);
/* Examine error code ..
*/
/* User code
*/
}
}
Listing 4.18, Obtaining information about a task.
The code for OSTaskQuery() is shown in listing 4.19. You should note that I now allow you to examine ALL the
tasks, including the idle task L4.19(1). You need to be especially careful NOT to change what OSTCBNext and
OSTCBPrev are pointing to. As usual, we check to see if you want information about the current task L4.19(2) and
also, the task must have been created in order to obtain information about it L4.19(3). All fields are copied using the
assignment shown instead of field by field L4.19(4). This is much faster because the compiler will most likely
generate memory copy instructions.
INT8U OSTaskQuery (INT8U prio, OS_TCB *pdata)
{
OS_TCB *ptcb;
if (prio > OS_LOWEST_PRIO && prio != OS_PRIO_SELF) {
return (OS_PRIO_INVALID);
}
OS_ENTER_CRITICAL();
if (prio == OS_PRIO_SELF) {
prio = OSTCBCur->OSTCBPrio;
}
if ((ptcb = OSTCBPrioTbl[prio]) == (OS_TCB *)0) {
OS_EXIT_CRITICAL();
return (OS_PRIO_ERR);
}
*pdata = *ptcb;
OS_EXIT_CRITICAL();
return (OS_NO_ERR);
}
Listing 4.19, OSTaskQuery()
(1)
(2)
(3)
(4)
Chapter 5
Time Management
We saw in section 3.10 that µC/OS-II (as do other kernels) requires that you provide a periodic interrupt to keep track
of time delays and timeouts. This periodic time source is called a Clock Tick and should occur between 10 and 100
times per second, or Hertz. The actual frequency of the clock tick depends on the desired tick resolution of your
application. However, the higher the frequency of the ticker, the higher the overhead.
Section 3.10 discussed the tick ISR (Interrupt Service Routine) as well as the function that it needs to call to notify
µC/OS-II about the tick interrupt, OSTimeTick(). This chapter will describe five services that deal with time
issues:
1)
2)
3)
4)
5)
OSTimeDly(),
OSTimeDlyHMSM(),
OSTimeDlyResume(),
OSTimeGet() and,
OSTimeSet().
The functions described in this chapter are found in the file OS_TIME.C.
5.00 Delaying a task, OSTimeDly()
µC/OS-II provides a service that allows the calling task to delay itself for a user specified number of clock ticks. This
function is called OSTimeDly(). Calling this function causes a context switch and forces µC/OS-II to execute the
next highest priority task that is ready-to-run. The task calling OSTimeDly() will be made ready-to-run as soon as
the time specified expires o r, if another task cancels the delay by calling OSTimeDlyResume(). You should note
that this task will run only when it’s the highest priority task.
Listing 5.1 shows the code for OSTimeDly(). As can be seen, your application calls this function by supplying the
number of ticks to delay and can be a value between 1 and 65535. If you specify a value of zero L5.1(1), you are
indicating that you don’t want to delay the task and thus the function will immediately return to the caller. A non zero
value will cause OSTimeDly() to remove the current task from the ready list L5.1(2). Next, the number of ticks are
stored in the OS_TCB of the current task L5.1(3) where it will be decremented on every clock tick by
OSTimeTick(). Finally, since the task is no longer ready, the scheduler is called L5.1(4) so that the next highest
priority task that is ready-to-run gets executed.
void OSTimeDly (INT16U ticks)
{
if (ticks > 0) {
OS_ENTER_CRITICAL();
if ((OSRdyTbl[OSTCBCur->OSTCBY] &= ~OSTCBCur->OSTCBBitX) == 0) {
OSRdyGrp &= ~OSTCBCur->OSTCBBitY;
}
OSTCBCur->OSTCBDly = ticks;
OS_EXIT_CRITICAL();
(1)
(2)
(3)
OSSched();
(4)
}
}
Listing 5.1, OSTimeDly()
It is important to realize that the resolution of a delay is between 0 and 1 tick. In other words, if you try to delay for
only one tick, you could end up with a delay between 0 and 1 tick. This is assuming, however, that your processor is
not heavily loaded. Figure 5-1 illustrates what happens. A tick interrupt occurs every 10 mS F5-1(1). Assuming that
you are not servicing any other interrupts and you have interrupts enabled, the tick ISR will be invoked F5-1(2). You
may have a few high priority tasks (i.e. HPTs) that were waiting for time to expire so they will get to execute next
F5-1(3). The low priority task (i.e. LPT) shown in figure 5-1 then gets a chance to execute and, upon completion, calls
OSTimeDly(1) at the moment shown at F5-1(4). µC/OS-II puts the task to sleep until the next tick. When the next
tick arrives, the tick ISR executes F5-1(5) but this time, there are no HPTs to execute and thus, µC/OS-II executes the
task that delayed itself for 1 tick F5-1(6). As you can see, the task actually delayed for less than one tick! On heavily
loaded systems, the task may call OSTimeDly(1) a few tens of microseconds before the tick occurs and thus the
delay would result in almost no delay because the task would immediately be rescheduled. If your application must
delay for at least one tick, you must call OSTimeDly(2) thus specifying a delay of 2 ticks!
10 mS
Tick interrupt
(1)
(2)
(5)
OSTickISR()
(3)
All HPT
(6)
Low Priority Task
(4)
Task calls OSTimeDly(1) here!
5 mS
Figure 5-1, Delay resolution
5.01 Delaying a task, OSTimeDlyHMSM()
OSTimeDly() is a very useful function but, your application needs to know time in term of ticks. You can use the
global #define constant OS_TICKS_PER_SEC (see OS_CFG.H) to convert time to ticks but this is somewhat
awkward. The function OSTimeDlyHMSM() has been added so that you can specify time in hours ( H), minutes ( M),
seconds (S) and milliseconds (M) which is more ‘natural’. Like OSTimeDly() , calling this function causes a
context switch and forces µC/OS-II to execute the next highest priority task that is ready-to-run. The task calling
OSTimeDlyHMSM() will be made ready-to-run as soon as the time specified expires or if another task cancels the
delay by calling OSTimeDlyResume() (see section 5.02). Again, this task will run only when it’
s the highest
priority task.
Listing 5.2 shows the code for OSTimeDlyHMSM(). As can be seen, your application calls this function by
supplying the delay in hours, minutes, seconds and milliseconds. In practice, you should avoid delaying a
task for long periods of time because, it’s always a good idea to get some ‘feedback activity’from a task (incrementing
counter, blinking an LED, etc.). If however, you do need long delays, µC/OS-II can delay a task for 256 hours (close
to 11 days)!
OSTimeDlyHMSM() starts by checking that you have specified valid values for its arguments L5.2(1). As with
OSTimeDly(), OSTimeDlyHMSM() exits if you specify no delay L5.2(9). Because µC/OS-II only knows about
ticks, the t otal number of ticks is computed from the specified time L5.2(3). The code shown in listing 5.2 is obviously
not very inefficient. I just showed the equation this way so you can see how the total ticks are computed. The actual
code efficiently factors in OS_TICKS_PER_SEC. L5.2(3) determines the number of ticks given the specified
milliseconds with rounding to the nearest tick. The value 500/OS_TICKS_PER_SECOND basically correspond to
0.5 tick converted to milliseconds. For example, if the tick rate (i.e. OS_TICKS_PER_SEC) is set to 100 Hz (10 mS)
then a delay of 4 mS would result in no delay! A delay of 5 mS would result in a delay of 10 mS, etc.
µC/OS-II only supports delays of 65535 ticks. To support potentially long delays obtained by L5.2(2),
OSTimeDlyHMSM() determines how many times we need to delay for more than 65535 ticks L5.2(4) as well as the
remaining number of ticks L5.2(5). For example, if OS_TICKS_PER_SEC was 100 and you wanted a delay of 15
minutes then OSTimeDlyHMSM() would have to d elay for 15 * 60 * 100 or, 90000 ticks. This delay is broken down
into two delays of 32768 ticks (because we can’t do a delay of 65536 ticks, only 65535) and one delay of 24464 ticks.
In this case, we would first take care of the remainder L5.2(6) and then, the number of times we exceeded 65536
L5.2(7)-(8) (i.e. done with two 32768 tick delays).
INT8U OSTimeDlyHMSM (INT8U hours, INT8U minutes, INT8U seconds, INT16U milli)
{
INT32U ticks;
INT16U loops;
if (hours > 0 || minutes > 0 || seconds > 0 || milli > 0) {
(1)
if (minutes > 59) {
return (OS_TIME_INVALID_MINUTES);
}
if (seconds > 59) {
return (OS_TIME_INVALID_SECONDS);
}
if (milli > 999) {
return (OS_TIME_INVALID_MILLI);
}
ticks = (INT32U)hours
* 3600L * OS_TICKS_PER_SEC
(2)
+ (INT32U)minutes *
60L * OS_TICKS_PER_SEC
+ (INT32U)seconds) *
OS_TICKS_PER_SEC
+ OS_TICKS_PER_SEC * ((INT32U)milli + 500L/OS_TICKS_PER_SEC) / 1000L;(3)
loops = ticks / 65536L;
(4)
ticks = ticks % 65536L;
(5)
OSTimeDly(ticks);
(6)
while (loops > 0) {
(7)
OSTimeDly(32768);
(8)
OSTimeDly(32768);
loops--;
}
return (OS_NO_ERR);
} else {
return (OS_TIME_ZERO_DLY);
}
(9)
}
Listing 5.2, OSTimeDlyHMSM()
Because of the way OSTimeDlyHMSM() is implemented, you cannot resume (see next section) a task that has called
OSTimeDlyHMSM() with a combined time that exceeds 65535 clock ticks. In other words, if the clock tick runs at
100 Hz then, you will not be able to resume a delayed task that called OSTimeDlyHMSM(0, 10, 55, 350) or
higher.
5.02 Resuming a delayed task, OSTimeDlyResume()
µC/OS-II allows you to resume a task that delayed itself. In other words, instead of waiting for the time to expire, a
delayed task can be made ready-to-run by another task which ‘cancels’the delay. This is done by calling
OSTimeDlyResume() and specifying the priority of the task to resume. In fact, OSTimeDlyResume() can also
resume a task that is waiting for an event (see Chapter 6,Intertask Communication & Synchronization) although this is
not recommended. In this case, the task pending on the event will think it timed out waiting for the event.
INT8U OSTimeDlyResume (INT8U prio)
{
OS_TCB *ptcb;
if (prio >= OS_LOWEST_PRIO) {
return (OS_PRIO_INVALID);
}
OS_ENTER_CRITICAL();
ptcb = (OS_TCB *)OSTCBPrioTbl[prio];
if (ptcb != (OS_TCB *)0) {
if (ptcb->OSTCBDly != 0) {
ptcb->OSTCBDly = 0;
if (!(ptcb->OSTCBStat & OS_STAT_SUSPEND)) {
OSRdyGrp
|= ptcb->OSTCBBitY;
OSRdyTbl[ptcb->OSTCBY] |= ptcb->OSTCBBitX;
OS_EXIT_CRITICAL();
OSSched();
} else {
OS_EXIT_CRITICAL();
}
return (OS_NO_ERR);
} else {
OS_EXIT_CRITICAL();
return (OS_TIME_NOT_DLY);
}
} else {
OS_EXIT_CRITICAL();
return (OS_TASK_NOT_EXIST);
}
(1)
(2)
(3)
(4)
(5)
(6)
(7)
}
Listing 5.3, Resuming a delayed task.
The code for OSTimeDlyResume() is shown in listing 5.3 and starts by making sure you specify a valid priority
L5.3(1). Next, we verify that the task to resume does in fact exist L5.3(2). If the task exist, we check to see if the task
is waiting for time to expire L5.3(3). Whenever the OS_TCB field OSTCBDly contains a non-zero value, the task is
waiting for time to expire, whether because the task called OSTimeDly(), OSTimeDlyHMSM() or any of the
PEND functions described in Chapter 6. The delay is then cancelled by forcing OSTCBDly to zero L5.3(4). A
delayed task may also have been suspended and thus, the task is only made ready-to-run if the task was not suspended
L5.3(5). The task is placed in the ready list when the above conditions are satisfied L5.3(6). At this point, we call the
scheduler to see if the resumed task has a higher priority than the current task L5.3(7). This could result in a context
switch.
You should note that you could also have a task delay itself by waiting on a semaphore, mailbox or a queue with a
timeout (see Chapter 6). You would resume such a task by simply posting to the semaphore, mailbox or queue,
respectively. The only problem with this scenario is that it requires that you allocate an event control block (see
section 6.00) and thus your application would consume a little bit more RAM.
5.03 System time, OSTimeGet() and OSTimeSet()
Whenever a clock tick occurs, µC/OS-II increments a 32-bit counter. This counter starts at zero when you initiate
multitasking by calling OSStart() and rolls over after 4,294,967,295 ticks. At a tick rate of 100 Hz, this 32-bit
counter rolls over every 497 days. You can obtain the current value of this counter by calling OSTimeGet(). You
can also change the value of the counter by calling OSTimeSet(). The code for both functions is shown in listing
5.4. Note that interrupts are disabled when accessing OSTime. This is because incrementing and copying a 32-bit
value on most 8-bit processors requires multiple instructions that must be treated indivisibly.
INT32U OSTimeGet (void)
{
INT32U ticks;
OS_ENTER_CRITICAL();
ticks = OSTime;
OS_EXIT_CRITICAL();
return (ticks);
}
void OSTimeSet (INT32U ticks)
{
OS_ENTER_CRITICAL();
OSTime = ticks;
OS_EXIT_CRITICAL();
}
Listing 5.4, Obtaining and setting the system time.
Chapter 6
Intertask Communication &
Synchronization
µC/OS-II provides many mechanisms to protect shared data and provide intertask communication. We have already
seen two such mechanisms:
1)
Disabling and enabling interrupts through the two macros OS_ENTER_CRITICAL() and
OS_EXIT_CRITICAL(), respectively. You use these macros when two tasks or a task and an ISR need to
share data. See section 3.00, Critical Sections, section 8.03.02, OS_CPU.H, OS_ENTER_CRITICAL() and
OS_EXIT_CRITICAL() and, section 9.03.02, OS_CPU.H, Critical Sections.
2)
Locking and unlocking µC/OS-II’s scheduler with OSSchedLock() and OSSchedUnlock(), respectively.
Again, you use these services to access shared data. See section 3.06, Locking and Unlocking the Scheduler.
This chapter discusses the other three types of services provided by µC/OS -II: Semaphores, Message mailboxes and
Message queues.
Figure 6-1 shows how tasks and Interrupt Service Routines (ISRs) can interact with each other. A task or an ISR
signals a task F6-1A(1) through a kernel object called an Event Control Block (ECB). The signal is considered to be
an event which explains my choice of this name. A task can wait for another task or an ISR to signal the object
F6-1A(2). You should note that only tasks are allowed to wait for events to occur –an ISR is not allowed to wait on an
ECB. An optional timeout F6-1A(3) can be specified by the waiting task in case the object is not signaled within a
specified time period. Multiple tasks can wait for a task or an ISR to signal an ECB F6-1B. When the ECB is signaled,
only the highest priority task waiting on the ECB will be ‘signaled’and thus will be made ready-to-run. An ECB can
either be a semaphore, a message mailbox or a message queue as we will see later. When an ECB is used as a
semaphore, tasks will both wait and signal the ECB F6-1C(4).
Signal
ISR
(1)
Wait
ECB
(2)
Task
Timeout
(3)
Signal
Task
(1)
A
Wait
ECB
(2)
Task
Timeout
(3)
ISR
Task
Signal
Wait
B
ECB
Signal
Task
Task
Task
Wait/Signal
(4)
Task
Wait
Wait/Signal
Timeout
ECB
C
Timeout
(4)
Figure 6-1, Use of Event Control Blocks.
6.00 Event Control Blocks
µC/OS-II maintains the state of an ECB in a data structure called OS_EVENT (see uCOS_II.H). The state of an event
consists of the event itself (a counter for a semaphore, a pointer for a message mailbox and an array of pointers for a
queue) and, a waiting list for tasks waiting for the event to occur. Each semaphore, mailbox and queue is assigned an
ECB. The data structure for an ECB is shown in Listing 6.1.
typedef struct {
void
*OSEventPtr;
/* Ptr to message or queue structure */
INT8U
OSEventTbl[OS_EVENT_TBL_SIZE]; /* Wait list for event to occur
*/
INT16U OSEventCnt;
/* Count (when event is a semaphore) */
INT8U
OSEventType;
INT8U
OSEventGrp;
} OS_EVENT;
/* Event type
/* Group for wait list
*/
*/
Listing 6.1, Event Control Block data structure
OSEventPtr is only used when the ECB is assigned to a mailbox or a queue. In this case, OSEventPtr
points to the message when used for a mailbox or a pointer to a message queue data structure (see section 6.06,
Message Mailboxes and section 6.07, Message Queues) .
OSEventTbl[] and OSEventGrp are similar to OSRdyTbl[] and OSRdyGrp, respectively except that
they contain a list of tasks waiting on the event instead of being a list of tasks ready-to-run (see section 3.04,
Ready List).
OSEventCnt is used to hold the semaphore count when the ECB is used for a semaphore (see section 6.05,
Semaphores).
OSEventType contains the type associated with the ECB and can have the following values:
OS_EVENT_SEM, OS_EVENT_TYPE_MBOX or OS_EVENT_TYPE_Q. This field is used to make sure you
are accessing the proper object when you perform operations on these objects through µC/OS-II’s service
calls.
Each task that needs to wait for the event to occur is placed in the wait list consisting of the two
variables, .OSEventGrp and .OSEventTbl[]. Note that I used a dot (i.e. .) in front of the variable name to
indicate that the variable is part of a data structure. Task priorities are grouped (8 tasks per group) in .OSEventGrp.
Each bit in .OSEventGrp is used to indicate whenever any task in a group is waiting for the event to occur. When a
task is waiting, its corresponding bit in set in the wait table, .OSEventTbl[]. The size (in bytes)
of .OSEventTbl[] depends on OS_LOWEST_PRIO (see uCOS_II.H). This allows µC/OS -II to reduce the
amount of RAM (i.e. data space) when your application requires just a few task priorities.
The task that will be resumed when the event occurs is the highest priority task waiting for the event and corresponds
to the lowest priority number which has a bit set in .OSEventTbl[]. The relationship between .OSEventGrp
and .OSEventTbl[] is shown in Figure 6-2 and is given by the following rules:
Bit 0 in .OSEventGrp is 1 when any bit in .OSEventTbl[0] is 1.
Bit 1 in .OSEventGrp is 1 when any bit in .OSEventTbl[1] is 1.
Bit 2 in .OSEventGrp is 1 when any bit in .OSEventTbl[2] is 1.
Bit 3 in .OSEventGrp is 1 when any bit in .OSEventTbl[3] is 1.
Bit 4 in .OSEventGrp is 1 when any bit in .OSEventTbl[4] is 1.
Bit 5 in .OSEventGrp is 1 when any bit in .OSEventTbl[5] is 1.
Bit 6 in .OSEventGrp is 1 when any bit in .OSEventTbl[6] is 1.
Bit 7 in .OSEventGrp is 1 when any bit in .OSEventTbl[7] is 1.
.OSEventGrp
7
6
5
4
3
2
1
0
.OSEventTbl[OS_LOWEST_PRIO / 8 + 1]
Highest Priority Task Waiting
X
[0]
7
6
5
4
3
2
1
0
[1]
15 14 13 12 11 10 9
8
[2]
23 22 21 20 19 18 17 16
[3]
31 30 29 28 27 26 25 24
[4]
39 38 37 36 35 34 33 32
[5]
47 46 45 44 43 42 41 40
[6]
55 54 53 52 51 50 49 48
[7]
63 62 61 60 59 58 57 56
Priority of task waiting
for the event to occur.
Task's Priority
0
0
Y
Y
Y
X
X
X
Lowest Priority Task
(Idle Task, can NEVER be waiting)
Bit position in .OSEventTbl[OS_LOWEST_PRIO / 8 + 1]
Bit position in .OSEventGrp and
Index into .OSEventTbl[OS_LOWEST_PRIO / 8 + 1]
Figure 6-2, Wait list for task waiting for an event to occur.
The following piece of code is used to place a task in the wait list list:
pevent->OSEventGrp
|= OSMapTbl[prio >> 3];
pevent->OSEventTbl[prio >> 3] |= OSMapTbl[prio & 0x07];
Listing 6.2, Making a task wait for an event.
Y
prio is the task's priority and pevent is a pointer to the event control block.
You should realize from listing 6.2 that inserting a task in the wait list always takes the same amount of time and does
not depend on how many tasks are in your system. Also, from Figure 6 -2, the lower 3 bits of the task's priority are used
to determine the bit position in .OSEventTbl[], while the next three most significant bits are used to determine the
index into .OSEventTbl[]. Note that OSMapTbl[] (see OS_CORE.C) is a table in ROM, used to equate an
index from 0 to 7 to a bit mask as shown in the table 6.1.
Index
0
1
2
3
4
5
6
7
Bit mask (Binary)
00000001
00000010
00000100
00001000
00010000
00100000
01000000
10000000
Table 6.1, Contents of OSMapTbl[].
A task is removed from the wait list by reversing the process. The following code is executed in this case:
if ((pevent->OSEventTbl[prio >> 3] &= ~OSMapTbl[prio & 0x07]) == 0) {
pevent->OSEventGrp &= ~OSMapTbl[prio >> 3];
}
Listing 6.3, Removing a task from a wait list.
This code clears the bit corresponding to the task in .OSEventTbl[] and clears the bit in .OSEventGrp only if
all tasks in a group are not waiting, i.e. all bits in .OSEventTbl[prio >> 3] are 0. Another table lookup is
performed, rather than scanning through the table starting with .OSEventTbl[0], to find the highest priority task
that is waiting for the event. OSUnMapTbl[256] is a priority resolution table (see OS_CORE.C). Eight bits are
used to represent when tasks are waiting in a group. The least significant bit has the highest priority. Using this byte
to index the table returns the bit position of the highest priority bit set, a number between 0 and 7. Determining the
priority of the highest priority task waiting for the event is accomplished with the following section of code:
y
= OSUnMapTbl[pevent->OSEventGrp];
x
= OSUnMapTbl[pevent->OSEventTbl[y]];
prio = (y << 3) + x;
Listing 6.4, Finding the highest priority task waiting for the event.
For example, if .OSEventGrp contains 01101000 (binary) then the table lookup OSUnMapTbl[.OSEventGrp]
would yield a value of 3, which corresponds to bit #3 in .OSEventGrp. Notes that bit positions are assumed to start
on the right with bit #0 being the rightmost bit. Similarly, if .OSEventTbl[3] contained 11100100 (binary) then
OSUnMapTbl[.OSEventTbl[3]] would result in a value of 2 (i.e. bit #2). The priority of the task waiting ( prio)
would then be 26 (3 * 8 + 2)!
The number of ECBs to allocate depends on the number of semaphores, mailboxes and queues needed for your
application. The number of ECBs is established by the #define OS_MAX_EVENTS which you define in
OS_CFG.H. When OSInit() is called (see section 3.11), all ECBs are linked in a singly linked list - the list of free
ECBs (see figure 6-3). When a semaphore, mailbox or queue is created, an ECB is removed from this list and
initialized. ECBs cannot be returned to the list of free ECB because semaphores, mailboxes and queues cannot be
deleted.
OS_EVENT
OSEventFreeList
0
OS_MAX_EVENTS
Figure 6-3, List of free ECBs.
There are four common operations that can be performed on ECBs:
1)
2)
3)
4)
Initialize an ECB
Make a task ready
Make a task wait for an event
Make a task ready because a timeout occurred while waiting for an event.
To avoid duplicating code and thus to reduce code size, four functions have been created to performs these operations:
OSEventWaitListInit(), OSEventTaskRdy(), OSEventWait() and OSEventTO(), respectively.
6.01 Initializing an ECB, OSEventWaitListInit()
Listing 6.5 shows the code for OSEventWaitListInit() which is a function called when a semaphore, message
mailbox or a message queue is created (see OSSemCreate(), OSMboxCreate() or OSQCreate()). All we are
trying to accomplish in OSEventWaitListInit() is to indicate that no task is waiting on the ECB.
OSEventWaitListInit() is passed a pointer to an event control block which is assigned when the semaphore,
message mailbox or message queue is created.
void OSEventWaitListInit (OS_EVENT *pevent)
{
INT8U i;
pevent->OSEventGrp = 0x00;
for (i = 0; i < OS_EVENT_TBL_SIZE; i++) {
pevent->OSEventTbl[i] = 0x00;
}
}
Listing 6.5, Initializing the wait list.
6.02 Making a task ready, OSEventTaskRdy()
Listing 6.6 shows the code for OSEventTaskRdy(). This function is called by OSSemPost(), OSMboxPost(),
OSQPost() and OSQPostFront() when an ECB is signaled and the highest priority task waiting on the ECB
needs to be made ready-to-run. In other words, OSEventTaskRdy() removes the highest priority task (HPT) from
the wait list of the ECB and makes this task ready-to-run. Figure 6-4 is used to illustrate the first four operation
performed in OSEventTaskRdy().
OSEventTaskRdy() starts by determining the index into the .OSEventRdyTbl[] of the HPT L6.6/F6-4(1), a
number between 0 and OS_LOWEST_PRIO/8+1. The bit mask of the HPT in .OSEventGrp is then obtained
L6.6/F6-4(2), see table 6.1 for possible values. We then determine the bit position of the task in .OSEventTbl[]
L6.6/F6-4(3), a value between0 and OS_LOWEST_PRIO/8+1 . Next, the bit mask of the HPT in .OSEventTbl[]
is determined L6.6/F6-4(4), see table 6.1 for possible values. The priority of the task being made ready-to-run is
determined by combining the x and y indexes L6.6(5). At this point, we can now extract the task from the wait list
L6.6(6).
The Task Control Block (TCB) of the task being readied contains information that also needs to be changed. We can
thus obtain a pointer to that TCB knowing the task’s priority L6.6(7). Because the HPT is not waiting anymore, we
need to make sure that OSTimeTick() will not attempt to decrement the .OSTCBDly value of that task. We
prevent this by forcing this field to 0 L6,6(8). We then force the pointer to the ECB to NULL because the HPT will no
longer be waiting on this ECB L6.6(9). A message is sent to the HPT if OSEventTaskRdy() is called by either
OSMboxPost() or OSQPost(). This message is passed as an argument and needs to be placed in the task’s TCB
L6.6(10). When OSEventTaskRdy() is called, the msk argument contains the appropriate bit mask to clear the bit
in .OSTCBStat which corresponds to the type of event signaled (OS_STAT_SEM, OS_STAT_MBOX or
OS_STAT_Q, see uCOS_II.H) L6.6(11). Finally, if the .OSTCBStat indicates that the task is ready-to-run L6.6(12),
we insert this task in µC/OS-II’s ready list L6.6(13). Note that the task may not be ready-to-run because it could have
been explicitly suspended (see section 4.07, Suspending a Task, OSTaskSuspend() and section 4.08, Resuming a Task,
OSTaskResume()).
You should note that OSEventTaskRdy() is called with interrupts disabled.
void OSEventTaskRdy (OS_EVENT *pevent, void *msg, INT8U msk)
{
OS_TCB *ptcb;
INT8U
x;
INT8U
y;
INT8U
bitx;
INT8U
bity;
INT8U
prio;
y
= OSUnMapTbl[pevent->OSEventGrp];
bity = OSMapTbl[y];
x
= OSUnMapTbl[pevent->OSEventTbl[y]];
bitx = OSMapTbl[x];
prio = (INT8U)((y << 3) + x);
if ((pevent->OSEventTbl[y] &= ~bitx) == 0) {
pevent->OSEventGrp &= ~bity;
}
ptcb
= OSTCBPrioTbl[prio];
ptcb->OSTCBDly
= 0;
ptcb->OSTCBEventPtr = (OS_EVENT *)0;
#if (OS_Q_EN && (OS_MAX_QS >= 2)) || OS_MBOX_EN
ptcb->OSTCBMsg
= msg;
#else
msg
= msg;
#endif
ptcb->OSTCBStat
&= ~msk;
if (ptcb->OSTCBStat == OS_STAT_RDY) {
OSRdyGrp
|= bity;
OSRdyTbl[y]
|= bitx;
}
}
(1)
(2)
(3)
(4)
(5)
(6)
(7)
(8)
(9)
(10)
(11)
(12)
(13)
Listing 6.6, Making a task ready-to-run.
.OSEventGrp
7
6
5
4
3
2
1
0
.OSEventTbl[]
x
6
5
4
[0]
7
[1]
15 14 13 12 11 10
[2]
23 22 21 20 19 18 17 16
[3]
31 30 29 28 27 26 25 24
[4]
39 38 37 36 35 34 33 32
[5]
47 46 45 44 43 42 41 40
[6]
55 54 53 52 51 50 49 48
[7]
63 62 61 60 59 58 57 56
bity
bitx
(2)
(4)
3
2
(3)
Figure 6-4, Making a task ready-to-run.
1
0
9
8
y
(1)
6.03 Making a task wait for an event, OSEventTaskWait()
Listing 6.7 shows the code for OSEventTaskWait(). This function is called by OSSemPend() , OSMboxPend()
and OSQPend() when a task must wait on an ECB. In other words, OSEventTaskWait() removes the current
task from the ready list and places this task in the wait list of the ECB.
void OSEventTaskWait (OS_EVENT *pevent)
{
OSTCBCur->OSTCBEventPtr = pevent;
if ((OSRdyTbl[OSTCBCur->OSTCBY] &= ~OSTCBCur->OSTCBBitX) == 0) {
OSRdyGrp &= ~OSTCBCur->OSTCBBitY;
}
pevent->OSEventTbl[OSTCBCur->OSTCBY] |= OSTCBCur->OSTCBBitX;
pevent->OSEventGrp
|= OSTCBCur->OSTCBBitY;
}
(1)
(2)
(3)
Listing 6.7, Making a task wait on an ECB.
The pointer to the ECB is placed in the task’
s TCB to link the task to the event control block L6.7(1). Next, the task is
removed from the ready list L6.7(2) and placed in the wait list for the ECB L6.7(3).
6.04 Making a task ready because of a timeout, OSEventTO()
Listing 6.8 shows the code for OSEventTO(). This function is called by OSSemPend(), OSMboxPend() and
OSQPend() when a task has been made ready-to-run by OSTimeTick() which means that the ECB was not
signaled within the specified timeout period. In this case, we must remove the task from the wait list of the ECB
L6.8(1) and mark the task as being ready L6.8(2). Finally, the link to the ECB is removed from the task’s TCB L6.8(3).
You should note that OSEventTO() is also called with interrupts disabled.
void OSEventTO (OS_EVENT *pevent)
{
if ((pevent->OSEventTbl[OSTCBCur->OSTCBY] &= ~OSTCBCur->OSTCBBitX) == 0) {
pevent->OSEventGrp &= ~OSTCBCur->OSTCBBitY;
}
OSTCBCur->OSTCBStat
= OS_STAT_RDY;
OSTCBCur->OSTCBEventPtr = (OS_EVENT *)0;
}
(1)
(2)
(3)
Listing 6.8, Making a task ready because of a timeout.
6.05 Semaphores
µC/OS-II's semaphores consist of two elements: a 16-bit unsigned integer used to hold the semaphore count (0..65535),
and a list of tasks waiting for the semaphore count to be greater than 0. To enable µC/OS-II’s semaphore services, you
must set the configuration constant OS_SEM_EN to 1 (see file OS_CFG.H).
A semaphore needs to be created before it can be used. Creating a semaphore is accomplished by calling
OSSemCreate() (see next section) and specifying the initial count of the semaphore. The initial value of a
semaphore can be between 0 and 65535. If you use the semaphore to signal the occurrence of one or more events
then you would typically initialize the semaphore to 0. If you use the semaphore to access a shared resource then you
would initialize the semaphore to 1 (i.e. use it as a binary semaphore). Finally, if the semaphore allows your
application to obtain any one of ‘
n’identical resources then, you would initialize the semaphore to ‘
n’. The semaphore
would then be used as a counting semaphore.
µC/OS-II provides five services to access semaphores: OSSemCreate(), OSSemPend(), OSSemPost(),
OSSemAccept() and OSSemQuery(). Figure 6-5 shows a flow diagram to illustrate the relationship between
tasks, ISRs and a semaphore. Note that the symb ology used to represent a semaphore is either a ‘key’or a ‘flag’. You
would use a ‘key’symbol if the semaphore was used to access shared resources. The ‘N’next to the key represents
how many resources are available for the resource. ‘N’would be 1 for a binary semaphore. You would use a ‘flag’
symbol when a semaphore is used to signal the occurrence of an event. ‘N’in this case represents the number of times
the event can be signaled. As you can see from figure 6-5, a task or an ISR can call OSSemPost() . However, only
tasks are allowed to call OSSemPend() and OSSemQuery().
OSSemCreate()
Task
OSSemPost()
N
OR
ISR
OSSemPost()
OSSemAccept()
OSSemPend()
OSSemAccept()
OSSemQuery()
Task
N
Figure 6-5, Relationship between tasks, ISRs and a semaphore.
6.05.01 Creating a Semaphore, OSSemCreate()
The code to create a semaphore is shown in listing 6.9. OSSemCreate() starts by obtaining an ECB from the free
list of ECBs (see figure 6-3) L6.9(1). The linked list of free ECBs is adjusted to point to the next free ECB L6.9(2). If
there was an ECB available L6.9(3), the ECB type is set to OS_EVENT_TYPE_SEM L6.9(4). Other OSSem???()
function calls will check this field to make sure that the ECB is of the proper type. This prevents you from calling
OSSemPost() on an ECB that was created for use as a message mailbox (see section 6.06). Next the desired initial
count for the semaphore is stored in the ECB L6.9(5). The wait list is then initialized by calling
OSEventWaitListInit() (see section 6.01, Initializing an ECB, OSEventWaitListInit()) L6.9(6). Because the
semaphore is being initialized, there are no tasks waiting for it. Finally, OSSemCreate() returns a pointer to the
ECB L6.9(7). This pointer MUST be used in subsequent calls to manipulate semaphores (OSSemPend(),
OSSemPost(), OSSemAccept() and OSSemQuery()). The pointer is basically used as the semaphore’s handle.
If there were no more ECBs, OSSemCreate() would have returned a NULL pointer.
You should note that once a semaphore has been created, it cannot be deleted. In other words, there is no way in
µC/OS-II to return an ECB back to the free list of ECBs. It would be ‘dangerous’to delete a semaphore object if tasks
were waiting on the semaphore and/or relying on the presence of the semaphore. What would those tasks do?
OS_EVENT *OSSemCreate (INT16U cnt)
{
OS_EVENT *pevent;
OS_ENTER_CRITICAL();
pevent = OSEventFreeList;
(1)
if (OSEventFreeList != (OS_EVENT *)0) {
OSEventFreeList = (OS_EVENT *)OSEventFreeList->OSEventPtr;
}
OS_EXIT_CRITICAL();
if (pevent != (OS_EVENT *)0) {
pevent->OSEventType = OS_EVENT_TYPE_SEM;
pevent->OSEventCnt = cnt;
OSEventWaitListInit(pevent);
}
return (pevent);
(2)
(3)
(4)
(5)
(6)
(7)
}
Listing 6.9, Creating a semaphore.
6.05.02 Waiting on a Semaphore, OSSemPend()
The code to wait on a semaphore is shown in listing 6.10. OSSemPend() starts by checking that the ECB being
pointed to by pevent has been created by OSSemCreate() L6.10(1). If the semaphore is available (its count is
non-zero) L6.10(2) then the count is decremented L6.10(3), and the function return to its caller with an error code
indicating success. Obviously, if you want the semaphore, this is the outcome you are looking for. This also happens
to be the fastest path through OSSemPend().
If the semaphore is not available (the count is zero) then we check to see if the function was called by an ISR L6.10(4).
Under normal circumstances, you should not call OSSemPend() from an ISR because an ISR cannot be made to wait.
I decided to add this check just in case. However, if the sema phore is in fact available, the call to OSSemPend()
would be successful even if called by an ISR!
If the semaphore count is zero and OSSemPend() was not called by an ISR then the calling task needs to be put to
sleep until another task (or an ISR) signals the semaphore (see the next section). OSSemPend() allows you to
specify a timeout value as one of its arguments (i.e. timeout). This feature is useful to avoid waiting indefinitely for
the semaphore. If the value passed is non-zero, then OSSemPend() will suspend the task until the semaphore is
signaled or the specified timeout period expires. Note that a timeout value of 0 indicates that the task is willing to
wait forever for the semaphore to be signaled. To put the calling task to sleep, OSSemPend() sets the status flag in
the task’s TCB (Task Control Block) to indicate that the task is suspended waiting for a semaphore L6.10(5). The
timeout is also stored in the TCB L6.10(6) so that it can be decremented by OSTimeTick(). You should recall (see
section 3.10, Clock Tick ) that OSTimeTick() decrements each of the created task’s .OSTCBDly field if it’
s
non-zero. The actual work of putting the task to sleep is done by OSEventTaskWait() (see section 6.03, Making
a task wait for an event, OSEventTaskWait()) L6.10(7).
Because the calling task is no longer ready-to-run, the scheduler is called to run the next highest priority task that is
ready-to-run L6.10(8). When the semaphore is signaled (or the timeout period expired) and the task that called
OSSemPend() is again the highest priority task then OSSched() returns. OSSemPend() then checks to see if the
TCB’s status flag is still set to indicate that the task is waiting for the semaphore L6.10(9). If the task is still waiting
for the semaphore then it mu st not have been signaled by an OSSemPost() call. Indeed, the task must have be
readied by OSTimeTick() indicating that the timeout period has expired. In this case, the task is removed from the
wait list for the semaphore by calling OSEventTO() L6.10(10), and an error code is returned to the task that called
OSSemPend() to indicate that a timeout occurred. If the status flag in the task’s TCB doesn’t have the
OS_STAT_SEM bit set then the semaphore must have been signaled and the task that called OSSemPend() can now
conclude that it has the semaphore. Also, the link to the ECB is removed L6.10(11).
void OSSemPend (OS_EVENT *pevent, INT16U timeout, INT8U *err)
{
OS_ENTER_CRITICAL();
if (pevent->OSEventType != OS_EVENT_TYPE_SEM) {
OS_EXIT_CRITICAL();
(1)
*err = OS_ERR_EVENT_TYPE;
}
if (pevent->OSEventCnt > 0) {
pevent->OSEventCnt--;
OS_EXIT_CRITICAL();
*err = OS_NO_ERR;
} else if (OSIntNesting > 0) {
OS_EXIT_CRITICAL();
*err = OS_ERR_PEND_ISR;
} else {
OSTCBCur->OSTCBStat
|= OS_STAT_SEM;
OSTCBCur->OSTCBDly
= timeout;
OSEventTaskWait(pevent);
OS_EXIT_CRITICAL();
OSSched();
OS_ENTER_CRITICAL();
if (OSTCBCur->OSTCBStat & OS_STAT_SEM) {
OSEventTO(pevent);
OS_EXIT_CRITICAL();
*err = OS_TIMEOUT;
} else {
OSTCBCur->OSTCBEventPtr = (OS_EVENT *)0;
OS_EXIT_CRITICAL();
*err = OS_NO_ERR;
}
}
(2)
(3)
(4)
(5)
(6)
(7)
(8)
(9)
(10)
(11)
}
Listing 6.10, Waiting for a semaphore.
6.05.03 Signaling a Semaphore, OSSemPost()
The code to signal a semaphore is shown in listing 6.11. OSSemPost() starts by checking that the ECB being
pointed to by pevent has been created by OSSemCreate() L6.11(1). Next, we check to see if any tasks are
waiting on the semaphore L6.11(2). There are tasks waiting when the OSEventGrp field in the ECB contains a
non-zero value. The highest priority task waiting for the semaphore will be removed from the wait list by
OSEventTaskRdy() (see section 6.02, Making a task ready, OSEventTaskRdy()) L6.11(3) and this task will be
made ready-to-run. OSSched() is then called to see if the task made ready is now the highest priority task
ready-to-run. If it is, a context switch will result (only if OSSemPost() is called from a task) and the readied task
will be executed. If the readied task is not the highest priority task then OSSched() will return and the task that
called OSSemPost() will continue execution. If there were no tasks waiting on the semaphore, the semaphore count
simply gets incremented L6.11(5).
You should note that a context switch does not occur if OSSemPost() is called by an ISR because context switching
from an ISR can only occurs when OSIntExit() is called at the completion of the ISR from the last nested ISR (see
section 3.09, Interrupts under µC/OS-II).
INT8U OSSemPost (OS_EVENT *pevent)
{
OS_ENTER_CRITICAL();
if (pevent->OSEventType != OS_EVENT_TYPE_SEM) {
OS_EXIT_CRITICAL();
return (OS_ERR_EVENT_TYPE);
}
if (pevent->OSEventGrp) {
OSEventTaskRdy(pevent, (void *)0, OS_STAT_SEM);
OS_EXIT_CRITICAL();
OSSched();
(1)
(2)
(3)
(4)
return (OS_NO_ERR);
} else {
if (pevent->OSEventCnt < 65535) {
pevent->OSEventCnt++;
OS_EXIT_CRITICAL();
return (OS_NO_ERR);
} else {
OS_EXIT_CRITICAL();
return (OS_SEM_OVF);
}
}
(5)
}
Listing 6.11, Signaling a semaphore.
6.05.04 Getting a Semaphore without waiting, OSSemAccept()
It is possible to obtain a semaphore without putting a task to sleep if the semaphore is not available. This is
accomplished by calling OSSemAccept() and the code for this function is shown in listing 6.12. OSSemAccept()
starts by checking that the ECB being pointed to by pevent has been created by OSSemCreate() L6.12(1).
OSSemAccept() then gets the current semaphore count L6.12(2) to determine whether the semaphore is available
(i.e. non-zero value indicates available) L6.12(3). The count is decremented only if the semaphore was available
L6.12(4). Finally, the original count of the semaphore is returned to the caller L6.12(5). The code that called
OSSemAccept() will need to examine the returned value. A returned value of zero indicates that the semaphore
was not available while a non-zero value indicates that the semaphore was available. Furthermore, a non-zero value
indicates to the caller the number of resources that was available. Keep in mind that in this case, one of the resources
has been allocated to the calling task because the count has been decremented. An ISR should use OSSemAccept()
instead of OSSemPend().
INT16U OSSemAccept (OS_EVENT *pevent)
{
INT16U cnt;
OS_ENTER_CRITICAL();
if (pevent->OSEventType != OS_EVENT_TYPE_SEM) {
OS_EXIT_CRITICAL();
return (0);
}
cnt = pevent->OSEventCnt;
if (cnt > 0) {
pevent->OSEventCnt--;
}
OS_EXIT_CRITICAL();
return (cnt);
(1)
(2)
(3)
(4)
(5)
}
Listing 6.12, Getting a semaphore without waiting.
6.05.05 Obtaining the status of a semaphore, OSSemQuery()
OSSemQuery() allows your application to take a ‘snapshot’of an ECB that is used as a semaphore. The code for
this function is shown in listing 6.13. OSSemQuery() is passed two arguments: pevent contains a pointer to the
semaphore which is returned by OSSemCreate() when the semaphore is created and, pdata which is a pointer to
a data structure (OS_SEM_DATA, see uCOS_II.H) that will hold information about the semaphore. Your
application will thus need to allocate a variab le of type OS_SEM_DATA that will be used to receive the information
about the desired semaphore. I decided to use a new data structure because the caller should only be concerned with
semaphore specific data as opposed to the more generic OS_EVENT data structure which contain two additional fields
(i.e. .OSEventType and .OSEventPtr). OS_SEM_DATA contains the current semaphore count (.OSCnt) and
the list of tasks waiting on the semaphore (.OSEventTbl[] and .OSEventGrp).
As always, our function checks that pevent points to an ECB containing a semaphore L6.13(1). OSSemQuery()
then copies the wait list L6.13(2) followed by the current semaphore count L6.13(3) from the OS_EVENT structure to
the OS_SEM_DATA structure.
INT8U OSSemQuery (OS_EVENT *pevent, OS_SEM_DATA *pdata)
{
INT8U i;
INT8U *psrc;
INT8U *pdest;
OS_ENTER_CRITICAL();
if (pevent->OSEventType != OS_EVENT_TYPE_SEM) {
OS_EXIT_CRITICAL();
return (OS_ERR_EVENT_TYPE);
}
pdata->OSEventGrp = pevent->OSEventGrp;
psrc
= &pevent->OSEventTbl[0];
pdest
= &pdata->OSEventTbl[0];
for (i = 0; i < OS_EVENT_TBL_SIZE; i++) {
*pdest++ = *psrc++;
}
pdata->OSCnt
= pevent->OSEventCnt;
OS_EXIT_CRITICAL();
return (OS_NO_ERR);
(1)
(2)
(3)
}
Listing 6.13, Obtaining the status of a semaphore.
6.06 Message Mailboxes
A message mailbox (or simply a mailbox) is a µC/OS-II object that allows a task or an ISR to send a pointer size
variable to another task. The pointer would typically be initialized to point to some application specific data structure
containing a ‘message’. To enable µC/OS-II’s message mailbox services, you must set the configuration constant
OS_MBOX_EN to 1 (see file OS_CFG.H).
A mailbox needs to be created before it can be used. Creating a mailbox is accomplished by calling
OSMboxCreate() (see next section) and specifying the initial value of the pointer. Typically, the initial value is a
NULL pointer but a mailbox can initially contain a message. If you use the mailbox to signal the occurrence of an
event (i.e. send a message) then you would typically initialize it to a NULL pointer because the event (most likely)
would not have occurred. If you use the mailbox to access a shared resource then you would initialize the mailbox
with a non-NULL pointer. In this case, you would basically use the mailbox as a binary semaphore.
µC/OS-II provides five services to access mailboxes: OSMboxCreate(), OSMboxPend(), OSMboxPost(),
OSMboxAccept() and OSMboxQuery(). Figure 6-6 shows a flow diagram to illustrate the relationship between
tasks, ISRs and a message mailbox. Note that the symbology used to represent a mailbox is an I -beam. The content of
the mailbox is a pointer to a message. What the pointer points to is application specific. A mailbox can only contain
one pointer (mailbox is full) or a pointer to NULL (mailbox is empty). As you can see from figure 6-6, a task or a n ISR
can call OSMboxPost(). However, only tasks are allowed to call OSMboxPend() and OSMboxQuery().
OSMboxCreate()
Task
OSMboxPost()
OSMboxPend()
OSMboxAccept()
OSMboxQuery()
ISR
Task
Mailbox
OSMboxPost()
OSMboxAccept()
Message
Figure 6-6, Relationship between tasks, ISRs and a message mailbox.
6.06.01 Creating a Mailbox, OSMboxCreate()
The code to create a mailbox is shown in listing 6.14 and is basically identical to OSSemCreate() except that the
ECB type is set to OS_EVENT_TYPE_MBOX L6.14(1) and, instead of using the .OSEventCnt field, we use
the .OSEventPtr field to hold the message pointer L6.14(2).
OSMboxCreate() returns a pointer to the ECB L6.14(3). This pointer MUST be used in subsequent calls to access
the mailbox (OSMboxPend(), OSMboxPost(), OSMboxAccept() and OSMboxQuery()). The pointer is
basically used as the mailbox handle. Note that if there were no more ECBs, OSMboxCreate() would have
returned a NULL pointer.
You should note that once a mailbox has been created, it cannot be deleted. It would be ‘dangerous’to delete a
message mailbox object if tasks were waiting on the mailbox.
OS_EVENT *OSMboxCreate (void *msg)
{
OS_EVENT *pevent;
OS_ENTER_CRITICAL();
pevent = OSEventFreeList;
if (OSEventFreeList != (OS_EVENT *)0) {
OSEventFreeList = (OS_EVENT *)OSEventFreeList->OSEventPtr;
}
OS_EXIT_CRITICAL();
if (pevent != (OS_EVENT *)0) {
pevent->OSEventType = OS_EVENT_TYPE_MBOX;
pevent->OSEventPtr = msg;
OSEventWaitListInit(pevent);
}
return (pevent);
}
Listing 6.14, Creating a mailbox.
(1)
(2)
(3)
6.06.02 Waiting for a message at a Mailbox, OSMboxPend()
The code to wait for a message to arrive at a mailbox is shown in listing 6.15. Again, the code is very similar to
OSSemPend() so I will only discuss the differences. OSMboxPend() verifies that the ECB being pointed to by
pevent has been created by OSMboxCreate() L6.15(1). A message is available when .OSEventPtr contains
a non-NULL pointer L6.15(2). In this case, OSMboxPend() stores the pointer to the message in msg and places a
NULL-pointer in .OSEventPtr to empty the mailbox L6.15(3). Again, this is the outcome you are looking for. This
also happens to be the fastest path through OSMboxPend().
If a message is not available (.OSEventPtr contains a NULL-pointer), we check to see if the function was called by
an ISR L6.15(4). As with OSSemPend(), you should not call OSMboxPend() from an ISR because an ISR cannot
be made to wait. Again, I decided to add this check just in case. However, if the message is in fact available, the call
to OSMboxPend() would be successful even if called from an ISR!
If a message is not available then the calling task must be suspended until either a message is posted or the specified
timeout period expires L6.15(5). When a message is posted to the mailbox (or the timeout period expires) and the task
that called OSMboxPend() is again the highest priority task then OSSched() returns. OSMboxPend() checks to
see if a message was placed in the task’s TCB by OSMboxPost() L6.15(6). If this is the case, the call is successful
and the message is returned to the caller. Note that we again need to clear the mailbox’s content by placing a
NULL-pointer in .OSEventPtr.
A timeout is detected by looking at the .OSTCBStat field in the task’s TCB to see if the OS_STAT_MBOX bit is still
set. A timeout occurred when the bit is set L6.15(7). The task is removed from the mailbox’s wait list by calling
OSEventTO() L6.15(8). Note that the returned pointer is set to NULL L6.15(9) because there was no message. If
the status flag in the task’s TCB doesn’t have the OS_STAT_MBOX bit set then a message must have been sent. The
task that called OSMboxPend() will thus receive the pointer to the message L6.15(10). Also, the link to the ECB is
removed L6.15(11).
void *OSMboxPend (OS_EVENT *pevent, INT16U timeout, INT8U *err)
{
void *msg;
OS_ENTER_CRITICAL();
if (pevent->OSEventType != OS_EVENT_TYPE_MBOX) {
OS_EXIT_CRITICAL();
*err = OS_ERR_EVENT_TYPE;
return ((void *)0);
}
msg = pevent->OSEventPtr;
if (msg != (void *)0) {
pevent->OSEventPtr = (void *)0;
OS_EXIT_CRITICAL();
*err = OS_NO_ERR;
} else if (OSIntNesting > 0) {
OS_EXIT_CRITICAL();
*err = OS_ERR_PEND_ISR;
} else {
OSTCBCur->OSTCBStat |= OS_STAT_MBOX;
OSTCBCur->OSTCBDly
= timeout;
OSEventTaskWait(pevent);
OS_EXIT_CRITICAL();
OSSched();
OS_ENTER_CRITICAL();
if ((msg = OSTCBCur->OSTCBMsg) != (void *)0) {
OSTCBCur->OSTCBMsg
= (void *)0;
OSTCBCur->OSTCBStat
= OS_STAT_RDY;
OSTCBCur->OSTCBEventPtr = (OS_EVENT *)0;
OS_EXIT_CRITICAL();
(1)
(2)
(3)
(4)
(5)
(6)
*err
= OS_NO_ERR;
} else if (OSTCBCur->OSTCBStat & OS_STAT_MBOX) {
OSEventTO(pevent);
OS_EXIT_CRITICAL();
msg
= (void *)0;
*err
= OS_TIMEOUT;
} else {
msg
= pevent->OSEventPtr;
pevent->OSEventPtr
= (void *)0;
OSTCBCur->OSTCBEventPtr = (OS_EVENT *)0;
OS_EXIT_CRITICAL();
*err
= OS_NO_ERR;
}
(7)
(8)
(9)
(10)
(11)
}
return (msg);
}
Listing 6.15, Waiting for a message to arrive at a mailbox.
6.06.03 Sending a message to a mailbox, OSMboxPost()
The code to deposit a message in a mailbox is shown in listing 6.16. After making sure that the ECB is used as a
mailbox L6.16(1), OSMboxPost() checks to see if any task is waiting for a message to arrive at the mailbox
L6.16(2). There are tasks waiting when the OSEventGrp field in the ECB contains a non-zero value. The highest
priority task waiting for the message will be removed from the wait list by OSEventTaskRdy() (see section 6.02,
Making a task ready, OSEventTaskRdy()) L6.16(3), and this task will be made ready-to-run. OSSched() is then
called to see if the task made ready is now the highest priority task ready-to-run. If it is, a context switch will result
(only if OSMboxPost() is called from a task) and the readied task will be executed. If the readied task is not the
highest priority task then OSSched() will return and the task that called OSMboxPost() will continue execution.
If there were no tasks waiting for a message to arrive at the mailbox, then the pointer to the message is saved in the
mailbox L6.16(6), assuming there isn’t already a non-NULL pointer L6.16(5). Storing the pointer in the mailbox
allows the next task to call OSMboxPend() to immediately get the message.
You should note that a context switch does not occur if OSMboxPost() is called by an ISR because context
switching from an ISR can only occurs when OSIntExit() is calle d at the completion of the ISR, and from the last
nested ISR (see section 3.09, Interrupts under µC/OS-II).
INT8U OSMboxPost (OS_EVENT *pevent, void *msg)
{
OS_ENTER_CRITICAL();
if (pevent->OSEventType != OS_EVENT_TYPE_MBOX) {
OS_EXIT_CRITICAL();
return (OS_ERR_EVENT_TYPE);
}
if (pevent->OSEventGrp) {
OSEventTaskRdy(pevent, msg, OS_STAT_MBOX);
OS_EXIT_CRITICAL();
OSSched();
return (OS_NO_ERR);
} else {
if (pevent->OSEventPtr != (void *)0) {
OS_EXIT_CRITICAL();
return (OS_MBOX_FULL);
} else {
pevent->OSEventPtr = msg;
OS_EXIT_CRITICAL();
return (OS_NO_ERR);
}
(1)
(2)
(3)
(4)
(5)
(6)
}
}
Listing 6.16, Depositing a message in a mailbox.
6.06.04 Getting a message without waiting, OSMboxAccept()
It is possib le to obtain a message from a mailbox without putting a task to sleep if the mailbox is empty. This is
accomplished by calling OSMboxAccept() and the code for this function is shown in listing 6.17.
OSMboxAccept() starts by checking that the ECB being pointed to by pevent has been created by
OSMboxCreate() L6.17(1). OSMboxAccept() then gets the current contents of the mailbox L6.17(2) in order
to determine whether a message is available (i.e. non-NULL pointer) L6.17(3). If a message is available, the ma ilbox
is emptied L6.17(4). Finally, the original contents of the mailbox is returned to the caller L6.17(5). The code that
called OSMboxAccept() will need to examine the returned value. If OSMboxAccept() returns a NULL pointer
then a message was not available. A non-NULL pointer indicates that a message was deposited in the mailbox. An
ISR should use OSMboxAccept() instead of OSMboxPend().
You can use OSMboxAccept() to ‘
flush’the contents of a mailbox.
void *OSMboxAccept (OS_EVENT *pevent)
{
void *msg;
OS_ENTER_CRITICAL();
if (pevent->OSEventType != OS_EVENT_TYPE_MBOX) {
OS_EXIT_CRITICAL();
return ((void *)0);
}
msg = pevent->OSEventPtr;
if (msg != (void *)0) {
pevent->OSEventPtr = (void *)0;
}
OS_EXIT_CRITICAL();
return (msg);
(1)
(2)
(3)
(4)
(5)
}
Listing 6.17, Getting a message without waiting.
6.06.05 Obtaining the status of a mailbox, OSMboxQuery()
OSMboxQuery() allows your application to take a ‘snapshot’of an ECB used for a message mailbox. The code for
this function is shown in listing 6.18. OSMboxQuery() is passed two arguments: pevent contains a pointer to the
message mailbox which is returned by OSMboxCreate() when the mailbox is created and, pdata which is a
pointer to a data structure (OS_MBOX_DATA, see uCOS_II.H) that will hold information about the message mailbox.
Your application will thus need to allocate a variable of type OS_MBOX_DATA that will be used to receive the
information about the desired mailbox. I decided to use a new data structure because the caller should only be
concerned with mailbox specific data as opposed to the more generic OS_EVENT data structure which contain two
additional fields (i.e. .OSEventCnt and .OSEventType). OS_MBOX_DATA contains the current contents of the
message (i.e. .OSMsg) and the list of tasks waiting for a message to arrive (.OSEventTbl[] and .OSEventGrp).
As always, our function checks that pevent points to an ECB containing a mailbox L6.18(1). OSMboxQuery()
then copies the wait list L6.18(2) followed by the current message L6.18(3) from the OS_EVENT structure to the
OS_MBOX_DATA structure.
INT8U OSMboxQuery (OS_EVENT *pevent, OS_MBOX_DATA *pdata)
{
INT8U i;
INT8U *psrc;
INT8U *pdest;
OS_ENTER_CRITICAL();
if (pevent->OSEventType != OS_EVENT_TYPE_MBOX) {
OS_EXIT_CRITICAL();
return (OS_ERR_EVENT_TYPE);
}
pdata->OSEventGrp = pevent->OSEventGrp;
psrc
= &pevent->OSEventTbl[0];
pdest
= &pdata->OSEventTbl[0];
for (i = 0; i < OS_EVENT_TBL_SIZE; i++) {
*pdest++ = *psrc++;
}
pdata->OSMsg
= pevent->OSEventPtr;
OS_EXIT_CRITICAL();
return (OS_NO_ERR);
(1)
(2)
(3)
}
Listing 6.18, Obtaining the status of a mailbox.
6.06.06 Using a mailbox as a binary semaphore
A message mailbox can be used as a binary semaphore by initializing the mailbox with a non-NULL pointer ((void
*1) works well). A task requesting the ‘semaphore’would call OSMboxPend() and would release the ‘
semaphore’
by calling OSMboxPost(). Listing 6.19 shows how this works. You would use this technique to conserve code
space if your application only needed binary semaphores and mailboxes. In this case, you could set OS_SEM_EN to 0
and only use mailboxes instead of both mailboxes and semaphores.
OS_EVENT *MboxSem;
void Task1 (void *pdata)
{
INT8U err;
for (;;) {
OSMboxPend(MboxSem, 0, &err);
/* Obtain access to resource(s) */
.
.
/* Task has semaphore, access resource(s)
*/
.
OSMboxPost(MboxSem, (void )1); /* Release access to resource(s) */
}
}
Listing 6.19, Using a mailbox as a binary semaphore.
6.06.07 Using a mailbox instead of OSTimeDly()
The timeout feature of a mailbox can be used to simulate a call to OSTimeDly(). As shown in listing 6.20, Task1()
resumes execution after the time period expired if no message is received within the specified TIMEOUT period. This
is basically identical to OSTimeDly(TIMEOUT). However, the task can be resumed by Task2() when Task(2)
post a ‘dummy’ message to the mailbox before the timeout expires.
This is the same as calling
OSTimeDlyResume() had Task1() called OSTimeDly(). You should note that the returned message is
ignored because we are not actually looking to get a message from another task or an ISR.
OS_EVENT *MboxTimeDly;
void Task1 (void *pdata)
{
INT8U err;
for (;;) {
OSMboxPend(MboxTimeDly, TIMEOUT, &err);
.
.
/* Code executed after time delay
.
}
/* Delay task
*/
*/
}
void Task2 (void *pdata)
{
INT8U err;
for (;;) {
OSMboxPost(MboxTimeDly, (void *)1);
.
.
}
/* Cancel delay for Task1
*/
}
Listing 6.20, Using a mailbox as a time delay.
6.07 Message Queues
A message queue (or simply a queue) is a µC/OS-II object that allows a task or an ISR to send pointer size variables to
another task. Each pointer would typically be initialized to point to some application specific data structure containing
a ‘message’. To enable µC/OS-II’s message queue services, you must set the configuration constant OS_Q_EN to 1
(see file OS_CFG.H ) and determine how many message queues µC/OS-II will need to support by setting the
configuration constant OS_MAX_QS, also found in OS_CFG.H.
A queue needs to be created before it can be used. Creating a queue is accomplished by calling OSQCreate() (see
next section) and specifying the number of entries (i.e. pointers) that a queue can hold.
µC/OS-II provides seven services to access message queues: OSQCreate(), OSQPend(), OSQPost(),
OSQPostFront(), OSQAccept(), OSQFlush() and OSQQuery(). Figure 6-7 shows a flow diagram to
illustrate the relationship between tasks, ISRs and a message queue. Note that the symbology used to represent a
queue looks like a mailbox with multiple entries. In fact, you can think of a queue as an array of mailboxes except that
there is only one wait list associated with the queue. Again, what the pointers point to is application specific. ‘N’
represents the number of entries that the queue holds. The queue is full when your application has called OSQPost()
(or OSQPostFront()) ‘N’times before your application has called OSQPend() or OSQAccept(). As you can
see from figure 6-7, a task or an ISR can call OSQPost(), OSQPostFront(), OSQFlush() or OSQAccept().
However, only tasks task are allowed to call OSQPend() and OSQQuery().
OSQCreate()
Task
ISR
OSQPost()
OSQPostFront()
OSQFlush()
OSQPost()
OSQPostFront()
OSQFlush()
OSQAccept()
N
OSQPend()
OSQAccept()
OSQQuery()
Task
Queue
Message
Figure 6-7, Relationship between tasks, ISRs and a message queue.
Figure 6-8 shows the different data structures needed to implement a message queue. An ECB is required because we
need a wait list F6-8(1) and using an ECB allows us to use some of the same code as we used with semaphores and
mailboxes. When a message queue is created, a queue control block (i.e. an OS_Q, see OS_Q.C) is allocated and
linked to the ECB using the .OSEventPtr field in OS_EVENT, F6-8(2). Before you create a queue, however, you
need to allocate an array of pointer F6-8(3) which contains the desired number of queue entries. In other words, the
number of elements in the array corresponds to the number of entries in the queue. The starting address of the array is
passed to OSQCreate() as an argument as well as the size (in number of elements) of the array. In fact, you don’t
actually need t o use an array as long as the memory occupies contiguous locations.
OS_EVENT(1)
OSEventGrp
7 6 5 4 3 2 1 0
OSEventTbl[]
63 62 61 60 59 58 57 56
OSEventCnt
OSEventPtr
Field not used!
OS_Q (2)
void *MsgTbl[]
OSQPtr
OSQStart
OSQSize
OSQOut
OSQIn
OSQEnd
OSQEntries
(3)
OSQEntries
OSQSize
Array allocated by your application
Figure 6-8, Data structures used in a message queue.
The configuration constant OS_MAX_QS in OS_CFG.H specifies how many queues you are allowed to have in your
application and MUST be set to at least 2. When µC/OS-II is initialized, a list of free queue control blocks is created
as shown in figure 6-9.
OS_MAX_QS
OSQFreeList
OSQPtr
OSQStart
OSQSize
OSQOut
OSQIn
OSQEnd
OSQEntries
OSQPtr
OSQStart
OSQSize
OSQOut
OSQIn
OSQEnd
OSQEntries
OSQPtr
OSQStart
OSQSize
OSQOut
OSQIn
OSQEnd
OSQEntries
0
OS_Q
Figure 6-9, List of free queue control blocks.
A queue control block is a data structure that is used to maintain information about the queue and it contains the fields
described below. Note that the fields are preceded with a dot to show that they are members of a structure as opposed
to simple variables.
.OSQPtr is used to link queue control blocks in the list of free queue control blocks. Once the queue is
allocated, this field is not used.
.OSQStart contains a pointer to the start of the message queue storage area. Your application must declare
this storage area before creating the queue.
.OSQEnd is a pointer to one location past the end of the queue. This pointer is used to make the queue a
circular buffer.
.OSQIn is a pointer to the location in the queue where the next message will be inserted. .OSQIn is adjusted
back to the beginning of the message storage area when .OSQIn equals .OSQEnd.
.OSQOut is a pointer to the next message to be extracted from the queue. .OSQOut is adjusted back to the
beginning of the message storage area when .OSQOut equals .OSQEnd . .OSQOut is also used to insert a
message (see OSQPostFront()).
.OSQSize contains the size of the message storage area. The size of the queue is determined by your
application when the queue is created. Note that µC/OS-II allows the queue to contain up to 65535 entries.
.OSQEntries contains the current number of entries in the message queue. The queue is empty
when .OSQEntries is zero and full when it equals .OSQSize. The message queue is empty when the
queue is created.
A message queue is basically a circular buffer as shown in figure 6-10. Each entry contains a pointer. The pointer to
the next message is deposited at the entry pointed to by .OSQIn F6-10(1) unless the queue is full
(i.e. .OSQEntries == .OSQSize) F6-10(3). Depositing the pointer at .OSQIn implements a FIFO
(First-In-First-Out) queue. We can implement a LIFO (Last-In-First-Out) queue by pointing to the entry
preceeding .OSQOut F6-10(2) and depositing the pointer at that location. The pointer is also considered full
when .OSQEntries == .OSQSize. Message poin ters are always extracted from the entry pointed to
by .OSQOut. The pointers .OSQStart and .OSQEnd are simply markers used to establish the beginning and end
of the array so that .OSQIn and .OSQOut can wrap around to implement this circular motion.
.OSQStart
.OSQEnd
(5)
(5)
.OSQOut
(2)
.OSQOut
.OSQSize
(4)
(3)
.OSQEntries
(3)
.OSQIn
(1)
Pointer to message
Figure 6-10, Message queue is a circular buffer of pointers.
6.07.01 Creating a Queue, OSQCreate()
The code to create a message queue is shown in listing 6.21. OSQCreate() requires that you allocate an array of
pointers that will hold the message. The array MUST be declared as an array of pointers to void.
OSQCreate() starts by obtaining an ECB from the free list of ECBs (see figure 6-3) L6.21(1). The linked list of
free ECBs is adjusted to point to the next free ECB L6.21(2). Other OSQ???() function calls will check this field to
make sure that the ECB is of the proper type. This prevents you from callingOSQPost() on an ECB that was created
for use as a semaphore (see section 6.05). Next, OSQCreate() obtains a queue control block from the free list
L6-21(3). OSQCreate() initializes the queue control block L6-21(4) (if one was available), sets the ECB type to
OS_EVENT_TYPE_Q L6.21(5) and makes .OSEventPtr point to the queue control block L6.21(6). The wait list is
initialized by calling OSEventWaitListInit() (see section 6.01, Initializing an ECB, OSEventWaitListInit())
L6.9(7). Because the queue is being initialized, there are no tasks waiting. Finally, OSQCreate() returns a pointer
to the allocated ECB L6.21(9). This pointer MUST be used in subsequent calls that operate on message queues
(OSQPend(), OSQPost(), OSQPostFront(), OSQFlush(), OSQAccept() and OSQQuery()). The
pointer is basically used as the queue’
s handle. Note that if there were no more ECBs, OSQCreate() would have
returned a NULL pointer. If a queue control block was not available, OSQCreate() returns the ECB back to the list
of free ECBs L6.21(8) (there is no point in wasting the ECB).
You should note that once a message queue has been created, it cannot be deleted. It would be ‘dangerous’to delete a
message queue object if tasks were waiting for messages from it.
OS_EVENT *OSQCreate (void **start, INT16U size)
{
OS_EVENT *pevent;
OS_Q
*pq;
OS_ENTER_CRITICAL();
pevent = OSEventFreeList;
if (OSEventFreeList != (OS_EVENT *)0) {
OSEventFreeList = (OS_EVENT *)OSEventFreeList->OSEventPtr;
}
OS_EXIT_CRITICAL();
if (pevent != (OS_EVENT *)0) {
OS_ENTER_CRITICAL();
pq = OSQFreeList;
if (OSQFreeList != (OS_Q *)0) {
OSQFreeList = OSQFreeList->OSQPtr;
}
OS_EXIT_CRITICAL();
if (pq != (OS_Q *)0) {
pq->OSQStart
= start;
pq->OSQEnd
= &start[size];
pq->OSQIn
= start;
pq->OSQOut
= start;
pq->OSQSize
= size;
pq->OSQEntries
= 0;
pevent->OSEventType = OS_EVENT_TYPE_Q;
pevent->OSEventPtr = pq;
OSEventWaitListInit(pevent);
} else {
OS_ENTER_CRITICAL();
pevent->OSEventPtr = (void *)OSEventFreeList;
OSEventFreeList
= pevent;
OS_EXIT_CRITICAL();
pevent = (OS_EVENT *)0;
}
}
return (pevent);
(1)
(2)
(3)
(4)
(5)
(6)
(7)
(8)
(9)
}
Listing 6.21, Creating a queue.
6.07.02 Waiting for a message at a Queue, OSQPend()
The code to wait for a message to arrive at a queue is shown in listing 6.22. OSQPend() verifies that the ECB being
pointed to by pevent has been created by OSQCreate() L6.22(1). A message is available when .OSQEntries
is greater than 0 L6.22(2). In this case, OSQPend() stores the pointer to the message in msg, moves the .OSQOut
pointer so that it points to the next entry in the queue L6.22(3) and, OSQPend() decrements the number of entries left
in the queue L6.22(4). Because we are implementing a circular buffer, we need to check that .OSQOut has not
moved past the last valid entry in the array L6.22(5). When this happens, however, .OSQOut is adjusted to point
back at the beginning of the array L6.22(6). This is the path you are looking for when calling OSQPend() and it also
happens to be the fastest.
If a message is not available (.OSEventEntries is 0) then we check to see if the function was called by an ISR
L6.22(7). As with OSSemPend() and OSMboxPend(), you should not call OSQPend() from an ISR because an
ISR cannot be made to wait. However, if the message is in fact available, the call to OSQPend() would be successful
even if called from an ISR!
If a message is not available then the calling task must be suspended until either a message is posted or the specified
timeout period expires L6.22(8). When a message is posted to the queue (or the timeout period expired) and the task
that called OSQPend() is again the highest priority task then OSSched() returns L6.22(9). OSQPend() then
checks to see if a message was placed in the task’s TCB by OSQPost() L6.22(10). If this is the case, the call is
successful, some cleanup work is done to unlink the message queue from the TCB L6.22(11) and the message is
returned to the caller L6.22(17).
A timeout is detected by looking at the .OSTCBStat field in the task’s TCB to see if the OS_STAT_Q bit is still set.
A timeout occurred when the bit is set L6.22(12). The task is removed from the queue’s wait list by calling
OSEventTO()L6.22(13). Note that the returned pointer is set to NULL L6.22(14) (no message was available).
If the status flag in the task’s TCB doesn’t have the OS_STAT_Q bit set then a message must have been sent and thus,
the message is extracted from the queue L6.22(15). Also, the link to the ECB is removed because the task will no
longer wait on that message queue L6.22(16).
void *OSQPend (OS_EVENT *pevent, INT16U timeout, INT8U *err)
{
void *msg;
OS_Q *pq;
OS_ENTER_CRITICAL();
if (pevent->OSEventType != OS_EVENT_TYPE_Q) {
OS_EXIT_CRITICAL();
*err = OS_ERR_EVENT_TYPE;
return ((void *)0);
}
pq = pevent->OSEventPtr;
if (pq->OSQEntries != 0) {
msg = *pq->OSQOut++;
pq->OSQEntries--;
if (pq->OSQOut == pq->OSQEnd) {
pq->OSQOut = pq->OSQStart;
}
OS_EXIT_CRITICAL();
*err = OS_NO_ERR;
} else if (OSIntNesting > 0) {
OS_EXIT_CRITICAL();
*err = OS_ERR_PEND_ISR;
} else {
OSTCBCur->OSTCBStat
|= OS_STAT_Q;
OSTCBCur->OSTCBDly
= timeout;
OSEventTaskWait(pevent);
OS_EXIT_CRITICAL();
OSSched();
OS_ENTER_CRITICAL();
if ((msg = OSTCBCur->OSTCBMsg) != (void *)0) {
OSTCBCur->OSTCBMsg
= (void *)0;
OSTCBCur->OSTCBStat
= OS_STAT_RDY;
OSTCBCur->OSTCBEventPtr = (OS_EVENT *)0;
OS_EXIT_CRITICAL();
*err
= OS_NO_ERR;
} else if (OSTCBCur->OSTCBStat & OS_STAT_Q) {
OSEventTO(pevent);
OS_EXIT_CRITICAL();
msg
= (void *)0;
*err
= OS_TIMEOUT;
} else {
msg = *pq->OSQOut++;
pq->OSQEntries--;
if (pq->OSQOut == pq->OSQEnd) {
pq->OSQOut = pq->OSQStart;
}
OSTCBCur->OSTCBEventPtr = (OS_EVENT *)0;
OS_EXIT_CRITICAL();
*err = OS_NO_ERR;
}
}
(1)
(2)
(3)
(4)
(5)
(6)
(7)
(8)
(9)
(10)
(11)
(12)
(13)
(14)
(15)
(16)
return (msg);
(17)
}
Listing 6.22, Waiting for a message to arrive at a queue.
6.07.03 Sending a message to a queue (FIFO), OSQPost()
The code to deposit a message in a queue is shown in listing 6.23. After making sure that the ECB is used as a queue
L6.23(1), OSQPost() checks to see if any task is waiting for a message to arrive at the queue L6.23(2). There are
tasks waiting when the OSEventGrp field in the ECB contains a non-zero value. The highest priority task waiting
for the message will be removed from the wait list by OSEventTaskRdy() (see section 6.02, Making a task ready,
OSEventTaskRdy()) L6.23(3), and this task will be made ready-to-run. OSSched() is then called to see if the task
made ready is now the highest priority task ready-to-run. If it is, a context switch will result (only if OSQPost() is
called from a task) and the readied task will be executed. If the readied task is not the highest priority task then
OSSched() will return and the task that called OSQPost() will continue execution. If there were no tasks waiting
for a message to arrive at the queue, then the pointer to the message is saved in the queue L6.23(5) unless the queue is
already full L6.23(4). You should note that if the queue is full, the message will not be inserted in the queue and thus,
the message will basically be lost. Storing the pointer to the message in the queue allows the next tas k that calls
OSQPend() (on this queue) to immediately get the pointer.
You should note that a context switch does not occur if OSQPost() is called by an ISR because context switching
from an ISR can only occurs when OSIntExit() is called at the completion of the ISR, from the last nested ISR
(see section 3.09, Interrupts under µC/OS-II).
INT8U OSQPost (OS_EVENT *pevent, void *msg)
{
OS_Q
*pq;
OS_ENTER_CRITICAL();
if (pevent->OSEventType != OS_EVENT_TYPE_Q) {
OS_EXIT_CRITICAL();
return (OS_ERR_EVENT_TYPE);
}
if (pevent->OSEventGrp) {
OSEventTaskRdy(pevent, msg, OS_STAT_Q);
OS_EXIT_CRITICAL();
OSSched();
return (OS_NO_ERR);
} else {
pq = pevent->OSEventPtr;
if (pq->OSQEntries >= pq->OSQSize) {
OS_EXIT_CRITICAL();
return (OS_Q_FULL);
} else {
*pq->OSQIn++ = msg;
pq->OSQEntries++;
if (pq->OSQIn == pq->OSQEnd) {
pq->OSQIn = pq->OSQStart;
}
OS_EXIT_CRITICAL();
}
return (OS_NO_ERR);
}
}
(1)
(2)
(3)
(4)
(5)
Listing 6.23, Depositing a message in a queue (FIFO).
6.07.04 Sending a message to a queue (LIFO), OSQPostFront()
OSQPostFront() is basically identical to OSQPost() except that OSQPostFront() uses .OSQOut instead
of .OSQIn as the pointer to the next entry to insert. The code is shown in listing 6.24. You should note, however,
that .OSQOut points to an already inserted entry and thus, .OSQOut must be made to point to the previous entry.
If .OSQOut points at the beginning of the array L6.24(1), then a decrement really means positioning .OSQOut at the
end of the array L6.24(2). However, .OSQEnd points to one entry past the array and thus .OSQOut needs to be
adjusted to be within range L6.24(3). OSQPostFront() implements a LIFO queue because the next message
extracted by OSQPend() will be the last message inserted by OSQPostFront().
INT8U OSQPostFront (OS_EVENT *pevent, void *msg)
{
OS_Q
*pq;
OS_ENTER_CRITICAL();
if (pevent->OSEventType != OS_EVENT_TYPE_Q) {
OS_EXIT_CRITICAL();
return (OS_ERR_EVENT_TYPE);
}
if (pevent->OSEventGrp) {
OSEventTaskRdy(pevent, msg, OS_STAT_Q);
OS_EXIT_CRITICAL();
OSSched();
return (OS_NO_ERR);
} else {
pq = pevent->OSEventPtr;
if (pq->OSQEntries >= pq->OSQSize) {
OS_EXIT_CRITICAL();
return (OS_Q_FULL);
} else {
if (pq->OSQOut == pq->OSQStart) {
pq->OSQOut = pq->OSQEnd;
}
pq->OSQOut--;
*pq->OSQOut = msg;
pq->OSQEntries++;
OS_EXIT_CRITICAL();
}
return (OS_NO_ERR);
}
(1)
(2)
(3)
}
Listing 6.24, Depositing a message in a queue (LIFO).
6.07.05 Getting a message without waiting, OSQAccept()
It is possible to obtain a message from a queue without putting a task to sleep if the queue is empty. This is
accomplished by calling OSQAccept() and the code for this function is shown in listing 6.25. OSQAccept()
starts by checking that the ECB being pointed to by pevent has been created by OSQCreate() L6.25(1).
OSQAccept() then checks to see if there are any entries in the queue L6.25(2). If the queue contains at least one
message, the next pointer is extracted from the queue L6.25(3). The code that calls OSQAccept() will need to
examine the returned value. If OSQAccept() returns a NULL pointer then a message was not available L6.25(4). A
non-NULL pointer indicates that a message pointer was available. An ISR should use OSQAccept() instead of
OSQPend(). If an entry was available, OSQAccept() extracts the entry from the queue.
void *OSQAccept (OS_EVENT *pevent)
{
void *msg;
OS_Q *pq;
OS_ENTER_CRITICAL();
if (pevent->OSEventType != OS_EVENT_TYPE_Q) {
OS_EXIT_CRITICAL();
return ((void *)0);
}
pq = pevent->OSEventPtr;
if (pq->OSQEntries != 0) {
msg = *pq->OSQOut++;
pq->OSQEntries--;
if (pq->OSQOut == pq->OSQEnd) {
pq->OSQOut = pq->OSQStart;
}
} else {
msg = (void *)0;
}
OS_EXIT_CRITICAL();
return (msg);
(1)
(2)
(3)
(4)
}
Listing 6.25, Getting a message without waiting.
6.07.06 Flushing a queue, OSQFlush()
OSQFlush() allows your application to remove all the messages posted to a queue and basically, start with a fresh
queue. The code for this function is shown in listing 6.26. As usual, µC/OS-II chec ks to ensure that pevent is
pointing to a message queue L6.26(1). The IN and OUT pointers are then reset to the beginning of the array and the
number of entries is cleared L6.26(2). I decided to not check to see if there were any tasks pending on the queue
because this would be irrelevant anyway. In other words, if tasks were waiting on the queue then .OSQEntries
would already have been set to 0. The only difference is that .OSQIn and .OSQOut may have been pointing
elsewhere in the array.
INT8U OSQFlush (OS_EVENT *pevent)
{
OS_Q *pq;
OS_ENTER_CRITICAL();
if (pevent->OSEventType != OS_EVENT_TYPE_Q) {
OS_EXIT_CRITICAL();
return (OS_ERR_EVENT_TYPE);
}
pq
= pevent->OSEventPtr;
pq->OSQIn
= pq->OSQStart;
pq->OSQOut
= pq->OSQStart;
pq->OSQEntries = 0;
OS_EXIT_CRITICAL();
return (OS_NO_ERR);
}
(1)
(2)
Listing 6.26, Flushing the contents of a queue.
6.07.07 Obtaining the status of a queue, OSQQuery()
OSQQuery() allows your application to take a ‘snapshot’of the contents of a message queue. The code for this
function is shown in listing 6.27. OSQQuery() is passed two arguments: pevent contains a pointer to the message
queue which is returned by OSQCreate() when the queue is created and, pdata which is a pointer to a data
structure (OS_Q_DATA, see uCOS_II.H) that will hold information about the message queue. Your application will
thus need to allocate a variable of type OS_Q_DATA that will be used to receive the information about the desired
queue. OS_Q_DATA contains the following fields:
.OSMsg contains the contents pointed to by .OSQOut if there are entries in the queue. If the queue is
empty, .OSMsg contains a NULL-pointer.
.OSNMsgs contains the number of messages in the queue (i.e. a copy of .OSQEntries).
.OSQSize contains the size of the queue (in number of entries).
.OSEventTbl[] and .OSEventGrp contains a snapshot of the message queue wait list. The caller to
OSQQuery() can thus determine how many tasks are waiting for the queue.
As always, our function checks that pevent points to an ECB containing a queue L6.27(1). OSQQuery() then
copies the wait list L6.27(2). If the queue contains any entries L6.27(3), the next message pointer to be extracted from
the queue is copied into the OS_Q_DATA structure L6.27(4). If the queue is empty, then a NULL-pointer is placed in
OS_Q_DATA L6.27(5). Finally, we copy the number of entries and the size of the message queue L6.27(6).
INT8U OSQQuery (OS_EVENT *pevent, OS_Q_DATA *pdata)
{
OS_Q
*pq;
INT8U
i;
INT8U *psrc;
INT8U *pdest;
OS_ENTER_CRITICAL();
if (pevent->OSEventType != OS_EVENT_TYPE_Q) {
OS_EXIT_CRITICAL();
return (OS_ERR_EVENT_TYPE);
}
pdata->OSEventGrp = pevent->OSEventGrp;
psrc
= &pevent->OSEventTbl[0];
pdest
= &pdata->OSEventTbl[0];
for (i = 0; i < OS_EVENT_TBL_SIZE; i++) {
*pdest++ = *psrc++;
}
pq = (OS_Q *)pevent->OSEventPtr;
if (pq->OSQEntries > 0) {
pdata->OSMsg = pq->OSQOut;
} else {
pdata->OSMsg = (void *)0;
}
pdata->OSNMsgs = pq->OSQEntries;
pdata->OSQSize = pq->OSQSize;
OS_EXIT_CRITICAL();
return (OS_NO_ERR);
}
(1)
(2)
(3)
(4)
(5)
(6)
Listing 6.27, Obtaining the status of a queue.
6.07.08 Using a message queue when reading analog inputs
It is often useful in control applications to read analog inputs at a regular interval. To accomplish this, you can create
a task and call OSTimeDly() (see section 5.00, OSTimeDly()) and specify the desired sampling period. As shown in
figure 6-11, you could use a message queue instead and have your task pend on the queue with a timeout. The timeout
corresponds to the desired sampling period. If no other task sends a message to the queue, the task will be resumed
after the specified timeout which basically emulates the OSTimeDly() function.
You are probably wondering why I decided to use a queue when OSTimeDly() does the trick just fine. By adding a
queue, you can have other tasks abort the wait by sending a message thus forcing an immediate conversion. If you add
some intelligence to your messages, you can tell the ADC task to convert a specific channel, tell the task to increase
the sampling rate, and more. In other words, you can say to the task: “Can you convert analog input #3 for me now?”.
After servicing the message, the task would initiate the pend on the queue which would restart the scanning process.
(2)
Analog Inputs
MUX
ADC
(3)
Task
(4)
Queue
OSQPost()
(5)
OSQPend()
(1)
Timeout
Figure 6-11, Reading analog inputs.
6.07.09 Using a queue as a counting semaphore
A message queue can be used as a counting semaphore by initializing and loading a queue with as many non-NULL
pointer ((void *1) works well) as there are resources available. A task requesting the ‘semaphore’would call
OSQPend() and would release the ‘semaphore’by calling OSQPost(). Listing 6.28 shows how this works. You
would use this technique to conserve code space if your application only needed counting semaphores and message
queues (you would then have no need for the semaphore services). In this case, you could set OS_SEM_EN to 0 and
only use queues instead of both queues and semaphores. You should note that this technique consumes a pointer size
variable for each resource that the semaphore is guarding as well as requiring a queue control block. In other words,
you will be sacrificing RAM space in order to save code space. Also, message queues services are slower than
semaphore services. This technique would be very inefficient if your counting semaphore (in this case a queue) is
guarding a large amount of resources (you would require a large array of pointers).
OS_EVENT *QSem;
void
*QMsgTbl[N_RESOURCES]
void main (void)
{
OSInit();
.
.
QSem = OSQCreate(&QMsgTbl[0], N_RESOURCES);
for (i = 0; i < N_RESOURCES; i++) {
OSQPost(Qsem, (void *)1);
}
.
.
OSTaskCreate(Task1, .., .., ..);
.
.
OSStart();
}
void Task1 (void *pdata)
{
INT8U err;
for (;;) {
OSQPend(&QSem, 0, &err);
/* Obtain access to resource(s) */
.
.
/* Task has semaphore, access resource(s)
*/
.
OSMQPost(QSem, (void )1);
/* Release access to resource(s) */
}
}
Listing 6.28, Using a queue as a counting semaphore.
Chapter 7
Memory Management
Your application can allocate and free dynamic memory using any ANSI C compiler’s malloc() and free()
functions, respectively. However, using malloc() and free() in an embedded real-time system is dangerous
because eventually, you may not be able to obtain a single contiguous memory area because of fragmentation.
Fragmentation is the development of a large number of separate free areas (i.e. the total free memory is fragmented
into small pieces). I discussed the problem of fragmentation in section 4.02 when I indicated that task stacks could be
allocated using malloc() . Execution time of malloc() and free() are also generally non-deterministic
because of the algorithms used to locate a contiguous block of free memory.
µC/OS-II provides an alternative to malloc() and free() by allowing your application to obtain fixed-sized
memory blocks from apartition made of a contiguous memory area as illustrated in Figure 7-1. All memory blocks are
the same size and the partition contains an integral number of blocks. Allocation and de-allocation of these memory
blocks is done in constant time and is deterministic.
As shown in Figure 7-2, more than one memory partition can exist and thus, you application can obtain memory
blocks of different sizes. A specific memory block must, however, always be returned to the partition from which it
came from. This type of memory management is not subject to fragmentation.
Start address
Partition
Block
Figure 7-1, Memory partition
Partition #1
Partition #2
Partition #3
Partition #4
Figure 7-2, Multiple memory partitions.
7.00 Memory Control Blocks
µC/OS-II keeps track of memory partitions through the use of a data structure called a memory control block as shown
in listing 7.1. Each memory partition requires its own memory control block.
typedef struct {
void
*OSMemAddr;
void
*OSMemFreeList;
INT32U OSMemBlkSize;
INT32U OSMemNBlks;
INT32U OSMemNFree;
} OS_MEM;
Listing 7.1, Memory control block data structure.
OSMemAddr is a pointer to the beginning (i.e. base) of the memory partition from which memory blocks
will be allocated from. This field is initialized when you create a partition (see section 7.01, Creating a
partition) and is not used thereafter.
OSMemFreeList is a pointer used by µC/OS-II to point to either the next free memory control block or
to the next free memory block. The use depends on whether the memory partition has been created or not
(see section 7.01).
OSMemBlkSize determines the size of each memory block in the partition and is a parameter you
specify when the memory partition is created (see section 7.01).
OSMemNBlks establishes the total number of memory blocks available from the partition. This
parameter is specified when the partition is created (see section 7.01).
OSMemNFree is used to determine how many memory blocks are available from the partition.
µC/OS-II initializes the memory manager if you configure OS_MEM_EN to 1 in OS_CFG.H. Initialization is
done by OSMemInit() (which is automatically called by OSInit() ) and consist of creating a linked list of
memory control blocks as shown in figure 7-3. You specify the maximum number of memory partitions with the
configuration constant OS_MAX_MEM_PART (see OS_CFG.H) which MUST be set to at least 2.
As can be seen, t he OSMemFreeList field of the control block is used to chain the free control blocks.
OSMemFreeList
OSMemAddr
OSMemAddr
OSMemAddr
OSMemFreeList
OSMemFreeList
OSMemFreeList
OSMemBlkSize
OSMemBlkSize
OSMemBlkSize
OSMemNBlks
OSMemNBlks
OSMemNBlks
OSMemNFree
OSMemNFree
OSMemNFree
0
OS_MAX_MEM_PART
Figure 7-3, List of free memory control blocks.
7.01 Creating a partition, OSMemCreate()
Your application must create each partition before they can be used. You create a memory partition by calling
OSMemCreate(). Listing 7.2 shows how you could create a memory partition containing 100 blocks of 32
bytes each.
OS_MEM
INT8U
*CommTxBuf;
CommTxPart[100][32];
void main (void)
{
INT8U err;
OSInit();
.
.
CommTxBuf = OSMemCreate(CommTxPart, 100, 32, &err);
.
.
OSStart();
}
Listing 7.2, Creating a memory partition.
The code to create a memory partition is shown in listing 7.3. OSMemCreate() requires four arguments: the
beginning address of the memory partition., the number of blocks to be allocated from this partition, the size (in bytes)
of each block and, a pointer to a variable that will contain an error code when OSMemCreate() returns or a
NULL pointer if OSMEMCreate() fails. Upon success, OSMemCreate() returns a pointer to the
allocated memory control block. This pointer must be used in subsequent calls to memory management services (see
OSMemGet(), OSMemPut() and OSMemQuery() in the next sections).
Each memory partition must contain at least 2 memory blocks L7.3(1). Also, each memory block must be able to hold
the size of a pointer because a pointer is used to chain all the memory blocks together L7.3(2). Next,
OSMemCreate() obtains a memory control block from the list of free memory control blocks L7.3(3). The
memory control block will contain run-time information about the memory partition.
OSMemCreate() will not
be able to create a memory partition unless a memory control block is available L7.3(4). If a memory control block is
available and we satisfied all the previous conditions, the memory blocks within the partition are linked together in a
singly linked list L7.3(5). When all the blocks are linked, the memory control block is filled with information about
the partition L7.3(6). OSMemCreate() returns the pointer to the memory control block so it can be used in
subsequent calls to access the memory blocks from this partition L7.3(7).
OS_MEM *OSMemCreate (void *addr, INT32U nblks, INT32U blksize, INT8U *err)
{
OS_MEM *pmem;
INT8U
*pblk;
void
**plink;
INT32U
i;
if (nblks < 2) {
*err = OS_MEM_INVALID_BLKS;
return ((OS_MEM *)0);
}
if (blksize < sizeof(void *)) {
*err = OS_MEM_INVALID_SIZE;
return ((OS_MEM *)0);
}
OS_ENTER_CRITICAL();
pmem = OSMemFreeList;
if (OSMemFreeList != (OS_MEM *)0) {
OSMemFreeList = (OS_MEM *)OSMemFreeList->OSMemFreeList;
}
OS_EXIT_CRITICAL();
if (pmem == (OS_MEM *)0) {
*err = OS_MEM_INVALID_PART;
return ((OS_MEM *)0);
}
plink = (void **)addr;
pblk = (INT8U *)addr + blksize;
for (i = 0; i < (nblks - 1); i++) {
*plink = (void *)pblk;
plink = (void **)pblk;
pblk
= pblk + blksize;
}
*plink = (void *)0;
OS_ENTER_CRITICAL();
pmem->OSMemAddr
= addr;
pmem->OSMemFreeList = addr;
pmem->OSMemNFree
= nblks;
pmem->OSMemNBlks
= nblks;
pmem->OSMemBlkSize = blksize;
OS_EXIT_CRITICAL();
*err
= OS_NO_ERR;
return (pmem);
(1)
(2)
(3)
(4)
(5)
(6)
(7)
}
Listing 7.3, OSMemCreate()
Figure 7-4 shows how the data structures look like when OSMemCreate() completes successfully. Note that
the memory blocks are sho w nicely linked one after the other. At run-time, as you allocate and de -allocate memory
blocks, the blocks will most likely not be in this order.
pmem
OSMemAddr
= addr
OSMemFreeList= addr
OSMemBlkSize = blksize
OSMemNBlks
= nblks
OSMemNFree
= nblks
Contiguous memory
OSMemCreate() arguments
0
Figure 7-4, OSMemCreate()
7.02 Obtaining a memory block, OSMemGet()
Your application can get a memory block from one of the created memory partition by calling OSMemGet(). You
simply use the pointer returned by OSMemCreate() in the call to OSMemGet() to specify which partition
the memory block will come from. Obviously, you application will need to know how big the memory block obtained
is so that it doesn’t exceeds its storage capacity. In other words, you must not use more memory than what is available
from the memory block. For example, if a partition contains 32 byte blocks then your application can use up to 32
bytes. When you are done using the block, you must return the block to the proper memory partition (see section 7.03,
Returning a memory block, OSMemPut()).
Listing 7.4 shows the code for OSMemGet(). The pointer specify the partition from which you want to get a
memory block from L7.4(1). OSMemGet() first checks to see if there are free blocks available L7.4(2). If a block
is available, it is removed from the free list L7.4(3). The free list is then updated L7.4(4) so that it points to the next
free memory block and, the number of blocks is decremented indicating that it has been allocated L7.4(5). The pointer
to the allocated block is finally returned to your application L7.4(6).
void *OSMemGet (OS_MEM *pmem, INT8U *err)
{
void
*pblk;
OS_ENTER_CRITICAL();
if (pmem->OSMemNFree > 0) {
pblk
= pmem->OSMemFreeList;
pmem->OSMemFreeList = *(void **)pblk;
pmem->OSMemNFree--;
OS_EXIT_CRITICAL();
*err = OS_NO_ERR;
return (pblk);
} else {
(1)
(2)
(3)
(4)
(5)
(6)
OS_EXIT_CRITICAL();
*err = OS_MEM_NO_FREE_BLKS;
return ((void *)0);
}
}
Listing 7.4, OSMemGet()
You should note that you can call this function from an ISR because if a memory block is not available, there is no
waiting. The ISR would simply receive a NULL pointer if no memory blocks are available.
7.03 Returning a memory block, OSMemPut()
When your application is done using a memory block, it must return it to the appropriate partition. This is
accomplished by calling OSMemPut(). You should note that OSMemPut() has no way of knowing whether
the memory block returned to the partition belongs to that partition. In other words, if you allocated a memory block
from a partition containing blocks of 32 bytes then you should not return this block to a memory partition containing
blocks of 120 bytes. The next time an application request a block from the 120 bytes partition, it will actually get 32
‘valid’bytes and the remaining 88 bytes may belong to some other task(s). This could certainly make your system
crash.
Listing 7.5 shows the code for OSMemPut(). You simply pass OSMemPut() the address of the memory
control block for which the memory block belongs to L7.5(1). We then check to see that the memory partition is not
already full L7.5(2).
This situation would certainly indicate that something went wrong during the
allocation/de-allocation process. If the memory partition can accept another memory block, it is inserted in the linked
list of free blocks L7.5(3). Finally, the number of memory blocks in the memory partition is incremented L7.5(4).
INT8U OSMemPut (OS_MEM *pmem, void *pblk)
{
OS_ENTER_CRITICAL();
if (pmem->OSMemNFree >= pmem->OSMemNBlks) {
OS_EXIT_CRITICAL();
return (OS_MEM_FULL);
}
*(void **)pblk
= pmem->OSMemFreeList;
pmem->OSMemFreeList = pblk;
pmem->OSMemNFree++;
OS_EXIT_CRITICAL();
return (OS_NO_ERR);
}
(1)
(2)
(3)
(4)
Listing 7.5, OSMemPut()
7.04 Obtaining status about memory partition, OSMemQuery()
OSMemQuery() is used to obtain information about a memory partition. Specifically, your application can
determine how many memory blocks are free, how many memory blocks have been used (i.e. allocated), the size of
each memory block (in bytes), etc. This information is placed in a data structure called OS_MEM_DATA as shown
in listing 7.6.
typedef struct {
void
*OSAddr;
void
*OSFreeList;
/* Points to beginning address of the memory partition
/* Points to beginning of the free list of memory blocks
*/
*/
INT32U OSBlkSize;
INT32U OSNBlks;
INT32U OSNFree;
INT32U OSNUsed;
} OS_MEM_DATA;
/*
/*
/*
/*
Size (in bytes) of each memory block
Total number of blocks in the partition
Number of memory blocks free
Number of memory blocks used
*/
*/
*/
*/
Listing 7.6, Data structure used to obtain status from a partition.
OSMemQuery() is shown in listing 7.7. As you can see, all the fields found in OS_MEM are
copied to the OS_MEM_DATA data structure with interrupts disabled L7.7(1). This ensures that the fields will not
The code for
be altered until they are all copied. You should also notice that computation of the number of blocks used is performed
outside of the critical section because it’s done using the local copy of the data L7.7(2).
INT8U OSMemQuery (OS_MEM *pmem, OS_MEM_DATA *pdata)
{
OS_ENTER_CRITICAL();
pdata->OSAddr
= pmem->OSMemAddr;
pdata->OSFreeList = pmem->OSMemFreeList;
pdata->OSBlkSize = pmem->OSMemBlkSize;
pdata->OSNBlks
= pmem->OSMemNBlks;
pdata->OSNFree
= pmem->OSMemNFree;
OS_EXIT_CRITICAL();
pdata->OSNUsed
= pdata->OSNBlks - pdata->OSNFree;
return (OS_NO_ERR);
}
(1)
(2)
Listing 7.7, OSMemQuery()
7.05 Using memory partitions
Figure 7-5 shows an example of how you can use the dynamic memory allocation feature of µC/OS -II as well as its
message passing capability (see chapter 6). Also, refer to listing 7.8 for the pseudo-code of the two tasks shown. The
numbers in parenthesis in figure 7-5 correspond to the appropriate action in listing 7.8.
The first task reads and checks the value of analog inputs (pressures, temperatures, voltages, etc.) and sends a message
to the second task if any of the analog inputs exceed a threshold. The message sent contains a time stamp, information
about which channel had the error, an error code, an indication of the severity of the error and any other information
you can think of.
Error handling in this example is centralized. This means that other tasks or even ISRs can post error messages to the
error handling task. The error handling task could be responsible for displaying error messages on a monitor (i.e. a
display), logging errors to a disk, dispatching other task(s) which would take corrective action(s) based on the error,
etc.
OSTime
OSTimeGet()
(3)
ErrMsgQ
Analog
Inputs
AI
Task
OSQPost()
OSQPend()
(5)
(6)
Error
Handler
(1)
(4)
(7)
OSMemGet()
OSMemPut()
(2)
(8)
ErrMsgPart
Figure 7-5, Using dynamic memory allocation.
0
AnalogInputTask()
{
for (;;) {
for (all analog inputs to read) {
Read analog input;
if (analog input exceed threshold) {
Get memory block;
Get current system time (in clock ticks);
Store the following items in the memory block:
System time (i.e. a time stamp);
The channel that exceeded the threshold;
An error code;
The severity of the error;
Etc.
Post the error message to error queue;
(A pointer to the memory block containing the data)
}
}
Delay task until it’s time to sample analog inputs again;
}
}
ErrorHandlerTask()
{
for (;;) {
Wait for message from error queue;
(Gets a pointer to a memory block containing information
about the error reported)
Read the message and take action based on error reported;
Return the memory block to the memory partition;
}
}
(1)
(2)
(3)
(4)
(5)
(6)
(7)
(8)
Listing 7.8, Scanning analog inputs and reporting errors.
7.06 Waiting for memory blocks from a partition
Sometimes it’s useful to have a task wait for a memory block in case a partition runs out of blocks. µC/OS-II doesn’
t
support ‘pending’on a partitions, but you can support this requirement by adding a counting semaphore (see section
6.05, Semaphores) to guard the memory partition. To obtain a memory block, you simply need to obtain a semaphore
then call OSMemGet(). The whole process is shown in listing 7.9.
First we declared our system objects L7.9(1). You should note that I used hard-coded constants for clarity. You
would certainly create #define constants in a real application. We initialize µC/OS-II by calling OSInit()
L7.9(2). We then create a semaphore with an initial count corresponding to the number of blocks in the partition
L7.9(3). We then create the partition L7.9(4) and one of the tasks L7.9(5) that will be accessing the partition. By now,
you should be able to figure out what you need to do to add the other tasks. It would obviously not make much sense
to use a semaphore if only one task is using memory blocks –there would be no need to ensure mutual exclusion! In
fact, it wouldn’t event make sense to use partitions unless you intend to share memory blocks with other tasks.
Multitasking is then started by calling OSStart() L7.9(6). When the task gets to execute, it obtains a memory
block L7.9(8) only if a semaphore is available L7.9(7). Once the semaphore is available, the memory block is
obtained. There is no need to check for returned error code of OSSemPend() because the only way µC/OS-II will
return to this task is if a memory block is released. Also, you don’t need the erro r code for OSMemGet() for the
same reason –you must have at least one block in the partition in order for the task to resume. When the task is done
using a memory block, it simply needs to return it to the partition L7.9(9) and signal the semaphore L7.9(10).
OS_EVENT
OS_MEM
INT8U
OS_STK
*SemaphorePtr;
*PartitionPtr;
Partition[100][32];
TaskStk[1000];
(1)
void main (void)
{
INT8U err;
OSInit();
.
.
SemaphorePtr = OSSemCreate(100);
PartitionPtr = OSMemCreate(Partition, 100, 32, &err);
.
OSTaskCreate(Task, (void *)0, &TaskStk[999], &err);
.
OSStart();
(2)
(3)
(4)
(5)
(6)
}
void Task (void *pdata)
{
INT8U err;
INT8U *pblock;
for (;;) {
OSSemPend(SemaphorePtr, 0, &err);
pblock = OSMemGet(PartitionPtr, &err);
.
. /* Use the memory block */
.
OSMemPut(PartitionPtr, pblock);
OSSemPost(SemaphorePtr);
}
(7)
(8)
(9)
(10)
}
Listing 7.9, Waiting for memory blocks from a partition.
Chapter 8
Porting µC/OS-II
This chapter describes in general terms what needs to be done in order to adapt µC/OS-II to different processors.
Adapting a real-time kernel to a microprocessor or a microcontroller is called a port. Most of µC/OS-II is written in C for
portability, however, it is still necessary to write some processor specific code in C and assembly language. Specifically,
µC/OS-II manipulates processor registers which can only be done through assembly language. Porting µC/OS-II to
different processors is relatively easy because µC/OS-II was designed to be portable. If you already have a port for the
processor you are intending to use then you don’t need to read this chapter, unless of course you want to know how
µC/OS-II’s processor specific code works.
A processor can run µC/OS-II if it satisfies the following general requirements:
1.
2.
3.
4.
5.
You must have a C compiler for the processor and the C compiler must be able to produce reentrant code.
You must be able to disable and enable interrupts from C.
The processor must support interrupts and you need to provide an interrupt that occurs at regular
intervals (typically between 10 to 100 Hz).
The processor must support a hardware stack, and the processor must be able to store a fair amount of d ata
on the stack (possibly many Kbytes).
The processor must have instructions to load and store the stack pointer and other CPU registers either on
the stack or in memory.
Processors like the Motorola 6805 series do not satisfy requirements #4 and #5 so µC/OS-II cannot run on such
processors.
Application Software
礐/OS-II
礐/OS-II Configuration
(Processor Independent Code)
uCOS_II.C
OS_CORE.C
uCOS_II.H
OS_MBOX.C
OS_MEM.C
OS_Q.C
OS_SEM.C
OS_TASK.C
OS_TIME.C
(Application Specific)
OS_CFG.H
INCLUDES.H
礐/OS-II Port
(Processor Specific Code)
OS_CPU.H
OS_CPU_A.ASM
OS_CPU_C.C
Software
Hardware
CPU
Timer
Figure 8-1, µC/OS-II Hardware/Software Architecture
Figure 8-1 shows µC/OS-II’s architecture and its relationship with the hardware. When you use µC/OS-II in an
application, you are responsiblefor providing the Application Software and the µC/OS-II Configuration sections. This
books (and diskette) contains all the source code for the Processor Independent Code section as well as the Processor
Specific Code for the Intel 80x86, Real Mode, LargeModel. If you intend to use µC/OS-II on a different processor, you
will need to either obtain a copy of a port for the processor you intend to use or, write one yourself if the desired
processor port is not available. Check the official µC/OS-II WEB site at www.uCOS-II.com for a list of available ports.
Porting µC/OS-II is actually quite straightforward once you understand the subtleties of the target processor and the C
compiler you will be using. If your processor and compiler satisfy µC/OS-II’s requirements, and you have all the
necessary tools at your disposal, porting µC/OS-II consists of:
1.
2.
3.
4.
Setting the value of 1 #define constants ( OS_CPU.H)
Declaring 10 data types (OS_CPU.H )
Declaring 3 #define macros (OS_CPU.H)
Writing 6 simple functions in C (OS_CPU_C.C )
5.
Writing 4 assembly language functions (OS_CPU_A.ASM )
Depending on the processor, a port can consist of writing or changing between 50 and 300 lines of code! Porting
µC/OS-II could take you anywhere between a few hours to about a week.
Once you have a port of µC/OS-II for your processor, you will need to verify its operation. Testing a multitasking
real-time kernel such as µC/OS-II is not as complicated as you may think. You should test your port without application
code. In other words, test the operations of the kernel by itself. There are two reasons to do this. First, you don’t want
to complicate things anymore than they need to be. Second, if something doesn’t work, you know that the problem lies
in the port as opposed to your application. Start with a couple of simple tasks and only the ticker interrupt service
routine. Once you get multitasking going, it’s quite simple to add your application tasks.
8.00 Development Tools
As previously stated, you need a C compiler for the processor you intend to use in order to port µC/OS-II. Because
µC/OS-II is a preemptive kernel, you should only use a C compiler that generates reentrant code. Your C compiler must
also be able to support assembly language programming. Most C compiler designed for embedded systems will, in fact,
also include an assembler, a linker, and a locator. The linker is used to combine object files (compiled and assembled files)
from different modules while the locator will allow you to place the code and data anywhere in the memory map of the
target processor. Your C compiler must also provide a mechanism to disable and enable interrupts from C. Some
compilers will allow you to insert in-line assembly language statements in your C source code. This makes it quite easy
to insert the proper processor instructions to enable and disable interrupts. Other compilers will actually contain
language extensions to enable and disable interrupts directly from C.
8.01 Directories and Files
The installation program provided on the distribution diskette will install µC/OS-II and the port for the Intel 80x86 (Real
Mode, Large Model) on your hard disk. I devised a consistent directory structure to allow you to easily find the files for
the desired target processor. If you add a port for another processor, you should consider following the same
conventions.
All the ports should be placed under the \SOFTWARE\uCOS-II directory on your hard drive. The source code for each
microprocessor or microcontroller port MUST be found in either two or three files: OS_CPU.H , OS_CPU_C.C
and optionally, OS_CPU_A.ASM. The assembly language file is optional because some compilers will allow you to
have in-line assembly language and thus, you can place the needed assembly language code directly in
OS_CPU_C.C. The directory in which the port is located determines which processor you are using. Below are
examples of the directories where you would store different ports. Note that each have the same file names even though
they are totally different targets.
Intel/AMD 80186:
Motorola 68HC11:
\SOFTWARE\uCOS-II\Ix86S :
OS_CPU.H
OS_CPU_A.ASM
OS_CPU_C.C
\SOFTWARE\uCOS-II\Ix86L :
OS_CPU.H
OS_CPU_A.ASM
OS_CPU_C.C
\SOFTWARE\uCOS-II\68HC11:
OS_CPU.H
OS_CPU_A.ASM
OS_CPU_C.C
8.02 INCLUDES.H
As I mentioned in chapter 1, INCLUDES.H is a MASTER include file and is found at the
top of all .C files as follows:
#include “includes.h”
INCLUDES.H allows every .C file in your project to be written without concerns about which header file will
actually be needed. The only drawback to having a master include file is that INCLUDES.H may include header files
that are not pertinent to the actual .C file being compiled. This means that each file will require extra time to compile. This
inconvenience is offset by code portability. You can edit INCLUDES.H to add your own header files but, your
header files should be added at the end of the list.
8.03 OS_CPU.H
OS_CPU.H contains processor a nd implementation specific #defines constants, macros, and typedefs.
The general layout of OS_CPU.H is shown in listing 8.1:
#ifdef OS_CPU_GLOBALS
#define OS_CPU_EXT
#else
#define OS_CPU_EXT extern
#endif
/*
*********************************************************************************************************
*
DATA TYPES
*
(Compiler Specific)
*********************************************************************************************************
*/
typedef
typedef
typedef
typedef
typedef
typedef
typedef
typedef
typedef
unsigned
unsigned
signed
unsigned
signed
unsigned
signed
float
double
char BOOLEAN;
char INT8U;
char INT8S;
int
INT16U;
int
INT16S;
long INT32U;
long INT32S;
FP32;
FP64;
typedef unsigned int
OS_STK;
/*
/*
/*
/*
/*
/*
/*
/*
Unsigned 8 bit quantity
Signed
8 bit quantity
Unsigned 16 bit quantity
Signed
16 bit quantity
Unsigned 32 bit quantity
Signed
32 bit quantity
Single precision floating point
Double precision floating point
*/
*/
*/
*/
*/
*/
*/
*/
/* Each stack entry is 16-bit wide
*/
(1)
(2)
/*
*********************************************************************************************************
*
Processor Specifics
*********************************************************************************************************
*/
#define
#define
OS_ENTER_CRITICAL()
OS_EXIT_CRITICAL()
???
???
/* Disable interrupts
/* Enable interrupts
*/
*/
(3)
#define
OS_STK_GROWTH
1
/* Define stack growth: 1 = Down, 0 = Up
*/
(4)
#define
OS_TASK_SW()
???
(5)
Listing 8.1, Contents of OS_CPU.H
8.03.01
OS_CPU.H, Compiler Specific Data Types
Because different microprocessors have different word length, the port of µC/OS-II includes a series of type definitions
that ensures portability. Specifically, µC/OS-II’s code never makes use of C’s short, int and, long data types
because they are inherently non-portable. Instead, I defined integer data types that are both portable and intuitive
L8.1(1). Also, for convenience, I have included floating-point data types L8.1(2) even though µC/OS-II doesn’
t make
use of floating-point.
The INT16U data type, for example, always represents a 16-bit unsigned integer. µC/OS-II and your application code
can now assume that the range of values for variables declared with this type is from 0 to 65535. A µC/OS-II port to a
32-bit processor could mean that an INT16U is actually declared as an unsigned short instead of an
unsigned int . Where µC/OS-II is concerned, however, it still deals with an INT16U .
You must tell µC/OS-II the data type of a task’s stack. This is done by declaring the proper C data type for OS_STK.
If stack elements on your processor are 32-bit and your compiler documentation specify that an int is 32-bit then, you
would declareOS_STK as being of type unsigned int. All task stacks MUST be declared using OS_STK
as its data type.
All you have to do is to consult the compiler’s manual and find the standard C data types that corresponds to the types
expected by µC/OS-II.
8.03.02
OS_CPU.H, OS_ENTER_CRITICAL() and OS_EXIT_CRITICAL()
µC/OS-II like all real-time kernels need to disable interrupts in order to access critical sections of code, and re-enable
interrupts when done. This allows µC/OS-II to protect critical code from being entered simultaneously from either
multiple tasks or Interrupt Service Routines (ISRs). The interrupt disable time is one of the most important specification
that a real-time kernel vendor can provide because it affects the responsiveness of your system to real-time events.
µC/OS-II tries to keep the interrupt disable time to a minimum but, with µC/OS-II, interrupt disable time is largely
dependent on the processor architecture, and the quality of the code generated by the compiler. Every processor
generally provide instructions to disable/enable interrupts a nd your C compiler must have a mechanism to perform these
operations directly from C. Some compilers will allow you to insert in-line assembly language statements in your C
source code. This makes it quite easy to insert processor instructions to enable and disable interrupts. Other compilers
will actually contain language extensions to enable and disable interrupts directly from C. To hide the implementation
method chosen by the compiler manufacturer, µC/OS-II defines two macros to disable and enable interrupts:
OS_ENTER_CRITICAL() and OS_EXIT_CRITICAL(), respectively L8.1(3).
µC/OS-II’s critical sections are wrapped with OS_ENTER_CRITICAL() and OS_EXIT_CRITICAL()
as shown below:
µC/OS-II Service Function
{
OS_ENTER_CRITICAL();
/* µC/OS-II critical code section */
OS_EXIT_CRITICAL();
}
Method #1:
The first and simplest way to implement these two macros is to invoke the processor instruction to disable interrupts for
OS_ENTER_CRITICAL() and the enable interrupts instruction for OS_EXIT_CRITICAL() . There
is, however, a little problem with this scenario. If you called the µC/OS-II function with interrupts disabled then, upon
return from µC/OS-II, interrupts would be enabled! If you had interrupts disabled, you may have wanted them to be
dis abled upon return from the µC/OS-II function. In this case, the above implementation would not be adequate.
Method #2:
The second way to implement OS_ENTER_CRITICAL() is to save the interrupt disable status onto the stack
and then, disable interrupts. OS_EXIT_CRITICAL() would simply be implemented by restoring the interrupt
status from the stack. Using this scheme, if you called a µC/OS-II service with either interrupts enabled or disabled then,
the status would be preserved across the call. If you call a µC/OS-II service with interrupts disabled, you are potentially
extending the interrupt latency of your application. Your application can use OS_ENTER_CRITICAL() and
OS_EXIT_CRITICAL() to also protect critical sections of code. Be careful, however, because your
application will ‘crash’if you have interrupts disabled before calling a service such as OSTimeDly() . This will
happen because the task will be suspended until time expires but, because interrupts are disabled, you would never
service the tick interrupt! Obviously, all the PEND calls are also subject to this problem so, be careful. As a general rule,
you should always call µC/OS-II services with interrupts enabled!
The question is thus, which one is better? Well, that all depends on what you are willing to sacrifice. If you don’t care
in your application whether interrupts are enabled after calling a µC/OS-II service then, you should opt for the first
method because of performance. If you want to preserve the interrupt disable status across µC/OS-II service calls then
obviously the second method is for you.
Just to give you an example, disabling interrupts on an Intel 80186 is done by executing the STI instructions and
enabling interrupts is done by executing the CLI instruction. You can thus implement the macros as follows:
#define OS_ENTER_CRITICAL()
#define OS_EXIT_CRITICAL()
asm CLI
asm STI
Both the CLI and STI instructions execute in less that 2 clock cycles each on this processor (i.e. total of 4 cycles). To
preserve the interrupt status you would need to implement the macros as follows:
#define OS_ENTER_CRITICAL()
#define OS_EXIT_CRITICAL()
asm PUSHF; CLI
asm POPF
In this case, OS_ENTER_CRITICAL() would consume 12 clock cycles while OS_EXIT_CRITICAL()
would use up another 8 clock cycles (i.e. a total of 20 cycles). Preserving the state of the interrupt disable status would
thus take 16 clock cycles longer than simply disabling/enabling interrupts (at least on the 80186). Obviously, if you have
a faster processor s uch as an Intel Pentium-II then, the difference would be minimal.
8.03.03
OS_CPU.H, OS_STK_GROWTH
The stack on most microprocessors and microcontrollers grows from high-memory to low-memory. There are, however,
some processors that work the other way around. µC/OS-II has been designed to be able to handle either flavor. This
is accomplished by specifying to µC/OS-II which way the stack grows through the configuration constant
OS_STK_GROWTH L8.1(4) as shown below:
Set OS_STK_GROWTH to 0 for Low to High memory stack growth.
Set OS_STK_GROWTH to 1 for High to Low memory stack growth.
8.03.04
OS_CPU.H, OS_TASK_SW()
OS_TASK_SW() L8.1(5) is a macro that is invoked when µC/OS-II switches from a low-priority task to the
highest-priority task. OS_TASK_SW() is always called from task level code. Another mechanism,
OSIntExit(), is used to perform a context switch when an ISR makes a higher priority task ready for execution.
A context switch simply consist of saving the processor registers on the stack of the task being suspended, and
restoring the registers of the higher-priority task from its stack.
In µC/OS-II, the stack frame for a ready task always looks as if an interrupt has just occurred and all processor registers
were saved onto it. In other words, all that µC/OS-II has to do to run a ready task is to restore all processor registers from
the task’
s stack and execute a return from interrupt. To switch context, you should implement OS_TASK_SW() so
that you simulate an interrupt. Most processors provide either software interrupt or TRAP instructions to accomplish
this. The ISR or trap handler (also called the ‘exception handler’) MUST vector to the assembly language function
OSCtxSw() (see section 8.04.02).
For example, a port for an Intel or AMD 80x86 processor would use an INT instruction. The interrupt handler would
need to vector to OSCtxSw(). A port for the Motorola 68HC11 processor would most likely use the SWI instruction.
Again, the SWI handler would be OSCtxSw() . Finally, a port for a Motorola 680x0/CPU32 processor would
probably use one of the 16 TRAP instructions. Of course, the selected TRAP handler would be none other than
OSCtxSw() .
There are some processors like the Zilog Z80 that do not provide a software interrupt mechanism. In this case, you
would need to simulate the stack frame as closely to an interrupt stack frame as you can. In this case,
OS_TASK_SW() would simply call OSCtxSw() instead of vector to it. The Z80 is a processor that has been
ported to µC/OS and thus would be portable to µC/OS-II.
8.04 OS_CPU_A.ASM
A µC/OS-II port requires that you write four fairly simple assembly language functions:
OSStartHighRdy()
OSCtxSw()
OSIntCtxSw()
OSTickISR()
If your compiler supports in-line assembly language code, you could actually place all the processor specific code into
OS_CPU_C.C instead of having a separate assembly language file.
8.04.01
OS_CPU_A.ASM, OSStartHighRdy()
This function is called by OSStart() to start the highest priority task ready-to-run. Before you can call
OSStart() , however, you MUST have created at least one of your tasks (see OSTaskCreate() and
OSTaskCreateExt()). OSStartHighRdy() assumes that OSTCBHighRdy points to the
task control block of the task with the highest priority. As mentionedpreviously, in µC/OS-II, the stack frame for a ready
task always looks as if an interrupt has just occurred and all processor registers were saved onto it. To run the highest
priority task all you need to do is restore all processor registers from the task’s stack in the proper order and, execute a
return from interrupt. To simplify things, the stack pointer is always stored at the beginning of the task control block (i.e.
its OS_TCB). In other words, the stack pointer of the task to resume is always stored at offset 0 in the OS_TCB.
Note that OSStartHighRdy() MUST call OSTaskSwHook() because we are basically doing a ‘half’
context switch – we are restoring the registers of the highest priority task. OSTaskSwHook() can examine
OSRunning to tell it whether OSTaskSwHook() was called from OSStartHighRdy() (i.e. if
OSRunning is FALSE ) or from a regular context switch (i.e. OSRunning is TRUE ).
OSStartHighRdy() MUST also set OSRunning to TRUE before the high priority task is restored (but
after calling OSTaskSwHook()).
8.04.02
OS_CPU_A.ASM, OSCtxSw()
As previously mentioned, a task level context switch is accomplished by issuing a software interrupt instruction or,
depending on the processor, executing a TRAP instruction. The interrupt service routine, trap or exception handler
MUST vector to OSCtxSw() .
The sequence of events that leads µC/OS-II to vector to OSCtxSw() is as follows. The current task calls a service
provided by µC/OS-II which causes a higher priority task to be ready-to-run. At the end of the service call, µC/OS-II calls
the function OSSched() which concludes that the current task is no longer the most important task to run.
OSSched() loads the address of the highest priority task into OSTCBHighRdy and then executes the
software interrupt or trap instruction by invoking the macro OS_TASK_SW(). Note that the variable
OSTCBCur already contains a pointer to the current task’s Task Control Block, OS_TCB. The software interrupt
instruction (or trap) forces some of the processor registers (most likely the return address and the processor’s status
word) onto the current task’s stack and the processor then vectors to OSCtxSw().
The pseudo code of what needs to be done by OSCtxSw() is shown in listing 8.2. This code must be written in
assembly language because you cannot access CPU registers directly from C.
void OSCtxSw(void)
{
Save processor registers;
Save the current task’s stack pointer into the current task’s OS_TCB:
OSTCBCur->OSTCBStkPtr = Stack pointer;
Call user definable OSTaskSwHook();
OSTCBCur = OSTCBHighRdy;
OSPrioCur = OSPrioHighRdy;
Get the stack pointer of the task to resume:
Stack pointer = OSTCBHighRdy->OSTCBStkPtr;
Restore all processor registers from the new task’s stack;
Execute a return from interrupt instruction;
}
Listing 8.2, Pseudo code for OSCtxSw()
You should note that interrupts are disabled during OSCtxSw() and also during execution of the user definable
function OSTaskSwHook() .
8.04.03
OS_CPU_A.ASM, OSIntCtxSw()
OSIntCtxSw() is a function that is called by OSIntExit() to perform a context switch from an ISR.
Because OSIntCtxSw() is called from an ISR, it is assumed that all the processor registers are properly saved
onto the interrupted task’s stack. In fact, there are more things on the stack frame than we need. OSIntCtxSw()
will thus have to clean up the stack so that the interrupted task is left with just the proper stack frame content.
To understand what needs to be done in OSIntCtxSw(), lets look at the sequence of events that leads µC/OS-II
to call OSIntCtxSw() . You may want to refer to figure 8-2 to help understand the following description. We will
assume that interrupts are not nested (i.e. an ISRs will not be interrupted), interrupts are enabled, and the processor is
executing task level code. When an interrupt arrives, the processor completes the current instruction, recognizes the
interrupt and initiates an interrupt handling procedure. This generally consist of pushing the processor status register
and the return address of the interrupted taskonto the stack F8-2(1). The order and which registers are pushed onto the
stack is irrelevant.
LOW MEMORY
(5)
(4)
(3)
Return address to caller of OSIntCtxSw()
SP Points Here!
Processor Status Word
(6)
Return address to caller of OSIntExit()
SP must be adjusted
to point here.
(2)
Saved Processor Registers
This new SP is saved into
the preempted task's OS_TCB.
(7)
Interrupt Return Address
(1)
Stack Growth
Processor Status Word
HIGH MEMORY
Figure 8-2, Stack contents during an ISR
The CPU then vectors to the proper ISR. µC/OS-II requires that your ISR begins by saving the rest of the processor
registers F8-2(2). Once the registers are saved, µC/OS-II requires that you either call OSIntEnter() or, that you
increment the global variable OSIntNesting by one. At this point, the interrupted task’
s stack frame only
contains the re gister contents of the interrupted task. The ISR can now start servicing the interrupting device and
possibly, make a higher priority task ready. This would occur if the ISR sends a message to a task (by calling
OSMboxPost() or OSQPost() ), resume a task (by calling OSTaskResume() ), invoke
OSTimeTick() or OSTimeDlyResume() . Let us assume that a higher priority task is made ready to
run.
µC/OS-II requires that your ISR calls OSIntExit() when the ISR completes servicing the interrupting device.
OSIntExit() basically tell µC/OS-II that it’s time to return back to task level code. The call toOSIntExit()
causes the return address of the caller to be pushed onto the interrupted task’s stack F8-2(3).
OSIntExit() starts by disabling interrupts because it needs to execute critical code. Depending on how
OS_ENTER_CRITICAL() is implemented (see section 8.03.02), the processor’s status register could be
pushed onto the interrupted task’s stack F8-2(4). OSIntExit() notices that the interrupted task is no longer the
task that needs to run because a higher priority task is now ready. In this case, the pointer OSTCBHighRdy is
made to point to the new task’s OS_TCB and OSIntExit() calls OSIntCtxSw() to perform the context
switch. Calling OSIntCtxSw() causes the return address to be pushed onto the interrupted task’s stack F8-2(5).
As we are switching context, we only want to leave items F8-2(1) and F8-2(2) on the stack and ignore items F8-2(3), F8-2(4)
and F8-2(5). This is accomplished by adding a ‘constant’to the stack pointer F8-2(6). The exact amount of stack
adjustment must be known and this value greatly depends on the processor being ported (an address can be 16-bit,
32-bit or 64-bit), the compiler used, compiler options, memory model, etc. Also, the proces sor status word could be 8, 16,
32 or even 64-bit wide and, OSIntExit() may allocate local variables. Some processors allow you to directly add
a constant to the stack pointer, others don’t. In the latter case, you can simply execute the appropriate numb er of pops
instructions to one of the processor registers to accomplish the same thing. Once the stack is adjusted, the new stack
pointer can be saved into the OS_TCB of the task being switched out F8-2(7).
OSIntCtxSw() is the only function in µC/OS-II (and also µC/OS) that is compiler specific and has generated
more e -mail than any other aspect of µC/OS. If your port crashes after a few context switches then, you should suspect
that the stack is not being properly adjusted in OSIntCtxSw() .
The pseudo code in listing 8.3 shows what needs to be done by OSIntCtxSw(). This code must be written in
assembly language because you cannot access CPU registers directly from C. If your C compiler supports in-line
assembly, you can put the code for OSIntCtxSw() in OS_CPU_C.C instead of OS_CPU_A.ASM . As
you can see, except for the first line, the code is identical to OSCtxSw(). You can thus reduce the amount of code
in the port by ‘jumping’to the appropriate section of code in OSCtxSw().
void OSIntCtxSw(void)
{
Adjust the stack pointer to remove calls to:
OSIntExit(),
OSIntCtxSw() and possibly the push of the processor status word;
Save the current task’s stack pointer into the current task’s OS_TCB:
OSTCBCur->OSTCBStkPtr = Stack pointer;
Call user definable OSTaskSwHook();
OSTCBCur = OSTCBHighRdy;
OSPrioCur = OSPrioHighRdy;
Get the stack pointer of the task to resume:
Stack pointer = OSTCBHighRdy->OSTCBStkPtr;
Restore all processor registers from the new task’s stack;
Execute a return from interrupt instruction;
}
Listing 8.3, Pseudo code for OSIntCtxSw()
8.04.04
OS_CPU_A.ASM, OSTickISR()
µC/OS-II requires that you provide a periodic time source to keep track of time delays and timeouts. A ‘tick’should
occur between 10 and 100 times per second, or Hertz. To accomplish this, you can either dedicate a hardware timer, or
obtain 50/60 Hz from an AC power line.
You MUST enable ticker interrupts AFTER multitasking has started, i.e. after calling OSStart() . In other words,
you should initialize and tick interrupts in the first task that executes following a call to OSStart(). A common
mistake is to enable ticker interrupts between calling OSInit() and OSStart() as shown in listing 8.4:
void main(void)
{
.
.
OSInit();
/* Initialize µC/OS-II
.
.
/* Application initialization code ...
/* ... Create at least on task by calling OSTaskCreate()
.
.
Enable TICKER interrupts; /* DO NOT DO THIS HERE!!!
.
.
OSStart();
/* Start multitasking
}
*/
*/
*/
*/
*/
Listing 8.4, Incorrect place to start the tick interrupt.
What could happen (and it has happened) is that the tick interrupt c ould be serviced before µC/OS-II starts the first task.
At this point, µC/OS-II is in an unknown state and will cause your application to crash.
The pseudo code for the tick ISR is shown in listing 8.5. This code must be written in assembly language because you
cannot access CPU registers directly from C. If your processor is able to increment OSIntNesting with a single
instruction then, there is no need for you to call OSIntEnter() . Incrementing OSIntNesting is much
quicker than going through the overhead of the function call and return. OSIntEnter() only increments the
OSIntNesting , while protecting that increment in a critical section.
void OSTickISR(void)
{
Save processor registers;
Call OSIntEnter() or increment OSIntNesting;
Call OSTimeTick();
Call OSIntExit();
Restore processor registers;
Execute a return from interrupt instruction;
}
Listing 8.5, Pseudo code for Tick ISR
8.05 OS_CPU_C.C
A µC/OS-II port requires that you write six fairly simple C functions:
OSTaskStkInit()
OSTaskCreateHook()
OSTaskDelHook()
OSTaskSwHook()
OSTaskStatHook()
OSTimeTickHook()
The only function that is actually necessary is OSTaskStkInit() . The other five functions MUST be declared
but don’t need to contain any code inside them.
8.05.01
OS_CPU_C.C, OSTaskStkInit()
This function is called by OSTaskCreate() and OSTaskCreateExt() to initialize the stack frame of
a task so that the stack looks as if an interrupt just occurred and all the processor registers were pushed onto that stack.
Figure 8-3 shows what OSTaskStkInit() will put on the stack of the task being created. Note that figure 8-3
assumes a stack growing from high-memory to low-memory. The discussion that follows applies just as well for a stack
growing in the opposite direction.
LOW MEMORY
Stack Pointer
(4)
(3)
Saved Processor Registers
Interrupt Return Address
(2)
Processor Status Word
Task start address
(1)
'pdata'
HIGH MEMORY
Stack Growth
Figure 8-3, Stack frame initialization with ‘pdata’passed on the stack
When you create a task, you specify to OSTaskCreate() or OSTaskCreateExt() the start address of the task,
you pass it a pointer called pdata , the task’s top-of-stack and the task’
s priority. OSTaskCreateExt()
requires additional arguments but these are irrelevant in discussing OSTaskStkInit() . To properly initialize
the stack frame, OSTaskStkInit() only requires the first three arguments just mentioned in addition to an
‘option’value which is only available in OSTaskCreateExt() .
Recall that under µC/OS-II, a task is written as shown below. A task is an infinite loop but otherwise looks just like any
other C function. When the task is started by µC/OS-II, it will receive an argument just as if it was called by another
function.
void MyTask (void *pdata)
{
/* Do something with argument ‘pdata’ */
for (;;) {
/* Task code
*/
}
}
If I were to call MyTask() from another function, the C compiler would push the argument onto the stack followed
by the return address of the function calling MyTask() . Some compilers would actually pass pdata in one or
more registers. I’ll discuss this situation later. Assumingpdata is pushed onto the s tack, OSTaskStkInit()
simply simulates this scenario and loads the stack accordingly F8-3(1). It turns out that, unlike a C function call, however,
we really don’t know what the return address of the caller is. All we have is the start address of the task, not the return
address of the function that would have called this function (i.e. task)! It turns out that we don’t really care because a
task is not supposed to return back to another function anyway.
At this point, we need to put on the stack the re gisters that are automatically pushed by the processor when it recognizes
and starts servicing an interrupt. Some processors will actually stack all of its registers while others will stack just a few.
Generally speaking, a processor will stack at leastthe value of the program counter for the instruction to return to upon
returning from an interrupt and, the processor status word F8-3(2). You must obviously match the order exactly.
Next, you need to put on the stack the rest of the processor registers F8-3(3). The stacking order depends on whether
your processor gives you a choice or not. Some processors have one or more instructions that pushes many registers
at once. You would thus have to emulate the stacking order of such instruction(s). To give you an example, the Intel
80x86 has the PUSHA instruction which pushes 8 registers onto the stack. On the Motorola 68HC11 processor, all the
registers are automatically pushed onto the stack during an interrupt response so, you will also need to match the same
stacking order.
Now it’s time to come back to the issue of what to do if your C compiler passes the pdata argument in registers
instead of on the stack. You will need to find out from the compiler documentation the register where pdata would
actually be stored in. The stack frame would look as shown in figure 8-4. pdata would simply be placed on the stack
in the area where you would save the corresponding register.
LOW MEMORY
Stack Pointer
(4)
(3)
Saved Processor Registers
'pdata'
(2)
(1)
Interrupt Return Address
Stack Growth
Processor Status Word
Task start address
HIGH MEMORY
Figure 8-4, Stack frame initialization with ‘pdata’passed in register
Once you’ve completed the initialization of the stack, OSTaskStkInit() will need to return the address where
the stack pointer would point to after the stacking is complete F8-3(4). OSTaskCreate() or
OSTaskCreateExt() will take this address a nd save it in the task control block (OS_TCB ). The processor
documentation will tell you whether the stack pointer needs to point to the next ‘free’location on the stack or, the
location of the last stored value. For example, on an Intel 80x86 processor, the stack pointer points to the last stored data
while on a Motorola 68HC11 processor, it points at the next free location.
8.05.02
OS_CPU_C.C, OSTaskCreateHook()
OSTaskCreateHook() is called whenever a task is created by either OSTaskCreate() or
OSTaskCreateExt(). This allows you or the user of your port to extend the functionality of µC/OS-II.
OSTaskCreateHook() is called when µC/OS-II is done setting up its internal structures but before the
scheduler is called. Interrupts are disabled when this function is called. Because of this, you should keep the code in
this function to a minimum because it directly affects interrupt latency.
When called, OSTaskCreateHook() receives a pointer to the OS_TCB of the task created and can thus
access all of the structure elements. OSTaskCreateHook() has limited capability when the task is created
with OSTaskCreate() . However, with OSTaskCreateExt(), you get access to a TCB extension
pointer (OSTCBExtPtr ) in OS_TCB which can be used to access additional data abo ut the task such as the
contents of floating-point registers, MMU (Memory Management Unit) registers, task counters, debug information, etc.
The code for
OSTaskCreateHook() is generated only if OS_CPU_HOOKS_EN is set to 1 in
OS_CFG.H. This allows the user of your port to redefine all the hook functions in a different file. Obviously, users
of your port would need access to the source of your port to compile your port with OS_CPU_HOOKS_EN set to
0 in order to prevent multiply defined symbols at link time.
8.05.03
OS_CPU_C.C, OSTaskDelHook()
OSTaskDelHook() is called whenever a task is deleted. OSTaskDelHook() is called before unlinking
the task from µC/OS-II’s internal linked list of active tasks. When called, OSTaskDelHook() receives a pointer
to the task control block (OS_TCB) of the task being deleted and can thus access all of the structure elements.
OSTaskDelHook() can see if a TCB extension has been created (non-NULL pointer).
OSTaskDelHook() would thus be responsible for performing cleanup operations. OSTaskDelHook()
is not expected to return anything.
The code for OSTaskDelHook() is generated only if OS_CPU_HOOKS_EN is set to 1 in OS_CFG.H.
8.05.04
OS_CPU_C.C, OSTaskSwHook()
OSTaskSwHook() is called whenever a task switch occurs. This happens whether the task switch is performed
by OSCtxSw() or OSIntCtxSw() . OSTaskSwHook() can directly access OSTCBCur and
OSTCBHighRdy because these are global variables. Of course, OSTCBCur points to the OS_TCB of the
task being switched out and OSTCBHighRdy points to the OS_TCB of the new task. You should note that
interrupts are always disabled during the call to OSTaskSwHook() and thus, you should keep any additional
code to a minimum since it will affect interrupt latency. OSTaskSwHook() doesn’t have any arguments and is
not expected to return anything.
The code for OSTaskSwHook() is generated only if OS_CPU_HOOKS_EN is set to 1 in OS_CFG.H.
8.05.05
OS_CPU_C.C, OSTaskStatHook()
OSTaskStatHook() is called once per second by OSTaskStat(). You can ext end the statistics
capability with OSTaskStatHook(). For instance, you could keep track and display the execution time of each
task, the percentage of the CPU that is used by each task, how often each task executes and more.
OSTaskStatHook() doesn’t have any arguments and is not expected to return anything.
The code for
OSTaskStatHook() is generated only if OS_CPU_HOOKS_EN is set to 1 in
OS_CFG.H.
8.05.06
OS_CPU_C.C, OSTimeTickHook()
OSTaskTimeHook() is called by OSTimeTick() at every system tick.
In fact,
OSTimeTickHook() is called before a tick is actually processed by µC/OS-II to give your port or the
application first claim on the tick. OSTimeTickHook() doesn’t have any arguments and is not expected to
return anything.
The code for
OC_CFG.H.
OSTimeTickHook() is generated only if OS_CPU_HOOKS_EN is set to 1 in
OSTaskCreateHook()
void OSTaskCreateHook(OS_TCB *ptcb)
File
Called from
Code enabled by
OS_CPU_C.C
OSTaskCreate() and
OSTaskCreateExt()
OS_CPU_HOOKS_EN
This function is called whenever a task is created. OSTaskCreateHook() is called after a TCB has been allocated
and initialized and, the stack frame of the task is also initialized. OSTaskCreateHook() allows you to extend the
functionality of the task creation function with your own features. For example, you can initialize and store the contents
of floating-point registers, MMU registers or anything else that can be associated with a task. You would, however,
typically store this additional information in memory that would be allocated by your application. You could also use
OSTaskCreateHook() to trigger an oscilloscope, a logic analyzer or set a breakpoint.
Arguments
ptcb is a pointer to the task control block of the task created.
Returned Value
NONE
Notes/Warnings
Interrupts are disabled when this function is called. Because of this, you should keep the code in this function to a
minimum because it can directly affects interrupt latency.
Example
This example assumes that you created a task using the OSTaskCreateExt() function because it is expecting to
have the .OSTCBExtPtr field in the task’
s OS_TCB contain a pointer to storage for floating-point registers.
void OSTaskCreateHook (OS_TCB *ptcb)
{
if (ptcb->OSTCBExtPtr != (void *)0) {
/* Save contents of floating-point registers in .. */
/* .. the TCB extension
*/
}
}
OSTaskDelHook()
void OSTaskDelHook(OS_TCB *ptcb)
File
Called from
Code enabled by
OS_CPU_C.C
OSTaskDel()
OS_CPU_HOOKS_EN
This function is called whenever you delete a task by calling OSTaskDel(). You could thus dispose of memory you
would have allocated through the task create hook, OSTaskCreateHook(). OSTaskDelHook() is called just
before the TCB is removed from the TCB chain. You could also use OSTaskCreateHook() to trigger an
oscilloscope, a logic analyzer or set a breakpoint.
Arguments
ptcb is a pointer to the task control block of the task being deleted.
Returned Value
NONE
Notes/Warnings
Interrupts are disabled when this function is called. Because of this, you should keep the code in this function to a
minimum because it directly affects interrupt latency.
Example
void OSTaskDelHook (OS_TCB *ptcb)
{
/* Output signal to trigger an oscilloscope
}
*/
OSTaskSwHook()
void OSTaskSwHook(void)
File
Called from
Code enabled by
OS_CPU_C.C
OSCtxSw() and OSIntCtxSw()
OS_CPU_HOOKS_ENA
This function is called whenever a context switch is performed. The global variable OSTCBHighRdy points to the TCB
of the task that will be getting the CPU while OSTCBCur will point to the TCB of the task being switched out.
OSTaskSwHook() is called just after saving the task’s registers and saving the stack pointer into the current task’
s
TCB. You can use this function to save the contents of floating-point registers, MMU registers, keep track of task
execution time, keep track of how many times the task has been switched-in, and more.
Arguments
NONE
Returned Value
NONE
Notes/Warnings
Interrupts are disabled when this function is called. Because of this, you should keep the code in this function to a
minimum because it directly affects interrupt latency.
Example
void OSTaskSwHook (void)
{
/* Save
floating-point registers in current task’s TCB ext. */
/* Restore floating-point registers in current task’s TCB ext. */
}
OSTaskStatHook()
void OSTaskStatHook(void)
File
Called from
Code enabled by
OS_CPU_C.C
OSTaskStat()
OS_CPU_HOOKS_EN
This function is called every second by µC/OS-II’s statistic task and allows you to add your own statistics.
Arguments
NONE
Returned Value
NONE
Notes/Warnings
The statistic task starts executing about 5 seconds after calling OSStart(). Note that this function will not be called
if either OS_TASK_STAT_EN or OS_TASK_CREATE_EXT_EN is set to 0.
Example
void OSTaskStatHook (void)
{
/* Compute the total execution time of all the tasks
/* Compute the percentage of execution of each task
}
*/
*/
OSTimeTickHook()
void OSTimeTickHook(void)
File
Called from
Code enabled by
OS_CPU_C.C
OSTimeTick()
OS_CPU_HOOKS_EN
This function is called by OSTimeTick() which in turn is called whenever a clock tick occurs. OSTimeTickHook()
is called immediately upon entering OSTimeTick() to allow execution of time critical code in your application.
You can also use this function to trigger an oscilloscope for debugging, trigger a logic analyzer, establish a breakpoint
for an emulator, and more.
Arguments
NONE
Returned Value
NONE
Notes/Warnings
OSTimeTick() is generally called by an ISR and thus, the execution time of the tick ISR will be increased by the code
you provide in this function. Interrupts may or may not be enabled when OSTimeTickHook() is called depending
how the processor port has been implemented. If interrupts are disable, this function will affect interrupt latency.
Example
void OSTimeTickHook (void)
{
/* Trigger an oscilloscope
}
*/
Chapter 9
80x86, Large Model Port
This chapter describes how µC/OS-II has been ported to the Intel 80x86 series of processors running in Real Mode and
for the Large Model. This port applies to the following CPUs:
•
•
•
•
•
•
80186
80286
80386
80486
Pentium
Pentium-II
It turns out that the port can run on most 80x86 compatible CPU manufactured by AMD, Cyrix, NEC (V-series) and
others. I used Intel here in a generic fashion. There are literally millions of 80x86 CPU being sold each year. Most of
these end up in desktop type computers but, a growing number of processors are making their way in embedded systems.
The fastest processors (i.e. the Pentium-IIs) should reach 1000 MHz by year 2000.
Most C compiler that support 80x86 processors running in real mode offer different memory models, each suited for a
different program and data size. Each model uses memory differently. The Large Model allows your application (code
and data) to reside in a 1 MegaBytes memory space. Pointers in this model require 32-bits although they can only
address up to 1 MegaBytes! The next section will show why a 32-bit pointer in this model can only address 20-bits worth
of memory.
This port can also be adapted to run on the 8086 processor but requires that you replace the use of the
instruction with the proper number of PUSH instructions.
PUSHA
Figure 9-1 shows the programming model of an 80x86 processor running in real mode. All registers are 16-bit wide and
they all need to be saved during a context switch.
15
0
AX
AH
AL
BX
BH
BL
CX
CH
CL
DX
DH
DL
General Purpose Registers
15
0
BP
Pointers
SP
15
0
SI
Index Registers
DI
15
0
Instruction Pointer
IP
SW
OF DF IF TF SF ZF
15
AF
PF
CF
Status Word
0
CS
SS
DS
Segment Registers
ES
Figure 9-1, 80x86 Real-Mode Register Map
The 80x86 provides a clever mechanism to access up to 1 Mbytes of memory with its 16-bit registers. Memory
addressing relies on using asegment and an offset register. Physical address calculation is done by shifting a segment
register by 4 (multiplying it by 16) and adding one of six other registers (AX, BP , SP , SI , DI or IP ). The result is a
20-bit address which can access up to 1 Mbytes. Figure 9-2 shows how the registers are combined. Each segment points
to a block of 16 memory locations called a paragraph. A 16-bit segment register can point to any of 65,536 different
paragraphs of 16 bytes and thus address 1,048,576 bytes. Because the offset is also 16-bit, a single segment of code
cannot exceed 64 Kbytes. In practice, however, programs are made up of many smaller segments.
15
XXXX
0
XXXX XXXX
XXXX
0000
XXXX
XXXX
15
+
0000
XXXX XXXX
0
20
XXXX
Segment Register
Offset (Register)
0
XXXX XXXX
XXXX
XXXX
Physical Address
Figure 9-2, Addressing with a Segment and an Offset
The Code Segment register (CS) points to the base of the program currently executing, the Stack Segment register (SS)
points to the base of the stack, the Data Segment register (DS) points to the base of one data area while the Extra
Segment register (ES) points to the base of another area where data may be stored. Each time the CPU needs to generate
a memory address, one of the segment registers is automatically chosen and its contents is added to an offset. It is
common to find the segment-colon-offset notation in literature to reference a memory location. For example, 1000:00FF
represents physical memory location 0x100FF.
9.00 Development Tools
I used the Borland C/C++ V3.1 compiler along with the Borland Turbo Assembler to port and test the 80x86 port. The
compiler generates reentrant code and provides in-line assembly language instructions to be inserted in C code. Once
compiled, the code is executed on a PC. I tested the code on a Pentium-II based computer running the Microsoft
Windows 95 operating system. In fact, I configured the compiler to generate a DOS executable which was run in a DOS
window.
This port will run on most C compilers as long as the compiler can generate Real-Mode code. You will most likely have
to change some of the compiler options and assembler directives.
9.01 Directories and Files
The installation program provided on the distribution diskette will install the port for the Intel 80x86 (Real Mode, Large
Model) on your hard disk. The port is found under the \SOFTWARE\uCOS-II\Ix86L directory on your
hard drive. The directory name stands for Intel 80x86 Real Mode, Large Model. The source code for the port is found
in the following files: OS_CPU.H , OS_CPU_C.C and, OS_CPU_A.ASM .
9.02 INCLUDES.H
INCLUDES.H is a MASTER include file and is found at the top of all .C files. INCLUDES.H allows every .C file
in your project to be written without concerns about which header file will actually be needed. The only drawback to
having a master include file is thatINCLUDES.H may include header files that are not pertinent to the actual .C file
being compiled. This means that each file will require extra time to compile. This inconvenience is offset by code
portability. You can editINCLUDES.H to add your own header files but, your header files should be added at the
end of the list. Listing 9.1 shows the contents of INCLUDES.H for the 80x86 port.
#include
#include
#include
#include
#include
#include
#include
<stdio.h>
<string.h>
<ctype.h>
<stdlib.h>
<conio.h>
<dos.h>
<setjmp.h>
#include
#include
#include
#include
"\software\ucos-ii\ix86l\os_cpu.h"
"os_cfg.h"
"\software\blocks\pc\source\pc.h"
"\software\ucos-ii\source\ucos_ii.h"
Listing 9.1, INCLUDES.H
9.03 OS_CPU.H
OS_CPU.H contains processor and implementation specific #defines constants, macros, and typedefs.
OS_CPU.H for the 80x86 port is shown in listing 9.2.
#ifdef OS_CPU_GLOBALS
#define OS_CPU_EXT
#else
#define OS_CPU_EXT extern
#endif
/*
*********************************************************************************************************
*
DATA TYPES
*
(Compiler Specific)
*********************************************************************************************************
*/
typedef
typedef
typedef
typedef
typedef
typedef
typedef
typedef
typedef
unsigned
unsigned
signed
unsigned
signed
unsigned
signed
float
double
char BOOLEAN;
char INT8U;
char INT8S;
int
INT16U;
int
INT16S;
long INT32U;
long INT32S;
FP32;
FP64;
/*
/*
/*
/*
/*
/*
/*
/*
Unsigned 8 bit quantity
Signed
8 bit quantity
Unsigned 16 bit quantity
Signed
16 bit quantity
Unsigned 32 bit quantity
Signed
32 bit quantity
Single precision floating point
Double precision floating point
*/
*/
*/
*/
*/
*/
*/
*/
typedef unsigned int
OS_STK;
/* Each stack entry is 16-bit wide
*/
#define
#define
#define
#define
#define
#define
INT8S
INT8U
INT16S
INT16U
INT32S
INT32U
/* Define data types for backward compatibility ...
/* ... to uC/OS V1.xx. Not actually needed for ...
/* ... uC/OS-II.
*/
*/
*/
BYTE
UBYTE
WORD
UWORD
LONG
ULONG
/*
*********************************************************************************************************
*
Intel 80x86 (Real-Mode, Large Model)
*
* Method #1: Disable/Enable interrupts using simple instructions. After critical section, interrupts
*
will be enabled even if they were disabled before entering the critical section. You MUST
*
change the constant in OS_CPU_A.ASM, function OSIntCtxSw() from 10 to 8.
*
(1)
* Method #2: Disable/Enable interrupts by preserving the state of interrupts. In other words, if
*
interrupts were disabled before entering the critical section, they will be disabled when
*
leaving the critical section. You MUST change the constant in OS_CPU_A.ASM, function
*
OSIntCtxSw() from 8 to 10.
*********************************************************************************************************
*/
#define OS_CRITICAL_METHOD
2
#if
OS_CRITICAL_METHOD == 1
#define OS_ENTER_CRITICAL() asm CLI
#define OS_EXIT_CRITICAL()
asm STI
#endif
/* Disable interrupts
/* Enable interrupts
*/
*/
#if
OS_CRITICAL_METHOD == 2
#define OS_ENTER_CRITICAL() asm {PUSHF; CLI}
#define OS_EXIT_CRITICAL()
asm POPF
#endif
/* Disable interrupts
/* Enable interrupts
*/
*/
(2)
/*
*********************************************************************************************************
*
Intel 80x86 (Real-Mode, Large Model) Miscellaneous
*********************************************************************************************************
*/
#define
OS_STK_GROWTH
1
/* Stack grows from HIGH to LOW memory on 80x86
*/
(3)
#define
uCOS
0x80
/* Interrupt vector # used for context switch
*/
(4)
#define
OS_TASK_SW()
asm
INT
uCOS
(5)
/*
*********************************************************************************************************
*
GLOBAL VARIABLES
*********************************************************************************************************
*/
OS_CPU_EXT
INT8U
OSTickDOSCtr;
/* Counter used to invoke DOS's tick handler every 'n' ticks
*/
(6)
Listing 9.2, OS_CPU.H
9.03.01
OS_CPU.H, Data Types
Because different microprocessors have different word length, the port of µC/OS-II includes a series of type definitions
that ensures portability L9.2(1). With the Borland C/C++ compiler, an int is 16-bit and a long is 32-bit. Also, for
your convenience, I included floating-point data types even though µC/OS-II doesn’t make use of floating-point.
A stack entry for the 80x86 processor running in in real-mode is 16-bit wide and thus, OS_STK is declared accordingly
for the Borland C/C++ compiler. All task stacks MUST be declared using OS_STK as its data type.
9.03.02
OS_CPU.H, Critical Sections
µC/OS-II like all real-time kernels need to disable interrupts in order to access critical sections of code, and re-enable
interrupts when done. This allows µC/OS-II to protect critical code from being entered simultaneously from either
multiple tasks or ISRs. Because the Borland C/C++ compiler supports in-line assembly language, it’s quite easy to
specify the instructions to disable and enable interrupts. µC/OS-II defines the two macros to disable and enable
interrupts: OS_ENTER_CRITICAL() and OS_EXIT_CRITICAL() , respectively. I actually provide
you with two methods of disabling and enabling interrupts L9.2(2). The method used is established by the #define
macro OS_CRITICAL_METHOD which can either be set to 1 or 2. For the tests, I chose method #2 but it’
s up to
you to decide which one is best for your application.
Method #1:
The first and simplest way to implement these two macros is to invoke the processor instruction to disable interrupts
(CLI) for OS_ENTER_CRITICAL() and the enable interrupts instruction (STI) for
OS_EXIT_CRITICAL() . There is, however, a little problem with this scenario. If you called the µC/OS-II
function with interrupts disabled then, upon return from µC/OS-II, interrupts would be enabled! If you had interrupts
disabled, you may have wanted them to be disabled upon return from the µC/OS-II function. In this case, the above
implementation would not be adequate. If you don’
t care in your application whether interrupts are enabled after calling
a µC/OS-II service then, you should opt for this method because of performance. If you chose this method, you will need
to change the constant in OSIntCtxSw() from 10 to 8 (see OS_CPU_A.ASM )!
Method #2:
The second way to implement OS_ENTER_CRITICAL() is to save the interrupt disable status onto the stack
and then, disable interrupts. This is accomplished on the 80x86 by executing the PUSHF instruction followed by the
CLI instruction. OS_EXIT_CRITICAL() simply needs to execute a POPF instruction to restore the
original contents of the processor’s SW register. Using this scheme, if you called a µC/OS-II service with either
interrupts enabled or disabled then, the status would be preserved across the call. A few words of caution however, if
you call a µC/OS-II service with interrupts disabled, you are potentially extending the interrupt latency of your
application. Also, your application will ‘crash’if you have interrupts disabled before calling a service such as
OSTimeDly(). This will happen because the task will be suspended until time expires but, because interrupts are
disabled, you would never service the tick interrupt! Obviously, all the PEND calls are also subject to this problem so,
be careful. As a general rule, you should always call µC/OS-II services with interrupts enabled! If you want to preserve
the interrupt disable status across µC/OS-II service calls then obviously this method is for you but be careful.
9.03.03
OS_CPU.H, Stack Growth
The stack on an 80x86 processor grows from high-memory to low-memory which means that
must be set to 1 L9.2(3).
9.03.04
OS_STK_GROWTH
OS_CPU.H, OS_TASK_SW()
In µC/OS-II, the stack frame for a ready task always looks as if an interrupt has just occurred and all processor registers
were saved onto it. To switch context, OS_TASK_SW() thus needs to simulate an interrupt L9.2(5). The 80x86
provides 256 software interrupts to accomplish this. The interrupt service routine (ISR) (also called the ‘exception
handler’
) MUST vector to the assembly language function OSCtxSw() (see OS_CPU_A.ASM ).
Because I tested the code on a PC, I decided to use interrupt number 128 (i.e. 0x80) because I found it to be available
L9.2(4). Actually, the original PC used interrupts 0x80 through 0xF0 for the BASIC interpreter. Few if any PCs nowadays
come with a BASIC interpreter built in so, it should be save to these vectors. Optionally, you can also use vectors 0x4B
to 0x5B, 0x5D to 0x66, or 0x68 to 0x6F. If you use this port on an embedded processor such as the 80186 processor you
will most likely not be as restricted in your choice of vectors.
9.03.05
OS_CPU.H, Tick Rate
The tick rate for an RTOS should generally be set between 10 and 100 Hz. It is always preferable (but not necessary) to
set the tick rate to a ‘round number’. Unfortunately, on the PC, the default tick rate is 18.20648 Hz which is not what I
would call a nice ‘round number’. For this port, I decided to change the tick rate of the PC from the standard 18.20648 Hz
to 200 Hz (i.e. 5 mS between ticks). There are two reasons to do this. First, 200 Hz happens to be about 11 times faster
than 18.20648 Hz. This will allow us to ‘
chain’into DOS once every 11 ticks. In DOS, the tick handler is responsible for
some ‘system’maintenance which is expected to happen every 54.93 mS. The second reason is to have 5.00 mS time
resolution for time delays and timeouts. If you are running the example code on an 80386 PC, you may find that the
overhead of the 200 Hz may be unacceptable. On a Pentium-II processor, however, 200 Hz is not likely to be a problem.
This brings us to the last statement in OS_CPU.H which declares an 8-bit variable (OSTickDOSCtr ) that will
keep track of the number of times the ticker is called. Every 11th time, the DOS tick handler will be called L9.2(6).
OSTickDOSCtr is used in OS_CPU_A.ASM and really only applies to a PC environment. You would most
likely not use this scheme if you were to design an embedded system around a non-PC architecture because you would
set the tick rate to the proper value in the first place.
9.04 OS_CPU_A.ASM
A µC/OS-II port requires that you write four fairly simple assembly language functions:
OSStartHighRdy()
OSCtxSw()
OSIntCtxSw()
OSTickISR()
9.04.01
OS_CPU_A.ASM, OSStartHighRdy()
This function is called by OSStart() to start the highest priority task ready-to-run. Before you can call
OSStart() , however, you MUST have created at least one of your tasks (see OSTaskCreate() and
OSTaskCreateExt()). OSStartHighRdy() assumes that OSTCBHighRdy points to the
task control block of the task with the highest priority. Figure 9-3 shows the stack frame for an 80x86 real-mode task
created by either OSTaskCreate() or OSTaskCreateExt() .
As can be seen,
OSTCBHighRdy->OSTCBStkPtr points to the task’s top-of-stack.
LOW MEMORY
Simulate PUSH DS
Simulate PUSH ES
Simulate PUSHA
Simulate Interrupt
Simulate call to task
DS = Current DS
ES = 0x4444
DI = 0x3333
SI = 0x2222
BP = 0x1111
SP = 0x0000
BX = 0xBBBB
DX = 0xDDDD
CX = 0xCCCC
AX = 0xAAAA
OFF task
SEG task
PSW = 0x0202
OFF task
SEG task
OFF pdata
SEG pdata
OSTCBHighRdy->OSTCBStkPtr
Stack Growth
SS:SP points here after executing:
POP DS
POP ES
POPA
IRET
HIGH MEMORY
Figure 9-3, 80x86 Stack frame when task is created
The code for OSStartHighRdy() is shown in listing 9.3.
_OSStartHighRdy
MOV
MOV
LES
MOV
MOV
PROC FAR
AX, SEG _OSTCBHighRdy
DS, AX
; Reload DS
;
BX, DWORD PTR DS:_OSTCBHighRdy ; SS:SP = OSTCBHighRdy->OSTCBStkPtr
SS, ES:[BX+2]
;
SP, ES:[BX+0]
;
(1)
;
POP
POP
POPA
DS
ES
; Load task's context
;
;
(2)
(3)
(4)
; Run task
(5)
;
IRET
_OSStartHighRdy
ENDP
Listing 9.3, OSStartHighRdy()
To start the task, OSStartHighRdy() simply needs to retrieve and load the stack pointer from the task’
s
OS_TCB L9.3(1), execute a POP DS L9.3(2), POP ES L9.3(3), POPA L9.3(4) and IRET
L9.3(5) instructions. I decided to store the stack pointer at the beginning of the task control block (i.e. its OS_TCB)
to make it easier to access from assembly language.
Upon executing the IRET instruction, the task code is resumed and the stack pointer (i.e. SS:SP) is pointing at the
return address of the task as if the task was called by a normal function. SS:SP+4 points to the argument pdata which
is passed to the task..
9.04.02
OS_CPU_A.ASM, OSCtxSw()
A task level context switch is accomplished by executing a software interrupt instruction on the 80x86 processor. The
interrupt service routine MUST vector to OSCtxSw() . The sequence of events that leads µC/OS-II to vector to
OSCtxSw() is as follows. The current t ask calls a service provided by µC/OS-II which causes a higher priority task
to be ready-to-run. At the end of the service call, µC/OS-II calls the function OSSched() which concludes that the
current task is no longer the most important task to run. OSSched() loads the address of the highest priority task
into OSTCBHighRdy and then executes the software interrupt instruction by invoking the macro
OS_TASK_SW() . Note that the variable OSTCBCur already contains a pointer to the current task’s Task
Control Block, OS_TCB. The code for OSCtxSw() is shown in listing 9.4. The numbers in parenthesis
corresponds to the enumerated description that follows.
_OSCtxSw
;
PROC
FAR
;
PUSHA
PUSH
ES
PUSH
DS
(1)
; Save current task's context
;
;
(2)
(3)
(4)
;
MOV
MOV
AX, SEG _OSTCBCur
DS, AX
; Reload DS in case it was altered
;
;
LES
MOV
MOV
BX, DWORD PTR DS:_OSTCBCur
ES:[BX+2], SS
ES:[BX+0], SP
; OSTCBCur->OSTCBStkPtr = SS:SP
;
;
(5)
;
CALL
FAR PTR _OSTaskSwHook
(6)
MOV
MOV
MOV
MOV
AX, WORD PTR DS:_OSTCBHighRdy+2 ; OSTCBCur = OSTCBHighRdy
DX, WORD PTR DS:_OSTCBHighRdy
;
WORD PTR DS:_OSTCBCur+2, AX
;
WORD PTR DS:_OSTCBCur, DX
;
(7)
MOV
MOV
AL, BYTE PTR DS:_OSPrioHighRdy
BYTE PTR DS:_OSPrioCur, AL
(8)
;
;
; OSPrioCur = OSPrioHighRdy
;
LES
BX, DWORD PTR DS:_OSTCBHighRdy
MOV
SS, ES:[BX+2]
MOV
SP, ES:[BX]
; SS:SP = OSTCBHighRdy->OSTCBStkPtr
;
;
(9)
;
POP
POP
POPA
DS
ES
; Load new task's context
;
;
(10)
(11)
(12)
; Return to new task
(13)
;
IRET
;
_OSCtxSw
ENDP
Listing 9.4, OSCtxSw()
Figure 9-4 shows the stack frames of the task being suspended and the task being resumed. On the 80x86 processor, the
software interrupt instruction forces the SW register to be pushed onto the current task’s stack followed by the return
address (segment a nd offset) of the task that executed the INT instruction F9-4(1) & L9.4(1) (i.e. the task that invoked
OS_TASK_SW() ). To save the rest of the task’s context, the PUSHA F9-4(2) & L9.4(2), PUSH ES F9-4(3) &
L9.4(3) and PUSH DS F9-4(4) & L9.4(4) instructions are executed. To finish saving the context of the task is being
suspended, OSCtxSw() saves the SS and SP registers in its OS_TCB F9-4(5) & L9.4(5). It is important that the
SS register be saved first. Intel guaranties that interrupts will be disabled for the next instruction. This means that saving
of SS and SP are performed indivisibly.
OSTCBCur
OS_TCB
OSTCBHighRdy
OS_TCB
(6)
(5)
80x86 CPU
(Real-Mode)
SS
SP
OSTCBCur->OSTCBStkPtr
OSTCBHighRdy->OSTCBStkPtr
AX
BX
CX
DX
LOW MEMORY
LOW MEMORY
DS
ES
SI
DI
(4)
PUSH DS
PUSH ES
(3)
PUSHA
(2)
OS_TASK_SW()
(INT 128)
(7)
DS
ES
DI
SI
BP
SP
BX
DX
CX
AX
OFF task
SEG task
PSW
(1)
BP
(1)
(2)
(3)
(4)
Stack Growth
HIGH MEMORY
CS
IP
PSW
(7)
(8)
(9)
(10)
DS
ES
DI
SI
BP
SP
BX
DX
CX
AX
OFF task
SEG task
PSW
POP DS
POP ES
(8)
POPA
(9)
IRET
(10)
Stack Growth
HIGH MEMORY
Figure 9-4, 80x86 Stack frames during a task level context switch
The user definable task switch hook (OSTaskSwHook() ) is then called L9.4(6). Note that when
OSTaskSwHook() is called, OSTCBCur points to the current task’s OS_TCB while
OSTCBHighRdy points to the new task’s OS_TCB. You can thus access each task’s OS_TCB from
OSTaskSwHook(). If you never intend to use the context switch hook, you can comment out the call which
would save you a few clock cycles during the context switch.
Upon return from OSTaskSwHook() , OSTCBHighRdy is then copied to OSTCBCur because the new
task will now also be the current task L9.4(7). Also, OSPrioHighRdy is copied to OSPrioCur for the same
reason L9.4(8). At this point, OSCtxSw() can load the processor’s registers with the new task’s context. This is
done by first retrieving the SS and SP registers from the new task’s OS_TCB F9-4(6) & L9.4(9). Again, it is important
that the SS register be restored first. Intel guaranties that interrupts will be disabled for the next instruction. This means
that restoring of SS and SP are performed indivisibly. The other registers are pulled from the stack by executing a POP
DS F9-4(7) & L9.4(10), a POP ES F9-4(8) & L9.4(11), a POPA F9-4(9) & L9.4(12) and finally an IRET F9-4(10) &
L9.4(13) instruction. The task code resumes once the IRET instruction completes.
You should note that interrupts are disabled during OSCtxSw() and also during execution of the user definable
function OSTaskSwHook() .
9.04.03
OS_CPU_A.ASM, OSIntCtxSw()
OSIntCtxSw() is a function that is called by OSIntExit() to perform a context switch from an ISR
(Interrupt Service Routine). Because OSIntCtxSw() is called from an ISR, it is assumed that all the processor
registers are already properly saved onto the interrupted task’s stack. In fact, there are more things on the stack frame
than we need. OSIntCtxSw() will thus have to clean up the stack so t hat the interrupted task is left with just the
proper stack frame content.
The code shown in listing 9.5 is identical to OSCtxSw() except for two things. First, there is no need to save the
registers (i.e. use PUSHA, PUSH ES and PUSH DS ) onto the stack because it is assumed that the beginning of
the ISR has done that. Second, OSIntCtxSw() needs to adjust the stack pointer so that the stack frame only
contains the task’s context. To understand what is happening, refer also to figure 9-5 for the following description.
_OSIntCtxSw PROC
;
;
ADD
ADD
;
MOV
MOV
;
LES
MOV
MOV
;
CALL
;
MOV
MOV
MOV
MOV
;
MOV
MOV
;
LES
MOV
MOV
;
POP
POP
POPA
;
IRET
;
_OSIntCtxSw ENDP
FAR
SP,8
SP,10
; Ignore calls to OSIntExit and OSIntCtxSw
; (Uncomment if OS_CRITICAL_METHOD is 1, see OS_CPU.H)
; (Uncomment if OS_CRITICAL_METHOD is 2, see OS_CPU.H)
AX, SEG _OSTCBCur
DS, AX
; Reload DS in case it was altered
;
BX, DWORD PTR DS:_OSTCBCur
ES:[BX+2], SS
ES:[BX+0], SP
; OSTCBCur->OSTCBStkPtr = SS:SP
;
;
FAR PTR _OSTaskSwHook
AX, WORD
DX, WORD
WORD PTR
WORD PTR
(1)
(2)
(3)
PTR DS:_OSTCBHighRdy+2
PTR DS:_OSTCBHighRdy
DS:_OSTCBCur+2, AX
DS:_OSTCBCur, DX
; OSTCBCur = OSTCBHighRdy
;
;
;
(4)
AL, BYTE PTR DS:_OSPrioHighRdy
BYTE PTR DS:_OSPrioCur, AL
; OSPrioCur = OSPrioHighRdy
(5)
BX, DWORD PTR DS:_OSTCBHighRdy
SS, ES:[BX+2]
SP, ES:[BX]
; SS:SP = OSTCBHighRdy->OSTCBStkPtr
;
;
(6)
DS
ES
; Load new task's context
;
;
(7)
(8)
(9)
; Return to new task
(10)
Listing 9.5, OSIntCtxSw()
Assuming that the processor recognizes an interrupt, the processor completes the current instruction and initiates an
interrupt handling procedure. This consist of automatically pushing the processor status register followed by the return
address of the interrupted task onto the stack.
OS_TCB
OSTCBCur
OSTCBHighRdy
(6)
OS_ENTER_CRITICAL()
(Method #2)(3)
(2) Call OSIntExit()
Saved by ISR
(1)
OFF OSIntCtxSw
SEG OSIntCtxSw
PSW
OFF OSIntExit
SEG OSIntExit
DS
ES
DI
SI
BP
SP
BX
DX
CX
AX
OFF task
SEG task
PSW
OSTCBHighRdy->OSTCBStkPtr
AX
BX
CX
DX
LOW MEMORY
(4)
(7)
SS
SP
OSTCBCur->OSTCBStkPtr
Call OSIntCtxSw()
80x86 CPU
(Real-Mode)
LOW MEMORY
DS
ES
ADD SP,10
(5)
SI
DI
(8)
BP
(1)
Stack Growth
HIGH MEMORY
OS_TCB
CS
IP
PSW
(8)
(9)
(10)
(11)
DS
ES
DI
SI
BP
SP
BX
DX
CX
AX
OFF task
SEG task
PSW
POP DS
POP ES
(9)
POPA
(10)
IRET
(11)
Stack Growth
HIGH MEMORY
Figure 9-5, 80x86 Stack frames during an interrupt level context switch
The CPU then vectors to the proper ISR. µC/OS-II requires that your ISR begins by saving the rest of the processor
registers F9-5(1). Once the registers are saved, µC/OS-II requires that you either call OSIntEnter() or, that you
increment the global variable OSIntNesting by one. At this point, the interrupted task’
s stack frame only
contains the register contents of the interrupted task. The ISR can now start servicing the interrupting device and
possibly, make a higher priority task ready. This would occur if the ISR sends a message to a task (by calling
OSMboxPost() or OSQPost()), resume a task (by calling OSTaskResume() ), invokes
OSTimeTick() or OSTimeDlyResume() . Let us assume that a higher priority task is made ready to
run.
µC/OS-II requires that your ISR calls OSIntExit() when the ISR completes servicing the interrupting device.
OSIntExit() basically tell µC/OS-II that it’s time to return back t o task level code. The call to OSIntExit()
causes the return address of the caller to be pushed onto the interrupted task’s stack F9-5(2).
OSIntExit() starts by disabling interrupts because it needs to execute critical code. Depending on how
OS_ENTER_CRITICAL() is implemented (see section 9.03.02), the processor’s status register could be
pushed onto the interrupted task’s stack F9-5(3). OSIntExit() notices that the interrupted task is no longer the
task that needs to run because a higher priority task is now ready. In this case, the pointer OSTCBHighRdy is
made to point to the new task’s OS_TCB and OSIntExit() calls OSIntCtxSw() to perform the context
switch. Calling OSIntCtxSw() causes the return address to be pushed onto the interrupted task’s stack F9-5(4)
.
Because we are switching context, we only want to leave item F9-5(1) on the stack and ignore items F9-5(2), F9-5(3), and
F9-5(4). This is accomplished by adding a ‘constant’to the stack pointer F9-5(5) & L9.5(1). When using Method #2 for
OS_ENTER_CRITICAL(), this constant needs to be 10. If you decide to use Method #1, however, you will
need to change the constant to 8. The actual value of this constant depends on the compiler and compiler options.
Specifically, a different compiler may allocate variables for OSIntExit() . Once the stack is adjusted, the new
stack pointer can be saved into the OS_TCB of the task being switched out F9-5(6) & L9.5(2). It is important that the SS
register be saved first. Intel guaranties that interrupts will be disabled for the next instruction. This means that saving
of SS and SP are performed indivisibly. OSIntCtxSw() is the only function in µC/OS-II (and also µC/OS) that is
compiler specific and has generated more e -mail than any other aspect of µC/OS. If your port appears to crash after a few
context switches then, you should suspect that the stack is not being properly adjusted in OSIntCtxSw() .
The user definable task switch hook ( OSTaskSwHook()) is then called L9.5(3). Note that OSTCBCur points
to the current task’s OS_TCB while OSTCBHighRdy points to the new task’s OS_TCB . You can thus access
each task’s OS_TCB from OSTaskSwHook() . If you never intend to use the context switch hook, you can
comment out the call which would save you a few clock cycles during the context switch.
Upon return from OSTaskSwHook(), OSTCBHighRdy is copied to OSTCBCur because the new task
will now also be the current task L9.5(4). Also, OSPrioHighRdy is copied to OSPrioCur for the same
reason L9.5(5). At this point, OSCtxSw() can load the processor’s registers with the new task’s context. This is
done by first retrieving the SS and SP registers from the new task’s OS_TCB F9-5(7) & L9.5(6). Again, it is important
that the SS register be restored first. Intel guaranties that interrupts will be disabled for the next instruction. This means
that restoring of SS and SP are performed indivisibly. The other registers are pulled from the stack by executing a POP
DS F9-5(8) & L9.5(7), a POP ES F9-5(9) & L9.5(8), a POPA F9-5(10) & L9.5(9) and finally an IRET F9-5(11) &
L9.5(10) instruction. The task code resumes once the IRET instruction completes.
You should note that interrupts are disabled during
definable function OSTaskSwHook().
9.04.04
OSIntCtxSw() and also during execution of the user
OS_CPU_A.ASM, OSTickISR()
As mentioned in section 9.03.05, the tick rate of an RTOS should be set between 10 and 100 Hz. On the PC, the ticker
occurs every 54.93 mS (18.20648 Hz) and is obtained by a hardware timer that interrupts the CPU. You should recall that
I decided to reprogram the tick rate to 200 Hz. The ticker on the PC is assigned to vector 0x08 but µC/OS-II needs to have
it ‘redefined’so that it vectors to OSTickISR() instead. Because of this, the PC’s tick handler is saved (see
PC.C, PC_DOSSaveReturn()) in vector 129 (0x81). To satisfy DOS, however, the PC’s handler will be
called every 54.93 mS (described shortly). Figure 9-6 shows the contents of the interrupt vector table (IVT) before and
after installing µC/OS-II.
Before (DOS only)
After (礐 /OS-II installed)
Interrupt Vector Table
(IVT)
Interrupt Vector Table
(IVT)
0x00
0x01
0x02
0x03
0x04
0x05
0x06
0x07
0x08
0x00
0x01
0x02
0x03
0x04
0x05
0x06
0x07
0x08
0x7F
0x80
0x81
DOS Tick Handler
(18.20648 Hz)
Undefined
Undefined
0x7F
0x80
0x81
OSTickISR()
(200 Hz):
Every 11 ticks, do 'INT 0x81'
OSCtxSw()
DOS Tick Handler
Figure 9-6, PC’s Interrupt Vector Table (IVT)
With µC/OS-II, it is very important that you enable ticker interrupts AFTER multitasking has started, i.e. after calling
OSStart() . In the case of the PC, however, ticker interrupts are already occuring before you actually execute your
µC/OS-II application. To prevent the ISR from invokingOSTickISR() until µC/OS-II is ready, you need to do the
following:
PC_DOSSaveReturn() (see PC.C) which is called by main() needs to:
Get the address of the interrupt handler for the DOS ticker;
Relocate the DOS ticker at location 0x81;
main() needs to:
Install the context switch vector (i.e. OSCtxSw()) at vector 0x80;
Create at least one application task;
Call OSStart() when ready to multitask;
The first task to execute needs to:
Install OSTickISR() at vector 0x08;
Change the tick rate from 18.20648 Hz to 200 Hz;
The tick handler on the PC is somewhat tricky so I decided to explain it using the pseudo code shown in listing 9.6. Like
all µC/OS-II ISRs, all the registers need to be saved onto the current task’s stack L9.6(1). Upon entering an ISR, you need
to tell µC/OS-II that you are starting an ISR by either calling OSIntEnter() or, directly incrementing
OSIntNesting L9.6 (2). You can directly increment this variable because the 80x86 processor can perform this
operation indivisibly. Next, the counter OSTickDOSCtr is decremented L9.6(3) and when it reaches 0, the DOS
ticker handler is called L9.6(4). This happens every 54.93 mS. Ten times out of 11, however, a command is sent to the
Priority Interrupt Controller (i.e. the PIC) to clear the interrupt L9.6(5). Note that there is no need to do this when the DOS
ticker is called because the DOS ticker directly clears the interrupt source. Next, we call OSTimeTick() so that
µC/OS-II can update all the tasks that are either waiting for time to expire or are pending for some event to occur but with
a timeout L9.6(6). At the completion of all ISRs, OSIntExit() is called L9.6(7). If a higher priority task has been
made ready by this ISR (or any other nested ISRs) and, this is the last nested ISR then OSIntExit() will NOT
return to OSTickISR() ! Instead, restoring the processor’s context of the new task and issuing an IRET is done
by OSIntCtxSw() . If the ISR is not the last nested ISR or the ISR did not cause a higher priority task to be ready
then, OSIntExit() returns back to OSTickISR() . At this point, the processor registers are restored
L9.6(8) and the ISR returns to the interrupted source by executing an IRET instruction L9.6(9).
void OSTickISR (void)
{
Save processor registers;
OSIntNesting++;
OSTickDOSCtr—-;
if (OSTickDOSCtr == 0) {
Chain into DOS by executing an ‘INT 81H’ instruction;
} else {
Send EOI command to PIC (Priority Interrupt Controller);
}
OSTimeTick();
OSIntExit();
Restore processor registers;
Execute a return from interrupt instruction (IRET);
}
Listing 9.6, Pseudo code for OSTickISR()
(1)
(2)
(3)
(4)
(5)
(6)
(7)
(8)
(9)
This code for OSTickISR() is shown in listing 9.7 for reference.
_OSTickISR
;
PROC
FAR
PUSHA
PUSH
PUSH
ES
DS
MOV
MOV
AX, SEG _OSTickDOSCtr
DS, AX
; Reload DS
INC
BYTE PTR _OSIntNesting
; Notify uC/OS-II of ISR
; Save interrupted task's context
;
;
;
DEC
CMP
JNE
BYTE PTR DS:_OSTickDOSCtr
BYTE PTR DS:_OSTickDOSCtr, 0
SHORT _OSTickISR1
; Every 11 ticks (~199.99 Hz), chain into
MOV
INT
JMP
BYTE PTR DS:_OSTickDOSCtr, 11
081H
; Chain into DOS's tick ISR
SH ORT _OSTickISR2
DOS
;
_OSTickISR1:
MOV
MOV
OUT
AL, 20H
DX, 20H
DX, AL
; Move EOI code into AL.
; Address of 8259 PIC in DX.
; Send EOI to PIC if not processing DOS timer.
;
_OSTickISR2:
CALL
FAR PTR _OSTimeTick
; Process system tick
CALL
FAR PTR _OSIntExit
; Notify uC/OS-II of end of ISR
POP
POP
POPA
DS
ES
; Restore interrupted task's context
;
;
;
IRET
;
_OSTickISR
; Return to interrupted task
ENDP
Listing 9.6, OSTickISR()
You can simplify OSTickISR() by not increasing the tick rate from 18.20648 Hz to 200 Hz. The pseudo code
shown in listing 9.7 contains the steps that the tick ISR would need to take. The ISR still needs to save all the registers
onto the current task’s stack L9.7(1) and increment OSIntNesting L9.7 (2). Next, the DOS ticker handler is called
L9.7 (3). Note that there is no need to clear the interrupt ourselves because this is handled by the DOS ticker. We then
call OSTimeTick() so that µC/OS-II can update all the tasks that are either waiting for time to expire or are
pending for some event to occur but with a timeout L9.7 (4). When you are done servicing the ISR, you call
OSIntExit()L9.7 (5). Finally, the processor registers are restored L9.7 (6) and the ISR returns to the interrupted
source by executing an IRET instruction L9.7 (7). Note that you MUST NOT change the tick rate by calling
PC_SetTickRate() if you are to use this version of the code. You will also have to change the configuration
constant OS_TICKS_PER_SEC (see OS_CFG.H ) from 200 to 18!
void OSTickISR (void)
{
Save processor registers;
OSIntNesting++;
Chain into DOS by executing an ‘INT 81H’ instruction;
OSTimeTick();
OSIntExit();
Restore processor registers;
Execute a return from interrupt instruction (IRET);
}
(1)
(2)
(3)
(4)
(5)
(6)
(7)
Listing 9.7, Pseudo code for 18.2 Hz OSTickISR()
The new code for OSTickISR() would look as shown in listing 9.8.
_OSTickISR
;
PROC
FAR
PUSHA
PUSH
PUSH
ES
DS
MOV
MOV
AX, SEG _OSIntNesting
DS, AX
; Reload DS
INC
BYTE PTR _OSIntNesting
; Notify uC/OS-II of ISR
INT
081H
; Chain into DOS's tick ISR
CALL
FAR PTR _OSTimeTick
; Process system tick
CALL
FAR PTR _OSIntExit
; Notify uC/OS-II of end of ISR
POP
POP
POPA
DS
ES
; Restore interrupted task's context
; Save interrupted task's context
;
;
;
;
;
;
;
IRET
;
_OSTickISR
; Return to interrupted task
ENDP
Listing 9.8, 18.2 Hz version of OSTickISR()
9.05 OS_CPU_C.C
A µC/OS-II port requires that you write six fairly simple C functions:
OSTaskStkInit()
OSTaskCreateHook()
OSTaskDelHook()
OSTaskSwHook()
OSTaskStatHook()
OSTimeTickHook()
The only function that is actually necessary is OSTaskStkInit() . The other five functions MUST be declared
but don’t need to contain any code inside them. I didn’
t put any code in these five functions in OS_CPU_C.C
because I am assuming that they would be user defined.
To that end, the #define constant
OS_CPU_HOOKS_EN (see OS_CFG.H) is set to 0. To define the code in OS_CPU_C.C , you would need
to set OS_CPU_HOOKS_EN to 1.
9.05.01
OS_CPU_C.C, OSTaskStkInit()
This function is called by OSTaskCreate() and OSTaskCreateExt() to initialize the stack frame of
a task so that the stack looks as if an interrupt just occurred and all the processor registers were pushed onto that stack.
Figure 9-7 shows what OSTaskStkInit() will put on the stack of the task being created. Note that the diagram
doesn’t show the stack frame of the code calling OSTaskStkInit() but instead, the stack frame of the task
being created.
LOW MEMORY
Simulate PUSH DS
Simulate PUSH ES
Simulate PUSHA
Simulate Interrupt
Simulate call to task
DS = Current DS
ES = 0x4444
DI = 0x3333
SI = 0x2222
BP = 0x1111
SP = 0x0000
BX = 0xBBBB
DX = 0xDDDD
CX = 0xCCCC
AX = 0xAAAA
OFF task
SEG task
SW = 0x0202
OFF task
SEG task
OFF pdata
SEG pdata
Top-Of-Stack
Stack Growth
ptos
HIGH MEMORY
Figure 9-7, Stack frame initialization with ‘pdata’passed on the stack
When you create a task, you specify to OSTaskCreate() or OSTaskCreateExt() the start address
of the task ( task ), you pass it a pointer ( pdata), the task’s top-of-s tack (ptos ) and the task’
s priority (prio).
OSTaskCreateExt() requires additional arguments but these are irrelevant in discussing
OSTaskStkInit() . To properly initialize the stack frame, OSTaskStkInit() only requires the first three
arguments just mentioned (i.e. task, pdata and ptos ).
The code for OSTaskStkInit() is shown in listing 9.9.
void *OSTaskStkInit (void (*task)(void *pd), void *pdata, void *ptos, INT16U opt)
{
INT16U *stk;
opt
= opt;
stk
= (INT16U *)ptos;
*stk-= (INT16U)FP_SEG(pdata);
*stk-= (INT16U)FP_OFF(pdata);
*stk-= (INT16U)FP_SEG(task);
*stk-= (INT16U)FP_OFF(task);
*stk-= (INT16U)0x0202;
*stk-= (INT16U)FP_SEG(task);
*stk-= (INT16U)FP_OFF(task);
*stk-= (INT16U)0xAAAA;
*stk-= (INT16U)0xCCCC;
*stk-= (INT16U)0xDDDD;
*stk-= (INT16U)0xBBBB;
*stk-= (INT16U)0x0000;
*stk-= (INT16U)0x1111;
*stk-= (INT16U)0x2222;
*stk-= (INT16U)0x3333;
*stk-= (INT16U)0x4444;
*stk
= _DS;
return ((void *)stk);
/* 'opt' is not used, prevent warning
/* Load stack pointer
/* Simulate call to function with argument
*/
(1) */
(2) */
/* Place return address of function call
(3) */
/* SW = Interrupts enabled
/* Put pointer to task
on top of stack
(4) */
*/
/*
/*
/*
/*
/*
/*
/*
/*
/*
/*
(5) */
*/
*/
*/
*/
*/
*/
*/
*/
(6) */
AX
CX
DX
BX
SP
BP
SI
DI
ES
DS
=
=
=
=
=
=
=
=
=
=
0xAAAA
0xCCCC
0xDDDD
0xBBBB
0x0000
0x1111
0x2222
0x3333
0x4444
Current value of DS
}
Listing 9.9, OSTaskStkInit()
OSTaskStkInit() creates and initializes a local pointer to 16-bit elements because stack entries are 16-bit wide
on the 80x86 L9.9(1). Note that µC/OS-II requires that the pointer ptos points to an empty stack entry.
The Borland C/C++ compiler passes the argument pdata on the stack instead of registers (at least with the compiler
options I selected). Because of this, pdata is placed on the stack frame with the OFFSET and SEGMENT in the order
shown L9.9(2).
The address of your task is placed on the stack next L9.9(3). In theory, this should be the return address of your task.
However, in µC/OS-II, a task must never return so, what is placed here is not really critical.
The Status Word (SW ) along with the task address are placed on the stack L9.9(4) to simulate the behavior of the
processor in response to an interrupt. The SW register is initialized to 0x0202 . This will allow the task to have
interrupts enabled when it starts. You can in fact start all your tasks with interrupts disabled by forcing the SW to
0x0002 instead. There are no options in µC/OS-II to selectively enable interrupts upon startup for some tasks and
disable interrupts upon task startup on others. In other words, either all tasks have interrupts disabled upon startup or
all tasks have them disabled. You could, however, overcome this limitation by passing the desired interrupt startup state
of a task by using pdata . If you chose to have interrupts disabled, each task will need to enable them when they
execute. You will also have to modify OSTaskIdle() and OSTaskStat() to enable interrupts in those
functions. If you don’t, your application will crash! I would thus recommend that you leave the SW initialized to
0x0202 and have interrupts enabled when the task starts.
Next, the remaining registers are placed on the stack to simulate the PUSHA, PUSH ES and PUSH DS instructions
which are assumed to be found at the beginning of every ISR L9.9(5). Note that the AX , BX , CX , DX, SP , BP , SI and
DI registers are placed to satisfy the order of the PUSHA instruction. If you were to port this code to a ‘plain’8086
processor, you may want to simulate the PUSHA instruction or place the registers in a neater order. You should also
note that each register has a unique value instead of all zeros. This can be useful for debugging. Also, the Borland
compiler supports ‘pseudo-registers’(i.e. the _DS keyword notifies the compiler to obtain the value of the DS register)
which in this case is used to copy the current value of the DS register to the simulated stack frame L9.9(6).
Once completed, OSTaskStkInit() returns the address of the new top-of-stack. OSTaskCreate()
or OSTaskCreateExt() will take this address and save it in the task’s OS_TCB.
9.05.02
OS_CPU_C.C, OSTaskCreateHook()
As previously mentioned,
9.05.03
OS_CPU_C.C, OSTaskDelHook()
As previously mentioned,
9.05.04
OS_CPU_C.C does not define any code for this function.
OS_CPU_C.C does not define any code for this function.
OS_CPU_C.C, OSTaskSwHook()
As previously mentioned, OS_CPU_C.C does not define any code for this function. See Example #3 on how to use
this function.
9.05.05
OS_CPU_C.C, OSTaskStatHook()
As previously mentioned, OS_CPU_C.C does not define any code for this function. See Example #3 for an example
on how to use this function.
9.05.06
OS_CPU_C.C, OSTimeTickHook()
As previously mentioned,
OS_CPU_C.C does not define any code for this function.
9.06 Memory requirements
Table 9.1 shows the amount of memory (both code and data space) used by µC/OS-II based on the value of
configuration constants. Data in this case means RAM and Code means ROM if µC/OS-II is used in an embedded
system.
The
spreadsheet
is
actually
provided
on
the
companion
diskette
(\SOFTWARE\uCOS-II\Ix86L\DOC\ROM-RAM.XLS). You will need Microsoft Excel for Office 97
(or higher) to use this file. The spreadsheet allows you to do ‘
what-if’scenarios based on the options you select.
OS_MAX_EVENTS
OS_MAX_MEM_PART
OS_MAX_QS
OS_MAX_TASKS
10
5
5
63
DATA
(Bytes)
164
104
124
2925
OS_LOWEST_PRIO
63
264
OS_TASK_IDLE_STK_SIZE
512
1024
OS_TASK_STAT_EN
OS_TASK_STAT_STK_SIZE
1
512
Configuration Parameters
OS_CPU_HOOKS_EN
OS_MBOX_EN
OS_MEM_EN
OS_Q_EN
OS_SEM_EN
OS_TASK_CHANGE_PRIO_EN
OS_TASK_CREATE_EN
OS_TASK_CREATE_EXT_EN
OS_TASK_DEL_EN
OS_TASK_SUSPEND_EN
Value
1
1
1
1
1
1
1
1
1
1
礐 /OS-II Internals
Total Application Stacks
Total Application RAM
TOTAL:
CODE
(Bytes)
325
10
1024
600
725
1475
475
450
225
300
550
525
0
(See OS_MAX_EVENTS)
(See OS_MAX_MEM_PART)
(See OS_MAX_QS)
(See OS_MAX_EVENTS)
0
1
0
0
0
2700
35
0
0
0
0
8350
5675
Table 9.1, µC/OS-II memory requirements for 80186.
The number of bytes in the CODE column have been rounded up to the nearest 25 bytes. I used the Borland C/C++
compiler V3.1 and the options were set to generate the fastest code. The number of bytes shown are not meant to be
accurate but are simp ly provided to give you a relative idea of how much code space each of the µC/OS-II group of
services require. For example, if you don’t need message queue services (i.e. OS_Q_EN set to 0 ) then you will save
about 1475 bytes of code space. In this case, µC/OS-II would only use up 6875 bytes of code space.
The DATA column is not as straightforward. You should notice that the stacks for both the idle task and the statistics
task have been set to 1024 (i.e. 1K) each. Based on your own requirements, these number may be higher or lower. As a
minimum, µC/OS-II requires 35 bytes of RAM (µC/OS-II Internals) for internal data structures.
Table 9.2 shows how µC/OS-II can scale down the amount of memory required for smaller applications. In this case, I
only allowed 16 tasks but with 64 priority levels (0 to 63). In this case, your application will not have access to:
-
Message mailboxe services ( OS_MBOX_EN set to 0)
Memory partition services (OS_MEM_EN set to 0)
Changing task priorities (OS_TASK_CHANGE_PRIO_EN set to 0)
The old task creation (OSTaskCreate() ) function (OS_TASK_CREATE_EN set to 0)
Deleting task (OS_TASK_DEL_EN set to 0)
Suspending and Resuming tasks (OS_TASK_SUSPEND_EN set to 0)
Notice that the CODE space reduced by about 3K and the DATA spacereduced by over 2200 bytes! Most of the DATA
savings come from the reduced number of OS_TCB s needed because only 16 tasks are available. For the 80x86 large
model port, each OS_TCB eats up 45 bytes of RAM.
OS_MAX_EVENTS
OS_MAX_MEM_PART
OS_MAX_QS
OS_MAX_TASKS
10
5
5
16
DATA
(Bytes)
164
0
124
792
OS_LOWEST_PRIO
63
264
OS_TASK_IDLE_STK_SIZE
512
1024
OS_TASK_STAT_EN
OS_TASK_STAT_STK_SIZE
1
512
Configuration Parameters
OS_CPU_HOOKS_EN
OS_MBOX_EN
OS_MEM_EN
OS_Q_EN
OS_SEM_EN
OS_TASK_CHANGE_PRIO_EN
OS_TASK_CREATE_EN
OS_TASK_CREATE_EXT_EN
OS_TASK_DEL_EN
OS_TASK_SUSPEND_EN
Value
1
0
0
1
1
0
0
1
0
0
礐 /OS-II Internals
Total Application Stacks
Total Application RAM
TOTAL:
CODE
(Bytes)
325
10
1024
0
0
1475
475
0
0
300
0
0
0
(See OS_MAX_EVENTS)
(See OS_MAX_MEM_PART)
(See OS_MAX_QS)
(See OS_MAX_EVENTS)
0
1
0
0
0
2700
35
0
0
0
0
5275
3438
Table 9.2, A scaled down µC/OS-II configuration.
9.07 Execution times
Tables 9.3 and 9.4 show the execution time for most µC/OS-II functions. The values were obtained by having the
compiler generate assembly language code for the 80186 processor with the C source interleaved as comments. The
assembly code was then passed through the Microsoft MASM 6.11 assembler with the option set so that the number of
cycles for each instruction gets included. I then added the number of instructions (the I column) and clock cycles (the
C column) for the code to obtain three values: the maximum amount of time interrupts are disabled for the service, the
minimum execution time of the service and its maximum. As you can immagine, this is a very tedious job but worth the
effort. Giving you this information allows you to see the ‘cost’impact of each function in terms of execution time.
Obviously, this information has very little use unless you are using a 80186 processor except for the fact that it gives you
an idea of the relative cost for each function.
The number of clock cycles were divided by 33 (i.e. I assumed a 33 MHz clock) to obtain the execution time of the service
in µS (i.e. the µS column). For the minimum and maximum times, I always assumed that the intended function of the
service was performed succesfully. I further assumed that the processor was able to run at the full bus speed (i.e.
without any wait states). On average, I determined that the 80186 requires 10 clock cycles per instruction!
For the 80186, maximum interrupt disable time is 33.3 µS (or 1100 clock cycles).
N/A means that the execution time for the function was not determined because I didn’
t believe they were critical.
I provided the column listing the number of instructions because you can determine the execution time of the functions
for other x86 processors if you have an idea of the number of cycles per instruction. For example, you could assume that
a 80486 executes (on average) an instruction every 2 clock cycle (5 times faster than a 80186). Also, if your 80486 was
running at 66 MHz instead of 33 MHz (2 times faster) then you could take the execution times listed in the tables and
divide them all by 10.
Interrupts Disabled
Service
Minimum
Maximum
I
C
礢
I
C
礢
I
C
礢
N/A
Miscellaneous
OSInit()
N/A
N/A
N/A
N/A
N/A
N/A
N/A
N/A
OSSchedLock()
4
34
1.0
7
87
2.6
7
87
2.6
OSSchedUnlock()
57
567
17.2
13
130
3.9
73
782
23.7
OSStart()
0
0
0.0
35
278
8.4
35
278
8.4
OSStatInit()
N/A
N/A
N/A
N/A
N/A
N/A
N/A
N/A
N/A
OSVersion()
0
0
0.0
2
19
0.6
2
19
0.6
Interrupt Management
OSIntEnter()
4
42
1.3
4
42
1.3
4
42
1.3
OSIntExit()
56
558
16.9
27
207
6.3
57
574
17.4
OSTickISR()
30
310
9.4
948
10803
327.4
2304
20620
624.8
OSMboxAccept()
15
161
4.9
13
257
7.8
13
257
7.8
OSMboxCreate()
15
148
4.5
115
939
28.5
115
939
28.5
OSMboxPend()
68
567
17.2
28
317
9.6
184
1912
57.9
OSMboxPost()
OSMboxQuery()
84
747
22.6
24
305
9.2
152
1484
45.0
120
988
29.9
128
1257
38.1
128
1257
38.1
OSMemCreate()
21
181
5.5
72
766
23.2
72
766
23.2
OSMemGet()
19
247
7.5
18
172
5.2
33
350
10.6
OSMemPut()
23
282
8.5
12
161
4.9
29
321
9.7
OSMemQuery()
40
400
12.1
45
450
13.6
45
450
13.6
OSQAccept()
34
387
11.7
25
269
8.2
44
479
14.5
OSQCreate()
14
150
4.5
154
1291
39.1
154
1291
39.1
OSQFlush()
18
202
6.1
25
253
7.7
25
253
7.7
OSQPend()
64
620
18.8
45
495
15.0
186
1938
58.7
OSQPost()
98
873
26.5
51
547
16.6
155
1493
45.2
OSQPostFront()
OSQQuery()
87
788
23.9
44
412
12.5
153
1483
44.9
128
1100
33.3
137
1171
35.5
137
1171
35.5
OSSemAccept()
10
113
3.4
16
161
4.9
16
161
4.9
OSSemCreate()
14
140
4.2
98
768
23.3
98
768
23.3
OSSemPend()
58
567
17.2
17
184
5.6
164
1690
51.2
OSSemPost()
OSSemQuery()
87
776
23.5
18
198
6.0
151
1469
44.5
110
882
26.7
116
931
28.2
116
931
28.2
Message Mailboxes
Memory Partition Management
Message Queues
Semaphore Management
Table 9.3, Execution times of µC/OS-II services on 33 MHz 80186.
Interrupts Disabled
Service
Minimum
I
C
礢
I
OSTaskChangePrio()
63
567
17.2
OSTaskCreate()
57
567
17.2
OSTaskCreateExt()
57
567
OSTaskDel()
62
OSTaskDelReq()
Maximum
C
礢
I
C
礢
178
981
29.7
166
1532
46.4
217
2388
72.4
266
2939
89.1
17.2
284
3157
95.7
284
3157
95.7
620
18.8
116
1206
36.5
165
1757
53.2
23
199
6.0
39
330
10.0
39
330
10.0
OSTaskResume()
27
242
7.3
48
430
13.0
97
981
29.7
OSTaskStkChk()
31
316
9.6
62
599
18.2
62
599
18.2
OSTaskSuspend()
37
352
10.7
63
579
17.5
112
1130
34.2
OSTaskQuery()
84
1025
31.1
95
1122
34.0
95
1122
34.0
OSTimeDly()
57
567
17.2
81
844
25.6
85
871
26.4
OSTimeDlyHMSM()
57
567
17.2
216
2184
66.2
220
2211
67.0
OSTimeDlyResume()
57
567
17.2
23
181
5.5
98
989
30.0
OSTimeGet()
7
57
1.7
14
117
3.5
14
117
3.5
OSTimeSet()
7
61
1.8
11
99
3.0
11
99
3.0
OSTimeTick()
30
310
9.4
900
10257
310.8
1908
19707
597.2
OSTaskCreateHook()
0
0
0.0
4
38
1.2
4
38
1.2
OSTaskDelHook()
0
0
0.0
4
38
1.2
4
38
1.2
OSTaskStatHook()
0
0
0.0
1
16
0.5
1
16
0.5
OSTaskSwHook()
0
0
0.0
1
16
0.5
1
16
0.5
OSTimeTickHook()
0
0
0.0
1
16
0.5
1
16
0.5
Task Management
Time Management
User Defined Functions
Table 9.4, Execution times of µC/OS-II services on 33 MHz 80186.
Below is a list of assumptions about how the minimum, maximum and interrupt disable times were determined and the
conditions that lead to these values.
OSSchedUnlock() :
Minimum assumes that OSLockNesting is decremented to 0 but there are no higher priority tasks
ready to run and thus OSSchedUnlock() returns to the caller.
Maximum also decrements OSLockNesting to 0 but this time, a higher priority task is ready to run.
This means that a context switch would occur.
OSIntExit():
Minimum assumes that OSIntNesting is decremented to 0 but there are no higher priority tasks ready
to run and thus OSIntExit() returns to the interrupted task.
Maximum also decrements OSIntNesting to 0 but this time, the ISR has made a higher priority task is
ready to run. This means that OSIntExit() will not return to the interrupted task but instead, to the
higher priority task that is ready to run.
OSTickISR():
For this function, I assumed that your application can have the maximum number of tasks allowed by µC/OS-II
(64 tasks total).
Minimum assumes that none of the 64 tasks are either waiting for time to expire or for a timeout on an event.
Maximum assumed that ALL 63 tasks (the idle task is never waiting) are waiting for time to expire. 625 µS may
seem like a lot of time but, if you consider that all the tasks are waiting for time to expire then the CPU has
nothing else to do anyway! On average, though, you can assume that OSTickISR() would take about
500 µS (i.e. 5% overhead if your tick interrupts occurs every 10 mS).
OSMboxPend() :
Minimum assumes that a message is available at the mailbox.
Maximum occurs when a message is not available so, the task will have to wait. In this case, a context switch
occurs. The maximum time is as seen by the calling task. In other words, this is the time it takes to look at the
mailbox, determine that there is no message, call the scheduler, context switch to the new task, context switch
back from whatever task was running, determine that a timeout occured and returning to the caller.
OSMboxPost() :
Minimum assumes that the mailbox is empty and that no task is waiting on the mailbox to contain a message.
Maximum occurs when one or more tasks are waiting on the mailbox for a message. In this case, the message
is given to the highest priority task waiting and a context switch is performed to resume that task. Again, the
maximum time is as seen by the calling task. In other words, this is the time it takes to wake up the waiting task,
pass it the message, call the scheduler, context switch to the task, context switch back from whatever task was
running, determine that a timeout occured and returning to the caller.
OSMemGet():
Minimum assumes that a memo ry block is not available.
Maximum assumes that a memory block is available and is returned to the caller.
OSMemPut():
Minimum assumes that you are returning a memory block to an already full partition.
Maximum assumes that your are returning the memory block to the partition.
OSQPend() :
Minimum assumes that a message is available at the queue.
Maximum occurs when a message is not available so, the task will have to wait. In this case, a context switch
occurs. The maximum time is as seen by the calling task. In other words, this is the time it takes to look at the
queue, determine that there is no message, call the scheduler, context switch to the new task, context switch
back from whatever task was running, determine that a timeout occured and returning to the caller.
OSQPost() :
Minimum assumes that the queue is empty and that no task is waiting on the queue to contain a message.
Maximum occurs when one or more tasks are waiting on the queue for a message. In this case, the message is
given to the highest priority task waiting and a context switch is performed to resume that task. Again, the
maximum time is as seen by the calling task. In other words, this is the time it takes to wake up the waiting task,
pass it the message, call the scheduler, c ontext switch to the task, context switch back from whatever task was
running, determine that a timeout occured and returning to the caller.
OSQPostFront():
This function performs virtually the same processing as OSQPost() .
OSSemPend():
Minimum assumes that the semaphore is available (i.e. has a count higher than 0).
Maximum occurs when the semaphore is not available so, the task will have to wait. In this case, a context
switch occurs. As usual, the maximum time is as seen by the calling task. This is the time it takes to look at the
semaphore value, determine that it’s 0, call the scheduler, context switch to the new task, context switch back
from whatever task was running, determine that a timeout occured and returning to the caller.
OSSemPost():
Minimum assumes that there are no tasks waiting on the semaphore.
Maximum occurs when one or more tasks are waiting for the semaphore. In this case, the highest priority task
waiting is readied and a context switch is performed to resume that task. Again,the maximum time is as seen by
the calling task. This is the time it takes to wake up the waiting task, call the scheduler, context switch to the
task, context switch back from whatever task was running, determine that a timeout occured and returning to
the caller.
OSTaskChangePrio() :
Minimum assumes that you are changing the priority of a task that will not have a priority higher than the
current task.
Maximum assumes that you are changing the priority of a task that will have a higher priority than the current
task. In thic case, a context switch will occur.
OSTaskCreate():
Minimum assumes that OSTaskCreate() will not create a higher priority task and thus no context
switch is involved.
Maximum assumes that OSTaskCreate() is creating a higher priority task and thus a context switch
will result.
In both cases, the execution times assumed that OSTaskCreateHook() didn’t do anything.
OSTaskCreateExt():
Minimum assumes that OSTaskCreateExt() will not need to initialize the stack with zeros in order
to do stack checking.
Maximum assumes that OSTaskCreateExt() will have to initialize the stack of the task. However,
the execution time greatly depends on the number of elements to initialize. I determined that it takes 100 clock
cycles (3 µS) to clear each element. A 1000 byte stack would require: 1000 bytes divided by 2 bytes/element
(16-bit wide stack) times 3 µS per element or, 1500 µS. Note that interrupts are enabled while the stack is being
cleared to allow your application can respond to interrupts.
In both cases, the execution times assumed that OSTaskCreateHook() didn’t do anything.
OSTaskDel():
Minimum assumes that the task being deleted is not the current task.
Maximum assumes that the task being deleted is the current task. In this case, a context switch will occur.
OSTaskDelReq():
Both minimum and maximum assume that the call will return indication that the task is deleted. This function
is so short that it doesn’t make much difference anyway.
OSTaskResume():
Minimum assumes that a task is being resumed but this task has a lower priority than the current task. In this
case, a context switch will not occur.
Maximum assumes that the task being resumed will be ready-to-run and will have a higher priority than the
current task. In this case, a context switch will occur.
OSTaskStkChk():
Minimum assumes that OSTaskStkChk() is checking a ‘full’stack. Obviously, this is hardly possible
since the task being checked would most likely have crashed. However, this does establish the absolute
minimum exe cution time, however unlikely.
Maximum also assumes that OSTaskStkChk() is checking a ‘
full’stack but you need to add the
amount of time it takes to check each ‘zero’stack element. I was able to determine that each element takes 80
clock cycles (2.4 µS) to check. A 1000 byte stack would thus require: 1000 bytes divided by 2 bytes/element
(16-bit wide stack) times 2.4 µS per element or, 1200 µS. Total execution time would thus be 1218 µs. Note that
interrupts are enabled while the stack is being checked.
OSTaskSuspend() :
Minimum assumes that the task being suspended is not the current task.
Maximum assumes that the current task is being suspended and a context switch will occur.
OSTaskQuery():
Minimum and maximum are the same and it is assumed that all the options are included so that an OS_TCB
contains all the fields. In this case, an OS_TCB for the large model port requires 45 bytes.
OSTimeDly():
Both the minimum and maximum assume that the time delay will be greater than 0 tick. In this case, a context
switch always occur.
Minimum is the case where the bit in OSRdyGrp doesn’t need to be cleared.
OSTimeDlyHMSM() :
Both the minimum and maximum assume that the time delay will be greater than 0. In this case, a context switch
will occur. Furthermore, the time specified must result in a delay of less than 65536 ticks. In other words, if a tick
interrupt occurs every 10 mS (100 Hz) then the maximum value that you can specify is 10 minutes, 55 seconds
and 350 mS in order for the execution times shown to be valid. Obviously, you can specify longer delays using
this function call.
OSTimeDlyResume():
Minimum assumes that the delayed task is made ready to run but, this task has a lower priority than the current
task. In this case, µC/OS-II will not perform a context switch.
Maximum assumes that the delayed task is made ready to run and this task has a higher priority than the current
task. This, of course, results in a context switch.
OSTimeTick() :
This function is almost identical to OSTickISR() except that OSTickISR() accounted for
OSIntEnter() and OSIntExit(). I assumed that your application can have the maximum
number of tasks allowed by µC/OS-II (64 tasks total).
Minimum assumes that none of the 64 tasks are either waiting for time to expire or for a timeout on an event.
Maximum assumed that ALL 63 tasks (the idle task is never waiting) are waiting for time to expire. 600 µS may
seem like a lot of time but, if you consider that all the tasks are waiting for time to expire then the CPU has
nothing else to do anyway! On average, though, you can assume that OSTimeTick() would take about
450 µS (i.e. 4.5% overhead if your tick interrupts occurs every 10 mS).
Interrupts Disabled
Service
Minimum
Maximum
I
C
礢
I
C
礢
I
C
OSVersion()
0
0
.0
2
19
.6
2
19
.6
OSStart()
0
0
.0
35
278
8.4
35
278
8.4
OSSchedLock()
4
34
1.0
7
87
2.6
7
87
2.6
OSIntEnter()
4
42
1.3
4
42
1.3
4
42
1.3
OSTimeGet()
7
57
1.7
14
117
3.5
14
117
3.5
OSTimeSet()
7
61
1.8
11
99
3.0
11
99
3.0
OSSemAccept()
10
113
3.4
16
161
4.9
16
161
4.9
OSSemCreate()
14
140
4.2
98
768
23.3
98
768
23.3
OSMboxCreate()
15
148
4.5
115
939
28.5
115
939
28.5
OSQCreate()
14
150
4.5
154
1291
39.1
154
1291
39.1
OSMboxAccept()
15
161
4.9
13
257
7.8
13
257
7.8
OSMemCreate()
21
181
5.5
72
766
23.2
72
766
23.2
OSTaskDelReq()
23
199
6.0
39
330
10.0
39
330
10.0
OSQFlush()
18
202
6.1
25
253
7.7
25
253
7.7
OSTaskResume()
27
242
7.3
48
430
13.0
97
981
29.7
OSMemGet()
19
247
7.5
18
172
5.2
33
350
10.6
OSMemPut()
23
282
8.5
12
161
4.9
29
321
9.7
OSTimeTick()
30
310
9.4
900
10257
310.8
1908
19707
597.2
OSTickISR()
30
310
9.4
948
10803
327.4
2304
20620
624.8
OSTaskStkChk()
31
316
9.6
62
599
18.2
62
599
18.2
OSTaskSuspend()
37
352
10.7
63
579
17.5
112
1130
34.2
OSQAccept()
34
387
11.7
25
269
8.2
44
479
14.5
OSMemQuery()
40
400
12.1
45
450
13.6
45
450
13.6
OSIntExit()
56
558
16.9
27
207
6.3
57
574
17.4
OSSchedUnlock()
57
567
17.2
13
130
3.9
73
782
23.7
OSTimeDly()
57
567
17.2
81
844
25.6
85
871
26.4
OSTimeDlyResume()
57
567
17.2
23
181
5.5
98
989
30.0
OSTaskChangePrio()
63
567
17.2
178
981
29.7
166
1532
46.4
OSSemPend()
58
567
17.2
17
184
5.6
164
1690
51.2
OSMboxPend()
68
567
17.2
28
317
9.6
184
1912
57.9
OSTimeDlyHMSM()
57
567
17.2
216
2184
66.2
220
2211
67.0
OSTaskCreate()
57
567
17.2
217
2388
72.4
266
2939
89.1
OSTaskCreateExt()
57
567
17.2
235
2606
95.7
284
3157
95.7
OSTaskDel()
62
620
18.8
116
1206
36.5
165
1757
53.2
OSQPend()
64
620
18.8
45
495
15.0
186
1938
58.7
OSMboxPost()
84
747
22.6
24
305
9.2
152
1484
45.0
OSSemPost()
87
776
23.5
18
198
6.0
151
1469
44.5
OSQPostFront()
87
788
23.9
44
412
12.5
153
1483
44.9
OSQPost()
OSSemQuery()
98
873
26.5
51
547
16.6
155
1493
45.2
110
882
26.7
116
931
28.2
116
931
28.2
OSMboxQuery()
120
988
29.9
128
1257
38.1
128
1257
38.1
OSTaskQuery()
OSQQuery()
84
1025
31.1
95
1122
34.0
95
1122
34.0
128
1100
33.3
137
1171
35.5
137
1171
35.5
OSInit()
N/A
N/A
N/A
N/A
N/A
N/A
N/A
N/A
N/A
OSStatInit()
N/A
N/A
N/A
N/A
N/A
N/A
N/A
N/A
N/A
Table 9.5, Execution times sorted by interrupt disable time.
礢
Interrupts Disabled
Service
Minimum
Maximum
I
C
礢
I
C
礢
I
C
OSVersion()
0
0
.0
2
19
.6
2
19
礢
.6
OSIntEnter()
4
42
1.3
4
42
1.3
4
42
1.3
OSSchedLock()
4
34
1.0
7
87
2.6
7
87
2.6
OSTimeSet()
7
61
1.8
11
99
3.0
11
99
3.0
OSTimeGet()
7
57
1.7
14
117
3.5
14
117
3.5
OSSemAccept()
10
113
3.4
16
161
4.9
16
161
4.9
OSQFlush()
18
202
6.1
25
253
7.7
25
253
7.7
OSMboxAccept()
15
161
4.9
13
257
7.8
13
257
7.8
OSStart()
0
0
.0
35
278
8.4
35
278
8.4
OSMemPut()
23
282
8.5
12
161
4.9
29
321
9.7
OSTaskDelReq()
23
199
6.0
39
330
10.0
39
330
10.0
OSMemGet()
19
247
7.5
18
172
5.2
33
350
10.6
OSMemQuery()
40
400
12.1
45
450
13.6
45
450
13.6
OSQAccept()
34
387
11.7
25
269
8.2
44
479
14.5
OSIntExit()
56
558
16.9
27
207
6.3
57
574
17.4
OSTaskStkChk()
31
316
9.6
62
599
18.2
62
599
18.2
OSMemCreate()
21
181
5.5
72
766
23.2
72
766
23.2
OSSemCreate()
14
140
4.2
98
768
23.3
98
768
23.3
OSSchedUnlock()
57
567
17.2
13
130
3.9
73
782
23.7
OSTimeDly()
OSSemQuery()
57
567
17.2
81
844
25.6
85
871
26.4
110
882
26.7
116
931
28.2
116
931
28.2
OSMboxCreate()
15
148
4.5
115
939
28.5
115
939
28.5
OSTaskResume()
27
242
7.3
48
430
13.0
97
981
29.7
OSTimeDlyResume()
57
567
17.2
23
181
5.5
98
989
30.0
OSTaskQuery()
84
1025
31.1
95
1122
34.0
95
1122
34.0
OSTaskSuspend()
OSQQuery()
37
352
10.7
63
579
17.5
112
1130
34.2
128
1100
33.3
137
1171
35.5
137
1171
35.5
OSMboxQuery()
120
988
29.9
128
1257
38.1
128
1257
38.1
OSQCreate()
14
150
4.5
154
1291
39.1
154
1291
39.1
OSSemPost()
87
776
23.5
18
198
6.0
151
1469
44.5
OSQPostFront()
87
788
23.9
44
412
12.5
153
1483
44.9
OSMboxPost()
84
747
22.6
24
305
9.2
152
1484
45.0
OSQPost()
98
873
26.5
51
547
16.6
155
1493
45.2
OSTaskChangePrio()
63
567
17.2
178
981
29.7
166
1532
46.4
OSSemPend()
58
567
17.2
17
184
5.6
164
1690
51.2
OSTaskDel()
62
620
18.8
116
1206
36.5
165
1757
53.2
OSMboxPend()
68
567
17.2
28
317
9.6
184
1912
57.9
OSQPend()
64
620
18.8
45
495
15.0
186
1938
58.7
OSTimeDlyHMSM()
57
567
17.2
216
2184
66.2
220
2211
67.0
OSTaskCreate()
57
567
17.2
217
2388
72.4
266
2939
89.1
OSTaskCreateExt()
57
567
17.2
235
2606
95.7
284
3157
95.7
OSTimeTick()
30
310
9.4
900
10257
310.8
1908
19707
597.2
OSTickISR()
30
310
9.4
948
10803
327.4
2304
20620
624.8
OSInit()
N/A
N/A
N/A
N/A
N/A
N/A
N/A
N/A
N/A
OSStatInit()
N/A
N/A
N/A
N/A
N/A
N/A
N/A
N/A
N/A
Table 9.6, Execution times sorted by maximum execution time.
Chapter 10
Upgrading from
µC/OS to µC/OS-II
This chapter describes what you need to do to migrate a port done for µC/OS to run on µC/OS-II. If you have gone
through the effort of porting µC/OS to a processor then the amount of work to get this port to work with µC/OS-II should
be minimal. In most cases, you should be able to do this in about an hour. If you are familiar with the µC/OS port then,
you may want to go to the summary in section 10.05.
10.00
Directories and Files
The first thing you will n otice in that the directory structure for µC/OS-II is similar to µC/OS except that the main directory
is called \SOFTWARE\uCOS-II instead of \SOFTWARE\uCOS , respectively.
All µC/OS-II ports should be placed under the \SOFTWARE\uCOS-II directory on your hard drive. The source
code for each microprocessor or microcontroller port MUST be found in either two or three files: OS_CPU.H,
OS_CPU_C.C and optionally, OS_CPU_A.ASM . The assembly language file is optional because some
compilers will allow you to havein-line assembly language and thus, you can place the needed assembly language code
directly in OS_CPU_C.C .
The processor specific code (i.e. the port) for µC/OS was placed in files having the processor name as part of the file
names. For example, the Intel 80x86 real-mode, large model had files called: Ix86L.H, Ix86L_C.C , and
Ix86L_A.ASM. Table 10.1 shows the correspondance between the new file and directory names and the old ones.
\SOFTWARE\uCOS\Ix86L
Ix86L.H
Ix86L_A.ASM
Ix86L_C.C
\SOFTWARE\uCOS-II\Ix86L
OS_CPU.H
OS_CPU_A.ASM
OS_CPU_C.C
Table 10.1, Renaming files for µC/OS-II
As a starting point, all you have to do is copy the old file names (from the µC/OS directory) to the new names in the
equivalent µC/OS-II directory. It will be easier to modify these files than to create them from scratch. Table 10.2 shows
a few more examples of µC/OS port file translations.
\SOFTWARE\uCOS\I80251
I80251.H
I80251.C
\SOFTWARE\uCOS-II\I80251
OS_CPU.H
OS_CPU_C.C
\SOFTWARE\uCOS\M680x0
M680x0.H
M680x0.C
\SOFTWARE\uCOS-II\M680x0
OS_CPU.H
OS_CPU_C.C
\SOFTWARE\uCOS\M68HC11
M68HC11.H
M68HC11.C
\SOFTWARE\uCOS\Z80
Z80.H
Z80_A.ASM
Z80_C.C
\SOFTWARE\uCOS-II\M68HC11
OS_CPU.H
OS_CPU_C.C
\SOFTWARE\uCOS-II\Z80
OS_CPU.H
OS_CPU_A.ASM
OS_CPU_C.C
Table 10.2, Renaming files from µC/OS to µC/OS-II
10.01
INCLUDES.H
You will need to modify the INCLUDES.H file of your application. For example, the µC/OS
INCLUDES.H file for the Intel 80x86 real mode, large model looks as shown in listing 10.1. You will need to edit this file
and change:
a) the directory name UCOS to uCOS-II
b) the file name IX86L.H to OS_CPU.H
c) the file name UCOS.H to uCOS_II.H
The new file should thus look as shown in listing 10.2.
/*
***************************************************************
*
INCLUDES.H
***************************************************************
*/
#include
#include
#include
#include
#include
#include
<STDIO.H>
<STRING.H>
<CTYPE.H>
<STDLIB.H>
<CONIO.H>
<DOS.H>
#include
#include
#include
"\SOFTWARE\UCOS\IX86L\IX86L.H"
"OS_CFG.H"
"\SOFTWARE\UCOS\SOURCE\UCOS.H"
Listing 10.1, µC/OS INCLUDES.H
/*
***************************************************************
*
INCLUDES.H
***************************************************************
*/
#include
<STDIO.H>
#include
#include
#include
#include
#include
<STRING.H>
<CTYPE.H>
<STDLIB.H>
<CONIO.H>
<DOS.H>
#include
#include
#include
"\SOFTWARE\uCOS-II\IX86L\OS_CPU.H"
"OS_CFG.H"
"\SOFTWARE\uCOS-II\SOURCE\uCOS_II.H"
Listing 10.2, µC/OS-II INCLUDES.H
10.02
OS_CPU.H
OS_CPU.H contains processor and implementation specific #defines constants, macros, and typedefs.
10.02.01 OS_CPU.H, Compiler specific data types
To satisfy µC/OS-II, you will need to create six new data types: INT8U , INT8S , INT16U , INT16S,
INT32U and INT32S . These corresponds to unsigned and signed 8, 16 and 32 bit integers, respectively. In
µC/OS, I had declared the equivalent data types: UBYTE, BYTE , UWORD , WORD , ULONG and LONG . All you
have to do is copy the µC/OS data types and change UBYTE to INT8U, BYTE to INT8S , UWORD to
INT16U … as shown in listing 10.3.
/* uC/OS data types:
typedef unsigned char
typedef signed
char
typedef unsigned int
typedef signed
int
typedef unsigned long
typedef signed
long
UBYTE;
BYTE;
UWORD;
WORD;
ULONG;
LONG;
/*
/*
/*
/*
/*
/*
Unsigned
Signed
Unsigned
Signed
Unsigned
Signed
8
8
16
16
32
32
bit
bit
bit
bit
bit
bit
quantity
quantity
quantity
quantity
quantity
quantity
*/
*/
*/
*/
*/
*/
*/
/* uC/OS-II data
typedef unsigned
typedef signed
typedef unsigned
typedef signed
typedef unsigned
typedef signed
INT8U;
INT8S;
INT16U;
INT16S;
INT32U;
INT32S;
/*
/*
/*
/*
/*
/*
Unsigned
Signed
Unsigned
Signed
Unsigned
Signed
8
8
16
16
32
32
bit
bit
bit
bit
bit
bit
quantity
quantity
quantity
quantity
quantity
quantity
*/
*/
*/
*/
*/
*/
*/
types
char
char
int
int
long
long
Listing 10.3, µC/OS to µC/OS-II data types
In µC/OS, a task stack was declared as being of type OS_STK_TYPE . A stack, in µC/OS-II, must be declared as
being of type OS_STK . To prevent you from editing all your application files, you could simply create the two data
types in OS_CPU.H as shown in listing 10.4 (Intel 80x86 given as an example).
#define OS_STK_TYPE
#define OS_STK
UBYTE
INT8U
/* Satisfy uC/OS
/* Satisfy uC/OS-II
Listing 10.4, µC/OS and µC/OS-II task stack data types
*/
*/
10.02.02 OS_CPU.H, OS_ENTER_CRITICAL() and OS_EXIT_CRITICAL()
µC/OS-II (as did µC/OS) defines two macros to disable and enable interrupts: OS_ENTER_CRITICAL() and
OS_EXIT_CRITICAL() , respectively. You shouldn’t have to change these macros when migrating from
µC/OS to µC/OS-II.
10.02.03 OS_CPU.H, OS_STK_GROWTH
The stack on most microprocessors and microcontrollers grows from high-memory to low-memory. There are, however,
some processors that work the other way around. µC/OS-II has been designed to be able to handle either flavor. This
is accomplished by specifying to µC/OS-II which way the stack grows through the configuration constant
OS_STK_GROWTH as shown below:
Set OS_STK_GROWTH to 0 for Low to High memory stack growth.
Set OS_STK_GROWTH to 1 for High to Low memory stack growth.
These are new
#define constants from µC/OS so you will need to include them in OS_CPU.H.
10.02.04 OS_CPU.H, OS_TASK_SW()
OS_TASK_SW() is a macro that is invoked when µC/OS-II switches from a low-priority task to the highes t-priority
task. OS_TASK_SW() is always called from task level code. This macro doesn’t need to be changed from µC/OS
to µC/OS-II.
10.02.05 OS_CPU.H, OS_FAR
OS_FAR was used in µC/OS because of the Intel 80x86 architecture. This #define has been removed in µC/OS-II
because it made the code less portable. It turns out that if you specify the large model (for the Intel 80x86) then all
memory references assumed the ‘far’attribute anyway.
All tasks in µC/OS were declared as shown in listing 10.5. You can either edit all the files that made references to
OS_FAR or simply create a macro in OS_CPU.H to equate OS_FAR to nothing in order to satisfy µC/OS-II.
void OS_FAR task (void *pdata)
{
pdata = pdata;
while (1) {
.
.
}
}
Listing 10.5, Declaration of a task in µC/OS
10.03
OS_CPU_A.ASM
A µC/OS and µC/OS-II port requires that you write four fairly simple assembly language functions:
OSStartHighRdy()
OSCtxSw()
OSIntCtxSw()
OSTickISR()
10.03.01 OS_CPU_A.ASM, OSStartHighRdy()
In µC/OS-II, OSStartHighRdy() MUST call OSTaskSwHook(). OSTaskSwHook() did not
exist. OSStartHighRdy() need to call OSTaskSwHook() before you load the stack pointer of the
highest priority task. Also, OSStartHighRdy() needs to set OSRunning to 1 immediately after calling
OSTaskSwHook (). Listing 10.6 shows the pseudo-code of OSStartHighRdy() . µC/OS only had the
last three steps.
OSStartHighRdy:
Call OSTaskSwHook();
Set OSRunning to 1;
Load the processor stack pointer with OSTCBHighRdy->OSTCBStkPtr;
POP all the processor registers from the stack;
Execute a Return from Interrupt instruction;
Listing 10.6, Pseudo -code for OSStartHighRdy()
10.03.02 OS_CPU_A.ASM, OSCtxSw()
Two things have been added in µC/OS-II during a context switch. First, you MUST call OSTaskSwHook()
immediately after saving the current task’
s stack pointer into the current task’s TCB. Second, you MUST set
OSPrioCur to OSPrioHighRdy BEFORE you load the new task’s stack pointer.
Listing 10.7 shows the pseudo-code of OSCtxSw(). µC/OS-II adds steps L10.7(1) and L10.7(2).
OSCtxSw:
PUSH processor registers onto the current task’s stack;
Save the stack pointer at OSTCBCur->OSTCBStkPtr;
Call OSTaskSwHook();
OSTCBCur = OSTCBHighRdy;
OSPrioCur = OSPrioHighRdy;
Load the processor stack pointer with OSTCBHighRdy->OSTCBStkPtr;
POP all the processor registers from the stack;
Execute a Return from Interrupt instruction;
(1)
(2)
Listing 10.7, Pseudo -code for OSCtxSw()
10.03.03 OS_CPU_A.ASM, OSIntCtxSw()
Like OSCtxSw() , two things have been added in OSIntCtxSw() for µC/OS-II. First, you MUST call
OSTaskSwHook() immediately after saving the current task’s stack pointer into the current task’s TCB. Second,
you MUST set OSPrioCur to OSPrioHighRdy BEFORE you load the new task’
s stack pointer.
Listing 10.8 shows the pseudo-code of OSIntCtxSw(). µC/OS-II adds steps L10.8(1) and L10.8(2).
OSCtxSw:
Save the stack pointer at OSTCBCur->OSTCBStkPtr;
Call OSTaskSwHook();
OSTCBCur = OSTCBHighRdy;
OSPrioCur = OSPrioHighRdy;
Load the processor stack pointer with OSTCBHighRdy->OSTCBStkPtr;
POP all the processor registers from the stack;
Execute a Return from Interrupt instruction;
(1)
(2)
Listing 10.8, Pseudo-code for OSIntCtxSw()
10.03.04 OS_CPU_A.ASM, OSTickISR()
The code for this function in µC/ OS-II is identical to µC/OS and thus shouldn’t be altered.
10.04
OS_CPU_C.C
A µC/OS-II port requires that you write six fairly simple C functions:
OSTaskStkInit()
OSTaskCreateHook()
OSTaskDelHook()
OSTaskSwHook()
OSTaskStatHook()
OSTimeTickHook()
The o nly function that is actually necessary is OSTaskStkInit() . The other five functions MUST be declared
but don’t need to contain any code inside them.
10.04.01 OS_CPU_C.C, OSTaskStkInit()
In µC/OS, OSTaskCreate() was considered a processor specific function. It turned out that only a portion of
OSTaskCreate() was actually processor specific. This portion has been extracted out of
OSTaskCreate() and placed in a new function called OSTaskStkInit().
OSTaskStkInit() is only responsible for setting up the task’s stack to look as if an interrupt just occurred and
all the processor registers were pushed onto the task’s stack. To give you an example, listing 10.9 shows the µC/OS code
for OSTaskCreate() for the Intel 80x86 real-mode, large model. Listing 10.10 shows the code for
OSTaskStkInit() for the same processor but for µC/OS-II. As you can see by comparing the two listings,
lines L10.9(2) through L10.9(18) have basically been extracted from OSTaskCreate() and placed in
OSTaskStkInit() . In other words, everything after OS_EXIT_CRITICAL() L10.9(1) and calling
OSTCBInit() L10.9(19) has been moved to OSTaskStkInit().
You will notice that the code for µC/OS-II uses the new data types (see section 10.02.01, OS_CPU.H, Compiler specific
data types). Also, instead of initializing all the processor registers to0x0000, I decided to initialize them with a value
that would make debugging a little easier. You should note that the initial value of a register when a task is created is not
critical.
UBYTE OSTaskCreate(void (*task)(void *pd), void *pdata, void *pstk, UBYTE p)
{
UWORD OS_FAR *stk;
UBYTE
err;
OS_ENTER_CRITICAL();
if (OSTCBPrioTbl[p] == (OS_TCB *)0) {
OSTCBPrioTbl[p] = (OS_TCB *)1;
OS_EXIT_CRITICAL();
stk
= (UWORD OS_FAR *)pstk;
*--stk = (UWORD)FP_OFF(pdata);
*--stk = (UWORD)FP_SEG(task);
*--stk = (UWORD)FP_OFF(task);
*--stk = (UWORD)0x0202;
*--stk = (UWORD)FP_SEG(task);
*--stk = (UWORD)FP_OFF(task);
*--stk = (UWORD)0x0000;
*--stk = (UWORD)0x0000;
*--stk = (UWORD)0x0000;
*--stk = (UWORD)0x0000;
*--stk = (UWORD)0x0000;
*--stk = (UWORD)0x0000;
*--stk = (UWORD)0x0000;
*--stk = (UWORD)0x0000;
*--stk = (UWORD)0x0000;
*--stk = _DS;
err
= OSTCBInit(p, (void far *)stk);
if (err == OS_NO_ERR) {
if (OSRunning) {
OSSched();
}
} else {
OSTCBPrioTbl[p] = (OS_TCB *)0;
}
return (err);
} else {
OS_EXIT_CRITICAL();
return (OS_PRIO_EXIST);
}
(1)
(2)
(3)
(4)
(5)
(6)
(7)
(8)
(9)
(10)
(11)
(12)
(13)
(14)
(15)
(16)
(17)
(18)
(19)
}
Listing 10.9, OSTaskCreate() for µC/OS
void *OSTaskStkInit (void (*task)(void *pd), void *pdata, void *ptos, INT16U opt)
{
INT16U *stk;
opt
stk
*stk-*stk-*stk-*stk-*stk-*stk-*stk-*stk-*stk-*stk-*stk-*stk-*stk-*stk-*stk-*stk-*stk
return
= opt;
= (INT16U *)ptos;
= (INT16U)FP_SEG(pdata);
= (INT16U)FP_OFF(pdata);
= (INT16U)FP_SEG(task);
= (INT16U)FP_OFF(task);
= (INT16U)0x0202;
= (INT16U)FP_SEG(task);
= (INT16U)FP_OFF(task);
= (INT16U)0xAAAA;
= (INT16U)0xCCCC;
= (INT16U)0xDDDD;
= (INT16U)0xBBBB;
= (INT16U)0x0000;
= (INT16U)0x1111;
= (INT16U)0x2222;
= (INT16U)0x3333;
= (INT16U)0x4444;
= _DS;
((void *)stk);
}
Listing 10.10, OSTaskStkInit() for µC/OS-II
10.04.02 OS_CPU_C.C, OSTaskCreateHook()
OSTaskCreateHook() is a function that did not exist in µC/OS. If you are simply migrating from µC/OS to
µC/OS-II then you can simply declare an empty function as shown in listing 10.11. You should note that if I didn’t assign
ptcb to ptcb then some compilers would generate a warning indicating that the argument ptcb is not used.
#if OS_CPU_HOOKS_EN
OSTaskCreateHook(OS_TCB *ptcb)
{
ptcb = ptcb;
}
#endif
Listing 10.11, OSTaskCreateHook() for µC /OS-II
You should also wrap the function declaration with the conditional compilation directive. The code for
OSTaskCreateHook() is generated only if OS_CPU_HOOKS_EN is set to 1 in OS_CFG.H. This
allows the user of your port to redefine all the hook functions in a different file.
10.04.03 OS_CPU_C.C, OSTaskDelHook()
OSTaskDelHook() is a function that did not exist in µC/OS. Again, if you are migrating from µC/OS to µC/OS-II
then you can simply declare an empty function as shown in listing 10.12. You should note that if I didn’t assign ptcb
to ptcb then some compilers would generate a warning indicating that the argument ptcb is not used.
#if OS_CPU_HOOKS_EN
OSTaskDelHook(OS_TCB *ptcb)
{
ptcb = ptcb;
}
#endif
Listing 10.12, OSTaskDelHook() for µC/OS-II
You should also wrap the function declaration with the conditional compilation directive. The code for
OSTaskDelHook() is generated only if OS_CPU_HOOKS_EN is set to 1 in OS_CFG.H. This allows
the user of your port to redefine all the hook functions in a different file.
10.04.04 OS_CPU_C.C, OSTaskSwHook()
OSTaskSwHook() is also function that did not exist in µC/OS. If you are migrating from µC/OS to µC/OS-II then
you can simply declare an empty function as shown in listing 10.13.
#if OS_CPU_HOOKS_EN
OSTaskSwHook(void)
{
}
#endif
Listing 10.13, OSTaskSwHook() for µC/OS-II
You should also wrap the function declaration with the conditional compilation directive. The code for
OSTaskSwHook() is generated only if OS_CPU_HOOKS_EN is set to 1 in OS_CFG.H.
10.04.05 OS_CPU_C.C, OSTaskStatHook()
OSTaskStatHook() is also function that did not exist in µC/OS. You can simply declare an empty function as
shown in listing 10.14.
#if OS_CPU_HOOKS_EN
OSTaskStatHook(void)
{
}
#endif
Listing 10.14, OSTaskStatHook() for µC/OS-II
You should also wrap the function declaration with the conditional compilation directive. The code for
OSTaskStatHook() is generated only if OS_CPU_HOOKS_EN is set to 1 in OS_CFG.H .
10.04.06 OS_CPU_C.C, OSTimeTickHook()
OSTimeTickHook() is also function that did not exist in µC/OS. You can simply declare an empty function as
shown in listing 10.15.
#if OS_CPU_HOOKS_EN
OSTimeTickHook(void)
{
}
#endif
Listing 10.14, OSTimeTickHook() for µC/OS-II
You should also wrap the function declaration with the conditional compilation directive. The code for
OSTimeTickHook() is generated only if OS_CPU_HOOKS_EN is set to 1 in OS_CFG.H .
10.05
Summary
Table 10.3 provides a summary of the changes needed to bring a port for µC/OS towork with µC/OS-II. You should note
that ‘processor_name.?’Is the name of the µC/OS file containing the port.
µC/OS
Processor_name.H
Data types:
Change UBYTE to
Change BYTE to
Change UWORD to
Change WORD to
Change ULONG to
Change LONG to
Change OS_STK_TYPE to
OS_ENTER_CRITICAL(
)
OS_EXIT_CRITICAL()
-
OS_TASK_SW()
OS_FAR
Processor_name.ASM
OSStartHighRdy()
OSCtxSw()
OSIntCtxSw()
OSTickISR()
Processor_name.C
OSTaskCreate()
µC/OS-II
OS_CPU.H
Data types
INT8U
INT8S
INT16U
INT16S
INT32U
INT32S
OS_STK
No change
No change
Add OS_STK_GROWTH
No change
Define OS_FAR to nothing or,
Remove all references to OS_FAR
OS_CPU_A.ASM
Add call to OSTaskSwHook()
Set OSRunning to 1 (8-bit)
Add call to OSTaskSwHook()
Copy OSPrioHighRdy to OSPrioCur (8-bit)
Add call to OSTaskSwHook()
Copy OSPrioHighRdy to OSPrioCur (8-bit)
No change
OS_CPU_C.C
Extract stack initialization code and put this code in a function called
OSTaskStkInit() .
-
Add an empty function called OSTaskCreateHook() .
Add an empty function called OSTaskDelHook() .
-
Add an empty function called OSTaskSwHook().
Add an empty function called OSTaskStatHook() .
Add an empty function called OSTimeTickHook() .
Table 10.3, Summary of migrating a µC/OS port to µC/OS-II.
Chapter 11
Reference Manual
This chapter provides a user's guide to µC/OS-II services. Each of the user accessible kernel services is presented in
alphabetical order and the following information is provided for each of the services:
1)
2)
3)
4)
5)
6)
7)
8)
A brief description
The function prototype
The file name where the source code is found
The #define constant needed to enable the code for the service
A description of the arguments passed to the function
A description of the return value(s)
Specific notes and warning on the usage of the service
One or two examples on how to use the function
OSInit()
void OSInit(void)
File
Called from
Code enabled by
OS_CORE.C
Startup code only
N/A
OSInit() is used to initialize µC/OS-II. OSInit() must be called prior to calling OSStart() which will actually
start multitasking.
Arguments
NONE
Returned Value
NONE
Notes/Warnings
OSInit() must be called before OSStart().
Example
void main (void)
{
.
.
OSInit();
.
.
OSStart();
}
/* Initialize uC/OS-II */
/* Start Multitasking
*/
OSIntEnter()
void OSIntEnter(void)
File
Called from
Code enabled by
OS_CORE.C
ISR only
N/A
OSIntEnter() is used to notify µC/OS-II that an ISR is being processed. This allows µC/OS-II to keep track of
interrupt nesting. OSIntEnter() is used in conjunction with OSIntExit().
Arguments
NONE
Returned Value
NONE
Notes/Warnings
1)
2)
This function must not be called by task level code.
You can actually increment the interrupt nesting counter (OSIntNesting) directly if your processor can perform
this operation indivisibly. In other words, if your processor can perform a read-modify-write as an atomic operation
then you don't need to call OSIntEnter() and instead, directly increment OSIntNesting. This would avoid
the overhead associated with calling a function.
Example #1
(Intel 80x86, Real-Mode, Large Model)
Here we call OSIntEnter() because of backward compatibility with µC/OS. Also, you would do this if the processor
you are using does not allow you to increment OSIntNesting using a single instruction.
ISRx
PROC
PUSHA
PUSH
PUSH
FAR
MOV
MOV
AX, DGROUP
DS, AX
CALL
.
.
POP
POP
POPA
IRET
ENDP
FAR PTR _OSIntEnter ; Notify µC/OS-II of start of ISR
; Save interrupted task's context
ES
DS
;
; Reload DS
;
ISRx
DS
ES
; Restore processor registers
; Return from interrupt
Example #2
(Intel 80x86, Real-Mode, Large Model)
Here we increment OSIntNesting because the 80x86 allow you to perform this operation indivisibly.
ISRx
PROC
PUSHA
PUSH
PUSH
FAR
MOV
MOV
AX, DGROUP
DS, AX
INC
.
.
.
BYTE PTR _OSIntNesting ; Notify µC/OS-II of start of ISR
; Save interrupted task's context
ES
DS
;
; Reload DS
;
ISRx
POP
POP
POPA
IRET
ENDP
DS
ES
; Restore processor registers
; Return from interrupt
OSIntExit()
void OSIntExit(void);
File
Called from
Code enabled by
OS_CORE.C
ISR only
N/A
OSIntExit() is used to notify µC/OS-II that an ISR has completed. This allows µC/OS-II to keep track of interrupt
nesting. OSIntExit() is used in conjunction with OSIntEnter(). When the last nested interrupt completes,
µC/OS-II will call the scheduler to determine if a higher priority task has been made ready to run. In this case, the
interrupt will return to the higher priority task instead of the interrupted task.
Arguments
NONE
Returned Value
NONE
Notes/Warnings
This function must not be called by task level code. Also, if you decided to increment OSIntNesting you will still
need to call OSIntExit().
Example
(Intel 80x86, Real-Mode, Large Model)
ISRx
ISRx
PROC
PUSHA
PUSH
PUSH
.
.
CALL
POP
POP
POPA
IRET
ENDP
FAR
; Save processor registers
ES
DS
FAR PTR _OSIntExit ; Notify µC/OS-II of end of ISR
DS
; Restore processor registers
ES
; Return to interrupted task
OSMboxAccept()
void *OSMboxAccept(OS_EVENT *pevent);
File
Called from
Code enabled by
OS_MBOX.C
Task or ISR
OS_MBOX_EN
OSMboxAccept() allows you to check to see if a message is available from the desired mailbox. Unlike
OSMboxPend(), OSMboxAccept() does not suspend the calling task if a message is not available. If a message is
available, the message will be returned to your application and the contents of the mailbox will be cleared. This call is
typically used by ISRs because an ISR is not allowed to wait for a message at a mailbox.
Arguments
pevent is a pointer to the mailbox where the message is to be received from. This pointer is returned to your application
when the mailbox is created (see OSMboxCreate()).
Returned Value
A pointer to the message if one is available or, NULL if the mailbox does not contain a message.
Notes/Warnings
Mailboxes must be created before they are used.
Example
OS_EVENT *CommMbox;
void Task (void *pdata)
{
void *msg;
pdata = pdata;
for (;;) {
msg = OSMboxAccept(CommMbox);
if (msg != (void *)0) {
.
.
} else {
.
.
}
.
.
}
}
/* Check mailbox for a message
*/
/* Message received, process
*/
/* Message not received, do ..
/* .. something else
*/
*/
OSMboxCreate()
OS_EVENT *OSMboxCreate(void *msg);
File
Called from
Code enabled by
OS_MBOX.C
Task or Startup code
OS_MBOX_EN
OSMboxCreate() is used to create and initialize a mailbox. A mailbox is used to allow tasks or ISRs to send a pointer
sized variable (message) to one or more tasks.
Arguments
msg is used to initialize the contents of the mailbox. The mailbox is empty whenmsg is aNULL pointer. The mailbox will
initially contain a message when msg is non NULL.
Returned Value
A pointer to the event control block allocated to the mailbox. If no event control block is available, OSMboxCreate()
will return a NULL pointer.
Notes/Warnings
Mailboxes must be created before they are used.
Example
OS_EVENT *CommMbox;
void main(void)
{
.
.
OSInit();
/* Initialize µC/OS-II
.
.
CommMbox = OSMboxCreate((void *)0); /* Create COMM mailbox
OSStart();
/* Start Multitasking
}
*/
*/
*/
OSMboxPend()
void *OSMboxPend(OS_EVENT *pevent, INT16U timeout, INT8U *err);
File
Called from
Code enabled by
OS_MBOX.C
Task only
OS_MBOX_EN
OSMboxPend() is used when a task desires to receive a message. The message is sent to the task either by an ISR or
by another task. The message received is a pointer size variable and its use is application specific. If a message is
present in the mailbox when OSMboxPend() is called then, the message is retrieved, the mailbox emptied and the
retrieved message is returned to the caller. If no message is present in the mailbox, OSMboxPend() will suspend the
current task until either a message is received or a user specified timeoutexpires. If a message is sent to the mailbox and
multiple tasks are waiting for such a message, µC/OS-II will resume the highest priority task that is waiting. A pended
task that has been suspended with OSTaskSuspend() can receive a message. The task will, however, remain
suspended until the task is resumed by calling OSTaskResume().
Arguments
pevent is a pointer to the mailbox where the message is to be received from. This pointer is returned to your application
when the mailbox is created (see OSMboxCreate()).
timeout is used to allow the task to resume execution if a message is not received from the mailbox within the specified
number of clock ticks. A timeout value of 0 indicates that the task desires to wait forever for the message. The
maximumtimeout is 65535 clock ticks. The timeout value is not synchronized with the clock tick. The timeout count
starts being decremented on the next clock tick which could potentially occur immediately.
err is a pointer to a variable which will be used to hold an error code. OSMboxPend() sets *err to either:
1)
2)
3)
OS_NO_ERR, a message was received
OS_TIMEOUT, a message was not received within the specified timeout period
OS_ERR_PEND_ISR, you called this function from an ISR and µC/OS-II would have to suspend the ISR.
In general, you should not call OSMboxPend(). µC/OS-II checks for this situation in case you do
anyway.
Returned Value
OSMboxPend() returns the message sent by either a task or an ISR and *err is set to OS_NO_ERR. If a message is
not received within the specified timeout period, the returned message will be a NULL pointer and *err is set to
OS_TIMEOUT.
Notes/Warnings
Mailboxes must be created before they are used.
Example
OS_EVENT *CommMbox;
void CommTask(void *pdata)
{
INT8U err;
void *msg;
pdata = pdata;
for (;;) {
.
.
msg = OSMboxPend(CommMbox, 10, &err);
if (err == OS_NO_ERR) {
.
. /* Code for received message
*/
.
} else {
.
. /* Code for message not received within timeout */
.
}
.
.
}
}
OSMboxPost()
INT8U OSMboxPost(OS_EVENT *pevent, void *msg);
File
Called from
Code enabled by
OS_MBOX.C
Task or ISR
OS_MBOX_EN
OSMboxPost() is used to send a message to a task through a mailbox. A message is a pointer size variable and its use
is application specific. If there is already a message in the mailbox, an error code is returned indicating that the mailbox
is full. OSMboxPost() will then immediately return to its caller and the message will not be placed in the mailbox. If
any task is waiting for a message at the mailbox then, the highest priority task waiting will receive the message. If the task
waiting for the message has a higher priority than the task sending the message then, the higher priority task will be
resumed and the task sending the message will be suspended. In other words, a context switch will occur.
Arguments
pevent is a pointer to the mailbox where the message is to be deposited into. This pointer is returned to your
application when the mailbox is created (see OSMboxCreate()).
msg is the actual message sent to the task. msg is a pointer size variable and is application specific. You MUST never
post a NULL pointer because this indicates that the mailbox is empty.
Returned Value
OSMboxPost() returns one of these two error codes:
1) OS_NO_ERR, if the message was deposited in the mailbox
2) OS_MBOX_FULL, if the mailbox already contained a message
Notes/Warnings
Mailboxes must be created before they are used.
Example
OS_EVENT *CommMbox;
INT8U
CommRxBuf[100];
void CommTaskRx(void *pdata)
{
INT8U err;
pdata = pdata;
for (;;) {
.
.
err = OSMboxPost(CommMbox, (void *)&CommRxBuf[0]);
.
.
}
}
OSMboxQuery()
INT8U OSMboxQuery(OS_EVENT *pevent, OS_MBOX_DATA *pdata);
File
Called from
Code enabled by
OS_MBOX.C
Task or ISR
OS_MBOX_EN
OSMboxQuery() is used to obtain information about a message mailbox. Your application must allocate an
OS_MBOX_DATA data structure which will be used to receive data from the event control block of the message mailbox.
OSMboxQuery() allows you to determine whether any task is waiting for message(s) at the mailbox, how many tasks
are waiting (by counting the number of 1s in the .OSEventTbl[] field, and examine the contents of the contents of
the message. You can use the tableOSNBitsTbl[] to find out how many ones are set in a given byte. Note that the
size of .OSEventTbl[] is established by the #define constant OS_EVENT_TBL_SIZE (see uCOS_II.H ).
Arguments
pevent is a pointer to the mailbox. This pointer is returned to your application when the mailbox is created (see
OSMboxCreate()).
pdata is a pointer to a data structure of type OS_MBOX_DATA which contains the following fields:
void OSMsg;
/* Copy of the message stored in the mailbox */
INT8U OSEventTbl[OS_EVENT_TBL_SIZE]; /* Copy of the mailbox wait list */
INT8U OSEventGrp;
Returned Value
OSMboxQuery() returns one of these two error codes:
1) OS_NO_ERR, if the call was successful
2) OS_ERR_EVENT_TYPE, if you didn’t pass a pointer to a message mailbox
Notes/Warnings
Message mailboxes must be created before they are used.
Example
In this example, we check the contents of the mailbox to see how many tasks are waiting for it.
OS_EVENT *CommMbox;
void Task (void *pdata)
{
OS_MBOXDATA mbox_data;
INT8U
err;
INT8U
nwait;
INT8U
i;
/* Number of tasks waiting on mailbox */
pdata = pdata;
for (;;) {
.
.
err = OSMboxQuery(CommMbox, &mbox_data);
if (err == OS_NO_ERR) {
nwait = 0;
/* Count # tasks waiting on mailbox
if (mbox_data.OSEventGrp != 0x00) {
for (i = 0; i < OS_EVENT_TBL_SIZE; i++) {
nwait += OSNBitsTbl[mbox_data.OSEventTbl[i]];
}
}
}
.
.
}
*/
}
OSMemCreate()
OS_MEM *OSMemCreate(void *addr, INT32U nblks, INT32U blksize, INT8U *err);
File
Called from
Code enabled by
OS_MEM.C
Task or startup code
OS_MEM_EN
OSMemCreate() is used to c reate and initialize a memory partition. A memory partition contains a user-specified
number of fixed-sized memory blocks. Your application can obtain one of these memory blocks and when done, release
the block back to the partition.
Arguments
addr is the address of the start of a memory area that will be used to create fixed-sized memory blocks. Memory
partitions can either be created using static arrays or malloc’ed during startup.
nblks contains the number of memory blocks available from the specified partition. You MUST specify at least 2
memory blocks per partition.
blksize specifies the size (in bytes) of each memory block within a partition. A memory block MUST be large enough
to hold at least a pointer.
err is a pointer to a variable which will be used to hold an error code. OSMemCreate() sets *err to either:
1) OS_NO_ERR, if the memory partition was created successfully.
2) OS_MEM_INVALID_PART, if a free memory partition is not available.
3) OS_MEM_INVALID_BLKS, if you didn’
t specify at least 2 memory blocks per partition.
4) OS_MEM_INVALID_SIZE, if you didn’
t specify a block size that can at least contain a pointer variable.
Returned Value
OSMemCreate() returns a pointer to the created memory partition control block if one is available. If no memory
partition control block is available, OSMemCreate() will return a NULL pointer.
Notes/Warnings
Memory partitions must be created before they are used.
Example
OS_MEM *CommMem;
INT8U
CommBuf[16][128];
void main(void)
{
INT8U err;
OSInit();
/* Initialize µC/OS-II
.
.
CommMem = OSMemCreate(&CommBuf[0][0], 16, 128, &err);
.
.
OSStart();
/* Start Multitasking
}
OSMemGet()
void *OSMemGet(OS_MEM *pmem, INT8U *err);
*/
*/
File
Called from
Code enabled by
OS_MEM.C
Task or ISR
OS_MEM_EN
OSMemGet() is used to obtain a memory block from a memory partition. It is assumed that your application will know
the size of each memory block obtained. Also, your application MUST return the memory block (using OSMemPut())
when it no longer needs it. You can call OSMemGet() more than once until all memory blocks are allocated.
Arguments
pmem is a pointer to the memory partition control block that was returned to your application from the OSMemCreate()
call.
err is a pointer to a variable which will be used to hold an error code. OSMemGet() sets *err to either:
1) OS_NO_ERR, if a memory block was available and returned to your application.
2) OS_MEM_NO_FREE_BLKS, if the memory partition doesn’t contain any more memory blocks to allocate.
Returned Value
OSMemGet() returns a pointer to the allocated memory block if one is available. If no memory block is available from
the memory partition, OSMemGet() will return a NULL pointer.
Notes/Warnings
Memory partitions must be created before they are used.
Example
OS_MEM *CommMem;
void Task (void *pdata)
{
INT8U *msg;
pdata = pdata;
for (;;) {
msg = OSMemGet(CommMem, &err);
if (msg != (INT8U *)0) {
.
/* Memory block allocated, use it. */
.
}
.
.
}
}
OSMemPut()
INT8U OSMemPut(OS_MEM *pmem, void *pblk);
File
Called from
Code enabled by
OS_MEM.C
Task or ISR
OS_MEM_EN
OSMemPut() is used to return a memory block to a memory partition. It is assumed that you will return the memory
block to the appropriate memory partition.
Arguments
pmem is a pointer to the memory partition control block that was returned to your application from the OSMemCreate()
call.
pblk is a pointer to the memory block to return back to the memory partition.
Returned Value
OSMemPut() returns one of the following error codes:
1) OS_NO_ERR, if a memory block was available and returned to your application.
2) OS_MEM_FULL, if the memory partition cannot accept any more memory blocks. This is surely an indication
that something went wrong as you returned more memory blocks that you obtained using OSMemGet().
Notes/Warnings
Memory partitions must be created before they are used.
Example
OS_MEM *CommMem;
INT8U *CommMsg;
void Task (void *pdata)
{
INT8U err;
pdata = pdata;
for (;;) {
err = OSMemPut(CommMem, (void *)CommMsg);
if (err == OS_NO_ERR) {
.
/* Memory block released
.
}
.
.
}
*/
}
OSMemQuery()
INT8U OSMemQuery(OS_MEM *pmem, OS_MEM_DATA *pdata);
File
Called from
Code enabled by
OS_MEM.C
Task or ISR
OS_MEM_EN
OSMemQuery() is used to obtain information about a memory partition. Basically, this function returns the same
information found in the OS_MEM data structure but, in a new data structure called OS_MEM_DATA. OS_MEM_DATA
also contains an additional field that indicates the number of memory blocks in use.
Arguments
pmem is a pointer to the memory partition control block that was returned to your application from the OSMemCreate()
call.
pdata is a pointer to a data structure of type OS_MEM_DATA which contains the following fields:
void
*OSAddr;
void
*OSFreeList;
INT32U OSBlkSize;
INT32U OSNBlks;
INT32U OSNFree;
INT32U OSNUsed;
/*
/*
/*
/*
/*
/*
Points to beginning address of the memory partition */
Points to beginning of the free list of memory blocks*/
Size (in bytes) of each memory block
*/
Total number of blocks in the partition
*/
Number of memory blocks free
*/
Number of memory blocks used
*/
Returned Value
OSMemQuery() always returns OS_NO_ERR.
Notes/Warnings
Memory partitions must be created before they are used.
Example
OS_MEM
*CommMem;
OS_MEM_DATA mem_data;
void Task (void *pdata)
{
INT8U err;
pdata = pdata;
for (;;) {
.
.
err = OSMemQuery(CommMem, &mem_data);
.
.
}
}
OSQAccept()
void *OSQAccept(OS_EVENT *pevent);
File
Called from
Code enabled by
OS_Q.C
Task or ISR
OS_Q_EN
OSQAccept() allows you to check to see if a message is available from the desired message queue. Unlike
OSQPend(), OSQAccept() does not suspend the calling task if a message is not available. If a message is available,
the message will be returned to your application and the message will be extracted from the queue. This call is typically
used by ISRs because an ISR is not allowed to wait for messages at a queue.
Arguments
pevent is a pointer to the message queue where the message is to be received from. This pointer is returned to your
application when the message queue is created (see OSQCreate()).
Returned Value
A pointer to the message if one is available or, NULL if the message queue does not contain a message.
Notes/Warnings
Message queues must be created before they are used.
Example
OS_EVENT *CommQ;
void Task (void *pdata)
{
void *msg;
pdata = pdata;
for (;;) {
msg = OSQAccept(CommQ);
if (msg != (void *)0) {
.
.
} else {
.
/* Check queue for a message
*/
/* Message received, process
*/
/* Message not received, do .. */
.
/* .. something else
*/
}
.
.
}
}
OSQCreate()
OS_EVENT *OSQCreate(void **start, INT8U size);
File
Called from
Code enabled by
OS_Q.C
Task or startup code
OS_Q_EN
OSQCreate() is used to create a message queue. A message queue is used to allow tasks or ISRs to send pointer
sized variables (messages) to one or more tasks. The meaning of the messages sent are application specific.
Arguments
start is the base address of the message storage area. A message s torage area is declared as an array of pointers to
voids.
size is the size (in number of entries) of the message storage area.
Returned Value
OSQCreate() returns a pointer to the event control block allocated to the queue. If no event control block is available,
OSQCreate() will return a NULL pointer.
Notes/Warnings
Queues must be created before they are used.
Example
OS_EVENT *CommQ;
void
*CommMsg[10];
void main(void)
{
OSInit();
/* Initialize µC/OS-II
.
.
CommQ = OSQCreate(&CommMsg[0], 10); /* Create COMM Q
.
.
OSStart();
/* Start Multitasking
}
*/
*/
*/
OSQFlush()
INT8U *OSQFlush(OS_EVENT *pevent);
File
Called from
Code enabled by
OS_Q.C
Task or ISR
OS_Q_EN
OSQFlush() is used to empty the contents of the message queue and basically eliminate all the messages sent to the
queue. This function takes the same amount of time to execute whether tasks are waiting on the queue (and thus no
messages are present) or the queue contains one or more messages.
Arguments
pevent is a pointer to the message queue. This pointer is returned to your application when the message queue is
created (see OSQCreate()).
Returned Value
One of the following codes:
1) OS_NO_ERR, the message queue was flushed.
2) OS_ERR_EVENT_TYPE, if you attempted to flush an object other than a message queue.
Notes/Warnings
Queues must be created before they are used.
Example
OS_EVENT *CommQ;
void main(void)
{
INT8U err;
OSInit();
.
.
err = OSQFlush(CommQ);
.
.
OSStart();
/* Initialize µC/OS-II
*/
/* Start Multitasking
*/
}
OSQPend()
void *OSQPend(OS_EVENT *pevent, INT16U timeout, INT8U *err);
File
Called from
Code enabled by
OS_Q.C
Task only
OS_Q_EN
OSQPend() is used when a task desires to receive messages from a queue. The messages are sent to the task either
by an ISR or by another task. The messages received are pointer size variables and their use is application specific. If
a at least one message is present at the queue when OSQPend() is called, the message is retrieved and returned to
the caller. If no message is present at the queue, OSQPend() will suspend the current task until either a message
is received or a user specified timeout expires. If a message is sent to the queue and multiple tasks are waiting for such
a message then, µC/OS-II will resume the highest priority task that is waiting. A pended task that has been suspended
with OSTaskSuspend() can receive a message. The task will, however, remain suspended until the task is
resumed by calling OSTaskResume() .
Arguments
pevent is a pointer to the queue where the messages are to be received from. This pointer is returned to your
application when the queue is created (see OSQCreate()).
timeout is used to allow the task to resume execution if a message is not received from the mailbox within the specified
number of clock ticks. A timeout value of 0 indicates that the task desires to wait forever for the message. The
maximum timeout is 65535 clock ticks. The timeout value is not synchronized with the clock tick. The timeout count
starts being decremented on the next clock tick which could potentially occur immediately.
err is a pointer to a variable which will be used to hold an error code. OSQPend() sets *err to either:
1)
2)
3)
OS_NO_ERR, a message was received
OS_TIMEOUT, a message was not received within the specified timeout
OS_ERR_PEND_ISR, you called this function from an ISR and µC/OS-II would have to suspend the ISR.
In general, you should not call OSQPend(). µC/OS-II checks for this situation in case you do anyway.
Returned Value
OSQPend() returns a message sent by either a task or an ISR and *err is set to OS_NO_ERR. If a timeout occurred,
OSQPend() returns a NULL pointer and sets *err to OS_TIMEOUT.
Notes/Warnings
Queues must be created before they are used.
Example
OS_EVENT *CommQ;
void CommTask(void *data)
{
INT8U err;
void *msg;
pdata = pdata;
for (;;) {
.
.
msg = OSQPend(CommQ, 100, &err);
if (err == OS_NO_ERR) {
.
.
/* Message received within 100 ticks!
.
} else {
.
.
/* Message not received, must have timed out
.
}
.
.
}
*/
*/
}
OSQPost()
INT8U OSQPost(OS_EVENT *pevent, void *msg);
File
Called from
Code enabled by
OS_Q.C
Task or ISR
OS_Q_EN
OSQPost() is used to send a message to a task through a queue. A message is a pointer size variable and its use
is application specific. If the message queue is full an error code is returned to the caller. OSQPost() will then
immediately return to its caller and the message will not be placed in the queue. If any task is waiting for a message at the
queue then, the highest priority task will receive the message. If the task waiting for the message has a higher priority
than the task sending the message then, the higher priority task will be resumed and the task sending the message will
be suspended. In other words, a context switch will occur. Message queues are first-in-first-out (FIFO) which means
that the first message sent will be the first message received.
Arguments
pevent is a pointer to the queue where the message is to be deposited into. This pointer is returned to your application
when the queue is created (see OSQCreate()).
msg is the actual message sent to the task. msg is a pointer size variable and is application specific. You MUST never
post a NULL pointer.
Returned Value
OSQPost() returns one of these two error codes
1) OS_NO_ERR, if the message was deposited in the queue
2) OS_Q_FULL, if the queue is already full
Notes/Warnings
Queues must be created before they are used.
Example
OS_EVENT *CommQ;
INT8U
CommRxBuf[100];
void CommTaskRx(void *pdata)
{
INT8U err;
pdata = pdata;
for (;;) {
.
.
err = OSQPost(CommQ, (void *)&CommRxBuf[0]);
if (err == OS_NO_ERR) {
.
/* Message was deposited into queue
.
} else {
.
/* Queue is full
.
}
.
.
}
*/
*/
}
OSQPostFront()
INT8U OSQPostFront(OS_EVENT *pevent, void *msg);
File
Called from
Code enabled by
OS_Q.C
Task or ISR
OS_Q_EN
OSQPostFront() is used to send a message to a task through a queue. OSQPostFront() behaves
very much like OSQPost() except that the message is inserted at the front of the queue. This means that
OSQPostFront() makes the message queue behave like a last-in-first-out (LIFO) queue instead of a
first-in-first-out (FIFO) queue. A message is a pointer size variable and its use is application specific. If the message
queue is full an error code is returned to the caller. OSQPostFront() will then immediately return to its caller
and the message will not be placed in the queue. If any task is waiting for a message at the queue then, the highest
priority task will receive the message. If the task waiting for the message has a higher priority than the task sending the
message then, the higher priority task will be resumed and the task sending the message will be suspended. In other
words, a context switch will occur.
Arguments
pevent is a pointer to the queue where the message is to be deposited into. This pointer is returned to your application
when the queue is created (see OSQCreate()).
msg is the actual message sent to the task. msg is a pointer size variable and is application specific. You MUST never
post a NULL pointer.
Returned Value
OSQPostFront() returns one of these two error codes
1) OS_NO_ERR, if the message was deposited in the queue
2) OS_Q_FULL, if the queue is already full
Notes/Warnings
Queues must be created before they are used.
Example
OS_EVENT *CommQ;
INT8U
CommRxBuf[100];
void CommTaskRx(void *pdata)
{
INT8U err;
pdata = pdata;
for (;;) {
.
.
err = OSQPostFront(CommQ, (void *)&CommRxBuf[0]);
if (err == OS_NO_ERR) {
.
/* Message was deposited into queue
.
} else {
.
/* Queue is full
.
}
.
.
}
*/
*/
}
OSQQuery()
INT8U OSQQuery(OS_EVENT *pevent, OS_Q_DATA *pdata);
File
Called from
Code enabled by
OS_Q.C
Task or ISR
OS_MBOX_EN
OSQQuery() is used to obtain information about a message queue. Your application must allocate an OS_Q_DATA
data structure which will be used to receive data from the event control block of the message queue. OSQQuery()
allows you to determine whether any task is waiting for message(s) at the queue, how many tasks are waiting (by
counting the number of 1s in the .OSEventTbl[] field, how many messages are in the queue, what the message
queue size is, and examine the contents of the next message that would be returned if there is at least one message in the
queue. You can use the table OSNBitsTbl[] to find out how many ones are set in a given byte. Note that the size
of .OSEventTbl[] is established by the #define constant OS_EVENT_TBL_SIZE (see uCOS_II.H ).
Arguments
pevent is a pointer to the message queue. This pointer is returned to your application when the queue is created (see
OSQCreate()).
pdata is a pointer to a data structure of type OS_Q_DATA which contains the following fields.
void *OSMsg;
/* Next message if one available
INT16U OSNMsgs;
/* Number of messages in the queue
INT16U OSQSize;
/* Size of the message queue
INT8U OSEventTbl[OS_EVENT_TBL_SIZE]; /* Message queue wait list
INT8U OSEventGrp;
Returned Value
OSQQuery() returns one of these two error codes:
1) OS_NO_ERR, if the call was successful
2) OS_ERR_EVENT_TYPE, if you didn’t pass a pointer to a message queue
Notes/Warnings
Message queues must be created before they are used.
Example
In this example, we check the contents of the message queue to see how many tasks are waiting for it.
OS_EVENT *CommQ;
void Task (void *pdata)
{
OS_Q_DATA qdata;
INT8U
err;
INT8U
nwait;
INT8U
i;
pdata = pdata;
for (;;) {
.
.
/* Number of tasks waiting on queue */
*/
*/
*/
*/
err = OSQQuery(CommQ, &qdata);
if (err == OS_NO_ERR) {
nwait = 0;
/* Count # tasks waiting on queue
if (qdata.OSEventGrp != 0x00) {
for (i = 0; i < OS_EVENT_TBL_SIZE; i++) {
nwait += OSNBitsTbl[qdata.OSEventTbl[i]];
}
}
}
.
.
*/
}
}
OSSchedLock()
void OSSchedLock(void);
File
Called from
Code enabled by
OS_CORE.C
Task or ISR
N/A
OSSchedLock() is used to prevent task rescheduling until its counterpart, OSSchedUnlock(), is called. The task
which calls OSSchedLock() keeps control of the CPU even though other higher priority tasks are ready to run.
However, interrupts will still be recognized and serviced (assuming interrupts are enabled). OSSchedLock() and
OSSchedUnlock() must be used in pair. µC/OS-II allows OSSchedLock() to be nested up to 254 levels deep.
Scheduling is enabled when an equal number of OSSchedUnlock() calls have been made.
Arguments
NONE
Returned Value
NONE
Notes/Warnings
After calling OSSchedLock(), you application must not make any system call which will suspend execution of the
current task i.e., your application cannot call OSTimeDly(), OSTimeDlyHMSM(), OSSemPend(),
OSMboxPend() or OSQPend(). Since the scheduler is locked out, no other task will be allowed to run and your
system will lock up.
Example
void TaskX(void *pdata)
{
pdata = pdata;
for (;;) {
.
OSSchedLock();
/* Prevent other tasks to run
*/
.
.
.
OSSchedUnlock();
.
/* Code protected from context switch */
/* Enable other tasks to run
*/
}
}
OSSchedUnlock()
void OSSchedUnlock(void);
File
Called from
Code enabled by
OS_CORE.C
Task or ISR
N/A
OSSchedUnlock() is used to re-enable task scheduling. OSSchedUnlock() is used with OSSchedLock() in
pair. Scheduling is enabled when an equal number of OSSchedUnlock() as OSSchedLock() have been made.
Arguments
NONE
Returned Value
NONE
Notes/Warnings
After calling OSSchedLock(), you application must not make any system call which will suspend execution of the
current task i.e., your application cannot call OSTimeDly(), OSTimeDlyHMSM(), OSSemPend(),
OSMboxPend() or OSQPend(). Since the scheduler is locked out, no other task will be allowed to run and your
system will lock up.
Example
void TaskX(void *pdata)
{
pdata = pdata;
for (;;) {
.
OSSchedLock();
/* Prevent other tasks to run
*/
.
.
/* Code protected from context switch */
.
OSSchedUnlock(); /* Enable other tasks to run
*/
.
}
}
OSSemAccept()
INT16U OSSemAccept(OS_EVENT *pevent);
File
Called from
Code enabled by
OS_SEM.C
Task or ISR
OS_SEM_EN
OSSemAccept() allows you to check to see if a resource is available or an event occurred. Unlike
OSSemPend(), OSSemAccept() does not suspend the calling task if the resource is not available. You
would use OSSemAccept() from an ISR to obtain the semaphore.
Arguments
pevent is a pointer to the semaphore that guards the resource. This pointer is returned to your application when the
semaphore is created (see OSSemCreate()).
Returned Value
When the semaphore value is greater than 0 when OSSemAccept() is called then, the semaphore value is decremented
and the value of the semaphore before the decrement is returned to your application. If, however, the semaphore value
is 0 then, the resource is not available and 0 is returned to your application.
Notes/Warnings
Semaphores must be created before they are used.
Example
OS_EVENT *DispSem;
void Task (void *pdata)
{
INT16U value;
pdata = pdata;
for (;;) {
value = OSSemAccept(DispSem); /* Check resource availability */
if (value > 0) {
.
/* Resource available, process */
.
}
.
.
}
}
OSSemCreate()
OS_EVENT *OSSemCreate(WORD value);
File
Called from
Code enabled by
OS_SEM.C
Task or startup code
OS_SEM_EN
OSSemCreate() is used to create and initialize a semaphore. A semaphore is used to:
1) Allow a task to synchronize with either an ISR or a task
2) Gain exclusive access to a resource
3) Signal the occurrence of an event
Arguments
value is the initial value of the semaphore. The initial value of the semaphore is allowed to be between 0 and 65535.
Returned Value
A pointer to the event control block allocated to the semaphore. If no event control block is available, OSSemCreate()
will return a NULL pointer.
Notes/Warnings
Semaphores must be created before they are used.
Example
OS_EVENT *DispSem;
void main(void)
{
.
.
OSInit();
.
.
DispSem = OSSemCreate(1);
.
.
OSStart();
}
/* Initialize µC/OS-II
*/
/* Create Display Semaphore
*/
/* Start Multitasking
*/
OSSemPend()
void OSSemPend(OS_EVENT *pevent, INT16U timeout, INT8U *err);
File
Called from
Code enabled by
OS_SEM.C
Task only
OS_SEM_EN
OSSemPend() is used when a task desires to get exclusive access to a resource, synchronize its activities with an
ISR, a task or until an event occurs. If a task callsOSSemPend() and the value of the semaphore is greater than 0, then
OSSemPend() will decrement the semaphore and return to its caller. However, if the value of the semaphore is equal
to zero, OSSemPend() places the calling task in the waiting list for the semaphore. The task will thus wait until a task
or an ISR signals the semaphore or, the specified timeout expires. If the semaphore is signaled before the timeout expires,
µC/OS-II will resume the highest priority task that is waiting for the semaphore. A pended task that has been suspended
with OSTaskSuspend() can obtain the semaphore. The task will, however, remain suspended until the task is
resumed by calling OSTaskResume() .
Arguments
pevent is a pointer to the semaphore. This pointer is returned to your application when the semaphore is created (see
OSSemCreate()).
timeout is used to allow the task to resume execution if a message is not received from the mailbox within the specified
number of clock ticks. A timeout value of 0 indicates that the task desires to wait forever for the message. The
maximum timeout is 65535 clock ticks. The timeout value is not synchronized with the clock tick. The timeout count
starts being decremented on the next clock tick which could potentially occur immediately.
err is a pointer to a variable which will be used to hold an error code. OSSemPend() sets *err to either:
1)
2)
3)
OS_NO_ERR, the semaphore is available
OS_TIMEOUT, the semaphore was not signaled within the specified timeout
OS_ERR_PEND_ISR, you called this function from an ISR and µC/OS-II would have to suspend the ISR.
In general, you should not call OSMboxPend(). µC/OS-II checks for this situation in case you do
anyway.
Returned Value
NONE
Notes/Warnings
Semaphores must be created before they are used.
Example
OS_EVENT *DispSem;
void DispTask(void *pdata)
{
INT8U err;
pdata = pdata;
for (;;) {
.
.
OSSemPend(DispSem, 0, &err);
.
/* The only way this task continues is if … */
.
/* … the semaphore is signaled!
*/
}
}
OSSemPost()
INT8U OSSemPost(OS_EVENT *pevent);
File
Called from
Code enabled by
OS_SEM .C
Task or ISR
OS_SEM_EN
A semaphore is signaled by calling OSSemPost(). If the semaphore value is greater than or equal to zero, the
semaphore is incremented and OSSemPost() returns to its caller. If tasks are waiting for the semaphore to be signaled
then, OSSemPost() removes the highest priority task pending (waiting) for the semaphore from the waiting list and
makes this task ready to run. The scheduler is then called to determine if the awakened task is now the highest priority
task ready to run.
Arguments
pevent is a pointer to the semaphore. This pointer is returned to your application when the semaphore is created (see
OSSemCreate()).
Returned Value
OSSemPost() returns one of these two error codes
1) OS_NO_ERR, if the semaphore was successfully signaled
2) OS_SEM_OVF, if the semaphore count overflowed
Notes/Warnings
Semaphores must be created before they are used.
Example
OS_EVENT *DispSem;
void TaskX(void *pdata)
{
INT8U err;
pdata = pdata;
for (;;) {
.
.
err = OSSemPost(DispSem);
if (err == OS_NO_ERR) {
.
/* Semaphore signaled
*/
.
} else {
.
/* Semaphore has overflowed */
.
}
.
.
}
}
OSSemQuery()
INT8U OSSemQuery(OS_EVENT *pevent, OS_SEM_DATA *pdata);
File
Called from
Code enabled by
OS_SEM.C
Task or ISR
OS_SEM_EN
OSSemQuery() is used to obtain information about a semaphore. Your application must allocate an OS_SEM_DATA
data structure which will be used to receive data from the event control block of the semaphore. OSSemQuery()
allows you to determine whether any task is waiting on the semaphore, how many tasks are waiting (by counting the
number of 1s in the .OSEventTbl[] field, and obtain the semaphore count. You can use the table OSNBitsTbl[]
to find out how many ones are set in a given byte. Note that the size of .OSEventTbl[] is established by the
#define constant OS_EVENT_TBL_SIZE (see uCOS_II.H).
Arguments
pevent is a pointer to the semaphore. This pointer is returned to your application when the semaphore is created (see
OSSemCreate()).
pdata is a pointer to a data structure of type OS_SEM_DATA which contains the following fields.
INT16U OSCnt;
INT8U OSEventTbl[OS_EVENT_TBL_SIZE];
INT8U OSEventGrp;
/* Current semaphore count
/* Semaphore wait list
Returned Value
OSSemQuery() returns one of these two error codes:
1) OS_NO_ERR, if the call was successful
2) OS_ERR_EVENT_TYPE, if you didn’t pass a pointer to a semaphore
Notes/Warnings
Semaphores must be created before they are used.
Example
*/
*/
In this example, we check the contents of the semaphore to determine the highest priority task that is waiting for it.
OS_EVENT *DispSem;
void Task (void *pdata)
{
OS_SEM_DATA sem_data;
INT8U
err;
INT8U
highest; /* Highest priority task waiting on semaphore */
INT8U
x;
INT8U
y;
pdata = pdata;
for (;;) {
.
.
err = OSSemQuery(DispSem, &sem_data);
if (err == OS_NO_ERR) {
if (sem_data.OSEventGrp != 0x00) {
y
= OSUnMapTbl[sem_data.OSEventGrp];
x
= OSUnMapTbl[sem_data.OSEventTbl[y]];
highest = (y << 3) + x;
.
.
}
}
.
.
}
}
OSStart()
void OSStart(void);
File
Called from
Code enabled by
OS_CORE.C
Startup code only
N/A
OSStart() is used to start multitasking under µC/OS-II.
Arguments
NONE
Returned Value
NONE
Notes/Warnings
OSInit() must be called prior to calling OSStart(). OSStart() should only called once by your application
code. If you do call OSStart() more than once, OSStart() will not do anything on the second and subsequent
calls.
Example
void main(void)
{
.
.
OSInit();
.
.
OSStart();
}
/* User Code
*/
/* Initialize µC/OS-II
/* User Code
*/
*/
/* Start Multitasking
*/
OSStatInit()
void OSStatInit(void);
File
Called from
Code enabled by
OS_CORE.C
Startup code only
OS_TASK_STAT_EN &&
OS_TASK_CREATE_EXT__EN
OSStatInit() is used to have uC/OS-II determine the maximum value that a 32-bit counter can reach when no other
task is executing. This function must be called when there is only one task created in your application and, when
multitasking has started. In other words, this function must be called from the first, and only created task.
Arguments
NONE
Returned Value
NONE
Notes/Warnings
NONE
Example
void FirstAndOnlyTask (void *pdata)
{
.
.
OSStatInit();
/* Compute CPU capacity with no task running */
.
OSTaskCreate(…);
OSTaskCreate(…);
.
for (;;) {
.
.
}
/* Create the other tasks
*/
}
OSTaskChangePrio()
INT8U OSTaskChangePrio(INT8U oldprio, INT8U newprio);
File
Called from
Code enabled by
OS_TASK.C
Task only
OS_TASK_CHANGE_PRIO_EN
OSTaskChangePrio() allows you to change the priority of a task.
Arguments
oldprio is the priority number of the task to change.
newprio is the new task's priority.
Returned Value
OSTaskChangePrio() returns one of these error codes:
1) OS_NO_ERR, the task's priority was changed
2) OS_PRIO_INVALID, if either the old priority or the new priority exceeds the maximum number of tasks
allowed
3) OS_PRIO_EXIST, if newp already existed
4) OS_PRIO_ERR, there is no task with the specified 'old' priority (i.e. the task specified by oldprio does not
exist)
Notes/Warnings
The desired priority must not have already been assigned, otherwise, an error code is returned.
OSTaskChangePrio() verifies that the task to change exist.
Example
void TaskX(void *data)
{
INT8U err;
for (;;) {
.
.
Also,
err = OSTaskChangePrio(10, 15);
.
.
}
}
OSTaskCreate()
INT8U OSTaskCreate(void (*task)(void *pd), void *pdata, OS_STK *ptos, INT8U prio);
File
Called from
Code enabled by
OS_TASK.C
Task or startup code
N/A
OSTaskCreate() allows an application to create a task so it can be managed by µC/OS-II. Tasks can either be
created prior to the start of multitasking or by a running task. A task cannot be created by an ISR. A task MUST be
written as an infinite loop as shown in the example below and, MUST NOT return.
OSTaskCreate() is used for backward compatibility with µC/OS and when the added features of
OSTaskCreateExt() are not needed.
Depending on how the stack frame was built, your task will either have interrupts enable or disabled. You will need to
check with the processor specific code for details.
Arguments
task is a pointer to the task's code.
pdata is a pointer to an optional data area which can be used to pass parameters to the task when it is created. Where
the task is concerned, it thinks it was invoked and passed the argument pdata as follows:
void Task (void *pdata)
{
.
/* Do something with 'pdata'
for (;;) {
/* Task body, always an infinite loop.
.
.
/* Must call one of the following services:
/*
OSMboxPend()
/*
OSQPend()
/*
OSSemPend()
/*
OSTimeDly()
/*
OSTimeDlyHMSM()
/*
OSTaskSuspend()
(Suspend self)
/*
OSTaskDel()
(Delete self)
.
.
}
}
*/
*/
*/
*/
*/
*/
*/
*/
*/
*/
ptos is a pointer to the task's top of stack. The stack is used to store local variables, function parameters, return
addresses and CPU registers during an interrupt. The size of the stack is determined by the task's requirements and, the
anticipated interrupt nesting. Determining the size of the stack involves knowing how many bytes are required for
storage of local variables for the task itself, all nested functions, as well as requirements for interrupts (accounting for
nesting). If the configuration constantOS_STK_GROWTH is set to 1, the stack is assumed to grow downward (i.e. from
high memory to low memory). ptos will thus need to point to the highest valid memory location on the stack. If
OS_STK_GROWTH is set to 0, the stack is assumed to grow in the opposite direction (i.e. from low memory to high
memory).
prio is the task priority. A unique priority number must be assigned to each task and the lower the number, the higher
the priority.
Returned Value
OSTaskCreate() returns one of the following error codes:
1)
2)
OS_NO_ERR, if the function was successful
OS_PRIO_EXIST, if the requested priority already exist
Notes/Warnings
The stack MUST be declared with the OS_STK type.
A task MUST always invoke one of the services provided by µC/OS-II to either wait for time to expire, suspend the task
or, wait an event to occur (wait on a mailbox, queue or semaphore). This will allow other tasks to gain control of the CPU.
You should not use task priorities 0, 1, 2 , 3 and OS_LOWEST_PRIO-3, OS_LOWEST_PRIO-2,
OS_LOWEST_PRIO-1 and OS_LOWEST_PRIO because they are reserved for µC/OS-II’s use. This thus leaves you
with up to 56 application tasks.
Example #1
This examples shows that the argument that Task1() will receive is not used and thus, the pointer pdata is set to
NULL. Note that I assumed that the stack grows from high memory to low memory because I passed the address of the
highest valid memory location of the stack Task1Stk[]. If the stack grows in the opposite direction for the processor
you are using, you will need to pass Task1Stk[0] as the task’s top-of-stack.
OS_STK *Task1Stk[1024];
INT8U
Task1Data;
void main(void)
{
INT8U err;
.
OSInit();
/* Initialize µC/OS-II
.
OSTaskCreate(Task1,
(void *)&Task1Data,
&Task1Stk[1023],
25);
.
OSStart();
/* Start Multitasking
*/
*/
}
void Task1(void *pdata)
{
pdata = pdata;
for (;;) {
.
.
}
}
/* Task code
*/
Example #2
It is possible to create a 'generic' task that can be instantiated more than once. For example, a task can handle a serial port
and the task would be passed the address of a data structure that characterizes the specific port (i.e. port address, baud
rate, etc.).
OS_STK
*Comm1Stk[1024];
COMM_DATA Comm1Data;
OS_STK
*Comm2Stk[1024];
COMM_DATA Comm2Data;
/* Data structure containing COMM port
/* Specific data for channel 1
*/
*/
/* Data structure containing COMM port
/* Specific data for channel 2
*/
*/
void main(void)
{
INT8U err;
.
OSInit();
/* Initialize µC/OS-II
.
OSTaskCreate(CommTask,
(void *)&Comm1Data,
&Comm1Stk[1023],
25);
OSTaskCreate(CommTask,
(void *)&Comm2Data,
&Comm2Stk[1023],
26);
.
OSStart();
/* Start Multitasking
*/
*/
}
void CommTask(void *pdata)
{
for (;;) {
.
.
}
/* Generic communication task
*/
/* Task code
*/
}
OSTaskCreateExt()
INT8U OSTaskCreateExt(void (*task)(void *pd), void *pdata, OS_STK *ptos, INT8U prio,
INT16U, id, OS_STK *pbos, INT32U stk_size, void *pext, INT16U opt);
File
Called from
Code enabled by
OS_TASK.C
Task or startup code
N/A
OSTaskCreateExt() allows an application to create a task so it can be managed by µC/OS-II. This function serves
the same purpose as OSTaskCreate() except that it allows you to specify additional information about your task to
µC/OS-II. Tasks can either be created prior to the start of multitasking or by a running task. A task cannot be created by
an ISR. A task MUST be written as an infinite loop as shown in the example code below and, MUST NOT return.
Depending on how the stack frame was built, your task will either have interrupts enable or disabled. You will need to
check with the processor specific code for details. You should note that the first four arguments are exactly the same as
the ones for OSTaskCreate(). This was done to simplify the migration to this new, and more powerful function.
Arguments
task is a pointer to the task's code.
pdata is a pointer to an optional data area which can be used to pass parameters to the task when it is created. Where
the task is concerned, it thinks it was invoked and passed the argument pdata as follows:
void Task (void *pdata)
{
.
/* Do something with 'pdata'
for (;;) {
/* Task body, always an infinite loop.
.
.
/* Must call one of the following services:
/*
OSMboxPend()
/*
OSQPend()
/*
OSSemPend()
/*
OSTimeDly()
/*
OSTimeDlyHMSM()
/*
OSTaskSuspend()
(Suspend self)
/*
OSTaskDel()
(Delete self)
.
.
}
}
*/
*/
*/
*/
*/
*/
*/
*/
*/
*/
ptos is a pointer to the task's top of stack. The stack is used to store local variables, function parameters, return
addresses and CPU registers during an interrupt. The size of this stack is determined by the task's requirements, and the
anticipated interrupt nesting. De termining the size of the stack involves knowing how many bytes are required for
storage of local variables for the task itself, all nested functions, as well as requirements for interrupts (accounting for
nesting). If the configuration constantOS_STK_GROWTH is set to 1, the stack is assumed to grow downward (i.e. from
high memory to low memory). ptos will thus need to point to the highest valid memory location on the stack. If
OS_STK_GROWTH is set to 0, the stack is assumed to grow in the opposite dire ction (i.e. from low memory to high
memory).
prio is the task priority. A unique priority number must be assigned to each task and the lower the number, the higher
the priority (i.e. the importance) of the task.
id is the task’
s ID number. At this time , the ID is not currently used in any other function and has simply been added
in OSTaskCreateExt() for future expansion. You should set the id to the same value as the task’s priority.
pbos is a pointer to the task's bottom of stack. If the configuration constant OS_STK_GROWTH is set to 1, the stack is
assumed to grow downward (i.e. from high memory to low memory) and thus, pbos must point to the lowest valid stack
location. If OS_STK_GROWTH is set to 0, the stack is assumed to grow in the opposite direction (i.e. from low memory
to high memory) and thus, pbos must point to the highest valid stack location. pbos is used by the stack checking
function OSTaskStkChk().
stk_size is used to specify the size of the task’
s stack (in number of elements). If OS_STK is set to INT8U, then
stk_size corresponds to the number of bytes available on the stack. If OS_STK is set to INT16U, then stk_size
contains the number of 16-bit entries available on the stack. Finally, if OS_STK is set to INT32U, then stk_size
contains the number of 32-bit entries available on the stack.
pext is a pointer to a user supplied memory location (typically a data structure) which is used as a TCB extension. For
example, this user memory can hold the contents of floating-point registers during a context switch, the time each task
takes to execute, the number of times the task is switched-in, etc.
opt contains task specific options. The lower 8 bits are reserved by µC/OS-II but you can use the upper 8 bits for
application specific options. Each option consist of a bit. The option is selected when the bit is set. The current version
of µC/OS-II supports the following options:
OS_TASK_OPT_STK_CHK specifies whether stack checking is allowed for the task.
OS_TASK_OPT_STK_CLR specifies whether the stack needs to be cleared.
OS_TASK_OPT_SAVE_FP specifies whether floating-point registers will be saved the stack needs to be
cleared.
you should refer to uCOS_II.H for other options, i.e. OS_TASK_OPT_???.
Returned Value
OSTaskCreateExt() returns one of the following error codes:
1) OS_NO_ERR, if the function was successful
2) OS_PRIO_EXIST, if the requested priority already exist
Notes/Warnings
The stack MUST be declared with the OS_STK type.
A task MUST always invoke one of the services provided by µC/OS-II to either wait for time to expire, suspend the task
or, wait an event to occur (wait on a mailbox, queue or semaphore). This will allow other tasks to gain control of the CPU.
You should not use task priorities 0, 1, 2 , 3 and OS_LOWEST_PRIO-3, OS_LOWEST_PRIO-2,
OS_LOWEST_PRIO-1 and OS_LOWEST_PRIO because they are reserved for µC/OS-II’s use. This thus leaves you
with up to 56 application tasks.
Example #1
The task control block is extended (1) using a ‘user defined’data structure called TASK_USER_DATA (2) which, in this
case, contains the name of the task as well as other fields. The task name is initialized with the strcpy() standard
library function (3). Note that stack checking has been enabled (4) for this task and thus, you are allowed to call
OSTaskStkChk(). Also, we assume here that the stack grown downward (5) on the processor used (i.e.
OS_STK_GROWTH is set to 1). TOS stands for ‘Top-Of-Stack’and BOS stands for ‘Bottom-Of_Stack’.
typedef struct {
char
TaskName[20];
INT16U TaskCtr;
INT16U TaskExecTime;
INT32U TaskTotExecTime;
} TASK_USER_DATA;
OS_STK
TASK_USER_DATA
/* (2) User defined data structure */
*TaskStk[1024];
TaskUserData;
void main(void)
{
INT8U err;
.
OSInit();
/* Initialize µC/OS-II
.
strcpy(TaskUserData.TaskName, "MyTaskName"); /* (3) Name of task
err = OSTaskCreateExt(Task,
(void *)0,
&TaskStk[1023],
/* (5) Stack grows down (TOS)
10,
10,
&TaskStk[0],
/* (5) Stack grows down (BOS)
1024,
(void *)&TaskUserData,
/* (1) TCB Extension
OS_TASK_OPT_STK_CHK);
/* (4) Stack checking enabled
.
OSStart();
/* Start Multitasking
}
void Task(void *pdata)
{
pdata = pdata;
for (;;) {
.
.
}
}
/* Avoid compiler warning
*/
/* Task code
*/
Example #2
*/
*/
*/
*/
*/
*/
*/
Here we are creating a task but this time, on a processor for which the stack grows upward (1). The Intel MCS-251 is an
example of such a processor. It is assumed that OS_STK_GROWTH is set to 0. Note that stack checking has been
enabled (2) for this task and thus, you are allowed to call OSTaskStkChk(). TOS stands for ‘Top-Of-Stack’and BOS
stands for ‘Bottom-Of_Stack’.
OS_STK *TaskStk[1024];
void main(void)
{
INT8U err;
.
OSInit();
.
err = OSTaskCreateExt(Task,
(void *)0,
&TaskStk[0],
10,
10,
&TaskStk[1023],
1024,
(void *)0,
OS_TASK_OPT_STK_CHK);
.
OSStart();
/* Initialize µC/OS-II
*/
/* (1) Stack grows up (TOS)
*/
/* (1) Stack grows up (BOS)
*/
/* (2) Stack checking enabled */
/* Start Multitasking
*/
}
void Task(void *pdata)
{
pdata = pdata;
for (;;) {
.
.
}
}
/* Avoid compiler warning
*/
/* Task code
*/
OSTaskDel()
INT8U OSTaskDel(INT8U prio);
File
Called from
Code enabled by
OS_TASK.C
Task only
OS_TASK_DEL_EN
OSTaskDel() allows your application to delete a task by specifying the priority number of the task to delete. The
calling task can be deleted by specifying its own priority number or OS_PRIO_SELF if the task doesn't know its own
priority number. The deleted task is returned to the dormant state. The deleted task may be created by calling either
OSTaskCreate() or OSTaskCreateExt() to make the task active again.
Arguments
prio is the task's priority number to delete. You can delete the calling task by passingOS_PRIO_SELF in which case,
the next highest priority task will be executed.
Returned Value
OSTaskDel() returns one of the following error codes:
1)
2)
3)
4)
5)
OS_NO_ERR, if the task didn't delete itself
OS_TASK_DEL_IDLE, you tried to delete the idle task
OS_TASK_DEL_ERR, the task to delete does not exist
OS_PRIO_INVALID, if you specified a task priority higher than OS_LOWEST_PRIO
OS_TASK_DEL_ISR, you tried to delete a task from an ISR
Notes/Warnings
OSTaskDel() will verify that you are not attempting to delete the µC/OS-II's idle task.
You must be careful when you delete a task that owns resources.
OSTaskDelReq() which would be a safer approach.
Instead, you should consider using
Example
void TaskX(void *pdata)
{
INT8U err;
for (;;) {
.
.
err = OSTaskDel(10);
/* Delete task with priority 10
if (err == OS_NO_ERR) {
.
/* Task was deleted
*/
.
}
.
*/
.
}
}
OSTaskDelReq()
INT8U OSTaskDelReq(INT8U prio);
File
Called from
Code enabled by
OS_TASK.C
Task only
OS_TASK_DEL_EN
OSTaskDelReq() allows your application to request that a task deletes itself. Basically, you would use
OSTaskDelReq() when you need to delete a task that can potentially own resources (e.g. the task may own a
semaphore). In this case, you don’t want to delete the task until the resource is released. The requesting task calls
OSTaskDelReq() to indicate that the task needs to be deleted. Deletion of the task is, however, deferred to the task
being deleted. In other words, the task is actually deleted when it regains control of the CPU. For example, suppose task
#10 needs to be deleted. The task desiring to delete this task (example task #5) would call OSTaskDelReq(10).
When task #10 gets to execute it would call OSTaskDelReq(OS_PRIO_SELF) and monitors the returned value. If
the return value is OS_TASK_DEL_REQ then task #10 is asked to delete itself. At this point, task #10 would call
OSTaskDel(OS_PRIO_SELF). Task #5 would know whether task #10 has been deleted by calling
OSTaskDelReq(10) and check the return code. If the return code is OS_TASK_NOT_EXIST then task #5 would
know that task #10 has been deleted. In this case, task #5 may have to check periodically, though.
Arguments
prio is the task's priority number of the task to delete. If you specify OS_PRIO_SELF, then you are asking whether
another task wants you to be deleted.
Returned Value
OSTaskDelReq() returns one of the following error codes:
1)
2)
3)
4)
5)
OS_NO_ERR, if the task deletion has been registered
OS_TASK_NOT_EXIST, if the task does not exist. The requesting task can monitor this return code to see
if the task actually got deleted.
OS_TASK_DEL_IDLE, you asked to delete the idle task (this is obviously not allowed).
OS_PRIO_INVALID, if you specified a task priority higher than OS_LOWEST_PRIO or, you have not
specified OS_PRIO_SELF.
OS_TASK_DEL_REQ, if a task (possibly another task) requested that the running task be deleted.
Notes/Warnings
OSTaskDelReq() will verify that you are not attempting to delete the µC/OS-II's idle task.
Example
void TaskThatDeletes(void *pdata)
{
INT8U err;
/* My priority is 5
*/
for (;;) {
.
.
err = OSTaskDelReq(10);
/* Request task #10 to delete itself */
if (err == OS_NO_ERR) {
err = OSTaskDelReq(10);
while (err != OS_TASK_NOT_EXIST) {
OSTimeDly(1);
/* Wait for task to be deleted
*/
}
.
/* Task #10 has been deleted
*/
}
.
.
}
}
void TaskToBeDeleted(void *pdata)
/* My priority is 10
{
.
.
pdata = pdata;
for (;;) {
OSTimeDly(1);
if (OSTaskDelReq(OS_PRIO_SELF) == OS_TASK_DEL_REQ) {
/* Release any owned resources;
/* De-allocate any dynamic memory;
OSTaskDel(OS_PRIO_SELF);
}
}
}
*/
*/
*/
OSTaskResume()
INT8U OSTaskResume(INT8U prio);
File
Called from
Code enabled by
OS_TASK.C
Task only
OS_TASK_SUSPEND_EN
OSTaskResume() allows your application to resume a task that was suspended through the OSTaskSuspend()
function. In fact, OSTaskResume() is the only function that can ‘unsuspend’a suspended task.
Arguments
prio specifies the priority of the task to resume.
Returned Value
OSTaskResume() returns one of the following error codes:
1)
OS_NO_ERR, if the call was successful.
2)
3)
OS_TASK_RESUME_PRIO, the task you are attempting to resume does not exist.
OS_TASK_NOT_SUSPENDED, the task to resume has not been suspended.
Notes/Warnings
NONE
Example
void TaskX(void *pdata)
{
INT8U err;
for (;;) {
.
.
err = OSTaskResume(10); /* Resume task with priority 10
if (err == OS_NO_ERR) {
.
/* Task was resumed
.
}
.
.
}
*/
*/
}
OSTaskStkChk()
INT8U OSTaskStkChk(INT8U prio, INT32U *pfree, INT32U *pused);
File
Called from
Code enabled by
OS_TASK.C
Task code
OS_TASK_CREATE_EXT
OSTaskStkChk() is used to determine a task’
s stack statistics. Specifically, OSTaskStkChk() computes the
amount of free stack space as well as the amount of stack space used by the specified task. This function requires that
the task be created with OSTaskCreateExt() and that you specify OS_TASK_OPT_STK_CHK in the opt
argument.
Stack sizing is done by ‘walking’from the bottom of the stack and counting the number of zero entries on the stack until
a non-zero value is found. This of course assumes that the stack is cleared when the task is created. For that purpose,
you need to set OS_TASK_STK_CLR to 1 in your configuration. You could set OS_TASK_STK_CLR to 0 if your
startup code clears all RAM and you never delete your tasks. This would reduce the execution time of
OSTaskCreateExt().
Arguments
prio is the priority of the task you desire to obtain stack information about. You can check the stack of the calling task
by passing OS_PRIO_SELF.
pdata is a pointer to a variable of type OS_STK_DATA which contains the following fields.
INT32U OSFree;
INT32U OSUsed;
/* Number of bytes free on the stack
/* Number of bytes used on the stack
*/
*/
Returned Value
OSTaskStkChk() returns one of the following error codes:
1) OS_NO_ERR, if you specified valid arguments and the call was successful.
2) OS_PRIO_INVALID, if you specified a task priority higher than OS_LOWEST_PRIO, or you didn’
t
specify OS_PRIO_SELF.
3) OS_TASK_NOT_EXIST, if the specified task does not exist.
4) OS_TASK_OPT_ERR, if you did not specify OS_TASK_OPT_STK_CHK when the task was created by
OSTaskCreateExt() or, you created the task by using OSTaskCreate().
Notes/Warnings
Execution time of this task depends on the size of the task’s stack and is thus non -deterministic.
Your application can determine the total task stack space (in number of bytes) by adding the two fields .OSFree
and .OSUsed.
Technically, this function can be called by an ISR but, because of the possibly long execution time, it is not advisable.
Example
void Task (void *pdata)
{
OS_STK_DATA stk_data;
INT32U
stk_size;
for (;;) {
.
.
err = OSTaskStkChk(10, &stk_data);
if (err == OS_NO_ERR) {
stk_size = stk_data.OSFree + stk_data.OSUsed;
}
.
.
}
}
OSTaskSuspend()
INT8U OSTaskSuspend(INT8U prio);
File
Called from
Code enabled by
OS_TASK.C
Task only
OS_TASK_SUSPEND_EN
OSTaskSuspend() allows your application to suspend (or block) execution of a task unconditionally. The calling
task can be suspended by specifying its own priority number or OS_PRIO_SELF if the task doesn't know its own
priority number. In this case, another task will need to resume the suspended task. If the current task is suspended,
rescheduling will occur and µC/OS-II will run the next highest priority task ready to run. The only way to resume a
suspended task is to call OSTaskResume().
Task suspension is additive. This means that if the task being suspended is delayed until ‘n’ticks expire then the task
will be resumed only when both the time expires and the suspension is removed. Also, if the suspended task is waiting
for a semaphore and the semaphore is signaled then the task will be removed from the semaphore wait list (if it was the
highest priority task waiting for the semaphore) but execution will not be resumed until the suspension is removed.
Arguments
prio specifies the priority of the task to suspend. You can suspend the calling task by passing OS_PRIO_SELF in
which case, the next highest priority task will be executed.
Returned Value
OSTaskSuspend() returns one of the following error codes:
1)
2)
3)
4)
OS_NO_ERR, if the call was successful.
OS_TASK_SUSPEND_IDLE, if you attempted to suspend µC/OS-II’s idle task. This is of course not
allowed.
OS_PRIO_INVALID, if you specified a priority higher than the maximum allowed (i.e. you specified a
priority >= OS_LOWEST_PRIO) or, you didn't specify OS_PRIO_SELF.
OS_TASK_SUSPEND_PRIO, if the task you are attempting to suspend does not exist.
Notes/Warnings
OSTaskSuspend() and OSTaskResume() must be used in pair.
A suspended task can only be resumed by OSTaskResume().
Example
void TaskX(void *pdata)
{
INT8U err;
for (;;) {
.
.
err = OSTaskSuspend(OS_PRIO_SELF);
/* Suspend current task
.
/* Execution continues when ANOTHER task ..
.
/* .. explicitly resumes this task.
.
}
}
*/
*/
*/
OSTaskQuery()
INT8U OSTaskQuery(INT8U prio, OS_TCB *pdata);
File
Called from
Code enabled by
OS_TASK.C
Task or ISR
N/A
OSTaskQuery() allows your application to obtain information about a task. Your application must allocate an
OS_TCB data structure that will be used to receive a ‘
snapshot’of the desired task’s control block. Your copy will
contain every field in the OS_TCB structure. You should be careful when accessing the contents of the OS_TCB
structure, especially OSTCBNext and OSTCBPrev because they will point to the next and previous OS_TCB in the
chain of created tasks, respectively.
Arguments
prio is the priority of the task you wish to obtain data from. You can obtain information about the calling task by
specifying OS_PRIO_SELF.
pdata is a pointer to a structure of type OS_TCB which will contain a copy of the task’s control block.
Returned Value
OSTaskQuery() returns one of these two error codes:
1)
2)
OS_NO_ERR, if the call was successful.
OS_PRIO_ERR, if you are trying to obtain information from an invalid task.
Notes/Warnings
The available fields in the task control block depends on the following configuration options (see OS_CFG.H):
OS_TASK_CREATE_EN
OS_Q_EN
OS_MBOX_EN
OS_SEM_EN
OS_TASK_DEL_EN
Example
void Task (void *pdata)
{
OS_TCB task_data;
INT8U
err;
void
*pext;
INT8U
status;
pdata = pdata;
for (;;) {
.
.
err = OSTaskQuery(OS_PRIO_SELF, &task_data);
if (err == OS_NO_ERR) {
pext
= task_data.OSTCBExtPtr; /* Get TCB extension pointer
status = task_data.OSTCBStat;
/* Get task status
.
.
}
.
.
*/
*/
}
}
OSTimeDly()
void OSTimeDly(INT16U ticks);
File
Called from
Code enabled by
OS_TIME.C
Task only
N/A
OSTimeDly() allows a task to delay itself for a number of clock ticks. Rescheduling always occurs when the number
of clock ticks is greater than zero. Valid delays range from 0 to 65535 ticks. A delay of 0 means that the task will not be
delayed and OSTimeDly() will return immediately to the caller. The actual delay time depends on the tick rate (see
OS_TICKS_PER_SEC in the configuration file OS_CFG.H).
Arguments
ticks is the number of clock ticks to delay the current task.
Returned Value
NONE
Notes/Warnings
Note that calling this function with a delay of 0 results in no delay and thus the function returns immediately to the caller.
To ensure that a task delays for the specified number of ticks, you should consider using a delay value that is one tick
higher. For example, to delay a task for at least 10 ticks, you should specify a value of 11.
Example
void TaskX(void *pdata)
{
for (;;) {
.
.
OSTimeDly(10);
.
.
/* Delay task for 10 clock ticks */
}
}
OSTimeDlyHMSM()
void OSTimeDlyHMSM(INT8U hours, INT8U minutes, INT8U seconds, INT8U milli);
File
Called from
Code enabled by
OS_TIME.C
Task only
N/A
OSTimeDlyHMSM() allows a task to delay itself for a user specified amount of time specified in hours, minutes,
seconds and milliseconds. This is a more convenient and natural format than ticks. Rescheduling always occurs when
at least one of the parameters is non-zero.
Arguments
hours is the number of hours that the task will be delayed. The valid range of values is from 0 to 255 hours.
minutes is the number of minutes that the task will be delayed. The valid range of values is from 0 to 59.
seconds is the number of seconds that the task will be delayed. The valid range of values is from 0 to 59.
milli is the number of milliseconds that the task will be delayed. The valid range of values is from 0 to 999. Note that
the resolution of this argument is in multiples o f the tick rate. For instance, if the tick rate is set to 10 mS then a delay of
5 mS would result in no delay. The delay is actually rounded to the nearest tick. Thus, a delay of 15 mS would actually
result in a delay of 20 mS.
Returned Value
OSTimeDlyHMSM() returns one of the following error codes:
1)
2)
3)
4)
5)
OS_NO_ERR, if you specified valid arguments and the call was successful.
OS_TIME_INVALID_MINUTES, if the minutes argument is greater than 59.
OS_TIME_INVALID_SECONDS, if the seconds argument is greater than 59.
OS_TIME_INVALID_MS, if the milliseconds argument is greater than 999.
OS_TIME_ZERO_DLY, if all four arguments are 0.
Notes/Warnings
Note that calling this function with a delay of 0 hours, 0 minutes, 0 seconds and 0 milliseconds results in no delay and
thus the function returns immediately to the caller. Also, if the total delay time ends up being larger than 65535 clock
ticks then, you will not be able to abort the delay and resume the task by calling OSTimeDlyResume().
Example
void TaskX(void *pdata)
{
for (;;) {
.
.
OSTimeDlyHMSM(0, 0, 1, 0);
.
.
/* Delay task for 1 second */
}
}
OSTimeDlyResume()
INT8U OSTimeDlyResume(INT8U prio);
File
Called from
Code enabled by
OS_TIME.C
Task only
N/A
OSTimeDlyResume() allows your application to resume a task that has been delayed through a call to either
OSTimeDly() or OSTimeDlyHMSM().
Arguments
prio specifies the priority of the task to resume.
Returned Value
OSTimeDlyResume() returns one of the following error codes:
1)
2)
3)
4)
OS_NO_ERR, if the call was successful.
OS_PRIO_INVALID, if you specified a task priority greater than OS_LOWEST_PRIO.
OS_TIME_NOT_DLY, if the task is not waiting for time to expire.
OS_TASK_NOT_EXIST, if the task has not been created.
Notes/Warnings
Note that you MUST NOT call this function to resume a task that is waiting for an event with timeout. This situation
would make the task look like a timeout occurred (unless you desire this effect).
You cannot resume a task that has called OSTimeDlyHMSM() with a combined time that exceeds 65535 clock ticks. In
other words, if the clock tick runs at 100 Hz then, you will not be able to resume a delayed task that called
OSTimeDlyHMSM(0, 10, 55, 350) or higher.
(10 Minutes * 60 + 55 Seconds + 0.35) * 100 ticks/second
Example
void TaskX(void *pdata)
{
INT8U err;
pdata = pdata;
for (;;) {
.
err = OSTimeDlyResume(10);
/* Resume task with priority 10
*/
if (err == OS_NO_ERR) {
.
.
}
.
/* Task was resumed
*/
}
}
OSTimeGet()
INT32U OSTimeGet(void);
File
Called from
Code enabled by
OS_TIME.C
Task or ISR
N/A
OSTimeGet() allows a task obtain the current value of the system clock. The system clock is a 32-bit counter that
counts the number of clock ticks since power was applied or since the system clock was last set.
Arguments
NONE
Returned Value
The current system clock value (in number of ticks).
Notes/Warnings
NONE
Example
void TaskX(void *pdata)
{
INT32U clk;
for (;;) {
.
.
clk = OSTimeGet();
.
.
}
/* Get current value of system clock */
}
OSTimeSet()
void OSTimeSet(INT32U ticks);
File
Called from
Code enabled by
OS_TIME.C
Task or ISR
N/A
OSTimeSet() allows a task to set the system clock. The system clock is a 32-bit counter which counts the number of
clock ticks since power was applied or since the system clock was last set.
Arguments
ticks is the desired value for the system clock, in ticks.
Returned Value
NONE
Notes/Warnings
NONE
Example
void TaskX(void *pdata)
{
for (;;) {
.
.
OSTimeSet(0L);
/* Reset the system clock
.
.
}
}
*/
OSTimeTick()
void OSTimeTick(void);
File
Called from
Code enabled by
OS_TIME.C
Task or ISR
N/A
OSTimeTick() is used to process a clock tick. µC/OS-II checks all tasks to see if they were either waiting for time to
expire (because they called OSTimeDly() or OSTimeDlyHMSM()) or, are waiting for events to occur until they
timeout.
Arguments
NONE
Returned Value
NONE
Notes/Warnings
The execution time of OSTimeTick() is directly proportional to the number of tasks created in an application.
OSTimeTick() can be called by either an ISR or a task. If called by a task, the task priority should be VERY high (i.e.
have a low priority number) because this function is responsible for updating delays and timeouts.
Example
(Intel 80x86, Real-Mode, Large Model)
TickISR
PROC
PUSHA
PUSH
PUSH
FAR
; Save processor context
ES
DS
;
INC BYTE PTR _OSIntNesting
; Notify µC/OS-II of start of ISR
CALL FAR PTR _OSTimeTick
; Process clock tick
; User Code to clear interrupt
.
CALL FAR PTR _OSIntExit
; Notify µC/OS-II of end of ISR
POP
DS
; Restore processor registers
POP
ES
POPA
.
;
TickISR
IRET
ENDP
; Return to interrupted task
OSVersion()
INT16U OSVersion(void);
File
Called from
Code enabled by
OS_CORE.C
Task or ISR
N/A
OSVersion() is used to obtain the current version of µC/OS-II.
Arguments
NONE
Returned Value
The version is returned as x.yy multiplied by 100. In other words, version 1.00 is returned as 100.
Notes/Warnings
NONE
Example
void TaskX(void *pdata)
{
INT16U os_version;
for (;;) {
.
.
os_version = OSVersion();
.
.
}
/* Obtain uC/OS-II's version
*/
}
OS_ENTER_CRITICAL()
OS_EXIT_CRITICAL()
File
Called from
Code enabled by
OS_CPU.H
Task or ISR
N/A
OS_ENTER_CRITICAL() and OS_EXIT_CRITICAL() are macros which are used to disable and enable the
processor's interrupts, respectively.
Arguments
NONE
Returned Value
NONE
Notes/Warnings
These macros must be used in pair.
Example
INT32U Val;
void TaskX(void *pdata)
{
for (;;) {
.
.
OS_ENTER_CRITICAL();
.
.
.
OS_EXIT_CRITICAL();
.
.
}
}
/* Disable interrupts
*/
/* Access critical code
*/
/* Enable
*/
interrupts
Chapter 12
Configuration Manual
This chapter provides a description of the configurable elements of µC/OS-II. Because µC/OS-II is provided in
source form, configuration of µC/OS-II is done through a number of #define constants. The #define
constants are found in a file called OS_CFG.H and should exist for each project/product that you make.
This section describes each of the #define constant in the order in which they are found in OS_CFG.H .
Table 12-1 provides a summary of these constants and which µC/OS-II functions they affect.
Of course, OS_CFG.H must be included when µC/OS-II is built in order for the desired configuration to take
effect.
Set to 1 to
enable code
Service
Other config. constant(s)
affecting function
Miscellaneous
OSInit()
N/A
OS_MAX_EVENTS,
OS_Q_EN and OS_MAX_QS,
OS_MEM_EN,
OS_TASK_IDLE_STK_SIZE,
OS_TASK_STAT_EN,
OS_TASK_STAT_STK_SIZE
OSSchedLock()
N/A
N/A
OSSchedUnlock()
N/A
N/A
OSStart()
N/A
OS_TASK_STAT_EN &&
OS_TASK_CREATE_EXT_EN
N/A
N/A
N/A
OSIntEnter()
N/A
N/A
OSIntExit()
N/A
N/A
OSMboxAccept()
OS_MBOX_EN
N/A
OSMboxCreate()
OS_MBOX_EN
OS_MAX_EVENTS
OSMboxPend()
OS_MBOX_EN
N/A
OSMboxPost()
OSMboxQuery()
OS_MBOX_EN
OS_MBOX_EN
N/A
N/A
OSMemCreate()
OS_MEM_EN
OS_MAX_MEM_PART
OSMemGet()
OS_MEM_EN
N/A
OSMemPut()
OS_MEM_EN
OS_MEM_EN
N/A
N/A
OSQAccept()
OS_Q_EN
OSQCreate()
OS_Q_EN
N/A
OS_MAX_EVENTS,
OS_MAX_QS
OSQFlush()
OS_Q_EN
N/A
OSQPend()
OS_Q_EN
N/A
OSQPost()
OS_Q_EN
N/A
OSQPostFront()
OS_Q_EN
OS_Q_EN
N/A
OSStatInit()
OSVersion()
OS_TICKS_PER_SEC
Interrupt Management
Message Mailboxes
Memory Partition Management
OSMemQuery()
Message Queues
OSQQuery()
Table 12-1a
N/A
Set to 1 to
enable code
Service
Other config. constant(s)
affecting function
Semaphore Management
OSSemAccept()
OS_SEM_EN
N/A
OSSemCreate()
OS_SEM_EN
OS_MAX_EVENTS
OSSemPend()
OS_SEM_EN
N/A
OSSemPost()
OS_SEM_EN
N/A
OSSemQuery()
OS_SEM_EN
N/A
Task Management
OSTaskChangePrio()
OS_TASK_CHANGE_PRIO_EN OS_MAX_TASKS
OSTaskCreate()
OS_TASK_CREATE_EN
OS_MAX_TASKS
OSTaskCreateExt()
OS_TASK_CREATE_EXT_EN
OS_MAX_TASKS,
OS_TASK_STK_CLR
OSTaskDel()
OS_TASK_DEL_EN
OS_MAX_TASKS
OSTaskDelReq()
OS_TASK_DEL_EN
OS_MAX_TASKS
OSTaskResume()
OS_TASK_SUSPEND_EN
OS_MAX_TASKS
OSTaskStkChk()
OS_TASK_CREATE_EXT_EN
OS_MAX_TASKS
OSTaskSuspend()
OS_TASK_SUSPEND_EN
OS_MAX_TASKS
OSTaskQuery()
OS_MAX_TASKS
Time Management
OSTimeDly()
N/A
N/A
OSTimeDlyHMSM()
N/A
OS_TICKS_PER_SEC
OSTimeDlyResume()
N/A
OS_MAX_TASKS
OSTimeGet()
N/A
N/A
OSTimeSet()
N/A
N/A
OSTimeTick()
N/A
N/A
OSTaskCreateHook()
OS_CPU_HOOKS_EN
N/A
OSTaskDelHook()
OS_CPU_HOOKS_EN
N/A
OSTaskStatHook()
OS_CPU_HOOKS_EN
N/A
OSTaskSwHook()
OS_CPU_HOOKS_EN
N/A
OSTimeTickHook()
OS_CPU_HOOKS_EN
N/A
User Defined Functions
Table 12-1b
OS_MAX_EVENTS
OS_MAX_EVENTS specifies the maximum number of event control blocks that will be allocated. An event
control block is needed for every message mailbox, message queue or semaphore object. For example, if you
have 10 mailboxes, 5 queues and 3 semaphores, you must set OS_MAX_EVENTS to at least 18. If you
intend to use either mailboxes, queues and/or semaphores then you MUST set OS_MAX_EVENTS to at
least 2.
OS_MAX_MEM_PART
OS_MAX_MEM_PART specifies the maximum number of memory partitions that will be managed by the
memory partition manager found in OS_MEM.C . To use memory partition, however, you will also need to
set OS_MEM_EN to 1. If you intend to use memory partitions then you MUST set OS_MAX_MEM_PART
to at least 2.
OS_MAX_QS
OS_MAX_QS specifies the maximum number of message queues that your application will create. To use
message queue services, you will also need to set OS_Q_EN to 1. If you intend to use message queues then
you MUST set OS_MAX_QS to at least 2.
OS_MAX_TASKS
OS_MAX_TASKS specifies the maximum number of application tasks that can exist in your application. Note
that OS_MAX_TASKS cannot be greater than 62 because µC/OS-II reserves two tasks for itself (see
OS_N_SYS_TASKS in uCOS_II.H). If you set OS_MAX_TASKS to the exact number of tasks in
your system, you will need to make sure that you revise this value when you add additional tasks. Conversely,
if you make OS_MAX_TASKS much higher than your current task requirements (for future expansion), you will
be wasting valuable RAM.
OS_LOWEST_PRIO
OS_LOWEST_PRIO specifies the lowest task priority (i.e. highest number) that you intend to use in your
application and is provided to allow you to reduce the amount of RAM needed by µC/OS-II. Remember that
µC/OS-II’s priorities can go from 0 (highest priority) to a maximum of 63 (lowest possible priority). Setting
OS_LOWEST_PRIO to a value less than 63 means that your application cannot create tasks with a
priority number higher than OS_LOWEST_PRIO .
In fact, µC/OS-II reserves priorities
OS_LOWEST_PRIO and OS_LOWEST_PRIO – 1 for itself.
Task of priority
OS_LOWEST_PRIO is reserved for the idle task (OSTaskIdle()) while priority
OS_LOWEST_PRIO – 1 is reserved for the statistic task (OSTaskStat()). The priorities of
your application tasks can thus take a value between 0 and OS_LOWEST_PRIO – 2 (inclusively). The
lowest task priority specified by OS_LOWEST_PRIO is independent of OS_MAX_TASKS . For
example, you can set OS_MAX_TASKS to 10 and OS_LOWEST_PRIO to 32. You can thus have up
to 10 application tasks and each of those can have a task priority value between 0 and 30 (inclusively). Note
that each task must still have a different priority value. You MUST always set OS_LOWEST_PRIO to a
higher value than the number of application tasks in your system. For example, if you set
OS_MAX_TASKS to 20 and OS_LOWEST_PRIO to 10 then you will not be able to create more than
8 application tasks (0…7). You will simply be wasting RAM.
OS_TASK_IDLE_STK_SIZE
OS_TASK_IDLE_STK_SIZE specifies the size of µC/OS-II's idle task. The size is specified not in bytes but
in number of elements. This is because a stack MUST be declared to be of type OS_STK. The size of the idle
task stack depends on the processor you are using and the deepest anticipated interrupt nesting level. Very
little is being done in the idle task but, you should accommodate for at least enough space to store all processor
registers on the stack.
OS_TASK_STAT_EN
OS_TASK_STAT_EN specifies whether or not you will enable µC/OS-II's statistics task as well as its
initialization function. When set to 1, the statistic task and the statistic task initialization function are enabled.
The statistic task (OSTaskStat() ) is used to compute the CPU usage of your application. When
enabled, OSTaskStat() executes every second and computes the 8-bit variable OSCPUUsage
which provides the percentage of CPU utilization of your application.
OSTaskStat() calls
OSTaskStatHook() every time it executes so that you can add your own statistics as needed. See
OS_CORE.C for details on the statistics task. The priority of OSTaskStat() is always set to
OS_LOWEST_PRIO - 1.
The global variables OSCPUUsage , OSIdleCtrMax , OSIdleCtrRun and OSStatRdy
will not be declared when OS_TASK_STAT_EN is set to 0. This allows you to reduce the amount of
RAM needed by µC/OS-II if you don’t intend to use the statistic task.
OS_TASK_STAT_STK_SIZE
OS_TASK_STAT_STK_SIZE specifies the size of µC/OS-II's statistics task stack. The size is
specified not in bytes but in number of elements. This is because a stack is declared as being of type
OS_STK. The size of the statistics task stack depends on the processor you are using and the maximum of
the following actions:
1.
2.
3.
4.
The stack growth associated with performing 32-bit arithmetic
The stack growth associated with calling OSTimeDly()
The stack growth associated with calling OSTaskStatHook()
The deepest anticipated interrupt nesting level
If you want to run stack checking on this task and determine this task’s actual stack requirements then, you
must enable code generation for OSTaskCreateExt() by setting OS_TASK_CREATE_EXT_EN to 1.
Again, the priority of OSTaskStat() is always set to OS_LOWEST_PRIO - 1.
OS_CPU_HOOKS_EN
This configuration constant indicates whether OS_CPU_C.C declares the hook functions (when set to 1)
or not (when set to 0). Recall that µC/OS-II expects the presence of six functions that can either be defined in
the port (i.e. in OS_CPU_C.C ) or by the application code. These functions are:
1. OSTaskCreateHook()
2. OSTaskDelHook()
3. OSTaskStatHook()
4. OSTaskSwHook()
5. OSTimeTickHook()
OS_MBOX_EN
This constant allows you to enable (when set to 1) or disable (when set to 0) code generation of message
mailbox services and data structures. This allows you to reduce the amount of code space when your
application does not require the use of message mailboxes.
OS_MEM_EN
This constant allows you to enable (when set to 1) or disable (when set to 0) code generation of µC/OS-II’s
partition memory manager and its associated data structures. This allows you to reduce the amount of code
and data space when your application does not require the use of memory partitions.
OS_Q_EN
This constant allows you to enable (when set to 1) or disable (when set to 0) code generation of µC/OS-II’s
message queue manager and its associated data structures. This allows you to reduce the amount of code and
data space when your application does not require the use of message queues. Note that if OS_Q_EN is set
to 0 then the #define constant OS_MAX_QS is irrelevant.
OS_SEM_EN
This constant allows you to enable (when set to 1) or disable (when set to 0) code generation of µC/OS-II’s
semaphore manager and its associated data structures. This allows you to reduce the amount of code and data
space when your application does not require the use of semaphores.
OS_TASK_CHANGE_PRIO_EN
This constant allows you to enable (when set to 1) or disable (when set to 0) code generation of the function
OSTaskChangePrio(). If your application never changes task priorities once they are assigned
then you can reduce the amount of code space used by µC/OS-II by setting
OS_TASK_CHANGE_PRIO_EN to 0.
OS_TASK_CREATE_EN
This constant allows you to enable (when set to 1) or disable (when set to 0) code generation for the
OSTaskCreate()function. Enabling this function makes µC/OS-II backward compatible with
µC/OS’s task creation function.
If your application always uses OSTaskCreateExt()
(recommended) then you can reduce the amount of code space used by µC/OS-II by setting
OS_TASK_CREATE_EN to 0. Note that you MUST set at least one of the two #defines
OS_TASK_CREATE_EN or OS_TASK_CREATE_EXT_EN to 1. If you wish, you can actually
use both.
OS_TASK_CREATE_EXT_EN
This constant allows you to enable (when set to 1) or disable (when set to 0) code generation of the function
OSTaskCreateExt() which is the extended, and more powerful version of the two task creation
functions. If your application never uses OSTaskCreateExt() then you can reduce the amount of
code space used by µC/OS-II’s by setting OS_TASK_CREATE_EXT_EN to 0. Note, however, that
you need the extended task create function to use the stack checking function OSTaskStkChk() .
OS_TASK_DEL_EN
This constant allows you to enable (when set to 1) or disable (when set to 0) code generation of the function
OSTaskDel() which allows you to delete tasks. If your application never uses this function then you can
reduce the amount of code space used by µC/OS-II by setting OS_TASK_DEL_EN to 0.
OS_TASK_SUSPEND_EN
This constant allows you to enable (when set to 1) or disable (when set to 0) code generation of the two
functions OSTaskSuspend() and OSTaskResume() which allows you to explicitly suspend and resume
tasks, respectively. If your application never uses these functions then you can reduce the amount of code
space used by µC/OS-II by setting OS_TASK_SUSPEND_EN to 0.
OS_TICKS_PER_SEC
This constant specifies the rate at which you will call OSTimeTick() . It is up to your initialization code
to ensure that OSTimeTick() is invoked at this rate. This constant is used by OSStatInit() ,
OSTaskStat() and, OSTimeDlyHMSM().
Appendix E
Bibliography
Allworth, Steve T.
Introduction To Real-Time Software Design
New York, New York
Springer-Verlag, 1981
ISBN 0-387-91175-8
Bal Sathe, Dhananjay
Fast Algorithm Determines Priority
EDN (India), Sept. 1988, p.237
Comer, Douglas
Operating System Design, The XINU Approach
Englewood Cliffs, New Jersey
Prentice-Hall, Inc., 1984
ISBN 0-13-637539-1
Deitel, Harvey M. and Michael S. Kogan
The Design Of OS/2
Reading, Massachusetts
Addison-Wesley Publishing Company, 1992
ISBN 0-201-54889-5
Ganssle, Jack G.
The Art of Programming Embedded Systems
San Diego, California
Academic Press, Inc., 1992
ISBN 0-122-748808
Gareau, Jean L.
“Embedded x86 Programming: Protected Mode”
Embedded Systems Programming, April 1998 p80-93
Halang, Wolfgang A. and Alexander D. Stoyenko
Constructing Predictable Real Time Systems
Norwell, Massachusetts
Kluwer Academic Publishers Group, 1991
ISBN 0-7923-9202-7
Hunter & Ready
VRTX Technical Tips
Palo Alto, California
Hunter & Ready, Inc., 1986
Hunter & Ready
Dijkstra Semaphores, Application Note
Palo Alto, California
Hunter & Ready, Inc., 1983
Hunter & Ready
VRTX and Event Flags
Palo Alto, California
Hunter & Ready, Inc., 1986
Intel Corporation
iAPX 86/88, 186/188 User’s Manual: Programmer’s Reference
Santa Clara, California
Intel Corporation, 1986
Kernighan, Brian W., Ritchie, Dennis M.
The C Programming Language, Second Edition
Englewood Cliffs, N.J.
Prentice Hall, 1988
ISBN 0-13-110362-8
Klein, Mark H., Thomas Ralya, Bill Pollak, Ray Harbour Obenza, and Michael Gonzlez
A Practioner's Hardbook for Real-Time Analysis:
Guide to Rate Monotonic Analysis for Real-Time Systems
Norwell, Massachusetts
Kluwer Academic Publishers Group, 1993
ISBN 0-7923-9361-9
Labrosse, Jean J.
µC/OS, The Real-Time Kernel
Lawrence, Kansas
R & D Publications, 1992
ISBN 0-87930-444-8
Laplante, Phillip A.
Real-Time Systems Design and Analysis, An Engineer's Handbook
Piscataway, NJ 08855-1331
IEEE Computer Society Press
ISBN 0-780-334000
Lehoczky, John, Lui Sha, and Ye Ding
"The Rate Monotonic Scheduling Algorithm: Exact Characterization
and Average Case Behavior"
Proceedings of the IEEE Real-Time Systems Symposium
Los Alamitos, CA, 1989, pp. 166-171.
IEEE Computer Society
Madnick, E. Stuart and John J. Donovan
Operating Systems
New York, New York
McGraw-Hill Book Company, 1974
ISBN 0-07-039455-5
Ripps, David L.
An Implementation Guide To Real-Time Programming
Englewood Cliffs, New Jersey
Yourdon Press, 1989
ISBN 0-13-451873-X
Savitzky, Stephen R.
Real-Time Microprocessor Systems
New York, New York
Van Nostrand Reinhold Company, 1985
ISBN 0-442-28048-3
Wood, Mike and Tom Barrett
"A Real-Time Primer"
Embedded Systems Programming, February 1990 p20-28
Appendix F
Licensing
µC/OS-II is a great real-time kernel and has proven itself in countless applications all around the world. Also, a
number of Colleges and Universities are using µC/OS to teach real-time software.
µC/OS-II’s source and object code can be freely distributed (to students) by accredited Colleges and Universities
without requiring a license, as long as there is no commercial application involved. In other words, no licensing is
required if µC/OS-II is used for educational use.
You MUST obtain an 'Object Code Distribution License' to embed µC/OS-II in a commercial product. In other words,
you must obtain a license to put µC/OS-II in a product that is sold with the intent to make a profit. There will be a
license fee for such situations and you will need to contact me (see below) for pricing.
You MUST obtain an 'Source Code Distribution License' to distribute µC/OS-II’s source code. Again, there will be a
fee for such a license and you will need to contact me (see below) for pricing.
You can contact me at:
[email protected]
Or,
Jean J. Labrosse
9540 NW 9th Court
Plantation, FL 33324
U.S.A.
1-954-472-5094
1-954-472-7779 (FAX)
µC/OS-II Web site
The µC/OS-II WEB site (www.uCOS-II.com) contains the following information:
•
•
•
•
•
•
•
•
News on µC/OS and µC/OS-II,
Bug fixes,
Availability of ports,
Answers to frequently asked questions (FAQs),
Application notes,
Books,
Classes,
Links to other WEB sites, and