1
User Manual
Introduction
Welcome to AudioBase3 ! With AudioBase3, multiple DREAM users can share sound libraries,
music libraries and other sound files. With the advanced AudioBase3 search engine, searching
HUGE sound file databases is blazingly fast, and advanced search tools allow users to find exactly
what they need quickly and easily. AudioBase3 also includes a friendly web interface, so users
can search for sound files from their desktop – no workstation required!
AudioBase3 exists in two configurations:
AudioBase3 Basic
AudioBase3 Basic is included FREE with every new MediaLink2 installation, and works with the
FREE Apache2 webserver and FREE MySQL database. AudioBase3 Basic includes the following
features:
•
•
•
•
•
•
•
•
Completely new engine offers superior performance, especially with large datasets
Allows creation of centralized shared libraries via the MediaLink2 Server
Enables facility-wide library management from any DREAM controller
Provides basic web search capability
Backwardly compatible with older MFX3+ systems (requires MFX3+ software upgrade to
rev. 15.9)
Support for Internet Information Services (IIS) and Apache2 webservers (Apache2 is a
FREE download).
Support for Microsoft SQL Server ( 2000 & 2003 ) and MySQL databases (MySQL is a
FREE download).
Runs under Windows XP Professional or Windows Server 2003
Copyright © 2005 FairlightAU
1
AudioBase3 Extreme is the enhanced version of AudioBase3. AudioBase3 Extreme includes all the
features of AudioBase3 Basic, plus the following advanced features:
•
•
•
•
•
•
Integrates with Apple's iTunes, allowing direct ripping/publishing to AudioBase3 with
automatic metadata lookup
Metadata acquired from iTunes is automatically embedded in the WAV file, providing
compatibility with other systems (eg – DigiBase, NetMix).
Supports direct scanning and publishing of compatible WAV files, including BWF
metadata extraction. This allows libraries created on other systems (eg – NetMix,
SoundMiner) to be used by AudioBase3 Extreme.
Files ripped via iTunes or scanned with AudioBase3 Extreme can be
searched/played/downloaded via the web interface. This allows other systems on the
network to use the AudioBase3 Extreme library
"Picklists" of files ripped via iTunes can be created using the AudioBase3 Extreme web
interface, then opened directly on Dream systems (ML4). This allows music and sfx
searches to be performed outside of the studio environment, maximizing productivity.
Provides web-based library management
AudioBase3 Extreme is designed from the ground up to be a “good neighbour” to other systems,
and to maximize productivity in busy studio environments. With AudioBase3 Extreme, facilities
can quickly and easily leverage their existing audio CD or BWF/WAV libraries. With web-based
picklist generation, spotting or pre-production can be performed from any PC or Mac on the
network, without tying up valuable studio time. AudioBase3 Extreme is ideal choice for the
serious studio.
System Requirements
HARDWARE …
ENTRY LEVEL CONFIGURATION
Pentium IV 2.5 Ghz (or higher), 512MB RAM (minimum), dedicated 10GB library drive (minimum)
MIDRANGE CONFIGURATION
Pentium IV 3.0 Ghz (or higher), 1GB RAM (minimum), dedicated 50GB library drive (minimum)
HIGH END CONFIGURATION
Pentium IV XEON 3.0 Ghz (or higher), 1.5GB RAM (minimum), dedicated 100GB RAID5 library
drive (minimum)
Copyright © 2005 FairlightAU
2
SOFTWARE …
OPERATING SYSTEM
Windows XP Professional SP2 (minimum)
–orWindows Server 2003 SP2 (minimum)
WEBSERVER & DATABASE
FREE Apache 2.x webserver (minimum) & FREE MySQL 4.1.x database (minimum)
-orMicrosoft IIS 6.x webserver (minimum) & Microsoft SQL Server 2003 database (minimum)
*Note: Other webserver & database combinations may work, but are not supported.
AudioBase3 – on the QDC
Copyright © 2005 FairlightAU
3
INTRODUCTION
AudioBase3 is a clip database which allows you to search for sounds across all devices in a
DREAM system. Once a sound / clip has been found, it may be auditioned, and then imported
into the current open Project. AudioBase3 on a QDC allows searches to be made in a network
environment, using a MediaLink server.
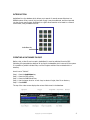
AudioBase Key
CREATING A DATABASE ON QDC
Before a clip or Wav file can be used in AudioBase3, it must be published from the QDC.
Publishing a Project adds the details of all its clips to the database which is stored on the system.
It is possible to publish individual files, or all the Projects and Wav files contained within a
directory.
Here’s how to “Publish”.
Step
Step
Step
Step
Step
1
2
3
4
5
-
Press the AudioBase key.
Press the FILE soft key.
Press the PUBLISH soft key.
Use the jogger wheel or + and - keys to select a Project, Wav file or directory.
Press Enter.
The top of the video screen displays the various fields stored in the database.
Copyright © 2005 FairlightAU
4
All the clips will be added to the database but no waveforms are “physically” copied. For the clip
to be used, the Project or .Wav file must be present on the system. The additional description
and user field can be added later.
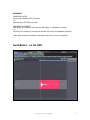
SEARCHING FOR SOUNDS
AudioBase can use various search criteria to filter the fields of the database to find clips. The
Search Options determine how the database will be searched:
Step 1 - Press the AudioBase key.
Step 2 - Press the SEARCH soft key.
Step 4 - Press the MATCH and FIELDS soft keys repetitively to scroll through the options
described below.
MATCH: This specifies how your search text is matched to the fields in the database. This
parameter affects all the fields being searched:
WHOLE -
Your search text must match all the text in a database field.
PART -
Your search text only has to match any part of a database field.
START -
Your search text only has to match the start of a database field.
FIELDS: This specifies if all the fields you search have to match, or if only one or more fields
have to match.
ALL -
All the selected fields must match.
ANY -
Clips are returned if any of the fields match.
To start using AudioBase3,
set the MATCH parameter to PART, and the FIELDS parameter to ALL.
Step 1 - Press the AudioBase key.
Step 2 - Press the SEARCH soft key.
Step 3 - Press the Prev (F8 on the keyboard) and Next (F9 on the keyboard) to highlight a field
you wish to search. Selected fields are highlighted in blue.
Step 4 - Enter your search text. If the field is left cleared, it will not be included in the search.
Step 5 - To add more fields to your search, repeat steps 3 and 4. Otherwise, press Enter to start
the search.
* Please Note * To quickly “Clear” all fields press <Shift-Del> on the keyboard.
Copyright © 2005 FairlightAU
5
Additional search conditions can be added to the text using “wildcard match” criteria.
Additional Search Conditions
Additional search parameters can be added to field searches in a similar manner to
the GO TO CLIP NAME function. Additional sorting criteria are provided by pressing the relevant
character on the keyboard. These are as follows:
*
ANY
This asterix places an (ANY criteria) in the search text. The asterix can be
replaced by any number of characters. For example, typing *squeak would enable the
listing of mouse squeak and door squeak.
=
ANY ONE
This equal sign (=) placed in the search text is used to replace any one character.
?
ONE OR NONE
This question mark (?) placed in the search text is used to replace any one character or
no character.
&
AND
An ampersand (&) is placed in the search text is used to add another name. Only clips
with names containing both search names will be listed. For example, typing
*door&*squeak would list only the clips with names including both door and squeak.
This will list door squeak but not mouse squeak or door slam.
|
OR
A bar (|) is placed in the search text to add another name. Clips with names
containing either search string will be listed. For example, typing *door|*slam will list
clips with names containing door as well as clips with names containing slam.
This will list door squeak and door slam but not mouse squeak.
~
NOT
A tilde (~) is placed in the search text to add another name. This will exclude the
specified text. For example, typing *door&~squeak would list the clips with names
including door except those also containing squeak. This will list door slam but not door
squeak.
Copyright © 2005 FairlightAU
6
Searching the Current Project
AudioBase3 can be switched to search the currently open Project instead of the clip database. It
does not matter whether it has been published or not.
To enter Project mode, hold down the Shift key (on the keyboard) and press the SEARCH soft
key.
Once in Project mode, AudioBase will stay there until you repeat <Shift + SEARCH soft key>.
The AudioBase Menu and the Search submenu change to show the new status. While in Project
mode, none of the editable fields are shown. This is because the screen is displaying clips in the
Project, and they contain none of the Category, Description or User Fields. For the same reason,
it is not possible to enter the Edit Submenu while in Project mode.
At the end of the Found Records list, you will find a list of Master Recordings that are not being
accessed by any clips. This can happen, for example, when you erase a clip, but do not dispose
of the Master Recording (see Space Menu for details of disposing).
Notes:
Search for FILENAME in project …
In the search-project domain, the FILENAME field is now a search criterion. You can, for
example, search for an attached file by name. Or search for only borrowed clips by setting
FILENAME to not the-project: "~@".("@" is the shortcut for the current project name, and "~"
means NOT).
PLACING SOUNDS IN A PROJECT
Before using AudioBase to import a clip, park the transport at the sync point in your Project. This
can be done with a 9 pin machine online:
Copyright © 2005 FairlightAU
7
Step 1 - After searching the database, a list of matching clips is displayed. Ensure the transport is
in STOP, then use the jogger wheel or + and - keys to highlight the clip you want.
Step 2 - Press the AUDITION soft key. This will play the clip using the currently selected track.
When auditioning, the Project remains stationary.
Step 3 - If necessary, use the transport keys (including Jog and Jump) to locate the clip to the
correct location.
Step 4 - Press the PASTE soft key to place the clip in the Project.
NOTES:
It is also possible to PASTE the highlighted clip immediately without auditioning. This will place
the sync point of the clip at the cursor. This will be the head of the clip unless a sync point has
been set using the TRIM function on the Binnacle. All clips imported using AudioBase are
borrowed unless <Blue-Paste> is used. To keep borrowed clips, use the KEEP ALL BORROWED
function in the Space Menu.
MAINTAINING A DATABASE ON THE QDC
The Name, Category, Description and User fields can be edited to add additional clip information.
Step
Step
Step
Step
Step
1
2
3
4
5
-
Use the AudioBase search functions to highlight the required clip record.
Press the EDIT soft key.
Press the Prev and Next keys to highlight a field you wish to edit.
Type the text you wish to enter.
Press <Enter>.
NOTES:
It is also possible to simultaneously change the selected field for all the clips listed from a search.
To do this, edit the desired field as described above except hold down the BLUE key when you
press <Enter>.
The SWAP soft key toggles the contents of the selected field between what you have just typed
and the previous contents.
Deleting Records
To delete records from the database follow the steps below:
Step
Step
Step
Step
1
2
3
4
-
Use the AudioBase3 search functions to display the required clip record(s).
Press the EDIT soft key.
Press the DELETE soft key.
Type the first letter of one of the options displayed on the screen as detailed below.
[O] OKAY - Deletes the record highlighted at the top of the list from the database.
[L] LIST - Deletes the record from the displayed list but not from the database.
[A] ALL - Deletes all the displayed records from the database.
[C] CANCEL - Aborts the DELETE operation
Copyright © 2005 FairlightAU
8
To delete all the records contained in a particular .MT Project follow the steps below:
Step
Step
Step
Step
Step
1
2
3
4
5
-
Press the AudioBase key.
Press the FILE soft key.
Press the PURGE soft key.
Use the jogger wheel or + and - keys to select the desired .MT Project.
Press Enter
LINE field
When the field is inactive (i.e., left blank), the files referenced in the search results are NOT
tested to see if they are online or not. This yields the fastest search. The results of the search will
show the LINE value as “?”, meaning "don't know".
When the field is set to ON, OFF or ANY, each file is tested to see if it is online or not, yielding a
much slower search. If set to ANY, then all files returned by the search are included in the
results, online or offline.
Notes:
AudioBase3 is designed to service a whole network of DREAM and MFX3+ workstations,
and is therefore capable of handling very large sound libraries.
When a search yields a large number of results, it produces very significant network traffic to
download all the information to the MFX workstation that initiated the search. To prevent this
happening, only the first group of 100 found records are downloaded, but as the list is scrolled,
more records are found inside the database and downloaded automatically, keeping the flow of
information coming smoothly. AudioBase3 sorts all records alphabetically by name before
downloading them from the server.
Editing the Form
The AudioBase Form can be changed from its default setup by editing a file which
defines its layout.
Type: $<Enter> This brings up an OS9 shell or text interface.
chd /dd/usr/mfx<Enter>
ed abase.form<Enter>
Copyright © 2005 FairlightAU
9
Now you will see a screen layout depicting the fields, their names and sizes. The first
part lists the fields provided by DREAM. You cannot change their names or sizes, and should not
interfere with this part of the file.
The second part shows user definable fields. By default, the first two are activated, and you can
change their names from USER 1 and USER 2 to anything you like.
To edit their names, use the arrow keys to move the cursor to the correct place, use the BACK
or DEL key to remove characters, and use the alphanumeric keyboard to insert characters. You
can also determine how many characters will be shown on the screen (the actual fields can take
up to 24 characters).
The last section contains the screen layout. Each line lists the fields that will be displayed.
A field beginning with F is from the first section, while one beginning with U is a user field. You
may change what is displayed on each line, but please remember that only 80 characters will fit
on to the screen. If you ask for more, the extra ones will simply not appear.
To save the file and return to work press the BLUE key and then Z (on the keyboard (or Esc Z).
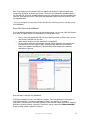
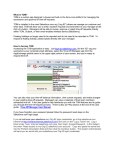
Using the Browser Interface
To access AB3 from a “remote” PC type: http://X.X.X.X/audiobase/ - the IP address being that of
the Medialink Server.
Copyright © 2005 FairlightAU
10
Search AudioBase3 - for clips or projects
Search Types
Clips - Search for Clips using clip search criteria
Projects - Search for Projects using project search criteria
Global - Search for any clip, filename, category, description or user data that matches the
text you type
Match
Whole - Find items that exactly match what you type in each box
Part - Find items that contain what you type in each box
Start - Find items that begin with what you type in each box
Fields
All - Match all the criteria you type
Any - Match any of the criteria you type
Additional Search Conditions
*
=
?
&
|
~
Any number of characters (including zero)
Any one character
One or zero characters
And
Or
Not
Click headers (Clip Name, Category, Description, etc) to change sort order.
Click any filename to find all clips in the selected file.
Click any Category, User1, User2, User3 or User4 link to find identical matches.
Click 'Play' to play WAV files that have been scanned or published from iTunes.
*Note* - if a 'Play' link does not appear, the file is missing or has moved from its original
location.
Copyright © 2005 FairlightAU
11
Edit AudioBase3 User Data
Search AudioBase for clips to edit, then enter User Data and use checkboxes to select the items
you wish to change.
Note that if your search returns multiple pages of results, you must update each page
individually.
Category, User1, User2, User3 and User4 can be changed globally, while Descriptions can be
changed individually.
Stereo clips are marked with an *
Publish iTunes CDs to AudioBase3
If your AudioBase3 installation has been configured accordingly, you can use iTunes to rip CDs
and publish the iTunes metadata into AudioBase3. Please be aware that the Server must be
connected to the Internet for this to work. Fairlight suggests that you use a separate protected
network card ( firewall ) to accomplish this.
Just follow these steps:
Rip the desired CD using iTunes.
Select desired CDs and click 'Add CDs to AudioBase3'.
File and Folder names are automatically 'cleaned' (illegal characters are removed) and
truncated to the correct length for QDC compliance.
Copyright © 2005 FairlightAU
12
New iTunes WAVs from the selected CD(s) are added to AudioBase3. If identical WAVs have
already been published, duplicates are ignored. iTunes info is automatically embedded directly
into the WAV file, and other AudioBase3xtreme users can automatically load the embedded data
using the 'Scan WAV files' menu. Other third party database systems may also be able to read
the embedded data.
*Warning* closing the iTunes popup window will abort the publishing process, and may corrupt
your AudioBase!
Scan WAV files into AudioBase3
If your AudioBase3 installation has been configured accordingly, you can scan WAV files placed in
your WAV1 and WAV2 folders into AudioBase3. Just follow these steps:
Copy or move the desired WAV files into your MediaLink WAV1 or WAV2 folder. You can
have as many subfolders as you wish.
Select desired folder(s) and click 'Add WAVs to AudioBase3'.
File and Folder names are automatically 'cleaned' (illegal characters are removed) and
truncated to the correct length for QDC compliance. New WAVs from the selected
folder(s) are added to AudioBase3. If identical WAVs have already been published,
duplicates are ignored.
How WAV data is scanned into AudioBase3 …
If Fairlight metadata is found in any WAV file, Category, User1 and Description information is
restored automatically. If third party metadata is found in any WAV file, it is placed in
'Description', and the name of the folder/subfolder where the WAV resides is placed in 'Category'.
Otherwise, the WAV filename is placed in 'Description' and the name of the folder/subfolder
where the WAV resides is placed in 'Category'.
Copyright © 2005 FairlightAU
13
Note:
If WAV scanners tries to rename a file and the new name is already in use in the same folder, a
warning will be displayed and the file will be skipped. To fix, manually rename each skipped file
with a unique name (24 characters or less) and rescan.
*Warning* closing the WAV Scanner popup window will abort the publishing process, and may
corrupt your AudioBase!!
Create/Manage Picklists
If your AudioBase3 installation has been configured accordingly, you can create 'Picklists' of WAV
files you've published from iTunes or scanned in the 'Scan WAV Files' menu. These Picklists can
then be used to generate an ML4 file on your MediaLink server. Just follow these steps:
Select an existing Picklist or create a new one.
For new Picklists, enter a Picklist Name, Mark Name, Frame Rate, Start Time, Stereo Track, Mono
Track, Description (optional) and Sample Rate. Once you've selected or created a Picklist, use the
Picklist search tool to find, play, add and delete clips. The clips you select will remain checked.
Click
Click
Click
Click
'Show Current Picklist Contents' to view/play/delete clips in the current picklist.
'Delete' to permanently delete the current picklist.
'Generate ML4' to create an ML4 file.
'Start Over' to return to the select/add Picklist menu.
Copyright © 2005 FairlightAU
14
AudioBase3 Maintenance
Delete Orphaned Files
In rare instances, filenames may remain in the database that contain no referenced clips. To find
and delete these orphaned files, click 'Delete Orphaned Files'
DISCLAIMER: FairlightAU is not responsible for the use of this software in relation to any illegal
manipulation or copies of any copyrighted or protected audio/sounds. It is entirely up to the end-user of
Audiobase3 to respect the copyrights of the people who create this audio/sounds.
FairlightAU
Aug-05
Copyright © 2005 FairlightAU
15