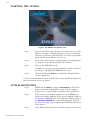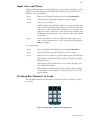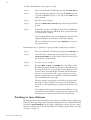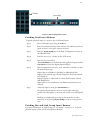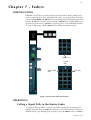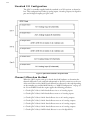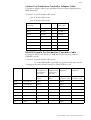
1
User Manual Software Version: 17.2 QDC Software Version: 1.2 Part No: DMIX100-A Document No: 191 i Important Notice COPYRIGHT The material in this document is copyright to Fairlight ESP Pty Ltd, and may not be quoted or reproduced in any form without written permission from the company. Fairlight is a trademark of Fairlight ESP Pty Ltd. All other trademarks are the property of their respective owners. LIMITED WARRANTY POLICY All the software and hardware provided with, or purchased especially for, Fairlight products has been tested for functionality. Fairlight ESP Pty Ltd will make its best efforts to correct reported defects for future releases subject to technical practicabilities. Fairlight ESP will also replace any defective media on which software has been delivered provided that the item to be replaced is returned to the dealer who supported the product within 90 days of purchase. Fairlight ESP Pty Ltd makes no warranty or representation either expressed or implied with respect to the system's performance or fitness for a particular purpose. In no event will Fairlight ESP Pty Ltd be liable for direct or indirect damages arising from any defect in the product or its documentation. Further, Fairlight ESP Pty Ltd will not accept any liability for any programs, sounds, audio recording or sequences stored in or used with Fairlight products, including the cost of recovery of such data. Product features and specifications are subject to change without notice. Fairlight ESP reserves the right to change any part of this document without notice. The warranties, remedies and disclaimers above are exclusive and take precedence over all others, oral or written, express or implied, to the extent permitted by law in the geographical area of the product's use. No employee of Fairlight ESP, agent, distributor or employee of an agent or distributor is authorized to offer any variation from this policy. Copyright © 2002 Fairlight ESP Pty Ltd, Unit 2, 1 Skyline Place, French's Forest, NSW 2086, AUSTRALIA. Telephone +61 2 8897 9999 Fax +61 2 8897 9900 END USER LICENSE AGREEMENT You have acquired a device (“DEVICE”) which includes software licensed by Fairlight ESP from one or more software licensors (“Fairlight ESP's Software Suppliers”). Such software products, as well as associated media, printed materials, and “online” or electronic documentation (“SOFTWARE”) are protected by international intellectual property laws and treaties. The SOFTWARE is licensed, not sold. All rights reserved. IF YOU DO NOT AGREE TO THIS END USER LICENSE AGREEMENT (“EULA”), DO NOT USE THE DEVICE OR COPY THE SOFTWARE. INSTEAD, PROMPTLY CONTACT FAIRLIGHT ESP FOR INSTRUCTIONS ON RETURN OF THE UNUSED DEVICE(S) FOR A REFUND. ANY USE OF THE SOFTWARE, INCLUDING BUT NOT LIMITED TO USE ON THE DEVICE, WILL CONSTITUTE YOUR AGREEMENT TO THIS EULA (OR RATIFICATION OF ANY PREVIOUS CONSENT). GRANT OF SOFTWARE LICENSE. This EULA grants you the following license: • You may use the SOFTWARE only on the DEVICE. • NOT FAULT TOLERANT. THE SOFTWARE IS NOT FAULT TOLERANT. FAIRLIGHT ESP HAS INDEPENDENTLY DETERMINED HOW TO USE THE SOFTWARE IN THE DEVICE, AND FAIRLIGHT ESP'S SOFTWARE SUPPLIERS HAVE RELIED ii UPON FAIRLIGHT ESP TO CONDUCT SUFFICIENT TESTING TO DETERMINE THAT THE SOFTWARE IS SUITABLE FOR SUCH USE. • NO WARRANTIES FOR THE SOFTWARE. THE SOFTWARE is provided “AS IS” and with all faults. THE ENTIRE RISK AS TO SATISFACTORY QUALITY, PERFORMANCE, ACCURACY, AND EFFORT (INCLUDING LACK OF NEGLIGENCE) IS WITH YOU. ALSO, THERE IS NO WARRANTY AGAINST INTERFERENCE WITH YOUR ENJOYMENT OF THE SOFTWARE OR AGAINST INFRINGEMENT. IF YOU HAVE RECEIVED ANY WARRANTIES REGARDING THE DEVICE OR THE SOFTWARE, THOSE WARRANTIES DO NOT ORIGINATE FROM, AND ARE NOT BINDING ON, FAIRLIGHT ESP'S SOFTWARE SUPPLIERS. • Note on Java Support. The SOFTWARE may contain support for programs written in Java. Java technology is not fault tolerant and is not designed, manufactured, or intended for use or resale as online control equipment in hazardous environments requiring fail-safe performance, such as in the operation of nuclear facilities, aircraft navigation or communication systems, air traffic control, direct life support machines, or weapons systems, in which the failure of Java technology could lead directly to death, personal injury, or severe physical or environmental damage. Sun Microsystems, Inc. has contractually obligated Fairlight ESP's Software Suppliers to make this disclaimer. • No Liability for Certain Damages. EXCEPT AS PROHIBITED BY LAW, FAIRLIGHT ESP'S SOFTWARE SUPPLIERS SHALL HAVE NO LIABILITY FOR ANY INDIRECT, SPECIAL, CONSEQUENTIAL OR INCIDENTAL DAMAGES ARISING FROM OR IN CONNECTION WITH THE USE OR PERFORMANCE OF THE SOFTWARE. THIS LIMITATION SHALL APPLY EVEN IF ANY REMEDY FAILS OF ITS ESSENTIAL PURPOSE. IN NO EVENT SHALL FAIRLIGHT ESP'S SOFTWARE SUPPLIERS BE LIABLE FOR ANY AMOUNT IN EXCESS OF U.S. TWO HUNDRED FIFTY DOLLARS (U.S.$250.00). • Limitations on Reverse Engineering, Decompilation, and Disassembly. You may not reverse engineer, decompile, or disassemble the SOFTWARE, except and only to the extent that such activity is expressly permitted by applicable law notwithstanding this limitation. • SOFTWARE TRANSFER ALLOWED BUT WITH RESTRICTIONS. You may permanently transfer rights under this EULA only as part of a permanent sale or transfer of the Device, and only if the recipient agrees to this EULA. If the SOFTWARE is an upgrade, any transfer must also include all prior versions of the SOFTWARE. • EXPORT RESTRICTIONS. You acknowledge that SOFTWARE is of US-origin. You agree to comply with all applicable international and national laws that apply to the SOFTWARE, including the U.S. Export Administration Regulations, as well as end-user, end-use and country destination restrictions issued by U.S. and other governments. For additional information on exporting the SOFTWARE, see http://www.microsoft.com/exporting/. iii DREAM Console Online Documentation QDC Software Version: 17.2 DREAM Station Software Version: 1.2 Part No: DMIX1001-A Document No: 191 Online Index Table of Contents Index ABCDEFGHIJKLMNOPQRSTUVWXZ This page has been left intentionally blank and may be removed from the printed version of the manual. vi OBTAINING TECHNICAL SUPPORT Users requiring technical support should contact their local Fairlight office or distributor. Information can also be found on the world wide web at: http://www.fairlightesp.com FAIRLIGHT OFFICES WORLD-WIDE USA West Coast Fairlight USA 844 North Seward Street, Hollywood, CA90038 USA Tel:+1 323 465 0070 Fax: +1 323 465 0080 United Kingdom Fairlight ESP Limited Unit 12, Spectrum House 32-34 Gordon House Road London NW5 1LP England Tel: + 44-20-7267-3323 Fax: + 44-20-7267-0919 Germany Fairlight Deutschland Gmbh August-Bebel-Strasse 26-53 14482 Potsdam-Babelsberg Berlin Germany Tel: +49 331 721 2930 Fax: +49 331 721 2933 USA East Coast Fairlight USA 2 West 45th Street, Penthouse New York, NY 10036 USA Tel: +1 212 819 1289 Fax: +1 212 819 0376 France Fairlight France 41-43 Rue des Peupliers 92100 Boulogne-Billancourt Paris France Tel: +33 1 4610 9292 Fax: +33 1 4610 9295 Japan Fairlight Japan Inc. 3-3-11 Ikejiri Setagaya-Ku Tokyo Japan 154-0001 Tel: +81 3 5432 4151 Freecall (Japan only): 0120 213 643 Fax: +81 3 5432 4533 Asia-Pacific Fairlight ESP Pty. Ltd. Unit 2, 1 Skyline Place, Frenchs Forest NSW 2086 Australia Tel: +61 2 8977 9999 Fax: +61 2 8977 9900 MANUAL ERRORS AND OMISSION To help ensure that Fairlight provides the most accurate and comprehensive documentation, please report any errors or omissions to: [email protected] vii Table of Contents Chapter 1: Introduction INTRODUCTION. . . . . . . . . . . . . . . . . . . . . .1-2 ABOUT THIS MANUAL . . . . . . . . . . . . . . . . .1-2 Finding the Information You Need . . . . . . . .1-2 Operational Instructions . . . . . . . . . . . . . . . .1-3 Installation Instructions . . . . . . . . . . . . . . . .1-4 DISPLAYING TRACKS . . . . . . . . . . . . . . . . . .4-2 The Clip . . . . . . . . . . . . . . . . . . . . . . . . . . . .4-3 Mono and Stereo Clips . . . . . . . . . . . . . . . . .4-4 SELECTING TRACKS AND FEEDS. . . . . . . . . .4-4 TIME SCALE AND DISPLAY ZOOMING. . . . .4-6 Alternate Zoom Factors . . . . . . . . . . . . . . . .4-6 TRANSPORT CONTROLS . . . . . . . . . . . . . . .4-7 Chapter 2: DREAM Console Overview INTRODUCTION. . . . . . . . . . . . . . . . . . . . . .2-2 TERMINOLOGY. . . . . . . . . . . . . . . . . . . . . . .2-2 ARCHITECTURE. . . . . . . . . . . . . . . . . . . . . . .2-3 Signal Flow . . . . . . . . . . . . . . . . . . . . . . . . .2-3 Track and Live Feeds . . . . . . . . . . . . . . . . . .2-4 Main Bus . . . . . . . . . . . . . . . . . . . . . . . . . . .2-5 Sub-Buses . . . . . . . . . . . . . . . . . . . . . . . . . .2-5 Aux Buses . . . . . . . . . . . . . . . . . . . . . . . . . .2-5 Returns. . . . . . . . . . . . . . . . . . . . . . . . . . . . .2-5 System Overview . . . . . . . . . . . . . . . . . . . . .2-6 USER INTERFACE. . . . . . . . . . . . . . . . . . . . . .2-7 Console Features . . . . . . . . . . . . . . . . . . . . .2-8 Recorder/Editor Display Features . . . . . . . .2-13 Mixer Display Features. . . . . . . . . . . . . . . .2-14 STARTING THE SYSTEM . . . . . . . . . . . . . . .2-15 SYSTEM SHUTDOWN . . . . . . . . . . . . . . . . .2-15 USING THE SYSTEM . . . . . . . . . . . . . . . . . .2-16 Chapter 3: Projects INTRODUCTION. . . . . . . . . . . . . . . . . . . . . .3-2 Project Menu Display. . . . . . . . . . . . . . . . . .3-2 NAVIGATING THE PROJECT MENU . . . . . . .3-4 Opening and Closing a Domain or Device. .3-4 Creating a New Project . . . . . . . . . . . . . . . .3-4 Closing a Project . . . . . . . . . . . . . . . . . . . . .3-5 Opening an Existing Project . . . . . . . . . . . . .3-5 FILES AND FOLDERS . . . . . . . . . . . . . . . . . . .3-5 Creating a New Folder . . . . . . . . . . . . . . . . .3-5 Copying Files Or Folders . . . . . . . . . . . . . . .3-6 Moving Files or Folders . . . . . . . . . . . . . . . .3-6 Renaming Projects and Folders . . . . . . . . . .3-6 Deleting Projects or Folders . . . . . . . . . . . . .3-7 Chapter 4: Tracks & Transport INTRODUCTION. . . . . . . . . . . . . . . . . . . . . .4-2 TABLE OF CONTENTS LOOP JOG AND LINEAR JOG . . . . . . . . . . . .4-7 SHUTTLE . . . . . . . . . . . . . . . . . . . . . . . . . . . .4-8 JUMP . . . . . . . . . . . . . . . . . . . . . . . . . . . . . . .4-8 Jump Methods . . . . . . . . . . . . . . . . . . . . . . .4-9 LOCATOR FUNCTIONS. . . . . . . . . . . . . . . . .4-9 SELECTING A RANGE . . . . . . . . . . . . . . . . .4-10 Selecting a Range using Cursor Position . . .4-10 Selecting a Range Between Gaps . . . . . . . .4-10 Range Menu. . . . . . . . . . . . . . . . . . . . . . . .4-10 Setting Range Modes . . . . . . . . . . . . . . . . .4-11 Jumping to To and From Points . . . . . . . . .4-11 PLAY MENU. . . . . . . . . . . . . . . . . . . . . . . . .4-12 RECORD MENU. . . . . . . . . . . . . . . . . . . . . .4-12 Chapter 5: Patching and Routing INTRODUCTION . . . . . . . . . . . . . . . . . . . . . .5-2 Setting up Your Control Room Monitors . . . .5-2 PATCHING INPUTS . . . . . . . . . . . . . . . . . . . .5-3 Patch Interrogation . . . . . . . . . . . . . . . . . . . .5-3 Analog And Digital Inputs . . . . . . . . . . . . . .5-3 Patching Physical Inputs To Feeds . . . . . . . .5-3 Fast Patching Inputs From the Path Configuration Panel . . . . . . . . . . . . . . . . . . . . . . . . . . . . . . .5-4 Input Gain and Phase . . . . . . . . . . . . . . . . . .5-6 Patching Bus Elements to Feeds . . . . . . . . . .5-6 Patching to Insert Returns . . . . . . . . . . . . . . .5-7 Patching To Multiple Signal Paths . . . . . . .5-10 Unpatching Inputs . . . . . . . . . . . . . . . . . . .5-10 PATCHING OUTPUTS . . . . . . . . . . . . . . . . .5-11 Patching Bus Outputs . . . . . . . . . . . . . . . . .5-11 Patching Insert Sends . . . . . . . . . . . . . . . . .5-12 Patching Direct Outputs . . . . . . . . . . . . . . .5-13 Monitor Outputs. . . . . . . . . . . . . . . . . . . . .5-15 CONFIGURING BUS FORMATS . . . . . . . . .5-15 The Bus Format Menu . . . . . . . . . . . . . . . .5-16 ASSIGNING SIGNALS TO BUSES. . . . . . . . .5-16 Assigning Feeds to Buses . . . . . . . . . . . . . .5-16 viii Fast Bus Assignment via the Path Configurator . . . . . . . . . . . . . . . . . . . . . . . . . . . . . . . . . . 5-17 Assigning Sub-Buses to the Main Bus. . . . . 5-17 Return Group To Bus. . . . . . . . . . . . . . . . . 5-18 Stem Assign . . . . . . . . . . . . . . . . . . . . . . . . 5-18 Aux to Main Bus . . . . . . . . . . . . . . . . . . . . 5-19 BUS REDUCTION . . . . . . . . . . . . . . . . . . . . 5-19 . . . . . . . . . . . . . . . . . . . . . . . . . . . . . . . . . 5-19 Chapter 6: Monitoring INTRODUCTION . . . . . . . . . . . . . . . . . . . . . 6-2 SELECTING CONTROL ROOM MONITOR SPEAKERS . . . . . . . . . . . . . . . . . . . . . . . . . . . 6-2 NAMING CONTROL ROOM SPEAKER SETS. 6-3 PATCHING CONTROL ROOM MONITOR OUTPUTS . . . . . . . . . . . . . . . . . . . . . . . . . . . . . . . 6-3 System I/O Ports . . . . . . . . . . . . . . . . . . . . . 6-3 TRIMMING RELATIVE SPEAKER LEVELS . . . . 6-4 SELECTING A CONTROL ROOM MONITOR SOURCE . . . . . . . . . . . . . . . . . . . . . . . . . . . . 6-4 PATCHING EXTERNAL MONITOR SOURCES6-4 NAMING EXTERNAL MONITOR SOURCES . 6-5 MONITOR FORMAT . . . . . . . . . . . . . . . . . . . 6-5 INSERTS IN MONITORING . . . . . . . . . . . . . . 6-6 MONITORING CONTROLS . . . . . . . . . . . . . 6-6 Monitor Level . . . . . . . . . . . . . . . . . . . . . . . 6-6 Dim. . . . . . . . . . . . . . . . . . . . . . . . . . . . . . . 6-6 Fixed Reference Level . . . . . . . . . . . . . . . . . 6-7 Master Mute . . . . . . . . . . . . . . . . . . . . . . . . 6-7 Individual Speaker Mutes . . . . . . . . . . . . . . 6-7 Monitor Phase Reversal . . . . . . . . . . . . . . . . 6-7 SELECTING STUDIO SPEAKER SETS . . . . . . . 6-8 PATCHING STUDIO SPEAKER OUTPUTS. . . 6-8 System I/O Ports . . . . . . . . . . . . . . . . . . . . . 6-9 NAMING STUDIO SPEAKER SETS . . . . . . . . . 6-9 SELECTING STUDIO MONITOR SOURCES . 6-9 Patching External Sources . . . . . . . . . . . . . 6-10 MONITOR SETS . . . . . . . . . . . . . . . . . . . . . 6-10 Recalling Monitor Sets. . . . . . . . . . . . . . . . 6-10 Setting Up Monitor Sets . . . . . . . . . . . . . . . 6-10 Labelling Monitor Sets . . . . . . . . . . . . . . . . 6-11 SAVING MONITOR SETUPS . . . . . . . . . . . . 6-11 SOLO . . . . . . . . . . . . . . . . . . . . . . . . . . . . . 6-11 SIP Defeat . . . . . . . . . . . . . . . . . . . . . . . . . 6-12 Disk Recorder Solo . . . . . . . . . . . . . . . . . . 6-12 Chapter 7: Faders INTRODUCTION . . . . . . . . . . . . . . . . . . . . . 7-2 OPERATION . . . . . . . . . . . . . . . . . . . . . . . . . 7-2 Calling a Signal Path to the Master Fader . . . 7-2 Fader Follows Selection . . . . . . . . . . . . . . . . 7-3 The Master Key . . . . . . . . . . . . . . . . . . . . . . 7-3 Solo . . . . . . . . . . . . . . . . . . . . . . . . . . . . . . . 7-3 Mute . . . . . . . . . . . . . . . . . . . . . . . . . . . . . . 7-5 The Fold Key . . . . . . . . . . . . . . . . . . . . . . . . 7-6 Soft Pot . . . . . . . . . . . . . . . . . . . . . . . . . . . . 7-6 Automation Mode Selection . . . . . . . . . . . . 7-6 Fader Displays . . . . . . . . . . . . . . . . . . . . . . . 7-6 USING GROUPS . . . . . . . . . . . . . . . . . . . . . . 7-7 NAMING FEEDS AND BUSES . . . . . . . . . . . . 7-7 CONTROLLING THE SIGNAL PATH . . . . . . . 7-8 Channel Panel . . . . . . . . . . . . . . . . . . . . . . . 7-8 Input Gain and Phase . . . . . . . . . . . . . . . . . 7-8 Inserts . . . . . . . . . . . . . . . . . . . . . . . . . . . . . 7-8 Direct Outs . . . . . . . . . . . . . . . . . . . . . . . . . 7-8 FADERS TO... . . . . . . . . . . . . . . . . . . . . . . . . 7-9 CHANNEL FADERS . . . . . . . . . . . . . . . . . . . 7-10 The Call Key . . . . . . . . . . . . . . . . . . . . . . . 7-10 FADER SETS. . . . . . . . . . . . . . . . . . . . . . . . . 7-11 Mapping Fader Sets . . . . . . . . . . . . . . . . . . 7-11 Mapping Multiple Faders . . . . . . . . . . . . . . 7-11 Mapping Link Groups . . . . . . . . . . . . . . . . 7-12 Inserting and Deleting Faders. . . . . . . . . . . 7-12 Holding Faders . . . . . . . . . . . . . . . . . . . . . 7-12 Chapter 8: The Channel Panel INTRODUCTION . . . . . . . . . . . . . . . . . . . . . 8-2 CALLING A SIGNAL PATH . . . . . . . . . . . . . . 8-2 Call Follow . . . . . . . . . . . . . . . . . . . . . . . . . 8-2 CHANNEL PANEL GENERAL OPERATION . . 8-3 The Master Fader . . . . . . . . . . . . . . . . . . . . . 8-3 The Fold Key . . . . . . . . . . . . . . . . . . . . . . . . 8-3 EQUALISER . . . . . . . . . . . . . . . . . . . . . . . . . . 8-3 Using the Equaliser . . . . . . . . . . . . . . . . . . . 8-4 THE SURROUND PANNER . . . . . . . . . . . . . . 8-6 Using the Panner . . . . . . . . . . . . . . . . . . . . . 8-7 Joystick . . . . . . . . . . . . . . . . . . . . . . . . . . . . 8-7 Trackball . . . . . . . . . . . . . . . . . . . . . . . . . . . 8-7 Panning IN/OUT . . . . . . . . . . . . . . . . . . . . . 8-7 Diverge Control . . . . . . . . . . . . . . . . . . . . . . 8-7 The Spread Control . . . . . . . . . . . . . . . . . . . 8-8 Rotate Control . . . . . . . . . . . . . . . . . . . . . . . 8-9 Pan, Diverge, Spread, Rotate Automation Enable . . . . . . . . . . . . . . . . . . . . . . . . . . . . . . . . . . . 8-9 Boom. . . . . . . . . . . . . . . . . . . . . . . . . . . . . . 8-9 TABLE OF CONTENTS ix DYNAMICS . . . . . . . . . . . . . . . . . . . . . . . . .8-10 Compressor Parameters . . . . . . . . . . . . . . .8-10 Limiter Parameters . . . . . . . . . . . . . . . . . . .8-11 Expander Parameters . . . . . . . . . . . . . . . . .8-12 Gate Parameters . . . . . . . . . . . . . . . . . . . . .8-12 One and Two-handed Editing. . . . . . . . . . .10-4 Undo and Redo . . . . . . . . . . . . . . . . . . . . .10-4 Single Track or Multitrack Editing. . . . . . . .10-5 Clip Layers . . . . . . . . . . . . . . . . . . . . . . . . .10-5 Transport and Selection Keys . . . . . . . . . . .10-5 AUXILIARY SENDS. . . . . . . . . . . . . . . . . . . .8-14 Auxiliary Send Controls . . . . . . . . . . . . . . .8-14 CUT AND COPY EDIT MODES . . . . . . . . . .10-6 The Clipboard . . . . . . . . . . . . . . . . . . . . . .10-6 Ghost . . . . . . . . . . . . . . . . . . . . . . . . . . . . .10-6 Using Cut or Copy . . . . . . . . . . . . . . . . . . .10-6 Cut Edit Targets . . . . . . . . . . . . . . . . . . . . .10-7 Copy Edit Targets . . . . . . . . . . . . . . . . . . . .10-7 Cut/Copy Soft Key Functions . . . . . . . . . . .10-7 Cut and Copy Edit Options. . . . . . . . . . . . .10-8 Cut/Copy with Range On . . . . . . . . . . . . . .10-8 PATH CONFIGURATION . . . . . . . . . . . . . .8-15 Level Meter . . . . . . . . . . . . . . . . . . . . . . . .8-15 Phase . . . . . . . . . . . . . . . . . . . . . . . . . . . . .8-15 Arm . . . . . . . . . . . . . . . . . . . . . . . . . . . . . .8-15 Insert IN . . . . . . . . . . . . . . . . . . . . . . . . . . .8-16 Insert Enable . . . . . . . . . . . . . . . . . . . . . . .8-16 Insert Config. . . . . . . . . . . . . . . . . . . . . . . .8-16 Direct IN . . . . . . . . . . . . . . . . . . . . . . . . . .8-19 Direct IN Enable . . . . . . . . . . . . . . . . . . . .8-19 Direct Config . . . . . . . . . . . . . . . . . . . . . . .8-19 SIP Defeat . . . . . . . . . . . . . . . . . . . . . . . . .8-21 Input Patch. . . . . . . . . . . . . . . . . . . . . . . . .8-21 Bus Routing . . . . . . . . . . . . . . . . . . . . . . . .8-21 MULTI TRIM . . . . . . . . . . . . . . . . . . . . . . . .8-22 Chapter 9: Recording INTRODUCTION. . . . . . . . . . . . . . . . . . . . . .9-2 PROJECT SET UP . . . . . . . . . . . . . . . . . . . . . .9-2 Project Sample Rate . . . . . . . . . . . . . . . . . . .9-2 Recording Bit Depth. . . . . . . . . . . . . . . . . . .9-2 Selecting A Sync Source . . . . . . . . . . . . . . . .9-3 Input Sync Auto . . . . . . . . . . . . . . . . . . . . . .9-3 Project Frame Rate . . . . . . . . . . . . . . . . . . . .9-4 PATCHING INPUTS TO TRACK FEEDS . . . . .9-4 Input Gain and Phase . . . . . . . . . . . . . . . . . .9-5 ARMING TRACKS . . . . . . . . . . . . . . . . . . . . .9-6 Arm on the Fly . . . . . . . . . . . . . . . . . . . . . . .9-6 Metering Input Levels . . . . . . . . . . . . . . . . . .9-6 RECORDING . . . . . . . . . . . . . . . . . . . . . . . . .9-6 Recording Types . . . . . . . . . . . . . . . . . . . . .9-7 ARM Mode . . . . . . . . . . . . . . . . . . . . . . . . .9-7 Monitoring Inputs. . . . . . . . . . . . . . . . . . . . .9-8 Auto Extend . . . . . . . . . . . . . . . . . . . . . . . . .9-9 Punch In / Punch Out. . . . . . . . . . . . . . . . . .9-9 Automatic Drop-in . . . . . . . . . . . . . . . . . . .9-10 RECORDING STEREO CLIPS . . . . . . . . . . . .9-10 Chapter 10: Binnacle Editing INTRODUCTION. . . . . . . . . . . . . . . . . . . . .10-2 EDITING . . . . . . . . . . . . . . . . . . . . . . . . . . .10-3 Edit Modes . . . . . . . . . . . . . . . . . . . . . . . . .10-3 Edit Options . . . . . . . . . . . . . . . . . . . . . . . .10-3 Edit Targets . . . . . . . . . . . . . . . . . . . . . . . .10-4 TABLE OF CONTENTS ERASE EDIT MODE . . . . . . . . . . . . . . . . . .10-11 Using Erase . . . . . . . . . . . . . . . . . . . . . . .10-11 Erase Edit Targets . . . . . . . . . . . . . . . . . . .10-11 Erase Edit Options . . . . . . . . . . . . . . . . . .10-11 TRIM EDIT MODE . . . . . . . . . . . . . . . . . . .10-13 Using Trim . . . . . . . . . . . . . . . . . . . . . . . .10-13 Trim Edit Targets . . . . . . . . . . . . . . . . . . .10-13 Trim Soft Key Functions . . . . . . . . . . . . . .10-14 Trim Edit Options . . . . . . . . . . . . . . . . . . .10-14 SLIP EDIT MODE . . . . . . . . . . . . . . . . . . . .10-15 Using Slip. . . . . . . . . . . . . . . . . . . . . . . . .10-15 Slip Edit Targets . . . . . . . . . . . . . . . . . . . .10-15 Slip Edit Options . . . . . . . . . . . . . . . . . . .10-16 NUDGE . . . . . . . . . . . . . . . . . . . . . . . . . . .10-16 Using Nudge . . . . . . . . . . . . . . . . . . . . . .10-16 Nudge with A Range . . . . . . . . . . . . . . . .10-16 FADES EDIT MODE . . . . . . . . . . . . . . . . . .10-18 Using Fade . . . . . . . . . . . . . . . . . . . . . . . .10-18 Cross-Fades . . . . . . . . . . . . . . . . . . . . . . .10-18 Fade Targets . . . . . . . . . . . . . . . . . . . . . . .10-19 Fade Soft Key Functions . . . . . . . . . . . . . .10-19 Fade Options . . . . . . . . . . . . . . . . . . . . . .10-19 Fade Defaults . . . . . . . . . . . . . . . . . . . . . .10-20 Creating Level Changes . . . . . . . . . . . . . .10-20 Chapter 11: Grouping INTRODUCTION . . . . . . . . . . . . . . . . . . . . .11-2 SUMMARY OF GROUPS . . . . . . . . . . . . . . .11-2 LINK GROUPS . . . . . . . . . . . . . . . . . . . . . . .11-2 Link Group Format . . . . . . . . . . . . . . . . . . .11-2 Link Group Features . . . . . . . . . . . . . . . . . .11-3 Creating a Link Group . . . . . . . . . . . . . . . .11-4 Destroying a Link Group . . . . . . . . . . . . . .11-5 Unfolding or Selecting to Access a Link Group Member . . . . . . . . . . . . . . . . . . . . . . . . . . . .11-5 MULTI TRIM. . . . . . . . . . . . . . . . . . . . . . . . .11-6 Applying Multi Trim . . . . . . . . . . . . . . . . . .11-6 x BUSES . . . . . . . . . . . . . . . . . . . . . . . . . . . . . 11-7 Unfolding to Access Bus Elements . . . . . . . 11-7 Chapter 12: Library INTRODUCTION . . . . . . . . . . . . . . . . . . . . 12-2 PRESETS. . . . . . . . . . . . . . . . . . . . . . . . . . . . 12-2 Equaliser . . . . . . . . . . . . . . . . . . . . . . . . . . 12-2 Dynamics . . . . . . . . . . . . . . . . . . . . . . . . . 12-2 Channel. . . . . . . . . . . . . . . . . . . . . . . . . . . 12-2 ALL CONSOLE . . . . . . . . . . . . . . . . . . . . . 12-2 SAVING A PRESET. . . . . . . . . . . . . . . . . . . . 12-3 EQ DISPLAY . . . . . . . . . . . . . . . . . . . . . . . . 16-3 Selecting Shelf . . . . . . . . . . . . . . . . . . . . . . 16-3 Numeric Entry . . . . . . . . . . . . . . . . . . . . . . 16-3 New or Old . . . . . . . . . . . . . . . . . . . . . . . . 16-3 In or Out . . . . . . . . . . . . . . . . . . . . . . . . . . 16-3 Copying an EQ . . . . . . . . . . . . . . . . . . . . . 16-4 Chapter 17: Gate Menu INTRODUCTION . . . . . . . . . . . . . . . . . . . . 17-2 GATING CLIPS . . . . . . . . . . . . . . . . . . . . . . 17-2 GATING DURING RECORD . . . . . . . . . . . . 17-3 LOADING A PRESET . . . . . . . . . . . . . . . . . . 12-3 DELETING A PRESET . . . . . . . . . . . . . . . . . . 12-3 Chapter 18: Time Compression & Expansion INTRODUCTION . . . . . . . . . . . . . . . . . . . . 18-2 Chapter 13: Talkback INTRODUCTION . . . . . . . . . . . . . . . . . . . . 13-2 USING TALKBACK . . . . . . . . . . . . . . . . . . . 13-2 SETTING UP THE TALKBACK PATHS . . . . . 13-2 Selecting a Talkback Destination . . . . . . . . 13-2 Select a Talkback Source . . . . . . . . . . . . . . 13-2 DIM . . . . . . . . . . . . . . . . . . . . . . . . . . . . . . . 13-3 Auto Cue . . . . . . . . . . . . . . . . . . . . . . . . . . 13-3 Chapter 14: Name INTRODUCTION . . . . . . . . . . . . . . . . . . . . 14-2 RENAMING A PROJECT . . . . . . . . . . . . . . . 14-2 NAMING TRACKS . . . . . . . . . . . . . . . . . . . . 14-2 NAMING CLIPS . . . . . . . . . . . . . . . . . . . . . . 14-2 SEED NAMES. . . . . . . . . . . . . . . . . . . . . . . . 14-3 NAMING FEEDS AND BUSES . . . . . . . . . . . 14-3 Chapter 15: Clip Level INTRODUCTION . . . . . . . . . . . . . . . . . . . . 15-2 Applying a Level Change. . . . . . . . . . . . . . 15-2 LEVEL SOFT KEY FUNCTIONS . . . . . . . . . . 15-2 Set . . . . . . . . . . . . . . . . . . . . . . . . . . . . . . . 15-2 Trim . . . . . . . . . . . . . . . . . . . . . . . . . . . . . 15-3 Mode. . . . . . . . . . . . . . . . . . . . . . . . . . . . . 15-3 Info . . . . . . . . . . . . . . . . . . . . . . . . . . . . . . 15-3 Range . . . . . . . . . . . . . . . . . . . . . . . . . . . . 15-4 PERFORMING TIME COMPRESSION/EXPANSION . . . . . . . . . . . . . . . . . . . . . . . . . . . . . . 18-2 STRETCH AND VARI . . . . . . . . . . . . . . . . . . 18-3 Selecting an Algorithm. . . . . . . . . . . . . . . . 18-3 Selecting the Scale. . . . . . . . . . . . . . . . . . . 18-3 Percent . . . . . . . . . . . . . . . . . . . . . . . . . . . 18-3 Target Time . . . . . . . . . . . . . . . . . . . . . . . . 18-4 Pitch using Varispeed . . . . . . . . . . . . . . . . 18-4 Range . . . . . . . . . . . . . . . . . . . . . . . . . . . . 18-4 PITCH . . . . . . . . . . . . . . . . . . . . . . . . . . . . . 18-5 Chapter 19: Solo and Mute INTRODUCTION . . . . . . . . . . . . . . . . . . . . 19-2 SOLOING TRACKS . . . . . . . . . . . . . . . . . . . 19-2 SOLO FOLLOWS EDIT . . . . . . . . . . . . . . . . 19-3 MUTING TRACKS . . . . . . . . . . . . . . . . . . . . 19-3 SAFE . . . . . . . . . . . . . . . . . . . . . . . . . . . . . . 19-3 DISABLE . . . . . . . . . . . . . . . . . . . . . . . . . . . 19-3 Chapter 20: Track & Takes INTRODUCTION . . . . . . . . . . . . . . . . . . . . 20-2 TRACK MENU . . . . . . . . . . . . . . . . . . . . . . . 20-2 Swap . . . . . . . . . . . . . . . . . . . . . . . . . . . . . 20-2 Numbers . . . . . . . . . . . . . . . . . . . . . . . . . . 20-2 Move . . . . . . . . . . . . . . . . . . . . . . . . . . . . . 20-2 Copy . . . . . . . . . . . . . . . . . . . . . . . . . . . . . 20-3 Shadow . . . . . . . . . . . . . . . . . . . . . . . . . . . 20-3 TAKES MENU . . . . . . . . . . . . . . . . . . . . . . . 20-3 Chapter 16: Clip Equalisation INTRODUCTION . . . . . . . . . . . . . . . . . . . . 16-2 Applying EQ . . . . . . . . . . . . . . . . . . . . . . . 16-2 Chapter 21: Go To TABLE OF CONTENTS xi INTRODUCTION. . . . . . . . . . . . . . . . . . . . .21-2 GO TO A TIMECODE LOCATION . . . . . . . .21-2 TIMECODE CALCULATOR . . . . . . . . . . . . .21-3 GO TO A MARK . . . . . . . . . . . . . . . . . . . . .21-4 FAST MARK LOCATION . . . . . . . . . . . . . . .21-4 GO TO LAST . . . . . . . . . . . . . . . . . . . . . . . .21-4 GO TO CLIP NAME . . . . . . . . . . . . . . . . . . .21-4 ALPHANUMERIC SORTING . . . . . . . . . . . .21-5 Chapter 22: ADR, GPI & Loop INTRODUCTION. . . . . . . . . . . . . . . . . . . . .22-2 USING THE ADR FUNCTIONS . . . . . . . . . .22-2 SETTING PREROLL AND POSTROLL . . . . . .22-3 GPI MENU . . . . . . . . . . . . . . . . . . . . . . . . . .22-3 Type - OFF . . . . . . . . . . . . . . . . . . . . . . . . .22-4 Type - ON . . . . . . . . . . . . . . . . . . . . . . . . .22-4 Type - Simple . . . . . . . . . . . . . . . . . . . . . . .22-4 Type - Record . . . . . . . . . . . . . . . . . . . . . .22-4 Type - PREROLL. . . . . . . . . . . . . . . . . . . . .22-5 Type - POSTROLL . . . . . . . . . . . . . . . . . . .22-6 Type - ADR REH . . . . . . . . . . . . . . . . . . . .22-6 Type - ADR PLAY. . . . . . . . . . . . . . . . . . . .22-7 Type - BEEPS . . . . . . . . . . . . . . . . . . . . . . .22-7 Type - PREREC . . . . . . . . . . . . . . . . . . . . . .22-7 Type - MARKS . . . . . . . . . . . . . . . . . . . . . .22-8 Type - CUE MUTE . . . . . . . . . . . . . . . . . . .22-8 SETTING LOOP MODE . . . . . . . . . . . . . . . .22-8 PUNCHING IN AND OUT OF AUTOMATION RECORD . . . . . . . . . . . . . . . . . . . . . . . . . .23-11 Manual Punch In . . . . . . . . . . . . . . . . . . .23-11 Automatic Automation Punch In . . . . . . .23-12 Active IN and Active OUT . . . . . . . . . . . .23-13 Punch. . . . . . . . . . . . . . . . . . . . . . . . . . . .23-13 LINKING AUDIO AND MIX RECORD WITH PRIME. . . . . . . . . . . . . . . . . . . . . . . . . . . . .23-13 PREVIEWING MIX MOVES. . . . . . . . . . . . .23-14 Active In/Out from Preview . . . . . . . . . . .23-15 Fill Range from Preview . . . . . . . . . . . . . .23-15 Using Mix ON with Preview . . . . . . . . . .23-15 SAVING AND LOADING MIXES . . . . . . . .23-15 Saving a Mix . . . . . . . . . . . . . . . . . . . . . .23-16 Loading a Mix . . . . . . . . . . . . . . . . . . . . .23-16 Deleting a Mix . . . . . . . . . . . . . . . . . . . . .23-16 Creating a New Mix . . . . . . . . . . . . . . . . .23-16 MIX UNDO . . . . . . . . . . . . . . . . . . . . . . . .23-16 THE MIX MENU . . . . . . . . . . . . . . . . . . . . .23-17 THE BLUE UTILS MENU. . . . . . . . . . . . . . .23-17 MULTI TRIM. . . . . . . . . . . . . . . . . . . . . . . .23-18 TRIMMING A MIX WITH MULTI TRIM . . .23-19 AUTOMATION WITH LINK GROUPS . . . .23-20 DATA STORAGE . . . . . . . . . . . . . . . . . . . .23-20 AUTOCUE . . . . . . . . . . . . . . . . . . . . . . . . .23-21 Chapter 24: Project Management INTRODUCTION . . . . . . . . . . . . . . . . . . . . .24-2 Chapter 23: Automation INTRODUCTION. . . . . . . . . . . . . . . . . . . . .23-2 AUTOMATION BASICS . . . . . . . . . . . . . . . .23-2 Mix ON . . . . . . . . . . . . . . . . . . . . . . . . . . .23-2 Static Snapshots . . . . . . . . . . . . . . . . . . . . .23-3 Parameter Enables . . . . . . . . . . . . . . . . . . .23-3 Signal Path Enables . . . . . . . . . . . . . . . . . .23-3 The Enable Matrix . . . . . . . . . . . . . . . . . . .23-4 Parameter Status. . . . . . . . . . . . . . . . . . . . .23-4 Recording Mix Data . . . . . . . . . . . . . . . . . .23-7 Transitions . . . . . . . . . . . . . . . . . . . . . . . . .23-8 Automation Playback . . . . . . . . . . . . . . . . .23-9 CREATING A SIMPLE MIX - FADERS ONLY .23-9 ADDITIONAL PROJECT MENU ITEMS . . . . .24-2 Password Protection . . . . . . . . . . . . . . . . . .24-2 Extend . . . . . . . . . . . . . . . . . . . . . . . . . . . .24-3 Refresh . . . . . . . . . . . . . . . . . . . . . . . . . . . .24-3 MANAGING DISK SPACE . . . . . . . . . . . . . .24-4 Dispose . . . . . . . . . . . . . . . . . . . . . . . . . . .24-4 Commit . . . . . . . . . . . . . . . . . . . . . . . . . . .24-4 Pack . . . . . . . . . . . . . . . . . . . . . . . . . . . . . .24-5 Keep Borrowed Clips . . . . . . . . . . . . . . . . .24-5 More About Committing. . . . . . . . . . . . . . .24-6 RECOVERING WAVEFORMS . . . . . . . . . . . .24-6 The W Display . . . . . . . . . . . . . . . . . . . . . .24-6 The Recover Waveform Command. . . . . . .24-6 CHANGING A MIX WITH TOUCH WRITE 23-10 24 AND 48 TRACK PROJECT COMPATIBILITY . . . . . . . . . . . . . . . . . . . . . . . . . . . . . . . . . . .24-7 PROTECTING MIX DATA WITH ISOLATE AND SAFE. . . . . . . . . . . . . . . . . . . . . . . . . . . . . .23-11 Automation Safe. . . . . . . . . . . . . . . . . . . .23-11 Automation Isolate . . . . . . . . . . . . . . . . . .23-11 Chapter 25: Marks TABLE OF CONTENTS INTRODUCTION . . . . . . . . . . . . . . . . . . . . .25-2 xii CREATING A MARK . . . . . . . . . . . . . . . . . . 25-2 EDITING MARKS . . . . . . . . . . . . . . . . . . . . . 25-2 GOTO MARK . . . . . . . . . . . . . . . . . . . . . . . 25-3 Chapter 26: AudioBase INTRODUCTION . . . . . . . . . . . . . . . . . . . . 26-2 CREATING A DATABASE . . . . . . . . . . . . . . 26-2 SEARCHING FOR SOUNDS . . . . . . . . . . . . 26-3 Additional Search Conditions . . . . . . . . . . 26-4 Searching the Current Project . . . . . . . . . . 26-5 PLACING SOUNDS IN A PROJECT . . . . . . . 26-6 MAINTAINING A DATABASE . . . . . . . . . . . 26-7 Deleting Records . . . . . . . . . . . . . . . . . . . . 26-7 GUIDE TO AUDIOBASE2 . . . . . . . . . . . . . . 26-8 Alphabetic Sort . . . . . . . . . . . . . . . . . . . . . 26-8 No Export . . . . . . . . . . . . . . . . . . . . . . . . . 26-8 The Line Field . . . . . . . . . . . . . . . . . . . . . . 26-8 PUBLISHING WITH TEXT FILES . . . . . . . . . 26-9 How AudioBase Recognises Text. . . . . . . 26-10 The File . . . . . . . . . . . . . . . . . . . . . . . . . . 26-10 Clips . . . . . . . . . . . . . . . . . . . . . . . . . . . . 26-10 Commands Using Text Files . . . . . . . . . . 26-10 Using Text Files . . . . . . . . . . . . . . . . . . . . 26-11 Editing the Form . . . . . . . . . . . . . . . . . . . 26-13 AudioBase Text Export. . . . . . . . . . . . . . . 26-13 INTRODUCTION . . . . . . . . . . . . . . . . . . . . 28-2 Setup Menu Options . . . . . . . . . . . . . . . . . 28-3 Project Sample Rate. . . . . . . . . . . . . . . . . . 28-4 Selecting A Sync Source . . . . . . . . . . . . . . 28-4 Input Sync Auto . . . . . . . . . . . . . . . . . . . . . 28-4 SYNCHRONIZATION . . . . . . . . . . . . . . . . . 28-5 Position . . . . . . . . . . . . . . . . . . . . . . . . . . . 28-5 Motion. . . . . . . . . . . . . . . . . . . . . . . . . . . . 28-5 How DREAM Console Synchronises . . . . . 28-5 Digital Synchronization Conflicts. . . . . . . . 28-5 Pull-up and Pull-down. . . . . . . . . . . . . . . . 28-6 Control of Sony Machines . . . . . . . . . . . . . 28-6 Conflicting Sync Sources . . . . . . . . . . . . . . 28-7 Chapter 29: Machine Control INTRODUCTION . . . . . . . . . . . . . . . . . . . . 29-2 M1 AND M2 SETUP . . . . . . . . . . . . . . . . . . 29-3 Type . . . . . . . . . . . . . . . . . . . . . . . . . . . . . 29-3 Lace / Unlace . . . . . . . . . . . . . . . . . . . . . . 29-3 Lace Time . . . . . . . . . . . . . . . . . . . . . . . . . 29-3 Lock . . . . . . . . . . . . . . . . . . . . . . . . . . . . . 29-3 Arm . . . . . . . . . . . . . . . . . . . . . . . . . . . . . . 29-4 Master . . . . . . . . . . . . . . . . . . . . . . . . . . . . 29-4 LTC Synchronization . . . . . . . . . . . . . . . . . 29-4 EDITING WITH MACHINE CONTROL . . . . 29-5 THE OFFSET MENU. . . . . . . . . . . . . . . . . . . 29-5 SONY ID CONFIGURATION. . . . . . . . . . . . 29-6 Chapter 27: Import / Export Chapter 30: Printing INTRODUCTION . . . . . . . . . . . . . . . . . . . . 27-2 INTRODUCTION . . . . . . . . . . . . . . . . . . . . 30-2 IMPORTING CLIPS . . . . . . . . . . . . . . . . . . . 27-2 Opening a Project as a Library. . . . . . . . . . 27-2 Importing a Single Clip . . . . . . . . . . . . . . . 27-3 Importing a Range of Clips . . . . . . . . . . . . 27-3 SETTING PRINTER CHARACTERISTICS . . . . 30-2 Printer Compression . . . . . . . . . . . . . . . . . 30-3 Printer Types . . . . . . . . . . . . . . . . . . . . . . . 30-4 LOCKING A LIBRARY TO PICTURE . . . . . . 27-4 Chapter 31: Macros IMPORTING WAVE FILES . . . . . . . . . . . . . . 27-4 Importing a Single WAV File . . . . . . . . . . . 27-4 Importing Multiple WAV Files . . . . . . . . . . 27-5 Search Options . . . . . . . . . . . . . . . . . . . . . 27-6 Broadcast WAVE . . . . . . . . . . . . . . . . . . . . 27-6 Importing Other File Formats. . . . . . . . . . . 27-7 INTRODUCTION . . . . . . . . . . . . . . . . . . . . 31-2 EXPORT. . . . . . . . . . . . . . . . . . . . . . . . . . . . 27-8 WAVE Export. . . . . . . . . . . . . . . . . . . . . . . 27-9 File Export Options . . . . . . . . . . . . . . . . . 27-10 File Exchange . . . . . . . . . . . . . . . . . . . . . 27-10 COMPATIBILITY WITH MFX2 AND MFX3 27-11 Backwards Compatibility. . . . . . . . . . . . . 27-11 RECORDING A MACRO . . . . . . . . . . . . . . . 31-2 Inserting a Pause . . . . . . . . . . . . . . . . . . . . 31-2 NAMING A MACRO . . . . . . . . . . . . . . . . . . 31-3 RUNNING A MACRO . . . . . . . . . . . . . . . . . 31-3 ERASING A MACRO . . . . . . . . . . . . . . . . . . 31-3 MACRO FILES . . . . . . . . . . . . . . . . . . . . . . . 31-3 DISPLAYING MACROS . . . . . . . . . . . . . . . . 31-4 Chapter 32: Backup and Restore Chapter 28: Timecode Setup INTRODUCTION . . . . . . . . . . . . . . . . . . . . 32-2 TABLE OF CONTENTS xiii BACKING UP . . . . . . . . . . . . . . . . . . . . . . . .32-3 Backup Tapemode Options . . . . . . . . . . . .32-4 MAKING A NEW SYSTEM DISK . . . . . . . . . .34-3 BOOTING FROM EXTERNAL DISK DRIVES .34-3 RESTORING . . . . . . . . . . . . . . . . . . . . . . . . .32-4 COPYING AND MOVING . . . . . . . . . . . . . .32-5 Chapter 33: System Files INTRODUCTION. . . . . . . . . . . . . . . . . . . . .33-2 WORKING WITH QDC SYSTEM CONFIGURATION FILES. . . . . . . . . . . . . . . . . . . . . . . . . .33-2 Editing a Configuration File . . . . . . . . . . . .33-2 Saving Changes to a File . . . . . . . . . . . . . .33-2 QDC NETWORK SETUP . . . . . . . . . . . . . . .33-3 QDC Setup File . . . . . . . . . . . . . . . . . . . . .33-3 THE MDR CONFIGURATION FILE . . . . . . .33-6 THE SONY_ID FILE . . . . . . . . . . . . . . . . . . .33-8 Device ID . . . . . . . . . . . . . . . . . . . . . . . . .33-8 Delay . . . . . . . . . . . . . . . . . . . . . . . . . . . . .33-8 Jogsh . . . . . . . . . . . . . . . . . . . . . . . . . . . . .33-8 THE SYSTEM PAGE . . . . . . . . . . . . . . . . . . .33-9 Print Options . . . . . . . . . . . . . . . . . . . . . . .33-9 File Display Sorting . . . . . . . . . . . . . . . . . .33-9 Library File List Filter . . . . . . . . . . . . . . . . .33-9 Waveform List Filter . . . . . . . . . . . . . . . . . .33-9 Meter Settings . . . . . . . . . . . . . . . . . . . . .33-10 Crossfade from Zero . . . . . . . . . . . . . . . . .33-10 Fade Def on Butted Clips . . . . . . . . . . . . .33-10 Distinguish Crossfades . . . . . . . . . . . . . . .33-10 Auto-Update DL File . . . . . . . . . . . . . . . .33-10 Wave Menu Audio Format . . . . . . . . . . . .33-10 Automatic Extension . . . . . . . . . . . . . . . .33-10 Super Trim . . . . . . . . . . . . . . . . . . . . . . . .33-10 WORKING WITH CONSOLE SYSTEM FILES . . . . . . . . . . . . . . . . . . . . . . . . . . . . . . . . . .33-11 Keyboard Focus . . . . . . . . . . . . . . . . . . . .33-11 The I-O Config.TXT File . . . . . . . . . . . . . .33-11 The Monitor_Matrix.TXT File . . . . . . . . . .33-12 The System_Variables File . . . . . . . . . . . .33-14 FMC Command Line Options . . . . . . . . .33-15 BLUE Utils Menu . . . . . . . . . . . . . . . . . . .33-16 FAIRLIGHT OS COMMANDS . . . . . . . . . .33-17 UPGRADING SYSTEM SOFTWARE . . . . . .33-23 QDC Software Upgrade . . . . . . . . . . . . . .33-23 Console Software Upgrade . . . . . . . . . . . .33-23 Chapter 34: Drive Formatting INTRODUCTION. . . . . . . . . . . . . . . . . . . . .34-2 FORMATTING A DRIVE. . . . . . . . . . . . . . . .34-2 FORMATTING OPTICAL DISKS . . . . . . . . . .34-2 TABLE OF CONTENTS Chapter 35: Specifications AUDIO I/O CONFIGURATION . . . . . . . . . .35-2 Standard I/O Configuration. . . . . . . . . . . . .35-3 Channel Allocation Method . . . . . . . . . . . .35-3 Standard I/O Cable Configurations . . . . . . .35-5 QDC I/O Connector . . . . . . . . . . . . . . . . . .35-6 Standard I/O Cable Pinouts . . . . . . . . . . . .35-6 Pin Connections for Standard QDC Configuration. . . . . . . . . . . . . . . . . . . . . . . . . . . . . . . .35-8 MADI Configuration. . . . . . . . . . . . . . . . .35-10 CONSOLE WIRING AND CONNECTION DETAILS . . . . . . . . . . . . . . . . . . . . . . . . . . . . .35-13 Meter USB . . . . . . . . . . . . . . . . . . . . . . . .35-13 Talkback . . . . . . . . . . . . . . . . . . . . . . . . .35-13 USB . . . . . . . . . . . . . . . . . . . . . . . . . . . . .35-13 GPIO . . . . . . . . . . . . . . . . . . . . . . . . . . . .35-15 QDC WIRING AND CONNECTION DETAILS . . . . . . . . . . . . . . . . . . . . . . . . . . . . . . . . . .35-16 General Purpose Interface . . . . . . . . . . . .35-16 Mixer . . . . . . . . . . . . . . . . . . . . . . . . . . . .35-17 Controller. . . . . . . . . . . . . . . . . . . . . . . . .35-17 Ethernet . . . . . . . . . . . . . . . . . . . . . . . . . .35-22 Printer . . . . . . . . . . . . . . . . . . . . . . . . . . .35-22 9 Pin A . . . . . . . . . . . . . . . . . . . . . . . . . . .35-23 9 Pin B . . . . . . . . . . . . . . . . . . . . . . . . . . .35-23 9 Pin Slave . . . . . . . . . . . . . . . . . . . . . . . .35-23 LTC - I/O . . . . . . . . . . . . . . . . . . . . . . . . .35-24 Serial Port. . . . . . . . . . . . . . . . . . . . . . . . .35-24 MIDI I/O . . . . . . . . . . . . . . . . . . . . . . . . .35-25 AES Sync I/O . . . . . . . . . . . . . . . . . . . . . .35-25 Modem . . . . . . . . . . . . . . . . . . . . . . . . . .35-26 VGA1. . . . . . . . . . . . . . . . . . . . . . . . . . . .35-26 Word Clock - In . . . . . . . . . . . . . . . . . . . .35-26 Word Clock - Out . . . . . . . . . . . . . . . . . .35-27 Video Sync - In. . . . . . . . . . . . . . . . . . . . .35-27 SYSTEM SPECIFICATIONS . . . . . . . . . . . . .35-28 Analogue Inputs and Outputs . . . . . . . . . .35-28 AES/EBU Inputs . . . . . . . . . . . . . . . . . . . .35-28 AES/EBU Outputs . . . . . . . . . . . . . . . . . . .35-28 Synchronisation . . . . . . . . . . . . . . . . . . . .35-28 DIMENSIONS, WEIGHT AND POWER REQUIREMENTS . . . . . . . . . . . . . . . . . . . . . . . . . . . .35-30 DREAM Console . . . . . . . . . . . . . . . . . . .35-30 DREAM QDC Engine . . . . . . . . . . . . . . . .35-30 DREAM Console Drawings. . . . . . . . . . . .35-31 Index. . . . . . . . . . . . . . . . . . . . . . . . . . . . . . ii 1-1 NOTES: 1-2 C h a p t e r 1 - I n t ro d u c t i o n INTRODUCTION The DREAM Console is part of a new family of products from Fairlight which marries together QDC processing with an ergonomic physical control surface in a combination that has a significant impact on productivity and efficiency. The DREAM Console interface incorporates a unique combination of dedicated editing and large format mixing features, an advanced graphical user interface and powerful database capabilities. These tools allow the operator to work quickly and efficiently without impeding the creativity of the digital recording, editing and mixing process. ABOUT THIS MANUAL The DREAM Console Installation and User Manual provides all the information necessary to rapidly become proficient at operating the system in a professional audio environment. This manual is designed to familiarize sound editors and engineers with the facilities provided by the DREAM Console. The terminology and concepts used in this manual assume a reasonable knowledge regarding audio principles and studio procedures. Finding the Information You Need Read through the chapters in the order presented to learn all the features of the system or use the Table of Contents or Index to quickly find the specific information you require. The manual is divided into the following chapters, each covering a specific topic: Chapter 1 Introduction Expansion Chapter 2 DREAM Console OverChapter 19 Solo and Mute view Chapter 20 Track & Takes Chapter 3 Projects Chapter 21 Go To Chapter 4 Tracks & Transport Chapter 22 ADR, GPI & Loop Chapter 5 Patching and Routing Chapter 23 Automation Chapter 6 Monitoring Chapter 24 Project Management Chapter 7 Faders Chapter 25 Marks Chapter 8 The Channel Panel Chapter 26 AudioBase Chapter 9 Recording Chapter 27 Import / Export Chapter 10 Binnacle Editing Chapter 28 Timecode Setup Chapter 11 Grouping Chapter 29 Machine Control Chapter 12 Library Chapter 30 Printing Chapter 13 Talkback Chapter 31 Macros Chapter 14 Name Chapter 32 Backup and Restore Chapter 15 Clip Level Chapter 33 System Files Chapter 16 Clip Equalisation Chapter 34 Drive Formatting Chapter 17 Gate Menu Chapter 35 Specifications Chapter 18 Time Compression & Operational Instructions Chapters 2 to 34 describe the procedures used to manage workflow and perform recording, editing, signal processing, playback and mixing operations. INTRODUCTION 1-3 Installation Instructions Complete installation instructions are included in the DREAM Console Installation Manual. Specifications Chapter 42 includes complete specifications and connection details for the DREAM Console System. INTRODUCTION 1-4 ABOUT THIS MANUAL 2-1 NOTES: 2-2 C h a p t e r 2 - D R E A M C o n s o l e O ve rv i ew INTRODUCTION DREAM Console is the latest generation digital audio system from Fairlight, offering exceptional power and speed for recording, editing and mixing. Configurable with up to 48 disk recorder tracks, 64 digital I/O and 64 analog I/O, the DREAM Console integrates full recording and editing capability with a fully featured, fully automated mixing engine capable of delivering final mixes in any format up to 7.1 surround. A highly intuitive work surface enables fast, ergonomic access to all of DREAM Console’s many features. These include 6-band EQ, full dynamics processing, and comprehensive grouping of faders and buses. DREAM Console is also equipped with Fairlight's new Binnacle editor. Designed to offer a natural transition for existing MFX users, the Binnacle presents the key editing functions in a new and highly optimised layout centred around the jog wheel. While DREAM Console is a complete solution for a studio undertaking full production and mixing of the majority of long form, commercials, film and radio work, it is also part of the DREAM Family of products and is the ideal partner to the Satellite, a digital audio workstation and Station, an integrated editor and mixer. The DREAM Console comes in two different configurations as detailed below. TERMINOLOGY Mixing Section The portion of the DREAM Console control surface that provides mixing control. Editing Section The portion of the DREAM Console control surface that provides editing control. Project The file created by Fairlight software containing the stored audio and its editing and mixing instructions. Physical Input/ Output An analog or digital audio input or output. Track Feed A signal path (channel) feeding to or from the disk recorder which can be processed and routed to mix buses and monitoring. Live Feed A signal path (channel) fed from a live, real time signal that has been brought from a physical input and can be processed and routed to mix buses and monitoring. Bus Destination of a mixing operation. Feeds are usually routed to buses via a multiformat surround panner. Buses may be configured with various multichannel formats such as stereo, LCRS, 5.1 or 7.1. Multitrack buses provide bus paths for summing feeds to be recorded to disk or other I/O. INTRODUCTION 2-3 Bus Element One component signal of a bus (e.g. left, right, centre or surround). Bus elements are automatically allocated to individual buses as they are created. Each system has a finite number of bus elements which will limit the format of buses as they are created. For example, DREAM Console has 48 available bus elements allowing: 1 X 5.1 main bus, 4 x 5.1 sub-buses, 2 X 5.1 auxes, and 2 X stereo auxes; or, 1 X 7.1 main bus, 3 X 5.1-buses, 4 X stereo aux buses, and 4 X mono aux buses and 8 X Multitrack buses. ARCHITECTURE Dream 24 Dream 48 Faders 24 48 Tracks 48 48 Live Feeds 48 48 Bus Elements 48 48 Main Bus Number / Max. Format 1 / 7.1 1 / 7.1 Sub-Buses Number / Max. Format 8 / 7.1 8 / 7.1 Aux-Buses Number / Max. Format 12 / 7.1 12 / 7.1 Analog Inputs Standard / Maximum 24 / 64 48 / 64 Analog Outputs Standard / Maximum 24 / 64 40 / 64 Digital I/O AES/MADI Standard / Maximum 24 / 64 48 / 64 Signal Flow Signal paths for feeds and buses comprise both fixed and moveable processing blocks. The diagrams below represent single elements of multichannel paths. Signal paths may be configured in formats from mono up to 7.1 surround. Individual elements may be controlled together as part of a bus or Link Group, or unfolded and controlled separately. When a track feed is armed for recording, the fader may be switched to control the level at the input to the disk recorder as shown below. DREAM CONSOLE OVERVIEW 2-4 Track and Live Feeds MUTE MOVEABLE PROCESSING BLOCKS I/P PATCH EQ DYN METER INS SC MUTE FADER DIRECT OUT FADER MAIN BUS PAN AUX SENDS O/P PATCH AUX BUS Live Feed Signal Flow MUTE MOVEABLE PROCESSING BLOCKS I/P PATCH FADER DIRECT OUT O/P PATCH FADER FADER FADER DISK DISK REC DISK REC REC EQ EQ DYN DYN SC SC INS INS METER MUTE FADER MUTE MAIN BUS PAN PAN AUX SENDS AUX AUX BUS BUS SHORT FADER PATH Track Feed Signal Flow • 48 Track Feeds • 48 Live Feeds • 6 band automated EQ: Bell, Shelf - High & Low, Notch, High Pass, Low Pass • Compressor plus Limiter / Expander / Gate • Insert • Direct Out • Track Metering • Aux Sends:12 x Mono up to 7.1 Surround Fader and Mute • Panning: up to 7.1 surround Link Groups MUTE FADER DIRECT DIRECT MUTE FADER OUT DIRECT MUTE FADER OUT OUT MOVEABLE PROCESSING BLOCKS I/P PATCH FADER FADER FADER DISK DISK REC DISK REC REC EQ EQ EQ DYN DYN SC DYN SC SC INS INS INS METER METER METER MUTE FADER MUTE FADER MUTE FADER PAN PAN PAN O/P PATCH MAIN MAIN BUS MAIN BUS BUS AUX AUX AUX AUX SENDS BUS AUX AUX SENDS BUS SENDS BUS SHORT FADER PATH • Up to 8 members with linked parameter controls and support for advanced surround panning features. ARCHITECTURE 2-5 Main Bus MOVEABLE PROCESSING BLOCKS I/P PATCH DYN DYN DYN SC SC SC INS INS INS DIRECT OUT FADER /MUTE METER METER O/P O/P PATCH PATCH Bus Element Signal Flow MOVEABLE PROCESSING BLOCKS I/P PATCH DYN DYN DYN SC SC SC INS INS INS DIRECT DIRECT DIRECT OUT OUT OUT FADER FADER FADER /MUTE /MUTE /MUTE METER METER METER O/P O/P PATCH PATCH Four Element Bus Signal Flow • 1 x Main Bus • Formats: Mono, Stereo, LCR, LCRS, LCRSS, 5.1, 6.1, 7.1 • Compressor plus Limiter / Expander / Gate • Insert • Master Fader and Mute Sub-Buses • 8 x Sub-Buses • Formats: Mono, Stereo, LCR, LCRS, LCRSS, 5.1, 6.1, 7.1 • Compressor plus Limiter / Expander / Gate • Insert • Direct Out • Master Fader and Mute Aux Buses • 12 x Aux Buses • Formats: Mono, Stereo, LCR, LCRS, LCRSS, 5.1, 6.1, 7.1 • Master Pan for Surround Aux Buses • Master Fader and Mute Returns • 48 Returns • Formats: Mono, or Stereo, LCR, LCRS, LCRSS, 5.1, 6.1, 7.1 • 2 band EQ • Aux Sends: 8 • Panning: up to 7.1 surround • 12 Return Group Faders DREAM CONSOLE OVERVIEW GAIN GAIN GAIN GAIN GAIN GAIN ANALOG/ AES/MADI INPUTS I/P PATCH FADER DISK REC LIVE FEEDS TRACK FEEDS SC DYN INS EQ INS METER METER EQ MUTE MUTE FADER FADER FADER RETURNS BUS TO FEED ASSIGNMENT SHORT FADER PATH SC DYN MOVEABLE PROCESSING BLOCKS EQ MOVEABLE PROCESSING BLOCKS MUTE AUX SENDS REDN BUS PAN AUX SENDS PAN PAN OSC AUX SENDS FADER DIRECT OUT PAN FADER FADER DIRECT OUT TALK BACK MUTE MUTE AUTOMATICALLY ALLOCATED BUS ELEMENTS INS INS INS FADER /MUTE FADER /MUTE FADER /MUTE BUS TO BUS ASSIGNMENT SC DYN SC DYN SC DYN BUS ELEMENTS MOVEABLE PROCESSING BLOCKS METER DIRECT OUT METER DIRECT OUT METER DIRECT OUT ANALOG/ O/P AES/MADI PATCH OUTPUTS 2-6 System Overview ARCHITECTURE 2-7 USER INTERFACE The DREAM Console system offers improved ease of use and operator efficiency, achieved through integration and advanced ergonomic design of the user interface. Figure 1: DREAM Console User Interface DREAM Console is made up of four interconnected hardware devices: 1. QDC Engine 2. DREAM Console and Keyboard 3. Recorder/Editor Video Monitor 4. Mixer Video Monitor DREAM CONSOLE OVERVIEW 2-8 Console Features The console control surface incorporates the various hardware user interface features indicated below: Talkback Mic Input Display Keys Monitor Selection Keys Utility Function Keys Bus Selection and Patching Keys Speaker Mute Keys Master Enable Keys Live Feed Selection Keys Fader Set Selection Keys Track Selection Keys Automation Keys Soft Keys Monitor Controls Project and Machine Control Keys Menu Keys LCD Menu Display Fader Section Numeric and Track View Keys Macro Keys Trackball Edit Target Keys Binnacle Editing Keys and Jog Wheel Edit Option Keys Figure 2: DREAM Console Edit and Assignment Panels Monitor Selection Keys DREAM Consoles studio and control room monitor sets allow user configurable control over selections of multiformat sources for monitoring in the control room or in the studio. USER INTERFACE 2-9 Bus Selection and Patching Keys The patching and assignment keys provide access to the various patching menus. Bus and Return Selection Keys are used for selecting buses for assignment, patching and mix control. Track Selection Keys The Track Selection Keys are used for selecting tracks and clips for editing and for arming tracks. Press a track key to add a track to the current selection. Double press a key to select that track only. To select a range, hold down the first key and double press the last track in the range. The Track/Channel Selection Keys are also used to select analog I/Os and signal paths for patching. Live Feed Selection Keys The Live Feed Selection Keys are used for selecting live feeds for mixing and patching operations.The Live Feed Selection Keys are also used to select digital I/Os for patching. Bus/Element Selection/Speaker Mute Keys These keys are used for selecting buses and bus elements for mixing and patching operations. Individual bus elements or speaker feeds (Left, Right, Centre, Surround, etc.) may be selected or muted by pressing the appropriate key. Menu Keys These menu keys provide access to a range of editing, project management and signal processing functions. Most keys have two functions the names of which are displayed in colour on the button cap. To activate the function displayed in blue, press and hold one of the three BLUE keys while pressing the menu key. Soft Keys Soft keys provide access to the menu options displayed on the LCD console display. There are two rows of soft keys, upper and lower. LCD Menu Display The LCD display provides status information and displays the menu options associated with the Menu Soft Keys. Menu options are displayed immediately above or below the Soft Key used to select the option. Project and Machine Control Keys These Menu Keys provide access to the main project navigation functions, machine control, and autolocation menus. To activate the function displayed in blue, press and hold one of the three BLUE keys while pressing the menu key. Automation Menu Keys These keys provide access to all automation functions. Edit Target Keys These keys modify the effect of each edit. For instance a Cut may be performed on a Range, a Clip, the Head of a clip or the Tail of a clip. Transport Keys The transport keys provide standard tape transport functions plus Jog/Shuttle selection and a range of play options under the Play Menu. To enter Record press the DREAM CONSOLE OVERVIEW 2-10 Play and Record keys together. Hold down the Jog/Shuttle key for a menu of Jog/ Shuttle settings. Hold down the Record key for a menu of record options. Macro Keys Macro keys can be programmed to play back sequences of keystrokes. There are three banks of nine macro keys. Binnacle Editing Keys and Jog Wheel The Binnacle is at the heart of the DREAM Console’s advanced editing interface. Dedicated edit functions are associated with these keys. In addition to normal Jog/ Shuttle transport operations, the jog wheel is used for zooming and parameter selection in soft menus. Numeric and Track View Keys The Numeric Keys are provided for entering timecode locations or parameter values. By pressing and holding one of the three BLUE keys, the Track View Keys select the number of tracks visible on the monitor track display. The Clear key can be used to clear numeric and text fields on the LCD menu and also to cancel dialogue box requests. Edit Option Keys The edit option keys modify the effect of each edit. An edit can be performed on All on a time Range, and can insert or delete time via Razor mode. Layers, Trackball The Trackball is used as a conventional pointing device for the on-screen graphical interface. Monitor Controls These controls allow adjustment of the listening level in the studio and control room and the selection and configuration of the nine possible multiformat monitor sets. The monitor source can also be selected here. Fader Section The Fader Section provides a motorised touch sensitive linear fader for control of the level of the current signal path. Also included are Solo and Mute keys, Automation Enable, and bus Master and Fold keys. Utility Function Keys These keys offer useful functions such as Multitrim for controlling parameters across temporary groups of feeds or buses; Fader Copy for quick duplication of complete path configurations; and an oscillator for alignment and signal tracing. Master Enable Keys The Master Enable keys allow fast global parameter automation enabling. Individual parameters can be enabled independently on the Channel Panel. Fader Set Selection Keys The order in which faders appear on the control surface is completely user definable. Fader sets are user defined selections of faders. The operator can quickly switch between banks of faders using the fader set selection keys. USER INTERFACE 2-11 Path Configuration Section Surround Panner Dynamics Section EQ Section Aux Sends Fader Strip Figure 3: DREAM Console Channel Panel and Fader Panel Path Configuration Section The DREAM Channel Panel provides complete display and control over all the parameters for a single path or group of paths. The Path Configuration Section can be used to define the order of signal processing elements within each path. Dynamics Section The Channel Panel dynamics section offers a complete set of user controls for the two fully featured dynamics modules on each signal path. All control changes may be written as automation data to be played back in real time. DREAM CONSOLE OVERVIEW 2-12 EQ Section The Channel Panel equaliser section provides dedicated control of the six-band equaliser available on each signal path. All control parameters can be fully automated. Surround Panner The Panning section on the Channel Panel offers controls for all of the sophisticated panning operations available in the DREAM Console panning model. In addition to a traditional joystick interface for panning mono signals and link groups, the panning section allows high level spatial manipulation of complete surround mixes. The spread and rotate controls provide the ability to create radical changes in perspective with ease. Auxiliary Sends The auxiliary sends section of the Channel Panel provides access to the individual send levels and pre/post switching for any feed called to the Master Fader. Four discrete send controls are provided for the first four sends while the last eight sends share two sets controls. All auxiliary send controls can be recorded as real time automation data. Fader Strip Each DREAM fader panel provides twelve complete fader strips. Faders can be configured to be displayed in any order as required, allowing the operator to remain in the mixing “sweet spot” while being in easy reach of all current feeds, groups or buses. Each strip includes an automated LCD legend panel displaying details of the current feed or bus name, any current modifications to fader function and the currently selected parameter under control. A user definable soft pot and soft key provides ready access to often used parameters. Standard mute and solo button functions are provided. A touch sensitive, long throw motorised fader provides precise control over signal levels. An automation enable and extensive automation indicators keep the operator informed and in control of all mix operations. Further status indicators are provided for signal source and path configuration giving the operator a complete overview of each channel. USER INTERFACE 2-13 Recorder/Editor Display Features The graphical display provides status information, clip and waveform display and visual feedback for editing functions. Shell Command Prompt Status Line Project Info Clip Info Track Display Figure 4: Recorder/Editor Graphical Display Shell Command Prompt This is the command line interface for typing system commands from the PC Keyboard. Project Information The Project Information Display shows the name of the current project, the frame rate and sample rate. Track Display The track display shows the 24 hour time-line on which audio clips can be placed. The amount of time displayed can be adjusted by pressing the Zoom key and turning the Jog wheel. The number of tracks visible can be selected using the blue track view keys to the right of the Binnacle. Status Line The Status Line displays messages and prompts associated with current edit mode or menu selected. Clip Information In normal play mode, clip information is displayed including layer, name, location and source of the clips. In arm mode, this area of the display contains input/track level meters. DREAM CONSOLE OVERVIEW 2-14 Mixer Display Features The mixer display shows real-time status of fader levels, signal levels, and automation for all track feeds, live feeds and buses. Also shown is the path configuration for the current path displaying the status of all signal processing parameters. A path may be a single mono live feed or a multichannel surround format link group. Track Feeds Live Feeds Buses Signal Path Display Figure 5: Mixer Monitor Graphical Display Track Feeds Each Track Feed is represented with the track name, EQ/pan/dynamics display, fader level, signal meter, enable indicators for EQ, dynamics, solo and mute. Live Feeds Each Live Feed is represented with the feed name, EQ/pan/dynamics display, fader level, signal meter, and enable indicators for EQ, dynamics, solo and mute. Buses The main bus and auxiliary buses are displayed with fader level and signal level meters. Signal Path Display The signal path display represents the configuration of the selected path. The signal flow is shown in the order it is configured. Signal paths may be simple mono live or track feeds, or multichannel surround format Link Groups which can be selected and modified from a single set of controls. USER INTERFACE 2-15 STARTING THE SYSTEM Figure 6: The DREAM Start Splash Screen Step 1 Power on the QDC engine, first press the switch on the rear of the Engine to the right, a red light will appear. Next press and hold the button on the front of the Engine for 5 seconds, a beep will be heard and the system will start to power on. Step 2 Power on the video monitors. Comprehensive start up diagnostics are displayed on the Recorder/Editor video monitor. Step 3 Power on the DREAM Console. Assuming the system is properly configured, once the console has booted up, it will display the DREAM Start screen, Step 4 Click on the Binnacle Start key to launch the Fairlight Mixing Console application. See the Console Installation section of the Dream Console Installation Manual for more information on start up options. SYSTEM SHUTDOWN DREAM CONSOLE OVERVIEW Step 1 Hold down the Shift key and press Pause/Break on the PC keyboard to switch the keyboard focus to the Console computer. Type Q then Y to quit the FMC and disk recorder applications. Step 2 If the system is in its default configuration, the DREAM Start splash screen will be displayed. If not use the trackball to click on the shortcut to DREAM Start on the Windows desktop. Click on the Shutdown DREAM key on the Binnacle display. This will shut down the QDC engine and shut down Windows on the console computer. Step 3 Once Windows has shut down, turn off the power to the Console. 2-16 USING THE SYSTEM Follow the instructions in the following chapters to quickly learn all the operating procedures necessary for completing audio production tasks with the DREAM Console. USING THE SYSTEM 3-1 NOTES: 3-2 C h a p t e r 3 - P ro j e c t s INTRODUCTION DREAM Console uses Project files to store work performed on the console and disk recorder. All audio recordings, editing and file imports are done within Projects. A project contains all the audio data, edit information and automation data. Edits performed on the audio data are non-destructive and are represented by clips which refer to pieces of audio data within the project. Projects are continually updated and written to disk while recording and editing is being performed therefore there is no need to save a project. Automation mix data however, must be save before closing a project. Project files are given the .MT filename extension. The Project Display is the first screen displayed when the system is started, or when the Project Menu is selected by pressing the Proj key. Project Menu Display Device Display Pathlist Display Folders Display Files Display Figure 1: Project Menu Display Device Display The device display shows the storage device currently available on the system, with the selected device highlighted. Device number SCSI ID Partition Name Disk Manufacturer Disk Size Available Space Disk Usage INTRODUCTION 3-3 Figure 2: Device Display UNIT # Device display shows the devices currently available on the system, with the selected device highlighted. 0 Device number is used to reference the device on the Project and Backup Menu. /SC03 SCSI ID shows the SCSI bus to which the selected device is connected and the device’s SCSI ID. In this case it is ID 3 on PCI SCSI bus 0, the internal bus. VOLUME This is the partition name. VENDOR Disk manufacturer. DISK SIZE Disk size in megabytes. FREE SPACE Available space in megabytes. FREE TIME Available space in mono track time at the current sample rate. BAR GRAPH Disk usage indicator. Folders On the left of the screen is the Folders display. This shows the Fairlight workstations, domains, drives and folders available to the DREAM Console. Pathlist The pathlist displays details of the currently selected path. Files On the right of the screen is the Files display. This shows the files stored on the selected device along with information regarding the size of the file, dates they were last modified, their sample rates etc. The selected file is always highlighted. PROJECTS 3-4 NAVIGATING THE PROJECT MENU To open the Project menu press the Proj (Project) key.This is already selected when the machine is powered up. To move up and down the list of files or folders and devices, use the Up and Down Arrow keys on the console or alternatively, use the jogger wheel. To jump between the files or folders and devices lists, press the Files Folders key on the DREAM Console. Project Navigation Keys Figure 3: Project Navigation Keys Opening and Closing a Domain or Device Step 1 Use the Files/Folders and arrow keys to select the desired domain or device so that it is highlighted. Step 2 Press the Folder + or Folder - icon key on the console depending whether you want to open or close the domain, device or folder. Creating a New Project Step 1 Press the Proj (Project) key. This is already selected when the machine is powered up. Close any previously opened Project by pressing the CLOSE soft key on the console. Step 2 Select the domain, device and folder where you would like the new Project to be created. Step 3 Press the NEW soft key on the console LCD menu. Step 4 Type the name you wish to give the new Project using the PC keyboard. The name appears in the console’s LCD display as you type. See the notes below for details on filenaming conventions. Step 5 Press the Enter key. NAVIGATING THE PROJECT MENU 3-5 The top section of the video screen display shows information about the currently open Project. Project Name of current Project. Frame Rate The frame rate currently set for the Project. Sample Rate The sample rate currently set for the Project. Date and Time Current date and time. Make sure you set up the project sample rate in the Digi menu before recording any material. See “Project Sample Rate” on page 9-2 for more details. Closing a Project Step 1 Press the Proj key on the console. Step 2 Press the CLOSE soft key. Opening an Existing Project Step 1 Press the Proj key on the console. Step 2 Use the project navigation keys to highlight the desired Project. Step 3 Press the Enter key. Opening a Project will close any currently open Project FILES AND FOLDERS Folders are a useful way to group Projects together. Folders can also be created within other folders Creating a New Folder Step 1 Press the Proj key. Step 2 Press the NEXT soft key. Step 3 Use the project navigation keys to select the domain, device and folder where you would like the new folder to be created. Step 4 Press the NEW FOLDER soft key. Step 5 Type the name you wish to give the folder using the PC keyboard. NOTE: The name appears in the console’s LCD display as you type. Step 6 PROJECTS Press the Enter key, and the new folder will be created. 3-6 Copying Files Or Folders Step 1 Press the Proj key. Step 2 Press the NEXT soft key. Step 3 Select the source file or folder. Step 4 Press the COPY soft key. Step 5 Select the destination. Step 6 Press the OKAY soft key. Step 7 Edit the name for the new file or folder. Step 8 Press Enter to start copying. Multiple files may also be copied in batches, see “Copying and Moving” on page 32-5 for more details. Moving Files or Folders Step 1 Press the Proj key. Step 2 Press the NEXT soft key. Step 3 Select the source Project. Step 4 Press the MOVE soft key. Step 5 Select the destination Step 6 Press the OKAY soft key. Multiple files may also be moved in batches, see “Copying and Moving” on page 32-5 for more details. You will be prompted to confirm the move process if it is across different devices. In this case, the move process may take a few minutes depending on the size of the Project. Renaming Projects and Folders Step 1 Press the Proj key. Step 2 Press the NEXT soft key. Step 3 Select the Project or folder you wish to rename. Step 4 Press the RENAME soft key. Step 5 Type the new name. Step 6 Press Enter. FILES AND FOLDERS 3-7 Deleting Projects or Folders Step 1 Press the Proj key. Step 2 Select the Project or folder you wish to delete. Step 3 Press the DELETE soft key. Step 4 Press the Y or Enter key to confirm the delete when prompted. Other feature of the Project Menu are described in “Project Management” on page 24-2. NOTES: A folder containing other folders is shown with a + sign. Locked files have an L indication. This usually means that another user has the file open. There is no way to open a file other than by pressing the Enter key. Names for Folders and Projects should contain no more than 18 characters, only the following characters: A - Z, a - z, 0 -9, _ (underscore) can be used. Although DREAM Console will allow entry of some other characters, you are advised NOT to use them, as they may cause problems in exchange with other audio workstations. PROJECTS 3-8 FILES AND FOLDERS 4-1 NOTES: 4-2 C h a p t e r 4 - Tra ck s & Tra n s p o r t INTRODUCTION The DREAM Console provides 48 disk recorder tracks routed via dedicated track feeds. In addition to the track feeds DREAM Console supports 48 live feeds which may be used for effects returns or any other real-time signal source. The DREAM Console can support up to 64 analog and digital inputs and outputs which may be patched to track feeds or buses as required (see “Patching and Routing” on page 52 for more details on patching). An additional 48 digital I/Os are available by fitting the MADI (multi-channel audio digital interface) I/O card. DISPLAYING TRACKS Disk recorder tracks are displayed on the video screen. Select the number of tracks to display by holding down the BLUE key, and pressing one of the numeric keys labelled 1T, 2T, 4T, 8T, 16T, 24T, 32T and 48T. Step 1 Hold down the BLUE key Step 2 Press the desired Track Display key Figure 1: Track Display Keys INTRODUCTION 4-3 Track numbers correspond to the track feeds. Figure 2: 48 Track Display Clips show the amplitude of the waveform. Figure 3: 1 Track Display The Clip When audio is recorded or imported into the DREAM Console it is displayed as a clip. The clip is a reference to the audio data stored on disk. Clips can be cut, copied or moved without affecting the original audio data. When new clips are recorded or pasted above existing clips, the clips become layered one above the other. Only the top clip is heard during play-back. The left most end of the clip is known as the head. The right end is the tail. Clips also contain information about the original timecode location of the audio data when recorded, and the current timecode location of the displayed clip. If a clip shows only a portion of the associated audio data on disk, it may be trimmed to show more. TRACKS & TRANSPORT 4-4 Layered clips, only exposed portions are heard. Figure 4: Layered Clips Mono and Stereo Clips DREAM systems support the playback of both mono and stereo clips. Mono clips are output only on the track upon which they appear. Stereo clips are displayed on a single track, but are output with the left channel on the track where the clip is displayed, and the right on the next track. For example, a stereo clip on track 3 will have its left output on track 3, and its right output on track 4. Stereo clips can be identified by the black line along the centre of the clip. This line separates the left waveform on the top, and the right on the bottom. Stereo clips are created by recording to a stereo link group, see “Link Groups” on page 11-2 for more details. Left Right Stereo Clip Mono Clip Figure 5: Mono and Stereo Clips SELECTING TRACKS AND FEEDS The DREAM Console has 48 dedicated Track Feed selection keys and 48 Live Feed selection keys. The feed selection keys perform different functions depending on the current mode of operation. The selection keys are used for selecting tracks for editing or mixing, creating groups, arming tracks and enabling automation. The DREAM Console is in an Edit mode when any of the Binnacle edit functions (COPY, CUT, ERASE, TRIM/SLIP, FADE) are selected. In these modes the selection keys select tracks for editing. Feeds are selected or called to the master fader and Channel Panel for mixing by pressing the Call key then pressing the feed selection key. Patching sources and destinations is achieved by pressing the Patch I/O key. Tracks are enabled for automation by pressing the Mix key. These functions and several others utilising the selection keys are described in detail later in this manual. In GROUP mode, feeds may be grouped and linked in various formats. Selecting the Group Master or a member of a Link Group will select all members of the group. See “Grouping” on page 11-2 for more details on group behaviour. SELECTING TRACKS AND FEEDS 4-5 In FOLLOW mode, the master fader selection follows the most recent edit track selection. FOLLOW is selected from the CALL menu by pressing the Call key. This is described in detail in “Faders” on page 7-2. In the edit modes, selected tracks are highlighted on the video display and the track keys are illuminated. To add a track to the current selection, press the desired track selection key. To select a range of tracks, press and hold down the first track select key and double click the last track selection key you wish to be active. All other selections will be deselected. To select a single track, double click on the desired track selection key. All other selections will be deselected. Selecting a track which is a member of a link group will select all tracks in the link group. To select an individual member of a link group, hold down the BLUE key and press the track selection key. The track selection may also be changed by holding the Track Sel key, to the left of the jog wheel, and turning the jog wheel or pressing the + or - keys. This is useful for moving selections from one track to another. Figure 6: Track Selection Keys TRACKS & TRANSPORT 4-6 TIME SCALE AND DISPLAY ZOOMING The track display represents 24 hours. The timescale can be zoomed from a six frame display to an eight hour display. The blue time scale graduations above the tracks give a reference in hours, minutes, seconds, frames. At all times, the cursor position indicates the current play point. Figure 7: Time Scale Display Step 1 Hold down the Zoom Binnacle key Step 2 Turn the jogger wheel to zoom in and out Sub-frames can be toggled on or off by holding down the BLUE key and pressing the SUBF key on the numeric keypad. Track display selection and zooming is possible while playing and recording. The zoom factor can also be entered by holding down the Zoom key and typing the desired zoom factor on the numeric keypad. This is useful for making macros. For information on Macros refer to “Macros” on page 31-2. There are 16 scales with larger numbers indicating more detail (less time). Zoom can be increased or decreased by holding the Zoom key and pressing + or - on the numeric keypad. Alternate Zoom Factors It is possible to set two different Zoom factors to allow for alternate views of the track display. Step 1 Select a Zoom factor by holding down the Zoom key Step 2 Select a different Zoom factor, by again holding down the Zoom key and turning the jogger wheel. Step 3 Press the Zoom key, the previous Zoom will be shown on the Track display. Press the Zoom key again and the alternate Zoom factor will be displayed. It is also possible to move the horizontal position of the cursor by holding down the BLUE and Zoom keys and turning the jogger wheel. TIME SCALE AND DISPLAY ZOOMING 4-7 TRANSPORT CONTROLS The PLAY, STOP, FF and REW controls work in a similar manner to a tape machine. An additional feature is increasing the fast-forward and rewind speeds by pressing the respective keys multiple times, starting from 16 times play speed. To enter record press the REC and PLAY keys together. Figure 8: Transport Control Keys The play command can be accessed also by pressing the PLAY key on the Binnacle. See “Editing” on page 10-3 for more details. LOOP JOG AND LINEAR JOG Pressing the JOG key when stopped enters the Jog mode. Holding down the JOG key brings up a menu on the lower console display. The value for each parameter can be changed by pressing its soft key and turning the jogger wheel or typing a value on the numeric keypad. The menus function as follows: LOOP / LINEAR Loop Jog repeats a section of audio before and up to the cursor at play speed. This has the effect of providing jogging at constant pitch. Linear Jog behaves like a tape machine when scrubbing audio. WIDTH The width of the loop when in Loop Jog. Usually set to 1 frame. Range 1 - 50 frames. FACTOR The gearing between the jogger wheel and the track display. A high value will give a lively feel, while a low value will be slower. Range 1 - 16. This is also linked to the zoom factor. Pressing Zoom and Jog together at the same time sets the Factor number equal to the Zoom number. DIMMER The attenuation applied when in Loop Jog (Loop Jog can be irritating at high levels). This is usually set at around -10dB. Range 0 - -99dB To activate the jog function at any time, just press the JOG key. The system will remain in jog until another transport key is pressed. Use STOP to mute the machine in Loop Jog. Jog mode can also be accessed by pressing the Play/Jog key on the Binnacle. Holding the BLUE key while jogging increases the jog speed by four times. TRACKS & TRANSPORT 4-8 SHUTTLE To shuttle the transport, hold down the BLUE key and press JOG/SHUT. The jogger wheel will then increase and decrease the transport velocity in forward and reverse. The PLAY key will illuminate in a steady state when play speed is reached. Press the FF or REW keys to reverse the shuttle direction. To play at normal speed in reverse, press PLAY, hold down the BLUE key and press JOG/SHUT, then press REW. JUMP The Jump keys provide a fast method of locating forwards and backwards through a Project. The Jump keys are located on the Binnacle, left and right of the Play/Jog key. Figure 9: Binnacle Transport and Editing Keys SHUTTLE 4-9 Jump Methods Holding down one of the Jump keys displays the Jump menu in the lower Console display. Selecting one of these menu items will take effect when the Jump key is released, and will remain as the jump method until a different method is selected. The methods are as follows: VARIABLE This enables you to use the jogger wheel or numeric keypad to enter the number of frames the transport will be moved each time a Jump key is pressed. Range 0 - 999 frames. CLIP NAME This enables the entry of search criteria in the same manner as for the GO TO CLIP NAME function. The same search text is used as the default setting for both the GO TO CLIP NAME and JUMP TO CLIP name functions. Changing the search text in one function will also cause the text to change in the other. JUMP TO CLIP NAME will locate the transport to the next clip with a matching name on any track. POINT or FADE The transport will locate to the head, tail or sync point (see below) of a clip, or the start or end of a fade (described later), on the selected track or tracks. POINT The transport will locate to the head, tail or sync point of a clip on the selected track or tracks. MARK The transport will locate to the next mark. NOTES: A sync point of a clip defaults to the head of a clip unless changed with the Trim/ Slip menu, see “Trim Edit Mode” on page 10-13. JUMP TO POINT and JUMP TO POINT OR FADE will only work on selected tracks. Holding down the Shift key and pressing a Jump key will override the Jump Menu and JUMP TO POINT. Holding down the Ctrl key and pressing a Jump key will override the Jump Menu and JUMP TO MARK. Holding down the BLUE key and pressing either Jump key will locate the transport to the start or end of the Range. LOCATOR FUNCTIONS Rapid navigation through the project is achieved by using the GO TO menu functions and by making MARKS on the time-line. For more information see “Go To” on page 21-2 and “Marks” on page 25-2. TRACKS & TRANSPORT 4-10 SELECTING A RANGE A Range allows a group of clips across one (or multiple tracks) to be selected. Many functions provided by DREAM Console require the use of a Range. Use the From and To keys on either side of the Jog wheel to set ranges. Range mode may be turned on or off by pressing the Range ON key, to the right of the Binnacle or by double pressing a Binnacle edit key. Selecting a Range using Cursor Position Step 1 Locate to the time at which you wish to start the range. Step 2 Press the From key. (Some functions start with FROM automatically). Step 3 Locate to the time at which you wish to end the range. Step 4 Press the To key. The duration of the range is indicated on the screen time display above the track display, and the range is high-lighted on the track display. Many functions start making a range as soon as you enter the function. To change the FROM point, just press the From key at any time. Selecting a Range Between Gaps To quickly set a range from the start to the end of a clip or clips use the BLUE-Gap/ From/To keys. The Blue-Gap function is related to the From/To range setting function which shares these keys. The BLUE-Gap/From key sets the beginning of the range to the first piece of silence to the left of the cursor on the most recently selected track. The BLUE-Gap/To key sets the end of the range to the first piece of silence to the right of the cursor on the most recently selected track. This function is identical to the Prev/Next Gap soft key function on the Range Menu which is available when the From or To keys are held down. Step 1 Hold down the BLUE key and press the Gap/From Binnacle key to set the start of the range. Step 2 Hold down the BLUE key and press the Gap/To Binnacle key to set the end of the range. Range Menu To access the Range menu options, press and hold either the From or To key and select the desired menu option by pressing the associated soft key. The following functions operate the same for both From and To: TIME Enter a timecode value using the numeric keypad and press Enter. MARK Select a mark by turning the Jog wheel and press Enter. LAST The last FROM or TO point is used. NEXT GAP Sets the FROM or TO points to the next points of silence before and after the cursor respectively. SELECTING A RANGE 4-11 PROJECT HEAD/TAIL Sets the FROM or TO points to the Project Head or Project Tail marks. Setting Range Modes There are two options for range behaviour as described below: Step1 Press the Set Up key Step 2 Press the Range soft key to toggle between the functions listed below. Range Ranges are automatically cleared when an editing mode key is selected unless the function must have a range to operate. AUTO Pressing the Range On key turns the last Range on or off. Range MANUAL Ranges are retained when selecting edit mode keys unless the function cannot use a Range. Pressing the key again will toggle the Range on or off. Double-clicking the key will select the menu without a Range. Jumping to To and From Points Holding down the BLUE key and pressing either Jump key will locate the transport to the start or end of the Range. TRACKS & TRANSPORT 4-12 PLAY MENU The Play Menu enables soft key selection of various transport selections. Step 1 Press the Play Menu transport key. Step 2 Press the desired soft key function. All the Play Menu functions preroll the transport: HEAD Plays the head of the clip under the cursor. If there is no clip under the cursor, the next clip is played. TAIL Plays the tail of the clip under the cursor. If there is no clip under the cursor, the next clip is played. EDIT Plays the last edit. FADE Plays the fade out. AGAIN Plays from the same place the transport last went into play. RECORD MENU All the Record Menu functions preroll the transport. Step 1 Press the REC Key Step 2 Press the desired soft key function HEAD Records from the head of the clip under the cursor and continues until stopped. CLIP Records from the head of the clip under the cursor and stops at the tail. HERE Records at the current cursor location. If a Preroll is active, the transport will locate to and play from the Preroll point, then drop into record at the point which the HERE soft key was pressed. AGAIN Records the same as the last record command. For details on setting pre-roll and post-roll see “Setting Preroll and Postroll” on page 22-3. PLAY MENU 5-1 NOTES: 5-2 Chapter 5 - Patching and Routing INTRODUCTION Before any recording, editing or mixing can be performed on DREAM console, the console needs to be configured and input signals patched to feeds, feeds to buses, and buses to outputs. Feeds are selected by pressing one or more of the selection keys at the top of the DREAM console. These keys are also used to display and select the associated inputs and outputs during patching operations. Buses are selected by pressing one of the bus selection keys. Individual bus elements are selected by pressing one or more of the illuminated speaker mute buttons at the left of the selection keys. In general, patching procedures require the operator to first select the destination, then select the source Setting up Your Control Room Monitors If this is the first time your DREAM console has been used you will first need to set up and patch your control room monitors. See “Monitoring” on page 6-2 for instructions on patching and using your monitors with the DREAM console. Patch I/O Key Stem Assign Key Bus Assign Key Figure 1: Dream Patching, Bus, Live and Track Selection Keys INTRODUCTION 5-3 PATCHING INPUTS Each Track Feed and Live Feed can be fed from a physical input or a Bus Element. Patching a physical input to a feed means connecting the signal at the physical input to the input of the feed signal path. Live Feed Connects the input directly to the destination bus of the feed (a Live Feed without an input cannot make any sound). Live Feeds are used for effects returns, microphones signals or other real-time inputs for mixing. Track Feed When a disk recorder track is armed an input can be recorded on to the track and monitored through it. During mix down the disk recorder track is played back and mixed to a bus through the Track Feed. Feeds are all inherently mono although they can be linked into multiformat Link Groups as described in “Link Groups” on page 11-2. Physical inputs can also be patched to Insert Returns. Patch Interrogation While input patching operations are in progress, the track and live selection keys are used to represent the physical inputs as described in the procedures below. The following convention for feed selection key and bus key illumination provides information on the current status of the patching: • Inputs available for patching to the selected feeds - Dimly Lit • Inputs currently patched to the selected feeds - Brightly Lit • Inputs currently patched to other feeds - Flashing Off to Dim • Inputs not installed - Unlit • Buses not currently patched to any feeds - Dimly Lit • Buses patched to the currently selected feeds - Brightly Lit • Buses patched to feeds other than those currently selected - Flashing Off to Dim Analog And Digital Inputs Physical inputs are numbered 1 to 64 Analog and 1 to 64 Digital, of which the latter can be further extended to include1 to 64 AES/EBU and 1 to 64 MADI. During patching the Digital Inputs are represented by the Live Feed keys, and the Analog Inputs by the Track Feed Keys. Patching Physical Inputs To Feeds The patching procedure requires the operator to first select the destination, then select the source. To patch a physical input to a Feed: PATCHING AND ROUTING Step 1 First enter the Patch I/O Menu by pressing the Patch I/O key Step 2 Select the feed to be patched to by using the Track Feed and/ or Live Feed keys in the Selection Panel (or you can use the feed keys already selected) 5-4 Step 3 Press the Patch soft key The Track Feed keys now show all the physical inputs from 1 to a maximum 64 digital (AES or MADI), OR 1 to a maximum 64 analog depending on the ANALOG/DIGITAL and AES/MADI soft keys. Step 4 Press the ANALOG/DIGITAL and AES/MADI soft keys to select the desired input type. Inputs that are available for patching are illuminated dim. Inputs of the selected type already assigned to the Feeds selected are brightly lit. Inputs assigned to other feeds or returns flash between off and dim illumination. Inputs that are not installed are not illuminated and cannot be selected. Step 5 Select the input by using the Track or Live Feed keys at the top of the Selection Panel. Press an edit mode key or another menu key to exit the patching menu or press Patch I/O to return to the previous state. It is also possible to patch a group of inputs to a group of Feeds: Step 1 First enter the Patch I/O Menu by pressing the Patch I/O key Step 2 Select the feeds to be patched to by using the Track Feed and/ or Live Feed keys in the Selection Panel (or you can use the feed keys already selected). Step 3 Press the Patch key. Step 4 Select the input type soft keys (ANALOG/DIGITAL and AES/MADI). Step 5 Select any number of physical inputs by holding one down, selecting others, or double pressing the last in a range, then releasing the original. The physical inputs are patched to the feeds successively until the feeds are all used. If the physical inputs are all used before the feeds are, then patching starts again from the first physical input. For example, selecting only one input will cause it to be patched to all selected Feeds. Selecting two inputs will cause them to be alternately patched to the selected feeds. Fast Patching Inputs From the Path Configuration Panel Step 1 Press the Call key to enter call mode. Step 2 Press a feed key on the selection panel to call the feed to the Channel Panel. PATCHING INPUTS 5-5 Step 3 Press and hold the Input Patch key on the Path Configuration Section. Press the ANALOG/DIGITAL and AES/MADI soft keys to select the desired input type. Inputs of the selected type already assigned to the selected feed are brightly lit. Inputs that are available for patching are illuminated dim. Inputs assigned to other feeds or returns flash between off and dim illumination. Inputs that are not installed are not illuminated and cannot be selected. Step 4 PATCHING AND ROUTING Press a live or track selection key to select a new input for the path. 5-6 Input Gain and Phase Analog and Digital inputs can have digital gain or attenuation, and phase reversal applied at the input. Inputs are selected by first selecting the feeds that they are patched to. To set input gain: Step 1 First enter the Patch I/O Menu by pressing the Patch I/O key. Step 2 Select the feed or feeds whose inputs you wish to adjust. Step 3 Press the Gain soft key. If all the inputs of the selected feeds have the same gain value, that value is shown in the LCD below the Gain soft key as an absolute value (ABS), otherwise this field is initialised to 0 dB and is displayed as a relative value (REL). ABS represents the absolute value of all Inputs. REL represents a trim or relative offset value applied to all inputs. Step 4 Use the Jog wheel or +/- keys to adjust the relative gain in real time or use the numeric keys to enter an absolute value and press Enter to complete. To set input phase: Step 1 First enter the Patch I/O Menu by pressing the Patch I/O key. Step 2 Select the feed or feeds whose inputs you wish to adjust. Step 3 Press the Phase soft key to toggle the phase of the selected inputs. If the inputs to all selected feeds are in phase the phase soft key is illuminated green. If the inputs to all selected feeds are out of phase the phase soft key is illuminated amber. If the inputs to the selected feeds do not all have the same phase status the phase soft key flashes red. Press the soft key to set all inputs in phase. Patching Bus Elements to Feeds The individual elements of a bus may be patched to feeds for recording or other processing. Figure 2: Speaker Mute / Bus Element Selection Keys PATCHING INPUTS 5-7 To select a Bus Element as the input for a feed: Step 1 First enter the Patch I/O Menu by pressing the Patch I/O key Step 2 Select the feed to be patched to by using the Feed keys at the top of the DREAM Console (or you can use the Feed keys already selected). Step 3 Press the Patch soft key. Step 4 Choose the Main, Aux or Sub-Bus key instead of a physical input key. Step 5 If the Main, an Aux or Sub-Bus is selected, the available bus element speaker mute keys will flash. Press a speaker mute key to select that bus element. The element patched to the feed is displayed at the left of the signal path display an the bottom of the mixer display. Choose another feed to patch or press Patch I/O to return to the previous mode. Bus Elements may be patched to a group of feeds or link group, as follows: Step 1 First enter the Patch I/O Menu by pressing the Patch I/O key Step 2 Select the feeds or link group to be patched to by using the Track or Live Feed keys on the Selection Panel (or you can use the feed keys already selected). Step 3 Press the Patch soft key. Step 4 Press the Main, an Aux or a Sub-Bus key. The Main or SubBus Elements will be patched to the feeds in the following order: Left, Left Centre, Centre, Right Centre, Right, Left Surround, Centre Surround, Right Surround, Boom. Elements that are not in the current bus or group format are not displayed or patched. If a stereo Aux Bus is selected the left channel is patched first then the right. The bus elements are patched to the feeds successively until the feeds are all used. If the bus elements are all used before the feeds are, then patching starts again from the first bus element. For example, selecting only one bus element will cause it to be patched to all selected Feeds. Selecting two bus elements will cause them to be alternately patched to all selected feeds. Patching to Insert Returns Patching procedures for feed and bus insert returns are similar to the procedures just discussed. Insert patching is achieved by first calling a feed to the Channel Panel and pressing the Insert Config Key in the Path Configuration Section. For more information on calling feeds to the Channel Panel see “Calling a Signal Path to the Master Fader” on page 7-2. PATCHING AND ROUTING 5-8 Call Key Insert Key Figure 3: Path Configuration Section Patching Feed Insert Returns To patch a physical input to a track or live feed Insert Return: Step 1 Enter Call mode by pressing the Call key. Step 2 Press the feed selection key of the feed you into which you want to patch an insert, or keep the current selection. Step 3 Press the Insert Config key in the Path Configuration section of the Channel Panel. Step 4 Press the Returns soft key on the LCD menu. Step 5 Press the Patch soft key. The Track Feed keys now show the analog physical inputs and the Live Feed keys show the digital physical inputs. Step 6 Press the ANALOG/DIGITAL and AES/MADI soft keys to select the desired input type. Inputs that are available for patching are illuminated dim. Inputs of the selected type already assigned to the Feeds selected are brightly lit. Inputs assigned to other feeds or returns flash between off and dim illumination. Inputs that are not installed are not illuminated and cannot be selected. Step 7 Select the input by using the Track Feed keys. If a signal path already has an insert return input, choosing another one will replace it, choosing the current one will unpatch it. Patching is completed by pressing an edit mode key or other menu key or by pressing Insert Config to return to the previous state. Patching Bus and Link Group Insert Returns For more information on Link Groups see “Grouping” on page 11-2. To patch physical inputs to Bus or Link Group Insert Returns: PATCHING INPUTS 5-9 Step 1 Press the Call key to call the bus or link group to the Channel Panel. Step 2 Select the bus to be inserted by pressing a bus selection key or press the feed key of any member of a link group to select the group or, retain the existing selection. To select a single member of a link group hold down the BLUE key and press the track key, then follow the procedure above. Step 3 Enter the Insert Menu by pressing the Insert Config key on the Path Configuration section of the Channel Panel. Step 4 Press the Returns soft key in the LCD menu. Step 5 Press the Patch soft key. The Track Feed keys now show the analog physical inputs and the Live Feed keys show the digital physical inputs. Step 6 Press the ANALOG/DIGITAL and AES/MADI soft keys to select the desired input type. Inputs that are available for patching are illuminated dim. Inputs of the selected type already assigned to the bus or feeds selected are brightly lit. Inputs assigned to other feeds or returns flash between off and dim illumination. Inputs that are not installed are not illuminated and cannot be selected. Step 7 Bus elements and link group members are selected with the speaker mute keys. Speaker mute keys corresponding to elements available in the current bus or link group format are illuminated dim green. The current element for patching is illuminated bright green. Elements that are already patched to inputs flash off to dim green. The current bus or group element is advanced automatically when an input is selected. Press a track key to select the input for the current bus or group element. The bus or group elements advance in the following order: Left, Left Centre, Centre, Right Centre, Right, Left Surround, Centre Surround, Right Surround, Boom. Elements that are not in the current bus or group format are not displayed. To skip the current element press the Next soft key. To remove patching for the current bus element and leave it with no output, press the Blank soft key. Step 8 To patch elements out of order press the speaker mute key of the element you wish to patch. Inserts may be switched in and out of circuit by pressing the ON/OFF soft key. Insert return gain and phase may also be adjusted in the Insert Config menu. PATCHING AND ROUTING 5-10 Patching To Multiple Signal Paths It is possible to patch the same physical input to many different signal paths, and have it heard on many of them at the same time. This includes Live Feeds, Track Feeds, and Insert Returns. The exception is that only one of a group of Track Feeds with the same physical input can be armed, or put in Thru mode, at one time. The user is prompted before sharing of physical inputs takes place. So, when a physical input is selected as part of the patching operations described above, if it is already being used by another signal path, the following warning message appears: One or more inputs already patched. Do you want to share, replace or remove? Press the Share or Replace soft key to choose the patching option you require. Press the input selection key again to remove it from the selection. When Share is selected, inputs that are already patched to existing destinations remain patched to those destinations, and are also patched to the currently selected destinations. When Replace is selected the input is unpatched from its current destinations and patched to the currently selected destination. Unpatching Inputs To remove input patching from a set of one or more feeds, press the Patch I/O key, select the feed and press the unpatch inputs soft key. PATCHING INPUTS 5-11 PATCHING OUTPUTS Physical outputs can be patched from buses, insert sends, direct outs and monitor outs. Patching Bus Outputs To select physical outputs for the buses: Step 1 Press the Patch I/O key to enter the Patch I/O menu. Step 2 Press the Inputs/Outputs soft key to select Outputs. Step 3 Select the Main Bus, a Sub-Bus, or an Aux Bus by pressing a bus selection key. Step 4 Press the Patch soft key. Step 5 Press the ANALOG/DIGITAL and AES/MADI soft keys to choose the desired type of output. The track feed keys may now be used to select analog outputs for the bus and the live feed keys to select digital outputs. Outputs of the selected type (Analog/AES/MADI) currently patched to the selected bus element are brightly lit. Outputs of the selected type (Analog/AES/MADI) currently patched to other sources flash off to dim. Outputs of the selected type (Analog/AES/MADI) currently available are dimly lit. Outputs of the selected type (Analog/AES/MADI) that are not fitted are unlit. The outputs can be selected for one bus element at a time. The Speaker Mute key of the current bus element is illuminated green. Speaker mute keys for bus elements already patched flash off to dim green. Speaker mute keys for bus elements not currently patched are illuminated dim green. Step 6 Each bus element may be patched to a single output or multiple outputs. Press the SINGLE/MULTI soft key to select single or multi mode. Step 7 In SINGLE mode the current bus element is advanced automatically when an output is selected. Press a track key to select the output for the current bus element. The bus elements advance in the following order: Left, Left Centre, Centre, Right Centre, Right, Left Surround, Centre Surround, Right Surround, Boom. Elements that are not in the current bus or group format are not displayed. To skip the current bus element press the Next soft key. To remove patching for the current bus element and leave it with no output, press the Blank soft key. PATCHING AND ROUTING 5-12 In MULTI mode outputs for the selected bus element may be toggled ON or OFF by pressing the corresponding Track keys. If the key is flashing, pressing the key will remove it from its current source and patch it to the current element. Press a track key to add it to the outputs for the current bus element. To advance to the next bus element press the Next soft key or press another speaker mute key to select that bus element out of sequence. Press the Patch I/O key to return to the previous mode or select another bus to patch by pressing a bus selection key. Patching Insert Sends To select physical outputs for insert sends: Step 1 Press the Call key to call a feed or bus to the Channel Panel. Step 2 Select the feed or bus to be inserted, or press the track key of any member of a link group to select the group, or retain the existing selection. Step 3 Enter the Insert Menu by pressing the Insert Config key on the Path Configuration section of the Channel Panel. Step 4 Press the Patch soft key in the LCD menu. Step 5 Press the ANALOG/DIGITAL and AES/MADI soft keys to choose the desired type of output. The track feed keys may now be used to select analog outputs for the insert sends and live feed keys to select digital outputs. Outputs of the selected type (Analog/AES/MADI) currently patched to the selected bus element are brightly lit. Outputs of the selected type (Analog/AES/MADI) currently patched to other sources flash off to dim. Outputs of the selected type (Analog/AES/MADI) currently available are dimly lit. Outputs of the selected type (Analog/AES/MADI) that are not fitted are unlit. If the selected path is a bus or a link group the outputs can be selected for one bus or link group element at a time. The Speaker Mute key of the current bus or link group element is illuminated green. Speaker mute keys for bus or link group elements already patched flash off to dim green. Speaker mute keys for bus or link group elements not currently patched are illuminated dim green. Step 6 Each insert send may be patched to a single output or multiple outputs. Press the SINGLE/MULTI soft key to select single or multi mode. PATCHING OUTPUTS 5-13 Step 7 In SINGLE mode Press a track key to select the output for the current feed insert send. OR If the selected path is a bus or link group, in SINGLE mode the current bus or link group element is advanced automatically when an output is selected. Press a track key to select the output for the current bus or link group element insert send. The bus or link group elements advance in the following order: Left, Left Centre, Centre, Right Centre, Right, Left Surround, Centre Surround, Right Surround, Boom. Elements that are not in the current bus or group format are not displayed. To skip the current bus or link group element press the Next soft key. To remove patching for the current bus or link group element and leave it with no output, press the Blank soft key. In MULTI mode outputs for the selected feed, bus or link group element may be toggled ON or OFF by pressing the corresponding Track keys. If the key is flashing, pressing the key will remove it from its current source and patch it to the current element. Press a track key to add it to the outputs for the insert send. To advance to the next bus or link group element press the Next soft key or press another speaker mute key to select that bus element out of sequence. Press the Insert Config key to return to the previous mode or select another path to patch by pressing a track or bus selection key. Inserts may be switched in and out of circuit by pressing the ON/OFF soft key. Patching Direct Outputs Any feed or bus may be sent to a Direct Output. Direct Outputs may have one or more physical outputs. To select physical outputs for Direct Outputs: Call Key Direct Key Figure 4: Path Configuration Section Step 1 PATCHING AND ROUTING Press the Call key to call a feed or bus to the Channel Panel. 5-14 Step 2 Select a feed or link group by pressing a track or live key or select the Main Bus, a Sub-Bus or an Aux Bus by pressing a bus selection key. Step 3 Press the Direct Config Key on the Path Configuration section of the Channel Panel. Step 4 Press the Patch soft key in the LCD menu. Step 5 Use the ANALOG/DIGITAL and AES/MADI soft keys to choose the desired type of output. The track feed keys may now be used to select analog outputs for the Direct Out and the live feed keys for digital outputs. Outputs of the selected type (Analog/AES/MADI) currently patched to the selected feed or bus element are brightly lit. Outputs of the selected type (Analog/AES/MADI) currently patched to other sources flash off to dim. Outputs of the selected type (Analog/AES/MADI) currently available are dimly lit. Outputs of the selected type (Analog/AES/MADI) that are not fitted are unlit. If the selected path is a bus or a link group the outputs can be selected for one bus element at a time. The Speaker Mute key of the current bus element is illuminated green. Speaker mute keys for bus elements already patched flash off to dim green. Speaker mute keys for bus elements not currently patched are illuminated dim green. Step 6 Each direct out may be patched to a single output or multiple physical outputs. Press the SINGLE/MULTI soft key to select single or multi mode. Step 7 In SINGLE mode Press a track key to select the output for the current feed direct out. OR If the selected path is a bus or link group, in SINGLE mode the current bus or link group element is advanced automatically when an output is selected. Press a track key to select the output for the current bus or link group element direct out. The bus or link group elements advance in the following order: Left, Left Centre, Centre, Right Centre, Right, Left Surround, Centre Surround, Right Surround, Boom. Elements that are not in the current bus or group format are not displayed. To skip the current bus or link group element press the Next soft key. To remove patching for the current bus or link group element and leave it with no output, press the Blank soft key. PATCHING OUTPUTS 5-15 In MULTI mode outputs for the selected feed, bus or link group element may be toggled ON or OFF by pressing the corresponding Track or Live keys. If the key is flashing, the system will warn you that the output is used by another signal path. Press a track key to add it to the outputs for the direct out. To advance to the next bus or link group element press the Next soft key or press another speaker mute key to select that bus element out of sequence. Press the Direct Config key to return to the previous mode or select another bus to patch by pressing a bus selection key. For a signal path with ports established for Direct Output, the Direct ON/OFF soft key is used to turn the direct output on and off. Direct Out Pre/Post The direct output signal can be derived before or after the feed/bus fader. Press the Pre/Post soft key to toggle the direct output. Direct Out Gain The direct output signal can have gain or attenuation applied prior to the output. If all the outputs of the selected bus or link group elements have the same gain value, that value is shown in the LCD below the Gain soft key as an absolute value (ABS), otherwise this field has the value 0 dB and is displayed as a relative value (REL). ABS represents the absolute value of all Outputs. REL represents a trim or offset applied to all Outputs. To alter the direct out level of a single member of a link group, individually select the member by holding down the BLUE key and pressing the selection key. Monitor Outputs Patching monitor outputs is covered in “Patching Control Room Monitor Outputs” on page 6-3. CONFIGURING BUS FORMATS The Main Bus, Sub-Buses and Aux Buses may be configured in mono, stereo or multi-channel surround formats. Each bus comprises individual bus element signal paths from one up to a maximum of eight, these elements include left, right, centre, etc. Bus formats must be configured prior to use. Bus Format Key MT Buses Key Figure 5: Bus Format and Bus Selection Keys PATCHING AND ROUTING 5-16 The Bus Format Menu The Bus Format Menu is used to set the format i.e. the number and type of independent bus elements comprising each bus: Step 1 Press the Bus Format Key. Step 2 Select one or more of the Main, or a Sub or Aux Bus by pressing the Main, Sub or Aux keys. Step 3 Available formats for the selected buses are displayed on the LCD. Press a soft key to select the format required. The formats available for Main, Sub-Buses and Aux Buses are: Mono; Stereo; LCR; LCRS; LCRSS(L,C,R,LS,RS); 5.1 (L,C,R,LS,RS,B); 6.1 (L,C,R,LS,CS,RS,B); 7.1 (L,LC,C,RC,R,LS,RS,B); and OFF; and Bus Reduction. Note that the Main bus can not be set to OFF, it must have a format of at least Mono. The Main Bus cannot be defined as OFF. Bus elements are assigned automatically from a finite pool of 48. As formats are defined for each bus, the number of available bus elements is reduced. The number of remaining elements available is displayed on the LCD. ASSIGNING SIGNALS TO BUSES Feeds must be assigned to buses in order to route their signals to outputs or to mixes for recording. Feed signals are routed to Main, Sub and Aux buses via a panner element in each signal path. Sub-Buses may also be assigned to the Main Bus if they are used for sub-mixing or as separate stems. An alternative to normal bus assignment is Stem Assign. Stem Assign allows the outputs of the panner to each bus element to be disconnected. This is useful when adding a pre-mixed stem to a mix. Each element of the stem may be assigned only to its corresponding bus element. Assigning Feeds to Buses To assign signal paths to buses: Step 1 Press the Bus Assign key Step 2 Press the bus selection key of the destination bus to which you want to assign signal paths. This can be the Main Bus or any Sub or Aux Bus The selected bus key will light, and so will all the Track and Live Feed keys associated with feeds already assigned to that bus. ASSIGNING SIGNALS TO BUSES 5-17 Step 3 Press any Track or Live Feed key to toggle its assignment on or off. Press the All Feeds soft key to assign all feeds to the selected bus. Press the deassign all soft key to deassign all sources. Step 4 Press the Bus Assign key to return to the previous mode or select any other mode. Bus Assignment may be automated using the Enable key next to the Bus Assign key. Note: once the Main Bus is selected as the destination bus, Sub-buses can be added to the source selection as described below. Press the Main key again to de-select the Main bus as the destination before selecting a Sub-bus as a new destination for bus assignment. Fast Bus Assignment via the Path Configurator The Path Configurator controls all the routing and assignment for the signal path currently selected to the Central Processing Panel. Step 1 Press the Call key to enter the call mode. Step 2 Press a feed selection key to call a feed to the Channel Panel. Step 3 Hold down the Bus Routing key in the Path Configuration section at the top of the Channel Panel. Buses to which the feed is currently routed are illuminated. Step 4 Press any bus selection key to assign the current feed to that bus. Assigning Sub-Buses to the Main Bus If the Main Bus has been selected, Sub-Buses may be routed to it. Bus elements in the Sub-Bus are routed directly to the corresponding elements in the Main Bus. It is possible to assign a Sub-Bus of a lower format to a Main Bus of a higher format (e.g. stereo Sub-Bus routed to a 5.1 Main Bus). In this case only the bus elements present in the Sub-Bus are connected to their corresponding elements in the Main Bus (i.e. Sub-Bus left to Main Bus left, Sub-Bus right to Main Bus right). If the Sub-Bus has a higher format than the Main Bus (e.g. 5.1 Sub-Bus routed to a stereo Main Bus), down-mixing automatically occurs. Bus to bus assignments use the same procedure as feed to bus assignments: Step 1 Press the Bus Assign key. Step 2 Press the Main bus selection key to select the Main Bus as the destination. Step 3 Press a Sub bus key to route that bus to the Main bus. Press the All Subs soft key to assign all Sub-Buses to the Main Bus. PATCHING AND ROUTING 5-18 Step 4 To complete the assignment process press the Bus Assign key to return to the previous state or select any other mode. To create a sub-bus output at a different level from that going to the Main bus, create a Direct Output for the sub-bus and offsetting its level using the Gain control on the Direct Config Menu. Return Group To Bus DREAM software release 1.2 does not support the Return Groups, this information is included for future reference. Once a destination bus has been chosen, return groups may be routed to it by pressing their Selection Panel keys. Return groups have inbuilt bus format structure. This means that the individual members of the return group are already hard-panned to a bus element depending on the number of group members. Stem Assign It may be desirable to assign a feed or members of a link group to a restricted set of the bus elements in the Main or Sub-Buses. This procedure is useful where the element order of an imported mix stem differs from the internal DREAM bus and link group element order, or when the panner alone cannot be used to create the desired assignment or spatial effect. To ensure that signals are routed to bus elements at unity gain turn off the panner in the selected feeds by de-selecting the Panning IN key on the Channel Panel. Feeds for stem assignment must first be assigned to the desired bus using bus assign, see “Assigning Signals to Buses” on page 5-16 above. Step 1 Hold down a BLUE key and press the Stem Assign key. Step 2 Press the bus selection key of the destination bus to which you want to assign signal paths. This can be the Main Bus or any Sub or Aux Bus to which the feed is currently assigned. The Speaker Mute keys now show which elements of the destination bus, the signal path is assigned to. Elements currently assigned are brightly lit, unassigned elements are dimly lit, and elements unavailable in the destination bus are off. Only bus elements that are available in the destination bus format can be selected. Step 3 Press any Track, Live Feed or Link Group key to toggle its selection on or off. ASSIGNING SIGNALS TO BUSES 5-19 Step 4 Use the Speaker Mute keys to toggle destination bus elements on and off. Multiple signal paths may be selected at the same time. If any bus elements are enabled in all of them, their Speaker Mute keys are solidly illuminated and may be toggled off. If any bus elements are enabled in some but not all the selected signal paths, their Speaker Mute keys flash. Pressing any flashing key enables that bus element in all the selected signal paths. Press again to remove the bus element Bus elements that are not enabled in any of the selected signal paths are dimly lit and may be toggled on for all selected signal paths. Stem Assign Soft Key Options Press connect all to connect the selected feeds to all bus elements. Press disconnect all to disconnect the selected feeds from all bus elements. Press boom only to disconnect the selected feeds from all bus elements except the Boom element. Press all but boom to connect the selected feeds to all bus elements except the Boom element. Stem Assign Group Members If a Link Group is chosen as the source, the individual elements are all stem assigned identically. If it is desired to change the group or bus members individually, the bus is first selected, then hold down a BLUE key and double press the member feed selection key. See “Link Groups” on page 11-2 for more details. Aux to Main Bus Aux buses cannot be assigned to the Main Bus. BUS REDUCTION Bus reduction is not available in DREAM Software Version 1.2. PATCHING AND ROUTING 5-20 BUS REDUCTION 6-1 NOTES: 6-2 Chapter 6 - Monit or ing INTRODUCTION The DREAM Console provides control of up to nine sets of monitor speakers for the Control Room supporting all surround formats up to 7.1. DREAM Console also supports automatic fold down into narrower formats, allowing, for example, a 5.1 mix to be checked in stereo monitors. The DREAM Console provides control of up to nine sets of monitor speakers or headphone feeds for the Studio. Studio monitors can be in mono or stereo formats. 16 Programmable Control Room Monitor Sets and 8 Studio Monitor Sets provide storage and instant recall of complete monitoring configurations. SELECTING CONTROL ROOM MONITOR SPEAKERS The system provides up to nine sets of monitor speakers, which are named Main and Alternative 1 to 8. The default speaker set is Main. The Monitor Alt key in the Monitor section is used to toggle between the Main speakers and the current (i.e. most recently selected) Alternative speaker set. The Monitor Alt key is illuminated when the alternative monitors are selected. To change the current Alternative speaker set: Step 1 Hold down a BLUE key and press the Monitor Setup key next to the Monitor Level Control. Step 2 Select one of the alternative speaker sets by pressing the appropriate soft key. The alternative speaker set is immediately switched into the monitoring chain. Each set of monitors can be set up in any of the available formats which are Mono, Stereo, LCR, LCRS, LCRSS, 5.1, 6.1, or 7.1. Selecting a monitor set of a lower or higher format than the currently selected monitor source will cause the elements of the source to be folded up or down to fit the format of the speaker system. See “The Monitor_Matrix.TXT File” on page 33-12 below for details on modifying the default downmix behaviour of the system. INTRODUCTION 6-3 NAMING CONTROL ROOM SPEAKER SETS Alternative speaker sets may be given more meaningful names specific to the current installation. Step 1 Hold down a BLUE key and press the Monitor Setup key next to the Monitor Level Control. Step 2 Press the soft key for the speaker set you wish to name e.g. Alt 2 Step 3 Press the Patch Outputs soft key. Step 4 Press the Name soft key. Step 5 Type the name on the PC keyboard and press Enter. PATCHING CONTROL ROOM MONITOR OUTPUTS To set the format and select the physical outputs for any of the monitor sets follow these steps: Step 1 Hold down a BLUE key and press the Monitor Setup key next to the Monitor Level Control. Step 2 Press the soft key to select the speaker set you wish to patch e.g. Alt 2 Step 3 Press the Patch Outputs soft key. Step 4 To determine the number of outputs required, you must specify the format of the speaker set. Press the Format soft key to cycle through the available formats. These are None, Mono, Stereo, LCR, LCRS, LCRSS, 5.1, 6.1, 7.1. Step 5 Select the type of digital physical output you wish to patch to by pressing the Analog/Digital, AES/MADI soft keys. Step 6 The speaker mute keys are now used to select each speaker. The current speaker mute key is brightly lit. Other elements included in the specified format are dimly lit. Press a speaker mute key to select the element to patch. Step 7 Live feed keys now represent digital outputs and track feed keys represent analog outputs. Press a feed selection key to select a physical output for the current speaker. Only one output can be selected for each speaker, selecting a new output replaces the previous patch. The output feed selection key patched to the current Monitor Element is brightly lit. Output track keys used for other purposes flash. Output track keys available for patching are dimly lit. Step 8 Select the speakers to patch one by one, by pressing each speaker mute key and following the patching procedure described above. System I/O Ports System output ports are only available for patching in the Monitor Setup Patching page. System ports are defined in the I/O Config.TXT file as described in “The IO Config.TXT File” on page 33-11. Use system output ports for patching your control room monitors to avoid accidentally patching other sources direct to the power amplifier inputs. MONITORING 6-4 TRIMMING RELATIVE SPEAKER LEVELS The level of each speaker in a speaker set can be adjusted independently. This is useful for setting surround speaker levels and compensating for different amplifier gains. Step 1 Hold down a BLUE key and press the Monitor Setup key next to the Monitor Level Control. Step 2 Press the Patch Outputs soft key. Step 3 Press the soft key for the speaker set you wish to adjust e.g. Alt 2 Step 4 The speaker mute keys are now used to select each speaker. The current speaker mute key is brightly lit. Other elements included the specified format are dimly lit. Press a speaker mute key to select the element to patch. Step 5 Press the Gain soft key and use the jog wheel or +/- keys to adjust the gain in real time, or use the numeric keys and press Enter to complete. Step 6 Select the speakers to adjust one by one, by pressing each speaker mute key and following the gain procedure described above. SELECTING A CONTROL ROOM MONITOR SOURCE The monitor source can be selected from one of the following: The Main Bus, a Sub-Bus, or an Aux Bus, OR external source presets 1 to 16, named ExtSrc by default on the LCD soft keys, which can be patched from any physical input, allowing monitoring of CD players, surround encoders/decoders and other external devices. The Source Alt key in the Monitor section is used to toggle between the Main bus and the current (i.e. most recently selected) alternative source. The Source Alt key is illuminated when the alternative source is selected. To change the current alternative source: Step 1 Hold down a BLUE key and press the Source Setup key next to the Monitor Level Control. Step 2 Select an alternative source by pressing one of the bus keys or one of the Ext Src soft keys in the LCD menu. The alternative source is immediately switched into the monitoring chain. PATCHING EXTERNAL MONITOR SOURCES To set the format and patch the physical inputs for external monitor sources, follow these steps: Step 1 Hold down a BLUE key and press the Source Setup key next to the monitor level control. Step 2 Press the define ExtSrc soft key. TRIMMING RELATIVE SPEAKER LEVELS 6-5 Step 3 Press the ExtSrc soft key for the source you wish to patch. Step 4 To determine the number of inputs required, you must specify the format of the external monitor source. Press the Format soft key to cycle through the available formats. These are Mono, Stereo, LCR, LCRS, LCRSS, 5.1, 6.1, 7.1 Step 5 Select the type of physical digital input you wish to patch to by pressing the AES/MADI soft keys. Step 6 The speaker mute keys are now used to select each element of the external source format. The current speaker mute key is brightly lit. Other elements included the specified format are dimly lit. Press a speaker mute key to select the element to patch. Step 7 Feed selection keys keys now represent the physical inputs of the type selected. Press a feed selection key to select a physical input for the current source element. Only one input can be selected for each element, selecting a new input replaces the previous patch. The input feed selection key patched to the current source element is brightly lit. Input feed selection keys used for other purposes flash. Input feed selection keys available for patching are dimly lit. Step 8 Select the source elements to patch one by one, by pressing each speaker mute key and following the patching procedure described above. NAMING EXTERNAL MONITOR SOURCES Alternative monitor sources may be given more meaningful names specific to the current installation. Step 1 Hold down a BLUE key and press the Source Setup key next to the monitor level control. Step 2 Press the define ExtSrc soft key. Step 3 Press the ExtSrc soft key for the source you wish to name. Step 4 Press the Name soft key. Step 5 Enter the name using the PC keyboard and press the Enter key to complete the operation MONITOR FORMAT The DREAM Console allows the operator to monitor a source in any format required. For instance a stereo source can be monitored in mono to check for compatibility. Similarly, a 5.1 surround source can be checked in stereo. By default the monitor format is the same as the current monitor set selected with the Monitor key. If a different monitor format is then selected, the monitor source signals are summed, attenuated or distributed to be heard in the selected format. The Format Alt key in the Monitor section is used to toggle between the default format for the current speaker set and the current (i.e. most recently selected) Alternative format. The Format Alt key is illuminated when the alternative format is selected. MONITORING 6-6 To change the current alternative format: Step 1 Hold down a BLUE key and press the Format Setup key next to the Monitor Level Control. Step 2 Select an alternative format by pressing one of the format soft keys in the LCD menu. The alternative format is immediately applied to the monitoring chain. Whenever the signal path or monitor source being monitored is narrower than the current Monitor Format, the speakers that are not needed are muted. See “The Monitor_Matrix.TXT File” on page 33-12 below to see how the default settings are derived. The user can modify these settings to suit any mode of operation or to make the DREAM Console monitoring conform to any surround delivery format requirements. Operators should be aware that while the DREAM Console is capable of playing a surround mix on any speaker format, when checking for compatibility, the appropriate decoding system should be employed for the target audience listening environment. See “Inserts in Monitoring” on page 6-6 below for details on employing external decoders in the monitoring path. INSERTS IN MONITORING Inserts in monitoring are not used explicitly, but can be chosen by using the Source Setup Menu, which allows any physical inputs to be monitored. This allows, for instance, both the Lt, Rt outputs of a Dolby encoder and the individual LCRS outputs of a Dolby decoder to be monitored directly as external monitor source inputs. See “Selecting a Control Room Monitor Source” on page 6-4 above and “Patching External Monitor Sources” on page 6-4 for more details on setting up and using monitor sources. MONITORING CONTROLS The Control Room monitoring controls include: Monitor Level The Monitor Level control provides direct control of the control room listening level. Dim The DIM key next to the monitor level control reduces the monitor level by a fixed amount. Follow these steps to set the Dim level reduction amount: Step 1 Hold down the DIM key next to the Monitor Level Control. The DIM key is illuminated when the monitors are dimmed. The level reduction is displayed on the LCD. The range is 0 to -20dB. Step 2 Turn the jog wheel to enter the value. Step 3 Release the DIM key. Press the DIM key again to return to normal listening level. INSERTS IN MONITORING 6-7 Fixed Reference Level The BLUE Fixed key next to the monitor level control is used to set the monitoring level to a fixed reference standard volume. The Fixed key bypasses the Monitor Level control. Follow these steps to set the fixed monitoring level: Step 1 Select the monitor system to calibrate by pressing the Monitor key to select the Main monitors or hold down the BLUE key and press the Monitor key then select an alternative monitor set. Step 2 Using a pink noise source and a sound pressure level meter, follow the steps in “Trimming Relative Speaker Levels” on page 6-4 to set all speakers to the same sound pressure level (for 5.1 film mixing the surround speaker level may be reduced by 3dB). Adjust the pink noise level in each bus element to 0VU, -20dBFS or your local standard. Use the speaker mute keys to mute all speakers except the centre speaker. Place the SPL meter at your normal listening position and use the amplifier gain controls to roughly set the sound pressure level to 83dBSPL, 85dBSPL or your local standard (set the meter to slow response, C weighted). Repeat this process for the all speakers. Step 3 Hold down the BLUE and Fixed keys to enter the fixed calibration mode. The variable gain setting is displayed on the LCD. Step 4 Turn the jog wheel to adjust the level. Step 5 Release the Fixed key. Press the Fixed key again to re-enable the Monitor Level control. Refer to SMPTE RP 200 Proposed SMPTE Recommended Practice: Relative and Absolute Sound Pressure Levels for Motion-Picture Multichannel Sound Systems or your local standards manual for more details on reference monitoring levels. Master Mute Press the MUTE key next to the Monitor Level control to mute the control room monitor outputs. The MUTE key is illuminated red when the monitors are muted. Press the MUTE key again to unmute the monitors. Individual Speaker Mutes The individual Speaker Mutes can be used to mute each individual speaker. The speaker mute keys are illuminated dim red for elements available in the current Main Bus format. Press a speaker mute key to mute the selected speaker. The mute key will be lit bright red when muted. Press the key again to unmute the speaker. The speaker mute keys are also used for bus and link group element selection during patching operations. Monitor Phase Reversal The phase of each monitor speaker may be inverted. Hold down the phase key above the speaker mute keys and press the speaker mute key of the speaker you wish to modify. The mute key will flash to indicate that its phase is currently inverted. Hold down the phase key and press the speaker mute key to return to normal phase. MONITORING 6-8 SELECTING STUDIO SPEAKER SETS Figure 1: Studio Monitor Controls The Studio Monitoring system can select from 9 Studio Speaker Sets. Studio Speaker Sets can be either stereo or mono and may be patched to loudspeakers or headphone amplifiers as required. Follow these steps to select the current Studio Speaker Set: Step 1 Hold down a BLUE key and press the Setup/Output key in the Studio Monitor Controls section. Step 2 Selects from one of the 9 available speaker sets by pressing a soft key. Step 3 Hold down a BLUE key and press the Setup/Output key again, or press any other menu key to continue working PATCHING STUDIO SPEAKER OUTPUTS To set the format and select the physical outputs for any of the monitor sets follow these steps: Step 1 Hold down a BLUE key and press the Setup/Output key in the Studio Monitor Controls section. Step 2 Press the patch outputs soft key. Step 3 Select the speaker set you wish to patch by pressing one of the 9 speaker set soft keys. Step 4 To determine the number of outputs required, you must specify the format of the speaker set. Press the Format soft key to cycle through the available formats. These are None, Mono, Stereo. Step 5 If patching to a digital output select the type of physical output you wish to patch to by pressing the AES/MADI soft keys. Step 6 The speaker mute keys are now used to select each speaker. The current speaker mute key is brightly lit. Other elements included in the specified format are dimly lit. Available elements are Centre for mono, or Left and Right for stereo. Press a speaker mute key to select the element to patch. Step 7 Live feed keys now represent digital outputs and track feed keys represent analog outputs. Press a feed selection key to select a physical output for the current speaker. Only one output can be selected for each speaker, selecting a new output replaces the previous patch. SELECTING STUDIO SPEAKER SETS 6-9 The output feed selection key patched to the current Monitor Element is brightly lit. Output feed keys used for other purposes flash. Output feed keys available for patching are dimly lit. Step 8 Select the speakers to patch one by one, by pressing each speaker mute key and following the patching procedure described above. Press the next soft key to step through the elements or press the blank soft key to leave an element blank. Step 9 Press the end soft key to complete patching. System I/O Ports System output ports are only available for patching in the Monitor Setup Patching page. System ports are defined in the I/O Config.TXT file as described in “The IO Config.TXT File” on page 33-11. Use system output ports for patching your studio monitors to avoid accidentally patching other sources direct to the power amplifier or headphone inputs. NAMING STUDIO SPEAKER SETS Studio speaker sets may be given more meaningful names specific to the current installation. Step 1 Hold down a BLUE key and press the Setup/Output key in the Studio Monitor Controls section. Step 2 Press the patch outputs soft key. Step 3 Select the speaker set you wish to patch by pressing one of the 9 speaker set soft keys. Step 4 Press the name soft key and type the name on the PC keyboard. Step 5 Press Enter to complete. SELECTING STUDIO MONITOR SOURCES The studio monitor source can be selected from one of the following: The Main Bus, a Sub-Bus, or an Aux Bus, OR external source presets 1 to 16, named ExtSrc by default on the LCD soft keys, which can be patched from any physical input, allowing monitoring of CD players, VTRs, or other external devices. Step 1 Press the Setup/Source key in the Studio Monitor section. Step 2 Press any bus selection key to select a bus as the monitor source. Press any of the external source soft keys to select an external source (press the MORE soft key to select external sources 9 to 16). Press the Follow C/R soft key to make the studio monitor follow any selection made for the control room monitors. MONITORING 6-10 Patching External Sources External monitor sources are setup and patched in the Source Setup menu in the control room section. See “Patching External Monitor Sources” on page 6-4 above for complete instructions. MONITOR SETS Figure 2: Console Monitor Set Keys Monitor sets provide a useful way to store and recall monitoring configurations. 16 monitor sets are available for the control room monitoring system and 8 for the studio monitoring system. Monitor sets can store setups as simple as source selection, or as complex as a complete monitoring configuration including: fixed level, speaker mutes, speaker set, monitor format and source. Recalling Monitor Sets Step 1 Press the CR BANK or STUDIO BANK key in the Monitor Sets section at the top of the selection panel, to toggle between the two banks of monitor set keys for the control room or studio. In bank 1 the selection keys are illuminated red, in bank 2 the keys are green. Step 2 Press one of the monitor set selection keys labelled CR1-8 or S1-4 to recall the monitor set configuration. The selected monitor set key is brightly lit when pressed. Setting Up Monitor Sets Step 1 Follow the instructions in the sections above to achieve the monitoring configuration you wish to save. Step 2 Press the SETUP key to display the setup screen. Step 3 If necessary press the BANK selection key for the control room or studio monitor set you wish to store. Step 4 Press the monitor set selection for the set you wish to store. Step 5 Choose the attributes of the current monitoring setup to store by pressing one or more of the attribute selection keys. Press just the Source key to save the current source selection. Select any of the other attributes which are: Fixed Level (for control room), Speaker Mutes (for control room), Speaker Phase (for control room), Speaker Set, Alt Format (for control room). Step 6 Press the STORE key to save the monitor set configuration. Press any other menu key to continue working. MONITOR SETS 6-11 Labelling Monitor Sets The monitor set keys are fitted with removable lenses to enable the user to print and fit their own key cap text inserts on clear film. SAVING MONITOR SETUPS Utils key Figure 3: Mix Utils Keys The BLUE Utils menu offers the Update Sys-File item for storage of system settings. System Files are stored in the C:\Projects\Mixers\FMC\Data\ directory. Step 1 Hold down the BLUE key and press the Utils key to enter the Utils menu. Step 2 Press the Update Sys-File soft key to store the system settings. This information is stored in the following files: Monitor_Sources.TXT - patching and formats of external monitor sources and Monitor Sets. Speaker_Sets.TXT - patching and formats of all speaker sets. Setup_Variables.TXT - Call Follow state and console brightness. SOLO Individual feeds may be soloed into the monitoring system. There are three solo modes which may be entered by pressing the SOLO key next to any fader. These are solo-in-place or SIP, after-fader-listen or AFL, and pre-fader-listen or PFL. SIP mutes all other feeds leaving only the soloed feeds feeding the bus being monitored. SIP supports monitoring in any format. AFL and PFL modes replace the current monitor source with a the stereo solo bus whenever a feed is soloed. All soloed feeds are routed to the solo bus. Soloed link groups are automatically downmixed to allow all their members to monitored in the stereo monitor bus, normal monitor down mixing occurs between the monitor bus and the selected speaker set. The AFL solo signal is derived after the feed fader and mute. PFL solo is derived before the feed fader and mute. Hold down a BLUE key and press the Utils key to enter the Utils menu. Press the Solo soft key to select the solo system to be used. Soloed feeds are shown with a green indicator on the mixer video display. See “Solo” on page 7-3 for more details on the mixer solo system. MONITORING 6-12 Solo Clear The Solo Clear button clears all currently soloed paths, press the Solo Clear button again to restore the soloed channels. SIP Defeat Press the SIP Defeat key in the Path Configuration section of the Channel Panel to prevent the selected feed from being muted when other feeds are put into SIP. Alternatively, hold down a BLUE key and press the MUTE key above any fader to toggle SIP Defeat for that channel. This feature is useful for keeping reverb returns live when channels feeding them are soloed. SIP Defeat feeds are shown with a grey solo indicator on the mixer video display. SIP Defeat is sometimes referred to as Solo Safe. Disk Recorder Solo The disk recorder solo system allows an selection of track to be soloed. For details of the disk recorder solo and mute functions, see “Solo and Mute” on page 19-2. SOLO 7-1 NOTES: 7-2 C h a p ter 7 - Fad er s INTRODUCTION DREAM Console has one touch sensitive motorised Master Fader, which can be used to control the level of an individual feed, a bus, or a group of feeds. The fader section includes MUTE and SOLO buttons for eliminating and isolating a feed from the mix. In addition, the fader section includes a Master key to call the Main bus to the fader for level control, a Fold key for gaining access to the individual elements of a bus or link group, and the AUTO key for arming automation record. Faders To... Mute Key Solo / Safe Key Call Key Figure 1: Master Fader and Associated Keys OPERATION Calling a Signal Path to the Master Fader To assign the Master Fader to control a particular signal path, the signal path is called to the fader. Press the CALL key then press a feed selection key to call an individual feed or a pre-defined group of feeds, or press the Main bus key, or a Sub or INTRODUCTION 7-3 Aux bus key, a Return Group or a Multitrack Bus. Calling any member of a Link Group will call the entire group to the Master Fader. To call a Fader Group, hold down the Fader Group key and press a Fader Set selection key. Group operation is described in detail in “Grouping” on page 11-2. Step 1 Press the Call key. Step 2 Press a feed selection key, or the Main bus, or Sub, or Aux bus, a Return Group or a Multitrack Bus selection keys. The fader now controls the level of the selected signal path and the path is displayed at the bottom of the mixer display. Fader Follows Selection The fader selection can automatically follow the most recent signal path selection for context sensitive level control. Press the CALL key and press the Follow soft key to select the follow mode. Follow can be set to one of the following states: Follow Edit The Master Fader controls the most recently selected signal path in edit mode. Follow Mix The Master Fader controls the most recently selected signal path in mix mode. Follow All The Master Fader controls the most recently selected signal path in either mix or edit mode. Follow Off The CALL button must be pressed to assign the Master Fader to a signal path. The Master Fader does not follow any other selections. Call by Solo The Master Fader controls the most recently soloed signal path in mix mode. This refers only to mixer solo, engaged by pressing the SOLO key next to a fader. The Master Key The Master Key allows the Main Bus level control to quickly be called to the Master Fader and Channel Panel. Press the Master key again to return to the previous selection. Solo The DREAM Console offers two solo systems, disk recorder solo and the mixer solo. Mixer Solo Individual feeds may be soloed in the monitoring system. There are three solo modes which may be entered by pressing the SOLO key next to any fader. These are solo-in place or SIP, after-fader-listen or AFL, and pre-fader-listen or PFL. SIP mutes or reduces the level of all un-soloed feeds, leaving the soloed feeds feeding the bus being monitored, at the normal level set by their faders. SIP supports monitoring in any format, determined by the current monitor source. AFL and PFL modes replace the current monitor source with the stereo solo bus whenever a feed is soloed. All soloed feeds are routed to the solo bus. Soloed link groups are automatically upmixed or downmixed to allow all their members to FADERS 7-4 monitored in the stereo monitor bus, normal monitor upmixing or downmixing occurs between the monitor bus and the selected speaker set. The AFL solo signal is derived after the feed fader and mute. PFL solo is derived before the feed fader and mute. To set the solo mode: Step 1 Hold down a BLUE key and press the Utils key to enter the Utils menu. Step 2 Press the Solo soft key to select the solo mode to be used. Soloed feeds are shown with a green indicator on the mixer video display. Solo Clear The Solo Clear button clears all currently soloed paths. Solo Contrast When a feed is soloed in SIP mode all other feeds are reduced in level by the amount set in the Utils menu. To adjust the solo contrast: Step 1 Hold down the BLUE key and press the Utils key. Step 2 Press the Solo soft key and turn the jog wheel to set the gain reduction level. The range is 0 to -100dB, -100dB is off. SIP Defeat Press the SIP Defeat key in the Path Configuration section of the Channel Panel to prevent the selected feed from being muted when other feeds are put into SIP. Alternatively, hold down a BLUE key and press the MUTE key above any fader to toggle SIP Defeat for that channel. This feature is useful for keeping reverb returns live when channels feeding them are soloed. SIP Defeat feeds are shown with a grey solo indicator on the mixer video display. SIP Defeat is sometimes referred to as Solo Safe. Call Follows Solo The current feed called to the Channel Panel and Master Fader can follow the currently soloed feed. Call follows solo is enabled in the Call menu: Step 1 Press the Call key to display the Call menu. Step 2 Press the Call by Solo soft key to toggle call follows solos on or off. Disk Recorder Solo To solo a random selection of tracks use the Solo key located in the upper set of function keys. This function is not included in mix automation. Indicators next to the track numbers on the track display show red for soloed tracks and blue for muted tracks. Step 1 Press the Solo key located in the upper set of function keys. Step 2 Select the feeds that are to be soloed by pressing the feed selection keys to toggle feeds in and out of the selection. The currently soloed feeds are illuminated. OPERATION 7-5 Press the Solo key again to return to the previous mode. While any signal path is soloed, the Solo key flashes. Step 3 An alternative way of using the Solo key is to hold it down, make a selection of signal paths, then release it. This causes immediate return to the previous operation mode. Solo Menu The disk recorder solo functions are available from the Solo key at the top of the console. While the Solo key is held down, or while its menu is active, the soft key menu offers a number of additional functions: Solo On/Off Pressing the Solo ON/OFF soft key toggles the currently selected group of signals in and out of solo. Solo Follow The follow soft key causes the solo selection to be the same as the current edit selection of tracks. As tracks are selected for editing they are automatically soloed. Mute Mute has the same effect on an individual signal path as pulling the fader right down to the bottom of its travel. A single feed, sub-bus, fader or link group can be muted using the MUTE key in the Master Fader section, or above any fader. This mute function can be automated along with other parameters. Muted feeds are shown with a red indicator on the mixer video display. Disk Recorder Track Mute To mute a random selection of tracks use the track Mute key located in the upper set of function keys. This function is not included in mix automation. Indicators next to the track numbers on the track display show blue for soloed muted tracks. Step 1 Press the track Mute key located in the upper set of function keys. Step 2 Select the tracks that are to be muted by pressing the track selection keys to toggle feeds in and out of the selection. The currently muted feeds are illuminated. Step 3 Press the Mute key again to return to the previous mode. While any signal path is muted, the Mute key flashes. An alternative way of using the Mute key is to hold it down, make a selection of signal paths, then release it. This causes immediate return to the previous operation mode. FADERS 7-6 The disk recorder mute functions are available from the Mute key at the top of the console. The While the Mute key is held down, or while its menu is active, the soft key menu offers a number of additional functions: Mute On/ Off The On/Off soft key toggles the entire set of muted channels on and off. The Fold Key DREAM software release 1.2 does not support Fold. This information is included for future reference. The Fold Key can be used whenever a group of signal paths has been selected to the Central Fader. This could be a Link Group, a Fader Group, a Bus Master or Return Group. Pressing the Fold key causes the members of the Group to be represented by the speaker mute keys. From this position they can be individually called on to the Fader and the Parameter Pad. Pressing the Fold key again causes the speaker mute keys to resume their normal function. For more information on grouping see “Grouping” on page 11-2 Soft Pot The rotary control allows the panning of a signal path to its non-mono destination bus(es). Press the pan function key above the Studio level control to toggle the Soft Pot function between left-right and front-back pan. Automation Mode Selection The AUTO key places the selected signal path in automation record. Fader Displays The status of the signal path associated with each fader is indicated with illuminated tally displays. TOUCH The fader is has been touched. LATCH Touch is active and in Latch mode. Once a control is touched it will continue to write data after it is released. SAFE The selected signal path is in safe mode and will not update automation data. READ The selected signal path is in read mode and playing back automation data in mix mode. WRITE The selected signal path is armed to write automation data, the console is in write mode and recording automation. The WRITE indicator flashes while in write mode but not recording. OPERATION 7-7 TRIM The selected signal path is set to trim automation data, the console is in trim mode and recording automation. The TRIM indicator flashes while in trim mode but not recording. INPUT The fader controls the input level to a disk recorder track. BUS The fader controls a bus level. LINK The fader is a member of a link group. Signal LED Signal present LEDs are not supported in DREAM software release 1.2. The Signal LED monitors the channel audio level. For Live Feeds the level is taken before the channel processing. For Track Feeds, it depends whether or not the track is armed for recording. If it is not, the level is taken directly at the point of playback from the disk, prior to the channel processing. If it is armed, the level is taken at the end of the input path, just prior to recording to disk. If the signal path is a bus, the level is taken after the insert point (if any) and the Bus Master fader, just prior to output. The signal indicator shows green when there is signal present below the standard operating level of the system. At and above the operating level, the LED shows orange. At full digital level the LED shows red. USING GROUPS Fader Groups provide an efficient means of controlling more than one signal from a single fader. The inherent bus structure associated with multiformat work is handled seamlessly through the use of Link Groups. These aspects of the DREAM system are discussed fully in “Grouping” on page 11-2. NAMING FEEDS AND BUSES Feeds and buses can be named from the Call menu. Step 1 Press the Call key to access the Call menu. Step 2 Press a track, live or bus selection key to call a path to the master fader. Step 3 Press the name soft key and type a name on the PC keyboard. Step 4 Press Enter to store the name. The name will now appear on the fader LCD and on the mixer display. Press the Tab key to enter the name and step to the next feed. Hold the Shift key and press Tab to move to the previous feed. FADERS 7-8 CONTROLLING THE SIGNAL PATH Channel Panel Once a feed or bus has been called to the Master Fader, all the elements of the signal path may be controlled from the dedicated controls on the Channel Panel. See “The Channel Panel” on page 8-2 for complete details on using the EQ, Pan, Dynamics and Auxiliary sends. Input Gain and Phase Input gain and phase controls are accessed from the Patch I/O menu. Step 1 First enter the Patch I/O Menu by pressing the Patch I/O key. Step 2 Select the feed or feeds whose inputs you wish to adjust. Step 3 Press the Gain soft key. Step 4 Use the Jog wheel to adjust the value or use the numeric keys and press Enter to complete. To set input phase: Step 1 First enter the Patch I/O Menu by pressing the Patch I/O key. Step 2 Select the feed or feeds whose inputs you wish to adjust. Step 3 Press the Phase soft key to toggle the phase of the selected inputs. See “Input Gain and Phase” on page 5-6 for more details. Inserts Inserts are controlled from the Insert Config menu. Step 1 Enter the Insert Menu by pressing the Insert Config key on the Path Configuration section of the Channel Panel. Step 2 Press the Send/Return soft key to select patching for outputs or inputs. Step 3 Select the feed or bus to be inserted. Step 4 Press the Patch soft key to select physical inputs or outputs for the insert send and return. Step 5 Press the ANALOG/DIGITAL and AES/MADI soft keys to choose the desired type of input or output. Step 6 Press a track feed selection key to select a physical input or output. Press the ON/OFF soft key to switch the insert in or out of circuit. Direct Outs Step 1 Press the Direct Config key on the Path Configuration section of the Channel Panel to enter the Direct Outputs menu. Step 2 Select a feed or bus. Step 3 Press the Patch soft key to select a physical output for the direct out. CONTROLLING THE SIGNAL PATH 7-9 Step 4 Use the ANALOG/DIGITAL and AES/MADI soft keys to choose the desired type of output. Step 5 The track feed keys may now be used to select outputs for the Direct Out. Press the Direct ON/OFF soft key is used to turn the direct output on and off. Press the Pre/Post soft key to derive the direct output from before or after the feed or bus fader. Press the Gain soft key and turn the jog wheel or use the numeric keys to enter a gain value for the direct output. Press Enter to complete the operation. FADERS TO... The Faders To... menu allows the channel faders to be assigned to one of a number of feed parameters. Press the Faders To... key to toggle the fader between its normal function and the function selected in the BLUE Faders To... setup menu. The faders will snap to the level of the selected parameter on each channel. All other controls on the Channel Panel continue to function normally. To select the Faders To... function follow these steps: Step 1 Hold down the Blue key and press the Faders To... key to display the Faders To... menu. Step 2 Press one of the menu soft keys to select one of the following functions: Input - allows the faders to control the signal level prior to the disk recorder in a track feed. Direct Output - the faders control the direct out level of each feed. Boom Level - the fader controls the Boom level for each feed. OR Select an Aux bus to control the feed send level to the selected bus. Select a Sub-Bus that has been set up for bus reduction to control the independent feed fader for that bus. See “Bus Reduction” on page 5-19 for details on bus reduction. Step 3 Press the Auto Monitor soft key when a bus is selected to automatically switch that bus in to the monitoring chain whenever the Faders To... key is pressed. Faders to Aux While BLUE Faders To... is active, any of the Aux bus selection keys may be selected and the Aux key will be illuminated. All channel faders now control the level at which their signal path is sent to the selected Auxiliary bus (Bus Master faders are excluded). FADERS 7-10 The MUTE key now controls the aux send ON/OFF control. If the selected Aux bus is wider than mono, the soft pot allows the panning of the aux send to left and right bus elements. The mute, pan and fader controls may be automated and will record data for the aux bus send level, pan and ON/OFF parameters. Use the enable keys next to the Master fader to enable these parameters for automation. Use the enable keys next to the Master fader to enable these parameters for automation. Fader To Input While BLUE Faders To... is active, the Input soft key may be chosen. All track feed faders now control the level prior to the disk recorder. This can be used to control the level going to disk during recording. Note that live feed faders are inactive when Faders To Input is selected. The fader control can not be automated. Faders to Direct Output While BLUE Faders To... is active, the Direct Output soft key may be chosen. All channel faders now control the direct out level. The Mute key toggles the direct output ON and OFF. The fader control may be automated and will record data for the direct out level parameter. Use the enable key next to the Master fader to enable this parameter for automation. Fader To Boom While BLUE Faders To... is active, the Boom soft key may be chosen. All channel faders now control the boom level. The Mute key toggles the boom ON and OFF. The fader control may be automated and will record data for the boom level parameter. Use the enable key next to the Master fader to enable this parameter for automation. CHANNEL FADERS The DREAM Console may be loaded with up to 48 channel faders. Each fader may control a live or track feed, a bus, a return group master, a link group master, or a fader group. The signal path associated with each fader is determined by the current fader set. The name of the signal path is displayed in the LCD window above each fader. The default fader sets display feeds and buses in ascending numerical order from left to right. See “Fader Sets” on page 7-11 below for more information on using fader sets. The Call Key Press the CALL key on any fader to call the signal path assigned to that fader to the Channel Panel. CHANNEL FADERS 7-11 FADER SETS Channel Faders are assigned to signal paths using the Map key in the Fader Set Section. Figure 2: Fader Set Keys Fader sets define the function of each channel fader on the console. Fader sets are stored along with the preset snapshot in each project. In addition, separate fader set setups are stored in each automated mix that is saved. There are 10 fader sets available at any time. Press any fader set key to instantly recall that fader configuration. Mapping Fader Sets Step 1 Press the Map key in the Fader Set section. Step 2 Press a fader set number key to select the fader set to map. Step 3 The CALL key on the first fader will flash to indicate that it is ready to be defined. Selection keys on the selection panel for signal paths already in the current fader set are illuminated. The selection key of the path currently assigned to the current fader will flash. Press any feed, bus or group selection key on the selection panel to assign that path the current fader. Step 4 The next fader is automatically selected and the path assigned to it flashes. Continue to assign faders in order or select a fader out of sequence by pressing its CALL key and making a selection on the selection panel. Step 5 Press the Map key to complete mapping or select another fader set to map. Mapping Multiple Faders A range of feeds may be mapped to a range of faders. Step 1 Press the Map key. Step 2 Press the CALL key of the first fader in the range. Step 3 Hold down the first selection key in the range and double press the last selection key. The paths selected will replace the paths previously assigned to the sequence of faders starting with the fader selected. FADERS 7-12 Mapping Link Groups If a member of a link group is selected to map to a fader, only the link group master is assigned. If a link group is included in a range, the group takes up only one fader. Inserting and Deleting Faders When the Map key is pressed the map menu is displayed in the LCD. Press the Insert key to insert a path at the current fader position. Press the Delete key to delete the current path from the fader set. Press the Blank key to leave the current fader un-mapped. Holding Faders To temporarily retain a selection of channels in their current fader positions when recalling a new fader set, simply touch and hold the faders while pressing a fader set key. The existing channels will temporarily replace those in the new fader set. Press the fader set key without holding a fader, to resume the normal fader set. FADER SETS 8-1 NOTES: 8-2 Chapter 8 - The Channel Panel INTRODUCTION The Channel Panel provides all the detailed processing control needed for one signal path. Signal paths are called to the Channel Panel and the Master Fader one at a time to have their parameters adjusted. Multi Trim allows multiple paths to be controlled at once see “Link Groups” on page 11-2 for more details. Link groups and fader groups allow groups of faders to be adjusted from a single control, see “Grouping” on page 11-2 for more details. CALLING A SIGNAL PATH The Call key may be used at any time to select any signal path to the Master Fader: Step1 Pressing and releasing Call causes the function to latch on. In this mode, the Feed or Bus key representing the signal path currently on the Master Fader is illuminated. Step 2 Pressing any other selection key brings that signal path to the Master Fader, whereupon its key is illuminated fully and all other selection keys are extinguished. Only one signal path may be selected at a time in Call mode, however this may include multichannel link groups or buses. Step 3 Pressing the Call key again exits Call mode, and returns the system to the previous mode of operation. The selection of elements that existed in that previous mode is restored, with the signal path selected in Call mode remaining on the Master Fader. The Call key may also be pressed and held while calling a signal path to the Master Fader. In this case, releasing the Call key returns the system to its previous mode and selection immediately. Pressing the Call key on any fader on a fader panel will call that signal path to the Master Fader and Channel Panel. Call Follow Call Follow enables the current edit or mix selection always be called to the Master Fader. This provides context sensitive control for fast, intuitive mixing control. The last signal path selected will be the current Master Fader selection. Press the Call key to access the Call Follow menu. Call Follow has four options: Edit When in Edit mode any path selected is called to the Master Fader. Mix When in Mix mode any path selected is called to the Master Fader. All Any selection in Mix or Edit mode is called to the Master Fader. INTRODUCTION 8-3 Off The Call key must be pressed before selecting a signal path for control by the Master Fader and Channel Panel. Solo Call by Solo: Pressing the Solo key next to a Sidecar fader calls the path to the Parameter Pad CHANNEL PANEL GENERAL OPERATION The Channel Panel consists of five sets of dedicated user controls. When using the Channel Panel a signal path is called from the selection panels or by pressing the Call key on an individual fader. The Channel Panel controls are: Equalisers 4 band parametric / shelving / notching equalisers plus 2 bands of switchable hi / lo-pass filters and shelving EQs. Panning Complete surround panning including diverge, rotate and spread. Dynamics Compressor plus limiter or expander or gate. Auxiliary Sends Four aux sends with discrete sets of controls, plus two controls shared by eight sends. Path Configuration Overview of complete signal path with dedicated controls for gain, delay and phase, plus configuration keys for inserts, direct outs, patching and routing. The Master Fader The Master Fader provides level control to whichever signal path has been called to the Channel Panel. The Fold Key DREAM Software release 1.2 does not support folding and unfolding. This information is included for future reference. The Fold Key can be used whenever a group of signal paths has been selected to the Central Fader. This could be a Link Group, a Fader Group, or a Bus Master. Pressing the Fold key causes all the members of the group to be arrayed across the speaker mute keys. From this position they can be called on to the Fader and the Parameter Pad. Pressing the Fold key again causes the group members to disappear from the speaker mute keys, restoring the normal layout of the console. EQUALISER The equaliser provides four bands of parametric EQ and two filters. Each parametric section can be switched to band-pass/reject, shelving or notch. Each parametric section can be switched to one of four ranges: LF - 10-250Hz; LMF - 50Hz1k50Hz; HMF - 450-8k00Hz; HF 1k40-22k0Hz. Each parametric section pro- THE CHANNEL PANEL 8-4 vides +/-18dB of gain. Q has a range of 0.3 to 10. When notch is selected the filter has a gain of 0 to -99dB Each filter can be switched to hi-pass, lo-pass, hi-shelving, or lo-shelving. Hi-pass and Lo-pass filters have selectable slope settings of -6dB, -12dB, -18dB, or -24dB/ octave. Shelving filter gain is +/-18dB. The equaliser can be bypassed and also provides a gain makeup control with a range of +/-18dB. Figure 1: DREAM Equaliser Using the Equaliser The equaliser controls are organised into six equaliser sections plus the lower section containing gain make-up and EQ Setup and EQ bypass controls. As the EQ parameters are modified their values are displayed in the fat channel display at the bottom of the mixer video display. Starting with the lower section, the Level control provides gain make-up with a range of +/-16dB. The Level control can be included in the current automation parameter selection by pressing the blue enable key. The EQ Setup key is used to toggle the function of the key in each section between Shape, Range and Bypass. Press the key once and shape displays will flash allowing selection of the shape of each filter by using the IN key on each section. Press the EQ EQUALISER 8-5 Setup key again and the band displays on each section flash. Press the EQ Setup key again and the IN keys on each section adopt their normal bypass function. The EQ IN/OUT bypass key bypasses the entire equaliser on the selected signal path when not illuminated. Filter Sections Sections 1 and 6 control hi or lo-pass or shelving filters. Press the EQ Setup key once to select control over the filter shape. Press the IN key on each section to step through the available filter shapes: shelving, hi-pass, or lo-pass. The Gain/Slope control controls the gain of shelving filters with a range of +/-18dB, or the slope of hi or lo-pass filters with settings of -6dB, -12dB, -18dB, or -24dB/ octave. The actual gain and slope values are displayed on the fat channel at the bottom of the mixer video display. The Freq control of the filters provides the following ranges of control: hi-pass: 20Hz - 1.50kHz lo-shelf: 10Hz - 1.50kHz lo-pass: 3kHz - 18kHz hi-shelf: 8kHz - 22kHz The blue enable key at the left of the filter sections add all the controls in the section to the current automation parameter selection. Parametric Sections Sections 2 to 5 control parametric equalisers. Press the EQ Setup key once to select control over the filter shape. Press the IN key on each section to step through the available filter shapes: lo-shelf, notch, band-pass or hi-shelf. Press the EQ Setup key again to select control over the frequency range. Press the IN key on each section to step through the available ranges: LF - 10-250Hz; LMF - 50Hz-1k50Hz; HMF 450-8k00Hz; HF 1k40-22k0Hz. The Gain control controls filter gain with a range of +/-18dB for band-pass or 0 to -99dB for notch. The Frequency control controls the centre or cut-off frequency of the filter in the ranges described above. The Q control controls the Q of band-pass/reject filters with a range of 0.3 to 10. The blue enable key at the left of the EQ sections add all the controls in the section to the current automation parameter selection. EQ Flat To quickly set an individual band to flat, hold down a blue key and press the band IN key to set the gain to 0dB. To flatten the entire EQ section, hold down a BLUE key and press the EQ Setup key. This will set the entire EQ section to a default flat set-up with low shelf, low mid and high mid parametric, and high shelf filters. THE CHANNEL PANEL 8-6 THE SURROUND PANNER The Channel Panel provides controls for a comprehensive surround panning system. The panner automatically configures itself for control of signals within all the supported surround formats. In addition to simple two-dimensional panning of a mono signal, the surround panner provides advanced control of multichannel signal paths in contained in link groups. Figure 2: DREAM Panner The supported surround formats are: Stereo; LCRS; LCRSS; 5.1; 6.1; and 7.1. For mono signal paths the pan control is a simple panner, moving the signal left to right, and front to back around the surround field with the addition of divergence control to increase the size of the sound field. For link groups, the pan control pans all members of the link group at once, and adds spread and rotate functions which can imitate the effect of a camera pan with the entire surround sound field or collapse the entire sound field into a single point. Link groups can be created with default pan settings for each member, see “Link Group Format” on page 11-2. The surround panner provides automated control of a level control matrix between the feeds and the individual bus elements of the buses to which the feed is currently assigned. THE SURROUND PANNER 8-7 Using the Panner Step 1 Call a signal path to the Channel Panel by pressing the CALL button then pressing a feed selection key or pressing the Call button on any fader. Or, use Call Follow as described in “Call Follow” on page 8-2 above. The signal path must be assigned to a bus for the panner to have any effect. Step 2 Adjust the controls to achieve the desired result. The parameter values are displayed in the fat channel section at the bottom of the mixer video display. See the details of each control below. Joystick The joystick provides control over the perceived source location of the signal within the surround sound field by applying proportional intensity panning. Moving the joystick from left to right moves the signal from left to right across the speaker system. Moving the joystick front to back only has effect in formats that have surround channels. When a link group is created the master pan control for the group defaults to a centre position and applies offsets to the pan positions of the individual members. The blue enable key adds the joystick to the current automation parameter selection. Trackball The trackball can also be used for two dimensional panning. Press and hold the Pan key below the trackball and move the ball to control the front/back position of the signal. Panning IN/OUT The Pan IN/OUT key bypasses the level control matrix of the panner and sends the signal path at unity gain to all destination bus elements. The connection to individual bus elements may be turned on and off using stem assignment as described in “Stem Assign” on page 5-18. If the signal being panned is a Link Group, all members of the group are sent to all bus elements. Diverge Control The diverge control spreads the signal of an individual feed across more of the adjacent loudspeakers making the perceived size of the sound source larger. The diverge control operates in one-dimensional or two-dimensional mode. To switch between modes hold down the BLUE key and press the Panning IN key. The fat channel pan display changes from a bar to a circle when divergence is added. The boom or LFE channel is not included in diverge. One-dimensional Diverge One-dimensional mode is useful for spreading a mono source across left, right and centre speakers in a 5.1 bus for example, without allowing the signal to move into the surround loudspeakers. The divergence control range is 0 to 100%. At 0% the panner behaves as if the signal were a single point source. When the signal is panned to front-centre, at 70% divergence the signal is sent at equal level to left, centre and THE CHANNEL PANEL 8-8 right loudspeakers. The divergence control approximates an equal loudness contour as it adds signal to more loudspeakers. As the control moves beyond 70%, signal is removed from the centre loudspeaker or the loudspeaker closest to the pan target, and progressively added to the other loudspeakers. At 100% divergence there is no signal in the centre loudspeaker and the signal is distributed equally to left and right loudspeakers. Two-dimensional Diverge Two dimensional mode is useful for quickly spreading a signal to all loudspeakers or for contracting an effect from all loudspeakers down to a single speaker. Two-dimensional diverge includes front and surround loudspeakers. As the divergence is increased towards 70% the signal is distributed to all loudspeakers. Beyond 70% the signal is removed from the loudspeaker closest to the pan target. For Link Groups, divergence is applied to all members individually. When a link group is created with default pans, divergence is set to minimum. The Spread Control The spread control is only available when a link group is selected. The spread control adjusts the perceived size of a surround mix. The spread control range is from 0 to 100%. At 0 the display reads POINT, meaning point source. At 100 the display reads FULL, meaning full surround. At FULL spread the LR and FB pan controls have no effect as each member of the link group is hard panned to their respective bus elements. As the spread is reduced, the panning of each link group member is made to converge with the location of the link group master pan control. With the spread control less than full, the pan control enables the sound field to be moved to favour the location of the pan target. As the spread control approaches POINT, the panning of each member becomes closer to the pan location of the link group master. This has the effect of mixing the signals of each link group member so that they all emerge from the same loudspeakers as determined by the link group master pan. When a link group is created with default pans, spread is set to maximum, divergence is set to minimum and rotation is set to zero. The spread control can be used to great effect when it is desired to collapse the surround sound field to a point source. This may occur for instance, where the camera moves continuously from an interior shot to an exterior or visa versa. The surround field can be established for the interior and then as the camera moves through the door or window, the surround field collapses and pans and fades down to the location of the window. As this is occurring a pre-mixed surround field for the exterior can be growing from the rear speakers and spread out to the entire speaker system as the exterior shot is established. THE SURROUND PANNER 8-9 Rotate Control Rotate controls the left/right and front/back pan controls to rotate a single feed around the centre of the room. Adjust the front/back pan to reduce the radius of rotation. Use rotate on a link group to rotate a pre-mixed surround sound field with respect to the listener’s position. This effect is the audible equivalent of panning a camera, where all the elements in the visual field are subject to the same angular movement. The rotate control range is from -180 to +180 degrees. When rotation is applied, the panning of each link group member is offset in the direction of the rotation. Rotate can be used in conjunction with spread and link group pan to create more or less audible panning effects for the entire surround soundfield. When a link group is created with default pans, spread is set to maximum, divergence is set to minimum and rotation is set to zero. Hold down the Pan key below the trackball and turn the jog wheel to achieve continuous rotation. Pan, Diverge, Spread, Rotate Automation Enable The blue enable key adds this group of controls to the current automation parameter selection. Boom The Boom control is available when the selected signal path is feeding a bus whose surround format includes a sub-bass or low frequency effects channel. These include the following formats: 5.1; 6.1; and 7.1. The boom level is independent of the panner position. The boom element of a link group is only ever assigned to the boom element of the bus to which the link group is assigned. Boom ON/OFF The signal sent to the boom element of a bus may be switched on or off. This process is similar to stem assignment see “Stem Assign” on page 5-18. Press the Boom ON/OFF soft key in the Parameter Pad to turn the signal to the boom element on or off. This control will effect every member of a link group if a link group is selected. Boom Level The Boom Level control adjusts the amount of signal sent to the boom element of the bus to which a feed or link group is assigned. The boom level control range is OFF to +10dB. This level control may be pre or post the feed fader. Boom Pre/Post The BOOM Pre/Post soft key determines whether the boom signal is derived before or after the feed fader. This allows the boom level to be controlled by a combination of the feed fader level and the Boom Level control, or in pre-fader mode, just the Boom Level control. THE CHANNEL PANEL 8-10 DYNAMICS The DREAM Dynamics comprises two sections, the first of which is a compressor, the second of which can be switched between the functions of a limiter, an expander or a gate. The dynamics transfer function and parameter values are displayed in the fat channel at the bottom of the mixer video display. Figure 3: DREAM Dynamics Compressor Parameters Gain Makeup The Gain control adjusts the gain makeup. This gain element is used to compensate for the overall gain reduction caused by reducing the dynamic range of the signal. Delay The Delay control adjusts a look ahead delay for the sidechain which applies delay to the entire signal path. This feature is not yet implemented. Gain Reduction Meter The Gain Reduction Meter displays the amount of gain reduction being applied by the compressor. Compression Threshold The Thresh control adjusts the compressor threshold. This sets the signal level above which gain reduction occurs. The control range is -50 to 0dB. DYNAMICS 8-11 Compression Ratio The Ratio control adjusts the compression ratio. This sets the gain reduction ratio (input to output) applied to signals which rise above the threshold level. The control range is 1.0:1 to 10:1. Compressor Attack Time The Attack control adjusts the attack rate time constant of the sidechain detector. The control range is 0 to 100mS. Compressor Release Time Press the Hold key to toggle the Release control between Hold and Release. The Release control adjusts the release time constant of the sidechain detector. The control range is 0.03 to 4.03mS. Compressor Hold Time Press the Hold key to toggle the Release control between Hold and Release. Hold time controls the delay between applying gain reduction and commencing release of gain reduction. Compressor Automation Enable The blue enable key adds the compressor controls to the current automation parameter selection. Compressor IN/OUT The Compressor IN/OUT key bypasses the compressor section. Limiter Parameters Press the TYPE Lim/Exp/Gate key to select the Limiter controls. Limiter Threshold The Thresh control adjusts the limiter threshold. This sets the maximum output level of the limiter section. Control range is from -50 to 0dB. Limiter Attack Time The Attack control adjusts the attack rate time constant of the sidechain detector. The control range is 0 to 100mS. Limiter Release Time Press the Hold key to toggle the Release control between Hold and Release. The Release control adjusts the release time constant of the sidechain detector. The control range is 0.03 to 4.03mS. Limiter Hold Time Press the Hold key to toggle the Release control between Hold and Release. Hold time controls the delay between applying gain reduction and commencing release of gain reduction. Limiter IN/OUT The Lim/EXP IN/OUT key bypasses the limiter section. THE CHANNEL PANEL 8-12 Expander Parameters Expander Threshold The Thrsh controls adjusts the expander threshold. The expander threshold sets the signal level below which gain reduction occurs. The control range is from -50 to 0 dB. Expander Ratio The Ratio control adjusts expander ratio. This sets the gain reduction ratio (input to output) applied to signals which fall below the threshold level. The control range is 1.0:1 to 10:1. Expander Depth Press the Depth key to toggle the Ratio control between Ratio and Depth. Expander depth sets the maximum amount of gain reduction that will be applied when the signal falls below the expander threshold. When the signal falls below the level determined by the expander threshold minus the expander depth, no gain reduction is applied. The control range is from 0 to 60.2dB. Expander Attack Time The Attack control adjusts the attack rate time constant of the sidechain detector. The control range is 0 to 100mS. Expander Release Time Press the Hold key to toggle the Release control between Hold and Release. The Release control adjusts the release time constant of the sidechain detector. The control range is 0.03 to 4.03mS. Expander Hold Time Press the Hold key to toggle the Release control between Hold and Release. Hold time controls the delay between applying gain reduction and commencing release of gain reduction. Gate Parameters Gate Threshold The Thresh control sets the signal level below which gain reduction occurs. The control range is from -50 to 0dB. Gate Hysteresis Press the Hyst key to select gate hysteresis for the Thresh control. The gate hysteresis, sets the difference between the level which must be exceeded to open the gate, and the level below which the signal must fall to close the gate. The control range is 0 to 12.5dB. Gate Depth Press the Depth key to select gate depth for the Ration control. This sets the maximum amount of gain reduction that will be applied when the signal falls below the gate threshold. When the signal falls below the level determined by the gate threshold minus the gate range, no gain reduction is applied. The control range is from 0 to 60.2dB. DYNAMICS 8-13 Gate Attack Time The Attack control adjusts the attack rate time constant of the sidechain detector. The control range is 0 to 100mS. Gate Release Time Press the Hold key to toggle the Release control between Hold and Release. The Release control adjusts the release time constant of the sidechain detector. The control range is 0.03 to 4.03mS. Gate Hold Time Press the Hold key to toggle the Release control between Hold and Release. Hold time controls the delay between applying gain reduction and commencing release of gain reduction. Limiter/Expander/Gate Automation Enable Press the blue enable key to add the limiter, expander and gate controls to the current automation parameter selection. THE CHANNEL PANEL 8-14 AUXILIARY SENDS Each feed in the DREAM Console includes twelve auxiliary bus sends. The auxiliary send signals are derived immediately before or after the feed fader. Each auxiliary bus may be configured in any of the supported surround formats. Press the Bus Format key and an Aux bus selection key to set an auxiliary bus format. See “The Bus Format Menu” on page 5-16 for more details. To control the auxiliary bus master level, CALL the bus to the Master Fader by selecting it from the bus selection keys. Figure 4: DREAM Auxiliary Sends Auxiliary Send Controls The first four auxiliary sends have discrete controls while the last eight share two sets of controls. Each auxiliary send has the following controls: Level The level control adjusts the amount of signal sent from the selected feed to the auxiliary bus. The control range is OFF to +10dB. Send ON/OFF The send IN/OUT key toggles the feed to auxiliary bus assignment on or off. This control has the same effect as bus assignment via the bus assign menu. Pan If the selected bus is configured with a multichannel format, the pan control adjusts the amount of signal sent to each element of the auxiliary bus. If the bus is mono AUXILIARY SENDS 8-15 the pan control has no effect. Press the knob briefly to switch between Left/Right or Front/Back pan control. Press the Pan key to turn the pan control on or off. When the pan control is off the auxiliary send signal is sent to all auxiliary bus elements at equal level. Use Stem Assign to turn assignment to individual bus elements on or off see “Stem Assign” on page 5-18 for more details. Pre/Post Press the Pre/Post key to derive the auxiliary bus send level from before or after the feed fader. Setting Aux Pan Post Feed Pan This is done in the Bus Parameters Menu. PATH CONFIGURATION Not all path configuration features are available in DREAM Software release 1.2. The available features are described below. The Path Configuration section of the Channel Panel provides fast access to many patching and configuration functions for the selected signal path. Signal paths called to the Channel Panel may be mono feeds or link groups or buses with a number of bus elements. Path configuration operations may vary depending on the type of signal path being modified. Changes made in the Path Configuration Section are displayed in the fat channel display at the bottom of the mixer video display. Figure 5: DREAM Path Configuration Level Meter The level meter at the left of the Path Configuration displays the signal level immediately prior to the fader. The Meter Source key can be used to switch the meter between the group members or bus elements within the signal path. Phase The phase reverse control inverts the signal at the physical input. This is the same parameter that is found in the Patch I/O Inputs menu. Arm Arm is used make a track feed ready to record. The track must have an input patched to it before it can be armed, furthermore, the same input must not be patched to another track that is already armed. If the current signal path is a Link Group made up entirely of Track Feeds, all the members with unique inputs may be armed. THE CHANNEL PANEL 8-16 Insert IN The Insert IN key switches the insert in for the selected signal path. This only works if the signal path has insert send and return ports defined. Each signal path may have inserts, except for Returns and Auxiliary buses. When a signal path which has physical input(s) and output(s) defined for an insert point is called to the Channel Panel, the Insert IN key is dimly illuminated while the Insert is OFF, or brightly lit while ON. Insert Enable Insert Enable is used to add the Insert IN control to the current automation parameter selection. Insert Config Insert Config enters the insert menu. Patching Insert Sends Step 1 Press the Call key to call a feed or bus to the Channel Panel. Step 2 Select the feed or bus to be inserted, or press the feed selection key of any member of a link group to select the group, or retain the existing selection. Step 3 Enter the Insert Menu by pressing the Insert Config key on the Path Configuration section of the Channel Panel. Step 4 Press the Patch soft key in the LCD menu. Step 5 Press the ANALOG/DIGITAL and AES/MADI soft keys to choose the desired type of output. The track feed keys may now be used to select analog outputs for the insert sends and live feed keys to select digital outputs. Outputs of the selected type (Analog/AES/MADI) currently patched to the selected bus element are brightly lit. Outputs of the selected type (Analog/AES/MADI) currently patched to other sources flash off to dim. Outputs of the selected type (Analog/AES/MADI) currently available are dimly lit. Outputs of the selected type (Analog/AES/MADI) that are not fitted are unlit. If the selected path is a bus or a link group the outputs can be selected for one bus or link group element at a time. The Speaker Mute key of the current bus or link group element is illuminated green. Speaker mute keys for bus or link group elements already patched flash off to dim green. Speaker mute keys for bus or link group elements not currently patched are illuminated dim green. PATH CONFIGURATION 8-17 Step 6 Each insert send may be patched to a single output or multiple outputs. Press the SINGLE/MULTI soft key to select single or multi mode. Step 7 In SINGLE mode Press a track key to select the output for the current feed insert send. OR If the selected path is a bus or link group, in SINGLE mode the current bus or link group element is advanced automatically when an output is selected. Press a track key to select the output for the current bus or link group element insert send. The bus or link group elements advance in the following order: Left, Left Centre, Centre, Right, Right Centre, Left Surround, Centre Surround, Right Surround, Boom. Elements that are not in the current bus or group format are not displayed. To skip the current bus or link group element press the Next soft key. To remove patching for the current bus or link group element and leave it with no output, press the Blank soft key. In MULTI mode outputs for the selected feed, bus or link group element may be toggled ON or OFF by pressing the corresponding feed selection keys. If the key is flashing, the system will warn you that the output is used by another signal path. Press a track key to add it to the outputs for the insert send. To advance to the next bus or link group element press the Next soft key or press another speaker mute key to select that bus element out of sequence. To complete patching press the Insert Config key to return to the previous state or select another path to patch by pressing a track or bus selection key. Patching Feed Insert Returns Step 1 Enter Call mode by pressing the Call key. Step 2 Press the feed selection key of the feed you into which you want to patch an insert, or keep the current selection. Step 3 Press the Insert Config key in the Path Configuration section of the Channel Panel. Step 4 Press the Returns soft key on the LCD menu. Step 5 Press the Patch soft key. The Track Feed keys now show the analog physical inputs and the Live Feed keys show the digital physical inputs. Step 6 Press the ANALOG/DIGITAL and AES/MADI soft keys to select the desired input type. Inputs that are available for patching are illuminated dim. Inputs of the selected type already assigned to the Feeds selected are brightly lit. THE CHANNEL PANEL 8-18 Inputs assigned to other feeds or returns flash between off and dim illumination. Inputs that are not installed are not illuminated and cannot be selected. Step 7 Select the input by using the a feed selection keys. If a signal path already has an insert return input, choosing another one will replace it, while choosing the current one will unpatch it. Patching is completed by pressing an edit mode key or other menu key or by pressing Insert Config to return to the previous state. Patching Link Group and Bus Insert Returns Step 1 Press the Call key to call the bus or link group to the Channel Panel. Step 2 Select the bus to be inserted by pressing a bus selection key or press the feed key of any member of a link group to select the group or, retain the existing selection. To select a single member of a link group hold down the BLUE key and press the track key, then follow the procedure above. Step 3 Enter the Insert Menu by pressing the Insert Config key on the Path Configuration section of the Channel Panel. Step 4 Press the Returns soft key in the LCD menu. Step 5 Press the Patch soft key. The Track Feed keys now show the analog physical inputs and the Live Feed keys show the digital physical inputs. Step 6 Press the ANALOG/DIGITAL and AES/MADI soft keys to select the desired input type. Inputs that are available for patching are illuminated dim. Inputs of the selected type already assigned to the bus or feeds selected are brightly lit. Inputs assigned to other feeds or returns flash between off and dim illumination. Inputs that are not installed are not illuminated and cannot be selected. Step 7 Bus elements and link group members are selected with the speaker mute keys. Speaker mute keys corresponding to elements available in the current bus or link group format are illuminated dim green. The current element for patching is illuminated bright green. Elements that are already patched to inputs flash off to dim green. The current bus or group element is advanced automatically when an input is selected. Press a feed selection key to select the input for the current bus or group element. PATH CONFIGURATION 8-19 The bus or group elements advance in the following order: Left, Left Centre, Centre, Right, Right Centre, Left Surround, Centre Surround, Right Surround, Boom. Elements that are not in the current bus or group format are not displayed. To skip the current element press the Next soft key. To remove patching for the current bus element and leave it with no output, press the Blank soft key. Step 8 To patch elements out of order press the speaker mute key of the element you wish to patch. Inserts may be switched in and out of circuit by pressing the ON/OFF soft key. Insert return gain and phase may also be adjusted in the Insert Config menu. Direct IN Direct IN switches on the Direct Output for the signal path. The signal path cannot be a Return Group, and must have physical output defined for this purpose. If the signal path is a Link Group, all the members with outputs defined may have Direct Output switched ON. Any Feed or bus may be sent to a Direct Output. When a Feed which has physical output(s) defined for Direct Output is called to the CAP, the Direct key is dimly illuminated if the Direct Output is OFF and brightly lit if ON. To switch the Direct Output on and off, press the Direct IN key. Direct IN Enable Direct IN Enable is used to add the Direct IN control to the current automation parameter selection. Direct Config The Direct Config key displays the Direct Menu. Patching Direct Outputs Step 1 Press the Call key to call a feed or bus to the Channel Panel. Step 2 Select a feed or link group by pressing a track or live key or select the Main Bus, a Sub-Bus or an Aux Bus by pressing a bus selection key. Step 3 Press the Direct Config Key on the Path Configuration Section of the Channel Panel. Step 4 Press the Patch soft key in the LCD menu. Step 5 Use the ANALOG/DIGITAL and AES/MADI soft keys to choose the desired type of output. The track feed keys may now be used to select analog outputs for the Direct Out and the live feed keys for digital outputs. Outputs of the selected type (Analog/AES/MADI) currently patched to the selected feed or bus element are brightly lit. Outputs of the selected type (Analog/AES/MADI) currently patched to other sources flash off to dim. THE CHANNEL PANEL 8-20 Outputs of the selected type (Analog/AES/MADI) currently available are dimly lit. Outputs of the selected type (Analog/AES/MADI) that are not fitted are unlit. If the selected path is a bus or a link group the outputs can be selected for one bus element at a time. The Speaker Mute key of the current bus element is illuminated green. Speaker mute keys for bus elements already patched flash off to dim green. Speaker mute keys for bus elements not currently patched are illuminated dim green. Step 6 Each direct out may be patched to a single output or multiple physical outputs. Press the SINGLE/MULTI soft key to select single or multi mode. Step 7 In SINGLE mode Press a track key to select the output for the current feed direct out. OR If the selected path is a bus or link group, in SINGLE mode the current bus or link group element is advanced automatically when an output is selected. Press a feed selection key to select the output for the current bus or link group element direct out. The bus or link group elements advance in the following order: Left, Left Centre, Centre, Right, Right Centre, Left Surround, Centre Surround, Right Surround, Boom. Elements that are not in the current bus or group format are not displayed. To skip the current bus or link group element press the Next soft key. To remove patching for the current bus or link group element and leave it with no output, press the Blank soft key. In MULTI mode outputs for the selected feed, bus or link group element may be toggled ON or OFF by pressing the corresponding Track or Live keys. If the key is flashing, the system will warn you that the output is used by another signal path. Press a feed selection key to add it to the outputs for the direct out. To advance to the next bus or link group element press the Next soft key or press another speaker mute key to select that bus element out of sequence. To complete patching press the Direct Config key to return to the previous state or select another bus to patch by pressing a bus selection key. For a signal path with ports established for Direct Output, the Direct ON/OFF soft key can be used to turn the direct output on and off. PATH CONFIGURATION 8-21 Direct Out Pre/Post The direct output signal can be derived before or after the feed/bus fader. Press the Pre/Post soft key to toggle the direct output. Direct Out Gain The direct output signal can have gain or attenuation applied prior to the output. If all the outputs of the selected feeds have the same gain value, that value is shown in the LCD below the Gain soft key as an absolute value (ABS), otherwise this field has the value 0 dB and is displayed as a relative value (REL). ABS represents the absolute value of all Outputs. REL represents a trim or offset applied to all Outputs. SIP Defeat SIP Defeat, otherwise known as Solo Safe, prevents the signal path from being muted when another signal path is put into Solo-in-Place. If multiple signal paths are selected and Multi Trim is ON, the SIP Defeat key will be solidly illuminated if all selected signal paths are SIP Defeated, and OFF if none of them are. If some of them are SIP Defeated the key will flash, then pressing it once will remove SIP Defeat from all selected signal paths, double-pressing it will assert SIP Defeat for all selected signal paths. Input Patch Input Patch provides a fast alternative to the Patch I/O menu for patching the inputs to feeds. Step 1 Press the Call key to enter call mode. Step 2 Press a feed key on the selection panel to call the feed to the Channel Panel. Step 3 Press and hold the Input Patch key on the Path Configuration Section. Press the AES/MADI soft keys to select the desired input type. Inputs of the selected type already assigned to the selected feed are brightly lit. Inputs that are available for patching are illuminated dim. Inputs assigned to other feeds or returns flash between off and dim illumination. Inputs that are not installed are not illuminated and cannot be selected. Step 4 Press a live or track selection key to select a new analog or digitalinput for the path. Bus Routing Bus Routing provides a fast alternative to the Bus Assign menu for assigning feeds and buses to buses. THE CHANNEL PANEL Step 1 Press the Call key to enter call mode. Step 2 Press a feed or sub-bus key on the selection panel to call the path to the Channel Panel. 8-22 Step 3 Press and hold the Bus Routing key on the Path Configuration Section. Buses to which the selected feed is currently assigned are illuminated. Step 4 Press a bus selection key to toggle the assignment of the current path. MULTI TRIM The Multi Trim key allows the controls in the Central Assignment Panel to affect multiple signal paths at the same time. While Multi Trim is active, all controls on the Central Assignment Panel and Master Fader temporarily act as master controls for all signal paths selected on the Selection Panel. For example, you may select Track Feeds 19-23, then increase the Band 1 gain for all of them. The fader and rotary controls offset existing settings, while the switch controls are absolute, i.e. the first press of any switch puts all selected signal paths into one state, while subsequent presses change all of them to the other possible state. See “Multi Trim” on page 11-6 for more details. MULTI TRIM 9-1 NOTES: 9-2 C h a p t e r 9 - R e co rdi n g INTRODUCTION DREAM Console can record up to 48 simultaneous tracks to disk. The following chapter describes how to configure and then record audio into the system. Project Menu Key Setup Menu Key Digi Menu Key Figure 1: Digi and Proj Menu Keys PROJECT SET UP Step 1 Start a new Project by selecting the Proj key and then the NEW soft key. Step 2 Use the keyboard to type a name for the Project and press Enter. Project Sample Rate The sample rate for a Project is fixed after the first recording is made. It is therefore very important to check this before recording. Step 1 Hold down the BLUE key and press the Digi key. Step 2 Press the RATE soft key. Step 3 Turn the jogger wheel to select the desired sample rate. Step 4 Press Enter. Recording Bit Depth The bit depth for each recording is selected using the following steps. Unlike the Project rate, the bit depth can be changed every time a recording is made into a INTRODUCTION 9-3 Project. DREAM projects can support multiple bit depths. The available bit depth rates are 16, 20 and 24. Step 1 Press the ARM key. Step 2 Press the DEPTH soft key to toggle through the 16, 20 and 24 bit options. Selecting A Sync Source The DREAM Console’s sample rate clock can be referenced to one of several sync sources. The current sync source is displayed at the top right of the track menu. The sync indicator turns red if no sync is present. To select the sync source: Step 1 Hold down the BLUE key and press Digi. Step 2 Press the SYNC soft key. Step 3 Use the jogger wheel to select the desired sync source. Step 4 Press Enter, or, if INPUT is selected press a specific track key to select the input. The sync sources are as follows: INT Internal sync uses internal crystals to generate the clocks. AES The sync is taken from the AES sync input on the back of the QDC Engine. WCLK The sync is taken from the WORD CLOCK input on the back of the QDC Engine. VIDEO The sync is taken from the VIDEO input on the back of the QDC Engine. INPUT The sync is taken from a DIGITAL INPUT selected with the track keys. Input Sync Auto The INP SYNC soft key in the Digi Menu is available for all sync sources other than INPUT. Select INP SYNC to automatically sync to the lowest numbered armed digital input. When no tracks are armed the system reverts to the main sync source. The AUTO mode is used to automatically sync to an external input that is not locked to house sync. This mode should be used with caution as it is easy to lose the integrity of system synchronisation. Manual selection of INPUT sync ensures that the operator is always aware of the current sync source. For more information on synchronisation issues see “Synchronization” on page 28-5. RECORDING 9-4 Project Frame Rate The frame rate (timecode format) can be changed at any time, but should be set to the local standard, or to match the format of the video material or project currently being worked on. Step 1 Press the Setup key. Step 2 Press the TC FORMAT soft key. Step 3 Turn the jogger wheel to select the desired timecode format. Select Non-Drop or Drop-Frame (if applicable). Step 4 Press Enter. NOTE: 1. The sample rate is also fixed if an import from another Project is performed (Refer to “Import / Export” on page 27-2). 2. The sample rate and frame rate jogger wheel selection can also be performed using the + and - keys on the numeric keypad or the numeric keys 0 to 4. PATCHING INPUTS TO TRACK FEEDS Step 1 First enter the Patch I/O Menu by pressing the Patch I/O key Step 2 Select the feed to be patched to by using the Track Feed keys on the Selection Panel (or you can use the Track keys already selected) Step 3 Press the Patch soft key The Track Feed keys now show all the analog physical inputs and the Live Feed keys show the digital inputs. Step 4 Press the ANALOG/DIGITAL and AES/MADI soft keys in the LCD menu to select the desired input type. Inputs that are available for patching are illuminated dim. Inputs of the selected type already assigned to the Feeds selected are brightly lit. Inputs assigned to other feeds or returns flash between off and dim illumination. Inputs that are not installed are not illuminated and cannot be selected. PATCHING INPUTS TO TRACK FEEDS 9-5 Step 5 Select the input by using the Track or Live Feed keys on the selection panel. Patching is completed by pressing an edit mode key or other menu key or by pressing Patch I/O to return to the previous state. It is also possible to patch a group of inputs to a group of Feeds: Step 1 First enter the Patch I/O Menu by pressing the Patch I/O key Step 2 Select the feeds to be patched to by using the Track or Live Feed keys on the selection panel (or you can use the Track or Live keys already selected). Step 3 Press the Patch soft key. Step 4 Select the input type soft keys (ANALOG/DIGITAL and AES/MADI). Step 5 Select any number of physical inputs by holding one down, selecting others, then releasing the original. The physical inputs are patched to the feeds successively until the feeds are all used. If the physical inputs are all used before the feeds are, then patching starts again from the first physical input. For example, selecting only one input will cause it to be patched to all selected Feeds. Selecting two inputs will cause them to be alternately patched to the selected feeds. Input Gain and Phase Analog and Digital inputs can have digital gain or attenuation, and phase reversal applied at the input. Inputs are selected by first selecting the feeds that they are patched to. To set input gain: Step 1 First enter the Patch I/O Menu by pressing the Patch I/O key. Step 2 Select the feed or feeds whose inputs you wish to adjust. Step 3 Press the Gain soft key. If all the inputs of the selected feeds have the same gain value, that value is shown in the LCD below the Gain soft key as an absolute value (ABS), otherwise this field is initialised to 0 dB and is displayed as a relative value (REL). ABS represents the absolute value of all Inputs. REL represents a trim or relative offset value applied to all inputs. Step 4 Use the Jog wheel to adjust the value or use the numeric keys and press Enter to complete. To set input phase: RECORDING Step 1 First enter the Patch I/O Menu by pressing the Patch I/O key. Step 2 Select the feed or feeds whose inputs you wish to adjust. 9-6 Step 3 Press the Phase soft key to toggle the phase of the selected inputs. If the inputs to all selected feeds are in phase the track keys are illuminated green. If the inputs to all selected feeds are out of phase the track keys are illuminated amber. If the inputs to the selected feeds do not all have the same phase status the track keys flash green to amber. ARMING TRACKS An input can only be recorded on one track at a time. If an input is patched to more than one track, arming one of these tracks will disarm any other track patched to this input. The transport must be in STOP to monitor the inputs. To arm a track: Step 1 Press Arm. Track selection keys flash red to indicate the available tracks. Step 2 Select track(s) to be armed by pressing the track selection keys. Any number of tracks can be armed at the same time, as long as your system contains enough channels to play them. Arm on the Fly Normally tracks are armed before you put the system into record, but it is possible drop in or out of record on specific tracks while the system is recording by pressing one or more track keys. If the input patching for the track is not unique (i.e. it tries to record an input that is already being recorded on another track) the first track disarms. Metering Input Levels The input levels to the armed tracks are shown as vertical bargraphs at the top of the screen. These are seen on the video screen as soon as you enter the Arm Menu. For tracks that are not armed for record, meters show the playback levels. The behaviour of the meters can be changed so that the background colour changes to warn you when a certain input level has been reached. This is done by setting the METER RED LEVEL field on the System Page. Press the BLUE key and the S key, then use the mouse to change the value of RED, or type RED n ENTER, where n is the desired audio level, with or without a minus sign, for example, RED 18.) The meter scaling can also be changed. This is done by setting the Meter Law, which affects the Range of the meter and its linearity. Meter Law can be changed on the System Page, or by typing LAW n ENTER, where n is a number from 1 to 6. For more information on system page settings see “The System Page” on page 33-9. RECORDING Step 1 Locate the transport to where you want to start recording, then press PLAY and RECORD together. ARMING TRACKS 9-7 Step 2 Press STOP or PLAY to end the recording. It is also possible to drop tracks in and out of record using the track keys in the Arm Menu. Recording Types Recordings can be made using the following different recording modes. Press the Record soft key in the Arm menu to toggle through the options listed below. Record NEW A new clip is created for each recording. This will result in new layers on top of previous recordings. This is the default and is the safest way to record when learning to use a DREAM Console. The HANDLE parameter available when this type of recording is selected sets the amount of buffered audio recorded to disk prior to the start of the clip. This handle may be exposed by applying a TRIM HEAD edit (please read the “Trim Edit Mode” on page 10-13 for further details). The available handle range is 0 - 30 frames. Record OVER Recording replaces audio that is already on the disk. This is destructive and cannot be undone. Clips lying under the cursor, or the next ones along, are replaced on armed tracks. The recording continues past the end of the original clip unless the tail of the clip does not show all the waveform due to the clip tail having been trimmed or cut. In this case, the recording will stop. Record TAPE Tape mode behaves just like an analog tape recorder. If recording is commenced where there are no clips lying under the cursor on an armed track, a new clip is created. If recording commences where there is an existing clip, the clip is over written using the same method as for OVER. The WINDOW parameter available when this type of recording is selected sets a time window prior to the start of an existing clip. If the DREAM Console drops in to record within this window the recording starts at the start of the existing clip. This is useful for maintaining existing timing for dropins. The available window range is 0 - 999 frames. ARM Mode The fifth soft key in the Arm Menu sets the operating mode of the arm menu. In Ready mode the track keys are used to arm tracks for recording. Armed Ready tracks play back existing clips until dropped into record. When in record the input signal is passed through to the output of the track feed. Armed tracks show the input highlighted in red on the meters display on the video screen and on the track keys. In Thru mode the track keys are used to monitor the input of a track. Tracks can not be armed in Thru mode. Thru tracks show the input highlighted in green on the meters display on the video screen and on the track keys. RECORDING 9-8 Monitoring Inputs The MONITOR soft key in the Arm Menu determines what is monitored on armed tracks in the various transport modes. Press the MONITOR soft key, use the jog wheel or +/- keys and press Enter to select the input monitor mode. The comprehensive input monitoring options cover all recording requirements. The are five monitor modes for armed tracks are summarised below: REW FF STOP PLAY REC JOG/SH INPUT Input Input Input Input Input Track AUTO Input Input Input Track Input Track RECORD Mute Mute Mute Track Input Track MUTE Mute Mute Mute Track Mute Track REPRO Mute Mute Mute Track Track Track These setting support the following example applications: • INPUT: Track feed always monitors input. Studio monitoring is fed through headphones, or recording is not from a Microphone and the desire is to punch in cued from source material rather than playback material. Use INPUT. • AUTO: Track feed monitors input on record and track on playback. Studio monitoring is fed through cans, voice-over recording or over-dubs. Choose AUTO to allow cueing of source or monitoring of Studio Mic. • RECORD: Track feed monitors input on record and track on playback and mutes when stopped. Use when monitor system handles mutes to the studio when system is in Record, but input monitoring is required in the control room. However input must be muted when system is in STOP to avoid feedback. Use RECORD. • MUTE: Track feed only monitors track on play back, muted in all other states. Studio is fed through speakers. Recording is from microphone. Therefore we never want input to be monitored. Choose MUTE Mode to prevent feedback. • REPRO: Track feed monitors track on record and play back. The desire is to record onto tracks that are already being monitored (e.g. record 5.1 Mix onto tracks that already have source material on them), or the console includes Track/ Group switching facility. Use REPRO. Assigning Track Feeds to Buses Track feeds must be assigned to a bus to be monitored through the studio monitors. Step 1 Press the Bus Assign key Step 2 Press the bus selection key of the destination bus to which you want to assign track feeds. This can be the Main Bus or any Sub or Aux Bus The selected bus key will light, and so will all the Track and Live Feed keys associated with feeds already assigned to that bus. RECORDING 9-9 Step 3 Press any Track Feed key to toggle its assignment on or off. Press the All Feeds soft key to assign all feeds to the selected bus. Press the deassign all soft key to deassign all sources. Step 4 To complete the assignment process press the Bus Assign key to return to the previous state or select any other mode. Ensure that the track feed fader is up to allow signal to reach the disk recorder. Selecting a Monitor Source Step 1 Hold down the BLUE key and press the Source Setup key next to the Monitor Level control. Step 2 Press the bus selection key of the bus you have assigned your track feeds to. Step 3 Ensure that the bus master fader is up by checking the screen display. If the fader level is down press the CALL button and then press the bus selection key to call the bus to the Master Fader. Auto Extend The Auto Extend feature allows the DREAM system to support projects of any size up to the maximum capacity of the disk drive. It is possible, while recording, to reach the limit of the single project file size, which is 4 Gigabytes (approximately 12 track-hours of 16 bit audio). If this happens while the transport is actually in record, the DREAM Console will automatically create a new Project and continue recording. This can only happen if there is additional free space on the SAME DISK DRIVE on which the system is currently recording. At the point where the Project is extended there will be a split in the clips that were currently recording. The new Project borrows audio from the earlier Project in a read-only operation, which means that Tape Mode and Overwrite mode cannot replace that audio by recording. Also, no operation in the Space Menu (which is used to free disk space) will operate on the borrowed audio. For more information about borrowing, please see the “Importing Clips” on page 27-2. AutoExtend may be turned off using the mouse on the System Page (BLUE-S) see “The System Page” on page 33-9 for more details. Punch In / Punch Out It is possible to enter record while playing back from disk on the DREAM Console. While playing, start recording by pressing the RECORD and PLAY buttons together. To drop out of Record, press the PLAY, STOP, JOG, REW or FF buttons. You can drop in or out on individual tracks whilst recording by pressing the track keys. RECORDING 9-10 Each time you enter Record you will create a new clip on each armed track. These clips are placed over any other clips that they encounter on the same tracks. The monitoring switches from recorded material to live as you enter Record, exactly as though you were erasing the existing audio. Clips covered by new recordings may be retrieved by POPPING the clip stack in the Takes menu see “Takes Menu” on page 20-3 for more details. Automatic Drop-in Pre-determined drop in and drop out points may be activated using the Machine Control section of the console. See “Using the ADR Functions” on page 22-2 for further details. RECORDING STEREO CLIPS Stereo clips may be recorded by creating a stereo link group with two adjacent track feeds. Arm the tracks by pressing either track feed selection key while in the arm menu. Clips recorded into the link group will appear in the first of the two tracks. See “Grouping” on page 11-2 for more information on creating and using link groups. RECORDING STEREO CLIPS 10-1 NOTES: 10-2 Chapter 10 - Binnacle Editing INTRODUCTION Binnacle Editing introduces a new and more ergonomic editing control panel for increased efficiency and ease of use. It is common to all of Fairlight's DREAM family of products. It is designed to achieve the following: • Universal availability - no matter where the you navigate to in the system, the basic editing functions are always available on dedicated keys. This allows a user to learn the keystrokes like a musical instrument and achieve phenomenal speed. • Two-handed operation - Allows the user to employ both hands, thus increasing efficiency and speed. The term Binnacle is a reference to the compass housing on the bridge of a ship. On a DREAM console it refers to the area which includes the Jog wheel and the surrounding keys as illustrated below: Edit Targets Edit Options Figure 1: The Binnacle The Binnacle is designed so that a user can have one hand operating the Jog wheel and the surrounding keys, while the other hand can roam the console. INTRODUCTION 10-3 EDITING There are three basic steps to a Binnacle edit sequence: Step 1. Select an Edit Mode from the six Edit Modes available. These are Copy, Cut, Erase, Trim & Slip (on one key) and Fade. Step 2. Set the options on the Option keys on the right hand side of the Binnacle. These are Range On, All Layers and Razor On. Step 3. Execute the edit using the Target keys on the left hand side of the Binnacle. These are Clip/Range, Head and Tail. In Copy, Cut, Trim and Slip modes there are two stages to this step (e.g. Cut and Paste). Erase and Fade mode edits are finished with just one keystroke. Edit Modes The six Binnacle edit modes are selected on the outer ring of keys: • Copy - copies the selection to the clipboard. • Cut - cuts the selection to the clipboard. • Erase - erases the selection. • Trim & Slip (on one key) - trims or slips the selection. • Fade - fades or cross-fades the selection. Once an edit mode is selected, it remains current until another edit mode or system mode is selected. The most recently pressed edit mode key is illuminated in amber (red for slip mode). The selection of a Binnacle edit mode causes the LCD to switch to a display containing soft key functions relevant to that mode. Pressing an edit mode key twice, will toggle between Range on and off, if it is relevant to that mode Edit Options The Binnacle options are Range ON, All Layers and Razor ON. The options have an influence on what happens when a Binnacle command is issued. This varies according to the edit mode and target of the command. Refer to “Selecting a Range” on page 4-10 for information on setting ranges. BINNACLE EDITING 10-4 Edit Targets The target for a Binnacle command is the set of audio clips or parts of clips that are going to be affected by the command. Pressing the target key executes the edit command. The possible targets are: • Clip - when RANGE is off, the target consists of all clips on selected tracks under the cursor. The current clips that will be affected are highlighted in RED on the video screen. • Range - when RANGE is on, the target consists of all clips and parts of clips on selected tracks lying inside the Range. The current clips and parts of clips that will be affected are highlighted in RED on the video screen. • Head - if RANGE is off, the target consists of the parts of the clips on the selected tracks touching the cursor and lying to its left. If RANGE is on, the target consists of the clips and parts of clips on the selected tracks, lying between the Range start and the cursor. In both cases, the pieces that will be affected by the command are the RED parts lying to the LEFT of the cursor. • Tail - if RANGE is off, the target consists of the parts of the clips on the selected tracks touching the cursor and lying to its right. If RANGE is on, the target consists of the clips and parts of clips on the selected tracks, lying between the cursor and the Range end. In both cases, the pieces that will be affected by the command are the RED parts lying to the RIGHT of the cursor. One and Two-handed Editing The Binnacle allows Cut, Copy and Trim operations to be performed with one hand or two, depending on the operators preferred style and the details of the particular edit. Each edit is described in both modes below. A copy edit is a two-handed edit when the target key is pressed and held with the left hand to start the edit, the right hand is used to change the track selection or transport position, then the target key is released to paste and finish the edit. A one handed edit is performed by pressing and releasing the target key to copy then pressing the Enter key to paste. Undo and Redo DREAM provides 64 levels of undo and redo. Pressing the Undo key once will undo the last edit. Pressing the key multiple times will allow you to progressively step backwards through previous edits. Use the Redo key to reinstate edits that you have undone. Redo is only available immediately after an Undo. Undo is not possible after any SPACE MENU functions, the NUMBERS function in the Track Menu, or the KEEP function in the Import Menu. EDITING 10-5 Single Track or Multitrack Editing Editing may be performed on single or multiple tracks. Multitrack edits are performed on all selected tracks. When pasting from the clipboard the number and order of tracks is retained. Selecting a different destination track moves the entire selection. Clip Layers When clips are recorded or pasted on top of each other they become layered one above the other. Only the top clip is heard. To move a clip from a lower layer to the top, use the POP TAKES function by pressing the Takes key. See “Takes Menu” on page 20-3 for more details. Transport and Selection Keys The Binnacle includes several keys located within easy reach of one hand, designed for fast transport control and Range selection. For more information on transport and track selection see “Tracks & Transport” on page 4-2. The transport and range features include: • Jogger Wheel - this is used for many functions, including moving the transport and scrubbing the audio. • To and From - these keys are used to set the beginning (From) and end (To) of the Range. Pressing and releasing one of these keys sets the Range to start or finish at exactly that point. Holding down one of the keys allows various menu options and other keys to be used for setting the Range extremities. • Play/Jog - if the transport is not in Jog, this key will put it into Jog. If it is in Jog, this key will put the transport in Play. This is designed to allow the most common transport commands used during editing to be accessible without moving the hand. • Jump Left and Jump Right - these keys allow location of the transport to important features in the Project, such as the next clip, next mark, start or end of the Project, and many more. Holding down a Jump key causes display of a menu on the LCD that selects and locks in one of the Jump choices. • Zoom - the Zoom key is used to change the horizontal time scale of the video display. To use it, hold it down while rotating the Jog wheel. • Enter - the Enter key is used to complete many editing and menu selection operations. • BLUE - the BLUE key modifies the function of any key with blue text. To select a blue function hold the BLUE key while pressing any other key. • Track Sel - Holding the Track Sel key and turning the Jog wheel will change the selected track. BINNACLE EDITING 10-6 CUT AND COPY EDIT MODES Cut and copy commands can operate on either selected clips, or a Range of clips or a Range within clips. In CUT mode, the selected clips are removed from a track and held on the clipboard. In COPY mode, the clips are left unchanged, but copies of the clips are passed to the clipboard. The resulting content of the clipboard is the same for both CUT and COPY modes. The Clipboard When clips or sections of clips are cut or copied, they are placed on the clipboard. When the Enter key is pressed or when the target key is released whilst in the EDIT mode, the contents of the clipboard are pasted on to the currently selected tracks. Clips can be pasted multiple times by pressing the Enter key repeatedly. If other clips are cut or copied to the clipboard, the previous contents of the clipboard are lost, regardless of whether they were used or not. Ghost A Ghost is a representation of the clipboard's top layer. A ghost is shown as a floating white image at the cursor position. The ghost display is automatically removed after pasting or when a new Mode is selected. Whenever the CUT, COPY or ERASE modes are current, the Ghost soft key can be used to toggle the ghost clip display on or off. Using Cut or Copy Follow these steps to perform a CUT or COPY edit: Step 1 Press either the Cut or Copy key to select the edit mode. Step 2 Select the desired track(s). If only one track is to be edited, double press its track key to ensure no other tracks are selected Step 3 Locate the transport so the cursor lies over the desired edit point. Clips that will be edited are highlighted in red. Step 4 Hold down the required edit target key (Range/Clip, Head or Tail), on the left hand side of the Binnacle. Step 5 Locate the transport so the cursor lies over the destination edit point. Select an alternative destination track if desired. Step 6 Let go of the edit target key to paste the clip(s). Binnacle editing allows CUT and COPY to be achieved as a one-handed or two-handed edit. To perform a one-handed edit hit the edit target key (Range/Clip, Head or Tail) to COPY or CUT, then hit enter to paste. To perform a two-handed edit hold down the edit target key (Range/Clip, Head or Tail) to COPY or CUT, then release it to paste, as described in the steps above. CUT AND COPY EDIT MODES 10-7 Cut Edit Targets The result of a CUT edit is determined by the target key pressed. The following examples illustrate how Cut works using a single clip with one-handed editing: Range/Clip The entire clip is removed from the track and placed on the clipboard. When Enter is pressed, the clip is placed on the currently selected track. Head The section of the clip from the head to the cursor is cut and placed on the clipboard. When Enter is pressed, the clip is pasted with the cursor positioned at the cut point. Tail CUT TAIL functions in the same manner as CUT HEAD, except that it works from the cursor to the tail. The section of the clip from the cursor to the tail is cut and placed on the clipboard. When Enter is pressed, the clip is pasted with the cursor positioned at the cut point. CUT TAIL can be used to shorten a clip by pasting the tail over the original closer to the head. If all you wish to do is remove the tail permanently, don't paste the waveform. Copy Edit Targets The result of a COPY edit is determined by the target key pressed. In COPY mode, the original clip is not altered, but the contents of the clipboard are the same as for CUT. Range/Clip A copy of the clip is placed on the clipboard. When Enter is pressed, the clip is placed on the currently selected track. Head The section of the clip from the head to the cursor is cut and placed on the clipboard. When Enter is pressed, the clip is pasted with the cursor positioned at the copy point. Tail COPY TAIL functions in the same manner as COPY HEAD, except that it works from the cursor to the tail. The section of the clip from the cursor to the tail is placed on the clipboard. When Enter is pressed, the clip is pasted with the cursor positioned at the copy point. Cut/Copy Soft Key Functions When the Cut, Copy or Erase keys are selected on the Binnacle, the following LCD soft key options are available: BINNACLE EDITING Split Clip Splits the clip at the current cursor position into two clips. Reverse Reverses the clip. Ghost On or Off, displays or hides the last clipboard item 10-8 Cut and Copy Edit Options The Binnacle edit options for Cut and Copy are, RANGE ON, ALL LAYERS, RAZOR ON. Cut/Copy with Range On The CUT and COPY commands offer additional functions when a Range is selected. In CUT mode, the selected range is removed from a track and held on the clipboard. In COPY mode, the range is left unchanged, but a copy of the range is passed to the clipboard. The resulting content of the clipboard is the same for both CUT and COPY modes. For details on selecting ranges see “Selecting a Range” on page 4-10 To perform a CUT or COPY with RANGE ON follow these steps: Step 1 Press either the Cut or Copy key. Step 2 Select the desired track(s). If only one track is to be edited, double click its tracks key to ensure no other tracks are selected. Step 3 Define a Range using the From and To keys or press Range On to recall the last range set. Step 4 Hold down the required edit target key (Range/Clip, Head or Tail), on the left hand side of the Binnacle. Step 5 Locate the transport so the cursor lies over the destination edit point. Select an alternative destination track if desired. Step 6 Let go of the selected edit function to paste the Range To do a one-handed edit hit the edit target key to copy or cut, then hit enter to perform the paste. To do a two-handed edit hold down the edit target key to copy or cut, then release it to perform the paste, as described in the steps above. Cut/Copy with Range On Targets Range/Clip Copies all clips or parts of clips within the Range into the clipboard. When Enter is pressed, the range is pasted with the cursor positioned at the copy point. Head Copies all clips or parts of clips from the beginning of the Range to the current cursor position into the clipboard. When Enter is pressed, the range is pasted with the cursor positioned at the end of the range. Tail Copies all clips or parts of clips from the current cursor position to the end of the Range into the clipboard. When Enter is pressed, the range is pasted with the cursor positioned at the beginning of the range. CUT AND COPY EDIT MODES 10-9 Range Soft Key Functions When the Cut, Copy or Erase keys are selected on the Binnacle, and a RANGE is selected, the following additional LCD soft key options are available: Split Range Splits clips at the beginning and the end of the Range. If no clips lies at a Range end, then no split is performed at that point. Fill Uses the current contents of the clipboard to fill the current Range. B/FWD Fill A Backward Forward Fill is performed using the contents of the clipboard to fill the current Range. Overlap Defines the amount of Overlap to be used to auto fade the loops in a Fill operation. Bounce Bounce mixes audio from all clips in a Range and creates a new clip on a destination track, which you are prompted to enter. Bounce includes EQs, levels and fades. To interrupt a bounce once started press CTRL Q. Fill The FILL function is used to automatically repeat a section of audio to fill a Range on a track to create background fills or buzz tracks. The audio used for the fill is the clip currently on the clipboard from the last CUT or COPY function. The OVERLAP parameter can be set to cross-fade the clips: Step 1 COPY (or CUT) the desired audio to the clipboard. The cursor’s sync point will be maintained Step 2 Create a RANGE encompassing the area to be filled. Step 3 Press the OVERLAP soft key and enter a value in frames. Step 4 Press the FILL soft key. B/F (Backwards Forwards) FILL Pressing the B/F FILL soft key will fill the Range as per the normal FILL function, except every second clip will be reversed. BINNACLE EDITING 10-10 Cut/Copy with All Layers Overlapping clips are arranged in layers. When the All Layers key is selected after pressing either the Cut or Copy keys, the target will consist of all clips on all layers. When range is off and you press All Layers or Razor, a range is created that encloses the selected clips, if any. This range is bounded by the head and tail of the top clip under the cursor. If there is no clip on the selected track, the Range will be set to zero width, and an error will result if you try and execute a cut or copy command. Range/Clip Copies all layers from the beginning of the Range to the end of the Range into the clipboard. A ghost of the uppermost clips is presented. The cursor may be moved, and completing the edit causes the contents of the clipboard with all its layers to be pasted at the new location. Head Copies all layers from the beginning of the Range to the current cursor position into the clipboard. A ghost of the uppermost clips is presented. The cursor may be moved, and completing the edit causes the contents of the clipboard with all its layers to be pasted at the new location. Tail Copies all layers from the current cursor position to the end of the Range into the clipboard. A ghost of the uppermost clips is presented. The cursor may be moved, and completing the edit causes the contents of the clipboard with all its layers to be pasted at the new location. Cut/Copy with Razor On Edits performed with Razor On insert or remove time from the selected tracks, emulating a tape edit performed with a razor blade. When the Razor On key is selected after pressing either the Cut or Copy keys, the following will occur: Cut With Razor On Audio is removed from the selected tracks and inserted at the cursor. Audio after the Range is then moved in time to the start of the Range. Paste With Razor On The contents of the clipboard are inserted at the cursor. Audio to the right of the cursor is moved along to the right. Using Razor On Mid-Edit RAZOR mode can be turned on in between the CUT and PASTE stages of an edit. For example, you may perform a cut with RAZOR off leaving the time-line intact, then press RAZOR ON to insert time when pasting. Razor Soft Key Functions When Razor On is selected an additional soft key Menu is available on the LCD: Insert Space Silence will be inserted from the start of a Range for the duration of the Range. CUT AND COPY EDIT MODES 10-11 ERASE EDIT MODE The ERASE mode commands remove clips (and parts of clips) from the Project. To enter ERASE mode, press the Erase key. The Binnacle will remain in ERASE mode until another edit mode key is pressed. Unlike COPY and CUT, the ERASE edit is completed at the moment of striking the target key. Using Erase Step 1 Press the Erase key. Step 2 Select the desired track(s). If only one track is to be edited, double click its track key to ensure no other tracks are selected Step 3 Locate the transport so the cursor lies over the desired edit point, clips that will be edited are highlighted in red. Step 4 Press the required edit target key (Range/Clip, Head or Tail), on the left hand side of the Binnacle. Erase Edit Targets The result of an ERASE edit is determined by the target key pressed. Range / Clip Erases all clips on the top layer which touch the cursor on selected tracks. Head Erases the heads of all clips which touch the cursor on selected tracks. Tail Erases the tails of all clips on the top layer which touch the cursor on selected tracks. Erase Edit Options The Binnacle options for ERASE are, RANGE ON, ALL LAYERS, RAZOR ON. Erase with Range On To perform an ERASE with RANGE on, follow these steps: Step 1 Press either the Erase key. Step 2 Select the desired track(s). If only one track is to be edited, double click its tracks key to ensure no other tracks are selected. Step 3 Define a Range using the From and To keys, or press Range to recall the last range set. On Step 4 Press the required edit function key (Range/Clip, Head or Tail), on the left hand side of the Binnacle. The selection should now be erased. BINNACLE EDITING 10-12 Erase Range Targets Range / Clip Erases all clips on the top layer from the beginning of the Range to the end of the Range. Head Erases all clips on the top layer from the beginning of the Range to the current cursor position. Tail Erases all clips on the top layer from the current cursor position to the end of the Range. Erase with All Layers On Overlapping clips are arranged in layers. When the All Layers key is selected after pressing either the Erase key, the target will consist of all clips on all layers. When range is off and you press All Layers or Razor, a range is created that encloses the selected clips, if any. This range is bounded by the head and tail of the top clip under the cursor. If there is no clip on the selected track, the Range will be set to zero width, and an error will result if you try and execute a cut or copy command. Range / Clip Erases all layers from the beginning of the Range to the end of the Range. Head Erases all layers from the beginning of the Range to the current cursor position. Tail Erases all layers from the current cursor position to the end of the Range. Erase with Razor On Edits performed with Razor On insert or remove time from the selected tracks, emulating a tape edit performed with a razor blade. Range / Clip Erases all layers from the beginning of the Range to the end of the Range, together with the associated track time. Head Erases all layers from the beginning of the Range to the current cursor position, together with the associated track time. Tail Erases all layers from the current cursor position to the end of the Range, together with the associated track time. ERASE EDIT MODE 10-13 TRIM EDIT MODE Trimming allows clips to be resized. Trim commands are used to set the head and tail of clips, to determine how much of the original recording is played by the clip. Trimming may shorten a clip, or extend a clip if the original recording is longer than the displayed clip. This will be the case if the clip was imported with handles or if the original clip has been edited. Using Trim Step 1 Press the Trim key. Step 2 Select the desired track(s). If only one track is to be edited, double click its track key to ensure no other tracks are selected. Step 3 Locate the transport so the cursor lies over the desired edit point, clips that will be edited are highlighted in red. Step 4 Hold down the required edit target key (Range/Clip, Head or Tail), on the left hand side of the Binnacle. Step 5 Locate the transport so the cursor lies over the destination edit point. Step 6 Let go of the selected edit function to trim the clip(s). Binnacle editing allows TRIM to be achieved as a one-handed or two-handed edit. To perform a one-handed edit hit the edit target key to TRIM, move the cursor if necessary, then hit Enter to trim the clip. Hitting Enter again will trim the clip again. To perform a two-handed edit hold down the edit target key to Trim, move the cursor then release the target key to trim the clip. When trimming the head or tail of a clip pressing the target key once executes the TRIM. Move the cursor and hit Enter to TRIM the head or tail again, if required. Trim Edit Targets The result of a TRIM edit is determined by the target key pressed. Range/Clip Moves the head and tail of the selected clip(s) while maintaining the position of the waveform. The clip moves in sync with the cursor while the waveform remains fixed. This exposes a different section of the waveform without changing the length of the clip. The clip can be trimmed as long as the original recording extends beyond the desired head or tail locations. Head BINNACLE EDITING Trims the head of the selected clip(s) to the cursor while maintaining the position of the tail of the waveform. 10-14 Tail Trims the tail of the selected clip(s) to the cursor while maintaining the position of the head of the waveform. Trim Soft Key Functions When the Trim key is selected on the Binnacle, the following LCD soft key options are available: Trim Selects TRIM mode when the Trim/Slip key is pressed. Hold down the BLUE key and press the Trim soft key to set TRIM as the default mode. Slip Selects SLIP mode when the Trim/Slip key is pressed. Hold down the BLUE key and press the Slip soft key to set SLIP as the default mode. Sync Pressing the Trim Sync soft key creates a sync marker within the selected clip(s) at the cursor position. The JUMP TO POINT or JUMP TO POINT OR FADE functions will then land on this point. It can be used to quickly jump to a frequently used sync point within a clip. It also determines where a clip is referenced when using AudioBase. To change the sync point, select TRIM SYNC at the new location. There is only one sync point per clip. This sync marker should not be confused with the term 'sync point' used throughout this manual except in the section on JUMP. Trim Edit Options Trim is usually applied to a single clip or selections across tracks therefore, no options are available. Range On RANGE ON is not supported in Trim Mode. Layers On ALL LAYERS ON is not supported in Trim Mode. Razor On RAZOR ON is not supported in Trim Mode. TRIM EDIT MODE 10-15 SLIP EDIT MODE SLIP mode moves clips to a new time location. Slipping the head moves the head of a clip to the cursor while maintaining the position of the tail. Slipping the tail moves the tail of a clip to the cursor while maintaining the position of the head.These commands alter the length of the clip Using Slip . Step 1 Press the Trim/Slip key (and then the Slip soft key if not in SLIP mode). Step 2 Select the desired track(s). If only one track is to be edited, double click its tracks key to ensure no other tracks are selected. Step 3 Locate the transport so the cursor lies over the desired edit point, clips that will be edited are highlighted in red. Step 4 Hold down the required edit target key (Range/Clip, Head or Tail), on the left hand side of the Binnacle. Step 5 Locate the transport so the cursor lies over the destination edit point. Step 6 Let go of the selected edit function to trim the clip(s). Binnacle editing allows SLIP to be achieved as a one-handed or two-handed edit. To perform a one-handed edit hit the edit target key to SLIP, move the cursor if necessary, then hit Enter to slip the clip. Hitting Enter again will trim the clip again. To perform a two-handed edit hold down the edit target key to Slip, move the cursor then release the target key to slip the clip. When slipping the head or tail of a clip pressing the target key once executes the SLIP. Move the cursor and hit Enter to SLIP the head or tail again, if required. Slip Edit Targets The result of a SLIP edit is determined by the target key pressed. BINNACLE EDITING Range / Clip The entire clip is slipped from its current position by an offset defined by the difference between the cursor position when the key was pressed and the cursor position when the edit was completed. Head The head of the clip is slipped to the position that the cursor is at when the edit is completed. The tail remains stationary, with audio being moved out from the tail or pushed under it as required. Tail The tail of the clip is slipped to the position that the cursor is at when the edit is completed. The head remains stationary, with audio being moved out from the head or pushed under it as required. 10-16 Locating the cursor over the clip and typing RTB Enter, will slip the clip to its original recording time. RTB stands for Return To Birthday. Slip Edit Options Slip is usually applied to a single clip or selections across tracks therefore, no options are available. Range On RANGE ON is not supported in Slip Mode. Layers On ALL LAYERS ON is not supported in Slip Mode. Razor On RAZOR ON is not supported in Slip Mode. NUDGE Although not a Binnacle editing function, the NUDGE function is closely related to SLIP. The NUDGE function slips clips by a predetermined amount of time. NUDGE can operate on one or many tracks affecting clips that lie under the cursor, or within a Range. NUDGE can operate in fixed steps of plus or minus one frame, or in variable steps from 1 to 99 sub-frames (a sub-frame is 1/80th of a frame). The Nudge key is located to the left of the LCD display. Using Nudge Step 1 Press the Nudge key, to the left of the LCD. Step 2 Locate the cursor over the clips and select the appropriate track(s). Step 3 Press the Variable or One Frame nudge soft keys to slip the clip(s) by the selected amount. When there is no Range selected, only the top layer of clips highlighted under the cursor is nudged. Nudge with A Range Follow these steps to perform a NUDGE with a range selected: Step 1 Press the Nudge key, to the left of the LCD. Step 2 Use the From and To keys to select a Range that includes all clips to be nudged. Step 3 Press the Variable or One Frame nudge soft keys to slip the clip(s) by the selected amount. When a Range is selected, all layers of clips within the Range are nudged, including those which are completely buried. NUDGE 10-17 NOTES: Nudging is possible while the transport is in play. It is possible to nudge the sync of clips by holding down the Shift key and pressing the Nudge key. The Nudge Menu will then nudge the waveform within clips without affecting heads and tails. Hold down the Shift key and press the Nudge key to return to normal operation. When nudging a Range, clips not wholly within the Range are not affected. However, since the Range itself is also nudged, it is possible for the Range to move so as to wholly enclose a clip, in which case the clip will then be nudged with the rest of the Range. BINNACLE EDITING 10-18 FADES EDIT MODE The Fade key on the Binnacle allows fades to be applied to the heads and tails of clips. The fades are performed by the system in real time as the audio is output from the machine. Applying a fade to a clip does not affect the waveform on disk. Fades are applied from the cursor position to the head or tail of clips on selected tracks. If a level has been applied to a clip, the fade will start or finish at this level. All clips have small default fades to prevent clicks. These can been seen at the heads and tails of clips at Zoom 16. Fades are shown as shaded ramps on the clips. Fade In Cross fade point Fade Out Fade displayed on clip Figure 2: Fade Display Using Fade Step 1 Press the Fade key. Step 2 Locate the transport to the fade point and select the desired tracks. Step 3 Use the soft keys and jog wheel to set the fade parameters, if required. Step 4 Press the required edit target key (Range/Clip, Head or Tail), on the left hand side of the Binnacle. Cross-Fades If a fade is placed on a clip and there is another clip layered underneath, a cross-fade between the two will automatically be invoked. Cross-fade parameters can be modified with the soft key menu functions. FADES EDIT MODE 10-19 Fade Targets The result of a FADE is determined by the target key pressed. Range / Clip Applies an AUTO IN and AUTO OUT Fade to the head and tail of all selected clips. See below for details on Auto In and Out Head Fades from the head of the currently selected clip(s) to the current cursor position. Tail Fades from the current cursor position to the tail of the currently selected clip(s). Fade Soft Key Functions Auto In Sets a value in frames for an Automatic Fade at the head of a clip, or clips within a Range. Pressing any other key accepts the entered value immediately. Pressing Auto In followed by Enter executes an Auto In fade to the head(s) of any clips touched by the cursor on selected tracks. Auto Out Same as for Auto In, but executed for tails of clips. X-Level These soft keys allows level and time characteristics for fades to be adjusted. This enables you to set sudden or gradual fades. The fade curve is shown on the upper graphics display X-Point Capture Head Captures the fade parameters from the head of the current clip (NOT available when RANGE activated) Capture Tail Captures the fade parameters from the tail of the current clip (NOT available when RANGE activated) Capturing Fade Parameters It is possible to copy the fade parameters from a clip so they can be reapplied to other clips, or adjusted and reapplied to the same or other clips. Step 1 Press the Fade key Step 2 Select the clip from which you want to copy the parameters. Step 3 Press the HEAD or TAIL soft keys to capture the parameters from the corresponding fade. Fade Options Range On Follow these steps to perform a fade on a range: BINNACLE EDITING Step 1 Press the Fade key. Step 2 Use the From and To keys to select a Range, or press RANGE ON to recall the last range set. 10-20 Step 3 Press the required edit target key (Range/Clip, Head or the left hand side of the Binnacle. Tail), on Range Fade Targets The result of a RANGE FADE is determined by the target key pressed. Range / Clip Applies an Auto In and Auto Out fade to all the clips wholly contained within the Range. Head Creates a new Master Recording (bounce) over the Range and sets a fade up from its beginning to its end. Also splits the clips underneath so that no unexpected crossfades occur. Tail Creates a new Master Recording (bounce) over the Range and sets a fade down from its beginning to its end. Also splits the clips underneath so that no unexpected crossfades occur. Layers On ALL LAYERS ON is not supported in Fade Mode. Razor On RAZOR ON is not supported in Fade Mode. Fade Defaults Every clip has a small fade at the head or tail to make it sound smoother. This is called the default fade, and you can control its length. One way is to type FDEF n RETURN on the PC keyboard, where n is the length you want in sub-frames. This method lasts only during the current session and is not remembered by the Project or the machine. Creating Level Changes By pasting a copy of a section of a clip onto itself, you are able to change the level of the copy to create a level change. If the copy is cross-faded with the original, a smooth level transition results. When using the COPY and PASTE functions, be sure to be in STOP otherwise a slight movement of the jogger wheel may result in phasing during the fades. FADES EDIT MODE 11-1 NOTES: 11-2 Chapter 11 - Grouping INTRODUCTION Grouping is a fast and convenient method of controlling more than one signal path from a single fader or parameter control. There are two types of groups: Link Groups and Fader Groups. Link groups are designed for controlling groups of feeds in multichannel formats. Link groups simplify many tasks associated with working in surround formats and share many of the operational features of surround format buses. Link groups can include up to eight members. The simplest link group has two members and fulfils the function of a stereo channel. Fader groups are not available in DREAM software release 1.2. Fader Groups are similar to other VCA or DCA grouping schemes and allows one fader or parameter control to control a group of signal paths. Fader Groups can include any number of members. SUMMARY OF GROUPS Type Member Type Master Fader Selection to Control Panel Stem Structure Fold on Creation Link Group Live Feed Link Group Master - level equal to first member. Select any member in Selection Panel Yes Yes Fader Group Master Fader Group menu key and Speaker Set key No No or Track Feed Fader Group Live Feed or Track Feed LINK GROUPS Link groups allow the control of up to eight feeds with one fader. Link groups can only include track feeds or live feeds not a mixture of both. Link groups can be created in any standard multichannel format. Link Group Format When a link group is created, the number of members determines the format of the link group. When a link group is created, you have the option of retaining the current pan setting of each member or using default pan settings for the chosen format. If default pans are selected each member of the group is panned to one element of the bus in the following order: If 2 Feeds are linked, they are panned L R. If 3 Feeds are linked they are panned L C R. If 4 Feeds are linked they are panned L C R S. If 5 Feeds are linked they are panned L C R LS RS. If 6 Feeds are linked they are panned L C R LS RS B. INTRODUCTION 11-3 If 7 Feeds are linked they are panned L C R LS CS RS B. If 8 Feeds are linked they are panned L LC C RC R LS RS B The panner of each member is panned hard to one Bus Element position, spread is set to maximum, divergence is set to minimum and rotation is set to zero. If the link group contains a Boom channel, the assignment is achieved by Stem Assignment of the member to the Boom element only, of the destination Bus. See “Stem Assign” on page 5-18. Group member panning can be changed later by unfolding or individually selecting a member as described below. If you are using a link group to control a premixed stem which is delivered in a different channel order, it may be necessary to edit the track order on the disk recorder or to change the input patching of the feeds if the stem is played in off an external device. Link Group Features Linking feeds in link groups has the following effects: 1. Selecting one member using the Track or Live Feed keys selects the entire link group. 2. There is only one fader for the group. When the group is created, the group master fader adopts the level of the first fader in the group. When the fader is adjusted, the member’s fader levels are offset by the amount the master fader is moved in dBs. To get access to the individual fader settings the group must be unfolded or its member individually selected as described below. 3. When a group is created the master pan control is centred. The pan control of each member may be changed as described above in “Link Group Format”. The Spread and Rotate controls becomes active when the link group master is called to the Master Fader. These pan parameters offer unique and flexible panning controls to multichannel link groups. See “The Surround Panner” on page 8-7 for a complete description of these functions. When pan link is enabled, the link group master aux send pan control is centred and the member’s send pan controls adopt default pans as described above. 4. When the group is created, the Channel Panel controls adopt the position of the first feed in the group. When a rotary control is adjusted, the controls of the members are offset by the amount the master control is moved. Switch controlled parameters display the current settings of the members if all members are set to the same value. If some members in the group are set differently the switches or parameter displays flash. Pressing a switch with a toggled value will set all members off. Double pressing will set all member parameters on. For switches which cycle through a number of values, pressing the switch will set all members to the next value of the Group Master. To get access to the individual parameter settings, the group must be unfolded or its member individually selected as described below. 5. The MUTE and SOLO keys on the Master Fader section indicate the mute and solo status of all the members. The MUTE or SOLO keys are illuminated if all members are currently muted or soloed. The MUTE or SOLO keys will flash if all members are not in the same state. Press the MUTE or SOLO key to mute or solo GROUPING 11-4 all members of the link group. If the keys are flashing, a single press will unmute or unsolo, double pressing either key will mute or solo all members. 6. When the group is created the channel Soft Pot is set to the position of the first feed in the group. When it is adjusted the values of the Soft Pot parameters of all the members of the group are offset. The channel Soft Key displays the setting of the Soft Key parameter of all the members of the group if they are set the same. If some members of the group are set differently the Soft Key will flash. Pressing the Soft Key once will set the parameters off. Double pressing will set the Soft Key parameters on. Note that, if the group master fader is selected, and is therefore positioned on the Central Fader, the Central Fader Soft key is used to select the current function, not to toggle the Soft key itself. 7. The AUTO key on the Master Fader section enables automation recording for the link group master which will control all the members. Creating a Link Group Link Group Key Figure 1: The Link Group Key Link groups are created from the Link Group menu: Step 1 Press the Link Group Key. The feeds that currently belong to link groups flash red. Feeds available for selection are dimly lit. Step 2 Press the feed selection key of the first feed of the group. Step 3 Press the feed selection key of the last feed of the group. Link groups can only include track feeds or live feeds, not a mixture of both. Link groups can only include up to eight contiguous members. Step 4 Select a menu item from the Apply Defaults? soft key menu. all defaults - applies pan settings to each member to set the link group into a surround format as described above under “Link Group Format”. All defaults also applies the feed parameter values of the first member of the group to all the members. Parameters modified are fader level, pan, EQ, dynamics, aux sends, inserts and direct out state. LINK GROUPS 11-5 default pans - applies pan settings to each member to set the link group into a surround format as described above under “Link Group Format”. Default pans affects the pan parameter only. feed params - applies the feed parameter values of the first member of the group to all the members, excluding pan. Parameters modified are fader level, EQ, dynamics, aux sends, inserts and direct outs. no defaults - no feed parameters are modified. Step 5 Press the Link Group key to return to the previous mode or press another mode key to continue mixing or editing. Destroying a Link Group Link groups are destroyed from the Link Group menu: Step 1 Press the Link Group Key. The feeds that currently belong to link groups flash red. Step 2 Press the feed selection key of a feed belonging to a group. Step 3 Select unlink on the LCD soft key menu item. Press the Link Group key to complete the operation and return to the previous mode or press another key to continue mixing or editing. Unfolding or Selecting to Access a Link Group Member Note that folding and unfolding is not available in the DREAM 1.2 software release but are included here for future reference. BLUE selection, as described below, can be used to select individual members of a link group. Once a link group has been created, selecting or calling any member will select the entire group and place the link group master on the Master Fader. The link group master is the first feed in the group. In order to adjust any of the members of the group independently they must either be unfolded or independently selected. Follow these steps to access a link group member by unfolding: Step 1 Call the group to the Master Fader by pressing the CALL key, then pressing the feed selection key of any member of the link group. Step 2 Press the Fold key next to the Master Fader. The members of the link group will now unfold across the faders to the left of the Master Fader replacing the faders that are normally positioned there in the current fader set. Each feed may now be adjusted or called to the Channel Panel. Press the Fold key again to re-group the feeds and return the current fader set. Follow these steps to access a link group member by selecting: GROUPING Step 1 Press the CALL key prior to calling any path to the Master Fader. Step 2 Hold down the BLUE key and press the feed selection key of any member of a link group. Double press to uniquely select a track feed for editing. 11-6 Once the BLUE key has been pressed it can be released as long as one or more selection key is held down. This enables multiple selections to be made with two hands. MULTI TRIM Multi Trim is a convenient method for making temporary groups to adjust the parameters of an arbitrary set of signal paths. Multi Trim operates by employing a virtual master with its own settings for all switches and control values for an entire channel strip. The values for these controls are initialised to zero or unity on power up, after which they remember their last settings. Multi Trim may act in relative or absolute mode. In relative mode, the Multi Trim group member’s parameters will be offset by the amount the master control is moved. In absolute mode, the member’s parameters follow the absolute value of any control that is adjusted. To change every parameter on all the selected paths, set the master controls on the Channel Panel or Master Fader and press the apply values soft key. When Multi Trim is selected, the Master Fader and rotary controls move to show the last virtual master values set, and all Channel Panel controls now act as master controls for all signal paths selected on the Selection Panel. There may be no selection in Multi Trim mode, which allows for the virtual master values to be adjusted to suitable positions before making a selection and applying values. Applying Multi Trim Multi Trim Key Figure 2: The Multi Trim Key Step 1 Press the Multi Trim key. Step 2 Press feed, bus or fader group selection keys to toggle them in or out of the selection. Step 3 Select Absolute or Relative mode by pressing the Abs or Rel soft keys in the LCD menu. Step 4 Adjust the Master Fader or any controls in the Channel Panel to control the group. The mixer display will be updated to show the changes as they occur. To update all parameters for all channels selected when in Absolute mode, press the apply values soft key. Step 5 Press the Multi Trim key to return to the previous mode or press another key to continue mixing or editing. MULTI TRIM 11-7 BUSES Buses share many features with link groups. The method of independently adjusting the individual elements of a bus is similar to that employed with link groups. Unfolding is not supported in DREAM software release 1.2. This information is included for future reference. Unfolding to Access Bus Elements Step 1 Call the bus to the Master Fader by pressing the CALL key, then pressing the bus selection key of the desired bus. Step 2 Press the Fold key next to the Master Fader. The members of the link group will now unfold across the faders to the left of the Master Fader replacing the faders that are normally positioned there in the current fader set. Each feed may now be adjusted or called to the Channel Panel. Press the Fold key again to re-group the feeds and return the current fader set. GROUPING 11-8 BUSES 12-1 NOTES: 12-2 Chapter 12 - Library INTRODUCTION The Library menu provides storage for Equaliser, Dynamics, Channel presets or complete Console snap shots. Up to 100 of each type of preset can be stored. These presets can be recalled and applied to any signal path in any project. Library Key Figure 1: Automation Keys To access the Library menu, press the Lib key. Select the preset type by pressing the EQ, DYN, CH or ALL CONSOLE soft key. Select the library function by pressing the Save, Load or Delete keys. The presets and functions are described below. PRESETS Equaliser A library of 100 equaliser settings is provided. Each equaliser preset stores all the parameter settings of the equaliser section on the signal path currently called to the Master fader. Press the EQ soft key in the Library menu to select equaliser presets. Dynamics A library of 100 dynamics settings is provided. Each dynamics preset stores all the parameter settings of the dynamics section on the signal path currently called to the Master fader. Press the DYN soft key in the Library menu to select dynamics presets. Channel A library of 100 channel settings is provided. Each channel preset stores all the parameter settings on the signal path currently called to the Master fader, excluding I/ O patching. ALL CONSOLE A library of 100 console settings is provided. Each console preset stores all mixer parameters for all feeds and buses. All patching, routing and name settings are also stored. Default Console Template INTRODUCTION 12-3 A special console library file named default is used to store the default setup of the console on power up. You may overwrite this file with any setup that suits your requirements. SAVING A PRESET Follow these steps to save a preset: Step 1 Call a signal path to the Master fader by pressing the Call key and then pressing one of the feed or bus selection keys. Step 2 Adjust the parameters you wish to store. Step 3 Press the Lib key to display the library menu. Step 4 Press the EQ, DYN, CH or ALL CONSOLE soft keys to select the type of preset you wish to store. Step 5 Press the Save soft key and type a new name for the library preset. The previously entered name is displayed by default. Step 6 Press Enter to save the preset or press the Cancel soft key to cancel the operation. LOADING A PRESET Follow these steps to load a preset: Step 1 Call the destination signal path to the Master fader by pressing the Call key and then pressing one of the feed or bus selection keys. Step 2 Press the Lib key to display the library menu. Step 3 Press the EQ, DYN, CH or ALL CONSOLE soft keys to select the type of preset you wish to store. Step 4 Turn the jog wheel to scroll through the list of available library presets for the selected type. Step 5 Press the Load soft key then press the Yes soft key to confirm the operation. DELETING A PRESET Unwanted library presets can be deleted by following these steps: LIBRARY Step 6 Press the Lib key to display the library menu. Step 7 Press the EQ, DYN, CH or ALL CONSOLE soft keys to select the type of preset you wish to delete. Step 8 Turn the jog wheel to scroll through the list of available library presets for the selected type. Step 9 Press the Delete soft key then press the Yes soft key to confirm the operation. 12-4 DELETING A PRESET 13-1 NOTES: 13-2 Chapter 13 - Ta lkback INTRODUCTION DREAM Console provides two talkback paths and one physical microphone preamplifier. An external microphone preamplifier must be used for the second talkback circuit. Alternatively, use the same microphone and input and use the two talkback paths to feed separate buses, for example for talkback and slate. Each talkback path uses a physical input and can be routed via a dedicated return with no signal processing. The talkback signals can be sent to one or more buses for slate or communications purposes. The talkback microphone can be connected to the XLR socket on the assignment panel. See “Talkback” on page 35-13 for details on connecting the talkback microphone. USING TALKBACK Press the Talk 1 and Talk 2 keys to unmute the talkback microphones. The talkback keys provides momentary or latching operation. Touch the key briefly to latch. Touch and hold for momentary operation. See “Setting Momentary Talkback Time Threshold” on page 33-14 for changing the latching response time of this switch. SETTING UP THE TALKBACK PATHS To control the talkback configuration, hold down a BLUE key and press a Talk key. An LCD menu will appear with options for configuring talkback. Selecting a Talkback Destination The talkback signals can be routed to any bus or combination of buses. Step 1 Hold down a BLUE key and press a Talk key. Buses currently selected for the talkback signal are illuminated, other buses are dimly lit. Step 2 Press any bus selection key to toggle it in or out of the selection to which the talkback signal is assigned. Select a Talkback Source To select the physical input for a talkback microphone: Step 1 Hold down a BLUE key and press the Talk key. Step 2 Press the Patch Source soft key in the LCD menu. The track feed keys are now used to select analog inputs. The input, if any, that is currently patched to the talkback channel is brightly lit. Inputs that are patched to other paths are flashing. Inputs that available to patch to this talkback channel are dimly illuminated. Step 3 Press a feed selection key to patch a physical input to the talkback channel. This replaces the previously selected patch. INTRODUCTION 13-3 DIM The level of the monitor speakers is dimmed automatically when Talkback is engaged. To set the dim attenuation, hold down the DIM key and turn the jog wheel to set the amount of attenuation. Auto Cue The Auto Cue feature enables automatic dimming of the control room monitors when the transport is stopped or not locked to timecode. This is achieved by automatically turning on one of the talkback circuits. This feature ensures that the faders are controlled by valid automation data before playing back an automated mix at full level. To use Auto Cue without affecting normal studio communications use the second talkback circuit and de-assign it from all destination buses. To enable Auto Cue hold down a BLUE key and press a Talkback key. Press the Auto Cue soft key to toggle Auto Cue on and off. TALKBACK 13-4 DIM 14-1 NOTES: 14-2 C hapter 14 - Name INTRODUCTION The Name Menu allows you to rename Projects, tracks and clips, and to setup seed names using the alphanumeric keys. When a name function is selected, the original name appears in the upper console display. You can then use the BACKSPACE key to edit the original name. Name Key Figure 1: Name Key Step 1 Press the NAME key. Step 2 Select the required name function by pressing a soft key. Step 3 Edit the name in the upper console display with the PC keyboard.d. Step 4 Press Enter. RENAMING A PROJECT To rename a Project whilst it is open, select the PROJECT soft key in the Name Menu, then enter the new name. NAMING TRACKS The track names of a Project can be changed to help organise Projects. Select the required track and press the TRACK soft key in the Name Menu. Enter the new name. NAMING CLIPS All clips in a Project can be given an individual name. A clip can be copied and given a different name to the original. Different clips can also be given the same name. To name a clip, locate the transport so the cursor lies over the clip, selecting the appropriate track if necessary, then press the CLIP soft key in the Name Menu. Enter the new name on the PC keyboard. INTRODUCTION 14-3 SEED NAMES Seed names are given to all new recordings in a Project. You will notice that recordings are given an incremental number for each new clip. Seed names allow you to enter a name that will be given to each new recording which will include an incremental numeric suffix. In the Name Menu, the last soft key allows you to toggle between GLOBAL and TRACK seed modes. To enter a seed name, first select GLOBAL or TRACK, then select the SEED soft key and enter the name. The descriptions for these modes are as follows: GLOBAL The global seed name is given to every new recording in the Project followed by an incremental number. For example, if a global seed name “Voice Over “is entered, the first recording will be named “Voice Over 1". The numeric suffix will increment automatically for each recording i.e. the next recording will have the name “Voice Over 2". If more than one track is recorded at the same time, the recordings on each track will have an incremental number. TRACK In the track mode, each track can be given an individual seed name. This is done by selecting a track key before entering the name. When in the track mode, recordings on tracks with seed names will be given the track seed name followed by an incremental number. If a track has no seed name, it will be given the global seed name. NOTES: 1. The system defaults to a null GLOBAL seed name. This results in recordings being given names with numbers only. 2. To clear seed names, select the desired name function, then type a new seed number and press Enter. 3. To start recording at a specific number, edit the seed name's numeric suffix. 4. Use only the following characters in names: A - Z, a - z, 0 - 9, _ (underscore) 5. If a Range has been created, all clips that are wholly inside it can be named with one command. NAMING FEEDS AND BUSES Feeds and Buses can be named from the Call menu. Names appear in the mixer display on each channel or bus tile. NAME Step 1 Press the Call key to enter the Call menu. Step 2 Press a feed or bus selection key to call the path to the master fader. Step 3 Press the name soft key. 14-4 Step 4 Type a name for the signal path and press Enter. Press the Tab key to enter the name and step to the next feed. Hold the Shift key and press Tab to move to the previous feed. NAMING FEEDS AND BUSES 15-1 NOTES: 15-2 C hapter 15 - Clip Level INTRODUCTION The LEVEL Menu allows clips to be amplified and attenuated by up to 99dB. The gain changes are performed by the system in real time as the audio is output from the machine. Applying a level to a clip does not affect the waveform on disk. The level function can operate on multiple tracks, on clips that lie beneath the cursor and also within a Range. The gain shown for a clip is relative to the original waveform. For mixer level setting functions see “Faders” on page 7-2. Level Key Figure 1: Level Key Applying a Level Change Step 1 Press the Level key. Step 2 Locate the cursor over the clip(s) or define a Range that wholly contains the dips. The level of a clip is shown in the edit display. Step 3 Select SET or TRIM and use the jogger wheel, numeric keypad or the + and - keys to set the desired level (to enter a negative value type Clear -). The output level changes in real-time. Step 4 Press Enter to make the change permanent. The output of each track is displayed on the level meters. Press BLUE “a” on the PC keyboard to display the meters. LEVEL SOFT KEY FUNCTIONS Set The SET soft key sets the level of all selected clips to the value that was entered. For example, if three clips were already set to levels of -6, 0 and +4dB, Using the SET function at +2dB would change the levels of all three clips to +2dB. INTRODUCTION 15-3 Trim The TRIM soft key adds the entered value to the existing level of all selected clips. For example, if three clips were already set to levels of -6, 0 and +4dB, using the TRIM function at +2dB would change the levels of the clips to -4, +2 and +6dB respectively. Mode The MODE soft key switches the Level Menu between CLIP level and DISPLAY level. When in DISPLAY mode, the waveforms displayed in clips can be scaled for easier viewing whilst editing. This does not change the level of the clip - only the displayed waveform. Clip Press the clip soft key to select the clip as the target for the level change. Display Press the display soft key to alter the amplitude scale of the display. When in DISPLAY mode, the waveforms displayed in clips are be scaled for easier viewing whilst editing. This does not change the level of the clip - only the displayed waveform. Clip Before Level Change Clip After Level Change Figure 2: Display Level Change Step 1 Press the Level key. Step 2 Locate the cursor over the clip(s) or define a Range that wholly contains the clips Step 3 Press the MODE soft key to change to DISPLAY mode. Step 4 Select SET or TRIM and use the jogger wheel, numeric keypad or the + and - keys to set the desired display. The clip display changes in real time. Step 5 Press Enter to make the change permanent Info Additional information can be displayed in clips on the track display. When Info is ON the clip display includes the status of the LEVEL, PAN, EQ, and BIT DEPTH if greater than 16, associated with each clip. Press the Info soft key to toggle between ON and OFF. CLIP LEVEL 15-4 Range A number of clips can be altered at the same time using a Range and track selection. A range is created using the From and To keys, as described in“Selecting a Range” on page 4-10. When using a Range, only clips that are entirely within the Range are affected. NOTES: It is possible, when using the Level Menu, to push the level of a clip over digital full scale. Check the meters, to set the level for just part of a clip, then use the SPLIT command to break it into the right sized pieces, then set the appropriate levels. To create a ramp between different levels in one clip, first copy the section whose level is to be changed (using the Edit Menu), then paste it back on top of its source. Change its level as desired, then use the Fade Menu to create fades at either end of the clip. This will cause it to crossfade with the source clip underneath, which will be playing at the original level. LEVEL SOFT KEY FUNCTIONS 16-1 NOTES: 16-2 Chapter 16 - Clip Equalisation INTRODUCTION DREAM Console provides clip based, four band parametric Equalisation (plus shelving) which can be applied to a single clip or range of clips within a Project. EQ is performed by the system in real time as the audio is output from the DREAM Console, therefore applying an EQ change does not affect the audio data on disk. The clip based EQ is independent of the track feed mixer EQ. For mixer EQ functions see. EQ Key Figure 1: EQ Key Applying EQ Step 1 Press the EQ key. Step 2 Locate the cursor over the clip or define a Range of clips. Step 3 Press the EDIT soft key. Step 4 Use the numeric keypad to select the appropriate EQ parameter. Step 5 Adjust the parameter using the jogger wheel. Step 6 Press Enter. Each equalisation band has three parameters you can change. They are: centre frequency of the band, gain (cut or boost) at that frequency, and Q-factor (sharpness of the band) or whether it is a high or low shelf. INTRODUCTION 16-3 EQ DISPLAY EQ Parameters In/Out Level Overload Old/New Figure 2: EQ Display Frequency The centre frequency of each band. Q or Shelf This displays the Q of the band or indicates the type of shelf. Range 0-99. Gain The gain of the band. Range -99 to +20dB. Old or New Shows if the EQ is the old or new setting. Overload This shows red when digital clipping is occurring. Level The gain adjustment applied to the EQ. Range -20 to +20dB. In or Out Shows if EQ is switched in or out. Selecting Shelf To change a Q parameter to a shelf, hold down the BLUE key and press the + or keys on the numeric keypad. Numeric Entry To enter the values for the EQ parameters as numbers, press the NUMBER soft key and use the numeric keypad. Otherwise, the twelve numeric keys map to the twelve EQ parameters. New or Old Whilst adjusting an EQ parameter it is possible to toggle between the new and old settings using the NEW/OLD soft key until you press <Enter>. In or Out Toggle the EQ on and off with the IN/OUT soft key. CLIP EQUALISATION 16-4 Copying an EQ The EQ parameters of a clip can be copied to another clip or Range of clips. Step 1 Press the EQ key. Step 2 Locate the cursor over the source clip. Step 3 Press the COPY soft key. Step 4: The five soft keys enable deselection of bands if required Step 5 Locate the cursor over the destination clip or define a Range of clips. Step 6 Press <Enter>. Notes: Parameter Display Current EQ parameters are always shown at the top of the screen when the EQ menu is active, helping to see what is active and what values are current. The layout of the parameter values is exactly the same as the layout on the numeric keypad. A graph helps you to see what is going on. EQ In/Out Use the EQ In/Out Soft key to toggle the EQ on or off at any time. This action will affect the clip under the cursor, or all clips in the Range, if any. The on/off position of this switch is stored in the clip along with the settings of the EQ parameters. 1. While you are changing parameter values with the jogger wheel, the actual sound is updated every .25 sec. 2. Turning the wheel faster increases the steps between values. 3. There is no limit to the frequency Range for each band, so you can have your low frequency higher than your high frequency if you want. 4. When you are using a Range, it is possible to change one or more bands for the entire Range, while leaving other bands as they were. So, for example, the clips might have different settings for LOW EQ but the same setting for HIGH EQ. EQ DISPLAY 17-1 NOTES: 17-2 C hapter 17 - Gate Menu INTRODUCTION The Gate Menu automatically edits clips to remove sections that fall below a given level. Gating can be set to occur during recording and playback of audio. Gate Key Figure 1: The Gate Key GATING CLIPS Step 1 Hold down the BLUE key and the GATE key. Step 2 Locate the cursor over a clip or define a Range of clips. Step 3 Enter the parameters (described below). Step 4 Press the GATE soft key. The Gating soft key parameters are as follows: GATE Executes the gating function. THRESHOLD This is the level the signal has to fall below for gating to occur. Range -99 to -1dB. Use the Jog wheel or numeric keypad to enter the value. HOLD The duration in frames that a signal must remain below the threshold before gating will occur. Range 0 to 999 frames. Use the Jog wheel or numeric keypad to enter the value. HANDLE The length in frames the clip will be extended at the head and the tail to allow for slow attack and decay. Range 0 to 99 frames. Use the Jog wheel or numeric keypad to enter the value. INTRODUCTION 17-3 COMMIT Turning COMMIT on will give you the option of permanently removing the gated audio from your Project. This process is described later in the Space Menu. The COMMIT process can be performed at any time later, so leave this turned off for now. Once a Gate has occurred the clips can be trimmed using the TRIM command to adjust the hands and tails. Original Clip Clip after Gating Figure 2: Gating GATING DURING RECORD Using the GATE function described above will take time to scan the clip(s). It is possible to set the gate parameters prior to making a recording so the gate is instantaneous if used after the recording is complete. The threshold and gate indicators are displayed on the level meters. These can be turned off by setting the THRESHOLD to -99dB. Gate Indicators Threshold Figure 3: Gate Meter Display The indicators are coloured as follows: GATE MENU Green The signal level is above the threshold. Yellow The signal level has fallen below the threshold. Red The signal level has stayed below the threshold for longer than the HOLD time. This means that the recording will be gated. 17-4 NOTE: 1. The gating information gained during recording is based on the threshold and hold values set at the time of the recording. If you change those values and then issue the gate command, the audio will be re-scanned. 2. When you have armed tracks for recording and the meters are displayed, a traffic light display shows you the gating activity. 3. When COMMIT is toggled ON, the system will ask you to confirm by pressing the Enter key before anything destructive happens. While the computer is waiting for confirmation you may play the audio to check whether it is okay before pressing Enter. To escape at this point, press any soft key or mode key. GATING DURING RECORD 18-1 NOTES: 18-2 Chapter 18 - Time Compre ssion & Expansion INTRODUCTION The DREAM Console provides powerful DSP functions which can be found within the Wave Menu. All of the WAVE functions create a new waveform on disk. A new clip is created and the original is not altered or erased. Wave Key Figure 1: Wave Key PERFORMING TIME COMPRESSION/EXPANSION Step 1 To enter the Wave Menu, press the WAVE key. Press the MODE soft key. Step 2 Use the jogger wheel or + and - keys to select the desired function. Step 3 Press Enter. The functions available are STRETCH, VARI and PITCH as described above. . STRETCH Stretching and compressing clips in time while maintaining pitch. VARI Stretching and compressing clips by varying the pitch. PITCH Changing the pitch without changing the duration. INTRODUCTION 18-3 STRETCH AND VARI Selecting an Algorithm The STRETCH and PITCH functions use algorithms which must be selected and optimized depending on signal content for the best results. Step 1 Press the Algorithm soft key. Step 2 Use the jogger wheel or + and - keys to select the desired algorithm. Step 3 Press Enter. The algorithms are as follows: VOICE 1 Deep male voice. VOICE 2 Female voice or high male voice. POP 1 Percussive Pop music. POP 2 Pop music. CLASSIC 1 Percussive Classical music. CLASSIC 2 Classical music. There are optional high-performance, third-party plug-in algorithms available. Contact your distributor for more details. Selecting the Scale The STRETCH and PITCH algorithms have a Scale parameter which must be optimized for the best results. Start adjusting around 50 and increase the value to reduce frequency wobble, or decrease to reduce flanging and phasing. Step 1 Press the SCALE soft key. Step 2 Use the jogger wheel or numeric keys to enter the desired scale. Step 3 Press Enter. Percent The STRETCH and VARI functions can be activated by entering a value from 25% to 400% (100% is no change). The function is performed as soon as this value is entered. The location of the cursor on the selected clip will be maintained with the new clip. Step 1 Locate the cursor over the source clip. Step 2 Press the PERCENTAGE soft key. Step 3 Enter a percentage value using the jogger wheel or numeric keypad. Step 4 Press Enter. TIME COMPRESSION & EXPANSION 18-4 Target Time The STRETCH and VARI functions can be activated by entering a target length for the clip. The function is performed as soon as the time is entered. Step 1 Locate the cursor over the source clip. Step 2 Press the TARGET soft key. Step 3 Enter a target time using the jogger wheel or numeric keypad. The target time appears in the upper console display. Step 4 Press Enter. Pressing the TARGET soft key repeatedly brings up target durations corresponding with some useful ratios, such as 24 to 25 and 44.1K to 48K, and these can be further edited. Pitch using Varispeed The VARI function can be activated by entering the pitch shift in semitones and cents (hundredths of a semitone). The function is performed as soon as the pitch is entered. Step 1 Locate the cursor over the source clip. Step 2 Press the MEASURE soft key to toggle between time and pitch. Step 3 Press the SEMITONES soft key. Step 4 Enter the pitch using the jogger wheel or numeric keypad. Note: Holding down the BLUE key and pressing the + and - keys will increment in whole semitones. Step 5 Press Enter. Range The STRETCH and VARI functions can be activated by defining a target Range for the clip. The function is performed as soon as FIT RANGE is selected. (The FIT RANGE soft key appears when a Range is defined.) Step 1 Define a Range for the destination clip with the From and To keys. Step 2 Locate the cursor over the source clip (this does not have to be in the Range). Step 3 Press the FIT RANGE soft key. STRETCH AND VARI 18-5 PITCH The PITCH function can be activated by entering the pitch shift in semitones and cents (hundredths of a semitone). The function is performed as soon as the pitch is entered Adjust the Algorithm and Scale as described above. Step 1 Locate the cursor over the source clip. Step 2 Press the SEMITONES soft key Step 3 Enter the pitch using the jogger wheel or numeric keypad. Note: Holding down the BLUE key and pressing the + and keys will increment in whole semitones. Step 4 Press Enter. NOTES: The audio format for the new Master Recordings created by the Wave Menu may be chosen on the System Page. The options include processing in the clips original bit depth or in the current Project bit depth. TIME COMPRESSION & EXPANSION 18-6 PITCH 19-1 NOTES: 19-2 Chapter 19 - Solo and Mute INTRODUCTION The DREAM Console provides two independent solo and mute systems. The solo and mute features described in this chapter are integrated into the disk recorder system. These offer a fast method of controlling which track feeds are monitored. The solo and mute functions described in this chapter can be used in conjunction with mixer solo and mute features which are described in “Solo” on page 7-3 and “Mute” on page 7-5. The disk recorder SOLO and MUTE functions operate in a similar manner to those on a mixing console. SOLO mutes all tracks except for soloed tracks, MUTE silences only the selected tracks. Both the SOLO and MUTE functions can be activated by pressing the Solo or Mute key then selecting the desired tracks. Solo Key Mute Key Figure 1: Solo and Mute Keys There is also a useful feature where you can hold down the Solo or Mute key while selecting the tracks. This will automatically return you to the previous menu when you release the keys. SOLOING TRACKS Step 1 Press or hold the Solo key. Step 2 Select tracks to SOLO. The SOLO function can be toggled on or off with the first soft key in the LCD menu. This will switch between soloing the selected tracks and monitoring all tracks. Indicators next to the track numbers show orange for soloed tracks and blue for remaining silent tracks. INTRODUCTION 19-3 SOLO FOLLOWS EDIT The SOLO FOLLOWS EDIT function automatically puts selected tracks into SOLO as you edit. Step 1 Press the Solo key. Step 2 Toggle the FOLLOW function on or off with the second soft key. MUTING TRACKS Step 1 Press or hold the Mute key. Step 2 Select tracks to mute. The MUTE function can be toggled on or off with the first soft key. This will switch between muting the selected tracks and monitoring all tracks. Indicators next to the track numbers show blue for muted tracks. SAFE Tracks can be put into SAFE mode to prevent accidental editing or recording. Step 1 Hold down the BLUE key and press the Safe key. Step 2 Select tracks to be in SAFE mode. The SAFE function can be toggled on or off with the first soft key. This will switch between having the selected tracks safe and no tracks safe. Indicators next to the track numbers show green for safe tracks. DISABLE Tracks can be disabled for playback, waveform display and editing. SOLO AND MUTE Step 1 Hold down the BLUE key and press the Disab key. Step 2 Select tracks to DISABLE. The DISABLE function can be toggled on or off with the first soft key. This will switch between having the selected tracks disabled and no tracks disabled. 19-4 DISABLE 20-1 NOTES: 20-2 Chapter 20 - Track & Takes INTRODUCTION The Track Menu is used to copy and move clips to other tracks without affecting their position in time. Tracks may also be re-numbered. All Track functions, except NUMBERS, use a Range, and affect all layers of clips. The Takes Menu provides the POP function which moves clips on lower layers to the top. Clips that lie beneath the cursor are listed in the upper display. Takes Key Track Key Figure 1: Takes and Track Keys TRACK MENU Step 1 Hold down the BLUE key and press the Track key. Step 2 Define a Range (not applicable to the NUMBERS function). Step 3 Select the source track. Step 4 Select the desired function. Step 5 Select the destination track. Swap After SWAP has been selected, the defined Range will be swapped on the source and destination tracks. Numbers The NUMBERS function swaps the entire track, including the track name. It does not use a Range and is not reversible using the UNDO key. Move removes the clips in the Range on the source track and places them on the destination track. Any clips on the destination track will be buried. MOVE INTRODUCTION 20-3 Copy places a copy of the clips in the Range onto the destination track. Any clips on the destination track will be buried. The source track is not changed. COPY Shadow The audio on the destination track is erased where there are clips on the source track.This is useful for splitting audio to different tracks, for example, telephone and perspective splits. The source track is not changed. TAKES MENU When new clips are recorded or copied above existing clips in a track, only the top clip can be heard. The Takes Menu allows you to select a clip from several clips that have been layered and bring it to the top. Clips that lie beneath the cursor are listed in the upper display Clip Layers Under Cursor Figure 2: Takes Display TRACK & TAKES Step 1 Locate the transport so the cursor lies over the clip. Step 2 Hold down the BLUE key and press Takes. Step 3 Use the Jogger wheel or + and - keys to select desired clip. Step 4 Press the POP soft key. 20-4 TAKES MENU 21-1 NOTES: 21-2 C hapter 21 - Go To INTRODUCTION The Go To Menu is used to locate to SMPTE times, marks (stored timecode points), or named clips. After the transport has located to the target, you will be returned to the mode you were in before the GO TO command. GO TO commands are terminated with the Enter key if you want to locate, or with the Play key to preroll the selected point and go into play immediately (see “Setting Preroll and Postroll” on page 22-3). Go To Key Figure 1: The Go To Key GO TO A TIMECODE LOCATION Step 1 Press the GO TO key. The timecode location is displayed in the lower half of the upper console display. Step 2 Edit the timecode location if necessary using numeric keypad. Use CLEAR to set this value to 00:00:00:00. Step 3 Press Enter to move to the new timecode location. The TIME soft key is the default mode for the GO TO function. The GO TO TIME function locates the transport at a specific timecode point.The output of each track is displayed on the level meters. Press PLAY to play from the new location with pre-roll. INTRODUCTION 21-3 TIMECODE CALCULATOR Figure 2: Numeric Keys and GOTO Menu The GOTO menu provides access to a flexible timecode calculator. The LCD displays the current timecode location above the numeric register display. Numbers are entered into the numeric register by typing on the numeric keypad or by capturing the current timecode location using the down arrow key above the GOTO key. There are actually two registers. The displayed register containing the most recently entered value and another hidden register containing the previously entered value. Operations are performed on the values contained in these two registers. Follow these steps to jump to a location 30 seconds ahead of the current location. Step 1 Press the GOTO key. Step 2 Press the down arrow to capture the current location and load it into the numeric register. Step 3 Type 30 then press the 00 key. Step 4 Press the + key. Step 5 Press Enter to move the transport to the new location. Subframe display and calculation may be turned on or off by holding down a BLUE key and pressing the Subf key on the numeric keypad. There are 80 SMPTE subframes per frame. Pressing the + key when no values are entered into the numeric registers increments the displayed register by one frame or one subframe. Turning the jog wheel clockwise performs the same function as the + key. Turning the jog wheel anti-clockwise performs the same function as the - key. GO TO 21-4 GO TO A MARK The GO TO MARK function locates the transport at a mark. For details on entering and editing marks see “Marks” on page 25-2. Step 1 Press the GO TO key. Step 2 Press the MARK soft key. Step 3 Stored marks are listed on the video display. Select the desired mark using the jogger wheel, + and - keys or type the mark number on the numeric keypad. Step 4 Press Enter. FAST MARK LOCATION Step 1 Press the GO TO key. Step 2 Press one of the track keys. It is possible to quickly locate to the first 24 marks using the track keys. GO TO LAST Locates the transport to last place you located to using the Go To Menu. GO TO CLIP NAME The GO TO CLIP NAME function locates the transport to the head of the desired clip. It also incorporates an alphanumeric search function to help sort through clips by name. Step 1 Select GO TO Step 2 Select CLIP NAME. Step 3 Clips are listed on the video display. Select the desired clip using the jogger wheel or by typing the name of the clip using the alphanumeric sort facility described below. Step 4 Press Enter. GO TO A MARK 21-5 ALPHANUMERIC SORTING When the GO TO CLIP NAME soft key is pressed, the display lists all clips in the Project. If you start typing letters on the alphanumeric keyboard, the list is shortened to show only clips starting with matching letters. The name you type appears in the upper console display. Additional logical sorting criteria are provided by the soft keys. These are as follows: GO TO ANY This places an asterix (*) in the search text. The asterix can be replaced by any number of characters. For example, typing * squeak would enable the listing of mouse squeak and doorsqueak. ANY 1 This places an equals sign (=) in the search text to replace any one character. 1 OR NONE This places a question mark (?) in the search text to replace any one character or no character. OR A bar (|) is placed in the search text to add another name. Clips with names containing either search string will be listed. For example, typing *door|*slam will list clips with names containing door as well as clips with names containing slam. This will list “door squeak” and “door slam” but not “mouse squeak”. AND An ampersand (&) is placed in the search text to add another name. Only clips with names containing both search names will be listed. For example, typing *door&*squeak would list only the clips with names including both door and squeak. This will list “door squeak” but not “mouse squeak” or “door slam”. 21-6 ALPHANUMERIC SORTING 22-1 NOTES: 22-2 Chapter 22 - ADR, GPI & Loop INTRODUCTION DREAM Console provides the ability to automate recording using In and Out points with a simple interface. The ADR menu includes functions for setting pre and post-roll and features for automatic dialogue replacement. GPI/ADR Key Preroll Key Loop Key Figure 1: GPI/ADR and Preroll Keys USING THE ADR FUNCTIONS Step 1 Arm the desired tracks. Step 2 Press the ADR key. Step 3 Set the IN and OUT points using the From and To keys. Step 4 Select the desired mode. Step 5 Press the CYCLE soft key. The soft keys function as follows: REHEARSE Selects REHEARSE mode. When CYCLE is pressed, the transport loops continuously between the Preroll and Postroll points. Armed tracks will switch to input between the IN and OUT points. RECORD / PLAYBACK toggles between the following modes: RECORD When CYCLE is pressed, the transport locates to the preroll point and does one pass to the postroll point with the transport dropping in and out of record at the IN and OUT points. PLAYBACK When CYCLE is pressed, the transport locates to the preroll point and plays to the postroll point. Both of the above modes return the transport to the Preroll point on completion. CYCLE Starts the transport in one of the above modes. INTRODUCTION 22-3 PREROLL Locates the transport to the preroll position. MORE Toggles to a second soft key Menu. The second soft key Menu functions as follows: EARLY IN The transport drops into record as soon as this key is pressed. This enables dropping in during the Preroll period. REC OUT Selects between one of the following modes: PROG - The transport drops out of record at the OUT time. OPEN - Recordings continue until stopped by the operator. KEEP PLAYING The transport drops out of record at the OUT time, but continues playing without stopping at the Postroll point. BACK Returns to the first soft key Menu. NOTES: 1. The Auto Record functions also control the armed tracks on a 9 pin machine if it is online. 2. Countdown beeps and relay closures for ADR can be set up using the GPI Menu. SETTING PREROLL AND POSTROLL The highest value preroll and postroll of the machines currently online will be used for RECORD and PLAY functions. This includes M1, M2, DISK and LTC Generator. Step 1 To enter the Preroll Menu, hold down the BLUE key and press the Preroll key. Then press the POSTROLL soft key if you are setting the POSTROLL. Step 2 Select the soft key for the desired machine. Available machines are: M1 - external machine 1 M2 - external machine 2 Disk - internal disk recorder Gen - LTC generator output Step 3 Use the jogger wheel or numeric keypad to enter the preroll. Range 1 to 99 seconds. Step 4 Press Enter. GPI MENU GPI means General Purpose Interface (sometimes known as GPO - General Purpose Output). It refers to eight logic interface outputs in the GPI connector at the ADR, GPI & LOOP 22-4 rear of the QDC Engine which can be used to trigger events external to the DREAM Console. The GPI is used for tally lights and other studio automation tasks. GPOs switch at specific timecodes or upon certain events. Each GPO is given a type, which determines what type of event triggers it. The first eight track keys (on the console) represent the eight GPOs when the GPI Menu is active. Only one can be selected at a time. Step 1 Press the BLUE key and then the GPI key on the console to access the GPI Menu. Step 2 Select which of the eight available outputs you wish to use via the track keys. Step 3 Press the first soft key, turn the Jog wheel and press Enter to select one of the 12 possible GPO types. Depending on which is chosen, additional soft key settings will be displayed. Type - OFF Description GPO is inactive. Type - ON Description GPO is always ON. Examples Example - Recording session in progress tally light. Type - Simple Description GPO fires at a given timecode. Examples Starting a device. Time Timecode when the GPI fires. Pulse Sets the length of time the GPO remains ON. May be set to a number of milliseconds, or set to HELD where the GPO stays on until the transport stops. Copy Copies the value in the TIME field to the numeric Register, where it may be used for another operation. Fire Fires a GPO immediately, for testing purposes. If pulse is set to held, the GPO switches on and off as the key is pressed and released. Type - Record Description GPO remains on while the transport is in Record. GPI MENU 22-5 Examples Warning lights, tallies, indicator lights for artists. Timecode GPO remains ON whenever the transport is inside the ADR Menu Record Range. If Command is chosen, the GPO turns on only when the transport is in Record. Pulse Only available if Timecode is set. Sets the length of time the GPO remains ON. May be set to a number of milliseconds, or set to HELD where the GPO stays on until the transport stops. Fire Fires a GPO immediately, for testing purposes. If pulse is set to held, the GPO switches on and off as the key is pressed and released. Type - PREROLL ADR, GPI & LOOP Description GPO remains on while the transport is Prerolling. Examples Indicator lights for artists. Timecode GPO remains ON whenever the transport is inside the ADR Menu Record Range. If Command is chosen, the GPO turns on only when the transport is in Record. Pulse Only available if Timecode is set. Sets the length of time the GPO remains ON. May be set to a number of milliseconds, or set to HELD where the GPO stays on until the transport stops. Fire Fires a GPO immediately, for testing purposes. If pulse is set to held, the GPO switches on and off as the key is pressed and released. 22-6 Type - POSTROLL Description GPO remains on while the transport is Postrolling. Examples Indicator lights for artists. Timecode GPO remains ON whenever the transport is inside the ADR Menu Record Range. If Command is chosen, the GPO turns on only when the transport is in Record. Pulse Only available if Timecode is set. Sets the length of time the GPO remains ON. May be set to a number of milliseconds, or set to HELD where the GPO stays on until the transport stops. Fire Fires a GPO immediately, for testing purposes. If pulse is set to held, the GPO switches on and off as the key is pressed and released. Type - ADR REH Description GPO remains on while the ADR Menu is in Rehearse mode. Examples Indicator lights for artists. Timecode GPO remains ON whenever the transport is inside the ADR Menu Record Range. If Command is chosen, the GPO turns on only when the transport is in Record. Pulse Only available if Timecode is set. Sets the length of time the GPO remains ON. May be set to a number of milliseconds, or set to HELD where the GPO stays on until the transport stops. Fire Fires a GPO immediately, for testing purposes. If pulse is set to held, the GPO switches on and off as the key is pressed and released. GPI MENU 22-7 Type - ADR PLAY Description GPO remains on while the ADR Menu is in Play mode. Examples Indicator lights for artists. Timecode GPO remains ON whenever the transport is inside the ADR Menu Record Range. If Command is chosen, the GPO turns on only when the transport is in Record. Pulse Only available if Timecode is set. Sets the length of time the GPO remains ON. May be set to a number of milliseconds, or set to HELD where the GPO stays on until the transport stops. Fire Fires a GPO immediately, for testing purposes. If pulse is set to held, the GPO switches on and off as the key is pressed and released. Type - BEEPS Description GPO fires three times leading up to a programmed recording. Examples Cueing for artists. Spacing Time between beeps. Pulse Only available if Timecode is set. Sets the length of time the GPO remains ON. May be set to a number of milliseconds, or set to HELD where the GPO stays on until the transport stops. Fire Fires a GPO immediately, for testing purposes. If pulse is set to held, the GPO switches on and off as the key is pressed and released. Type - PREREC ADR, GPI & LOOP Description GPO fires once at a given time leading up to a programmed recording. Examples Streaming lights. Pre Time Set a time in frames by which the GPI precedes the recording. Pulse Only available if Timecode is set. Sets the length of time the GPO remains ON. May be set to a number of milliseconds, or set to HELD where the GPO stays on until the transport stops. Fire Fires a GPO immediately, for testing purposes. If pulse is set to held, the GPO switches on and off as the key is pressed and released. 22-8 Type - MARKS Description GPO fires when the transport reaches each MARK (in play and record). Examples Track starts for CD recorders. Pulse Only available if Timecode is set. Sets the length of time the GPO remains ON. May be set to a number of milliseconds, or set to HELD where the GPO stays on until the transport stops. Fire Fires a GPO immediately, for testing purposes. If pulse is set to held, the GPO switches on and off as the key is pressed and released. Type - CUE MUTE Description Can be set ON or OFF independently for the PREROLL and POSTROLL periods of the ADR Menu. Examples Controls whether the original track is heard during each stage of the ADR recording. Ahead If toggled ON, GPI is ON during the Preroll section. IN If toggled ON, GPI is ON during the record section. Fire Fires a GPO immediately, for testing purposes. If pulse is set to held, the GPO switches on and off as the key is pressed and released. NOTE: When a GPO is set to the BEEPS type, DREAM Console can also output audio beeps from one of its channels. This is controlled from a configuration file called mdr_cfg, which is discussed in “The MDR Configuration File” on page 33-6l. SETTING LOOP MODE The Loop Menu places the transport in a continuous loop. The transport will repeat the loop until Stop or another transport key is pressed. Step 1 Press the Loop key. Step 2 Set the loop start and end points using the From and To keys on the Binnacle. Step 3 Press the Enter key. The Loop should now begin. Step 4 To end the Loop, press the Stop key. SETTING LOOP MODE 22-9 ADR, GPI & LOOP 22-10 SETTING LOOP MODE 23-1 NOTES: 23-2 Chapter 23 - Aut omat ion INTRODUCTION The optional DREAM automation system provides simple, flexible and comprehensive facilities for recording and editing mix automation data. All feed and bus mix parameters can be automated and played back in perfect synchronisation with the project audio. In addition to the channel parameters, bus assignments, inserts and direct outs may also be recorded. The DREAM automation system is designed to allow the operator to record all the static and dynamic parameter changes involved in balancing the mix of tracks played back from the disk recorder and live feeds from external sources. Mix moves may be recorded on one or more parameters or channels at a time. More moves may be added with each pass, resulting in complex and detailed mixes that can be played back identically every time the project and mix are loaded. This chapter does not cover basic operation of the mixer. Refer to the chapters on “Patching and Routing”, “Faders” and “The Channel Panel” for a complete overview of mixer operation. “Automation Basics” below provides an in depth discussion on the fundamentals of the automation system. Example procedures are detailed later in the chapter. Figure 1: DREAM Console Enable and Automation Keys AUTOMATION BASICS Every parameter on every signal path can independently be set to any one of five automation states. These states are: Read, Write, Trim, Preview, and Isolate. The DREAM automation system provides the user with many different methods of engaging these states on the parameters of the mixer. This flexibility allows each user to adopt the methods that suit their preferred technique or project requirements. This chapter will introduced some of these basic methods. A thorough understanding of fundamentals of the system will guide the user to find the methods that work best for them. Mix ON Before the Mix ON key is pressed, all mixing and routing functions can be manually operated but the mixer will not record or play back automation. Pressing the Mix ON key allows the console to write and read mix automation data. The automation data for a project starts at a timecode location one frame after midnight and finishes one frame before midnight. However, the system requires a minimum preroll of at INTRODUCTION 23-3 least one second and it is advisable to start projects at a location of at least one minute after midnight, providing adequate preroll. Static Snapshots Project Snapshot Every project contains a snapshot of the state of the mixer when the project was last closed. When a project is opened, the mixer state is updated and all parameters are recalled. Mix Snapshot Every saved mix contains a snapshot of the state of the mixer when the mix was saved. More than one complete mix can be saved within a project. When a mix is loaded the mixer state is updated and all parameters are recalled. See “Data Storage” on page 23-20 for more details. Parameter Enables Parameters must be enabled before any automation data can be recorded. Parameters can be enabled by pressing any of the blue oval Enable keys. Enable keys appear in the Master Enable section, in each section of the Channel Panel, next to the Master Fader, and next to the Bus Assign key. The enable keys provide a hierarchy allowing the operator to enable specific groups of parameters, for example, one band of the equaliser; or to select all parameters of a given type, for example, all dynamics parameters; or all parameters can be selected at once by pressing the ALL enable key. See the “Parameter Enable Map” on page 23-6 below for a detailed view of which parameters belong to which enable key. The three enable keys next to the Master Fader duplicate the function of the Pan enable key in the Channel Panel, the Mute master enable and the Fader master enable in the Master Enables section. If an individual group of parameters is enabled, the associated Master Enable key will flash to show that some, but not all of that type of parameter is enabled. Double pressing the Master Enable will clear all individual enables. If any parameter or master enable is enabled, the ALL master enable will flash. Parameter enables apply only to recording mix data and have no effect on read. All mix moves will play back regardless of the parameter enable settings. Signal Path Enables Enabling signal paths for automation, allows the operator to limit the range of paths on which automation may be recorded. Signal path enables are only effective when recording automation using manual or automatic Punch in, Prime mode, or when using Touch Write or Trim when the Mix menu Touch AutoEnable item is not selected. These methods are all dependent on the signal path enable selection and are described in detail below. It is possible to record parameters on signal paths that are not enabled, by using the AUTO key next to any fader, or by using Touch when the Mix menu Touch AutoEnable item is selected. Signal paths can be selected and enabled for automation only when the Mix menu is active. Press the Mix key to activate the Mix menu. Feeds or buses which are illuminated when the Mix menu is active are enabled for automation record, press any AUTOMATION 23-4 feed or bus selection key to toggle its enable status. This selection is also referred to as the “mix mask”. The Enable Matrix The enable matrix is the selection of which parameters are enabled to enter automation record. These parameters are the intersection of the selected signal paths and the enabled parameters. Track 1 Track 2 Track 3 Track 4 ... Live 1 Live 2 Live 3 Live 4 ... Bus 1 Bus 2 ... Fader Mute EQ HF Gain 1 EQ HF Freq 1 EQ HF Shape 1 EQ HF Gain 2 EQ HF Freq 2 ... Dyn Comp Thresh Dyn Comp Ratio ... Aux 1 Gain Aux 1 Mute Aux 1 Pre Aux 1 Pan Aux 2 Gain ... Parameter Status Mixer parameters can be in one of five states: Read, Write, Trim, Isolate and Preview. The current state of each parameter is displayed by coloured illumination surrounding all rotary encoders, illumination in the bottom half of all switches and text indicators next to each fader. Note that the text indicators next to the faders display the status of the fader level parameter, not the status of the entire signal path. The five parameter states are described below. Read When parameters are in Read the automation system takes control of the parameter values and the physical position of the pots and faders. Controls are illuminated green when in Read. A parameter is in Read whenever any automation data has been recorded for that parameter anywhere in the project and the transport is in PLAY. Mix On must be engaged for a parameter to be in Read. AUTOMATION BASICS 23-5 The parameter can be taken out of Read by engaging one of the other modes. Write/Trim Parameters must be explicitly placed in Write or Trim. Mix On must be engaged for a parameter to be in Write or Trim. The Write/Trim key must be toggled to the Write or Trim position. WRITE: automation is armed for record and absolute values are written for the selected parameters. Indictors are illuminated red. TRIM: automation is armed for record and relative values are written for the selected parameters. In trim mode, moving a control applies an offset to the values already recorded for the selected parameter. For example, in trim mode, increasing a fader level by 10dB will add 10dB to the previously recorded fader levels retaining all the relative changes in the previously recorded data. In trim mode, indicators are illuminated amber. In Trim mode the control continues to move as it follows the previously recorded data. As soon as the control is touched it becomes stationary, and any changes made to the control’s position are written as offsets to the underlying data. If the control is touched but not moved no changes are made. If the control is moved then released, when not in Touch Snap, the system continues to playback the original moves at the offset or trimmed level. If the system is in Touch Snap, the system drops back into Read. There are four methods for engaging the Write or Trim state for any parameter, see “Recording Mix Data” on page 23-7 below. Isolate When parameters are Isolated the user can manually control them. The controls have no illumination. All parameters are isolated when the Mix ON key is not illuminated. When the Mix ON key is illuminated and no data has been recorded for a parameter the parameter remains isolated and can still be manually controlled. A signal path can be manually isolated by pressing the Isolate key and selecting the path with the selection keys. When a feed is in Isolate, all parameters on that feed ignore previously recorded automation data and can be manually controlled. Isolated parameters do not display illuminated automation indicators. Preview Preview is used to audition new mix settings over existing automation data and then replace the existing automation by dropping in to record. Preview state is engaged on enabled parameters by first pressing the Preview key and then arming parameters using Touch Latch for individual parameters, or the AUTO key next to a fader to arm all parameters on the selected feed. In Preview, parameters are isolated and will ignore previously written data. Parameters can be manually controlled. When armed in Preview, parameters are illuminated in flashing red. Once in preview mode a parameter can be placed into Write by dropping in manually with the In key or automatically using the Active In and Out points. AUTOMATION 23-6 Enable Keys Figure 2: Blue Parameter Enables ALL Master Enable Track Enable Insert Enable Direct Enable Input to Track Insert IN/OUT Direct IN/OUT Fader Master Enable Master Fader Fader Enable All Faders Direct Level Mute Master Enable Master Fader Mute Enable All Mutes Dyn Master Enable EQ Master Enable Bus Assign Enable Compressor Enable Limiter/Exp Enable EQ Level Enable EQ IN/OUT Enable Main Assign Gain Type L/E/G EQ Level EQ IN/OUT Sub 1 Assign Delay Threshold Threshold Hysteresis Ratio Ratio Attack Depth Release Attack Hold Release IN/OUT Hold IN/OUT Aux Master Enable Pan Master Enable Pan Enable L/R Pan F/B Pan Image Enable Rotate Spread Diverge EQ EQBand Band22 Enable Enable EQBand Band33 EQ Enable BandEnable 2EQ Gain Band EQ Band44 Enable Enable EQ Band55 Band Band 6 Gain Band 2EQ Gain Enable Band 2 Q Band 1 Freq Band1 Gain Band1Band GainEnable 2 Gain Band 6 Freq Band1 Gain BandBand 2 Q 5 Gain Band Freq Band 1 Shape Band1 Freq Band12Band1 Freq Gain Band 2 Q Band 6 Shape Band Freq Band12 Freq Band 5 Q Band 2 Shape Band 1 IN/OUT Band Freq Band12 Freq Band 6 IN/OUT Band 2 Band Shape5 Freq Band 2 Range Band 2 Shape Band 2Band Range 5 Shape Band 2 IN/OUT Band 2 Range Band 2Band IN/OUT 5 Range Band 2 IN/OUT Band 5 IN/OUT EQ Band 1 Enable EQBand Band66 EQ Enable BandEnable 1 Gain Master Fader Pan Enable 7 Aux 1 Aux 1 Enable Enable Aux 2 8 1 Aux 1 Enable 1 Enable 9 Level Aux 3 Level Aux 1 Enable Enable 1 Aux10 1 Level Aux 4 LevelAux Enable Enable Aux 5 Aux 1 Aux 11 1 Pan Level Pan Level Enable Enable 1 Aux12 1 Pan Level Aux 6 Pan LevelAux Enable Enable PRE/POST PRE/POST Pan Level Pan Level PRE/POST PRE/POST Pan Level Pan Level IN/OUT PRE/POST PRE/POST Pan IN/OUT Pan IN/OUT PRE/POST PRE/POST Pan IN/OUT Pan IN/OUT IN/OUT PRE/POST PRE/POST IN/OUT IN/OUT PRE/POST PRE/POST IN/OUT IN/OUT IN/OUT IN/OUT Sub 2 Assign Sub 3 Assign Sub 4 Assign Sub 5 Assign Sub 6 Assign Sub 7 Assign Sub 8 Assign Boom Enable Level PRE/POST IN/OUT 1D/2D Pan IN/OUT Figure 3: Parameter Enable Map AUTOMATION BASICS 23-7 Recording Mix Data The AUTO key next to any fader is illuminated whenever any parameter on that signal path is recording automation data in Write or Trim, or if any parameter on the signal path is in Preview. Mix data is recorded as discrete events. Each event occurs at a specific timecode location and relates to a specific parameter on a specific signal path. When a new mix is started there are no events recorded and all controls will remain static as the project is played. Once mix data is recorded, it is played back or read when the transport runs past the timecode at which the event is recorded. If the transport is located to any point in the project, the mixer state will reflect the result of all the events that have occurred from the start of the project to the current timecode. The static snapshot recorded with every mix preserves the basic setup and balance of the mix. Dynamic move events can be added to this to create the final complete mix. Entering Automation Record There are four methods of entering automation record: 1. Press the AUTO key next to any fader. Enabled parameters on the channel are put into record irrespective of the signal path enable mix mask. 2. Use Touch mode and move any fader, pot or switch. That parameter is put into Write or Trim if it is enabled. If Touch Auto Enable is ON, the signal path enable mix mask is ignored. If Touch Auto Enable is OFF, the signal path must be enabled in the mix mask for Parameters to enter record. 3. Punch in manually on enabled tracks with the In key, or punch in automatically at the Active In point using PUNCH or the PLAY key. All enabled parameters on all enabled signal paths in the current mix mask are put into record. Note that the mix mask may be changed between Punches, allowing different channels to be put into Record on subsequent Punch passes. 4. Use the Prime mode and the transport PLAY and REC keys or ADR functions to record automation on selected signal paths. All enabled parameters on all enabled signal paths in the current mix mask are put into record. The first two methods are the simplest and most common methods. These techniques are described in detail below. Leaving Automation Record There are seven methods of leaving automation record: 1. Press the AUTO key on any fader. 2. Cause the transport to leave PLAY by using any transport command. 3. Press the Mix ON key to disable the mix automation system. 4. When in Touch Snap mode, release any fader, pot or switch. 5. Punch out manually on enabled tracks with the Out key, or punch out automatically at the Active Out point after pressing PUNCH or the PLAY key. 6. In Prime mode, use ADR or the PLAY key to punch out. 7. Press the All Read soft key to instantly place all parameters in Read. AUTOMATION 23-8 Transitions When the automation system makes a transition from Write or Trim to Read, Glide out data will be written to smooth the parameter transition as described below. When a transition is made from Preview to Write, Glide In data will be written. The Glide times are set in the Utils menu. The Glide In transition starts before the point that the system entered record (In point minus Glide In time) and finishes at the point where the system entered record. The Glide Out transition starts at the point where the system leaves record and finishes at the Out point plus the Glide Out time. Write/Trim to Read • Touch Snap - Glide Out When a Touch Snap enabled parameter is released the system returns to Read and the parameter values are ramped from the most recently written value to the previously recorded value over the Glide Out time. • Punch Out - Glide Out Parameters currently in Write or Trim return to Read, and the parameter values are ramped from the most recently written value to the previously recorded value over the Glide Out time, when the Out key is pressed or when the transport passes the Active Out point. • AUTO key - Glide Out Parameters currently in Write or Trim return to Read, and the parameter values are ramped from the most recently written value to the previously recorded value over the Glide Out time, when the AUTO key is pressed. • STOP or Mix ON key - On Stop Hold/Return/Event Parameters currently in Write or Trim return to Read when the STOP key or Mix ON key is pressed. In this case the data that is written after the parameter returns to Read is determined by the On Stop menu item in the Mix menu. If On Stop Hold is selected, all events after the system enters Read are deleted leaving the last written value in force over the remaining duration of the project. If On Stop Return is selected, the parameter returns to the previously recorded value over the Glide Out time. If On Stop Event is selected, the last written value remains in force until a previously recorded event is encountered. At this point the parameter value ramps to the new value over the Glide Out time. Read to Write/Trim • Preview - Glide In When a parameter is punched in to Write from Preview, the parameter ramps to the newly recorded value prior to the drop in point over the Glide In time set in the Utils menu. • Touch - Current When a Touch enable parameter enters Write or Trim its value is always the current Read value therefore there is no transition. • Punch In - Current AUTOMATION BASICS 23-9 When a parameter is punched in to Write or Trim by pressing the In key or passing over an Active In point, its value is always the current Read value therefore there is no transition. • AUTO - Current When a parameter enters Write or Trim by pressing the AUTO key, its value is always the current Read value therefore there is no transition. Automation Playback The DREAM automation system ensures that your mix will always play back exactly as recorded. There are two main forms of automation data recorded in a project. The first is the static snapshot of all parameters which is recorded whenever a mix is saved. The second type of data are the dynamic automation events that are recorded every time a parameter is modified while the system is writing or trimming automation. Once a dynamic event has been recorded on a feed or bus, that parameter will be in READ whenever Mix ON is engaged and the transport is in PLAY. When the system detects that a parameter control has changed while in Write or Trim, a dynamic event is recorded that stores the previous value and the new value (FROM value and TO value) of that specific parameter at a specific timecode location. When Mix ON is engaged and the transport is located to any position on the time line, the automation system looks back and forward in time to find any events previously recorded for the parameter. If no dynamic events have been recorded for the parameter, the parameter is set to the value recorded in the mix snapshot. The current value for any parameter is determined in the following order: 1. The parameter is set to the TO value of the most recent previous event. 2. If no previous event exists, the parameter is set to the FROM value of the next future event. 3. If no future or previous event exists, the parameter is set to the value recorded in the mix snapshot. CREATING A SIMPLE MIX - FADERS ONLY AUTOMATION Step 1 Press the Mix ON key to enable mix automation. Step 2 Establish a basic static mix including bus assignments, fader levels, EQ, panning and dynamics. These static settings are saved with the rest of the mix. Step 3 Press the blue Fader key in the Master Enables section. Step 4 Press the Mix key to display the Mix menu. Press the On STOP soft key until Event is selected. This determines what happens to the parameter value when you drop out of automation record by pressing the transport STOP key. The Event setting tells the mixer to hold the last recorded value until the next previously recorded event occurs. If no events are encountered the parameter will remain at the same value. Step 5 Press the AUTO key next to the fader you wish to control. The WRITE indicator next to the fader will be illuminated. 23-10 Step 6 Press PLAY and move the fader as required to adjust the balance. Step 7 Press the transport STOP key to stop recording automation. Notice that the fader indicator displays READ. Step 8 Rewind, press PLAY and audition the changes you have made. Watch the fader move as it reproduces the moves you recorded. You can continue to add fader moves using the same method. Change the On STOP setting to On STOP - Return this returns the parameter to the previously recorded value when the STOP key is pressed. If new moves are recorded over previously recorded data, the new moves replace the old moves. Use On STOP-Hold to overwrite all subsequent events for the parameter, maintaining the same value to the end of the project. You can use the AUTO key to drop in and out of record over old mix data. Enable Pan, Mute or any other parameter and use the AUTO key to enter record for these parameters as well. CHANGING A MIX WITH TOUCH WRITE Touch write offers an alternative way to modify existing mix data and simplifies the process of arming the mixer to record automation. Because touch write makes it easy to make mistakes and overwrite existing data, the following safety features are available: 1. Only enabled parameters can ever be written. 2. In touch mode the mixer senses which control you have touched and arms only that single parameter. 3. By default, only paths that are in the Mix mask are enabled for Touch Write. However the Touch Auto Enable feature allows this safety feature to be over-ridden. Setting Touch Auto Enable to ON allows any enabled parameter on any path to enter Write or Trim when touched. Step 1 Press the Mix ON key to enable mix automation. Step 2 Press the blue Fader key in the Master Enables section. Step 3 Press the Mix key to display the Mix menu. Press the Touch AutoEn soft key. Touch Auto Enable allows the mixer to record mix data for any enabled parameter on any path that is touched. The parameter must be enabled with the Master Enable keys or the enable keys on the Channel Panel. Step 4 Hold down a BLUE key and press the Utils key to display the Mix Utils menu. Press the Glide Out soft key and turn the jog wheel or use the numeric keys to enter a glide out time in frames. The range is from 0 to 99. Enter a value of 25 and press Enter or the Exit soft key to enter the value. The glide out time smooths the transition from newly recorded mix data to the previously recorded moves. This relates to drop- CHANGING A MIX WITH TOUCH WRITE 23-11 ping out of record from touch write or by pressing the AUTO key or the Out key. Step 5 Press the Touch key to select Snap. In Snap mode the parameter enters record when touched, and returns to read when released. In Latch mode the parameter remains in record when released. Step 6 Press PLAY and move the fader as required to modify the previously recorded mix. Notice that when you touch the fader the automation indicator changes to WRITE to show that you are currently recording mix data. The indicator returns to READ when the fader is released. Enable Pan, Mute or any other group of parameters and use touch write to record new mix data. PROTECTING MIX DATA WITH ISOLATE AND SAFE Automation Safe You can protect all or part of a mix from accidental changes by making selected feeds or buses Safe. Safe paths can not record new mix data. Step 1 Press the Safe key. Currently Safe signal paths are illuminated on the selection panel. Step 2 Press any selection key to toggle the selected feed or bus in or out of safe mode. Step 3 Press the Safe key again to return to the previous mode. The Safe key flashes when any feeds have safe enabled. Automation Isolate When a feed or bus is isolated it does not respond to any stored automation data. An isolated feed can be manually controlled but cannot record or play back mix automation. Step 1 Hold down a BLUE key and press the Isolate key. Isolated signal paths are illuminated on the selection panel. Step 2 Press any selection key to toggle the feed or bus in or out of isolate mode. Step 3 Press the Isolate key again to return to the previous mode. PUNCHING IN AND OUT OF AUTOMATION RECORD The In and Out keys can be used to enter automation record. The keys can be pressed while the transport is in STOP or PLAY to manually drop in or out of Write or Trim on the selected feeds and parameters. Alternatively, timecode In and Out points can be captured and, when the In and Out points are made active, the system will automatically drop in and out of automation record when the transport passes over these timecode locations. Manual Punch In Step 1 AUTOMATION Press the Mix ON key to enable mix automation. 23-12 Step 2 Establish a basic static mix including bus assignments, fader levels, EQ, panning and dynamics. These static settings are saved with the rest of the mix. Step 3 Press the Mix key to display the Mix menu. When the Mix menu are active, the illuminated selection keys display the signal paths currently enabled for Punch in automation recording. Step 4 Press any selection key to toggle the enable state of that signal path. This selection can be used to protect previously recorded automation data from accidental modification. You can also use the soft switches above the faders to enable the signal paths associated with those faders. Step 5 Press the blue Fader key in the Master Enables section. This enables recording of fader mix data only on the selected paths. You can enable any parameter you wish to record. Step 6 Press PLAY then press the In key. Notice that the indicator next to the fader changes to WRITE to show that you are currently recording mix data. Move the faders as required to adjust the mix. Step 7 Press the Out key to punch out of automation record. The automation indicator returns to READ and the fader returns to its initial position or the position previously recorded. Use Glide Out in the Utils menu to smooth this transition. You can also drop out of automation record by pressing the STOP key or by toggling the MIX On key. Use The On Stop Mix menu item to determine what data is written after the transport stops. Automatic Automation Punch In You can drop in and out of automation record at pre-defined In and Out points. Automation is only recorded on enabled paths and parameters as described above. Step 1 Press the Mix key to enter the mix menu. Step 2 Move the transport to the required In point and press the From Binnacle key to capture the In point. The In point timecode location is displayed in the Mix menu. Step 3 Move the transport to the required Out point and press the To Binnacle key to capture the Out point. The Out point is displayed below the In point in the Mix menu. Step 4 Hold down a BLUE key and press the Active In key to make the automation In point active. The In key flashes blue when active. Step 5 Hold down a BLUE key and press the Active Out key to make the automation Out point active. The Out key flashes blue when active. Step 6 Move the transport to a location before the In point and press PLAY. The selected parameters on the selected feeds will enter WRITE or TRIM when the transport moves past the In point, and return to READ when the transport moves past the Out point. PUNCHING IN AND OUT OF AUTOMATION RECORD 23-13 The Active In and Out points become inactive once the system has dropped in or out. The selected parameters return to the previously recorded values over the Glide Out time specified in the Utils menu. Active IN and Active OUT When the transport passes over the Active In point the automation system will drop in to Write or Trim on enabled parameters. When the transport passes over the Active Out point the automation system will drop back in to Read. Once the transport has moved over the In or Out point, they are made inactive and must be made active again by holding down a BLUE key and pressing either the In or Out key. This means you can quickly audition the changes you have just recorded by pressing the Play Again soft key in the Play Menu without having to first disable automation. Punch Once the In and Out points are made active, use the Punch key to preroll five seconds before the In point, and play through an automation pass, dropping into Write or Trim at the In point and dropping back into Read at the Out point. The transport continues to play after the Out point. LINKING AUDIO AND MIX RECORD WITH PRIME Use the Prime key to enter automation record on the selected feeds when the disk recorder enters record. Prime mode supports all ADR record features as well. Use Prime to drop in and out of automation record each time you drop in and out of record on the disk recorder, mixing as you record and doing two jobs at once. Step 1 Press the Mix ON key to enable mix automation. Step 2 Press the Mix key to display the Mix menu. When the Mix menu are active, the illuminated selection keys display the signal paths currently enabled for automation recording. Step 3 Press the track selection keys to toggle the enable state of the tracks you wish to record automation on. You can also use the soft switches above the faders to enable the signal paths associated with those faders. Step 4 Press the blue Fader key in the Master Enables section. This enables recording of fader mix data only on the selected paths. You can enable any parameter you wish to record. Step 5 Arm the tracks you wish to record. (This step is not necessary to enable automation) Step 6 Press the PLAY and REC transport keys to drop in to record. Note that the enabled tracks enter Write. Step 7 Press STOP or PLAY to drop out of record. The enabled tracks return to Read. The selected parameters return to the previously recorded values over the Glide Out time specified in the Utils menu. AUTOMATION 23-14 PREVIEWING MIX MOVES Preview is used to temporarily isolate parameters from playing back previously recorded mix data. This can be used to establish and audition a new mix on selected feeds and parameters before dropping this new mix data in to replace the previously recorded mix data. Entering preview is similar to entering automation record using either touch enable or the AUTO keys. However, while the Preview key is lit, data can only be written by pressing the In key or automatically punching in over an In-Out range, or using the Fill Range soft key in the Mix menu. It is not possible to enter Trim mode from preview. Preview automatically selects Write. To preview and record a new mix over existing automation data follow these steps: Step 1 Press the Mix ON key to enable the automation system. Step 2 Press parameter enable keys for the parameters you wish to modify. Step 3 Press the Mix key to select feeds to automate. Select the feeds you wish to modify. Make sure that Touch AutoEnable is not selected in the Mix LCD menu. Step 4 Press Preview key to enter preview mode. Step 5 Press the Touch key to select touch Latch mode. In touch latch mode the parameter remains in preview when the control is released. Step 6 Locate the transport to the section you wish to modify and press PLAY. Note that parameters with previously recorded mix data are displayed in green for READ. Step 7 Modify a parameter and note that the parameter control flashes red and the associated channel AUTO key is illuminated to indicate that it is in preview. The parameter now ignores previously recorded mix data. Roll back the transport and modify more parameters to establish the new mix. Note that the parameters remain flashing red and in preview. Continue in this way to build up the new mix balance. To take a parameter out of Preview, press the Touch key to enter touch Snap mode and touch a parameter control. The parameter will drop back into READ and be displayed green. Press the Touch key again to return to Latch mode. Alternatively, press the channel AUTO key to drop the whole feed out of Preview. To enter Preview on enabled parameters on any signal path, turn the Touch Auto Enable Mix menu item on. This over-rides the signal path enable mix mask. To Preview all the enabled parameters on a signal path, press the AUTO key next to the fader. Note that all the enabled parameters on that path now flash red. PREVIEWING MIX MOVES 23-15 Step 8 When you are satisfied with the new mix, roll back the transport and press PLAY. Press the In key to drop the previewed parameters into automation record at the desired location. Active In/Out from Preview To drop into record from Preview at a specified timecode location follow these steps: Step 1 Establish your new mix in Preview mode as described above. Step 2 Press the Mix key to make the Mix menu active. Step 3 Select a range with the From and To keys on the Binnacle. Step 4 Hold down a BLUE key and press the Active In and optionally the Active Out keys. Step 5 Locate the transport to a location before the In point and press play. The flashing parameters will drop in to automation record at the In point and drop out at the Out point if set. The selected parameters return to the previously recorded values over the Glide Out time specified in the Utils menu. Fill Range from Preview Fill Range can be used to write the static previewed parameters over a specified range with a single key press. Step 1 Establish your new mix in Preview mode as described above. Step 2 Press the Mix key to make the Mix menu active. Step 3 Select a range with the From and To keys on the Binnacle. Press the Fill Range soft key in the Mix menu to write the static values of the flashing previewed parameters across the selected range. The selected parameters ramp in from the previously recorded value to the previewed value over the Glide In time and return to the previously recorded values over the Glide Out time specified in the Utils menu. Using Mix ON with Preview Toggle the Mix ON key at any time to isolate all parameters from reading automation data. This can be useful for previewing a new mix balance. Be aware however, that when Mix ON is subsequently engaged, all previously recorded parameters will switch to Read and the new mix will be lost. When using Mix On with Preview, the Preview selection is preserved when switching Mix On on or off. Parameters in Preview are isolated and will retain the adjustments made while Mix ON was not engaged. SAVING AND LOADING MIXES Up to 256 complete mixes may be saved in each project and recalled later. Mixes must be saved before closing a project. Any unsaved mix data is lost unless saved. The available space left in the project file for new mixes or mix data is displayed in AUTOMATION 23-16 the Mix menu. When the space left falls below 2% the Save soft key becomes disabled. Saving a Mix Step 1 Hold down a BLUE key and press the Mix/File key. Step 2 Press the Save soft key in the LCD menu. Step 3 Type a unique name for the mix on the PC keyboard and press Enter. Alternatively, type a name with a numeric suffix, (e.g. Demo Mix 1). The next time you press Save, a new name will automatically be generated with an incremented suffix (e.g. Demo Mix 2). Press Enter, to save the mix with the new name. Loading a Mix Step 1 Hold down a BLUE key and press the Mix/File key. Step 2 Turn the jog wheel to scroll through the previously saved mixes. Press the Sort: soft key to select TIME or ALPHA. ALPHA sorts the saved mixes in alpha-numeric order. TIME sorts the saved mixes in the order in which they were saved, with the most recently saved mix at the end of the list. Step 3 Press the Load soft key in the LCD menu to load the selected mix. Step 4 Confirm by pressing the Yes or No soft key. Deleting a Mix Step 1 Hold down a BLUE key and press the Mix/File key. Step 2 Turn the jog wheel to scroll through the previously saved mixes. Step 3 Press the Delete soft key in the LCD menu to delete the selected mix. Creating a New Mix Follow these steps to create new empty mix with no automation data: Step 1 Hold down a BLUE key and press the Mix/File key. Step 2 Press the New Mix soft key in the LCD menu. This new mix must be saved once new data has been written. MIX UNDO DREAM software release version 1.2 supports one level of mix undo. Step 1 Hold down a BLUE key and press the Mix/File key. Step 2 Press the UNDO PASS soft key in the LCD menu. UNDO PASS deletes all mix automation data written between entering PLAY and STOP during the last mix pass. UNDO PASS can be used up until any new automation data is written. If UNDO PASS is pressed during a mix pass the soft key flashes to indicate that all data written during that pass will be ignored. MIX UNDO 23-17 THE MIX MENU Only mix menu items that are dimly lit are available in DREAM software release 1.2. Press the Mix key to display the Mix menu. When the mix menu is active, the feed and bus selection keys are used to enable specific paths for automation. The From and To keys can be used to set the In and Out points for automation punch In and Out points which are displayed at the left of the LCD. The available mix memory is displayed in percent. The current mix name is displayed at the right of the LCD. all Read All parameters are instantly dropped in to Read. On STOP Determines what data is written after leaving automation record by pressing the STOP key or pressing the Mix ON. Hold - erases all events from the current position to the end of the project. Return - returns to the previously recorded value at the cur- rent location. Event - holds the current value until the next event is en- countered. Touch Auto Enable ON - When a Touch mode is engaged (SNAP or LATCH), any enabled parameters that are touched are automatically put into Write or Trim. It is not necessary to first enable the feed or bus. OFF - When a Touch mode is engaged (SNAP or LATCH), only feeds or buses that have been enabled in the mix menu will be put into Write or Trim when their enabled parameters are touched. Fill Range Used in conjunction with Preview. Causes the current values of previewed parameters to be written through the range. THE BLUE UTILS MENU Glide In When a parameter transitions from one READ value to a new RECORD value discontinuously, as when dropping in from PREVIEW to RECORD or when merging one mix into another, this value is used to define a ramp from the previous data to the new data. Press the Glide In soft key and use the jog wheel, numeric keys or +/- keys and press Enter to change the Glide In value. AUTOMATION 23-18 Glide Out When a parameter transitions from one RECORD value to a new READ value discontinuously, as when dropping out of RECORD or when merging one mix into another, this value is used to define a ramp from the previous data to the new data Press the Glide Out soft key and use the jog wheel, numeric keys or +/- keys and press Enter to change the Glide Out value. Update Sys-File Saves the following system settings to the following files: Monitor_Sources.TXT - patching and formats of external monitor sources. Speaker_Sets.TXT - patching and formats of all speaker sets. Setup_Variables.TXT - Call Follow state and console brightness. MULTI TRIM Multi Trim can be used to adjust a group of parameters while recording automation. Multi Trim groups are temporary groups of feeds which are controlled from a single virtual master. Individual members of the temporary Multi Trim group must be enabled for automation while the Mix menu is active, prior to entering Multi Trim mode or from the AUTO keys next to each member fader. No automation is recorded for the virtual Multi Trim master itself. Follow these general steps for using Multi Trim: Step 1 Press the Multi Trim key. Step 2 Press feed, bus or fader group selection keys to toggle them in or out of the Multi Trim selection. Step 3 Select Absolute or Relative mode by pressing the Abs or Rel soft keys in the LCD menu. In absolute mode the values of the individual member’s parameters are set to the position of the virtual master control. In relative mode, changes made to the virtual master controls are applied as offsets to the values of the member’s parameters. Step 4 Adjust the Master Fader or any controls in the Channel Panel to control the group. The mixer display will be updated to show the changes as they occur. No changes are made until the master controls are changed. To update all parameters for all channels selected when in Absolute mode, press the apply values soft key. Step 5 Press the Multi Trim key to return to the previous mode or press another key to continue mixing or editing. Multi Trim can be used in conjunction with the automation record modes in the following ways. ABS - WRITE MULTI TRIM 23-19 With Multi Trim in absolute mode and automation in Write mode, Multi Trim is useful for establishing static presets of fader levels and other parameters across a range of feeds. ABS -TRIM With Multi Trim in absolute mode and automation in Trim mode, the members of the Multi Trim Group will all move to the level of the virtual master. Depending on the initial position of each member control this will cause the automation values to be trimmed or offset by differing amounts. This may cause unpredictable results and it is therefore NOT advised to use this combination. REL - WRITE With Multi Trim in relative mode and automation in Write mode, Multi Trim is useful for reducing the level across an established static mix, or for performing fades on a static mix. REL - TRIM Multi Trim in relative mode with automation in Trim mode is the most useful combination. This combination allows the level of an existing dynamic mix to be trimmed across a whole section of the mix. Changes in the virtual Multi Trim master apply relative offsets to all the members while retaining the dynamic changes in the existing mix automation. TRIMMING A MIX WITH MULTI TRIM Follow these steps to change the level of a section of a previously recorded mix. AUTOMATION Step 1 Press the Mix ON key to enable automation. Step 2 Press the blue Fader key in the Master Enables section. Step 3 Press the Mix key to display the Mix menu. Step 4 Press the feed selection keys of the feeds you wish to adjust or press the soft switch keys next to the faders. Step 5 Press the Write/Trim key to select Trim. Step 6 Press the Multi Trim key to enter Multi Trim mode. Step 7 Press the Rel soft key in the Multi Trim menu to enter relative mode. Step 8 Make sure that no feeds or buses are selected on the selection panel and move the Master Fader to the 0dB mark. Step 9 Press the feed selection keys of the feeds you wish to adjust to place them under control of the Multi Trim master. Step 10 Move the transport to a location prior to the section you wish to adjust and press PLAY. Step 11 Press the In key to drop in to automation Trim on the selected feeds. Step 12 Move the Master Fader to adjust the level of the selected feeds. Step 13 Press the Out key to stop recording automation data and drop the selected feeds back in to Read. 23-20 Step 14 Press the Multi Trim key to leave Multi Trim mode. AUTOMATION WITH LINK GROUPS Link groups are useful for dealing with groups of feeds carrying audio in a multichannel format such as stereo or 5.1. See “Grouping” on page 11-2 for an overview of link groups. Link groups should be established before any automation is written. If members are added to a group when automation data is present on either the master or the members, the data on the members is erased. If the link group is destroyed or unlinked after automation is recorded for the group, the automation data remains on the group master but not the slaves. Only the parameters on the link group master can be automated the slave member’s parameters follow the master. The slaves’ fader levels always match the level of the master. Other slave member’s parameters are isolated and can not be individually automated but can be manually controlled and their relative offset to the master adjusted. DATA STORAGE All the mix data of the current mix is stored in system memory. This data must be explicitly saved to disk as a named mix. If a new project is loaded, the previous mix data is retained in memory and may be saved as a mix in the new project. The following diagram represents the data objects that are stored in each DREAM project which is stored on hard disk in an MT file. Each project contains all the audio recorded and the clips which represent the audio edits made in the project. This data is written to disk automatically. Each project also contains a static snapshot of all the mixer setting including the fader sets. The project also contains all the manually saved mixes, each of which contain a snapshot and all the dynamic events generated during the mix. An additional storage verification object is stored which is used to check the integrity of the project. AUTOMATION WITH LINK GROUPS 23-21 Data Objects on Disk (.MT File) Saved Mix 3 Audio + EDL Data Saved Mix 2 Preset Snapshot Saved Mix 1 PresetFader Sets Snapshot Preset Snapshot Fader Sets Console Settings Preset Fader Sets Snapshot Fader Sets Console Settings Console Settings Console Settings Mix Moves Mix Moves Mix Moves Verify Error Check Figure 4: Automation Data Map AUTOCUE The Auto Cue feature enables automatic dimming of the control room monitors when the transport is stopped or not locked to timecode. This is achieved by automatically turning on one of the talkback circuits. This feature ensures that the faders are controlled by valid automation data before playing back an automated mix at full level. To use Auto Cue without affecting normal studio communications use the second talkback circuit and de-assign it from all destination buses. To enable Auto Cue hold down a BLUE key and press a Talkback key. Select Talkback 1 or 2 and press the Auto Cue soft key to toggle Auto Cue on and off. AUTOMATION 23-22 AUTOCUE 24-1 NOTES: 24-2 Chapter 24 - Project Management INTRODUCTION To further enhance Project Management within the DREAM Console, the following features within the Project Menu are available. Project Navigation Keys Figure 1: Project Keys ADDITIONAL PROJECT MENU ITEMS Press the Proj key then press the next key to reveal the extra menu items. Password Protection Any DREAM Console Project may have a password which restricts access to the material. When there is no password, one can be applied by anyone who opens the file. There are three levels of access available to a file with a password, one of which must be chosen when the password is created. These are: Public Any user can open the file and change any part of it. A password is not requested upon opening the file. Play Only Any user can open the file and play the audio, but cannot change anything. A password is requested when first opening the file and, if none is supplied, read-only permission is granted. Extending the file will then create a new unpassworded file extension, which can be edited as required without changing the original file. If the correct password is supplied when opening the file, then full write, delete, rename and move permission is granted. Private No user can open the file at all, without supplying the correct password Password protection does not prevent file deletion from the Project menu. Once you have opened a file using its password, all other Projects with the same password can be opened without the machine requesting you supply the password again. This may apply to several passwords that have been used in a single session on the machine INTRODUCTION 24-3 Restarting the system software re-enables the password protection. Alternatively, to re-enable password protection without re-starting the system, type enduser Enter. Extend Extending a Project creates a new Project with all the clips borrowed from the original. The extended Project also inherits all the track names and marks. Projects can be extended for several reasons: 1. The current drive is full. Extending the Project to another drive will enable more recordings. 2. The current Project is full. Projects have a 4 Gig limit, extending the Project will enable more recordings. 3. The original Project is a pre-edited and labelled bed. This allows Projects to be used as a templates. 4. To create new versions. This will allow further recording and editing without affecting the original Project. When working on an extension, the original Project can be regarded the same as a library Project, i.e. all the clips are borrowed. It is not possible to perform an Overwrite record on borrowed clips. When using libraries and extensions, be very careful with what you do to the original Projects and libraries. Erasing clips or Projects that are used by other Projects will result in missing audio. Extending A Project Step 1 Press the Proj key. Step 2 Press the EXTEND soft key. Step 3 Select the desired destination. Step 4 Type the new name. Step 5 Press Enter. Refresh Pressing the Refresh soft key will updated the directory view for the current folder, drive or domain. PROJECT MANAGEMENT 24-4 MANAGING DISK SPACE After recording and editing has taken place within a Project, unwanted audio clips can start to take up valuable disk drive space. Unwanted audio can be: • audio that has been erased from clips • audio that has been trimmed from clips • audio that is covered over by another clip. The Space Menu is used to remove and delete unwanted audio clips from the Project. Hold the BLUE key and press the Space key to access the SPACE menu. Space Key Figure 2: Space Key Dispose DISPOSE removes waveforms that have no clips in the Project. If any part of a waveform is used by a clip, the waveform will not be affected. Waveforms will have no clips if they have all been erased, or if the UNDO key was pressed after a recording. If DISPOSE is used immediately after a recording has been undone, the next recording will use this free space. NOTE: After DISPOSE, you will not be able to recover the waveform with the RW (Recover Waveform) command. (See “Recovering Waveforms” on page 24-6). Step 1 Hold down the BLUE key and press the Space key. Step 3 Press the DISPOSE soft key. Step 3 Press the Enter key. Commit COMMIT removes sections of waveforms that are not heard and clips that are buried. Only clips under the cursor (or highlighted in a Range on selected tracks) are committed. MANAGING DISK SPACE 24-5 Underlying clips, except for sections used in crossfades, are removed. A waveform may be broken up into smaller waveforms if sections of it are unused. Step 1 Hold down the BLUE key and press the Space key. Step 2 Define a Range and select tracks. Step 3 Press the COMMIT soft key. Step 4 Press the Enter key. After COMMIT, you will not be able to trim the heads or tails of the affected clips. When commit doesn’t commit: 1. If only a small section of a waveform is unused, it may be left whole as breaking it up will actually use more disk space. 2. If the waveform is used by another clip that was not selected. Pack The PACK function shuffles the data in a Project to flush out the empty spaces resulting from the DISPOSE and COMMIT functions. The free space generated is available for use by any Project. Use PACK at any time after DISPOSE and COMMIT. Be sure not to inadvertently switch the machine off during PACK, as this will destroy your Project. Step 1 Hold down the BLUE key and press the Space key. Step 2 Press the PACK soft key. Step 3 Press the Enter key. The Project is packed into the smallest possible area of disk, releasing the remainder for general use. This may take some time, because the audio on the hard disks will be moved around. Keep Borrowed Clips The KEEP BORROWED function copies borrowed clips permanently into the Project. After KEEP BORROWED, the Project will no longer need to access the library Projects or Projects from which it was extended. The HANDLES parameter determines how much extra of the original waveform (if available) is copied from libraries. This will determine how much a clip can be trimmed later. The HANDLES parameter can be set to 0 to 99 seconds, or to ALL, which will copy the entire waveform. NOTE: To keep just one clip, use the Edit Menu to cut the clip, then hold down the BLUE key and press Enter. This will copy the waveform shown in the clip with no handles. PROJECT MANAGEMENT 24-6 Step 1 Hold down the BLUE key and press the Space key. Step 2 Enter a HANDLES value if required (then press Enter). Step 3 Press the KEEP ALL BORROWED soft key. Step 4 Press the Enter key. Once a KEEP BORROWED has been performed on a Project, back ups can be made with the knowledge that all originally borrowed audio clips are now stored in one place. More About Committing Examples of committing to clarify its operation are: A 30 second recording has just been made, and then the first ten seconds are trimmed off. Go to the Space Menu and press COMMIT while the cursor is touching this clip, with Handles set to zero. The effect will be to remove the first ten seconds of audio data, with that disk space becoming free. Attempting to enlarge the clip using the TRIM command will fail, because there is no more data in the Master Recording. If Handles are set to 2 seconds, only the first 8 seconds of data would be removed. A 30 second recording has been made, and this time the last 15 seconds of the resulting clip (Clip A) are covered by pasting another clip (Clip B) on top. Go to the Space Menu, move the transport so that Clip A is touching the cursor, and press COMMIT. Now erase Clip B, and it can be seen that the part of Clip A that was underneath Clip B has been removed. This part of the data on disk has now been removed, minus the Handle. This time do the same thing, but make a copy of Clip A on another track. After committing the original Clip A and erasing Clip B, Clip A has now been trimmed as before, but can still be extended using the TRIM command. This is because, whenever there is a clip anywhere in the Project that references the same Master Recording, even partially, the Master Recording will not be touched, allowing the uncommitted clips to be trimmed out to their fullest possible extent. RECOVERING WAVEFORMS The W Display To see a list of all the unreferenced master recordings, type BLUE W. The top section of the video display changes to show a list of waveforms which have no clip referencing them. You can scroll up and down the list using the jog wheel. The display shows the size, birthday, and clip name. The birthday is the timecode at which the recording was originally made. The Recover Waveform Command If you have found a master recording that you think is the one you want, type: RW number Enter, where number is the waveform number printed at the left end of the line. The RW stands for Recover Waveform. This command will place a clip using the full length of the master recording on your current track, with its head at the cursor position. You can now play the clip to find out whether it was the one you wanted. RECOVERING WAVEFORMS 24-7 Recovering Stereo Clips If the master recording is a stereo recording, it will have two waveforms, and you will often see them on consecutive lines. They will have the same numbers in their birthday, size and space fields. Occasionally, due to the dispose command, the two waveforms will not be at consecutive positions in the display. To recover both sides into a stereo clip, type RW number1 number 2 Enter, using both waveform numbers. You cannot create a stereo clip out of two original mono recordings. You can make a mono clip from one side of a stereo waveform, but this will prevent it from subsequently being made into a stereo clip. By typing the two waveform numbers in reverse, you can reverse the right and left sides of the waveform. Return to Birthday To get a clip back into sync with the position it was originally recorded, highlight the clip and type the Return to Birthday command, RTB Enter. The Waveform Show Command If you wish to show all the Master Recordings in the project, type: WS a Enter. This stands for “Waveform Show ALL”. Each referenced Master Recording will show you the name of the first clip that references it. If you want to return to a display of only the UNREFERENCED master recordings, type: WS Enter. NOTES: Disposing and Committing create blocks of free space that can be used by the Project. They cannot, however, be used by any other Project or file, because the blocks are inaccessible little “islands” in the middle of the Project. Packing shoves all the data down towards the beginning of the file so that it occupies a continuous block, and then gives back the empty piece at the end. To regain the maximum possible disk space, highlight the whole Project (from Mark zero to Mark 999), then DISPOSE, COMMIT and PACK. The first two operations are virtually instantaneous. All Space Menu operations are permanent. No UNDO! When Committing, nothing will happen to the Master Recording that a clip is referencing unless the selected Range contains all clips that reference it. It is a very good idea to dispose often during recording sessions. Each time a useless recording is made, UNDO it to remove it from sight, then dispose. The next recording will immediately occupy the freed disk space. Committing with Handles set to ALL is a way of removing the parts of the clips that are not heard, but preserving the Master Recordings entirely. This can be used, for example when a stack of clips have been placed on top of each other, to simplify the edit structure down to one layer effectively, without losing any recorded audio data. 24 AND 48 TRACK PROJECT COMPATIBILITY DREAM Console can support in 24 and 48 track versions. 24 track projects can be opened on a 48 track system in the usual manner. PROJECT MANAGEMENT 24-8 In order to open a 48 track project on a 24 track system the project must be exported as an ML file. See “Export” on page 27-8 for more details on exporting. An ML file can be imported into a 24 track system and will allow editing on the first 24 tracks only. ML file exchange is available with the optional connectivity software package. ML export is only available with the optional connectivity software package. 24 AND 48 TRACK PROJECT COMPATIBILITY 25-1 NOTES: 25-2 Chapter 25 - Marks INTRODUCTION A mark is a stored time location in a Project, indicated by a yellow pointer on the timescale. The DREAM Console can store 1000 marks with each Project including 0 and 999 which automatically indicate the area you have worked in (i.e. the head and tail of the Project). Marks can be given names and can be used as location points for scenes and sync points or beats and bars. Mark Key Figure 1: Mark Key CREATING A MARK To create a mark, locate the transport to the desired point and press the Mark button. Marks are shown as yellow indicators on the timescale. EDITING MARKS To edit a mark, hold down the BLUE key and press the Mark button. The selected mark is highlighted in the upper video display showing mark information. • Mark number • Mark name • Timecode When in the EDIT MARK mode, the console soft keys perform the following functions: NUMBER Press this key and use the jogger wheel or + and - keys to select a mark. The last mark you created or selected will be the default when you enter this menu. TIME Enables entry of a new timecode value with the numeric keypad. NAME Allows you to enter a name for the mark using the alphanumeric keyboard. DELETE Deletes the mark from the Project. INTRODUCTION 25-3 RENUM Renumbers the marks into correct timecode order. GOTO MARK The GOTO menu allow the transport to jump to any named mark including the head and tail of the project. Press the GOTO key, press the Mark soft key and turn the jog wheel to select a mark. Press Enter to locate to the mark point. NOTES: 1. Making and naming marks can be done during recording (no other form of editing is allowed at that time.) You can enter the Edit Marks Menu, press the Mark key to create a mark, then immediately press the Name soft key, type a name and press Enter, because the newly created mark is always the current one for naming. 2. You can create special Beat Marks for musical uses by typing the following: IBM number beats tempo Enter, where IBM = Insert Beat Marks number = number of bars required beats = number of beats per bar tempo = beats per minute <RETURN> = Enter key in the alphanumeric keyboard. Beat marks are placed at the beginnings of all bars starting from the current timecode, and are named bar1, bar2 etc. They can all be deleted by typing DBM<RETURN> (delete beat marks). 3. Whenever Mark is selected on a soft Menu, or the Edit Marks Menu is entered, the Marks display is shown on the video screen. You can also display it at other times by typing BLUE-9 or <esc>M. When the transport is in motion, the marks display automatically scrolls to show the last mark reached. 4. Marks are not the best way to create edit points on the fly, if the edit is to be done immediately. The best way is to use the From and To keys (see Editing). 5. Marks 0 (Project head) and 999 (Project tail) cannot be deleted. MARKS 25-4 GOTO MARK 26-1 NOTES: 26-2 C h a p t e r 2 6 - Aud i o B a s e INTRODUCTION AudioBase is a clip database which allows you to search for sounds across all devices in a DREAM Console system. Once a sound / clip has been found, it may be auditioned, and then imported into the current open Project. AudioBase2 allows searches to be made in a network environment, using a MediaLink server. AudioBase creates and maintains a central database of clips from many Projects. AudioBase Key Figure 1: AudioBase Key CREATING A DATABASE Before a clip or Wav file can be used in AudioBase, it must be published. Publishing a Project adds the details of all its clips to the database which is stored on the system. It is possible to publish individual files, or all the Projects and Wav files contained within a directory. Step 1 Press the AudioBase key. Step 2 Press the FILE soft key. Step 3 Press the PUBLISH soft key. Step 4 Use the jogger wheel or + and - keys to select a Project, Wav file or directory. Step 5 Press Enter. The top of the video screen displays the various fields stored in the database. INTRODUCTION 26-3 Clip Name Source Project Category Description Sample Rate Stereo/Mono Project Availability Duration User Fields Figure 2: AudioBase Clip Data All the clips will be added to the database but no waveforms are copied. For the clip to be used, the Project containing that clip must be present on the system. The additional description and user field can be added later as described below in “Maintaining a Database” on page 26-7. SEARCHING FOR SOUNDS AudioBase can use various search criteria to filter the fields of the database to find clips.The Search Options determine how the database will be searched: Step 1 Press the AudioBase key. Step 2 Press the SEARCH soft key. Step 4 Press the MATCH and FIELDS soft keys repetitively to scroll through the options described below. MATCH: This specifies how your search text is matched to the fields in the database. This parameter affects all the fields being searched: WHOLE Your search text must match all the text in a database field. PART Your search text only has to match any part of a database field. START Your search text only has to match the start of a database field. FIELDS: This specifies if all the fields you search have to match, or if only one or more fields have to match. AUDIOBASE ALL All the selected fields must match. ANY Clips are returned if any of the fields match. 26-4 To start using AudioBase, set the MATCH parameter to PART, and the FIELDS parameter to ALL. Step 1 Press the AudioBase key. Step 2 Press the SEARCH soft key. Step 3 Press the Prev (F8 on the keyboard) and Next (F9 on the keyboard) to highlight a field you wish to search. (9 to 15 provide AudioBase functions). Selected fields are highlighted in blue. Step 4 Enter your search text. Press the CLEAR key to clear text from the field. If the field is left cleared, it will not be included in the search. Step 5 To add more fields to your search, repeat steps 3 and 4. Otherwise, press Enter to start the search. Additional search conditions can be added to the text. These are described on the following page. Additional Search Conditions Additional search parameters can be added to field searches in a similar manner to the GO TO CLIP NAME function. Additional sorting criteria are provided by pressing the relevant key on the keyboard. These are as follows: ANY * This places an asterix (*) in the search text. The asterix can be replaced by any number of characters. For example, typing *squeak would enable the listing of mouse squeak and door squeak. ANY ONE = This places an equals sign (=) in the search text to replace any one character. ONE OR NONE? This places a question mark (?) in the search text to replace any one character or no character. AND & An ampersand (&) is placed in the search text to add another name. Only clips with names containing both search names will be listed. For example, typing *door&*squeak would list only the clips with names including both door and squeak. This will list door squeak but not mouse squeak or door slam. OR A bar (|) is placed in the search text to add another name. Clips with names containing either search string will be listed. For example, typing *door|*slam will list clips with names containing door as well as clips with names containing slam. This will list door squeak and door slam but not mouse squeak. SEARCHING FOR SOUNDS 26-5 NOT ~ A tilde (~) is placed in the search text to add another name. This will exclude the specified text. For example, typing *door&~squeak would list the clips with names including door except those also containing squeak. This will list door slam but not door squeak. Searching the Current Project AudioBase can be switched to search the currently open Project instead of the clip database. It does not matter whether it has been published or not. To enter Project mode, hold down the Shift key (on the keyboard) and press the SEARCH soft key. Once in Project mode, AudioBase will stay there until you repeat <Shift + SEARCH soft key>. The AudioBase Menu and the Search submenu change to show the new status. While in Project mode, none of the editable fields are shown. This is because the screen is displaying clips in the Project, and they contain none of the Category, Description or User Fields. For the same reason, it is not possible to enter the Edit Submenu while in Project mode. At the end of the Found Records list, you will find a list of Master Recordings that are not being accessed by any clips. This can happen, for example, when you erase a clip, but do not dispose of the Master Recording (see Space Menu for details of disposing). AUDIOBASE 26-6 PLACING SOUNDS IN A PROJECT Before using AudioBase to import a clip, park the transport at the sync point in your Project. This can be done with a 9 pin machine online: Matching Clips List Figure 3: Placing Clips Step 1 After searching the database, a list of matching clips is displayed. Ensure the transport is in STOP, then use the jogger wheel or + and - keys to highlight the clip you want. Step 2 Press the AUDITION soft key. This will play the clip using the currently selected track. When auditioning, the Project remains stationary. Step 3 If necessary, use the transport keys (including Jog and Jump) to locate the clip to the correct location. Step 4 Press the PASTE soft key to place the clip in the Project. NOTES: It is also possible to PASTE the highlighted clip immediately without auditioning. This will place the sync point of the clip at the cursor. This will be the head of the clip unless a sync point has been set using the TRIM function on the Binnacle. All clips imported using AudioBase are borrowed. To keep the clips, use the KEEP ALL BORROWED function in the Space Menu. PLACING SOUNDS IN A PROJECT 26-7 MAINTAINING A DATABASE The Name, Category, Description and User fields can be edited to add additional clip information. The following fields can be edited: Step 1 Use the AudioBase search functions to highlight the required clip record. Step 2 Press the EDIT soft key. Step 3 Press the Prev and Next keys to highlight a field you wish to edit. Step 4 Type the text you wish to enter. Step 5 Press <Enter>. NOTES: It is also possible to simultaneously change the selected field for all the clips listed from a search. To do this, edit the desired field as described above except hold down the BLUE key when you press <Enter>. The SWAP soft key toggles the contents of the selected field between what you have just typed and the previous contents. It is possible to import and export AudioBase data with a PC database. See later in this Chapter for details. Deleting Records To delete records from the database follow the steps below: AUDIOBASE Step 1 Use the AudioBase search functions to display the required clip record(s). Step 2 Press the EDIT soft key. Step 3 Press the DELETE soft key. Step 4 Type the first letter of one of the options displayed on the screen as detailed below. [O] OKAY Deletes the record highlighted at the top of the list from the database. [L] LIST Deletes the record from the displayed list but not from the database. [A] ALL Deletes all the displayed records from the database. [C] CANCEL Aborts the DELETE operation. 26-8 To deleting all the records from a particular Project follow the steps below: Step 1 Press the AudioBase key. Step 2 Press the FILE soft key. Step 3 Press the PURGE soft key. Step 4 Use the jogger wheel or + and - keys to select the desired Project. Step 5 Press Enter. GUIDE TO AUDIOBASE2 AudioBase2 is the optional networked version of AudioBase. In most ways its operation is exactly the same as AudioBase, but its installation is very different. This is beyond the scope of this manual, but is covered in the AudioBase2 Installation Manual. While AudioBase runs inside the DREAM Console computer, AudioBase2 runs on a MediaLink server using a commercial database called Microsoft SQL Server. The AudioBase2 SQL database can be accessed directly from an HTML browser running on the MediaLink Server or any PC connected to the network. Several HTML pages provide functions to search and edit clips and files. Several clips may be amended or deleted at the same time. These functions eliminate the need to export the database as a text file, modify it with Excel, and re-import it as with AudioBase 1. To export an existing AudioBase 1 database into AudioBase2, type exportab1 at the command line. AudioBase2 is designed to service a whole network of DREAM and MFX workstations, and is therefore capable of handling very large sound libraries. When a search yields a large number of results, it produces very significant network traffic to download all the information to the MFX workstation that initiated the search. To prevent this happening, only the first group of 100 found records are downloaded, but as the list is scrolled, more records are found inside the database and downloaded automatically, keeping the flow of information coming smoothly. Alphabetic Sort AudioBase2 sorts all records alphabetically by name before downloading them from the server to the DREAM Console workstation, while AudioBase does not. No Export Because AudioBase2 works in the PC environment, no export procedure is provided. The SQL database can be interrogated and edited directly on the PC where it is running, using tools supplied with the AudioBase2 package. The Line Field AudioBase2 allows the Line field to have the value Any, which means records are found whether they are online or offline. The reason for this is that, with the very large number of records that could be present in AudioBase2, it could take a long time to find out if each of them has audio on a disk somewhere on the network. GUIDE TO AUDIOBASE2 26-9 This is particularly true if you are searching for individual WAVE files, because each one's presence on the network must be verified each time you search for it (otherwise someone else might have deleted it since the last time). If the value Any is entered in the Line field before the search, the verification time will be saved, and the search results will arrive quickly. When the records are auditioned, any that are offline will not play, and an error message will be displayed. NOTES: 1. With AudioBase2 running, the Import and Export soft key Menus have been removed from the AudioBase Menu. These functions are performed using a separate HTML browser, such as Internet Explorer using an MediaLink Server. 2. In AudioBase 1 the colour of an active field (when you put search criteria into) is either grey or blue. In AudioBase2 they are always blue. 3. A new value ANY has been added to the criterion LINE. When selected, the search routine does not check whether the files containing the clips matching all other criteria are On Line, (i.e. on machines which are on line at the time of the search) or Off Line. It is recommended to use this option if you know that the files containing the clips returned by the search are on line as a search may take tens of seconds just to check the file On Line status.This option is also available in AudioBase 1. PUBLISHING WITH TEXT FILES AudioBase can work with text files in two ways: 1. During publication it can take data from a text file and place it into editable fields in the database. The fields into which data can be placed are Name, Category, Description and User fields. 2. It can output, as part of the publication process, a text file containing all the editable information about the clips from the Project that was just published. This file can be written to your hard disk, or can be exported to another computer using FTP. The Text File Format When AudioBase outputs a file as part of the publication, the format of the first line is as follows: Project: Project Name Project Identification Number Between each entry there is a tab, and at the end of the line there is a carriage return. This line is used during subsequent republication to identify the Project to which the text file refers. Each subsequent line represents one clip in the Project. It is set out as follows: ~AudioBase User Number Clip Name Category Description 1...User 4 Between each entry there is a tab, and at the end of the line there is a carriage return. The AudioBase Number is written with a tilde (~) at the beginning to distinguish it from other text. It is used to identify a clip in the Project. AUDIOBASE 26-10 When you make your own text files, you can omit the first line, or just the Project identification number, and still publish using this file. The AudioBase number at the beginning of each line (and the tab separating it from the next part) is also optional, you can still use the data without this identification. How AudioBase Recognises Text When you tell AudioBase to publish a text file, it must match up the file and its contents correctly with a Project. It will do this automatically if the information is correct. The File For AudioBase to recognise a text file, it must have a name of the format XXX.txt where XXX is any string of up to 15 characters, not including illegal ones (space = & | ? / \ ^ ~ [N.B. an underscore is shown as a space on the video screen]). The system recognises no difference between upper and lower case. AudioBase has three ways to associate a particular text file with a particular Project. Here they are, in order of priority: • Project Identification number matches the one in the Project. • Project Name on the first line matches the Project Name (this is unreliable if there is more than one Project in your system with that name - AudioBase will choose the first one it finds). The name of the text file is the same as that of the Project, not counting the suffixes (ditto). If none of these conditions is true, AudioBase will ask you to choose which Project goes with this text file at the time you start publication. Clips AudioBase has two ways to associate the text describing a particular clip with the same clip in the Project. Here they are in order of priority. The AudioBase number in the text file matches one in the Project file. The Clip Name in the text file matches one in the Project file (this is unreliable if there is more than one clip in the Project with that name - AudioBase will choose the first one it finds). Commands Using Text Files Publish a Text File After pressing the Publish soft key, you are invited to browse and select a file. If you select a text file, it is incorporated into the publication process. First AudioBase will look at the text file and see if it matches a Project file on one of your hard disks. If it does, the publication proceeds automatically. If a match cannot be made, AudioBase will ask you to select the Project (which you do by browsing and then pressing <Enter>). During publication, AudioBase tries to match text entries with clips in the Project. Wherever a match is made, a Clip Record is made from the clip, and the data from the text file is inserted into the appropriate fields. If there are clips in the Project that are not matched by anything in the text file, they are inserted into the database with PUBLISHING WITH TEXT FILES 26-11 no editable data except their names. If there are lines in the text file that are not matched by clips in the Project, they are ignored. Export The difference between EXPORT and PUBLISH is that Export also outputs a text file after publication. You may choose a Project or a text file as the target of the command, and the first part will go exactly the same as Publish. The text file is created during publication, and can be directed to a choice of destinations. Before starting the process, AudioBase will ask you for the destination. You have four choices: • File • Macintosh • PC • Unix These are chosen by typing the first letter of the choice. If you choose File, the text file will be saved to the same hard disk where the Project is located. Its name will be the same as that of the Project, except for its .txt suffix. If you choose any of the computer types, the text file will be sent out of the modem port, using Z-Modem protocol, to any computer that is connected. To make this happen, you must have your computer connected via a serial cable between one of its communications ports and the QDC Engine modem port. The computer must be running a terminal program and be ready to receive data. You will be asked to confirm that this is the case before the command starts. Import Importing is similar to publishing a text file, except that first the file is brought in from another computer. After issuing the command you will be asked to identify which Project will be published with this text file. You may choose either Browse, to find the file in the usual way, Auto, to tell DREAM Console that the required identification data can be found in the text file you are sending in, or C to Cancel. Once this situation has been clarified, you will be asked to choose the type of computer that will be sending the data, and to confirm that your computer is ready to transmit data. After confirming you should start the transmission from your computer. After the transfer is complete AudioBase will attempt to match it to the appropriate Project, and if successful the publication will proceed as usual. Afterwards, the imported text file is removed from your hard disk. Using Text Files Example 1 Sometimes you might want to put a CD Library or other stored sounds into the DREAM Console, and there may be some database information supplied already. In this situation you will need a computer running some kind of software that handles databases or tables. For the sake of this description we will describe the use of Microsoft Excel on a PC. 1. Record the sound into the DREAM Console. 2. Using the GATE function, or by editing, divide the recording into individual sounds. 3. Name the clips exactly as on the supplied database. AUDIOBASE 26-12 4. Load the information from your supplied database into an Excel file. 5. Make sure that the data are ranged in successive cells in the order Name, Category, Description, User 1,....User 4 (the user fields may contain any kind of information you like, but they cannot contain more than 24 characters). 6. Load a terminal program on the PC, and get it ready to send the file you just saved. Go to the AudioBase Menu and press the File soft key. Now press Import, and when the DREAM Console is ready, send the text file from the PC. 7. After the DREAM Console has received the file it will ask you to find the Project with which to publish the text file. Select the Project where you recorded the CD and press Enter. Example 2 The task here is exactly the same, but this time we will allow DREAM Console to create a text file which is then merged with the supplied database information. 1. Record sound into DREAM Console. 2. Using the GATE function, or by editing, divide the recording into individual sounds. 3. If you want the clips named in the Project, name them exactly as on the supplied database. If you will only ever access the sounds through AudioBase, there is no need to name the clips, as long as they have been recorded or edited into the same order as they appear in the supplied database. 4. Go to the AudioBase Menu, press File, then Export. Choose PC as the export type, making sure the PC is running its terminal program and is ready to receive. The Project will be published, and the text file will be transferred to the PC. 5. Once the file is on your PC, load it into Excel as a text-only file with tab delimiters. You will now be able to edit the Clip Record information. 6. Load the information from your supplied database into the same Excel file. To do this will require first loading it into a different Excel file then copying the information across to the first file. 7. Arrange the information so that the data from the received database lines up with the data from AudioBase. This would mean that each line, other than the first, contains two clip names, which must be the same. The latter half of the line should contain category and description information from the received database. 8. Remove one set of clip names, and all other fields such as duration, etc., supplied in the received database, so that you have, on each line after the first, the fields listed above under Text File Format, in the same order. 9. Repeat step 6 from Example 1. This time AudioBase will not ask you to find the Project file, because the ID and Name are written into the first line of the text file. PUBLISHING WITH TEXT FILES 26-13 Editing the Form The AudioBase Form can be changed from its default setup by editing a file which defines its layout. Type: $<Enter> This brings up an OS9 shell or text interface. chd /dd/usr/mfx<Enter> ed abase.form<Enter> Now you will see a screen layout depicting the fields, their names and sizes. The first part lists the fields provided by the DREAM Console. You cannot change their names or sizes, and should not interfere with this part of the file. The second part shows user definable fields. By default, the first two are activated, and you can change their names from USER 1 and USER 2 to anything you like. To edit their names, use the arrow keys to move the cursor to the correct place, use the BACK or DEL key to remove characters, and use the alphanumeric keyboard to insert characters. You can also determine how many characters will be shown on the screen (the actual fields can take up to 24 characters). The lines listing USER 3 and USER 4 have asterisks in front which deactivate the fields. Removing these will activate them (but not put them on the screen). There is also an area for the titles of these user fields which you may edit. The last section contains the screen layout. Each line lists the fields that will be displayed. A field beginning with F is from the first section, while one beginning with U is a user field. You may change what is displayed on each line, but please remember that only 80 characters will fit on to the screen. If you ask for more, the extra ones will simply not appear. To save the file and return to work press the BLUE key and then Z on the keyboard (or Esc Z). AudioBase Text Export The ABTEXT command reads an ABF file (i.e., abase.master, abase.srch or abase2.srch) and writes two output text files, one containing the clip data and the other the file data. These files are tab-delimited text files with PC eol format and are suitable for import to external spreadsheets and AudioBase 2. This facility therefore provides a utility to transfer existing AudioBase 1 databases to AudioBase 2. All three files must be specified, type: “abtext -?” from the shell for details. AUDIOBASE 26-14 PUBLISHING WITH TEXT FILES 27-1 NOTES: 27-2 Chapter 27 - Import / Export INTRODUCTION DREAM Console has a number of features to allow the import and export of audio clips and Projects. Import Key Figure 1: Import Key IMPORTING CLIPS It is possible to import clips from other Projects on the system (with the same sample rate as the main Project). Opening a Project as a Library Step 1 Hold down the BLUE key and press Import. Step 2 Press the BROWSE soft key. Step 3 Select the desired library Project using the file navigation keys and Jog wheel. Step 4 Press Enter. Once opened, the Project will stay open as a library until another library is opened. Pressing any editing key will return you to the main Project, but returning to the Import Menu will display the last library from which a clip was imported. The import menu gives you the option of KEEP or BORROW when importing clips. Importing clips does not affect the library Project in any way. BORROW places a clip in the Project that references the waveform from the library. When the clip plays, it actually plays from the library Project. For your Project to play correctly, the library Project must be present. BORROW INTRODUCTION 27-3 KEEP copies the waveform from the library into the Project. This makes it a permanent part of the Project as if it was recorded in, using disk space in the process. KEEP It is possible to keep clips that have previously been borrowed by using the Space Menu described in “Managing Disk Space” on page 24-4. Importing a Single Clip Step 1 Locate the transport so the cursor lies at the point you want the clip to go (this can be done with M1 online). Step 2 Hold down the BLUE key and press Import. (Open a library if one is not already open). Step 3 Locate the transport so the cursor lies on the sync point of the clip. Also check that only one track is selected. Step 4 Select KEEP or BORROW. Step 5 Select the desired target track (it is a good idea to make a note of the destination track before using the import menu). The clip will be placed on the destination track with the syncpoint under the cursor. Importing a Range of Clips Step 1 Locate the transport so the cursor lies at the point you want the Range of clips to go. Step 2 Hold down the BLUE key and press Import. (Open a library if one is not already open). Step 3 Define a Range of clips and tracks. Step 4 Align the cursor position in the library to the required sync point in the Project. Step 5 Select KEEP or BORROW. The clips will be imported to the Project on their original tracks. IMPORT / EXPORT 27-4 LOCKING A LIBRARY TO PICTURE When the Import Menu is selected, M1 will automatically go offline. It is possible to put M1online with an offset to the current library position by using the LOCK function. This enables you to audition a sound to picture before importing. Step 1 Press the LOCK soft key to audition to picture Step2 Pressing the LOCK key again will turn off the lock function. This enables you to locate to a different sound for auditioning. IMPORTING WAVE FILES WAVE Files can be imported into a current open Project either by borrowing or keeping them. Importing a Single WAV File Step 1 Position the cursor at the point at which the clip needs to be placed. Step 2 Hold down the BLUE key and press the Import key. Step 3 Browse to the WAV file you wish to import. Step 4 Press Borrow or Keep. Step 5 Select which track to place the clip onto. The clip will now be imported at the cursor position. If a WAVE clip needs to be kept at a later time after a BORROW, use the KEEP BORROWED soft key within the Space Menu. LOCKING A LIBRARY TO PICTURE 27-5 Importing Multiple WAV Files Figure 2: Importing Wave Files Step 1 Hold down the BLUE key and press the Import key. Step 2 Press the WAV Files soft key. Step 3 A database form will appear on the video display. This is used to enter search criteria for importing multiple WAV files. Use the Up arrow and Down arrow keys on the console to move the cursor up and down the list. Use the + and - keys on the console or arrow keys on the PC keyboard to select items on the form. Step 4 Select the path for where the WAV files are located. Step 5 Select a sub folder (if required). Step 6 Select a filename. Step 7 Select a sample rate. Step 8 Select a format and then press Enter to begin the search. Step 9 A list will appear of all the WAV files found by the search. Select either Borrow or Keep and the clips will be imported into the current open Project. NOTES: When importing multiple WAVE files, a clip is created for each file. These clips are arrayed down the selected tracks, and if there are more clips after that, they are placed at the tails of the already placed clips. No more than 249 borrowings can occur for any Project. IMPORT / EXPORT 27-6 Search Options SEARCH IN Determines which disk drive and optional subdirectory is the place to begin the search. Use the Up and Down arrow keys to switch between the drives in the QDC system. If you want to add a subdirectory to the search criteria, type a forward slash (/) after the disk drive name, and then the name of the subdirectory. INCLUDE Determines whether subdirectories of the search start point will be searched or not. Move to this field and use the Up and Down arrow keys to toggle the switch on and off. If you choose to search subdirectories, the search may take much longer. FILENAME You may narrow the search by specifying a match string that ends a restricted set of files. All the AudioBase search characters may be used, see “Searching for Sounds” on page 26-3. SAMPLE RATE Allows you to search for files with only one sample rate. This field is automatically set to your current Project sample rate. To change it, use the Left and Right arrow keys. Moving past the left of all sample rate buttons turns them all off, meaning there is no limitation and files of all sample rates will be found. FORMAT Allows you to limit the search to only mono or only stereo files. Use the Left and Right arrow keys to change the settings. Moving past the left of all buttons turns them all off, meaning that both mono and stereo files will be found. Broadcast WAVE Broadcast Wave files include a timecode location contained within the file. Imported BWFs can be placed at their sync time on the timeline. Importing a Single Broadcast WAV File If the imported file is detected as a BWF file, the user can select to either import it to its sync position (as defined in the BWF's timecode reference) or to the current cursor position. When the software determines that a file selected for import is a BWF, a dialog pops up: Place broadcast wave at sync time? Press Y or N. The name of the resultant imported clip is derived from the BWF's description field, truncated to 24 characters if necessary. If the imported file is a normal WAV file, it will be placed on the track selected with the head of the clip at the cursor position. IMPORTING WAVE FILES 27-7 Importing Multiple Broadcast WAV Files When the first BWF is encountered, the following popup box will appear on the video screen: Place broadcast waves at sync times? Yes BWF only to be placed at its sync time - subsequent BWFs will repeat the dialogue. Cursor Places the BWF at the current cursor position - subsequent BWFs will repeat the dialogue. All Places all imported BWFs at their sync times. Never Places all imported BWFs at the current cursor location. Importing Other File Formats A new open file exchange program has been initiated with the introduction of the ML4 file exchange format. ML4 and ML3 are both supported by the external file conversion software packages Media Magic and AVTransfer. Fairlight are actively moving towards use of PC-based software for file format conversion for speed of both operation and updates, and users requiring file format conversion should access information on these packages through their respective websites: Media Magic for Apple Macintosh: www.darkmatterdigital.com AVTransfer for Microsoft Windows: www.avtransfer.net Contact your Fairlight distributor for more information. DREAM Console supports WaveFrame, AKAI, and OMF file formats as standard. Please refer to the Fairlight File Exchange Manual for more details. IMPORT / EXPORT 27-8 EXPORT The Export Menu is used to allow audio to be exported from a Project in the following formats: • WAV • Broadcast WAV • Fairlight ML • Fairlight DL To access the File Exchange Menu press the Export key on the console. Export Key Figure 3: Export Key Export Menu Soft Key Options Dubber Export Exports a file to the root of the current disk drive, which can be read by Fairlight's DaD Dubber product. The file will be named XXX.DL where XXX.MT is the name of the currently open Project. File Exchange Exports an ML3 file to the root of the current disk drive, which can be read by Fairlight's File Exchange partners. The file will be named XXX.ML where XXX.MT is the name of the currently open Project. WAV Export Opens the WAV Export sub-menu, used for turning DREAM Console audio into WAV files. EXPORT 27-9 WAVE Export The WAV Export function may use either the red clips under the cursor, or, if a Range is present, clips that are wholly included. Real time audio features such as EQ, level and fades are ignored - only the raw waveform data is exported. All exports from the WAV Export Menu are in BWF format. Figure 4: Wave Export To export clips to a Broadcast WAV File: Step 1 Select the clip or clips to be exported. Ranges of clips can also be selected - with each clip entirely within the Range being exported to a Broadcast Wav file. Step 2 Press the Export key on the console and select WAV EXPORT soft key. Step 3 A menu will appear in the top of the video screen prompting for the destination and name of the Broadcast WAV file that will be created. Use the Up arrow and Down arrow keys on the console to move the cursor up and down the list. Use the + and - keys on the console or arrow keys on the PC keyboard to select items on the form. Selecting the Publish to AudioBase box will publish all the created WAV files into AudioBase. Step 4 IMPORT / EXPORT Press Enter to perform the export. All the clips selected will now appear as separate Broadcast WAV files in the folder specified. 27-10 File Export Options UNIT Sets the destination drive. Use the Up and Down arrow keys to move between the available drives on your system. FOLDER If desired, you can add a directory name where you would like these WAVE files to be placed. The WAVE Import page can search for them and find them in this directory, but they cannot be borrowed successfully from it, only kept (see Import Menu for details). FILE NAME Determines how the WAVE files will be named. Use the Left and Right arrow keys to move between choices. If Other... is chosen, another field appears, allowing you to enter a new file name of up to 8 characters. PUBLISH TO AUDIOBASE Allows WAVE files to be published to AudioBase at the same time as creating them. This is a very useful way of publishing a single sound or group of sounds to AudioBase without publishing the whole Project. NOTES: The BWF format is 100% compliant with normal .WAV players, which simply play the files as normal WAV files, without recognizing the extra data chunks in the BWF format. BWF compatible WAV players however, are able to make use of the extra data incorporated in the exported file. This data incorporates the following: • Description = <clipname> from <track no> in <Project name>. • Origination Date and OriginationTime = The time and date of export. • Originator = “Fairlight” <Name of the machine performing the Export>. • Originator Reference = The name of the current open Project from which the Export was made. Time reference of the exported BWF is derived from the current timecode of the head of the original clip. File Exchange A new open file exchange program has been initiated with the introduction of the ML4 file exchange format. ML4 and ML3 are both supported by the external file conversion software packages Media Magic and AVTransfer. Fairlight are actively moving towards use of PC-based software for file format conversion for speed of both operation and updates, and users requiring file format conversion should access information on these packages through their respective websites: Media Magic for Apple Macintosh: www.darkmatterdigital.com AVTransfer for Microsoft Windows: www.avtransfer.net Contact your Fairlight distributor for more information. ML3 EXPORT 27-11 Press the File Exchange soft key to export an ML3 file to the root of the current disk drive. This format can be read by Fairlight's File Exchange partners such as AKAI. The file will be named XXX.ML where XXX.MT is the name of the currently open Project. The ML3 file contains only the top layer of clips. To export an ML3 file with all layers, for import by an MFX3, type: filex -a Enter ML4 To export an ML4 file that can be read by Media Magic and AVTransfer, type: filex -n Enter COMPATIBILITY WITH MFX2 AND MFX3 Any Project created under MFX2, MFX3, MFX3plus, MFX3.48 can be loaded into the DREAM Console, where it will be converted to a Project with full facilities. Backwards Compatibility MFX3plus systems can load 24 track projects via file exchange export as described above. Other systems are not back compatible. IMPORT / EXPORT 27-12 COMPATIBILITY WITH MFX2 AND MFX3 28-1 NOTES: 28-2 Chapter 28 - Timecode Set up INTRODUCTION The Setup Menu is used to configure the Project’s timecode format. The Digi Menu is used to select the sync source and the sample clock rate. The frame rate (timecode format) can be changed at any time, but should be set to the local standard. Setup Key Digi Key Figure 1: Setup and Digi Keys Follow these steps to change the frame rate: Step 1 Press the Setup key. Step 2 Press the TC FORMAT soft key Step 3 Turn the jogger wheel to select the desired timecode format. Step 4 Press Enter. Step 5 Select Non-Drop or Drop-Frame (if applicable) INTRODUCTION 28-3 Setup Menu Options Display timecode Choose units for displaying time: timecode (TC), Feet and Frames in 16mm format (F/F16), Feet and Frames in 35mm format (F/F35), or Hours, Feet and Frames at either film format (H/F/F 16 and H/ F/F/ 35). Use + and - or jog. Press Enter to confirm selection. All feet and frames measurements are based on a 24 frame per second film speed, regardless of the timecode format you have actually set. TC Format Sets the frame format for video sync or chasing timecode. Use the + and - keys or jogger to choose: 24 fps, 25 fps, NTSC DropFrame (DF) or NTSC Non-Drop Frame (ND). Press Enter to confirm your selection. NTSC When ND or DF is selected for the previous soft choice, this allows you to determine whether the correct frame rate is 29.97 or 30 frames per second. This field determines at which frame rate your selected sample rate will be accurately reproduced. For example, if you choose a sample rate of 44100 Hz and you set this field to 30, the system will run at precisely 44100 Hz when 30 frame timecode is used for synchronization. But if you use standard NTSC video (at 29.97 fps) as a sync source, the system will run down to 44056 Hz. This may be desirable if you plan to return the audio to a 30 fps environment later. Often, Projects that are finished on film or for CD mastering require a setting of 30, but Projects finished on video normally use 29.97. Range Determines what happens to Ranges when changing menus (Modes). In Auto Mode, Ranges are always switched off when entering a new mode, unless the new mode must have a Range, this is the option chosen by most operators. In Manual Mode, Ranges are always preserved, unless the new mode cannot have a Range. Also in Manual Mode, pressing the current Mode key again toggles the Range on and off, keeping the last timecode values that it had. NOTE: Always set the correct sample rate and frame rate before making your first recording - this will avoid problems later. TIMECODE SETUP 28-4 Project Sample Rate The sample rate for a Project is fixed after the first recording is made. It is therefore very important to check this before recording. Step 1 Hold down the BLUE key and press the Digi key. Step 2 Press the RATE soft key. Step 3 Turn the jogger wheel to select the desired sample rate. Available rates are 32, 44.056, 44.1, 48, and 96 kHz. Step 4 Press Enter. Selecting A Sync Source The DREAM Console’s sample rate clock can be referenced to one of several sync sources. The current sync source is displayed at the top right of the track menu. The sync indicator turns red if no sync is present. To select the sync source: Step 1 Hold down the BLUE key and press Digi. Step 2 Press the SYNC soft key. Step 3 Use the jogger wheel to select the desired sync source. Step 4 Press Enter, or, if INPUT is selected press a specific track key to select the input. The sync sources are as follows: INT Internal sync uses internal crystals to generate the clocks. AES The sync is taken from the AES sync input on the back of the QDC Engine. WCLK The sync is taken from the WORD CLOCK input on the back of the QDC Engine. VIDEO The sync is taken from the VIDEO input on the back of the QDC Engine. INPUT The sync is taken from . Input Sync Auto The INP SYNC soft key in the Digi Menu is available for all sync sources other than INPUT. Select INP SYNC to automatically sync to the lowest numbered armed digital input. When no tracks are armed the system reverts to the main sync source. The AUTO mode is used to automatically sync to an external input that is not locked to house sync. This mode should be used with caution as it is easy to lose the integrity of system synchronisation. Manual selection of INPUT sync ensures that the operator is always aware of the current sync source. Read below for more information on. INTRODUCTION 28-5 SYNCHRONIZATION DREAM Console can track the position and motion of external transports such as a video tape recorder, timecode-striped audio tape or a timecode generator. The disk recorder will play in time with the Master Timecode source so that sound and picture coincide. Position This is an absolute location reference to a sequence of pictures or audio. It is used to determine whether the disk recorder is playing the right part of its Project. For video, position reference is usually provided by 9 pin (Sony protocol from an RS422 port). For audio tapes LTC is normally used (though 9 pin is also a possibility). Motion The motion of an external machine is a measure of its speed, and the disk recorder must move at the same speed to remain in sync. This translates into producing the correct number of samples every second, which is called the Master Clock rate. This can be locked to a Digital Word Clock, a video signal, an AES/EBU signal, by the internal crystal, a timecode source, or a digital audio source which is being recorded. If the Position Reference and Motion References are not the same, it is possible that they will drift apart over time. This will be shown by a warning at the top of the DREAM Console’s video screen which indicates when an inconsistent timecode frame was encountered. How DREAM Console Synchronises DREAM Console goes through a number of steps in achieving synchronization in play mode: 1. Read the position reference and start loading up the corresponding audio on all active tracks. 2. When ready, start playing, but with the outputs muted. Use variable speed to reduce the error between the DREAM Console position and the Position Reference until it is very small. 3. Switch to the Motion Reference for continued playback. The system is said to be locked once this switch is made, and the audio is unmuted. 4. Warn of error status if the sync error increases, if a reference signal is lost etc. Digital Synchronization Conflicts When you are recording a digital source, it must be synchronised to the same Master Clock Reference as the DREAM Console, or an overflow (too many samples) or underflow (too few samples) may occur at the input. This causes a characteristic, periodic form of digital distortion called a whisper. A whisper sounds like a brief, glassy or metallic buzz, and occurs about once every few seconds, depending how fast the samples are overflowing or underflowing. One way to guarantee digital synchronization is to choose the digital input signal itself as the Master Clock Reference for the DREAM Console. This is done in the Digi Menu by selecting INPUT under the Sync soft key or AUTO under the Inp Sync soft key. This latter source of timing will only be used when a digital input is armed, with the normal HOUSE sync used at other times. TIMECODE SETUP 28-6 A side effect is that the word clock rate of all digital outputs will also sync to the digital input, which may cause digital synchronization conflicts downstream from the DREAM Console. For example, trouble may occur if, at the same time as recording your digital input, your outputs are feeding the inputs of a digital console. If you choose INPUT, the digital console will be required to sample rate convert all of DREAM Console’ s outputs, or synchronise with its Master Clock. The best solution to digital sync conflicts is to drive all digital devices from a single, studio-wide word clock signal. Then all devices will have identical word rates, so whispers never occur and digital interconnections may made with ease. In this instance, the sync HOUSE option is always used. Pull-up and Pull-down The normal sample rates used by the digital audio industry are 32,000, 44,056. 44,100, 48,000 and 96,000 samples per second. The normal frame rates are 24, 25, 29.97 and 30. These last two may cause confusion when used together. DREAM Console can alter its sample rates far enough to accommodate the small speed change caused by going from 30 to 29.97 frames per second and back again. In other words, if you slow down the frame rate from 30 to 29.97, the DREAM Console can slow its internal sample rate to match. This is called Pull-up or Pulldown, depending in which direction you are taking the speed. When you choose a frame rate you are telling DREAM Console what frame rate to expect. To put it more accurately, you are telling it the frame rate at which the chosen sample rate will be accurately reproduced. For example, if you tell the DREAM Console that the NTSC frame rate is 30 (in the Setup Menu) and the sample rate is 44,100, it will automatically pull down the sample rate to 44,056 if you feed in timecode at 29.97. If, however, you change the NTSC field to 29.97, the DREAM Console will play at 44,100 at 29.97 frames per second, and will pull up to a sample rate of 44,144 when timecode runs at 30 frames per second. It is advisable to choose a sample rate at which you want to make the final transfer of the Project. Then record your material at whichever frame rate is going to be used during that final transfer. The importance of this choice is that you do not want to compromise the quality of your final product by using sample rate conversion at the moment it leaves DREAM Console for the last time. You should make these choices at the very beginning of the Project, and then you may use any other combination that suits your purposes temporarily during the recording and editing process. Control of Sony Machines Sony machines are those conforming to the Sony 9 pin transport protocol. DREAM Console can control one of these machines, which should be connected to 9 pin Port A or B. It is best if that machine is being referenced by the same house sync signal as the DREAM Console (normally video). If this is not possible, the DREAM Console and the Sony machine are essentially free-wheeling, and the DREAM Console will relocate if a relative drift of more than one frame occurs. This will cause a dropout in the audio. SYNCHRONIZATION 28-7 Conflicting Sync Sources If DREAM Console is being told to synchronise to one of its digital inputs (see “Selecting A Sync Source” on page 9-3), and is also being told to chase LTC, there is a natural conflict. If this condition ever arises, the DREAM Console will issue an error message. TIMECODE SETUP 28-8 SYNCHRONIZATION 29-1 NOTES: 29-2 Chapter 29 - Machine Control INTRODUCTION DREAM Console can communicate with industry standard Sony 9 pin serial controlled machines (with a timecode reader installed) providing control over external video (or audio) machines, directly from the console. Machine Control Keys Figure 1: Machine Control Keys DREAM Console can control two machines M1 and M2 plus the disk recorder, and generate timecode at all frame rates. The following menus on the console are used to configure and control external devices. Setup Used to set systems frame rate, time display format and NTSC rundown. PreRoll Used to set preroll times for automatic recording and playback. Offset Used to set offsets for M1, M2, Disk and Gen. M1 Button Takes first external machine on and off line. When used with the BLUE key, it opens a menu for setting parameters for Machine 1. M2 Button Takes second external machine on and off line. When used with the BLUE key, it opens a menu for setting parameters for Machine 2. Disk Button Hold down the BLUE key and press Disk to take the Console disk recorder on and offline. When it is offline, the disk recorder will not locate or respond to transport controls, or playback any audio. Gen Button Switches the timecode generator on and off. The timecode generator outputs longitudinal timecode at the LTC output and MIDI timecode at the MIDI output. INTRODUCTION 29-3 M1 AND M2 SETUP The master machines M1 and M2 can be configured to select 9 pin port A, 9 pin port B, 9 pin slave, LTC input A or LTC input B. Only one master can be selected an any one time. Step 1 Hold down the BLUE key and press M1 or M2. Step 2 Select the desired soft key parameter as detailed below. Type Select the type of machine that will come on line when M1 or M2 is pressed. Choices are: Sony A or Sony B Gives you control over any Sony 9 pin transport. It is always the timecode Master (see options below). LTC A or LTC B Causes DREAM Console to chase the timecode coming in either LTC port A or B. 9 pin Rem DREAM Console emulates a Sony 9 pin slave machine and can be controlled from the 9 Pin Slave port. Lace / Unlace Press the soft key to toggle between Lace and Unlace. This determines if video machines will remain in shuttle or unlaced wind when a FASTWIND (FFwd / Rew) command is issued. When Lace is ON, the REW and FF commands send shuttle at maximum speed. This keeps the picture on the heads during rewind or fast forward for some machines which would otherwise unlace (e.g. Sony 9800). When Lace is OFF, the machine is given a REW or FF command, which will cause the tape to unlace in some machines. In other machines, however (e.g. BetaCam SP) these commands do not unlace the tape, but give a very fast shuttle in the desired direction. When issuing a GO TO command to the machine, if the distance over which it is to be shuttled is greater than this time, the machine is given a REW or FF command, regardless of whether Lace is ON or OFF. Setting this time to zero guarantees that the slave will be given a goto. Lace Time Press the Lace Time soft key, use the jog wheel, +/- or numeric keys and press Enter to adjust the Lace Time. If a JUMP or GO TO command is issued that requires the transport to locate further than the time shown, video machines will unlace the tape from the heads and go into fast wind. Lock Press the Lock soft key to toggle between Chase and Run. MACHINE CONTROL 29-4 LOCK offers two modes: CHASE The DREAM Console continuously tracks the timecode from the 9 pin machine. RUN The DREAM Console gets the location from the 9 pin machine and then runs from the selected sync source. Changes in timecode are then ignored. Arm Press the Arm soft key and use the jog wheel or +/- keys and press Enter to select the type and range of 9 pin machine tracks to arm. Use the track selection keys to arm the tracks. This allows you to arm tracks on the 9 pin machine using the track keys. The menu can scroll to arm analog tracks 1-4 or digital tracks 1-48. Only tracks available on the current 9 pin machine can be armed. The 9 pin machine will go into record when the DREAM Console transport is placed in record. It is not necessary to have any disk recorder tracks armed. Note: Be careful not to inadvertently leave the 9 pin machine armed as this can result in accidental erasure of tapes. When a track on a 9 pin machine is armed, a red box with a V is displayed above the Track 1 label on the track display. Master The Master option appears only when M1/M2 is an LTC machine. If switched on, the system Master Clock will be driven by the incoming timecode when M1/ M2 is on line. Generally it is better to use video or AES/EBU as a Master Reference. When M1 or M2 are selected to chase timecode, MASTER is used to generate the sample clock from the incoming code. This should be ON if the timecode source is not referenced to the same sync source as the DREAM Console. See Synchronization chapter for further details. LTC Synchronization To lock to LTC (longitudinal timecode), either M1 or M2 (usually M2) must be configured to read one of the LTC input ports. Step 1 Press M2 (or M1 depending on configuration). Step 2: Press Play. If the LTC source is not locked to the same sync source as the DREAM Console, set LOCK TO MASTER ON in the Digi Menu. Enabling the LTC Generator The LTC generator will output the current timecode when in PLAY, and output a short burst of timecode when locating the transport. MIDI timecode is also output when GEN is enabled. Press GEN to toggle the generator on or off. M1 AND M2 SETUP 29-5 EDITING WITH MACHINE CONTROL All the transport controls and locating methods operate with a 9 pin remote machine online. The following procedure is used to place new recordings or previously used clips to picture. Press the M1 key to toggle the 9 pin machine on or off. The DREAM Consoles transport will locate to the timecode from the 9 pin machine. The system defaults to M1 controlling 9 pin Port A. Placing Sound to Picture Step 1 With M1 online, locate the video at the desired frame. Step 2 Take M1 offline. Step 3 Locate the transport so the cursor lies on the sync point of the clip. Step 4 CUT Step 5 Place M1 online, the transport will relocate to the video at the desired frame. Step 6 Press <Enter> to paste the clip. or COPY the clip to the clipboard. It is also possible to CUT or COPY the clip before locating to the desired frame. THE OFFSET MENU Each machine on the system can be given an Offset. This is the amount by which its timecode position exceeds the DREAM Console console’ s displayed time. When the disk recorder is offset, its position, which is shown on the video screen, will differ from the Console position, which is normally shown in the upper right of the LCD. There are two ways of entering offsets. One is to specify a machine’ s offset, and the other is to specify its desired position. A toggle in the menu allows you to choose which you prefer. In this menu the upper portion of the LCD shows the current position or offset of all the machines in the system. MACHINE CONTROL Restore Restores the machine’ s offset to the value it had before it was selected for changing (effectively UNDOing an offset change). Capture Makes the offset equal to the current position relative to the Master time display. The device being offset must be offline during this process, or it would always locate to its existing offset. Step 1 Press the OFFSET key. Step 2 Select the soft key for the desired machine. 29-6 Step 1 Press the OFFSET key. Step 3 Enter the offset value or press the CAPTURE soft key. POSITION The fifth soft key toggles between offset and position modes. The position mode displays the actual position of each machine. This allows you to enter known timecode references rather than calculating offsets. SONY ID CONFIGURATION Refer to “The Sony_ID File” on page 33-8 for details machine specific configurations. NOTES: 1. The position of any machine when online is defined as DREAM Console’s position plus offset. So if, for example, you give a machine a 30-second offset, it will immediately locate forward 30 seconds (unless it is the Master, in which case all the other machines will locate backwards by 30 seconds). 2. The DREAM Console will display the time Master minus Master Offset, when the Master is online. 3. Only positive offsets are allowed, so if you want a minus one hour offset, put in a 23 hour one. Or, CLEAR the Numeric Register, type the number, press the - (minus) key and then Enter. 4. To capture an offset between a Sony machine and the disk recorder, first move the Sony machine to a timecode and take the disk Offline by Disk. Now move the Sony machine to another timecode. Select the Offset Menu, then Disk and press the Capture soft key to produce a new offset for the disk which keeps it in sync with the Sony machine’ s current position. SONY ID CONFIGURATION 30-1 NOTES: 30-2 Chapter 30 - Printing INTRODUCTION The Print Menu allows a track sheet or dubbing chart to be printed, based on the layout of the clips in a current open Project. The DREAM Console supports serial or parallel printers. A printout shows the selected tracks and the start and end times for each clip. Print Key Figure 1: Print Key Step 1 Hold down the BLUE key and press Print. Step 2 Define a Range and select the desired tracks. Step 3 Press the PRINT CHART soft key. The other soft keys operate as follows: PAGE Determines how page numbers are shown. X or X of Y BAUD Selects the baud rate for the serial printer. 9600 or 38400 PORT Selects port used for the printer, MODEM or PRINTER. Use the modem port for a serial printer and the printer port for a parallel printer. STOP CHART Stops printing. SETTING PRINTER CHARACTERISTICS To change printer characteristics, display the System Page (type BLUE S). You may now use the mouse to choose 9, 24 or 48 pin printers. You may also set the size of your paper (if you want to print two pages of tractor feed paper with no header at the top of the second page, set the page length to double.) Use the mouse to click on individual fields, thus changing the displayed value. These are explained below. INTRODUCTION 30-3 Figure 2: System Page Print Options Printer Compression Removes vertical space where nothing is happening: i.e. no clip is starting, ending or being labelled. The lower this number, the more space is removed, therefore the more Project time will appear on each page. When compression is set to zero, the maximum space is removed. PRINTER HEAD DENSITY: Sets more or fewer dots per inch. More dots per inch will give you a smaller picture. PIXEL DENSITY (X-Axis): Controls the number of dots used. (More dots will give a wider picture). PIXEL DENSITY (Y-Axis): Similar to X-Axis. JOIN CLIPS This feature is designed to prevent the printing of large numbers of small clips that have been edited together to make a composite sound. It works together with the Minimum Gap parameter to print a single shape for many clips. When set to ALWAYS, it treats clips that are butted together (or overlapping) as just one clip. The name of the earliest clip is used. SAME NAME joins butted clips together, only if they have the same name. PRINTING CLIP ATTRACTION IN FRAMES The Join Clips software will treat clips as though they are butted together as long as they are closer than this minimum gap. It also has the effect of quantising the print output, so that events starting within a window of this gap will appear to start at the same time. TIMECODE FORMAT Click on this field to choose which timecode fields will be printed. 30-4 Printer Types Parallel Printers The DREAM Console printer output is a standard PC compatible parallel printer port. The system will support most Epson compatible parallel printers. Serial Printers The Modem output supports serially connected Epson compatible machines of the 9 pin or 24-pin protocol. Example: EPSON LQ1170 with IF C82305 or C82307 serial interface card. Baud rate = 9600 or 38400 8 bits, 1 stop bit, no parity, DTR handshake Pin Connections Fairlight 9 pin Printer 25 pin Switch Settings C 82305 C 82307 Pin 2 Pin 2 SW 1-1 on SW 1-1 on Pin 3 Pin 3 SW 1-2 on SW 1-2 on Pin 4 Pin 5 SW 1-3 off SW 1-3 off Pin 5 Pin 7 SW 1-4 off SW 1-4 off Pin 8 Pin 20 SW 1-5 off SW 1-5 off SW 1-6 off SW 1-6 off SW 2-1 on SW 2-1 on SW 2-2 on SW 2-2 on SW 2-3 off SW 2-3 off SW 2-4 on SW 2-4 on SW 2-5 off SW 2-5 off When DREAM Console prints a dubbing chart, the length of each clip is not necessarily shown in proportion to its duration. Instead, it depends on the space needed to display all the clip information (start timecode, name and end timecode), plus the space needed to show other clips that start or end while the first one is playing. If many clips start or end during a clip’s playback, that clip will be very long in the printout. SETTING PRINTER CHARACTERISTICS 30-5 NOTES: 1. Dubbing chart printing always takes a Range. 2. Dubbing charts print only the selected tracks. The durations of clips on the non-selected tracks are, however, taken into account, so you can print 12 tracks in one pass and the other 12 in another pass, and the two prints will join side by side to make one large display. This may spread your dub chart more than desired so, to prevent this from happening, deselect and disable the tracks that you do not want involved in any way in the print process. 3. To stop printing, type Ctrl-Q. Then press the Kill Que soft key. 4. To split the name of a clip include an ellipsis (...) in its name. The first part will print at the top of the clip and the second part at the bottom. PRINTING 30-6 SETTING PRINTER CHARACTERISTICS 31-1 NOTES: 31-2 C h a p t e r 3 1 - M a c ro s INTRODUCTION Macros are used to replay sequences of key strokes on the console. Macros can record any keys, but not the jogger wheel. Macros can be used to automate often repeated command sequences for common studio tasks.A total of 27 Macros can be recorded across three banks containing nine Macro keys each. Figure 1: Macro Keys RECORDING A MACRO Step 1 Press the Edit Macro key. Step 2 Select the Macro key you wish to define. Step 3 Press the LEARN soft key. Step 4 Press Enter. Step 5 Perform the functions to be recorded (any keys except the jogger wheel). The console beeps as each key is recorded into the macro. Step 6 Hold down the BLUE key and press the Edit Macro key to stop recording the macro. Inserting a Pause While recording a Macro a pause may be inserted between keystrokes. To insert a pause hold down the Ctrl key on the PC keyboard and press a number key on the numeric keypad. Press 1 to add a one frame pause, press 2 for a two frame pause, and so on. Press 0 for a ten frame pause. Multiple pauses may be added by pressing a number key more than once. INTRODUCTION 31-3 NAMING A MACRO Macros can be given names to allow identification when in the Edit Macro Menu. If not already in the Edit Macro Menu, press the Edit Macro key. Step 1 Select the desired macro key. Step 2 Press the NAME soft key. Step 3 Type the name. Step 4 Press Enter. RUNNING A MACRO Macros can be run in two ways. 1) Pressing one of the macro keys from within any menu except the Edit Macro Menu will run the macro. 2) From the Edit Macro Menu as follows: Step 1 Select the desired macro key. Step 2 Press the RUN soft key. This second procedure allows macros to call other macros. ERASING A MACRO Learning a macro will erase any previous macro for that key. It is sometimes desirable to erase a macro and leave it vacant to prevent it from being accidentally pressed. Step 1 Select the desired macro key. Step 2 Press the ERASE soft key. Step 3 Press the Enter key. If a macro key is pressed while learning a macro, the contents of that key will be recorded by the new macro. Changing either macro will not affect the other. All numeric values and menu selections must be entered with the numeric keypad. When entering numbers, press the Clear key then type the number and Enter. Soft key menu parameters that are normally scrolled with the jogger wheel can be selected with the 0 to 9 keys. To invoke a delay in a macro, hold down the Ctrl key and press one of the numeric keys. The delay will be the approximate value of the key in frames (e.g: 5 will be 5 frames) with 0 being 10 frames. MACRO FILES Macros can be saved to and loaded from disk. A macro file is a snapshot of all the function keys. Macros are saved to .MK file.The following procedure is performed in the Edit Macro Menu. Step 1 MACROS Press the File soft key. 31-4 Step 2 Select one of the macro file functions as listed below. The File Menu performs similar functions to a PC or Macintosh file menu. LOAD Load allows you to select a macro file from one of the drives and load it into the system. This will erase the previous set of macro keys. SAVE Save will update the currently loaded file to include changes. SAVE AS This will save the current set of macro keys as a new file. The system will prompt you for a destination and name. UNLOAD Unload will clear all macro keys. DISPLAYING MACROS The contents of a Macro can be displayed on the LCD by pressing the To Panel key. DISPLAYING MACROS 32-1 NOTES: 32-2 Chapter 32 - Back up and Restore INTRODUCTION The Backup Menu allows multiple projects and macro files to be transferred to an Exabyte tape or another disk. The backup device can be any hard disk, optical disk or Exabyte tape drive connected to the system either directly or via a network. To enter the Backup Menu, hold down the BLUE key and press the B/Up key. Backup Key Figure 1: Backup Key The functions provided in the Backup menu are as follows: BACKUP This is the same as copy, but a BU (backup) file is also created. The BU file lists the files backed up and the locations they came from. This is stored in the destination where all the marked files have been copied to. RESTORE This opens a BU file and uses it to mark the files for restoring. COPY Copies all the marked files from their current locations to the destination. MOVE Moves all the marked files from their current locations to the destination. EJECT Ejects removable media such as exabyte tape. Backups are performed as a background task. This enables the DREAM Console to continue working as normal, with the backup process being suspended when the open Project needs to play or record. When backing up or restoring to and from tape drives, files cannot be added to the end of existing tapes. Backing up to a tape will always erase the previous contents of the tape. INTRODUCTION 32-3 BACKING UP Destination Summary Selected Items Figure 2: Backup Display The following procedure is run from the Backup Menu: Step 1 Press the BACKUP soft key. Step 2 Select the destination device and folder. It is possible to create a folder using the NEW FOLDER soft key. Step 3 Press Enter. Step 4 Type the Backup (BU) filename when prompted. The default for this name is the current date and time. Step 5 Press Enter. Step 6 Use the jogger wheel and the MARK soft key to select the files for backup Step 7 Press the START BACKUP soft key. Step 8 A window will appear prompting: Do you wish to verify your backup? If Y (Yes) is selected, the backup files will be verified against the original files. This will take longer, but will ensure that valuable files are safely stored. Projects can be unmarked by pressing the UNMARK soft key.If you mark a Project that has borrowed clips, you will be prompted to select the libraries if required. BACKUP AND RESTORE 32-4 Backup Tapemode Options Fairlight recommends that you backup in the default Native format for your tape drive. Some Exabyte tape drives support tape formats for other models, these options may be used for compatibility across various drives. Press the Tapemode soft key in the backup menu to toggle through the following options: Native The default native tape format for the tape drive fitted 8200 Exabyte 8200 format 8500 Exabyte 8500 format 8200 comp Exabyte 8200 format with data compression 8500 comp Exabyte 8500 format with data compression RESTORING The following procedure is run from the Backup Menu: Step 1 Select the required backup (BU) file. Step 2 Press the RESTORE soft key. Step 3 Use the jogger wheel and the MARK soft key to select files for restore. You will be prompted to confirm the destination or select new ones. Step 4 Press the START RESTORE soft key. Projects can be unmarked by pressing the UNMARK soft key. When restoring from Exabyte, it is possible to mark individual files. It is not necessary to restore the whole tape. RESTORING 32-5 COPYING AND MOVING Copy and Move options allow multiple files to be selected and moved or copied as a batch. The following procedure is run from the Backup Menu: BACKUP AND RESTORE Step 1 Press the COPY or MOVE soft keys. Step 2 Select the destination device and folder. Step 3 Press Enter. Step 4 Use the jogger wheel and the MARK soft key to select the files to be copied or moved Step 5 Press the START COPY or START MOVE soft key. It is possible to create a folder using the NEW FOLDER soft key. 32-6 COPYING AND MOVING 33-1 NOTES: 33-2 Chapter 33 - Syst em Files INTRODUCTION DREAM Console uses a number of files to store setup information. These are normally set to sensible values at the factory, but in some cases you may need to change them. There are two main groups of system files. Those associated with the QDC engine and those associated with the console. The console system files are stored on the console computer under the Windows operating system.The QDC Configuration files are stored in OS9 partitions on the boot drive. The names of the files, which are given below, include the disk partition and full path that is needed to access them. Some options are only taken into account when the machine boots up. Therefore, to ensure your changes take effect, restart the machine by powering down and switching back on. WORKING WITH QDC SYSTEM CONFIGURATION FILES It is always necessary to quit the disk recorder application and access the operating system in order to edit a configuration file. Step 1 Hold down the Shift key and press Pause/Break. Step 2 Type: Q Y and wait for the hatch prompt (#) to appear. Editing a Configuration File Type: ED filename RETURN, where filename is the name of the file you want to edit. Move the cursor around the file using the arrow keys. To add text, move the cursor to the desired location and start typing. Text is always inserted, never overwritten. To remove text, use the DEL or BACKSPACE key. Type ESC to view the command options. Saving Changes to a File When you have the file exactly the way you want, type ESC ZY. This will close the file and save your changes. If you want to abandon editing without saving changes, type ESC QY. To return to the Disk Recorder program, use the trackball to click on the Start key on the DREAM Start splash screen. INTRODUCTION 33-3 QDC NETWORK SETUP The default network settings are suitable for installations where the console is directly connected to the QDC engine with the CAT5 cross-over cable supplied. If the QDC engine is connected to a Fairlight Medialink network, the network configuration of the system may need to be modified. Network configuration requires the following changes: 1. Edit the /nvr/setup file on the QDC engine. Modify the engine IP address, hostname, network domain name, and console IP address. Modify the DNS server and domain settings to enable internet access if necessary. Modify the AudioBase server address if necessary. These settings are described in detail below. 2. Change the console IP address in the Windows Network and Dial-up Connections settings window. This address must be unique and within the subnet range of the engine. See “Console Network Configuration” on page 4-7 for more details. 3. Edit the C:\Projects\Mixers\DREAM.bat file on the console PC. Modify the engine IP address at the top of the file to match the address set under the Web section of the setup file on the QDC engine. See “DREAM.BAT” on page 39-8 for more details. QDC Setup File The QDC engine network settings are configured in the /nvr/setup file. While the DREAM Start splash screen is displayed on the mixer display, any characters typed on the PC keyboard are passed through to the QDC engine. Start DREAM Start, if necessary by using the trackball to double-click on the DREAM Start icon on the Windows desktop. To configure the networking setup on the engine, type setup at the # prompt. The setup file will be displayed in a text editor. Use the arrow keys to navigate through the setup file. The default setup file is shown below: [Web] HOSTNAME IP_ADDRESS NET_MASK DOMAINNAME VISIBILITY DNSSERVER DNSDOMAIN GATEWAY SCANHOSTS [AudioBase] VERSION SERVER [Console] ENABLE SERVER SERVER_PORT CLIENT_PORT DEBUG SYSTEM FILES = = = = = = = = virgin 10.1.1.11 255.255.0.0 VIRGIN PUBLIC off your_dns_domain.com 10.1.1.1 = 1,11-20 = 1 = 10.1.1.1 = = = = No 10.1.1.111 2727 2727 = 0 33-4 [Surface] #SERVER = 10.1.1.111 #SERVER_PORT = 2721 CLIENT_PORT = 2801 DEBUG = 0 The following entries may need to be changed to enable the engine to run with your existing Fairlight Medialink network configuration. [Web] HOSTNAME Enter a unique network identification name for the QDC engine. To avoid conflict with engine software modules use names which include an underscore character, for example, Studio_1. Hostnames are limited to 10 characters. IP_ADDRESS Enter a unique address for the QDC engine. This address must be within the subnet range of the console. This means that with the engine or console netmask set to 255.255.0.0 and the console address set to 192.168.0.111, the engine IP address must start with 192.168, for example, 192.168.0.11. Medialink devices must be in the same class C subnet, therefore the first three numbers in the IP address of QDC engines and Medialink servers must be the same. Fairlight recommends the following IP allocation strategy: w.x.y.1-10 for servers w.x.y.11-110 for engines w.x.y.111-254 for consoles. DOMAINNAME Enter the domain name for your local network domain.The DOMAINNAME entry classifies what group you appear in. The name can have no spaces. For example DOMAINNAME = MUSIC or DOMAINNAME = ADR. DNSSERVER QDC engines can connect directly to the Internet for the purposes of FTP connections, etc. Enter the IP address of a domain name server on your network. Set this up to resolve names correctly. Enter Off to disable domain name service requests. Please refer to your network administrator or IT professional for advice on the correct DNS entries for the following fields. DNSDOMAIN Enter the DNS domain to enable DNS lookups. Note DNSDOMAIN has nothing to do with DOMAIN. GATEWAY This is the default route for all IP traffic. Any network that cannot be reached directly will be sent to this host. SCANHOSTS Enter the range of addresses for the QDC to scan when detecting network nodes. The SCANHOSTS entry will accept multiple ranges separated by commas, for example, 132,254. This will cause the QDC to scan only IP addresses 1-32 and then 254 in the current class C subnet, for other QDCs, MFX3pluses and MediaLink servers. QDC NETWORK SETUP 33-5 If the SCANHOSTS directive is not present, the entire class C subnet will be scanned. It is highly recommended that this configuration be optimized for all installations, to avoid unnecessary network traffic and processor overhead in the QDC. The remaining parameters are described below. [Web] NET_MASK The netmask determines what range of IP addresses the engine can receive messages from. The subnet part of the engine’s IP address are the numbers that coincide with 255 in the netmask. The numbers that coincide with 0 in the netmask are the machine specific part of the IP address. The engine can only receive messages from other devices in the same subnet. In the IP address example above, the netmask is 255.255.0.0. and the engine address is 192.168.0.11. The engine will only see messages from devices in the 192.168.x.y subnet. Medialink devices must be in the same class C subnet, therefore the first three numbers in the IP address of QDC engines and Medialink servers must be the same. VISIBILITY The VISIBILITY entry when set to PUBLIC means that other machines can see your machine across the network. When set to PRIVATE, your machine can see other machines on the network but no one else can see this machine. [AudioBase] VERSION Specifies what version of AudioBase to run (1 or 2), if set to 2 then the SERVER entry specifies the name or address of the machine which should be the AudioBase 2 Server. SERVER Specifies the name or address of an AudioBase 2 Server. Only required if VERSION is set to 2. [Console] This section determines the TCP/IP parameters for editor commands sent across a network. Editor commands are sent via the RS422 serial link by default. ENABLE Enables editor commands sent over TCP/IP, this entry must be set No. SERVER Enter the IP address of a Satellite console connected to the QDC engine to enable the ftp transfer of emu.raw on start up. SERVER_PORT Must be set to 2727. CLIENT_PORT Must be set to 2727. DEBUG Enables development debug. Must be set to 0. [Surface] This section determines the TCP/IP parameters for mixer commands sent across a network from a Dream or Station. SYSTEM FILES 33-6 If the SERVER entry is present then client mode is enabled and this QDC will connect to the surface on the specified port number. If there is no SERVER key then this QDC checks for the CLIENT_PORT key and if it is present enters server mode and listens on that port. By default the QDC runs as a server and the SERVER entry must be commented out. #SERVER Specify the name or address of an optional surface server. This line must be commented by appending it with a # character. #SERVER_PORT Specify the port number of an optional surface server. This line must be commented by appending it with a # character. CLIENT_PORT Specify the port number of the FMC surface client. Must be set to 2801. DEBUG Enables development debug. Must be set to 0. Once the setup file has been modified, type ESC Z to save and quit. Restart the machine when prompted. THE MDR CONFIGURATION FILE This file contains many settings that are used by the Multitrack Disk Recorder program (MDR). To open it when DREAM Console is running, type: CFG RETURN CAUTION: The MDR Configuration File contains many things that you should not change! If you do, some operations of the system may become unstable, or not work at all. DO NOT CHANGE ANYTHING that is not described fully here. The following lines may be changed: @ArmKeyDelay on Normally there is a delay in the reaction time of the track keys, to allow for the possibility of double clicking. Change this setting to “off” in order to remove this delay (useful when using the track keys to put individual tracks into record). When it is off, double clicking does not work. @FadeDefault 72 Every clip is played with a fade at both ends (unless it is butted up to another clip), even when you do not specify one. The value here is used every time the system powers up (you may change it temporarily while the system is running). The number is set in time units, which are equivalent to sample periods at 48 kHz. A table shows you the equivalents in subframes at various frame rates. THE MDR CONFIGURATION FILE 33-7 @DitherOutput 24 This allows you to set the dithering of the digital and analog outputs. In most cases this should be left at 24, but if you are outputting to a digital system where only 16 or 20 bits are going to be used, you should set the dither accordingly. @DefaultInputType 1 This will set the input type for newly created Projects, immediately upon power up. Once a Project has been loaded or created, all new Projects created after it will inherit the patching and input type from it. The numbers of the different input types can be seen in the file you are editing. Note that the mixer also has a default input type, and that each Title will overwrite the settings of the inputs to match their state when the Title was saved. @PlayInhibitThreshold 24 When you are recording a large number of tracks at once, DREAM Console may sometimes have difficulty keeping up with the disk playback bandwidth requirements. Turning on this function (by setting it to the number of tracks you are recording) tells the DREAM Console not to try to load playback buffers on the tracks you are recording. This means when you exit Record, there will be no audio loaded to provide playback, (but this would have happened anyway if you are recording a lot of tracks simultaneously, for more than about 10 seconds.) This parameter does not normally need to be altered unless you are doing a lot of recording with more than 16 tracks armed. @BeepsTrackNumber If you are using the ADR Menu, and you have set one of the GPIs to BEEPS, you will also get audible beeps from one of the outputs. This parameter allows you to choose the track that the beeps will output. It may be the track you are recording on if you want. @BeepsVolume Sets the audio level of the beeps. Set it to -99 if you do not want any beeps. @BeepsFrequency Sets the frequency of the beeps in Hertz. @MinSegmentDuration 0 Sometimes a large amount of editing can result in lots of tiny clips sandwiched between larger ones. These clips are played, but not really heard, and can absorb a lot of disk bandwidth by requiring a single disk seek to fetch only a few inaudible samples. By setting this parameter to a non-zero number, these unnecessary seeks are avoided. In addition, any files that are being passed to the DaD will play much better if this parameter is set to 16 or more samples. SYSTEM FILES 33-8 THE SONY_ID FILE The Sony ID file tells the system about the characteristics of different 9 pin devices, such as how many analog and digital tracks the device has. The file also contains device ID entries for the Fairlight products which are reported to external master machines when the Fairlight product is connected as a slave. Device ID When DREAM Console is connected as a slave 9 pin device, it replies to the controlling machine with a device ID. Normally this is set to the official Fairlight ID, which is FA. However, some editors or synchronisers may not recognise this device name. It is therefore useful to be able to give a device name that is familiar to the editor or other controller. To open Sony_ID for editing, first QUIT, then type: ED /DD/USR/SYS/SONY_ID RETURN, to open the file in a text editor on the QDC engine. Towards the end of the file you will see the entries for Fairlight products. To change the system’s device name, edit the following line: 0xFA 0xA2 “Fairlight” (24 fps)" "Digital Audio Workstation" "QDC Engine The Fairlight QDC ID is 0xFA 0xA2. Change this ID to the ID for any Sony device that the controlling machine recognises. All the Sony devices listed in this file have their corresponding ID at the beginning of the line, which can be used to replace the Fairlight ID. The system automatically modifies the last two bits in the ID to indicate the current frame rate. This feature may not be supported by some systems. To prevent the system from doing this you must edit the following file: /dd/usr/sys/tcs_cfg. SONYRemove the asterisk at the beginning of the following line: *@SETENV OLDID. Delay The delay modifier is used to declare the number of frames ahead of a drop-in point the record command should be sent down the 9-pin wire when using ADR cycle record. For most devices the default of 3 is correct. It can be altered for machines that are slower or faster at dropping into record. It can also be used to offset drop points on a remote machine. Add delay=# to the end of the device definition you wish to modify, where # is the delay in frames. Jogsh The jogsh modifier is used to modify the behaviour of the DREAM Console transport when acting as a master, controlling slave 9-pin devices in jog or shuttle mode. The default setting is jogsh=1. When jogsh=0 the DREAM Console sends jog commands to the slave and then reads and chases the slave’s timecode. This provides uniform picture jogging but in some cases may cause excessive variations in audio jog speed. THE SONY_ID FILE 33-9 When jogsh=1 the DREAM Console sends jog commands to the slave, the slave then reads and chases the DREAM Console‘s timecode. This provides uniform audio jogging but in some cases may cause excessive variations in video jog speed. Add jogsh=# to the end of the device definition you wish to modify, where # is 1 or 0. THE SYSTEM PAGE This page is used for setting some system parameters. To reach it press BLUE s. Your mouse is used to make changes on this page, then save them to disk if necessary. Whenever you wish to save the current configuration, click on the SAVE icon. To return to the track display type BLUE t. Figure 1: System Page Print Options Many of the fields on the S Page concern the operation of the printing software. These are described fully in “Setting Printer Characteristics” on page 30-2. File Display Sorting Allows you to choose the order in which files are displayed on the F Page. This may be done by the last Edit Date, the File Creation date, or alphabetically. The right hand field determines the direction of the sort. Library File List Filter A list of the current library files i.e. Projects from which the current Project is borrowing clips, can be displayed by typing BLUE L. The list can be filtered to show only libraries that are offline, which means they cannot be found on the network connected to this machine, and therefore cannot be opened. This filtered list is useful because you can see immediately which files must be restored to the system before the borrowed clips in the Project will play properly. Waveform List Filter A list of all Master Recordings (Waveforms) used by the current Project can be displayed by typing BLUE W. The list can be filtered to show only waveforms which have no clips referencing them (choose NOT USED with the mouse). SYSTEM FILES 33-10 Meter Settings The Meter Calibration Law sets different curves for the channel meters. There are two groups: from 1 to 3 has a lower limit of -54 dB, and from 4 to 6 has a lower limit of -72 dB. Within each group, the lower numbered curves devote more meter length to the higher levels. You can change the meter calibration law at any time the meters are displayed by typing law number <RETURN>, where number is the meter calibration law you wish to use. Meter Red Level allows you to set the level at which the meter elements are coloured red. You can also change this at any time the meters are displayed by typing red number <RETURN>, where number is the audio level where the meters are to turn red. You may include the minus sign or not, just as you prefer. Crossfade from Zero This is used when you have set a crossfade that is longer than one of the clips in the overlapping region. When ON is chosen, the short clip will fade in such a way that it will reach a level of -× at the edge of the clip, even if the crossfade is not at an end. When OFF is chosen the clip will fade in the normal way as dictated by the crossfade parameters, and then it will stop playing at its end, with the level still up. Fade Def on Butted Clips This option allows you to decide whether fade defaults are used at butted clips. It is generally a good idea to leave it switched off if the audio is continuous across your edits. Distinguish Crossfades If this is set to ON, crossfades are shown on the video screen using black shading. Auto-Update DL File Allows you to have DREAM Console create a Dubber file automatically whenever a Project is closed. Options are NEVER, ASK (you will be prompted each time a Project is closed), or ALWAYS. Wave Menu Audio Format Allows you to choose whether Wave Menu operations (Time Stretch etc.) produce new Master Recording in the original format of the clips being processed, or in the current system bit depth. Automatic Extension When ON, causes a new file to be created automatically if the 4 Gigabyte maximum file size is reached while recording. This file is an extension of the previously existing file, and all clips, marks and names are carried forward into the new file. Super Trim When ON is selected, the user is shown when the full length of a clip when trimming. See the Binnacle Editing Chapter earlier within this manual THE SYSTEM PAGE 33-11 WORKING WITH CONSOLE SYSTEM FILES It is necessary to access the console computer operating system in order to modify console system files. To access the Windows operating system, you must exit the FMC mixer application running on the console, and the disk recorder application running on the QDC engine. Quitting FMC automatically quits the disk recorder application. To quit the FMC application, hold down the Shift key and press the Pause/Break key on the PC keyboard to switch the keyboard focus to the console computer, then type Q then Y. The Windows desktop will now be displayed. System files are stored in the C:\Projects\Mixers\FMC\Data directory. Use Windows explorer or use the trackball to click on My Computer, on the desktop, to navigate through the file system. Use the Notepad text editor to edit files. Keyboard Focus When running FMC, the keyboard output can be directed either to the console computer, or to the QDC engine. Keyboard output is directed to the QDC engine by default. To switch the keyboard focus to the DREAM console computer hold down the Shift key and press the Pause/Break key on the PC keyboard. To change the keyboard focus back to the QDC engine press the Pause/Break key. Pressing the Pause/Break key will always direct the keyboard output to the QDC engine. The I-O Config.TXT File The I-O Config.txt file specifies what I/O hardware is fitted in your QDC engine. This file must be edited to allow the Console to properly address the physical I/O hardware. The I-O Config.txt file is stored in C:\Projects\Mixers\FMC\Data directory. Open the file with the Notepad text editor, define the physical I/O as described in the file. You can also name individual I/Os which will then bring their names up on the FAT channel when you patch them. System Ports System output ports can only be accessed from the Monitor Setup Patch Outputs menu. Using system ports for control room monitors prevents the operator from inadvertently patching signals direct to the power amplifier inputs. To define a system port enter an attribute value of 1 as described in the I-O Config file. The file contents are similar to the following: # # # # # # # # # # # # # # # # # # # # SYSTEM FILES -------------------------------------------------------I/O configuration There are three types of I/O: 1 is Analog 2 is AES 3 is MADI -------------------------------------------------------First define the number of different types of I/O: IO_CONFIG,type,inputs,outputs where IO_CONFIG,1,16,8 IO_CONFIG,2,32,16 IO_CONFIG,3,0,0 would configure the system with 16 analog IPs, 8 analog outputs, 32 digital IPs, 16 digital OPs and no MADI -------------------------------------------------------These ports are then define one by one using a number of statements like these: INPUT,type,index,name,attibutes OUTPUT,type,index,name,attibutes 33-12 # # # # # # # # # Note, that the index counts from 1, and that the name must be less than 12 characters long. The attribute can be omitted; a value of 1 specifies the port to be a system port. --------------------------------------------------------This system has 32 analog IPs, 32 analog outputs, 32 digital IPs, 32 digital OPs and no MADI. Digital Inputs 1&2 are named DAT L&R respectively Analog Outputs 25&26 are named Main Mon L&R respectively IO_CONFIG,1,32,32 IO_CONFIG,2,32,32 IO_CONFIG,3,0,0 INPUT,2,1,DAT L INPUT,2,2,DAT R OUTPUT,1,25,Main Mon L,1 OUTPUT,1,26,Main Mon R,1 The Monitor_Matrix.TXT File The monitor matrix file is a text file which contains a complete set of upmix and downmix matrix coefficients. These are used when monitoring a larger format bus on a smaller format speaker set, or when selecting a larger or smaller monitoring format than the current monitor source bus. Monitor Downmix Matrix Defaults The monitoring downmix matrix allows any source format to be monitored on any format speaker system. The elements of the source signal path are distributed or summed and attenuated as necessary to maintain the soundfield image in the target format. When monitoring a source format with less elements than the current monitor format, the elements in the source format that also appear in the monitoring format are passed through to their respective loudspeakers unmodified. For example, when monitoring a stereo bus through a 5.1 speaker system, the left and right bus elements appear in the left and right speakers and the centre and surround speakers are ignored. The exception to this where the source format contains a centre or centre surround element and the target format does not. In these cases the centre channel is distributed between left and right elements Bass Management The default monitor matrix eliminates the boom or LFE channel when downmixing to a format that does not include a boom channel. If it is desired to add the boom signal into the front monitors this may be done by adding the appropriate entries to the monitor matrix file as described below. Editing the Monitor_Matrix File The monitor matrix data is contained in a readable text file on the StationDREAM Console console computer. The file specifies both downmix and upmix combinations. This file can be opened and edited to conform to your specific monitoring requirements. The file is laid out as a comma delimited table. Each downmix entry begins with a description prefixed with a # (e.g. #Stereo to Mono). Each subsequent row describes a node in the matrix and has the following elements: WORKING WITH CONSOLE SYSTEM FILES 33-13 SET_NODE command, source format (e.g. Stereo), destination format (e.g. Mono), source element (e.g. Left), destination element (e.g. Centre), Gain in dB. For example, here is the entry for Stereo to Mono downmix: # Stereo to Mono SET_NODE,Stereo,Mono,Left,Centre,-3 SET_NODE,Stereo,Mono,Right,Centre,-3 Source elements that are not passed through to the destination do not appear in the downmix entry. Follow these steps to edit the monitor_matrix file: Step 1 Quit FMC by holding down the Shift key and pressing the Pause/ Break key on the PC keyboard and typing Q then Y. Step 2 Use the trackball to double-click on the Start button on the task bar at the bottom left of the mixer screen. Step 3 Use the trackball to select Programs > Accessories > Notepad. Notepad is a basic text editor application. Step 4 In Notepad select Open from the File menu at the top of the screen. Navigate to the following file and click Open. C:/Projects/Mixers/FMC/Data/monitor_matrix.txt Step 5 Select File > Save As and type monitor_matrix.bak to save a back up copy, then File > Open C:/Projects/Mixers/FMC/ Data/monitor_matrix.txt to re-open the original file for editing. Step 6 Use the arrow keys to scroll down the file to the entry you wish to modify. Edit the gain value at the end of a line or type a new line to add an element (e.g. Boom). Step 7 When you have finished making changes click File > Save, then File > Exit to save the file and exit Notepad. Step 8 Click on the DREAM Start Icon on the desktop to restart FMC and the disk recorder. Your modified monitor matrix settings are now active. SYSTEM FILES 33-14 Removing Boom from a Monitor Downmix The following setting sends the boom channel from a 5.1. bus to left and right speakers of a stereo monitor set: # 5.1 to Stereo SET_NODE,5.1,Stereo,Left,Left,0 SET_NODE,5.1,Stereo,Right,Right,0 SET_NODE,5.1,Stereo,Centre,Left,-3 SET_NODE,5.1,Stereo,Centre,Right,-3 SET_NODE,5.1,Stereo,S-left,Left,0 SET_NODE,5.1,Stereo,S-Right,Right,0 SET_NODE,5.1,Stereo,Boom,Left,-3 SET_NODE,5.1,Stereo,Boom,Right,-3 Remove the last two lines to eliminate the boom element from the monitors as shown below: # 5.1 to Stereo #SET_NODE,5.1,Stereo,Left,Left,0 #SET_NODE,5.1,Stereo,Right,Right,0 #SET_NODE,5.1,Stereo,Centre,Left,-3 #SET_NODE,5.1,Stereo,Centre,Right,-3 #SET_NODE,5.1,Stereo,S-left,Left,0 #SET_NODE,5.1,Stereo,S-Right,Right,0 The System_Variables File The System_Variables file contains user configured setup parameters plus automatically generated system variables. Only modify the parameters described below. The file is located at C:\Projects\Mixers\FMC\Data\System_Variables.txt. To edit the file open it in Windows notepad as described above. Setting the Automation Lock Window The timecode lock window specifies the number of consecutive contiguous timecode frames that the automation system must read from the disk recorder before entering automation record. This prevents the system from dropping out of WRITE mode when locking to an external video transport. Edit the following line in System_Variables.txt: TC_LOCK_WINDOW,10 Change the number at the end of the line to specify the number of frames. This number will also determine the amount of pre-roll required prior to performing an automation mix pass. Typical values are: TC_LOCK_WINDOW,1 for Vmotion. TC_LOCK_WINDOW,5 for Betacam. TC_LOCK_WINDOW,10 for U-matic. Setting Momentary Talkback Time Threshold The Momentary Talkback Time Threshold defines the amount of time the talkback key must be held down to prevent the switch from latching. The default value is 500 milliseconds. WORKING WITH CONSOLE SYSTEM FILES 33-15 Edit the following line in System_Variables.txt. Change the numerical value at the end of the line to specify the time threshold in milliseconds: MOMENTARY_TB_TIME_THRESHOLD,500 Enabling AFL and PFL Modes AFL and PFL solo modes require two of the available buses. Disable AFL and PFL to free these buses. Edit the following line in System_Variables.txt. Change the numerical value at the end of the line to 1 for enabled or 0 to disable: AFL_PFL_ENABLED,1 Metering Numeric Peak Level The numeric peak levels displayed on the mixer display bus meters have a variable threshold. The level at which these values are displayed can be set in the System_Variables.txt file. Edit the following line in the file: PEAK_DISPLAY_LIMIT,950 The value is from 0 to 1000 in 0.1dB steps where 1000 = full scale level. In the example above the value of 950 will cause the numeric display to first be shown when the signal level reaches -5dB below full scale. 970 will set the threshold to -3dB, 990 will set the threshold to -1dB, and so on. FMC Command Line Options The FMC mixer application is launched by the DREAM.bat batch file. This file is in turn launched from DREAM Start application on the Windows desktop or in the Windows Startup directory. When executed, the batch file downloads current console software from the QDC engine via ftp and launches the FMC application with a complete set of command line options. It may be necessary to edit the batch file to specify the QDC engine IP address if it is different to the default values and to specify the current FMC application name. You can also modify other FMC command line options as necessary. The DREAM start-up batch file is located at C:\Projects\Mixers\DREAM.bat. Use the Notepad editor to edit the file. Click on the Start menu and select Programs>Accessories>Notepad and open the DREAM.bat file. Edit the following entries for QDC IP address and FMC application name as indicated at the top of the file. See the examples below: set QDC_IPADDRESS=192.200.150.15 set FMC_APP_NAME=FMC.exe FMC command line options are listed below. It should not be necessary to modify these settings in DREAM.bat. Option SYSTEM FILES Description -b<cmdline> Run <cmdline> when FMC exits. <cmdline> may include a path. E.g. the following will run “dream start” (note: spaces are accepted) -bc:\projects\mixers\dream start. -c Run MSAT on the same machine as FMC ignoring the -p setting. 33-16 Option Description -d Run without dsp, i.e. mix surface does not use TCP/IP to communicate with the QDC engine. -e Run without editor emulator (inhibits editor and keyboard comms to the QDC engine). -g Run without graphics. -h Hi-res mode (1600 x 1200) otherwise runs 1280 x 1024. -l Lo-res mode (1024 x 768). -m Enable mix automation. -p<###.###.###.###> Specify the IP address for a network connected machine running MSAT for testing. -q<###.###.###.###> Specify the IP address for the QDC engine. -r Run jog and editor commands over TCP/IP. -s<#> Specify mixer type, where # = 0 for satellite, 1 for station, 2 for console, 3 for station24. -u Disables “stop on wrong USB driver” message. FMC will still check the drivers, still report out of date drivers and will still say that it can't continue - but it will continue anyway. A typical command line would be: C:\projects\mixers\fmc\fmc.exe -s1 -q192.168.200.21 -bc:\projects\mixers\dream start BLUE Utils Menu The BLUE Utils menu offers the Update Sys-File item for storage of system settings. System Files are stored in the C:\Projects\Mixers\FMC\Data\ directory. Step 1 Hold down the BLUE key and press the Utils key to enter the Utils menu. Step 2 Press the Update Sys-File soft key to store the system settings. This information is stored in the following files: Monitor_Sources.TXT - patching and formats of external monitor sources. Speaker_Sets.TXT - patching and formats of all speaker sets. Setup_Variables.TXT - Call Follow state and console brightness. WORKING WITH CONSOLE SYSTEM FILES 33-17 FAIRLIGHT OS COMMANDS The DREAM Console QDC engine runs on the high performance, multi-user, multi-tasking, real-time Fairlight operating system. DREAM Console systems are supplied fully configured. It is not usually necessary to operate the system at operating system level. However, during installation, configuration or upgrade, the advanced user may need to modify the configuration files described above. CAUTION: The following Fairlight OS command details are included to assist the advanced user or systems administrator. Modifying aspects of the operating system setup may cause your system to become unstable or inoperative. If not confident, do not proceed. Call your Fairlight distributor for assistance. Most commands will provide help on syntax and options by typing the command name followed by the -? option. ATTR Function: Display or change file attributes Syntax: attr [<opts>] {<path> [<opts>] <permissions> Attributes: d s pe pw pr e w r - turns attribute on -n turns attribute off Options: -a do not print attributes after changes -x directory to search is execution directory -z get list of file names from standard input -z= <path> get list of file names from <path> CHD Function: Change current directory Syntax: chd <path> COPY Function: Copy data from one path to another Syntax: copy [<opts>] <srcpath> [<dstpath>] [<opts>] Options: -a abort on error -b= <size> buffer size -f rewrite destination files with no write permission -p don’t print file names copied (with -w option only) -r rewrite destination -v verify integrity of files written -w= <dir name> wild card copy to <dir name> -x look in execution directory for source -z get list of file names from standard input -z= <path> get list of file names from <path> SYSTEM FILES 33-18 DATE Function: Display system date and time Syntax: date [<opts>] Options: -j print day, seconds past midnight in julian time -m print hour:minute:sec in military format Dcheck Function: Check directory/file integrity Syntax: dcheck [<opts>] <devnam> Options: -d= <num> print path to dir <num> deep -r rebuild allocation map from file structure -y answer “y” to all questions in repair mode DEL Function: Delete files Syntax: del [<opts>] {<file> [<opts>] Options: -e erases the disk space that the file occupied -f delete files with no write permission -p show file name and ask before deleting -x delete files from execution directory -z get list of file names from standard input -z= <path> get list of file names from <path> DELDIR Function: Delete a directory Syntax: deldir [<opts>] {<dir> [<opts>] Options: -q delete directories without asking questions -f delete files with no write permission -z get list of directory names from standard input -z= <path> get list of directory names from <path> DF Function: Print Disks/Tape Drives Found and Mounted on The System Syntax: df [<opts>] Options: -e Debug Listing -t= <name> Only display info with devices with file manager type <name> -z Debug Enable FAIRLIGHT OS COMMANDS 33-19 DIR Function: Display directory contents Syntax: dir [<opts>] {<dir names> [<opts>] Options: -a show all files -d show directories with a slash -e extended dir listing -n treat dirs like files -r recursive dir listings -r= <num> recursive dir listing to depth <num> -s unsorted dir listing -u unformatted listing -x directory is execution dir -z get list of dir names from standard input -z= <path> get list of dir names from <path> DISKINIT Function: Initialise a disk drive Syntax: diskinit <device> [<size>] <device> = device name <size> = total sectors (DD.TOT) (dec or $hex) Options: -a= <number of allocated sectors> -b Search for bad blocks before initialization. That might take few hours on larger disks. -c= <sectors/cluster> (default = 1) -d= <min sectors in root dir> -f initializes partition as FAT32. Only options -c, -b, -e and -n from the above list can be used with -f. -ff As -f above but format fixed disks as if they were removable media. -i <device> is image file -m= -n= -p= -q -r -s -v= -x -z -w SYSTEM FILES <max sectors in bit map> <volume name> (default = ‘Blank’) <partition start sector> (dec or $hex) quiet - do not prompt user do not read device do not display parameters <logical block size in bytes> do not use old DD parameters read DD.TOT from [scsi] drive initializes partition as FLFS (>4 Gb). Only options -n, -q, -s from the above list can be used with -w. 33-20 ED Function: Edit a file Usage: ED [<opts>] <filename> options: -t -h -d disable TABS enable hex math enable tvt debug output ERRMESG Function: Translate error message usage: errmesg <options> errorcode<:errorcode> <options> errmesg num:num where num:num is two decimal numbers errmesg num where num is a single decimal number If a single number is prefixed by 0x then that number is used as a full 16 bit HEX error code. The program can be made to exit with the supplied error code with -x. ESPFIND Function: Searches directory structure starting at start_root for file names that match match_string. usage: /dd/USR/CMDS/espfind <opts> start_root match_string Options: -d=N don't descend beyond the Nth directory level (default = 0, no limit) FIND Function: Find a file Syntax: find [<opts>] [<root directory>] <file> Options: -d show directories searched -a find all occurrences FREE Function: Report free space on disk Syntax: free [<opts>] {<device> [<opts>] Options: -b= <size> buffer size FAIRLIGHT OS COMMANDS 33-21 FTP Function: Connect to a remote internet site and transfer files Syntax: ftp [<opts>] [<host>] [<opts>] Options: -d Turn on debug mode. -g Turn off wildcard expansions (name globbing). -n Disable Auto-login to host. -r Overwrite the existing file on get command. -s Do not pre-extend file on received data. -v Verify verbose mode is enabled. LIST Function: List a file Syntax: list [<opts>] {<path> [<opts>] Options: -z get list of file names from standard input -z= <path> get list of file names from <path> LOGIN Function: Provides system login security Syntax: login [<opts>] <name> [,] <password> Options: -n operate in non-interactive mode (super user only) MAKDIR Function: Create a directory Syntax: makdir [<opts>] {<dir name> [<opts>]} Options: -x create directory in execution directory -z get list of dir names from standard input -z= <file> get list of dir names from <file> MOVE Function: Move Data from one Folder to another Syntax: MOVE <pathlist source> <pathlist destination> PD Function: Display current directory Syntax: pd RENAME Function: Rename a file or directory Syntax: rename [<opts>] <path> <name> [<opts>] Options: SYSTEM FILES 33-22 -x path starts from execution dir SCSIDM Function: Test Sectors on a disk Syntax: SCSIDM /SCX0 This test can take up to 45 minutes depending on the size and content of the drive. The time “resting” and percentage are displayed once the command is executed. SETIME Function: Set system date and time Syntax: setime [<opt>] [yy mm dd hh mm ss] [am/pm] Options: -d don’t display time -s setime for battery backed-up clocks TCOPY Function: Copy an entire folder Syntax: TCOPY <Name of the Source folder > <Name of the destination folder > UPGRADE Function: Utility to Install an MFX release from File or Tape - Version 1.15 Syntax: upgrade -<options> Options: -f= <file> Absolute Pathlist to MFX3 Software Image -d= <device> Search Root of <device> for release files -n= <name> Name to Give new disk if and when it is formatted (default:MFX3) -t Use tape device (default:/mt0) -s Don’t sort release files when browsing -g Don’t OS9GEN (don’t make disk bootable) disk FAIRLIGHT OS COMMANDS 33-23 UPGRADING SYSTEM SOFTWARE CAUTION: System upgrades are normally performed by your Fairlight distributor. This information is provided for system administrators and advanced users only. Please refer all queries to your Fairlight distributor. QDC Software Upgrade Software upgrades are made available on the internet from the Fairlight web site (www.fairlightesp.com.au). Follow the links on the support pages to locate the latest release. The QDC software release is distributed as .gz archive file (e.g. 16.5.21a.gz). Each release is accompanied by detailed release notes in PDF format. Carefully read the release notes for any release specific or upgrade issues, prior to starting the upgrade. The release file may be transferred to the /dd/RELEASE directory on the QDC engine by making an FTP connection to the QDC engine from a locally TCP/IP networked computer. When making an FTP connection to the QDC engine, login as mfx. No password is required (some FTP applications may make it necessary to enter a single space as a password). The QDC engine’s IP address is specified in the setup file, see “QDC Network Setup” on page 33-3 and is displayed in the diagnostic screen during start up. Type upgrade at the hash prompt and follow the on-screen instructions to select the release file and target device. Proceed by following the on-screen instructions and restarting the system as required. Software Version To display the current QDC software version number, type ver at the command line. Console Software Upgrade Software upgrades are made available on the internet from either the Fairlight web site (www.fairlightesp.com.au), follow the links on the support pages to locate the latest release, or from the Fairlight ftp site (ftp.fairlightesp.com.au). Carefully read the release notes for any release specific or upgrade issues, prior to starting the upgrade. The software release is contained in a self-extracting archive named DREAM V## Upgrade.exe where ## is the version number. Once the software has been transferred to a local internet connected computer it may be copied to the console computer in one of a number of ways. For example: 1. Create a CDR containing the DREAM archive and insert it in the Console’s CD drive. Use Windows explorer to copy the file to the root directory of the C: drive. 2. Copy the DREAM archive to the C:\ directory of the Console computer from another computer connected via an Ethernet local area network or an Ethernet cross-over cable. 3. Copy the DREAM archive to a removable SCSI storage device. Connect the removable SCSI storage device to the QDC engine. Use FTP to transfer the DREAM archive from the QDC engine to the Console’s C: drive. SYSTEM FILES 33-24 Refer to the document available with the software release download file which explains the process in detail. Once the DREAM self-extracting archive has been copied to the C:\ directory of the Console, the archive can be executed. Step 1 Click on the Start menu and select Run. Step 2 Type C:\DREAM V100 Upgrade (use the name of the archive file if different). Step 3 Follow the on screen instructions to install the upgrade. The FMC application will be extracted to the C:\projects\mixers\fmc directory. FMC is usually launched from a shortcut on the desktop which runs the DREAM Start splash screen application which in turn runs a batch file named DREAM.bat. The batch file downloads current console software from the QDC engine via ftp, and launches the FMC application with a complete set of command line options. It may be necessary to edit the batch file to specify the current FMC application name. See “Automatic Start-up” on page 39-6 for details of the start up procedure. Software Version The currently running version of FMC is displayed in the Utils menu. Hold down a BLUE key and press the Utils key to display the version number. UPGRADING SYSTEM SOFTWARE 34-1 NOTES: 34-2 Chapter 34 - Drive Formatting INTRODUCTION DREAM Console supports two different disk file systems: • FAT32, the Microsoft Windows compatible file system specified in the AES31 standard. • FLFS (Fairlight File System), invented by Fairlight to handle devices larger than 4 Gigabytes. It must be used for these large devices. Only a Fairlight approved disk drive should be used with DREAM Console. A list of suitable drives can be downloaded from http://www.fairlight.net. FORMATTING A DRIVE Step 1 Attach the new disk drive to the system, with the power OFF. Its SCSI address must be different from that of any other disk or tape drive already attached. Note its SCSI address. Step 2 Power on the QDC Engine and console Step 3 Check that the disk is seen when the SCSI bus is scanned If necessary type quit to return to the hash prompt. Step 4 To initialise a disk in RBF format type at the prompt: diskinit /tdXY -v=1024 -c=128 -z RETURN (Y is the SCSI address of the drive, X is the PCI bus 0=internal, 1=external, bottom PCI slot) OR To initialise a disk in FLFS format, necessary if the drive is larger than 4 GBytes, type: diskinit /tdXY -w RETURN (Y is the SCSI address of the drive, X is the PCI bus 0=internal, 1=external, bottom PCI slot) OR To initialise a disk in FAT32 format, for compatibility with Microsoft operating systems: diskinit /tdXY -f RETURN (Y is the SCSI address of the drive, X is the PCI bus 0=internal, 1=external, bottom PCI slot) Step 5 You will be asked to verify that you wish to go ahead with this operation. If you confirm, the initialisation takes only a few seconds. A reboot is necessary after initialisation. FORMATTING OPTICAL DISKS Formatting optical platters is exactly the same as formatting hard disks. INTRODUCTION 34-3 MAKING A NEW SYSTEM DISK A new system disk may be setup using the upgrade command. Quit to the hash prompt. Type upgrade at the hash prompt. Follow the on-screen prompts to select a target device and initialize if necessary. See “Upgrading System Software” on page 33-23 for more information. BOOTING FROM EXTERNAL DISK DRIVES It is possible to boot the QDC engine from an external bootable system disk. To enable this, the NVRAM settings must be modified. Follow this procedure: Step 1 Restart the QDC, and at the autoboot countdown, press any key. Step 2 Type rc RETURN Step 3 You will be asked 'Do you want to use the recommended NVRAM configuration? (Y/N/Q)'. Type n RETURN Step 4 You will be presented with 4 options. A) Reconfigure All of NVRAM? B) Reconfigure Booting Preferences? C) Reconfigure System Setup? D) Quit this menu and reboot? Type c RETURN Step 5 Press RETURN until you see the option: SCSI Controller Slot for Boot .. (0=On Board SCSI) ..... (000 .. 003) [000] Once you see this option, you then have to type in the 'PCI SLOT NUMBER' that you want to boot from. You must have a SCSI card in this SLOT. PCI slot zero is the onboard SCSI, and as a general rule, if you have an extra PCI SCSI card, it should be in PCI slot 1 which is the bottom PCI slot on the rear of the engine. Network interface cards should be in slot 2, or if you have TWO external PCI SCSI cards, put the NIC in slot 3. Step 6 Enter the PCI slot number you want boot from, and press RETURN Step 7 Respond by pressing RETURN until you get the 4 options: A), B), C), and D), as above. Choose D. Step 8 Type RETURN to restart the QDC engine, and it should now boot from the external PCI card. To return to booting the internal boot disk, follow the procedure above and select the appropriate disk. DRIVE FORMATTING 34-4 BOOTING FROM EXTERNAL DISK DRIVES 35-1 NOTES: 35-2 Chapter 35 - Specifications AUDIO I/O CONFIGURATION The QDC engine can be configured for a range of different I/O options. Each QDC card can be loaded with I/O daughter boards as shown below. There can be a maximum of four QDC cards in an engine. There are four different I/O daughter board options: AI1 - Analog Input; AO1 - Analog Output; AO1M - Analog Output with Monitoring Relay Option; and AES1 - Digital I/O. The MADI digital I/O option takes up one entire QDC card. The diagram below shows one QDC card with the three, fifty pin I/O connectors at the left and the six I/O daughter board positions numbered 1-6 from top to bottom. To determine the I/O configuration of an installed system quit to the MFX: prompt and type qdcinit -lvv. The screen will display a complete list of I/O components and pin connection data. QDC Card 1 I/O Daughter Board Analog Input (8 channels) (do not fit if I/O board 2 is AES) Con 1 I/O Daughter Board Analog Output (8 channels) or AES I/O (4 stereo in & 4 stereo out) 2 (only fit AO1M in slot 2 or 5) I/O Daughter Board Analog Output (8 channels) or AES I/O (4 stereo in & 4 stereo out) 3 Con 2 I/O Daughter Board Analog Output (8 channels) or AES I/O (4 stereo in & 4 stereo out) I/O Daughter Board Analog Output (8 channels) or AES I/O (4 stereo in & 4 stereo out) 4 5 (only fit AO1M in slot 2 or 5) Con 3 I/O Daughter Board Analog Input (8 channels) 6 (do not fit if I/O board 5 is AES) Figure 1: QDC I/O Options AUDIO I/O CONFIGURATION 35-3 Standard I/O Configuration The QDC is normally supplied with the standard set of I/O options as shown below. This configuration provides 16 analog inputs, 16 analog outputs, 16 digital inputs and 16 digital outputs per QDC card. Figure 2: QDC With Standard I/O Option Fitted Channel Allocation Method When the QDC engine starts up, it checks the fitted hardware to determine the channels allocated to each card and subsequently to the I/O connectors on the rear of the unit. If the card is a MADI card, channels are allocated to the card depending on the sampling rate and the MADI mode, see “MADI Configuration” on page 3510. For non-MADI cards the engine applies the following procedure: 1. Check QDC1 Slot1, if AI1 fitted allocate 1st set of 8 analog inputs. 2. Check QDC1 Slot6, if AI1 fitted allocate next set of 8 analog inputs. 3. Check QDC1 Slot2, if AO1 fitted allocate 1st set of 8 analog outputs. 4. Check QDC1 Slot5, if AO1 fitted allocate next set of 8 analog outputs. 5. Check QDC1 Slot4, if AO1 fitted allocate next set of 8 analog outputs. 6. Check QDC1 Slot3, if AO1 fitted allocate next set of 8 analog outputs. 7. Check QDC1 Slot3, if AES1 fitted allocate 1st set of 4 digital I/Os. SPECIFICATIONS 35-4 8. Check QDC1 Slot4, if AES1 fitted allocate next set of 4 digital I/Os. 9. Check QDC1 Slot5, if AES1 fitted allocate next set of 4 digital I/Os. 10.Check QDC1 Slot2, if AES1 fitted allocate next set of 4 digital I/Os. The engine continues checking QDC cards, I/O slots and allocating I/O channel for all available cards. I/O Allocation Order Slot No. Analog Inputs Analog Outputs Digital I/O Slot 1- AI 1 Slot 2 - AO/AOM/AES 1 4 Slot 3 - AO/AES 4 1 Slot 4 - AO/AES 3 2 Slot 5 - AO/AOM/AES 2 3 Slot 6 - AI 2 Standard Configuration Channel Allocation Applying the method above we can determine that the connector/channel allocation for the standard configuration shown above would be as follows: Connector 1 Connector 2 Connector 3 Analog Inputs 1-8 Analog Outputs 1-8 Digital I/Os 1-8 Digital I/Os 9-16 Analog Inputs 9-16 Analog Outputs 9-16 Note that the order of I/O daughter boards is reversed on connector 3. This allows for a standard cable configuration to be used as described below. AUDIO I/O CONFIGURATION 35-5 Standard I/O Cable Configurations The range of possible I/O configurations shown in figure 1 above can be supported by four standard cable types. AI/AO QDC 50 Pin I/O 8 x Analog Inputs 8 x Analog Outputs DIO/DIO 4 x Digital Inputs QDC 50 Pin I/O 4 x Digital Outputs 4 x Digital Inputs 4 x Digital Outputs DIO/AO 4 x Digital Inputs QDC 50 Pin I/O 4 x Digital Outputs 8 x Analog Outputs AO/AO QDC 50 Pin I/O 8 x Analog Outputs 8 x Analog Outputs Two other cable types containing only eight pairs are possible, although it is advisable to fit all connectors with a complete set of sixteen pairs to allow for future options. NONE/AI QDC 50 Pin I/O 8 x Analog Inputs NONE/DIO QDC 50 Pin I/O 4 x Digital Inputs 4 x Digital Outputs SPECIFICATIONS 35-6 QDC I/O Connector Description: Audio I/O 16 balanced pairs digital or analog Connector: 50 Pin D Female + GND 17 33 16 32 15 31 14 30 13 29 12 28 11 27 10 26 9 25 8 24 7 23 6 22 5 21 4 20 3 19 2 18 50 49 48 47 46 45 44 43 42 41 40 39 38 37 36 35 Pair # Pair 1 Pair 2 Pair 3 Pair 4 Pair 5 Pair 6 Pair 7 Pair 8 Pair 9 Pair 10 Pair 11 Pair 12 Pair 13 Pair 14 Pair 15 Pair 16 Standard I/O Cable Pinouts AI/AO + GND 17 33 16 32 15 31 14 30 13 29 12 28 11 27 10 26 9 25 8 24 7 23 6 22 5 21 4 20 3 19 2 18 50 49 48 47 46 45 44 43 42 41 40 39 38 37 36 35 Channel # Analog Input 1 Analog Input 2 Analog Input 3 Analog Input 4 Analog Input 5 Analog Input 6 Analog Input 7 Analog Input 8 Analog Output 1 Analog Output 2 Analog Output 3 Analog Output 4 Analog Output 5 Analog Output 6 Analog Output 7 Analog Output 8 AUDIO I/O CONFIGURATION 35-7 DIO/DIO + GND 17 33 16 32 15 31 14 30 13 29 12 28 11 27 10 26 9 25 8 24 7 23 6 22 5 21 4 20 3 19 2 18 Channel # 50 Digital Input 1/2 49 Digital Input 3/4 48 Digital Input 5/6 47 Digital Input 7/8 46 Digital Output 1/2 45 Digital Output 3/4 44 Digital Output 5/6 43 Digital Output 7/8 42 Digital Input 9/10 41 Digital Input 11/12 40 Digital Input 13/14 39 Digital Input 15/16 38 Digital Output 9/10 37 Digital Output 11/12 36 Digital Output 13/14 35 Digital Output 15/16 DIO/AO + GND 17 33 16 32 15 31 14 30 13 29 12 28 11 27 10 26 9 25 8 24 7 23 6 22 5 21 4 20 3 19 2 18 SPECIFICATIONS Channel # 50 Digital Input 1/2 49 Digital Input 3/4 48 Digital Input 5/6 47 Digital Input 7/8 46 Digital Output 1/2 45 Digital Output 3/4 44 Digital Output 5/6 43 Digital Output 7/8 42 Analog Output 1 41 Analog Output 2 40 Analog Output 3 39 Analog Output 4 38 Analog Output 5 37 Analog Output 6 36 Analog Output 7 35 Analog Output 8 35-8 AO/AO + 17 16 15 14 13 12 11 10 9 8 7 6 5 4 3 2 GND 33 32 31 30 29 28 27 26 25 24 23 22 21 20 19 18 50 49 48 47 46 45 44 43 42 41 40 39 38 37 36 35 Channel # Analog Output 1 Analog Output 2 Analog Output 3 Analog Output 4 Analog Output 5 Analog Output 6 Analog Output 7 Analog Output 8 Analog Output 9 Analog Output 10 Analog Output 11 Analog Output 12 Analog Output 13 Analog Output 14 Analog Output 15 Analog Output 16 Pin Connections for Standard QDC Configuration To clarify the channel allocation information above, the following table describes the pin connection data for a QDC card with a standard configuration. AUDIO I/O CONFIGURATION 35-9 16 Analog Inputs - 16 Analog Outputs - 16 Digital I/Os 1 QDC Card Analog Inputs Analog Outputs Digital Inputs Con Digital Outputs QDC Pins - Port GND 46 Pins + 29 45 Con 13 28 44 QDC - D out 1-2 12 27 43 Port GND 50 D out 3-4 11 26 38 Pins + 33 49 D out 5-6 10 21 37 Con 17 32 48 D out 7-8 5 20 36 QDC - D in 1-2 16 31 47 D out 9-10 4 19 35 Port GND 42 D in 3-4 15 30 42 D out 11-12 3 18 Pins + 25 41 D in 5-6 14 25 41 D out 13-14 2 Con 9 24 40 D in 7-8 9 24 40 D out 15-16 QDC GND A Out 1 8 23. 39 D in 9-10 8 23 39 Port + 50 A Out 2 7 22 38 D in 11-12 7 22 2 33 49 A Out 3 6 21 37 D in 13-14 6 1 17 32 48 A Out 4 5 20 36 D in 15-16 2 16 31 47 A Out 5 4 19 35 1 15 30 46 A Out 6 3 18 42 1 A in 2 14 29 45 A Out 7 2 25 41 1 A in 3 13 28 44 A Out 8 9 24 40 1 A in 4 12 27 43 A Out 9 8 23 39 1 A in 5 11 26 50 A Out 10 7 22 38 A in 1 A in 6 10 33 49 A Out 11 6 21 37 2 A in 7 17 32 48 A Out 12 5 20 36 1 A in 8 16 31 47 A Out 13 4 19 35 2 A in 10 15 30 46 A Out 14 3 18 1 A in 11 14 29 45 A Out 15 2 3 A in 12 13 28 44 A Out 16 1 A in13 12 27 43 3 A in 14 11 26 1 A in 15 10 A in 9 A in 16 SPECIFICATIONS 35-10 MADI Configuration In QDC software version 17.1, MADI cards provide 32 channels of I/O at all sampling rates. At 96 kHz the MADI interface employs high density framing as described below. In QDC software version 17.2 and above, MADI cards support various I/O configurations as described below. The number of I/O channels available on each MADI card output is determined by a combination of the sampling rate of the current project and the MADI mode environment variables set in the /nvr/aman_cfg file. The default configuration provides 56 channels at 44.1/48kHz and 28 channels at 96kHz. Inputs automatically conform to the incoming signal format. MADI Modes MADI cards will operate in one of the following modes: Framing aman_cfg Environment Variables Sample Rate I/O Channels 44.1/48K 56 channels Normal No variables set 44.1/48K 64 channels Normal MADI_HIGHDENSITY 96K 28 channels Normal No variables set 96K 28 channels Legacy MADI96K_LEGACY 96K 32 channels Normal MADI96K_HIGHDENSITY 96K 32 channels Legacy MADI96K_HIGHDENSITY MADI96K_LEGACY 96K 24 channels Normal MADI96K_24PER 96K 24 channels Legacy MADI96K_24PER MADI96K_LEGACY In order for MADI to work, both receiving and sending equipment must be using the same modes. These modes are explained below. MADI Density and Framing At 44.1k/48k the MADI frame can contain either 56 or 64 channels. 64 channel mode is selected by the environment variable MADI_HIGHDENSITY. At 96k the MADI frame can contain either 28 or 32 channels. 32 channel mode is selected by the environment variable MADI96K_HIGHDENSITY. This variable can also be used in conjunction with MADI96K_LEGACY. At 96k there is a choice of two framing systems: 1. The default framing is a 28/32 channel MADI frame repeated at a 96k rate. 2. The “Legacy” mode frame is a 56/64 channel MADI frame repeated at a 48k rate carrying 28/32 channels of audio. Each audio channel occupies two consecutive MADI channels. This is selected by the environment variable MADI96K_LEGACY. AUDIO I/O CONFIGURATION 35-11 MADI Environment Variables To modify the MADI mode the nvr/aman_cfg file must be created and/or edited and the environment variables as described above must be entered. To edit the file open the file in the text editor by typing ed /nvr/aman_cfg at the # prompt. Then enter the required variables exactly as shown below, one per line. Save the file and restart the system when you have finished editing. setenv MADI_HIGHDENSITY If SET and SR<=48k then the MADI frame will transmit 64 channels. (Default is 56) Only affects MADI Outputs. MADI inputs automatically adapt. setenv MADI96K_HIGHDENSITY If SET and SR=96k then the MADI frame will transmit 32 channels (Default is 28) Only affects MADI Outputs. MADI inputs automatically adapt. setenv MADI96K_LEGACY If SET and SR=96k then the MADI frame will be 56 channels long * carrying 28 channels of 96K audio. Each 96K channel uses two consecutive MADI channels. MADI96K_HIGHDENSITY can also be set to get a 64ch frame with 32ch of 96k. setenv MADI96K_24PER If SET and SR=96k then the MADI frame will be 28 channels long carrying 24 channels of 96K audio. A second MADI card will carry I/Os 25-48. MADI96K_LEGACY can also be set to get a 56ch frame with 24ch of 96k. This allows two separate 24 track MADI machines to be connected to an MFX with two MADI cards at 96K. SPECIFICATIONS 35-12 MADI Channel Numbering Note that the AES10 MADI specification defines MADI channels with numbers from 0 to 55. For improved useability the Fairlight interface numbers MADI channels from 1 to 56 or 1 to 64. It is essential to know what channels are on what connector to establish correct operation with devices to which they are connected. Note that the user interfaces in Satellite and Station only allow access to the first 48 I/O, regardless of what mode is in use. At 44.1 or 48kHz, all I/O appears on the first card in the system. When two MADI cards are installed in a system running at 96kHz the channel numbering depends on both the MADI96K_24PER and MADI96K_HIGHDENSITY variables as shown below: MADI Card 1 MADI Card 2 Neither variable set I/O 1 to 28 I/O 29 to 56 MADI96K_HIGHDENSITY variable set I/O 1 to 32 I/O 33 to 64 MADI96K_24PER variable set (with or without MADI96K_HIGHDENSITY) I/O 1 to 24 I/O 25 to 48 Note that MADI96K_LEGACY can be used in conjunction with any of the above - it does not affect the number of channels, only the framing style. MADI Connector Options MADI cards can be supplied with three possible connector options. The Coaxial only card is fitted with a 75 ohm BNC connector. The Optical card is fitted with both BNC and optical connectors. Two optical connectors are available. The ST connector, is a round bayonet-style. The SC connector is a square click-fit style. The toggle switch on the MADI card must be operated to select optical or coaxial. Coaxial cable should be 75 Ohm, and optical connections should be made using multimode 62.5/125 uM (up to 2 kM distance) or 50/125 uM (more restricted distance) cable. AUDIO I/O CONFIGURATION 35-13 CONSOLE WIRING AND CONNECTION DETAILS The following information contains all the wiring details necessary for specifying studio cabling installations. Connector sex described is the panel mount connector on the rear of the console. Meter USB Description: USB and DC Power connection for external meters. Note that Sidecars do not require DC power. Cable must be shielded and less than 3 meters in length. Connector: 5 Pin XLR Female XLR5 SIGNAL PAIR PIN 1 USB + 1 PIN 2 0 VDC PIN 3 12 VDC PIN 4 0 VDC PIN 5 USB - 1 SHELL SHIELD 1 Talkback Description: Mic level input and line level output for studio talkback microphone. Mic input may be configured to carry +8VDC phantom power for electret and condenser microphones. Connector: D 9 Female 9 Pin D Type Connector Signal Pair PIN 1 TB Out + 1 PIN 2 TB Out GND/Shield 1 PIN 3 TB In GND/Shield 2 PIN 4 NC PIN 5 TB In + 2 PIN 6 TB Out - 1 PIN 7 NC PIN 8 NC PIN 9 TB In - 2 USB Description: Standard USB port. Cable must be shielded and less than 3 meters in length. Connector: USB Type A Female USB Type A Connector SPECIFICATIONS Signal 35-14 PIN 1 +5VDC PIN 2 USBDO- PIN 3 USBDO+ PIN 4 GND CONSOLE WIRING AND CONNECTION DETAILS 35-15 GPIO Description: General Purpose I/O Connector: D 15 Female SPECIFICATIONS 15 Pin D Type Connector Signal 15 Pin D Type Connector Signal PIN 1 GP In 1 PIN 9 GND PIN 2 GP In 2 PIN 10 GND PIN 3 GP In 3 PIN 11 GND PIN 4 GP In 4 PIN 12 GND PIN 5 GP Out 1 PIN 13 GND PIN 6 GP Out 2 PIN 14 GND PIN 7 GP Out 3 PIN 15 GND PIN 8 GP Out 4 35-16 QDC WIRING AND CONNECTION DETAILS The following information contains all the wiring details necessary for specifying studio cabling installations. Connector sex described is the panel mount connector on the rear of the QDC engine. General Purpose Interface Description: Remote tally and ADR signalling interface. Connector: 37 Pin D Male Input: TTL Level CMOS Logic Hi Z Output: TTL Level CMOS Logic (Hi source +15mA max, Lo sink -48mA max) PIN 1 GND PIN 19 GND PIN 2 GPIOBOUT6 PIN 20 GPIOBOOUT7 PIN 3 GPIOBOUT5 PIN 21 GND PIN 4 GND PIN 22 GPIOBOUT4 PIN 5 GPIOBOUT2 PIN 23 GPIOBOUT3 PIN 6 GPIOBOUT1 PIN 24 GND PIN 7 GND PIN 25 GPIOBOUT0 PIN 8 GPIOIN6 PIN 26 GPIOIN7 PIN 9 GPIOIN5 PIN 27 GND PIN 10 GND PIN 28 GPIOIN4 PIN 11 GPIOIN2 PIN 29 GPIOIN3 PIN 12 GPIOIN1 PIN 30 GND PIN 13 GND PIN 31 GPIOINO PIN 14 GPIOOUT6 PIN 32 GPIOOUT7 PIN 15 GPIOOUT5 PIN 33 GND PIN 16 GND PIN 34 GPIOOUT4 PIN 17 GPIOOUT2 PIN 35 GPIOOUT3 PIN 18 GPIOOUT1 PIN 36 GND PIN 37 GPIOOUT0 QDC WIRING AND CONNECTION DETAILS 35-17 Mixer Description: Control Interface for Fame and Prodigy systems. Connector: 25 pin D Female PIN 1 GND PIN 13 SYNCN PIN 2 RxFFN PIN 14 RxFFP PIN 3 RxCLKN PIN 15 RxCLKP PIN 4 RxDATN PIN 16 RxDATP PIN 5 RxWRN PIN 17 RxWRP PIN 6 NC PIN 18 NC PIN 7 NC PIN 19 GND PIN 8 TxFFN PIN 20 TxFFP PIN 9 TxCLKN PIN 21 TXxCLKP PIN 10 TxDATN PIN 22 TxDATP PIN 11 TxWRPN PIN 23 TxWRP PIN 12 HSSLDETn PIN 24 GND PIN 25 SYNC Controller Description: Serial interface to Satellite, Station and Console Connector: 25 pin D Male on Engine Satellite Controller Cable Description: QDC Serial interface to Satellite Console. Connector: 25 pin D Female cable mount 9 pin D Female RS232 cable mount 9 pin D Female RS422 cable mount SPECIFICATIONS 25 Pin D Type Connector Signal Pair 9 Pin D Type Connectors PIN 5 CON Tx 1 232 PIN 2 PIN 7 GND 1 232 PIN 5 PIN 3 CON Rx 2 232 PIN 3 PIN 1 GND 2 232 PIN 5 PIN 10 CON Rx POS 3 422 PIN 3 PIN 23 CON Rx NEG 3 422 PIN 4 PIN 11 CON Tx POS 4 422 PIN 2 PIN 24 CON Tx NEG 4 422 PIN 1 SHELL GND Drain 422 SHELL 35-18 Station/Console Controller Cable Description: QDC Serial interface to Station Console Connector: 25 pin D Female cable mount 9 pin D Female cable mount 25 Pin D Type Connector Signal Pair 9 Pin D Type Connector PIN 1 232 GND 1 PIN 5 PIN 5 232 CON Tx 1 PIN 2 PIN 3 232 CON Rx 2 PIN 3 PIN 11 422 CON Tx POS 3 PIN 8 PIN 10 422 CON Rx POS 4 PIN 7 PIN 24 422 CON Tx NEG 3 PIN 1 PIN 23 422 CON Rx NEG 4 PIN 6 SHELL GND Drain SHELL Satellite Controller External Adapter Cable Description: Adapter cable for systems upgrading from MFK controllers and MFX engines. Connector: 37 pin D Female cable mount 9 pin D Female RS232 cable mount 9 pin D Female RS422 cable mount 37 Pin D Type Connector Signal Pair 9 Pin D Type Connectors PIN 1 GND 1 232 PIN 5 PIN 6 CON Tx 1 232 PIN 2 PIN 24 CON Rx 2 232 PIN 3 PIN 10 GND 2 422 PIN 5 PIN 12 CON Tx POS 3 422 PIN 2 PIN 13 CON Rx POS 4 422 PIN 3 PIN 30 CON Tx NEG 3 422 PIN 1 PIN 31 CON Rx NEG 4 422 PIN 4 SHELL GND Drain 422 SHELL QDC WIRING AND CONNECTION DETAILS 35-19 Station/Console Controller External Adapter Cable Description: Controller adapter cable for systems upgrading from MFK controllers. Connector: 37 pin D Female cable mount 9 pin D Female cable mount 37 Pin D Type Connector Signal Pair 9 Pin D Type Connector PIN 1 GND 1 PIN 5 PIN 6 CON Rx 1 PIN 2 PIN 24 CON Tx 2 PIN 3 PIN 12 CON Tx POS 3 PIN 8 PIN 13 CON Rx POS 4 PIN 7 PIN 30 CON Tx NEG 3 PIN 1 PIN 31 CON Rx NEG 4 PIN 6 SHELL GND Drain SHELL DREAM Console Controller External Adapter Cable Description: Controller adapter cable for systems upgrading from MFK/Fame/ Prodigy controllers. Connector: 37 pin D Female cable mount 2 x 10 pin DIL header (optionally 2 x 9 pin D Female cable mount) (Crimp pins for 10way crimp housings are Farnell P/N 865-783) D37 Female 10 Way DIL crimp housing (Farnell P/N 865-722) 10 Way DIL crimp housing (Farnell P/N 865-722) D9 Female (optional) D9 Female (optional) Signal:- QDC comms Signal:- RS232 (CN2) Signal:- RS422 (CN3) Signal:- RS232 (COM 1 CN6) Signal:- RS422 (COM2 CN9) CON TX 232 PIN 6 PIN 3 PIN 2 CON RX232 PIN 24 PIN 5 PIN 3 GND PIN 1 PIN 9 PIN 5 CON TX422+ PIN 13 PIN 4 PIN 7 CON TX422- PIN 31 PIN 2 PIN 6 CON RX422+ PIN 12 PIN 3 PIN 2 CON RX422- PIN 30 PIN 1 PIN 1 Shield shell Signal SPECIFICATIONS PIN 9 PIN 5 35-20 Station Pre-Production Controller Adapter Cable Description: Adapter cable for pre-production Station systems upgrading from MFK controllers. Connector: 37 pin D Female cable mount 9 pin D Female cable mount 9 pin D Female cable mount 37 Pin D Type Connector Signal Pair 9 Pin D Type Connectors PIN 1 GND 1 232 PIN 5 PIN 6 CON Tx 1 232 PIN 2 PIN 24 CON Rx 2 232 PIN 3 PIN 12 CON Tx POS 3 422 PIN 2 PIN 13 CON Rx POS 4 422 PIN 7 PIN 30 CON Tx NEG 3 422 PIN 1 PIN 31 CON Rx NEG 4 422 PIN 6 SHELL GND Drain 422 SHELL DREAM Console Pre-Production Controller Cable Description: QDC Serial interface to DREAM Console for pre-production DREAM Consoles. Connector: 25 pin D Female cable mount 2 x 10 pin DIL header (optionally 2 x 9 pin D Female cable mount) (Crimp pins for 10way crimp housings are Farnell P/N 865-783) D25 Female Signal 10 Way DIL crimp housing (Farnell P/N 865-722) 10 Way DIL crimp housing (Farnell P/N 865-722) D9 Female (optional) D9 Female (optional) Signal:- RS232 (CN2) Signal:- RS422 (CN3) Signal:- RS232 (COM 1 - CN6) Signal:- RS422 (COM2 - CN9) PIN 5 232 CON TX PIN 3 PIN 2 PIN 3 232 CON RX PIN 5 PIN 3 PIN 1 232 GND PIN 9 PIN 5 PIN 11 CON TX 422 POS PIN 4 PIN 7 PIN 24 CON TX 422 NEG PIN 2 PIN 6 PIN 10 CON RX 422 POS PIN 3 PIN 2 PIN 23 CON RX 422 NEG PIN 1 PIN 1 shell Shield PIN 9 PIN 5 QDC WIRING AND CONNECTION DETAILS 35-21 MFX to QDC Controller Adapter Cable Description: Adapter cable for systems upgrading from MFX to QDC engines. Connector: 24 pin Centronics Female cable mount 25 pin D Female cable mount SPECIFICATIONS 24 Pin Centronics Connector MFK Signal DREAM Signal Pair 25 Pin D Type Connectors PIN 5 RS422 Tx POS CON Tx POS 1 PIN 10 PIN 17 RS422 Tx NEG CON Tx NEG 1 PIN 23 PIN 6 RS422 Rx POS CON Rx POS 2 PIN 11 PIN 18 RS422 Rx NEG CON Rx NEG 2 PIN 24 PIN 11 QWRTY 232 Rx CON Tx 3 PIN 2 PIN 14 GND GND C 3 PIN 9 PIN 23 MFX 232 Tx H_Rx DATA 4 PIN 20 PIN 8 MFX PRESENT GND C 4 PIN 7 PIN 12 MFX 232 Rx H_Tx DATA 5 PIN 5 PIN 24 RS 232 IN CON Rx 5 PIN 3 PIN 1 GND GND Drain PIN 1 35-22 Ethernet Description: 100BaseT ethernet interface to console or network. Use CAT5 shielded twisted pair cable and shielded RJ45 connectors. Connector: RJ45 PIN 1 Rx + PIN 2 Rx - PIN 3 Tx + PIN 6 Tx - Cross-over Cable Required for direct connection between console and engine. Not required if hub is present. RJ45-1 Signal RJ45-2 PIN 1 Rx + PIN 3 PIN 2 Rx - PIN 6 PIN 3 Tx + PIN 1 PIN 6 Tx - PIN 2 Printer Description: Standard PC parallel printer interface. Connector: 25 pin D female PIN 1 PSTROBEn PIN 14 PRAUTOFDn PIN 2 PDR0 PIN 15 PRFAULTn PIN 3 PDR1 PIN 16 PRINTITn PIN 4 PDR2 PIN 17 PRSELINn PIN 5 PDR3 PIN 18 GND PIN 6 PDR4 PIN 19 GND PIN 7 PDR5 PIN 20 GND PIN 8 PDR6 PIN 21 GND PIN 9 PDR7 PIN 22 GND PIN 10 PRACKn PIN 23 GND PIN 11 PRBUSYn PIN 24 GND PIN 12 PRERROR PIN 25 GN PIN 13 PRSELECT QDC WIRING AND CONNECTION DETAILS 35-23 9 Pin A Description: Sony/RS422 Machine control master interface. Connector: 9 pin D Female PIN 1 GND PIN 2 9ARxA PIN 3 9ATxB PIN 4 GND PIN 5 NC PIN 6 GND PIN 7 9ARxB PIN 8 9ATxA PIN 9 NC 9 Pin B Description: Sony/RS422 Machine control master interface. Connector: 9 pin D Female PIN 1 GND PIN 2 9BRxA PIN 3 9BTxB PIN 4 GND PIN 5 NC PIN 6 GND PIN 7 9BRxB PIN 8 9BTxA PIN 9 N 9 Pin Slave Description: Sony/RS422 Machine control slave interface. Connector: 9 pin D Female SPECIFICATIONS PIN 1 GND PIN 2 9BTxA PIN 3 9RRxB PIN 4 GND PIN 5 NC PIN 6 GND PIN 7 9BTxB PIN 8 9BRxA PIN 9 GND 35-24 LTC - I/O Description: Balanced audio longitudinal time code interface. Connector: 9 pin D Male Input Level: -20dbm to +10dbm Output Level: 0dbm Note: Unbalanced loads connected to LTC OUT should NOT ground the LTC OUT NEGATIVE signal. PIN 1 GND PIN 2 LTC A IN NEGATIVE PIN 3 LTC OUT NEGATIVE PIN 4 GND PIN 5 LTC B IN POSITIVE PIN 6 LTC A IN POSITIVE PIN 7 GND PIN 8 LTC OUT POSITIVE PIN 9 LTC B IN NEGATIVE Serial Port Description: RS232 serial interface. Connector: 9 pin D Male PIN 1 SER_DCD PIN 2 SER_Rx PIN 3 SER_Tx PIN 4 SER_DTR PIN 5 GND PIN 6 SER_DSR PIN 7 SER_RTS PIN 8 SER_CTS PIN 9 NC QDC WIRING AND CONNECTION DETAILS 35-25 MIDI I/O Description: MIDI interface (not implemented). Connector: 9 pin D Female 9 pin D- type Signal MIDI DIN Connector PIN 1 NOT CONNECTED PIN 2 MIDI IN NEGATIVE DIN1 PIN 5 PIN 3 MIDI OUT NEGATIVE DIN2 PIN 5 PIN 4 MIDI THROUGH GND DIN3 PIN 2 PIN 5 MIDI THROUGH POSITIVE DIN3 PIN 4 PIN 6 MIDI IN POSITIVE DIN1 PIN 4 PIN 7 MIDI OUT GND DIN PIN 2 PIN 8 MIDI OUT POSITIVE DIN2 PIN 4 PIN 9 MIDI THROUGH NEGATIVE DIN PIN 5 AES Sync I/O Description: Sony/RS422 Machine control interface. Connector: 9 pin D Male SPECIFICATIONS PIN 1 GND PIN 2 AES IN NEGATIVE PIN 3 AES OUT POSITIVE PIN 4 BIPHASE TACH PIN 5 BIP DIRECTION PIN 6 AES IN POSITIVE PIN 7 GND PIN 8 AES OUT NEGATIVE PIN 9 NOT CONNECTE 35-26 Modem Description: RS232 serial interface for connection to serial printer or modem. Connector: 9 pin D Male PIN 1 MOD_DCD PIN 2 MOD_RX PIN 3 MOD_TX PIN 4 MOD_DTR PIN 5 GND PIN 6 MOD_DSR PIN 7 MOD_RTS PIN 8 MOS_CTS PIN 9 N VGA1 Description: SVGA Monitor output for command shell and disk recorder. Connector: 15 pin High Density D Female Resolution: 1024(H) x 768(V) Frequency: HSYNC: 60khz PIN 1 RED PIN 2 GREEN PIN 3 BLUE PIN 4 GND PIN 5 GND PIN 6 GND PIN 7 GND PIN 8 GND PIN 10 GND PIN 11 GND PIN 12 NC PIN 13 HSYNC PIN 14 VSYNC PIN 15 NC VSYNC: 75hz SVGA STANDARD Word Clock - In Description: Sample word clock synchronisation input. Connector: BNC Input Optically Isolated Input Impedance: 75 Ohms QDC WIRING AND CONNECTION DETAILS 35-27 Word Clock - Out Description: Sample word clock synchronisation output. Connector: BNC Output Level: 4.3V TTL Output Impendence: 75 Ohms Video Sync - In Description: Video synchronisation input. Connector: BNC Input Level: 1V p-p Input Impedance: 75 Ohms Terminated SPECIFICATIONS 35-28 SYSTEM SPECIFICATIONS Analogue Inputs and Outputs Input impedance >10k Ohms Output impedance <55 Ohms Maximum input level +24dBu Maximum output level +24dBu Standard operating level adjustable from +14dBu to +24 dBu Input signal to noise >113dB A-weighted (A/D conversion) Output signal to noise >113dB A-weighted (A/D conversion) Through system signal to noise >110dB A-weighted Through system THD <0.0008% Bandwidth (.25dB) 20Hz to 20kHz AES/EBU Inputs Minimum differential 200mV Input impedance 110 Ohms transformer isolated Channel status insensitive to channel status AES/EBU Outputs Output level 4V Output impedance 110 Ohms transformer isolated Channel status professional, normal audio, source locked, sample frequency locked to project sample rate, stereophonic, 24-bit word length Synchronisation System sample rates 32, 44.056, 44.1, 48, 96kHz Run-Up/Run-down sample rates 44.044, 44.056, 47.952, 48.048, 95.904, 96.096kHz SRC range (with optional SRC I/O module) Input: 0.33 to 3.0 x system sample rate with range limits of 8kHz to 108kHz SYSTEM SPECIFICATIONS 35-29 Output: current system sample rate converted to any other possible system sample rate Clock references internal, AES reference, WCLK, any digital input, video reference, LTC input Clocks may be derived from an external WCLK or AES sync that is running at either the system sample rate, 0.5 or 2.0 x system sample rate. Thus, the system may be run at 96kHz locked to a 48kHz reference, or at 48kHz locked to a 96kHz reference, for example. SRC O/P sample clocks may be independently locked to any of the available references except digital inputs. Where O/P sample rates are exactly 2.0 or 0.5 x system sample rate, the output rate is automatically sample locked to the system rate. SPECIFICATIONS 35-30 DIMENSIONS, WEIGHT AND POWER REQUIREMENTS CAUTION: Double pole/neutral fusing. Disconnect power before changing fuse or servicing. DREAM Console Width 3 Bay - 1622 mm / 63.86” 5 Bay - 2603 mm / 102.5” Depth 1012 mm / 39.8” Height at Meter Bridge 947 mm / 37.3” Height at Meter Faders 720 mm / 28.3” Net Weight 3 Bay - 125kg; 5 Bay - 195kg Supply Voltage 85-132 or 170-264 VAC (internal link selectable) Power connected via two line-mount male IEC connectors inside console. Power Consumption 3 Bay - 1000 Watts; 5 Bay - 1500 Watts Fuse 3 Bay - 1 x Fuse 2A 20 x 5mm Quickblow (F) Glass or Ceramic 250V, UL only; 2 x Fuse 4A 20 x 5mm Quickblow (F) Glass or Ceramic 250V, UL only. 5 Bay - 1 x Fuse 2A 20 x 5mm Quickblow (F) Glass or Ceramic 250V, UL only; 4 x Fuse 4A 20 x 5mm Quickblow (F) Glass or Ceramic 250V, UL only. DREAM QDC Engine Width 485 mm (19” Rack Mounting) Depth 460 mm / 18.1” Height 360 mm / 14.2” (8 RU) Supply Voltage 85-275 VAC 49-63Hz Weight 31 kg Power Consumption 300 Watts Fuse Fuse 10A 3AG Antisurge (T) HRC Ceramic 250V, UL only DIMENSIONS, WEIGHT AND POWER REQUIREMENTS 35-31 DREAM Console Drawings 3 Bay Version SPECIFICATIONS 35-32 5 Bay Version DIMENSIONS, WEIGHT AND POWER REQUIREMENTS 35-33 SPECIFICATIONS Index - i NOTES: INDEX Index - ii Index Symbols # . . . . . . . . . . . . . . . . . . . . . . . . . . 33-2 Numerics 24 and 48 Track Project Compatability 24-7 A Active In . . . . . . . . . . . . . . . . . . . . Active Out . . . . . . . . . . . . . . . . . . ADR . . . . . . . . . . . . . . . . . . . . . . . ADR REH (GPI) . . . . . . . . . . . . . AES . . . . . . . . . . . . . . . . . . . . . . . . AFL . . . . . . . . . . . . . . . . . . . . . . . After-Fader-Listen . . . . . . . . . . . . . Algorithm . . . . . . . . . . . . . . . . . . . All Layers . . . . . . . . . . . . . . . . . . . all Read . . . . . . . . . . . . . . . . . . . . . Alternate Zoom . . . . . . . . . . . . . . . Alternative Speaker Sets . . . . . . . . Architecture . . . . . . . . . . . . . . . . . Arm . . . . . . . . . . . . . . . . . . . . . . . Arming . . . . . . . . . . . . . . . . . . . . . ArmKeyDelay . . . . . . . . . . . . . . . . Assigning signals to Buses . . . . . . . Attack . . . . . . . . . . . . . . . . . . . . . . AudioBase . . . . . . . . . . . . . . . . . . . Audition . . . . . . . . . . . . . . . . . . . . AUTO . . . . . . . . . . . . . . . . . . . . . Auto Extend . . . . . . . . . . . . . . . . . Auto In . . . . . . . . . . . . . . . . . . . . . Auto Out . . . . . . . . . . . . . . . . . . . AutoCue . . . . . . . . . . . . . . . . . . . . Automation . . . . . . . . . . . . . . . . . . Automation Lock Window . . . . . . Automation Locked to Video . . . . Auxiliary Sends . . . . . . . . . . . . . . . 23-12 23-12 22-2 22-6 9-3, 28-4 6-11 6-11 18-3, 18-5 10-10 23-17 4-6 6-2, 6-4, 6-5 2-3 8-15 9-6 33-6 5-16 8-11, 8-12, 8-13 26-2, 33-5 26-6 9-3, 23-7, 28-4 9-9 10-19 10-19 23-21 23-2 33-14 33-14 8-14 B B/F FILL . . . . . . . . . . . . . . . . . . . . B/FWD Fill . . . . . . . . . . . . . . . . . Backup . . . . . . . . . . . . . . . . . . . . . Backwards Compatibility . . . . . . . Bass Management . . . . . . . . . . . . . Beats Per Minute . . . . . . . . . . . . . BEEPS . . . . . . . . . . . . . . . . . . . . . BeepsFrequency . . . . . . . . . . . . . . BeepsTrackNumber . . . . . . . . . . . BeepsVolume . . . . . . . . . . . . . . . . INDEX 10-9 10-9 32-2 27-11 33-12 25-3 22-7 33-7 33-7 33-7 Betacam . . . . . . . . . . . . . . . . . . . . . Birthday . . . . . . . . . . . . . . . . . . . . Bit Depth . . . . . . . . . . . . . . . . . . . BLUE Files . . . . . . . . . . . . . . . . . . BLUE Gap . . . . . . . . . . . . . . . . . . BLUE Jump . . . . . . . . . . . . . . . . . Blue W . . . . . . . . . . . . . . . . . . . . . Boom . . . . . . . . . . . . . . . . . . . . . . Boom Level . . . . . . . . . . . . . . . . . . Boom ON/OFF . . . . . . . . . . . . . . Boom Pre/Post . . . . . . . . . . . . . . . Borrow . . . . . . . . . . . . . . . . . . . . . Bounce . . . . . . . . . . . . . . . . . . . . . Broadcast WAVE . . . . . . . . . . . . . Browse (Import) . . . . . . . . . . . . . . BUS . . . . . . . . . . . . . . . . . . . . . . . . Bus Assign . . . . . . . . . . . . . . . . . . . Bus Elements . . . . . . . . . . . . . . . . . Bus Formats . . . . . . . . . . . . . . . . . Bus Reduction . . . . . . . . . . . . . . . . Bus Routing . . . . . . . . . . . . . . . . . Buses . . . . . . . . . . . . . . . . . . . . . . . 33-14 24-7 9-2 33-16 4-10 4-9 24-6 8-9, 33-14 8-9 8-9 8-9 27-2 10-9 27-6 27-2 7-7 5-16 5-6 5-15 5-19 8-21 11-7 C Call . . . . . . . . . . . . . . . . . . . . . . . . Call by Solo . . . . . . . . . . . . . . . . . . Call Follow . . . . . . . . . . . . . . . . . . Calling a Signal Path . . . . . . . . . . . Capture Head . . . . . . . . . . . . . . . . Capture Tail . . . . . . . . . . . . . . . . . CFG . . . . . . . . . . . . . . . . . . . . . . . Channel Library Presets . . . . . . . . . Channel Panel . . . . . . . . . . . . . . . . Channel presets . . . . . . . . . . . . . . . Classic . . . . . . . . . . . . . . . . . . . . . . Clear . . . . . . . . . . . . . . . . . . . . . . . CLIENT_PORT . . . . . . . . . . . . . . Clip . . . . . . . . . . . . . . . . . . . . . . . . Clip (Clip Level) . . . . . . . . . . . . . . Clipboard . . . . . . . . . . . . . . . . . . . Clock Rate . . . . . . . . . . . . . . . . . . . Coaxial . . . . . . . . . . . . . . . . . . . . . Commit . . . . . . . . . . . . . . . . . . . . . Compatibility . . . . . . . . . . . . . . . . Compression Attack Rate . . . . . . . . . . . . . . . Bypass . . . . . . . . . . . . . . . . . . . Gain Makeup . . . . . . . . . . . . . Hold Time . . . . . . . . . . . . . . . Ratio . . . . . . . . . . . . . . . . . . . . 7-2 7-3 8-2 8-2 10-19 10-19 33-6 12-2 8-2 12-3 18-3 2-10, 31-3 33-5 4-3, 10-4 15-3 10-6 9-2 35-12 17-3, 24-4 27-11 8-11 8-11 8-10 8-11 8-11 Index - iii Release Rate . . . . . . . . . . . . . . . 8-11 Threshold . . . . . . . . . . . . . . . . . 8-10 Compressor . . . . . . . . . . . . . . . . . . 8-10 Configuration Files . . . . . . . . . . . . 33-2 Conflict of Sync . . . . . . . . . . . . . . . 28-7 Console . . . . . . . . . . . . . . . . . . . . . 2-8 CONSOLE Library Presets . . . . . . 12-2 Copy . . . . . . . . . . . . . . . . . . . . . . . 20-3, 32-2 Cross-Fades . . . . . . . . . . . . . . . . . . 10-18 Cross-over Cable . . . . . . . . . . . . . . 35-22 Cue Mute (GPI) . . . . . . . . . . . . . . . 22-8 Cursor . . . . . . . . . . . . . . . . . . . . . . 4-6 Cycle (ADR) . . . . . . . . . . . . . . . . . 22-2 D Data Storage . . . . . . . . . . . . . . . . . . 23-20 Database . . . . . . . . . . . . . . . . . . . . . 26-2 Default Console Template . . . . . . . 12-3 DefaultInputType . . . . . . . . . . . . . 33-7 Delay . . . . . . . . . . . . . . . . . . . . . . . 8-10 Delete (Mark) . . . . . . . . . . . . . . . . 25-2 DEPTH . . . . . . . . . . . . . . . . . . . . . 9-3 Device Display . . . . . . . . . . . . . . . . 3-2 Dim . . . . . . . . . . . . . . . . . . . . . . . . 6-6, 13-3 Dimmer . . . . . . . . . . . . . . . . . . . . . 4-7 Direct Config . . . . . . . . . . . . . . . . . 8-19 Direct IN . . . . . . . . . . . . . . . . . . . . 8-19 Direct Out Gain . . . . . . . . . . . . . . . 5-15, 8-21 Direct Out Pre/Post . . . . . . . . . . . . 5-15, 8-21 Direct Outputs . . . . . . . . . . . . . . . . 5-13 Disk Button . . . . . . . . . . . . . . . . . . 29-2 Diskinit . . . . . . . . . . . . . . . . . . . . . 34-2 Display . . . . . . . . . . . . . . . . . . . . . . 15-3 Display (Display Level) . . . . . . . . . 15-3 Dispose . . . . . . . . . . . . . . . . . . . . . 24-4 DitherOutput . . . . . . . . . . . . . . . . 33-7 Diverge Control . . . . . . . . . . . . . . . 8-7 DNSDOMAIN . . . . . . . . . . . . . . . 33-3 DNSSERVER . . . . . . . . . . . . . . . . 33-3 Dolby Process Monitoring . . . . . . . 6-6 DOMAINNAME . . . . . . . . . . . . . 33-3 DREAM.bat . . . . . . . . . . . . . . . . . . 33-15 Drive Formatting . . . . . . . . . . . . . . 34-2 DYN presets . . . . . . . . . . . . . . . . . . 12-3 Dynamic Range Control . . . . . . . . 8-10 Dynamics . . . . . . . . . . . . . . . . . . . . 8-10 Dynamics Library Presets . . . . . . . . 12-2 E Early In . . . . . . . . . . . . . . . . . . . . . 22-3 ED . . . . . . . . . . . . . . . . . . . . . . . . . 33-2 Edit Macro . . . . . . . . . . . . . . . . . . . 31-2 Edit Modes . . . . . . . . . . . . . . . . . . 10-6 Edit Options . . . . . . . . . . . . . . . . . 10-3 Edit Targets . . . . . . . . . . . . . . . . . . 10-4 Editing . . . . . . . . . . . . . . . . . . . . . .10-2 Eject . . . . . . . . . . . . . . . . . . . . . . . .32-2 Enables . . . . . . . . . . . . . . . . . . . . . .23-3 EQ Flat . . . . . . . . . . . . . . . . . . . . . .8-5 EQ Presets . . . . . . . . . . . . . . . . . . .12-3 Equaliser . . . . . . . . . . . . . . . . . . . . .8-3 Equaliser Library Presets . . . . . . . . .12-2 Erase . . . . . . . . . . . . . . . . . . . . . . . .10-11 Erasing a Macro . . . . . . . . . . . . . . .31-3 Event . . . . . . . . . . . . . . . . . . . . . . .23-17 Expander . . . . . . . . . . . . . . . . . . . .8-12 Range . . . . . . . . . . . . . . . . . . . .8-12 Ratio . . . . . . . . . . . . . . . . . . . . .8-12 Threshold . . . . . . . . . . . . . . . . .8-12 Export . . . . . . . . . . . . . . . . . . . . . . .27-8 Extend . . . . . . . . . . . . . . . . . . . . . .24-3 F Factor . . . . . . . . . . . . . . . . . . . . . . .4-7 FadeDefault . . . . . . . . . . . . . . . . . .33-6 Fader . . . . . . . . . . . . . . . . . . . . . . .7-10 Fader Follow . . . . . . . . . . . . . . . . . .7-3 Fader Follows Selection . . . . . . . . .7-3 Fader Sets . . . . . . . . . . . . . . . . . . . .7-11 Faders To... . . . . . . . . . . . . . . . . . . .7-9 Fades . . . . . . . . . . . . . . . . . . . . . . .10-18 Fields . . . . . . . . . . . . . . . . . . . . . . .26-3 Filenames . . . . . . . . . . . . . . . . . . . .3-7 Fill . . . . . . . . . . . . . . . . . . . . . . . . .10-9 Fill Range / Clip . . . . . . . . . . . . . . .23-17 Filter Sections . . . . . . . . . . . . . . . . .8-5 Fixed Reference Level . . . . . . . . . . .6-7 Flat . . . . . . . . . . . . . . . . . . . . . . . . .8-5 FLFS . . . . . . . . . . . . . . . . . . . . . . . .34-2 FMC Command Line Options . . . .33-15 FMC Version Number . . . . . . . . . .33-24 Fold Key . . . . . . . . . . . . . . . . . . . . .8-3 Folding . . . . . . . . . . . . . . . . . . . . . .11-5 Follow . . . . . . . . . . . . . . . . . . . . . .19-3 All . . . . . . . . . . . . . . . . . . . . . . .7-3 Edit . . . . . . . . . . . . . . . . . . . . . .7-3 Mix . . . . . . . . . . . . . . . . . . . . . .7-3 Off . . . . . . . . . . . . . . . . . . . . . .7-3 Solo . . . . . . . . . . . . . . . . . . . . .7-5 Format Configuring Bus Formats . . . . .5-15 Monitoring . . . . . . . . . . . . . . . .6-5 Formatting a Drive . . . . . . . . . . . . .34-2 Frame Rate . . . . . . . . . . . . . . . . . . .9-4 Frequency . . . . . . . . . . . . . . . . . . . .16-3 From . . . . . . . . . . . . . . . . . . . . . . . .4-10 G Gain . . . . . . . . . . . . . . . . . . . . . . . .16-3 Gain Makeup . . . . . . . . . . . . . . . . .8-10 INDEX Index - iv Gain Reduction Meter . . . . . . . . . Gap . . . . . . . . . . . . . . . . . . . . . . . . Gate . . . . . . . . . . . . . . . . . . . . . . . Hysteresis . . . . . . . . . . . . . . . . Range . . . . . . . . . . . . . . . . . . . Threshold . . . . . . . . . . . . . . . . GATEWAY . . . . . . . . . . . . . . . . . Gating . . . . . . . . . . . . . . . . . . . . . . Gen . . . . . . . . . . . . . . . . . . . . . . . . Ghost . . . . . . . . . . . . . . . . . . . . . . Glide In . . . . . . . . . . . . . . . . . . . . Glide Out . . . . . . . . . . . . . . . . . . . Global . . . . . . . . . . . . . . . . . . . . . . GoTo . . . . . . . . . . . . . . . . . . . . . . GPI . . . . . . . . . . . . . . . . . . . . . . . . 8-10 4-10 8-12 8-12 8-12, 8-13 8-12 33-3 17-2 29-2 10-6, 10-7 23-17 23-18 14-3 21-2 22-3 H Handle . . . . . . . . . . . . . . . . . . . . . Hash Prompt . . . . . . . . . . . . . . . . Hatch Prompt . . . . . . . . . . . . . . . . Head . . . . . . . . . . . . . . . . . . . . . . . Hold . . . . . . . . . . . . . . . . . . . . . . . Hold Time . . . . . . . . . . . . . . . . . . 17-2 33-2 33-2 4-3, 10-4 17-2, 23-17 8-11, 8-12, 8-13 HOSTNAME . . . . . . . . . . . . . . . . 33-3 Hysteresis . . . . . . . . . . . . . . . . . . . 8-12 I I/O names . . . . . . . . . . . . . . . . . . . IBM . . . . . . . . . . . . . . . . . . . . . . . Import . . . . . . . . . . . . . . . . . . . . . Importing Wave Files . . . . . . . . . . In . . . . . . . . . . . . . . . . . . . . . . . . . Info . . . . . . . . . . . . . . . . . . . . . . . . INP SYNC . . . . . . . . . . . . . . . . . . Input . . . . . . . . . . . . . . . . . . . . . . . Input Indicator . . . . . . . . . . . . . . . Input Patch . . . . . . . . . . . . . . . . . . Input Trim . . . . . . . . . . . . . . . . . . Insert Beat Marks . . . . . . . . . . . . . Insert Config . . . . . . . . . . . . . . . . . Insert IN . . . . . . . . . . . . . . . . . . . . Insert Returns . . . . . . . . . . . . . . . . Insert Sends . . . . . . . . . . . . . . . . . Insert Space . . . . . . . . . . . . . . . . . . Inserts in Monitoring . . . . . . . . . . INT . . . . . . . . . . . . . . . . . . . . . . . I-O Config.TXT . . . . . . . . . . . . . . IP_ADDRESS . . . . . . . . . . . . . . . Isolate . . . . . . . . . . . . . . . . . . . . . . 33-11 25-3 27-2 27-4 23-7 15-3 9-3, 28-4 9-3, 28-4 7-7 8-21 5-6, 9-5 25-3 8-16 8-16 5-7, 8-17 8-16 10-10 6-6 9-3, 28-4 33-11 33-3 23-11 J Jog . . . . . . . . . . . . . . . . . . . . . . . . 4-7 Jump . . . . . . . . . . . . . . . . . . . . . . . 4-8, 4-9 INDEX K Keep Import . . . . . . . . . . . . . . . . . . . Keep Borrowed . . . . . . . . . . . . . . . Keep Playing . . . . . . . . . . . . . . . . . Keyboard Focus . . . . . . . . . . . . . . . 27-3 24-5 22-3 33-11 L LATCH . . . . . . . . . . . . . . . . . . . . . Latch . . . . . . . . . . . . . . . . . . . . . . . Learn . . . . . . . . . . . . . . . . . . . . . . . Level . . . . . . . . . . . . . . . . . . . . . . . Level Meter . . . . . . . . . . . . . . . . . . Lib key . . . . . . . . . . . . . . . . . . . . . Library . . . . . . . . . . . . . . . . . . . . . . Limiter . . . . . . . . . . . . . . . . . . . . . Threshold . . . . . . . . . . . . . . . . Linear Jog . . . . . . . . . . . . . . . . . . . Link Group Format . . . . . . . . . . . . Link Group Selection . . . . . . . . . . Link Groups . . . . . . . . . . . . . . . . . Link Indicator . . . . . . . . . . . . . . . . Live Feed . . . . . . . . . . . . . . . . . . . . Locking Automation to Video . . . . Loop . . . . . . . . . . . . . . . . . . . . . . . Loop Jog . . . . . . . . . . . . . . . . . . . . Loudspeakers . . . . . . . . . . . . . . . . . LTC . . . . . . . . . . . . . . . . . . . . . . . 7-6 23-11 31-2 15-2 8-15 12-3 12-2 8-11 8-11 4-7 11-2 11-5 11-2 7-7 5-3 33-14 22-8 4-7 6-2 29-2 M M1 . . . . . . . . . . . . . . . . . . . . . . . . M2 . . . . . . . . . . . . . . . . . . . . . . . . Macro . . . . . . . . . . . . . . . . . . . . . . Macro Pause . . . . . . . . . . . . . . . . . MADI Configuration . . . . . . . . . . MADI Connector Options . . . . . . Mapping Fader Sets . . . . . . . . . . . . Mark Beats . . . . . . . . . . . . . . . . . . . . Mark (Go To) . . . . . . . . . . . . . . . . Marks (GPI) . . . . . . . . . . . . . . . . . Master Fader . . . . . . . . . . . . . . . . . MasterFader . . . . . . . . . . . . . . . . . Match . . . . . . . . . . . . . . . . . . . . . . MDR . . . . . . . . . . . . . . . . . . . . . . . Meter Settings . . . . . . . . . . . . . . . . Metering . . . . . . . . . . . . . . . . . . . . MFX2 . . . . . . . . . . . . . . . . . . . . . . MFX3 . . . . . . . . . . . . . . . . . . . . . . MFX3.48 . . . . . . . . . . . . . . . . . . . MFX3plus . . . . . . . . . . . . . . . . . . . MIDI . . . . . . . . . . . . . . . . . . . . . . MinSegmentDuration . . . . . . . . . . Mix Data . . . . . . . . . . . . . . . . . . . . 29-2 29-2 31-2 31-2 35-10 35-12 7-11 25-3 21-4 22-8 7-2, 8-3 7-2 26-3 33-6 33-10 9-6 27-11 27-11 27-11 27-11 29-2 33-7 23-20 Index - v Mix Menu . . . . . . . . . . . . . . . . . . . 23-17 Mix ON . . . . . . . . . . . . . . . . . . . . . 23-2 Mode (Level Mode) . . . . . . . . . . . . 15-3 Mode Level . . . . . . . . . . . . . . . . . . 15-3 Momentary Talkback . . . . . . . . . . . 33-14 MOMENTARY_TB_TIME_THRESHOLD,50 0 33-15 Monitor Format . . . . . . . . . . . . . . . 6-5 Monitor Level . . . . . . . . . . . . . . . . 6-6 Monitor Phase Reversal . . . . . . . . . 6-7 Monitor Ports . . . . . . . . . . . . . . . . 33-11 Monitor Source Patching . . . . . . . . 6-4 Monitor Source Selection . . . . . . . . 6-4, 9-9 Monitor Speakers . . . . . . . . . . . . . . 6-2 Monitor_Sources.TXT . . . . . . . . . . 6-11, 33-16 Mono Clips . . . . . . . . . . . . . . . . . . 4-4 Move . . . . . . . . . . . . . . . . . . . . . . . 20-2, 32-2 MTC . . . . . . . . . . . . . . . . . . . . . . . 29-2 Multi Trim . . . . . . . . . . . . . . . . . . . 8-22, 11-6 Multitrack Editing . . . . . . . . . . . . . 10-5 Mute . . . . . . . . . . . . . . . . . . . . . . . 7-5, 19-3 Monitoring . . . . . . . . . . . . . . . 6-7 Speaker Mutes . . . . . . . . . . . . . 6-7 N Pan Controls . . . . . . . . . . . . . . . . . .8-6 Pan ON/OFF . . . . . . . . . . . . . . . . .8-7 Parametric Sections . . . . . . . . . . . . .8-5 Password Protection . . . . . . . . . . . .24-2 Patch inputs . . . . . . . . . . . . . . . . . .5-4, 9-4 Patching . . . . . . . . . . . . . . . . . . . . .5-2 Patching External Monitor Sources .6-4 Patching Monitor Outputs . . . . . . .6-3 Patching Outputs . . . . . . . . . . . . . .5-11 Path Configuration . . . . . . . . . . . . .8-15 Pause . . . . . . . . . . . . . . . . . . . . . . .31-2 Pause/Break Key . . . . . . . . . . . . . . .33-11 PFL . . . . . . . . . . . . . . . . . . . . . . . . .6-11 Phase . . . . . . . . . . . . . . . . . . . . . . .5-6, 8-15, 95 Phase Reversal . . . . . . . . . . . . . . . . .6-7 Pitch . . . . . . . . . . . . . . . . . . . . . . . .18-2, 18-5 PLAY (GPI) . . . . . . . . . . . . . . . . . .22-7 Play Menu . . . . . . . . . . . . . . . . . . .4-12 Playback (ADR) . . . . . . . . . . . . . . .22-2 PlayInhibitThreshold . . . . . . . . . . .33-7 Pop . . . . . . . . . . . . . . . . . . . . . . . . .18-3, 20-3 Postroll . . . . . . . . . . . . . . . . . . . . . .22-3 Postroll (GPI) . . . . . . . . . . . . . . . . .22-6 Pre-Fader-Listen . . . . . . . . . . . . . . .6-11 Prerec . . . . . . . . . . . . . . . . . . . . . . .22-7 PreRoll . . . . . . . . . . . . . . . . . . . . . .29-2 Preroll . . . . . . . . . . . . . . . . . . . . . . .22-3 Preroll (GPI) . . . . . . . . . . . . . . . . . .22-5 Presets . . . . . . . . . . . . . . . . . . . . . . .12-2 PRIME . . . . . . . . . . . . . . . . . . . . . .23-13 Prime . . . . . . . . . . . . . . . . . . . . . . .23-7 Printer . . . . . . . . . . . . . . . . . . . . . .35-22 Projects . . . . . . . . . . . . . . . . . . . . . .3-2 Publish . . . . . . . . . . . . . . . . . . . . . .26-2 Publish to AudioBase (Wave Export) 27-10 PUNCH . . . . . . . . . . . . . . . . . . . . .23-7 Punch In . . . . . . . . . . . . . . . . . . . . .9-9 Name . . . . . . . . . . . . . . . . . . . . . . . 31-3 Name (Mark) . . . . . . . . . . . . . . . . . 25-2 Naming Buses . . . . . . . . . . . . . . . . . . . . 14-3 Clips . . . . . . . . . . . . . . . . . . . . 14-2 Feeds . . . . . . . . . . . . . . . . . . . . 14-3 Tracks . . . . . . . . . . . . . . . . . . . 14-2 Naming External Monitor Sources . 6-5 Naming Feeds and Buses . . . . . . . . 7-7 Naming Speaker Sets . . . . . . . . . . . 6-3 NET_MASK . . . . . . . . . . . . . . . . . 33-3 New . . . . . . . . . . . . . . . . . . . . . . . . 9-7 Nudge . . . . . . . . . . . . . . . . . . . . . . 10-16 Number (Mark) . . . . . . . . . . . . . . . 25-2 Numbers . . . . . . . . . . . . . . . . . . . . 20-2 Q O Q . . . . . . . . . . . . . . . . . . . . . . . . . .16-3 Offset . . . . . . . . . . . . . . . . . . . . . . . 29-2 On STOP . . . . . . . . . . . . . . . . . . . 23-17 One-handed edit . . . . . . . . . . . . . . 10-6, 10-8, 10-13, 10-15 Optical . . . . . . . . . . . . . . . . . . . . . . 35-12 OS9 . . . . . . . . . . . . . . . . . . . . . . . . 33-2 OS9 Commands . . . . . . . . . . . . . . 33-17 Out . . . . . . . . . . . . . . . . . . . . . . . . 23-7 Over . . . . . . . . . . . . . . . . . . . . . . . . 9-7 Overlap . . . . . . . . . . . . . . . . . . . . . 10-9 P Pack . . . . . . . . . . . . . . . . . . . . . . . . 24-5 R Range . . . . . . . . . . . . . . . . . . . . . . .4-10, 10-4 Modes . . . . . . . . . . . . . . . . . . . .4-11 Range Menu . . . . . . . . . . . . . . .4-10 Setup . . . . . . . . . . . . . . . . . . . .28-3 Rate . . . . . . . . . . . . . . . . . . . . . . . .9-2, 28-4 Ratio . . . . . . . . . . . . . . . . . . . . . . . .8-11 Razor On . . . . . . . . . . . . . . . . . . . .10-10 RBF . . . . . . . . . . . . . . . . . . . . . . . .34-2 Read Indicator . . . . . . . . . . . . . . . .7-6 Rec Out (ADR) . . . . . . . . . . . . . . .22-3 Record (ADR) . . . . . . . . . . . . . . . .22-2 Record (GPI) . . . . . . . . . . . . . . . . .22-4 INDEX Index - vi Recording . . . . . . . . . . . . . . . . . . . Recovering Waveforms . . . . . . . . . Redo . . . . . . . . . . . . . . . . . . . . . . . Reference Level . . . . . . . . . . . . . . . Refresh . . . . . . . . . . . . . . . . . . . . . Rehearse . . . . . . . . . . . . . . . . . . . . Relative Speaker Levels . . . . . . . . . Release . . . . . . . . . . . . . . . . . . . . . Renaming a Project . . . . . . . . . . . . Renum (Mark) . . . . . . . . . . . . . . . Restore . . . . . . . . . . . . . . . . . . . . . Return . . . . . . . . . . . . . . . . . . . . . Return to Birthday . . . . . . . . . . . . Returns . . . . . . . . . . . . . . . . . . . . . Reverse . . . . . . . . . . . . . . . . . . . . . Rotate Control . . . . . . . . . . . . . . . Running a Macro . . . . . . . . . . . . . 9-6 24-6 10-4 6-7 24-3 22-2 6-4 8-11, 8-12, 8-13 14-2 25-3 32-2 23-17 24-7 5-8, 8-17 10-7 8-9 31-3 S Safe . . . . . . . . . . . . . . . . . . . . . . . . Safe Indicator . . . . . . . . . . . . . . . . Sample Rate . . . . . . . . . . . . . . . . . Saving Monitor Setups . . . . . . . . . Scale . . . . . . . . . . . . . . . . . . . . . . . SCANHOSTS . . . . . . . . . . . . . . . SCSI . . . . . . . . . . . . . . . . . . . . . . . Search . . . . . . . . . . . . . . . . . . . . . . Seed . . . . . . . . . . . . . . . . . . . . . . . Seed Names . . . . . . . . . . . . . . . . . Select a Link Group Member . . . . Select a range of tracks . . . . . . . . . Select a single track . . . . . . . . . . . . Selecting a Monitor Source . . . . . . Selecting Monitor Speakers . . . . . . Semitones . . . . . . . . . . . . . . . . . . . Sends . . . . . . . . . . . . . . . . . . . . . . SERVER_PORT . . . . . . . . . . . . . Set . . . . . . . . . . . . . . . . . . . . . . . . . Set Level . . . . . . . . . . . . . . . . . . . . Setup . . . . . . . . . . . . . . . . . . . . . . Setup_Variables.TXT . . . . . . . . . . Shadow . . . . . . . . . . . . . . . . . . . . . Shelf . . . . . . . . . . . . . . . . . . . . . . . Shuttle . . . . . . . . . . . . . . . . . . . . . Signal LED . . . . . . . . . . . . . . . . . . Signal Path . . . . . . . . . . . . . . . . . . Simple (GPI) . . . . . . . . . . . . . . . . SIP . . . . . . . . . . . . . . . . . . . . . . . . SIP Defeat . . . . . . . . . . . . . . . . . . . 19-3, 23-11 7-6 9-2, 28-4 6-11 18-3, 18-5 33-3 34-2 26-3 14-3 14-3 11-5 4-5 4-5 6-4, 9-9 6-2 18-4 8-16 33-5 15-2 15-2 29-2 6-11, 33-16 20-3 16-3 4-8 7-7 7-8 22-4 6-11 6-12, 7-4, 821 Slip Soft Key Function . . . . . . . . . . 10-14 Snap . . . . . . . . . . . . . . . . . . . . . . . 23-11 INDEX Snap Shot . . . . . . . . . . . . . . . . . . . Snapshots . . . . . . . . . . . . . . . . . . . Soft Key Functions . . . . . . . . . . . . Solo . . . . . . . . . . . . . . . . . . . . . . . . Solo Call Follow . . . . . . . . . . . . . . Solo Clear . . . . . . . . . . . . . . . . . . . Solo Contrast . . . . . . . . . . . . . . . . . Solo On/Off . . . . . . . . . . . . . . . . . Solo Safe . . . . . . . . . . . . . . . . . . . . Solo-in-Place . . . . . . . . . . . . . . . . . Sony_ID File . . . . . . . . . . . . . . . . . Source . . . . . . . . . . . . . . . . . . . . . . Speaker Mutes . . . . . . . . . . . . . . . . Speaker_Sets.TXT . . . . . . . . . . . . . Speakers . . . . . . . . . . . . . . . . . . . . . Split Clip . . . . . . . . . . . . . . . . . . . . Split Range . . . . . . . . . . . . . . . . . . Spread Control . . . . . . . . . . . . . . . Stereo Clips . . . . . . . . . . . . . . . . . . Stretch . . . . . . . . . . . . . . . . . . . . . . Subframes . . . . . . . . . . . . . . . . . . . Surface . . . . . . . . . . . . . . . . . . . . . . Swap . . . . . . . . . . . . . . . . . . . . . . . Sync . . . . . . . . . . . . . . . . . . . . . . . Sync Conflict . . . . . . . . . . . . . . . . . Sync Point . . . . . . . . . . . . . . . . . . . Sync Source . . . . . . . . . . . . . . . . . . Sys-File . . . . . . . . . . . . . . . . . . . . . System Files . . . . . . . . . . . . . . . . . . System Page . . . . . . . . . . . . . . . . . . System Ports . . . . . . . . . . . . . . . . . System_Variables . . . . . . . . . . . . . . 12-2 23-3 10-7, 10-14 6-11, 7-3, 19-2 7-3 6-12, 7-4 7-4 7-5 6-12, 7-4, 821 6-11 33-8 6-4 6-7 6-11, 33-16 6-2, 6-4, 6-5 10-7 10-9 8-8 4-4, 9-10 18-2 4-6 33-5 20-2 9-3, 28-4 28-7 10-14 9-3, 28-4 6-11, 33-16 33-2 33-9 33-11 33-14 T Tail . . . . . . . . . . . . . . . . . . . . . . . . tail . . . . . . . . . . . . . . . . . . . . . . . . . Talkback . . . . . . . . . . . . . . . . . . . . Talkback Time Threshold . . . . . . . Tape . . . . . . . . . . . . . . . . . . . . . . . TC FORMAT . . . . . . . . . . . . . . . . TC_LOCK_WINDOW . . . . . . . . Terminology . . . . . . . . . . . . . . . . . Threshold . . . . . . . . . . . . . . . . . . . Time (Mark) . . . . . . . . . . . . . . . . . Time Compression/Expansion . . . . Time Scale . . . . . . . . . . . . . . . . . . . Timecode . . . . . . . . . . . . . . . . . . . To . . . . . . . . . . . . . . . . . . . . . . . . . Touch . . . . . . . . . . . . . . . . . . . . . . Touch Auto Enable . . . . . . . . . . . . Touch Indicator . . . . . . . . . . . . . . Touch Write . . . . . . . . . . . . . . . . . 10-4 4-3 13-2 33-14 9-7 9-4, 28-2 33-14 2-2 8-10, 17-2 25-2 18-2 4-6 28-2 4-10 23-7 23-17 7-6 23-10 Index - vii TRACK . . . . . . . . . . . . . . . . . . . . . 14-3 Track . . . . . . . . . . . . . . . . . . . . . . . 20-2 Track Display . . . . . . . . . . . . . . . . . 4-2 Track Feed . . . . . . . . . . . . . . . . . . . 5-3 Track Selection . . . . . . . . . . . . . . . 4-4 Transport Controls . . . . . . . . . . . . 4-7 Trim . . . . . . . . . . . . . . . . . . . . . . . 10-13 Soft Key Function . . . . . . . . . . 10-14 Trim Indicator . . . . . . . . . . . . . . . . 7-7 Trim Level . . . . . . . . . . . . . . . . . . . 15-3 Trimming Relative Speaker Levels . 6-4 Two-handed edit . . . . . . . . . . . . . . 10-2, 10-6, 10-8, 10-13, 10-15 U U-matic . . . . . . . . . . . . . . . . . . . . . 33-14 Undo and Redo . . . . . . . . . . . . . . . 10-4 Unfold . . . . . . . . . . . . . . . . . . . . . . 11-5 Unfolding Buses . . . . . . . . . . . . . . . 11-7 Unpatch inputs . . . . . . . . . . . . . . . 5-10 Unpatching Inputs . . . . . . . . . . . . . 5-10 Update Sys_Files . . . . . . . . . . . . . . 6-11, 33-16 Upgrading System Software . . . . . . 33-23 Utils . . . . . . . . . . . . . . . . . . . . . . . . 6-11, 23-10, 23-17, 33-16 V Vari . . . . . . . . . . . . . . . . . . . . . . . . 18-2 VERSION . . . . . . . . . . . . . . . . . . . 33-5 Version Number . . . . . . . . . . . . . . 33-24 Video . . . . . . . . . . . . . . . . . . . . . . . 9-3, 28-4 VISIBILITY . . . . . . . . . . . . . . . . . . 33-3, 33-5 Vmotion . . . . . . . . . . . . . . . . . . . . 33-14 Voice . . . . . . . . . . . . . . . . . . . . . . . 18-3 W Wave Export . . . . . . . . . . . . . . . . . 27-9 Wave Files . . . . . . . . . . . . . . . . . . . 27-4 Waveform Show . . . . . . . . . . . . . . . 24-7 WCLK . . . . . . . . . . . . . . . . . . . . . . 9-3, 28-4 Web . . . . . . . . . . . . . . . . . . . . . . . . 33-5 Width . . . . . . . . . . . . . . . . . . . . . . 4-7 Write Indicator . . . . . . . . . . . . . . . 7-6 X X-Level . . . . . . . . . . . . . . . . . . . . . . 10-19 X-Point . . . . . . . . . . . . . . . . . . . . . 10-19 Z Zoom . . . . . . . . . . . . . . . . . . . . . . . 4-6 Zoom Factors . . . . . . . . . . . . . . . . . 4-6 INDEX Index - viii INDEX